#База знаний
-

0
Начинаем разрабатывать на Java: где взять, как установить и настроить всё, что нужно.
vlada_maestro / shutterstock

Пишет на Java. Верит в Agile. Пьёт много кофе и не любит грязный код.
Чтобы начать программировать на Java, нужно установить комплект разработчика приложений (SDK). Он позволит запускать, отлаживать и исполнять наши первые программы. Также нам понадобится среда разработки (IDE), где мы и будем писать код.
Пройдём через это вместе. Установим JDK в Windows, Ubuntu и macOS, и IntelliJ IDEA тоже в Windows, Ubuntu и macOS. Поехали!
Java Development Kit (JDK) — это комплект ПО для разработчиков приложений на Java. Стандартная установка включает в себя интерпретатор, облегчённый интерпретатор JRE, компилятор, библиотеку Java-классов, отладчик, средства архивации и сжатия jar и другое.
Чтобы установить JDK в Windows, нужно:
- загрузить актуальную версию пакета,
- установить его,
- настроить переменные окружения.
Нам нужна бесплатная версия — AdoptOpenJDK (она есть под Windows, macOS, Ubuntu и другие платформы).
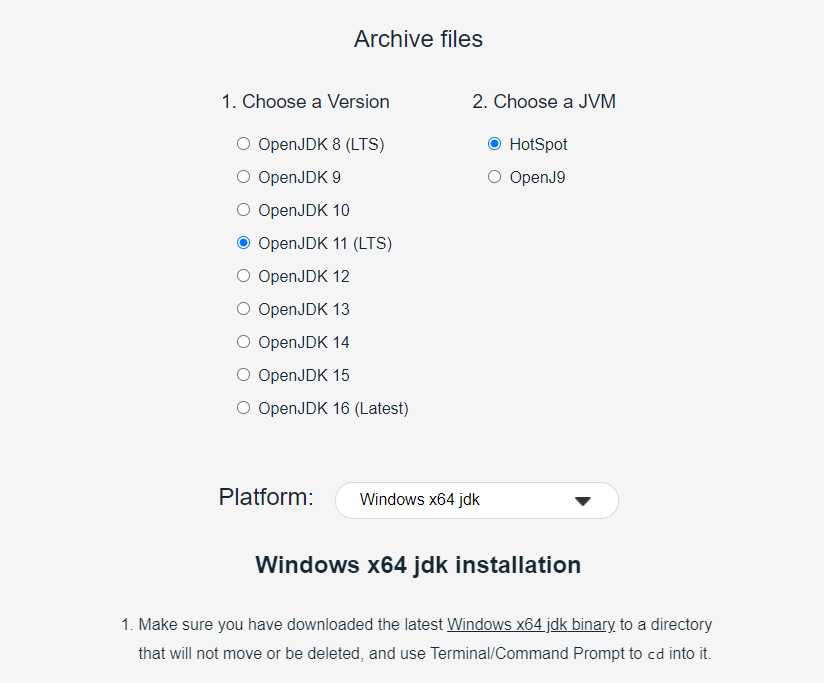
Идём сюда и выбираем версию JDK (актуальны версии 8+), виртуальную Java-машину (JVM) и свою платформу.
Я выбрал OpenJDK 11 (LTS), HotSpot и Windows x64 jdk соответственно:
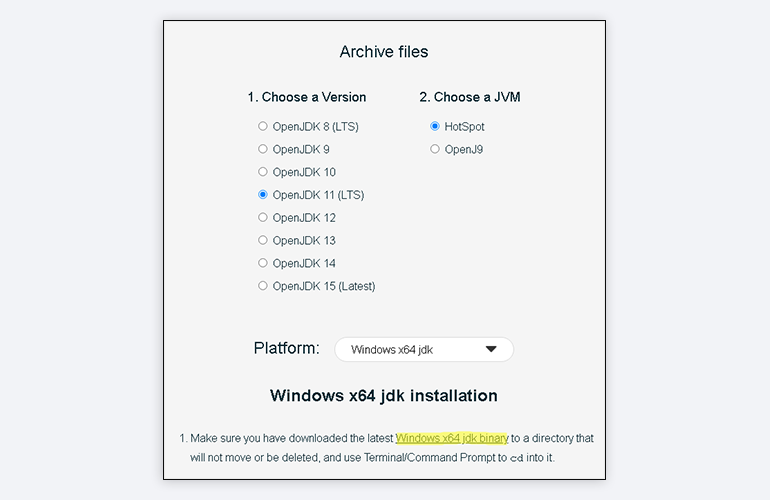
Скачиваем файл по появившейся ссылке (я выделил её жёлтым на скрине выше).
Извлекаем скачанный архив в папку C:\Program Files\Java\
При этом будет создана подпапка jdk-*номер версии*, а внутри неё появится папка bin.
В результате полный путь до папки bin у меня выглядит так:
C:\Program Files\Java\jdk-11.0.2\bin
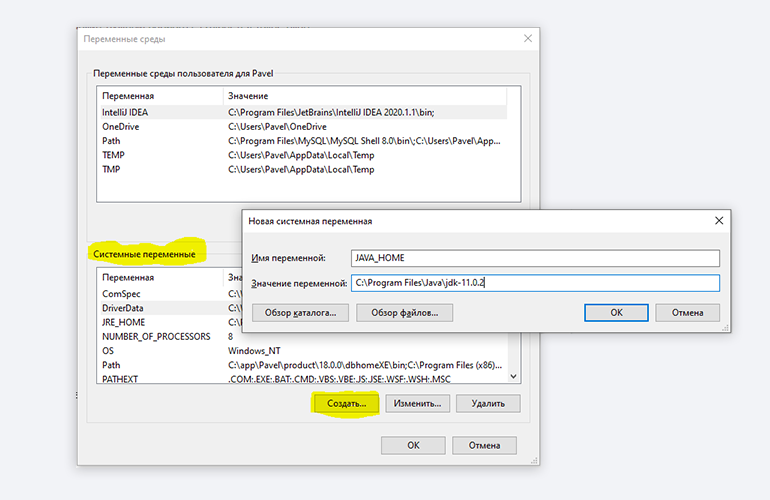
Нам нужно создать системную переменную JAVA_HOME, которая будет хранить путь до нашей версии JDK. Это понадобится программам для работы с проектами Java.
Заходим в Панель управления → Система → Дополнительные параметры системы → Дополнительно
А можно и прямо в Панели управления вбить в поиск слово «переменных» (без кавычек). ОС предложит варианты, из которых выбирайте «Изменение системных переменных среды».
У вас откроется окно:
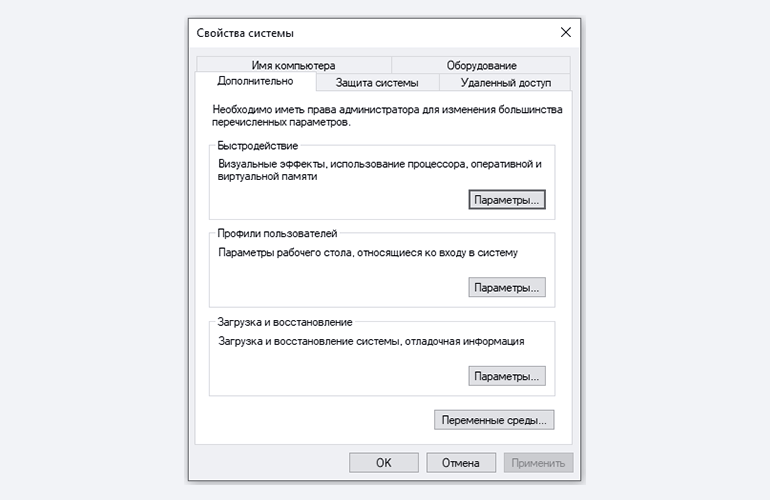
Здесь жмём на кнопку «Переменные среды».
В новом окне для раздела «Системные переменные» кликаем «Создать». В «Имя переменной» вводим JAVA_HOME (именно так, латиницей в верхнем регистре), а в поле «Значение переменной» подставляем наш путь C:\Program Files\Java\jdk-*номер версии*:
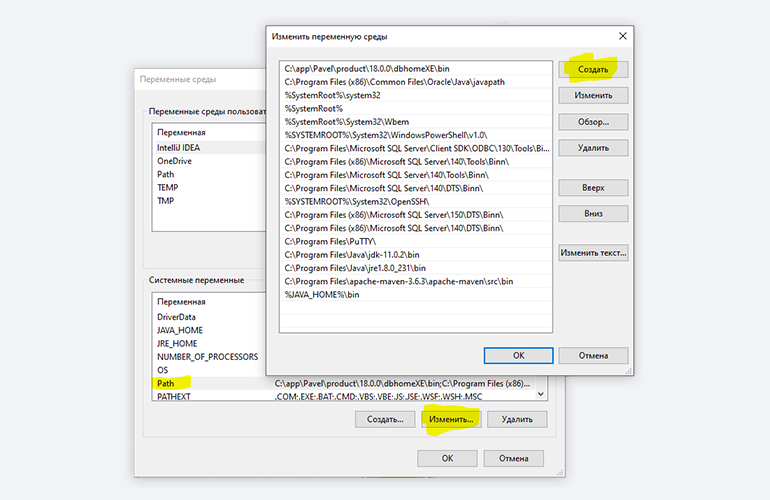
Далее в разделе «Переменные среды…» редактируем системную переменную Path. Нужно добавить в неё путь к папке с исполняемыми файлами Java, а именно: %JAVA_HOME%\bin (соблюдайте регистр символов):
Перезагружаем Windows.
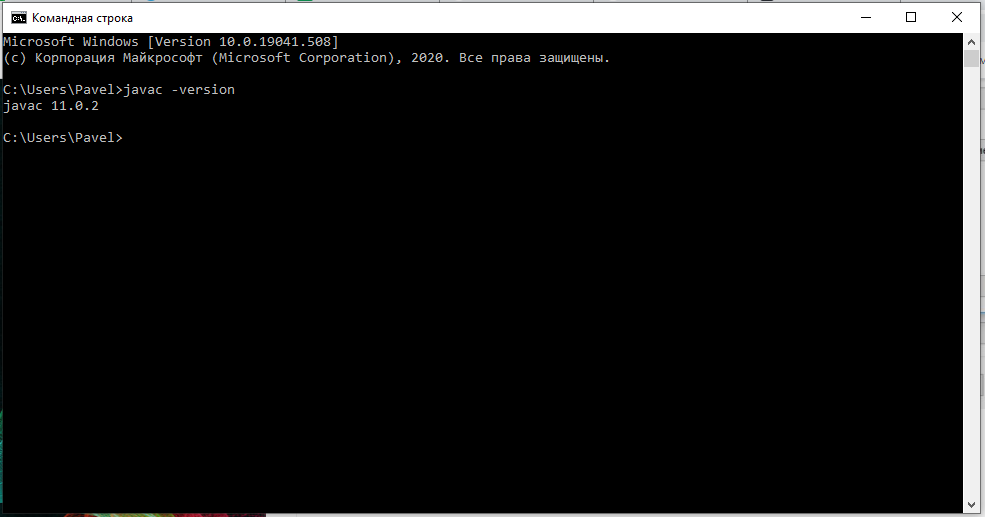
Запускаем Командную строку Windows. Для этого нажимаем Win + R, а в появившемся окне вводим cmd.exe и жмём на Enter.
В открывшейся консоли набираем javac -version и жмём ввод.
Если установка прошла успешно, то ответ покажет версию вашего компилятора:
Рассмотрим установку JDK на одном из самых популярных дистрибутивов Linux — Ubuntu 20.04 (LTS).
Проще всего установить версию, которая входит в пакет Ubuntu. По умолчанию в Ubuntu 20.04 входит версия Open JDK 11.
Открываем терминал сочетанием клавиш Ctrl + Alt + T и обновляем базу данных пакетов с помощью APT:
Проверяем ранее установленные версии командой:
Если установка уже выполнялась, то мы увидим что-то такое:

Для запуска любых приложений Java нужна JRE (Java Runtime Environment — среда выполнения для языка Java). Но для компиляции и разработки программ требуется JDK (Java Development Kit).
Чтобы установить JRE, вводим в консоль:
$ sudo apt install default-jre
Для установки JDK — команду:
$ sudo apt install default-jdk
Вводим команду:
Ответ должен выглядеть примерно так:
Этот способ установки использует HomeBrew (менеджер недостающих пакетов для macOS).
Прежде всего нужно добавить репозиторий в HomeBrew. Для этого открываем терминал (Cmd + N) и вводим:
$ brew tap AdoptOpenJDK/openjdk
Устанавливаем OpenJDK 11 командой:
$ brew cask install adoptopenjdk11
Вводим:
Ответ должен выглядеть примерно так:
openjdk version "11.0.2" 2019-01-15
OpenJDK Runtime Environment AdoptOpenJDK (build 11.0.2+9)
OpenJDK 64-Bit Server VM AdoptOpenJDK (build 11.0.2+9, mixed mode)
IntelliJ IDEA — это интегрированная среда разработки (IDE), то есть система программных средств для создания проектов на разных языках программирования.
Сегодня это самая популярная IDE для языка Java. А ещё есть Eclipse, NetBeans и немало других, но мы рекомендуем именно IDEA, потому что даже её бесплатная версия обладает широкой функциональностью, подходит для профессиональной разработки и вообще делает Java проще в использовании.
В IDE обязательно входят:
- текстовый редактор для написания кода (он знает синтаксис нужных языков);
- компилятор;
- отладчик.
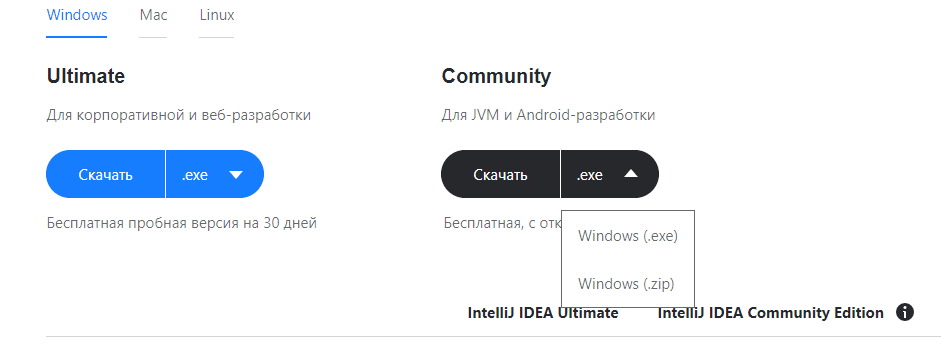
IntelliJ IDEA доступна в бесплатной (Community) и платной (Ultimate) версиях. Чем они различаются, видно на скрине ниже:

Пока что нам хватит возможностей бесплатной версии.
На заметку: IntelliJ предлагает студентам и преподавателям свободный доступ к своим продуктам.
Заходим сюда и качаем версию для Windows.
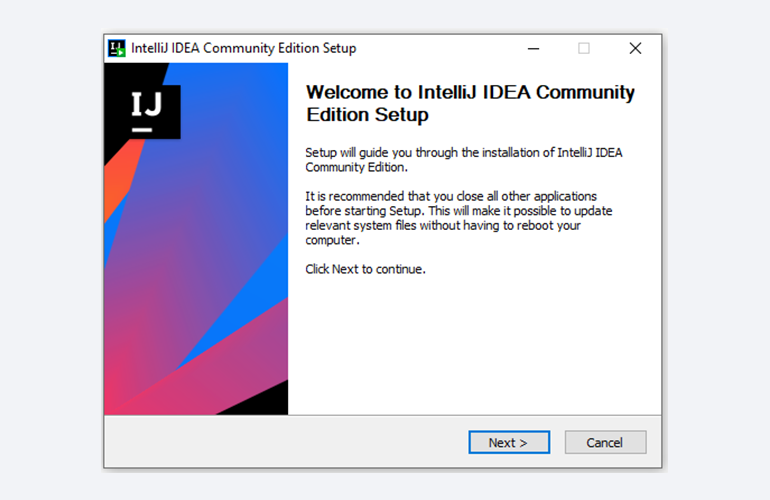
Запускаем скачанный файл .exe:
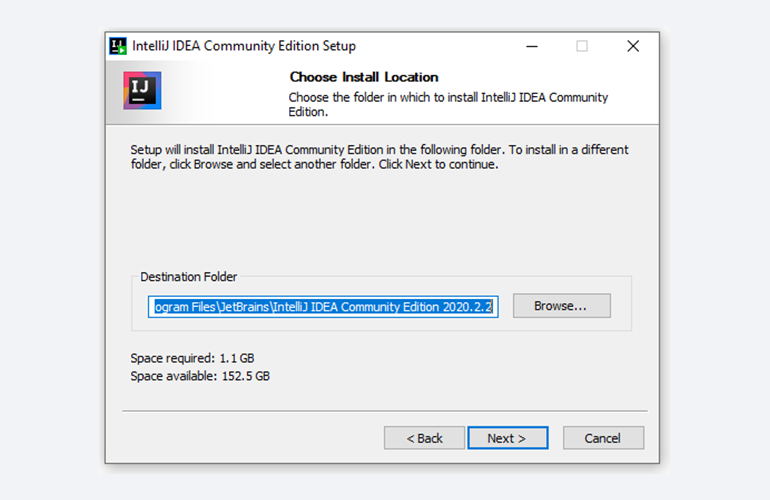
Жмём Next (Далее) и выбираем путь для установки:
Снова Next, и настраиваем параметры установки:
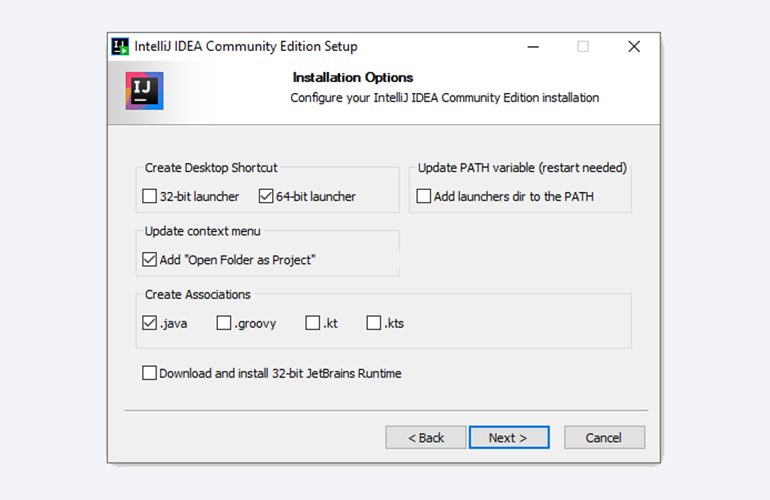
В общем случае это:
- 64-bit launcher — для запуска 64-разрядной версии приложения (будет создан ярлык на рабочем столе);
- Add ”Open Folder as Project“» — позволяет открывать папки с исходниками как проекты прямо через контекстное меню;
- .java — файлы такого типа (с таким расширением) будет открывать IDEA (по умолчанию и через контекстное меню).
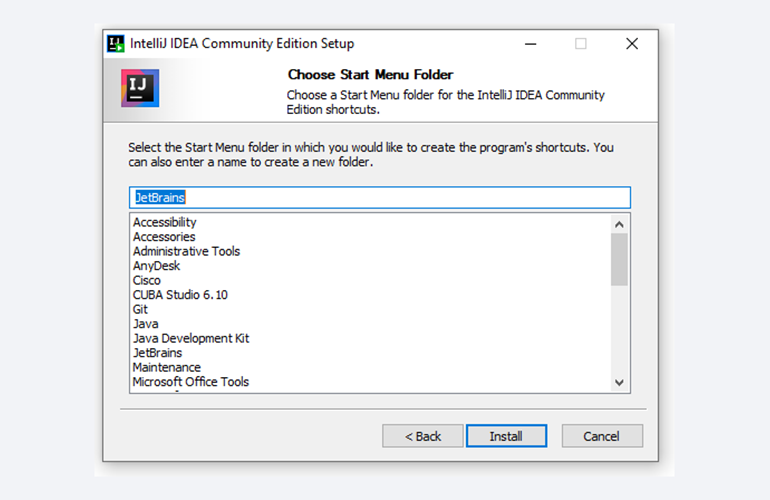
Кликаем Next (Далее) и выбираем папку для ярлыков IDEA (оставляем по умолчанию):
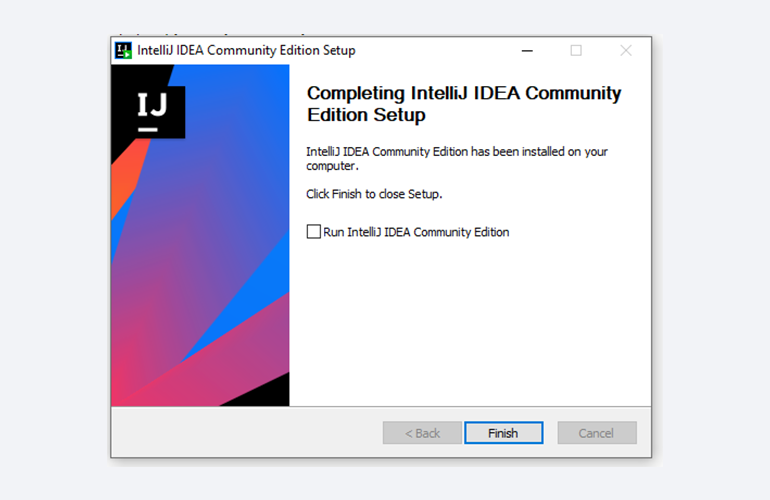
Нажимаем Install (Установить), после чего стартует установка:

Дожидаемся её окончания и жмём Finish (Завершить):
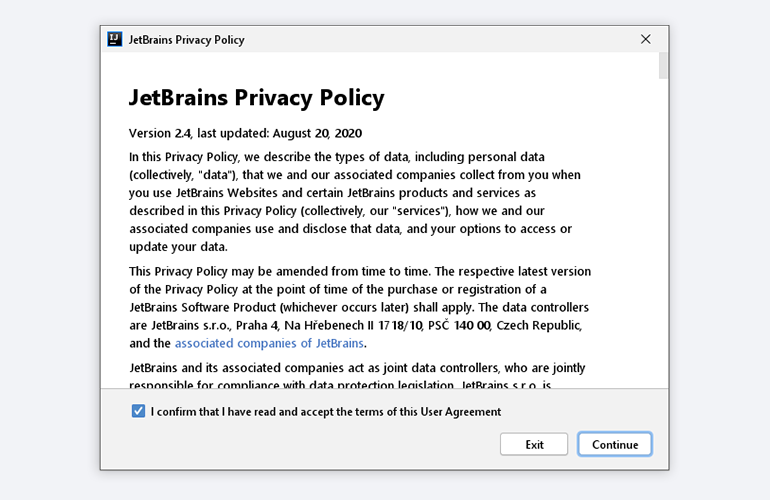
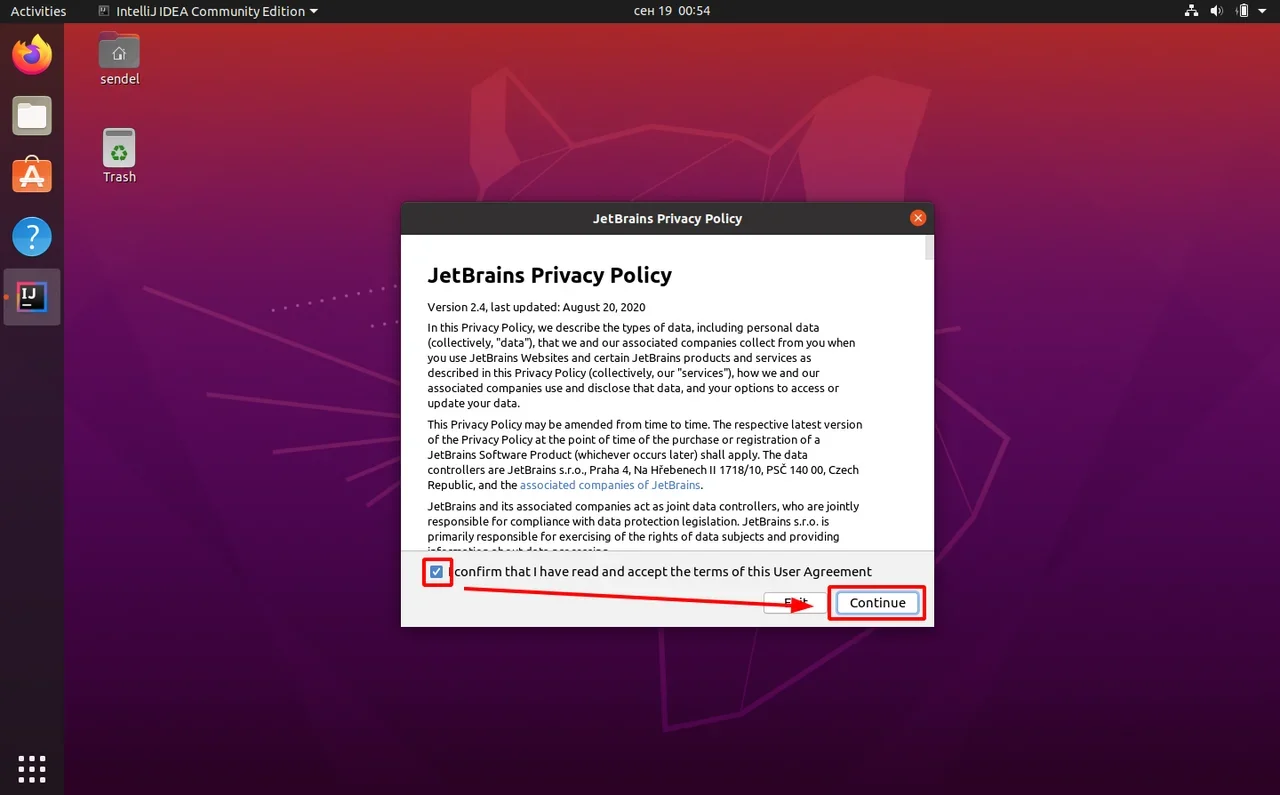
При первом запуске принимаем пользовательское соглашение и нажимаем Continue (Продолжить):
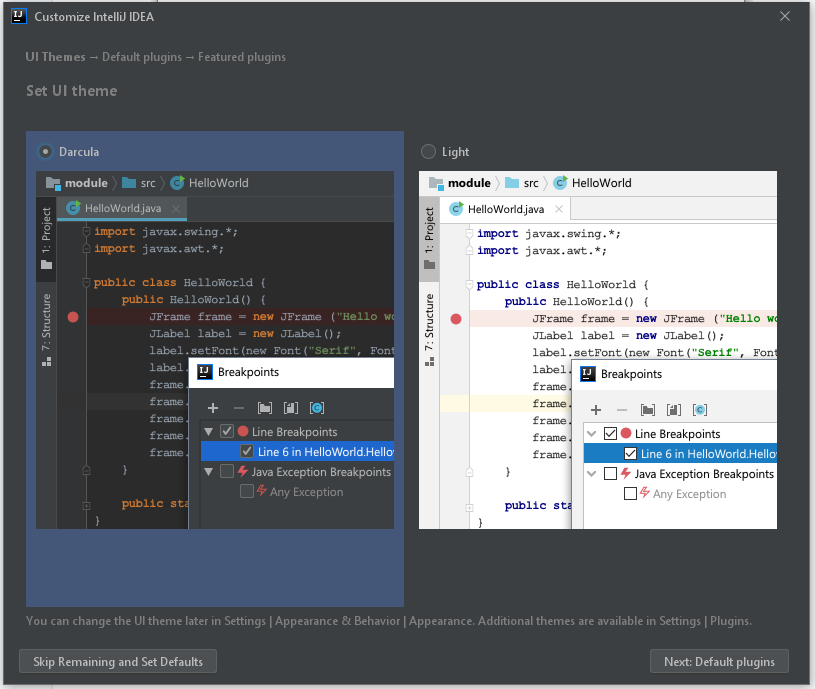
Далее выбираем тему оформления (доступны тёмная и светлая):
Жмём Next: Default plugins и переходим к выбору устанавливаемых плагинов:
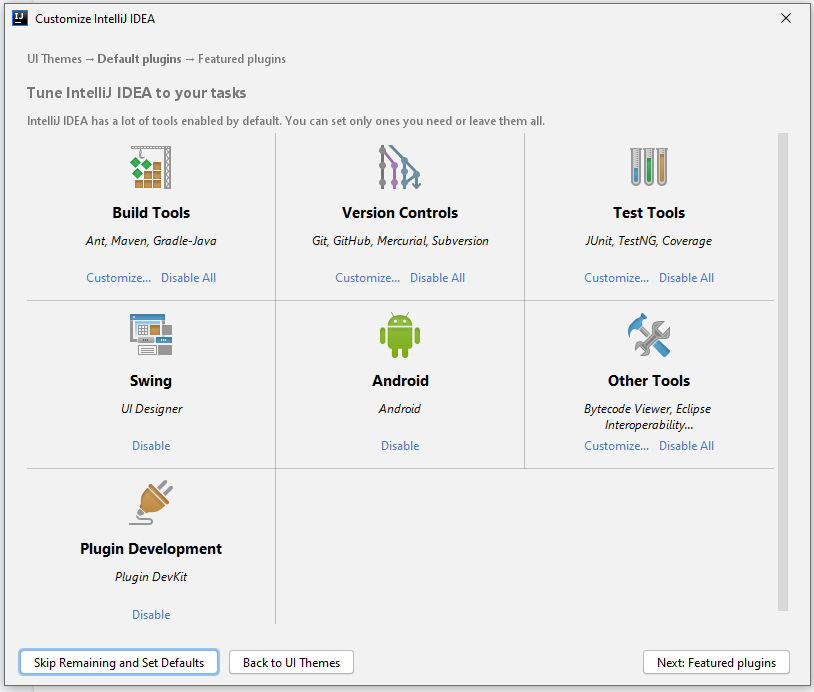
Если не знаете, что вам точно пригодится, — оставляйте всё как есть. А если, например, с Андроидом вам не работать — выключите соответствующий пункт.
Не волнуйтесь, если надобавляете лишнего или о чём-то забудете. Всё можно будет переиграть — в настройках среды.
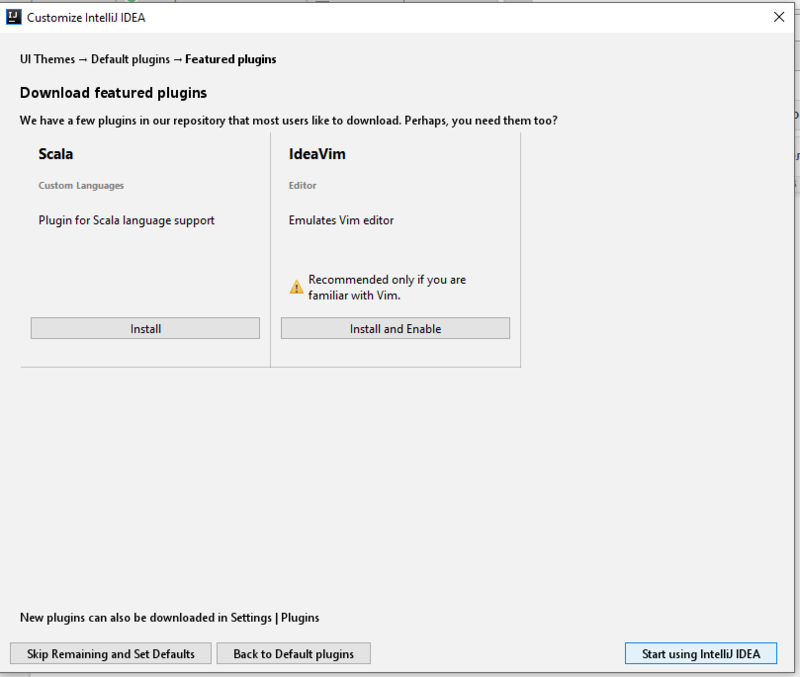
После чего нажмите на кнопку Next: featured plugins и выберите другие нужные плагины (или оставляйте всё по умолчанию):
И наконец, нажимаем Start using IntelliJ IDEA.
Вас встретит начальный экран среды разработки (Welcome screen). Здесь можно создать новый проект, открыть или импортировать существующий, а также скачать проект из системы контроля версий:
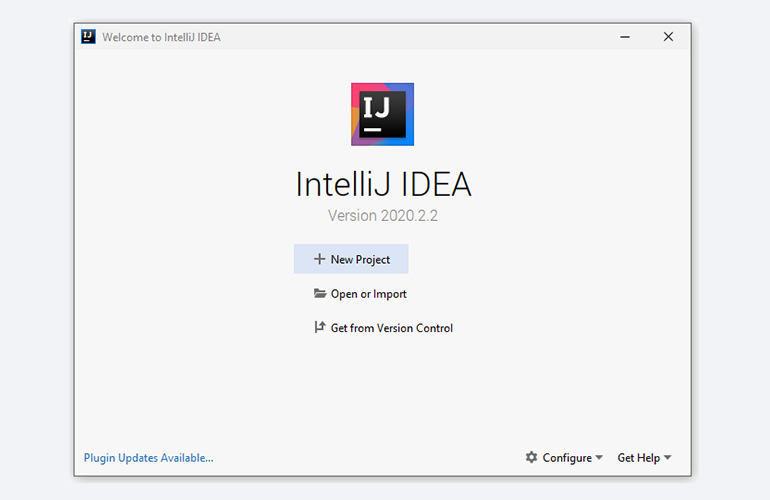
Если вы видите такой же экран — поздравляю, установка и настройка прошли успешно! Приятного обучения!
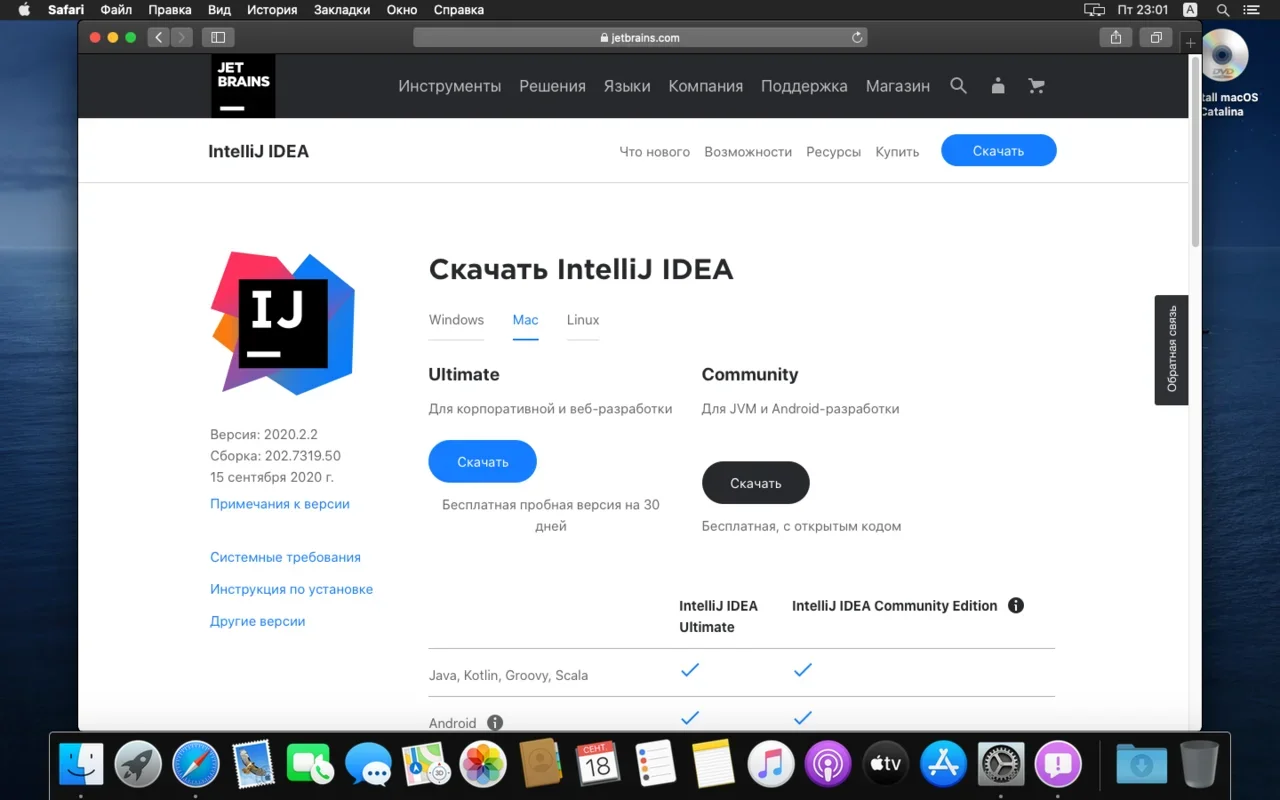
Здесь всё даже легче, чем в Windows. Для начала качаем версию для macOS отсюда (о различии между редакциями Community и Ultimate читайте выше — в пункте про установку на Windows):
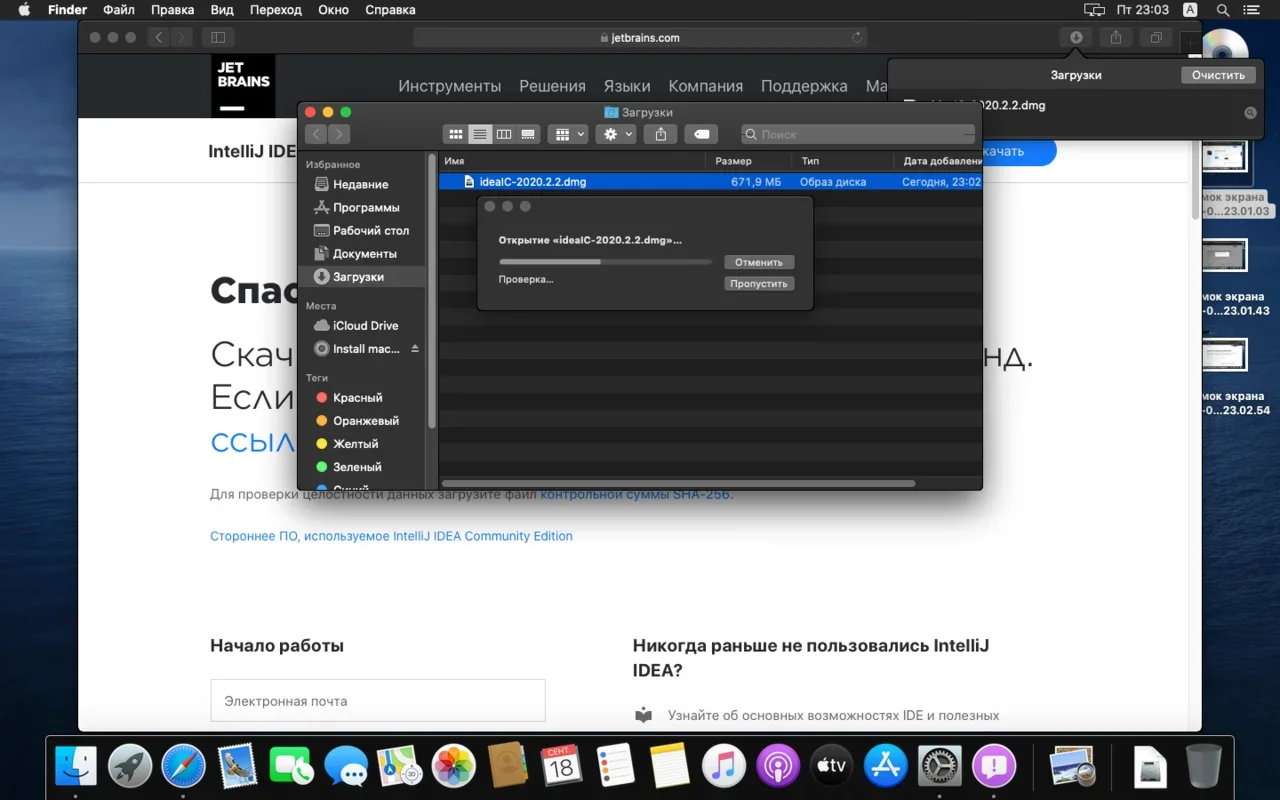
Открываем скачанный файл .dmg:
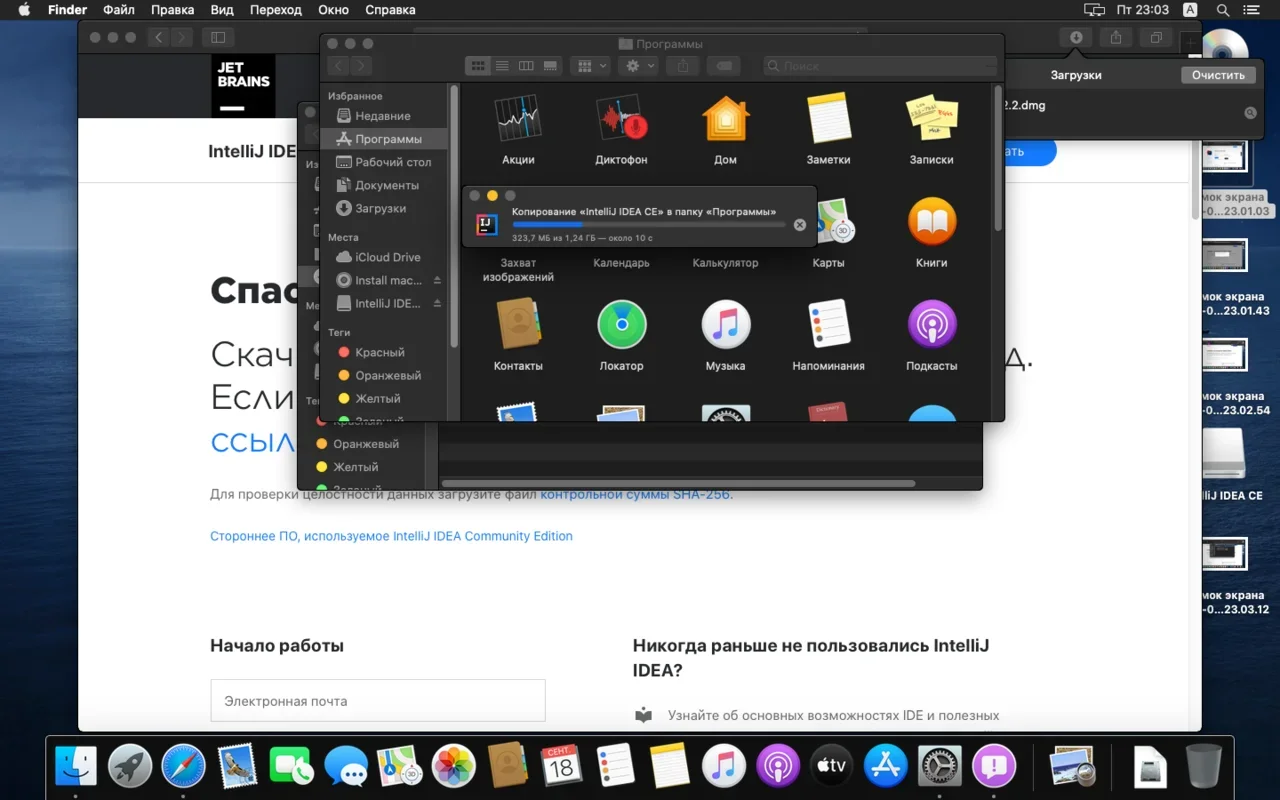
Копируем файл в «Программы»:
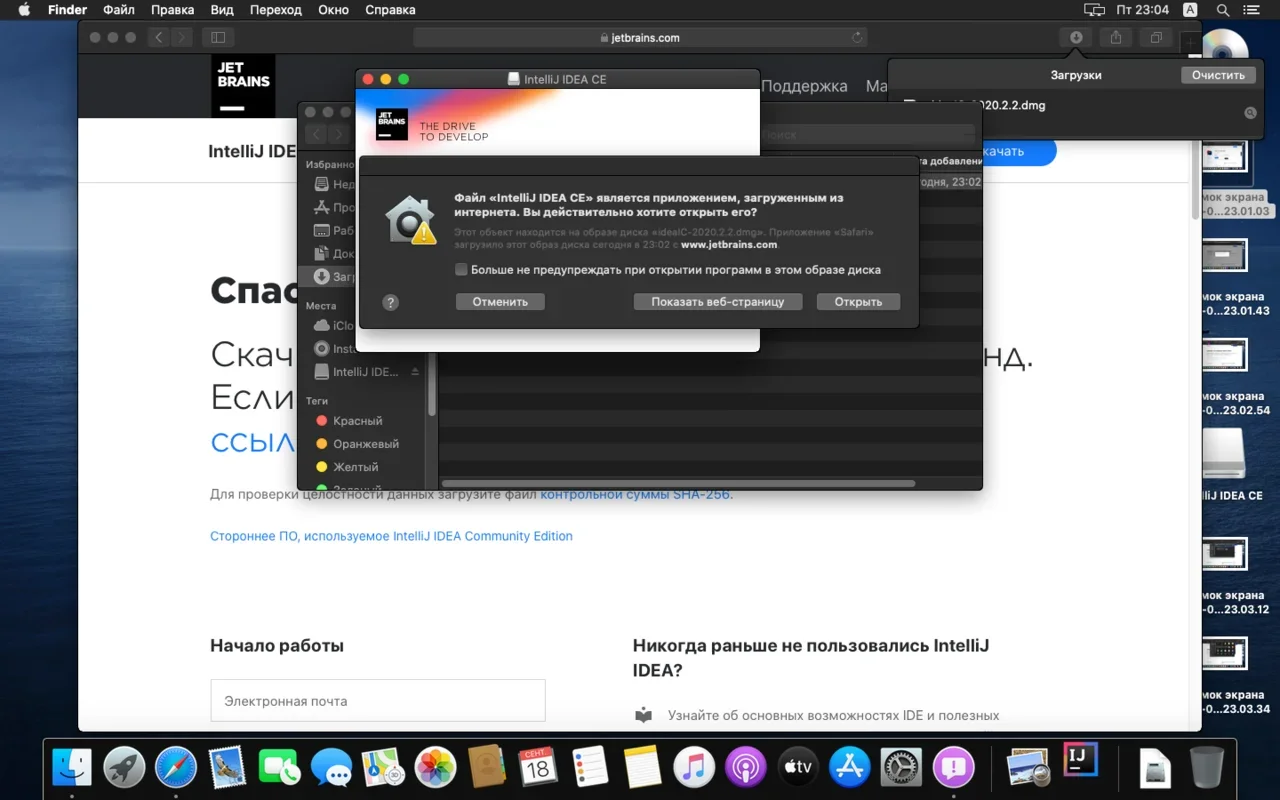
Читаем предупреждение ОС и жмём «Открыть»:
Принимаем пользовательское соглашение и жмём кнопку Continue (Продолжить):

Теперь приложением можно пользоваться. Приятного обучения!
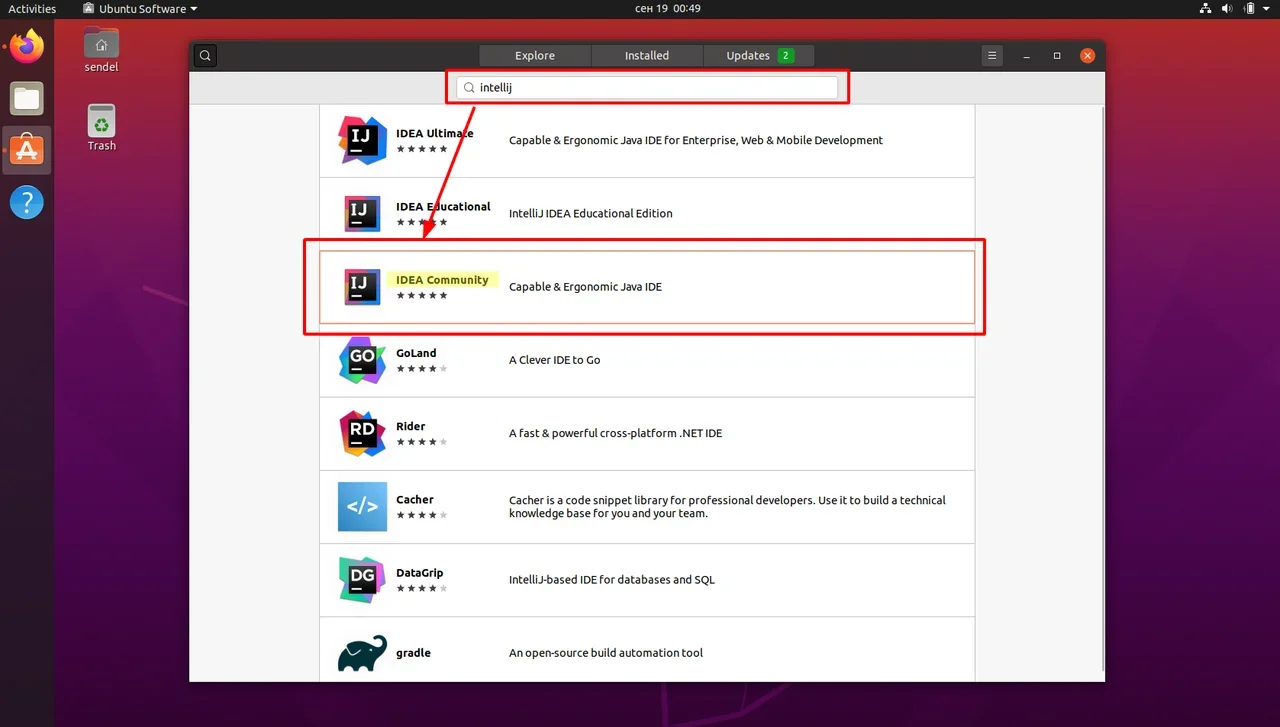
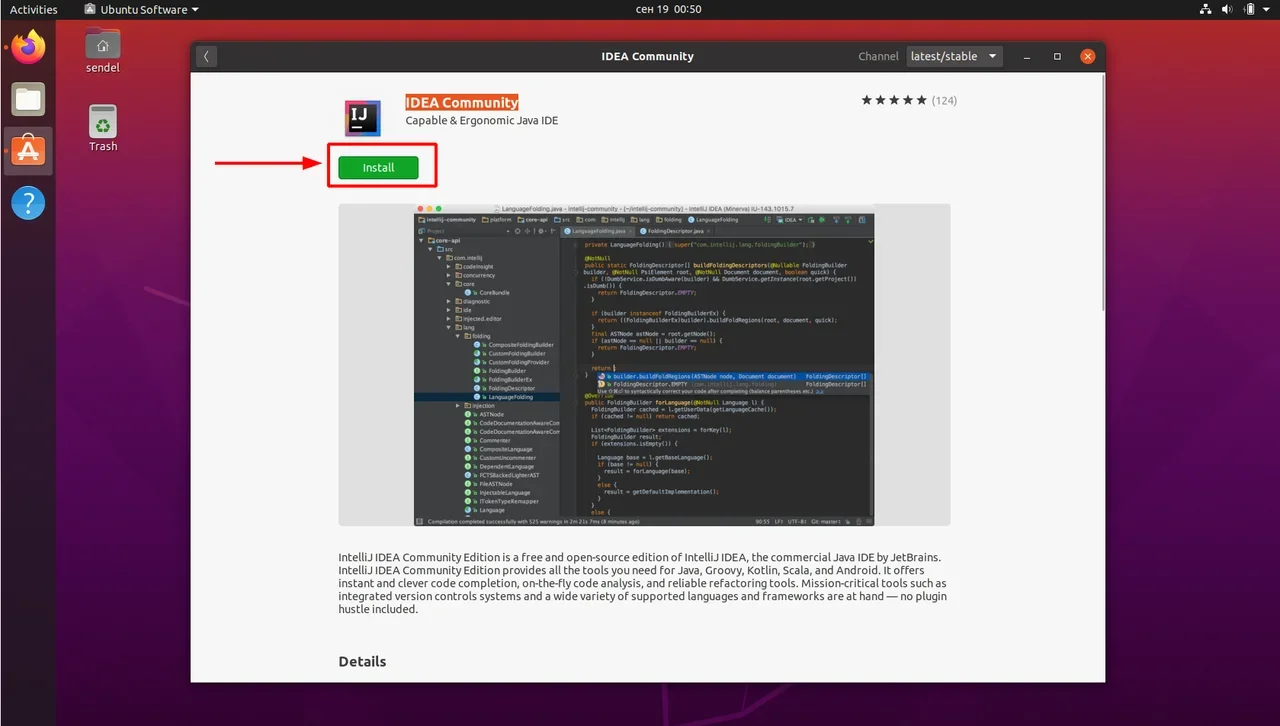
Для установки IntelliJ IDEA открываем Центр приложений Ubuntu:
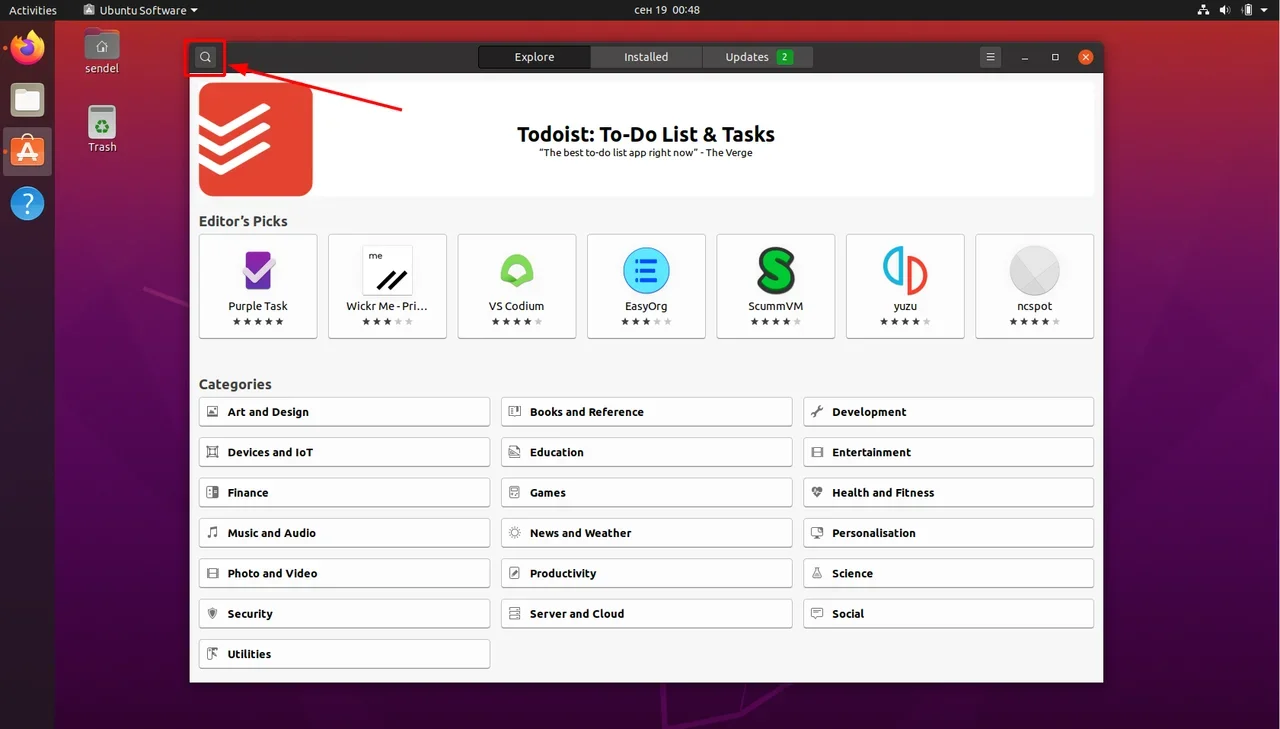
Вводим в поиск слово «Intellij» (без кавычек). Нам нужна IDEA Community (о различии между редакциями Community и Ultimate читайте выше — в пункте про установку на Windows):
Выбираем версию и нажимаем кнопку Install (Установить):
После установки видим IDEA в меню программ:
Запускаем, принимаем пользовательское соглашение и нажимаем кнопку Continue (Продолжить):
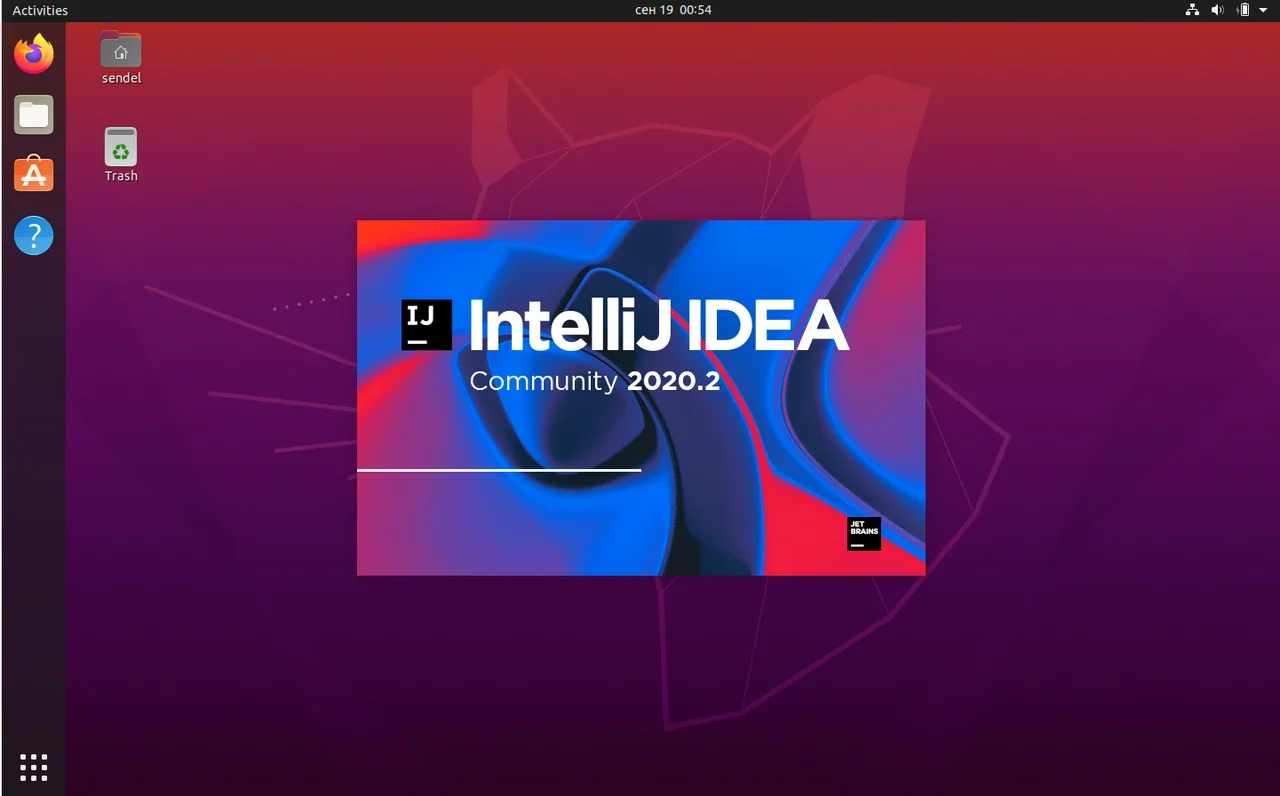
Вы увидите экран загрузки:
Далее вас встретит начальный экран (Welcome screen). Здесь можно создать новый проект, открыть или импортировать существующий, а также скачать проект из системы контроля версий.
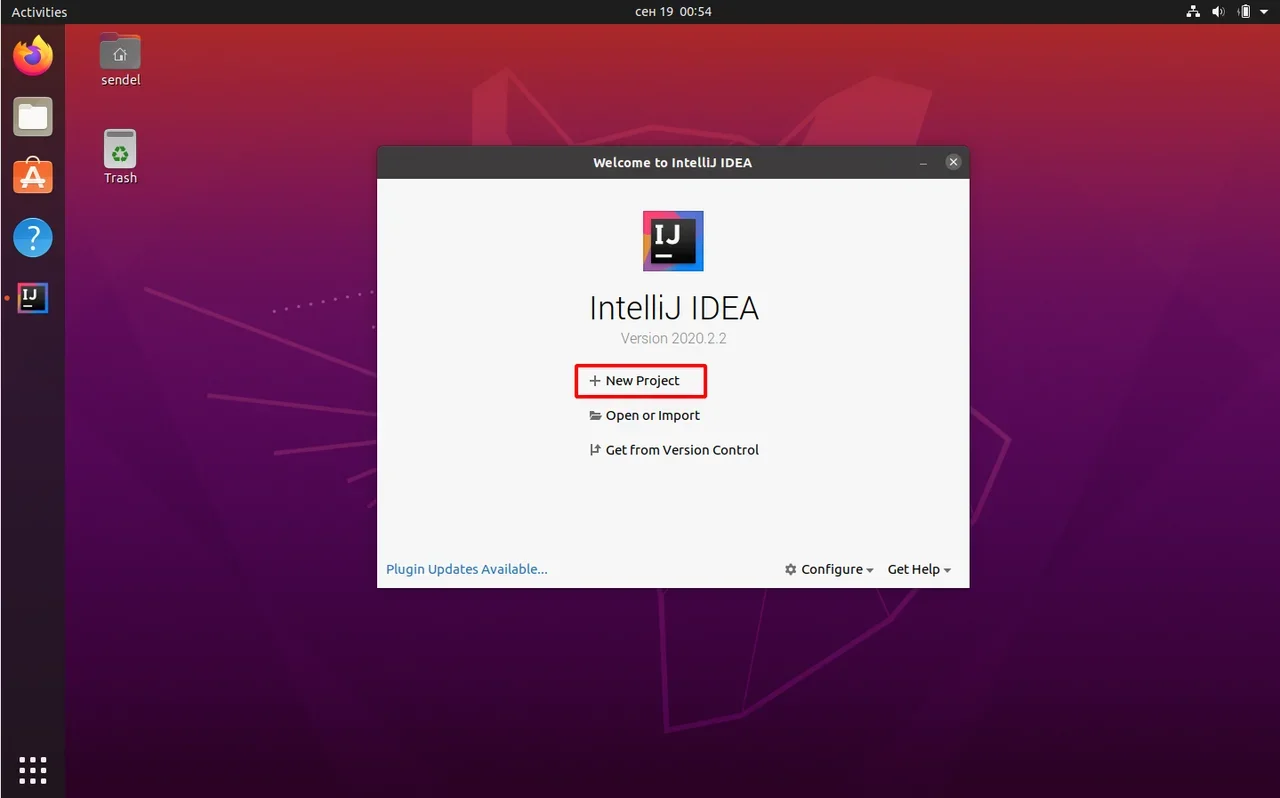
Если вы видите такой же экран — поздравляю, установка и настройка прошли успешно! Приятного обучения!

Жизнь можно сделать лучше!
Освойте востребованную профессию, зарабатывайте больше и получайте от работы удовольствие. А мы поможем с трудоустройством и важными для работодателей навыками.
Посмотреть курсы
Для разработки на Java должен быть установлен комплект разработчика приложений – Java Development Kit (сокращенно – JDK). Он нужен для запуска, отладки и исполнения программ. Также понадобится IDE – интегрированная среда разработки, в которой вы будете писать код.
Установка JDK
В комплект JDK входит интерпретатор, компилятор, библиотека Java-классов, отладчик, инструменты архивации и сжатия.
Посмотрим, как установить JDK на разные операционные системы.
Windows
Используйте бесплатную версию JDK, которая называется AdoptOpenJDK. Откройте сайт набора и выберите его состав. Например, для Windows подойдет такой набор:
-
OpenJDK 11 (LTS),
-
Java-машина HotSpot,
-
платформа Windows x64 jdk.
После выбора параметров внизу появится ссылка на скачивание набора. Нажмите на нее, чтобы скачать архив на диск.
Скачанный архив нужно распаковать. Сделайте это в папке C:\Program Files\Java\. При разархивировании внутри появится папка jdk-11 (номер зависит от версии OpenJDK). Внутри нее размещен каталог bin. Полный путь до него – C:\Program Files\Java\jdk-11.0.13+8\bin. У вас путь может быть другим. Он нужен для того, чтобы настроить переменные окружения.
Путь до версии JDK необходимо знать программам, которые будут использовать приложения из набора – например, среде разработки. Чтобы сохранить его в системе, настройте переменную JAVA_HOME:
-
Нажмите сочетание клавиш Win+R.
-
В появившемся окне введите «sysdm.cpl» и нажмите «ОК».
-
Перейдите на вкладку «Дополнительно».
-
В нижнем правом углу выберите «Переменные среды».
Появится список переменных сред. Нажмите «Создать» и заполните параметры:
-
Имя переменной – JAVA_HOME.
-
Значение переменной – C:\Program Files\Java\jdk-11.0.13+8 (укажите путь до папки с JKD на своем компьютере).
Система учитывает регистр. Параметры должны быть такими, как показано выше.
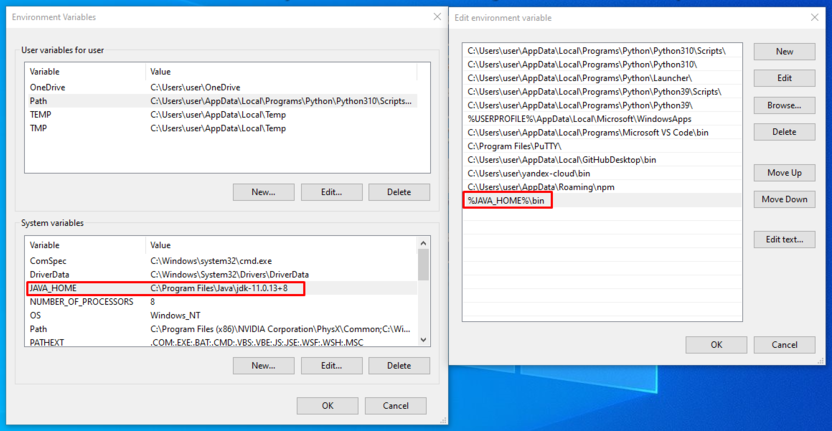
Найдите в поле «Переменные среды» системную переменную Path. Выделите ее и нажмите «Изменить». Добавьте в PATH путь к каталогу с файлами Java: %JAVA_HOME%\bin. Соблюдайте регистр и не пропускайте символы. После добавления переменных перезагрузите Windows.
После повторного запуска системы проверьте, что JDK установлен. Запустите командную строку и выполните команду:
java -version
Если установка прошла успешно, в ответе будет версия JDK.
Linux (Ubuntu 20.04)
В Ubuntu 20.04 по умолчанию входит пакет Open JDK 11. Перед установкой проверьте ранее установленные версии.
Откройте терминал (Ctrl + Alt +T) и выполните команду:
sudo apt update
Затем проверьте версию JDK:
java -version
Если JDK уже есть, в ответе будет указана версия.
Для запуска приложений на Java нужна среда выполнения – Java Runtime Environment (JRE). Установите ее командой:
sudo apt install default-jre
Затем установите JDK командой:
sudo apt install default-jdk
Где будет находиться JDK, отдельно указывать не надо. Проверьте версию еще раз:
java -version
В ответе должна быть указана версия JDK.
macOS
На macOS для установки JDK используется HomeBrew.
Добавьте в HomeBrew репозиторий с OpenJDK. Откройте терминал (Cmd + N) и выполните команду:
brew tap AdoptOpenJDK/openjdk
Установите OpenJDK 11:
brew cask install adoptopenjdk11
Проверьте установку:
java -version
В ответе должна быть указана версия JDK.
Комьюнити теперь в Телеграм
Подпишитесь и будьте в курсе последних IT-новостей
Подписаться
Установка среды разработки для Java
Самая популярная среда разработки для Java – IntelliJ IDEA. В ней есть все необходимое для создания проектов: текстовый редактор, компилятор, отладчик и другие инструменты. У Intellij IDEA есть бесплатная и платная версии. На первое время хватает возможностей бесплатной версии – Intellij IDEA Community Edition.
Windows
Скачайте версию Community для Windows с официального сайта JetBrains.
Запустите скачанный исполняемый файл и выберите путь для установки. По умолчанию это папка ProgramFiles/JetBrains.
Настройте параметры установки. Общие настройки:
-
64-bit launcher – добавление на рабочий стол ярлыка Intellij IDEA.
-
Add «Open Folder as Project» – открытие папки с исходниками в редакторе через контекстное меню.
-
.java – файлы с таким расширением по умолчанию будут открываться через Intellij IDEA.
Выберите папку для ярлыков (по умолчанию) JetBrains. Затем нажмите Install и Finish. Установка InteLLiJ IDEA завершена.
Linux (Ubuntu 20.04)
Установка среды разработки IntelliJ IDEA на Linux проходит даже проще, чем на Windows.
- Откройте «Центр приложений» и введите в поисковой строке слово «Intellij».
- Выберите IDEA Community и нажмите Install.
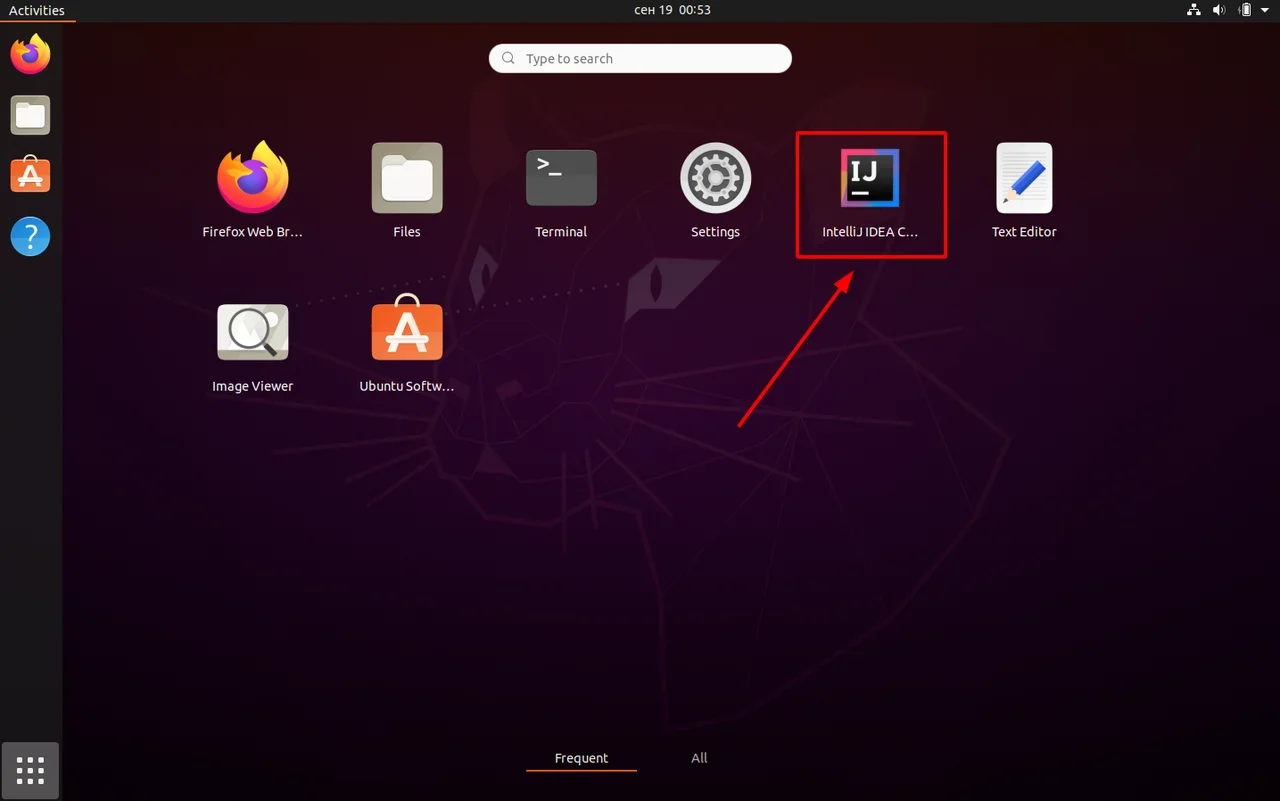
- После завершения установки откройте список программ.
- Запустите IDEA, примите условия соглашения.
На экране появится стартовое окно. Здесь можно создать или открыть проект.
macOS
На macOS InteLLiJ IDEA установка тоже очень простая.
- Скачайте версию IntelliJ IDEA для macOS с сайта JetBrains. Выберите версию Community.
- Откройте файл с расширением *.dmg. Скопируйте его в «Программы».
- Система выдаст предупреждение. Нажмите «Открыть».
- Примите пользовательское соглашение и нажмите «Продолжить».
Дождитесь завершения установки и запустите IDEA.
Запуск проектов
Среда разработки настроена, все приложения установлены. Осталось разобраться, как запустить JDK c помощью IDEA.
При первом запуске программа просит принять лицензионное соглашение. Затем появляется окно выбора темы – светлой или темной.
Следующий шаг – установка плагинов. Если пока не знаете, что понадобится для разработки, то ничего не меняйте. Если точно знаете, что, например, не будете писать приложения для Android, то удалите плагин Android.
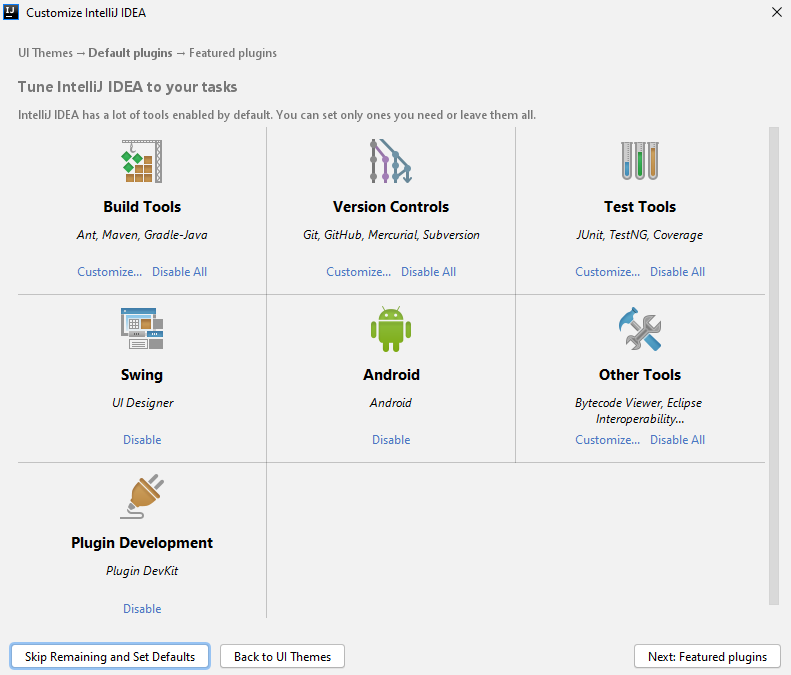
Не беспокойтесь о составе плагинов. Если что-то забудете или установите лишнее, в любой момент можно будет поправить список в настройках IDEA.
После добавления плагинов появится стартовый экран. Здесь можно создать новый проект, открыть существующий или скачать репозиторий из системы контроля версий.
Создайте новый проект и добавьте в него Java Class – пусть он называется first. Напишите первую программу:
public class first{
     public static void main(String args[])
     {
         System.out.println("Hello, world!");
     }
}
Чтобы запустить первую программу, нажмите Run. Внизу откроется консоль, в которой должно отобразиться приветствие – Hello, world!
Вы только что установили JDK, настроили среду разработки и выполнили первую программу.
IntelliJ IDEA is a cross-platform IDE that provides consistent experience on the Windows, macOS, and Linux operating systems.
IntelliJ IDEA is available in the following editions:
-
Community Edition is free and open-source, licensed under Apache 2.0. It provides all the basic features for JVM and Android development.
-
IntelliJ IDEA Ultimate is commercial, distributed with a 30-day trial period. It provides additional tools and features for web and enterprise development. For pricing information, refer to Subscription options & Pricing.
For more information about the editions, refer to the comparison matrix.
System requirements
|
Requirement |
Minimum |
Recommended |
|---|---|---|
|
RAM |
2 GB of free RAM |
8 GB of total system RAM |
|
CPU |
Any modern CPU |
Multi-core CPU. IntelliJ IDEA supports multithreading for different operations and processes making it faster the more CPU cores it can use. |
|
Disk space |
3.5 GB |
SSD drive with at least 5 GB of free space |
|
Monitor resolution |
1024×768 |
1920×1080 |
|
Operating system |
Officially released 64-bit versions of the following:
Pre-release versions are not supported. |
Latest 64-bit version of Windows, macOS, or Linux (for example, Debian, Ubuntu, or RHEL) |
You do not need to install Java to run IntelliJ IDEA because JetBrains Runtime is bundled with the IDE (based on JRE 17). However, to develop Java applications, a standalone JDK is required.
The JetBrains Toolbox App is the recommended tool to install JetBrains products. Use it to install and manage different products or several versions of the same product, including Early Access Program (EAP) and Nightly releases, update and roll back when necessary, and easily remove any tool. The Toolbox App maintains a list of all your projects to quickly open any project in the right IDE and version.
Install the Toolbox App
-
Download the installer .exe from the Toolbox App web page.
-
Run the installer and follow the wizard steps.
-
After you run the Toolbox App, click its icon
 in the notification area and select which product you want to install.
To install a specific version, click
and select Available versions.
 in the notification area and select which product you want to install.
 and select
Log in to your JetBrains Account from the Toolbox App, and it will automatically activate the available licenses for any IDE that you install.
Install the Toolbox App
-
Download the disk image .dmg from the Toolbox App web page.
-
Mount the image and drag the JetBrains Toolbox app to the Applications folder.
-
After you run the Toolbox App, click its icon in the main menu and select which product you want to install.
To install a specific version, click
and select Available versions.

Log in to your JetBrains Account from the Toolbox App, and it will automatically activate the available licenses for any IDE that you install.
Install the Toolbox App
-
Download the tarball .tar.gz from the Toolbox App web page.
-
Extract the tarball to a directory that supports file execution.
For example, if the downloaded version is 1.17.7391, you can extract it to the recommended /opt directory using the following command:
sudo tar -xzf jetbrains-toolbox-1.17.7391.tar.gz -C /opt
-
Execute the jetbrains-toolbox binary from the extracted directory to run the Toolbox App.
After you run the Toolbox App for the first time, it will automatically add the Toolbox App icon
to the main menu. -
Select the product that you want to install.
To install a specific version, click
and select Available versions.
Log in to your JetBrains Account from the Toolbox App, and it will automatically activate the available licenses for any IDE that you install.
Standalone installation
Install IntelliJ IDEA manually to manage the location of every instance and all the configuration files. For example, if you have a policy that requires specific install locations.
-
Download the installer .exe.
-
Run the installer and follow the wizard steps.
On the Installation Options step, you can configure the following:
-
Create a desktop shortcut for launching IntelliJ IDEA.
-
Add the directory with IntelliJ IDEA command-line launchers to the
PATHenvironment variable to be able to run them from any working directory in the Command Prompt. -
Add the Open Folder as Project action to the system context menu (when you right-click a folder).
-
Associate specific file extensions with IntelliJ IDEA to open them with a double click.

-

To run IntelliJ IDEA, find it in the Windows Start menu or use the desktop shortcut. You can also run the launcher batch script or executable in the installation directory under bin.
-
Download the ZIP archive
-
Extract the archive to the desired folder.
To run IntelliJ IDEA, use the launcher batch script or executable in the extracted directory under bin.
-
Download the disk image .
-
Mount the image and drag the IntelliJ IDEA app to the Applications folder.
Run the IntelliJ IDEA app from the Applications directory, Launchpad, or Spotlight.
-
Download the tarball .tar.gz.
-
Extract the tarball to a directory that supports file execution.
For example, to extract it to the recommended /opt directory, run the following command for IntelliJ IDEA Ultimate:
sudo tar -xzf ideaIU-*.tar.gz -C /opt
For IntelliJ IDEA Community, run:
sudo tar -xzf ideaIC-*.tar.gz -C /opt
Execute the idea.sh script from the extracted directory to run IntelliJ IDEA.
To create a desktop entry, do one of the following:
-
On the Welcome screen, click Configure | Create Desktop Entry
-
From the main menu, click Tools | Create Desktop Entry
When you run IntelliJ IDEA for the first time, you can take several steps to complete the installation, customize your instance, and start working with the IDE.
For more information, refer to Run IntelliJ IDEA for the first time.
For more information about the location of the default IDE directories with user-specific files, refer to Directories used by the IDE.
Silent installation on Windows
Silent installation is performed without any user interface. It can be used by network administrators to install IntelliJ IDEA on a number of machines and avoid interrupting other users.
To perform silent install, run the installer with the following switches:
-
/S: Enable silent install -
/CONFIG: Specify the path to the silent configuration file -
/D: Specify the path to the installation directoryThis parameter must be the last in the command line, and it should not contain any quotes even if the path contains blank spaces.
For example:
ideaIU.exe /S /CONFIG=d:\temp\silent.config /D=d:\IDE\IntelliJ IDEA Ultimate
To check for issues during the installation process, add the /LOG switch with the log file path and name between the /S and /D parameters. The installer will generate the specified log file. For example:
ideaIU.exe /S /CONFIG=d:\temp\silent.config /LOG=d:\JetBrains\IDEA\install.log /D=d:\IDE\IntelliJ IDEA Ultimate
Silent configuration file
You can download the default silent configuration file for IntelliJ IDEA at https://download.jetbrains.com/idea/silent.config
The silent configuration file defines the options for installing IntelliJ IDEA. With the default options, silent installation is performed only for the current user: mode=user. If you want to install IntelliJ IDEA for all users, change the value of the installation mode option to mode=admin and run the installer as an administrator.
The default silent configuration file is unique for each JetBrains product. You can modify it to enable or disable various installation options as necessary.
Install as a snap package on Linux
You can install IntelliJ IDEA as a self-contained snap package. Since snaps update automatically, your IntelliJ IDEA installation will always be up-to-date.
IntelliJ IDEA is distributed via two channels:
-
The stable channel includes only stable versions. To install the latest stable release of IntelliJ IDEA, run the following command:
sudo snap install intellij-idea-ultimate —classic
sudo snap install intellij-idea-community —classic
The
--classicoption is required because the IntelliJ IDEA snap requires full access to the system, like a traditionally packaged application. -
The edge channel includes EAP builds. To install the latest EAP build of IntelliJ IDEA, run the following command:
sudo snap install intellij-idea-ultimate —classic —edge
sudo snap install intellij-idea-community —classic —edge
When the snap is installed, you can launch it by running the intellij-idea-ultimate or intellij-idea-community command.
To list all installed snaps, you can run sudo snap list. For more information about other snap commands, refer to the Snapcraft documentation.
Last modified: 20 September 2023

![]()
Java runs on millions of machines but it is started to show its age, JAVA is not the hot language of the time but as JAVA is purely made up of OPPs concept, learning and understanding it will be helpful.
background image by b1-foto from Pixabay
Table Of Contents
- Install JAVA compiler
- Setup environment variable
- Install IntelliJ IDE
- Hello World Program
First install JAVA compiler
- Go to oracle JDK download
- Windows users download Windows x64 Installer.
- Accept the license agreement then click download.
- After downloading JDK, go to downloads, open the file(which you just downloaded).
- Click on next and next then wait till it gets installed.
- After installation is completed, click on close.
- Check if JDK is downloaded or not
- open cmd (YOu can open cmd by clicking the windows button and search for cmd, a black terminal will be open)
- type «java —version»
- If it shows something like 15.0.2 then congratulations, JAVA is installed, if not then also congratulations, you got your first error.
Setup environment variable
- Click on the Windows button, search «environment variable» click on it.
- A window will pop up, on the bottom left click on «environment variable».
- select «path» then on «edit».
- Click on «new».
- Paste «C:\Program Files\Java\jdk-15.0.2\bin» or your «java/bin» path.
- Click «ok» and «ok» and «ok».
Now you are set to install IntelliJ IDE.
Install IntelliJ IDE.
- Go to the download section on IntelliJ website
- Click download «Community version»
- After completion of the download, open the file.
- Click next, next and next, then click install
- After installation, open Intellij.
Let’s write your first program «hello world» in Intellij.
Hello world program.
- Open freshly install Intellij IDE.
- Click on «new project».
- Select JAVA on the top left corner.
- Click next.
- Tick «create a project from template» on the top left side.
- Click next.
- Name your project as hello world(You can name whatever you want)
- Click next.
- It will load for a min or 2
- Intellij will give you a starting template.
- Type «sout» Intellij will give you a suggestion press enter.
- If you didn’t get a suggestion type «System.out.println(«Hello World!!!»);»
- On the top right corner click on the run button.
- You can see your output in the terminal window.
Congratulation you have set up JAVA successfully and written your first JAVA project.
Conculusion
Setting up is not enough to learn further I recommend TheNewBoston youtube channel and his JAVA playlist.
#EnjoyLearning.
This is Shareef.
My portfolio
Github
IntelliJ IDEA is a very popular IDE for Java applications, and it is a user-friendly IDE that is perfect to use especially if you are a beginner. Installing IntelliJ IDEA 2022 is a perfect choice of IDE, and it comes with many features for you to develop applications easily. The question is how to install IntelliJ IDEA on Windows 10 and 11, before we go through the installation of the IDE, we will go through a quick summary of the IDE.
IntelliJ IDEA has two editions for you to choose from: the Community Edition and the Ultimate version. This IDE comes with a paid version which is the Ultimate version, and if you can’t afford the Ultimate version, you can still use the Community Edition for you to develop applications with ease. The Community Edition is an open-source IDE that provides all basic features for Java Virtual Machine and Android development.
Otherwise, the Ultimate version is used for commercial use. If you are a student or teacher, develop an open-source application, Java Champion, etc. You can have a free license from JetBrains if you ask for it.
Installing IntelliJ IDEA 2022 System Requirements
Things you must know before installing IntelliJ IDEA 2022. Make sure your machine or computer must have at least the minimum system requirements. Kindly see the table below to learn more about IntelliJ IDEA’s system requirements.
| Requirement | Minimum | Recommended |
|---|---|---|
| RAM | The minimum requirement for RAM is 2 GB | 8 GB of RAM |
| CPU | Any modern CPU | Any modern CPU |
| MONITOR RESOLUTION | 1024×768 | 1920×1080 |
You don’t need to install Java to install IntelliJ IDEA because the good thing is IntelliJ IDEA bundled the Java Runtime Environment based on JRE 11. However, if you want to develop Java applications, a standalone Java Development Kit is required.
Now, I will walk you through the process of installing the IDE. Installing the IDE is very simple and easy. What do we need to do to install the IDE? Obviously, you need to have an installer to install the IDE. The following guide will be the step-by-step tutorial for installing the IntelliJ IDEA IDE (Integrated Development Environment).
Installing IntelliJ IDEA 2022 Step-By-Step Tutorial
Make sure your computer meets the minimum system requirements before installing the IDE. Download the IntelliJ IDEA Community or Ultimate version. Once you have downloaded the application, please proceed below and follow the steps of installation.
Steps to do:
- Download the installer
- Run or open the installer and follow the steps below.
- A welcome dialog will show and click on next.
- Choose the installation location or leave that as default.
- Installation Options – You may check the Create Desktop Shortcut and if you want to open a project by right-clicking the folder, you can check the “Open folder as project”. Make sure you check the Update PATH variable and check the Create Associations if you are developing .java, .groovy, .kt, and .kts. Check it.
- Click next and install, and wait for the process to be completed.
- Once the installation has been completed, you can choose to reboot now to restart the computer and automatically make the changes take effect.
- Done, enjoy coding with IntelliJ IDEA IDE.
When you open your IDE, log in to your JetBrains account if you are using the IntelliJ IDEA Ultimate version. That is it: you can now develop your application with the most popular and intelligent Java IDE. If you are developing JavaFX applications, you can learn more about developing JavaFX applications here.
Developing Java applications is not so easy, but practice makes us perfect. I hope this tutorial meets the expectations of your questions. Enjoy coding!
YouTube Video
What’s up! Kent is my name. The name KENSOFT is derived from the words Kent and Software. My programming language of choice is Java