![]()
Веб-сервер представляет собой некоторую программу (службу), принимающую HTTP-запросы от клиентов, обычно от веб-браузеров, обрабатывающую данные запросы и выдающую им ответ, как правило, вместе с HTLM-страницей (сайтом), изображением, файлом, медиа-потоком или другими данными. Ниже подробно рассмотрим процесс установки подобной службы, а именно веб-сервера IIS 8 (Internet Information Server) входящего в поставку Microsoft Windows Server 2012 R2.
0. Оглавление
- Установка веб-сервера IIS
- Перезапуск сервера IIS
1. Установка веб-сервера IIS
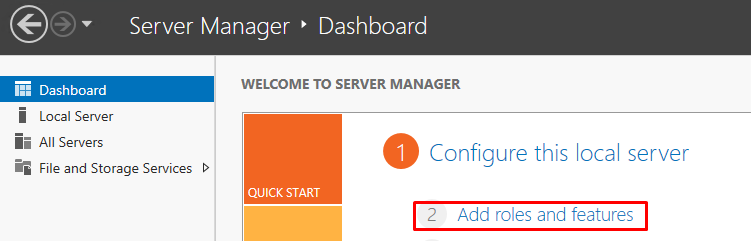
Запускаем Диспетчер серверов (Server Manager). Его можно запустить с ярлыка на панели задач, или же выполнив команду servermanager.exe (Для этого необходимо нажать комбинацию клавиш Win + R, в появившемся окне в поле «Открыть» (Open) написать имя команды и нажать «ОК» ).

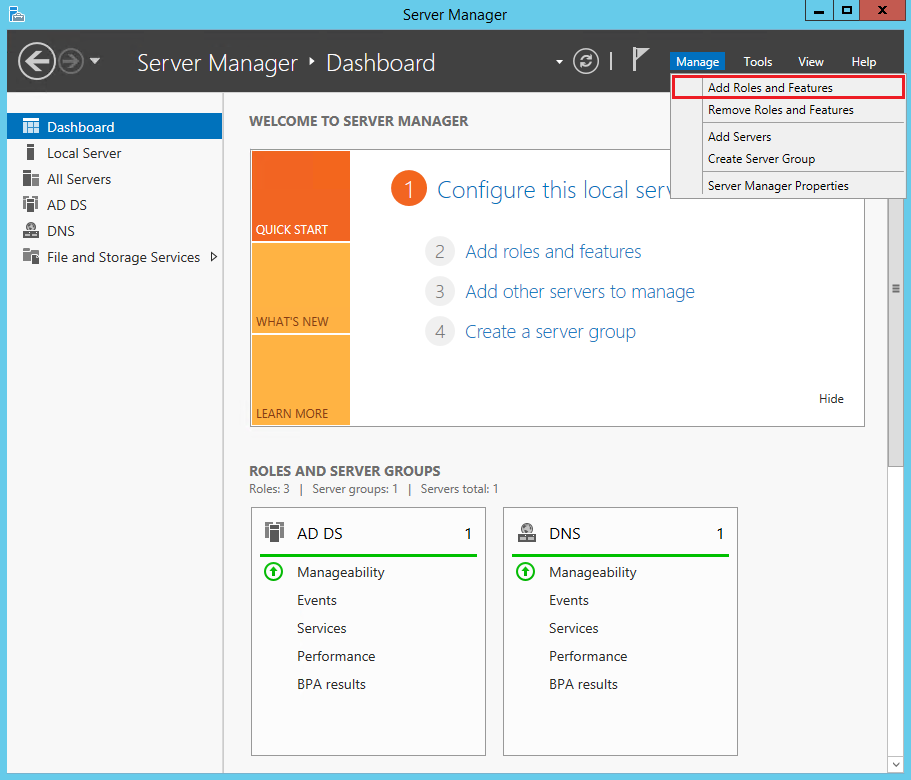
В диспетчере серверов, в меню, расположенном в правом верхнем углу окна, выберем «Управление» (Manage) — «Добавить роли и компоненты» (Add Roles and Features)

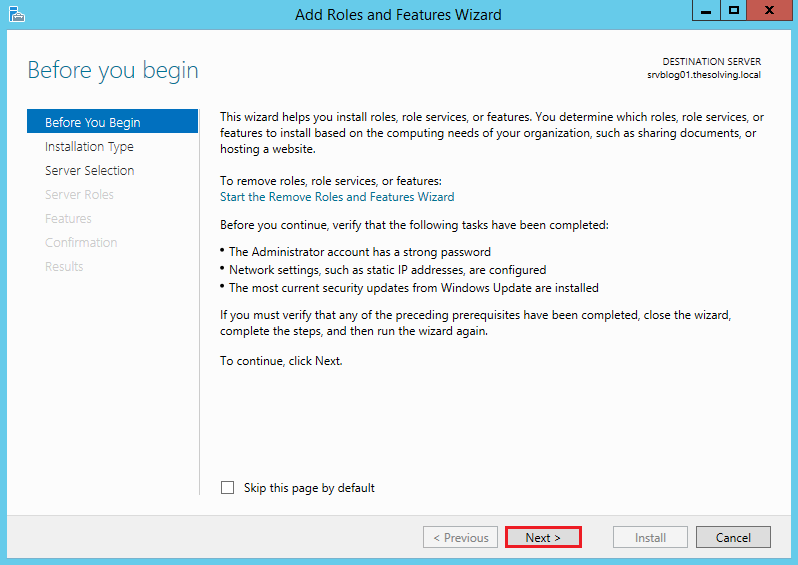
Запустится Мастер добавления ролей и компонентов (Add Roles and Features Wizard). Нажимаем «Далее» (Next) на стартовой странице.

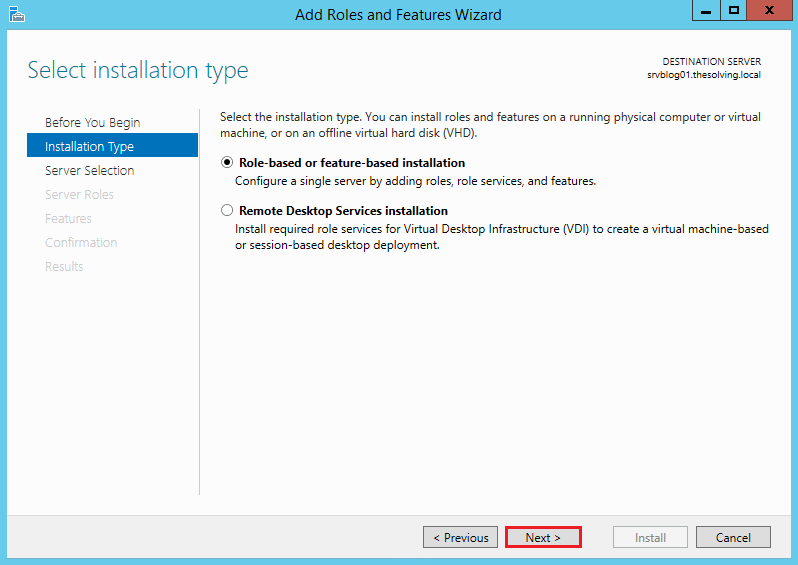
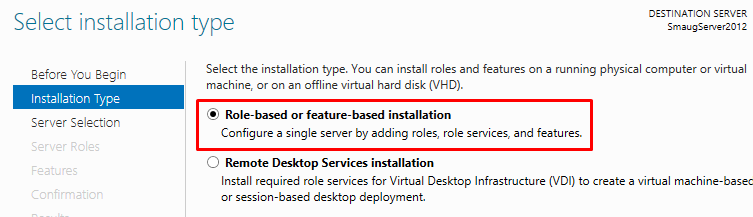
Тип установки (Installation Type) отмечаем «Установка ролей или компонентов» (Role-based or feature-based installation) и нажимаем «Далее» (Next).

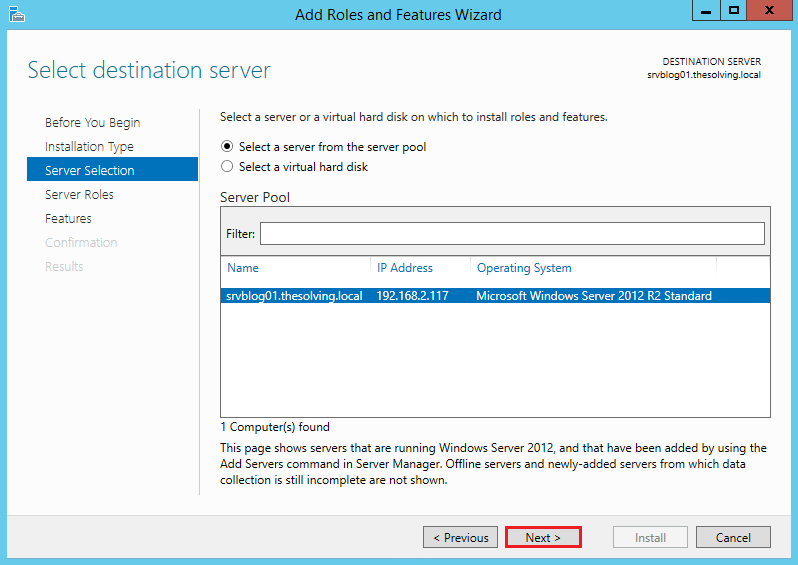
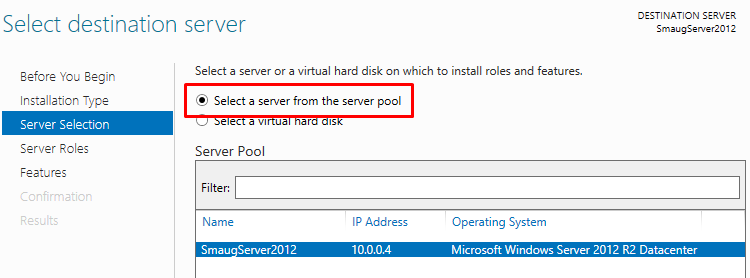
Выбираем текущий сервер из пула серверов (Select a server from the server pool) и снова жмем «Далее» (Next).

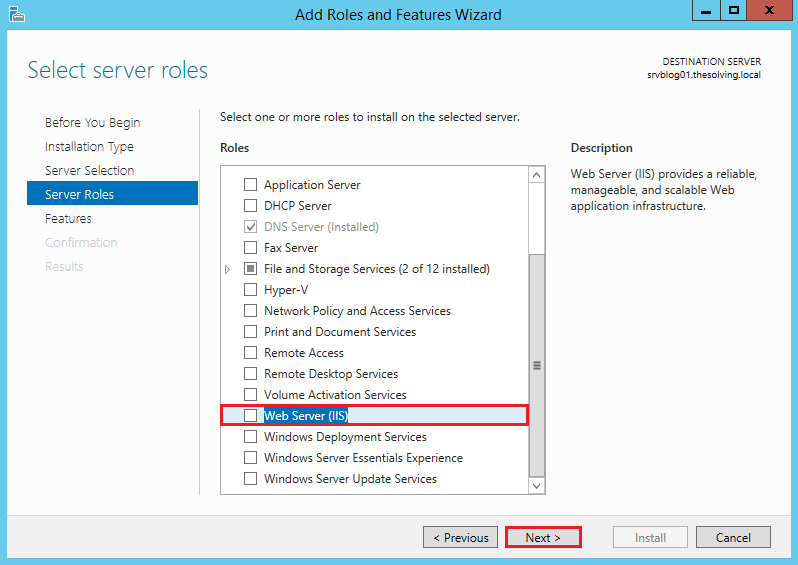
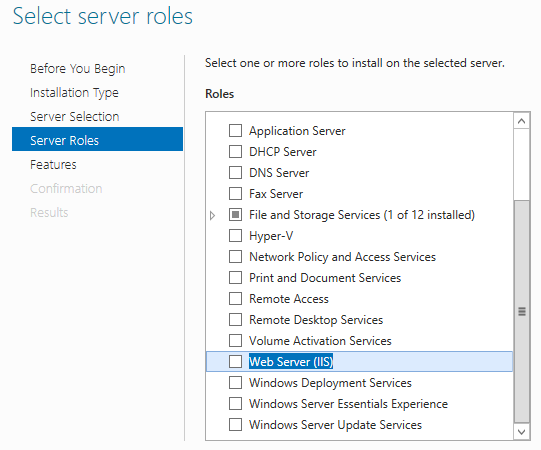
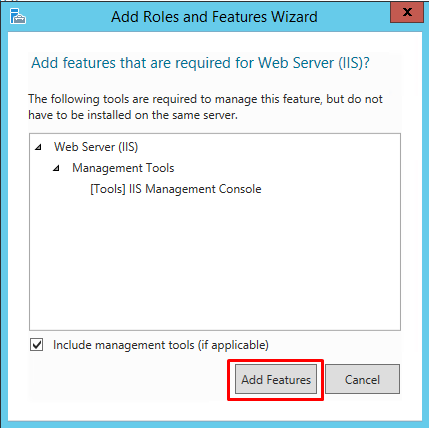
На следующем шаге выбираем роль, которую необходимо установить. В нашем случае это роль «Веб-сервер (IIS)» (Web Server). Отмечаем ее в списке.

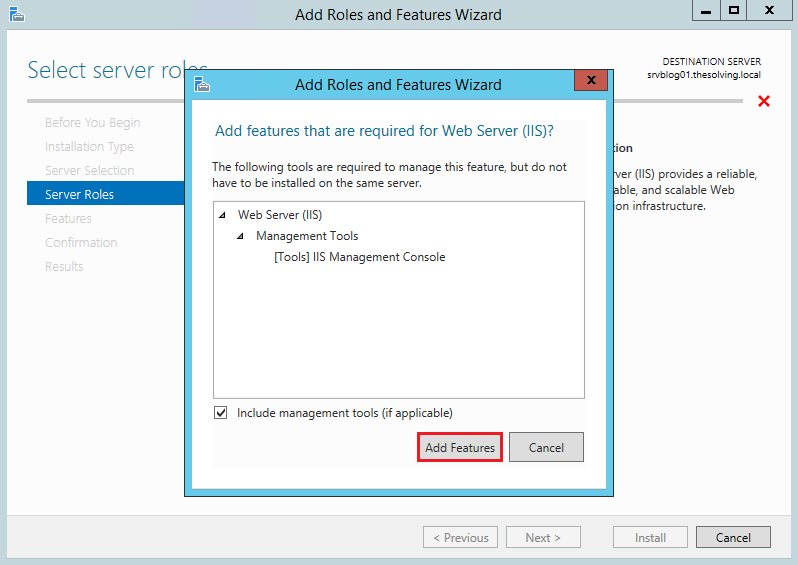
При этом мастер предложит нам добавить компоненты, необходимые для Веб-сервера, а именно «Консоль управления службами IIS» (IIS Management Console). Соглашаемся на установку дополнительных компонент нажав «Добавить компоненты» (Add Features) и жмем «Далее» (Next).

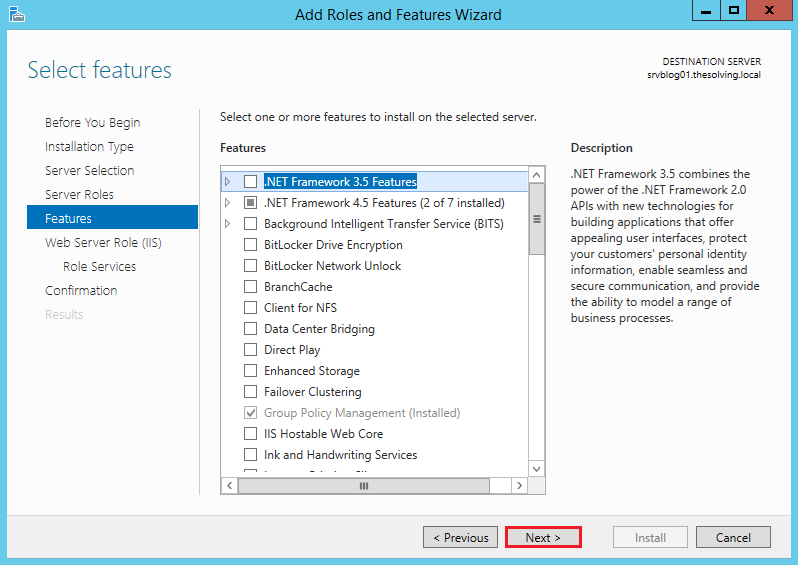
Оставляя список компонент без изменений нажимаем «Далее» (Next).

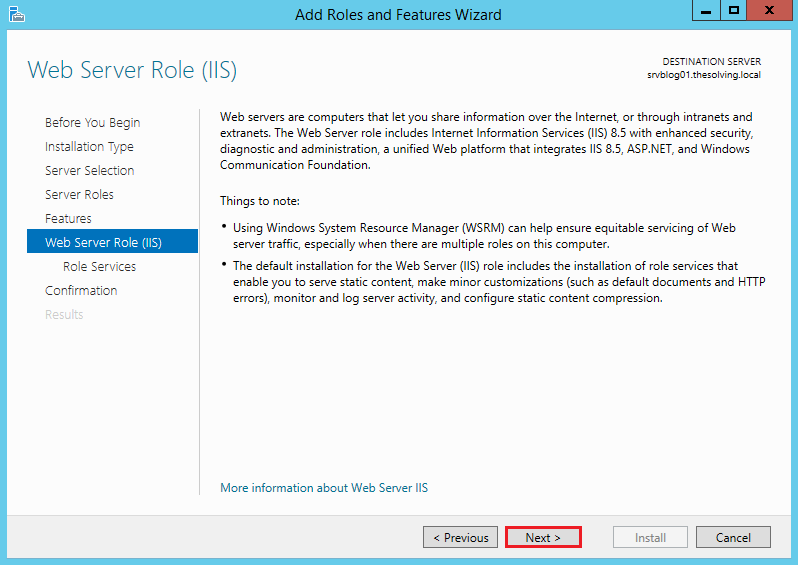
Ознакомившись с информацией о роли веб-сервера снова жмем «Далее» (Next).

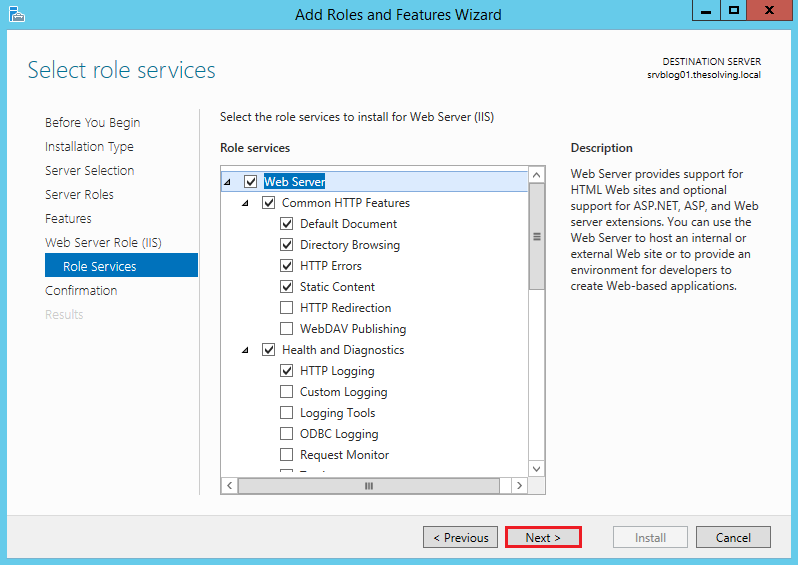
Затем необходимо выбрать службы ролей, которые будут установлены для веб-сервера. Этот набор зависит от конкретных задач, которые будет выполнять сервер IIS.
Например, для публикации баз данных «1С:Предприятие» 8 на веб-сервере или для запуска сайта на WordPress, требуется установка компонент:
- Общие функции HTTP (Common HTTP Features)
- Статическое содержимое (Static Content)
- Документ по умолчанию (Default Document)
- Обзор каталогов (Directory Browsing)
- Ошибки HTTP (HTTP Errors)
- Разработка приложений (Application Development)
- ASP
- ASP.NET 3.5
- Расширяемость .NET 3.5 (.NET Extensibility 3.5)
- Расширения ISAPI (ISAPI Extensions)
- Фильтры ISAPI (ISAPI Filters)
- Исправление и диагностика (Health and Diagnostics)
- Ведение журнала HTTP (HTTP Logging)
- Монитор запросов (Request Monitor)
- Средства управления (Management Tools)
- Консоль управления IIS (IIS Management Console)
Для установки FTP-сервера требуются компоненты:
- FTP-Сервер (FTP Server)
- Служба FTP (FTP Service)
- Расширяемость FTP (FTP Extensibility)
и т. д. Если выделить службу в списке, слева доступно ее краткое описание. Выбрав необходимые службы ролей жмем «Далее» (Next).

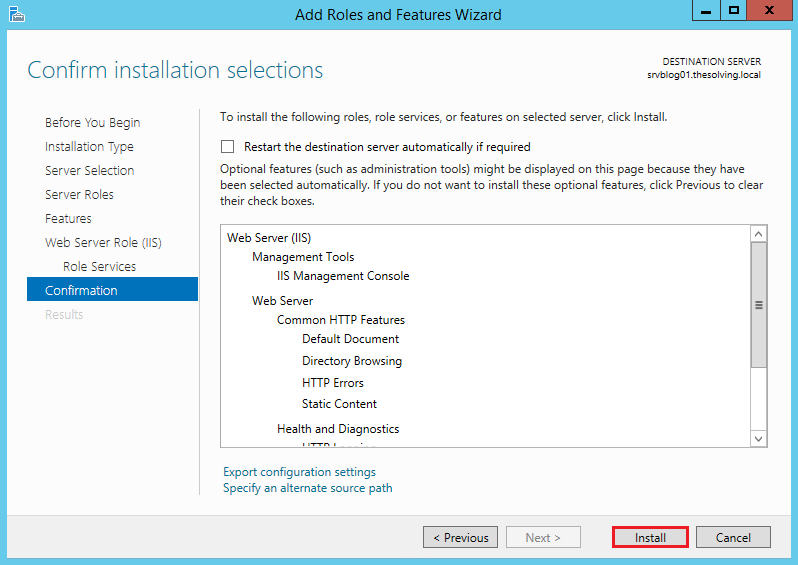
Устанавливаем флаг «Автоматический перезапуск конечного сервера, если требуется» (Restart the destination server automatically if required) если перезагрузка не помешает работе других пользователей и жмем «Установить» (Install) для начала установки указанных в списке служб.

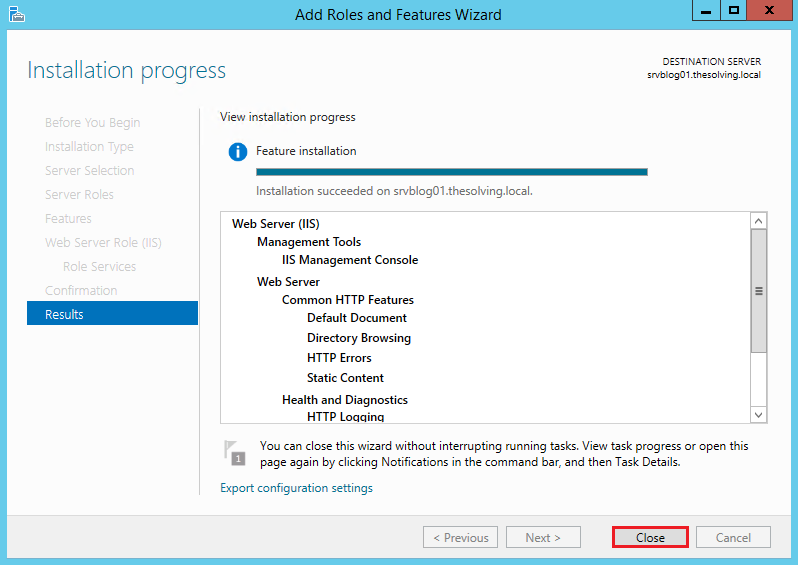
Дожидаемся завершения установки веб-сервера (может произойти перезагрузка сервера) и нажимаем «Закрыть» (Close) для завершения работы мастера.

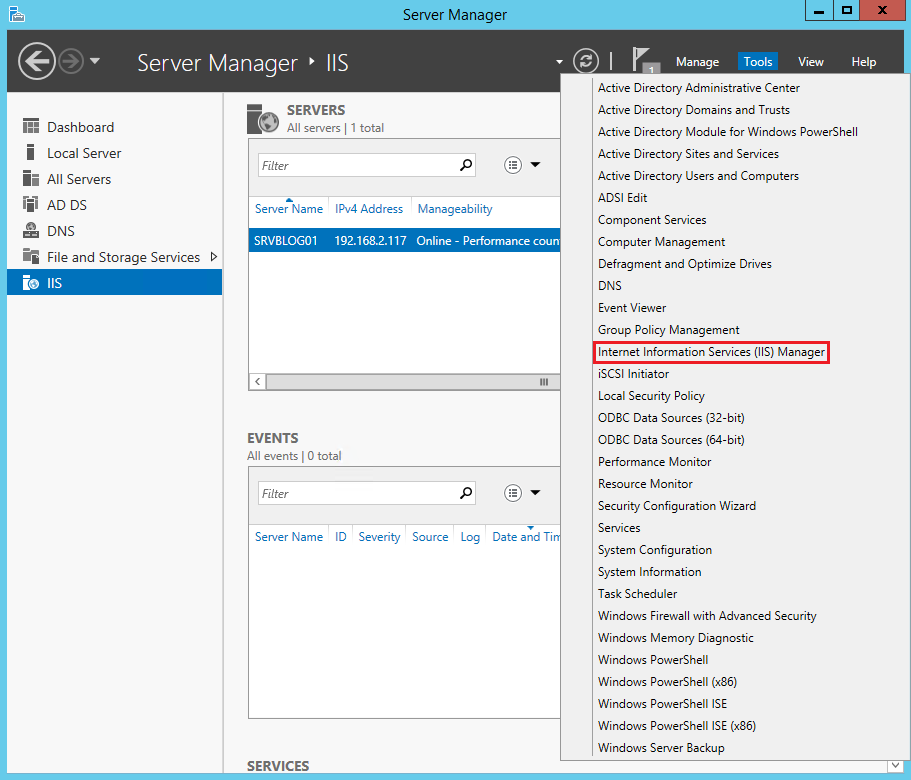
Возвращаемся в диспетчер серверов, в меню «Средства» (Tools) выбираем появившейся там пункт «Диспетчер служб IIS» (Internet Information Services).

В запустившемся Диспетчере служб IIS, в окне подключений (Connections) увидим только что установленные веб-сервер (соответствует сетевому имени компьютера) а также один веб-сайт, добавленный по умолчанию, с названием Default Web Site.

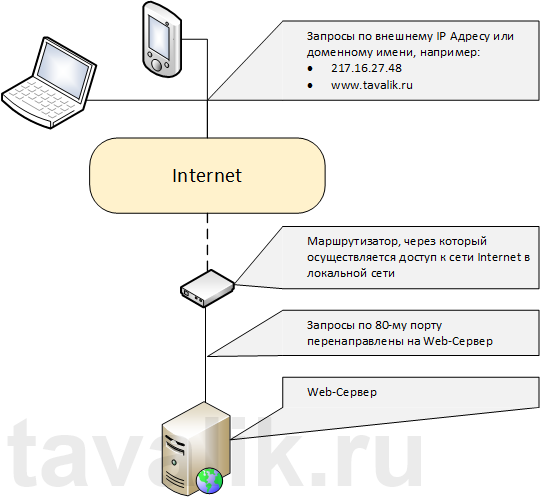
Данный сайт представляет одну веб-страницу с приветствием на различных языках и откликается на все запросы к данному веб-серверу по 80-му порту. Чтобы просмотреть его, достаточно запустить веб-браузер, например Internet Explorer, и ввести в строку адреса http://localhost.

Также этот сайт можно просмотреть с любого другого компьютера в сети, забив в строку адресе IP компьютера где установлен веб-сервер IIS.

Файлы этого сайта, как и файлы всех других добавленных позже сайтов по умолчанию располагаются в каталоге C:\interpub\wwwroot.

Ну и соответственно, чтобы сайты расположенные на данном веб-сервере были доступны из сети Интернет по внешнему IP-адресу или доменному имени (о том как привязать доменное имя к IP-адресу читайте здесь), необходимо на маршрутизаторе выполнить проброс 80-ого порта на компьютер с установленным веб-сервером IIS.
2. Перезапуск сервера IIS
Иногда требуется перезапустить веб сервер IIS. Сделать это можно как из Диспетчера служб IIS, кликнув правой кнопкой мыши по серверу в окне подключений или из меню «Действия» (Action)

так и из командной строки, выполнив команду
iisreset /noforce <имя_компьютера>
где:
- параметр /noforce необязателен и используется для защиты от потери данных в случае, когда службы IIS не могут быть остановлены в течение одноминутного периода ожидания.
- параметр <имя_компьютера> также необязателен при работе на локальном компьютере. В случае удаленного администрирования сервера IIS в качестве параметра <имя_компьютера> указывается имя NetBIOS компьютера, на котором выполняется перезапуск IIS.

При перезапуске веб сервера IIS происходит перезапуск следующих служб (если они устанавливались при установке компонент IIS):
| Служба | Описание |
|---|---|
| Служба IIS Admin | Эта служба управляет всеми службами IIS, кроме службы WWW (FTP, NMTP и SMTP). |
| Служба WWW | Эта служба обеспечивает подключения клиентов к веб-узлам. |
| Служба HTTP SSL | Эта служба обеспечивает безопасные подключения клиентов к веб-узлам. |
| Служба FTP | Эта служба обеспечивает FTP-подключения и администрирование в диспетчере IIS. |
| Служба SMTP | Эта служба обеспечивает передачу электронной почты по сети. |
| Служба NNTP | Эта служба обеспечивает передачу электронных новостей по сети. |
Installing IIS (Internet Information Services) on Windows Server 2012 R2 is an essential step for hosting websites and web applications on a Windows server. IIS is a web server software that allows users to publish content on the internet or intranet using the HTTP, HTTPS, FTP, FTPS, SMTP, or NNTP protocols. In this blog post, we will guide you through the process of installing IIS on Windows Server 2012 R2 and provide various methods to accomplish the task efficiently.
Video Tutorial:
The Challenge of Installing IIS on Windows Server 2012 R2
Setting up IIS on Windows Server 2012 R2 may seem like a daunting task, especially for beginners or those unfamiliar with server administration. It requires navigating through various server configurations and making the appropriate choices to ensure a smooth installation. However, with the right guidance and step-by-step instructions, installing IIS can be a relatively straightforward process.
Things You Should Prepare for
Before proceeding with the installation of IIS on Windows Server 2012 R2, there are a few things you should have prepared:
1. Windows Server 2012 R2 installation media or ISO file
2. Administrator access to the server
3. Stable internet connection (optional but recommended)
4. Sufficient disk space for the installation and subsequent web content
5. Knowledge of basic server administration concepts
Method 1: Installing IIS via Server Manager
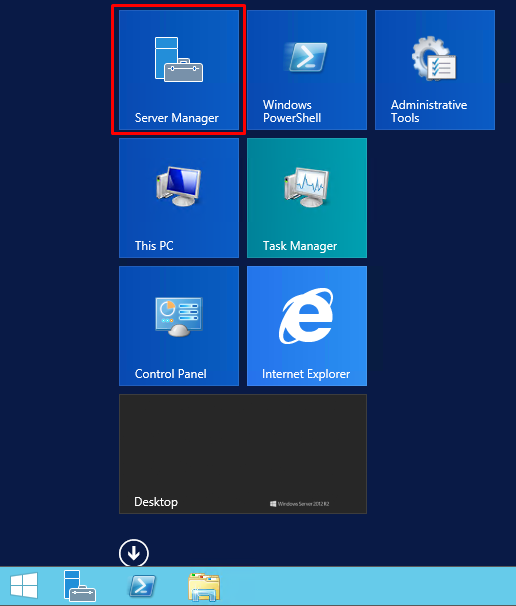
1. Launch the Server Manager by clicking on the Windows Start button and selecting “Server Manager” from the menu.
2. In the Server Manager window, click on «Manage» and then select «Add Roles and Features.«
3. The Add Roles and Features Wizard will open. Click «Next» to proceed.
4. Leave the installation type as «Role-based or feature-based installation» and click «Next.«
5. Select the appropriate server from the server pool and click «Next.«
6. On the Server Roles screen, scroll down and locate the «Web Server (IIS)» role. Check the box next to it and click «Next.«
7. Review the features required for IIS and click «Next.«
8. On the Web Server Role (IIS) screen, click «Next.«
9. Review the additional features and click «Next.«
10. On the Role services screen, select the desired role services for your specific needs. By default, the necessary components are selected. Click «Next.«
11. Review the confirmation screen and click «Install.«
12. The installation process will begin, and once completed, click on «Close» to exit the wizard.
Pros:
– The Server Manager simplifies the installation process by providing a user-friendly interface.
– It allows you to select specific role services required for your needs.
Cons:
– This method requires the Server Manager, which may not be available on all Windows Server editions.
Method 2: Installing IIS via PowerShell
1. Open PowerShell with administrative privileges.
2. Run the following command to install the Web Server (IIS) role and its dependencies:
«`
Install-WindowsFeature -Name Web-Server -IncludeManagementTools
«`
3. Press «Y» to confirm the installation when prompted.
4. Wait for the installation to complete. Once finished, you can close PowerShell.
Pros:
– PowerShell provides a command-line interface for efficient and automated installations.
– This method is suitable for administrators familiar with PowerShell scripting.
Cons:
– Beginners may find the syntax and commands in PowerShell challenging.
Method 3: Installing IIS using DISM
1. Open Command Prompt with administrative privileges.
2. Run the following command to install the Web Server (IIS) role and its dependencies:
«`
dism /online /enable-feature /featurename:IIS-WebServerRole /all
«`
3. Wait for the installation to complete. Once finished, you can close Command Prompt.
Pros:
– DISM provides a powerful command-line tool for managing Windows features.
– This method is suitable for users familiar with Command Prompt and want a lightweight installation.
Cons:
– Beginners may find the syntax and options in DISM confusing.
Method 4: Installing IIS using Server Core
Installing IIS on Windows Server 2012 R2 Core is a slightly different process altogether. Here are the steps:
1. Log in to the Windows Server Core.
2. Execute the following command to install the Web Server (IIS) role and its dependencies:
«`
powershell
Install-WindowsFeature -Name Web-Server -IncludeManagementTools
«`
3. Press «Y» to confirm the installation when prompted.
4. Wait for the installation to complete. Once finished, exit PowerShell by running the `exit` command.
5. You have successfully installed IIS on Windows Server 2012 R2 Core.
Pros:
– Server Core is a more lightweight version of Windows Server, consuming fewer resources.
– The command-line installation is quick and suitable for headless server deployments.
Cons:
– Server Core lacks a graphical user interface, making it less accessible for beginners.
There are several reasons why you might encounter issues when trying to install IIS on Windows Server 2012 R2. Here are three common reasons and their corresponding fixes:
1. Insufficient Disk Space:
– Common Fix: Free up disk space on the server by deleting unnecessary files or expanding storage capacity.
2. Conflicts with Existing Services:
– Common Fix: Check for any conflicting services or applications that might be using the same ports as IIS. Stop or reconfigure the conflicting services.
3. Missing Server Roles or Features:
– Common Fix: Ensure that the required server roles and features, such as the .NET Framework, are installed before attempting to install IIS.
Additional Tips
Here are three additional tips to ensure a successful installation of IIS on Windows Server 2012 R2:
1. Check Firewall Settings:
Before accessing your newly installed IIS server from external sources, make sure to configure the necessary firewall rules to allow incoming traffic on the appropriate ports.
2. Secure Your Server:
After installing IIS, take the time to harden the server’s security by configuring SSL certificates, enabling secure protocols, and implementing access controls.
3. Regularly Update IIS:
Keeping your IIS installation up to date is crucial for security and performance improvements. Be sure to regularly check for and apply updates.
5 FAQs about Installing IIS on Windows Server 2012 R2
Q1: Can I install IIS on Windows Server 2012 Essentials edition?
A: Yes, you can install IIS on Windows Server 2012 Essentials edition by following the same installation methods outlined in this article.
Q2: How can I verify if IIS is installed correctly?
A: You can verify the installation by opening a web browser on the server and navigating to `http://localhost`. If you see the default IIS welcome page, it means IIS is installed correctly.
Q3: Can I install IIS on a domain controller?
A: Yes, you can install IIS on a domain controller. However, it is generally recommended to separate the roles of a domain controller and a web server for security and performance reasons.
Q4: Can I install IIS on Windows Server Core without PowerShell?
A: No, PowerShell is the primary method for installing IIS on Windows Server Core. The command-line interface offers the most efficient way to manage server features.
Q5: Can I install specific role services after installing IIS?
A: Yes, you can install additional role services or remove existing ones by using the Server Manager or PowerShell, even after IIS is installed.
In Conclusion
Installing IIS on Windows Server 2012 R2 is an essential step for hosting websites and web applications. By following the methods outlined in this blog post, you can choose the most suitable method for your requirements and successfully install IIS. Remember to prepare adequately, follow the steps carefully, and consider the additional tips provided to ensure a smooth installation and configuration process.
We’ve already seen how you can install IIS (Internet Information Services) on Windows 8.1 for testing purposes. Now, we’ll see how you can install IIS on a server machine, to host your website for production purposes.
There’s no much differences between the two procedures. The installation is quick and easy.
Step one: Install the Web Server (IIS) role
Open the Server Manager and click Add Roles and Features:
Go on until you reach the Server Roles tab:
Select Web Server (IIS):
Click Add Features:
Ignore the Features tab and go on:
Click Next:
The default configuration will be fine. Click Next:
Click Install:
Installation completed!
Step two: Configure IIS
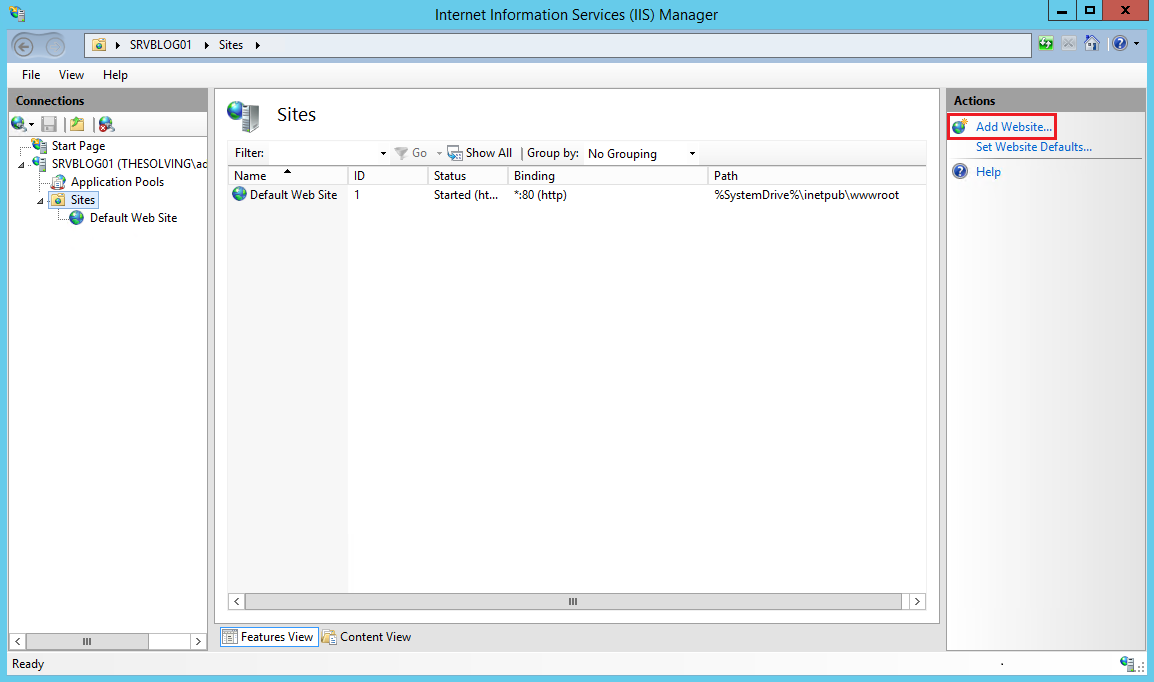
Go back to the Server Manager. Select Internet Information Services (IIS) Manager from the Tools menu:
Click Add Website:
Specify at least the site name and path. Click Ok:
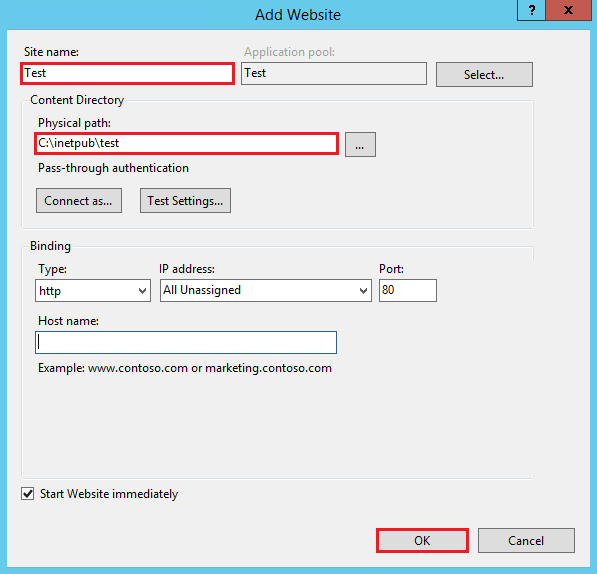
Your first site is ready to be accessed.
Share:


Tags: Microsoft Windows
После установки и настройки MySQL Community Server перейдите в «Диспетчер серверов». В правом верхнем меню пункт «Управление». Нажмите «Добавить роли и компоненты».

В разделе мастера «Перед началом работы» нажмите «Далее».

В появившемся окне выберите пункт «Установка ролей или компонентов». Нажмите «Далее».

В разделе «Выбор сервера» выберите, на какой сервер происходит установка. Нажмите «Далее».

В разделе мастера «Роли сервера» выберите пункт «Веб-сервер (IIS)».

Появится окно предупреждения о требующихся средствах, нажмите в нем «Добавить компоненты».

В окне выбора компонентов найдите и добавьте «Активация по HTTP» в разделах «Функции .NET Framework 3.5» и «Функции .NET Framework 4.5 – Службы WCF» и нажмите «Далее».

После чего на странице «Роль веб-сервера (IIS)» нажмите «Далее».

В окне выбора служб ролей нажмите «Далее».
И в окне подтверждения нажмите «Установить».

Начнётся установка.

После окончания установки IIS нажмите кнопку «Закрыть».
На этом установка IIS завершена. Полностью перезагрузите сервер.
После перезагрузки можно переходить к установке Fort Monitor Vendor.
Служба IIS (Internet Information Services) необходима для работы ASP.NET серверной части СпрутМонитор.
1. Запустите Диспетчер серверов через меню Пуск или кнопку на панели задач:
2. В появившемся окне, на вкладке Панель мониторинга, щелкните пункт Добавить роли и компоненты:
3. Нажмите кнопку Далее, затем на шаге выбора типа установки, выберите Установка ролей или компонентов:
4. На следующем шаге выберите сервер:
5. На шаге выбора ролей, выберите Веб-сервер:
6. Нажмите кнопку Добавить компоненты:
7. Следующие шаги можно пропустить. На последнем шаге выберите Установить:
.png)
8. После завершения установки, рекомендуется перезагрузить сервер.
9. Запустите браузер и перейдите по адресу http://localhost/. Если открылась тестовая страница IIS, значит установка произведена успешно.
См. также: Установка серверной версии СпрутМонитор.