Вы можете установить SMTP сервер с помощью встроенных средств во всех версиях Windows Server. Такой SMTP сервер внутри организации может работать в качестве почтового релея, который должен принимать и пересылать через себя SMTP сообщения от различных устройств (к примеру, сендеров, сканеров, устройств СКД и пр.) и приложений (веб приложения, SQL Reporting Services, SharePoint), которым необходимо иметь возможность отправлять почту через SMTP сервер. Такой релей может пересылать сообщения на полноценные Exchange сервер или на публичные почтовые сервисы в Интернет типа Gmail, Mail.ru, Office 365 и т.д (ведь не всегда целесообразно разворачивать полноценную внутреннюю почтовую инфраструктуру на базе Microsoft Exchange Server или других почтовых служб).
В этой статье мы покажем, как установить, настроить и протестировать работу SMTP сервера на Windows Server 2012 R2, 2016 и 2019, который будет функционировать в качестве mail релея. Такой SMTP сервер не хранит почтовые сообщения и на нем отсутствуют почтовые ящики, он сможет только отправлять или пересылать почту.
Содержание:
- Установка службы SMTP на Windows Server 2016/2012 R2
- Настройка SMTP сервера на Windows Server
- Автозапуск службы SMTPSVC
- Проверка работы SMTP сервера на Windows Server
Установка службы SMTP на Windows Server 2016/2012 R2
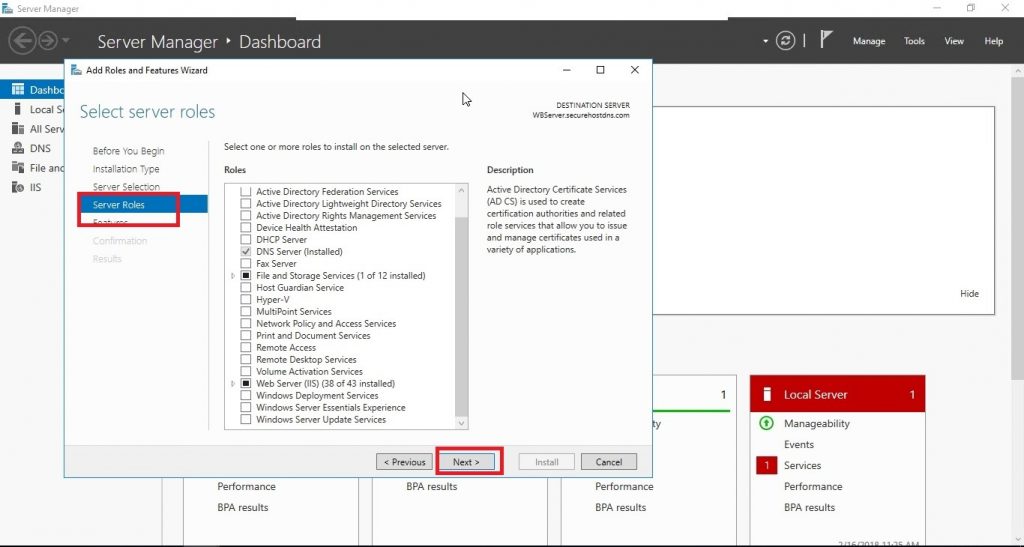
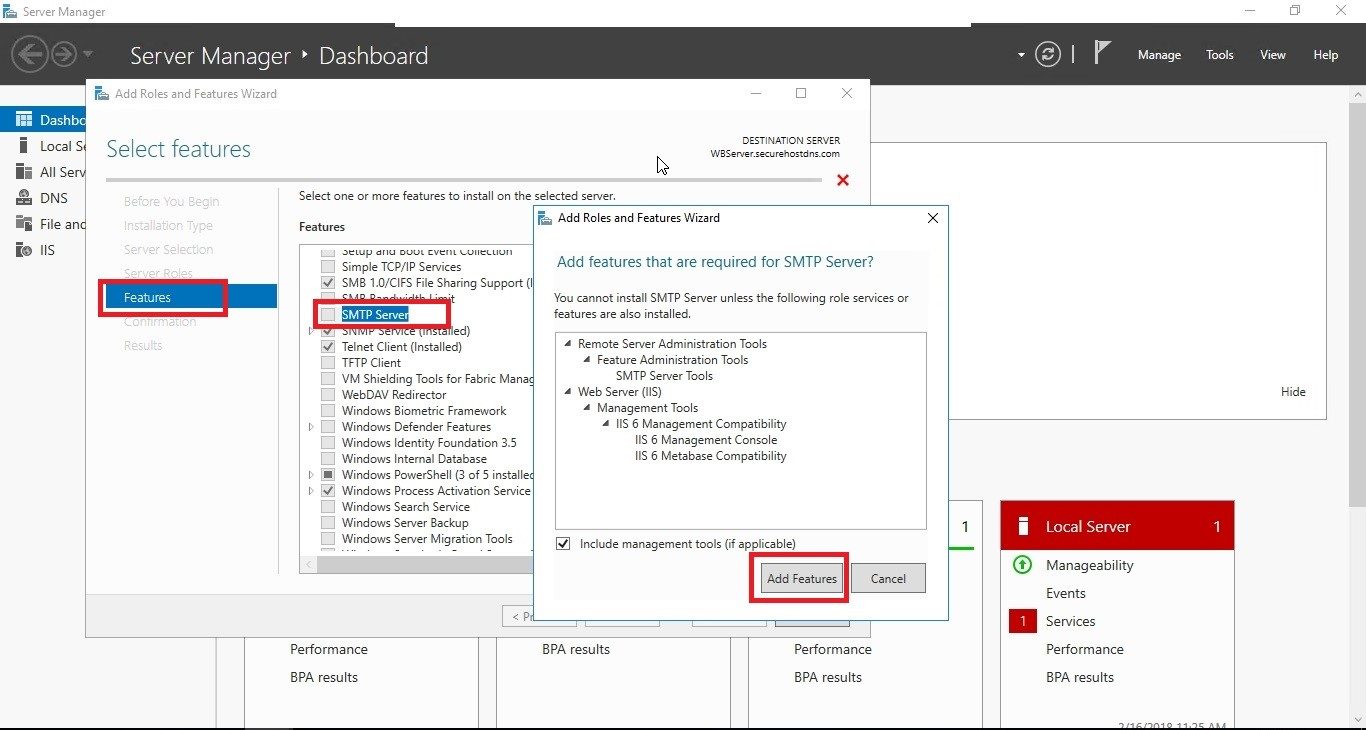
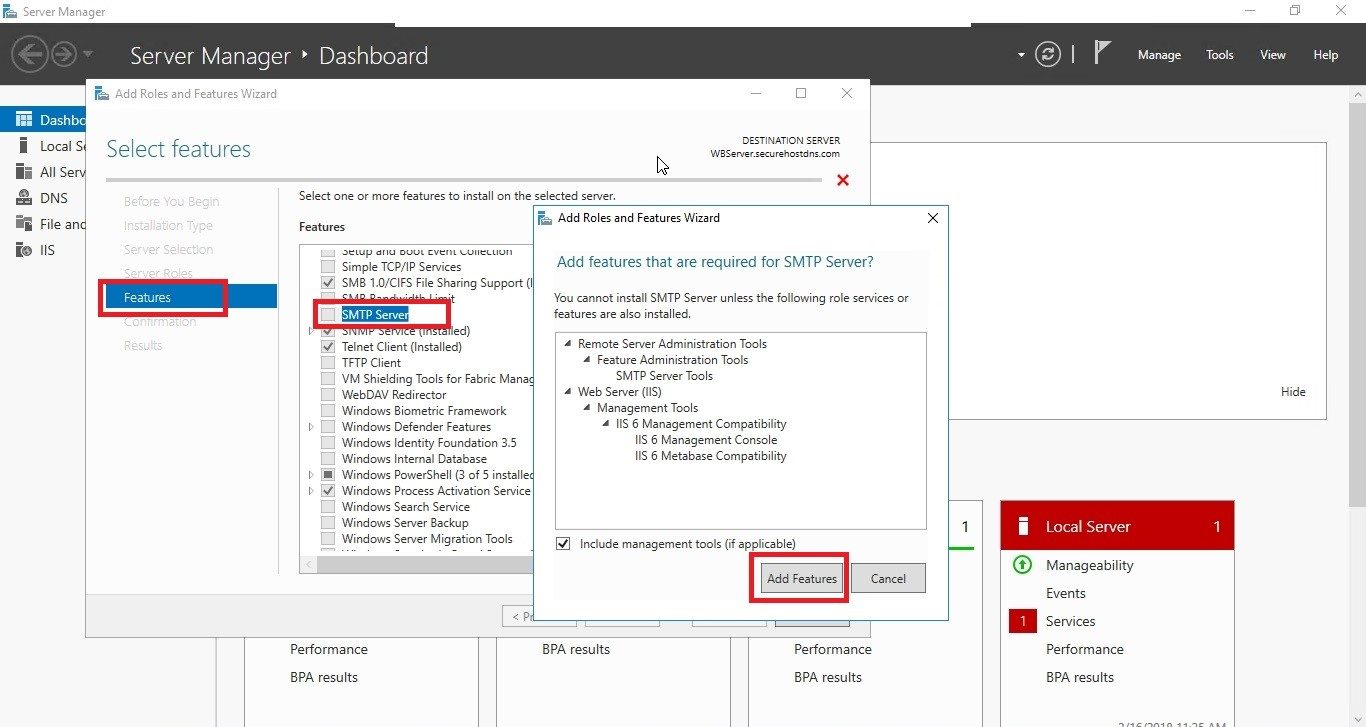
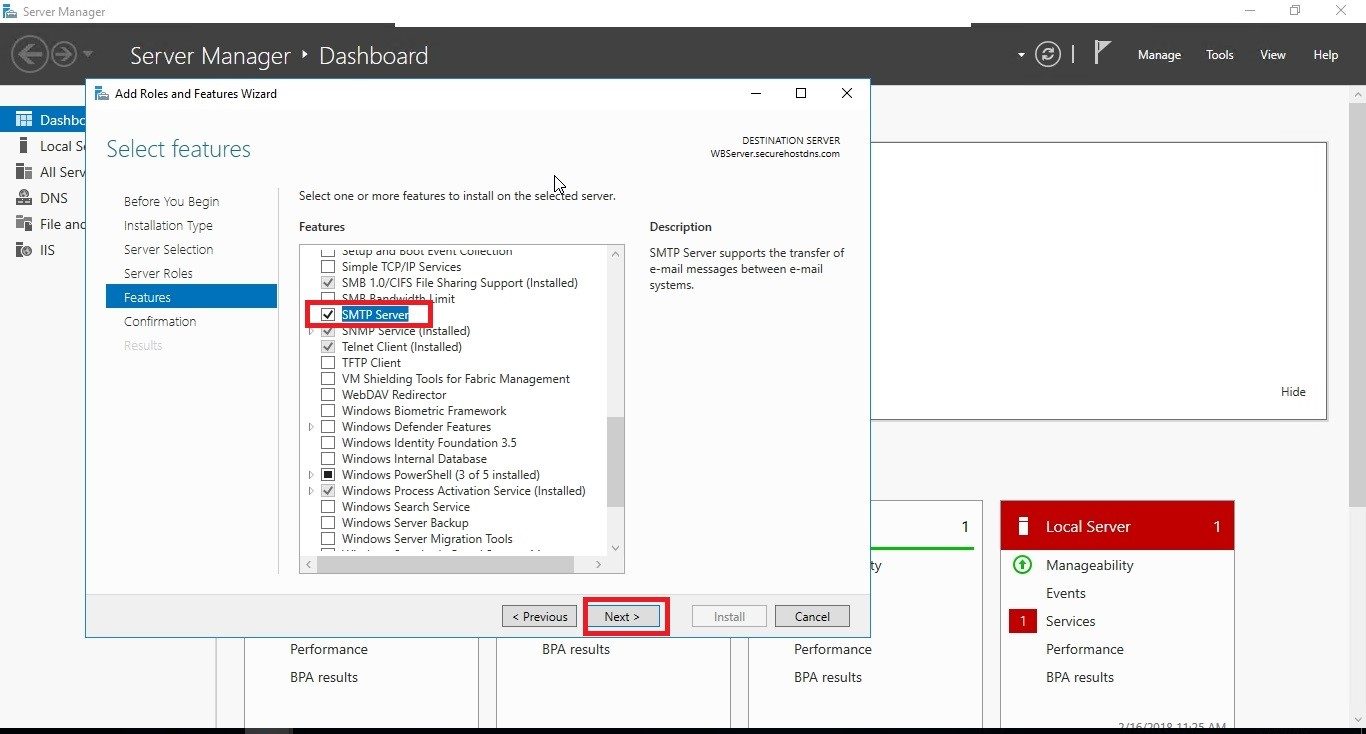
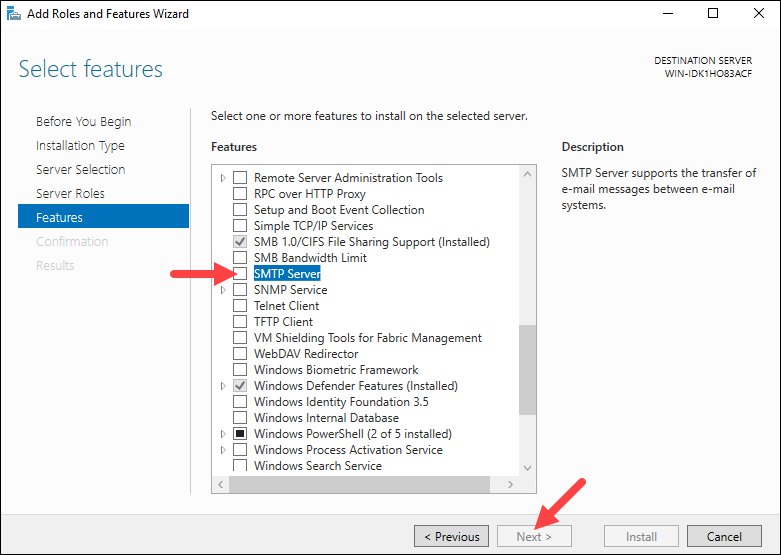
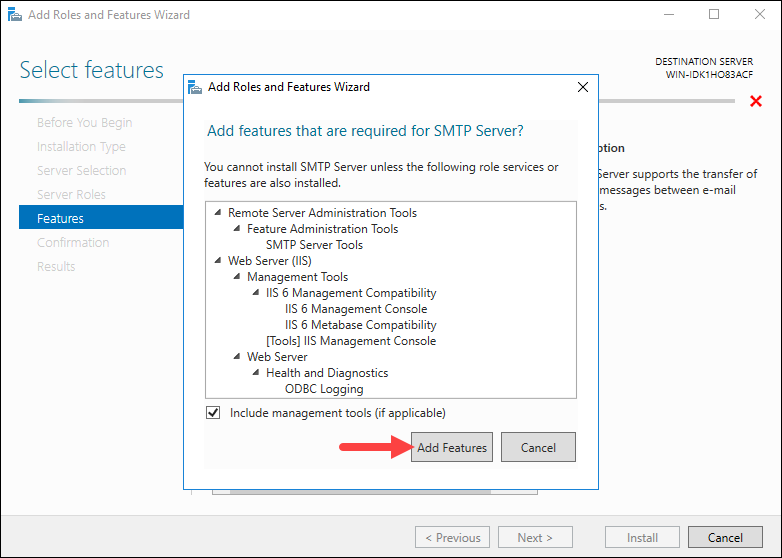
SMTP сервер – это один из компонентов Windows Server, который можно установить через Server Manager. Для этого откройте консоль Server Manager Dashboard (servermanager.exe), перейдите в режим Add roles and features и на этапе выбора функций отметьте чекбокс у пункта SMTP Server. Для управления службой SMTP нужно установить консоли управления, которые входят в комплект роли Web Server IIS (вам будет предложено установить IIS Management Tools).
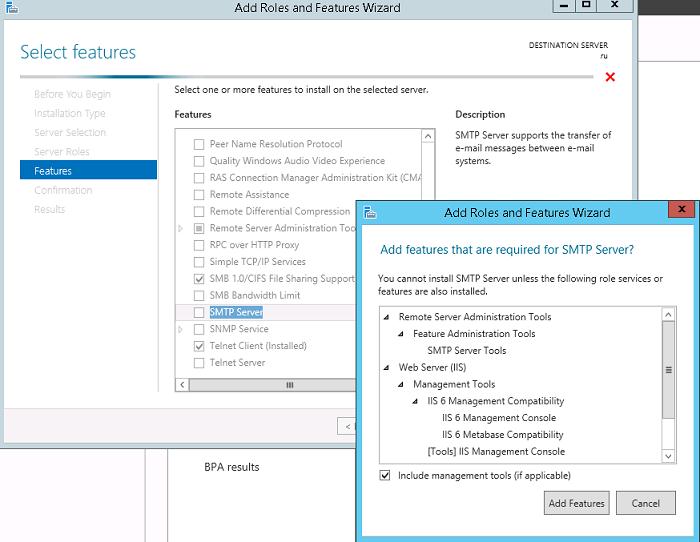
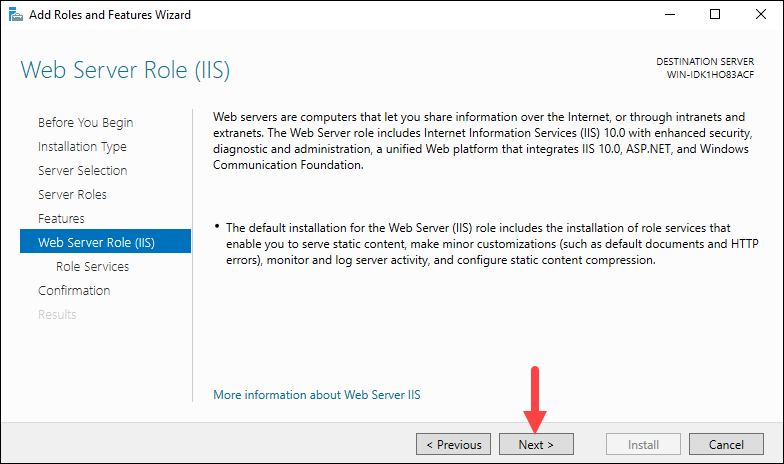
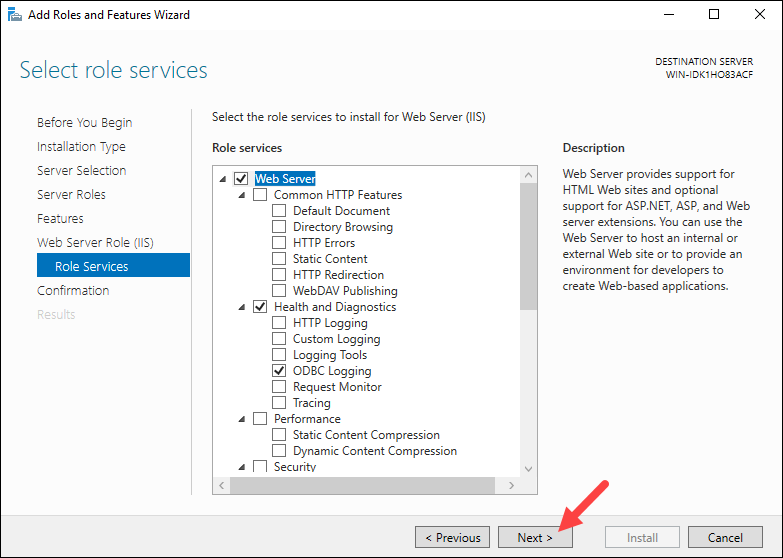
Оставьте все предлагаемые опции роли Web Server (IIS) и запустите установку.

Также вы можете установить компонент SMTP сервера с помощью одной команды PowerShell:
Install-WindowsFeature smtp-server
После окончания установки компонентов может потребоваться перезагрузка системы.
Настройка SMTP сервера на Windows Server
Управляется SMTP сервер консоль управления Internet Information Services (IIS) Manager 6. Открыть эту консоль можно через Server Manager: Tools-> Internet Information Services (IIS) 6.0 Manager или командой inetmgr6.exe.
 В консоли IIS 6 Manager разверните ветку с именем сервера, щёлкните ПКМ по SMTP Virtual Server и откройте его свойства.
 На вкладке General, если необходимо, выберите IP адрес, на котором должен отвечать SMTP сервер (если у сервера несколько IP адресов), и включите ведение логов Enable logging (чтобы сохранялась информация обо всех полученных письмах).
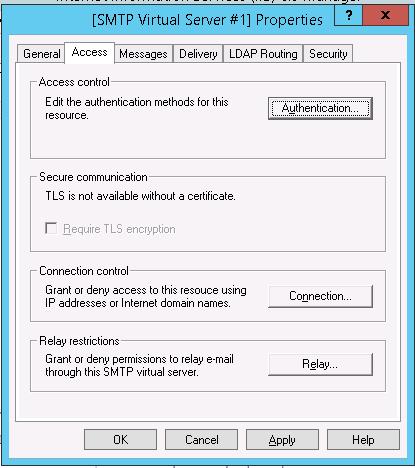
 Затем перейдите на вкладку Access.
 Здесь нажмите на кнопку Authentication и убедитесь, что разрешен анонимный доступ (Anonymous access).

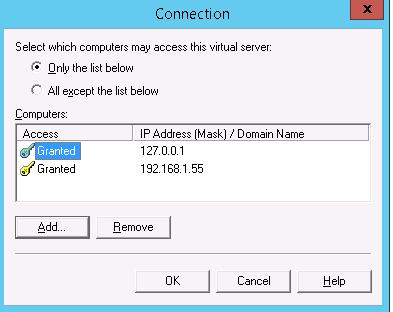
Вернитесь на вкладку Access и нажмите кнопку Connection. Здесь вы можете указать IP адреса устройств, которым разрешено отправлять почту через наш SMTP релей. Нужно выбрать опцию Only the list below и указать список IP адресов, не забыв самого себя (127.0.0.1).
Аналогичным образом настройте список разрешенных IP в настройках Relay (нажмите соответствующую кнопку). В этой секции указано каким IP адресам (или подсетям) можно пересылать почту через ваш SMTP сервер.
Примечание. Как правило, обязательно стоит включать эту опцию, как минимум ограничив список обслуживаемых устройств диапазоном IP адресов. В противном случае ваш SMTP сервер может использоваться спамерами и другими злоумышленниками как открытый релей для массовых почтовых рассылок.
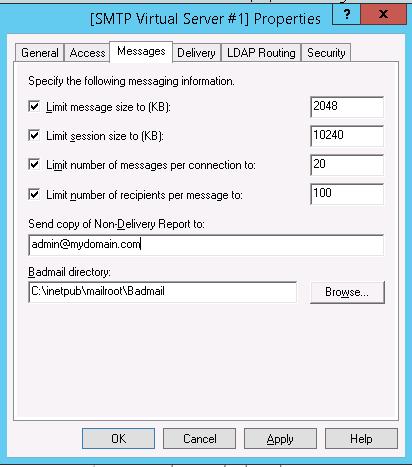
Перейдите на вкладку Messages. Здесь указывается email, на который будут отправляться копии всех NDR отчетов (Send copy of Non-Delivery Report to:). Также здесь можно указать ограничения на максимальный размер писем (Limit message size KB) и количество получателей (Limit number of recepients per message).
 Перейдите на вкладку Delivery:

Затем нажмите на кнопку Outbound Security. Здесь указывается, как нужно авторизоваться на почтовом сервере, на который ваш SMTP-сервере будет пересылать (relay) всю почту. К примеру, если вся почта будет отправляться на почтовый сервер Gmail и уже с него пересылаться адресатам, вам нужно выбрать тип аутентификации Basic authentication, указав в качестве пользователя и пароля данные для доступа к почтовому ящику на сервисе Gmail (в настройках аккаунта Google нужно разрешить отправку через smtp сервера gmail).

Затем нажмите на кнопку Advanced.
 Здесь указывается FQDN имя вашего SMTP сервера. Нажмите кнопку Check DNS, чтобы проверить корректность записи в DNS.
Если сервер должен пересылать почту внешнему smtp серверу, нужно указать его имя в поле Smart host (к примеру smtp.gmail.com или smtp.office365.com).
Некоторые внешние почтовые сервера принимает почту только при использовании защищенного SMTP соединения с помощью TLS Encryption (используется порт TCP 587). Это настраивается в разделе Delivery-> Outbound Security и Outbound Connections. Ознакомитесь с документацией вашего почтового провайдера.
Сохраните настройки SMTP сервера и перезапустите ваш виртуальный SMTP сервер для применения изменений.
Примечание.
- Настройки DNS критичны с точки зрения работоспособности почтовой системы. Если ваш SMTP сервер не может корректно разрешить DNS имена доменов, на которые он пытается отправить письма, доставка не удастся.
- Если ваш сервер сам будет отправлять почту в другие домены, важно, чтобы для вашего адреса была сформирована правильная PTR запись для разрешения обратных DNS запросов. PTR запись для белого IP адреса должна указывать на FQDN имя. В противном случае большинство внешних smtp серверов не будут принимать от вас почту, считая ваш сервер спамерским.
Автозапуск службы SMTPSVC
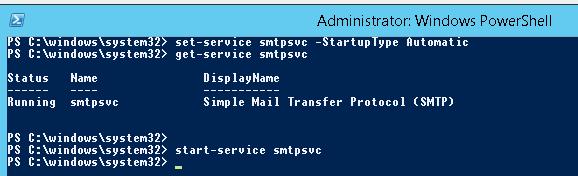
Осталось настроить автозапуск службы SMTP сервера. Быстрее всего это сделать из командной строки PowerShell:
set-service smtpsvc -StartupType Automatic
Запустим службу:
start-service smtpsvc
Проверим, что запущена служба SMTPSVC :
get-service smtpsvc
Status Name DisplayName
—— —- ————
Running smtpsvc Simple Mail Transfer Protocol (SMTP)

Проверка работы SMTP сервера на Windows Server
Ну и последнее, что осталось сделать, проверить работу созданного SMTP сервера. Проще всего это сделать, создав на рабочем столе текстовый файл smtp-test-email.txt и скопировав в него следующий текст, заменив имя отправителя и получателя на ваши.
From: [email protected]
To: [email protected]
Subject: Email test
This is the test email
Скопируйте файл smtp-test-email.txt в каталог C:\inetpub\mailroot\Pickup. SMTP сервер следит за появлением файлов в этой каталоге и при обнаружении файла прочтет его содержимое и попытается отправить письмо с данной темой и текстом адресату, указанному в разделе To:.
Проверьте ящик получателя, в него должно прийти такое письмо.
Совет. Протестировать работу SMTP сервера можно и из командой строки telnet, скрипта vbs или PowerShell:
Send-MailMessage -SMTPServer localhost -To [email protected] -From [email protected] -Subject "Email test" -Body "This is the test email sent via PowerShell"
Если вы хотите, чтобы вы включили Basic Authentication (Обычная проверка подлинности) для авторизации всех ваших SMTP клиентов (вместо анонимной аутентификации), вы можете отправить письмо с smtp-аутентификацией через telnet следующим образом.
Также убедитесь, что на вашем SMTP сервере не блокируется порт TCP 25 при удаленном подключении (локальным файерволом, антивирусом или межсетевым экраном). Проще всего это сделать с компьютера Windows, IP адрес которого добавлен в разрешенные. Проверку доступности порта можно выполнить с помощью командлета Test-NetConnection:
Test-NetConnection smtpsrv1.name.local –port 25
Если 25 порт блокируется, проверьте настройки Windows Firewall, антивируса и аппаратных межсетевых экранов.
Итак, вы настроили собственный почтовый SMTP релей на Windows Server 2016/2012 R2 и протестировали отправку писем через него.
Почтовый сервер – это устройство, при помощи которого происходит доставка электронных сообщений от отправителя к получателю. Собственно, это и следует из его названия. В данной статье рассмотрим, как происходит установка и базовая настройка почтового сервера на VPS с операционной системой семейства Windows Server, а также на виртуальном сервере, работающем на Ubuntu 20.04.
Установка сервера SMTP на Windows Server
На серверах, работающих под управлением операционных систем Windows, для передачи почтовых сообщений часто используется протокол SMTP. В Windows Server служба SMTP является одним из компонентов операционной системы.
Для корректной отправки почтового сообщения от имени домена, к которому будет привязан сервер SMTP, нам необходимо иметь доменное имя. При этом в настройках домена должна быть указана A-запись, содержащая IP-адрес VPS. В нашем примере мы будем использовать имя домена my-domain.host.
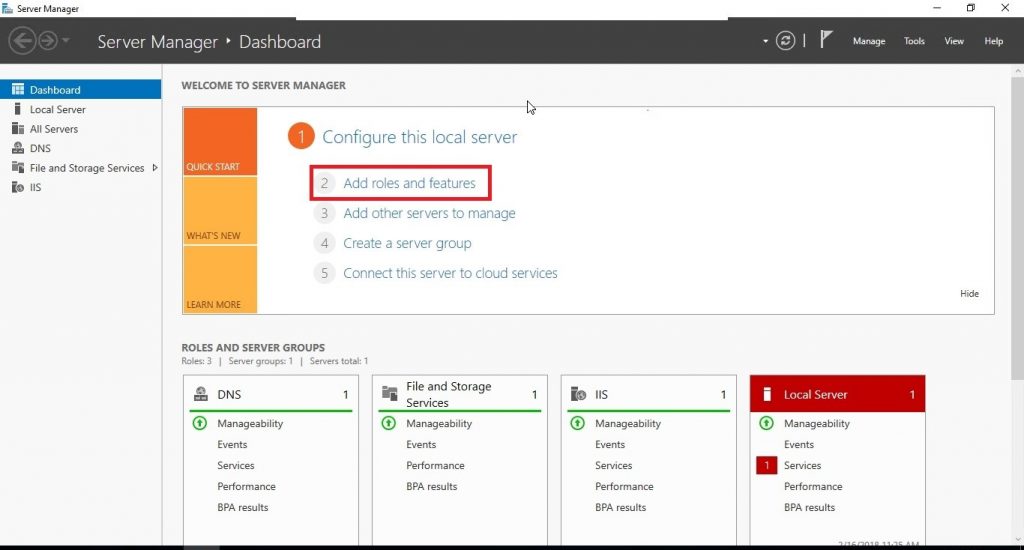
Установку почтового сервера нужно будет начать именно с добавления необходимых компонентов. Для этого запустите Server Manager, перейдите Manage → Add Roles and Features.
В открывшемся окне нажмите Next.

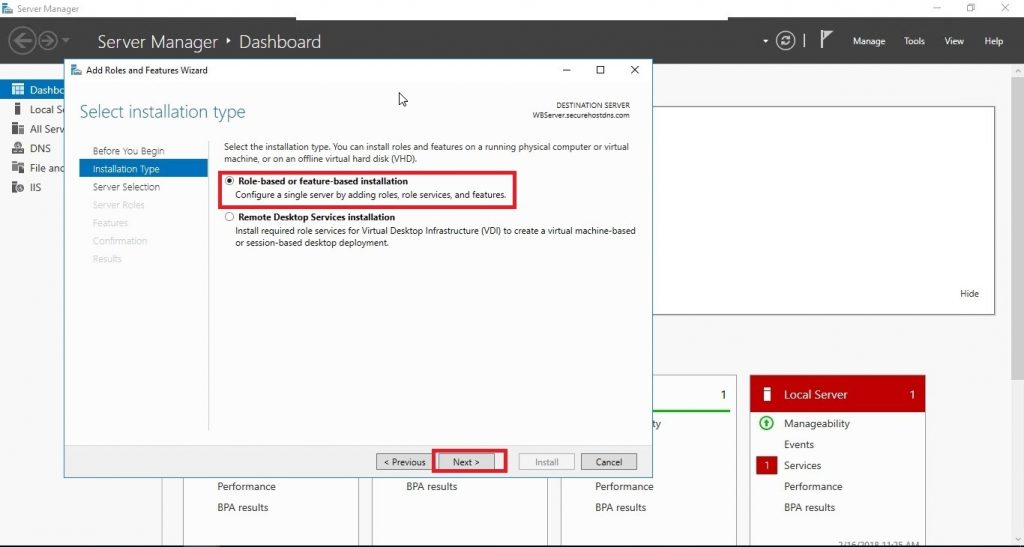
Далее выберите опцию Role-based or feature-based installation, после чего нажмите Next.
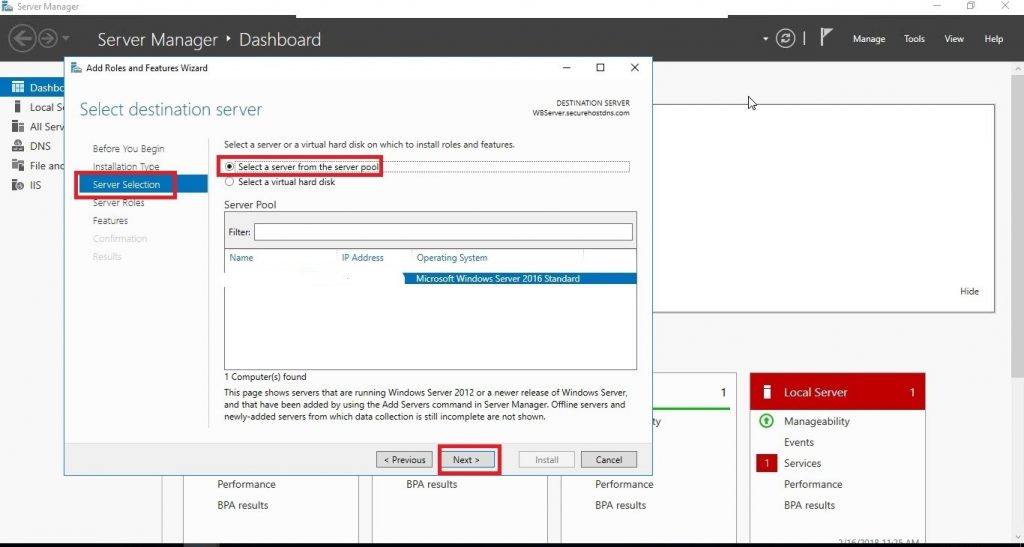
В следующем окне укажите сервер, на который будет производиться установка новых компонентов, либо просто нажмите Next, если в вашем пуле серверов одна-единственная запись.

На следующем шаге активируйте строку Web Server (IIS), после чего нажмите Add Features.
Далее нажмите Next.
После чего отметьте строку SMTP Server и нажмите Add Features.
И нажмите Next.
Далее ещё раз нажмите Next.
В следующем окне снова нажмите Next.
Для запуска установки выбранных компонентов нажмите Install.
Настройка сервера SMTP
На следующем этапе необходимо будет настроить сервер SMTP. Для чего в Server Manager перейдите Tools → Internet Information Services (IIS) 6.0 Manager.
В открывшемся окне менеджера IIS раскройте ветку вашего сервера и на строке SMTP Virtual Server нажмите правую кнопку мыши, после чего перейдите в Properties.
Далее в строке IP address: необходимо выбрать IP-адрес вашего сервера и активировать опцию Enable logging.
Во вкладке Access нажмите кнопку Authentication...
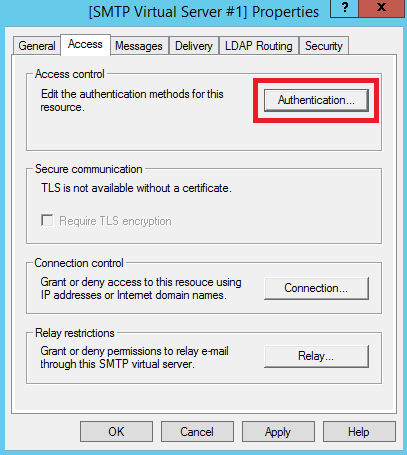
В открывшемся окне активируйте опцию Anonymous access. Активация данной опции нужна, чтобы пользователи и приложения смогли бы использовать сервер SMTP анонимно. Позже можно будет настроить более безопасную аутентификацию, пока же нажмите OK.
Далее в разделе Connection control нажмите кнопку Connection...
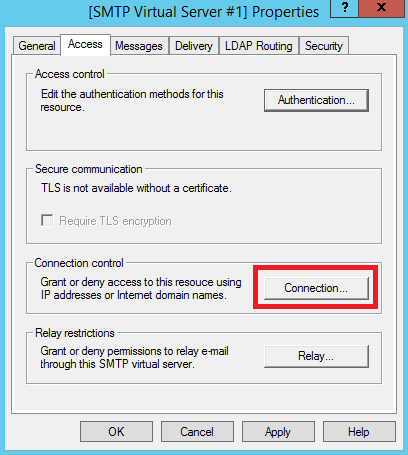
В окне Connection установите переключатель на Only the list below и при помощи кнопки Add... добавьте IP-адрес вашего VPS. После чего нажмите OK.

Точно такую же настройку необходимо проделать в разделе Relay restrictions. Для чего нажмите кнопку Relay... и добавьте IP-адрес вашего сервера установив переключатель в Only the list below.

После чего перейдите во вкладку Delivery и нажмите Advanced...

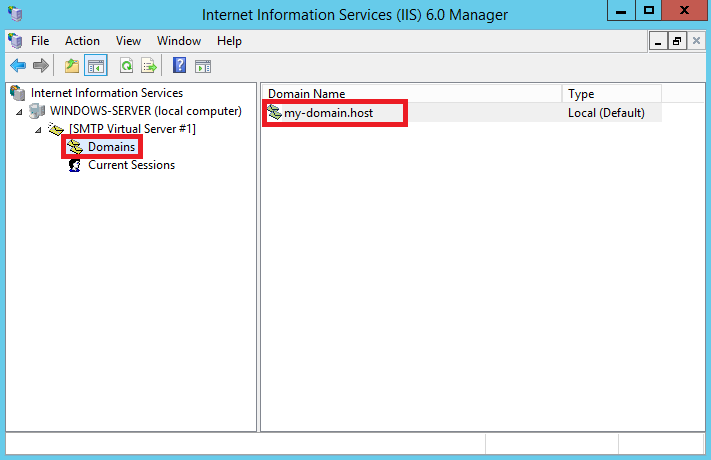
Здесь в строку Fully-qualified domain name: необходимо внести имя вашего домена, в нашем примере это – my-domain.host.
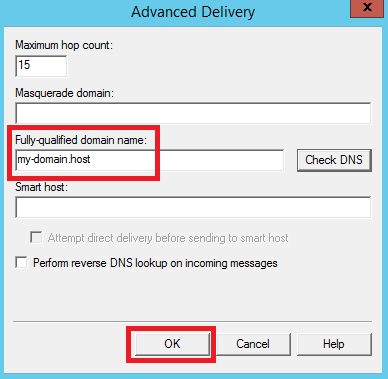
Для того, чтобы проверить корректность данной настройки, нажмите кнопку Check DNS.
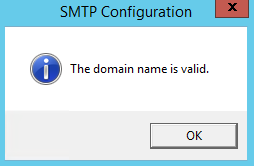
Далее сохраните все внесённые в настройки изменения при помощи кнопки OK.
Также необходимо указать корректное имя домена в ветке Domains.
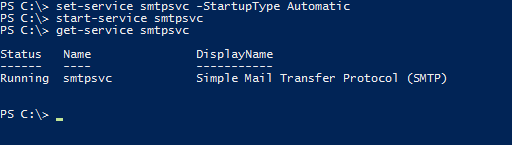
На следующем шаге нужно активировать функцию автоматического запуска сервера SMTP. Для этого запустите командную строку PowerShell и выполните следующие команды для запуска службы:
set-service smtpsvc -StartupType Automatic
start-service smtpsvc
Чтобы убедиться, что служба запущена, необходимо выполнить ещё одну команду:
get-service smtpsvcВывод данной команды должен выглядеть примерно следующим образом:
Теперь там же, в командной строке PowerShell, при помощи следующей команды отправьте сообщение на свою электронную почту:
Send-MailMessage -SmtpServer my-domain.host -To your@email.address -From mail@my-domain.host -Subject "Message Subject" -Body "Message Body"Здесь:
my-domain.host– имя домена, с которого будет производиться отправка сообщения;your@email.address– адрес электронной почты, на который будет отправлено сообщение;mail@my-domain.host– этот электронный адрес будет указан в сообщении как адрес отправителя;Message Subject– тема письма;Message Body– тело письма.
После чего проверьте свою почту, на которую должно прийти сообщение от вашего почтового сервера.
Установка и настройка Postfix на Ubuntu 20.04
Для операционной системы Ubuntu существует довольно популярный почтовый сервер – Postfix. Для установки Postfix мы будем использовать виртуальный сервер, работающий на Ubuntu 20.04. При этом на VPS должны быть произведены работы по первоначальной настройке, описанные в соответствующей статье нашего справочника.
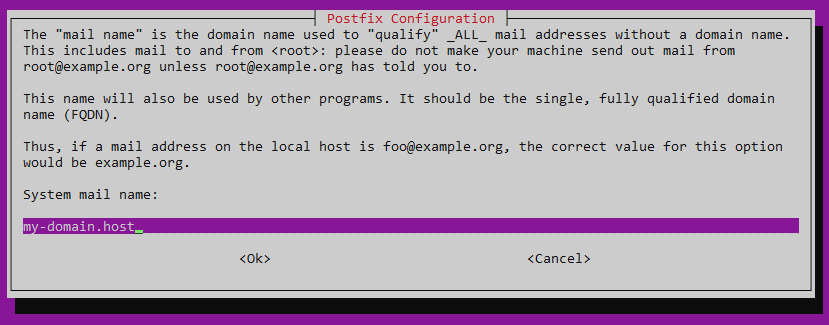
Также, для работы Postfix нужен домен с привязанной A-записью, которой является IP-адрес вашего виртуального сервера.
Плюс ко всему, необходимо соотнести имя домена с именем сервера и его IP-адресом. Для этого запустите следующую команду:
$ sudo hostnamectl set-hostname ubuntu-serverЗдесь, ubuntu-server – имя нашего сервера, вместо которого вы можете использовать своё.
Теперь при помощи текстового редактора откройте файл /etc/hosts:
$ sudo nano /etc/hostsВ данный файл добавьте строку:
XXX.XXX.XXX.XXX my-domain.host ubuntu-serverВ данном случае:
XXX.XXX.XXX.XXX– IP-адрес вашего сервера;my-domain.host– имя вашего домена;ubuntu-server– имя вашего сервера.
Теперь запустите установку Postfix и почтового пакета mailutils:
$ sudo apt install postfix mailutilsВ процессе установки система попросит вас выбрать тип конфигурации. Необходимо указать Internet Site:
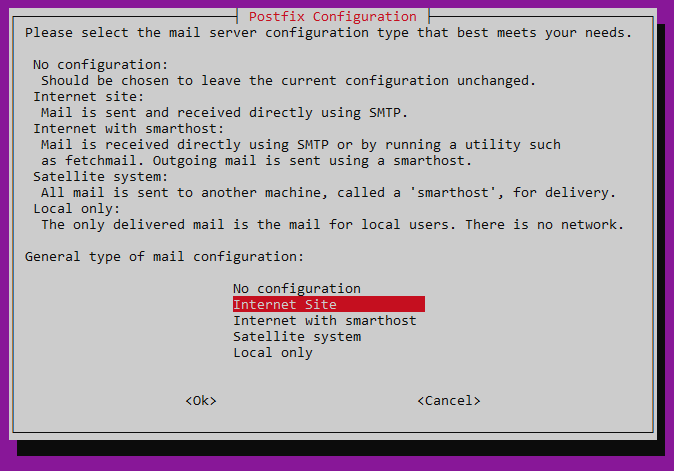
Также установщик попросит согласиться с именем домена, в отношении которого производится настройка почтового сервера. В нашем случае это будет my-domain.host.
По окончании установки можно попробовать с нашего почтового сервера отправить тестовое сообщение. Команда для отправки сообщения выглядит следующим образом:
$ echo "Message Body" | mail -s "Message Subject" your@email.addressВ данной команде:
Message Body– тело письма;Message Subject– тема письма;your@email.address– адрес электронной почты, на который будет отправлено сообщение.
Проверьте свой почтовый ящик (в нашем примере это – your@email.address), на который должно прийти отправленное из Postfix сообщение.
Simple Mail Transfer Protocol (SMTP) is an internet standard for transmission of electronic emails. SMTP services are used to send and receive emails in a secure manner. It’s an email solution if you are sending mails using any script from your website.
Here is a step by step guide to install and configure SMTP services on Windows Server 2019. SMTP by default uses TCP port 25.
Let’s start with the configuration steps of SMTP Service on Windows Server 2019
Installation of SMTP Service
- Open the Server Manager Dashboard. Click on ‘Manage’, then ‘Add Role & Features’.

- Click on ‘Next’ after this.
- Select ‘Role-based or feature-based installation’, then click ‘Next’.
- Select a server from pool.
- Click on ‘Next’ after selecting the role the server would play.
- Select ‘Features’. Next scroll down the list and select the ‘SMTP Server’ feature. Then click on next.
- A new window appears to inform you that some other services can also be installed. Click “Add Features” to confirm and continue.
- Click on ‘Next’ to continue.
- Click on ‘Install’ to complete the installation.
- Once the installation has been completed, click on ‘Close’. Close button will appear after complete installation.


Configuration of SMTP Services
- Launch the Internet Information Services (IIS) 6.0 Manager.
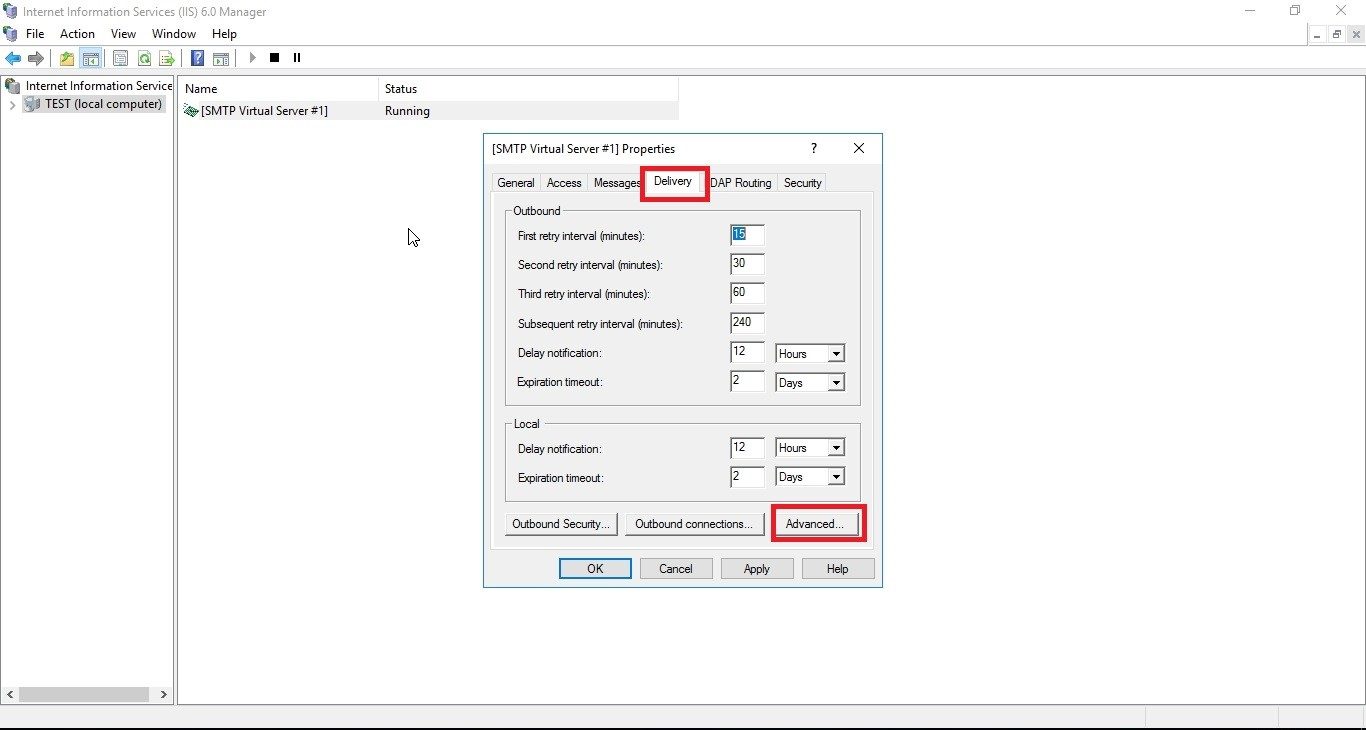
- Right-click on ‘SMTP Virtual Server #1’ and select ‘Properties’.
- Tap the General tab and change the IP Address to the server’s IP address.
- Then tap the ‘Access’ tab and click on the ‘Connection’ button.
- In the Connection window, select ‘Only the list below’ and click on the ‘Add’ button.
- Select the ‘Single computer’ option. To use the internal SMTP, type the IP address, add ‘Group of computers’ or ‘Domain’ of the devices permitted, and then click on the ‘OK’ button.
- In the ‘Access’ tab of the Connection window, click on the ‘Relay’ button to add the same permitted devices to the Relay restrictions’ list.
- In the ‘Delivery’ tab of the Connection window, set an external domain.
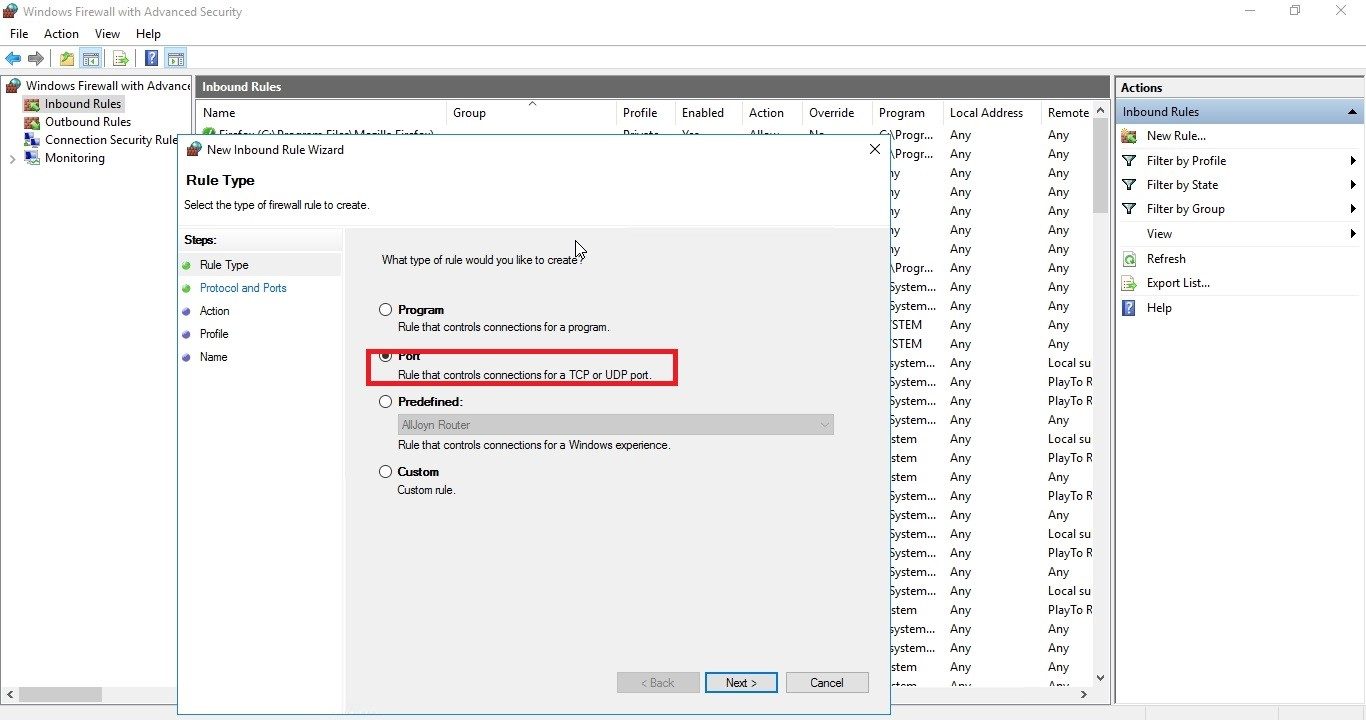
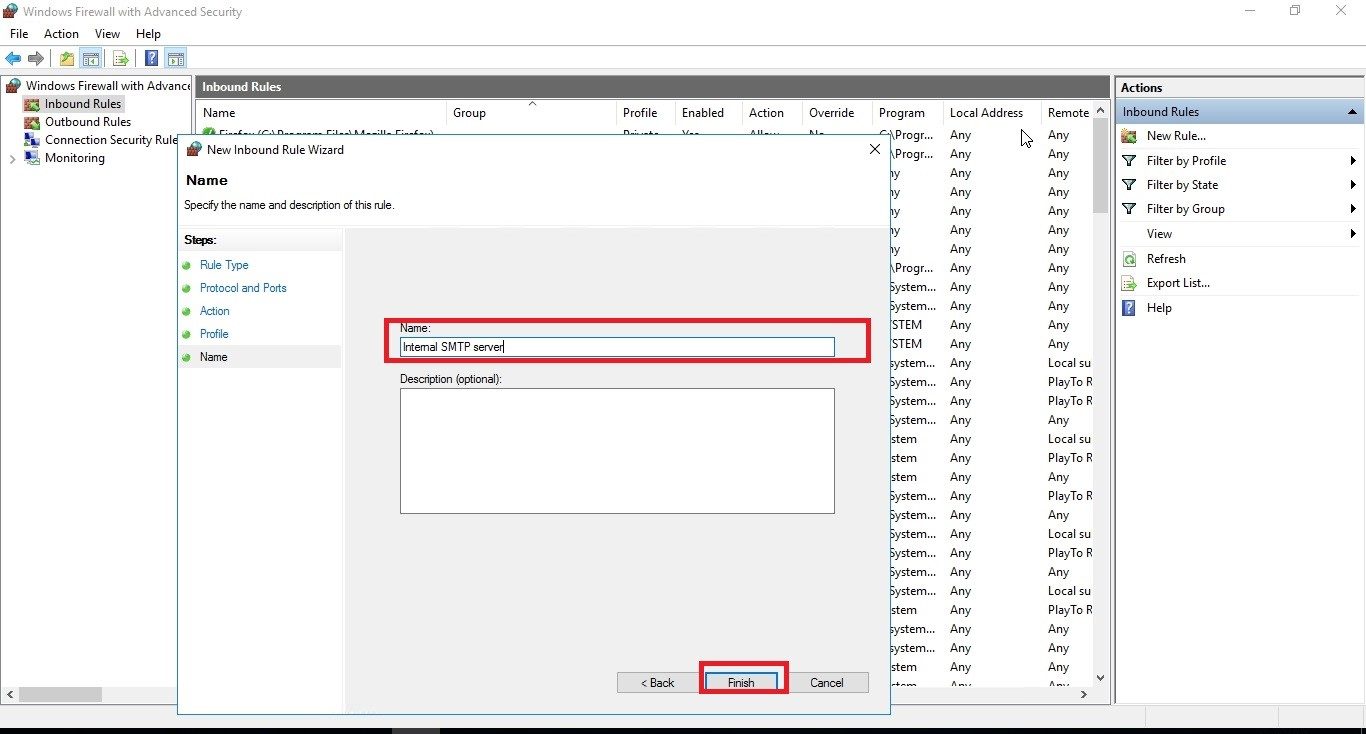
- Go to ‘Run’ and type wf.msc. This will launch the Windows Firewall with Advanced Security console.
- To begin the wizard, right-click on ‘Inbound Rules’ and select ‘New Rule’.
- Select ‘Port’ and click on ‘Next’.
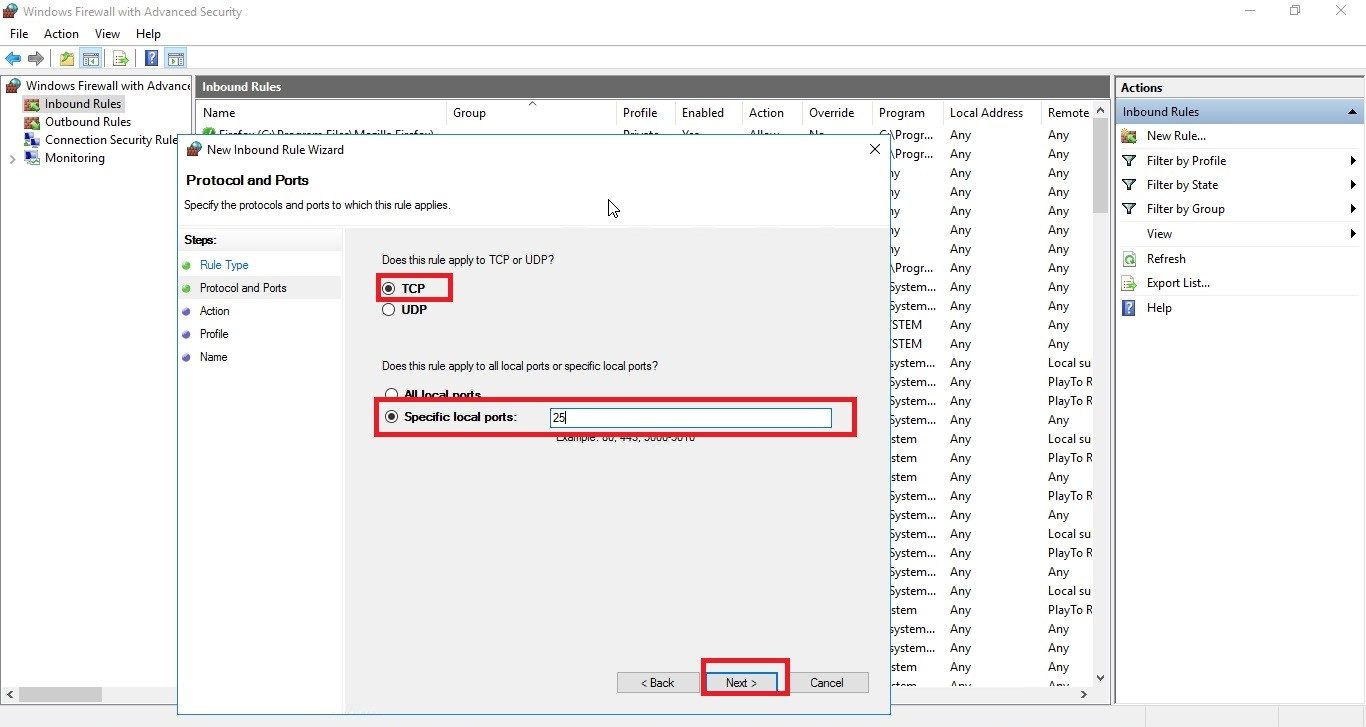
- Set the local port to 25 and click on ‘Next’.
- Select ‘Allow the connection’ and click on ‘Next’.
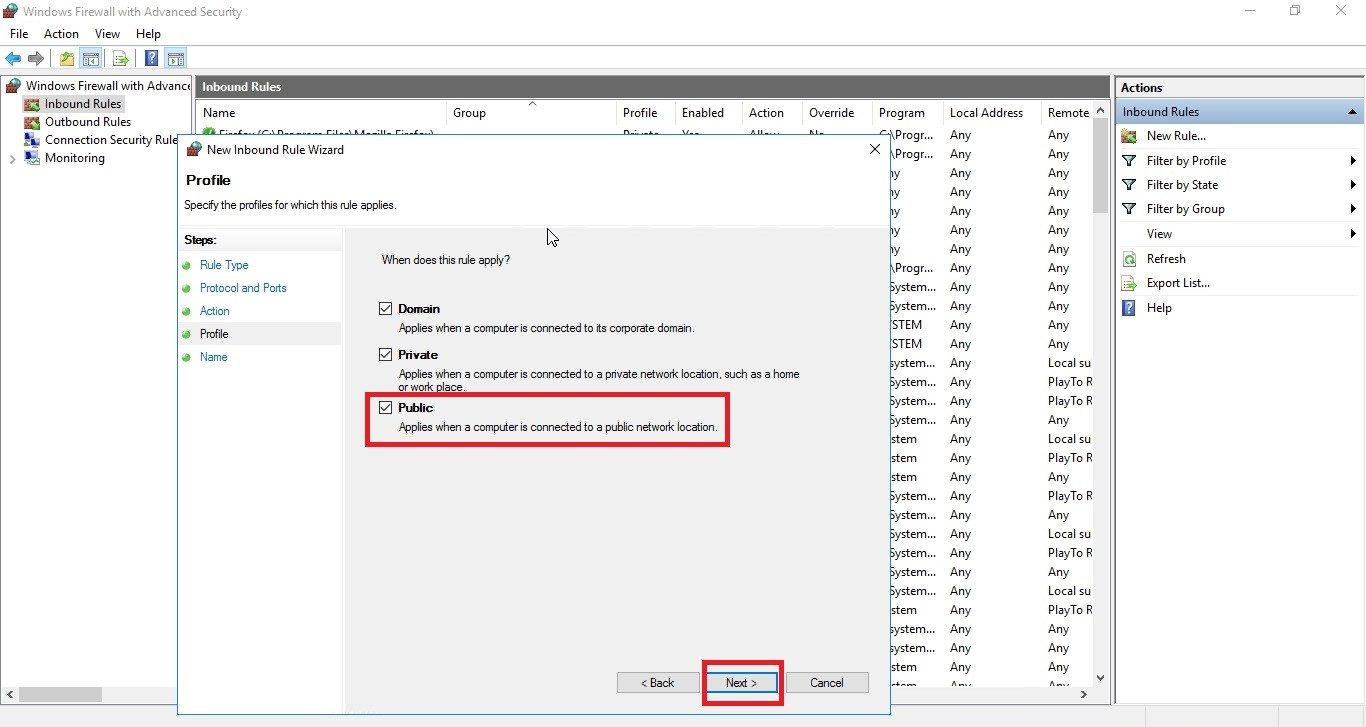
- Uncheck ‘Public’ (Ignore if you want to access the services from outside) to prevent external access to the server. Click on ‘Next’.
- Give the rule a name, and click on ‘Finish’.
- You can now see a new rule enabled in the firewall management console.
- Go to ‘Run’ and type wf.msc.
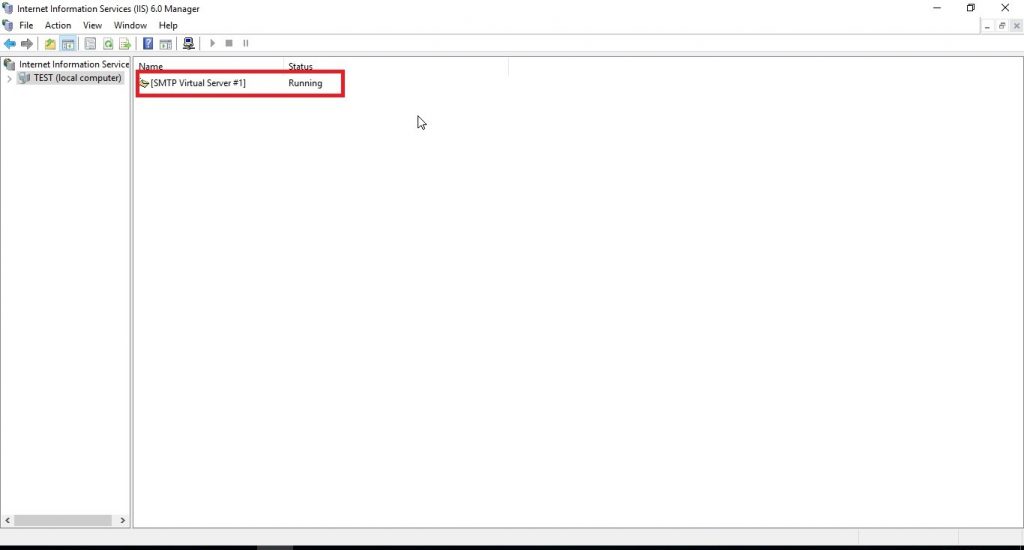
- Here you can see that SMTP services are running.
- Now you can deliver the mails with your windows server 2019 email server as per your convenience.


Also, you can configure the SMTP server in Linux too. To know how to do it, read the blog – A step by step guide on how to configure SMTP server in Linux”.
No matter which web hosting service – Windows/Linux, you have for your business, if you are not looking for a mail server and just want to send emails through contact-us form, then you can send mails from your server with the above configuration.
“Before the Acronis implementation, there was a huge risk that malware could take down our company. Now, with Acronis, I can say that we’ve done everything possible to protect our data from an attack.” CIO, high performance manufacturing company.
Read details in a report by Forrester.
[ninja_form id=2]
Hope this article helps you in setting up SMTP server on Windows 2019 easily. Feel free to drop any queries in the section below.
Update: This post has been edited for latest information on 6th Jan, 2023.
Services ZNetLive offers:
Domain Name Search
Buy Shared Hosting
Managed WordPress Hosting Plans
Buy VPS Hosting
Dedicated Server Rental
You can install an SMTP server using built-in tools in all versions of Windows Server. This SMTP server can work as a mail relay service that should receive and send SMTP emails from various devices in the organization (for example, senders, scanners, access control devices, etc.) and applications (web apps, SQL Reporting Services, SharePoint), which should be able to send mail using the SMTP protocol. Such a relay can send messages to your Exchange servers or to public email services such as Gmail, Yahoo, Office 365 (outlook.com), etc. (since it is not always advisable to deploy a full-featured internal email infrastructure based on Microsoft Exchange Server or other email services).
In this article we’ll show how to install, configure and test the SMTP server on Windows Server 2012 R2, 2016 and 2019 serving as a mail relay. This SMTP server can only send or forward emails, and there are no user mailboxes on it.
Contents:
- How to Install SMTP Service on Windows Server 2016 / 2012 R2?
- Configuring SMTP Server on Windows Server
- SMTPSVC Service Auto-Start
- Testing the SMTP Server on Windows
How to Install SMTP Service on Windows Server 2016 / 2012 R2?
SMTP service is one of the built-in features of Windows Server that can be installed through Server Manager. To do it, open the Server Manager Dashboard (servermanager.exe), go to Add roles and features and check SMTP Server when selecting the features to install. To manage the SMTP service, install the management consoles, being a part of Web Server (IIS) role, so you will be prompted to install some IIS components.

Leave all the suggested options of the Web Server (IIS) role and run installation.

You can also install the SMTP server role using the PowerShell command:
Install-WindowsFeature smtp-server
After the components are installed, you may need to restart your server.
Configuring SMTP Server on Windows Server
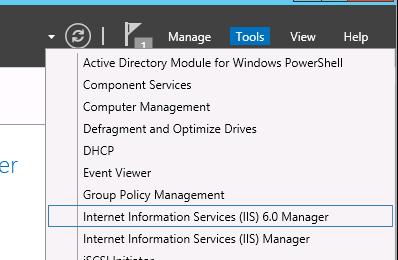
The SMTP server is still managed using the old school management console Internet Information Services (IIS) Manager 6. You can open this console from the Server Manager: Tools-> Internet Information Services (IIS) 6.0 Manager or with the command inetmgr6.exe.
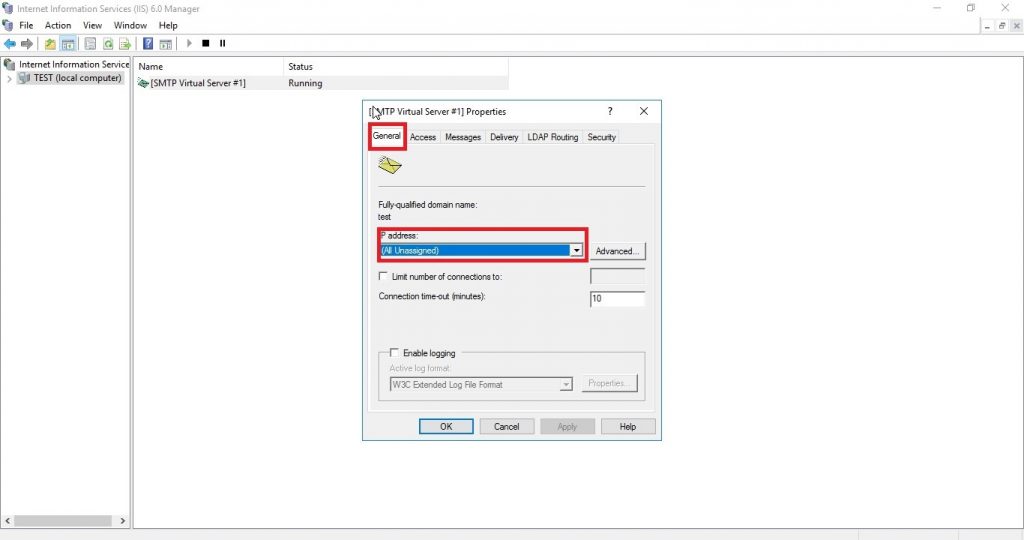
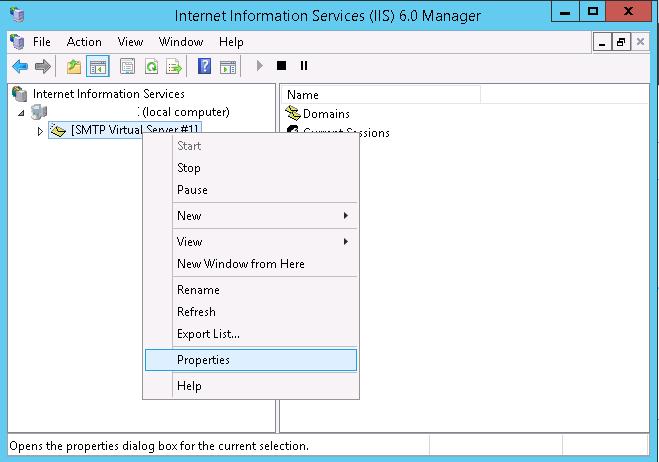
Expand the branch with your server name in the IIS 6 Manager, right-click SMTP Virtual Server and open its properties.
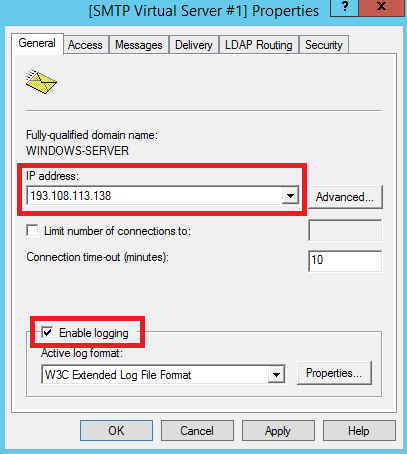
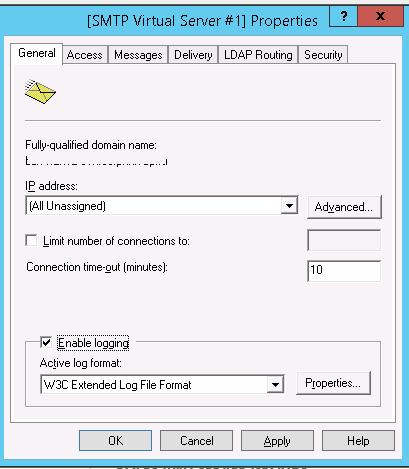
On the General tab, if necessary, select the IP address on which the SMTP server should respond (if the server has multiple IP addresses), and check the option Enable logging (in order to save information about all received emails to text log files).
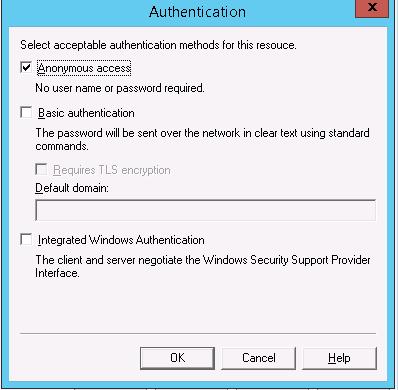
Then go to the Access tab.

Here click the Authentication button and make sure that the Anonymous access is enabled.
Go back to the Access tab and click the Connection button. Here you can specify the IP addresses of devices that are allowed to send emails through your SMTP relay. To do it, check the Only the list below and specify the list of IP addresses (subnets), don’t forget about yourself (127.0.0.1).
Configure the same way the list of allowed IPs in the Relay settings (click the corresponding button). This section indicates which IP addresses (or subnets) can relay email through your SMTP server.

Note. As a general rule, it’s worth to check this options and limit the list of accepted devices with the range of IP addresses. Otherwise, your SMTP server may be used by spammers and other attackers as an open relay for mass mailings.
Go to the Messages tab. Here the administrative e-mail address is specified, to which the copies of all NDR messages will be send (Send copy of Non-Delivery Report to:). Also here you can specify the restrictions on the maximum message size (Limit message size KB) and the maximum number of recipients (Limit number of recipients per message).

Go to the Delivery tab.
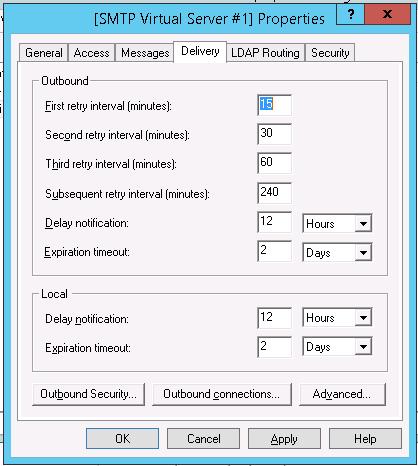
Then click Outbound Security. Here you specify the way of authentication on the external mail server to which your SMTP server will send (relay) all email messages. For example, if all emails will be forward to Gmail mail server and then sent to the recipients, you need to check the Basic authentication and specify your Gmail mailbox credentials (you must allow to send email via Gmail SMTP in the Google account settings).
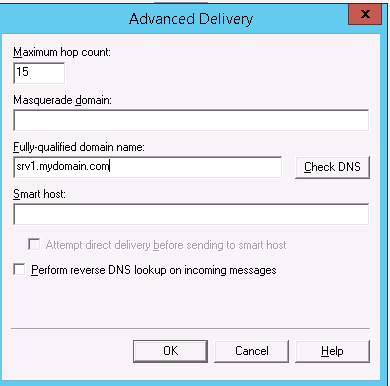
Then click Advanced.
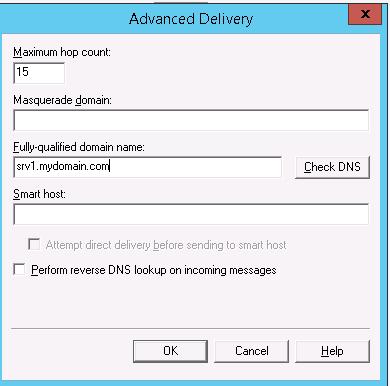
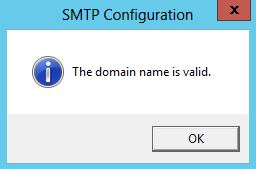
Here you specify the FQDN name of your SMTP server. Click the Check DNS button to make sure that the DNS record is valid.

If your server sends mail to an external SMTP server, specify its name in the Smart host field (for example, smtp.gmail.com or smtp.office365.com).
Some public mail servers accept email only when using a secure SMTP connection using TLS Encryption (TCP port 587). You can configure this setting in the section Delivery -> Outbound Security and Outbound Connections. Read the documentation of your email provider.
Save the SMTP server settings and restart your SMTP virtual service to apply the changes.
Note.
- The DNS settings are critical from the point of view of email system health. If your SMTP server cannot correctly resolve DNS names of domains to which it is trying to send email, the delivery will fail.
- If your server sends mail to other domains, it is important that the correct PTR record is created for your IP address in order to resolve reverse DNS lookups. The PTR record for your public IP address should point to your server FQDN name. Otherwise, most external SMTP servers won’t accept email from you, considering your server a spammer one.
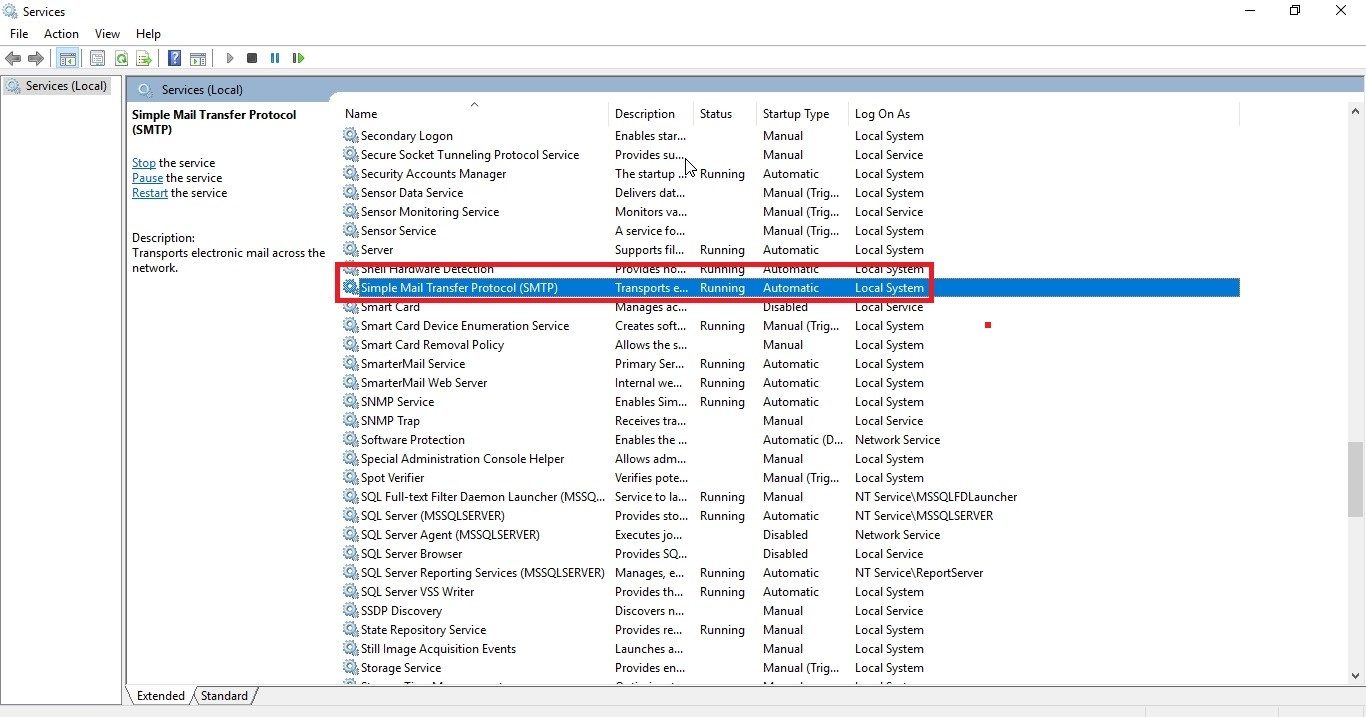
SMTPSVC Service Auto-Start
It remains to configure the automatic startup of SMTP service on your Windows Server. You can do it quickly using the PowerShell command prompt:
set-service smtpsvc -StartupType Automatic
Start the service:
start-service smtpsvc
Make sure that the SMTPSVC service is running:
get-service smtpsvc
Status Name DisplayName
—— —- ————
Running smtpsvc Simple Mail Transfer Protocol (SMTP)
Testing the SMTP Server on Windows
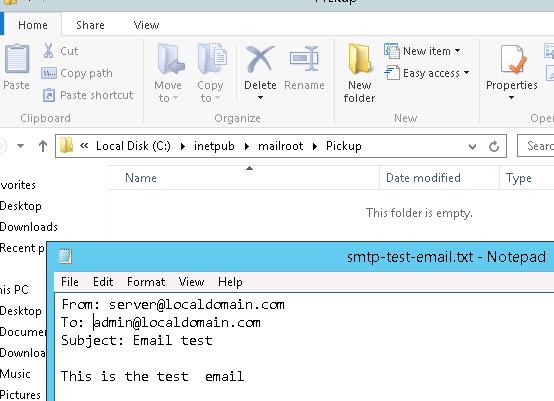
The last thing you have to do is to make sure that your SMTP server is working. It is easier to do it by creating a plain-text file smtp-test-email.txt on your desktop and copying the following text to it. Don’t forget to change the sender and recipient names to yours.
From: [email protected]
 To: [email protected]
 Subject: Email test
 This is the test email

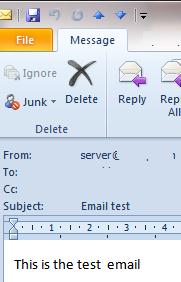
Copy the file smtp-test-email.txt to the C:\inetpub\mailroot\Pickup folder. The Windows SMTP server monitors new files appearing in this folder, and if a file is found it will read it contents and try to send an email with the given subject and body to the recipient specified in the To: line.
Check the recipient mailbox, and you will see this e-mail.

Tip. You can test your SMTP server using the telnet command, VBS script or PowerShell:
Send-MailMessage -SMTPServer localhost -To [email protected] -From [email protected] -Subject "Email test" -Body "This is the test email from PowerShell"
If you have enabled Basic Authentication to authenticate all your SMTP clients (instead of anonymous authentication), you can send an email with the smtp authentication via telnet as follows.
Also, make sure that TCP 25 port is not blocked on your SMTP server by the local firewall or anti-virus software. The easiest way to do this is from a Windows-based computer whose IP address has been added to the allowed connection list. Check availability of port 25 using the Test-NetConnection cmdlet:
Test-NetConnection smtprelay.woshub.com –port 25
If port 25 is blocked, check the settings of Windows Firewall, antivirus and hardware firewalls.
So, you have configured your own SMTP mail relay on Windows Server 2016 / 2012 R2 and tested sending emails through it.
Introduction
SMTP (Simple Mail Transfer Protocol) is a service that enables email exchange on the Internet and within a local network. To achieve that, SMTP interacts with the Mail Transfer Agent (MTA) and ensures the messages reach the intended recipients.
Mail servers and other message transfer agents usually use SMTP to send and receive email messages.
In this tutorial, you will learn to install and configure the SMTP server on Windows.
Prerequisites
- A Windows Server operating system.
- A user account with administrator privileges.
Note: Client operating systems like Windows 11, Windows 10, and Windows 8, do not have SMTP Server capabilities. Windows Server operating systems provide an SMTP server as part of the Internet Information Services (IIS). The client operating systems only provide the SMTP email client, which is not an SMTP server.
SMTP installation is a straightforward process on Windows Server operating systems. Use the Server Manager management console and follow the steps below to install SMTP.
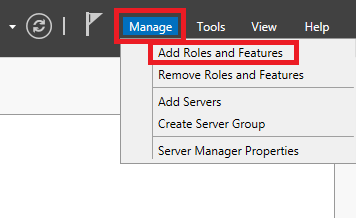
Step 1: Add Roles and Features in Server Manager Dashboard
Open the Server Manager management console and select Dashboard in the left pane.
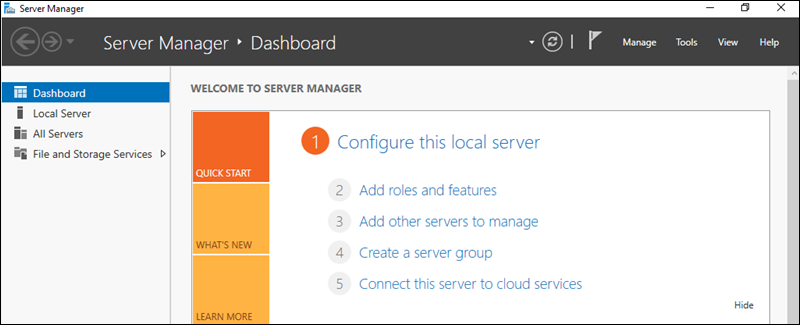
From the Dashboard, select the Add roles and features option to start the wizard and install the SMTP server.
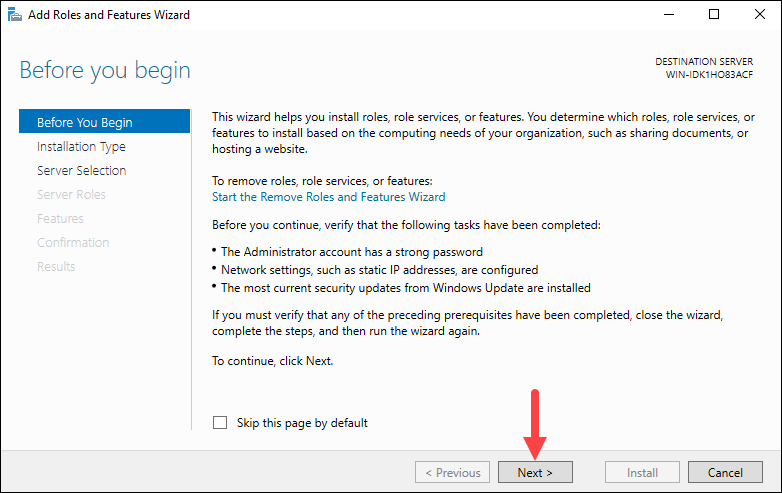
The Before You Begin screen appears, stating that the prerequisites for adding a role are:
- Having a strong password on the Administrator account.
- Configured network settings on the server.
- That you have installed the latest security updates.
If all the prerequisites are met, click Next to continue the installation.
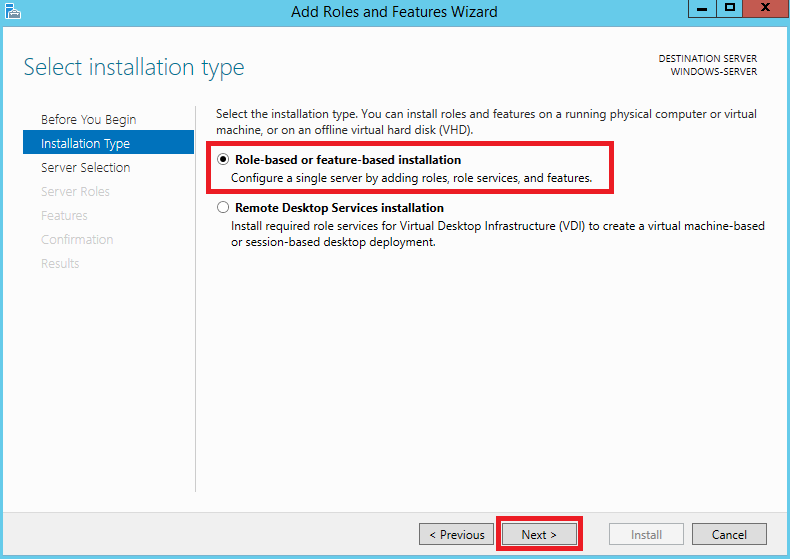
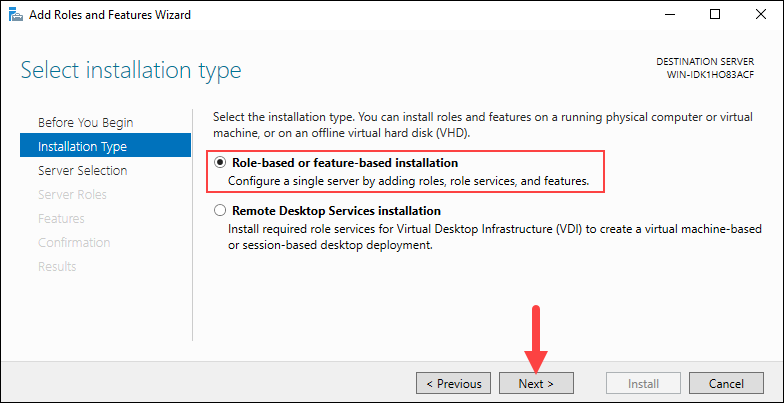
Step 2: Select Installation Type
In the Installation type window, select Role-based or feature-based installation. Click Next to continue.
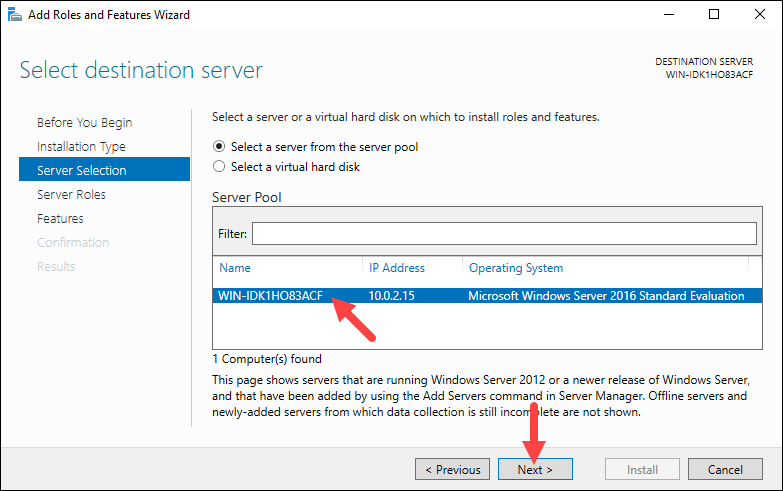
Step 3: Select Destination Server
Choose the Select a server from the server pool option and pick the desired server from the Server Pool to set the destination server. The Server Pool lists the servers you have added using the Add Server option in Server Manager. By default, the local server is selected.
Click Next to move on to the next step.
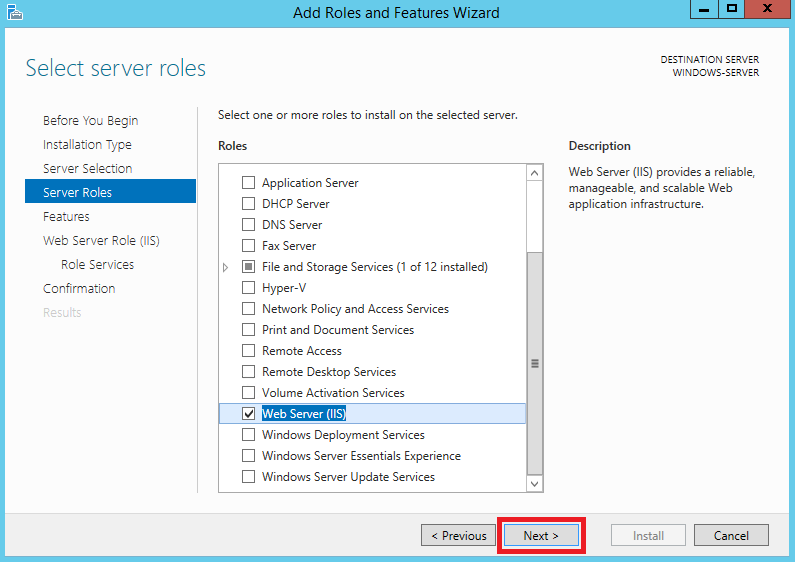
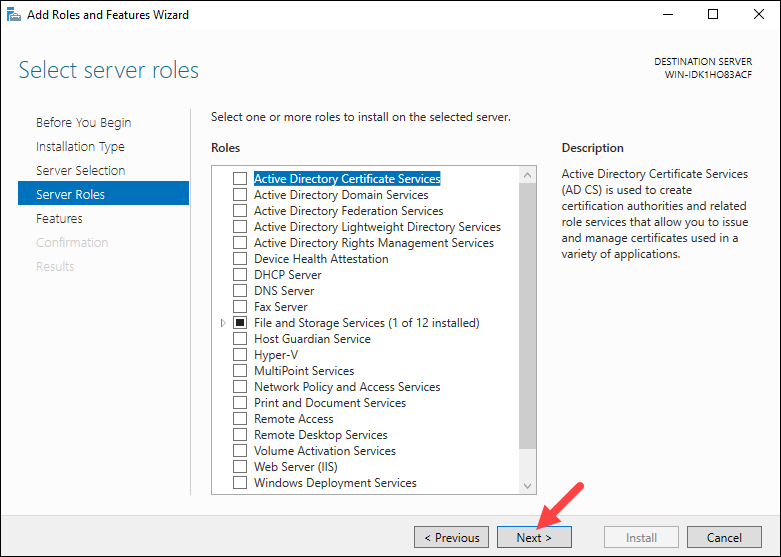
Step 4: Select Server Role
The Select server roles screen allows you to select which features and roles to install. Keep the default selection and click Next.
Step 5: Select Features
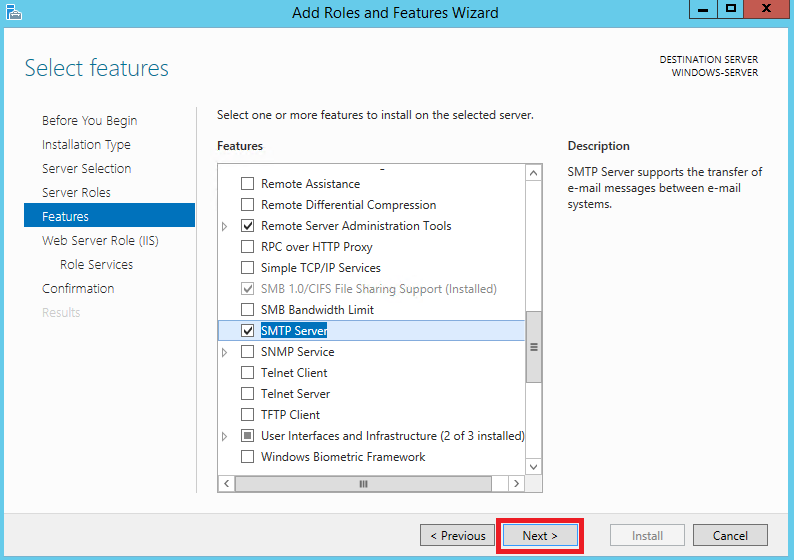
The next step is to select which features to install. Scroll through the list to find and select SMTP Server. Click Next to proceed.
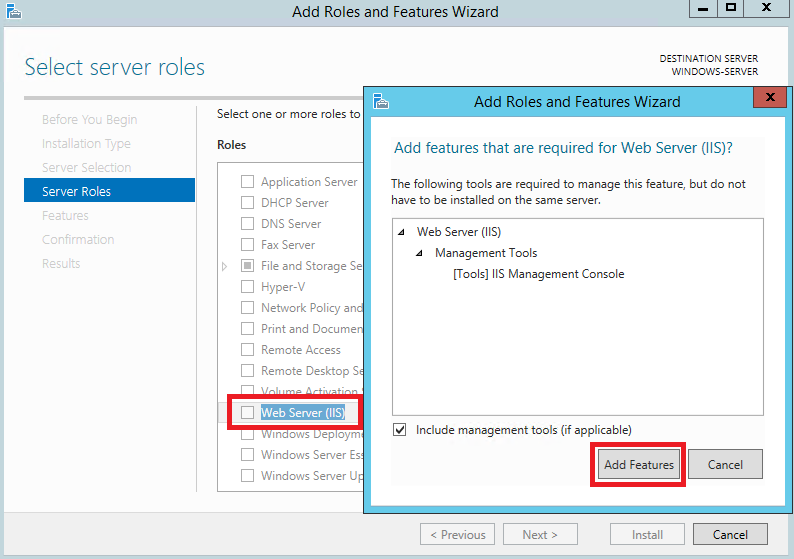
Step 6: Install Missing Features
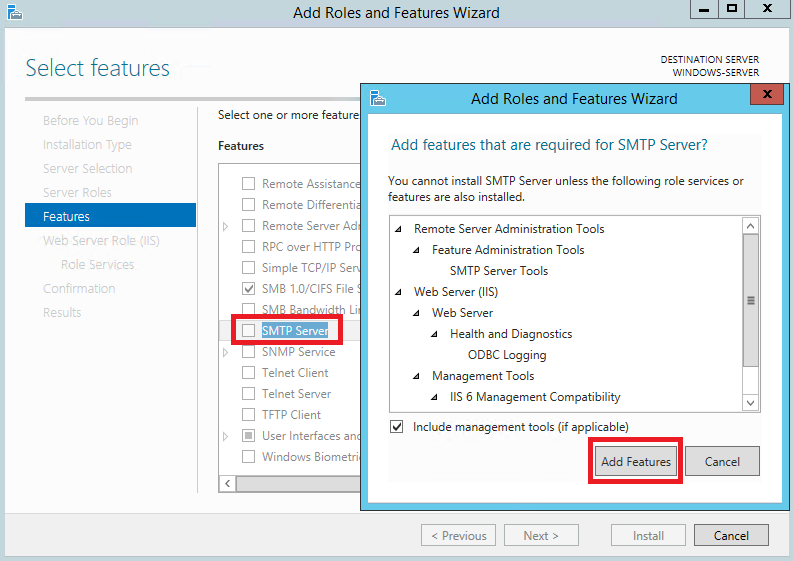
If the Remote Server Administration Tools and Web Server roles have not been previously installed, the wizard prompts you to install them. Check the Include management tools option and click Add Features to install them:
Install Web Server Role
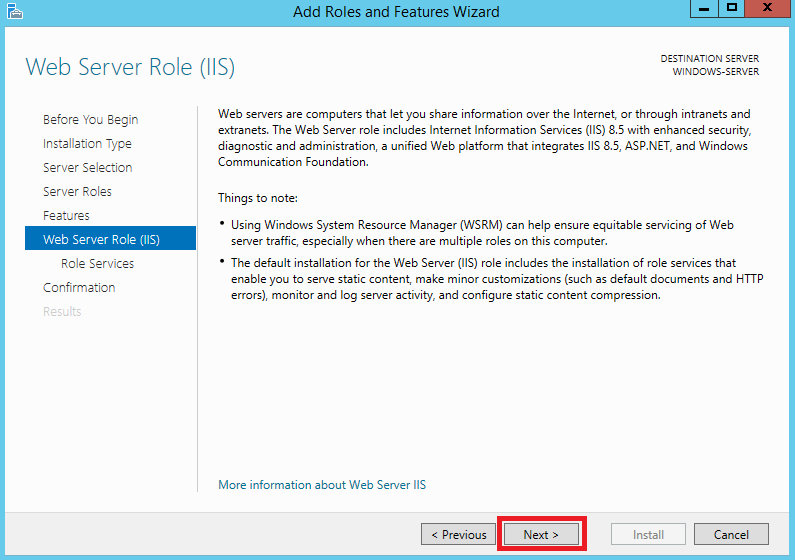
The wizard displays an information screen about the Web Server Role (IIS). Click Next to install the role.
Install Role Services
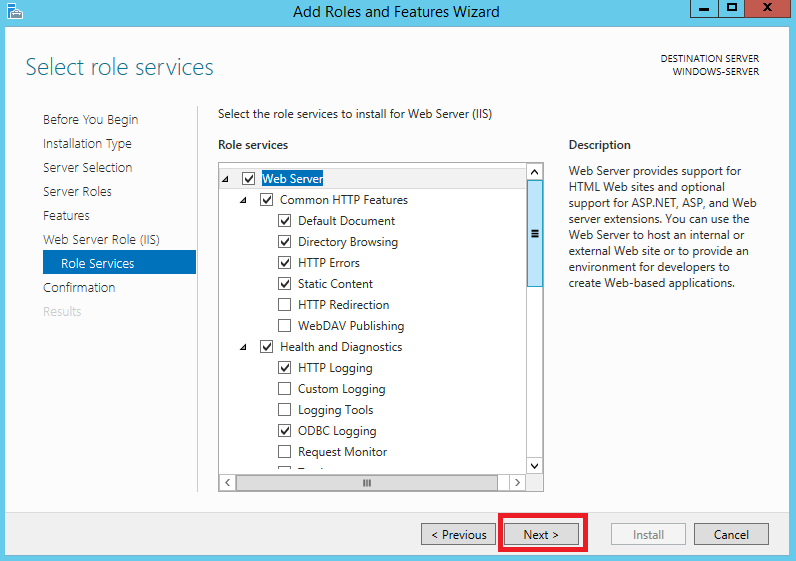
Check all the services you want to install for the Web Server role. The default options are preselected.
Click Next to proceed to the final step when you finish selecting the services.
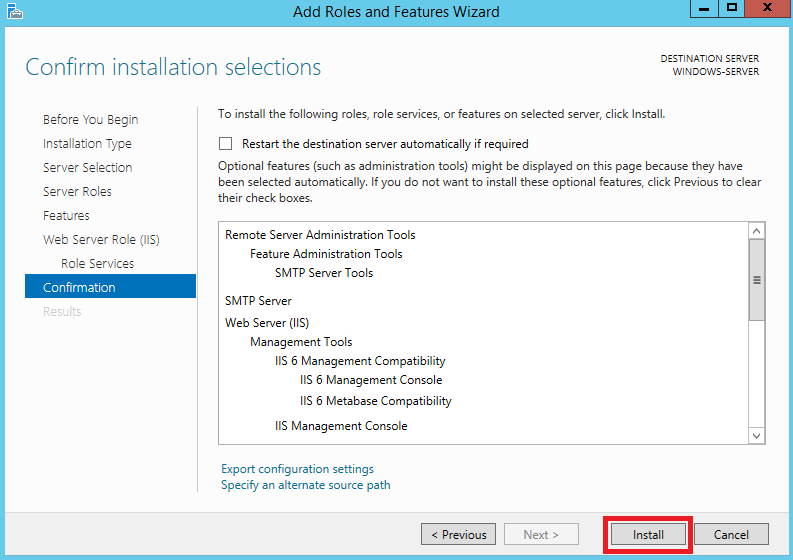
Step 7: Confirm Installation
The wizard displays a confirmation window with a summary of all the roles, services, and features about to be installed. Make sure that the Restart the destination server automatically if required option is checked and click Install to finish the installation.
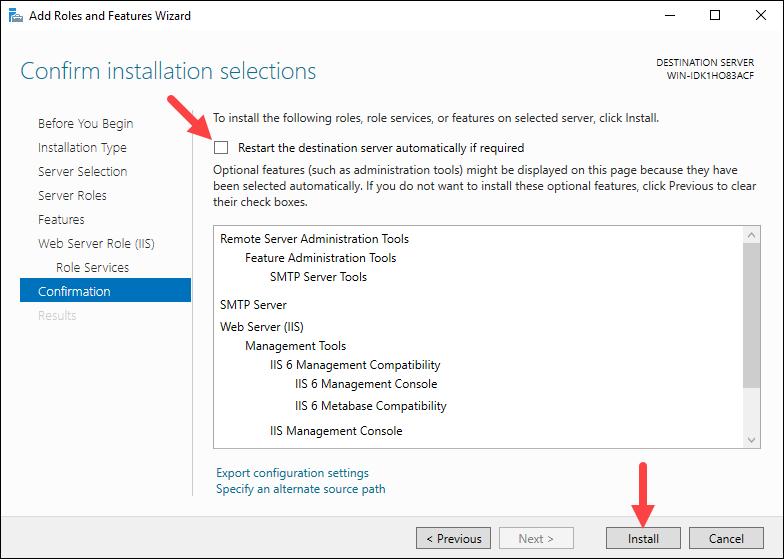
When the installation completes, click Close to exit the installation wizard.
Configure SMTP on Windows
Configure the SMTP server using the Internet Information Services (IIS) Manager 6.0. Follow the steps in the chapters below.
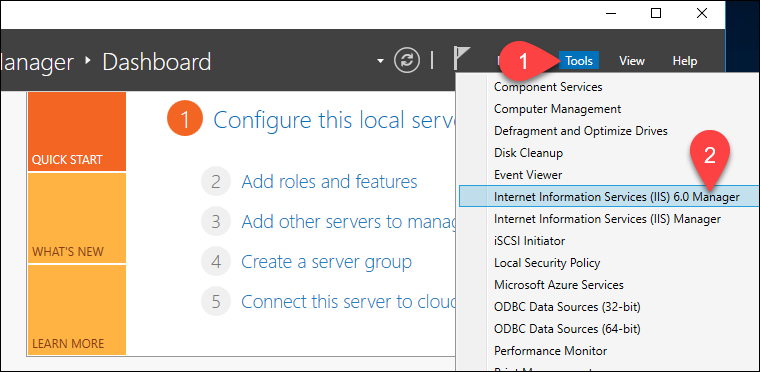
Step 1: Open IIS 6.0
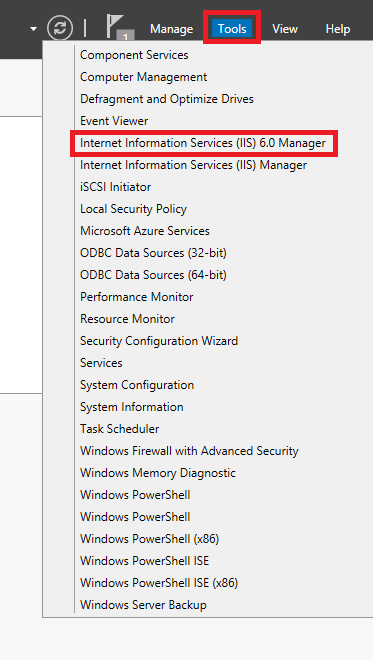
Open the IIS Manager 6.0 from the Server Manager dashboard.
Select the Tools option, and locate Internet Information Services (IIS) 6.0 Manager from the dropdown menu:
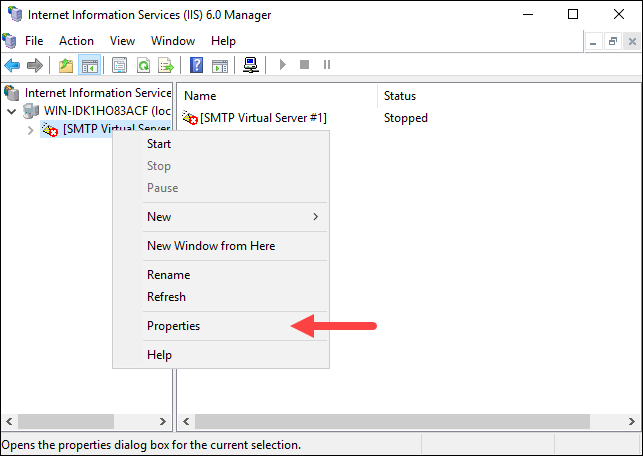
Step 2: Configure SMTP Virtual Server
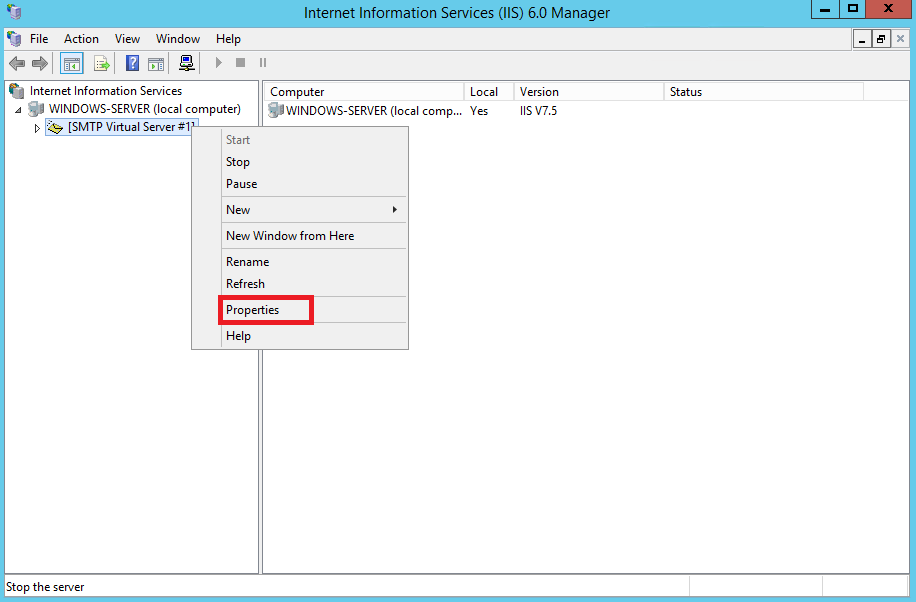
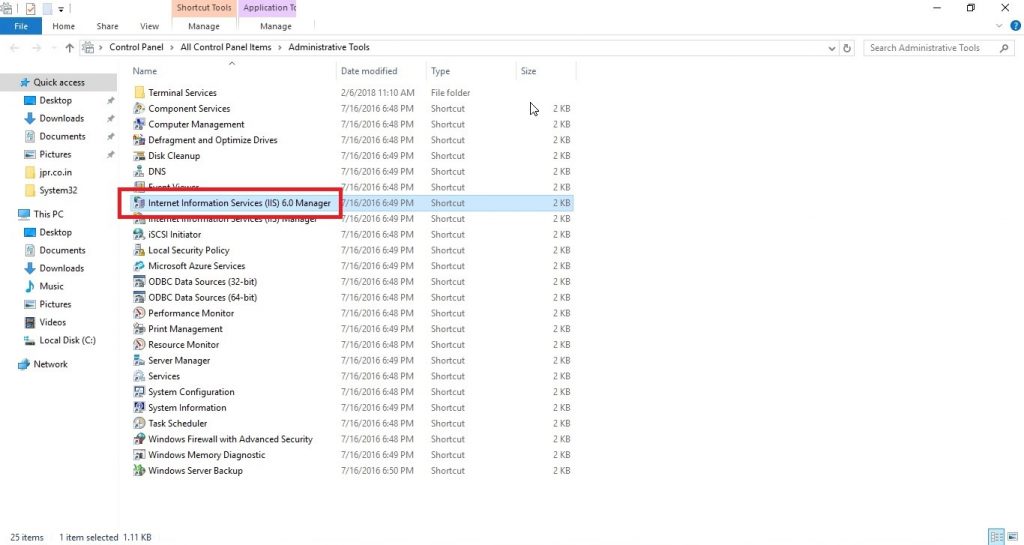
In IIS Manager 6.0, expand the computer name and right-click [SMTP Virtual Server #1].
Select Properties from the dropdown menu.
Step 3: Configure Relay
The relay options allow you to relay emails through the SMTP virtual server.
Configure Server Access
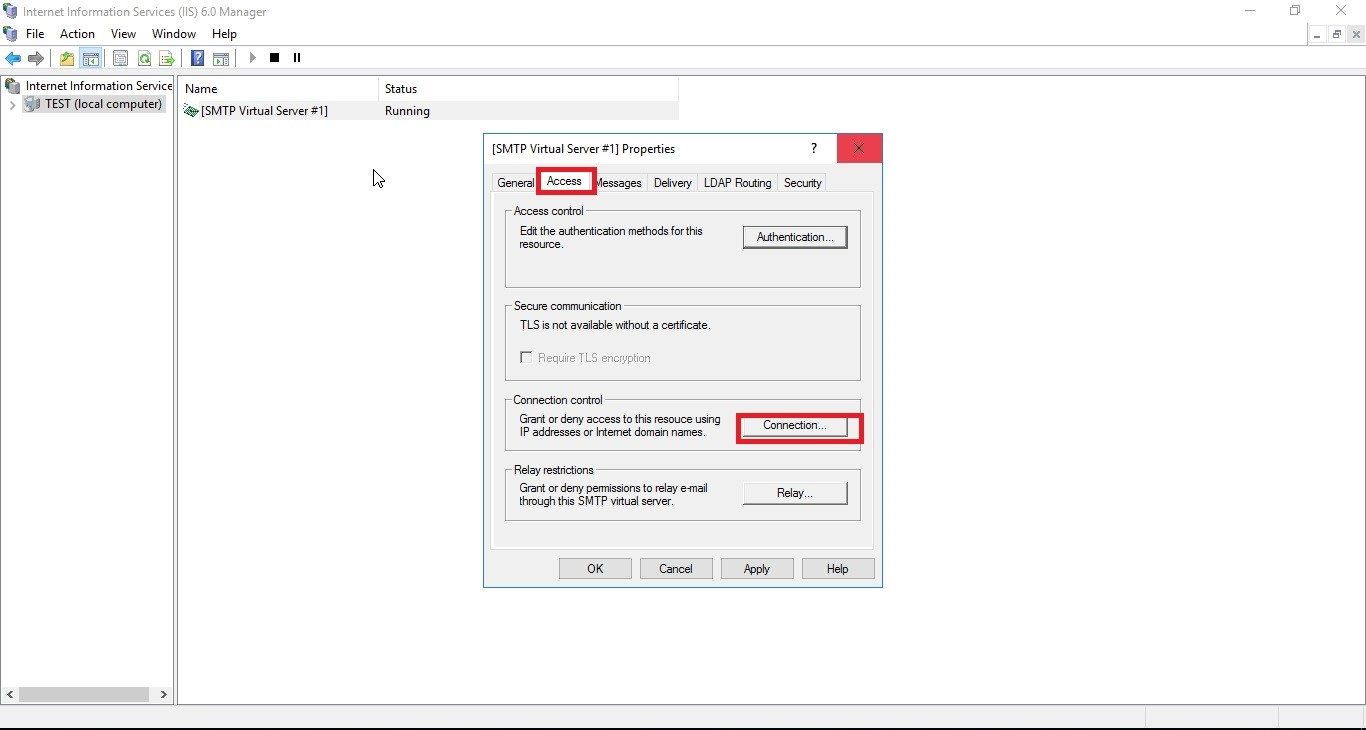
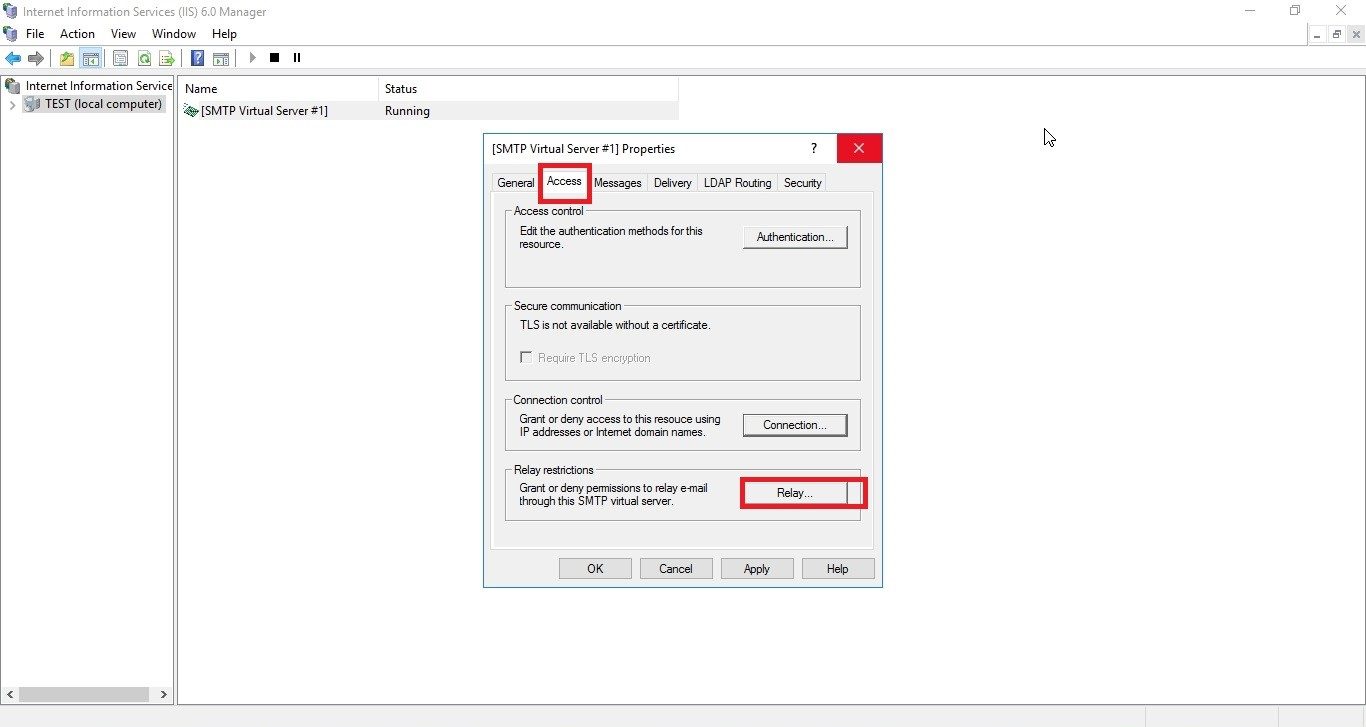
1. In [SMTP Virtual Server #1] properties, click the Access tab and select the Relay button:

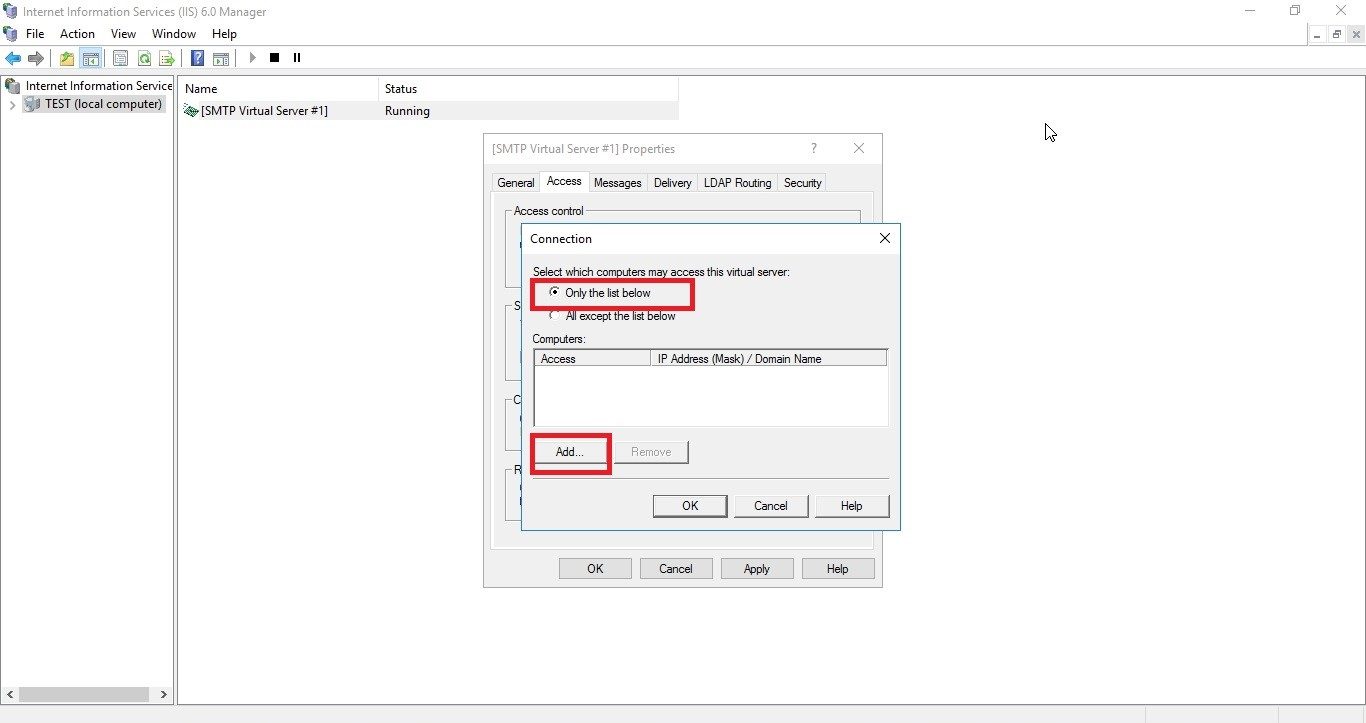
2. Select the Add… option to set which computer is allowed to relay emails through the SMTP server.
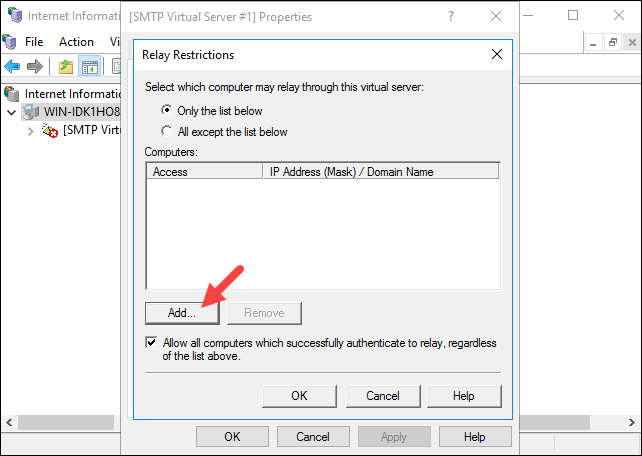
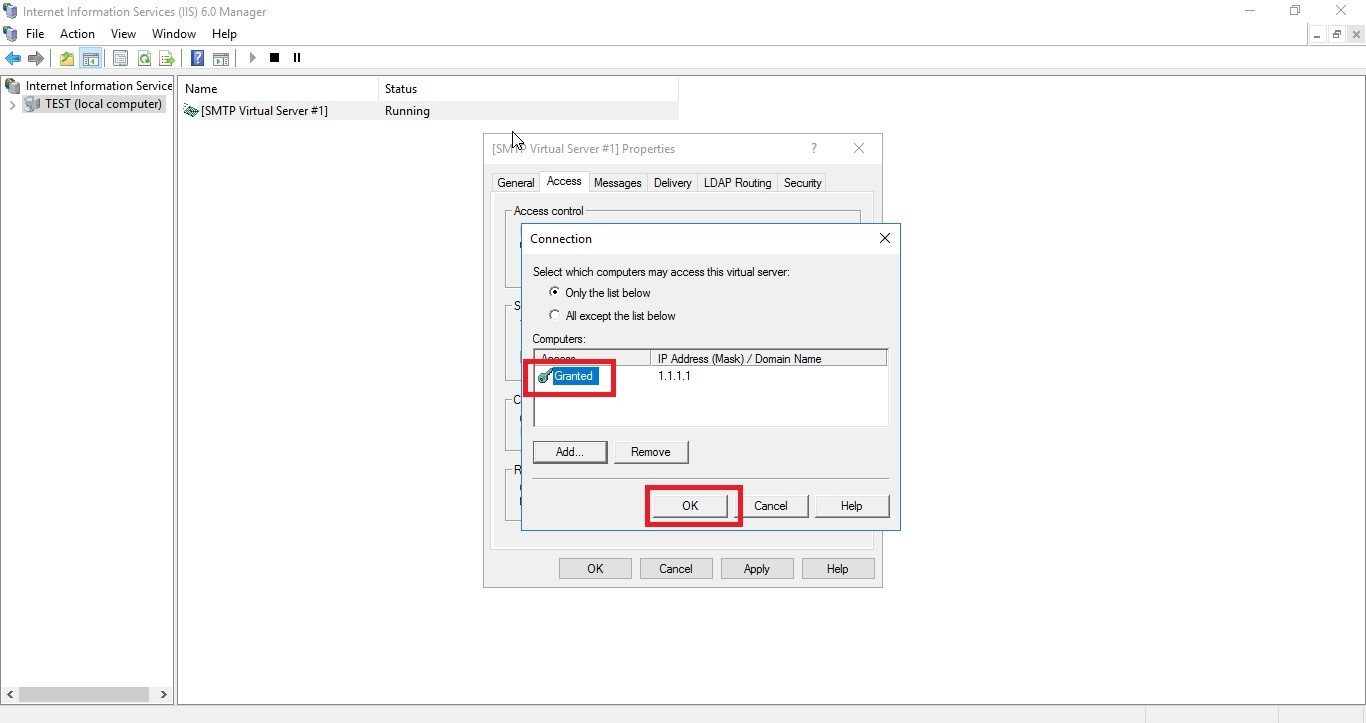
Select the Single Computer option and enter 127.0.0.1 to allow the localhost to relay emails through the SMTP server. You can also specify a group of computers using the Group of computers option.
Click OK to confirm the changes.

Step 4: Configure Security Options
The Delivery tab of [SMTP Virtual Server #1] properties contains different settings related to the intervals of retrying to send outbound emails after a failed delivery, and different security options.
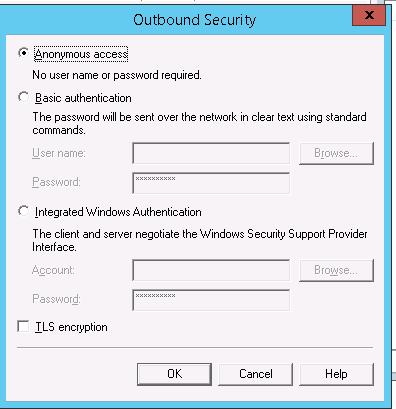
To configure the security options, click Outbound Security.
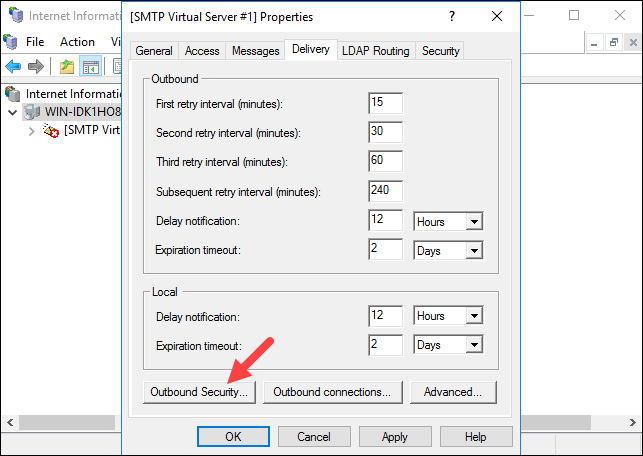
The pop-up window allows you to choose one of four options for securing your SMTP server:
- Anonymous access. Disables SMTP server authentication since it doesn’t require an account name or password.
- Basic authentication. Used when sending emails to a personal or exchange account. This option passes the account name and password as clear text, so make sure to use TLS encryption if you select this option.
- Integrated Windows Authentication. Uses the Windows domain account name and password for authentication.
- TLS encryption. Use TLS to secure the connection. This option requires you to install a valid SSL certificate on the server.

Note: Test core SMTP functionality with a personal e-mail or Exchange account by selecting Anonymous access. SMTP uses the AUTH command with Basic authentication, which can cause some e-mail providers to fail.
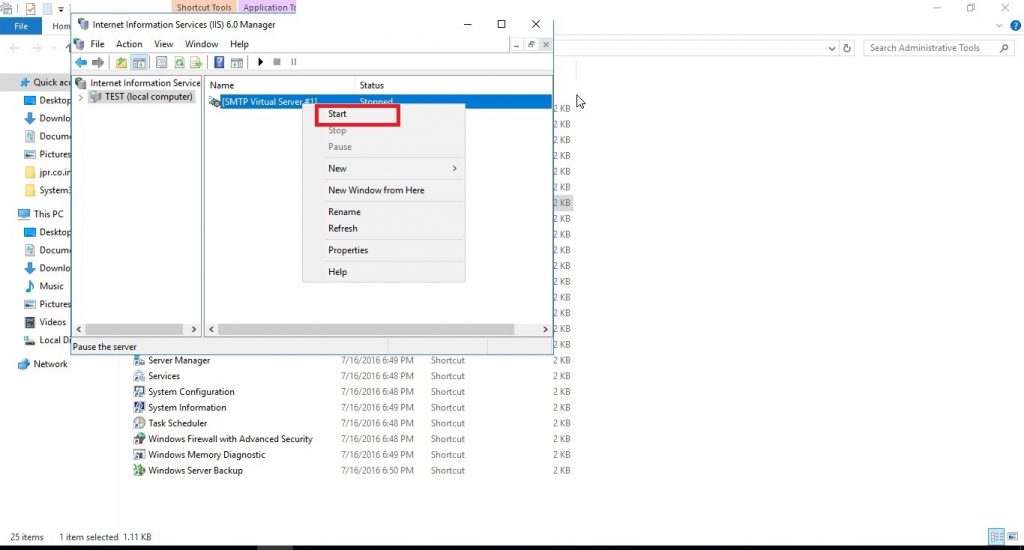
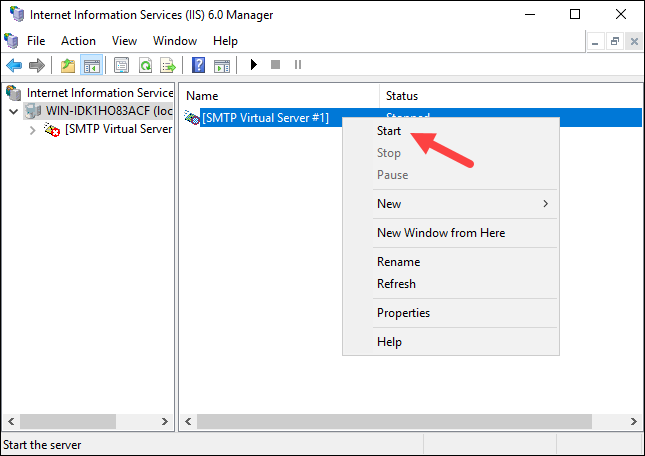
Step 5: Restart SMTP Server
Restart the SMTP Server to apply the changes. Right-click [SMTP Virtual Server #1], select Stop, and then select Start.
Test SMTP Server
Test the SMTP server configuration by sending an email message using the SMTP server. One of the ways to do that is to use telnet. Follow the steps below:
1. Press the Windows key and search for PowerShell.
2. Run the PowerShell app as Administrator.
3. Run the following command:
telnet localhost 254. Start the communication with the server by running:
EHLO server5. Enter the email address you will use to send the email. The syntax is:
MAIL FROM: [sender_email_address@domain.com]6. Enter the recipient email address. The syntax is:
RCPT TO: [recipient_email_address@domain.com]7. Inform the SMTP Server you are ready to send the message by entering:
DATA8. Enter the email subject:
Subject: Test Message9. Press Enter twice to move on to the email body. Type in the message body and press Enter to finish.
10. Send the email by entering a period (.) and pressing Enter.
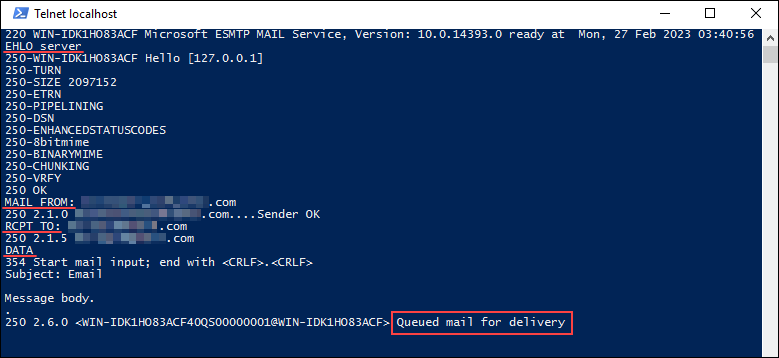
Check the recipient’s inbox to see if the email was delivered. If not, the message may still be in the SMTP Queue directory (C:\inetpub\mailroot\Queue).
Conclusion
This tutorial showed how to install and configure the SMTP server on Windows Server operating systems. An SMTP server allows you to exchange emails using the MTA, making it a great solution when you want to set up your own mail server.
Next, learn how to set up Postfix to use an external SMTP server, or learn to use the mail command in Linux.