Installing Under Windows
BSOD2600, one of the long term users of Cacti, provides an Installer on Windows.
We recommend you use that installer for Cacti. You can obtain that installer
under the Windows section of the Cacti forums. However, if you wish to install
Cacti yourself, please follow the instructions below.
-
(Optional) Apache — This software is optional if running Windows Internet
Information Server. -
Cacti — Install from the zip distribution and install in the web root or your
choice. Many choose to install into aCactisub folder. -
Spine — Install from the zip distribution into the
c:\cactidirectory.
Make sure yourspine.conf.distis located in that directory as well. -
RRDtool — Install from the Cacti website. Install it into the
c:\cacti
directory. -
PHP X — Install into the
c:phpfolder. If you choose to install into
c:\Program Files\php, you will have to use 8.3 filenames to reference it’s
binaries in Cacti. -
MySQL 5.x — Install into the default location. This is typically:
c:\Program Files\MySQL\MySQL Server X.XX. -
(Optional) Cygwin — Download and execute
setup.exefrom the Cygwin website.
Keep thesetup.exefile for later use. You will need Cygwin and its
development packages for building RRDtool and spine. -
(Optional) Net-SNMP — Install to the
c:net-snmpdirectory. If you choose to
usec:\Program Files\net-snmpyou will have to use 8.3 filenames to
reference its binaries in Cacti.
Common OS Changes
The following changes will be required regardless of your selected Webserver.
-
Add the following directory to the existing Windows System
PATHenvironment
variable:c:php. The Windows path can be accessed via the Control Panel at:
System -> Advanced -> Environment Variables -> System Variables. -
Add the following directory to a new Windows System environment variable
calledPHPRC:c:\php. -
Add a new Windows System environment variable called
MIBDIRSset it to
c:\php\extrasmibs -
Rename the file
c:\php\php.ini.disttophp.ini, and make the following
changes to it:Uncomment the following lines.
extension_dir = c:phpext extension=php_mysql.dll extension=php_snmp.dll extension=php_sockets.dll cgi.force_redirect = 0 -
In earlier installation guides to PHP, they recommended moving certain DLL’s
to thec:\winnt\system32directory. If so, you will have to remove those
files. Please review the PHP installation documentation for instructions on
removing those files. -
If you want to allow template importing, uncomment the following line:
file_uploads = On -
Give the user who will be running the scheduled task, modify rights to the
.indexfile in the location pointed to by theMIBDIRSWindows System
environment variable.
Web Server Configuration
-
Make sure you have stopped any IIS web servers before you proceed with Apache
installation, or make sure Apache is configured on an alternate port. -
If using Apache 2.x and PHP 5, then add the following lines.
LoadModule php5_module c:\php\php5\apache2.dll
AddType application/x-httpd-php .php
DirectoryIndex index.html index.htm index.php
IIS Specific Steps
-
Start the Internet Information Services (IIS) Manager, right click on the
Default Web Site (in most cases) and select Properties. -
Under the Home Directory tab, select Configuration and click Add. Browse to
the path ofphp4isapi.dllorphp5isapi.dll, and type in .php as the
extension. Note: if using IIS6, Enable All Verbs and Script Engine. -
Under the ISAPI Filters tab, click Add and browse to the
php4isapi.dllor
php5isapi.dllfile. Name the filter «php» and click OK. -
Under the Documents tab, add
index.phpto the list. -
If using IIS6, goto Web Service Extensions and add a new Web Service
Extension. Name the extension «php», and click Add and browse to the
php4isapi.dllorphp5isapi.dllfile, enable Set Extension status to
Enable, and click OK. -
Give the
IUSR_XXXXandIIS_WPGusers read & execute permissions to the
file%windir%\system32\cmd.exe. They will also need read permissions on
cacti_web_root/cactiand it’s subfolders. -
If using IIS6, give the
IIS_WPGuser modify permissions to the folders
cacti_web_root/cacti/logandcacti_web_root/cacti/rrd. -
Completely stop and start the IIS service using the following commands:
net stop iisadmin
net start w3svc
-
Installing a single instance of Cygwin, and using it for all applications
that require it is recommended so you do not have different versions of the
Cygwin dlls laying around on your system, which can cause conflicts. -
Run
setup.exeorsetup-x64.exeyou previously download. -
Once you reach the portion of setup entitled Select Packages, install the
following:- Base (include all items)
- Libs
- libcairo2
- libcrypt0
- libfontconfig-common
- libfontconfig1
- libfreetype6
- libgcrypt20
- libgd3
- libglib2.0_0
- libmariadb-devel
- libmysqlclient18
- libssl1.0
- libpango1.0_0
- libpng16
- libreadline7
- zlib-devel
- zlib0
- Devel
- autoconf
- automake
- binutils
- clang
- cygwin-devel
- gcc-core
- gcc-g++
- help2man
- libargp
- libltdl7
- libtool
- net-snmp-devel
- patch
- texinfo
- w32api-headers
- w32api-runtime
- windows-default-manifest
- Web
- wget
- libcairo2
- Libs
- Base (include all items)
-
Add
c:\cygwin\binto your Windows System PATH environment variable. -
Move
setup.exeorsetup-x64.exetoc:cygwinfor future use. This binary
is updated from time to time, so it’s recommended that you update it
periodically.
- TBD
MySQL Download and Installation Instructions
-
Extract the MySQL zip file to a temp directory and run
setup.exe. -
Install MySQL to the default directory, or for the purposes of this manual to
thec:\MySQLdirectory. -
If running an older version of MySQL, start it by running
c:\MySQL\bin\win\mysqladmin.exe. In more recent versions, this is not
required. -
Set a password for the root user
shell> cd c:\mysql\bin shell> mysqladmin --user=root password somepassword shell> mysqladmin --user=root --password reload -
Create the MySQL database:
shell> mysqladmin --user=root --password create cacti -
Import the default Cacti database:
shell> mysql --user=root --password cacti < c:\apache2\htdocs\cacti\cacti.sql -
Create a MySQL username and password for Cacti.
shell> mysql --user=root --password mysqlMySQL> GRANT ALL ON cacti.* TO cactiuser@localhost IDENTIFIED BY 'somepassword'; MySQL> GRANT SELECT ON mysql.time_zone_name TO cactiuser@localhost IDENTIFIED BY 'somepassword'; MySQL> flush privileges;
Net-SNMP Installation
-
If you plan to use any hosts with SNMP v2c support, and are using early
versions of PHP, you must download and install the Net-SNMP libraries.
Net-SNMP provides installers to install their product. However, caution must
be taken if you choose to use long file names as Cacti does not see them as
long file names. You will have to user 8.3 notation.Type Name Original c:\Program Files\Net-SNMP\binBecomes c:\progra~1\net-snmp\bin.
Cacti spine Installation
-
Extract the Spine zip file to
c:\cactiand modify thespine.conf.dist
file to include the following statements.DB_Host 127.0.0.1 or hostname (not localhost) DB_Database cacti DB_User cactiuser DB_Password cacti DB_Port 3306All other pre 0.8.6 settings are obsolete.
-
Spine now comes with a binary distribution. However, we strongly suggest that
you install Cygwin and then remove all the DLL files andsh.exefrom the
c:\cactidirectory.
Finishing your Setup
-
Edit
cacti_web_root/cacti/include/config.phpand specify the MySQL user,
password, database, and database port for your Cacti configuration.$database_default = "cacti"; $database_hostname = "localhost"; $database_username = "cactiuser"; $database_password = "cacti"; $database_port = "3306"; -
Point your web browser to:
http://your-server/cacti/Log in using the username and password of admin/admin. You will be required
to change this password immediately. -
From Cacti, go to Settings -> Paths and verify/udate your paths to point to
the correct locations. Recommended examples are posted below. If you plan on
using Spine, then it is very important that all paths include forward slashes
instead of backslashes.-
PHP Binary Path:
c:/php/php.exe -
RRDtool Binary Path:
c:/cacti/rrdtool.exe -
SNMPGET, SNMPWALK, SNMPBULKWALK, SNMPGETNEXT Paths:
c:/progra~1/net-snmp/bin/snmpget.exe
c:/progra~1/net-snmp/bin/snmpwalk.exe
c:/progra~1/net-snmp/bin/snmpbulkwalk.exe
c:/progra~1/net-snmp/bin/snmpgetnext.exe -
Cacti Logfile Path:
c:/mycacti/website/cacti/log/cacti.log -
Spine Path:
c:/cacti/spine.exe
-
-
Click on Devices. Delete the Localhost devices as it intended for Linux
environments In the upper right corner, click Add. Fill in the following
information and then click Add.- Description: My Windows localhost
- Hostname: localhost
- Device Template: Windows Device
-
You should now be looking at the localhost device screen. Right under it’s
name, there should be some SNMP information listed, if not you should double
check the SNMP settings on the server and firewall settings. In the upper
right-hand corner, click on Create Graphs for this Host. On the following
screen, select a disk partition and network interface. At the bottom of the
page, click on Create. -
Log into the user account you’ll be using for the scheduled task and verify
starting a Cacti polling cycle works. Do this by running the following from
the command prompt:php c:/cacti_web_root/cacti/poller.phpThe output should look something like the following:
C:\>php c:inetpubwwwrootcactipoller.php OK u:0.00 s:0.06 r:1.32 OK u:0.00 s:0.06 r:1.32 OK u:0.00 s:0.16 r:2.59 OK u:0.00 s:0.17 r:2.62 10/28/2005 04:57:12 PM - SYSTEM STATS: Time:4.7272 Method:cmd.php Processes:1 Threads:N/A Hosts:1 HostsPerProcess:2 DataSources:4 RRDsProcessed:2After this has ran once, you should have
cacti.login/cacti/log/and
RRDfiles in/cacti/rra/. -
You are going to need to schedule a task while logged on as an Administrator.
This task is required to you can runpoller.phpevery 5 minutes. Make sure
the Task Scheduler service is started and follow the steps below to begin.*Note: The following instructions are based on Windows XP and Windows
Server 2003. You should be able to follow these instructions close enough
for Windows 2000 as well.-
Select Start -> Settings -> Control Panel and double click on Scheduled
Tasks. -
Double click on Add Scheduled Task.
-
Click Next and Browse on the following screen. Find
c:phpand select
php.exe. Choose Daily on and click Next. -
Click Next again without changing the time or date settings.
-
When entering a username and password make sure the user has read and
write access to the following directories:cacti_web_root/cacti/rra
cacti_web_root/logMake sure the user has read, write, and execute access to the following
directories:c:\php
c:\phpsapi -
Click Next and Finish to close the wizard.
-
Right click on the task you just created, and select Properties.
-
Select the Schedule tab.
-
Make sure Daily is selected and click the Advanced button.
-
Check the Repeat checkbox, set it for 5 minutes and set the duration for
24 hours. -
Click Ok
-
In the Run textbox enter the following text making sure to use the
appropriate paths.c:\php\php.exe c:\mycacti\website\cacti\poller.php
The start in box should say
c:\mycacti\website\cacti. -
Copyright (c) 2004-2022 The Cacti Group
Configure a Web Server
Cacti functions with any web server which utilizes PHP and MySQL. It’s up to the system admin to utilize Microsoft IIS, Apache, or something else.
Microsoft IIS
Install
- How to Install IIS 8.0/8.5 on Windows Server 2012 R2
- How to Install IIS 7.0/7.5 on Windows Server 2008 / R2
- How to Install IIS 6 on Windows Server 2003
Configure
Follow:
- Using FastCGI to Host PHP Applications on IIS 7
- Using FastCGI to Host PHP Applications on IIS 6
After following the above guides:
IIS6 has the IIS_WPG user account. IIS7 it’s called IIS_IUSRS
- Give the COMPUTERNAME\IUSR_ and COMPUTERNAME\IIS_WPG users Read & Execute permissions to the file C:\Windows\system32\cmd.exe. Yes, this can be a large security hole, but it’s required so RRDTool can be launched for graphing by the anonymous web account. For slightly improved security, one can specify a separate custom User account which would be used for the /wwwroot/Cacti/ site. Then, instead of using IUSR_ everywhere throughout this document, replace it with the custom User account. This way, only a security vulnerability in Cacti’s code could exploit cmd.exe and not all sites on the IIS server.
- Right click on cmd.exe and select Properties.
- Click on the Security tab.
- Select the IUSR_ account
- Click on Read & Execute in the Permissions box.
- Repeat for the IIS_WPG user.
- Click OK.
- Both IUSR_ and IIS_WPG users will also need read permissions on C:\Inetpub\wwwroot\cacti\ and its subfolders.
- Right click on the folder C:\Inetpub\wwwroot\cacti and select Properties.
- Click on the Security tab.
- Click on Add… under the group or user names section.
- Type in IUSR_ COMPUTERNAME or click Advanced… and Find Now. Repeat for the IIS_WPG account.
- Click OK to close the select users or groups window.
- Select the IUSR_ COMPUTERNAME from the list.
- Select Read & Execute from the Permissions box.
- Repeat for the IIS_WPG account.
- At the bottom of the Security tab, click on Advanced….
- In the Permissions tab, click on Replace permissions entries on all child objects with entries shown here that apply to child objects.
- Click OK.
- Click Yes to the Security warning dialog box.
- Click OK to close the properties window.
- Give the IUSR_ and IIS_WPG users modify permissions to the folders C:\Inetpub\wwwroot\cacti\log\ and C:\Inetpub\wwwroot\cacti\rra.
- Completely stop and start the IIS service using the following commands from the command prompt. Alternatively, use the Service MMC snap-in under Administrative Tools:
net stop iisadmin
net start w3svc
- Install WOFF mimetypes for TrueType Fonts:
%SystemRoot%\system32\inetsrv\appcmd.exe set config /section:staticContent /+"[fileExtension='.woff',mimeType='application/font-woff']"
%SystemRoot%\system32\inetsrv\appcmd.exe set config /section:staticContent /+"[fileExtension='.woff2',mimeType='application/font-woff2']"
\
\
Apache
Make sure to stop the IIS web services before proceeding with the Apache installation or make sure Apache is configured on an alternate port.
Install
- Download the latest version from Apache Lounge.
- Make sure to read the Windows specific notes for other Windows tips.
- Extract the ZIP file to C:\Apache24\
- Edit \Apache24\conf\httpd.conf
- Set ServerRoot
- Set ServerName
- Edit \Apache24\conf\httpd.conf
- Manually run httpd.exe at a command prompt to check for errors.
- Once error free, execute httpd.exe -k install
Install PHP
- Download the latest version of PHP 7.0 from http://windows.php.net.
- Extract the ZIP file to C:\PHP\
- Add C:\PHP\ to your Windows PATH environment variable.
- The Windows path variable can be accessed via the Control Panel at: System | Advanced | Environment Variables
- In the System Variables groupbox, find Path and click Edit and add: C:\PHP
- Add a new system variable called PHPRC. Its value should be: C:\PHP
- Add a new system variable called MIBDIRS. Its value should be: C:\PHP\Extras\mibs
- Rename C:\PHP\php.ini-production to C:\PHP\php.ini
- Find and then uncomment/modify the following lines in C:\PHP\php.ini.
doc_root = C:\inetpub\wwwroot\
expose_php = Off
extension_dir = C:\PHP\ext
extension=php_gd2.dll
extension=php_gmp.dll
extension=php_ldap.dll
extension=php_mbstring.dll
extension=php_mysqli.dll
extension=php_openssl.dll
extension=php_pdo_mysql.dll
extension=php_snmp.dll
extension=php_sockets.dll
zend_extension=php_opcache.dll
upload_tmp_dir = C:\PHP\Uploadtemp
session.save_path = C:\PHP\Session
error_log = C:\php\php_errors.txt
date.timezone = "America/Los_Angeles" _(set your correct zone from http://php.net/date.timezone)_
opcache.enable=On
opcache.cli_enable=On`
- If using IIS, find, uncomment or add the following lines in C:\PHP\php.ini
fastcgi.impersonate = 1
cgi.fix_pathinfo = 1
cgi.force_redirect = 0
- If you have had previous versions of PHP installed, you had likely moved the PHP system files to in the Windows directory structure. If so, you will have to remove those files. Please review your PHP installation documentation for instructions on removing those files.
- Verify PHP is functional by running the following at the command prompt:
php -m
If messages with, Cannot find module are appearing, then there is something wrong with the MIBDIRS variable or missing mib file(s) in the PHP\Extras\mib folder.
Configure Permissions
- Change NTFS permissions on C:\PHP\Uploadtemp and C:\PHP\Session to grant Modify rights to the IUSR_ and IIS_WPG users for only files in the directory.
- Give the user who will be running the scheduled task, Modify rights to: c:\php\extras\mibs.index
Install MySQL
MySQL 5.6 / 5.7
- Download the latest Generally Available MSI Installer from MySQL.com.
- Launch the MSI
- Agree to the license
- Setup Type — Select Server only
- Click Execute and wait until the installation has completed.
- Click Next to begin the Product Configuration
- Type and Networking Page:
- Config Type: Server Machine
- Connectivity: Leave the defaults selected (TCP, Port 3306, Open Firewall port for network access)
- Enable Show Advanced Options
- Click Next.
- Accounts and Roles Page:
- Specify a root password
- Skip the User Accounts section
- Click Next.
- Windows Service Page
- Leave all defaults enabled
- Click Next.
- Plugins and Extensions
- Leave all defaults disabled
- Click Next.
- Advanced Options
- Enable General Log
- Enable Slow Query Log
- Click Next.
- Apply Server Configuration page
- Click Execute.
- Validate all steps are green and were successful.
- Click Finish
- Click Next through the remaining screens.
Install TimeZone Database
- Download TimeZone (POSIX standard) database from: http://dev.mysql.com/downloads/timezones.html
- Extract file
- Import:
c:\> mysql --user=root --password mysql < C:\downloads\timezone_posix.sql - Validate it works. The two queries below should return the same result in the form of central US time 2007-03-11 01:00:00
c:\> mysql --user=root --password mysql
mysql> SELECT CONVERT_TZ('2007-03-11 2:00:00','US/Eastern','US/Central');
+------------------------------------------------------------+
| CONVERT_TZ('2007-03-11 2:00:00','US/Eastern','US/Central') |
+------------------------------------------------------------+
| 2007-03-11 01:00:00 |
+------------------------------------------------------------+
1 row in set (0.01 sec)
mysql> SELECT CONVERT_TZ('2007-03-11 3:00:00','US/Eastern','US/Central');
+------------------------------------------------------------+
| CONVERT_TZ('2007-03-11 3:00:00','US/Eastern','US/Central') |
+------------------------------------------------------------+
| 2007-03-11 01:00:00 |
+------------------------------------------------------------+
1 row in set (0.00 sec)
Install Cacti Database
- Create the MySQL database:
c:\> mysqladmin --user=root --password create cacti - Import the default Cacti database:
c:\> mysql --user=root --password cacti < C:\Inetpub\wwwroot\cacti\cacti.sql
If you get any errors during this phase, you likely have sql-strict mode enabled or something else misconfigured in my.ini!
- Create a MySQL username and password for Cacti.
c:\> mysql --user=root --password mysql
mysql> GRANT ALL ON cacti.* TO cactiuser@localhost IDENTIFIED BY 'cactipw';
mysql> GRANT SELECT ON mysql.time_zone_name TO cactiuser@localhost IDENTIFIED BY 'cactipw';
mysql> flush privileges;
Install Net-SNMP
If you plan to use any hosts with SNMP v3 support, you must install the Net-SNMP binaries, since the PHP SNMP extension does not handle SNMPv3. You do NOT need to install/use the Net-SNMP SNMP agent. The Microsoft SNMP agent is recommended. The Net-SNMP binaries are useful when creating custom scripts, as they provide an easy way to query SNMP data from devices.
- Download from net-snmp.sourceforge.net
- Run the installer:
- Select the Net-SNMP agent service With Windows Extension DLL Support
- Uncheck Net-SNMP Trap Service
- Uncheck Perl SNMP Modules
- Select Encryption support
- Specify Destination Folder: C:\Net-SNMP
Validate
- From a command prompt run:
C:\>snmpwalk
If there are no errors, it’s properly installed.
Install Cacti
- Download the latest version from Github or www.cacti.net
- Extract the ZIP file to the root of your web server directory:
- IIS: C:\Inetpub\wwwroot\cacti\
- Apache: C:\Apache24\htdocs\cacti\
Configure Cacti
- Open a web browser to http://localhost/cacti/
- Follow the Installation Wizard
Configure Scheduled Task for Poller
You are going to need to schedule a task while logged on as an Administrator. This task is required for the Poller to run every 5 minutes. Make sure the Task Scheduler service is started and follow the steps below to begin.
- Open Task Scheduler
- Create a new Task
-
General Tab
- Name: Cacti Poller
- Security Options:
- Specify the user/service account the task will run under.
- Select Run whether user is logged on or not
-
Triggers Tab
- Create a new trigger.
- Select Daily
- Reoccur every: 1 days
- Repeat Task every: 5 minutes for a duration of Indefinitely
- Select Enabled
- Click OK
-
Actions Tab
- Create a new action.
- Program: C:\PHP\php.exe
- Argument: C:\cacti_web_root\poller.php
- Start In: C:\cacti_web_root
-
Conditions & Settings Tabs
- Configure per your IT standards.
- Click OK to create the Task.
Install Spine
Spine is a high speed poller replacement for cmd.php. It is almost 100% compatible with the legacy cmd.php processor and provides much more flexibility, speed and concurrency than cmd.php
Often, the latest compiled binaries of Spine can be found here: http://www.cacti.net/downloads/packages/Windows/. Alternatively, you can compile Spine with Cygwin yourself. Refer to the documentation https://github.com/Cacti/spine/blob/develop/README.md
Cacti сетевой монитор Windows с использованием SNMP
Cacti сетевой монитор Windows с использованием SNMP
Хотите узнать, как выполнить установку сетевого мониторинга Cacti Windows? В этом руководстве мы покажем вам, как установить SNMP в Windows и как настроить Cacti для мониторинга компьютера под управлением Windows с использованием Cacti.
• Windows 2012 R2
• Windows 2008 R2
Что такое кактусы?
Cacti — это платформа с открытым исходным кодом для мониторинга данных, полностью управляемая PHP.
В веб-интерфейсе пользователи могут использовать Cacti в качестве интерфейса к RRDtool, создавать графики и заполнять их данными, хранящимися в MySQL.
Cacti также имеет поддержку SNMP для пользователей для создания графиков для мониторинга сети.
Cacti Playlist:
На этой странице мы предлагаем быстрый доступ к списку видео, связанных с установкой Cacti.
Не забудьте подписаться на наш канал на YouTube FKIT.
Учебное пособие по кактусам:
На этой странице мы предлагаем быстрый доступ к списку учебных пособий по кактусам
Учебник — Включить SNMP Server 2012
Сначала мы собираемся установить и настроить службу SNMP на компьютере под управлением Windows 2012.
Откройте приложение Диспетчер серверов.
Откройте меню «Управление» и нажмите «Добавить роли и функции».

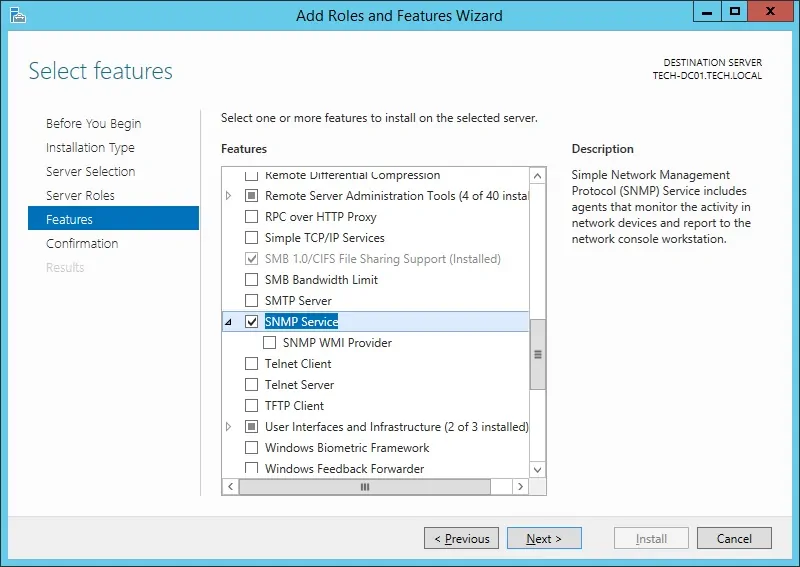
Откройте экран функций, выберите опцию обслуживания SNMP и завершите установку.
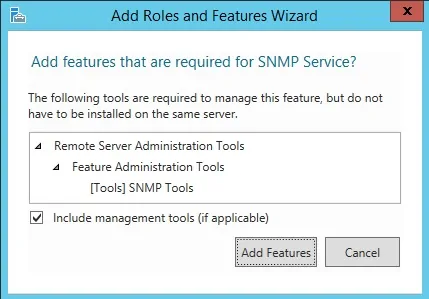
На следующем экране нажмите кнопку Добавить функции.
Функция SNMP была установлена на вашем компьютере, но нам все еще нужно настроить службу SNMP.
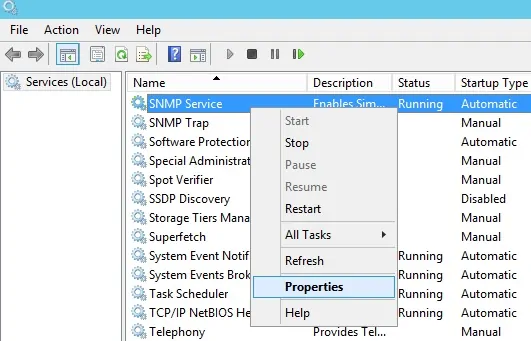
Откройте экран управления службами Windows и откройте свойства службы SNMP.
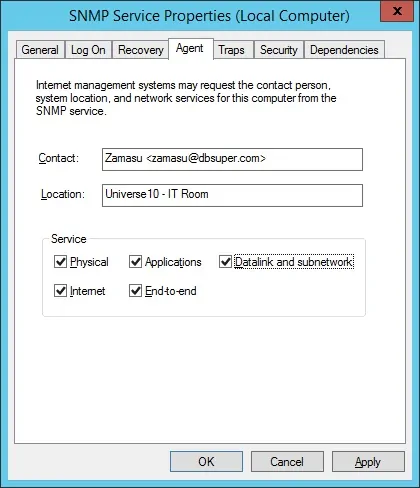
Откройте вкладку «Агент», выберите все параметры и введите контактную информацию об устройстве.
Перейдите на вкладку «Безопасность» и выберите «Принимать пакеты SNMP» с любого хоста.
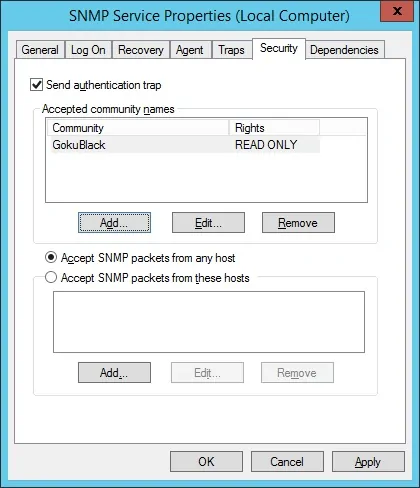
Вам нужно создать сообщество SNMP только для чтения.
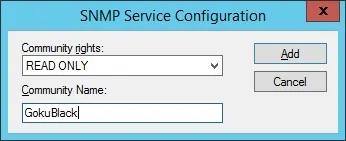
Вот резюме нашего примера конфигурации:
Сообщество GokuBlack имеет разрешение только для чтения на сервере Windows.
Контактное лицо, ответственное за этот компьютер Windows, было настроено как Zamasu.
Расположение оборудования было сконфигурировано как IT Room of Universe 10.
Вы успешно установили службу Windows SNMP.
Вы успешно настроили службу SNMP для Windows.
Чтобы проверить конфигурацию SNMP, используйте следующие команды на компьютере под управлением Ubuntu Linux.
# apt-get install snmp
# snmpwalk -v2c -c GokuBlack 34.210.148.86
Вот небольшой пример вывода SNMPWALK.
iso.3.6.1.2.1.1.1.0 = STRING: «Hardware: Intel64 — Software: Windows Version 6.3
iso.3.6.1.2.1.1.2.0 = OID: iso.3.6.1.4.1.311.1.1.3.1.3
iso.3.6.1.2.1.1.3.0 = Timeticks: (614928) 1:42:29.28
iso.3.6.1.2.1.1.4.0 = STRING: «Zamasu <zamasu@dbsuper.com>»
iso.3.6.1.2.1.1.5.0 = STRING: «TECH-DC01.TECH.LOCAL»
iso.3.6.1.2.1.1.6.0 = STRING: «Universe10 — IT Room»
Поздравляем! вы установили службу SNMP на компьютер под управлением Windows.
Брандмауэр Windows должен принимать сетевые пакеты через порт UDP: 161
Учебник — Cacti монитор Windows с использованием SNMP
Теперь нам нужно получить доступ к панели инструментов сервера Cacti и добавить компьютер с Windows в качестве устройства.
Откройте браузер и введите IP-адрес вашего веб-сервера плюс / кактус.
В нашем примере в браузере был введен следующий URL:
• http://35.162.85.57/cacti
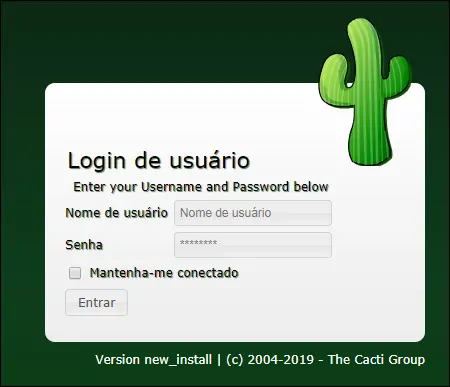
На экране входа в систему используйте имя пользователя по умолчанию и пароль по умолчанию.
• Имя пользователя по умолчанию: admin
• Пароль по умолчанию: admin
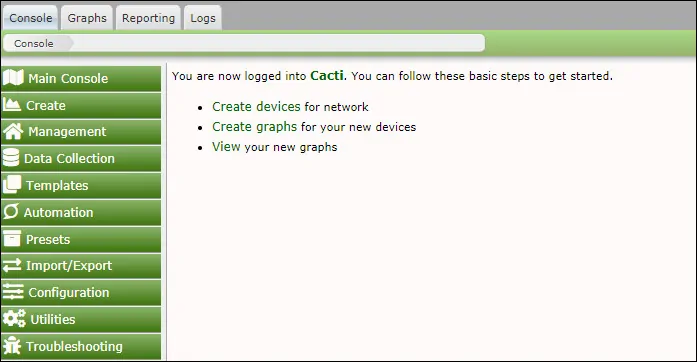
После успешного входа вы будете отправлены на Cacti Dashboard.
На экране панели инструментов Cacti откройте меню «Управление» и выберите «Устройства».
Нажмите на значок «плюс» в верхней правой части экрана, чтобы добавить новое устройство.

Выполните следующую настройку и нажмите кнопку «Создать».
• Описание — введите описание
• Имя хоста — введите IP-адрес вашего сервера Windows.
• Шаблон устройства — Windows
• Версия SNMP — 2
• Сообщество SNMP — войдите в свое сообщество SNMP
• Обнаружение сбитого устройства — SNMP Uptime
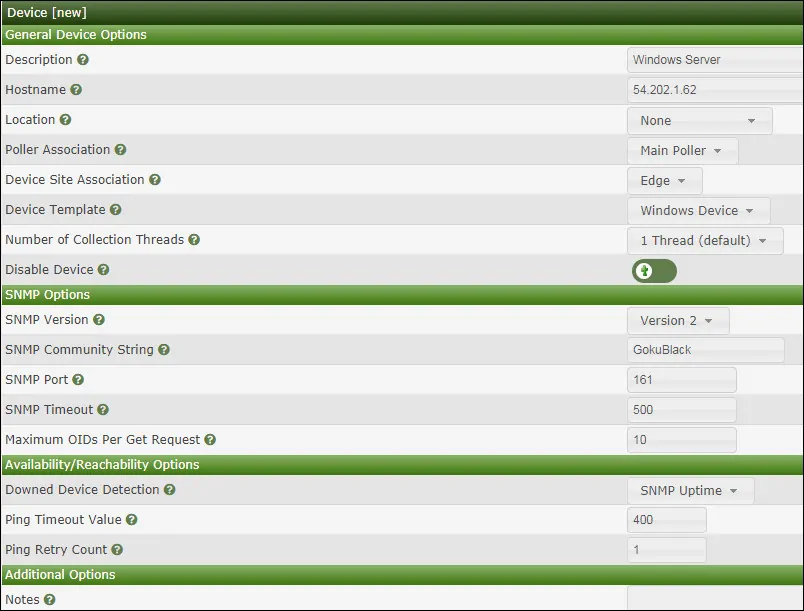
После нажатия кнопки «Создать» в верхней части страницы отобразится результат теста связи SNMP.
В верхней части экрана, нажмите на следующую опцию: Создать графики для этого устройства

Выберите шаблон, который соответствует вашим потребностям мониторинга сети
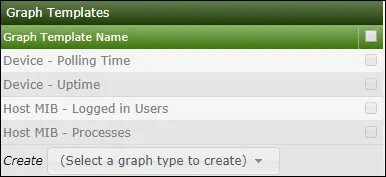
Выберите нужные разделы диска.

Выберите нужные сетевые интерфейсы.
Важный! В нижней правой части экрана выберите параметр с именем: Входные / выходные биты (64-разрядные)

Нажмите на кнопку «Создать», расположенную в нижней правой части экрана.
Перейдите в меню «Управление» и выберите «Устройства».
Подождите 5 минут и проверьте, было ли ваше серверное устройство Windows добавлено в список.

Настроить дерево графиков кактусов
Перейдите в меню «Управление» и выберите «Деревья».
Нажмите на знак «плюс» в верхней правой части экрана, чтобы добавить новое дерево.

Добавьте описание и нажмите кнопку «Создать».

На экране свойств дерева нажмите кнопку Изменить свойства дерева.
Включите опцию публикации.
Перетащите нужное устройство или конкретный график в левую часть экрана.
Нажмите на кнопку Сохранить.
Нажмите на кнопку «Закончить редактирование дерева».
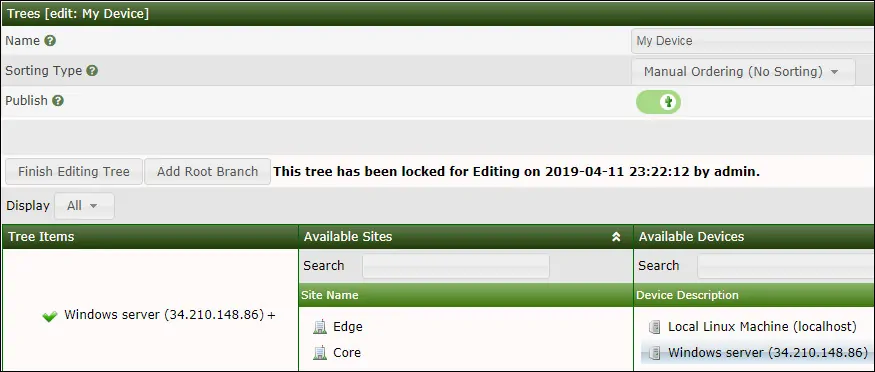
Конфигурация дерева кактусов была закончена.
Кактус Мониторинг Windows Server
Выберите вкладку Графики в верхней левой части экрана.
Найдите нужное дерево кактусов, где был включен сервер Windows.
Нажмите на имя устройства, которое вы настроили на сервере Windows.
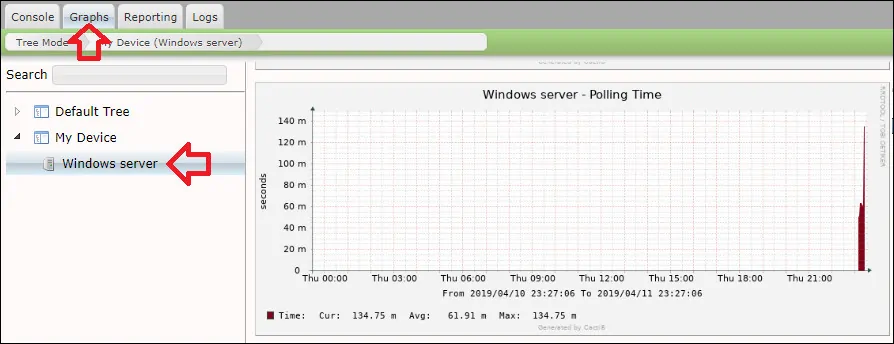
Теперь вы можете использовать Cacti в качестве решения для сетевого мониторинга для мониторинга серверов Windows с использованием SNMP.
VirtualCoin CISSP, PMP, CCNP, MCSE, LPIC22019-04-16T13:45:26-03:00
Related Posts
Leave A Comment
You must be logged in to post a comment.
Page load link
Ok
Система мониторинга Cacti – одно из самых распространенных решений для просмотра, контроля и анализа различных параметров сетевой инфраструктуры. Это открытое программное обеспечение, написанное на языке программирования PHP. Оно позволяет отслеживать состояние всех устройств, связанных с сетью, и предоставляет детальную информацию о трафике, загрузке процессора, памяти и других параметрах.
Установка Cacti на Windows Server может быть немного сложной задачей для новичков. Однако, если следовать пошаговой инструкции, описанной ниже, вы сможете установить Cacti на свой сервер без особых проблем. Внимательно читайте каждый шаг и следуйте инструкциям.
Шаг 1: Подготовка сервера. Перед установкой Cacti убедитесь, что на вашем сервере установлены все необходимые компоненты, включая веб-сервер Apache, базу данных MySQL и интерпретатор PHP. Если эти компоненты отсутствуют, установите их перед переходом к следующему шагу.
Шаг 2: Загрузка Cacti. Перейдите на официальный сайт Cacti и загрузите последнюю версию программы. После загрузки архива распакуйте его на сервере в каталог /var/www/html/cacti (или в другую папку, которую вы выбрали для размещения Cacti на вашем сервере).
Установка Cacti на Windows Server может быть выполнена в несколько простых шагов. Следуя этим инструкциям, вы сможете успешно настроить и использовать Cacti для мониторинга ваших систем и сетей.
Шаг 1: Загрузка и установка всех необходимых компонентов
Перед установкой Cacti убедитесь, что на вашем сервере установлены все необходимые компоненты. Это включает в себя:
- Apache сервер
- MySQL сервер
- PHP
- SNMP
Шаг 2: Создание базы данных и пользователя
Создайте новую базу данных MySQL и пользователя для Cacti. Запишите информацию о базе данных и пользователе, так как она понадобится вам на следующих шагах.
Шаг 3: Загрузка и установка Cacti
Загрузите последнюю версию Cacti с официального сайта. Распакуйте загруженный файл и скопируйте содержимое в директорию вашего Apache сервера.
Откройте веб-браузер и введите адрес вашего сервера. Вы должны увидеть страницу установки Cacti.
Следуйте инструкциям на странице установки Cacti. Введите информацию о базе данных и пользователе, которые вы создали на предыдущем шаге.
Шаг 4: Настройка Cacti
После установки Cacti вы должны настроить несколько параметров для корректной работы программы. Откройте файл config.php, который находится в директории Cacti.
Найдите и отредактируйте следующие строки:
$database_type = 'mysql'; $database_default = 'cacti'; $database_hostname = 'localhost'; $database_username = 'cactiuser'; $database_password = 'password';
Замените значения ‘cacti’, ‘localhost’, ‘cactiuser’ и ‘password’ на соответствующие значения вашей базы данных и пользователя.
Шаг 5: Запуск Cacti
После завершения настройки вы можете запустить Cacti, открыв веб-браузер и введя адрес вашего сервера. Вы должны увидеть домашнюю страницу Cacti.
Теперь вы готовы использовать Cacti для мониторинга ваших систем и сетей.
Подготовка к установке
Перед установкой Cacti на Windows Server необходимо выполнить несколько этапов подготовки:
1. Установите сервер баз данных.
Для работы Cacti требуется сервер баз данных, который будет хранить данные и настройки приложения. Поддерживаемые серверы баз данных включают MySQL, MariaDB и PostgreSQL. Установите сервер баз данных, выбрав одно из поддерживаемых приложений и следуя инструкциям на их официальных веб-сайтах.
2. Установите веб-сервер.
Для работы Cacti также необходим веб-сервер, который будет обрабатывать запросы от клиентов и отправлять им веб-страницы. Рекомендуется использовать веб-сервер Apache, который широко применяется в комбинации с Cacti. Установите Apache, последовав инструкциям на его официальном веб-сайте.
3. Установите PHP.
PHP — это скриптовый язык программирования, который используется для обработки данных и генерации динамических веб-страниц. Cacti требует PHP для своей работы, поэтому установите актуальную версию PHP, соответствующую требованиям Cacti, и следуйте инструкциям на официальном веб-сайте PHP.
4. Установите SNMP.
SNMP (Simple Network Management Protocol) — это протокол управления сетью, используемый для мониторинга и управления устройствами в сети. Cacti использует SNMP для сбора данных о производительности и состоянии устройств. Установите и настройте SNMP на вашем сервере Windows, следуя инструкциям в официальной документации Windows.
5. Загрузите файлы Cacti.
Перейдите на официальный веб-сайт Cacti и загрузите последнюю версию приложения. Распакуйте архив с файлами Cacti в каталог, где будет размещаться ваш сайт.
Подготовка к установке Cacti на Windows Server завершена, и вы готовы приступить к установке и настройке Cacti.
Проверка требований системы
Перед установкой Cacti необходимо убедиться, что ваша система соответствует следующим требованиям:
- Операционная система Windows Server (любая версия)
- Установленный веб-сервер (например, Apache)
- PHP версии 5.5.x или выше
- MySQL версии 5.0.x или выше
- RRDTool версии 1.0.x или выше
Если у вас уже установлены все необходимые компоненты, вы можете перейти к следующему шагу установки. В противном случае, необходимо установить недостающие компоненты.
Загрузка и установка необходимых компонентов
Для установки Cacti на Windows Server необходимо предварительно загрузить и установить несколько компонентов. Ниже представлен список необходимых компонентов и ссылки для их загрузки:
1. XAMPP — это пакет, включающий сервер баз данных MySQL, веб-сервер Apache и интерпретатор языка PHP. С помощью XAMPP вы сможете создать локальное окружение для запуска Cacti.
2. RRDtool — это база данных временных рядов, используемая Cacti для хранения данных. RRDtool также предоставляет инструменты для создания графиков и диаграмм.
3. Cacti — это само приложение для мониторинга сети, которое будет установлено на ваш сервер. Вы можете скачать последнюю версию Cacti с официального сайта.
После загрузки всех необходимых компонентов, вам нужно установить XAMPP и RRDtool на ваш сервер, следуя инструкциям, предоставленным на соответствующих веб-сайтах. Убедитесь, что XAMPP и RRDtool успешно установлены, прежде чем переходить к установке Cacti.
Настройка базы данных
Перед установкой Cacti необходимо настроить базу данных MySQL.
1. Откройте командную строку и войдите в MySQL с помощью команды:
mysql -u root -p
2. Создайте новую базу данных с помощью команды:
CREATE DATABASE cactidb;
3. Создайте нового пользователя и назначьте ему доступ к базе данных командой:
GRANT ALL ON cactidb.* TO 'cactiuser'@'localhost' IDENTIFIED BY 'password';
Где вместо ‘password’ укажите пароль, который хотите использовать для данного пользователя.
4. Обновите привилегии командой:
FLUSH PRIVILEGES;
5. Выйдите из MySQL командой:
exit;
Теперь база данных готова для установки Cacti.
Установка Cacti
Процесс установки Cacti на Windows Server включает несколько шагов. В этом руководстве мы перечислим каждый шаг и объясним, как выполнить его.
Шаг 1: Проверьте системные требования
Перед установкой Cacti убедитесь, что ваш сервер соответствует следующим системным требованиям:
— Операционная система: Windows Server 2016 или Windows Server 2019
— Веб-сервер: IIS (Internet Information Services) версии 7.0 или выше
— PHP версии 7.0 или выше
— MySQL Server версии 5.7 или выше
— NET-SNMP инструменты
Шаг 2: Установите веб-сервер и PHP
Установите IIS и PHP на вашем сервере. Проверьте, что веб-сервер работает и вы можете открыть веб-страницу.
Шаг 3: Установите MySQL Server
Загрузите и установите MySQL Server с официального сайта. После установки создайте базу данных для Cacti.
Шаг 4: Установите NET-SNMP инструменты
Загрузите NET-SNMP инструменты с официального сайта и установите их на ваш сервер.
Шаг 5: Загрузите и установите Cacti
Скачайте последнюю версию Cacti с официального сайта и распакуйте архив в каталог веб-сервера.
Шаг 6: Настройте Cacti
Откройте файл cacti/include/config.php в любом текстовом редакторе и отредактируйте его, указав параметры подключения к базе данных и другие настройки.
Шаг 7: Запустите установку Cacti
Откройте веб-браузер и перейдите по адресу http://localhost/cacti/install. Следуйте инструкциям на экране для запуска установки Cacti.
Шаг 8: Проверьте установку
После установки Cacti откройте веб-браузер и перейдите по адресу http://localhost/cacti, чтобы убедиться, что Cacti работает корректно.
Это была пошаговая инструкция по установке Cacti на Windows Server. Теперь вы можете использовать Cacti для мониторинга вашей сети.
Создание виртуального хоста в IIS
Для того чтобы установить Cacti на Windows Server, необходимо создать виртуальный хост в IIS. Виртуальный хост позволяет настроить отдельный домен или поддомен для работы с веб-приложениями.
Чтобы создать виртуальный хост в IIS, следуйте инструкциям ниже:
Шаг 1:
Откройте «Управление компьютером» и выберите вкладку «Службы IIS».
Шаг 2:
В разделе «Сайты» найдите папку «Default Web Site» и щелкните правой кнопкой мыши на ней. В открывшемся контекстном меню выберите «Добавить виртуальный каталог».
Шаг 3:
В появившемся окне «Добавить виртуальный каталог» укажите имя для вашего виртуального хоста и путь к папке, где будет размещено приложение Cacti.
Шаг 4:
Настройте доступ к виртуальному хосту, выбрав соответствующие параметры в разделе «Методы аутентификации». Рекомендуется использовать аутентификацию по учетным записям Windows или аутентификацию по форме.
Шаг 5:
Щелкните «Далее» и убедитесь, что виртуальный хост создан успешно. Затем нажмите «Готово» для завершения процесса создания виртуального хоста в IIS.
Теперь у вас есть виртуальный хост в IIS, готовый для установки и настройки Cacti на Windows Server.
Распаковка Cacti в директорию виртуального хоста
После успешной загрузки архива с Cacti с официального сайта, следует распаковать его содержимое в директорию вашего виртуального хоста.
Для начала, откройте архив с Cacti и найдите файл с расширением .zip или .tar.gz.
Затем, создайте директорию внутри вашего виртуального хоста, в которую будете распаковывать Cacti. Вы можете назвать эту директорию любым удобным для вас именем.
Откройте архив и извлеките все файлы и директории, находящиеся внутри него. Скопируйте их в ранее созданную директорию внутри виртуального хоста.
После того, как все файлы и директории будут скопированы, убедитесь, что права доступа к ним настроены корректно. Убедитесь, что веб-сервер имеет права на чтение и выполнение этих файлов.
Теперь Cacti распакован в директорию вашего виртуального хоста и готов к дальнейшей настройке и использованию.
Настройка параметров установки
Перед установкой Cacti на Windows Server необходимо настроить некоторые параметры, чтобы обеспечить правильную работу программы. В этом разделе мы рассмотрим основные параметры, которые следует настроить при установке Cacti.
1. Выбор языка. Во время установки Cacti вам будет предложено выбрать язык, на котором будут отображаться интерфейс и сообщения программы. Выберите русский язык, чтобы упростить работу с программой.
2. Настройка подключения к базе данных. Cacti требует базу данных для хранения данных и настроек. Введите данные для подключения к базе данных, включая хост, порт, имя базы данных, имя пользователя и пароль. Проверьте введенные данные на правильность, чтобы избежать проблем при дальнейшей работе с Cacti.
3. Настройка параметров хранения данных. Cacti позволяет настроить параметры хранения данных, такие как интервал сбора данных, количество хранимых данных и другие. Посмотрите рекомендации по настройке этих параметров в документации Cacti и выберите наиболее подходящие значения для вашей сети.
4. Настройка параметров отображения. Cacti позволяет настроить параметры отображения графиков, таблиц и других элементов интерфейса. Установите значения, которые соответствуют вашим потребностям и предпочтениям.
5. Проверка настроек и запуск установки. Перед окончательной установкой Cacti рекомендуется внимательно проверить все настройки, чтобы убедиться, что они заданы правильно. После этого вы можете запустить установку программы и дождаться ее завершения.
После настройки параметров установки вы будете готовы к работе с Cacti на Windows Server. Эти параметры можно изменить и дополнительно настроить после установки, чтобы лучше соответствовать вашим нуждам.
Видео:
Как активировать Windows Server 2022
#14. Установка и настройка терминального сервера на Windows Server 2019.
Installing Under Windows
Software Components Required
-
(Optional) Apache> — This software is optional if running Windows Internet
Information Server. -
Cacti> — Install from the zip distribution and install in the web root or
your choice. Many choose to install into a «Cacti» sub folder. - Spine — Install from the zip distribution into the c:\cacti directory. Make sure your spine.conf.dist is located in that directory as well.
- RRDTool — Install from the Cacti website. Install it into the c:\cacti directory.
-
PHP 4.3.6+ or 5.x — Install into the c:\php folder.
If you choose to install into c:\Program Files\php, you
will have to use 8.3 filenames to reference it’s binaries in Cacti. -
MySQL 4.x or MySQL 5.x — Install into the default location. This is typically
c:\Program Files\MySQL\MySQL Server X.XX. -
(Optional) Cygwin — Download and execute setup.exe
from the Cygwin website. Keep the setup.exe file for
later use. -
(Optional) Net-SNMP — Install to the c:\net-snmp
directory. If you choose to use c:\Program
Files\net-snmp you will have tu use 8.3 filenames to reference it’s
binaries in Cacti.
Configure PHP
- If using PHP 4, move the files in c:\php\dlls to c:\php
-
Add the following directory to the existing Windows System PATH environment variable: c:\php.
The Windows path can be accessed via the Control Panel at: System | Advanced |
Environment Variables | System Variables. -
Add the following directory to a new Windows System environment variable
called PHPRC: c:\php. - Add a new Windows System environment variable called MIBDIRS. If using PHP 4, set it to c:\php\mibs. If using PHP 5, set it to c:\php\extras\mibs
- If using PHP 4.3.5 or less, create the following directory c:\tmp.
-
Rename the file c:\php\php.ini.dist to php.ini, and make the following changes to it:
If using PHP 4 add/uncomment the following lines.
extension_dir = c:\php\extensions extension=php_snmp.dll extension=php_sockets.dll cgi.force_redirect = 0
If using PHP 5 uncomment the following lines.
extension_dir = c:\php\ext extension=php_mysql.dll extension=php_snmp.dll extension=php_sockets.dll cgi.force_redirect = 0
If using PHP 4.3.5 or less include the following line. If using 4.3.6 or
greater, you should remove this line if present.session.save_path=c:\tmp
-
In earlier installation guides to PHP, they recommended moving certain DLL’s
to the c:\winnt\system32 directory. If so, you will have
to remove those files. Please review the PHP installation documentation for
instructions on removing those files. -
If you want to allow template importing, uncomment the following line:
file_uploads = On
-
Give the user who will be running the scheduled task, modify rights to the
.index file in the location pointed to by the MIBDIRS Windows System environment variable.
Configure the Webserver (Apache)
-
Make sure you have stopped any IIS web servers before you proceed with Apache
installation, or make sure Apache is configured on an alternate port. -
If you are using Apache 1.3.x, installation of PHP 5 is
not recommended. If using PHP 4, add the following lines to your httpd.conf file. You can edit that file by selecting Start |
All Programs | Apache HTTP Server X.XX | Configure Server | Edit the httpd.conf
file pick from the Taskbar.If using Apache 1.3.x and PHP 4, then add the following lines:
LoadModule php4_module c:\php\sapi\php4apache.dll AddModule mod_php4.c AddType application/x-httpd-php .php DirectoryIndex index.html index.htm index.php
If using Apache 2.x and PHP 4, then add the following lines:
LoadModule php4_module c:\php\sapi\php4apache2.dll AddType application/x-httpd-php .php DirectoryIndex index.html index.htm index.php
If using Apache 2.x and PHP 5, then add the following lines.
LoadModule php5_module c:\php\php5apache2.dll AddType application/x-httpd-php .php DirectoryIndex index.html index.htm index.php
Configure the Webserver (IIS)
-
Start the Internet Information Services (IIS) Manager, right click on the
Default Web Site (in most cases) and select Properties. -
Under the Home Directory tab, select Configuration and click Add.
Browse to the path of php4isapi.dll or php5isapi.dll, and type in .php as the extension. Note: if
using IIS6, Enable All Verbs and Script Engine. -
Under the ISAPI Filters tab, click Add and browse to the php4isapi.dll or php5isapi.dll file.
Name the filter «php» and click OK. - Under the Documents tab, add index.php to the list.
-
If using IIS6, goto Web Service Extensions and
add a new Web Service Extension. Name the extension «php», and click Add and browse to the php4isapi.dll or php5isapi.dll file,
enable Set Extension status to Enable, and click OK. -
Give the IUSR_XXXX and IIS_WPG users read & execute permissions to the
file %windir%\system32\cmd.exe. They will also need read
permissions on cacti_web_root/cacti and it’s subfolders. - If using IIS6, give the IIS_WPG user modify permissions to the folders cacti_web_root/cacti/log and cacti_web_root/cacti/rrd.
-
Completely stop and start the IIS service using the following commands:
net stop iisadmin net start w3svc
Install Cygwin (optional)
-
Installing a single instance of Cygwin, and using it for all applications
that require it is recommended so you do not have different versions of the
Cygwin dlls laying around on your system, which can cause conflicts. - Run setup.exe you previously download.
-
Once you reach the portion of setup entitled Select Packages, install the
following:Base (include all items) Libs libart_lgpl libfreetype26 libpng12 zlib openssl Utils patch Web wget
-
Add c:\cygwin\bin to your Windows System PATH
environment variable. -
Move setup.exe to c:\cygwin
for future use.
Install RRDTool
- Extract the RRDTool zip file from the Cacti web site to c:\cacti\rrdtool.exe.
Install MySQL
- Extract the MySQL zip file to a temp directory and run setup.exe.
-
Install MySQL to the default directory, or for the purposes of this manual to
the c:\mysql directory. -
If running an older version of MySQL, start it by running c:\mysql\bin\winmysqladmin.exe. In more recent versions,
this is not required. -
Set a password for the root user
shell> cd mysql\bin shell> mysqladmin --user=root password somepassword shell> mysqladmin --user=root --password reload
-
Create the MySQL database:
shell> mysqladmin --user=root --password create cacti
-
Import the default Cacti database:
shell> mysql --user=root --password cacti < c:\apache2\htdocs\cacti\cacti.sql
-
Create a MySQL username and password for Cacti.
shell> mysql --user=root --password mysql mysql> GRANT ALL ON cacti.* TO cactiuser@localhost IDENTIFIED BY 'somepassword'; mysql> flush privileges;
-
If you are running MySQl 4.1 and above, you will need to apply the old
password setting in order to authenticate with Cacti. To make this change, stop
the MySQL service and add the following to the Start Parameter field. Start it
again once it has been added.--old-password
You will also need to update the cactiuser account with the old password
style.shell> UPDATE mysql.user SET Password = OLD_PASSWORD('cactipwd') WHERE Host = 'localhost' AND User = 'cactiuser'; mysql> FLUSH PRIVILEGES;
Install Net-SNMP
-
If you plan to use any hosts with SNMP v2c support, and are using early
versions of PHP, you must download and install the Net-SNMP libraries. Net-SNMP provides installers to install their product.
However, caution must be taken if you choose to use long file names as Cacti
does not them as long file names. You will have to user 8.3 notation. For
example c:\Program Files\Net-SNMP\bin becomes c:\progra~1\net-snmp\bin.
Install Spine
-
Extract the Spine zip file to c:\cacti and modify the spine.conf.dist file to include the following statements.
DB_Host  127.0.0.1 or hostname (not localhost)
DB_Database cacti
DB_User     cactiuser
DB_Password cacti
DB_Port     3306
All other pre 0.8.6 settings are obsolete.
-
Spine now comes with a binary distribution.
However, we strongly suggest that you install Cygwin and then remove all the DLL
files and sh.exe from the c:\cacti directory.
Configure Cacti
-
Edit cacti_web_root/cacti/include/config.php and
specify the MySQL user, password, database, and database port for your Cacti
configuration.$database_default = "cacti"; $database_hostname = "localhost"; $database_username = "cactiuser"; $database_password = "cacti"; $database_port = "3306";
-
Point your web browser to:
http://your-server/cacti/
Log in using the username and password of admin/admin. You will be required
to change this password immediately. -
From Cacti, go to Settings->Paths and verify/udate your paths to point to the correct
locations. Recommended examples are posted below. If you plan on using Spine, then it is very important that all paths include
forward slashes instead of backslashes.PHP Binary Path:
c:/php/php.exe
RRDTool Binary Path:
c:/cacti/rrdtool.exe
SNMPGET, SNMPWALK, SNMPBULKWALK, SNMPGETNEXT Paths:
c:/progra~1/net-snmp/bin/snmpget.exe
c:/progra~1/net-snmp/bin/snmpwalk.exe
c:/progra~1/net-snmp/bin/snmpbulkwalk.exe
c:/progra~1/net-snmp/bin/snmpgetnext.exe
Cacti Logfile Path:
c:/mycacti/website/cacti/log/cacti.log
Spine Path:
c:/cacti/Spine.exe -
Click on Devices. Delete the Localhost devices as it intended for Linux
environments In the upper right corner, click Add. Fill in the following
information and then click Add.Description: My Windows localhost Hostname: localhost Host Template: Windows 2000/XP
-
You should now be looking at the localhost device screen. Right under it’s
name, there should be some SNMP information listed, if not you should double
check the SNMP settings on the server and firewall settings. In the upper
right-hand corner, click on Create Graphs for this Host. On the following
screen, select a disk partition and network interface. At the bottom of the
page, click on Create. -
Log into the user account you’ll be using for the scheduled task and verify
starting a Cacti polling cycle works. Do this by running the following from the
command prompt:php c:/cacti_web_root/cacti/poller.php
The output should look something like the following:
C:\>php c:\inetpub\wwwroot\cacti\poller.php
OK u:0.00 s:0.06 r:1.32
OK u:0.00 s:0.06 r:1.32
OK u:0.00 s:0.16 r:2.59
OK u:0.00 s:0.17 r:2.62
10/28/2005 04:57:12 PM - SYSTEM STATS: Time:4.7272 Method:cmd.php Processes:1 Threads:N/A Hosts:1 HostsPerProcess:2 DataSources:4 RRDsProcessed:2
After this has ran once, you should have cacti.log in
/cacti/log/ and rrd files in /cacti/rra/. -
You are going to need to schedule a task while logged on as an Administrator.
This task is required to you can run poller.php every 5
minutes. Make sure the Task Scheduler service is started and follow the steps
below to begin.Note: The following instructions are based on Windows
XP and Windows Server 2003. You should be able to follow these instructions
close enough for Windows 2000 as well.-
Select Start —> Settings —> Control Panel
and double click on Scheduled Tasks. - Double click on Add Scheduled Task.
-
Click Next and Browse
on the following screen. Find c:\php and select php.exe. Choose Daily on and
click Next. -
Click Next again without changing the time or
date settings. -
When entering a username and password make sure the user has read and write
access to the following directories:cacti_web_root/cacti/rra cacti_web_root/log
Make sure the user has read, write, and execute access to the following
directories:c:\php c:\php\sapi
-
Click Next and Finish
to close the wizard. - Right click on the task you just created, and select Properties.
- Select the Schedule tab.
- Make sure Daily is selected and click the Advanced button.
-
Check the Repeat checkbox, set it for 5 minutes
and set the duration for 24 hours. - Click Ok
-
In the Run textbox enter the following text
making sure to use the appropriate paths.c:\php\php.exe c:\mycacti\website\cacti\poller.php
The start in box should say c:\mycacti\website\cacti.
-
Select Start —> Settings —> Control Panel
Apply Patches
-
There are two methods of applying patches to Cacti:
-
If you have Cygwin installed, then the patch instructions which use wget and
patch, will work. -
The other method requires you to visit
http://www.cacti.net/downloads/patches/0.8.6h/pre-patched/ and manually download
and replace the patched files.
-
If you have Cygwin installed, then the patch instructions which use wget and
-
You might need to reapply file/folder security on the files patched. Double
check they are correct.