С некоторых пор на серверных операционных системах от Microsoft, запущенных на “не серверном железе” перестали устанавливаться драйвера на сетевые карты от компании Intel. При этом на аналогичных десктопных операционных системах, драйвера успешно устанавливаются без каких-либо проблем. Суть проблемы, возможно кроется в наглом маркетинговом сговоре двух корпораций Microsoft и Intel. Далее рассмотрим, как решить данную проблему.
Рассмотрим решение проблемы пошагово.
Модифицируем файлы драйвера
- Для начала, находим на сайте Intel свою операционную систему и качаем пакет драйверов для сетевых карт I219.
- Переходим в диспетчер устройств и находим DevID нашей сетевой карты. В моем случае это: PCI\VEN_8086&DEV_0D55
- Распаковываем скачанный файл 7zip’ом и переходим в директорию “PRO1000\Winx64” далее, в зависимости от требуемой ОС переходим в требуемую директорию:
- NDIS63 — для Windows 8/Server 2012
- NDIS64 — для Windows 8.1/Server 2012 R2
- NDIS65 — для Windows 10/Server 2016
- Внутри выбранной директории находим и открываем файл e1d63x64.inf (для других ОС: e1d64x64.inf / e1d65x64.inf)
- Находим раздел [ControlFlags] и удаляем строчки, между [ControlFlags] и [Intel]
- Далее, в зависимости от исходной ОС (десктопной) ищем разделы:
- [Intel.NTamd64.6.2.1] – Windows 8
- [Intel.NTamd64.6.3.1] – Windows 8.1
- [Intel.NTamd64.10.0.1] – Windows 10
- Находим в нем строки со своим идентификатором (который мы нашли в пункте 2). Копируем их полностью в буфер обмена.
- Переходим в следующий раздел, в зависимости от целевой ОС (серверной)
- [Intel.NTamd64.6.2] – Windows Server 2012
- [Intel.NTamd64.6.3] – Windows Server 2012 R2
- [Intel.NTamd64.10.0] – Windows Server 2016
- В конец раздела после перечисления идентификаторов оборудования вставляем наши строки.
- Сохраняем изменения и закрываем файл.


Отключаем проверку подписи драйверов
После модификации файлов драйверов они не смогут пройти проверку подписи и, если мы все еще хотим установить драйвер десктопной сетевой карты Intel на Windows Server, то отключаем проверку подписи следующим образом:
Открываем консоль (cmd) от имени администратора и выполняем следующие команды:
bcdedit -set loadoptions DISABLE_INTEGRITY_CHECKS
bcdedit -set TESTSIGNING ON
Первая отключает проверку подписи, вторая включает тестовый режим.
Далее перезагружаем компьютер/сервер.
Установка драйвера
Открываем диспетчер устройств, далее выбираем нашу сетевую карту и жмем “Обновить драйверы…” -> “Выполнить поиск драйверов на этом компьютере” -> Указываем путь до папки с нашим модифицированным файлом -> На злобную ошибку о проверке издателя выбранных драйверов отвечаем решительно “Все равно установить этот драйвер”
Теперь драйвер сетевой карты успешно установится и будет работать.
Включение защиты и отключение тестового режима
После выполнения всех вышеуказанных действий снова включаем защиту от установки “не хороших” драйверов и выключаем тестовый режим командами в командной строке, запущенной от имени администратора:
bcdedit -set loadoptions ENABLE_INTEGRITY_CHECKS
bcdedit -set TESTSIGNING OFF
Вот и все! Удачи!
Источник информации: https://baduser.info/?p=1075
Небольшое лирическое отступление.
Однажды в студеную зимнюю пору, настраивая простенький файл- сервер, столкнулся с проблемой ранее мне не встречавшейся. Удачно установил серверную ОС (это была Windows Server 2008 R2) на не серверное оборудование и уже хотел открывать шампанское, но компания intel видимо решила, что жизнь моя проходит слишком легко и беззаботно. Установив почти все драйвера, стоп-кран сработал на драйвере сетевого контроллера!
Попробовал пару раз установить драйвер разными методами и понял, что проблема в самом драйвере. Найденная на официальном сайте intel, последняя версия драйвера ситуацию никак не изменила. Все та же ошибка. Полез ковырять инет и поиск показал, что есть причина моих (и многих других людей) бед. Как оказалось, маркетологи в Intel, перетерев тему с маркетологами microsoft, решили, что позволять ставить серверные ОСи на бытовые железки, слишком щедрый жест с их стороны. Отныне, хочешь серверную операционку – купи серверную железку! Видимо, чтобы глянуть, как у потребителя пройдет привыкание к новым реалиям, решили начать с малого – сетевых контроллеров:). К счастью, серверные и персональные версии Windows похожи друг на друга, а это часто дает возможность просто модифицировать драйвер. Данный случай не исключение.
Эта статья фактически является переводом (с некоторыми дополнениями и уточнениями) данного материала http://www.ivobeerens.nl/2013/06/24/enable-the-intel-i217-v-nic-in-windows-server-2012/comment-page-1/
Я использовал Windows Server 2008 R2 и сис.плату B150M-D3H со встроенным сетевым контроллером intel i219-v. Однако описанный метод актуален и для i217-v, и для i218-v, и для всех прочих новых сетевых intel серии PRO1000, и всех официально поддерживаемых версий ОС Windows Server.
Итак, все по порядку.
Переходим в Диспетчер устройств и смотрим ИД вашей сетевой
Я имел дело с I219-V с идентификатором поставщика и оборудования VEN_8086&DEV_15B8
Скачиваем последнюю версию драйвера intel network adapter driver с официального сайта Intel
Я не стал мелочиться и скачал Intel® Ethernet Adapters Connections CD
Распаковываем скачанный архив и переходим в PRO1000\Winx64\NDIS62если у вас Windows Server 2008 R2. Или выбираем другую папку соответственно вашей ОС.
NDIS61 — для Windows Vista/Server 2008,
NDIS62 — для Windows 7/Server 2008 R2
NDIS63 — для Windows 8/Server 2012
NDIS64 — для Windows 8.1/Server 2012 R2
NDIS65 — для Windows 10/Server 2016
Внутри находим и открываем файл e1d62x64.inf (Для других версий Windows он соответственно будет иметь имя e1d63x64.inf, e1d65x64.inf )
Находим раздел [ControlFlags] и удаляем две строчки, что ниже [ControlFlags]
Должно получиться так
Далее в разделе [Intel.NTamd64.6.1.1] согласно ИД оборудования вашей карты ищем подходящие строки. Выделяем их и копируем в буфер
Переходим в следующий раздел [Intel.NTamd64.6.1] и в его конец вставляем скопированные строки
Должно получиться так
Сохраняем изменения и закрываем файл.
Если у вас Windows Server 2012 или более поздняя версия, то перед установкой модифицированного драйвера необходимо отключить проверку подписи драйверов. Иначе установка не пройдет. Делается это из командной строки следующими командами:
bcdedit -set loadoptions DISABLE_INTEGRITY_CHECKS
bcdedit -set TESTSIGNING ON
обязательно перезагружаем компьютер
пробуем запустить инсталляцию через установщик Autorun.exe, который находится в корне нашей распакованной папки с драйверами. Или просто указываем папку с модифицированным драйвером в случае установки через диспетчер устройств. В процессе установки появится ругань на неподписанный драйвер — как обычно, не обращаем внимания…
В итоге установка проходит без проблем.
Если у вас Windows Server 2008, то установка закончена.
Если у вас Windows Server 2012 или более поздняя версия, то необходимо снова включить проверку подписи. Делается это из командной строки следующими командами:
bcdedit -set loadoptions ENABLE_INTEGRITY_CHECKS
bcdedit -set TESTSIGNING OFF
Hi wb,
Thanks for the clarification.
At this point I’m trying to understand Intel’s reasoning for I219-V supporting older Windows Server 2012 but not more recent Windows Server 2012 R2 or Windows Server 2016.
I’ve been trying to get my NUC6i5SYH to run Windows Server 2012 R2 or Windows Server 2016 as part of an experimental audio setup. Since Intel LAN driver will not install for I219-V with WS2012 R2 and WS2016, I have lost the ability to get the NUC6i5SYH to boot one of these two server OS in a diskless configuration (using Microsoft iSCSI virtual disk). This is very unfortunate. Had this NUC featured I219-LM LOM there would have been no trouble with WS2012 R2 or WS2016, but this is not the case.
Ironically, I have another much cheaper NUC5PPYH featuring Realtek gigabit Ethernet that has no trouble working with Windows Server 2012 R2 or Windows Server 2016. It looks like I’ll just have to give up trying to get my NUC6i5SYH to run WS2012 R2 or WS2016.
Can Intel confirm I219-V is supported with Windows Server 2012? Looking at Intel’s supported driver matrix PDF it shows even Windows Server 2012 as not being supported with I219-V. I can consider running Windows Server 2012 with my NUC6i5SYH if the I219-V driver can install properly.
Thanks.
Hi Sam,
Thank you for the additional information. Let me further check on this.
rgds,
wb
Hi wb,
I need to dispute your most recent statement above. I just completed an installation of Windows Server 2012 into my NUC6i5SYH with I219-V Ethernet, and the latest 21.1 LAN driver does NOT install against I219-V.
After this installer failed, I tried the INF driver installation method and got this:
The I219-V Ethernet of the NUC6i5SYH was not auto-detected and did not show up anywhere within this network adapter list.
This is basically proof that I219-V Ethernet is not supported with Windows Server 2012, in the same way Windows Server 2012 R2 and Windows Server 2016 are not supported for I219-V by the same driver package. Also, in studying the contents of the e1d63x64.inf, e1d64x64.inf and e1d65x64.inf files within the 21.1 driver package, it has become clear that I217-V/I218-V/I219-V are categorically excluded for Windows Server OS editions (2012, 2012 R2 and 2016), but I217-LM/I218-LM/I219-LM remain supported.
I would advice Intel to be more careful in stating which Windows OS edition is supported for which Intel LAN solution. There is obviously at least one case where the driver support matrix is incorrect, with the error not detected or corrected by Intel due to lack of verification of whether the driver can actually install or not.
Regards,
scan80269
HI Sam,
Thank you for bringing this matter to our attention. We will further look into this.
rgds,
wb
Hi,
I’ve had the same issues as you. Tried getting an ASUS B150i Pro motherboard with I219-V to work with Windows Server 2012R2 and 2016 as well. I started out with the Hyper-V Server editions, and tried to load drivers from Intel and Asus via the pnputil -i -a command, but this didn’t work.
After that i installed a Server 2012 R2 (with GUI). The only way I found to enable the Ethernet was to:
- Open Device Manager
- Open the unknown Network controller properties
- Driver — Update Driver
- Browse
- Let me pick from of list of device drivers on my computer
- Select the Intel i219-LM under Intel and use that instead.
This did work, but I have not been able to do the same for the Hyper-V Server edition (since it doesn’t have the Device Manager gui).
Kind regards,
Hi wb,
Thanks for answering. I have tried the drivers supplied by Asus (pnputil -i -a from the NDIS65 folder) and also from the latest 21.1 Intel drivers. I’ve tried running the supplied SETUPBD.exe application also.
As rspeak mentions, I believe this comes down to Windows Server 2016 and my hardware ID (15B8) not being in the .inf file.
rspeak, your procedure is for a different hardware ID than mine. How would you go about modifying e1d65x64.inf to support this HID: 15B8
As of now, when I do:
pnputil -i -a e1d65x64.inf
it gives me an driver installed correctly message. But sconfig still comes up with «No active network adapters»
This is extracted from device manager when my machine were running Windows Server 2012 R2 in GUI mode:
PCI\VEN_8086&DEV_15B8&SUBSYS_86721043&REV_31
PCI\VEN_8086&DEV_15B8&SUBSYS_86721043
PCI\VEN_8086&DEV_15B8&CC_020000
PCI\VEN_8086&DEV_15B8&CC_0200
Kind regards,
There’s a thread out there where you modify an INF file and then you can install the drivers. I have installed Server 2012 R2 Essentials on a Core i5 6th gen nuc
Also, the i7 NUC supports it with no hack required.
Hi Macvader,
Thank you for sharing the useful information. Glad to know you manage to made it work.
rgds,
wb
Macvader, well done! You solved it before I could give you the detailed procedures.&# 8232;I as well got it to work for my Hyper-V 2016, on the 6-gen i5 NUC. Also, some blogs show you copy and paste a whole bunch of Device IDs. Not necessary! Just do the ones that pertain to your LAN interface for your NUC, which in my case is 1570 ID. And bingo-bango, yer in biz!
Intel users ROCK!!
What do you mean «No Hack Required» ?
1. Загрузите драйвер, называемый PROWINX64 для декомпрессии в любую папку на сайт Intel. Введите папку PRO1000-> WinX64-> NDIS64, найдите файл с именем e1d64x64 (обратите внимание, что тип установки).
Адрес загрузки:https://downloadcenter.intel.com/zh-cn/download/26092/Ethernet—Windows-Server-2016-
2, открытый с блокнотом, найдите идентификатор, соответствующие I219-V, должны быть E1570.6.3.1
3, затем найдите ключ [Intel.ntamd64.6.3.1] над ним. В этом ключе найдите три строки данных, соответствующие идентификатору (E1570.6.3.1), а затем скопируйте его.
4, после жжения, в Intel.ntamd64.6.3.1, есть ключ под названием Intel.ntamd64.6.3. Вставьте три ряда данных, которые вы только что скопировали в этом ключе внизу. Хорошо, сохранить.
5. Откройте командный окно и выполните следующие две строки в свою очередь.
bcdedit -set loadoptions DISABLE_INTEGRITY_CHECKS
bcdedit -set TESTSIGNING ON
Две строки порядка означает, что тестовый режим включен, в котором можно установить тестовый режим (потому что мы изменили профиль драйвера)
6. Обновите программное обеспечение водителя
Пожалуйста, обратитесь к конкретным шагам.https://blog.csdn.net/a812073479/article/details/81514664Шаг 6-16.
7. Откройте окно «Команда» и выполните следующие две строки в порядке.
bcdedit -set loadoptions ENABLE_INTEGRITY_CHECKS
bcdedit -set TESTSIGNING OFF
Оригинальная ссылка:https://www.cnblogs.com/Goshinki/p/7514398.html
Introduction
This blog will be all about installing Intel I211, I217V, I218V and I219V drivers on Windows Server 2016 with EUFI boot. I’m running Windows Server 2016 as my main OS for lab, testing, Hyper-V with nested virtualization etc. I like it that way because I have all the options of the server OS at my disposal. Especially with the nested virtualization an NVME disk comes in handy. I also boot from NVMe so I need UEFI and use secure boot. That’s OK as it’s way better than the old BIOS and enables more scenario.
Windows Server 2016 doesn’t have any drivers for the I211, I217V, I218V and the I219V NICs.
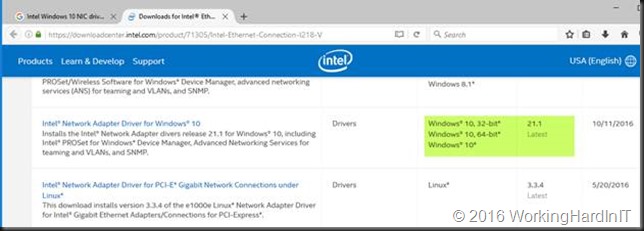
The Intel driver for them are only for Windows 10 and won’t install on a server OS. As you can see in the screenshot above that’s a system where I have the I211 driver already installed actually. We’ll work on the I218V as an example here.
That’s nothing new and we’ve dealt with this before by editing the .inf file for the driver. What might be new to some people as EUFI & NVME become a bit more popular is how to get a driver with an edited .inf file installed on your Windows Server OS.
Don’t worry even with an OS booting from EUFI with secure boot you can still disable driver signing / integrity checking when needed. We’ll walk you through an approach for installing Intel I211, I217V, I218V and I219V drivers on Windows Server 2016 with EUFI boot.
Installing Intel I211, I217V, I218V and I219V drivers on Windows Server 2016 with EUFI boot
Google for the Intel drivers of your NIC. Mine is a I218V. The instructions will work for a I217V or and i219V as well. Just adapt accordingly.
After downloading the most recent Windows 10 (x64 bit, we’ll use them with a server OS so there is no 32 bit here) Intel drivers form the Intel site we rename the exe to identify what package it is. We then extract the content to our work space. A free tool like 7zip will do the job just fine.
Prepping the .INF file
For the I211 we need to edit the .inf file and for the I217V, 218V and 219V we’ll edit the e1d65x64.inf file in note pad or your editor of choice. You’ll find it in the NDIS65 folder: C:\SysAdmin\PROWinx64\PRO1000\Winx64\NDIS65. The 65 in the folder and file names identifies our OS version (Windows 10 / Windows Server 2016).
But how do we know what .inf file to edit? We grab the hardware ID’s from the properties of our NIC or NICS.
Below you see the Hardware IDs for mu I218V. The I211 has PCI\VEN_8086&DEV_1539&SUBSYS_85F01043&REV_03 and my Iv218V has PCI\VEN_8086&DEV_15A1&SUBSYS_85C41043&REV_05.
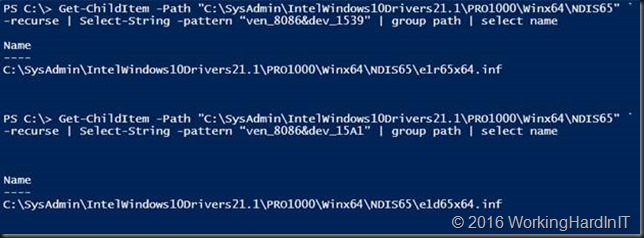
Drop the PCI\ from the beginning of the string and everything from the “&” on at the end. So for the I211 we’ll use VEN_8086&DEV_1539 and for the I218V we’ll use VEN_8086&DEV_15A1. We throw these ID strings into some PowerShell we run in our C:\SysAdmin\PROWinx64\PRO1000\Winx64\NDIS65 folder.
Get-ChildItem -Path “C:\SysAdmin\IntelWindows10Drivers21.1\PRO1000\Winx64\NDIS65” `
-recurse | Select-String -pattern “ven_8086&dev_1539” | group path | select name
Get-ChildItem -Path “C:\SysAdmin\IntelWindows10Drivers21.1\PRO1000\Winx64\NDIS65” `
-recurse | Select-String -pattern “ven_8086&dev_15A1” | group path | select name
So for my I218V I open op the e1d65x64.inf file in notepad++
I search for [ControlFlags] section and I edit the content of that section by deleting everything in it.
So it looks likes
Then I search for section [Intel.NTamd64.10.0.1] and I copy everything in there (I don’t bother to only copy the entries for my particular NIC or so.
Copy everything under that heading
I then search for section [Intel.NTamd64.10.0] and I paste what I just copied from section [Intel.NTamd64.10.0.1] nicely underneath what’s already in there.
Save the file. Basically, you’re done here.
Installing the driver
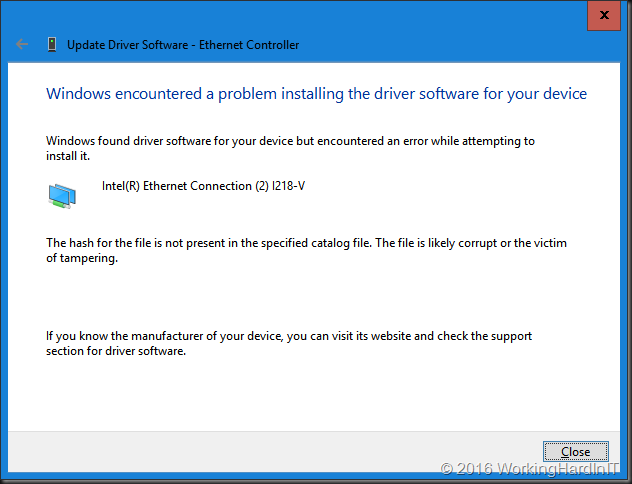
We now need to alter the standard startup setting of Windows Server 2016 temporarily because we will not be able to install a driver that’s been tampered with. If you don’t lower the security settings, you’ll get an error just like this one:
What I did is run the following in an elevated command prompt:
bcdedit /set LOADOPTIONS DISABLE_INTEGRITY_CHECKS
Note: as I’m using UEFI & secure boot the following won’t work as if you were using an older BIOS without secure boot.
bcdedit /set TESTSIGNING ON
bcdedit /set nointegritychecks OFF
But that’s OK. What we need to do is turn it of in another way. That last command bcdedit /set nointegritychecks OFF iIs not needed anyway. So, forget about that one. As a replacement for bcdedit /set TESTSIGNING ON you can use and advanced start option (requires reboot). You can also disable secure boot in EUFI, start again and then run bcdedit /set TESTSIGNING ON. I prefer the first as fixes itself the next boot and I don’t have to turn secure boot on again afterwards.
Go to setting and select Update & security.
Navigate to Recovery and click Restart Now
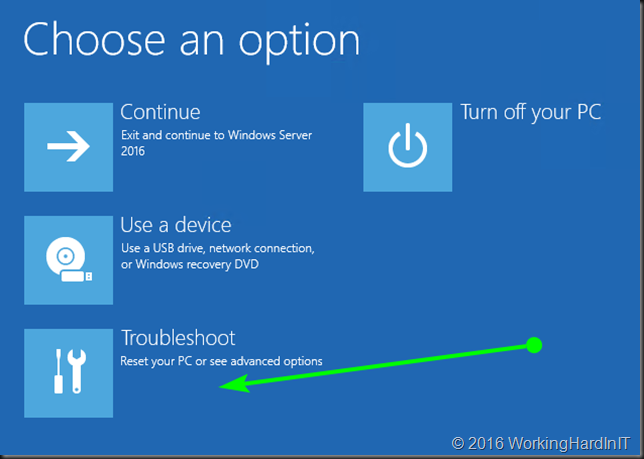
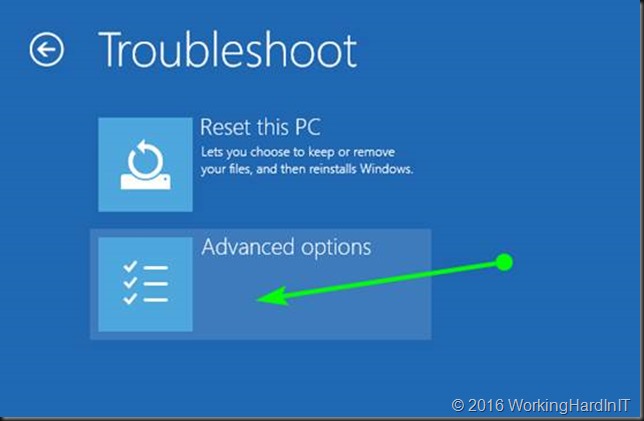
It will reboot to the following screen.Click Troubleshoot.
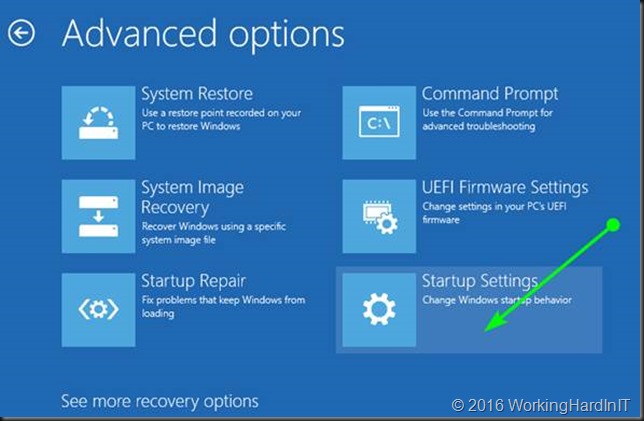
Select and click Advanced options.
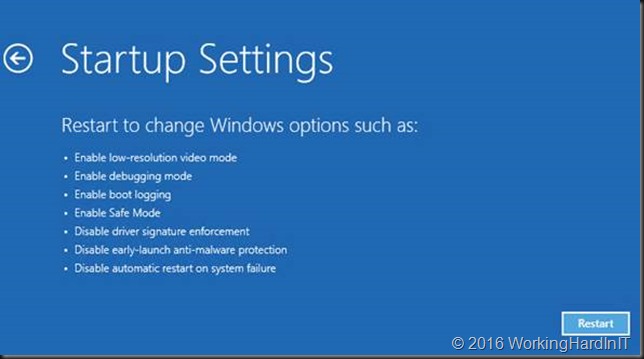
Click Startup Settings.
We click restart on the next screen
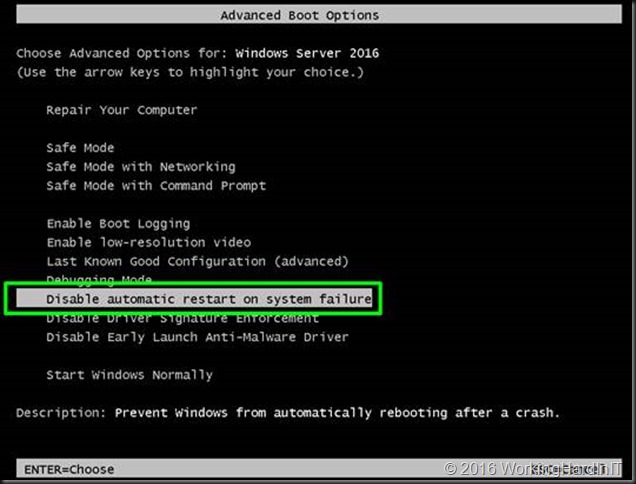
It will restart Advanced boot options. Select to disable driver signature enforcement. Hit ENTER.
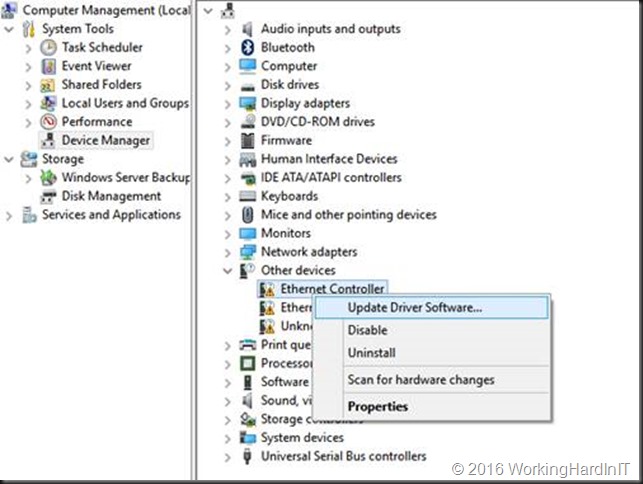
When your server has restarted, you’ll be able to install the driver you tampered with. To do so, in device manager select your NIC and click Update Driver Software.
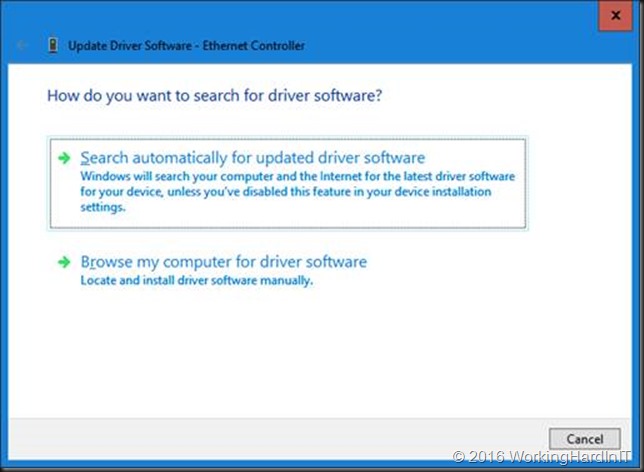
Select to Browse my computer for driver software
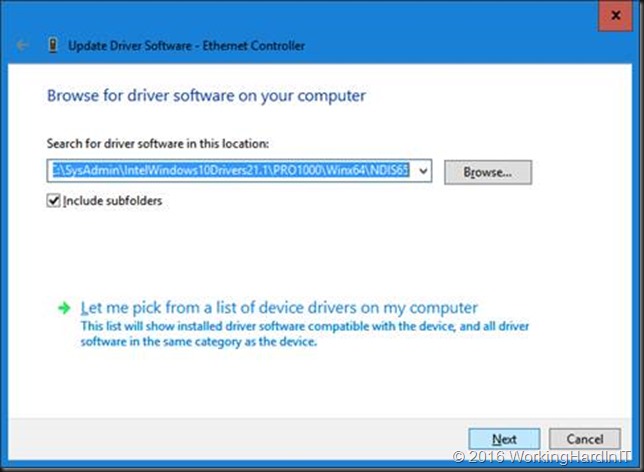
Point to the C:\SysAdmin\PROWinx64\PRO1000\Winx64\NDIS65 folder with your edited .inf files.
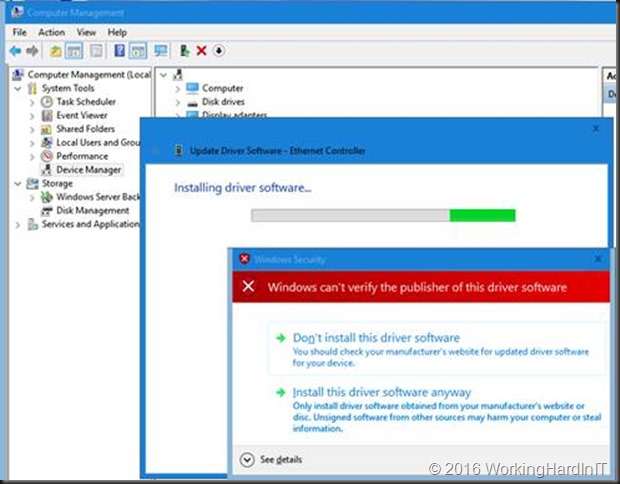
You’ll get a warning that the publisher of this driver can’t be verified. But as you’re the one doing the tampering here, you’ll be fine.
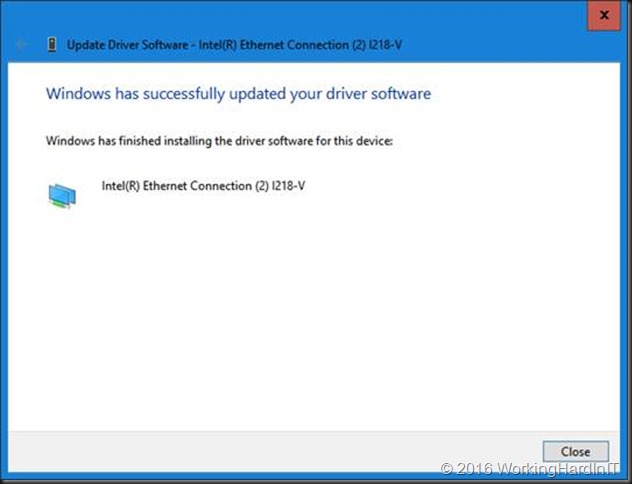
The result is successful install of the driver with a functional NIC for your system.
Cool, you’re in business!
No please reverse the setting you made to the integrity checks to make your system more secure again. From an elevated command prompt run:
bcdedit /set LOADOPTIONS ENABLE_INTEGRITY_CHECKS
Now reboot and you’re all secure again. That’s it, you’re done. I had both an I211 and an I218V NIC on my motherboard so I had to do this for both. Happy testing!


