Установка и настройка DNS-сервера и Active Directory в Windows Server 2016 практически не отличается от предыдущих выпусков серверов компании Microsoft, таких как Windows Server 2012, 2008. Пройдя несколько шагов устанавливается роль DNS и Доменные службы Active Directory, также для сервера имён потребуется небольшая настройка.
Установка и настройка роли DNS-сервера и Доменные службы Active Directory
До установки ролей сервера, требуется задать имя будущему серверу, а также статический IP-адрес. Также, если имеются, указываем IP-арес шлюза.
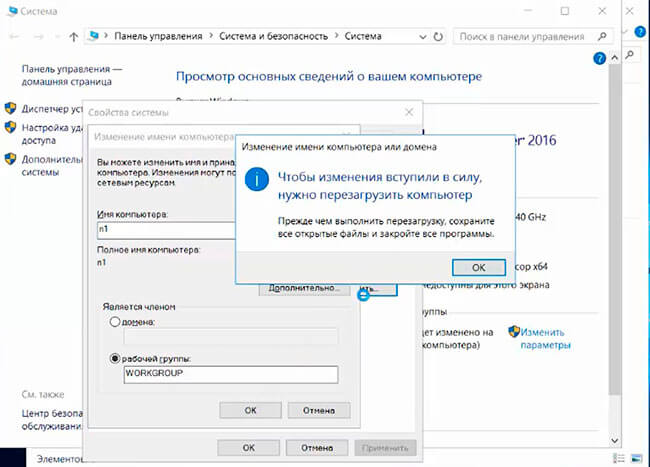
1. Нажимаем правой клавишей мыши на «Этот компьютер» и выбираем «Свойства». В открывшемся окне — «Изменить параметры» — «Изменить». Задаём имя компьютера и нажимаем «ОК». Для того, чтобы изменения вступили в силу, перезагружаем компьютер.
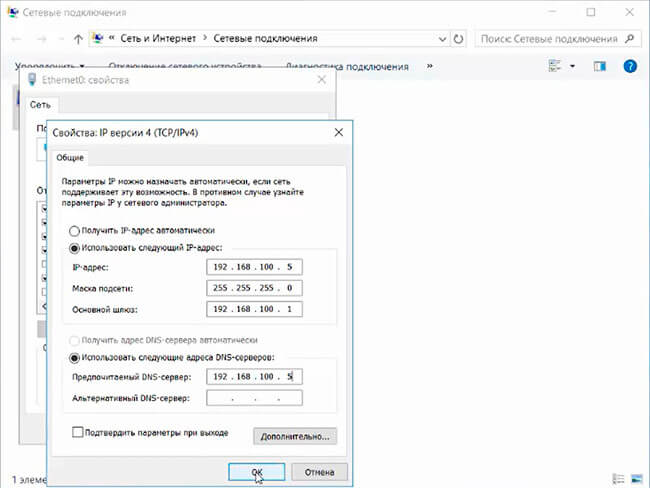
2. Для того, чтобы открыть сетевые соединения, в поле «Поиск» набираем команду ncpa.cpl. Выбираем нужный сетевой интерфейс, правой клавишей мыши — «Свойства». IP версии 6(TCP/IPv6) выключаем, если не используем. Затем выбираем IP версии(TCP/IPv4). Заполняем поля:
IP-адрес: адрес сервера (например, 192.168.100.5)
Маска подсети: маска сети (например, 255.255.255.0)
Основной шлюз: шлюз, если имеется (например, 192.168.100.1)
Предпочитаемый DNS-сервер: (например, 192.168.100.5)
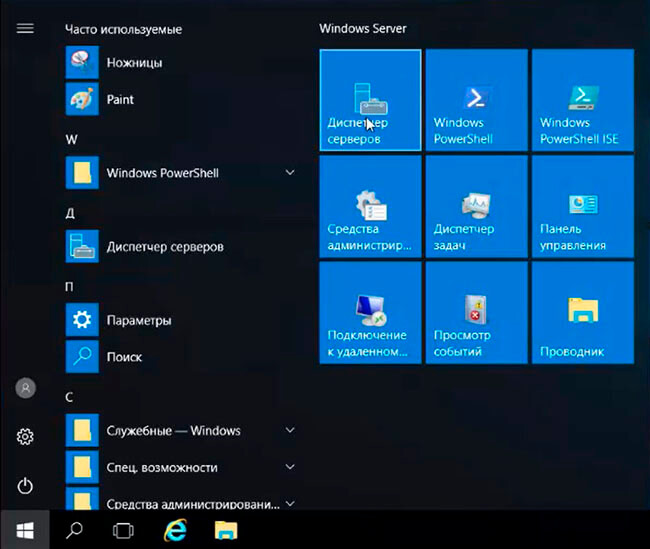
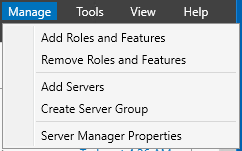
3. Теперь можно начать установку ролей сервера. Для этого выбираем «Диспетчер серверов».
4. В следующем окне — «Добавить роли и компоненты».

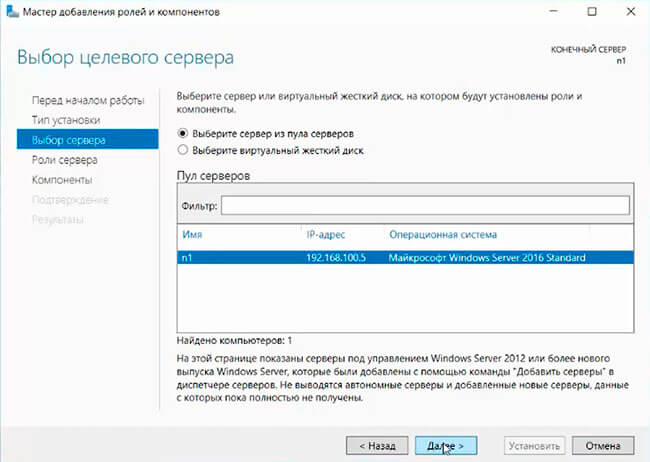
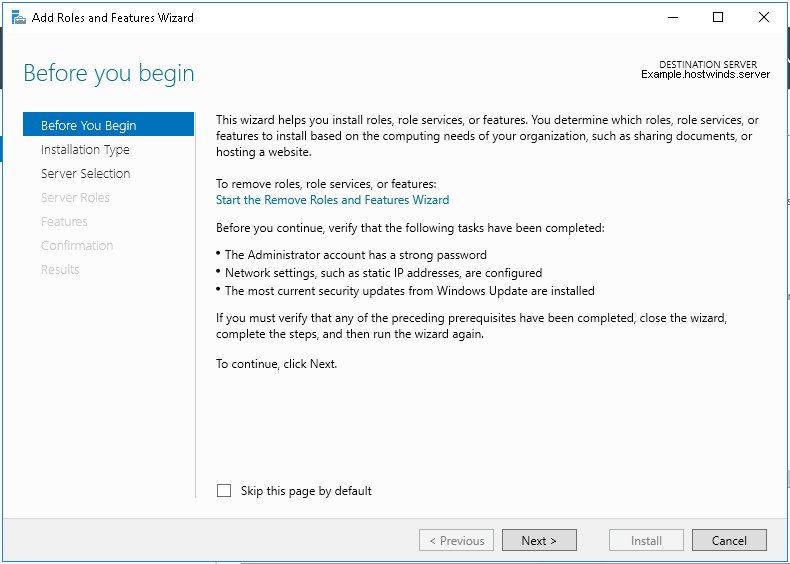
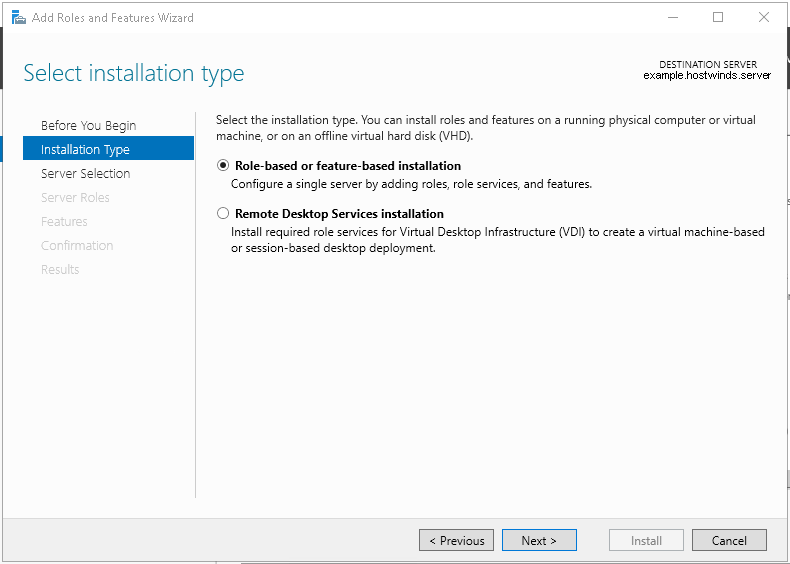
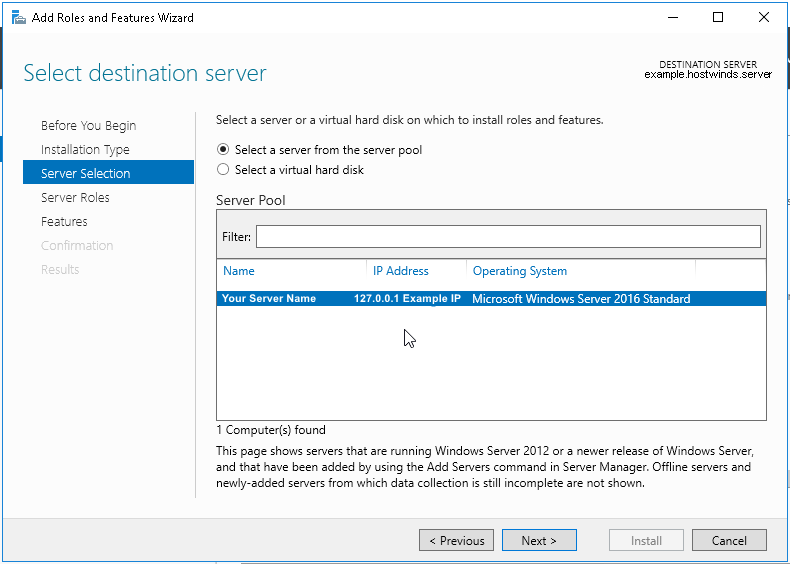
5. Читаем «Перед началом работы» и нажимаем «Далее». Затем оставляем по умолчанию чекбокс «Установка ролей или компонентов» и снова «Далее». В следующем окне выбираем сервер, на который будем устанавливать роли и «Далее».
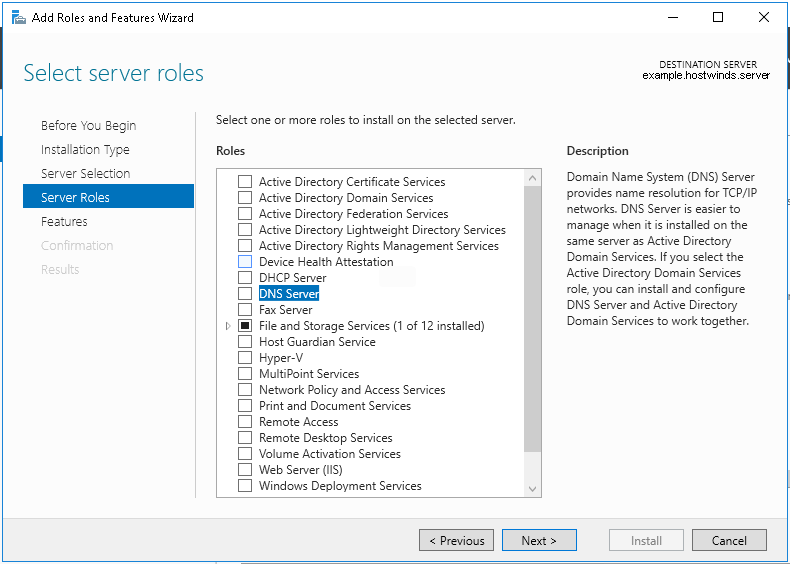
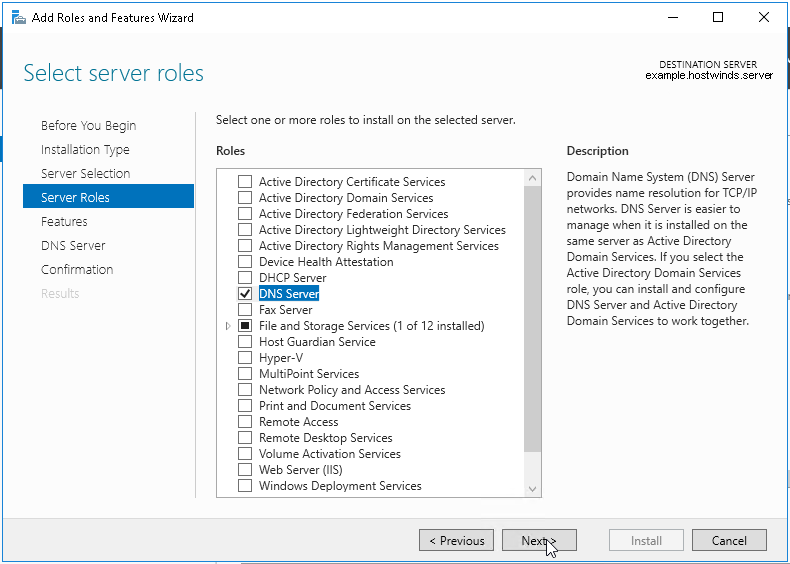
6. Выбора ролей сервера — ставим галочки напротив «DNS-сервера» и «Доменные службы Active Directory». При появлении запроса о добавлении компонентов — «Добавить компоненты». Затем «Далее».
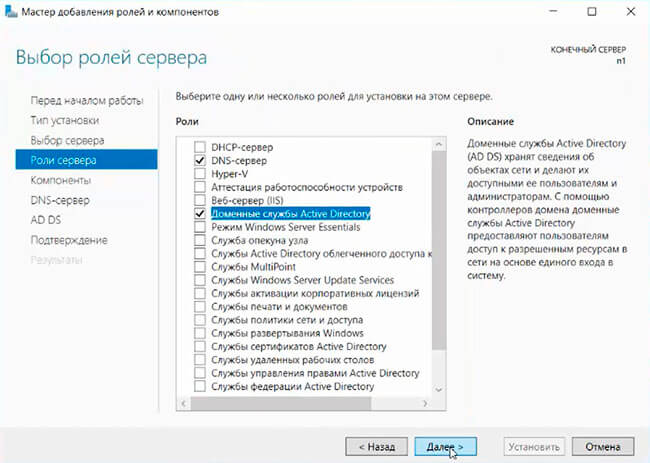
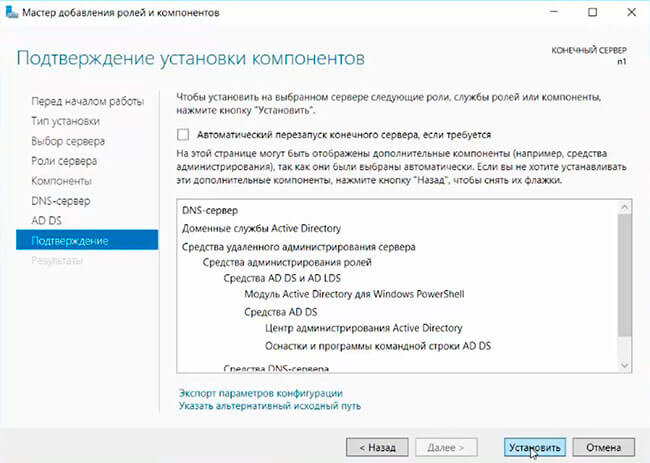
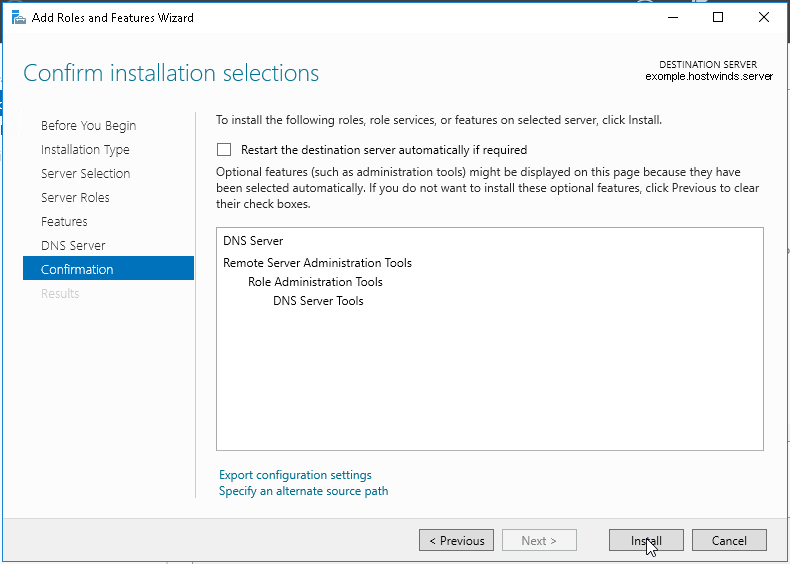
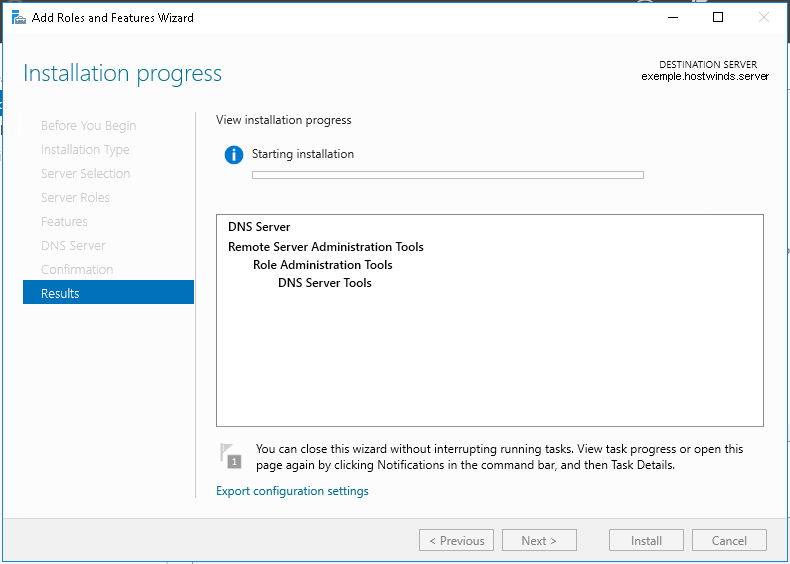
7. В следующих окнах нажимаем «Далее», а в окне «Подтверждение установки компонентов» выбираем «Установить». Этот мастер можно закрывать, по окончании установки появится предупреждение в диспетчере серверов.
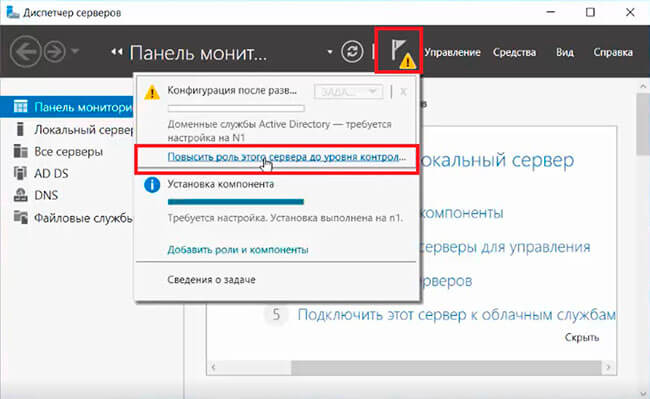
8. После окончания установки выбранных ролей сервера, нажимаем на значок предупреждения в «Диспетчере серверов» и выбираем «Повысить роль этого сервера до уровня контроллера домена».
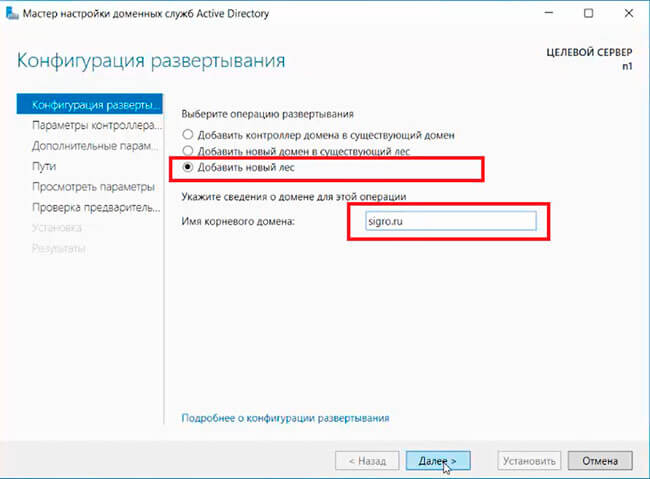
9. В следующем окне — «Добавить новый лес». Имя корневого домена — уникальное имя вашего домена.
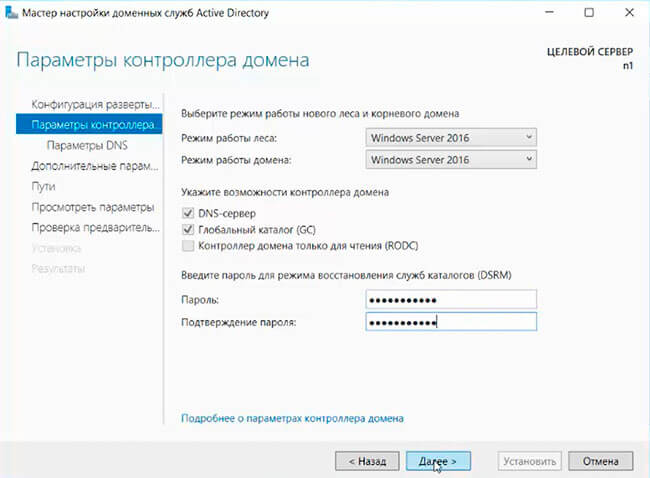
10. В «Параметрах контроллера домена» оставляем по умолчанию режим работы леса и домена — «Windows Server 2016». Вводим пароль для режима восстановления служб каталогов (DSRM).Этот пароль может пригодиться, его обязательно надо запомнить или записать в надежное место.
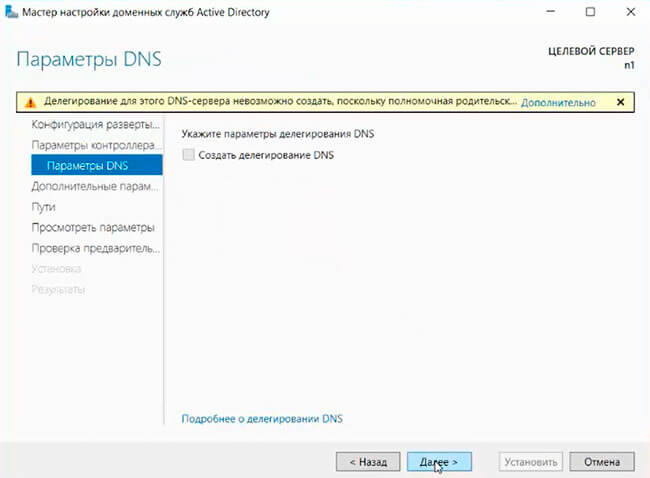
11. В окне «Параметры DNS» — нажимаем «Далее».
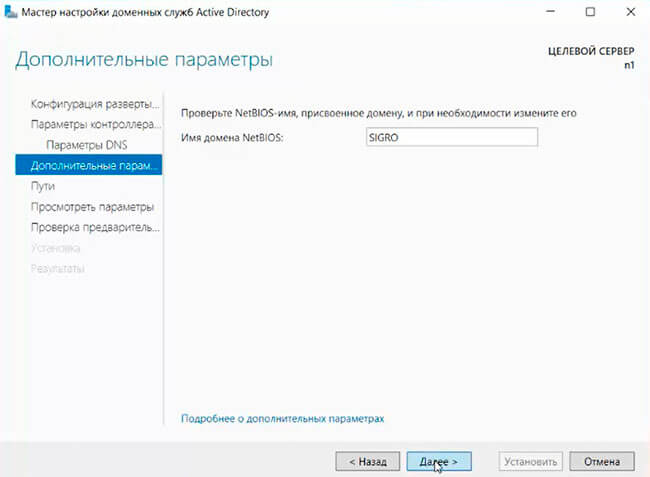
12. В «Дополнительные параметры» — «Далее».
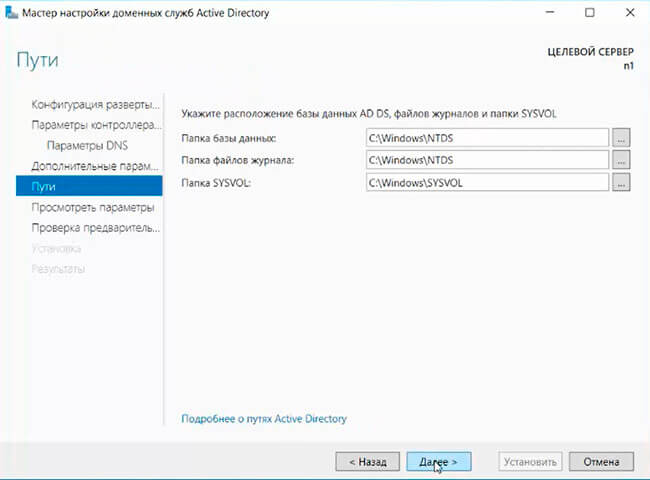
13. Расположение базы данных AD DS, файлов журналов и попок SYSVOL оставляем по умолчанию, нажимаем «Далее».
14. Проверяем параметры, затем «Далее».
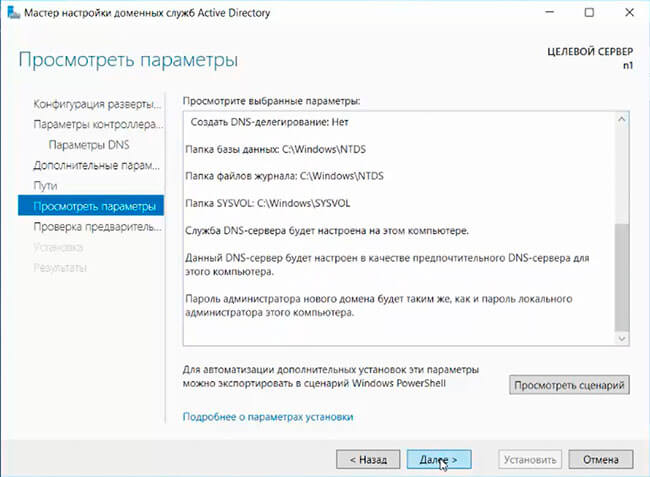
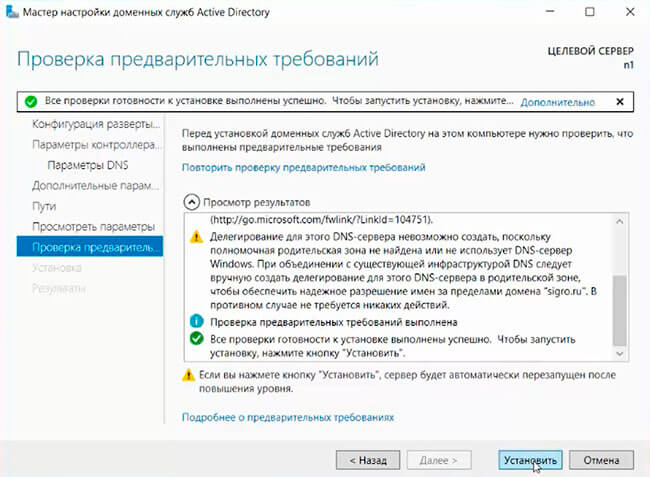
15. После того, как сервер проверит соответствие предварительных требований, можно нажимать «Установить».
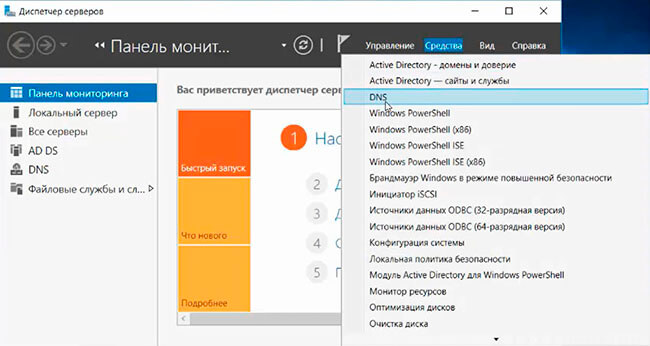
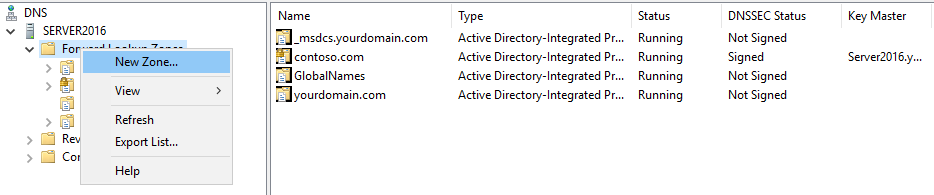
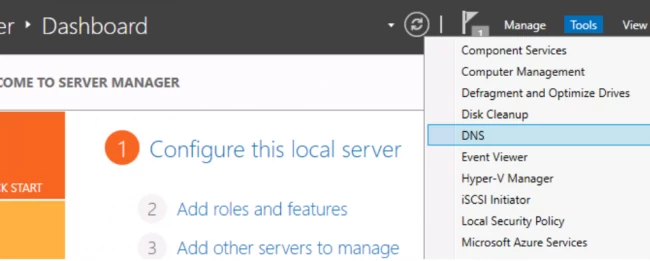
16. После настройки контроллера домена, можно перейти к настройке обратной зоны DNS-сервера. Для этого в «Диспетчер серверов» выбираем «Средства», далее «DNS».
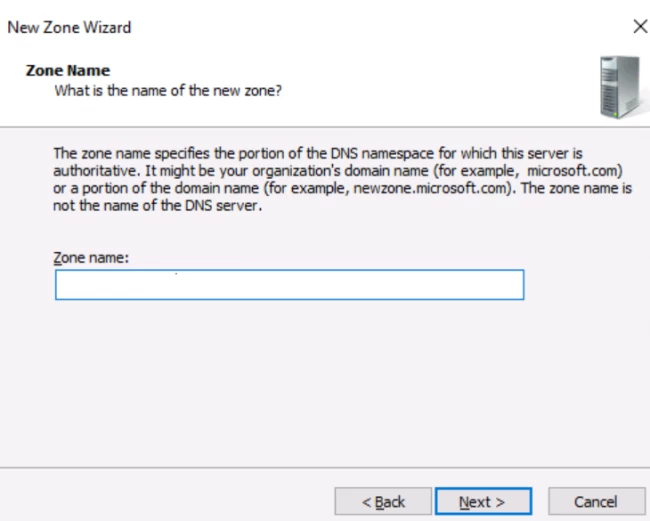
17. В открывшемся окне выбираем наш сервер, затем «Зона обратного просмотра». Правой клавишей мыши — «Создать новую зону…».
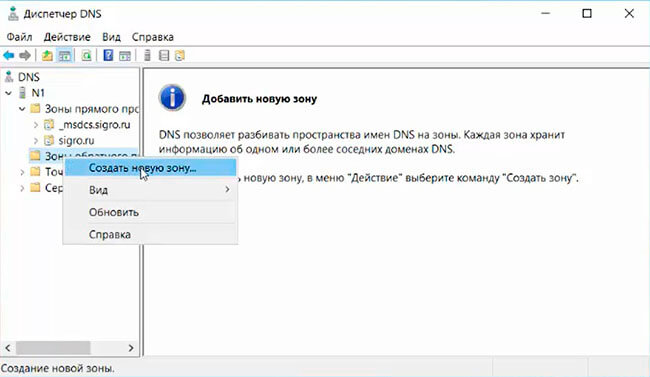
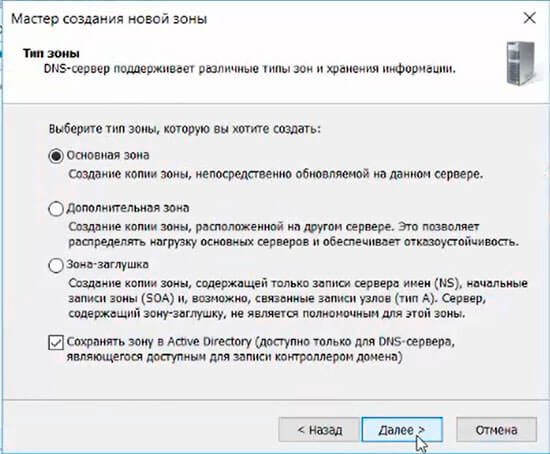
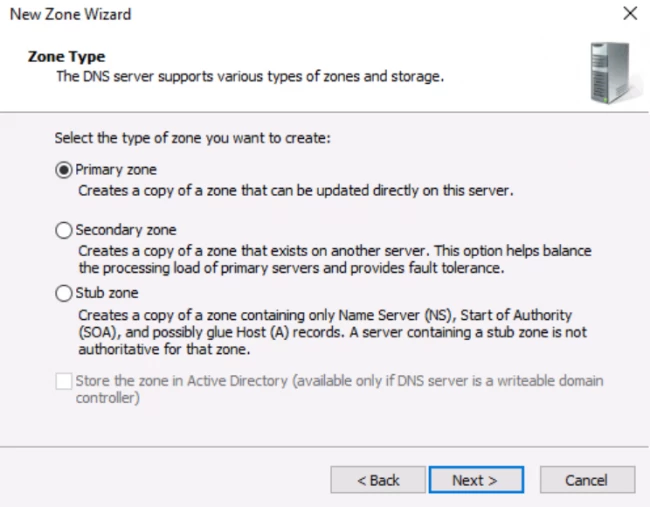
18. В мастере создания новой зоны оставляем тип зоны — «Основная зона», затем «Далее».
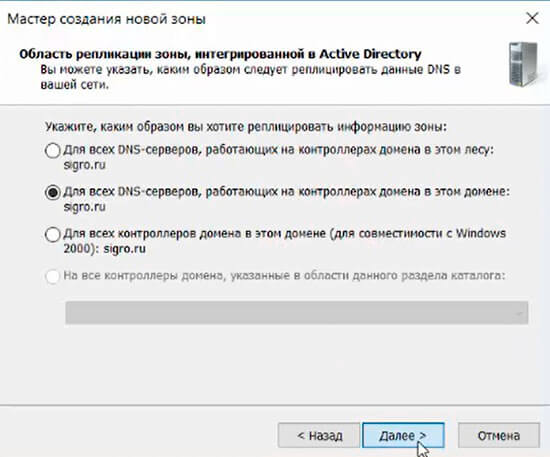
19. Оставляем по умолчанию чекбокс на «Для всех DNS-серверов, работающих на контроллерах домена в этом домене, снова «Далее».
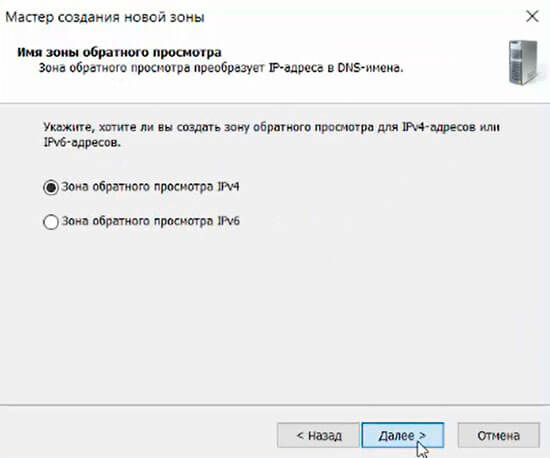
20. В следующем окне — «Зона обратного просмотра IPv4», затем «Далее».
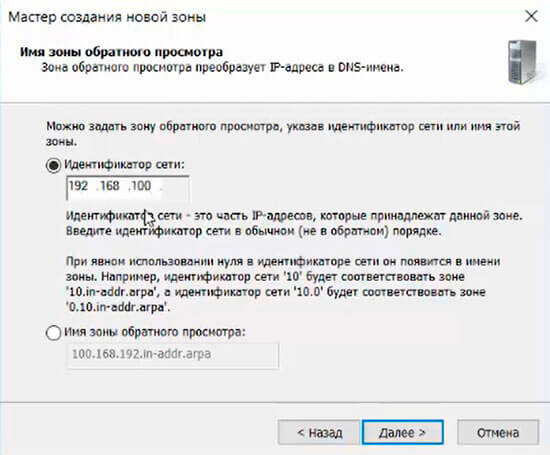
21. Для настройки зоны обратного просмотра задаем «Идентификатор сети» (например 192.168.100). После этого появится автоматически зона обратного просмотра. Нажимаем «Далее».
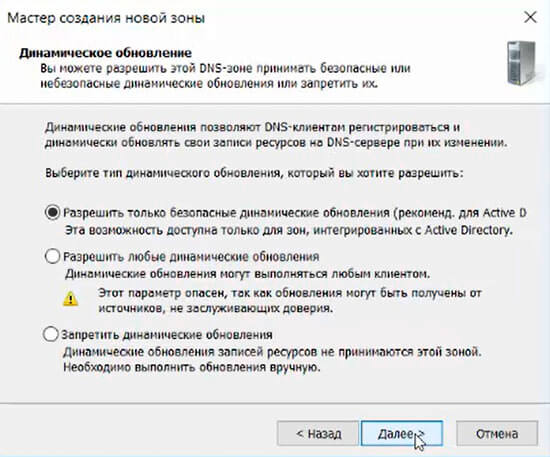
22. В следующем окне оставляем по умолчанию «Разрешить только безопасные динамические обновления, затем «Далее».
23. Для завершения настройки создания новой зоны проверяем настройки и нажимаем «Готово».
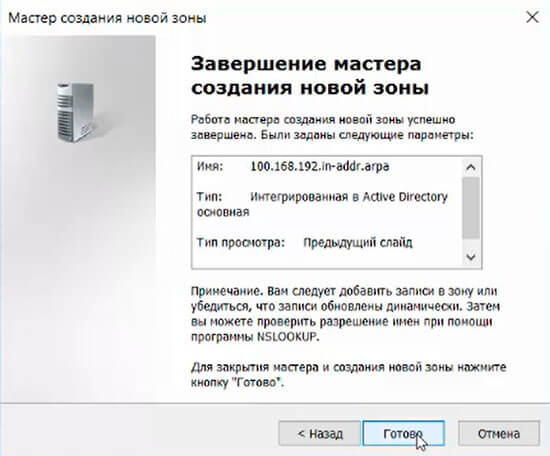
24. Появится зона обратного просмотра для домена.

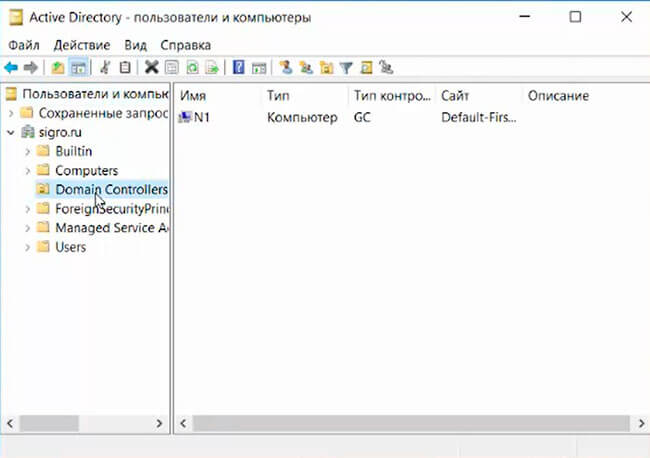
25. В «Диспетчере серверов» выбираем «Пользователи и компьютеры Active Directory». Проверяем работу Active Directory.
На этом установка и настройка выбранных ролей сервера заканчивается.
Посмотреть, что и как делать, можно здесь:
Читайте также:
- Установка и настройка DHCP — Windows Server 2016
- Второй контроллер домена — Windows Server 2016
- Создание и удаление пользователя, восстановление из корзины — Windows Server 2016
- Ввод компьютера в домен — Windows Server 2016
- Переименование учётной записи администратора домена — Windows Server 2016
- Windows server 2019 — установка и настройка Active Directory, DNS, DHCP
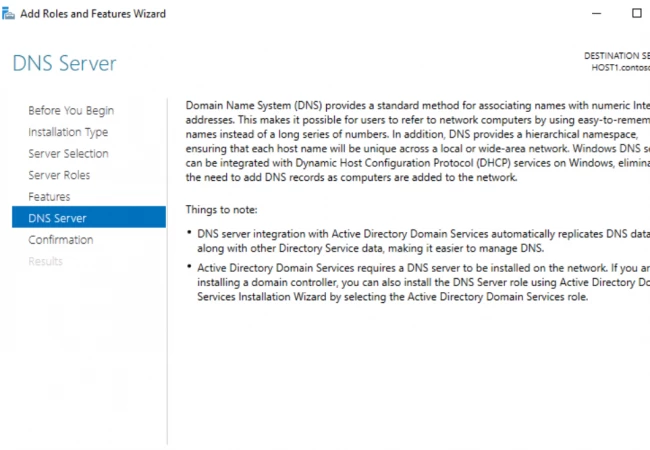
Microsoft Windows Server 2016 — это обновленная версия и мощная операционная система, способная выполнять множество различных настраиваемых ролей и функций. Однако для предотвращения перегрузки оборудования и серьезного снижения производительности оборудования Windows Server 2016 по-прежнему предоставляет модульный подход к задачам и ролям в административной среде сервера с помощью функции добавления ролей и компонентов.
В дополнение к текущим мощным возможностям, предлагаемым ролью DNS Windows Server 2012, Windows Server 2016 включает в себя обновленные и улучшенные функции.Назвать несколько:
- Настройки GP для NRPT позволяют клиенту DNS больше не связываться с определенным интерфейсом.
- Добавлены политики DNS
- Добавлено ограничение RRP / Response Rate.
- Аутентификация именованных объектов на основе DNS (DANE)
- Поддержка неизвестной записи
- Корневые подсказки IPv6
- Улучшена поддержка Windows Powershell
Чтобы настроить и настроить DNS, вам необходимо установить роль сервера DNS на Windows Server 2016. Эта статья проведет вас через процесс установки и настройки DNS в Windows Server 2016. Обратите внимание, что вам нужно будет войти в системуВаш Windows Server нашей функции VNC или подключение к удаленному рабочему столу.Когда вы готовы продолжить, пожалуйста, обратитесь к следующим шагам.
Как установить роль DNS-сервера в Windows Server 2016
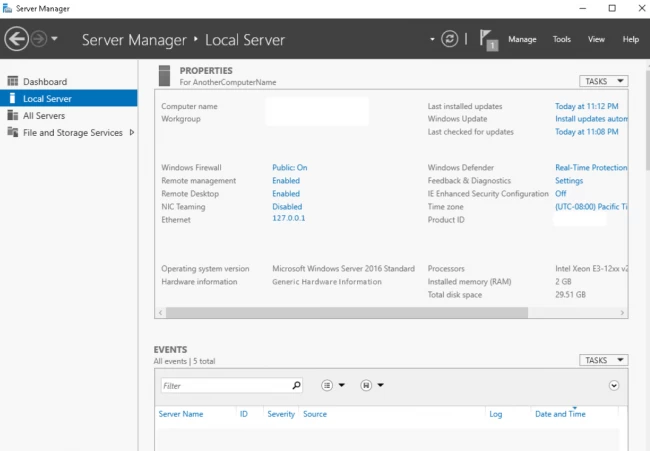
1. Откройте окно диспетчера сервера и перейдите к локальному серверу.
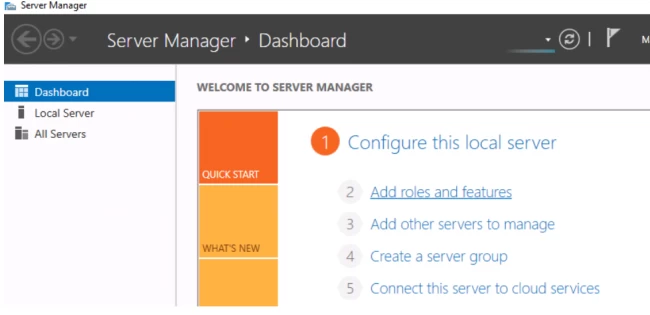
2. Нажмите Управление и «Добавить роли и функции».
3. После того, как появится окно мастера добавления ролей и функций, найдите время, чтобы прочитать информацию в разделе «Перед началом», прежде чем нажать Далее
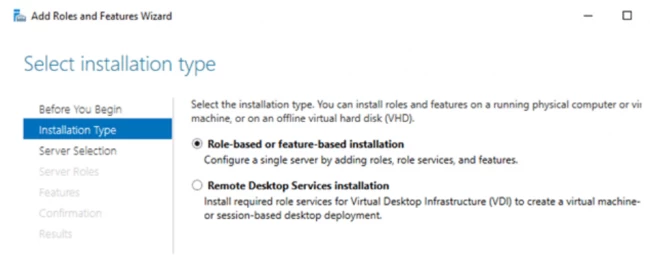
4. Если вы используете установку на основе ролей или функций, выберите переключатель рядом с ним.
5. Выберите сервер, который вы хотите использовать для этой роли.Как правило, для установки только для DNS, это то же самое, что и машина, на которой вы смотрите на это.Однако возможность удаленно установить роль доступна
6. Выберите роль DNS-сервера.
7. Затем окно просит вас подтвердить зависимости (обычно только инструменты администрирования, необходимые для роли DNS), также для установки. Нажмите Добавить функции, как это обычно требуется

8. Флажок должен быть отмечен в черном значке проверки. (Черный ящик в этом окне, как правило, означает, что не все функции установлены в этом дереве. Обычно это, по умолчанию, вещью для служб файлов и хранения). Затем нажмите Далее, чтобы двигаться вперед
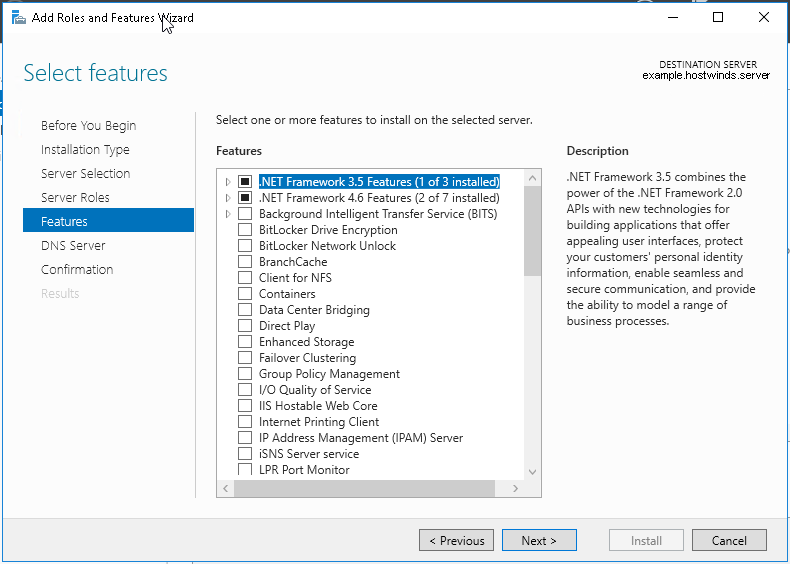
9. В окне функций вы можете установить дополнительные функции, которые часто не нужны для конфигурации только для DNS-DNS, однако не стесняйтесь взглянуть на них и помнить их, если вы найдете абсолютную потребность в них позже
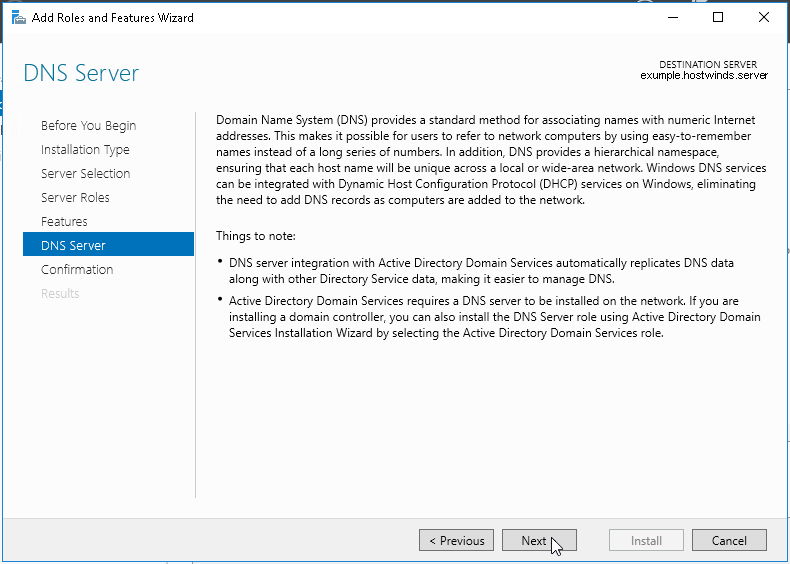
10. В следующем окне он дает вам краткое описание услуг и их функции, указывая на то, что может быть затронуто этой ролью или требует установки этой роли
11. Окончательное подтверждение установки. Он предоставляет возможность перезапустить целевой сервер (рекомендуется для массовых установок) и возвращает вас в окно диспетчера серверов.
Запуск / настройка роли DNS
1. Выберите параметр DNS на боковой панели диспетчера сервера.
2. Выберите сервер, который вы хотите управлять, щелкните правой кнопкой мыши его и нажмите «DNS Manager» (альтернативный метод, щелкните меню «Пуск», выберите «Административные инструменты», и нажмите DNS).
3. Щелкните «Действие».
4. Щелкните Настроить DNS-сервер…
5. Появится приглашение к мастеру настройки DNS-сервера, нажмите «Далее».
6. Выберите один из 3 вариантов, который вы хотите использовать, который может удовлетворить ваши потребности.
Зона прямого просмотра
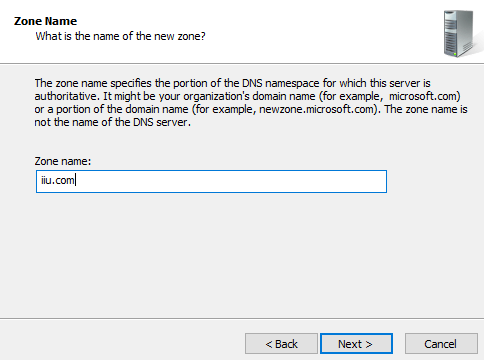
1. Как только будет выбран любой из вариантов, он перейдет к запросу имени зоны. Введите название зоны.
2. Если выбран параметр DNS, поддерживаемый поставщиком Интернет-услуг, он будет запрашивать информацию для DNS поставщика услуг Интернета. Если Сервер обслуживает зону, он запросит имя зоны. Подойдет любое имя.
3. После нажатия следующего на сервере придерживается зона, она будет спросить, хотите ли вы создать новый файл или использовать существующий файл, вводит информацию или файл, который вы хотите использовать, а затем нажмите «Далее»
4. Далее он представит вам 3 варианта, 2, если Active Directory не установлен. Сделал предпринимаемые предупреждения, выберите вариант, который вы хотите использовать, и нажмите Далее.
5. Этот раздел спросит вас, должен ли он переадресовывать запросы на DNS-серверы с определенным IP или если это не должно.Выберите опцию, которую вы хотите использовать, введите любую необходимую информацию и нажмите Далее.
6. Наконец, подтвердите детали с вами, и «Готово» завершит процесс.
Зона прямого и обратного просмотра
Эта опция использует аналогичный процесс для первой половины (Rester Zoneup Zone), с возможностью разницы, являющейся опцией первичных, вторичных и заглушних зон. Параметры описывают параметры для каждого и переходят к обратной половине зоны поиска.
1. Выберите, хотите ли вы создать зону обратного просмотра сейчас.
2. Нажмите Далее. Если вы выбрали, чтобы создать один сейчас, он перейдет на аналогичный экран к зоне переднего поиска, выбирая, какой вариант желательна. Однако, если вы решите не устанавливать зону обратного поиска, она закончит процесс.
3. Зона обратного просмотра использует тот же процесс, что и зона прямого просмотра, но требует информации rDNS.
Расширенный вид отображает зоны обратного поиска на 0, 127.0.0.1 и 255 трансляций. Это дополнительно отображает кэшированные поиски. Включите только продвинутый вид, если требуется диктует его, так как редактирование их может вызвать проблемы.
Доверительные пункты должны быть установлены для публичных криптографических ключей подписанных зон. Также известен как доверительный якорь и должен быть настроен на нефинансирующем сервере DNS.
Серверы условной пересылки Позволяют пользователю преобразовывать имена в частное пространство имен или ускорять преобразование в общедоступное пространство имен. Он работает так же, как мостовое соединение между двумя внутренними сайтами для связи.
Если вы нажали Root Hint, он отправит вас в конец и завершит задачу. Если вы выберете параметры зоны прямого или прямого и обратного просмотра, он будет продолжен.
In this tutorial, we want to learn how to install and configure DNS on Windows Server 2016 step by step.
Note: Before installing DNS on your virtual server, you must set the IP address of your server statically, otherwise you will encounter an error during installation.
Table of Contents
Tutorial How to Install and Configure DNS on Windows Server 2016
DNS stands for Domain Name System, which in its general sense is responsible for translating domain names to IP addresses.
DNSs have zones within them that, when installed and configured by network administrators, make them use their network domain name and use them.
Install DNS on Windows Server 2016
1- First open your Server Manager.
2. Click Add Roles and Features to open the Add Roles page.
3. On the page that opens, click Next.
4. Then click on Role-based or feature-based installation and click Next.
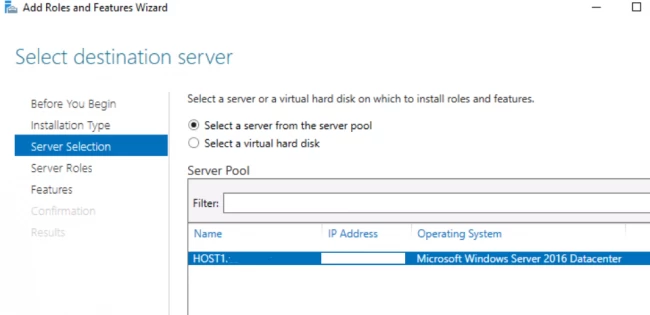
5- In this step, select Select a server from the server pool and select the name of your server in the box below, and finally click Next.
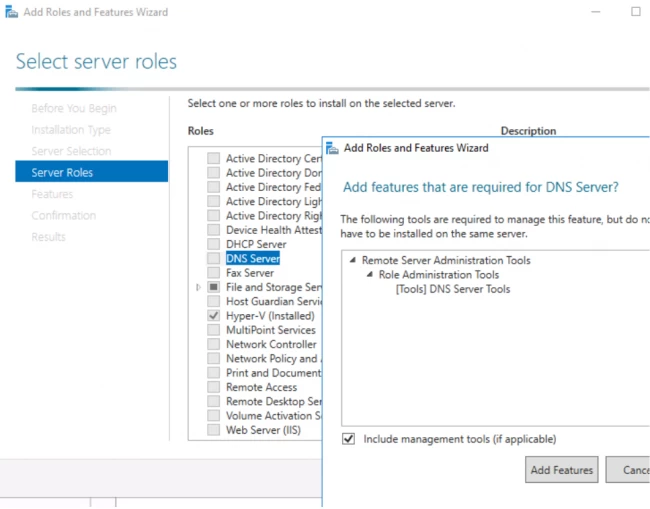
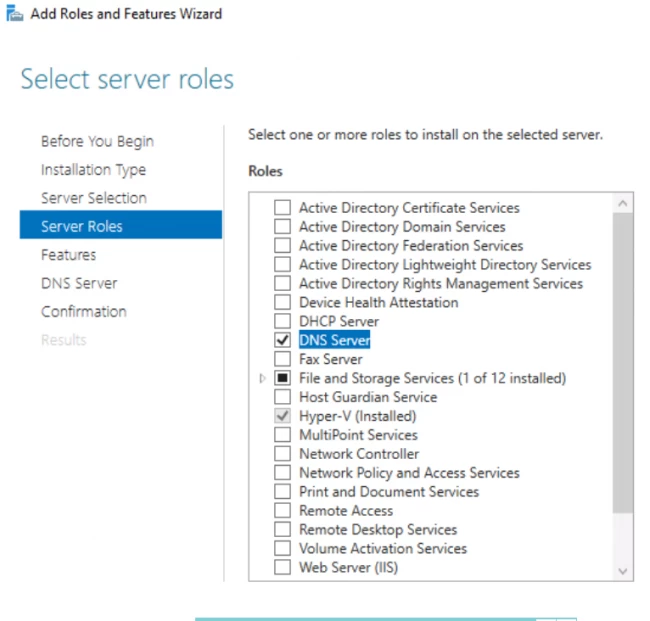
6- In this section, find the phrase DNS Server and check it.
After checking DNS Server, Windows will give you a message stating that you need to install some necessary features to control DNS, in this section click on Add Features and click Next.
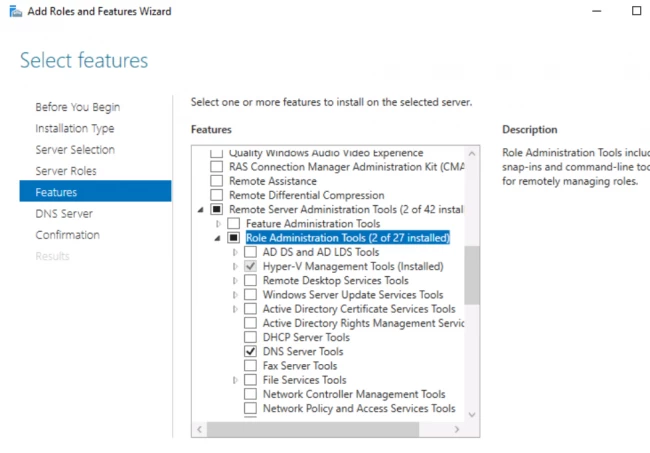
7- Pass the Features and DNS Server pages without changing and click on Install at the end.
Then wait for the DNS server to be installed on your server.
How to open DNS management console in Windows Server 2016
After installing the full DNS server roll on the Windows VPS, the 2016 server will explain how to open DNS Management, or DNS Management Console, in several different ways.
1: Open the DNS console from the Start menu
A) Open the Start menu and select Administrative Tools.
B) On the page that opens, click DNS to open the DNS management console.
2: Open the DNS management console from the Server manager
A) Open the Server Manager console.
B) From the Tools menu, click DNS Management to open the console.
3: Open the DNS management console from the Run window
A) Open the Run window by pressing the Winkey + R key combination on your keyboard.
B) Type dnsmgmt.msc and click OK.
This will open the DNS management console in a variety of ways.
There are two methods for configuring DNS on Windows Server 2016. One is using PowerShell and the other method is using GUI which is slightly longer, but easier and doesn’t require commands to be typed. I will show you the GUI method here.
Prerequisites
- Static IP is configured
- Firewall is turned off
- Latest updates from Microsoft are installed
- Administrator account has strong password
Step 1: Open the server manager dashboard.
Step 2. Click on Add roles and features.
Step 3. Read the pre-requirements and click Next.
Step 4. Choose Role-based or feature-based installation and click Next.
Step 5. Choose destination server for DNS role and click Next.
Step 6. Choose DNS server from server roles. As soon as you choose the role, a new window will pop up. Click Add features.
Step 7. Keep clicking Next through rest of pages and complete the installation process
Creating Forward Lookup Zone
Step 1. Open server manager dashboard.
Step 2. Click Tools -> DNS
Step 3. In DNS manager console, expand DNS server. Right-click Forward Lookup Zones.
Step 4. Click New Zone.
Step 5. Click Next.
Step 6. Choose primary zone and uncheck «Store the zone in AD«.
Step 9. Provide the zone name and click Next.
Step 10. Choose «Create a new file with this ….» and click Next.
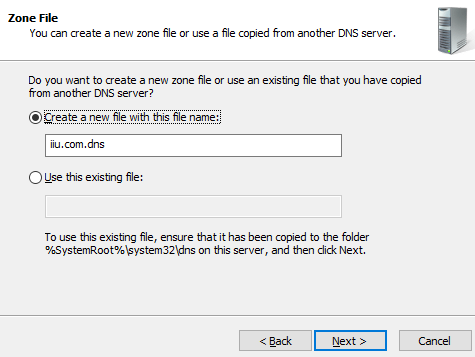
Step 10. Choose «Do not allow dynamic updates«.
Step 11. Click Finish.
Adding Host Record in a Forward Lookup Zone
Step 1. Open DNS manager console and right-click your forward lookup zone where you would like to create a host record.
Step 2. Click New Host (A or AAAA).
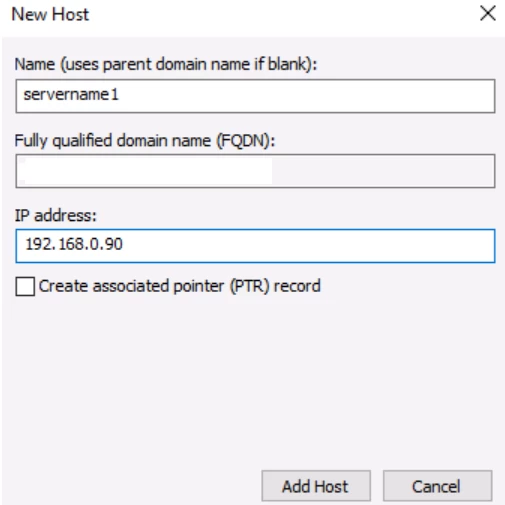
Step 3. Provide the name (and this will become FQDN in the form support.mydomain.com), and IP address.
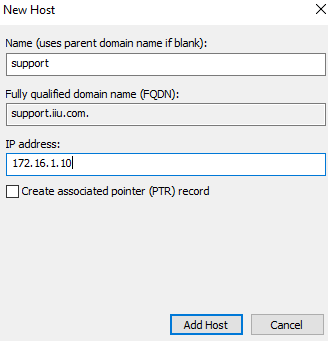
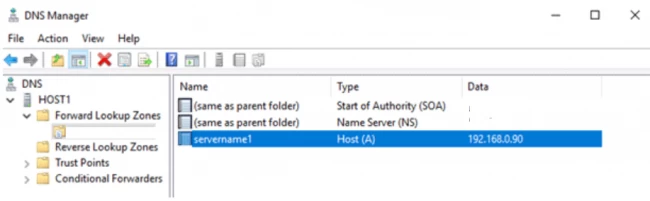
Step 4. Click ‘Add Host‘ and you are done.
List of content you will read in this article:
While there are plenty of DNS servers, both free and paid, available for anyone to use, in certain situations it is better to have your own. Its installation, however, can be more complex than you may think. In this tutorial, we are going to discuss the installation of DNS servers in Windows Server 2012, 2016, and 2019.
What is DNS?
In simple terms, DNS or Domain Name Server is like an internet address book. While you browse information on the web, you type different domain names, such as abc.com or xyz.com. Right? Furthermore, the web browser interacts with the help of IP (Internet Protocol) addresses.
The DNS translates the domain names to the IP addresses so that the web browsers can access the internet resources. Every device connected with the internet has a unique IP address. The devices use these IP addresses of other devices to exchange information. The DNS servers discard the requirement of remembering such complicated numbers, such as 192.168.1.1. Or there are even more complex addresses like 2111.bc00.2789.1::c567:s9a2.
Moving on, here are some insights about the features of the Window Servers!
Windows Server 2019 is power-packed with several features, standing first in the lane of other windows servers, namely, windows server 2012 and 2016!
Features of Windows Server 2019:
- Windows Admin center
- Storage Migration Services
- HCI and WSSD
- System Insights
In the same way earlier, as compared to Windows server 2012, Windows Server 2016, was clearly a more updated and powerful addition.
Here are some of the features:
- Addition of more DNS policies
- Improvised support of Windows Powershell
- Root hints IPv6
- Support for unknown record
- Addition of RRP
How to Install a DNS Server on Windows?
Let us begin our core topic to understand the process of installing a DNS server. Before that, here are some prerequisites.
Prerequisites
- Server with Windows Server 2012,2016,2019 (as per your requirements)
- Pre-installed DNS server role
If you do not have a pre-installed DNS server role, follow these steps!
Installing DNS server role
Now, let us start the process of installation:
- Click on the Server Manager and move on to Local server.
- Tap on Manage, as you can see the very first option that says, Add roles and features, click on it.
- Read the information and the data in front of you for a better understanding and then click on next.
- Click on the first option, Role-based or feature-based installation, and move on to the next page.
- Next up, from the server pool, you have to choose your desired server for the DNS server role.
- Then select the DNS server role. You will encounter a pop-up window asking you to install some additional tools for the DNS server. If you wish to install the tools, check your requirements and accordingly take the step.
- Now, you will see a checklist. Tick off the option DNS server. By default, the option of file and storage services is checked. Tap on next.
- The next window shows you some additional features for your DNS server. Read them carefully, add them if required.
- The next window is again an informational slide. Read and click Next.
- That’s it! The last window asks for your confirmation and takes you back to the Server Manager.
Bravo! You have successfully installed the DNS Server role in your system. Now, go to your Server Manager. You can see a box representing the DNS role!
Well, now that you have installed the DNS server role, let us tread forward. Here is a guide to making your work easy regarding the installation of the DNS server in Windows Server 2012.
Install the DNS server in Windows Server
To configure the DNS server, follow these steps:
- Open the Server Manager and click ‘Tools’. Then hit the DNS option.
- Now, the configuration of the zones is pending.
Zones are simply the distinct portions of a domain namespace. Furthermore, click on the DNS server, then on the Action menu. Click on Configure a DNS Server and the DNS Server wizard pops up. The wizard shows you three options, namely,
- Create forward and reverse lookup zones
- Create a forward lookup zone
- Configure root hints only
You need to select one option. Now, to sort your ambiguities, let us explain these pointers one by one.
- Forward and reverse lookup zone: This option takes an IP address and resolves it into a domain name.
- Forward lookup zone: This option is the exact opposite of the forward and reverse lookup zones. It helps you to take a domain name and then resolve it into an IP address.
- Root hints only: This option allows you to have the IP addresses of the DNS servers where records can be easily acquired.
Now, click on the option that suits you the best, and hit next. After that, enter the zone name. Move on and click next. Let us tread forward.
- Right Click on the Forward lookup zone and click on the first option, the ‘New zone’ option.

- Now, you have to select the kind of DNS you want to have. Now, there are three options on the screen. Primary zone, Secondary zone, and Stub zone.
The location of the Primary zone is in your server, whereas the Secondary zone resides on some other server. If your requirement is not related to handling large networks, then simply go for the Primary zone. Now, click on next and type any desired name for your zone file.
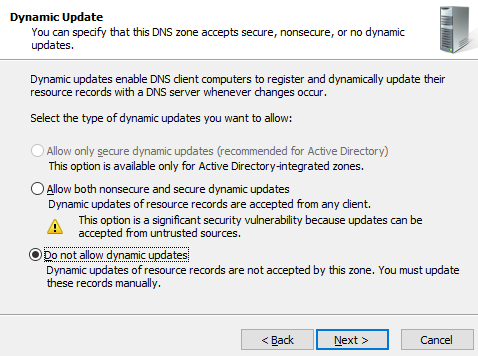
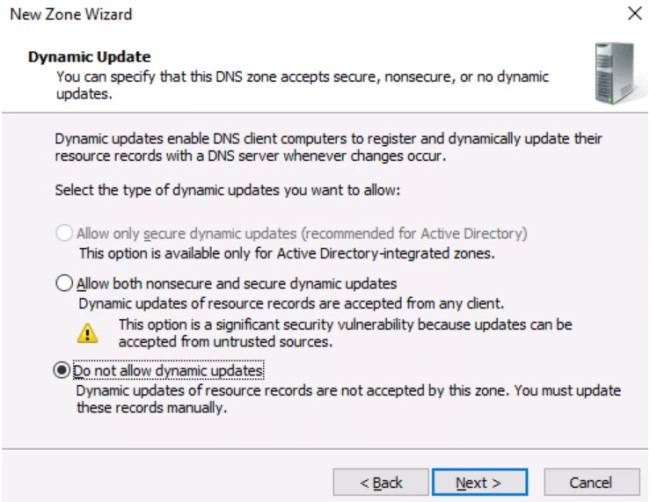
- The wizard box of the new zone file appears and asks you to select an option related to dynamic updates.
Now, you have to make a selection regarding how your server will respond to the Dynamic updates. You will see several options. Options like, allow only secure dynamic updates and then, do not allow dynamic updates. Here, choose the first option if you want integration between the DNS and the Active directory. If not, then opt for the latter option.
- Simply click next and hit finish.
Great! You have successfully created the forward zone. Now, to set up the zone, you have to complete another task. You need to add DNS records. There are numerous DNS records. Here’s a glimpse of some of them:
- A-record
- MX
- NS
- CNAME-record
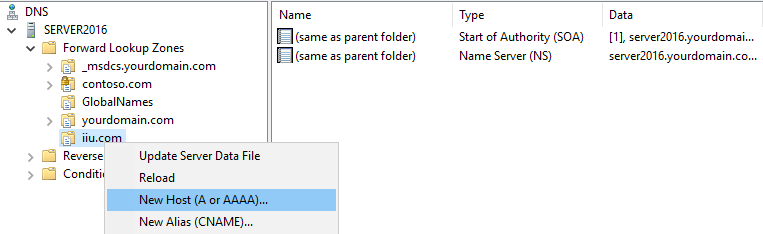
- Now, click on your zone name file and hit the option,’ New host (A or AAAA)’.
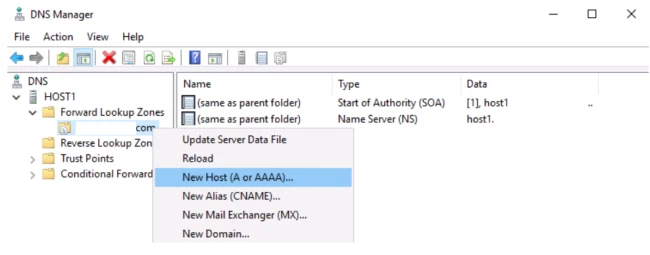
- Enter the asked details in the next window and tap on Add host.
The host is now created.
Now, using PowerShell, create a record. The next step is to allocate a file name for storing your DNS records. The zone name that you entered previously with a .dns extension, is by default the filename.
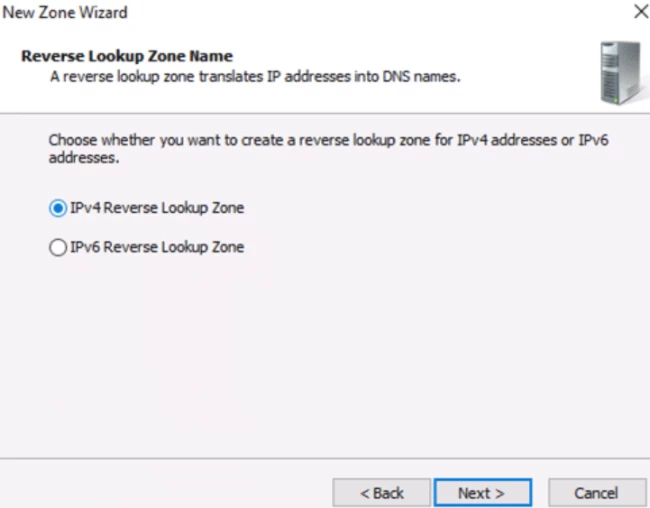
When you go to the DNS server window, you will see that a host has been created. Now, choose the reverse lookup zone and click on add new zone again. Keep following the steps as done in the case of forward lookup zone till you click the option of Primary zone.
Now here you have to enter the kind of IP address. Choose IPv4 and click next.
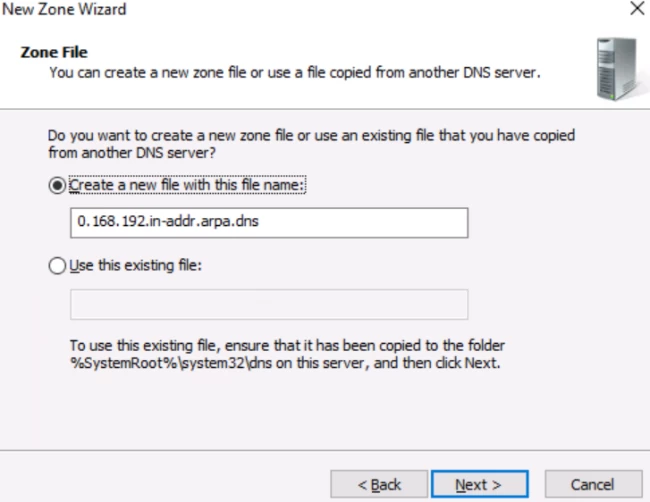
In the next window, type the first three parts of your IP address and hit next.

Again, click next.
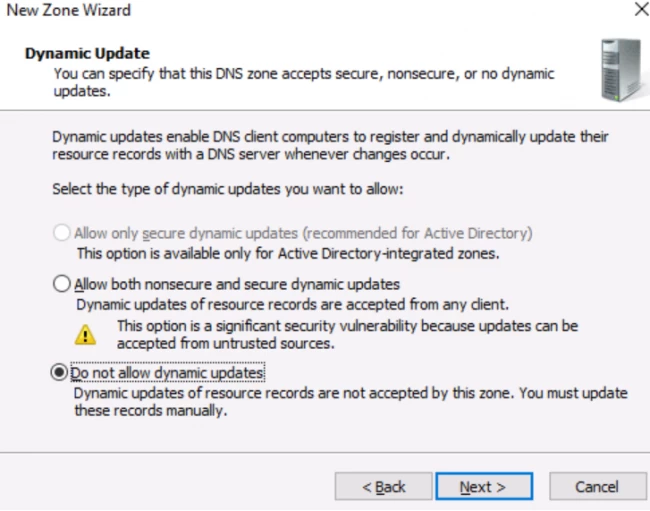
Again click on Do not allow dynamic updates and hit next.
The next window is the last window. Hit finish.
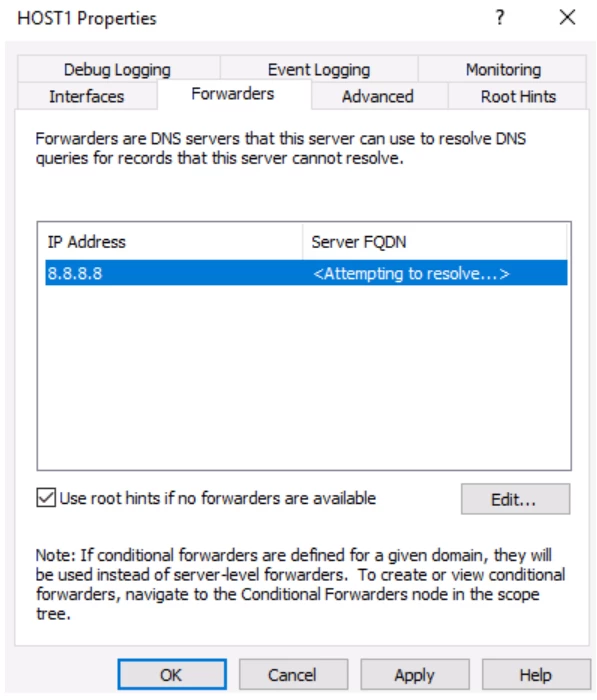
The next popup is regarding the configuration of the forwarders. Forwarders are DNS servers to which the server sends queries when it itself can’t answer them.
To complete the configuration, click on the properties.
Click next, and add the desired address where you want to divert the requests.
And that’s it, you’re done.
Conclusion
If you have precisely followed all the steps outlined in this article, the DNS server has been successfully installed in the Windows Server. We hope that this article assisted you to accomplish your goal in the best way possible. If you run into any problems during the installation process, have any questions or suggestions, please leave a comment in the comment section below.