Chrome OS is becoming more popular and the choice of many educational institutions. It is undeniable that many want to try it for themselves. But not everyone is willing to give up the safety and home feel of the Windows Operating System. Let me share a guide to help you with Dual Boot Chrome OS and Windows 10/11.
There is a new easy method to dual boot Chrome OS available. This does not require any Linux installation or the use of a USB drive. There are a few steps, which are easy to follow. So let’s start the procedure…
1.1. Requirements
- 64 Bit Computer System with 16GB or more space
- Secure Boot Disabled from BIOS
- Hyper-V or Virtualization is enabled from BIOS
- UEFI Boot (MBR may or may not support with MBR patch)
- Intel CPU from Sandy Bridge or later (Intel Core 2 Duo or older is Not Supported)
- Atom, Celeron, and Pentium processors are supported as of Baytrail or later.
- AMD Stoney Ridge or AMD Ryzen
- ARM CPUs are not supported
1.2. DIsable Hibernation and Fast Start-Up
To successfully dual boot Chrome OS and Windows, we need to disable hibernation and fast startup. Open the Windows terminal and here type, “powercfg.exe /hibernate off“. This will disable hibernation mode on our system.
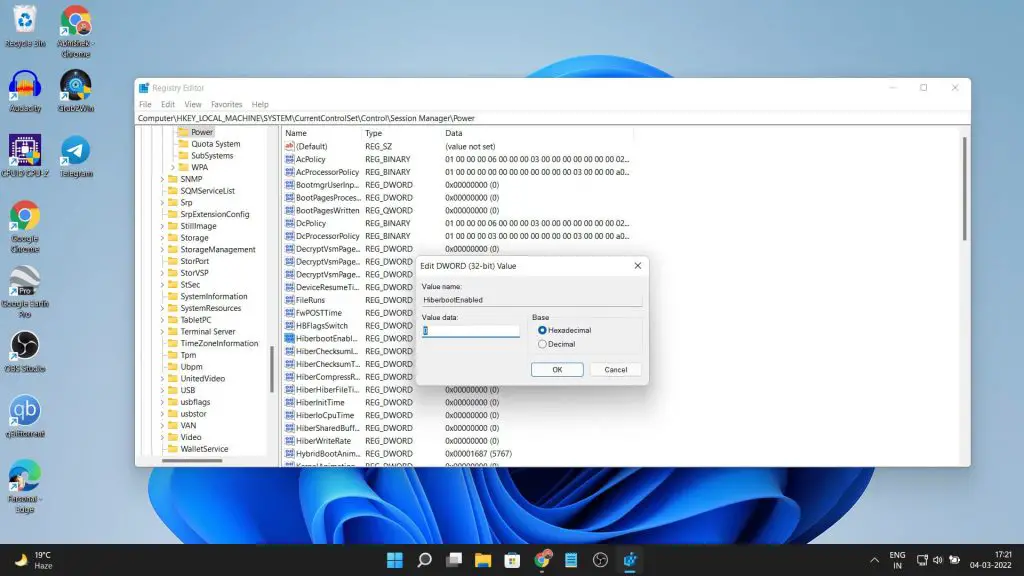
Now to disable fast start-up, we will edit the registry of our Windows computer. Right-click on the Windows key and run “Regedit“. Here follow this path, “HKEY_LOCAL_MACHINE\SYSTEM\CurrentControlSet\Control\Session Manager\Power“. You can paste this into the path dialogue box.
We need to locate the HyberBootEnabled option, then right-click and modify it. Change the value from “1” to ‘0″. this will disable the fast start-up option.
Disable Secure Boot
We need to disable secure boot from the BIOS of our computer. Different manufacturers have different keys to enter the BIOS. You can find the BIOS keys for various companies below.
While you are here and if your system is a bit older. Also, find something called the “legacy boot” and also disable that as well.
And lastly, we need to enable options related to virtualization. It is called Hyper-V for some and just virtualization for others. On modern computers, it is enabled by default. So, if you don’t see such an option, then it must be enabled already.
1.3. Installing WSL / Ubuntu
First, we will set up Ubuntu on our system. Open up PowerShell as admin by right-clicking on the start menu. Here type,
wsl --installAnd the installation of various tools and Ubuntu will begin. After that when you check your installed programs list you’ll see Ubuntu installed as well. Open Ubuntu and create a username and password. Now type,
sudo apt update && sudo apt -y install pv cgpt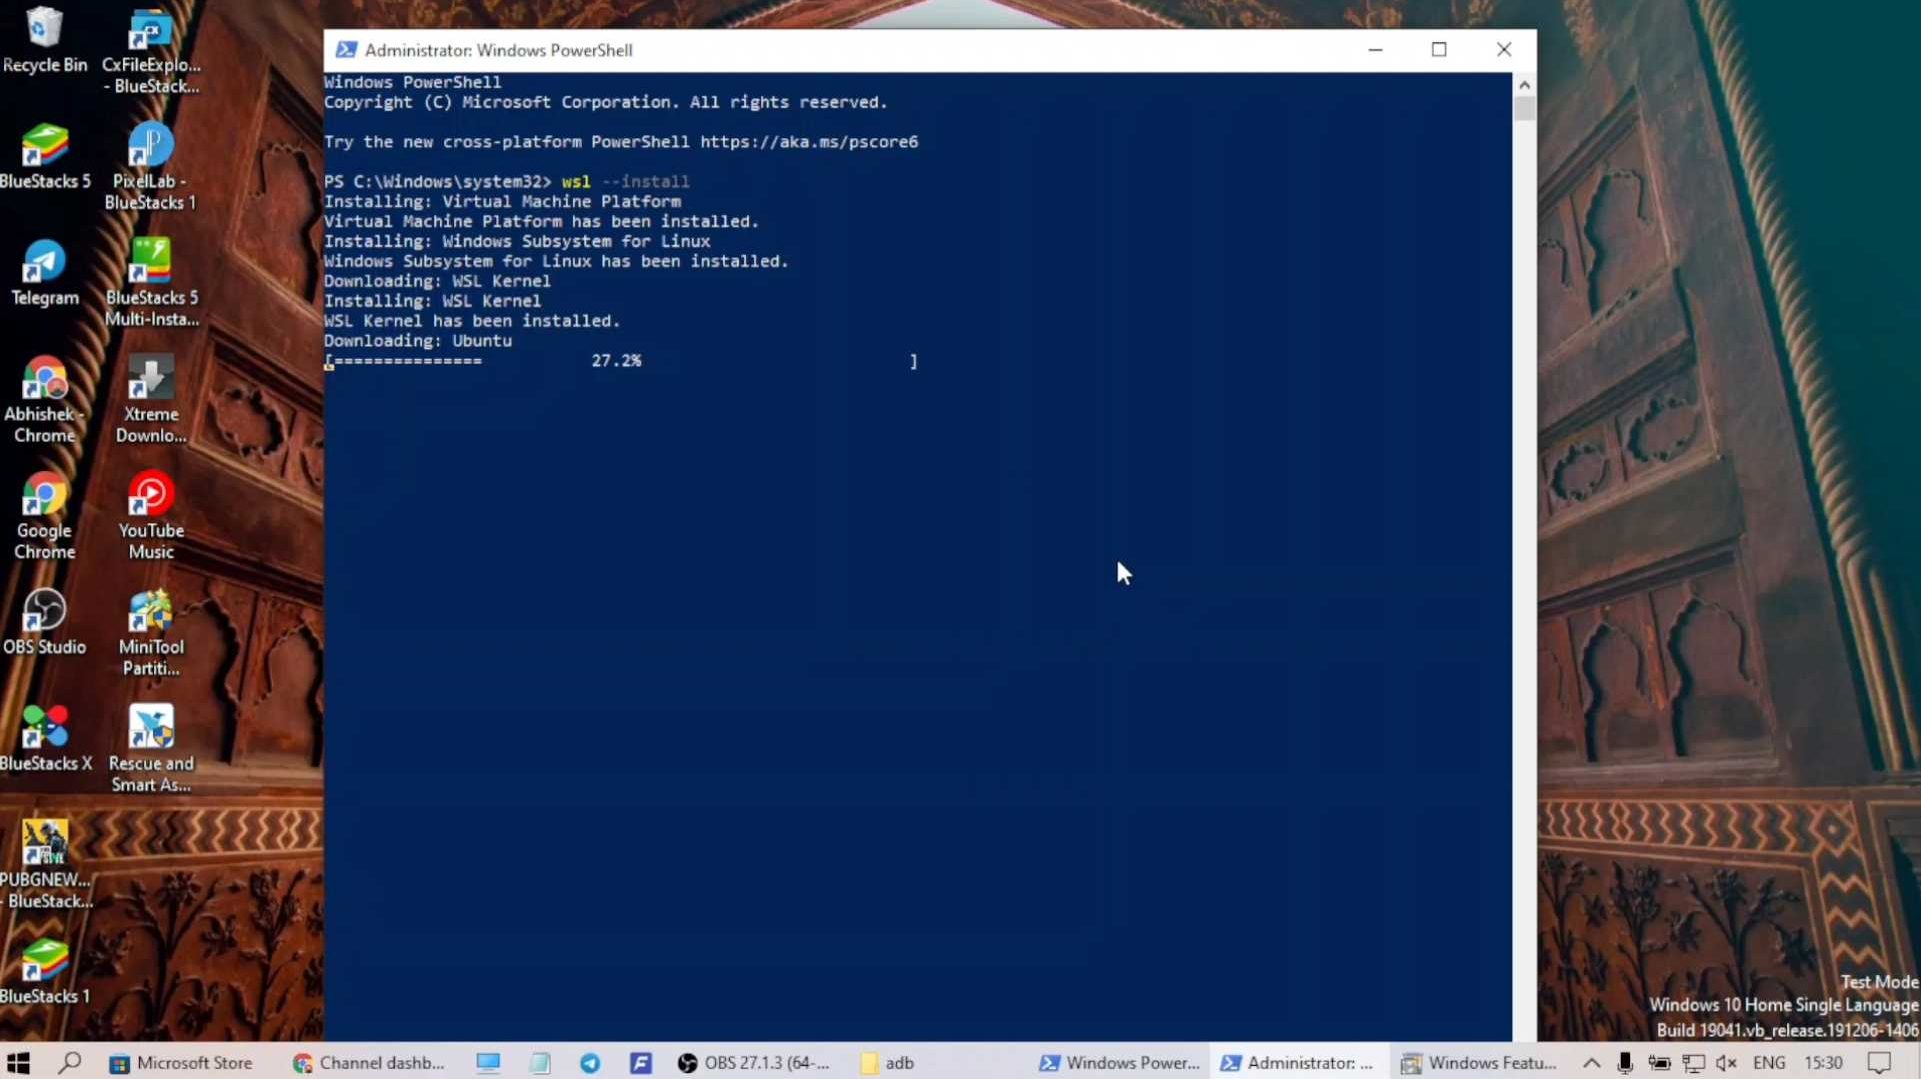
1.4. Creating Partitions
Now in the search dialogue type partition and open “Create and format hard disk”. We will create a new partition to install Chrome OS by right-clicking the D drive and shrinking it.
You can create a partition of 16GB and above. Name the partition “ChromeOS”. Now open the Chrome OS partition then create a folder and name it “chromeos” without spaces. Also, create a folder named “brunch” inside the partition.
1.5. Downloading Files
First, we will also need the latest Sebanc Brunch file to make all this work. Download the latest version and take note of the version number. Thanks to the developer Sebanc for making this possible.
Moving on, we will download the Chrome OS Recovery image. There are different versions for different CPUs and generations. Download the version similar to that of the Brunch file from the list.
- Intel 1st Gen to 9th Gen – Rammus
- Intel 10th and 11th gen – Volteer (Some 10th and 11th Gen need Kernel 5.10)
- AMD – Stoney Ridge and Bristol Ridge – Grunt
- AMD Ryzen – Zork (Some Ryzen 4xxx needs Kernel 5.10)
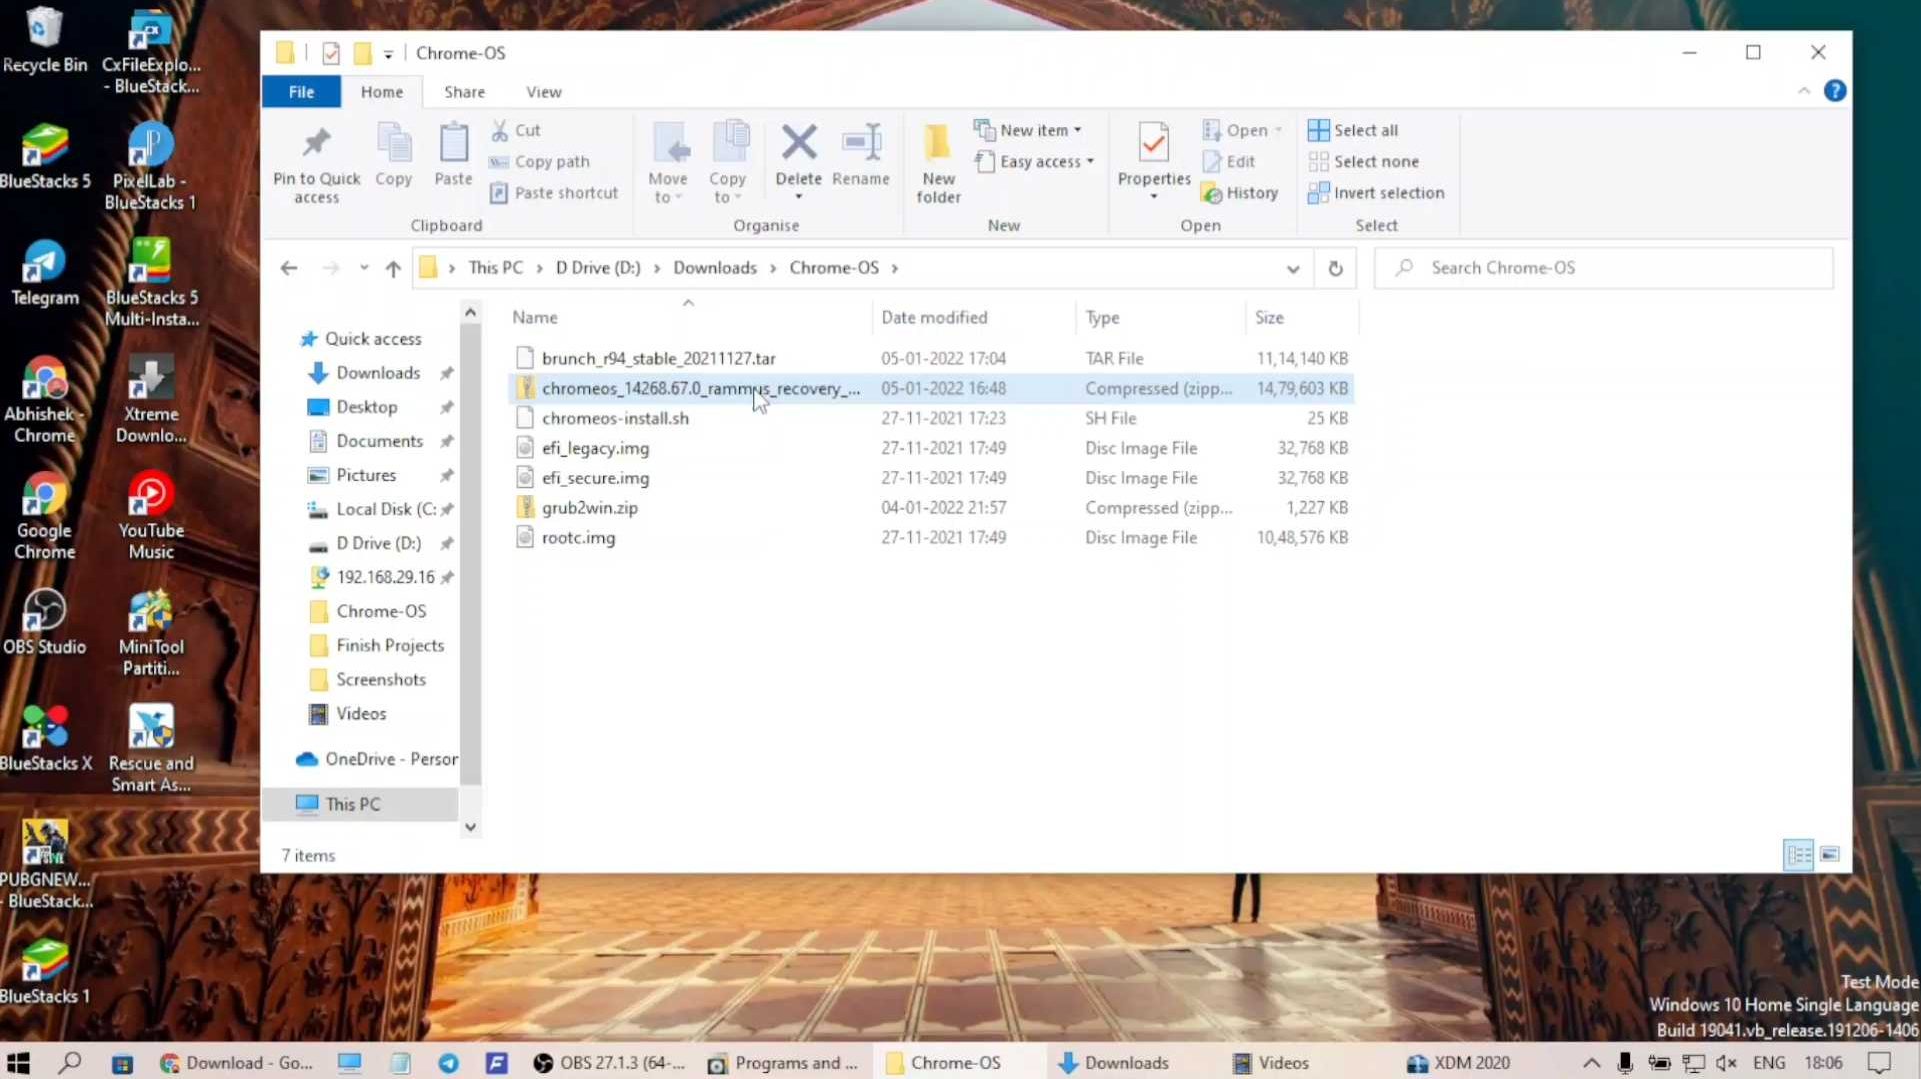
Now move all the downloaded files into a folder and name it “chromeos“. You can name it anything else but make sure there are no spaces or special characters.
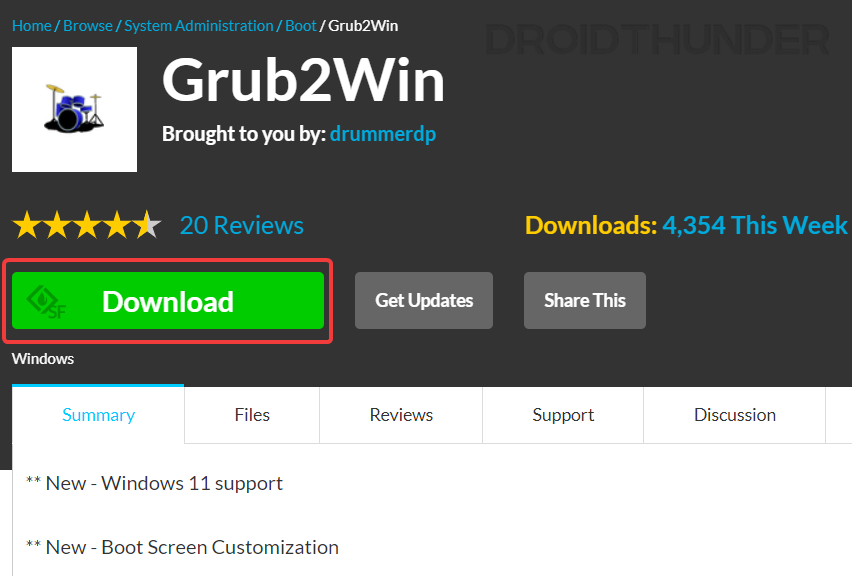
Lastly, we will download the Grub2Win file from this link. We will use this program to create a dual boot menu. Most of these files are similar to what we have used before.
For the MBR Boot system, download the MBR patch file from here (not guaranteed to work). Now using 7zip or WinRAR extract all the files. We have to extract the Brunch file twice to get the required files. In the case of MBR only, extract the patch file the same way and it will overwrite existing files in the folder.
Check Out The Video Guide:
1.6. Dual Boot Chrome OS and Windows 10/11 without Linux Mint
Now open Ubuntu and we will mount the directory where all our downloaded files are located. Make sure to double-check the directory path and names. Copy and paste the folder address of the ‘chromeos” folder on a blank document. And then copy and type its content in the below format.
cd /mnt/(your downloads folder location)" for example: cd /mnt/d/downloads/chromeos/After this, we will type our main installation command. Replace the bracket’s content with the file name that we have extracted. For the Chrome OS Recovery image, make sure to copy the full name including the extension. You can enable the extension in the file explorer from the View > Show extension option.
Locate your Chrome OS partition see the drive letter and type that in place of the bracket. lastly, put down the size of the partition after -s, probably a little lower than the actual size. Also, do not skip to add the chromeos.img at the end.
sudo bash chromeos-install.sh -src (recovery image name.bin) -dst /mnt/(chromeos partition folder)/brunch/chromeos.img -s (size)

For example: sudo bash chromeos-install.sh -src chromeos_14268.67.0_rammus_recovery_stable-channel_mp-v2.bin -dst /mnt/f/chromeos/brunch/chromeos.img -s 20
Now after making sure everything is correct and okay, hit enter and then let the process begin. Depending upon the size of the partition it can take anywhere from 30 to 60 minutes to complete the processes.
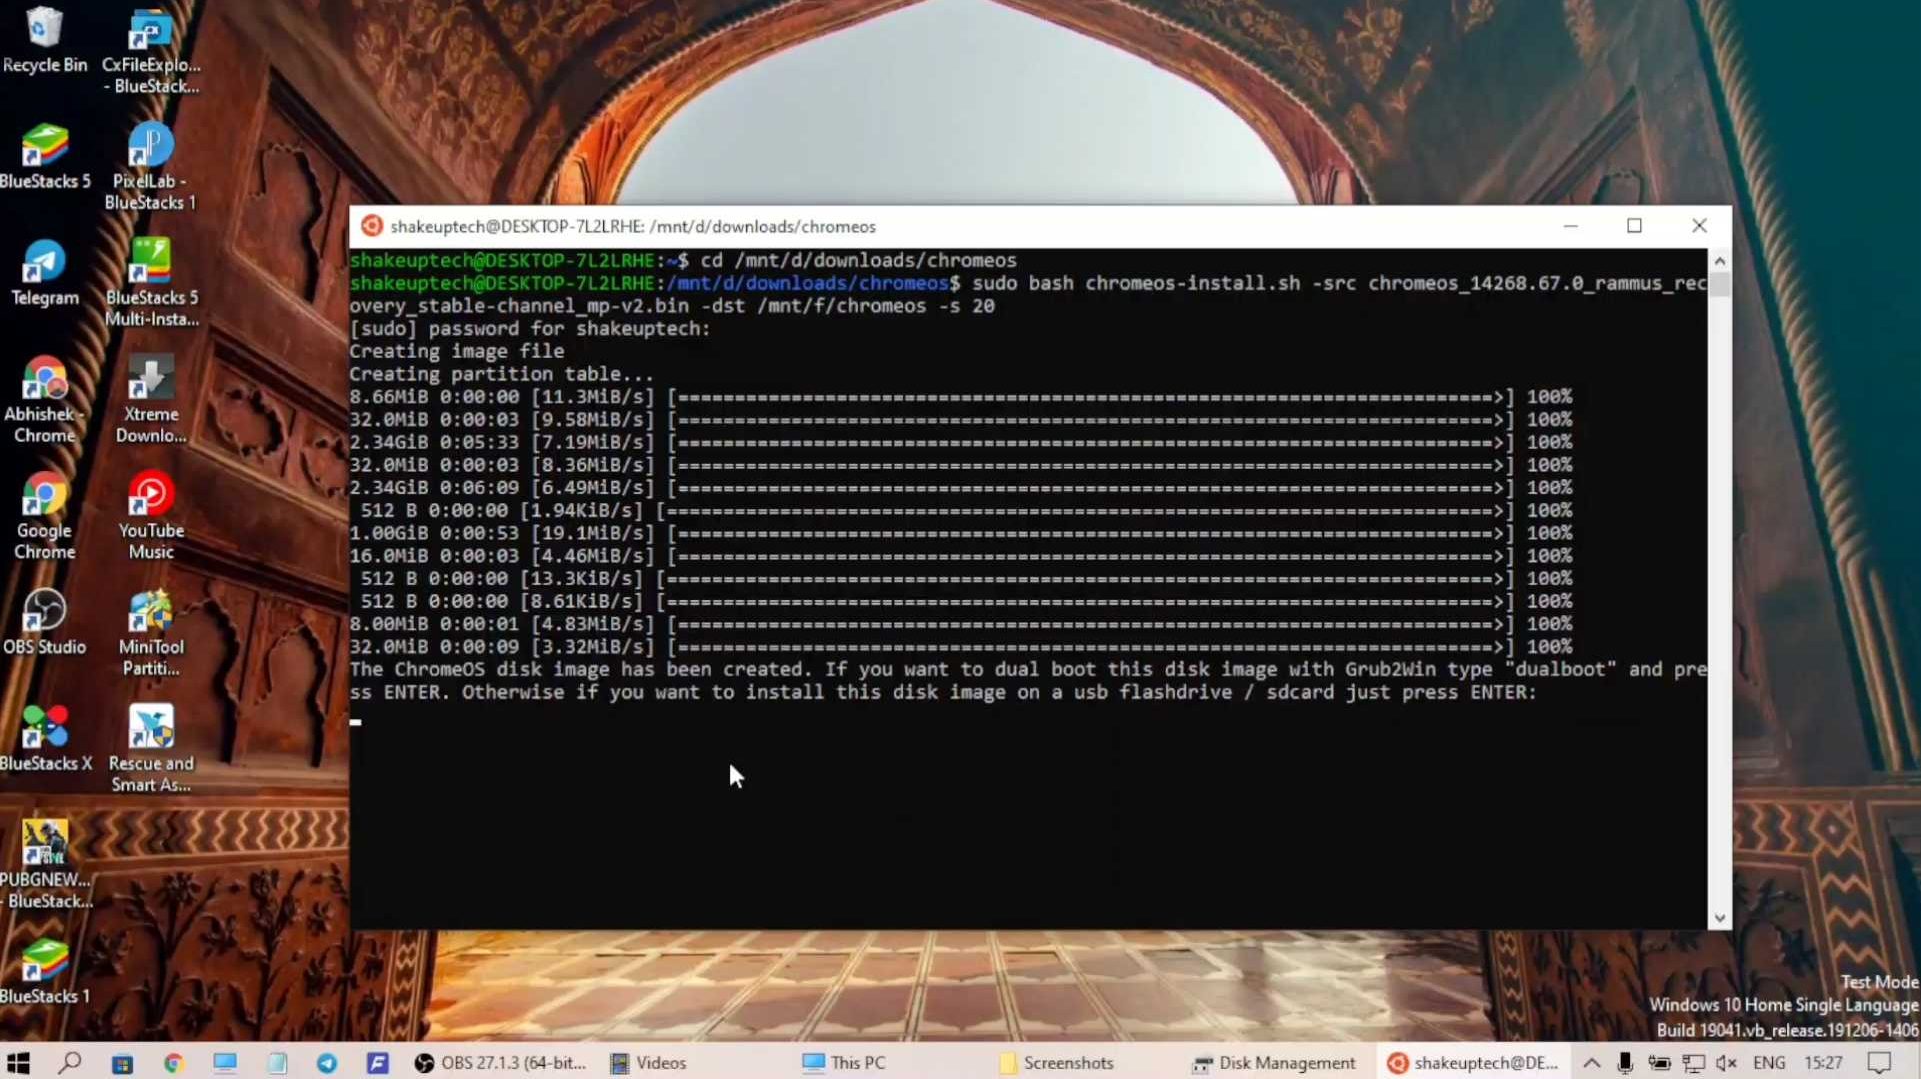
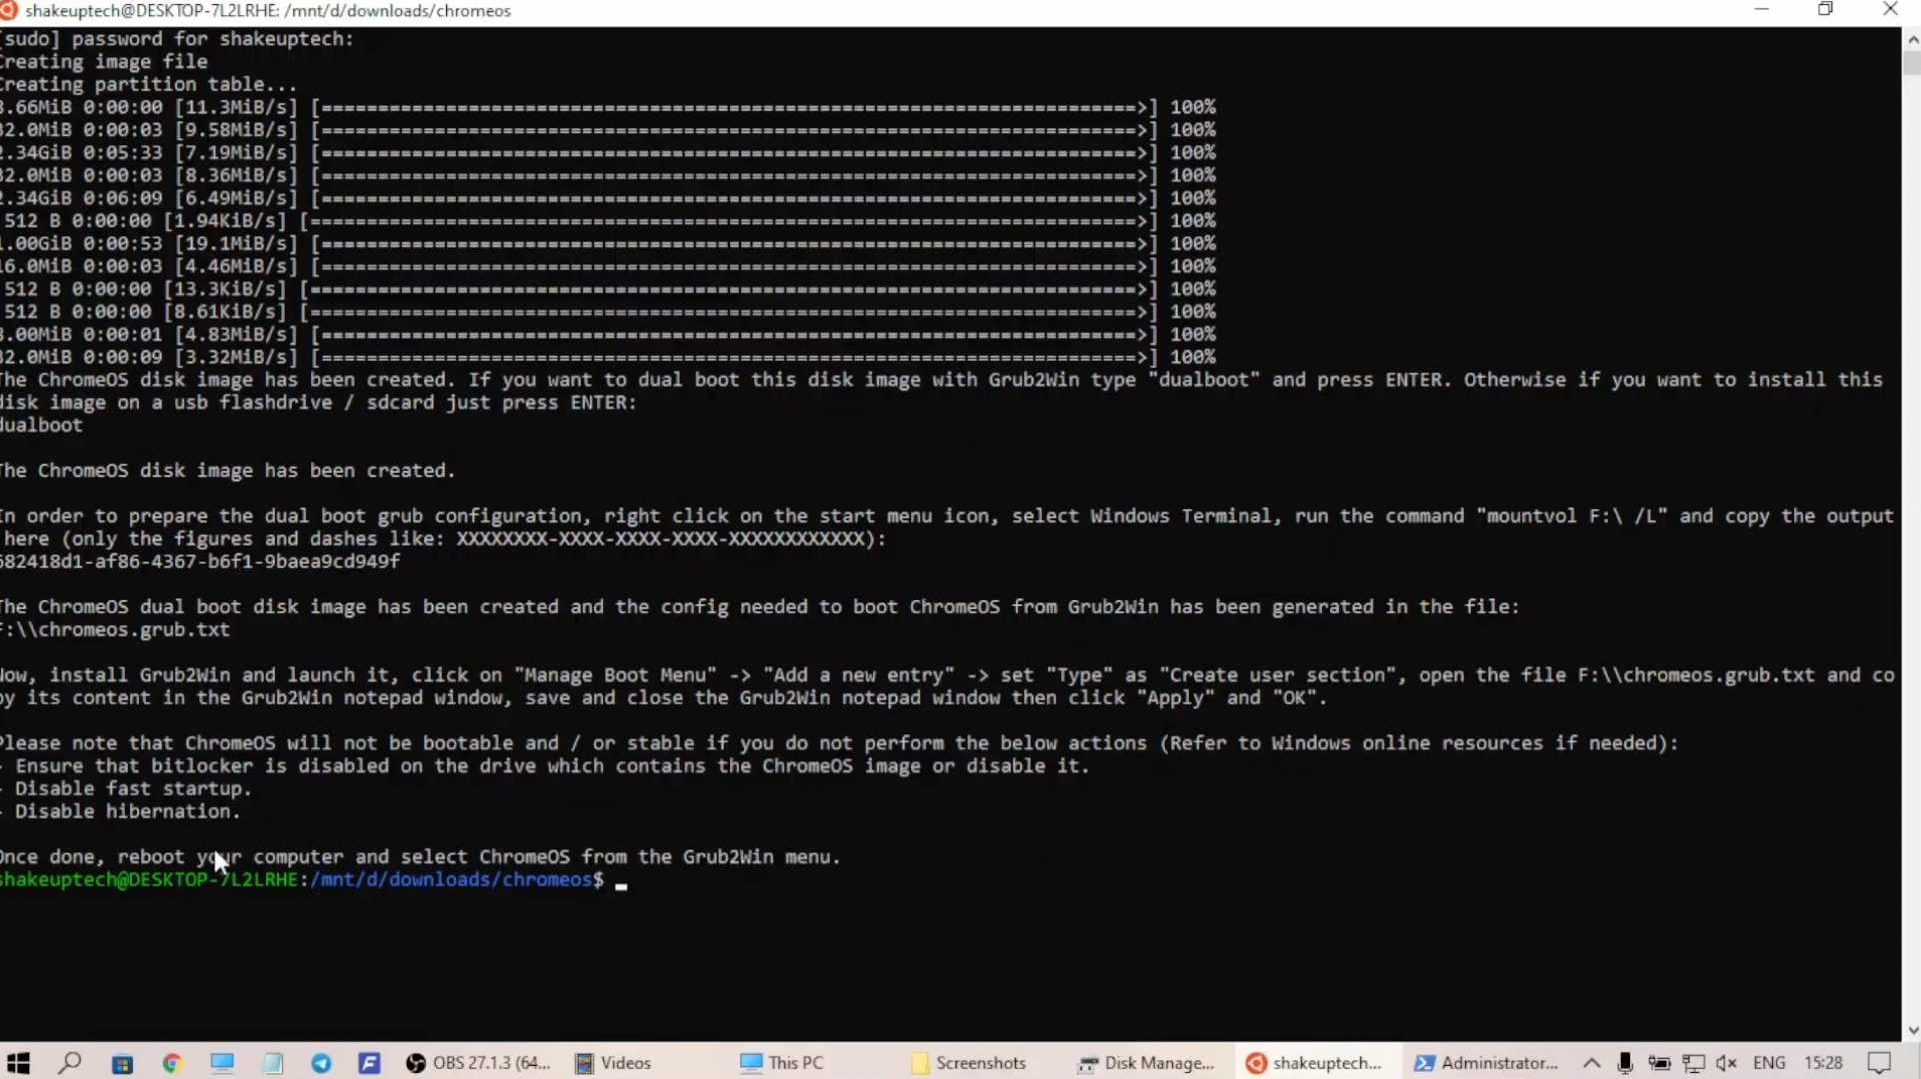
After the process is done, it will ask to either continue with the single boot installation of Chrome OS or dual boot installation. We need to type dualboot without spaces and hit enter. this will create a grub2win txt file in the Chrome OS partition. You can close the terminal after making sure that the Txt file is present in the partition.
1.7. Grub2Win For Dual Boot Menu
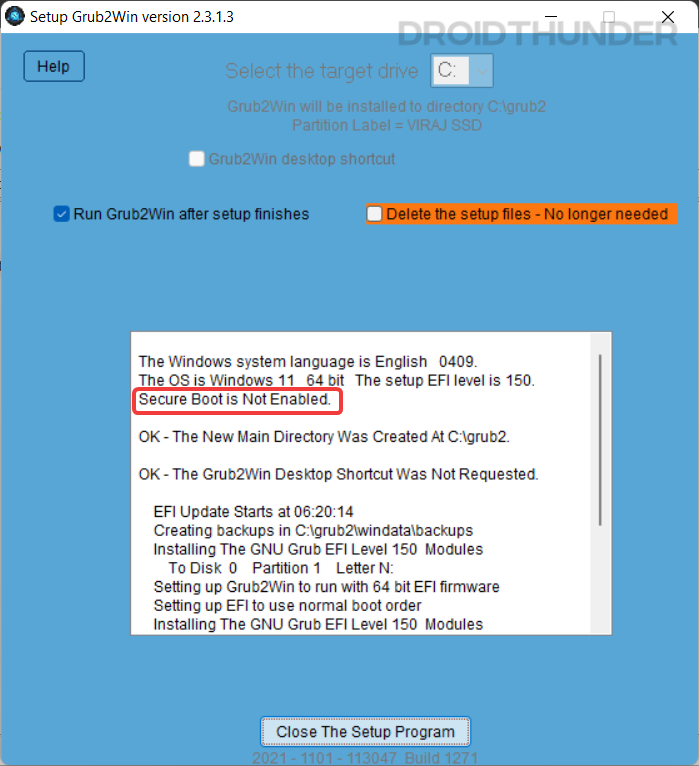
Now open the Grub2Win setup file and continue to run if prompted. The installation will take some time to complete. Make sure your secure boot is disabled otherwise, grub2win will not install successfully.
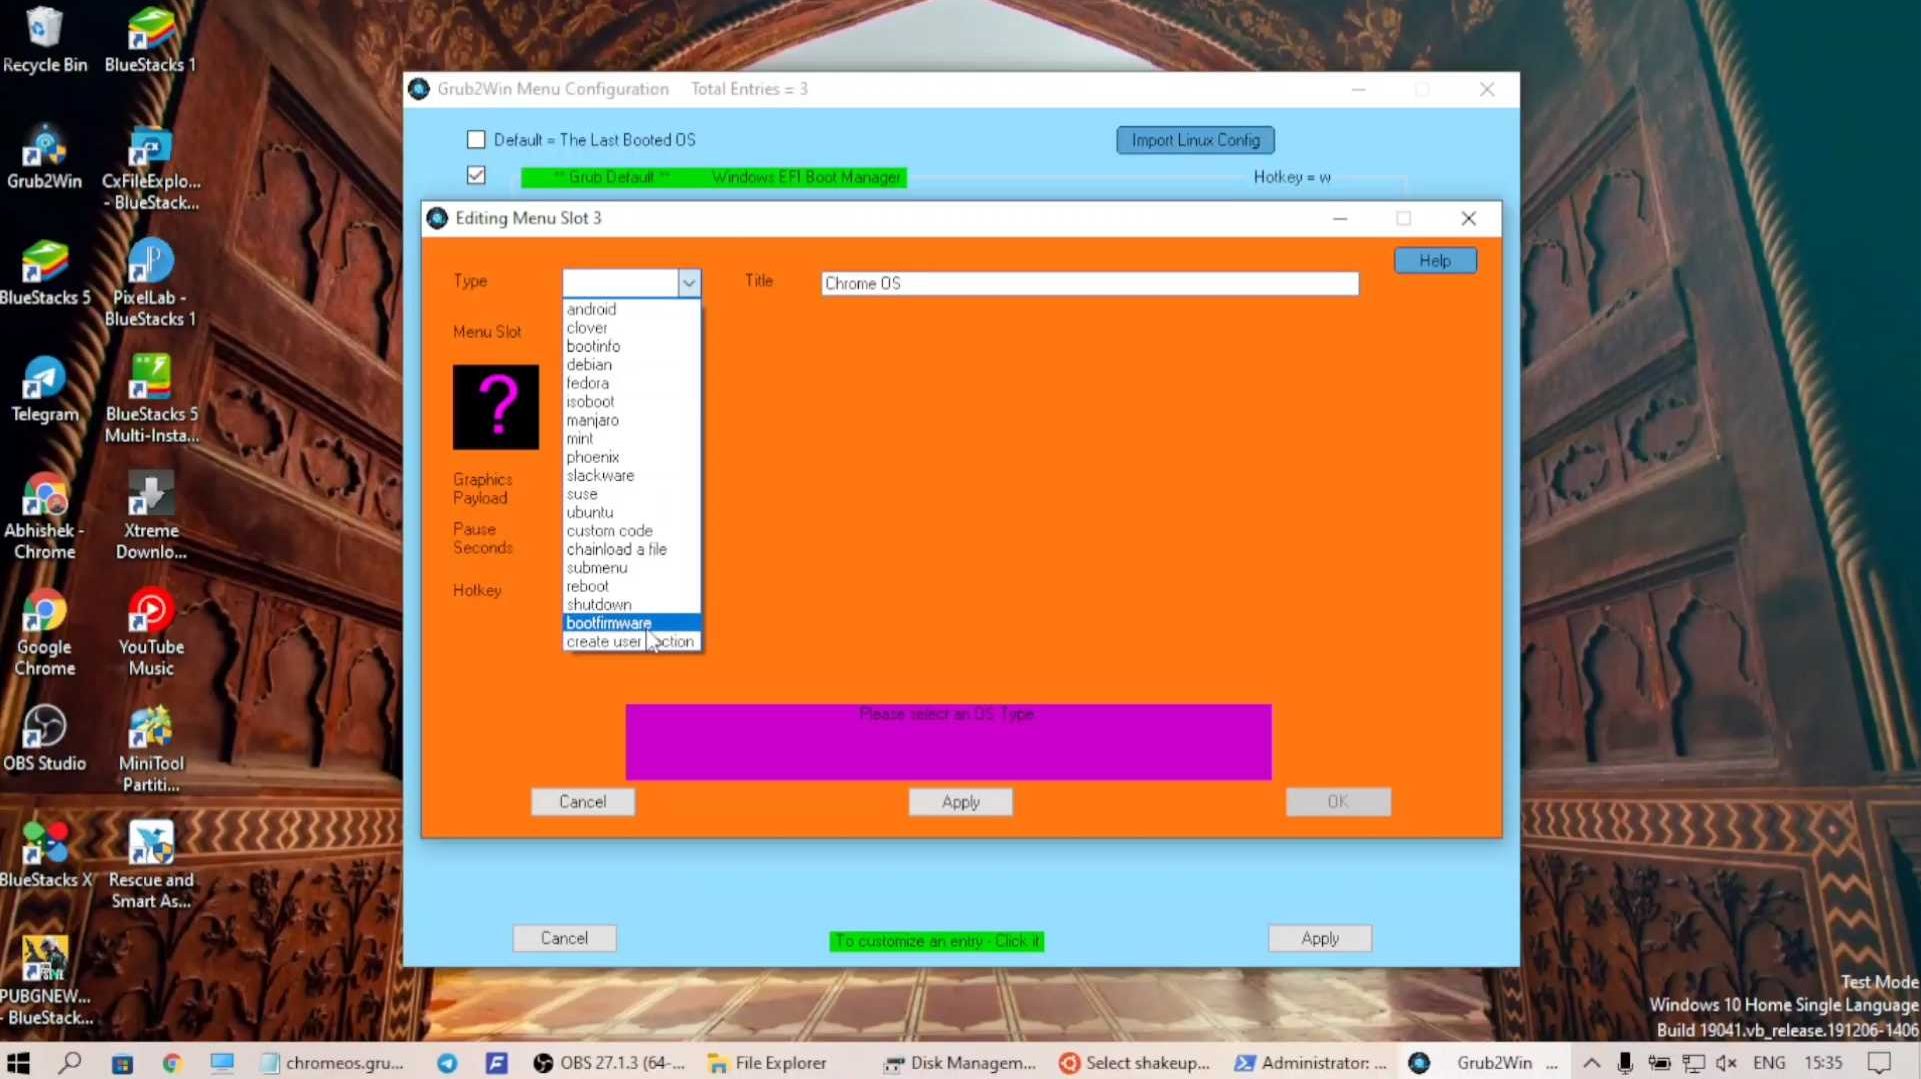
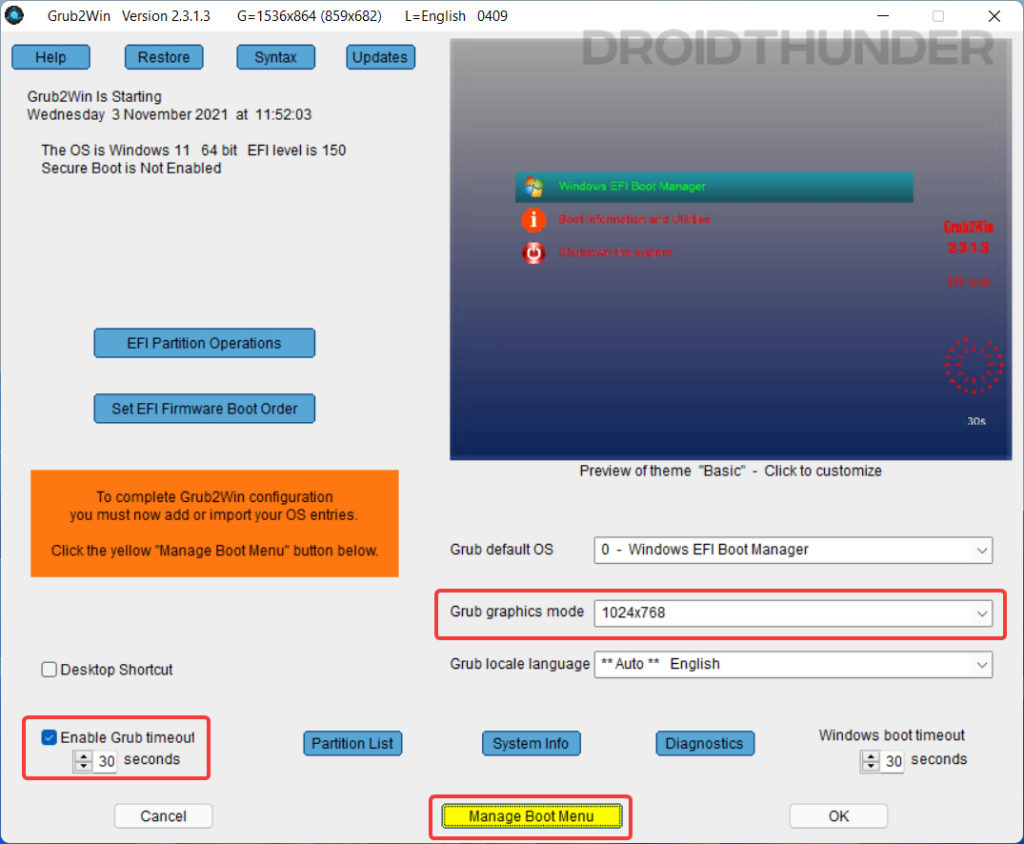
After it has been installed we will open the “Manage boot menu” and create a new entry. Name it as Chrome OS and in the Type section select “User Creation”‘ It will open up Notepad.
Now we need to open the chromeos folder that we created inside the Chrome OS partition. Here, open grub-menu.txt and copy all the commands. Paste those commands in the Notepad and close and save it. Now hit Apply and select OK.
If you see errors like Chrome OS is not supported or such, just ignore those and continue. Also, make sure to save the config file quickly after pasting it.
1.8. Dual Boot into Chrome OS
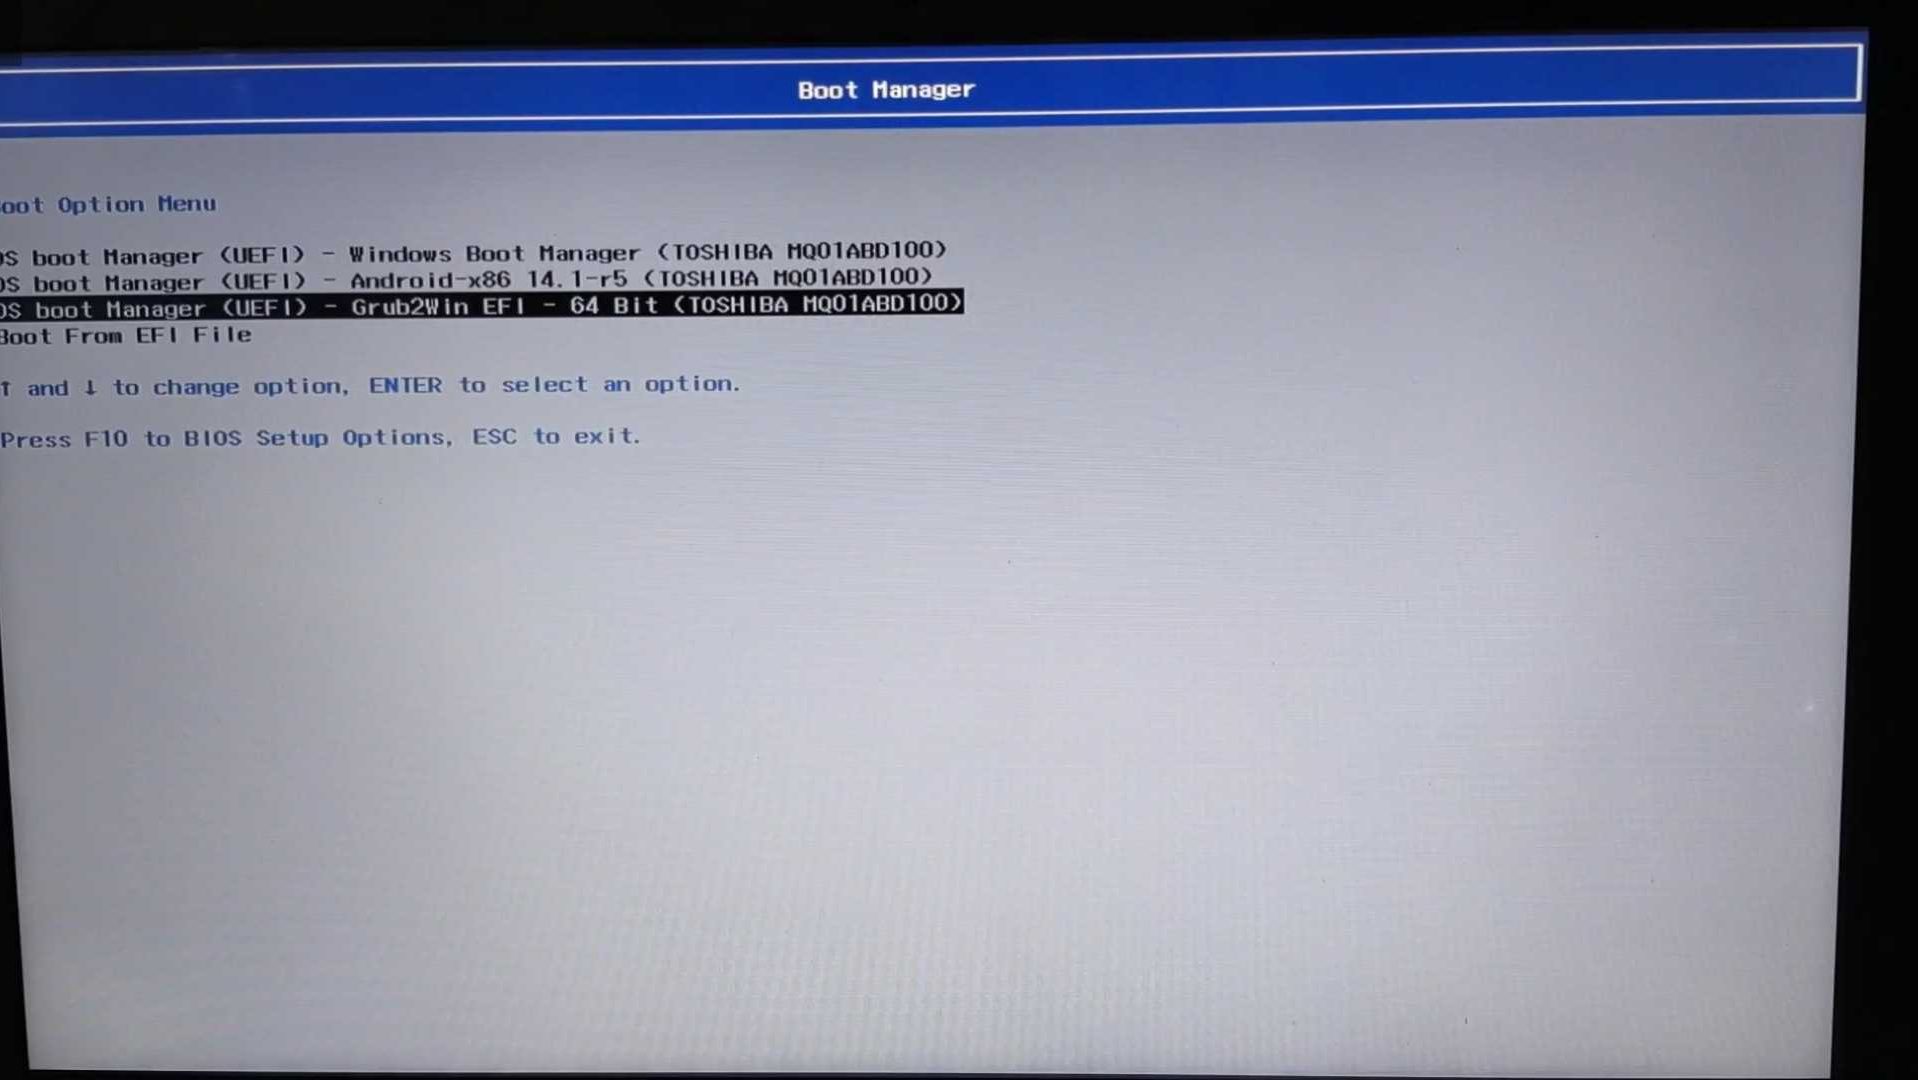
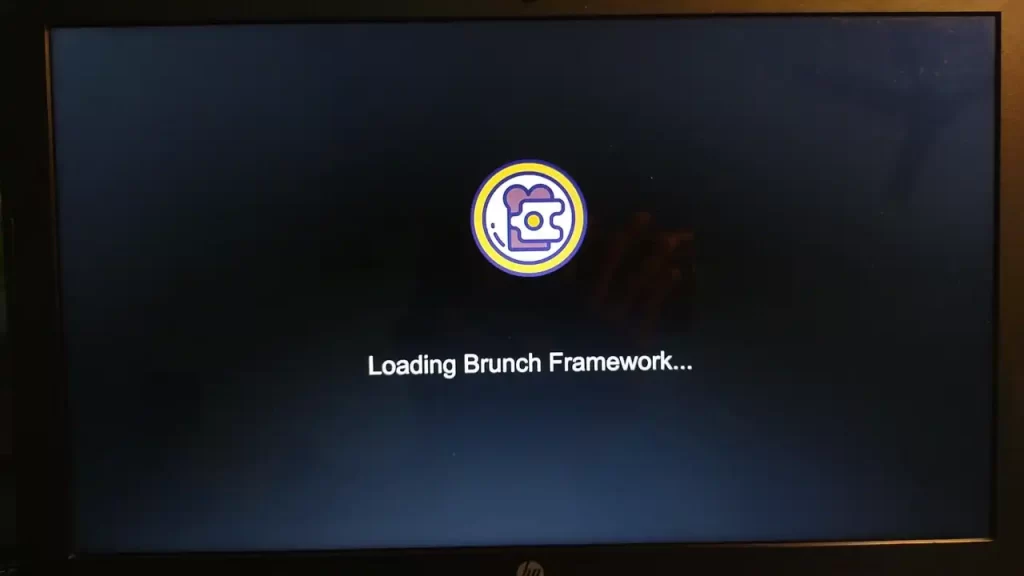
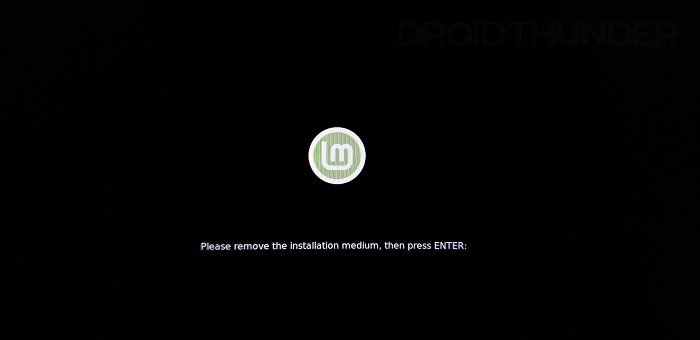
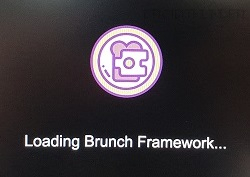
Now we will restart our system in BIOS and select Boot Device Options. Now select Grub2Win Boot Manager and using the down arrow key you will see Chrome OS name. Hit enter and you will see the Brunch framework logo.
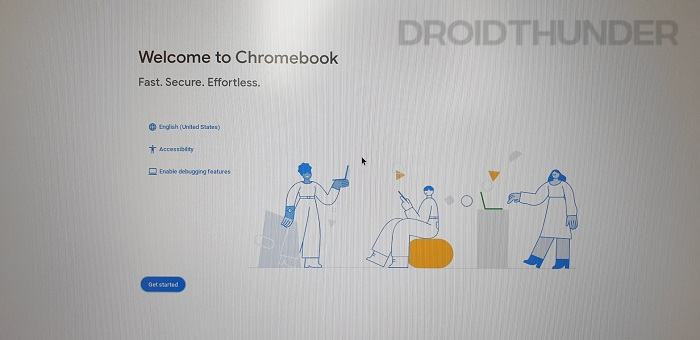
It will take some time but eventually, you will see the Chrome OS logo and the setup screen. Just set it up and start using your Chrome OS with Play Store support.
2. Dual Boot Chrome OS and Windows 10/11 with Linux Mint
2.1 Requirements
- Laptop or Desktop with x64 bit CPU
- UEFI or MBR BIOS (MBR needs an additional Patch to work)
- Secure Boot Disabled in BIOS
- Intel or AMD Chipset (AMD support is limited)
- No Nvidia or ARM support
- No Support for Virtual Machines (VMware)
- 8GB or Above USB Pendrive
2.2. DIsable Hibernation and Fast Start-Up
To successfully dual boot Chrome OS and Windows, we need to disable hibernation and fast startup. Open the Windows terminal and here type, “powercfg.exe /hibernate off“. This will disable hibernation mode on our system.
Now, to disable fast start-up, we will edit the registry of our Windows computer. Right-click on the Windows key and run “Regedit“. Here follow this path, “HKEY_LOCAL_MACHINE\SYSTEM\CurrentControlSet\Control\Session Manager\Power“. You can paste this in the path dialogue box.
We need to locate the HyberBootEnabled option, then right-click and modify it. Change the value from “1” to ‘0″. this will disable the fast start-up option.
Disable Secure Boot
We need to disable secure boot from the BIOS of our computer. Different manufacturers have different keys to enter the BIOS. You can find the BIOS keys for various companies below.
While you are here and if your system is a bit older. Also, find something called the “legacy boot” and disable that as well.
And lastly, we need to enable options related to virtualization. It is called Hyper-V for some just virtualization for others. On modern computers, it is enabled by default. So, if you don’t see such an option, then it must be enabled already.
2.3. Files Needed
Installing Chrome OS as a primary operating system is simpler than dual-booting it with Windows. Even the files we need are similar but there are a couple of new additions to the list. First, we need the Linux Mint OS file which is a type of Linux distribution. This will help us to flash the Chrome OS to our system.
We can download the Linux Mint image from this link and download the latest release. Next, we need to download the Brunch Framework to make the Chrome OS work on our system after flashing it. A GitHub user name Sebanc has made such a framework file for us to utilize. You can download that file from here.

Now we need the Chrome OS recovery image. This is the main Chrome OS file that we will flash in order to use the operating system. Download the image file from this link. Search for rammus (Intel Upto 9th Gen) samus for Intel 3rd Gen or lower, volteer (10th Gen or Above). And zork for (Ryzen), grunt for (AMD) (Stoney Ridge, and Bristol Ridge), then download the latest recovery image.
To dual-boot Chrome OS, we need to create a new boot menu. For that, we need a program called Grub2win. Download the program from this link. We also need a script that we will run in the terminal window to dual-boot Chrome OS. This script is called the multi-install script. Download it from here.
For the MBR Boot system, download the MBR patch file from here (not guaranteed to work).
2.4. Initial Process
Let’s start by extracting the files we downloaded earlier. Create a new folder called Chrome OS in the downloads folder. Extract the Brunch framework file and Chrome OS recovery image file. The Brunch Framework file is a tar.gz file, so we need to extract it twice. In the case of MBR, extract the patch file the same way and it will overwrite existing files in the folder.
After extracting the Chrome OS recovery image we need to rename the file obtained. For example, if you downloaded the Rammus image. Rename it as rammus_recovery.bin and for Zork, it should be zork_recovery.bin respectively. Move all the files thus extracted into the Chrome OS folder. Also, move the muti install script to the folder as well. Leave the Linux mint and grub file outside.
2.5. Create Partition
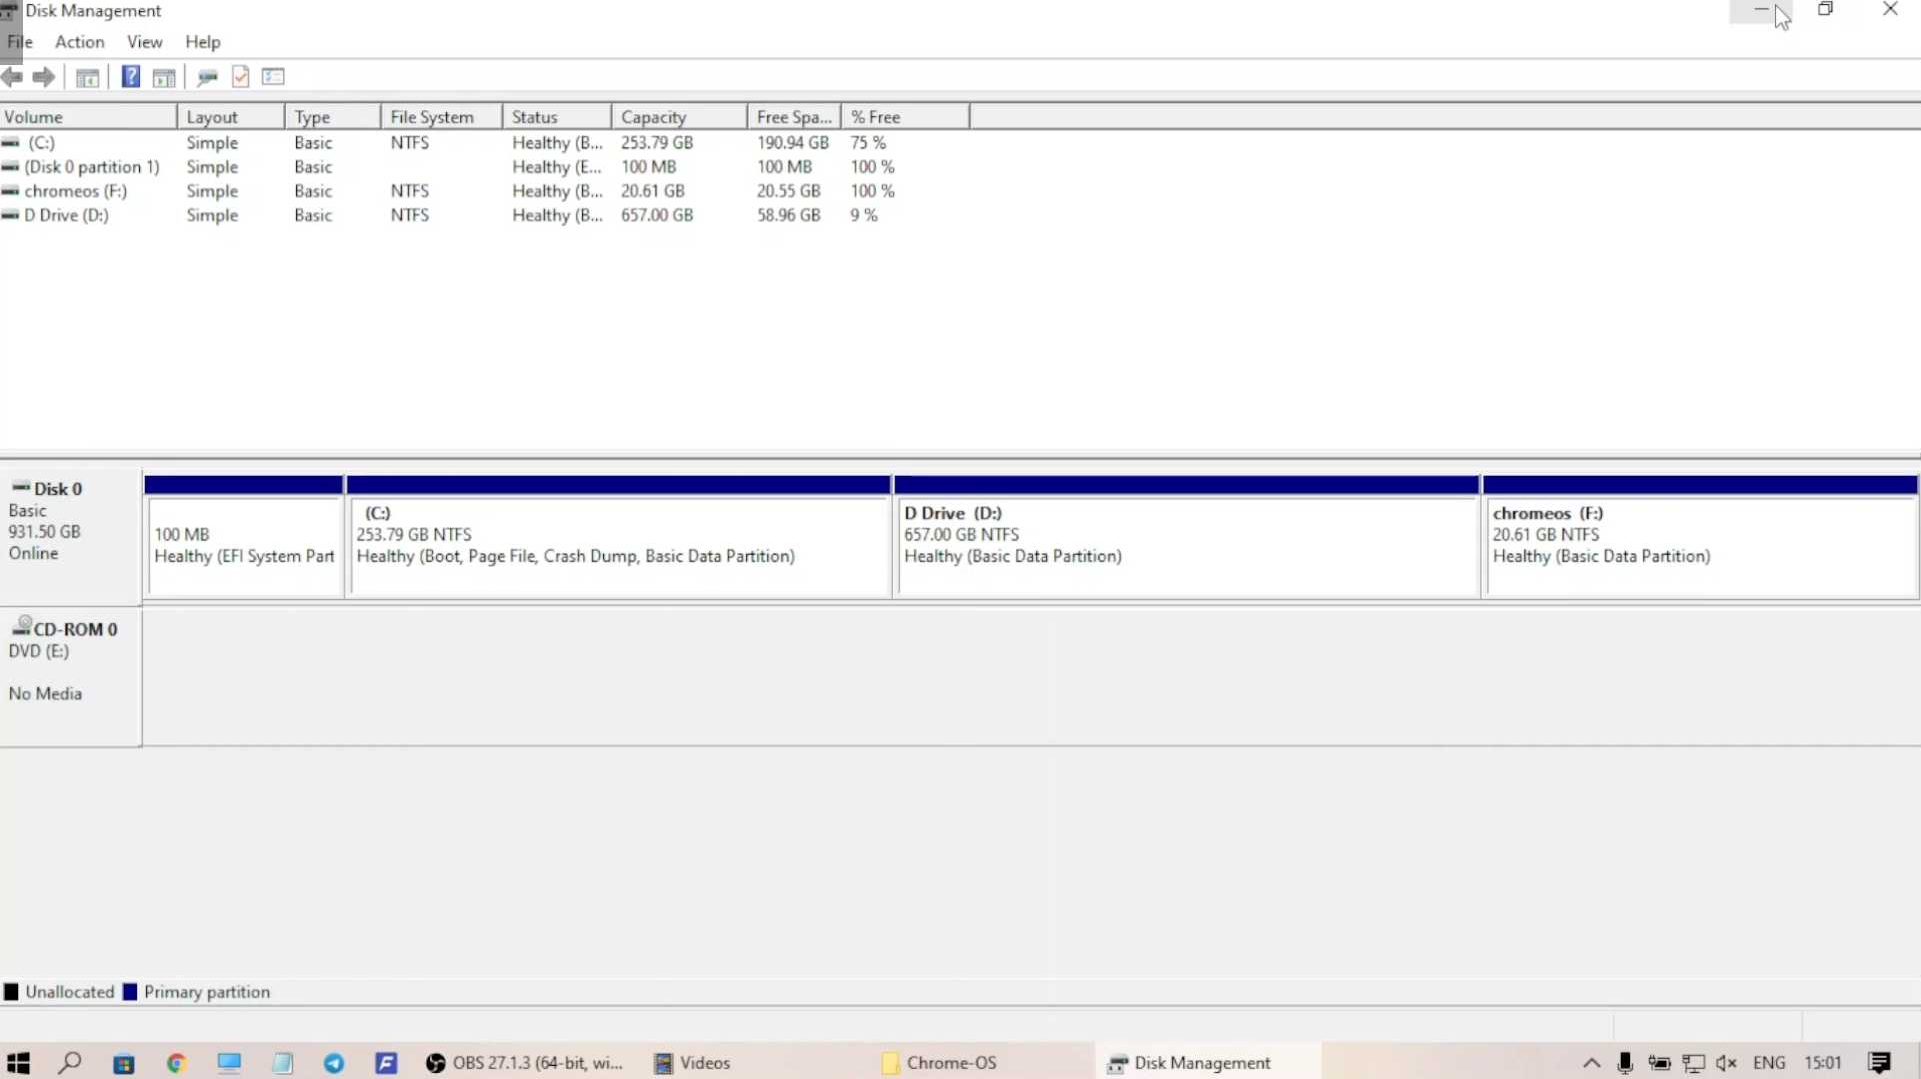
We need to create a partition in our drive to dual-boot Chrome OS. Open the search window and type partition. A program called Disk Management should appear. Open the app and it will show all the storage details and different partitions. the drive other than the C drive should be shrunk for this new partition. Right-click on the D drive as in my case and click shrink.
We have to put in the values for the storage space we want to allocate. The values will be in MB so choose wisely. I decided to make a 200 GB partition so I chose 200000 MB. You can choose anything upwards of 100GB. Follow the process and your new partition will be created.
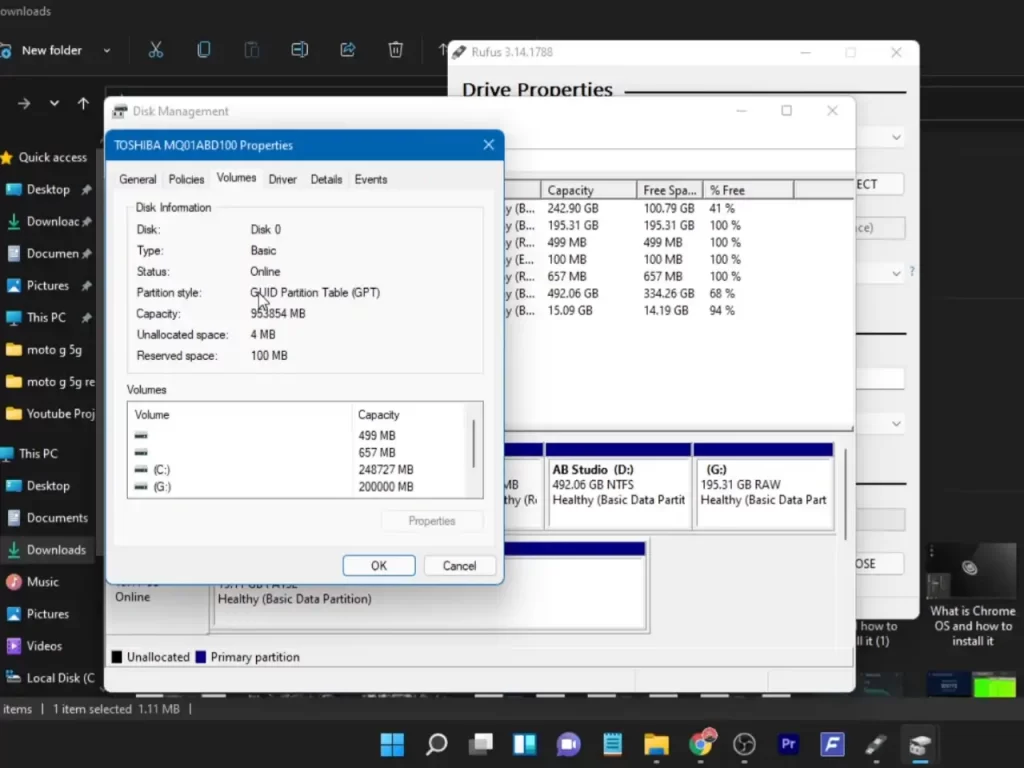
While you are here make sure to check your storage partition scheme as well. Whether it is GPT or MBR scheme. Right-click on the left area where it’s written Disk 0 and select properties. Now under the volume tab, you can see your storage partition scheme. Note it down as we will need it while making our bootable USB drive.
2.6. Create a Bootable USB
We need to make a bootable USB drive with Linux Mint OS. We will then boot into Linux Mint OS to flash the Chrome OS. First, we need a USB drive of 8 GB or more. Then, download a program called Rufus if you have not already.
Open the program and select the Linux Mint ISO image. Choose the partition scheme according to our previous step. Leave everything else as default and press start, It will then format your USB drive into a bootable drive.
Read How To Create Bootable USB For Multiple ISO Files
2.7. Entering System’s BIOS
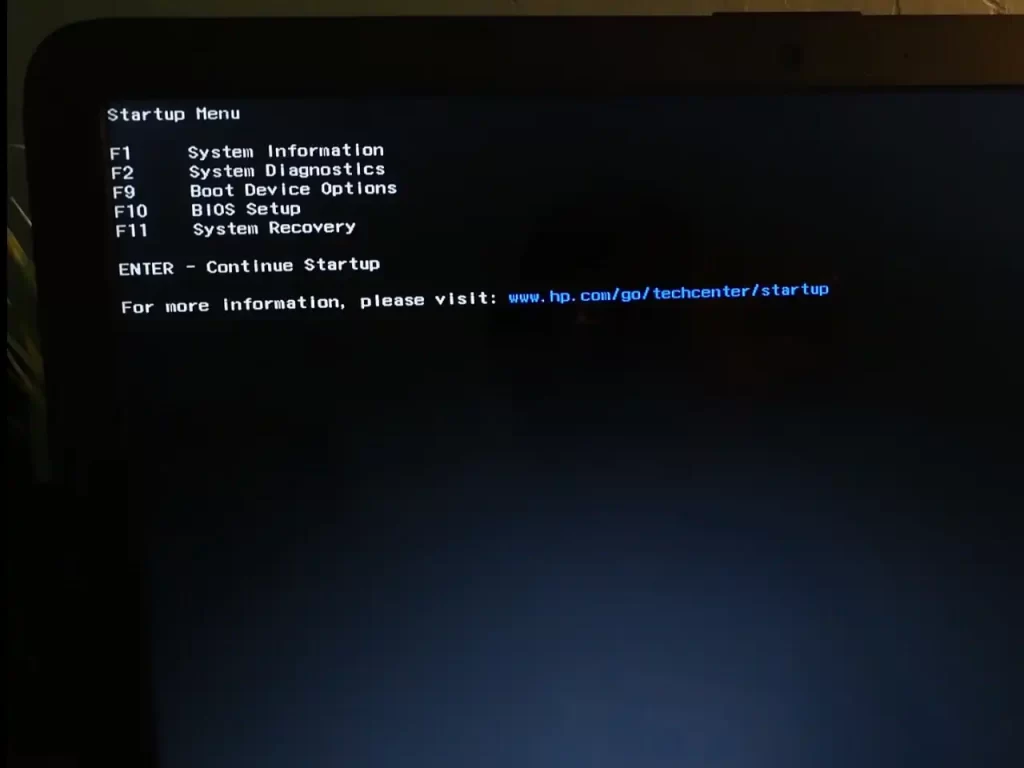
We need to enter our PC or laptop’s BIOS option to boot into Linux Mint. For HP laptops, the key to enter bios is the ESC key or F10. Restart your computer and as soon the screen lights up press the BIOS key and it will show various options. We need to select the Boot options and then select our USB drive. The system then will boot up from the USB drive which will then boot the Linux Mint OS.
2.8. Using Linux Mint
After booting into Linux Mint we do not need to install the Operating System. We can just use this interface to install the Chrome OS. Connect the system to an internet connection via WiFi or Ethernet.

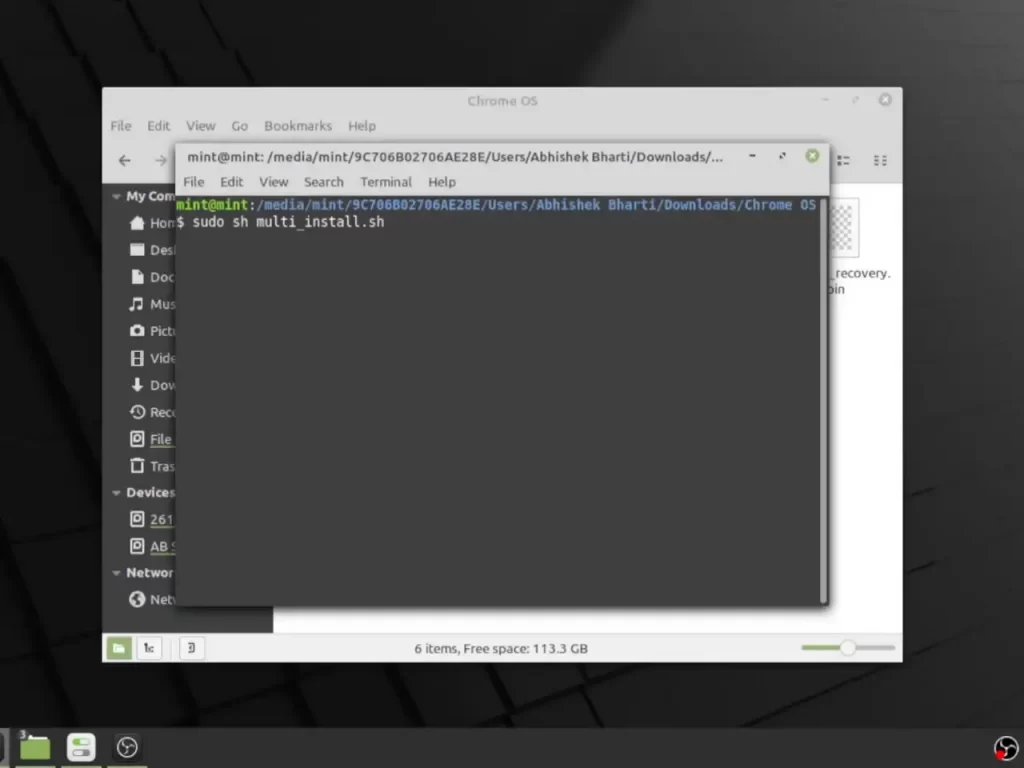
Open the computer icon and then select the drive where the Chrome OS is located. In the Chrome OS folder, we need to press right-click and select open in the terminal menu. Once in the terminal interface, we need to run some commands. First type sudo sh multi_install.sh and press enter. The process should start.
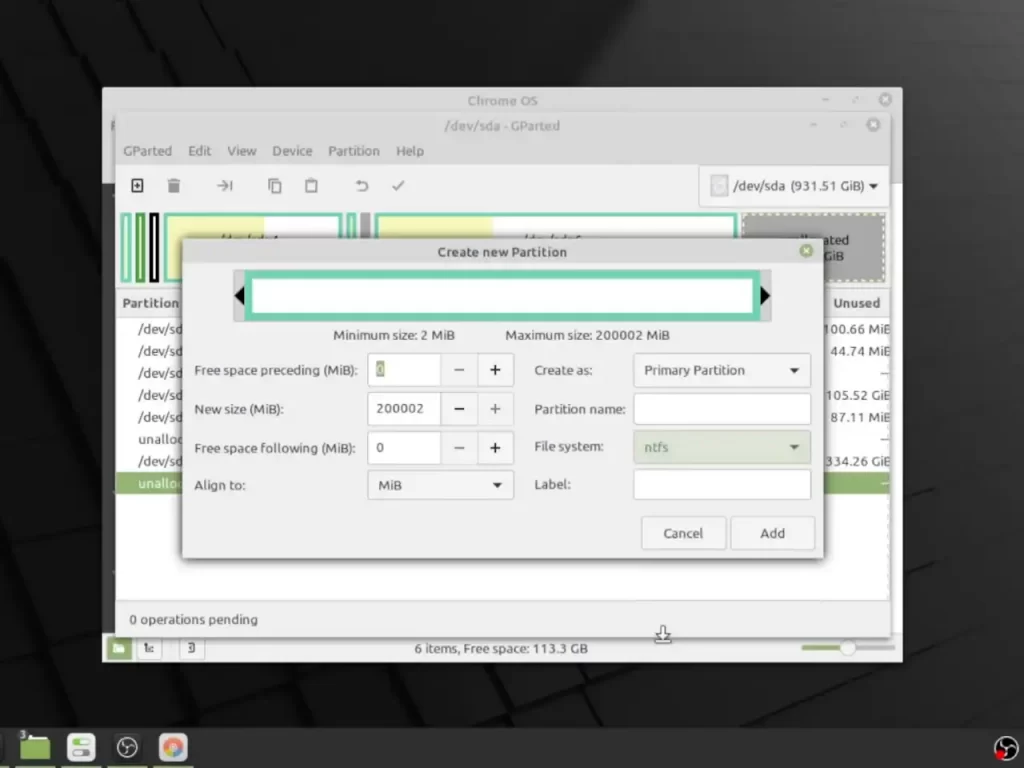
After the process is done there will be a new window opening up. It will list down all the partitions on our computer. We need to select the partition that we made earlier. Then press the Plus icon on top.
Now we need to format the partition and create a new partition for the OS. In the file system, select ‘NTFS’ and press add. Then press the Tick icon on top and confirm apply all operations.
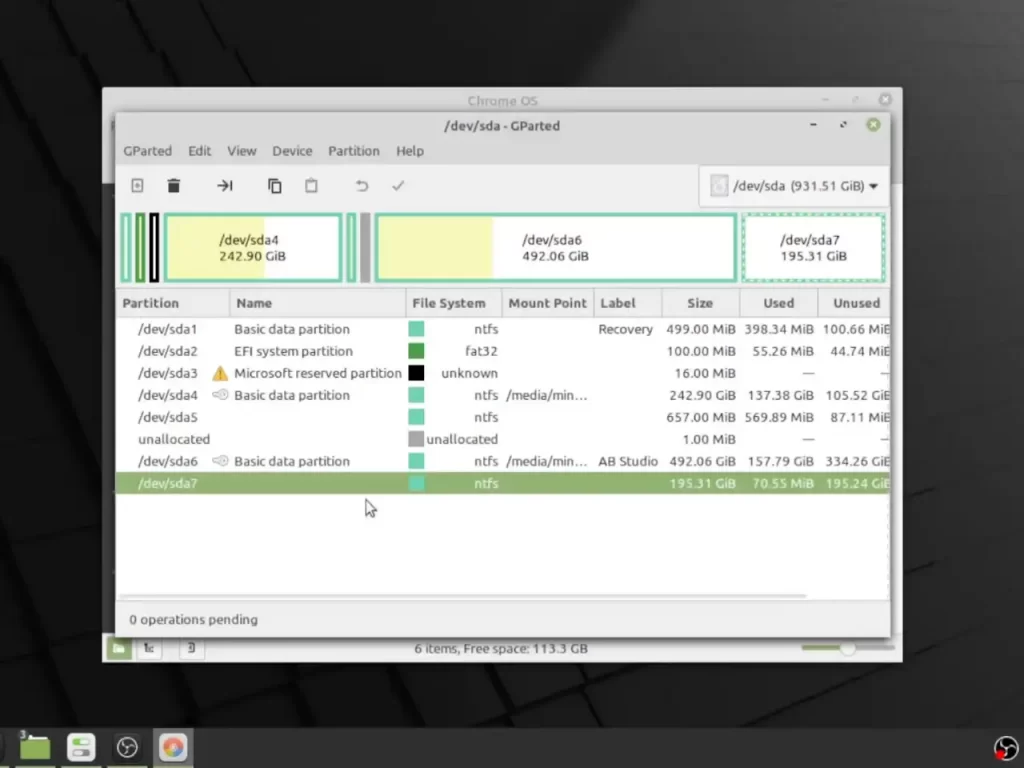
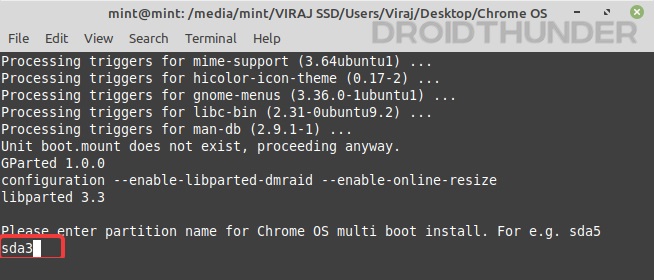
After it’s done creating a partition make sure to remember the name of the partition of the Chrome OS. For example, sda6, sda7, etc. When you will close the window you will be asked to enter the name of the partition in the terminal. For example sda6 or sda7, etc.
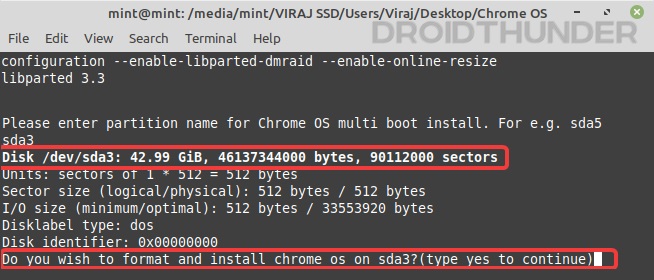
So type the name of the partition and press enter. Then type ‘Yes’ and the final process to install Chrome OS will begin. It will take some time though. After the installation is done there will be a pop-up window with some errors. Just ignore the error and close the window.
Now we need to copy some text from the terminal. Locate the commands between a bunch of asterisks. It will start with a menu entry and end with closing curly brackets. We need to copy the text inside those asterisks.
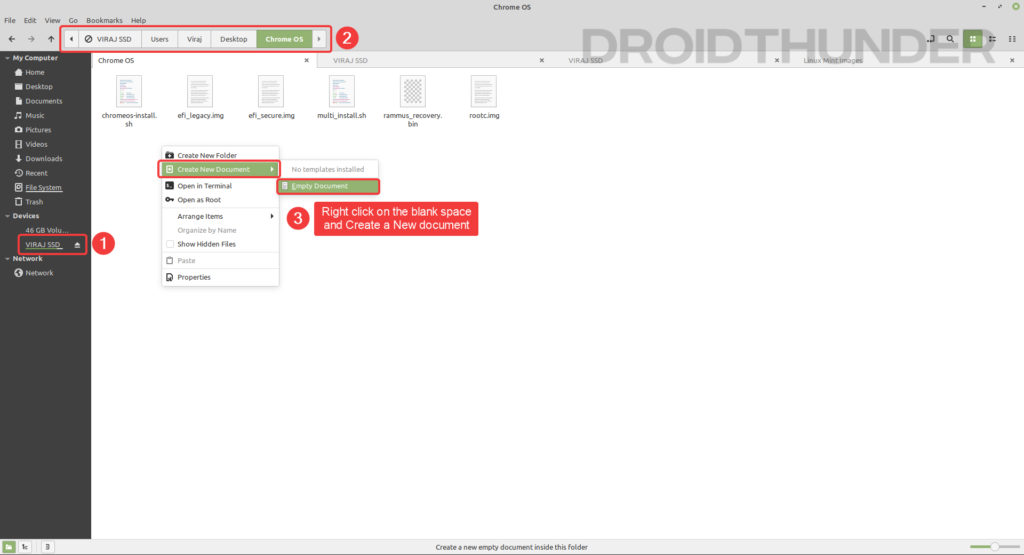
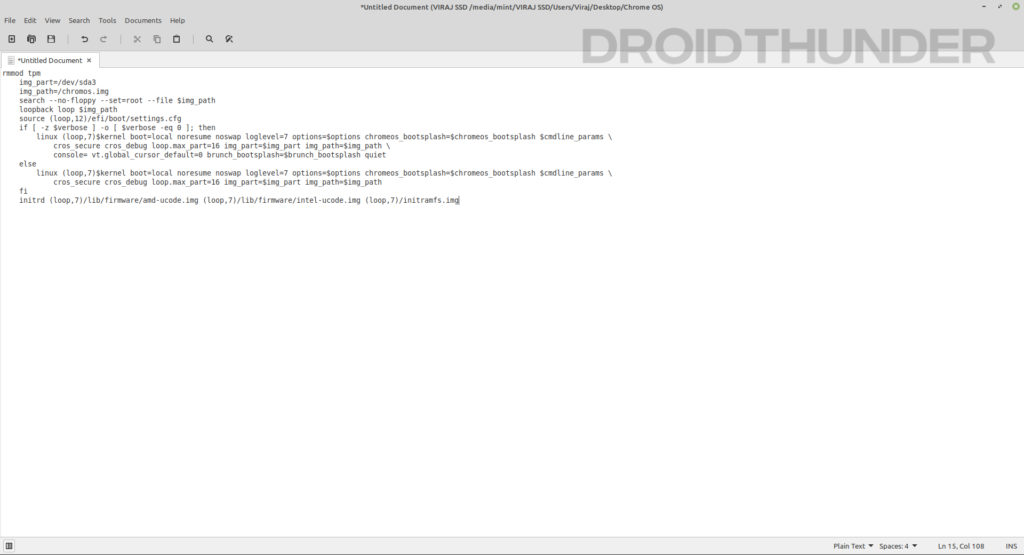
Then in the Chrome OS folder create a new text file or blank document. Then open the files and paste the commands. Save this file with the name of your choice as we will need it in a bit.

2.10. Editing Grub2WIn
Now just reboot your system and you should be back to Windows OS. We need to install the grub2win program we downloaded earlier. It will take a long time to install it so have patience. Once it’s done you may see an error saying your secure boot is enabled.
To fix it you need to enter your BIOS options and then select BIOS setup options. From here go to boot settings and disable secure boot and save and exit.
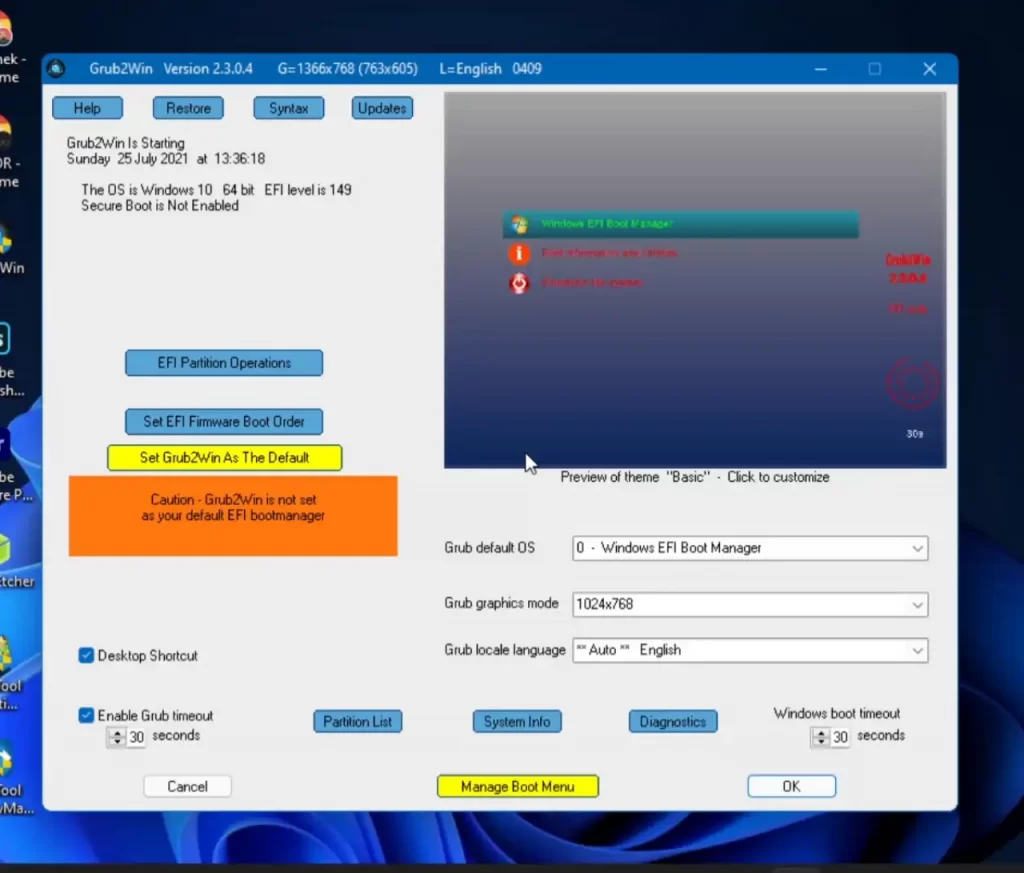
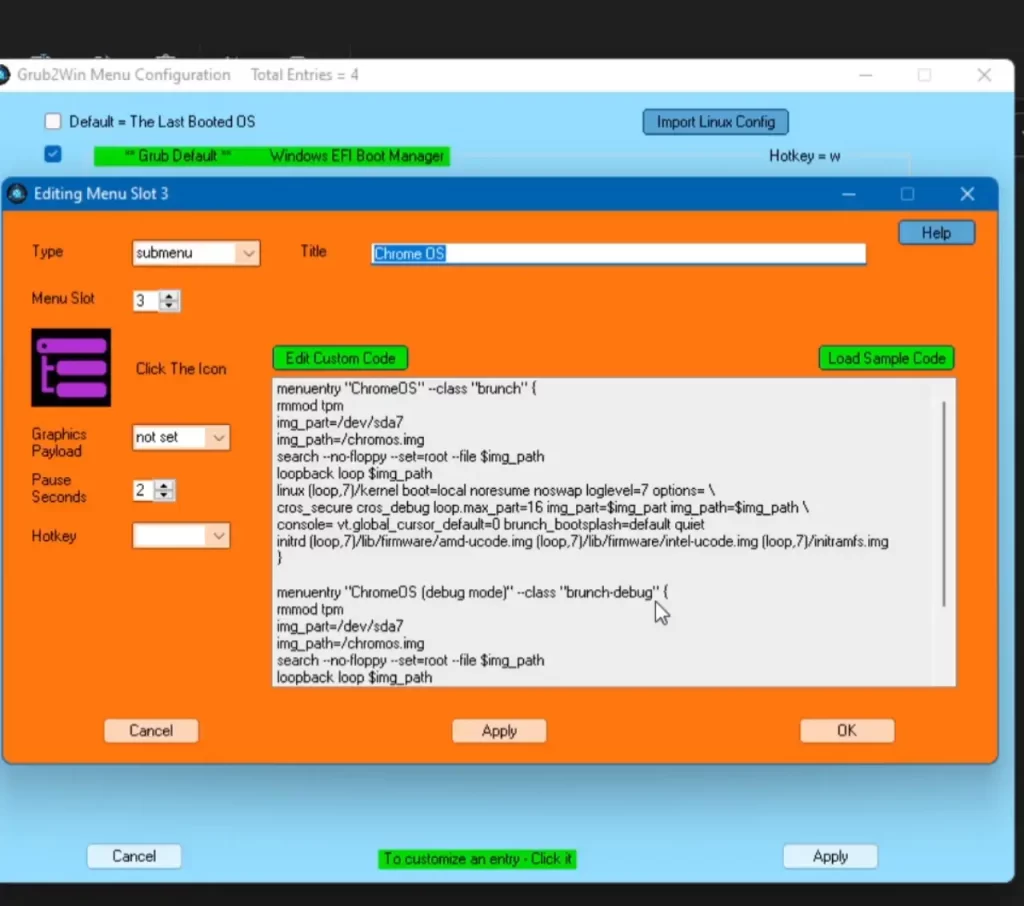
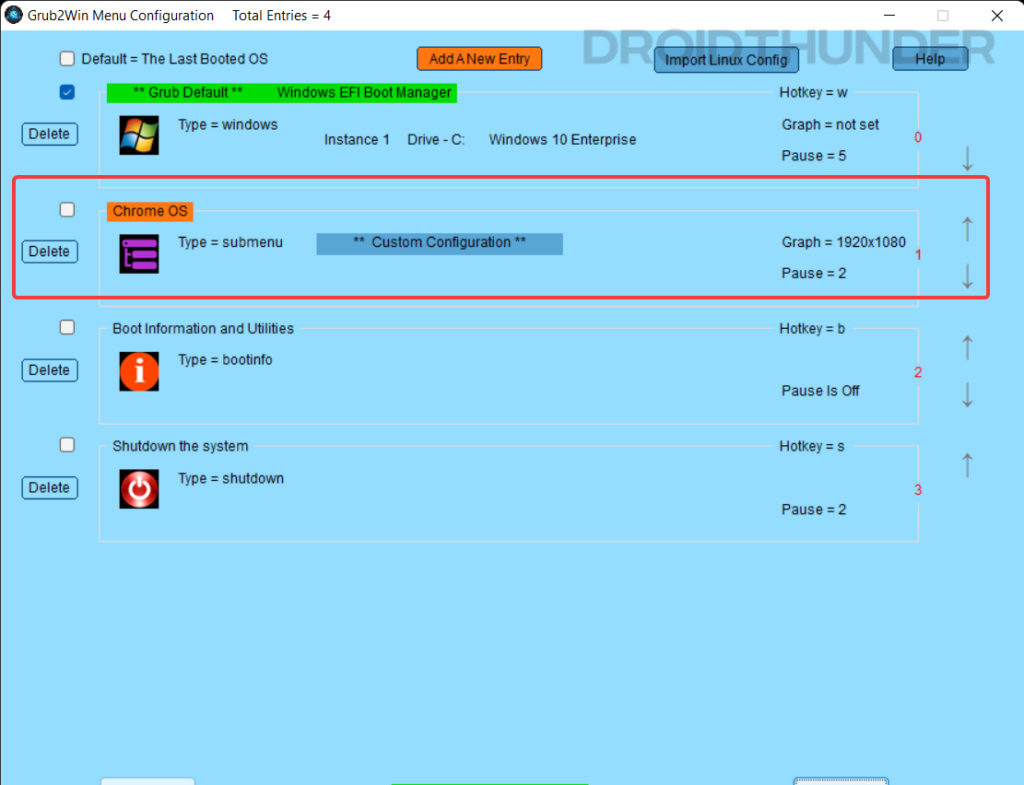
Once done you will not see that error in the program again. Now in the program, we need to go to Manage Boot Options at the bottom. Then click Add New Entry and from here we will create our menu entry for Dual Booting Chrome OS.
From the Type, drop-down select Submenu and rename Title as Chrome OS. Now click on Enter Custom Code and copy-paste the commands we copied earlier from the text file. Once done click Apply and OK and it’s done.
You can also move up and down the position of the boot menu according to your need. This is how it will appear when starting the system. You can set the Grub2Win as your default boot manager so you can choose between Windows and Chrome OS.
You can also customize other options related to the interface as well. After everything is done click on OK and exit the program and your settings will be saved. So now we have successfully installed Chrome OS in Dual Boot.
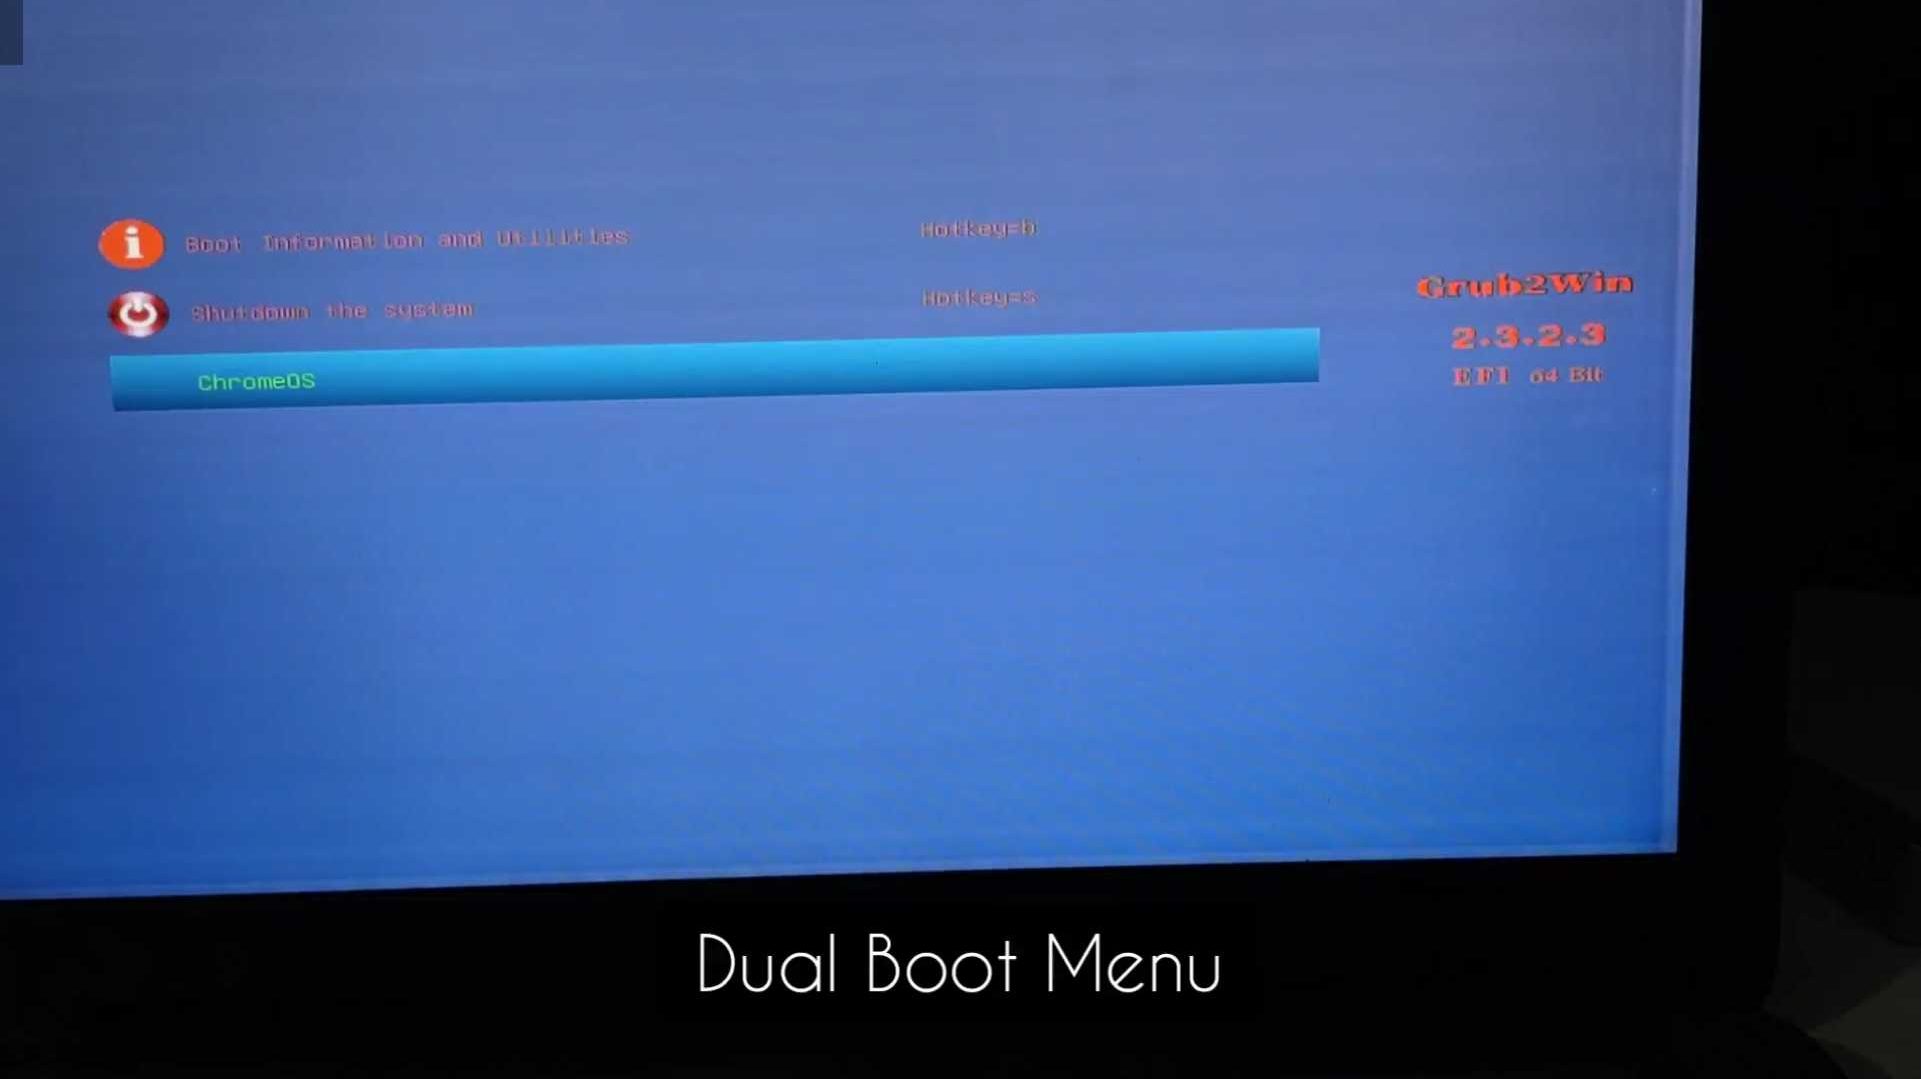
2.11. Dual Boot GRUB Menu
Now when you restart your system you will see the Grub2WIn boot manager asking to boot either into Windows or Chrome OS. Select the Chrome OS again same then it will start loading the Brunch Framework.
![]()
This will take some time and once done you will see the Chrome OS logo and the setup screen. it’s advisable to use a secondary Google account with this Chrome OS as Google officially doesn’t support third-party machines. So that was how to dual boot Chrome OS and Windows 10/11 using Linux Mint.
Chrome OS in Dual Boot Review and My Experience
I’ve been a long-time user of the Chrome OS which is installed in dual boot with Windows. Android OS is something I’ve always wanted to try on my laptop. Moreover, I’ve tried many other Android OS like Bliss OS, Prime OS, Android x86, and more. But only after trying Chrome OS, I could finally be at ease. Mainly because it was coming directly from Google.

Chrome OS is entirely based on the Chrome Browser platform. This means most of its functions are web-related, whether it’s the pre-installed apps or the web apps. There are not a lot of things you can do without the Internet. Google Play Store does make a huge difference in this regard. Because unlike Chrome OS Flex where you’re completely dependent on the Chrome browser. Here you can download and install offline games and play them in the pass time.
Mobile-specific Android Apps
Additionally, the main advantage is being able to use Android-specific apps like Instagram or portrait-mode games like Subway Surfers. You can actually browse the web while you watch Instagram, YouTube Shorts, or similar apps. Furthermore, you have the entire Google Play Store to browse and install apps.

Another feature besides Android is the Phone Hub, where you can monitor your smartphone’s battery, notifications, and more. Additionally, you can reply, silence, and find your device too. We can share recent files and media directly from the Phone Hub. Otherwise, to share extensively we have the Nearby Share option, which works great. If you’re into the Android ecosystem then Chrome OS feels just right at home as your Google Account syncs everywhere.
Additionally, to fully experience the Android games, you’ll need a wireless controller. Another advantage is the presence of Google Assistant, which makes controlling smart devices more convenient. Furthermore, we also have Linux support which opens a whole new world of possibilities. It’s made for advanced users but you can definitely try to play around.
Verdict
Overall the main reason to use Chrome OS is the Android support and access to the Google Play Store. Another thing is that even though the OS is based on the Chrome browser, it’s still not like the full desktop version of the Chrome browser we see on Windows or Linux. You can manually install the Linux version of the Chrome Browser to fix this. For a normal user, it will make more sense to dual boot Chrome OS and Windows as Linux OS can get really complicated sometimes.
Check Out The Video Guide:
3. Chrome OS and Windows 11
You can check out the new lightweight Chrome OS Flex: The Chrome OS For Everyone!
4. FAQ – Frequently Asked Questions
Can Chrome OS be installed on any computer?
There are certain requirements to install Chrome OS. We need a 64-bit System, UEFI or MBR Boot, and the Secure Boot should be disabled. Nvidia graphics and Virtual Machines are not supported.
Can you install Chrome OS on a Windows PC?
Yes, we can install Chrome OS on a Windows PC. We have the option to install it in the Primary partition or Dual boot Chrome OS and Windows OS.
Can I install Chrome OS on an old laptop?
Yes, in fact, it is recommended that you install Chrome OS on an old laptop or PC. It makes the performance of the laptop much better, transforming it into a Chromebook.
Is Chrome OS better than Linux?
Both Linux and Chrome OS are very popular and have their own advantages and disadvantages. Chrome OS has the ability to install Linux subsystems and run Linux applications.
Grub2Win says Chrome OS is not supported.
With recent updates, Grub2Win is flagging an error, but you can still continue with the process and successfully install and dual-boot Chrome OS and Windows.
Facing wi-fi, touchpad, and microphone issues on Chrome OS?
You can select brunch settings from the dual boot menu and then select the fix using the spacebar key. Then press enter to confirm and continue. Check the various fixes available here.
Why is Chrome OS not booting up after installation?
Depending upon the system you may need to change your kernel from the brunch configuration. Choose brunch settings from the dual boot menu and then select the kernel using the arrow key and enter to confirm. You check here for more information.
Home » Windows » How to Install Chrome OS (with Play Store) and Dual Boot with Windows

Windows 11 is a pretty new OS that Microsoft released recently, and most of us have already upgraded to it or looking forward to upgrading. But there are other OS, which are getting upgrades too. Come to think of it, Chrome OS feels like an operating system you should run alongside Windows. Why? Because you can dual boot Chrome OS and Windows together by installing them on the same hard drive.
Chrome OS is known for its performance, while Windows 11 is a versatile operating system. To add the cherry on the top, Chrome OS also supports Google Play Store and Linux apps. Having both OS together on a single machine is advantageous as well as a fun thing in itself. Sounds interesting, right? If it’s a yes, then this tutorial is for you. Today, we’ll learn how to install and run Chrome OS alongside Windows 10 or Windows 11 PC. Let’s get started!
Install and Dual Boot Chrome OS and Windows 11
Before we begin, I would like to mention that this tutorial involves complex operations and a lengthy procedure. Go ahead only if you are good with operating multiple systems. Apart from that, this guide won’t touch any of your Windows files, but I highly recommend that you back up all your crucial files because you never know when things go wrong.
Pre-requisites
- A USB flash drive with a minimum of 16GB of storage space is a must.
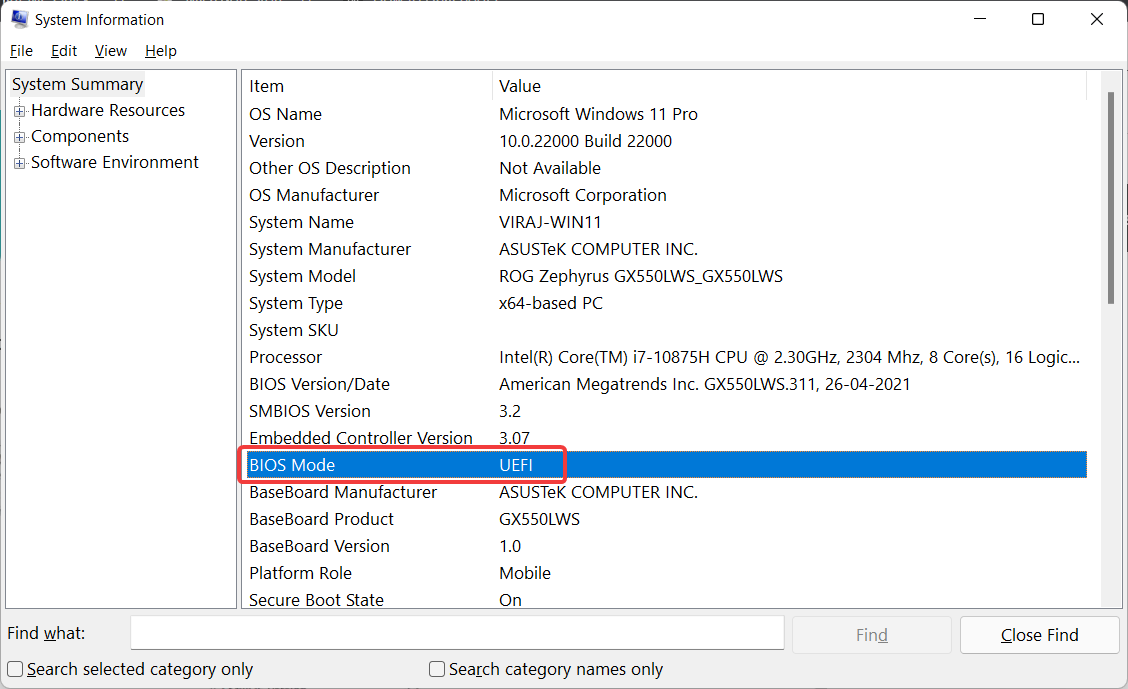
- UEFI Firmware support is another requirement for Brunch to work. It also works with legacy BIOS, but there are a few limitations. You can read them on the Brunch development page.
- To check whether your PC supports UEFI or MBR/BIOS, search System Information in the start menu and open it.
- Look for the BIOS mode. You’ll find your PC firmware type mentioned against it.

- Intel hardware (CPU and GPU) starting from 1st generation Nehalem architecture. Note that Intel first-generation graphics do not work with ChromeOS versions above r81.
- AMD Ryzen CPU and GPU. Currently supports AMD Ryzen and AMD Stoney Ridge processors only.
Downloads
We need the following components for flashing Chrome OS on your Windows PC hard drive.
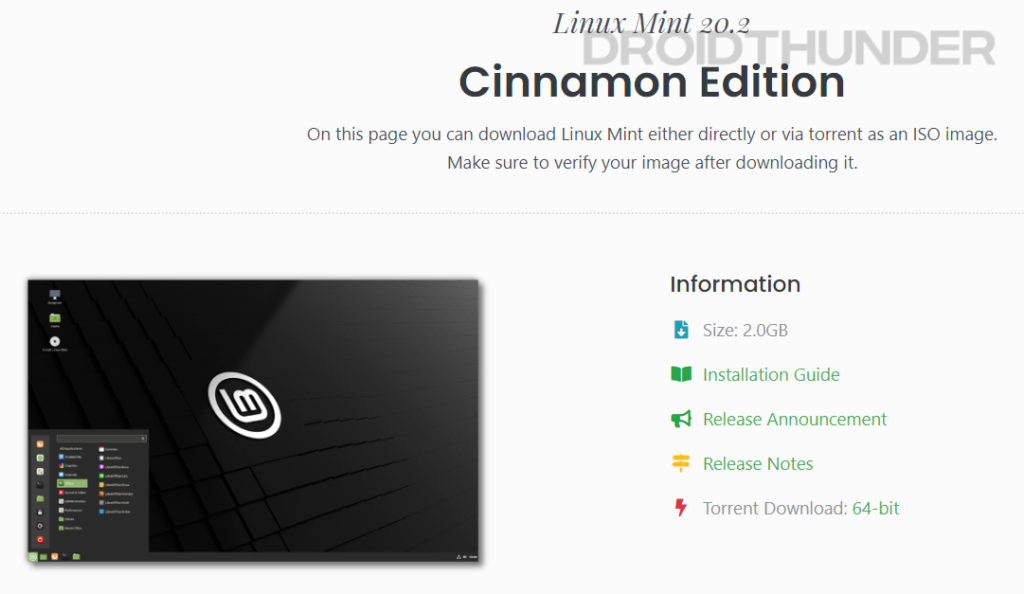
1. Linux Mint
We’ll use the Linux Mint Cinnamon image for dual-booting Chrome OS and Windows 10 or Windows 11 PC. You can use other Linux distros like Ubuntu or Debian too. However, I won’t recommend using them since many users reported that they are facing various errors while installing and booting Chrome OS.
Download Linux MintCinnamon Edition
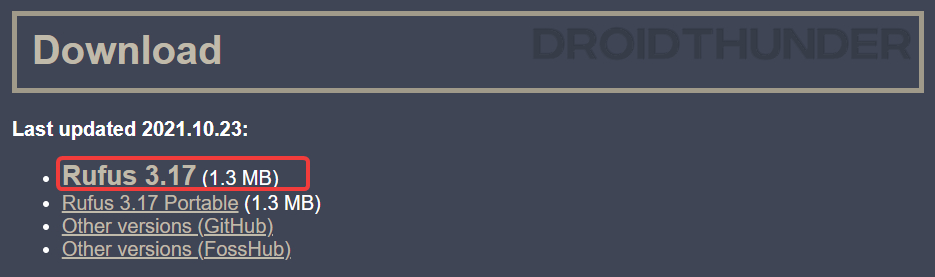
2. Rufus
Rufus is a windows utility that helps create bootable USB flash drives. Here, the purpose of using Rufus is to flash the Linux Mint image on the USB storage.
Download Rufusfor Windows
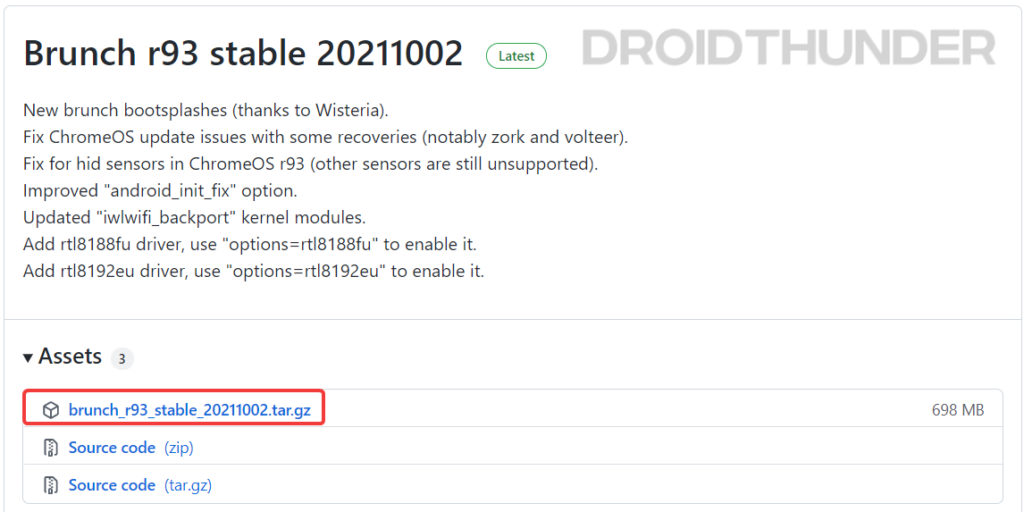
3. Brunch Framework
The purpose of the brunch framework is to build a generic Chrome OS image from an official recovery image. It uses a 1GB ROOTC partition (containing an initramfs, a custom kernel, the swtpm binaries, userspace patches, and config files) and a specific EFI partition to boot from it.
Warning: As Brunch is not the intended way for Chrome OS to work, thus, at some point, some Chrome OS scripts could behave terribly with Brunch and delete data unexpectedly, including Windows / non-Chrome OS partitions. I would highly recommend that you use Chrome OS on a device having less sensitive data.
Download Brunch Framework
4. Chrome OS Recovery Image
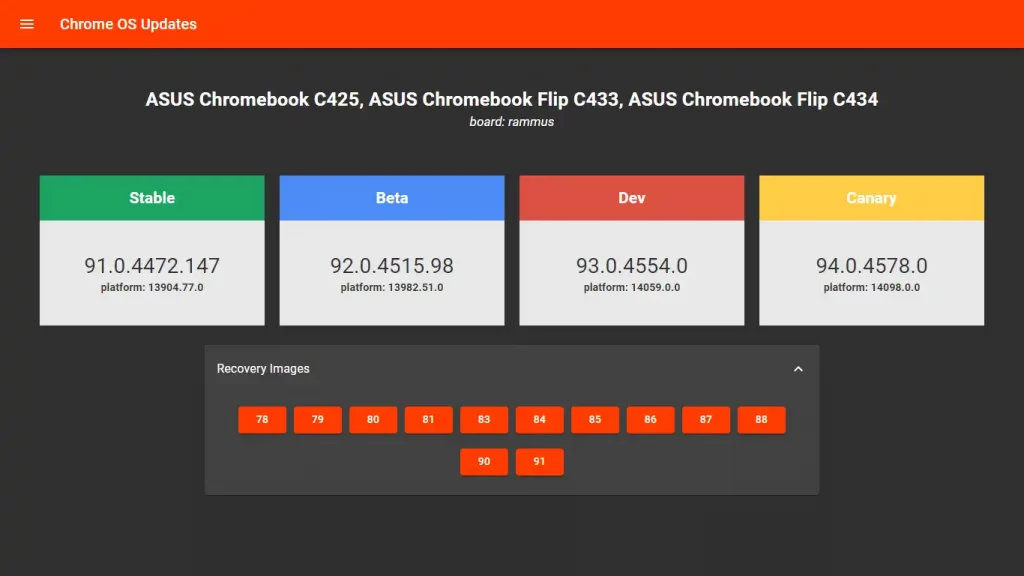
Now, it’s time to get the official Chrome OS recovery image. Click on the download button below. When the webpage opens, look for the word rammus. In the recovery column, hit on the latest recovery image to start the download. While writing this guide, the current version is 94, but it may change subsequently.
The reason we chose rammus is that it works on most modern generations of Intel processors. However, I suggest you go through the below list and download the specific image based on your processor.
Download Chrome OS Recovery ImageMirror #1
Intel Processors
- rammus = Intel 1st to 9th generation processors.
- volteer= Intel 10th & 11th generation CPUs.
AMD Processors
- grunt = AMD Stoney Ridge & Bristol Ridge.
- zork = AMD Ryzen.

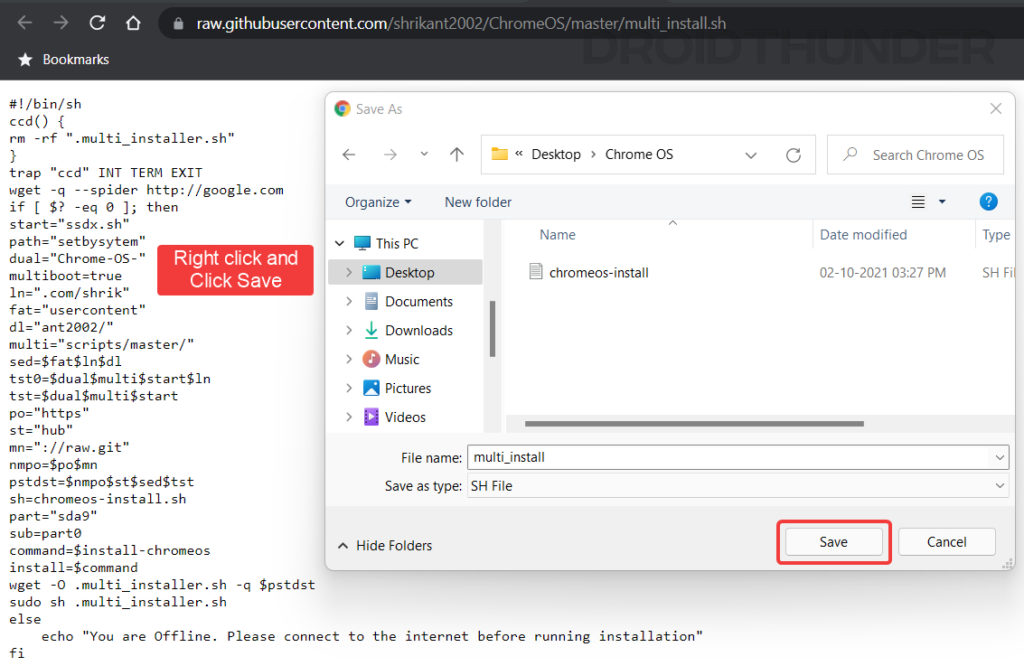
5. Shell Script
Finally, download the multi_install.sh shell script, which helps install Chrome OS on a Windows partition. Click on the download button below and press Ctrl + S to save the file.
Download multi_install.shMirror (Github)
Now that we have acquired all the necessary files – let’s get going to the steps!
Organize Files in One Place
- First off, gather all the downloaded files in one place. Let’s consider you have placed all the files in the Desktop folder.
- Now, Create a folder named Chrome OS on the Windows Desktop. You can also create it in any other place having sufficient storage.
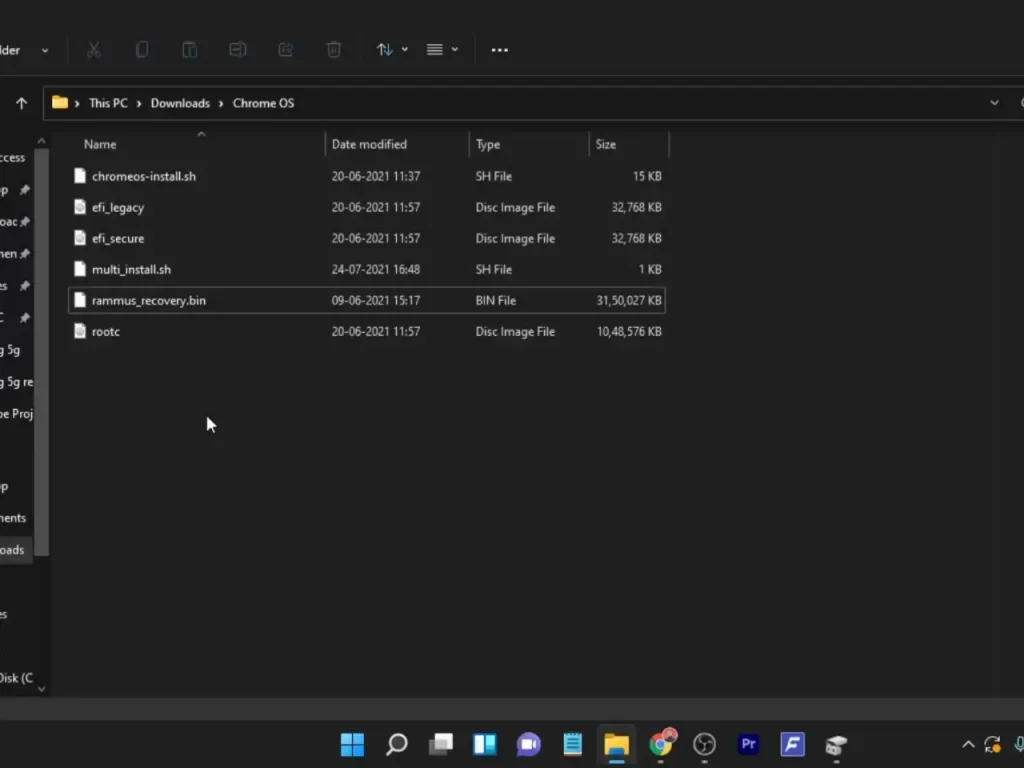
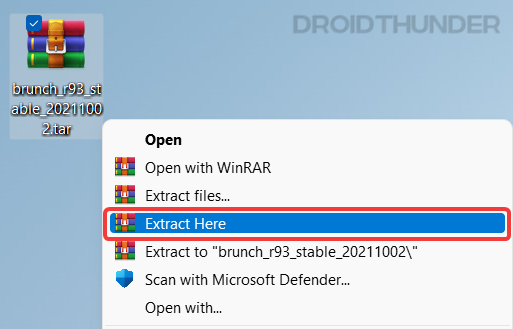
- Using WinRAR, extract the Brunch package by selecting the ‘Extract Here’ option. As a result, you’ll get four files out of the archive. Now, move these four files to the Chrome OS folder.
- chromeos-install.sh
- efi_legacy.img
- efi_secure.img
- rootc.img
- Next, extract the Chrome OS recovery image file.
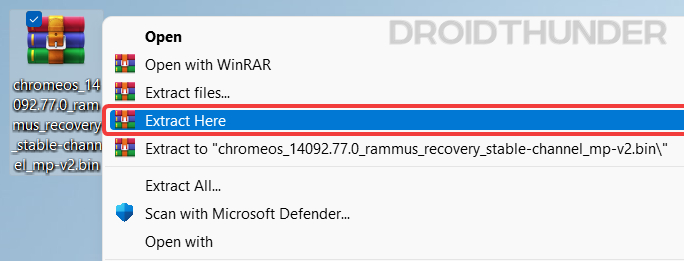
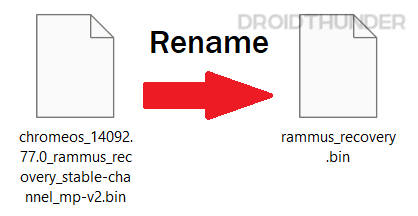
- Upon extraction, you’ll get a file having a .bin extension. Rename the .bin file to rammus_recovery. Now, move the rammus_recovery.bin file to the Chrome OS folder. Note that even if you have downloaded any other Chrome OS image like volteer, grunt or zork, make sure you rename it to their respective name + _recovery.bin. For example, volteer recovery filename would become volteer_recovery.bin, and grunt recovery would become grunt_recovery.bin, and so on.
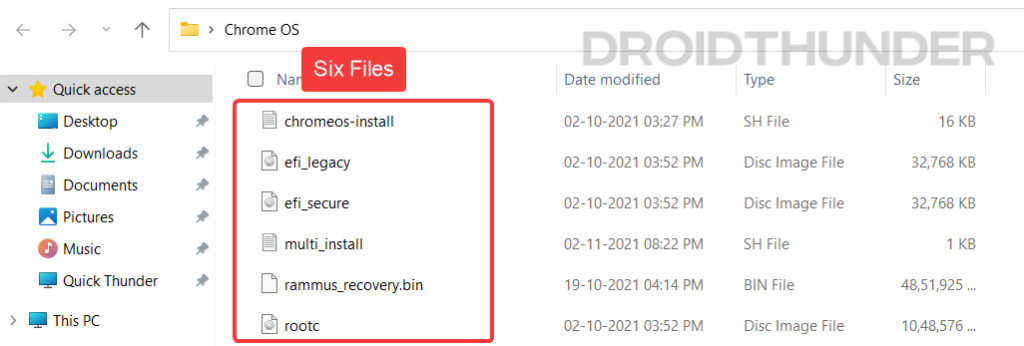
- Move the shell script file multi_install.sh into the Chrome OS folder.
- By this time, you should have six files in the Chrome OS folder. Do note the path of the Chrome OS folder as we’ll need it for performing further steps.
Flash Linux Mint Cinnamon
Using the Rufus utility, we’ll flash the Linux Mint ISO image on the USB storage. Linux distro installation is necessary because ChromeOS is a Linux-based operating system, and the shell scripts that we downloaded require a Linux environment to work. The steps for installing Linux Mint on the USB storage are as follows.
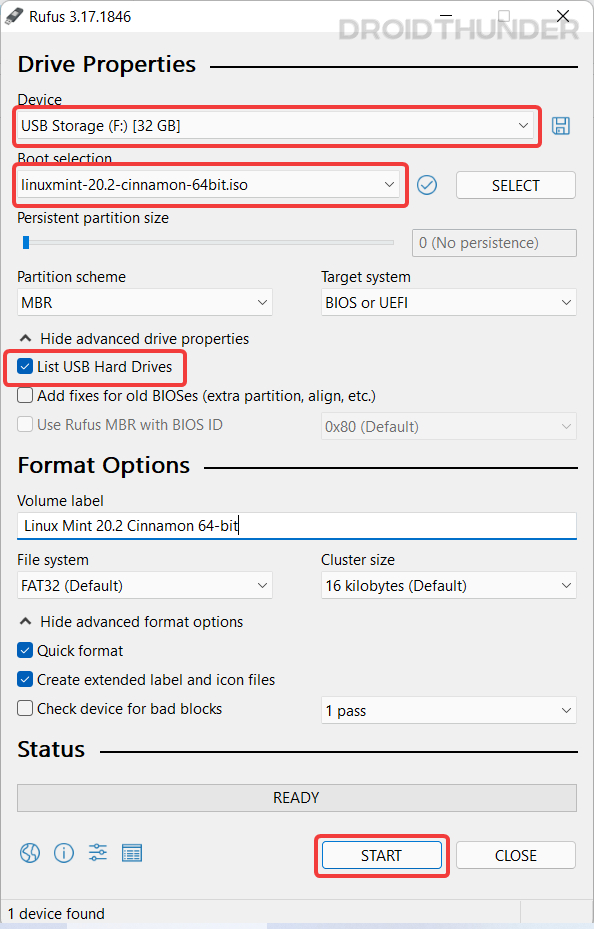
- Plug in the USB storage device such as Pendrive or microSD card and open Rufus utility.
- In Rufus, under Device, you shall see the plugged-in USB storage. Here I am using a 32GB Pendrive.
- Under Boot selection, select the Linux Mint ISO that we downloaded earlier.
- If you are using a Hard drive, tick the List USB Hard Drives option to see your connected hard disk.
- Keep all other settings unchanged and now press the Start button.
Do note that flashing the USB storage will wipe out all the data present on it. Therefore, we strongly recommend that you back up all the necessary data before pressing the Start button.
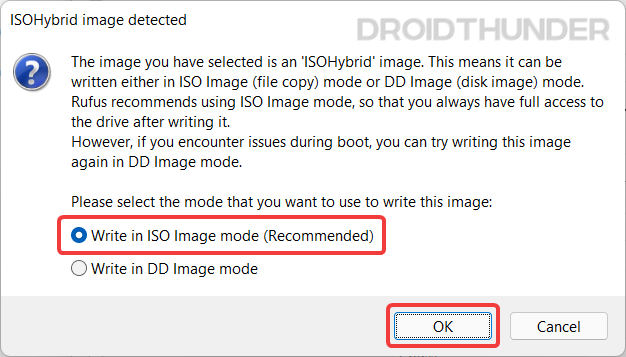
- When you press the Start button, a popup will appear. Select Write in ISO image mode option and press OK. If you choose DD Image boot, the USB drive won’t be accessible for you to operate in Windows. If you have a legacy BIOS and an old CPU, then DD Image mode is useful.
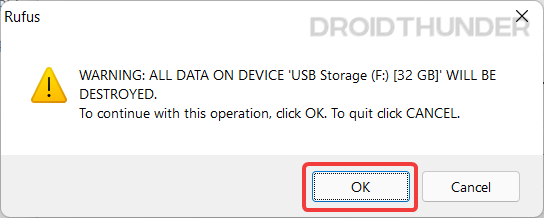
- Here, Rufus will warn you that it will erase all the data stored on the USB device that we are using to flash Linux Mint. If you have taken the backup, press OK.
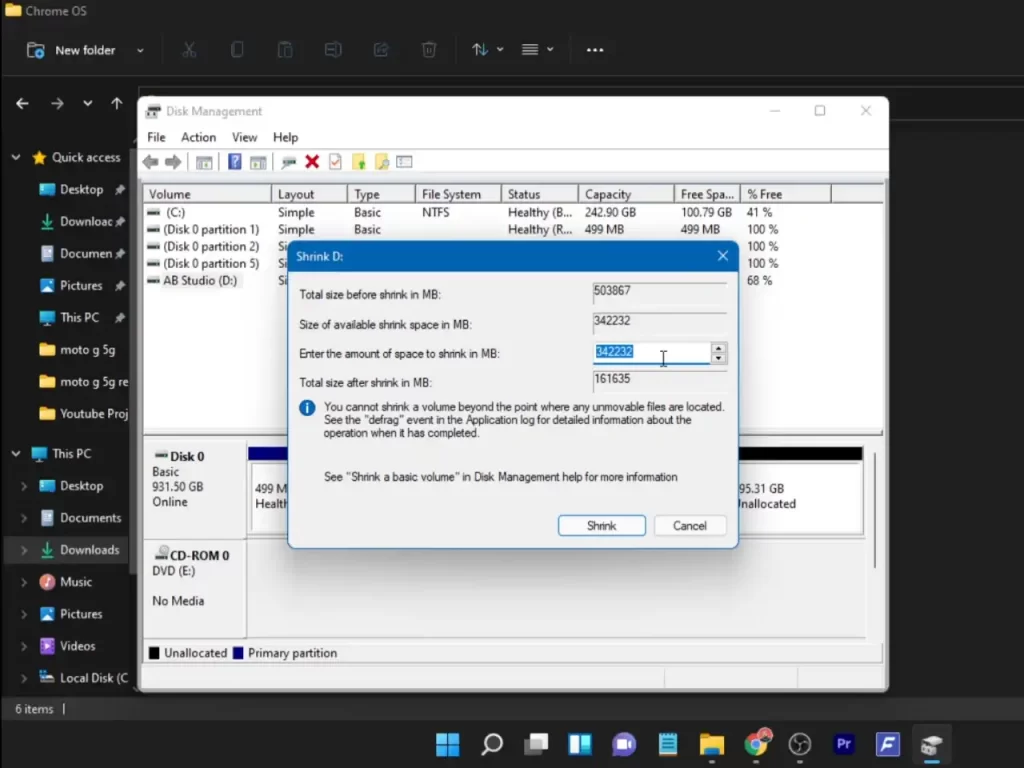
Create Unallocated Space for Chrome OS
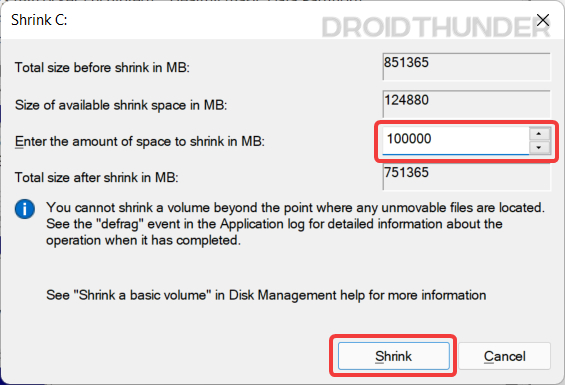
Now, we need to create an Unallocated partition using the Windows Disk Management tool. You need to have at least 14 GB or more free space on the hard drive for creating an unallocated partition. I have given 100 GB of space, but you can choose your partition size.
On a side note, let me tell you something. Chrome OS requires partition size in multiples of 22 GB, for example, 22000 MB (22 GB), 44000 MB (44 GB), and so on. But here, you can assign any size you want. Later, before flashing Chrome OS using Linux Mint, we will provide an appropriate partition size.
Let’s shrink the existing drive and create unallocated space. Here are the steps.
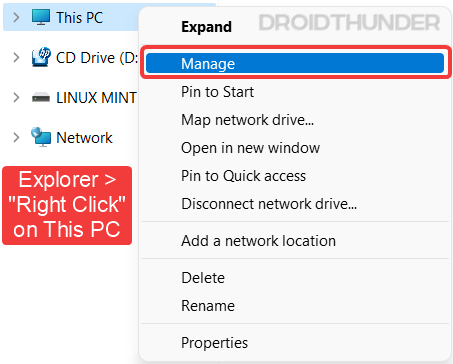
- Open Windows Explorer and right-click on This PC icon. Select Manage to open Computer Managemen tools.
- Select the Disk Management option from the left. Now, click on the partition from which you want to create unallocated space. I am using an external SSD for space creation. Right-click on the selected drive and click Shrink Volume.
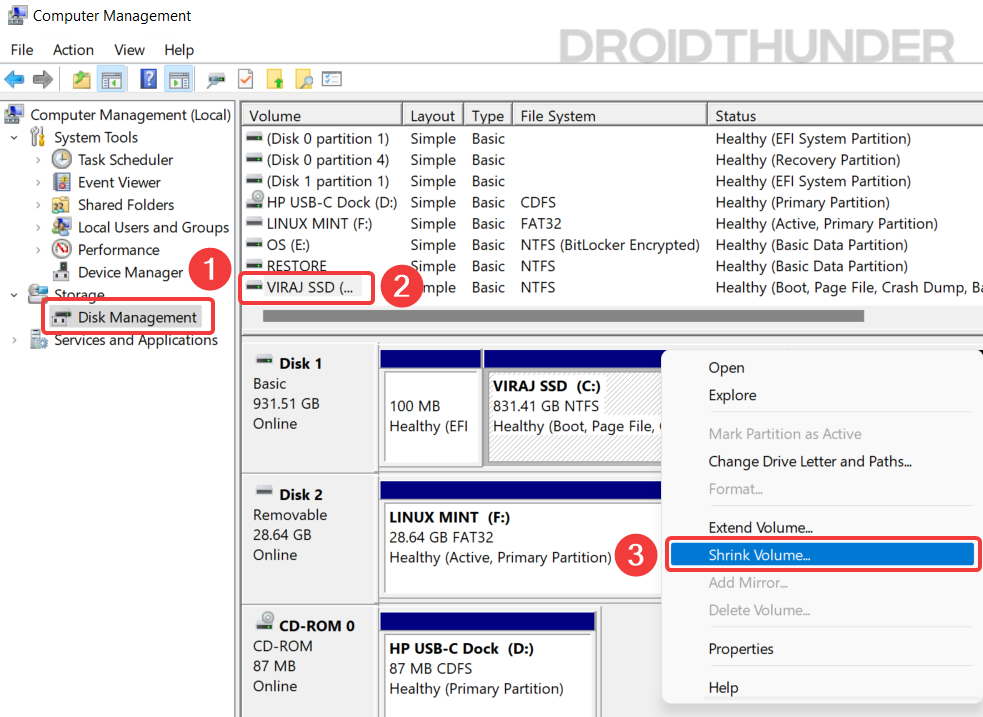
- As discussed at the beginning of this section, I will create a 100 GB (100000 MB) partition. Press the Shrink button to proceed.
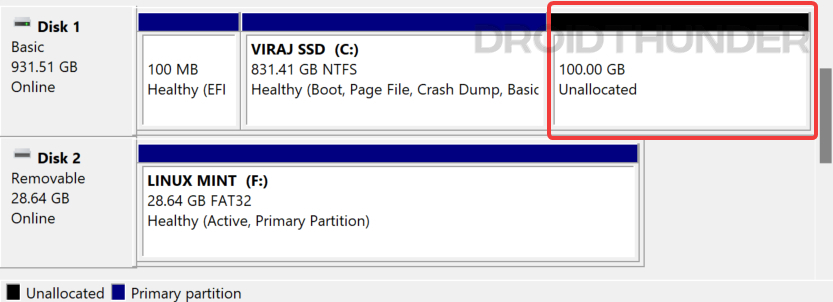
- Now, in the disk management, you will see that the unallocated space is separated from the selected drive and marked in black.
All good so far? Now we have completed all the required operations on Windows OS. Let’s boot the Linux Mint Cinnamon image from the USB flash drive.
Boot Linux Mint from USB Storage
For Linux Mint bootup and Chrome OS installation, we will have to perform a few operations in PC BIOS.
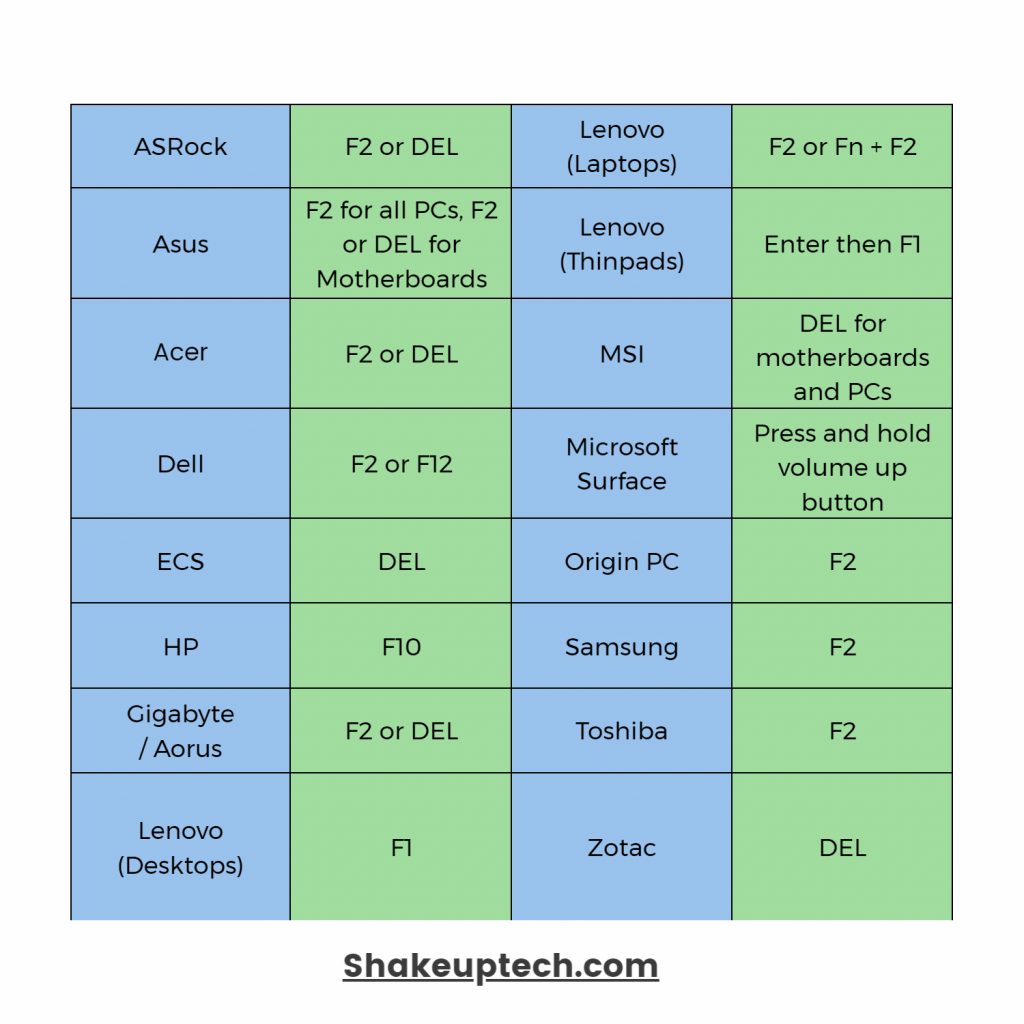
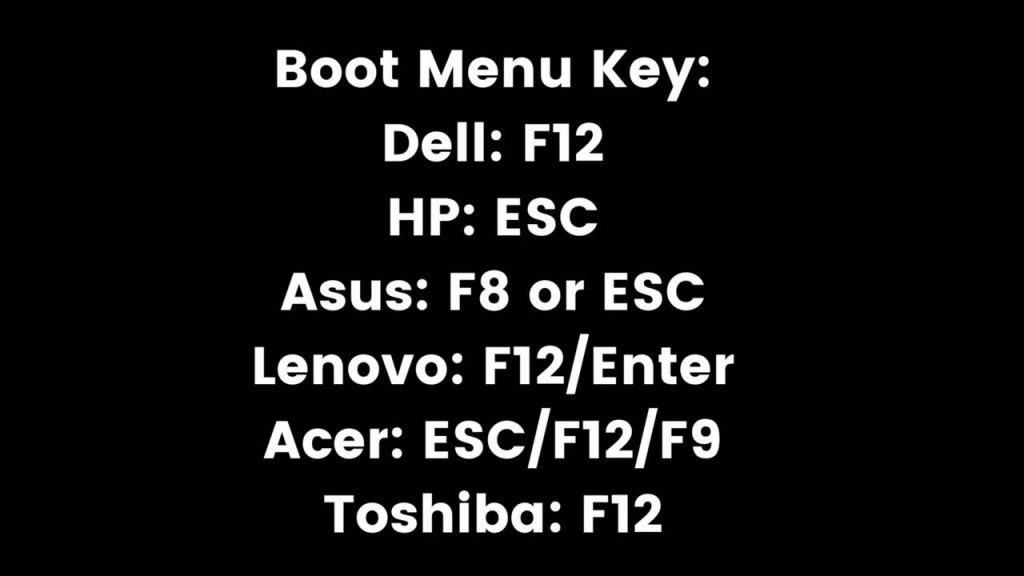
- Shut down the Windows PC if running. Boot into the BIOS menu. For doing that, start your PC and continuously press the F2 or DEL key on the keyboard. Your PC might have a different key set for booting into the BIOS. Refer to the below table and find out the right key.
| Brands | BIOS Key |
|---|---|
| Acer | F2 or DEL |
| ASUS | F2 for all PCs, F2 or DEL for motherboards |
| Dell | F2 or F12 |
| HP | ESC or F10 |
| Lenovo (Laptops) | F2 or Fn + F2 |
| Lenovo (Desktops) | F1 |
| Lenovo (Thinkpads) | Enter + F1 |
| MSI | DEL for motherboards and PCs |
| Origin PC | F2 |
| Samsung | F2 |
| Sony | F1, F2, or F3 |
| Toshiba | F2 |
- In the BIOS, navigate to the Boot tab and disable Fast Boot. Also, check if you have CSM (Compatibility Support Module) option. If present, set it to Disabled because we are using a UFEI mode. If you want to use Legacy mode, you can keep the CSM option enabled.
- Now that we want to boot Linux Mint instead of Windows, we need to change the boot order. Move USB Storage at the top so that BIOS will boot our USB flash drive.
Not to be Missed: How to Install Windows 11 on External SSD or USB Storage
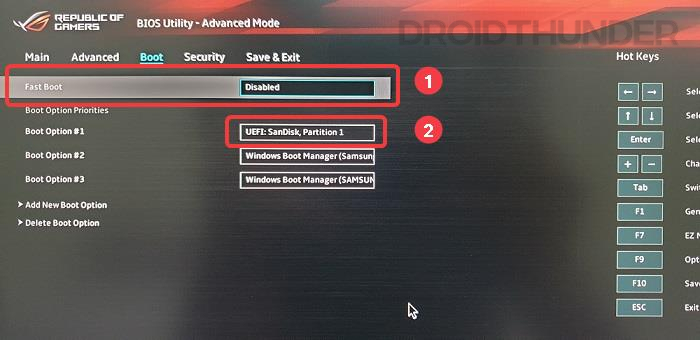
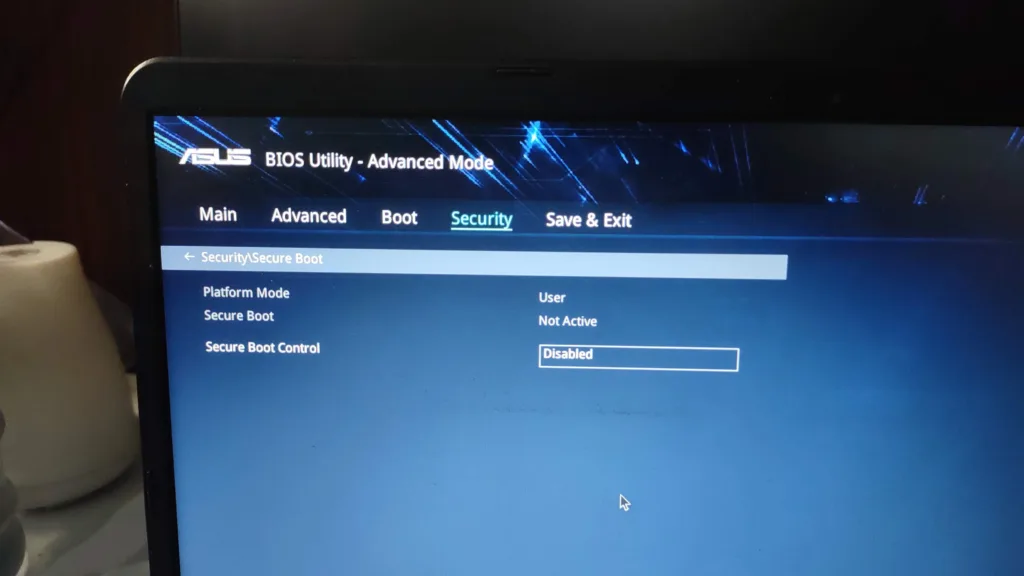
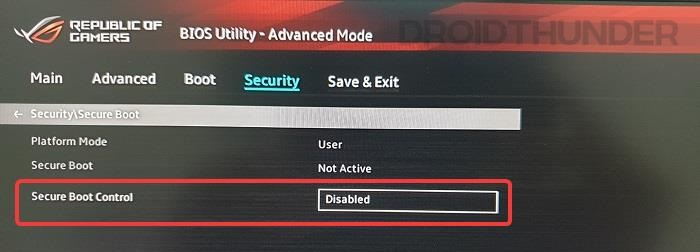
- Navigate to the Security tab and look for Secure Boot Control or a similar option. If enabled, change it to Disabled. Without disabling the secure boot function, you can’t boot the Chrome OS even after a successful installation.
- Finally, press the F10 key to save the changes and exit the BIOS. Your PC shall restart, and you will see the following Linux Mint Menu. Press Enter to proceed.

At this point, you should have entered into the Linux Mint Cinnamon OS.
Install Chrome OS
- Once you see the Linux Mint interface, connect your PC to the Internet using ethernet cable or Wi-Fi. The Chrome OS installer requires an active internet connection to fetch necessary libraries and dependencies.
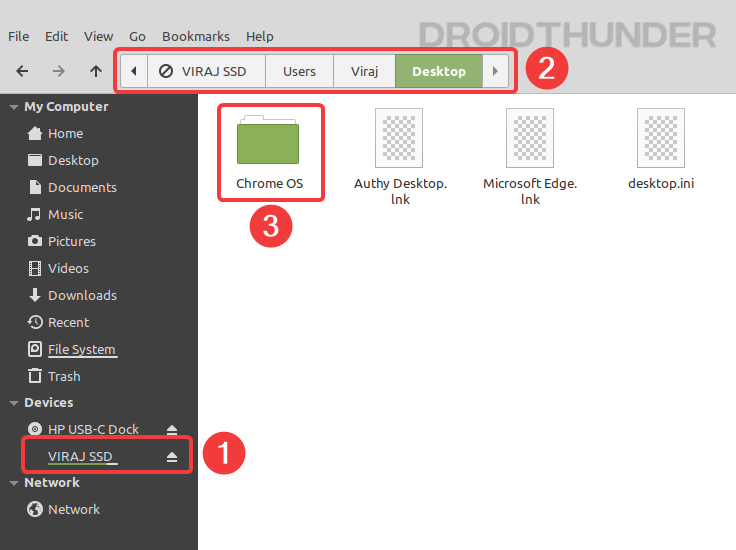
- Now, double-click the Computer icon on the desktop and navigate to the drive where you have kept the Chrome OS folder.
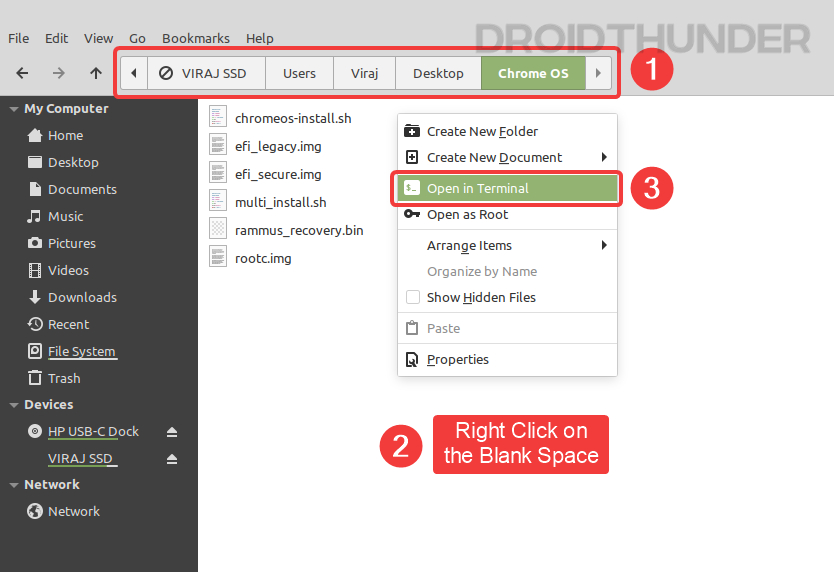
- Right-click on the blank white space and select the Open in Terminal option. A terminal window pointing to the Chrome OS folder shall open.
Shell Commands
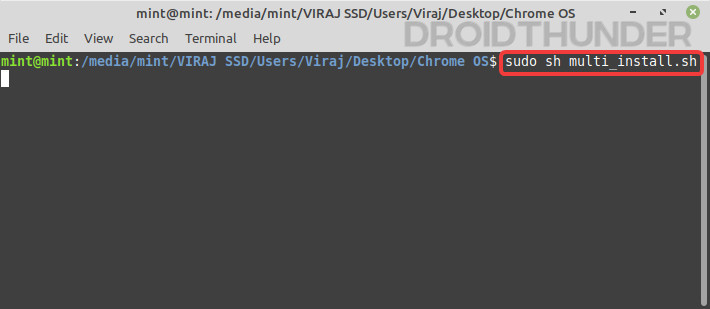
- Enter the following command in the Terminal window.
sudo sh multi_install.sh
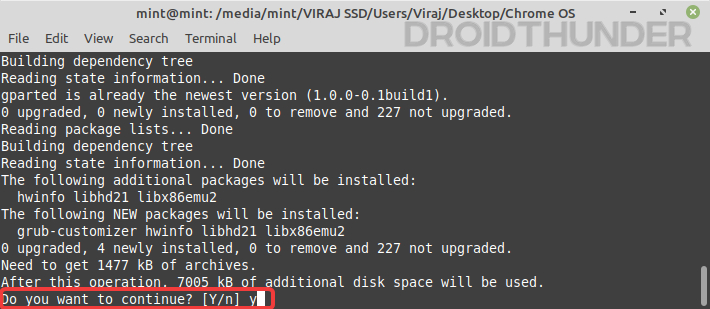
- The installer will ask you whether to download the required files and continue the installation. Press y and hit Enter key.
- Following the installation, a window will appear, and it’s nothing but a Linux disk partition tool GParted.
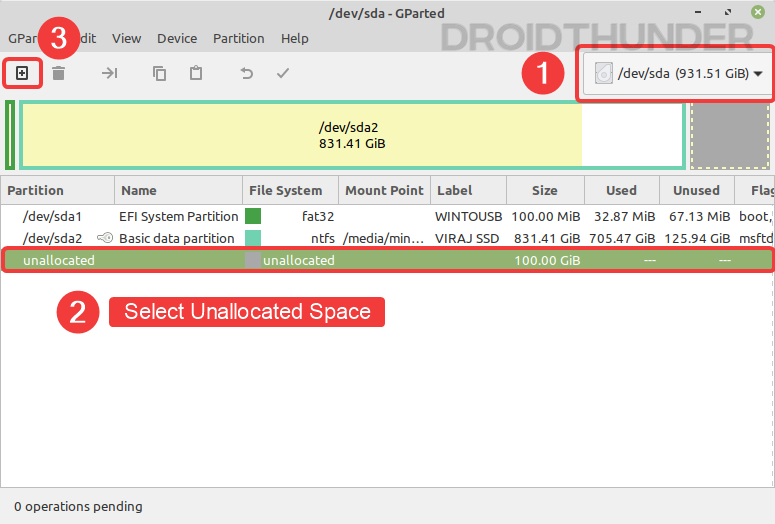
- If you have multiple drives connected to your PC, then make sure that the correct hard disk is visible at the top right side.
- Select the entry named unallocated.
- Click on the plus icon located at the top left to create a partition.
Making NTFS Partition for Chrome OS
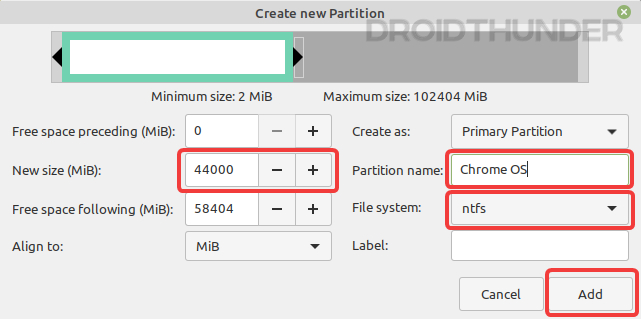
- Enter 44000 (or any multiple of 22000) in the New size field. Enter Chrome OS in the partition name field and choose File system as ntfs. Press Add button.
- Click the check icon located at the top to start the partitioning process. It will take hardly a few seconds to complete.
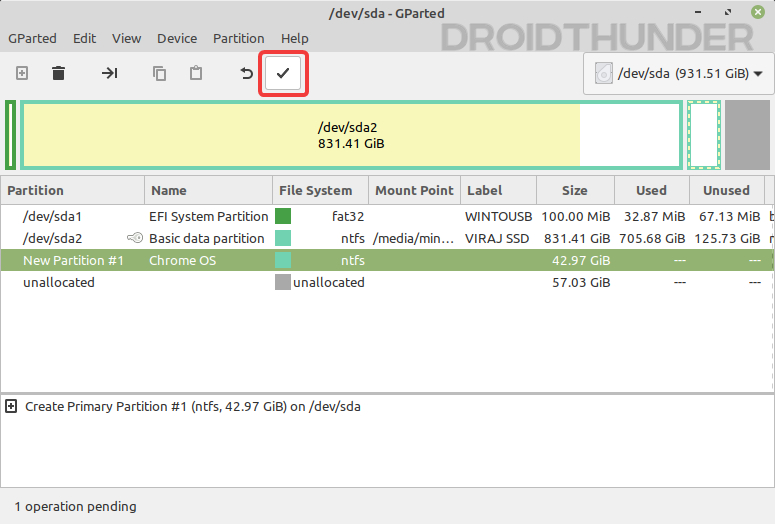
- Note the partition name, as we’ll need it in the next step. My partition here is sda3. Now, close the partition creation window so that the script in the terminal proceeds further.
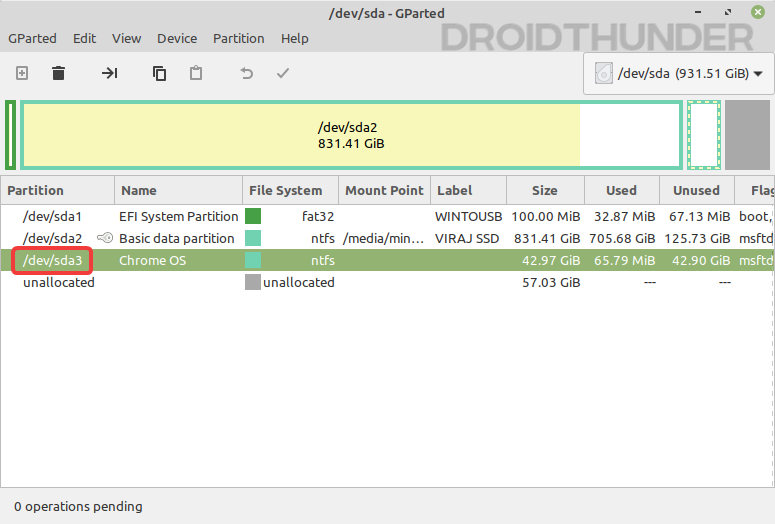
- The installer script will ask for the partition name. Enter the one that you noted in the previous step.
Partition writing process and Errors
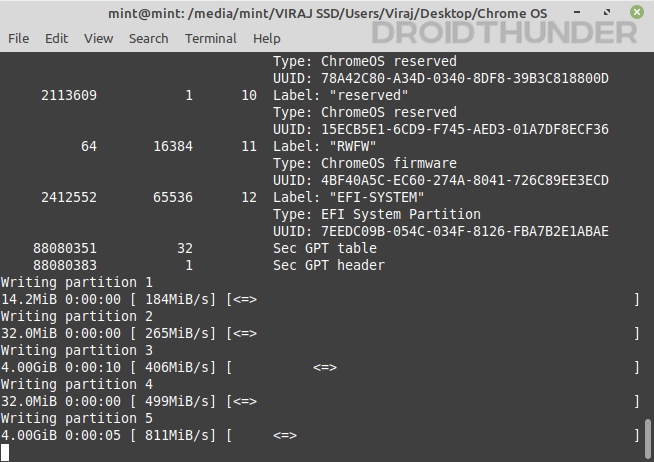
- Check the size and name of the entered partition. It is a confirmation. If everything looks ok, then type yes and hit the enter key. The script will start creating various volumes, and you should see the progress bar arrows as it writes.
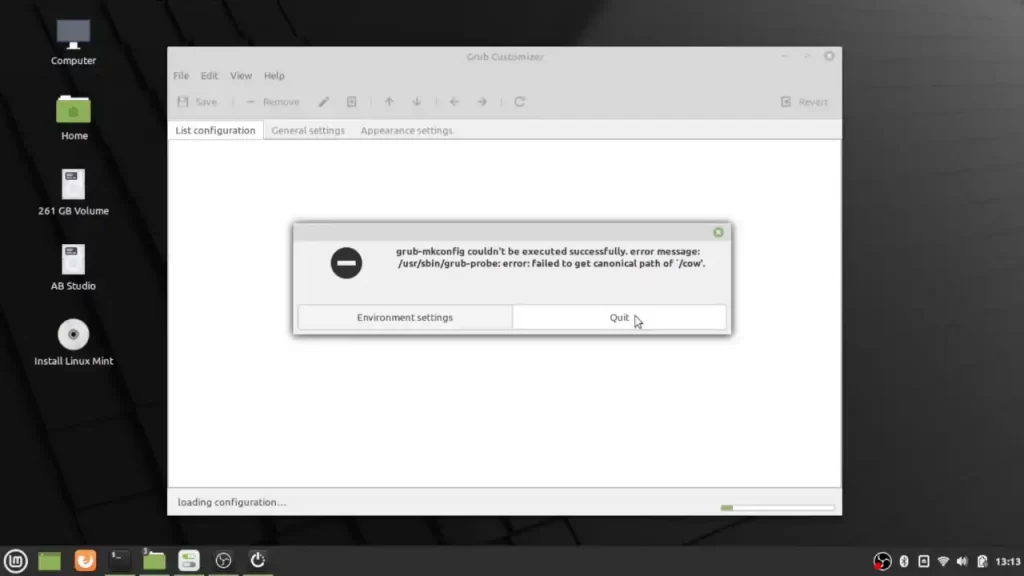
Now, don’t panic if you get this error – grub-install: error: failed to get canonical path of ‘/cow’. Head over to the troubleshooting section located at the of this guide and get it fixed.
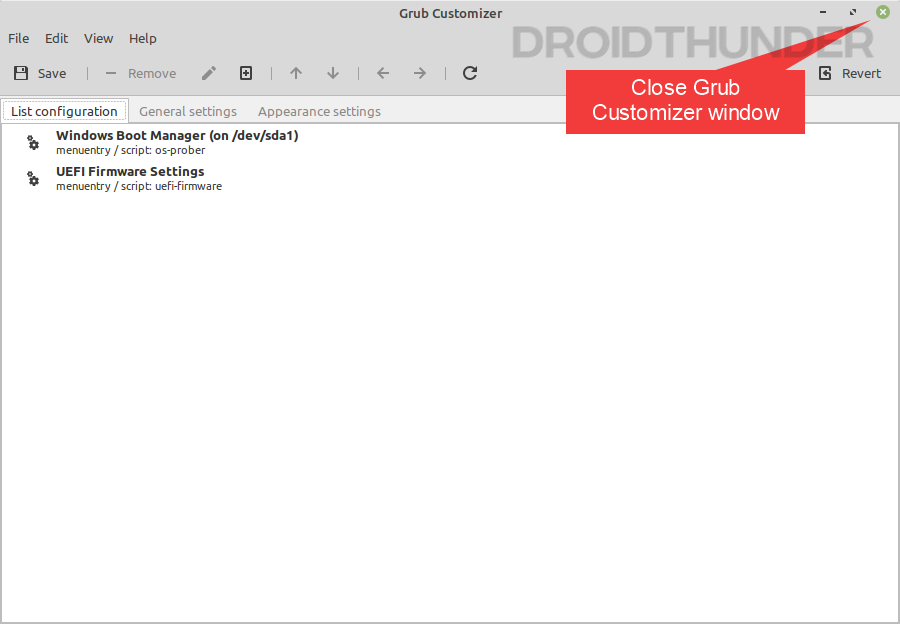
- One partition creation finishes, a grub customizer window will pop up. You don’t need to perform any actions here so, close the window.
- Now, the final thing in the Linux Mint is to copy the brunch code as shown in the image below. To do that, select the code using the cursor and press Ctrl + Shift + C key combination to copy it.
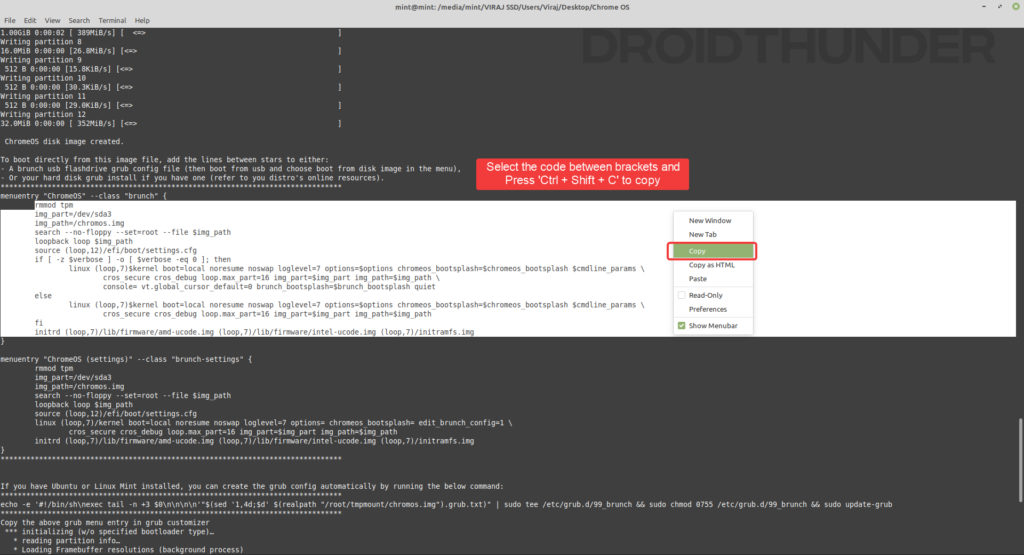
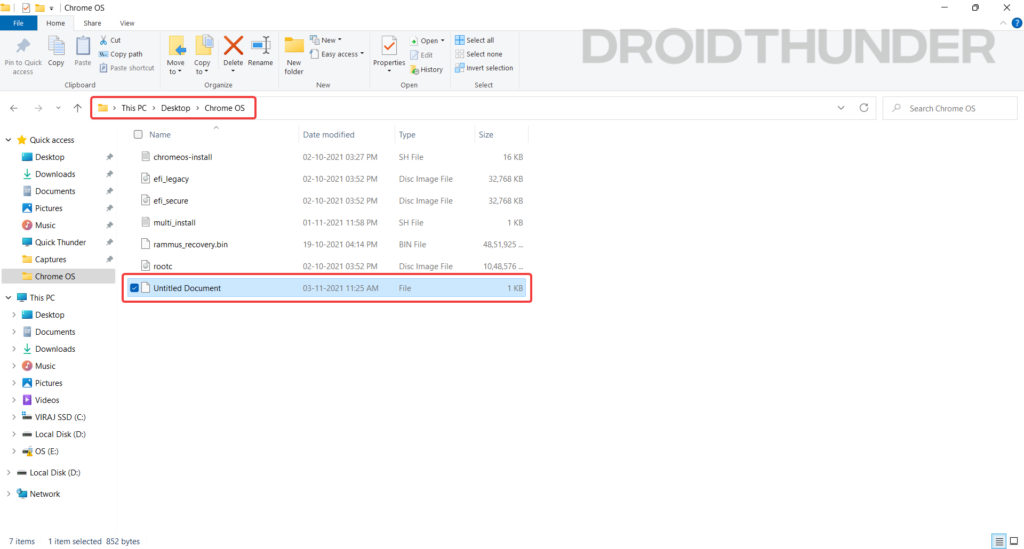
- Navigate to the Chrome OS folder. Create a notepad file by right-clicking and selecting Empty Document. Paste the code that you copied in the previous step.
- Finally, shut down Linux Mint, remove the USB, and hit Enter key.
Dual Boot Windows with Chrome OS
You have successfully installed Chrome OS alongside Windows, but to run it, we need to add its boot entry for it to be bootable. We’ll use the Grub2win application for this job.
Did you know? You can experience Chrome OS Fork FydeOS on your PC using a Virtual Machine (Play Store Support)
- Download the Grub2Win Application.
Download Grub2Win(Sourceforge.net)
- Open the Grub2Win application and make sure it says Secure Boot is Not Enabled.
- Now, click on the Manage Boot Menu button and perform the following steps.
- Select Type as Submenu.
- Enter Title as Chrome OS.
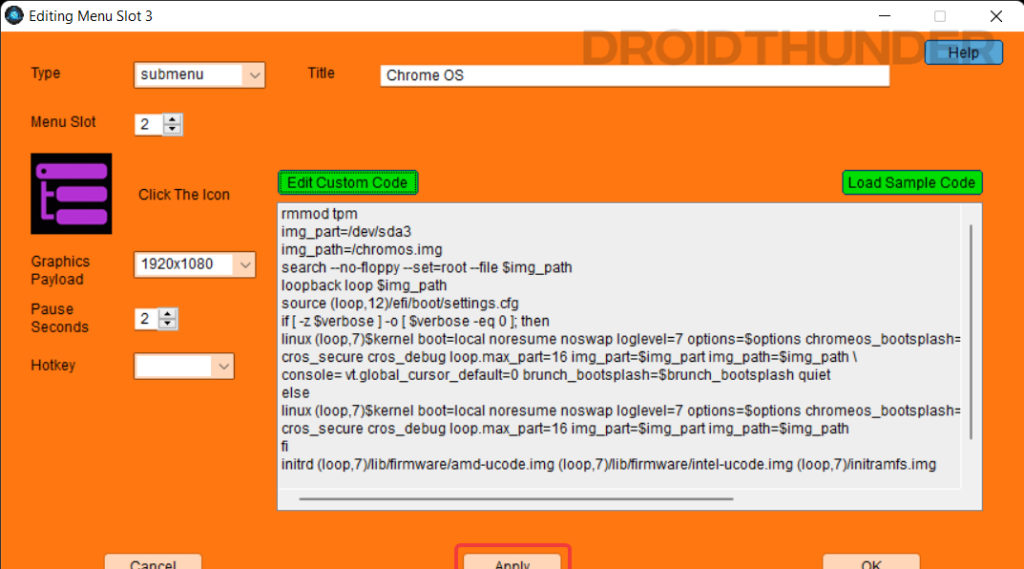
- Click on the Edit Custom Code button.
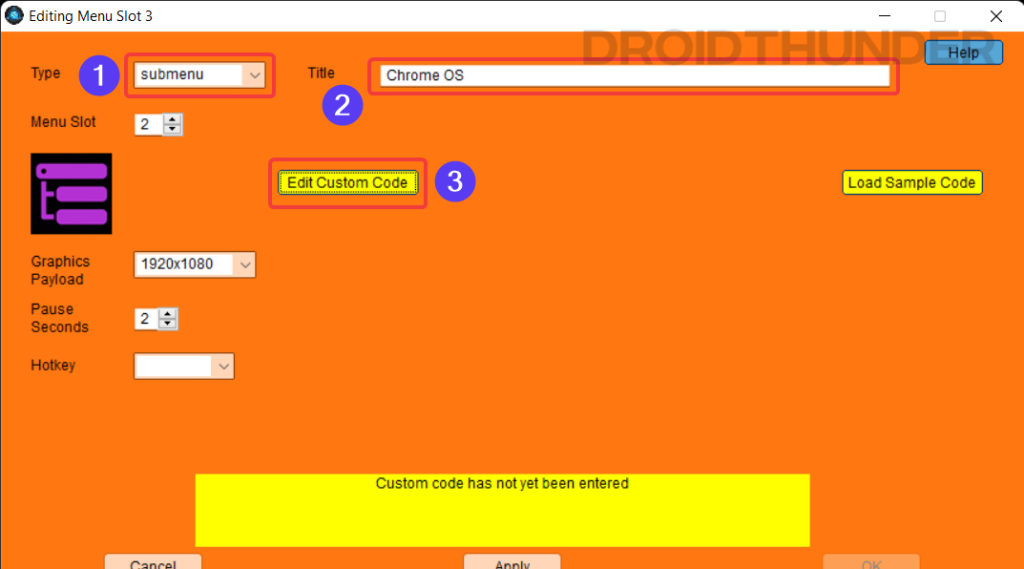
- Go to the Chrome OS folder and open the text file we saved before shutting down Linux Mint OS.
- Paste the text in the “Custom Code” field as shown below. Click on Apply and close the window.
- Move the Chrome OS position upwards as it will be easy to select it at the startup. Close the Grub2win application and restart the system.
Booting into the Chrome OS using Grub2Win Menu
- When the system restarts, you’ll see the Grub2Win menu. Press down the key to select Chrome OS as a highlighted row.

- BIOS will execute the code that we pasted while creating a Chrome OS boot entry in the Grub2Win application, and eventually Brunch framework will fire up.
- Woohoooo! There you go, guys! You have successfully booted into the Chrome OS.
You can now set up your Google account and have fun using Chrome OS alongside your Windows 10 or Windows 11 PC. Move to the Troubleshoot section if any hardware device or WiFi is not working on the Chrome OS.
Keep in mind, before you log into the Google account, you are officially not allowed to run Chrome OS with Play Store support on non-certified machines. In some ways or the other, you might be violating Google’s terms and conditions. So, we recommend you sign in with a secondary Google account so that your primary account remains safe.
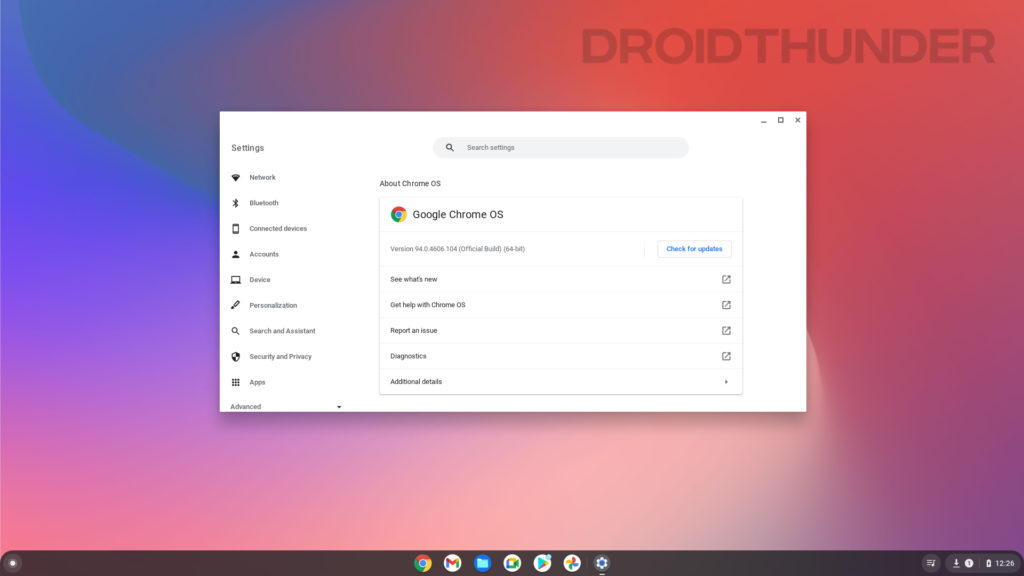
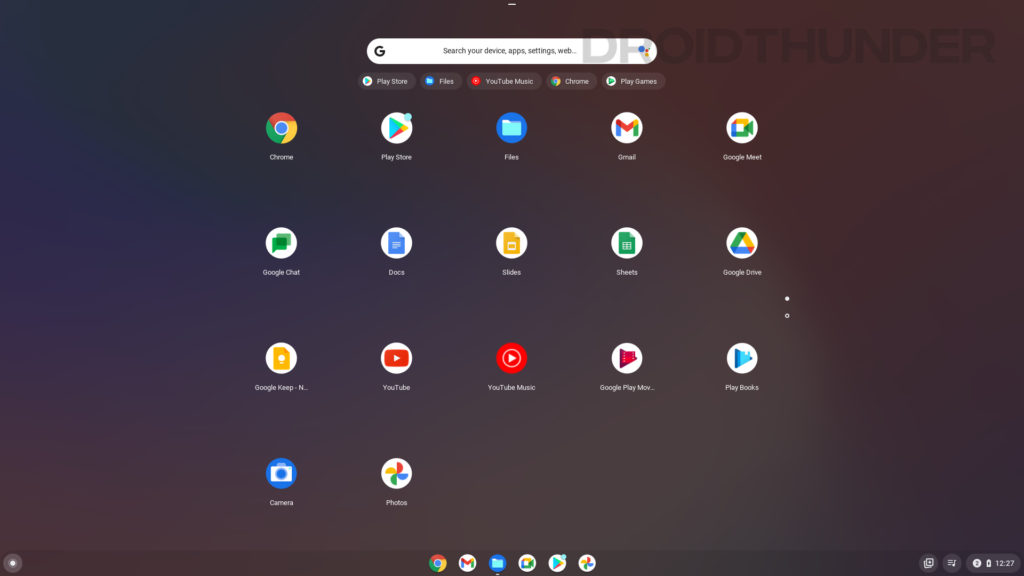
Chrome OS Screenshots
Uninstall Chrome OS From Windows PC
Installing Chrome OS on Windows partition is one lengthy procedure. But when we talk about its uninstallation, it is simple. Just boot into Windows OS and open the Disk Management tool. Locate the Chrome OS partition we created at the beginning of this guide, right-click on it, and select format.
Similarly, open the Grub2Win application. Delete the Chrome OS entry we added and save the changes.
Troubleshooting (Updated November 2021)
1. Fix grub-install: error: failed to get canonical path of ‘/cow’
So, you do come across this error, eh? That’s no problem. We’ll fix it by writing some quick commands in the terminal.
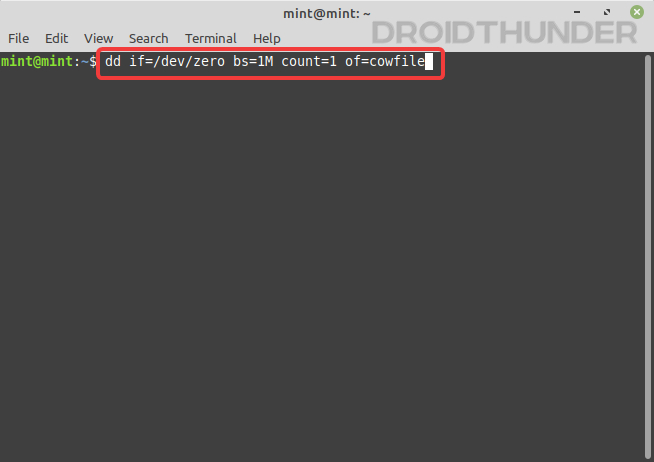
- Since there is already one instance of the terminal running, keep it as it is. Open another Terminal window and enter the following commands one by one.
dd if=/dev/zero bs=1M count=1 of=cowfile
mkfs -t vfat cowfile
sudo mv cowfile /cow
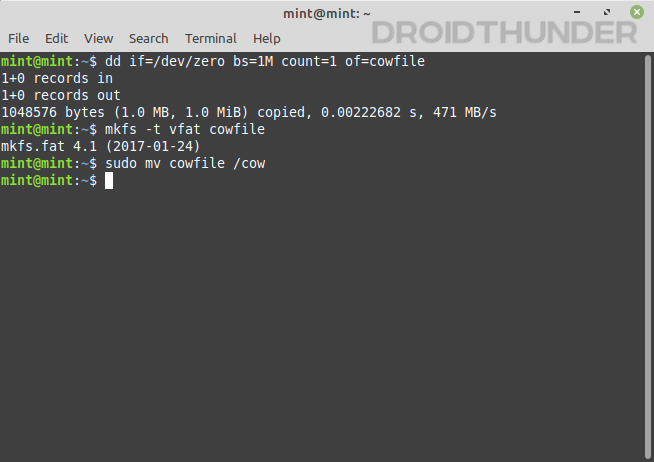
- After finishing all the commands, close the second instance of the Terminal. Click on the Environment settings button, a dialogue with various options shall appear. Click apply.
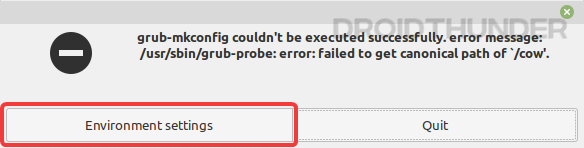
- Upon applying the Environment settings, the Grub Customizer windows will show up. We don’t need to do anything here so, just close it.
2. Fix Chrome OS Wifi, Bluetooth, Touchscreen Display not working
If you face issues with specific hardware components while using the Chrome OS, you can try Chrome’s Crosh terminal to make them work.
Fix Chrome OS Bluetooth issue
- Press Ctrl + Alt + T to open the Crosh Terminal and enter the following commands one by one.
shell
sudo edit-grub-config
- Now, you can add support for your specific device hardware. You can find the complete set of commands from here. For instance, if you have an RT3289LE or RT3290 Bluetooth device, then you can add “options=rtbth” (with quotes) at the end of cros_debug and before loop.max.
- Now, press Ctrl + X, hit the Y key, and then press enter to save the file. Restart your PC, and this time Bluetooth should work fine.
Fix Chrome OS WiFi issue
- Find out the manufacturer of your WiFi card.
- For Broadcom WiFi cards, use the following command in the Crosh terminal.
“
options=broadcom_wl“ - For Realtek WiFi cards, use the following command in the Crosh terminal.
“
options=rtl8188eu” or “options=rtl8821ce“
Enjoy Chrome OS and Windows together on a Single Machine
So, that’s how you can install Windows and Chrome OS on the same hard disk and boot both OS from a single machine. The steps could be complex and lengthy for beginners, but if you’ve dealt with Linux before, it’s an easy task for you to dual boot Windows 11 and Chrome OS.
That’s all from us in this guide. I hope you enjoyed it! If you face any issues while performing the above steps, post your comments below. We’ll try out best to help you out.
Leave a Comment
17 thoughts on “How to Install Chrome OS (with Play Store) and Dual Boot with Windows”
-
Hi, thanks for the help provided. However, I am unable to run the Shell Command sudo sh multi-install.sh (nothing happens), and Mint tells me that the file is “broken” when I click on the file.
Any suggestions? I am not quite conversant with Linux, though I have installed and run Ubuntu after a fashion in the past.
Thanks,
RajeevReply
-
Hi Rajeev,
Ensure that you are entering “sudo sh multi_install.sh” and not “sudo sh multi-install.sh”. Notice that there is an underscore between multi and install. If you’re entering it correctly and still the the command doesn’t work, let me know.
Reply
-
-
Hello,
I entered this for cowfile error
dd if=/dev/zero bs=1M count=1 of=cowfile
mkfs -t vfat cowfile
sudo mv cowfile /cowBut I am getting error that mv: missing operand
What should I do?
Reply
-
Hi Rock,
Try this:
Entersudo mkdir /cow, followed by the three commands required to fix the cowfile error.Reply
-
-
Dear Viraj,
thank you for your guide. I am following it and attempting to dual boot Chrome OS alongside Linux Mint. The installation seemed to have gone OK but there seems to be something wrong with the grub loader. When I start PC I first get the following error:
“`
error: no such module.
error: unrecognized number.
error: no such partition.
error: you need to load the kernel first.Press any key to continue…
Failed to boot both default and fallback entries.
Press any key to continue…
“`Then I get the option to press on any key, after which the GRUB screen appears with supposedly correct options:
“`
ChromeOS
Ubuntu
Advanced options for Ubuntu
“`But when I select `ChromeOS` I get the same error as above i.e.
“`
error: no such module.
error: unrecognized number.
error: no such partition.
error: you need to load the kernel first.Press any key to continue…
“`This is how I have my disk partitioned:
“`
~$ lsblk -p -f -o NAME,FSTYPE,FSSIZE,FSUSED,FSUSE%,LABEL,MOUNTPOINT,UUID,PTTYPE,PTUUID
NAME FSTYPE FSSIZE FSUSED FSUSE% LABEL MOUNTPOINT UUID PTTYPE PTUUID
/dev/sda dos b72e50c3
├─/dev/sda1 vfat 511M 4K 0% /boot/efi 812D-F377 dos b72e50c3
├─/dev/sda2 dos 706fbad4
├─/dev/sda3 ntfs chromeos 775D74A32776A294 dos b72e50c3
└─/dev/sda5 ext4 230,4G 14,1G 6% / 3a1e716f-01d4-407e-9fb5-7af498756919 dos b72e50c3
/dev/sr0
“`and this is the `chromeos` entry in grub (as per your guide, copied from /boot/grub/grub.cfg):
“`
### BEGIN /etc/grub.d/40_custom_proxy ###
menuentry “ChromeOS”{
rmmod tpm
search –no-floppy –set=root –file /chromos.img
loopback loop /chromos.img
source (loop,12)/efi/boot/settings.cfg
if [ -z $verbose ] -o [ $verbose -eq 0 ]; then
linux (loop,7)$kernel boot=local noresume noswap loglevel=7 options=$options chromeos_bootsplash=$chromeos_bootsplash $cmdline_params \
cros_secure cros_debug loop.max_part=16 img_uuid=b72e50c3-03 img_path=/chromos.img \
console= vt.global_cursor_default=0 brunch_bootsplash=$brunch_bootsplash quiet
else
linux (loop,7)$kernel boot=local noresume noswap loglevel=7 options=$options chromeos_bootsplash=$chromeos_bootsplash $cmdline_params \
cros_secure cros_debug loop.max_part=16 img_uuid=b72e50c3-03 img_path=/chromos.img
fi
initrd (loop,7)/lib/firmware/amd-ucode.img (loop,7)/lib/firmware/intel-ucode.img (loop,7)/initramfs.img
}
### END /etc/grub.d/40_custom_proxy ###
“`Do you perhaps have any idea how I could fix this? Thank you in advance.
Reply
-
Hi Pawel,
Did you disable the secure boot in BIOS?
Reply
-
hi Viraj, there isn’t such an option in my BIOS actually (?)
Reply
-
Can you share which PC you are trying this on? Also, can you upload screenshots of the errors on an image-sharing site like Imgur so that we can get a better idea?
Reply
-
-
-
-
In my case I allocated 23 gb to chrome os. But in terminal it is showing not enough space.I have 120 gb ssd with 25 gb free for chrome os. What should I do now?
Reply
-
Hi Abir,
Are you facing this issue in Linux Mint GParted or after entering the partition name?
If you are getting this error because of the latter case, change the GParted disk partition size from 23GB to 22GB. Chrome OS prefers memory allocation in multiples of 22000 only. It’s weird, but give it a try and let me know.
Reply
-
Thanks it worked
But now I am having issues with keyboard and touchpad.They are not working. And after being a light os chromeos is taking 98% of my cpu. when windows 11 takes just 40 to 55%.Have any idea about that?Reply
-
Good to hear that, Abir.
Regarding the keyboard, touch, and high CPU usage, can you tell me which laptop/PC you are using and its specifications? Also, which Cros Chrome OS build (e.g., rammus, sammus) did you use?
Reply
-
I’m using rammus 100 build on my Gateway NE511 laptop which has intel celeron n2830 processor. I also tried rammus 101 build but didn’t work.
-
Please follow the video below and try alt_touchpad_config or alt_touchpad_config2 commands in the crosh terminal for touchpad to work. For high CPU usage, you may want to try the enforce_hyperthreading=1 command, which will improve the performance by disabling Chrome OS security features. You can refer full list of commands here.
-
-
-
-
-
Wow, this tutorial is really great, thank you so much for taking the time to write this out in so much detail and included screenshots.
Im running Windows 11 with an Intel 11th Gen, so I renamed the .bin to volteer_recovery.bin as instructed.
However, when I got to step 13, I received the attached error:Do you wish to format and install chrome os on nvme0n1p4?(type yes to continue)yes
Ok, Proceeding installation on nvme0n1p4
ChromeOS recovery image rammus_recovery.bin not foundI double checked the naming of the file and its correct – volteer_recovery.bin
Please let me know what step I am missing.
Thank you for this!
Reply
-
Hello, I posted a comment a few days ago about this tutorial not working if you use a volteer bin file, rather than the rammus. I don’t see my comment below, so I assume there’s some type of approval process for comments.
Are you still monitoring this site? Is there anyway you could please help me with this?
Thank you!
BReply
-
Bro, what other bootloader can we use provided Grub2win doesn’t support Chrome OS
Reply
TipsMake.com написал специальную статью о том, как установить Chrome OS на ПК, но многие пользователи все еще пытаются запускать Chrome OS и Windows 10 параллельно.
Вот почему сегодня на сайте TipsMake.com вы найдете подробное руководство по двойной загрузке Chrome OS и Windows 10. Это позволит вам получить высокую производительность Chrome OS и универсальность Windows 10 (не говоря уже о том, что есть поддержка для приложений Play Store и Linux). По сути, это выгодная комбинация для пользователей. Так что не ждите больше, узнайте, как выполнить двойную загрузку Chrome OS и Windows 10 прямо сейчас.
- Запрос
- Необходимые загрузки
- Управление файлами
- Создать раздел
- Флэш-память Linux Mint Cinnamon
- Установить Chrome OS
- Двойная загрузка Chrome OS и Windows 10
- Устранение неполадок
Запрос
- Поддержка загрузки UEFI в BIOS
- CPU и GPU на базе Intel
- USB имеет не менее 16 ГБ памяти
Необходимые загрузки
1. Сначала загрузите Образ Linux Mint Cinnamon. В зависимости от архитектуры вашего ПК вы можете выбрать 64-битную или 32-битную сборку.
2. Далее скачать Руфус чтобы иметь возможность прошивать Linux Mint Cinnamon на USB.
3. После этого скачать официальный образ восстановления Chrome OS. Откройте Интернет и найдите rammus. Теперь щелкните последний образ для восстановления (сейчас это 80, но он может измениться в будущем). Rammus – это рекомендуемый образ для устройств с процессорами Intel 4-го поколения и новее. Однако, если у вас процессор Intel 3-го поколения или выше, загрузите последний образ для samus. А если у вас процессор AMD, вы можете попробовать его, загрузив последний образ grunt.
4. Теперь загрузите самый важный файл: Бранч. Это фреймворк, созданный разработчиком по имени sebanc. Эта платформа создает общий образ Chrome OS из официального образа для восстановления, чтобы его можно было установить на любой ПК с Windows. Чтобы загрузить файл, найдите последнюю стабильную сборку и нажмите «Активы». Теперь загрузите файл tar.gz.
5. Наконец, загрузите multi_install.sh скрипт для установки Chrome OS в раздел Windows. Сценарий написан Кедаром Нимбалкаром. Для загрузки нажмите Ctrl + Sand, сохраните файл.
Теперь, когда вы закончили загрузку, переходите к следующим шагам.
Управление файлами
1. Сначала создайте папку под названием Chrome OS на большом диске. Затем переместите файл multi_install.sh в папку Chrome OS.
Переместите файл multi_install.sh в папку Chrome OS.
2. Затем щелкните правой кнопкой мыши файл позднего завтрака и выберите «Извлечь на поздний завтрак». Все файлы будут извлечены в папку.
3. Теперь переместите все извлеченные файлы Brunch в ту же папку Chrome OS.
4. Аналогичным образом извлеките официальный образ восстановления Chrome OS, и вы получите папку. Откройте его и переименуйте файл в rammus_recovery.bin. Если вы скачали другое изображение, переименуйте его соответствующим образом.
Переименуйте файл в rammus_recovery.bin
5. Наконец, переместите файл rammus_recovery.bin прямо в папку Chrome OS. Наконец, вам необходимо иметь эти 6 файлов в папке Chrome OS. Обратите внимание, где вы хранили папку Chrome OS.
Создать раздел
Хотя создание одного раздела работает для многих пользователей, у некоторых возникают проблемы во время установки. Итак, чтобы избежать ошибок в процессе установки, вы можете создать два раздела – один на 100 ГБ и один на 60 ГБ. Это не является обязательным требованием к емкости, и вы можете уменьшить пространство в соответствии с вашими предпочтениями, но если у вас есть удобное пространство, следуйте этой структуре для беспроблемной установки.
Помните, что для установки Chrome OS вы будете использовать только раздел размером 100 ГБ. Следующие 60 ГБ необходимы для монтирования файла образа. Итак, после завершения установки вы можете использовать раздел 60 ГБ для всего в Windows 10.
1. Нажмите клавишу Winonce и найдите раздел диска. Теперь щелкните по первому результату.
2. Здесь щелкните правой кнопкой мыши последний диск и выберите «Сжать том».
3. Теперь введите 160 ГБ, если ваш жесткий диск имеет большую емкость. Затем нажмите «Сжать».
Введите 160 ГБ, если у вашего жесткого диска большой объем.
4. Затем щелкните правой кнопкой мыши нераспределенный раздел и превратите его в Новый простой том.
5. Готово, щелкните правой кнопкой мыши раздел размером 160 ГБ и выберите «Сжать». На этот раз введите 60 ГБ и создайте еще один раздел. Затем превратите его в New Simple Volume, как указано выше.
6. Наконец, щелкните правой кнопкой мыши раздел размером 100 ГБ и выберите Удалить том. Он станет Нераспределенным разделом (еще не выделенным). Теперь вы успешно создали диск для установки Chrome OS в раздел Windows.
7. Два раздела выглядят так:
Созданы два раздела
Флэш-память Linux Mint Cinnamon
1. Подключаем USB и открываем Rufus. Затем нажмите кнопку «Выбрать» и выберите образ ISO Linux Mint Cinnamon. Теперь просто нажмите Пуск. Вы получите несколько запросов, поэтому нажмите «Да»> «ОК», чтобы продолжить процесс прошивки.
Флэш-образ ISO Linux Mint Cinnamon
2. После того, как Rufus закончит прошивать, закройте его. Теперь подключите USB к компьютеру, на котором вы хотите установить Chrome OS. Если вы устанавливаете Chrome OS на тот же компьютер, оставьте это в покое.
3. Затем перезагрузите компьютер и несколько раз нажмите кнопку загрузки, чтобы загрузиться в BIOS. Если вы не знаете загрузочный ключ ПК, вы можете найти его в таблице ниже.
Ключ загрузки
4. После входа в BIOS перейдите на вкладку «Загрузка» и выберите «UEFI» в параметрах списка загрузки.
5. После этого перейдите на вкладку «Безопасность» и выключите безопасную загрузку. Помните, что каждый BIOS имеет собственный интерфейс, поэтому позиции меню могут отличаться на разных компьютерах. Однако найдите UEFI и безопасную загрузку на вкладках «Безопасность», «Загрузка» или «Конфигурация системы» и внесите соответствующие изменения.
6. Наконец, перейдите на вкладку Exit и выберите Exit Save Changes. Немедленно затем снова начните нажимать клавишу загрузки. Вам будет предложено выбрать загрузочное устройство. Выберите USB-накопитель и нажмите Enter.
7. Вы загрузитесь прямо в Linux Mint Cinnamon. Если появится экран-заставка, выберите вариант по умолчанию: «Запустить Linux Mint».
Установить Chrome OS
1. Теперь, когда вы загрузились в Linux Mint, щелкните значок сети в правом нижнем углу и подключитесь к Wi-Fi или Ethernet. Установщику Chrome OS потребуется активное подключение к Интернету для загрузки некоторых библиотек и зависимостей.
2. Теперь откройте «Компьютер» на рабочем столе и перейдите к диску, на котором вы сохранили папку Chrome OS.
Перейдите на диск, на котором вы заархивировали папку Chrome OS.
3. Здесь щелкните правой кнопкой мыши в любом месте окна и откройте Терминал. Теперь введите sudo sh multi_install.sh и нажмите Enter.
4. Начнется загрузка необходимых библиотек. После этого автоматически откроется окно GParted. Здесь прокрутите вниз и выберите нераспределенный раздел (100 ГБ). Затем нажмите кнопку с плюсом в верхней строке меню.
5. Затем выберите ntfs в качестве файловой системы и нажмите «Добавить».
6. Затем нажмите кнопку «Готово» в верхней строке меню.
7. Затем нажмите кнопку «Применить» в приложении.
8. Теперь запишите номер раздела, начиная с sda. Пример статьи – sda9. Наконец, закройте окно GParted.
Запишите номер раздела, начиная с sda
9. В окне Терминала введите номер раздела, который вы указали выше, и нажмите Enter.
10. Вы увидите детали раздела и попросите подтверждения. Если выбор раздела правильный, введите Да и нажмите Enter.
Примечание. Если вы столкнулись с какими-либо ошибками, просмотрите раздел этой статьи, посвященный разбиению на разделы, и убедитесь, что структура разделов такая же.
11. Наконец, Linux Mint начнет установку Chrome OS в раздел Windows.
12. После завершения установки в окне Терминала прокрутите немного вверх, и вы найдете раздел меню. Теперь выберите что-нибудь в элементе меню и скопируйте его. Вы можете щелкнуть правой кнопкой мыши в окне терминала, чтобы скопировать его.
13. Снова откройте «Компьютер» с рабочего стола и перейдите на диск C или любой другой раздел Windows. Щелкните правой кнопкой мыши и выберите «Новый документ»> «Пустой документ». Здесь добавьте .txt в конец и сохраните его.
14. Теперь откройте текстовый файл и вставьте команды, которые вы скопировали из окна Терминала. Затем сохраните текстовый файл.
Откройте текстовый файл и вставьте команды, которые вы скопировали из окна Терминала.
15. Наконец, вы завершили установку. Теперь щелкните меню «Пуск» Linux Mint и перезагрузите компьютер. Немедленно отключите USB, и вы загрузитесь прямо в Windows 10, потому что нужно сделать еще один шаг.
Двойная загрузка Chrome OS и Windows 10
Вы успешно установили Chrome OS в раздел Windows, но вам нужно добавить Chrome OS в качестве загрузочной операционной системы во время загрузки. И для этого мы будем использовать приложение Grub2Win.
1. Загрузитесь в Windows 10 и скачать приложение Grub2Win (Свободный). Помните, что приложение работает немного медленно, поэтому проявите терпение при работе с ним.
2. Во время настройки оставьте все по умолчанию. Затем щелкните «Управление загрузочным меню».
3. Здесь нажмите «Добавить новую запись».
4. В раскрывающемся меню выберите подменю и введите Chrome OS в поле Заголовок. Затем нажмите Edit Custom Code.
Нажмите Edit Custom Code.
5. Вставьте сюда команду, которую вы скопировали из Терминала, и сохраните ее в текстовый файл. Файл должен начинаться с img_part и убедитесь, что это не} в конце. Теперь нажмите Применить> ОК.
6. Вы успешно добавили Chrome OS в меню загрузки Windows 10. Вы также можете переместить Chrome OS наверх, щелкнув значок стрелки. Наконец, нажмите Применить.
7. Теперь перезагрузите компьютер, и на этот раз вы найдете и Chrome OS, и Windows 10 в интерфейсе Grub2Win. Выберите операционную систему Chrome OS, и потребуется некоторое время, чтобы все настроить при первом запуске.
Примечание. Если интерфейс Grub2Win не отображается после нескольких запусков, перейдите в раздел «Устранение неполадок», чтобы решить проблему.
8. Теперь вы можете настроить свою учетную запись Google и пользоваться Chrome OS с Windows 10.
Наслаждайтесь Chrome OS с Windows 10
Устранение неполадок
Если вы получаете сообщение об ошибке “Недостаточно места для создания файла изображения”, “не удалось получить-канонический-путь-коровы” или “GtkDialog сопоставлен без временного родителя” , в статье рекомендуется проследить за структурным разбиением в примере.
Кроме того, многие пользователи жаловались, что после нескольких начальных запусков интерфейс Grub2Win не отображается, и компьютер загружается непосредственно в Windows 10. Это происходит из-за того, что Windows перезаписывает другие интерфейсы EFI. Есть такие решения, как исправление GRUB через Linux Mint, но пока в статье об этом не говорится.
Для быстрого решения вы можете нажать клавишу загрузки (F7, F8, F9 и т. Д.) Во время процесса загрузки, а оттуда вы можете выбрать интерфейс Grub2Win EFI. После этого вам будет предложен вариант мультизагрузки. Нажимать кнопку загрузки каждый раз при загрузке проблематично, но на данный момент это быстрое и эффективное решение.
Windows 11 is on the verge of taking down Windows 10 and previous versions of the Windows operating system. Most of us have already upgraded to Windows 11 and have adopted the new environment, while there are many ups and downs with the new modified operating system. Other operating systems are getting upgrades, too, with pretty exciting features, such as the Chrome OS.
Chrome OS is one of the lightest operating systems, and any system with 2GB RAM can handle it easily. The OS is Linux-based, which means you can do pretty much anything with the Linux commands. However, Chrome OS is a bit different from other Linux distros as it is based on the operating system that we commonly use on Android smartphones and other devices. In Chrome OS, you also get the support to install the Google Play Store that provides a wide range of apps and games for free.
Now you can install both Chrome OS with Play Store and Windows 10 or 11 on the same hard drive and dual boot either of them at a time. Installing both the operating systems might take a lot of time and needs some specific software to be downloaded first. In this article, we have written a detailed guide on dual boot Windows and Chrome Os with Play Store. So let’s get started.
Table of Contents
Before we begin, I would like to mention that this tutorial involves complex operations and a lengthy procedure. Go ahead only if you are good with operating multiple systems. Apart from that, this guide won’t touch any of your Windows files, but I highly recommend that you back up all your crucial files because you never know when things go wrong.
Pre-requisites
- A USB flash drive with a minimum of 16GB of storage space is a must.
- UEFI Firmware support is another requirement for Brunch to work. It also works with legacy BIOS, but there are a few limitations. You can read them on the Brunch development page.
-
- To check whether your PC supports UEFI or MBR/BIOS, search System Information in the start menu and open it.
- Look for the BIOS mode. You’ll find your PC firmware type mentioned against it.
- Intel hardware (CPU and GPU) starting from 1st generation Nehalem architecture. Note that Intel first-generation graphics do not work with ChromeOS versions above r81.
- AMD Ryzen CPU and GPU. Currently supports AMD Ryzen and AMD Stoney Ridge processors only.
Downloads & Requirements
We need the following components for flashing Chrome OS on your Windows PC hard drive.
1. Linux Mint
We’ll use the Linux Mint Cinnamon image for dual-booting Chrome OS and Windows 10 or Windows 11 PC. You can use other Linux distros like Ubuntu or Debian too. However, I won’t recommend using them since many users reported that they are facing various errors while installing and booting Chrome OS.
Download Linux MintCinnamon Edition
2. Rufus
Rufus is a windows utility that helps create bootable USB flash drives. Here, the purpose of using Rufus is to flash the Linux Mint image on the USB storage.
Download Rufusfor Windows
3. Brunch Framework
The purpose of the brunch framework is to build a generic Chrome OS image from an official recovery image. It uses a 1GB ROOTC partition (containing an initramfs, a custom kernel, the swtpm binaries, userspace patches, and config files) and a specific EFI partition to boot from it.
Warning: As Brunch is not the intended way for Chrome OS to work, thus, at some point, some Chrome OS scripts could behave terribly with Brunch and delete data unexpectedly, including Windows / non-Chrome OS partitions. I would highly recommend that you use Chrome OS on a device having less sensitive data.
Download Brunch Framework
4. Chrome OS Recovery Image
Now, it’s time to get the official Chrome OS recovery image. Click on the download button below. When the webpage opens, look for the word rammus. In the recovery column, hit on the latest recovery image to start the download. While writing this guide, the current version is 94, but it may change subsequently.
The reason we chose rammus is that it works on most modern generations of Intel processors. However, I suggest you go through the below list and download the specific image based on your processor.
Download Chrome OS Recovery ImageMirror #1
Intel Processors
- rammus = Intel 1st to 9th generation processors.
- volteer= Intel 10th & 11th generation CPUs.
AMD Processors
- grunt = AMD Stoney Ridge & Bristol Ridge.
- zork = AMD Ryzen.
5. Shell Script
Finally, download the multi_install.sh shell script, which helps install Chrome OS on a Windows partition. Click on the download button below and press Ctrl + S to save the file.
Download multi_install.shMirror (Github)
Now that we have acquired all the necessary files – let’s get going to the steps!
Organize Files in One Place
Step 1 – First off, gather all the downloaded files in one place. Let’s consider you have placed all the files in the Desktop folder.
Step 2 – Now, Create a folder named Chrome OS on the Windows Desktop. You can also create it in any other place having sufficient storage.
Step 3 – Using WinRAR, extract the Brunch package by selecting the ‘Extract Here’ option. As a result, you’ll get four files out of the archive. Now, move these four files to the Chrome OS folder.
- chromeos-install.sh
- efi_legacy.img
- efi_secure.img
- rootc.img
Step 4 – Next, extract the Chrome OS recovery image file.
Step 5 – Upon extraction, you’ll get a file having a .bin extension. Rename the .bin file to rammus_recovery. Now, move the rammus_recovery.bin file to the Chrome OS folder. Note that even if you have downloaded any other Chrome OS image like volteer, grunt or zork, make sure you rename it to their respective name + _recovery.bin. For example, volteer recovery filename would become volteer_recovery.bin, and grunt recovery would become grunt_recovery.bin, and so on.
Step 6 – Move the shell script file multi_install.sh into the Chrome OS folder.
Step 7 – By this time, you should have six files in the Chrome OS folder. Do note the path of the Chrome OS folder as we’ll need it for performing further steps.
Flash Linux Mint Cinnamon
Using the Rufus utility, we’ll flash the Linux Mint ISO image on the USB storage. Linux distro installation is necessary because ChromeOS is a Linux-based operating system, and the shell scripts that we downloaded require a Linux environment to work. The steps for installing Linux Mint on the USB storage are as follows.
Step 1 – Plug in the USB storage device such as Pendrive or microSD card and open Rufus utility.
Step 2 – In Rufus, under Device, you shall see the plugged-in USB storage. Here I am using a 32GB Pendrive.
- Under Boot selection, select the Linux Mint ISO that we downloaded earlier.
- If you are using a Hard drive, tick the List USB Hard Drives option to see your connected hard disk.
- Keep all other settings unchanged and now press the Start button.
Do note that flashing the USB storage will wipe out all the data present on it. Therefore, we strongly recommend that you back up all the necessary data before pressing the Start button.
Step 3 – When you press the Start button, a popup will appear. Select Write in ISO image mode option and press OK. If you choose DD Image boot, the USB drive won’t be accessible for you to operate in Windows. If you have a legacy BIOS and an old CPU, then DD Image mode is useful.
Step 4 – Here, Rufus will warn you that it will erase all the data stored on the USB device that we are using to flash Linux Mint. If you have taken the backup, press OK.
Create Unallocated Space for Chrome OS
Now, we need to create an Unallocated partition using the Windows Disk Management tool. You need to have at least 14 GB or more free space on the hard drive for creating an unallocated partition. I have given 100 GB of space, but you can choose your partition size.
On a side note, let me tell you something. Chrome OS requires partition size in multiples of 22 GB, for example, 22000 MB (22 GB), 44000 MB (44 GB), and so on. But here, you can assign any size you want. Later, before flashing Chrome OS using Linux Mint, we will provide an appropriate partition size.
Let’s shrink the existing drive and create unallocated space. Here are the steps.
Step 1 – Open Windows Explorer and right-click on This PC icon. Select Manage to open Computer Managemen tools.
Step 2 – Select the Disk Management option from the left. Now, click on the partition from which you want to create unallocated space. I am using an external SSD for space creation. Right-click on the selected drive and click Shrink Volume.
Step 3 – As discussed at the beginning of this section, I will create a 100 GB (100000 MB) partition. Press the Shrink button to proceed.
Step 4 – Now, in the disk management, you will see that the unallocated space is separated from the selected drive and marked in black.
All good so far? Now we have completed all the required operations on Windows OS. Let’s boot the Linux Mint Cinnamon image from the USB flash drive.
Boot Linux Mint from USB Storage
For Linux Mint bootup and Chrome OS installation, we will have to perform a few operations in PC BIOS.
Step 1 – Shut down the Windows PC if running. Boot into the BIOS menu. For doing that, start your PC and continuously press the F2 or DEL key on the keyboard. Your PC might have a different key set for booting into the BIOS. Refer to the below table and find out the right key.
| Brands | BIOS Key |
|---|---|
| Acer | F2 or DEL |
| ASUS | F2 for all PCs, F2 or DEL for motherboards |
| Dell | F2 or F12 |
| HP | ESC or F10 |
| Lenovo (Laptops) | F2 or Fn + F2 |
| Lenovo (Desktops) | F1 |
| Lenovo (Thinkpads) | Enter + F1 |
| MSI | DEL for motherboards and PCs |
| Origin PC | F2 |
| Samsung | F2 |
| Sony | F1, F2, or F3 |
| Toshiba | F2 |
BIOS Menu keys for various Brands
Step 2 – In the BIOS, navigate to the Boot tab and disable Fast Boot. Also, check if you have CSM (Compatibility Support Module) option. If present, set it to Disabled because we are using a UFEI mode. If you want to use Legacy mode, you can keep the CSM option enabled.
Step 3 – Now that we want to boot Linux Mint instead of Windows, we need to change the boot order. Move USB Storage at the top so that BIOS will boot our USB flash drive.
Step 4 – Navigate to the Security tab and look for Secure Boot Control or a similar option. If enabled, change it to Disabled. Without disabling the secure boot function, you can’t boot the Chrome OS even after a successful installation.
Step 5 – Finally, press the F10 key to save the changes and exit the BIOS. Your PC shall restart, and you will see the following Linux Mint Menu. Press Enter to proceed.
At this point, you should have entered into the Linux Mint Cinnamon OS.
Install Chrome OS
Step 1 – Once you see the Linux Mint interface, connect your PC to the Internet using ethernet cable or Wi-Fi. The Chrome OS installer requires an active internet connection to fetch necessary libraries and dependencies.
Step 2 – Now, double-click the Computer icon on the desktop and navigate to the drive where you have kept the Chrome OS folder.
Step 3 – Right-click on the blank white space and select the Open in Terminal option. A terminal window pointing to the Chrome OS folder shall open.
Shell Commands
Step 4 – Enter the following command in the Terminal window.
sudo sh multi_install.sh
Step 5 – The installer will ask you whether to download the required files and continue the installation. Press y and hit Enter key.
Step 6 – Following the installation, a window will appear, and it’s nothing but a Linux disk partition tool GParted.
- If you have multiple drives connected to your PC, then make sure that the correct hard disk is visible at the top right side.
- Select the entry named unallocated.
- Click on the plus icon located at the top left to create a partition.
Making NTFS Partition for Chrome OS
Step 7 – Enter 44000 (or any multiple of 22000) in the New size field. Enter Chrome OS in the partition name field and choose File system as NTFS. Press Add button.
Step 8 – Click the check icon located at the top to start the partitioning process. It will take hardly a few seconds to complete.
Step 9 – Note the partition name, as we’ll need it in the next step. My partition here is sda3. Now, close the partition creation window so that the script in the terminal proceeds further.
Step 10 – The installer script will ask for the partition name. Enter the one that you noted in the previous step.
Partition writing process and Errors
Step 11 – Check the size and name of the entered partition. It is a confirmation. If everything looks ok, then type yes and hit the enter key. The script will start creating various volumes, and you should see the progress bar arrows as it writes.
Now, don’t panic if you get this error – grub-install: error: failed to get canonical path of ‘/cow’. Head over to the troubleshooting section located at the of this guide and get it fixed.
Step 12 – One partition creation finishes, a grub customizer window will pop up. You don’t need to perform any actions here so, close the window.
Step 13 – Now, the final thing in the Linux Mint is to copy the brunch code as shown in the image below. To do that, select the code using the cursor and press Ctrl + Shift + C key combination to copy it.
Step 14 – Navigate to the Chrome OS folder. Create a notepad file by right-clicking and selecting Empty Document. Paste the code that you copied in the previous step.
Step 15 – Finally, shut down Linux Mint, remove the USB, and hit Enter key.
Must read 30 Best Chrome Extensions
Dual Boot Windows with Chrome OS
You have successfully installed Chrome OS alongside Windows, but to run it, we need to add its boot entry for it to be bootable. We’ll use the Grub2win application for this job.
Step 1 – Download the Grub2Win Application.
Download Grub2Win
Step 2 – Open the Grub2Win application and make sure it says Secure Boot is Not Enabled.
Step 3 – Now, click on the Manage Boot Menu button and perform the following steps.
- Select Type as Submenu.
- Enter Title as Chrome OS.
- Click on the Edit Custom Code button.
Step 4 – Go to the Chrome OS folder and open the text file we saved before shutting down Linux Mint OS.
Step 5 – Paste the text in the “Custom Code” field as shown below. Click on Apply and close the window.
Step 6 – Move the Chrome OS position upwards as it will be easy to select it at the startup. Close the Grub2win application and restart the system.
Must read Top 10 Download Manager Extensions for Chrome
Booting into the Chrome OS using Grub2Win Menu
1. When the system restarts, you’ll see the Grub2Win menu. Press down the key to select Chrome OS as a highlighted row.
2. BIOS will execute the code that we pasted while creating a Chrome OS boot entry in the Grub2Win application, and eventually Brunch framework will fire up.
3. Woohoooo! There you go, guys! You have successfully booted into the Chrome OS.
You can now set up your Google account and have fun using Chrome OS alongside your Windows 10 or Windows 11 PC. Move to the Troubleshoot section if any hardware device or WiFi is not working on the Chrome OS.
Keep in mind, before you log into the Google account, you are officially not allowed to run Chrome OS with Play Store support on non-certified machines. In some ways or the other, you might be violating Google’s terms and conditions. So, we recommend you sign in with a secondary Google account so that your primary account remains safe.
Chrome OS Screenshots
Uninstall Chrome OS From Windows PC
Installing Chrome OS on Windows partition is one lengthy procedure. But when we talk about its uninstallation, it is simple. Just boot into Windows OS and open the Disk Management tool. Locate the Chrome OS partition we created at the beginning of this guide, right-click on it, and select format.
Similarly, open the Grub2Win application. Delete the Chrome OS entry we added and save the changes.
Must read How To Open Chrome In Incognito Mode Always
Troubleshooting (Updated November 2021)
1. Fix grub-install: error: failed to get canonical path of ‘/cow’
So, you do come across this error, eh? That’s no problem. We’ll fix it by writing some quick commands in the terminal.
Step 1 – Since there is already one instance of the terminal running, keep it as it is. Open another Terminal window and enter the following commands one by one.
dd if=/dev/zero bs=1M count=1 of=cowfile
mkfs -t vfat cowfile
su mv cowfile /cow
Step 2 – After finishing all the commands, close the second instance of the Terminal. Click on the Environment settings button, a dialogue with various options shall appear. Click apply.
Step 3 – Upon applying the Environment settings, the Grub Customizer windows will show up. We don’t need to do anything here so, just close it.
2. Fix Chrome OS Wifi, Bluetooth, Touchscreen Display not working
If you face issues with specific hardware components while using the Chrome OS, you can try Chrome’s Crosh terminal to make them work.
Fix Chrome OS Bluetooth issue
Step 1 – Press Ctrl + Alt + T to open the Crosh Terminal and enter the following commands one by one.
shell
sudo edit-grub-config
Step 2 – Now, you can add support for your specific device hardware. You can find the complete set of commands from here. For instance, if you have an RT3289LE or RT3290 Bluetooth device, then you can add “options=rtbth” (with quotes) at the end of cros_debug and before loop.max.
Step 3 – Now, press Ctrl + X, hit the Y key, and then press enter to save the file. Restart your PC, and this time Bluetooth should work fine.
Fix Chrome OS WiFi issue
Step 1 – Find out the manufacturer of your WiFi card.
For Broadcom WiFi cards, use the following command in the Crosh terminal.
“options=broadcom_wl“
For Realtek WiFi cards, use the following command in the Crosh terminal.
“options=rtl8188eu” or “options=rtl8821ce“
Enjoy Chrome OS and Windows together on a Single Machine
So, that’s how you can install Windows and Chrome OS on the same hard disk and boot both OS from a single machine. The steps could be complex and lengthy for beginners but if you’ve dealt with Linux before, it’s an easy task for you to dual boot Windows 11 and Chrome OS.
That’s all from us in this guide. I hope you enjoyed it! If you face any issues while performing the above steps, then post your comments below. We’ll try out best to help you out.
Chrome OS, несомненно, является самой быстрой операционной системой для настольных компьютеров. Он легкий, простой в использовании и не слишком ресурсоемкий, как Windows или Mac. Это делает его отличной ОС для установки на ваши старые ПК и Mac, которая тормозит и разряжает батарею.
Вдобавок к этому вы можете получить дополнительные преимущества, такие как разблокировка компьютера с помощью телефона Android и плавное переключение устройств во время просмотра.
Но официальная ОС Chrome, которую Google использует на своих Pixelbook (и позволяет другим OEM-производителям устанавливать на Chromebook), доступна не всем для загрузки. Поскольку есть также некоторые аппаратные требования, которые есть только у Chromebook.
Как установить Chrome OS на любой ПК или ноутбук
Хотя мы не можем установить Chrome OS, мы можем установить программное обеспечение с открытым исходным кодом Chromium OS, которое каждый может установить, изменить и использовать по своему усмотрению. Но для этого требуются некоторые технические знания. К счастью, у нас есть много разработчиков, которые модифицировали Chromium OS и упростили ее установку.
Среди них два лучших форка Chromium OS – это Neverware Cloud Ready и Flint Fyde OS.
Google Chrome OS против Cloud-Ready против Fyde OS
Так же, как Google Chrome OS, они также разработали ОС из проекта Chromium OS с открытым исходным кодом. Они берут исходный код из Chromium и добавляют свой собственный код для создания работающей ОС.
Они выглядят и работают так же, как Chrome OS, и их главное преимущество перед Chrome OS заключается в том, что вы можете устанавливать их на различное оборудование.
Cloud-Ready разработан Neverware, он защищен, прост в установке, а также имеет отличную документацию. И они тоже довольно часто обновляют ОС.
Это самый стабильный форк Chromium OS, который вы можете найти, и, несомненно, самый известный из всех. Но есть предостережение: хотя вы можете запускать приложения Linux в этой ОС, вы не можете устанавливать в нее приложения Android.
Neverware заявила, что в будущем будет поддерживать приложения для Android, но в настоящее время нет никаких признаков такого обновления.
Fyde OS впервые была представлена как Flint OS лондонской компанией Flint Innovations. Они разработали ОС для китайского рынка.
Когда Chrome OS начала поддерживать приложения Android, они добавили поддержку приложений Android в ОС Flint и переименовали ее в Fyde OS. Кроме того, вы можете установить ОС Fyde даже на Rasberry Pi и ASUS Thinker Board вместе с ПК и виртуальными машинами.
Но пользовательский интерфейс выглядит немного иначе по сравнению с Chrome OS, а также с нестабильной ОС.
Cloud-Ready – лучшая вилка, которую вы можете найти для установки, но если приложения Android так важны для вас, вы можете выбрать ОС Fyde в качестве второй лучшей альтернативы.
Как установить Cloud-Ready на любой ПК или ноутбук
- Перейдите к Neverware на сайте прокрутите вниз, пока не увидите параметр Для личного, домашнего использования. Нажмите здесь. Или вы можете нажать на это ссылка.
2. Здесь вы можете увидеть ссылки для загрузки для Windows, Mac и Chromebook.
- В разделе Windows загрузите Приложение USB Maker и установите его на свой ПК с Windows, как и любое другое приложение.
4. Выберите 64-битный или 32-битный в зависимости от вашего компьютера.
- Подключите USB-накопитель и нажмите Далее. При этом данные на USB-накопителе будут потеряны, поэтому сначала сделайте резервную копию своих данных.
- Этот процесс загрузит файлы CloudReady из Интернета и может занять до 20 минут. После завершения процесса нажмите Готово.
- Вы готовы к установке Cloud Ready OS с USB-накопителя.
- Выключите компьютер, на котором хотите установить ОС, и загрузите его с USB. Для этого вам необходимо изменить порядок загрузки в BIOS.
- Сохраните USB-накопитель в качестве первого варианта в порядке загрузки, чтобы устройство загружалось с USB.
-
После того, как устройство загрузилось с помощью USB, вы уже почти можете увидеть интерфейс Cloud Ready, затем нажмите «Поехали», чтобы начать. Это может занять несколько минут, так как ОС загружается с USB.
11. Подключитесь к Интернету с помощью кабеля Ethernet или Wi-Fi.
- ОС проверит наличие последних обновлений, а затем попросит вас войти в систему, используя адрес электронной почты, связанный с вашей учетной записью Google. Я рекомендую вам не входить в систему сразу.
-
Вы можете использовать ОС, готовую к работе с облаком, каждый раз таким образом, напрямую загружаясь с USB-накопителя. Поэтому, если вы не хотите выполнять установку на жесткий диск, вы можете продолжить вход в систему. Но если вы хотите стереть все окна и установить Cloud Ready Natively в систему, читайте дальше.
Установить деталь так просто, но теперь просто проверьте, правильно ли работает все устройство. Проверьте Wi-Fi, клавиатуру, мышь или трекпад и т. д. Если что-то не работает должным образом, это может быть проблема совместимости оборудования, поэтому не устанавливайте ОС, поскольку она несовместима с вашим оборудованием.
Однако, если все в порядке, вы можете перейти к следующему шагу установки Chrome OS. Большинство компьютеров работают нормально.
Кроме того, обязательно сделайте резервную копию своих данных на компьютере в облаке или на внешнем жестком диске, после установки ОС все ваши данные на компьютере будут потеряны.
- Для установки кликните время в правом нижнем углу и кликните переключатель «Установить ОС» на панели быстрых настроек.
- Затем снова нажмите на УСТАНОВИТЬ ОБЛАЧНУЮ ГОТОВНОСТЬ.
После завершения процесса выключите устройство, извлеките USB-накопитель и снова включите устройство. Вы можете видеть, что Cloud Ready успешно установлен на ваш компьютер.
Чтобы включить Linux, вы можете найти Virtual Box в панели приложений, открыть и установить Virtual Box.
Затем вы можете выбрать ОС, которую хотите открыть, включая Linux.
Как установить Cloud-Ready на любой ПК или ноутбук
- Перейдите на сайт Neverware , прокрутите вниз до пункта «Для личного, домашнего использования». Вы также можете перейти по этой ссылке .
2. Здесь вы можете увидеть ссылки для загрузки для Windows, Mac и Chromebook.
- В разделе Windows загрузите приложение USB Maker и установите его на свой ПК с Windows, как и любое другое приложение.
4. Выберите 64-битную или 32-битную версию в зависимости от вашего компьютера.
- Подключите USB-накопитель и нажмите Далее. При этом данные на USB-накопителе будут потеряны, поэтому сначала сделайте резервную копию своих данных
- Этот процесс загрузит файлы CloudReady из Интернета и может занять до 20 минут. Когда процесс будет завершен, нажмите «Готово».
- Вы готовы к установке Cloud Ready OS с USB-накопителя.
-
Выключите компьютер, на котором хотите установить ОС, и загрузите его с USB. Для этого вам необходимо изменить порядок загрузки в BIOS.
-
Сохраните USB-накопитель в качестве первого варианта в порядке загрузки, чтобы устройство загружалось с USB.
-
После того, как устройство загрузилось с помощью USB, вы уже почти можете увидеть интерфейс Cloud Ready, затем нажмите «Поехали», чтобы начать. Это может занять несколько минут, пока ОС загружается с USB.
11. Подключитесь к Интернету с помощью кабеля Ethernet или Wi-Fi.
- ОС проверит наличие последних обновлений, а затем попросит вас войти в систему, используя адрес электронной почты, связанный с вашей учетной записью Google. Я рекомендую вам не входить в систему сразу.
-
Вы можете использовать ОС, готовую к работе с облаком, каждый раз таким образом, напрямую загружаясь с USB-накопителя. Поэтому, если вы не хотите выполнять установку на жесткий диск, вы можете продолжить вход в систему. Но если вы хотите стереть все окна и установить Cloud Ready Natively в систему, читайте дальше.
Установить деталь так просто, но теперь просто проверьте, правильно ли работает все устройство. Проверьте Wi-Fi, клавиатуру, мышь или трекпад и т. д. Если что-то не работает должным образом, это может быть проблема совместимости оборудования, поэтому не устанавливайте ОС, поскольку она несовместима с вашим оборудованием.
Однако, если все в порядке, вы можете перейти к следующему шагу установки Chrome OS. Большинство компьютеров работают нормально.
Кроме того, обязательно сделайте резервную копию своих данных на компьютере в облаке или на внешнем жестком диске, после установки ОС все ваши данные на компьютере будут потеряны.
- Для установки кликните время в правом нижнем углу и кликните переключатель «Установить ОС» на панели быстрых настроек.
- Затем снова нажмите УСТАНОВИТЬ ОБЛАЧНУЮ ГОТОВНОСТЬ.
По завершении процесса выключите устройство, извлеките USB-накопитель и снова включите устройство. Вы можете видеть, что Cloud Ready успешно установлен на ваш компьютер.
Чтобы включить Linux, вы можете найти Virtual Box в панели приложений, открыть и установить Virtual Box.
Затем вы можете выбрать ОС, которую хотите открыть, включая Linux.
Как установить Fyde OS на любой ПК или ноутбук.
Перво-наперво, Fyde OS несовместима с Mac. Таким образом, только пользователи ПК могут загрузить и установить его. И это не так просто установить, как Cloud Ready.
- Сначала вам нужно скачать два файла.
Откройте сайт Fyde OS и загрузите iso-файл. Этот сайт будет на китайском языке, но вы можете перевести его с помощью Google Translate или просто загрузить, нажав первую кнопку.
Затем откройте сайт Etcher и загрузите приложение Etcher.
- Откройте Eitcher и выберите образ, который является iso-файлом, который мы загрузили с сайта Fyde OS.
- Подключите USB-накопитель, выберите USB-накопитель в качестве целевого и нажмите Flash. (Данные на USB-накопителе будут потеряны в процессе, поэтому сначала сделайте резервную копию своих данных)
- По завершении процесса перезагрузите устройство с USB-накопителя. Для выполнения этого шага вам необходимо изменить порядок загрузки.
-
После загрузки системы вы можете увидеть интерфейс Fyde OS. (это может занять несколько минут, так как ОС работает от USB)
-
В настоящее время сайт будет на китайском языке, для изменения щелкните значок глобуса (значок «Международный»).
Затем выберите язык в раскрывающемся меню и нажмите ОК. -
Теперь нажмите «Поехали» и подключитесь к Интернету через Ethernet или Wi-Fi.
8. В отличие от Cloud – Ready, вам необходимо иметь отдельную учетную запись Fyde. Чтобы создать учетную запись, нажмите «Дополнительные параметры», а затем «Создать учетную запись».
9. Войдите в свою учетную запись. Отсюда вы можете использовать всю ОС Fyde. Но он все еще не установлен на жесткий диск.
- Для установки перезагрузите устройство и нажмите Ctrl + Alt + F2, когда появится логотип Fyde OS, чтобы переключиться в режим командной строки.
-
Используйте «Chronos» как имя пользователя и пароль. Затем введите команду isblk и нажмите Enter.
12. Найдите физический диск. Вероятно, он будет отображаться как sd x. Вы также можете определить размер дискового пространства и количество разделов. Следующая команда примет в качестве метки «sda».
13. Введите следующую команду:
sudo / usr / sbin / chromeos-install --dst / dev / sda
14. Сценарий установки спросит, хотите ли вы продолжить, и предложит очистить целевой диск. Если вы уверены, введите Y и нажмите Enter для подтверждения.
15. После завершения установки перезагрузите устройство, вынув USB-накопитель.
Вы уже установили ОС Fyde.
Но все еще нет поддержки приложений для Android и Linux. Не волнуйтесь, вы можете легко их включить.
Включение поддержки приложений Android
- Поддержка приложений Android уже доступна. Вы можете скачать apks и установить, но нет Play Store.
- Вам просто нужно загрузить неопубликованный Play Store, загрузив apk-файл Play Store. Или вы даже можете загрузить Nova Launcher, чтобы получить из него доступ к Play Store.
Включение поддержки приложений Linux
<
p class=”_1qeIAgB0cPwnLhDF9XSiJM”>1. Откройте Chrome и откройте новую версию Windows в режиме инкогнито.
2. Введите «chrome: // flags / # enable-experimental-crostini-ui» и включите флаг.
3. Chrome запросит перезапуск, чтобы изменения вступили в силу.
4. После перезапуска откройте системные настройки Chrome OS.
5. Найдите «Linux», и вы должны увидеть раздел «Linux (бета)».
6. Откройте его и нажмите “Включить”.
7. Теперь установите Linux (бета) и подтвердите
8. У вас будет установлен терминал Linux в течение нескольких минут.
По умолчанию поисковая система Fyde OS по умолчанию настроена на bing, вы можете изменить этот Google в настройках браузера, если хотите.