Chrome OS is becoming more popular and the choice of many educational institutions. It is undeniable that many want to try it for themselves. But not everyone is willing to give up the safety and home feel of the Windows Operating System. Let me share a guide to help you with Dual Boot Chrome OS and Windows 10/11.
There is a new easy method to dual boot Chrome OS available. This does not require any Linux installation or the use of a USB drive. There are a few steps, which are easy to follow. So let’s start the procedure…
1.1. Requirements
- 64 Bit Computer System with 16GB or more space
- Secure Boot Disabled from BIOS
- Hyper-V or Virtualization is enabled from BIOS
- UEFI Boot (MBR may or may not support with MBR patch)
- Intel CPU from Sandy Bridge or later (Intel Core 2 Duo or older is Not Supported)
- Atom, Celeron, and Pentium processors are supported as of Baytrail or later.
- AMD Stoney Ridge or AMD Ryzen
- ARM CPUs are not supported
1.2. DIsable Hibernation and Fast Start-Up
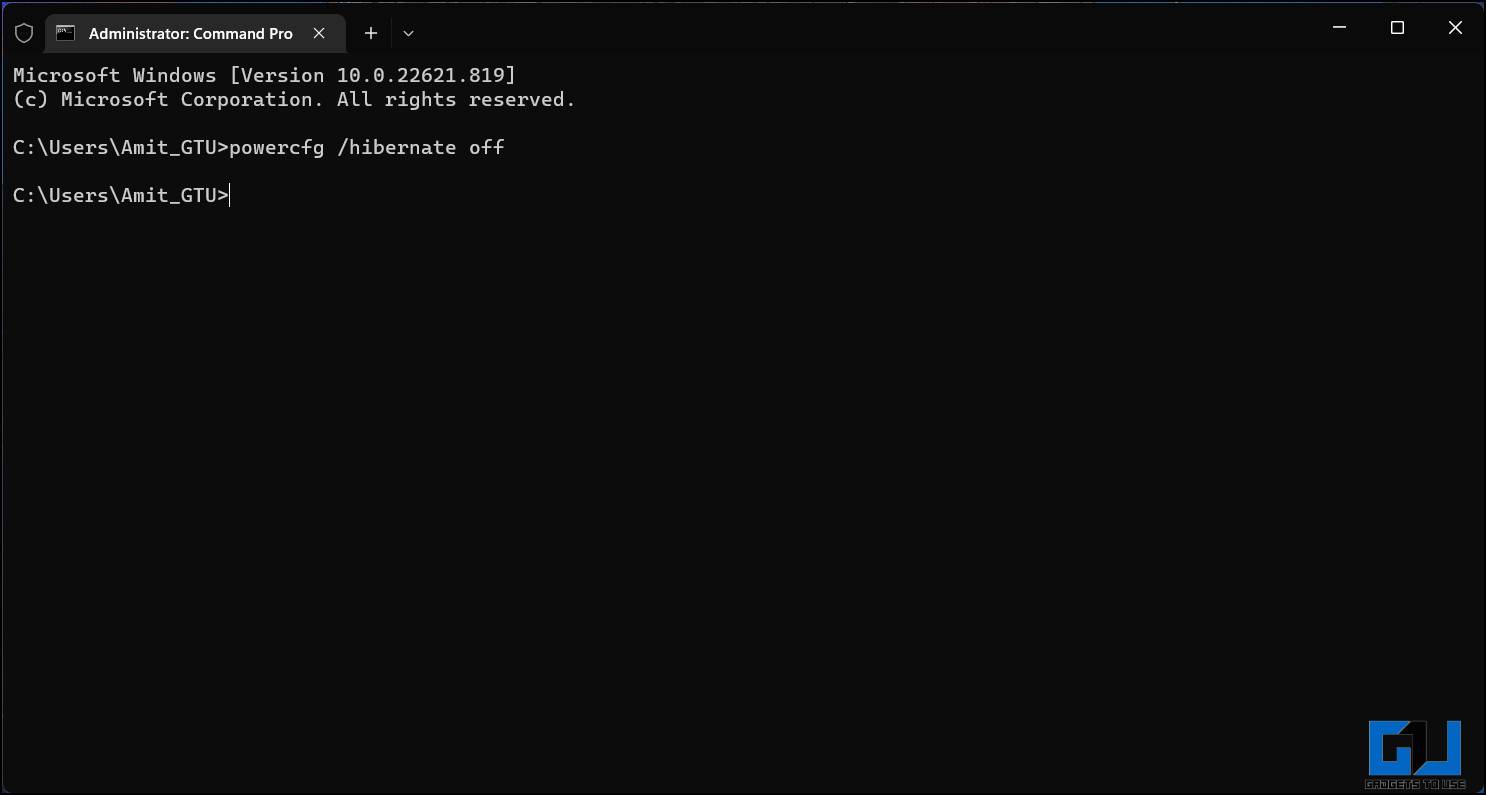
To successfully dual boot Chrome OS and Windows, we need to disable hibernation and fast startup. Open the Windows terminal and here type, “powercfg.exe /hibernate off“. This will disable hibernation mode on our system.
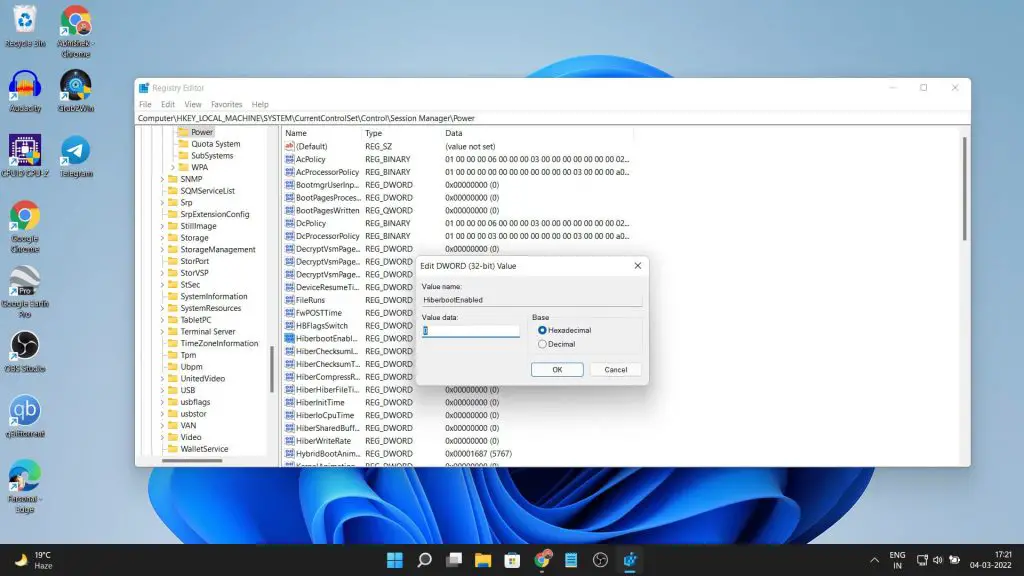
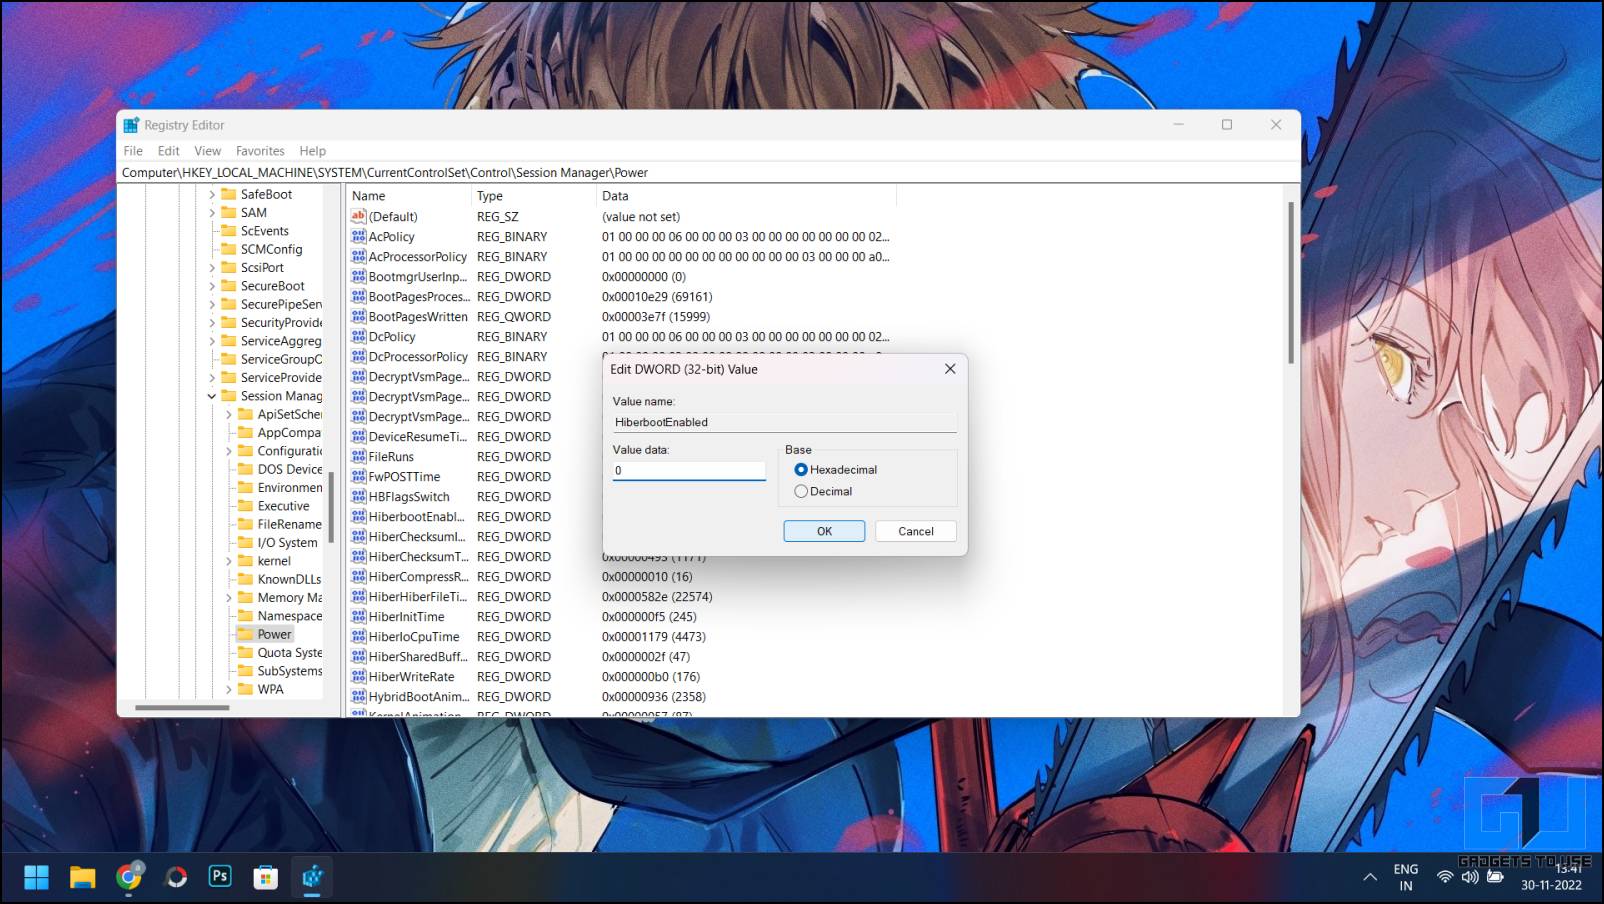
Now to disable fast start-up, we will edit the registry of our Windows computer. Right-click on the Windows key and run “Regedit“. Here follow this path, “HKEY_LOCAL_MACHINE\SYSTEM\CurrentControlSet\Control\Session Manager\Power“. You can paste this into the path dialogue box.
We need to locate the HyberBootEnabled option, then right-click and modify it. Change the value from “1” to ‘0″. this will disable the fast start-up option.
Disable Secure Boot
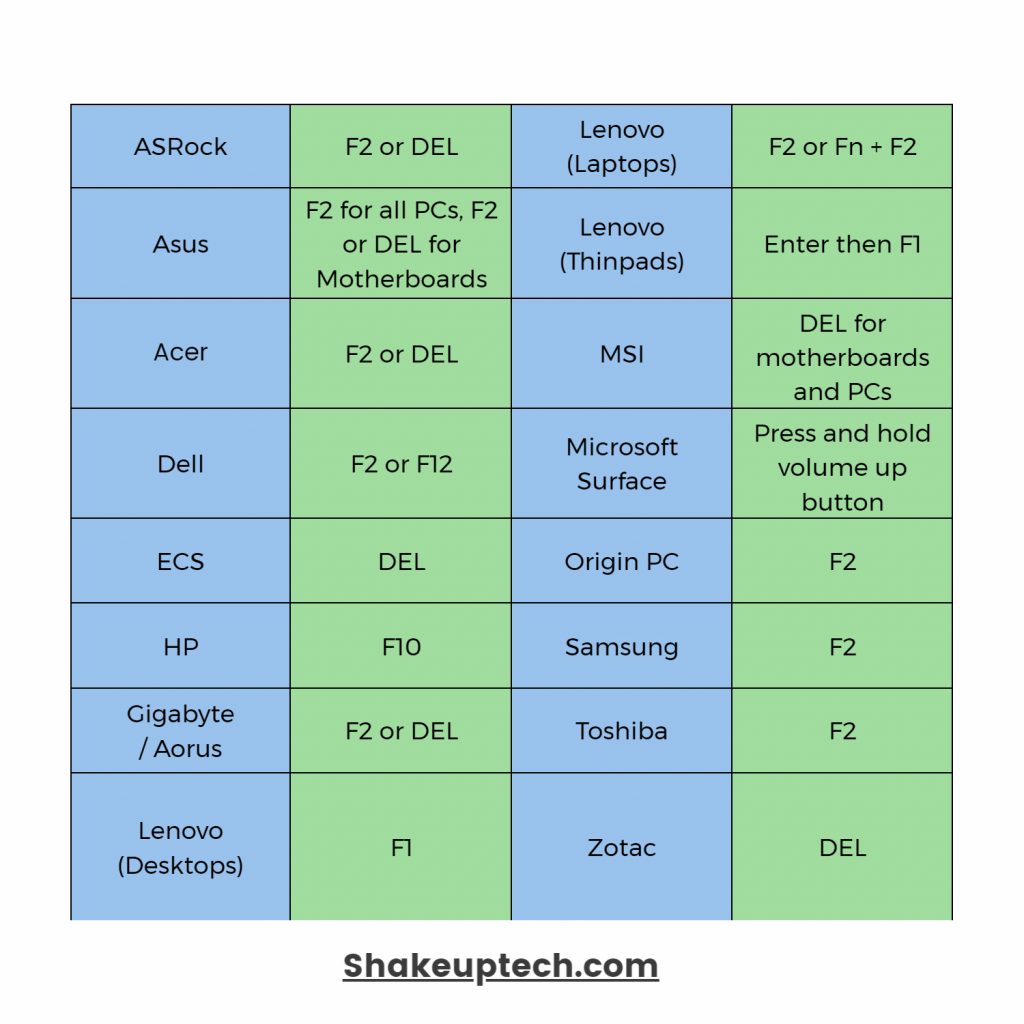
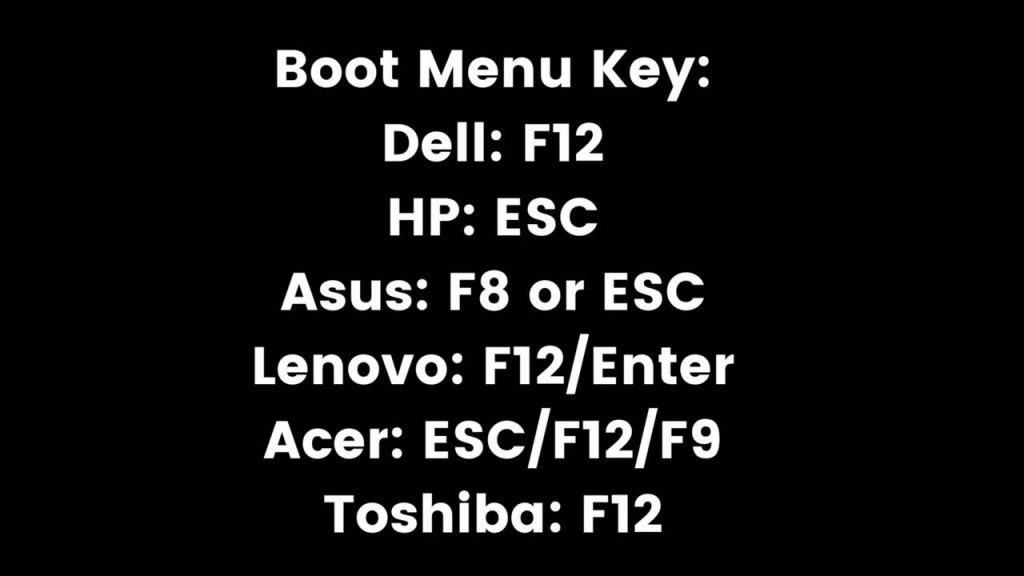
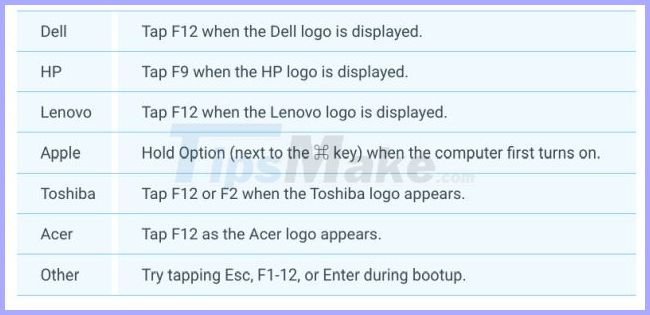
We need to disable secure boot from the BIOS of our computer. Different manufacturers have different keys to enter the BIOS. You can find the BIOS keys for various companies below.
While you are here and if your system is a bit older. Also, find something called the “legacy boot” and also disable that as well.
And lastly, we need to enable options related to virtualization. It is called Hyper-V for some and just virtualization for others. On modern computers, it is enabled by default. So, if you don’t see such an option, then it must be enabled already.
1.3. Installing WSL / Ubuntu
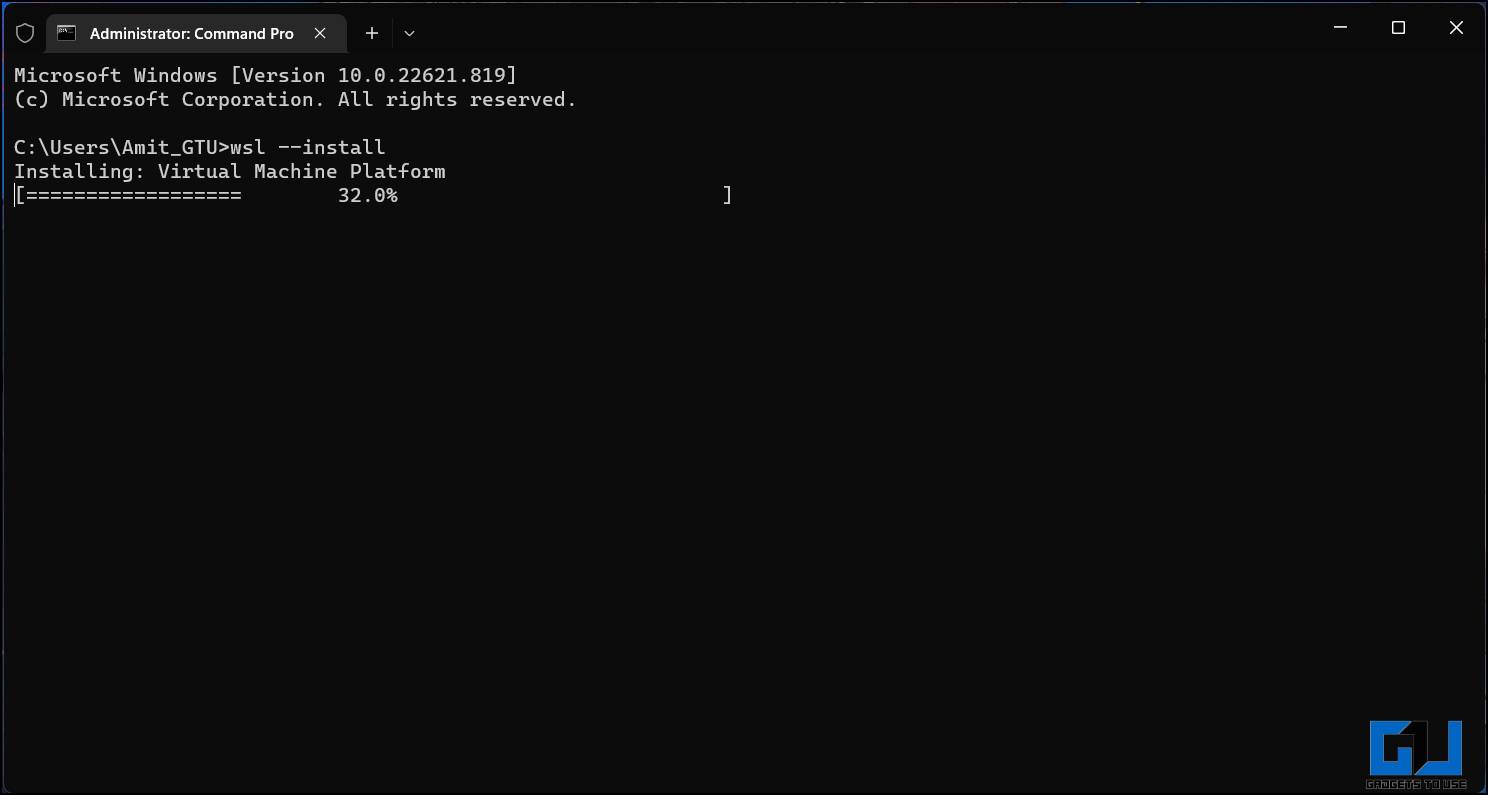
First, we will set up Ubuntu on our system. Open up PowerShell as admin by right-clicking on the start menu. Here type,
wsl --installAnd the installation of various tools and Ubuntu will begin. After that when you check your installed programs list you’ll see Ubuntu installed as well. Open Ubuntu and create a username and password. Now type,
sudo apt update && sudo apt -y install pv cgpt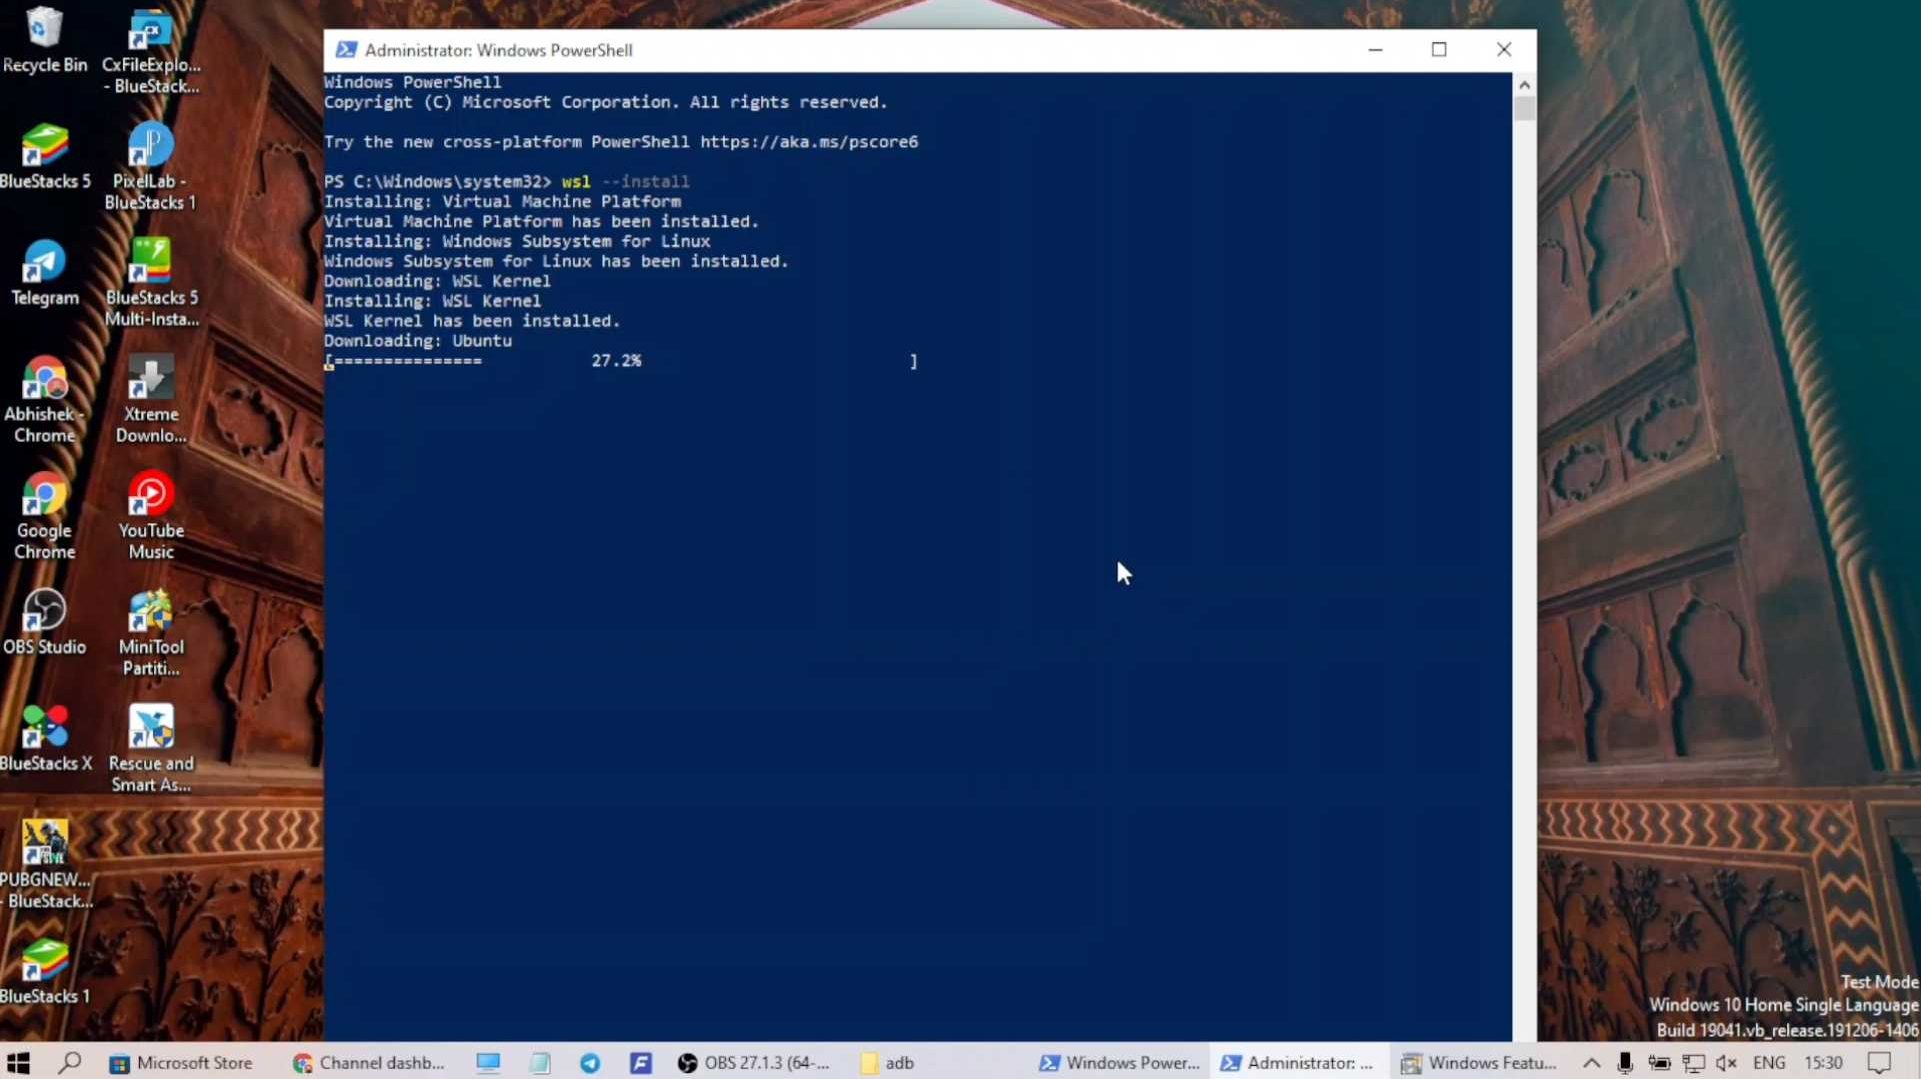
1.4. Creating Partitions
Now in the search dialogue type partition and open “Create and format hard disk”. We will create a new partition to install Chrome OS by right-clicking the D drive and shrinking it.
You can create a partition of 16GB and above. Name the partition “ChromeOS”. Now open the Chrome OS partition then create a folder and name it “chromeos” without spaces. Also, create a folder named “brunch” inside the partition.
1.5. Downloading Files
First, we will also need the latest Sebanc Brunch file to make all this work. Download the latest version and take note of the version number. Thanks to the developer Sebanc for making this possible.
Moving on, we will download the Chrome OS Recovery image. There are different versions for different CPUs and generations. Download the version similar to that of the Brunch file from the list.
- Intel 1st Gen to 9th Gen – Rammus
- Intel 10th and 11th gen – Volteer (Some 10th and 11th Gen need Kernel 5.10)
- AMD – Stoney Ridge and Bristol Ridge – Grunt
- AMD Ryzen – Zork (Some Ryzen 4xxx needs Kernel 5.10)
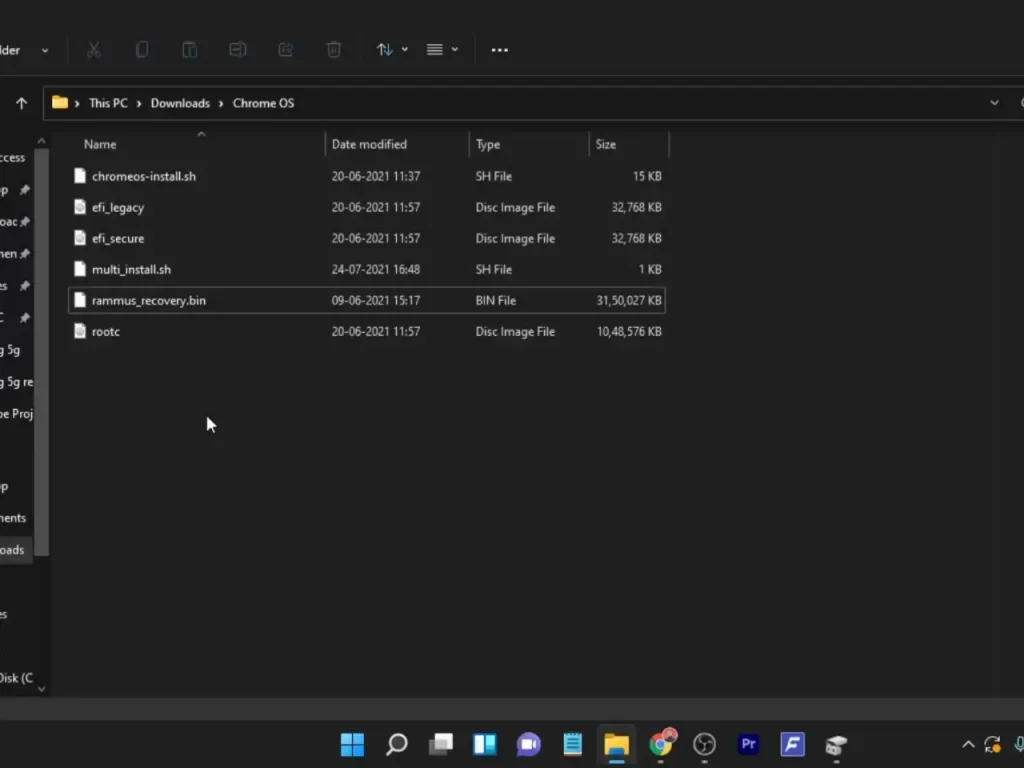
Now move all the downloaded files into a folder and name it “chromeos“. You can name it anything else but make sure there are no spaces or special characters.
Lastly, we will download the Grub2Win file from this link. We will use this program to create a dual boot menu. Most of these files are similar to what we have used before.
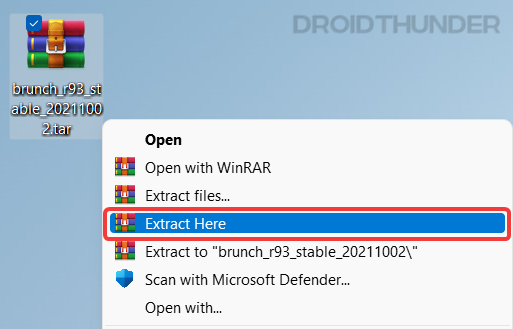
For the MBR Boot system, download the MBR patch file from here (not guaranteed to work). Now using 7zip or WinRAR extract all the files. We have to extract the Brunch file twice to get the required files. In the case of MBR only, extract the patch file the same way and it will overwrite existing files in the folder.
Check Out The Video Guide:
1.6. Dual Boot Chrome OS and Windows 10/11 without Linux Mint
Now open Ubuntu and we will mount the directory where all our downloaded files are located. Make sure to double-check the directory path and names. Copy and paste the folder address of the ‘chromeos” folder on a blank document. And then copy and type its content in the below format.
cd /mnt/(your downloads folder location)" for example: cd /mnt/d/downloads/chromeos/After this, we will type our main installation command. Replace the bracket’s content with the file name that we have extracted. For the Chrome OS Recovery image, make sure to copy the full name including the extension. You can enable the extension in the file explorer from the View > Show extension option.
Locate your Chrome OS partition see the drive letter and type that in place of the bracket. lastly, put down the size of the partition after -s, probably a little lower than the actual size. Also, do not skip to add the chromeos.img at the end.
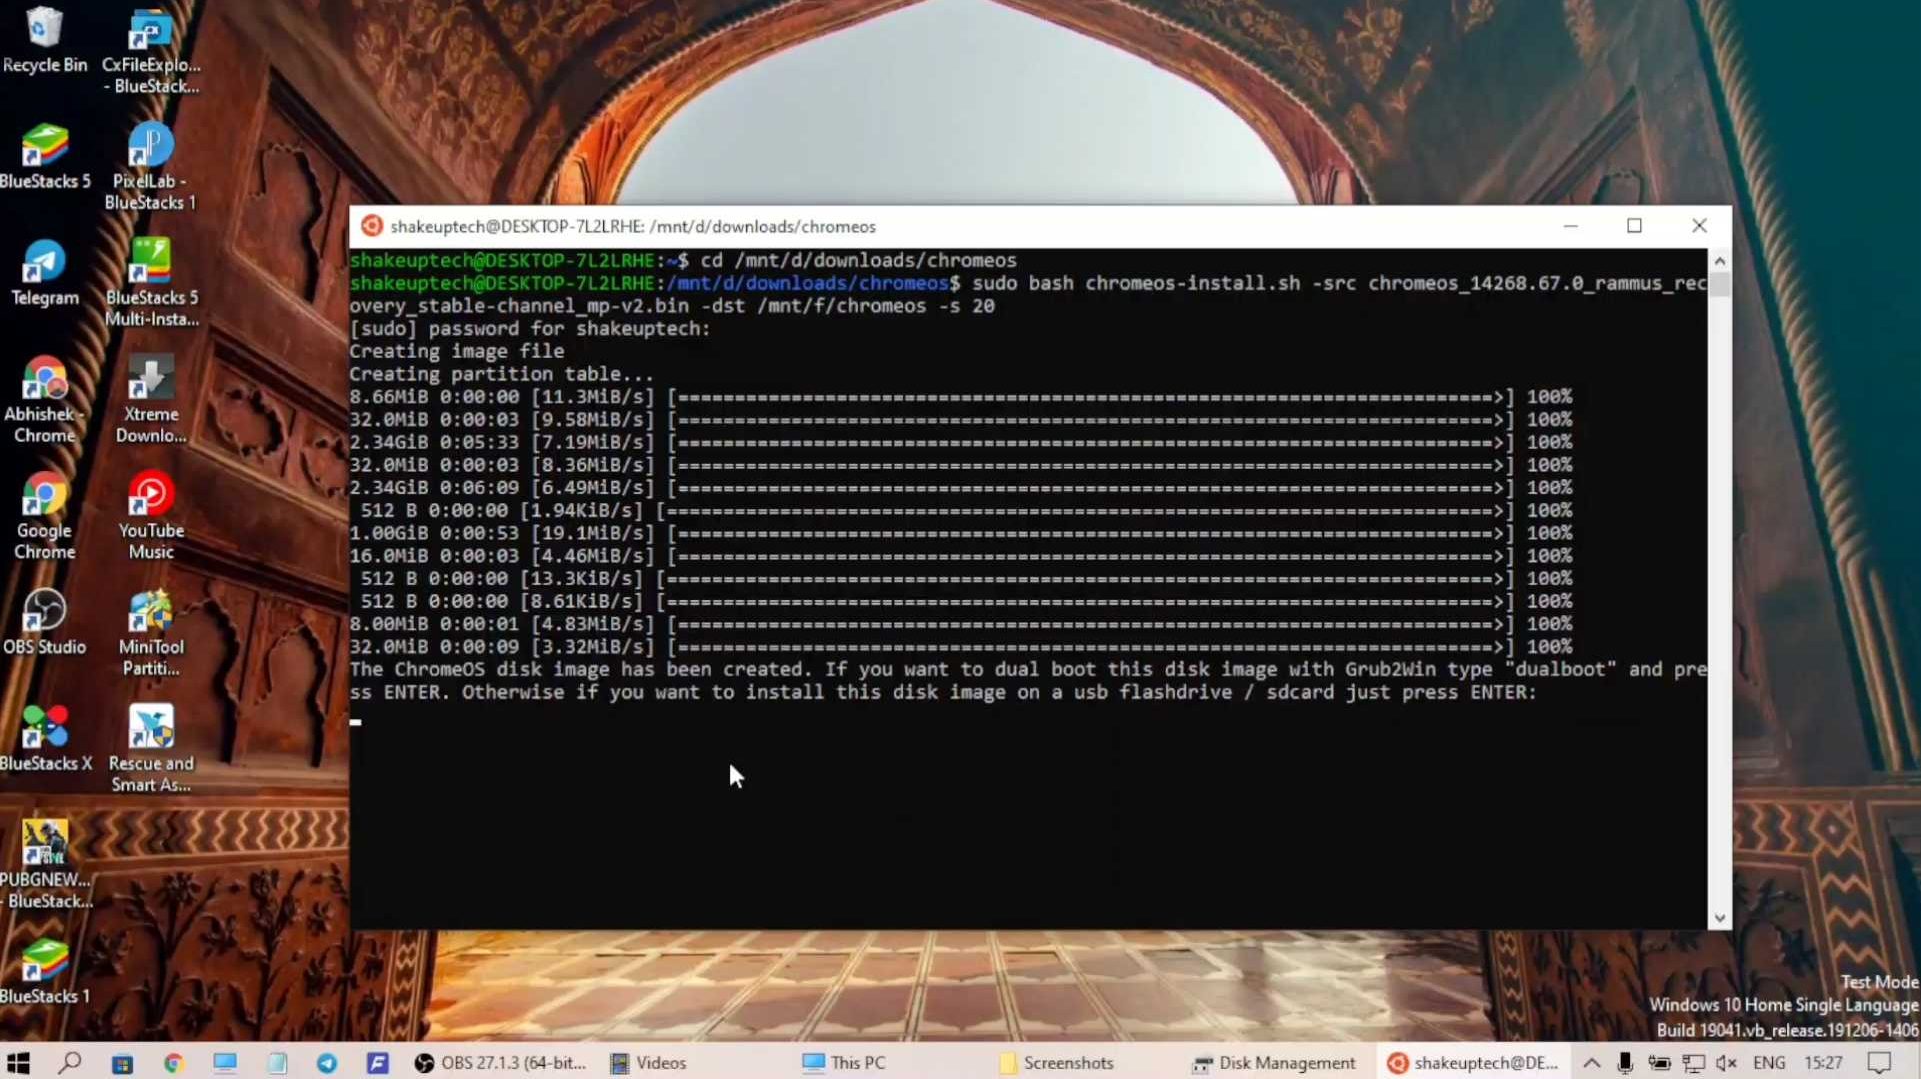
sudo bash chromeos-install.sh -src (recovery image name.bin) -dst /mnt/(chromeos partition folder)/brunch/chromeos.img -s (size)

For example: sudo bash chromeos-install.sh -src chromeos_14268.67.0_rammus_recovery_stable-channel_mp-v2.bin -dst /mnt/f/chromeos/brunch/chromeos.img -s 20
Now after making sure everything is correct and okay, hit enter and then let the process begin. Depending upon the size of the partition it can take anywhere from 30 to 60 minutes to complete the processes.
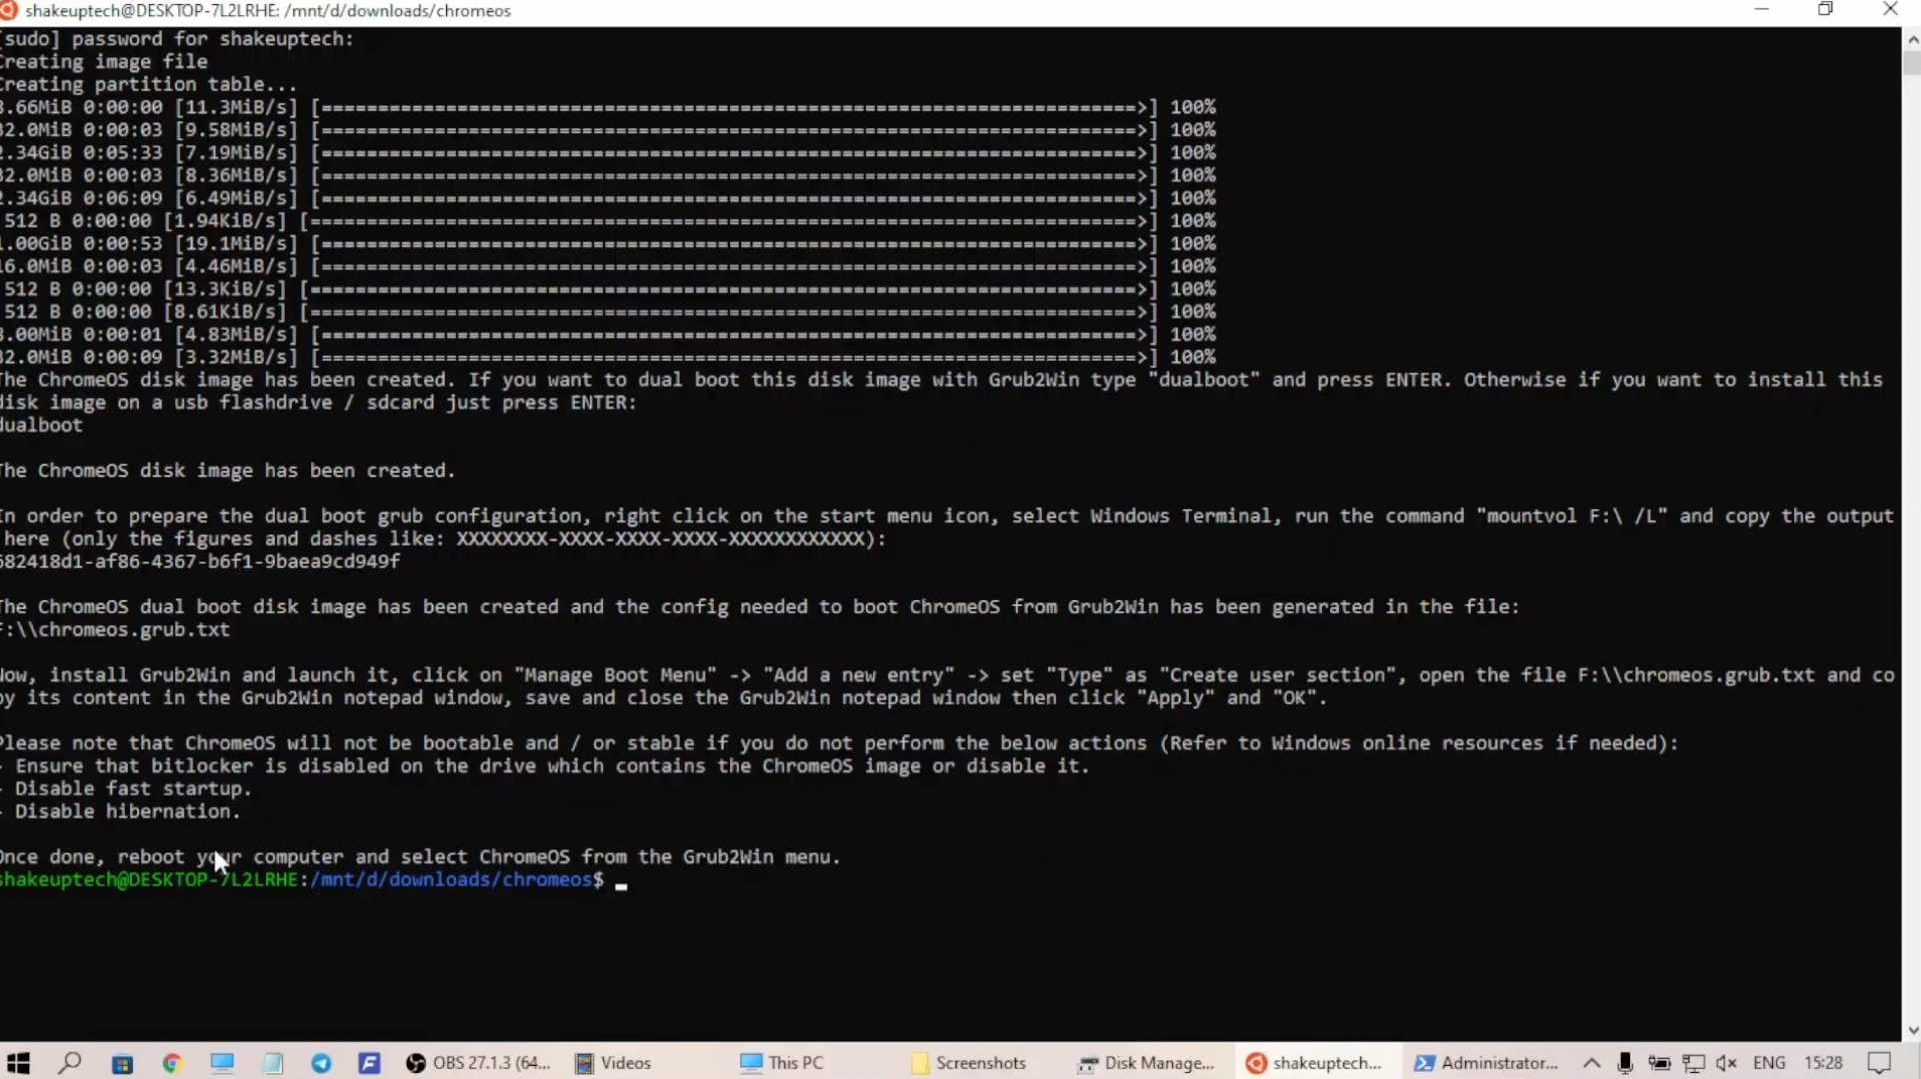
After the process is done, it will ask to either continue with the single boot installation of Chrome OS or dual boot installation. We need to type dualboot without spaces and hit enter. this will create a grub2win txt file in the Chrome OS partition. You can close the terminal after making sure that the Txt file is present in the partition.
1.7. Grub2Win For Dual Boot Menu
Now open the Grub2Win setup file and continue to run if prompted. The installation will take some time to complete. Make sure your secure boot is disabled otherwise, grub2win will not install successfully.
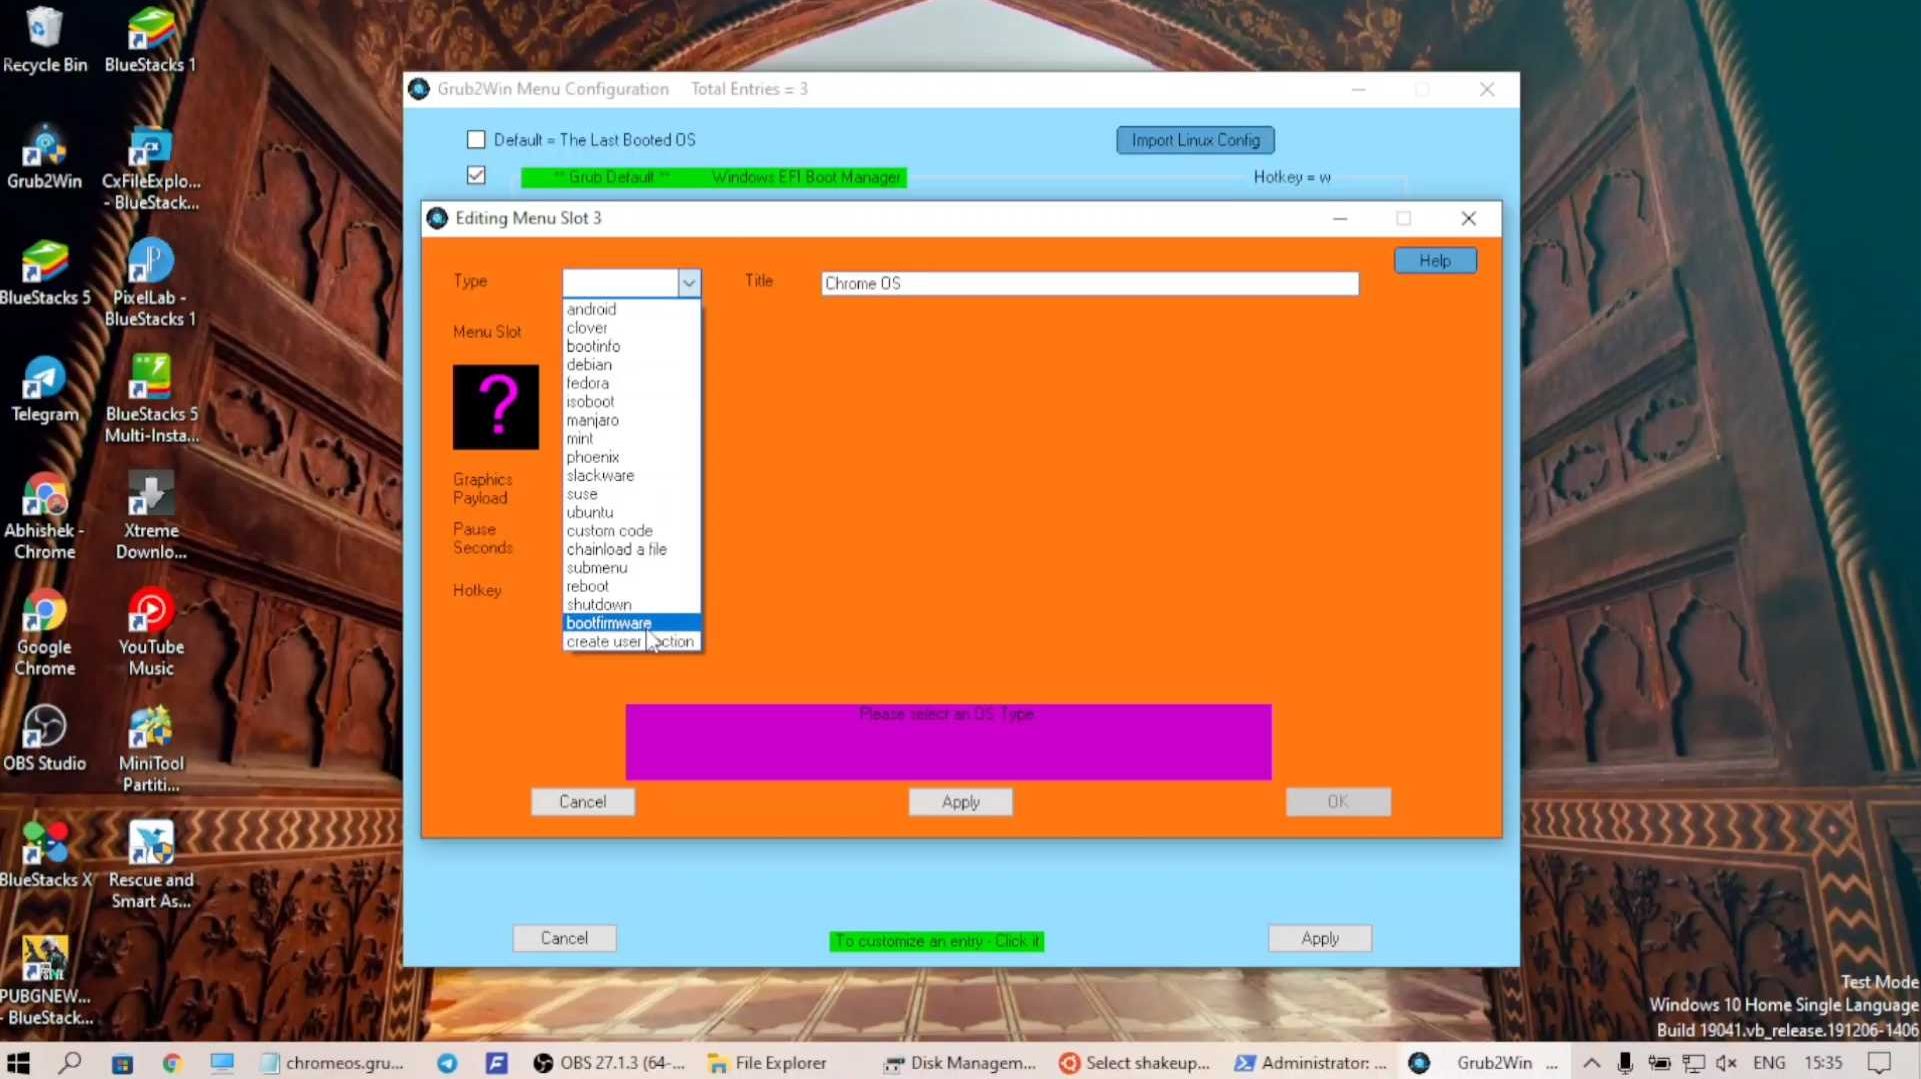
After it has been installed we will open the “Manage boot menu” and create a new entry. Name it as Chrome OS and in the Type section select “User Creation”‘ It will open up Notepad.
Now we need to open the chromeos folder that we created inside the Chrome OS partition. Here, open grub-menu.txt and copy all the commands. Paste those commands in the Notepad and close and save it. Now hit Apply and select OK.
If you see errors like Chrome OS is not supported or such, just ignore those and continue. Also, make sure to save the config file quickly after pasting it.
1.8. Dual Boot into Chrome OS
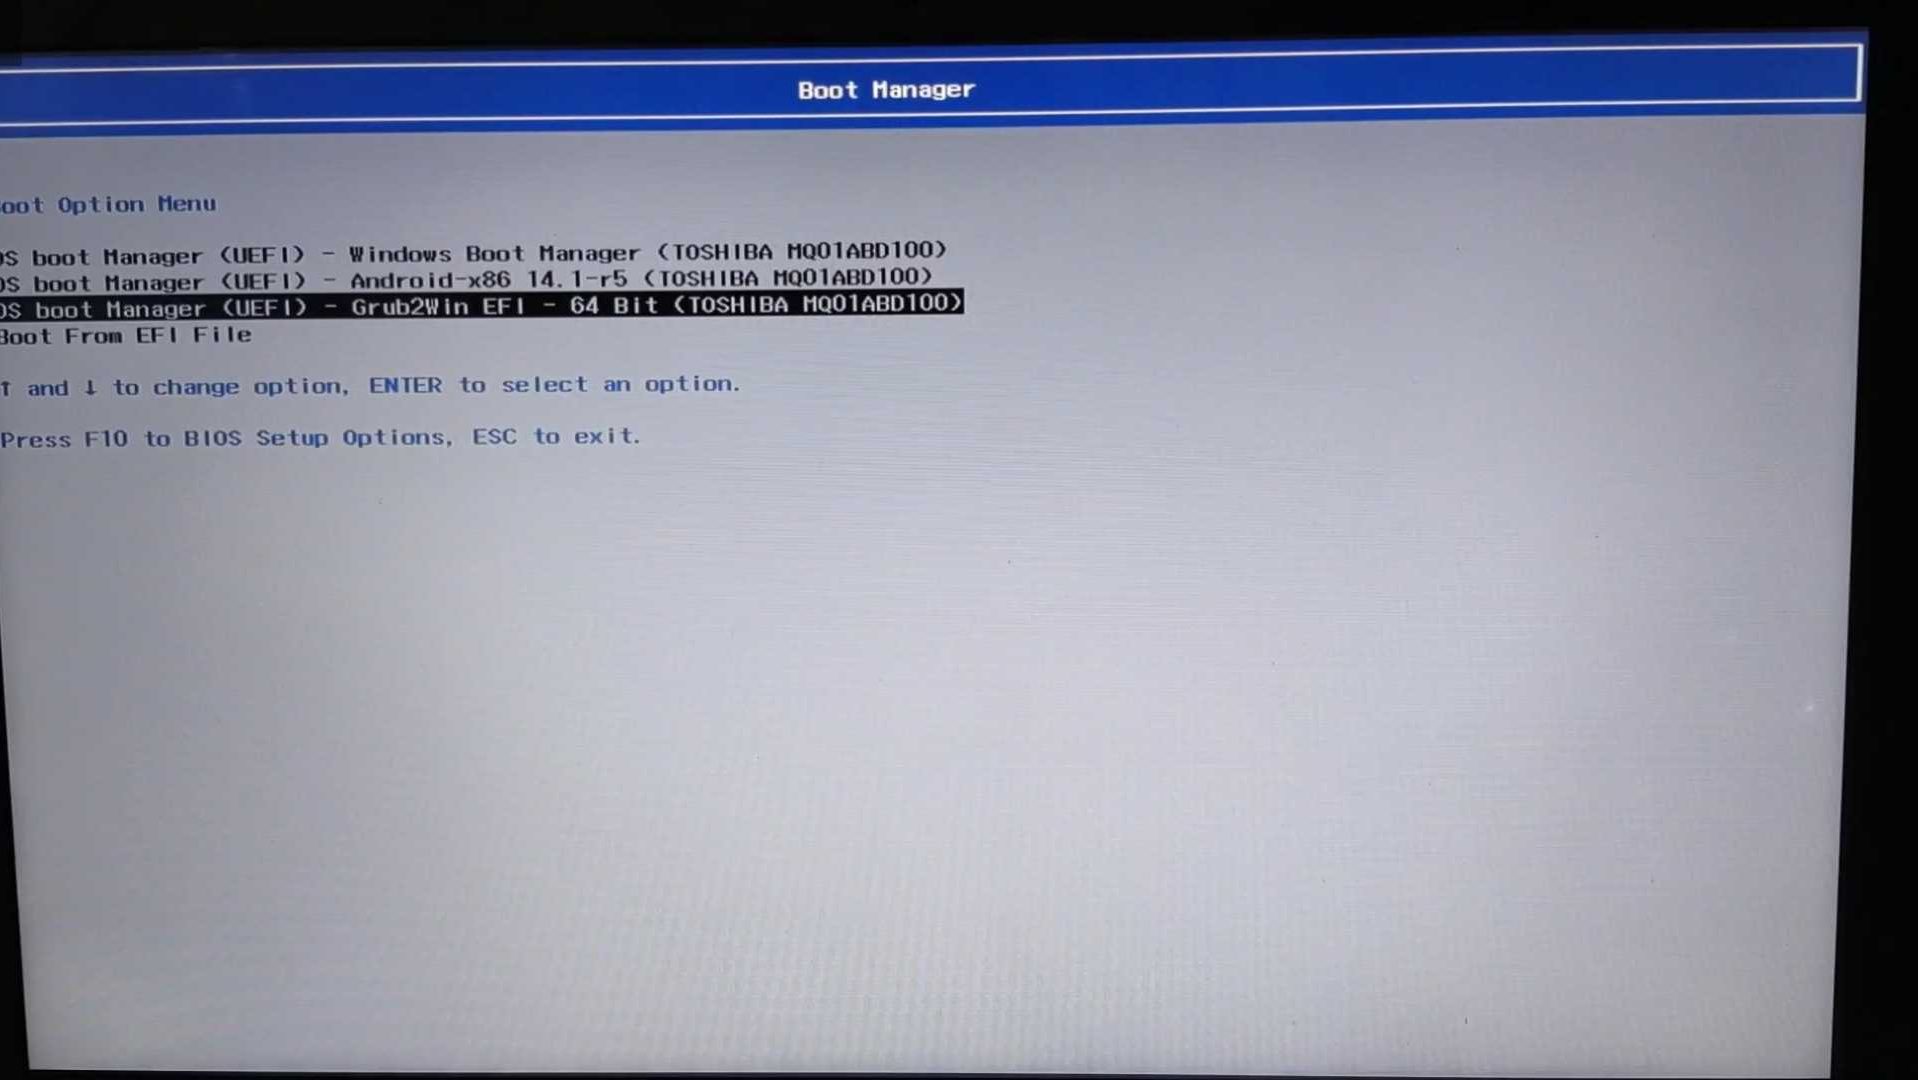
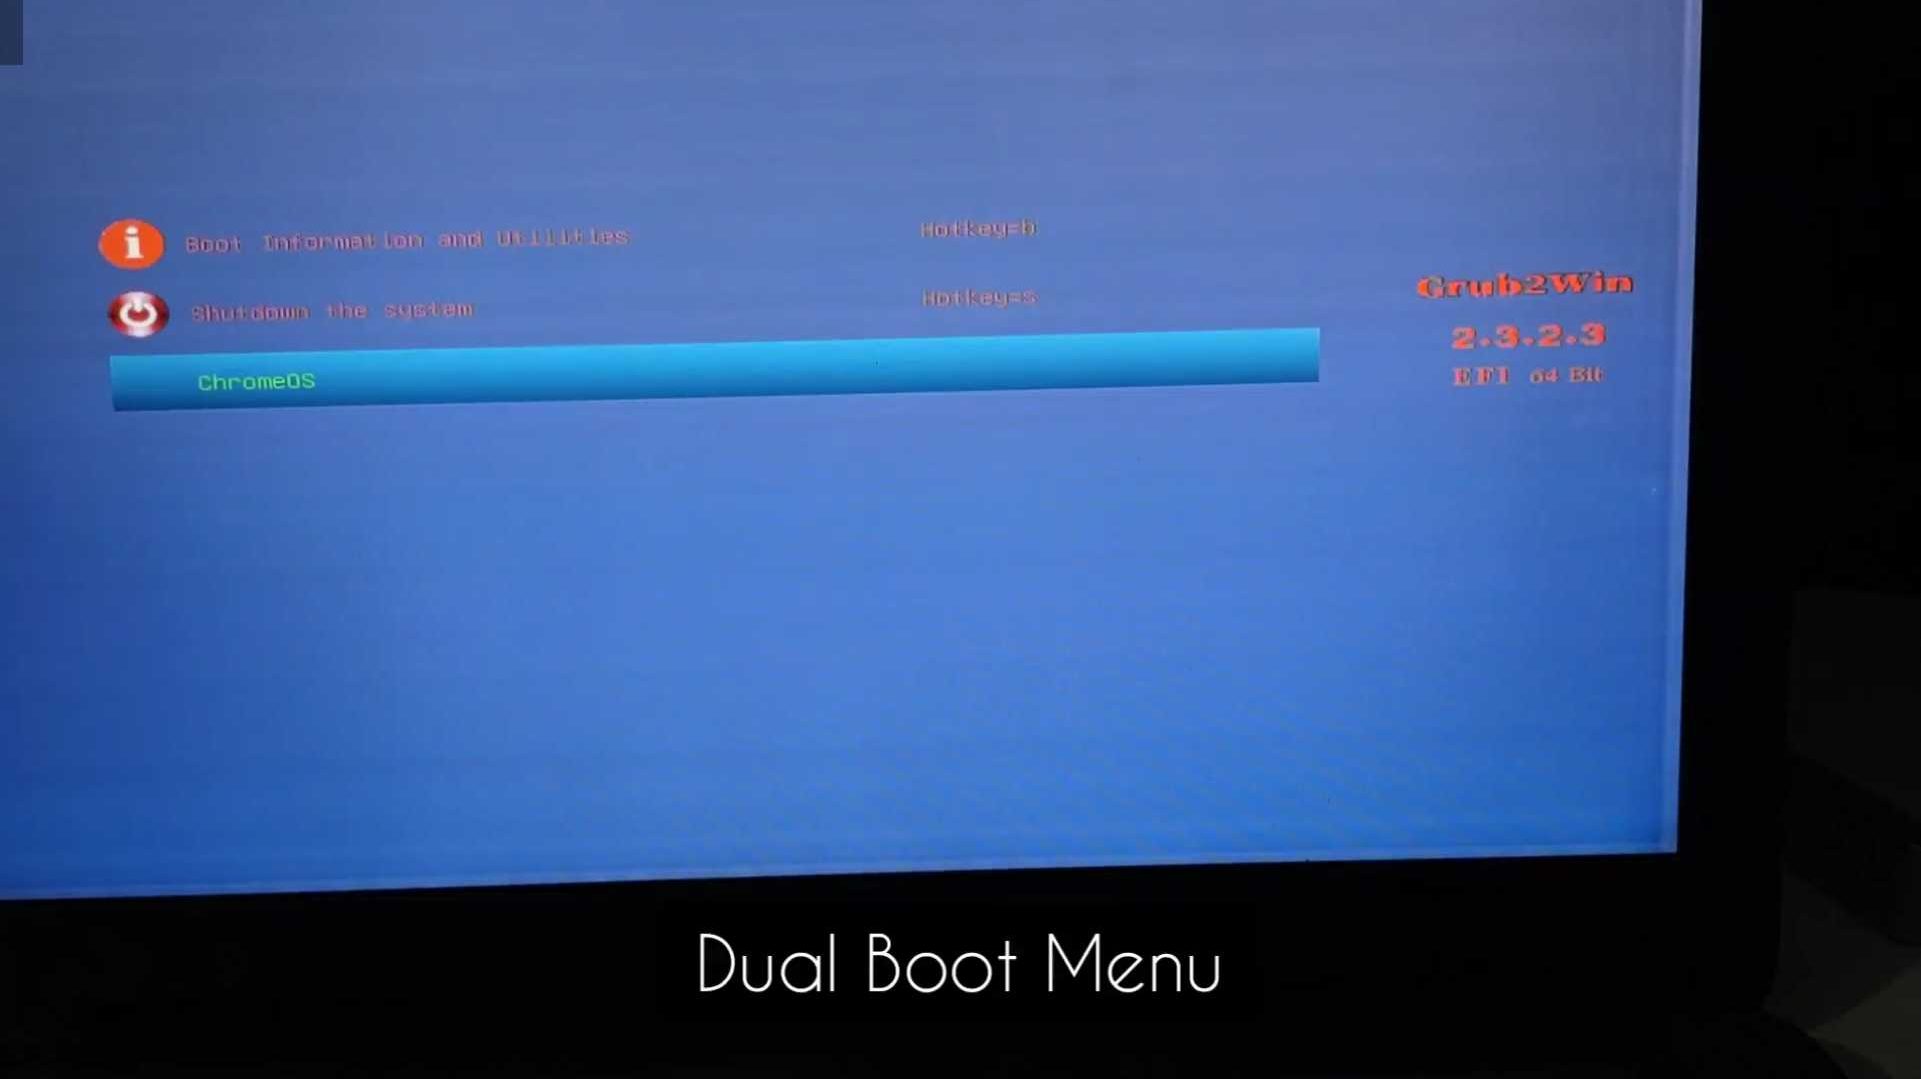
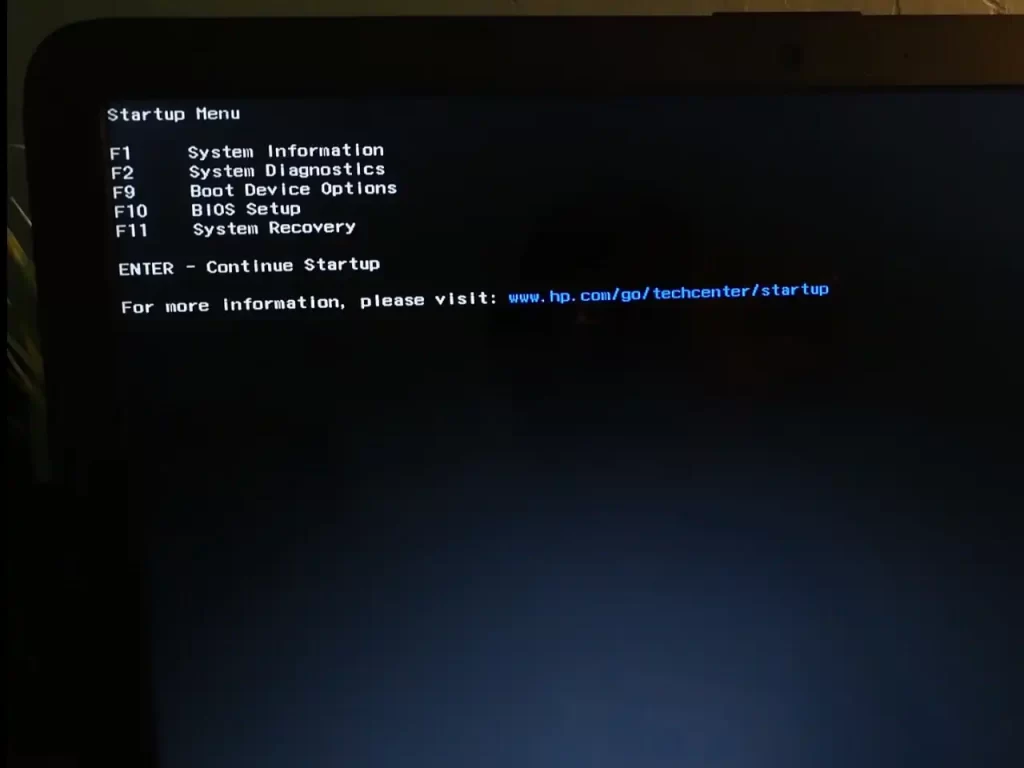
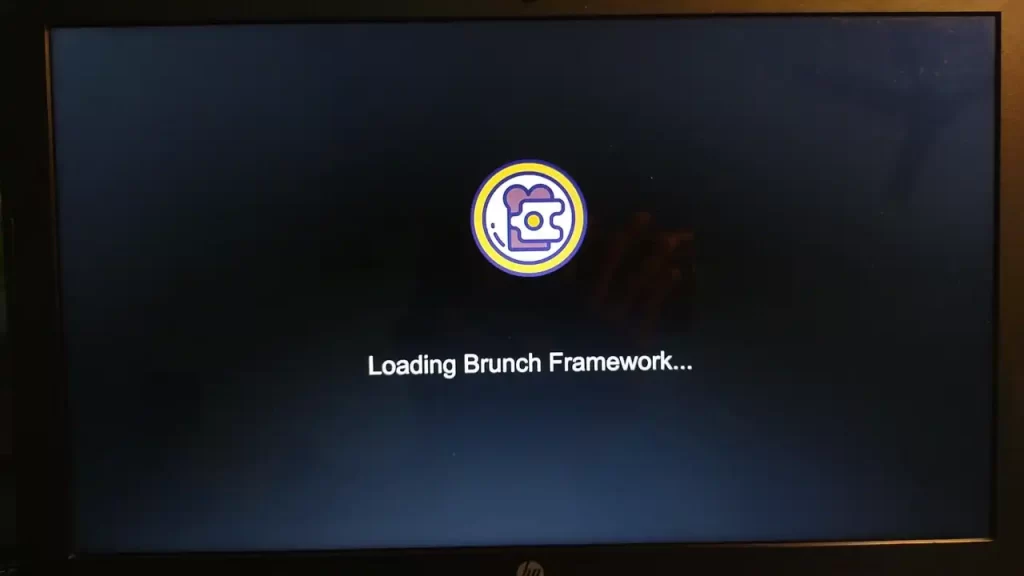
Now we will restart our system in BIOS and select Boot Device Options. Now select Grub2Win Boot Manager and using the down arrow key you will see Chrome OS name. Hit enter and you will see the Brunch framework logo.
It will take some time but eventually, you will see the Chrome OS logo and the setup screen. Just set it up and start using your Chrome OS with Play Store support.
2. Dual Boot Chrome OS and Windows 10/11 with Linux Mint
2.1 Requirements
- Laptop or Desktop with x64 bit CPU
- UEFI or MBR BIOS (MBR needs an additional Patch to work)
- Secure Boot Disabled in BIOS
- Intel or AMD Chipset (AMD support is limited)
- No Nvidia or ARM support
- No Support for Virtual Machines (VMware)
- 8GB or Above USB Pendrive
2.2. DIsable Hibernation and Fast Start-Up
To successfully dual boot Chrome OS and Windows, we need to disable hibernation and fast startup. Open the Windows terminal and here type, “powercfg.exe /hibernate off“. This will disable hibernation mode on our system.
Now, to disable fast start-up, we will edit the registry of our Windows computer. Right-click on the Windows key and run “Regedit“. Here follow this path, “HKEY_LOCAL_MACHINE\SYSTEM\CurrentControlSet\Control\Session Manager\Power“. You can paste this in the path dialogue box.
We need to locate the HyberBootEnabled option, then right-click and modify it. Change the value from “1” to ‘0″. this will disable the fast start-up option.
Disable Secure Boot
We need to disable secure boot from the BIOS of our computer. Different manufacturers have different keys to enter the BIOS. You can find the BIOS keys for various companies below.
While you are here and if your system is a bit older. Also, find something called the “legacy boot” and disable that as well.
And lastly, we need to enable options related to virtualization. It is called Hyper-V for some just virtualization for others. On modern computers, it is enabled by default. So, if you don’t see such an option, then it must be enabled already.
2.3. Files Needed
Installing Chrome OS as a primary operating system is simpler than dual-booting it with Windows. Even the files we need are similar but there are a couple of new additions to the list. First, we need the Linux Mint OS file which is a type of Linux distribution. This will help us to flash the Chrome OS to our system.
We can download the Linux Mint image from this link and download the latest release. Next, we need to download the Brunch Framework to make the Chrome OS work on our system after flashing it. A GitHub user name Sebanc has made such a framework file for us to utilize. You can download that file from here.

Now we need the Chrome OS recovery image. This is the main Chrome OS file that we will flash in order to use the operating system. Download the image file from this link. Search for rammus (Intel Upto 9th Gen) samus for Intel 3rd Gen or lower, volteer (10th Gen or Above). And zork for (Ryzen), grunt for (AMD) (Stoney Ridge, and Bristol Ridge), then download the latest recovery image.
To dual-boot Chrome OS, we need to create a new boot menu. For that, we need a program called Grub2win. Download the program from this link. We also need a script that we will run in the terminal window to dual-boot Chrome OS. This script is called the multi-install script. Download it from here.
For the MBR Boot system, download the MBR patch file from here (not guaranteed to work).
2.4. Initial Process
Let’s start by extracting the files we downloaded earlier. Create a new folder called Chrome OS in the downloads folder. Extract the Brunch framework file and Chrome OS recovery image file. The Brunch Framework file is a tar.gz file, so we need to extract it twice. In the case of MBR, extract the patch file the same way and it will overwrite existing files in the folder.
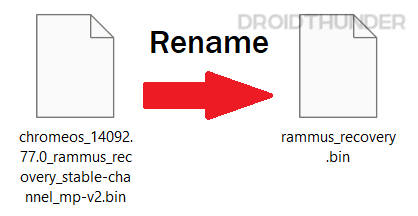
After extracting the Chrome OS recovery image we need to rename the file obtained. For example, if you downloaded the Rammus image. Rename it as rammus_recovery.bin and for Zork, it should be zork_recovery.bin respectively. Move all the files thus extracted into the Chrome OS folder. Also, move the muti install script to the folder as well. Leave the Linux mint and grub file outside.
2.5. Create Partition
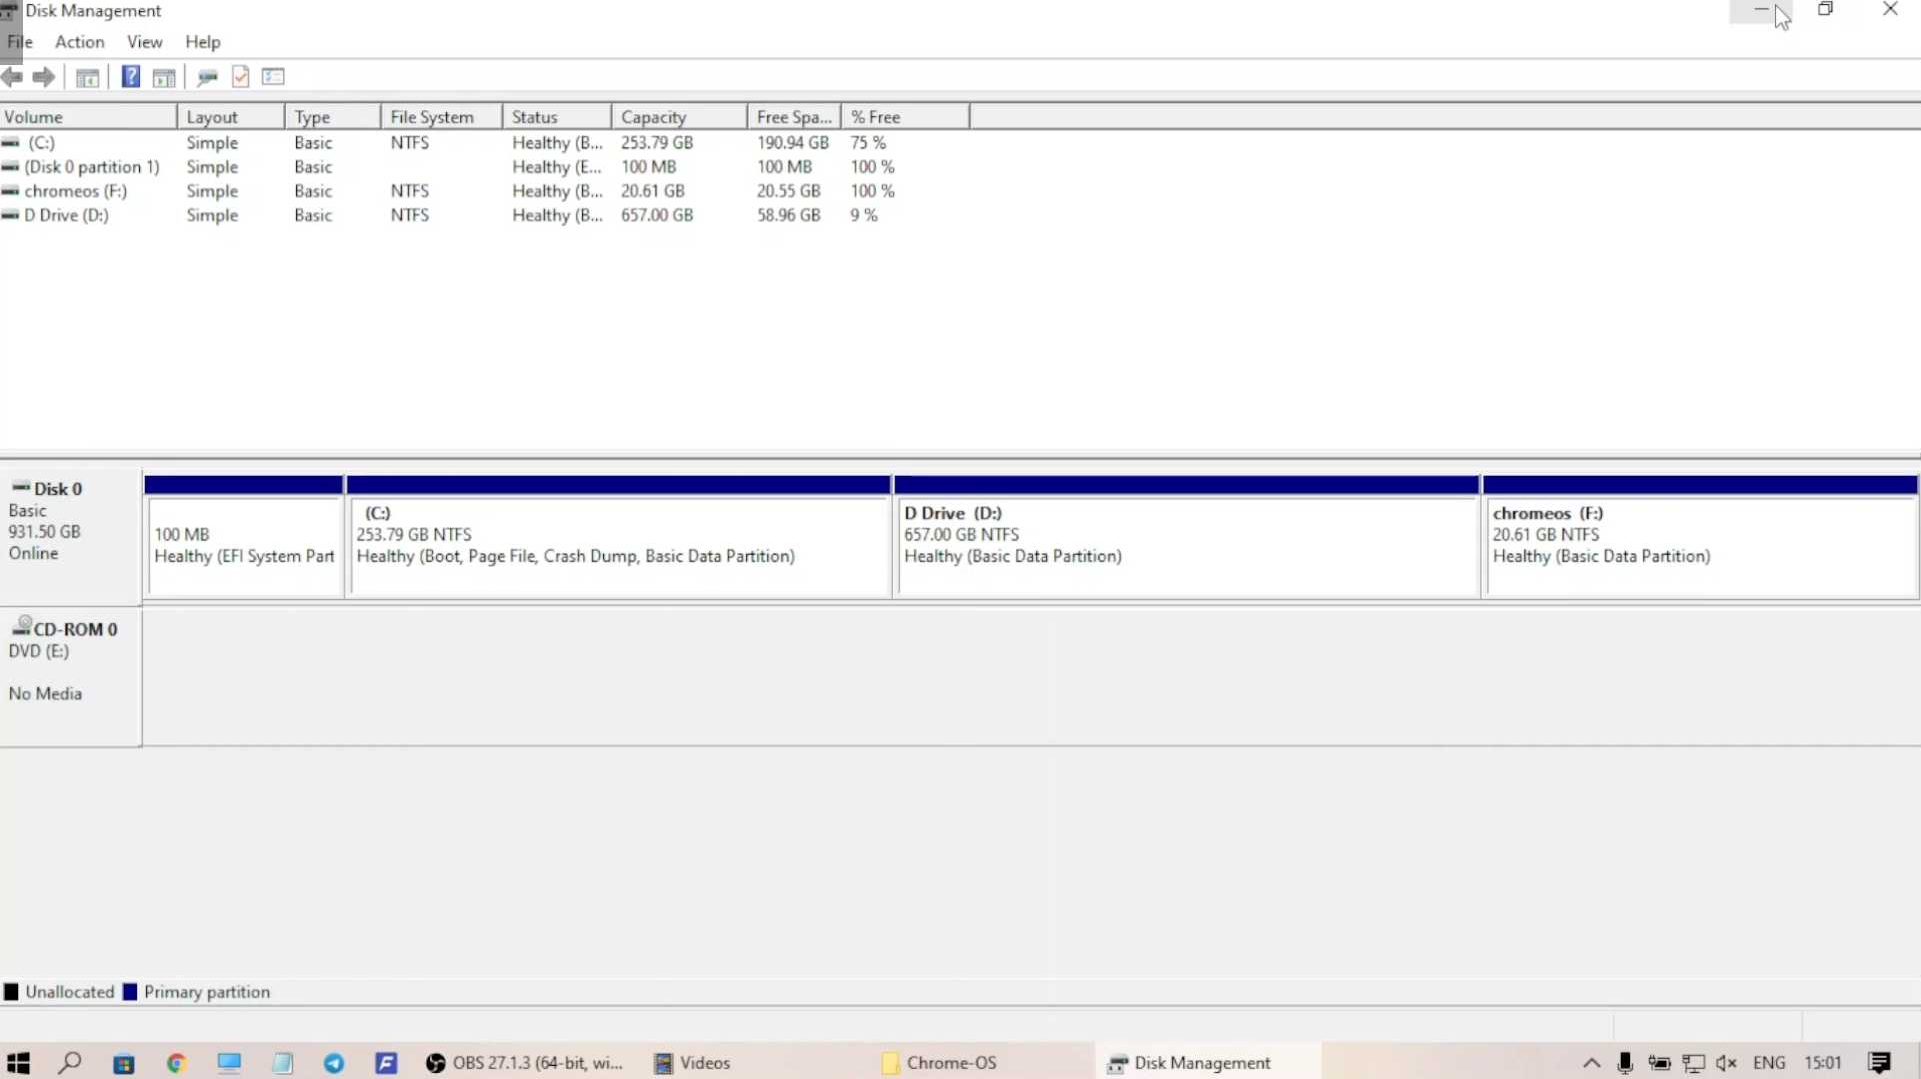
We need to create a partition in our drive to dual-boot Chrome OS. Open the search window and type partition. A program called Disk Management should appear. Open the app and it will show all the storage details and different partitions. the drive other than the C drive should be shrunk for this new partition. Right-click on the D drive as in my case and click shrink.
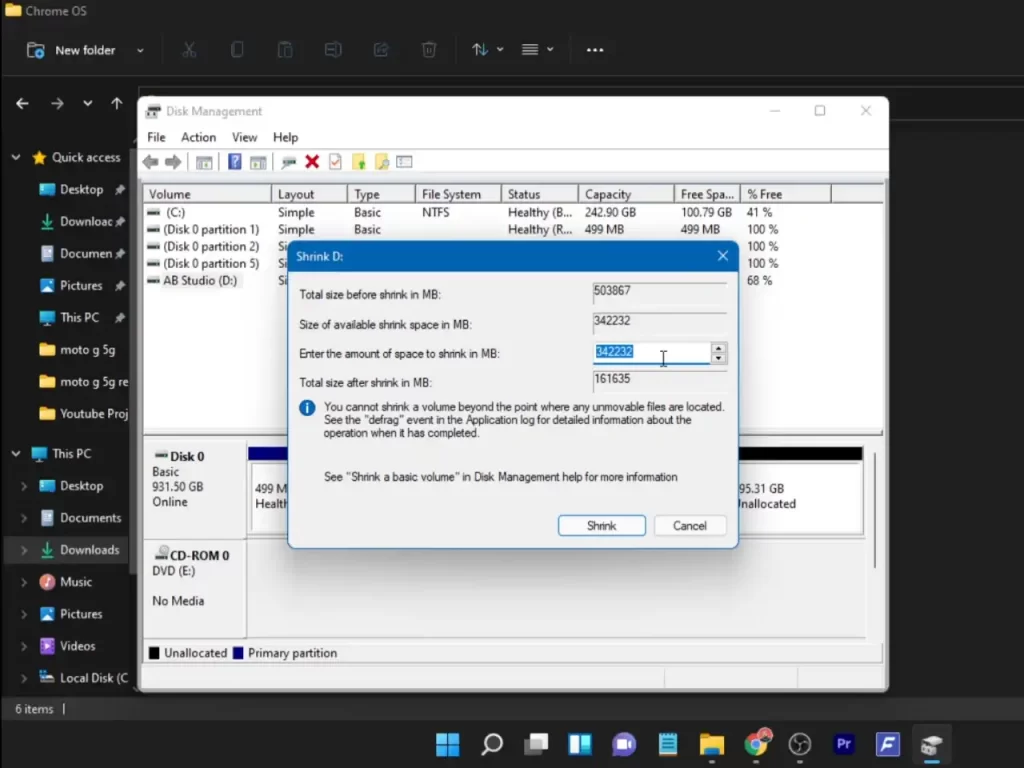
We have to put in the values for the storage space we want to allocate. The values will be in MB so choose wisely. I decided to make a 200 GB partition so I chose 200000 MB. You can choose anything upwards of 100GB. Follow the process and your new partition will be created.
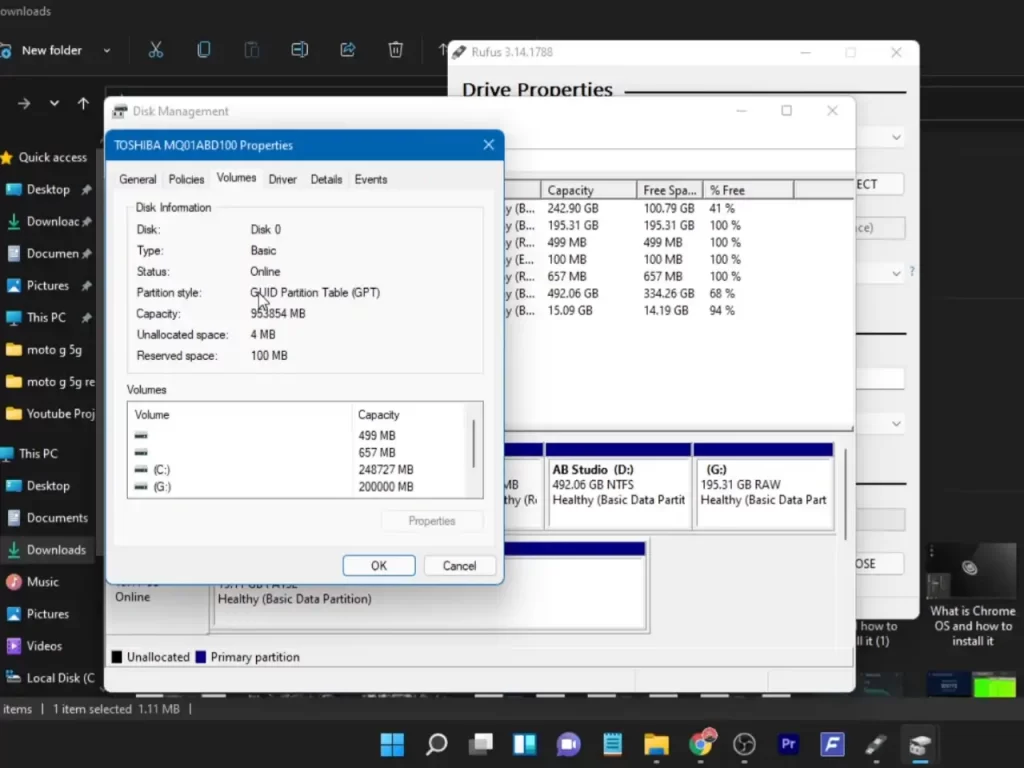
While you are here make sure to check your storage partition scheme as well. Whether it is GPT or MBR scheme. Right-click on the left area where it’s written Disk 0 and select properties. Now under the volume tab, you can see your storage partition scheme. Note it down as we will need it while making our bootable USB drive.
2.6. Create a Bootable USB
We need to make a bootable USB drive with Linux Mint OS. We will then boot into Linux Mint OS to flash the Chrome OS. First, we need a USB drive of 8 GB or more. Then, download a program called Rufus if you have not already.
Open the program and select the Linux Mint ISO image. Choose the partition scheme according to our previous step. Leave everything else as default and press start, It will then format your USB drive into a bootable drive.
Read How To Create Bootable USB For Multiple ISO Files
2.7. Entering System’s BIOS
We need to enter our PC or laptop’s BIOS option to boot into Linux Mint. For HP laptops, the key to enter bios is the ESC key or F10. Restart your computer and as soon the screen lights up press the BIOS key and it will show various options. We need to select the Boot options and then select our USB drive. The system then will boot up from the USB drive which will then boot the Linux Mint OS.
2.8. Using Linux Mint
After booting into Linux Mint we do not need to install the Operating System. We can just use this interface to install the Chrome OS. Connect the system to an internet connection via WiFi or Ethernet.

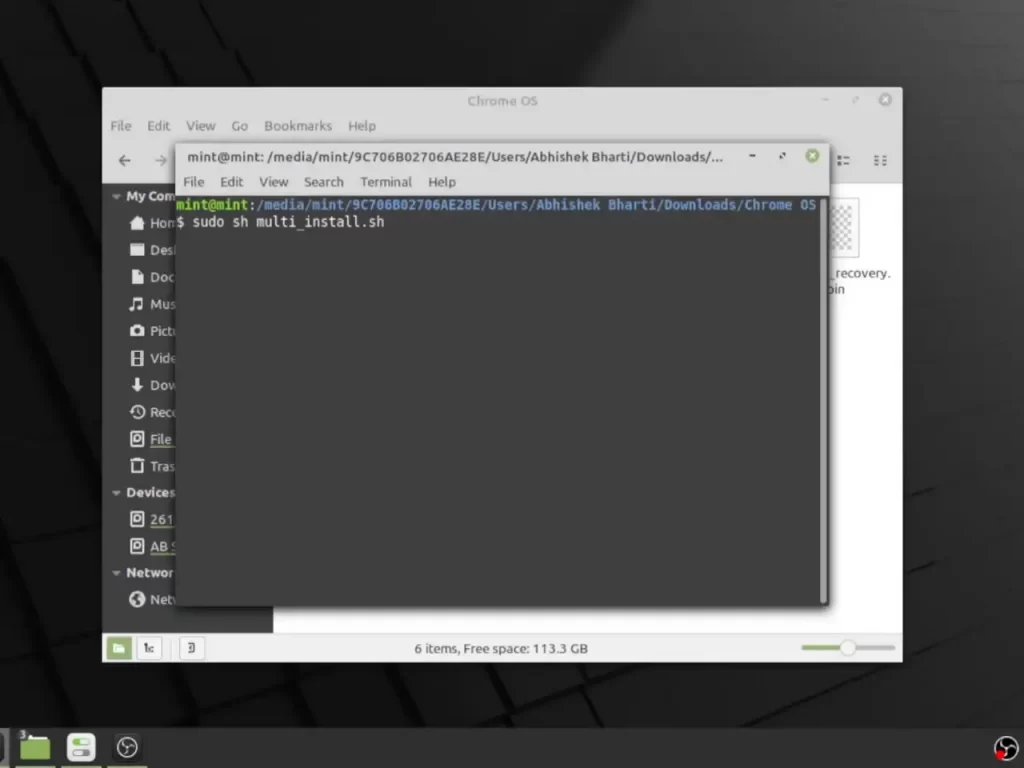
Open the computer icon and then select the drive where the Chrome OS is located. In the Chrome OS folder, we need to press right-click and select open in the terminal menu. Once in the terminal interface, we need to run some commands. First type sudo sh multi_install.sh and press enter. The process should start.
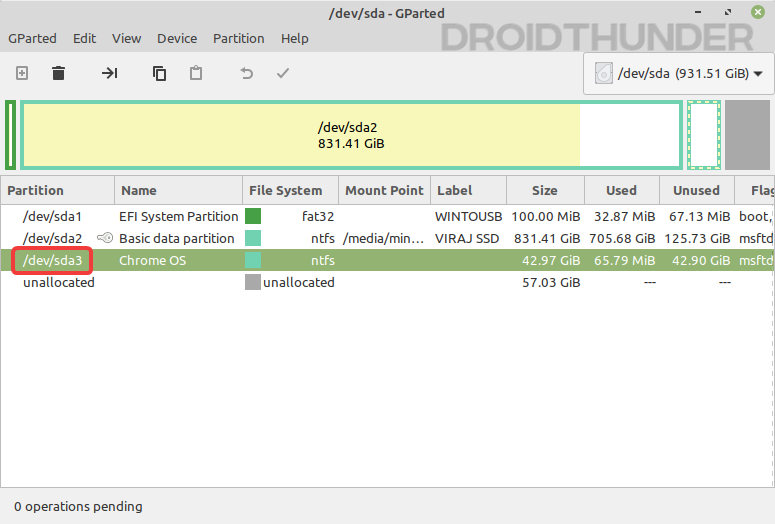
After the process is done there will be a new window opening up. It will list down all the partitions on our computer. We need to select the partition that we made earlier. Then press the Plus icon on top.
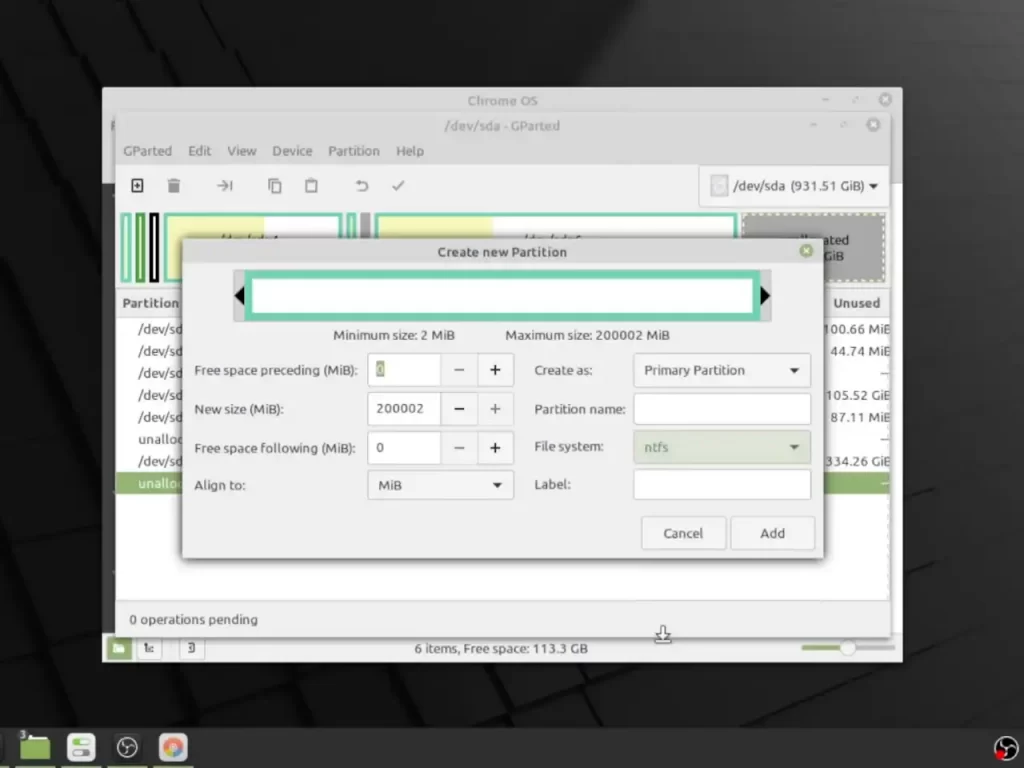
Now we need to format the partition and create a new partition for the OS. In the file system, select ‘NTFS’ and press add. Then press the Tick icon on top and confirm apply all operations.
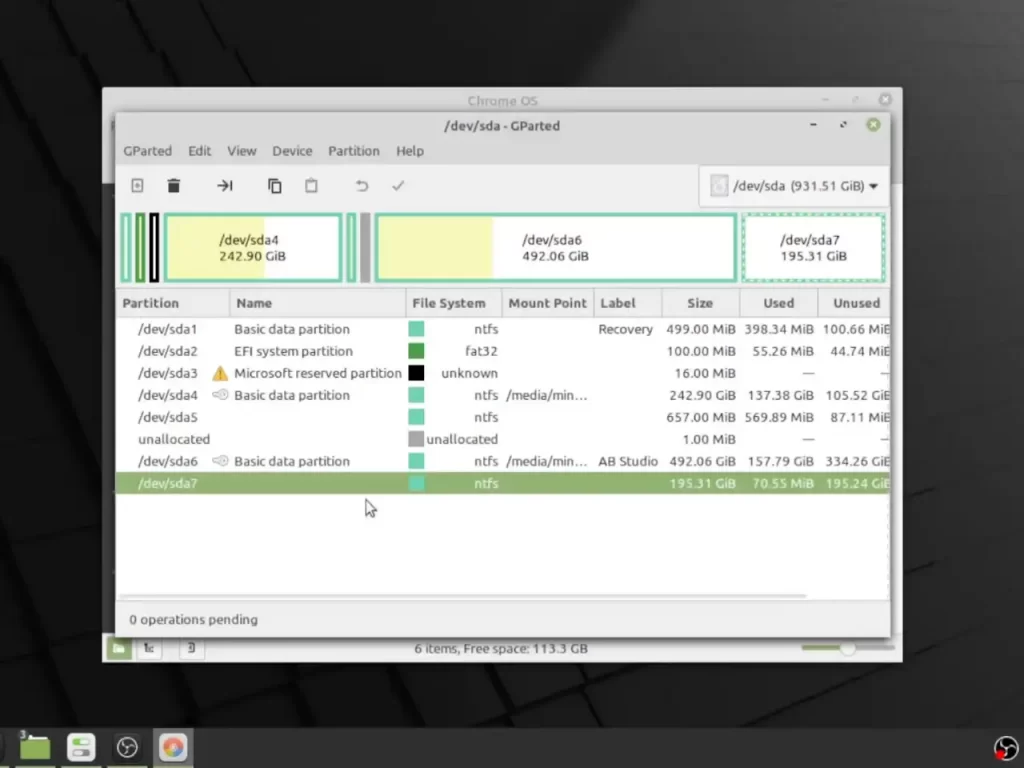
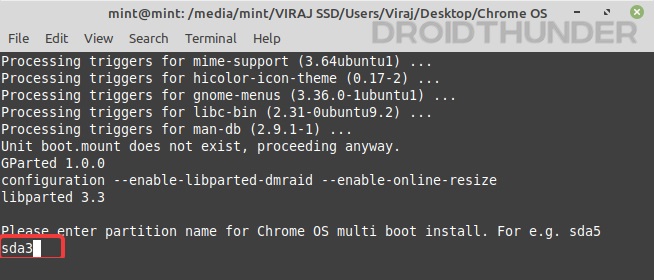
After it’s done creating a partition make sure to remember the name of the partition of the Chrome OS. For example, sda6, sda7, etc. When you will close the window you will be asked to enter the name of the partition in the terminal. For example sda6 or sda7, etc.
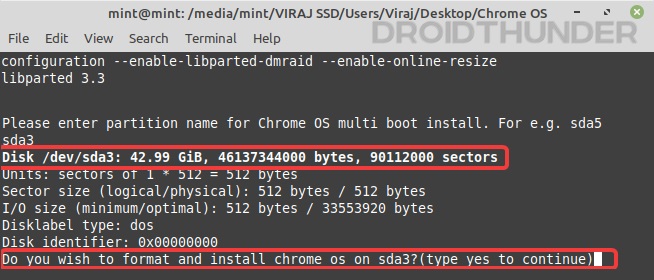
So type the name of the partition and press enter. Then type ‘Yes’ and the final process to install Chrome OS will begin. It will take some time though. After the installation is done there will be a pop-up window with some errors. Just ignore the error and close the window.
Now we need to copy some text from the terminal. Locate the commands between a bunch of asterisks. It will start with a menu entry and end with closing curly brackets. We need to copy the text inside those asterisks.
Then in the Chrome OS folder create a new text file or blank document. Then open the files and paste the commands. Save this file with the name of your choice as we will need it in a bit.

2.10. Editing Grub2WIn
Now just reboot your system and you should be back to Windows OS. We need to install the grub2win program we downloaded earlier. It will take a long time to install it so have patience. Once it’s done you may see an error saying your secure boot is enabled.
To fix it you need to enter your BIOS options and then select BIOS setup options. From here go to boot settings and disable secure boot and save and exit.
Once done you will not see that error in the program again. Now in the program, we need to go to Manage Boot Options at the bottom. Then click Add New Entry and from here we will create our menu entry for Dual Booting Chrome OS.
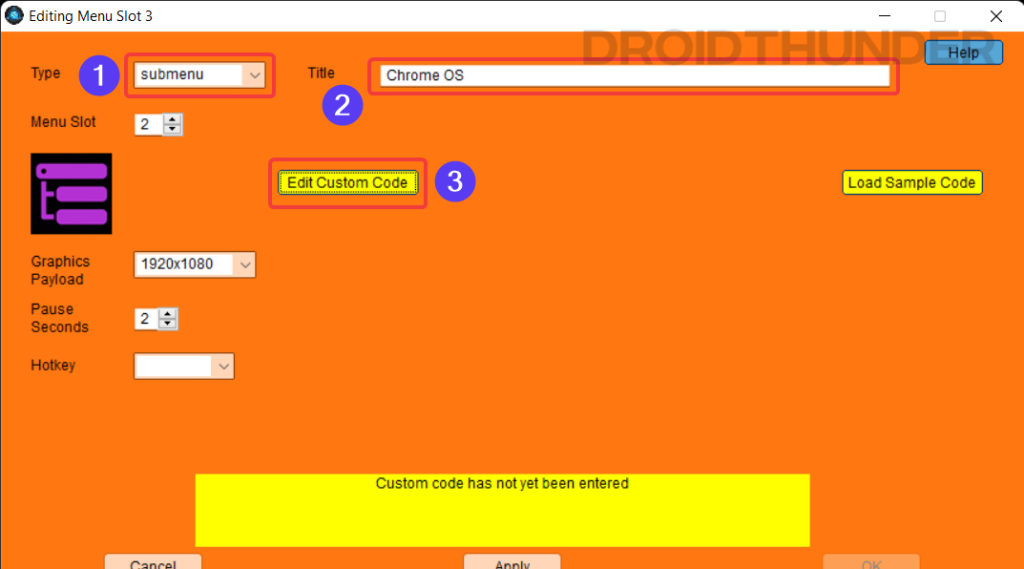
From the Type, drop-down select Submenu and rename Title as Chrome OS. Now click on Enter Custom Code and copy-paste the commands we copied earlier from the text file. Once done click Apply and OK and it’s done.
You can also move up and down the position of the boot menu according to your need. This is how it will appear when starting the system. You can set the Grub2Win as your default boot manager so you can choose between Windows and Chrome OS.
You can also customize other options related to the interface as well. After everything is done click on OK and exit the program and your settings will be saved. So now we have successfully installed Chrome OS in Dual Boot.
2.11. Dual Boot GRUB Menu
Now when you restart your system you will see the Grub2WIn boot manager asking to boot either into Windows or Chrome OS. Select the Chrome OS again same then it will start loading the Brunch Framework.
![]()
This will take some time and once done you will see the Chrome OS logo and the setup screen. it’s advisable to use a secondary Google account with this Chrome OS as Google officially doesn’t support third-party machines. So that was how to dual boot Chrome OS and Windows 10/11 using Linux Mint.
Chrome OS in Dual Boot Review and My Experience
I’ve been a long-time user of the Chrome OS which is installed in dual boot with Windows. Android OS is something I’ve always wanted to try on my laptop. Moreover, I’ve tried many other Android OS like Bliss OS, Prime OS, Android x86, and more. But only after trying Chrome OS, I could finally be at ease. Mainly because it was coming directly from Google.

Chrome OS is entirely based on the Chrome Browser platform. This means most of its functions are web-related, whether it’s the pre-installed apps or the web apps. There are not a lot of things you can do without the Internet. Google Play Store does make a huge difference in this regard. Because unlike Chrome OS Flex where you’re completely dependent on the Chrome browser. Here you can download and install offline games and play them in the pass time.
Mobile-specific Android Apps
Additionally, the main advantage is being able to use Android-specific apps like Instagram or portrait-mode games like Subway Surfers. You can actually browse the web while you watch Instagram, YouTube Shorts, or similar apps. Furthermore, you have the entire Google Play Store to browse and install apps.

Another feature besides Android is the Phone Hub, where you can monitor your smartphone’s battery, notifications, and more. Additionally, you can reply, silence, and find your device too. We can share recent files and media directly from the Phone Hub. Otherwise, to share extensively we have the Nearby Share option, which works great. If you’re into the Android ecosystem then Chrome OS feels just right at home as your Google Account syncs everywhere.
Additionally, to fully experience the Android games, you’ll need a wireless controller. Another advantage is the presence of Google Assistant, which makes controlling smart devices more convenient. Furthermore, we also have Linux support which opens a whole new world of possibilities. It’s made for advanced users but you can definitely try to play around.
Verdict
Overall the main reason to use Chrome OS is the Android support and access to the Google Play Store. Another thing is that even though the OS is based on the Chrome browser, it’s still not like the full desktop version of the Chrome browser we see on Windows or Linux. You can manually install the Linux version of the Chrome Browser to fix this. For a normal user, it will make more sense to dual boot Chrome OS and Windows as Linux OS can get really complicated sometimes.
Check Out The Video Guide:
3. Chrome OS and Windows 11
You can check out the new lightweight Chrome OS Flex: The Chrome OS For Everyone!
4. FAQ – Frequently Asked Questions
Can Chrome OS be installed on any computer?
There are certain requirements to install Chrome OS. We need a 64-bit System, UEFI or MBR Boot, and the Secure Boot should be disabled. Nvidia graphics and Virtual Machines are not supported.
Can you install Chrome OS on a Windows PC?
Yes, we can install Chrome OS on a Windows PC. We have the option to install it in the Primary partition or Dual boot Chrome OS and Windows OS.
Can I install Chrome OS on an old laptop?
Yes, in fact, it is recommended that you install Chrome OS on an old laptop or PC. It makes the performance of the laptop much better, transforming it into a Chromebook.
Is Chrome OS better than Linux?
Both Linux and Chrome OS are very popular and have their own advantages and disadvantages. Chrome OS has the ability to install Linux subsystems and run Linux applications.
Grub2Win says Chrome OS is not supported.
With recent updates, Grub2Win is flagging an error, but you can still continue with the process and successfully install and dual-boot Chrome OS and Windows.
Facing wi-fi, touchpad, and microphone issues on Chrome OS?
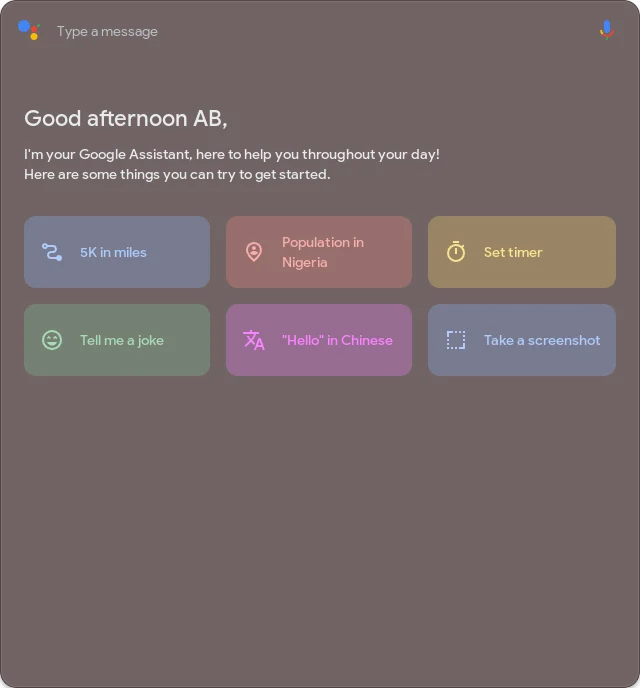
You can select brunch settings from the dual boot menu and then select the fix using the spacebar key. Then press enter to confirm and continue. Check the various fixes available here.
Why is Chrome OS not booting up after installation?
Depending upon the system you may need to change your kernel from the brunch configuration. Choose brunch settings from the dual boot menu and then select the kernel using the arrow key and enter to confirm. You check here for more information.
Home » Windows » How to Install Chrome OS (with Play Store) and Dual Boot with Windows

Windows 11 is a pretty new OS that Microsoft released recently, and most of us have already upgraded to it or looking forward to upgrading. But there are other OS, which are getting upgrades too. Come to think of it, Chrome OS feels like an operating system you should run alongside Windows. Why? Because you can dual boot Chrome OS and Windows together by installing them on the same hard drive.
Chrome OS is known for its performance, while Windows 11 is a versatile operating system. To add the cherry on the top, Chrome OS also supports Google Play Store and Linux apps. Having both OS together on a single machine is advantageous as well as a fun thing in itself. Sounds interesting, right? If it’s a yes, then this tutorial is for you. Today, we’ll learn how to install and run Chrome OS alongside Windows 10 or Windows 11 PC. Let’s get started!
Install and Dual Boot Chrome OS and Windows 11
Before we begin, I would like to mention that this tutorial involves complex operations and a lengthy procedure. Go ahead only if you are good with operating multiple systems. Apart from that, this guide won’t touch any of your Windows files, but I highly recommend that you back up all your crucial files because you never know when things go wrong.
Pre-requisites
- A USB flash drive with a minimum of 16GB of storage space is a must.
- UEFI Firmware support is another requirement for Brunch to work. It also works with legacy BIOS, but there are a few limitations. You can read them on the Brunch development page.
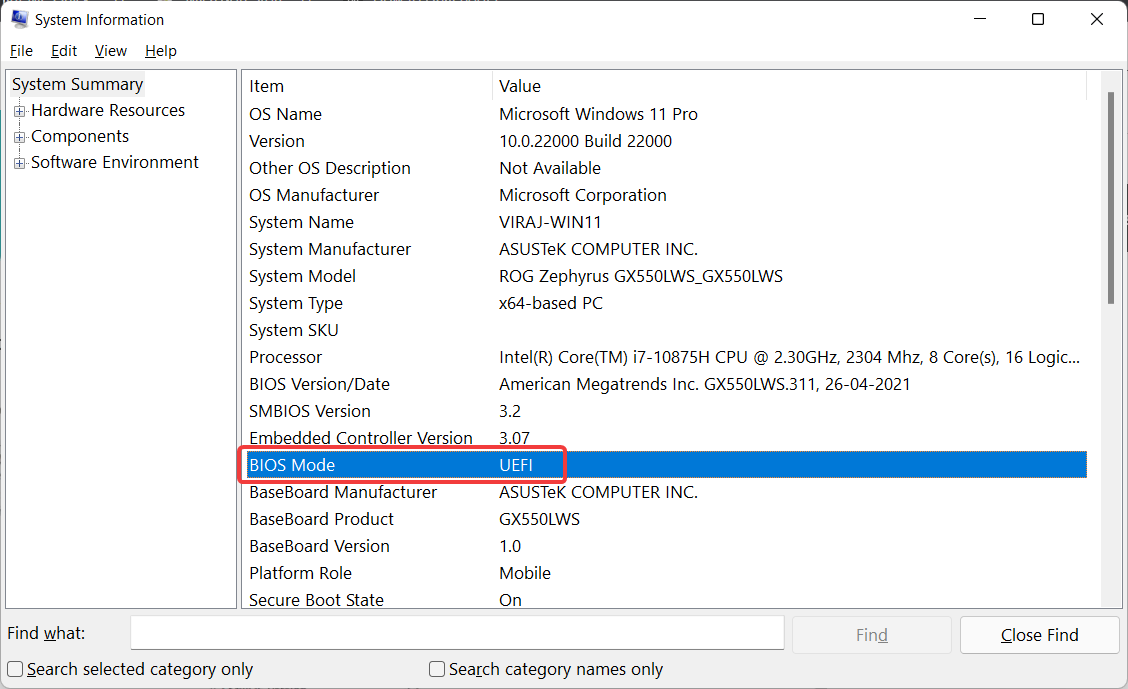
- To check whether your PC supports UEFI or MBR/BIOS, search System Information in the start menu and open it.
- Look for the BIOS mode. You’ll find your PC firmware type mentioned against it.

- Intel hardware (CPU and GPU) starting from 1st generation Nehalem architecture. Note that Intel first-generation graphics do not work with ChromeOS versions above r81.
- AMD Ryzen CPU and GPU. Currently supports AMD Ryzen and AMD Stoney Ridge processors only.
Downloads
We need the following components for flashing Chrome OS on your Windows PC hard drive.
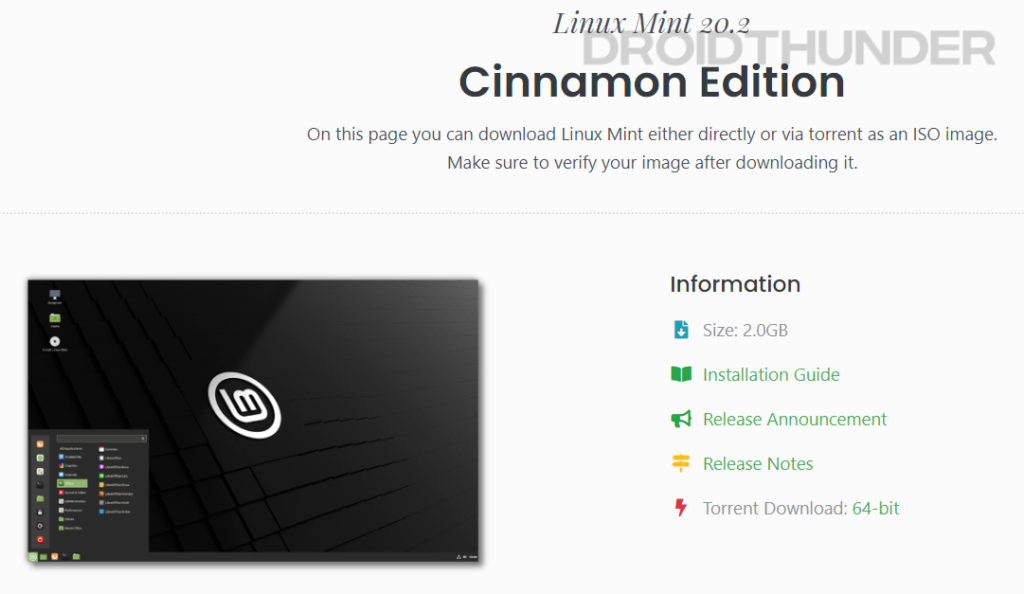
1. Linux Mint
We’ll use the Linux Mint Cinnamon image for dual-booting Chrome OS and Windows 10 or Windows 11 PC. You can use other Linux distros like Ubuntu or Debian too. However, I won’t recommend using them since many users reported that they are facing various errors while installing and booting Chrome OS.
Download Linux MintCinnamon Edition
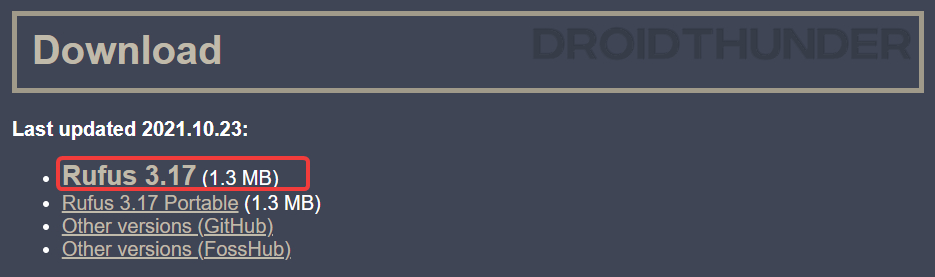
2. Rufus
Rufus is a windows utility that helps create bootable USB flash drives. Here, the purpose of using Rufus is to flash the Linux Mint image on the USB storage.
Download Rufusfor Windows
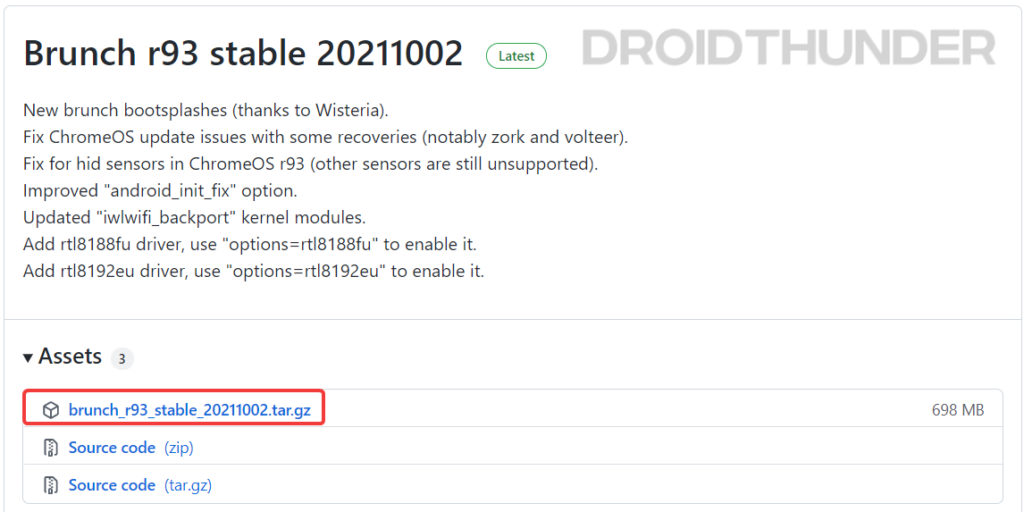
3. Brunch Framework
The purpose of the brunch framework is to build a generic Chrome OS image from an official recovery image. It uses a 1GB ROOTC partition (containing an initramfs, a custom kernel, the swtpm binaries, userspace patches, and config files) and a specific EFI partition to boot from it.
Warning: As Brunch is not the intended way for Chrome OS to work, thus, at some point, some Chrome OS scripts could behave terribly with Brunch and delete data unexpectedly, including Windows / non-Chrome OS partitions. I would highly recommend that you use Chrome OS on a device having less sensitive data.
Download Brunch Framework
4. Chrome OS Recovery Image
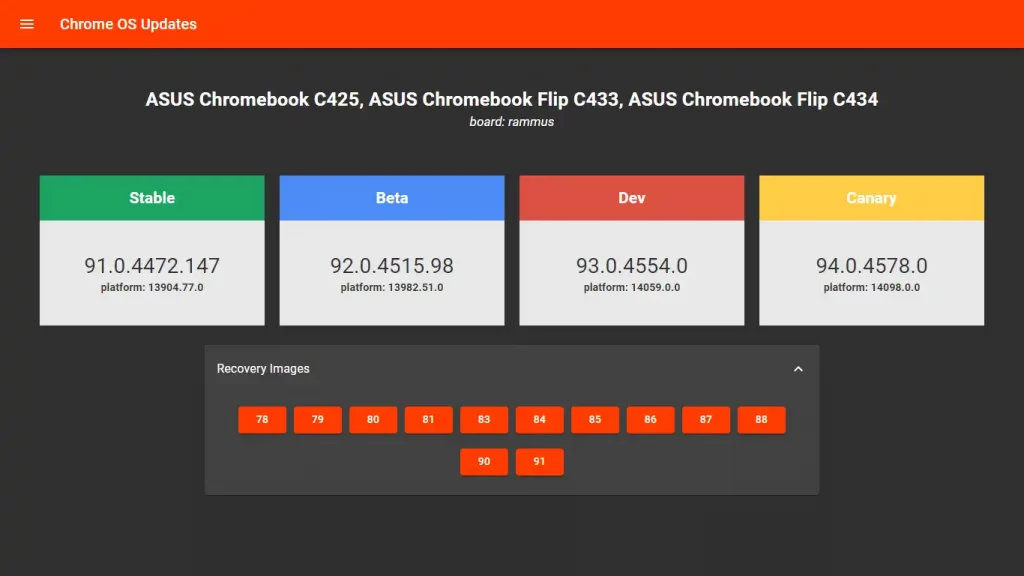
Now, it’s time to get the official Chrome OS recovery image. Click on the download button below. When the webpage opens, look for the word rammus. In the recovery column, hit on the latest recovery image to start the download. While writing this guide, the current version is 94, but it may change subsequently.
The reason we chose rammus is that it works on most modern generations of Intel processors. However, I suggest you go through the below list and download the specific image based on your processor.
Download Chrome OS Recovery ImageMirror #1
Intel Processors
- rammus = Intel 1st to 9th generation processors.
- volteer= Intel 10th & 11th generation CPUs.
AMD Processors
- grunt = AMD Stoney Ridge & Bristol Ridge.
- zork = AMD Ryzen.

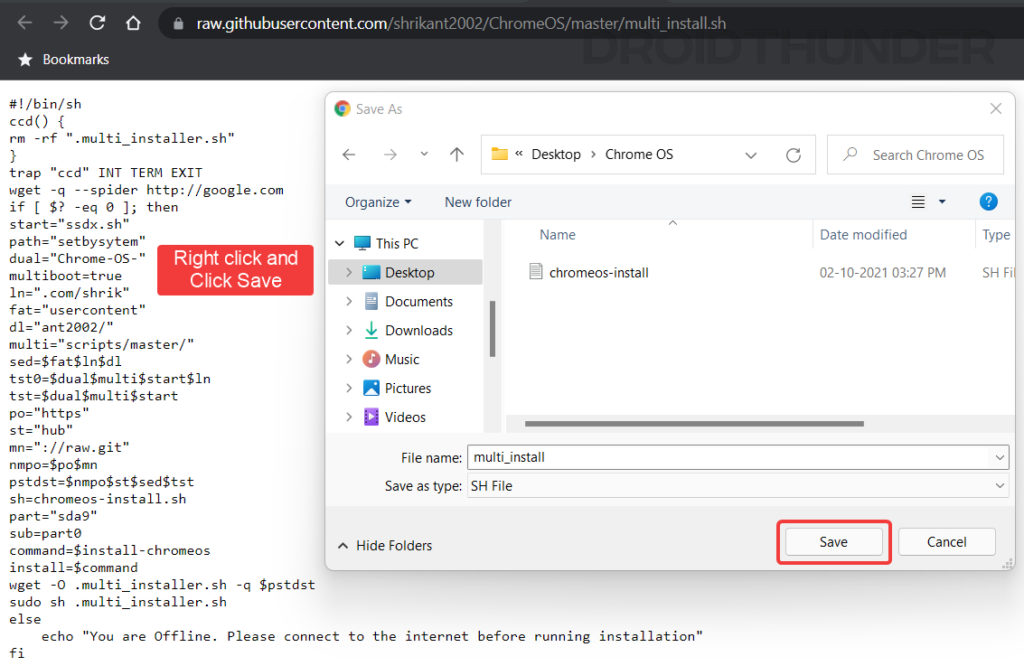
5. Shell Script
Finally, download the multi_install.sh shell script, which helps install Chrome OS on a Windows partition. Click on the download button below and press Ctrl + S to save the file.
Download multi_install.shMirror (Github)
Now that we have acquired all the necessary files – let’s get going to the steps!
Organize Files in One Place
- First off, gather all the downloaded files in one place. Let’s consider you have placed all the files in the Desktop folder.
- Now, Create a folder named Chrome OS on the Windows Desktop. You can also create it in any other place having sufficient storage.
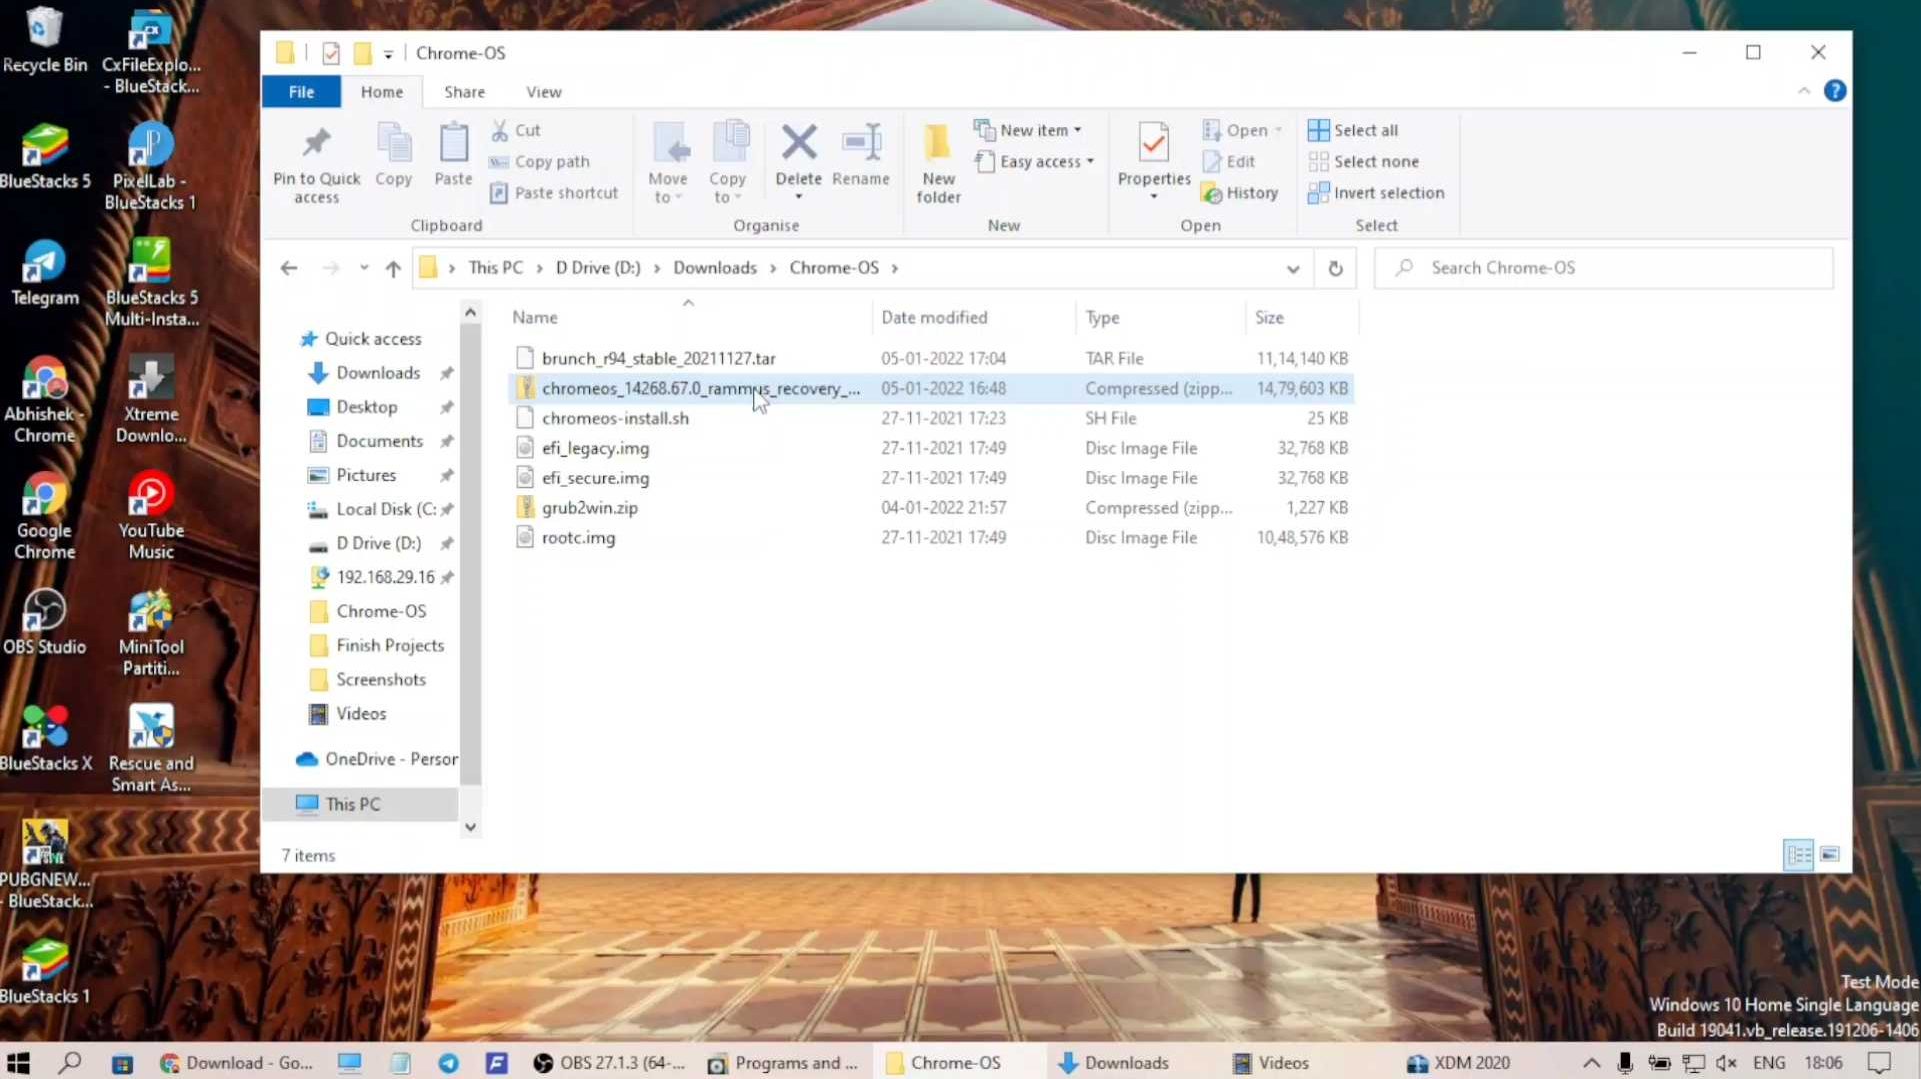
- Using WinRAR, extract the Brunch package by selecting the ‘Extract Here’ option. As a result, you’ll get four files out of the archive. Now, move these four files to the Chrome OS folder.
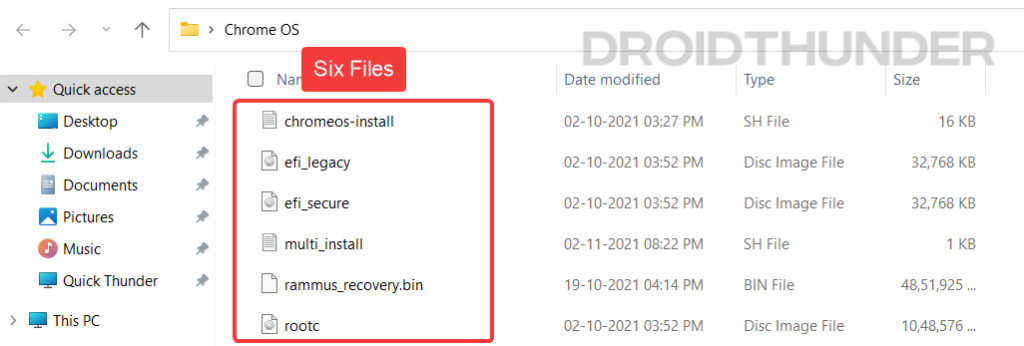
- chromeos-install.sh
- efi_legacy.img
- efi_secure.img
- rootc.img
- Next, extract the Chrome OS recovery image file.
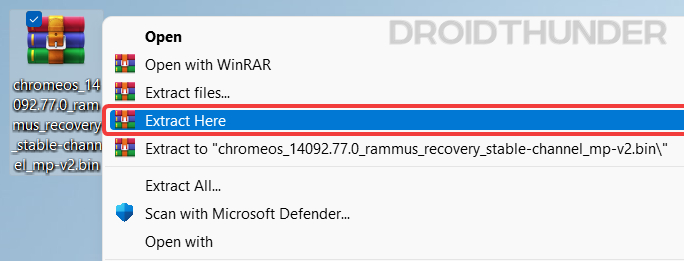
- Upon extraction, you’ll get a file having a .bin extension. Rename the .bin file to rammus_recovery. Now, move the rammus_recovery.bin file to the Chrome OS folder. Note that even if you have downloaded any other Chrome OS image like volteer, grunt or zork, make sure you rename it to their respective name + _recovery.bin. For example, volteer recovery filename would become volteer_recovery.bin, and grunt recovery would become grunt_recovery.bin, and so on.
- Move the shell script file multi_install.sh into the Chrome OS folder.
- By this time, you should have six files in the Chrome OS folder. Do note the path of the Chrome OS folder as we’ll need it for performing further steps.
Flash Linux Mint Cinnamon
Using the Rufus utility, we’ll flash the Linux Mint ISO image on the USB storage. Linux distro installation is necessary because ChromeOS is a Linux-based operating system, and the shell scripts that we downloaded require a Linux environment to work. The steps for installing Linux Mint on the USB storage are as follows.
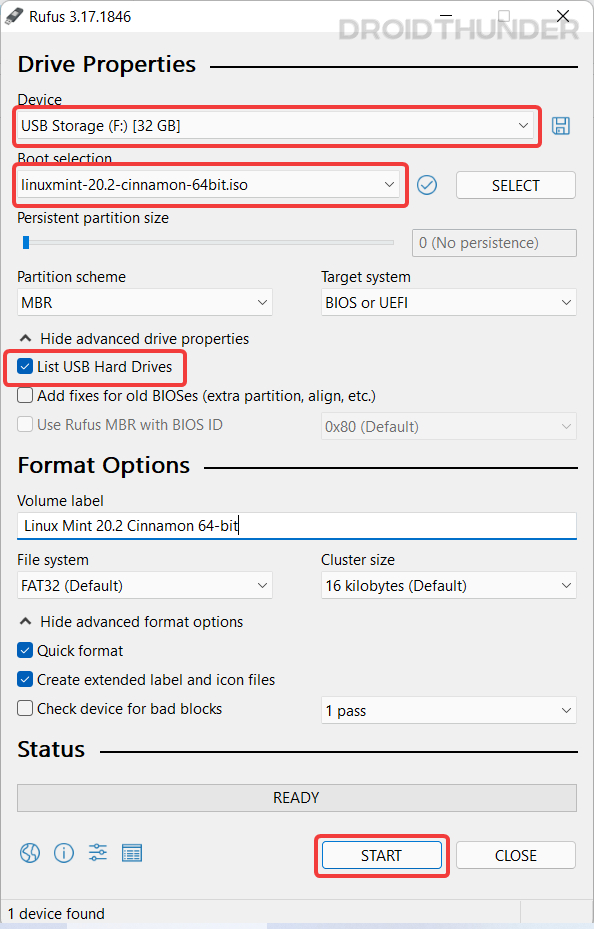
- Plug in the USB storage device such as Pendrive or microSD card and open Rufus utility.
- In Rufus, under Device, you shall see the plugged-in USB storage. Here I am using a 32GB Pendrive.
- Under Boot selection, select the Linux Mint ISO that we downloaded earlier.
- If you are using a Hard drive, tick the List USB Hard Drives option to see your connected hard disk.
- Keep all other settings unchanged and now press the Start button.
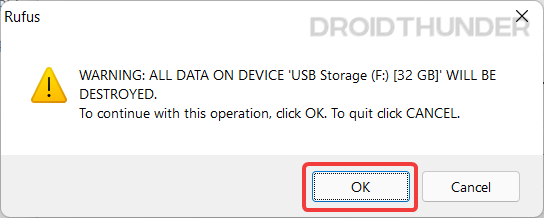
Do note that flashing the USB storage will wipe out all the data present on it. Therefore, we strongly recommend that you back up all the necessary data before pressing the Start button.
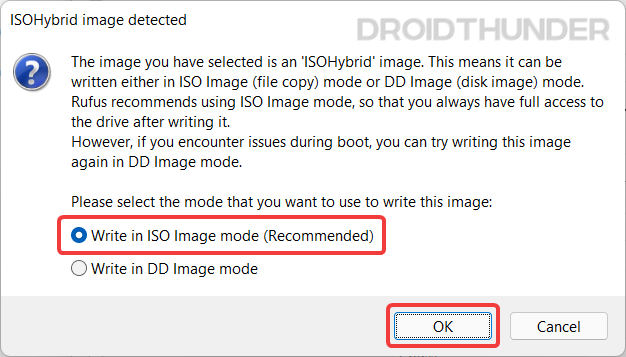
- When you press the Start button, a popup will appear. Select Write in ISO image mode option and press OK. If you choose DD Image boot, the USB drive won’t be accessible for you to operate in Windows. If you have a legacy BIOS and an old CPU, then DD Image mode is useful.
- Here, Rufus will warn you that it will erase all the data stored on the USB device that we are using to flash Linux Mint. If you have taken the backup, press OK.
Create Unallocated Space for Chrome OS
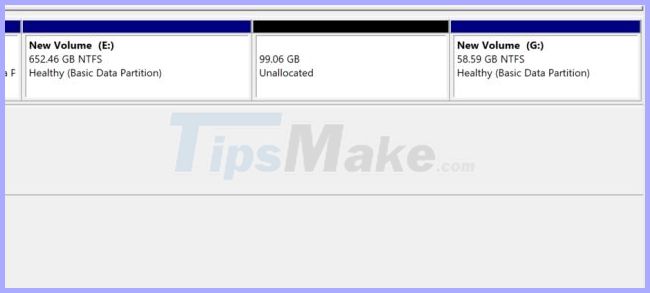
Now, we need to create an Unallocated partition using the Windows Disk Management tool. You need to have at least 14 GB or more free space on the hard drive for creating an unallocated partition. I have given 100 GB of space, but you can choose your partition size.
On a side note, let me tell you something. Chrome OS requires partition size in multiples of 22 GB, for example, 22000 MB (22 GB), 44000 MB (44 GB), and so on. But here, you can assign any size you want. Later, before flashing Chrome OS using Linux Mint, we will provide an appropriate partition size.
Let’s shrink the existing drive and create unallocated space. Here are the steps.
- Open Windows Explorer and right-click on This PC icon. Select Manage to open Computer Managemen tools.
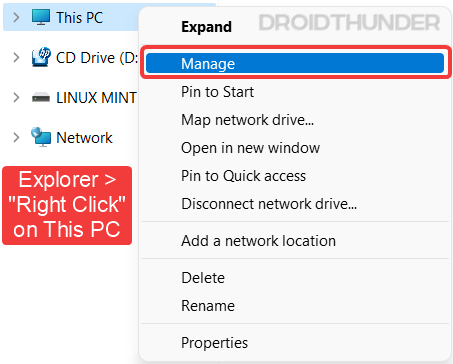
- Select the Disk Management option from the left. Now, click on the partition from which you want to create unallocated space. I am using an external SSD for space creation. Right-click on the selected drive and click Shrink Volume.
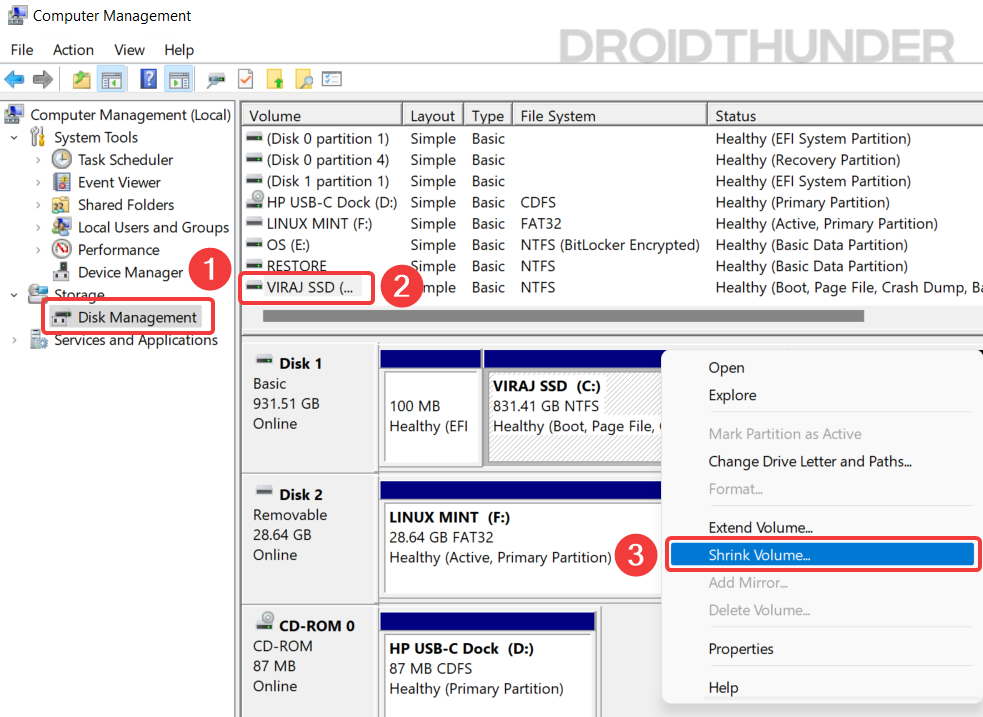
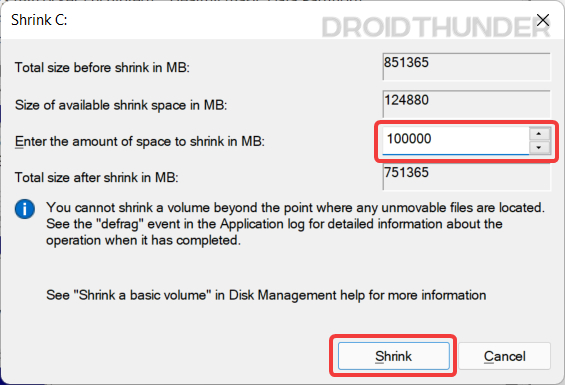
- As discussed at the beginning of this section, I will create a 100 GB (100000 MB) partition. Press the Shrink button to proceed.
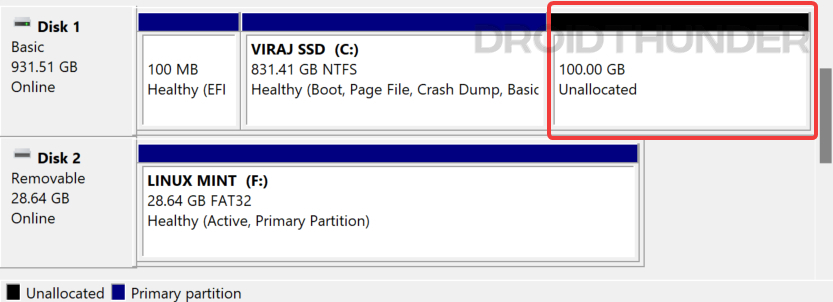
- Now, in the disk management, you will see that the unallocated space is separated from the selected drive and marked in black.
All good so far? Now we have completed all the required operations on Windows OS. Let’s boot the Linux Mint Cinnamon image from the USB flash drive.
Boot Linux Mint from USB Storage
For Linux Mint bootup and Chrome OS installation, we will have to perform a few operations in PC BIOS.
- Shut down the Windows PC if running. Boot into the BIOS menu. For doing that, start your PC and continuously press the F2 or DEL key on the keyboard. Your PC might have a different key set for booting into the BIOS. Refer to the below table and find out the right key.
| Brands | BIOS Key |
|---|---|
| Acer | F2 or DEL |
| ASUS | F2 for all PCs, F2 or DEL for motherboards |
| Dell | F2 or F12 |
| HP | ESC or F10 |
| Lenovo (Laptops) | F2 or Fn + F2 |
| Lenovo (Desktops) | F1 |
| Lenovo (Thinkpads) | Enter + F1 |
| MSI | DEL for motherboards and PCs |
| Origin PC | F2 |
| Samsung | F2 |
| Sony | F1, F2, or F3 |
| Toshiba | F2 |
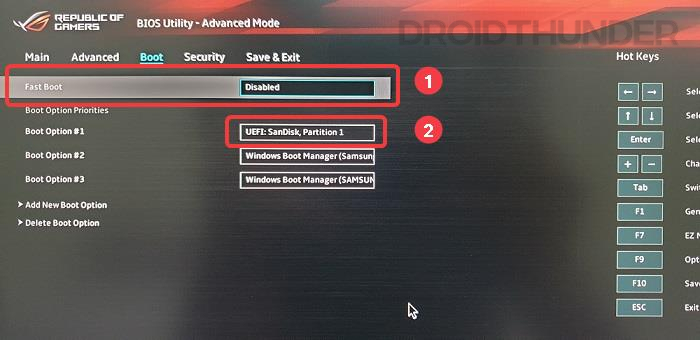
- In the BIOS, navigate to the Boot tab and disable Fast Boot. Also, check if you have CSM (Compatibility Support Module) option. If present, set it to Disabled because we are using a UFEI mode. If you want to use Legacy mode, you can keep the CSM option enabled.
- Now that we want to boot Linux Mint instead of Windows, we need to change the boot order. Move USB Storage at the top so that BIOS will boot our USB flash drive.
Not to be Missed: How to Install Windows 11 on External SSD or USB Storage
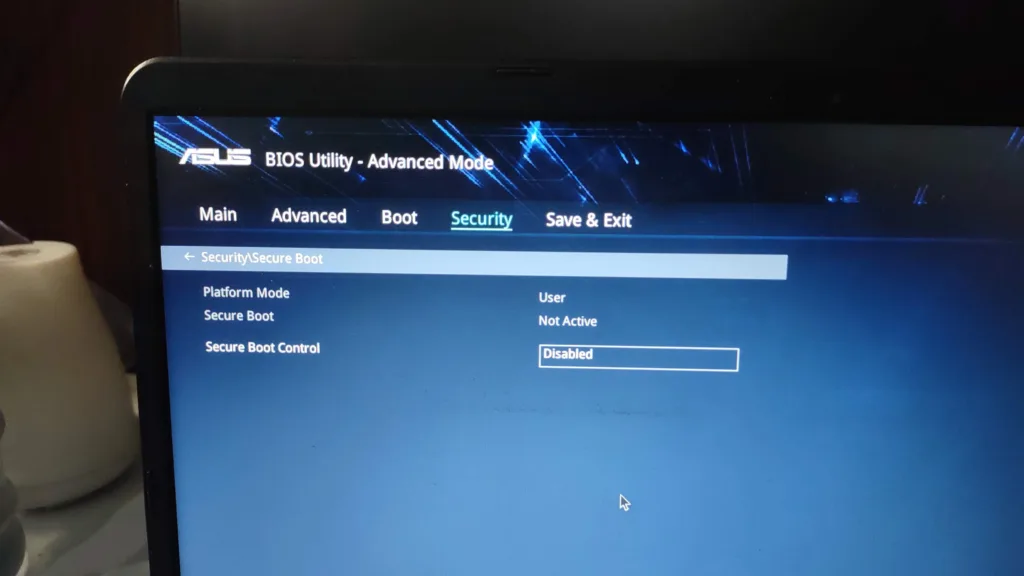
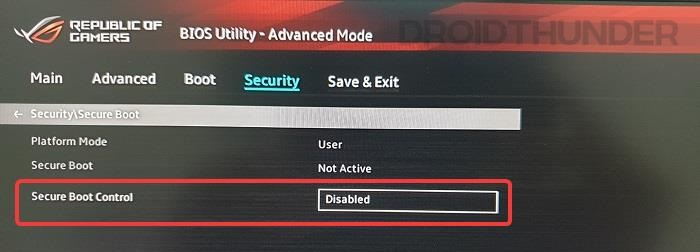
- Navigate to the Security tab and look for Secure Boot Control or a similar option. If enabled, change it to Disabled. Without disabling the secure boot function, you can’t boot the Chrome OS even after a successful installation.
- Finally, press the F10 key to save the changes and exit the BIOS. Your PC shall restart, and you will see the following Linux Mint Menu. Press Enter to proceed.

At this point, you should have entered into the Linux Mint Cinnamon OS.
Install Chrome OS
- Once you see the Linux Mint interface, connect your PC to the Internet using ethernet cable or Wi-Fi. The Chrome OS installer requires an active internet connection to fetch necessary libraries and dependencies.
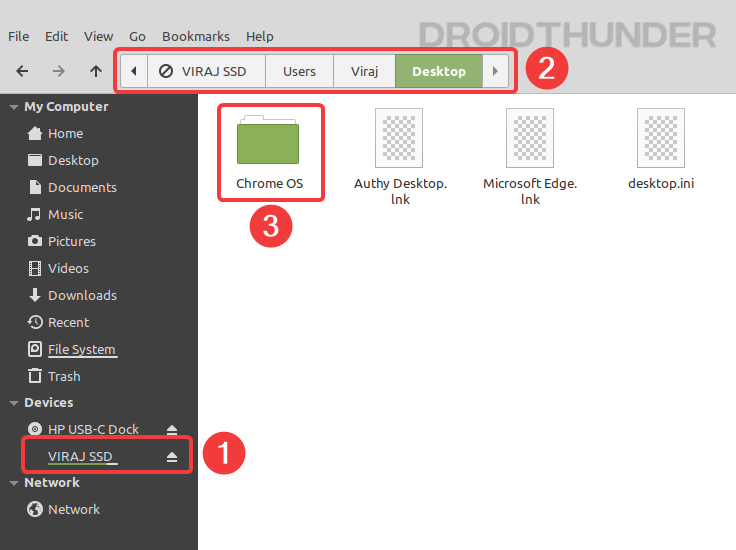
- Now, double-click the Computer icon on the desktop and navigate to the drive where you have kept the Chrome OS folder.
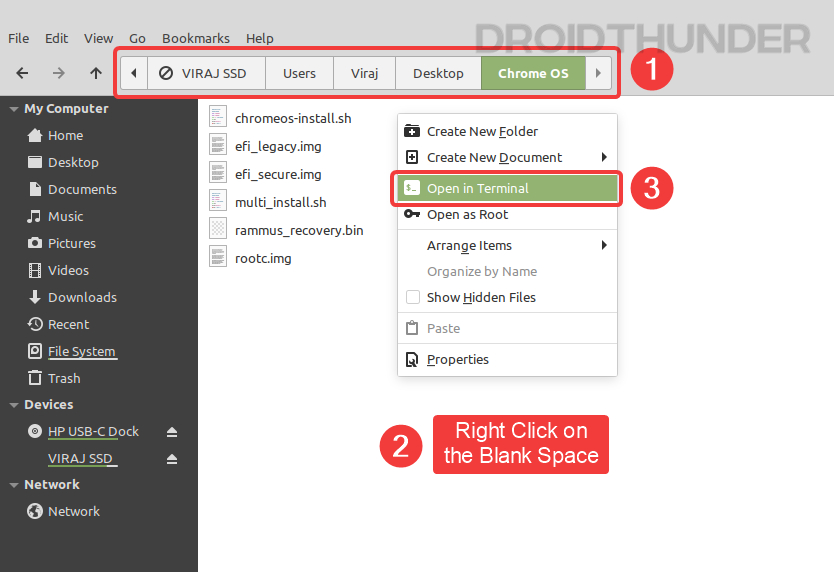
- Right-click on the blank white space and select the Open in Terminal option. A terminal window pointing to the Chrome OS folder shall open.
Shell Commands
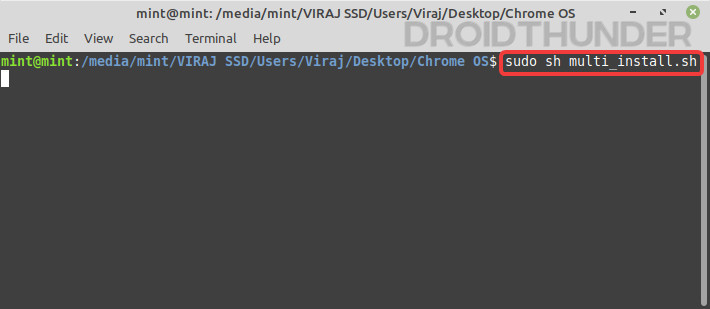
- Enter the following command in the Terminal window.
sudo sh multi_install.sh
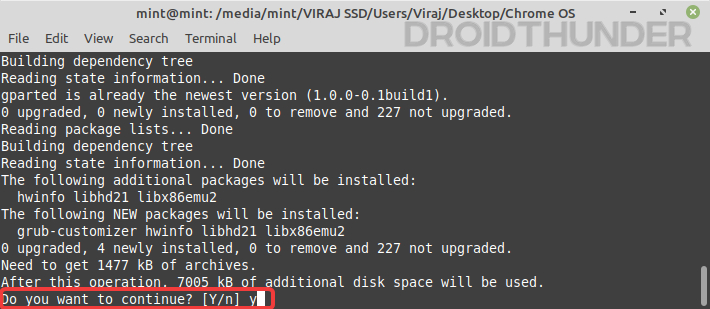
- The installer will ask you whether to download the required files and continue the installation. Press y and hit Enter key.
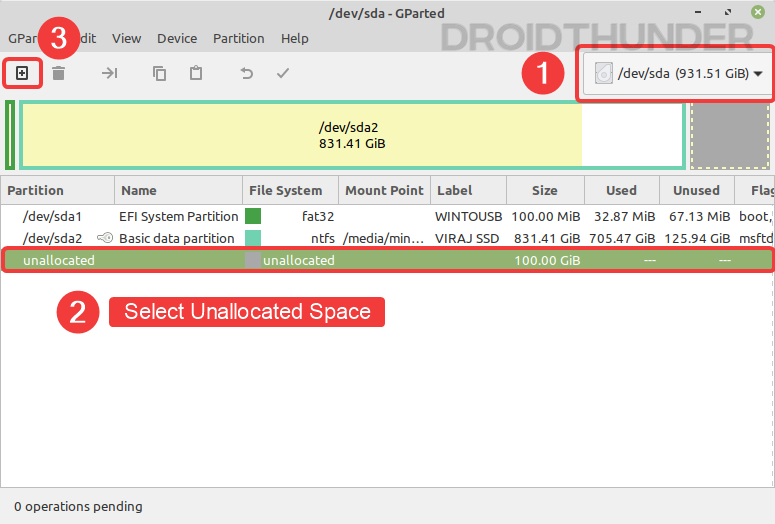
- Following the installation, a window will appear, and it’s nothing but a Linux disk partition tool GParted.
- If you have multiple drives connected to your PC, then make sure that the correct hard disk is visible at the top right side.
- Select the entry named unallocated.
- Click on the plus icon located at the top left to create a partition.
Making NTFS Partition for Chrome OS
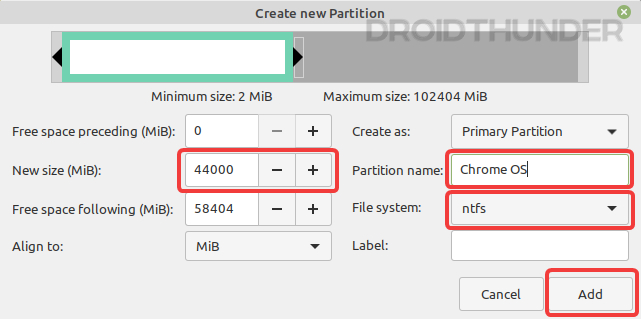
- Enter 44000 (or any multiple of 22000) in the New size field. Enter Chrome OS in the partition name field and choose File system as ntfs. Press Add button.
- Click the check icon located at the top to start the partitioning process. It will take hardly a few seconds to complete.
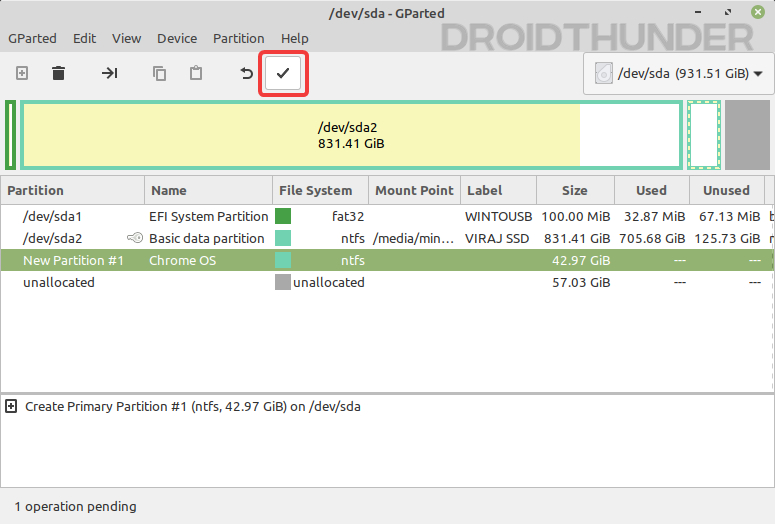
- Note the partition name, as we’ll need it in the next step. My partition here is sda3. Now, close the partition creation window so that the script in the terminal proceeds further.
- The installer script will ask for the partition name. Enter the one that you noted in the previous step.
Partition writing process and Errors
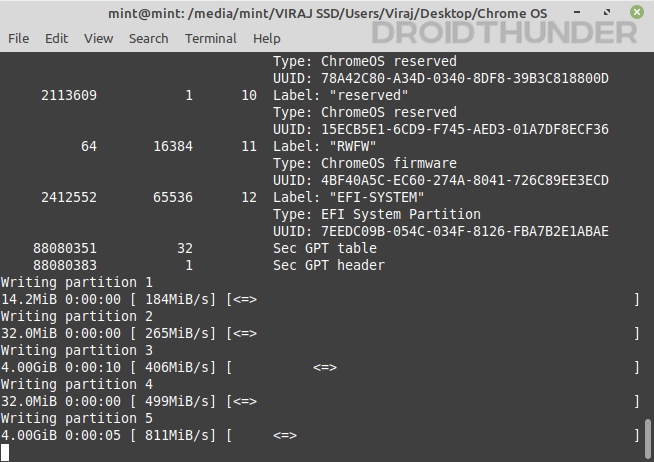
- Check the size and name of the entered partition. It is a confirmation. If everything looks ok, then type yes and hit the enter key. The script will start creating various volumes, and you should see the progress bar arrows as it writes.
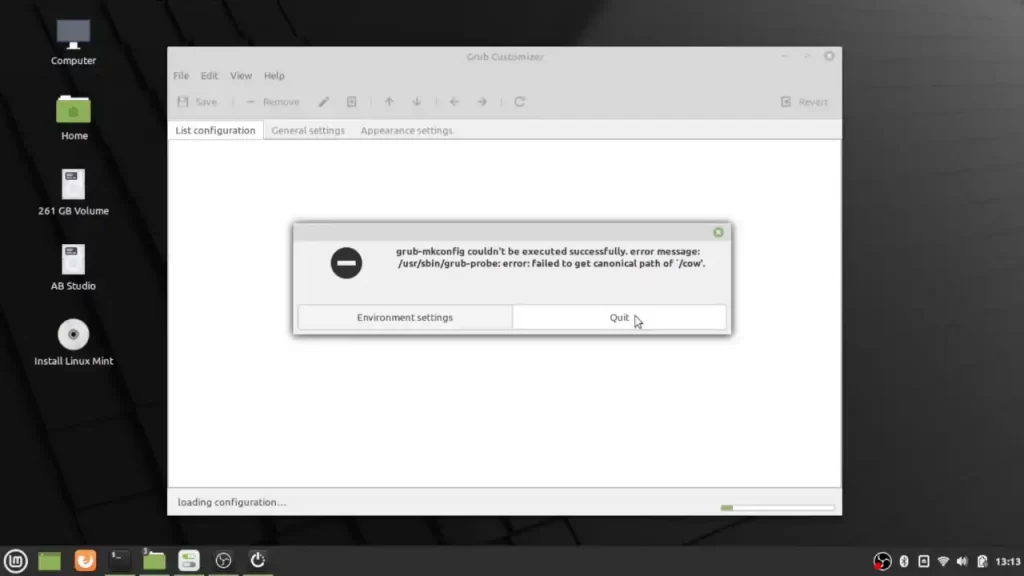
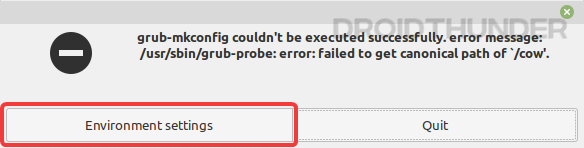
Now, don’t panic if you get this error – grub-install: error: failed to get canonical path of ‘/cow’. Head over to the troubleshooting section located at the of this guide and get it fixed.
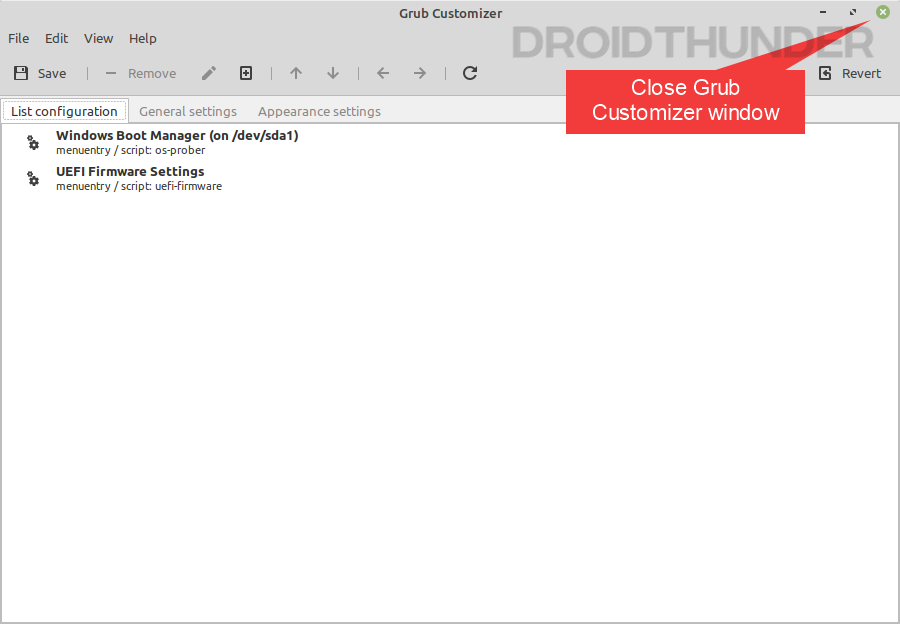
- One partition creation finishes, a grub customizer window will pop up. You don’t need to perform any actions here so, close the window.
- Now, the final thing in the Linux Mint is to copy the brunch code as shown in the image below. To do that, select the code using the cursor and press Ctrl + Shift + C key combination to copy it.
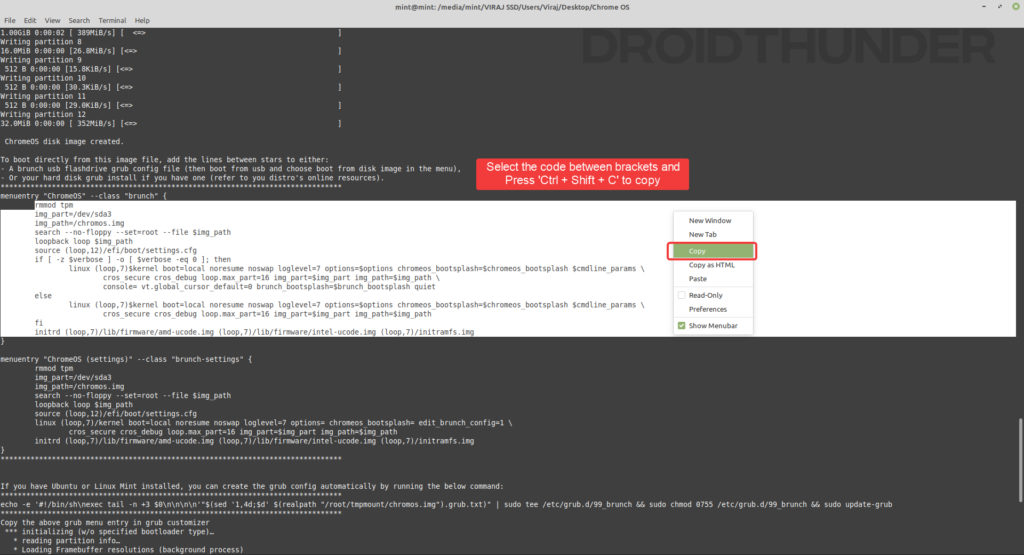
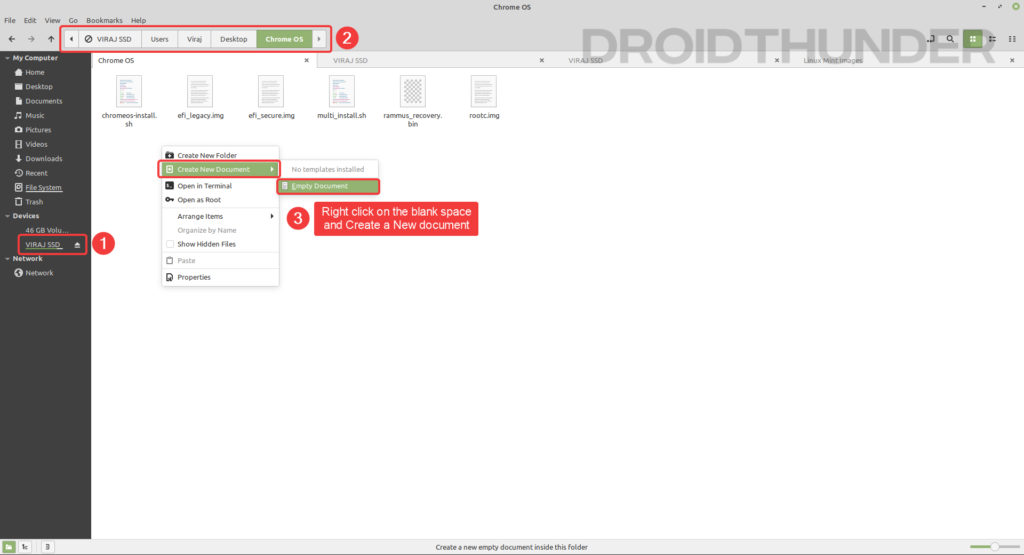
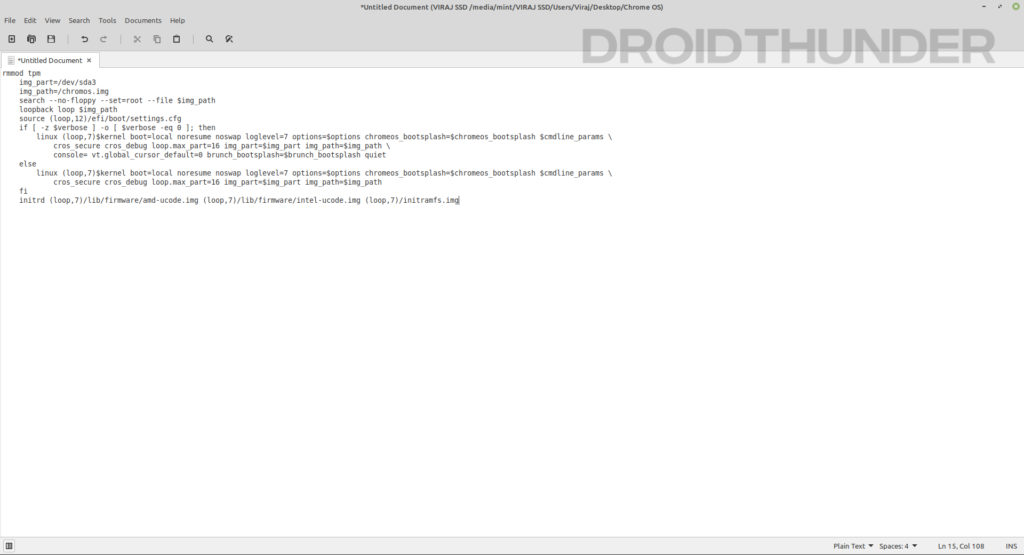
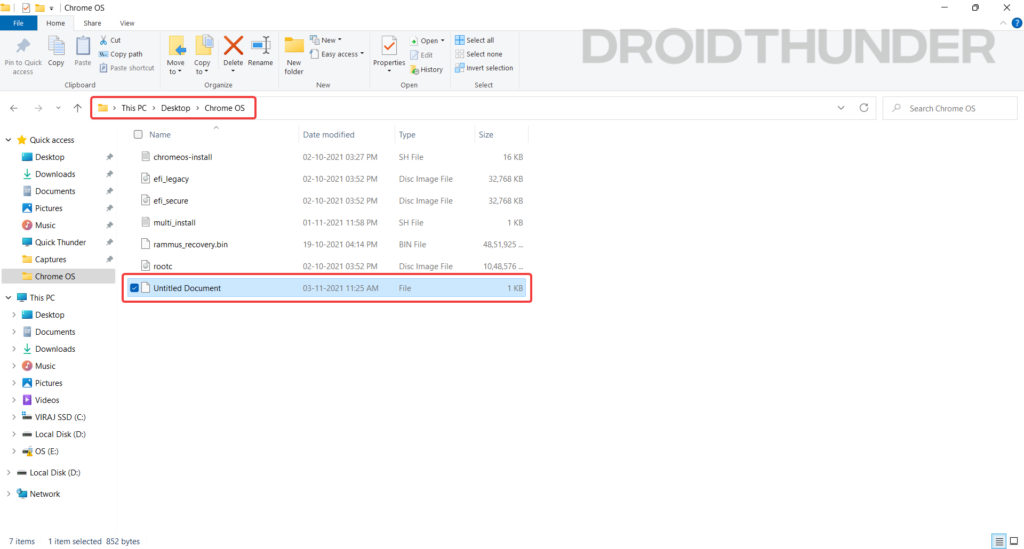
- Navigate to the Chrome OS folder. Create a notepad file by right-clicking and selecting Empty Document. Paste the code that you copied in the previous step.
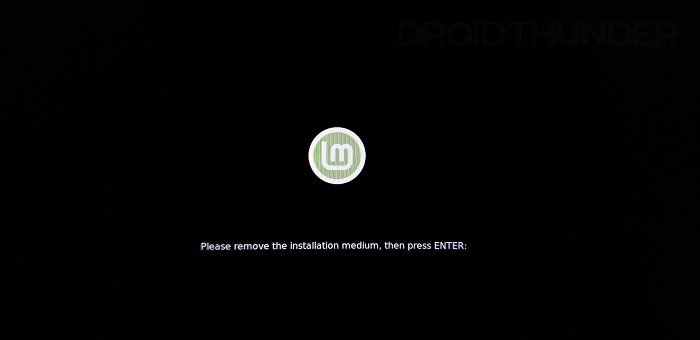
- Finally, shut down Linux Mint, remove the USB, and hit Enter key.
Dual Boot Windows with Chrome OS
You have successfully installed Chrome OS alongside Windows, but to run it, we need to add its boot entry for it to be bootable. We’ll use the Grub2win application for this job.
Did you know? You can experience Chrome OS Fork FydeOS on your PC using a Virtual Machine (Play Store Support)
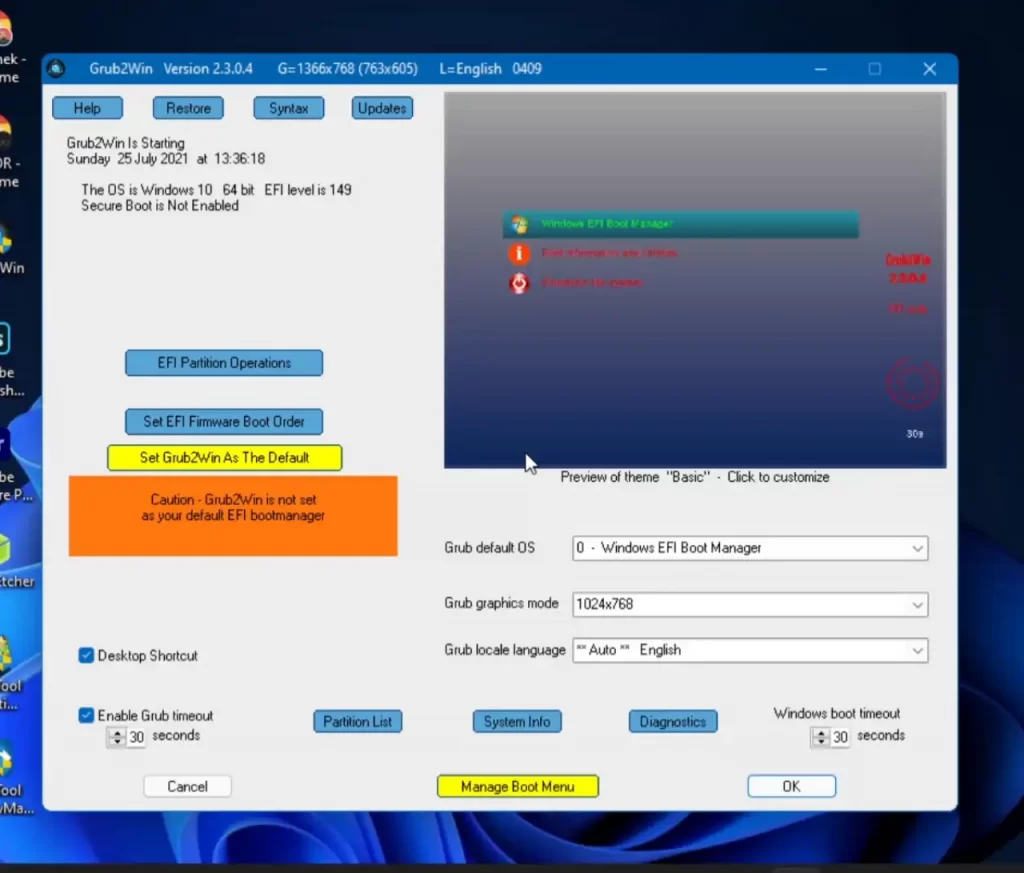
- Download the Grub2Win Application.
Download Grub2Win(Sourceforge.net)
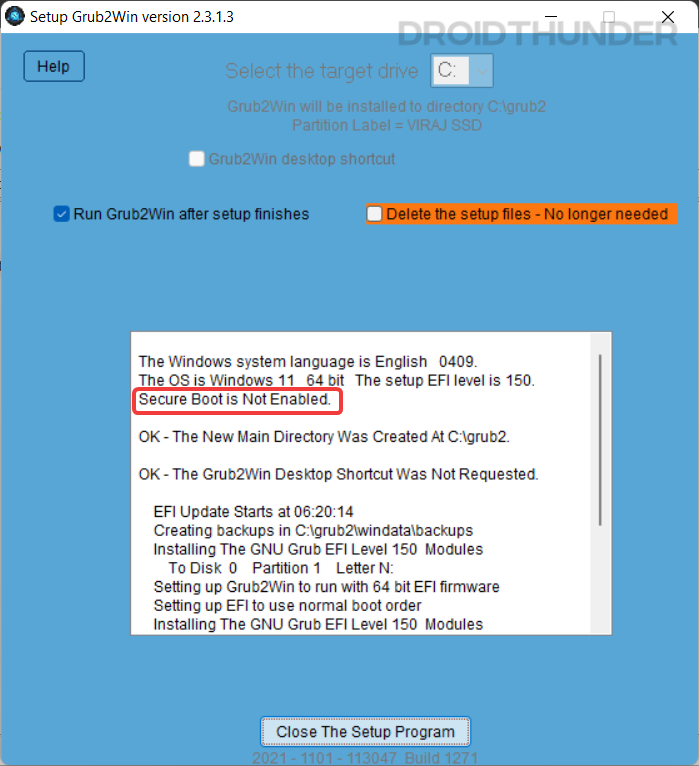
- Open the Grub2Win application and make sure it says Secure Boot is Not Enabled.
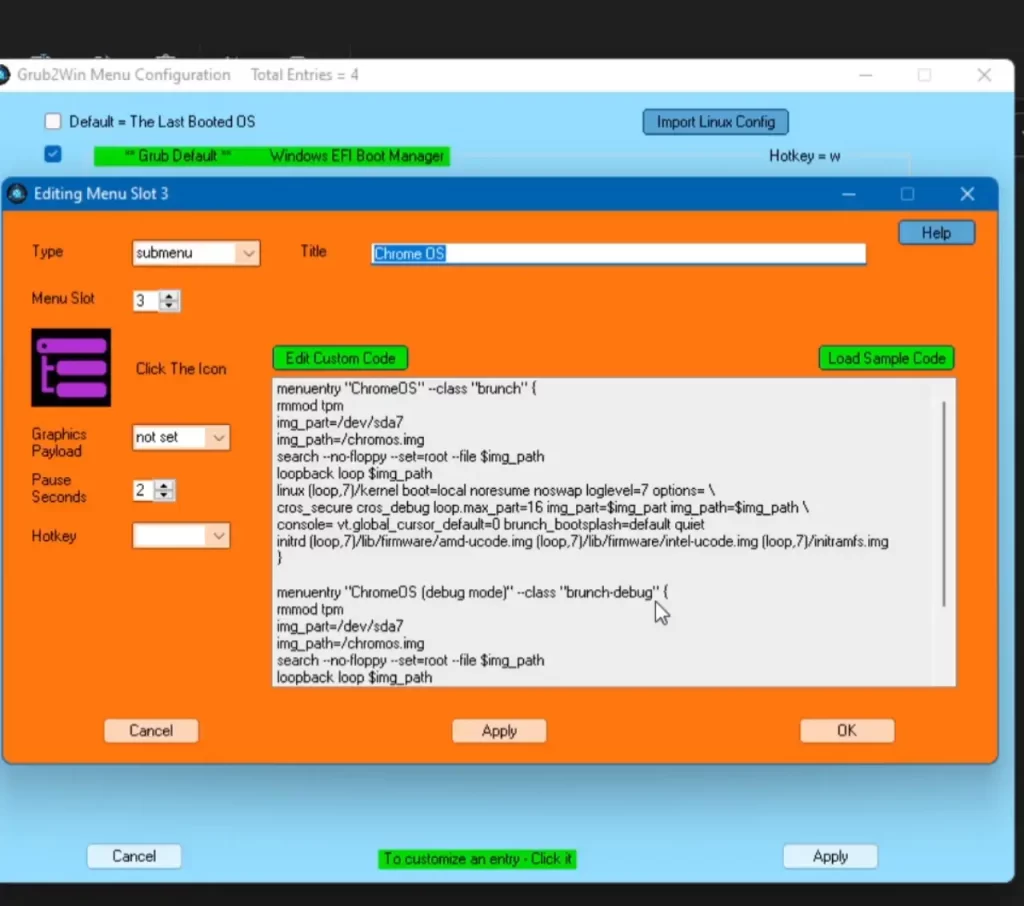
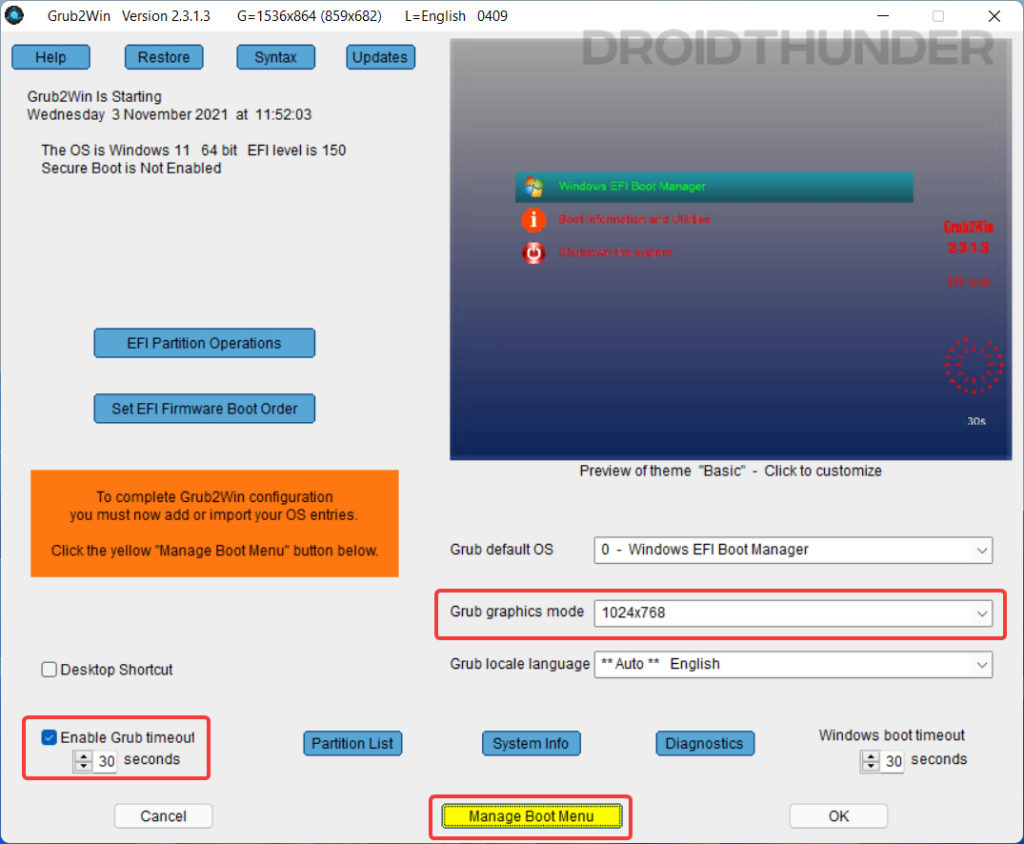
- Now, click on the Manage Boot Menu button and perform the following steps.
- Select Type as Submenu.
- Enter Title as Chrome OS.
- Click on the Edit Custom Code button.
- Go to the Chrome OS folder and open the text file we saved before shutting down Linux Mint OS.
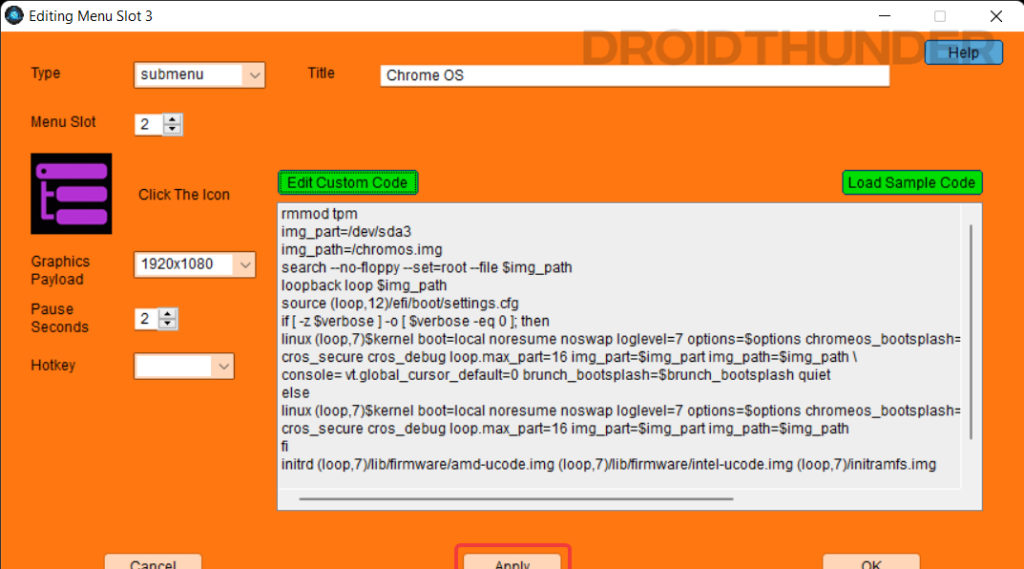
- Paste the text in the “Custom Code” field as shown below. Click on Apply and close the window.
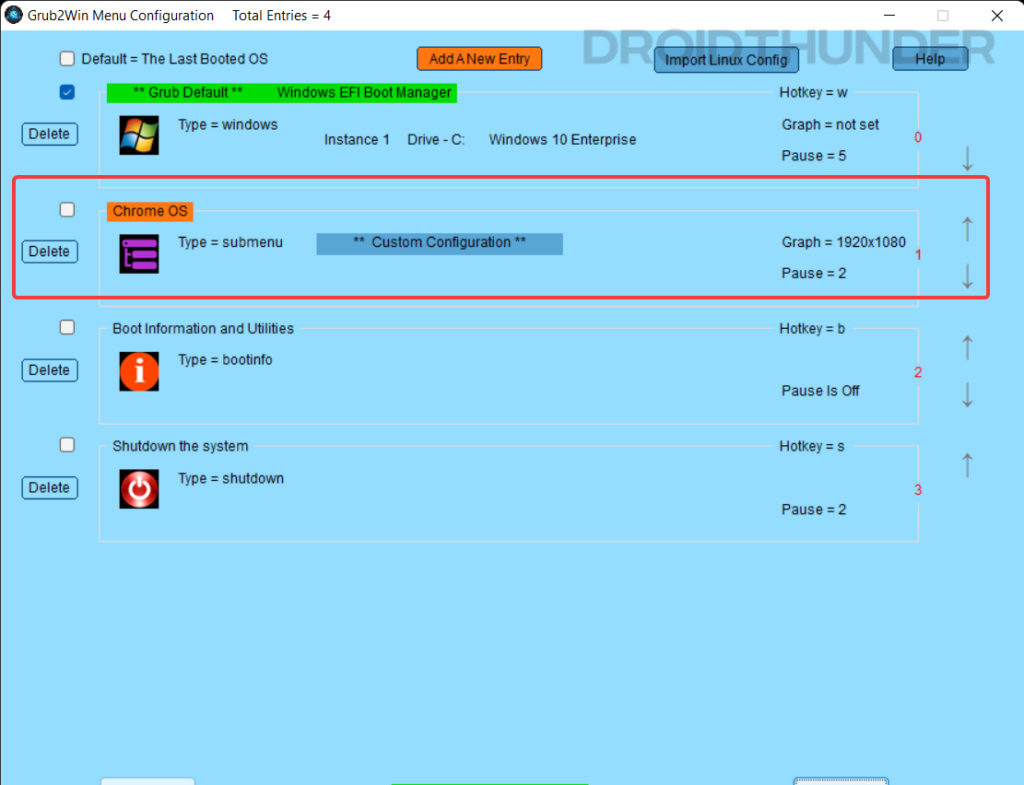
- Move the Chrome OS position upwards as it will be easy to select it at the startup. Close the Grub2win application and restart the system.
Booting into the Chrome OS using Grub2Win Menu
- When the system restarts, you’ll see the Grub2Win menu. Press down the key to select Chrome OS as a highlighted row.

- BIOS will execute the code that we pasted while creating a Chrome OS boot entry in the Grub2Win application, and eventually Brunch framework will fire up.

- Woohoooo! There you go, guys! You have successfully booted into the Chrome OS.
You can now set up your Google account and have fun using Chrome OS alongside your Windows 10 or Windows 11 PC. Move to the Troubleshoot section if any hardware device or WiFi is not working on the Chrome OS.
Keep in mind, before you log into the Google account, you are officially not allowed to run Chrome OS with Play Store support on non-certified machines. In some ways or the other, you might be violating Google’s terms and conditions. So, we recommend you sign in with a secondary Google account so that your primary account remains safe.
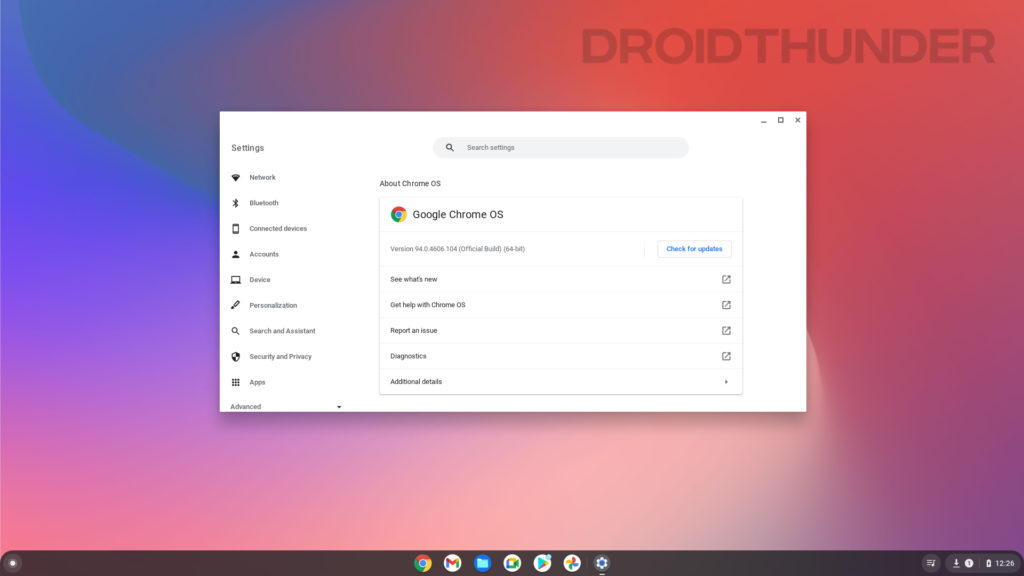
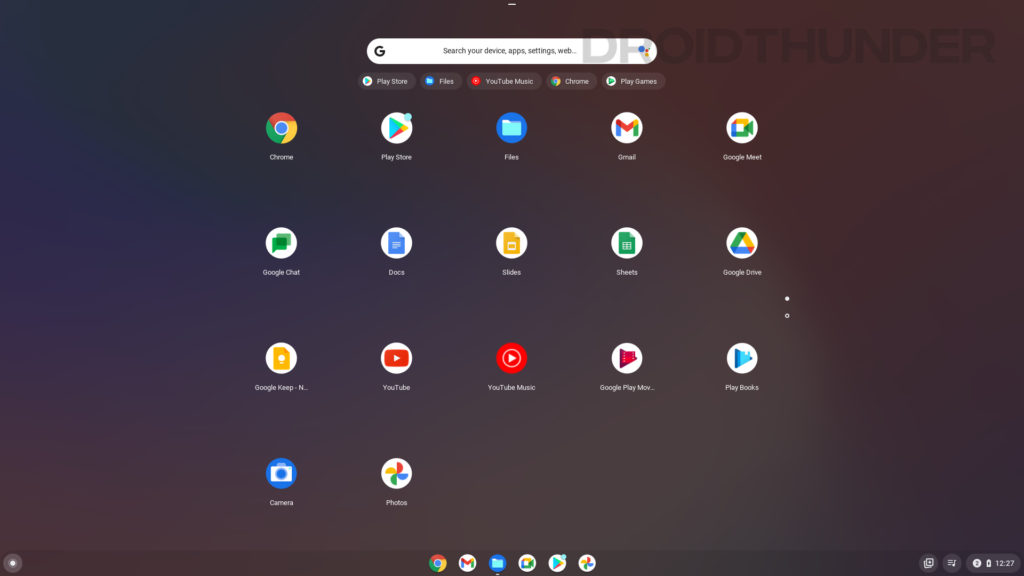
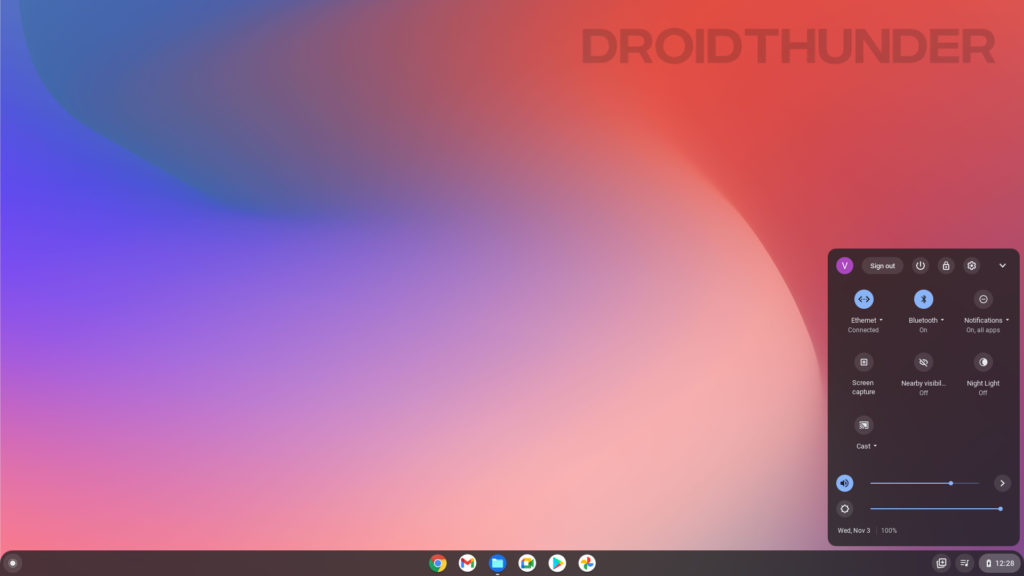
Chrome OS Screenshots
Uninstall Chrome OS From Windows PC
Installing Chrome OS on Windows partition is one lengthy procedure. But when we talk about its uninstallation, it is simple. Just boot into Windows OS and open the Disk Management tool. Locate the Chrome OS partition we created at the beginning of this guide, right-click on it, and select format.
Similarly, open the Grub2Win application. Delete the Chrome OS entry we added and save the changes.
Troubleshooting (Updated November 2021)
1. Fix grub-install: error: failed to get canonical path of ‘/cow’
So, you do come across this error, eh? That’s no problem. We’ll fix it by writing some quick commands in the terminal.
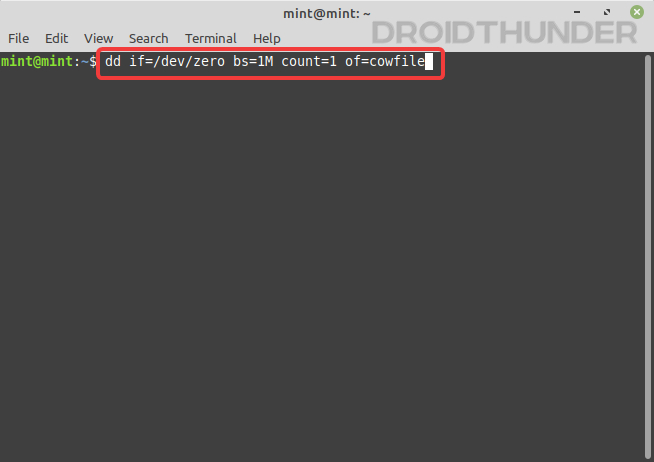
- Since there is already one instance of the terminal running, keep it as it is. Open another Terminal window and enter the following commands one by one.
dd if=/dev/zero bs=1M count=1 of=cowfile
mkfs -t vfat cowfile
sudo mv cowfile /cow
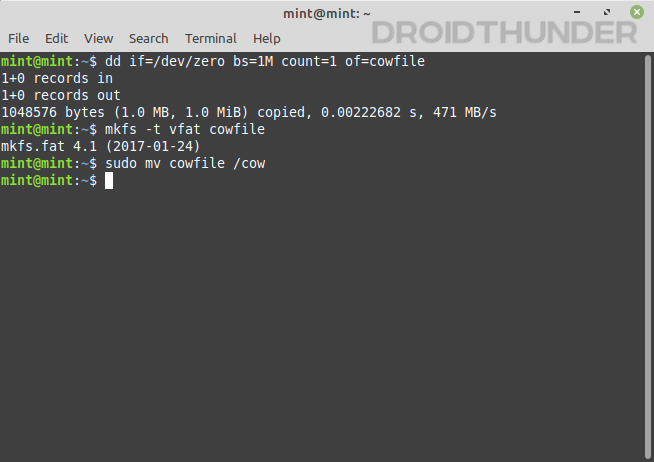
- After finishing all the commands, close the second instance of the Terminal. Click on the Environment settings button, a dialogue with various options shall appear. Click apply.
- Upon applying the Environment settings, the Grub Customizer windows will show up. We don’t need to do anything here so, just close it.
2. Fix Chrome OS Wifi, Bluetooth, Touchscreen Display not working
If you face issues with specific hardware components while using the Chrome OS, you can try Chrome’s Crosh terminal to make them work.
Fix Chrome OS Bluetooth issue
- Press Ctrl + Alt + T to open the Crosh Terminal and enter the following commands one by one.
shell
sudo edit-grub-config
- Now, you can add support for your specific device hardware. You can find the complete set of commands from here. For instance, if you have an RT3289LE or RT3290 Bluetooth device, then you can add “options=rtbth” (with quotes) at the end of cros_debug and before loop.max.
- Now, press Ctrl + X, hit the Y key, and then press enter to save the file. Restart your PC, and this time Bluetooth should work fine.
Fix Chrome OS WiFi issue
- Find out the manufacturer of your WiFi card.
- For Broadcom WiFi cards, use the following command in the Crosh terminal.
“
options=broadcom_wl“ - For Realtek WiFi cards, use the following command in the Crosh terminal.
“
options=rtl8188eu” or “options=rtl8821ce“
Enjoy Chrome OS and Windows together on a Single Machine
So, that’s how you can install Windows and Chrome OS on the same hard disk and boot both OS from a single machine. The steps could be complex and lengthy for beginners, but if you’ve dealt with Linux before, it’s an easy task for you to dual boot Windows 11 and Chrome OS.
That’s all from us in this guide. I hope you enjoyed it! If you face any issues while performing the above steps, post your comments below. We’ll try out best to help you out.
Leave a Comment
17 thoughts on “How to Install Chrome OS (with Play Store) and Dual Boot with Windows”
-
Hi, thanks for the help provided. However, I am unable to run the Shell Command sudo sh multi-install.sh (nothing happens), and Mint tells me that the file is “broken” when I click on the file.
Any suggestions? I am not quite conversant with Linux, though I have installed and run Ubuntu after a fashion in the past.
Thanks,
RajeevReply
-
Hi Rajeev,
Ensure that you are entering “sudo sh multi_install.sh” and not “sudo sh multi-install.sh”. Notice that there is an underscore between multi and install. If you’re entering it correctly and still the the command doesn’t work, let me know.
Reply
-
-
Hello,
I entered this for cowfile error
dd if=/dev/zero bs=1M count=1 of=cowfile
mkfs -t vfat cowfile
sudo mv cowfile /cowBut I am getting error that mv: missing operand
What should I do?
Reply
-
Hi Rock,
Try this:
Entersudo mkdir /cow, followed by the three commands required to fix the cowfile error.Reply
-
-
Dear Viraj,
thank you for your guide. I am following it and attempting to dual boot Chrome OS alongside Linux Mint. The installation seemed to have gone OK but there seems to be something wrong with the grub loader. When I start PC I first get the following error:
“`
error: no such module.
error: unrecognized number.
error: no such partition.
error: you need to load the kernel first.Press any key to continue…
Failed to boot both default and fallback entries.
Press any key to continue…
“`Then I get the option to press on any key, after which the GRUB screen appears with supposedly correct options:
“`
ChromeOS
Ubuntu
Advanced options for Ubuntu
“`But when I select `ChromeOS` I get the same error as above i.e.
“`
error: no such module.
error: unrecognized number.
error: no such partition.
error: you need to load the kernel first.Press any key to continue…
“`This is how I have my disk partitioned:
“`
~$ lsblk -p -f -o NAME,FSTYPE,FSSIZE,FSUSED,FSUSE%,LABEL,MOUNTPOINT,UUID,PTTYPE,PTUUID
NAME FSTYPE FSSIZE FSUSED FSUSE% LABEL MOUNTPOINT UUID PTTYPE PTUUID
/dev/sda dos b72e50c3
├─/dev/sda1 vfat 511M 4K 0% /boot/efi 812D-F377 dos b72e50c3
├─/dev/sda2 dos 706fbad4
├─/dev/sda3 ntfs chromeos 775D74A32776A294 dos b72e50c3
└─/dev/sda5 ext4 230,4G 14,1G 6% / 3a1e716f-01d4-407e-9fb5-7af498756919 dos b72e50c3
/dev/sr0
“`and this is the `chromeos` entry in grub (as per your guide, copied from /boot/grub/grub.cfg):
“`
### BEGIN /etc/grub.d/40_custom_proxy ###
menuentry “ChromeOS”{
rmmod tpm
search –no-floppy –set=root –file /chromos.img
loopback loop /chromos.img
source (loop,12)/efi/boot/settings.cfg
if [ -z $verbose ] -o [ $verbose -eq 0 ]; then
linux (loop,7)$kernel boot=local noresume noswap loglevel=7 options=$options chromeos_bootsplash=$chromeos_bootsplash $cmdline_params \
cros_secure cros_debug loop.max_part=16 img_uuid=b72e50c3-03 img_path=/chromos.img \
console= vt.global_cursor_default=0 brunch_bootsplash=$brunch_bootsplash quiet
else
linux (loop,7)$kernel boot=local noresume noswap loglevel=7 options=$options chromeos_bootsplash=$chromeos_bootsplash $cmdline_params \
cros_secure cros_debug loop.max_part=16 img_uuid=b72e50c3-03 img_path=/chromos.img
fi
initrd (loop,7)/lib/firmware/amd-ucode.img (loop,7)/lib/firmware/intel-ucode.img (loop,7)/initramfs.img
}
### END /etc/grub.d/40_custom_proxy ###
“`Do you perhaps have any idea how I could fix this? Thank you in advance.
Reply
-
Hi Pawel,
Did you disable the secure boot in BIOS?
Reply
-
hi Viraj, there isn’t such an option in my BIOS actually (?)
Reply
-
Can you share which PC you are trying this on? Also, can you upload screenshots of the errors on an image-sharing site like Imgur so that we can get a better idea?
Reply
-
-
-
-
In my case I allocated 23 gb to chrome os. But in terminal it is showing not enough space.I have 120 gb ssd with 25 gb free for chrome os. What should I do now?
Reply
-
Hi Abir,
Are you facing this issue in Linux Mint GParted or after entering the partition name?
If you are getting this error because of the latter case, change the GParted disk partition size from 23GB to 22GB. Chrome OS prefers memory allocation in multiples of 22000 only. It’s weird, but give it a try and let me know.
Reply
-
Thanks it worked
But now I am having issues with keyboard and touchpad.They are not working. And after being a light os chromeos is taking 98% of my cpu. when windows 11 takes just 40 to 55%.Have any idea about that?Reply
-
Good to hear that, Abir.
Regarding the keyboard, touch, and high CPU usage, can you tell me which laptop/PC you are using and its specifications? Also, which Cros Chrome OS build (e.g., rammus, sammus) did you use?
Reply
-
I’m using rammus 100 build on my Gateway NE511 laptop which has intel celeron n2830 processor. I also tried rammus 101 build but didn’t work.
-
Please follow the video below and try alt_touchpad_config or alt_touchpad_config2 commands in the crosh terminal for touchpad to work. For high CPU usage, you may want to try the enforce_hyperthreading=1 command, which will improve the performance by disabling Chrome OS security features. You can refer full list of commands here.
-
-
-
-
-
Wow, this tutorial is really great, thank you so much for taking the time to write this out in so much detail and included screenshots.
Im running Windows 11 with an Intel 11th Gen, so I renamed the .bin to volteer_recovery.bin as instructed.
However, when I got to step 13, I received the attached error:Do you wish to format and install chrome os on nvme0n1p4?(type yes to continue)yes
Ok, Proceeding installation on nvme0n1p4
ChromeOS recovery image rammus_recovery.bin not foundI double checked the naming of the file and its correct – volteer_recovery.bin
Please let me know what step I am missing.
Thank you for this!
Reply
-
Hello, I posted a comment a few days ago about this tutorial not working if you use a volteer bin file, rather than the rammus. I don’t see my comment below, so I assume there’s some type of approval process for comments.
Are you still monitoring this site? Is there anyway you could please help me with this?
Thank you!
BReply
-
Bro, what other bootloader can we use provided Grub2win doesn’t support Chrome OS
Reply
Chrome OS is a very lightweight OS developed by Google and it is all based on Linux which makes it a versatile operating system. With time, Google added some really good features to the Chrome OS like Play Store integration, Linux apps support, and more. If you want to try Chrome OS to see if it matches your taste then you install it on your PC without sacrificing your precious Windows. Here is a guide on how to Install and dual-boot ChromeOS without using a USB Drive. Meanwhile, you can also learn about Chrome OS Flex.
Prerequisites to Install ChromeOS Without USB
- 64-bit PC or laptop with at least 16 GB of empty storage space.
- The secure boot should be disabled from BIOS.
- Virtualization or Hyper-V should be enabled from BIOS.
- The system should support UEFI.
- Winrar should be installed on your Windows PC.
Step to Install ChromeOS without a USB Drive
If you have taken care of the prerequisites of Installing Chrome OS on your Windows PC. Let’s move on to the process to Install ChromeOS as Dual Boot on your Windows machine.
Disable Hibernation and fast start-up
In order to dual-boot Chrome OS on your Windows PC, we need to disable hibernation and fast start-up on Windows. To do that, open the elevated Command Prompt and execute this command:
powercfg.exe /hibernate off
This will turn off the hibernation, and next, we need to turn off the fast start-up. Here’s how it can be done:
1. Open Run, type “Regedit“, and press enter, to launch the registry editor.
2. Navigate to “HKEY_LOCAL_MACHINE\SYSTEM\CurrentControlSet\Control\Session Manager\Power“, and look for the ‘HyberBootEnabled’ key and double-click it to modify.
3. In the popup, change the value from 1 to 0 to disable it.
Installing Ubuntu
Next, we need to install Ubuntu on our Windows machine and it’s very easy to do. Here’s how you can install Ubuntu on your Windows machine.
1. Open an elevated Windows Powershell and execute this command:
wsl –install
2. This will begin the installation of Ubuntu on your machine and you need to stay connected to the network during the installation.
3. Once the installation is done, launch Ubuntu from the Start menu, and create a new username and password.
Note: The password stays blank even though you are typing, just type the password and hit enter.
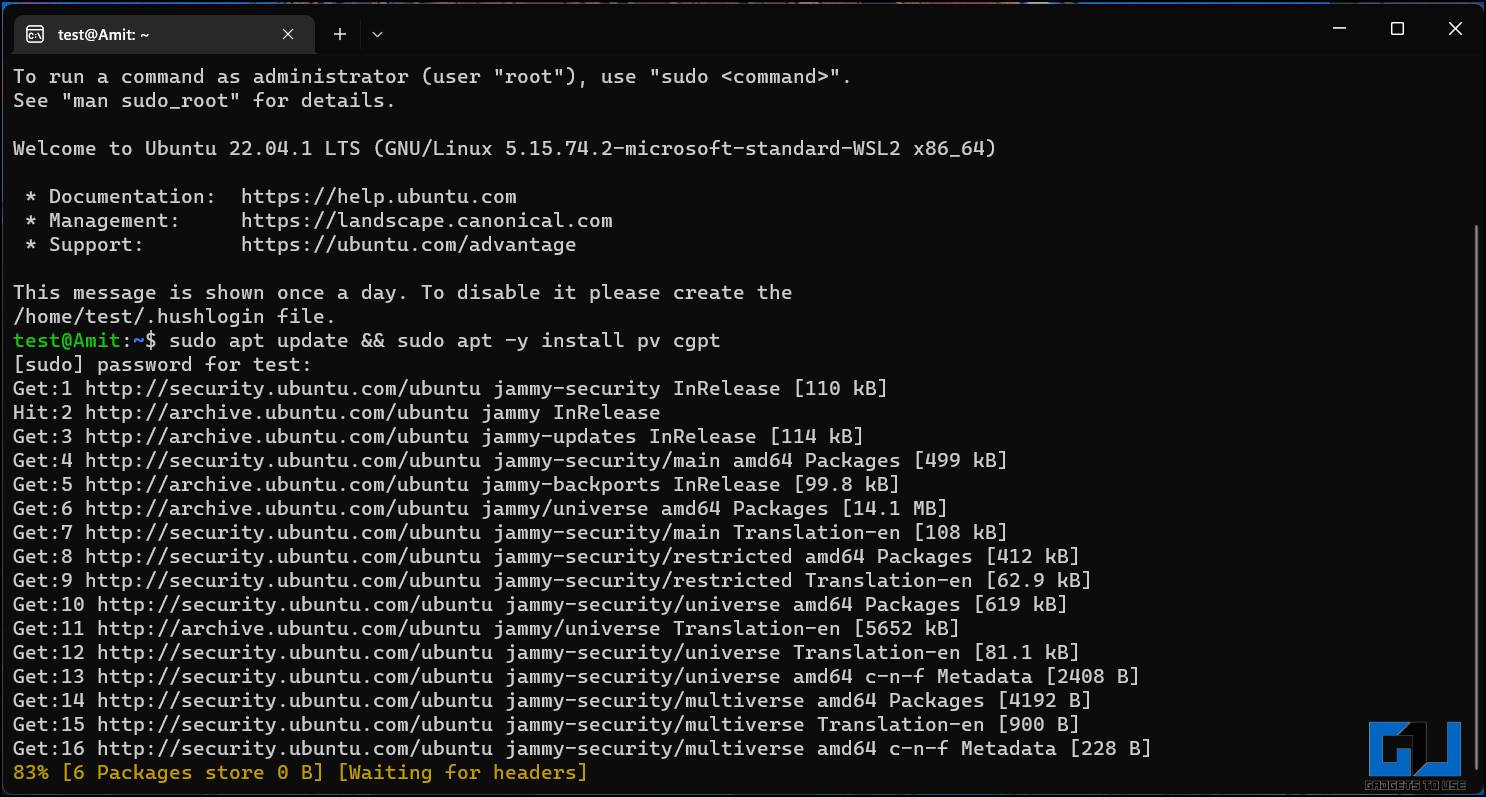
4. Now, type the following command, and press Enter.
sudo apt update && sudo apt -y install pv cgpt
This will also take some time to finish updating the apps, you need to stay connected to the internet during the whole update process.
Creating a new Partition on Windows to Install ChromeOS
Now we need to create a small partition on your Windows system’s disk to install ChromeOS on it. Follow these steps to create a partition on Windows.
1. Press Win + R to open Run, type “diskmgmt.msc” and press Enter.

2. Right-click on one of the drives that you want to create a partition from and select “Shrink Volume“.
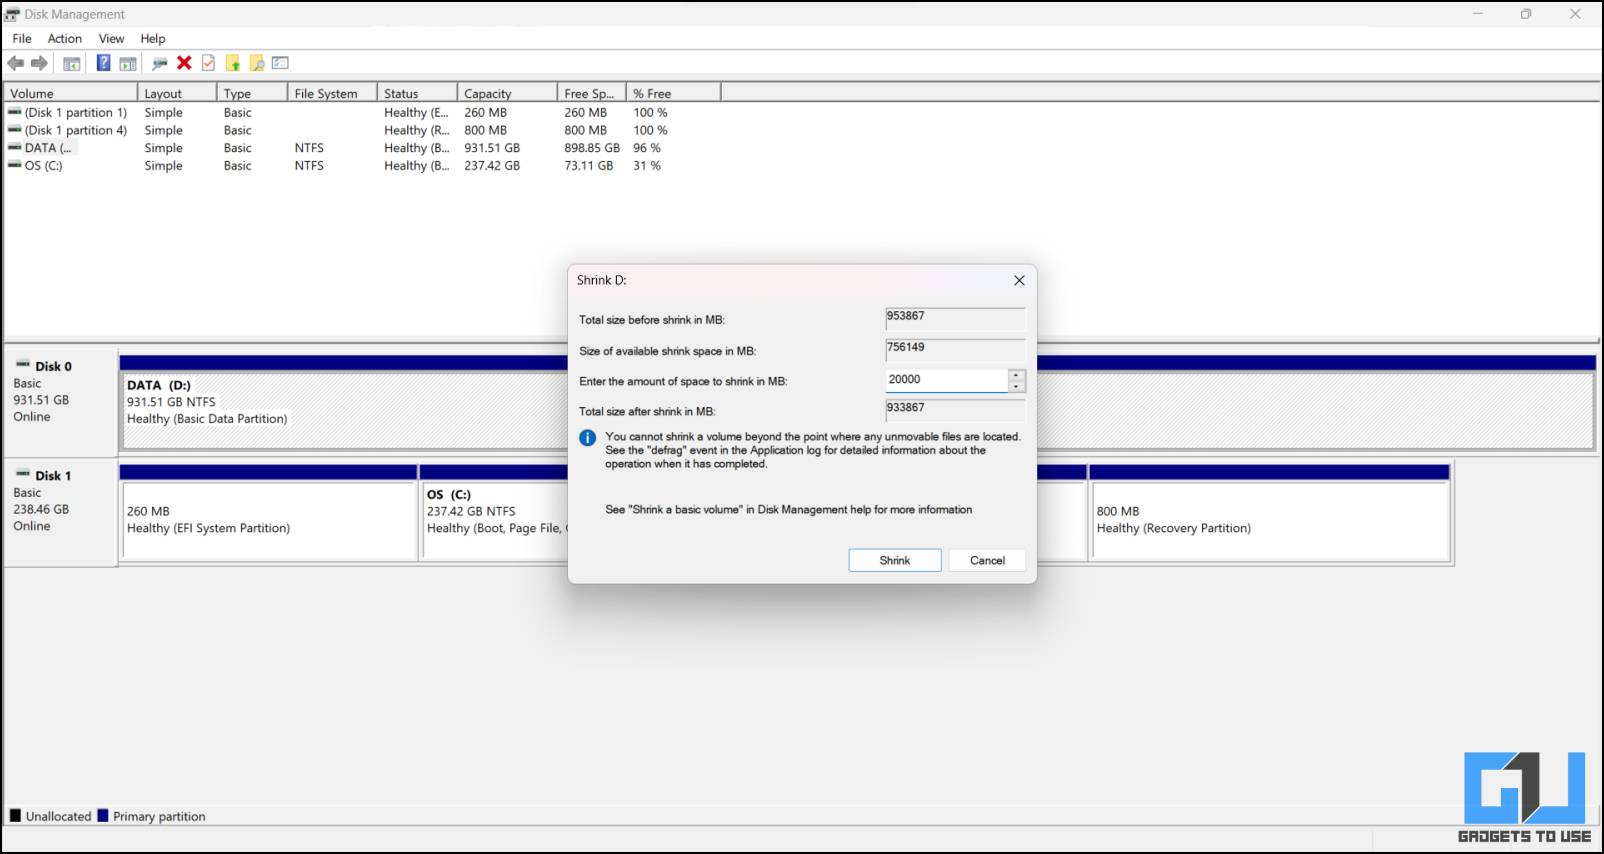
3. Type 20000 in the size section and click on Shrink, this will create an unallocated block of space.
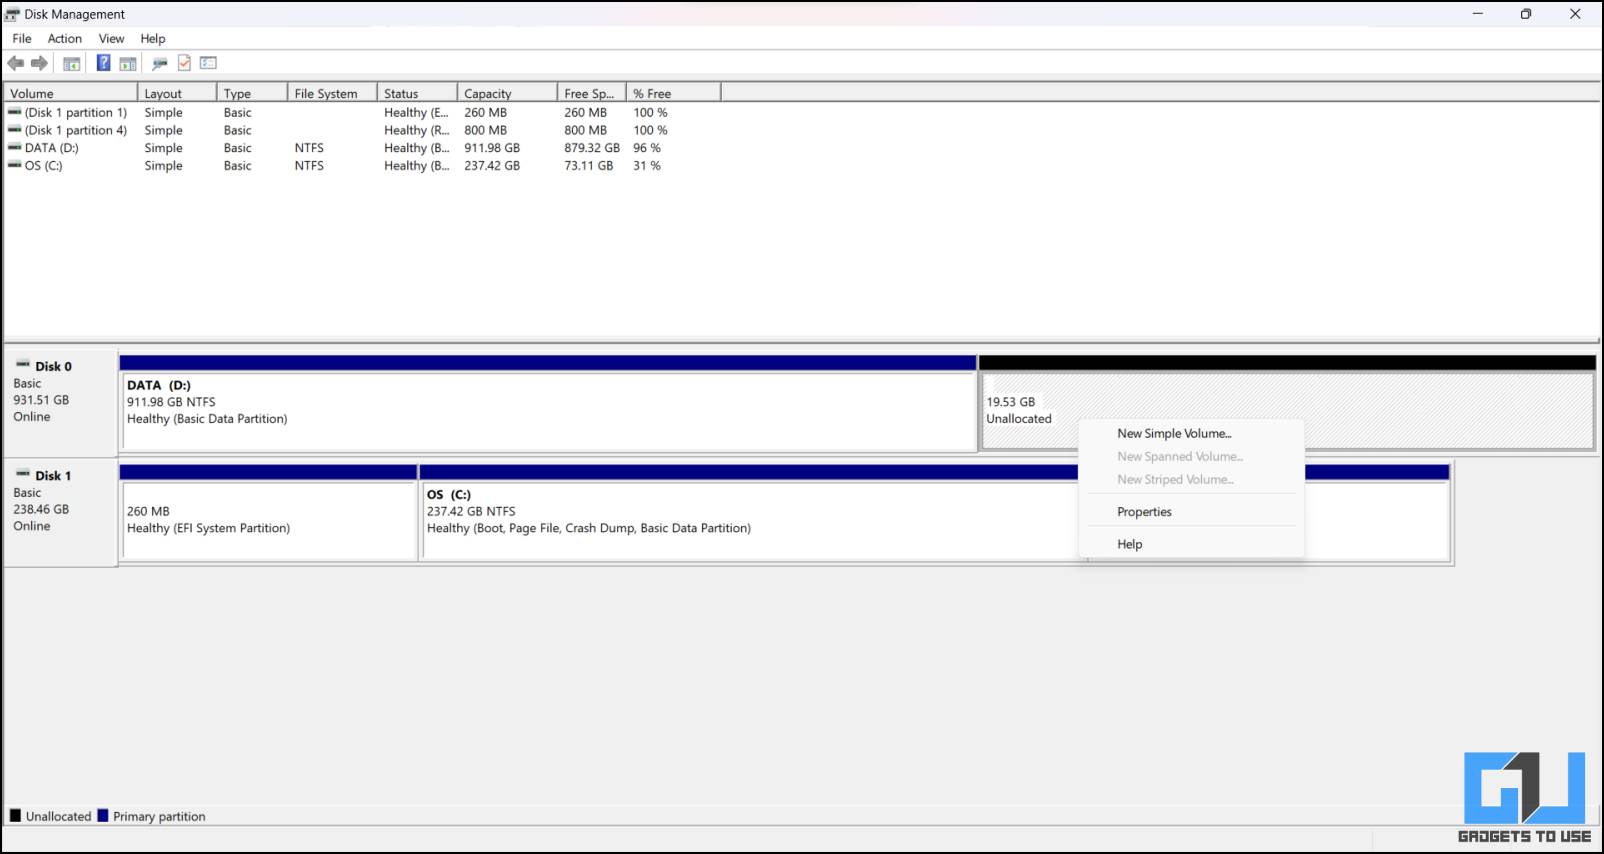
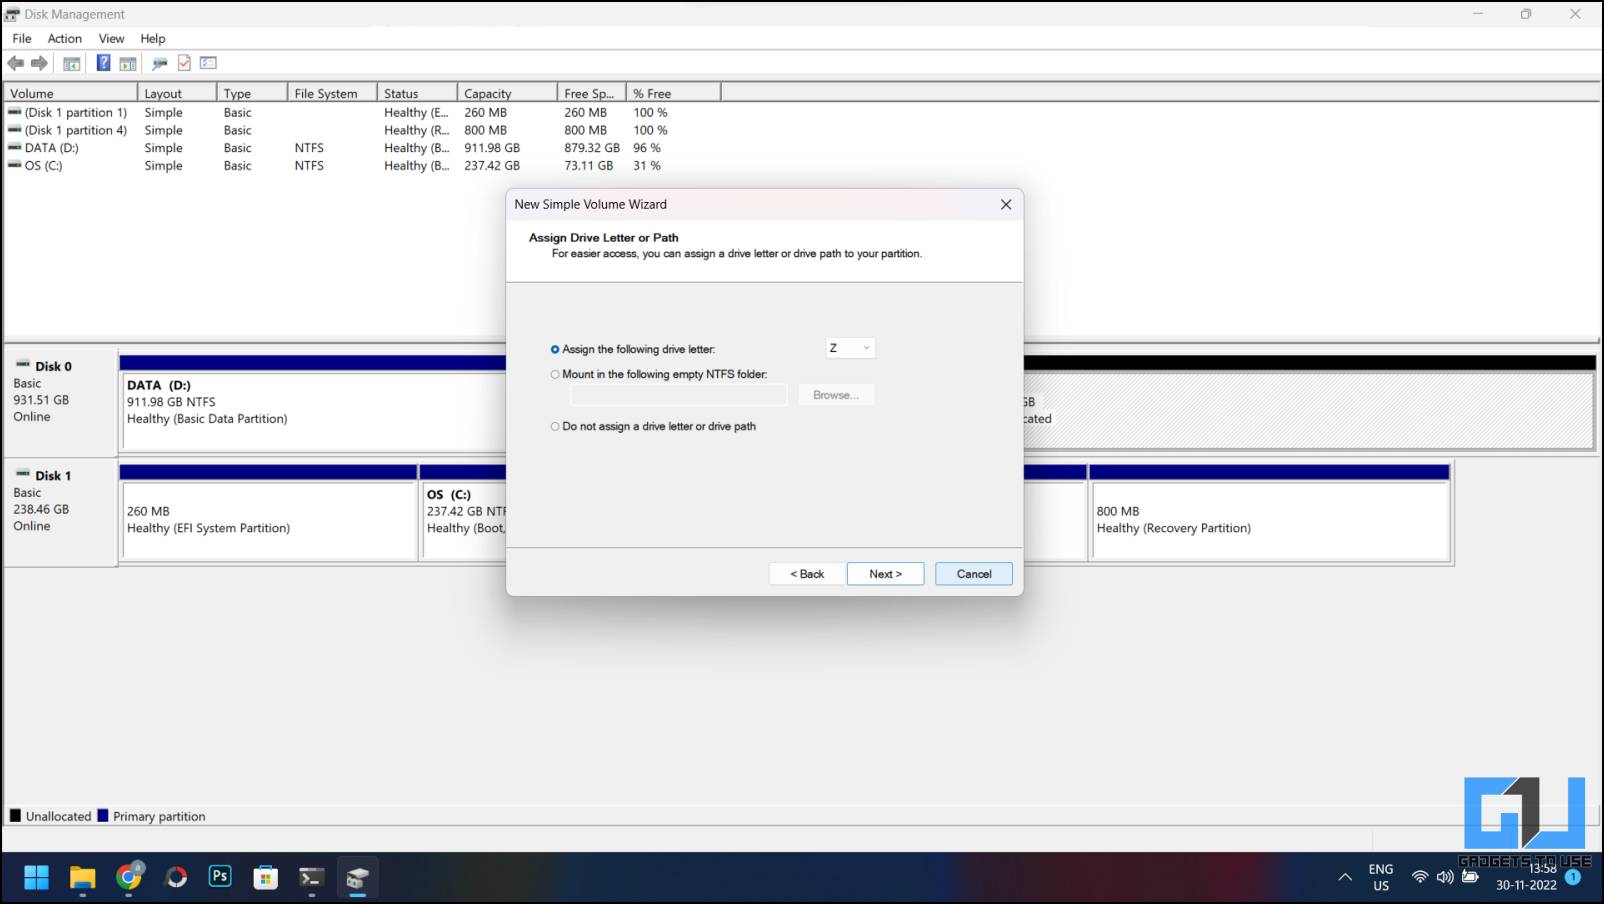
4. Right-click on the new partition you’ve created and select New simple volume. Click Next and assign the letter E to the drive and create the volume.
Now you can see this partition in your Windows explorer as an empty hard drive. Open the new partition drive and create a folder named “chromeos” inside it, we will need it later for mounting purposes.
Download the Required Files
We now need to download the Chrome OS recovery image and there are four versions of recovery images according to the CPU and its generations. Open this link and on that page, to download the latest recovery image according to your CPU and generations. Check the list below to learn, which recovery image you need to download according to your CPU.
- Intel up to 9th generation: rammus
- Intel above 9th generation: volteer
- AMD(Stony Ride and Briston Ridge): grunt
- AMD Ryzen: Zork
To make it all work, we need to download the Sebanc Brunch file. The last file you need to download is Grub2Win and once you get all the files, create a new folder named “chromeos” inside Downloads. Move all the files you’ve downloaded till now to this ‘chromeos‘ folder.
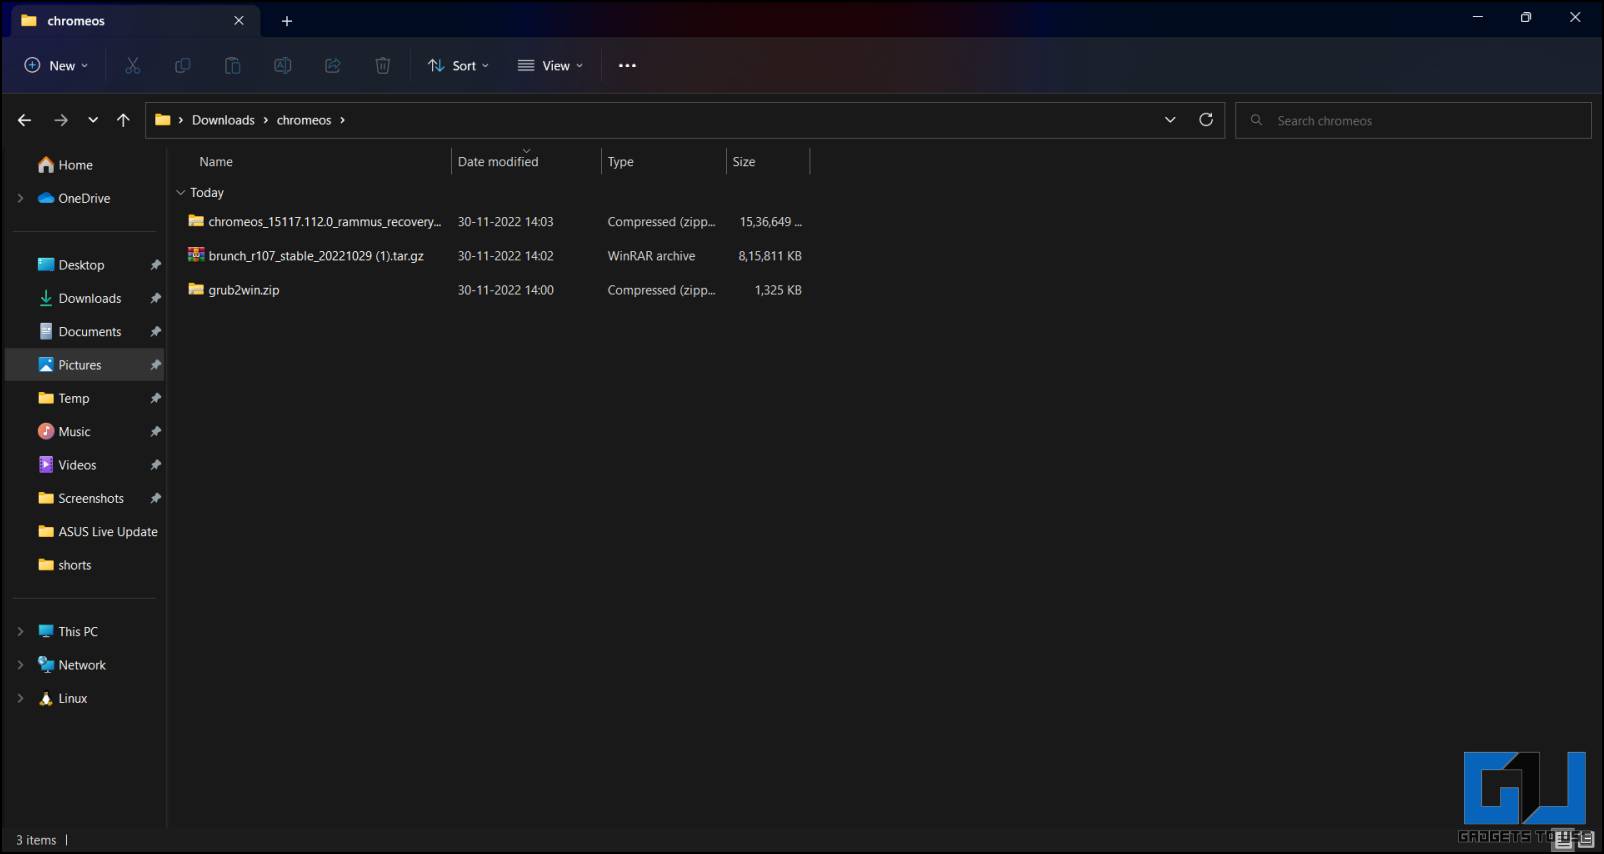
Open the ‘chromeos‘ folder, right-click on the Brunch file, and select Extract here under the Winrar menu. Once done, extract the ChromeOSzip file in the same way.
Install the Chrome OS to the New Partition
Next, we need to install the Chrome OS recovery file to the new partition that we created and for that we need Ubuntu. To do so we need to execute a few commands one by one and make sure to double-check the file or folder locations in the command before executing them.
1. Add the ‘chromeos’ folder location that we have created inside the Downloads folder. It will look something like “c/users/username/downloads/chromeos”.
cd /mnt/(your chromeos folder location)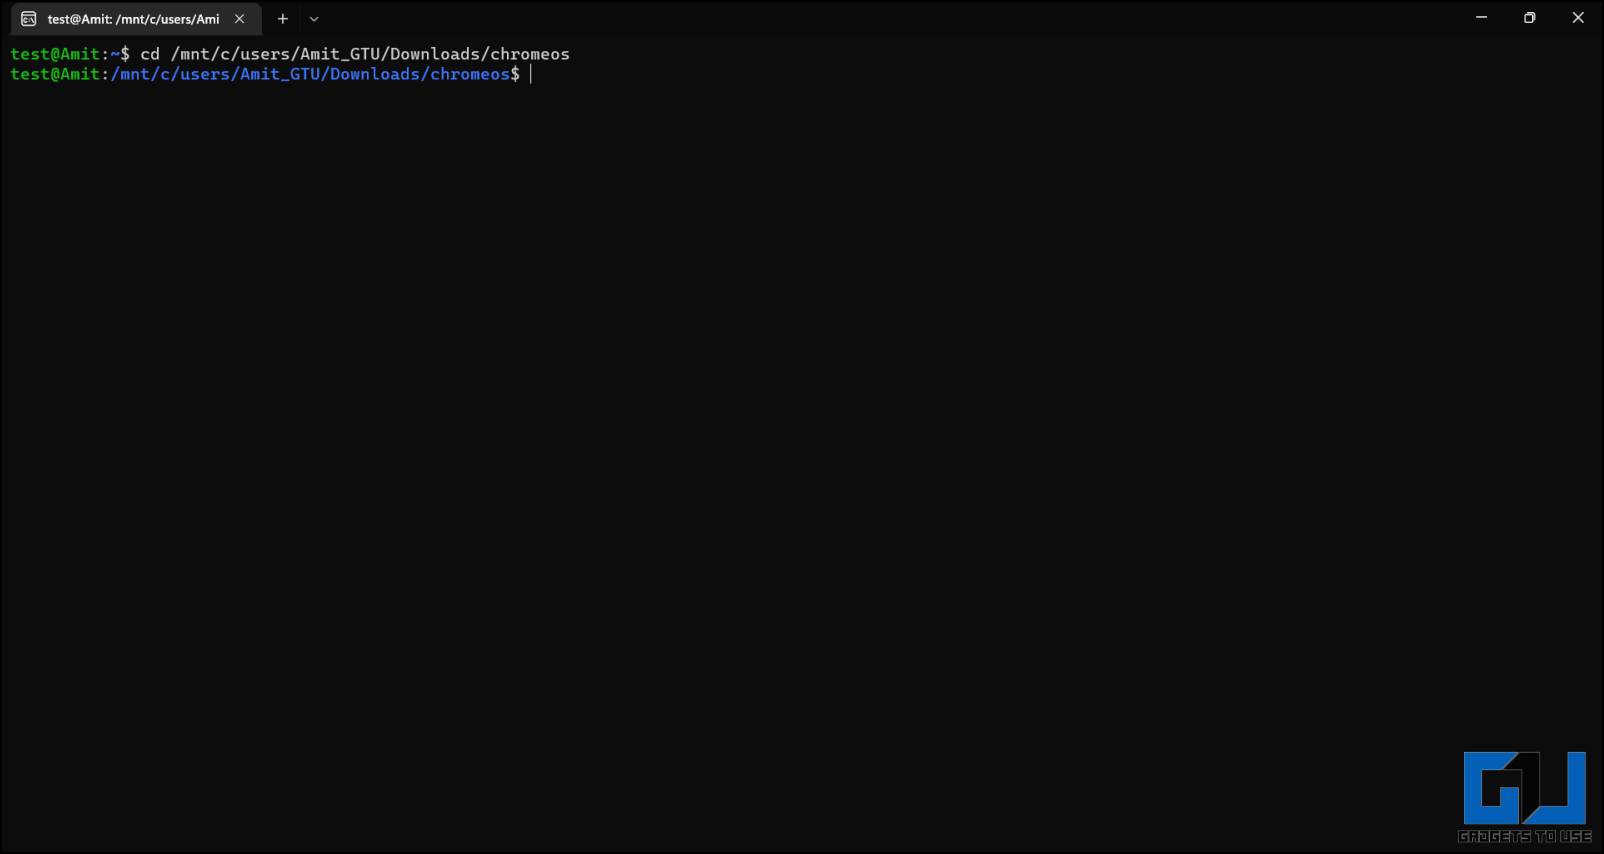
2. Next, add the recovery image name, this is the file that we extracted from rammus recovery zip file. The second bracket should be filled with the location of ‘chromeos folder’ created inside the new partition drive, eg: e/chromeos/.
sudo bash chromeos-install.sh -src (recovery image name.bin) -dst /mnt/(chromeos partition folder) -s 20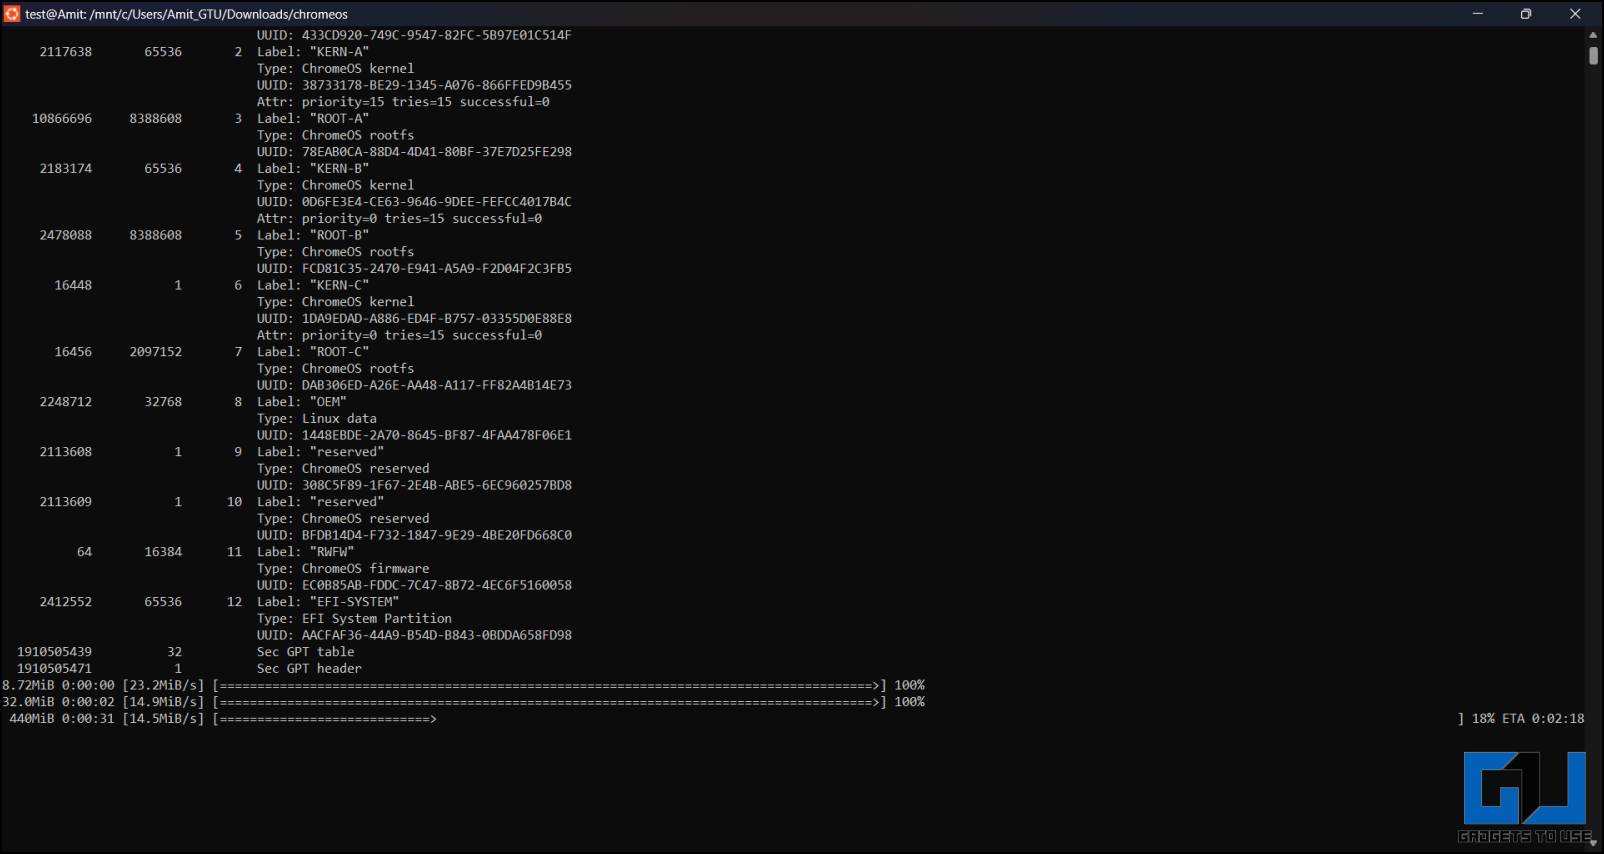
3. The process will take a few minutes and once it is done, it will give you a command to execute in Powershell. Copy that command and open a Powershell window and execute that command here.
You will get something as shown in the image below, just copy the text inside the brackets and paste it into the Ubuntu window and hit Enter.
Creating a boot entry for Chrome OS
Once ChromeOS has been installed, we need to create a boot entry for the ChromeOS image file that we created in the partitions above.
1. Extract the Grub2Win zip package and run the installer, confirm the installation, and once installed, it will open a window.

2. Now go to the new partition, created earlier and open the ‘chromeos-grub.txt‘ file to copy its contents.
3. Come back to the Grub2Win window and Click the Manage Boot Menu button.
4. Click Add a new Entry button and type ‘chromeos‘ in the title field. Click the Type drop-down menu and select Create user section.
5. Paste the code, copied in step #2, and click the cross button to close the notepad. Click Save then OK, then OK again on Grub2Win window.
Boot Chrome OS from the Boot Menu
Now, simply restart your computer and you will see a boot menu. Use the arrow keys to go down and select chromeos and press Enter key. This will boot the Chrome OS on your machine and from there you can start setting up your Chrome OS.
Wrapping Up
The process to dual boot ChromeOS without a USB drive is pretty tedious, but the result is a working dual boot Chome OS with all the features enabled. In case you get stuck at any step, feel free to reach out to us. Stay tuned to GadgetsToUse for more such walkthroughs.
Also, Read:
- How to Install Dynamic Island on Windows 11/10 for Free
- 5 Ways to See Motherboard Model Details on Windows PC or Laptop
- 15 Best Ways to Fix USB Not Detected on Windows 11
- How to Install Windows 11 on Unsupported Systems with Just a Single Tool
You can also follow us for instant tech news at Google News or for tips and tricks, smartphones & gadgets reviews, join GadgetsToUse Telegram Group or for the latest review videos subscribe GadgetsToUse YouTube Channel.
In this article we will teach you about how to Dual Boot Chrome OS and Windows 11/10. Dual boot is a way to keep more than one operating system on the same computer during the boot process. It lets the user choose from more than one operating system when the computer starts up for the first time. Chrome OS is becoming more and more popular, and many schools are choosing it. There’s no doubt that a lot of people want to try it for themselves. But not everyone is ready to give up the security and familiarity of Windows.
Microsoft just released Windows 11, which is a fairly new operating system. Most of us have already upgraded to it or are planning to do so soon. But there are also changes being made to other operating systems. Chrome OS seems like an operating system that you have to run along with Windows when you think about it. Why? Because you can install Chrome OS and Windows on the same internal or external hard drive and boot them both at the same time.
Requirements
- Support for UEFI in the motherboard
- There is also support for legacy BIOS, but there are a few restrictions. Here is where you can read the documentation.
- CPU and GPU both made by Intel
- AMD CPU and GPU support has also been added, but for now, only AMD Ryzen 3XXX and AMD Stoney Ridge processors are supported.
- A USB flash drive that can hold at least 16GB
How to Dual Boot Chrome OS and Windows 11/10
Right now, you can’t use both Chrome OS and Windows 11 or Windows 10 at the same time. Chrome OS is an operating system that runs in the cloud and doesn’t support dual booting. To dual-boot, you need to install two different operating systems on your computer. Chrome OS is made to run on Chromebooks, which are laptops that can only run Chrome OS. Windows 11/10 is a classic operating system that can be put on laptops, desktops, and tablets, among other things.
- Put software for a virtual machine on your Chromebook. Software like VirtualBox and VMware Workstation can be used to run virtual machines.
- Get the files you need to install Windows 11/10. You can get the files you need to install Windows 11/10 from the Microsoft website.
- Using the virtual machine software, you can make a Windows 11 or Windows 10 virtual machine.
- Put Windows 11 or Windows 10 on the virtual machine.
- After installing Windows 11/10, you can use it along with Chrome OS.
Benefits of Dual Booting Chrome OS and Windows
- Get the best of both worlds: Chrome OS is a fast, light operating system that is great for both browsing the web and getting work done. Windows 11/10 is a more powerful operating system that works better for games, software development, and other tasks that require a lot of power. You can get the best of both worlds by running both Chrome OS and Windows at the same time.
- How to be more productive: You can use Chrome OS to browse the web and get work done, and then switch to Windows 11/10 to play games, build software, or do other hard tasks. You can then use the right tool for the job, which can help you get more done.
- Access more software: Many programs are only available for Windows. You can use these programs without having to buy a separate Windows laptop if your computer can run both Chrome OS and Windows.
- Find out about the various operating systems: You can learn more about different operating systems if you use Chrome OS and Windows at the same time. This can help if you want to work in IT or make software as a career.
Conclusion
We hope that our article on how to Dual Boot Chrome OS and Windows PC will help you and solve all your problems. Users can try out a new operating system by using dual boot. With dual boot, you can try out a new operating system, but you can always go back to your old one. A dual-boot configuration can be very helpful for network administrators or computer technicians who need to work with or support more than one type of system.
FAQs
Can you dual boot Chrome OS and Windows 10?
You have successfully installed Chrome OS on a Windows partition, but you need to add Chrome OS as a bootable OS during startup. And to do that, we’ll use an app called Grub2Win.
Why Chrome is not working in Windows 11?
Sometimes, your antivirus software or firewall can stop Chrome from opening. In this case, you can try to figure out what’s wrong by turning them off for a short time. But be careful, because if you turn off your antivirus, your computer will be open to attacks. Click on Start and type “Windows Security” into the search bar.
Is Chrome slow on Windows 11?
One of the most popular web browsers in the world, Google Chrome is known for being fast, reliable, and easy to use. But many Windows 11 users have said that Chrome takes a long time to open, which is frustrating and makes them less productive.
Michael Smith
Michael Smith, a tech-savvy content editor at Bollyinside. With a knack for simplifying complex tech concepts, Michael specializes in crafting user-friendly «How-to» articles and valuable tips. His focus spans Windows, Mac, hardware, and support. Beyond work, he’s an avid explorer of diverse tech fields, constantly staying ahead of the curve.
TipsMake.com has written a dedicated article about how to install Chrome OS on a PC, but many users are still trying to run Chrome OS and Windows 10 in parallel.
And that’s why today, TipsMake.com gives you this detailed guide on how to dual boot Chrome OS and Windows 10. Doing this will allow you to get the fast performance of Chrome OS and versatility of Windows 10 (not to mention, there is support for Play Store and Linux applications). Basically, this is a beneficial combination for users. So don’t wait any longer, learn how to dual boot Chrome OS and Windows 10 now.
Instructions for dual booting Chrome OS and Windows 10
- Request
- The required downloads
- File management
- Create partition
- Flash Linux Mint Cinnamon
- Install Chrome OS
- Dual-boot Chrome OS and Windows 10
- Troubleshoot
Request
- Support UEFI boot in BIOS
- CPU and GPU based on Intel
- USB has at least 16GB of storage
The required downloads
1. First, download the Linux Mint Cinnamon image. Depending on your PC’s architecture, you can choose a 64-bit or 32-bit build.
2. Next, download Rufus to be able to flash Linux Mint Cinnamon on USB.
3. After that, download the official Chrome OS recovery image. Open the web and search for rammus. Now, click on the latest recovery image (right now, it’s 80 , but it may change in the future). Rammus is the recommended image for devices with Intel 4th and newer CPUs. However, if you have a 3rd generation Intel CPU or higher then download the latest image for samus. And if you have an AMD CPU, you can try it out by downloading the latest grunt image .
4. Now, download the most important file: Brunch. It is a framework built by a developer named sebanc. This framework creates a generic Chrome OS image from the official recovery image so that it can be installed on any Windows PC. To download the file, find the latest stable build and then click Assets. Now, download the tar.gz file.
5. Finally, download the multi_install.sh script to install Chrome OS on the Windows partition. Script written by Kedar Nimbalkar. To download, press Ctrl+ Sand save the file.
Now that you have finished downloading, move on to the next steps.
File management
1. First, create a folder called Chrome OS on a large space drive. Then, move the multi_install.sh file to the Chrome OS folder.
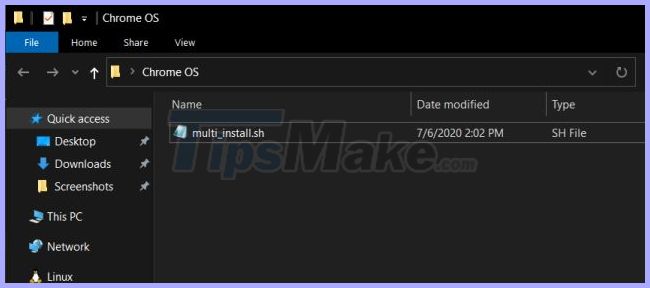
Move the multi_install.sh file into the Chrome OS folder
2. Next, right click on the Brunch file and select Extract to Brunch . All files will be extracted in a folder.
3. Now, move all the extracted Brunch files into the same Chrome OS folder.
4. Similarly, extract the official Chrome OS recovery image and you will get a folder. Open it and rename the file to rammus_recovery.bin. If you downloaded another image, please also rename it accordingly.

Rename the file to rammus_recovery.bin
5. Finally, move the rammus_recovery.bin file directly to the Chrome OS folder. Finally, you need to have these 6 files in the Chrome OS folder. Note where you kept the Chrome OS folder.
Create partition
While creating a single partition works for many users, some people experience problems during the installation. So, to avoid any errors during the installation process, you can create two partitions — one with 100GB and one with 60GB. This is not a required capacity requirement and you can reduce the space according to your preferences, but if you have a comfortable space then follow this structure to install seamlessly.
Remember, you will only use the 100GB partition to install Chrome OS. The next 60GB is needed to mount the image file. So once the installation is complete, you are free to use the 60GB partition for everything on Windows 10.
1. Press the key Winonce and search for disk partition. Now, click on the first result.
2. Here, right-click on the last drive and select Shrink Volume.
3. Now, enter 160GB if your hard drive has a large capacity. Then click Shrink.
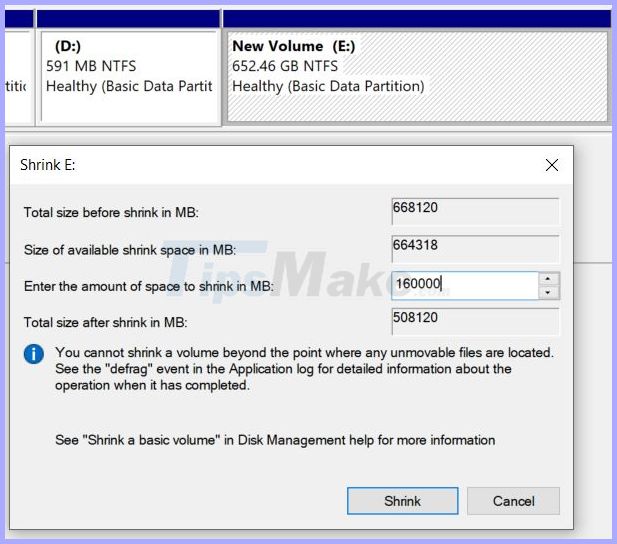
Enter 160GB if your hard drive has a large capacity
4. Next, right click on the unallocated partition and turn it into New Simple Volume .
5. Done, right-click on the 160GB partition and select Shrink. This time, enter 60GB and create another partition. Then turn it into New Simple Volume like above.
6. Finally, right-click on the 100GB partition and select Delete Volume. It will become an Unallocated partition (not yet allocated). Now, you have successfully created a drive to install Chrome OS on the Windows partition.
7. The two partitions look like this:
Two partitions created
Flash Linux Mint Cinnamon
1. Connect USB and open Rufus. Next, click the Select button and select the ISO Linux Mint Cinnamon image. Now, just click Start. You will get a few prompts, so click Yes> OK to continue the flashing process.

Flash image ISO Linux Mint Cinnamon
2. After Rufus finishes flashing, close it. Now, plug the USB into the PC where you want to install Chrome OS. If you are installing Chrome OS on the same PC, leave it alone.
3. Next, reboot the PC and press the boot key repeatedly to boot into the BIOS. If you don’t know the PC’s boot key, you can find it from the table below.
Boot key
4. Once you have entered the BIOS, move to the Boot tab and select UEFI from the Boot List Option .
5. After that, scroll to the Security tab and turn off Secure Boot. Remember, each BIOS has its own interface, so menu positions may vary on different PCs. However, look for UEFI and Secure Boot in the Security, Boot or System Configuration tabs and make the corresponding changes.
6. Finally, move to the Exit tab and select Exit Save Changes . Immediately, then, start pressing the boot key again. You will be asked to select a boot device. Select the USB drive and press Enter.
7. You will boot straight into Linux Mint Cinnamon. If you are prompted with the splash screen, select the default option: Start Linux Mint .
Install Chrome OS
1. Now that you’ve booted into Linux Mint, click the network icon in the lower right corner and connect to WiFi or Ethernet. The Chrome OS installer will need an active Internet connection to download some libraries and dependencies.
2. Now, open Computer on the desktop and move to the drive where you have stored the Chrome OS folder.
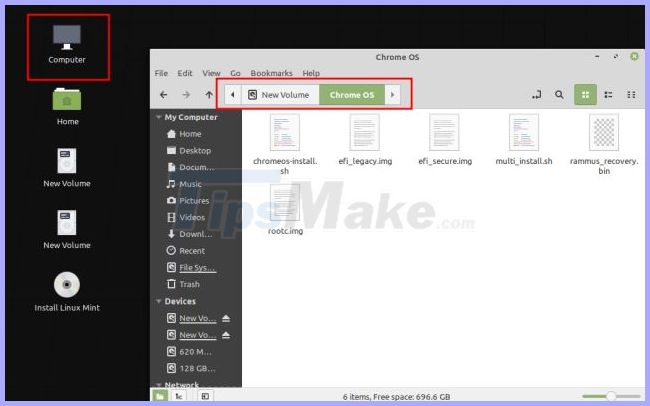
Move to the drive where you have archived the Chrome OS folder
3. Here, right-click anywhere on the window and open Terminal. Now, type sudo sh multi_install.sh and press Enter.
4. The necessary libraries will begin downloading. After that, a GParted window will automatically open. Here, scroll down and select the unallocated partition (100GB). Then click the plus button on the top menu bar.
5. Next, select ntfs as the file system and click Add.
6. Then click the Done button at the top menu bar.
7. Next, click the Apply button on the application.
8. Now, record the partition number starting with sda. Example of the article is sda9. Finally, close the GParted window .
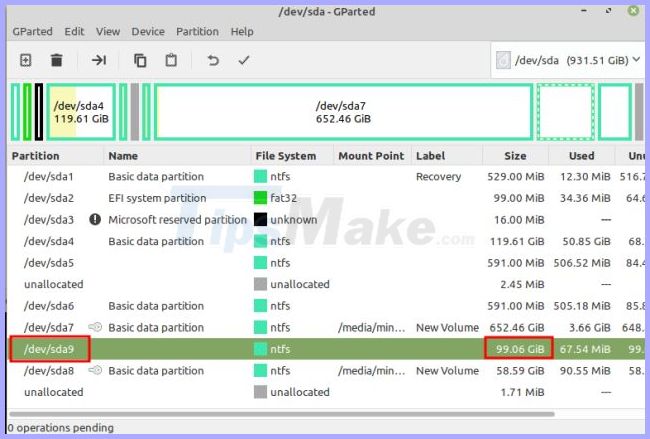
Record the partition number starting with sda
9. On the Terminal window, enter the partition number you noted above and click Enter.
10. You will see the partition details and ask for confirmation. If the partition selection is correct, type Yes and press Enter.
Note : If you encounter any errors, go through the Partitioning sectionof this article and make sure to follow the same partition structure.
11. Finally, Linux Mint will start installing Chrome OS on the Windows partition.
12. After installation is complete, on the Terminal window, scroll up a bit and you will find menuentry section . Now, select anything in the menuentry and copy it. You can right-click on the Terminal window to copy it.
13. Re-open Computer from the desktop again and move to C drive or any other Windows partition. Right click and select New Document> Empty document . Here, add the .txt to the end and save it.
14. Now, open the text file and paste the commands that you copied from the Terminal window. Then save the text file.
Open the text file and paste the commands that you copied from the Terminal window
15. Finally, you have completed the installation. Now, click on the Linux Mint Start menu and restart the computer. Immediately, remove the USB and you will boot directly into Windows 10 because there is one more step to take.
Dual-boot Chrome OS and Windows 10
You have successfully installed Chrome OS on the Windows partition, but you need to add Chrome OS as a bootable operating system during boot. And to do that, we will use the Grub2Win application.
1. Boot into Windows 10 and download the Grub2Win app (Free). Remember, the application is a bit slow, so please be patient while handling it.
2. During setup, leave everything as default. Then click Manage Boot Menu .
3. Here, click Add a New Entry .
4. From the drop-down menu, select submenu and type Chrome OS in the Title field . Next, click Edit Custom Code .
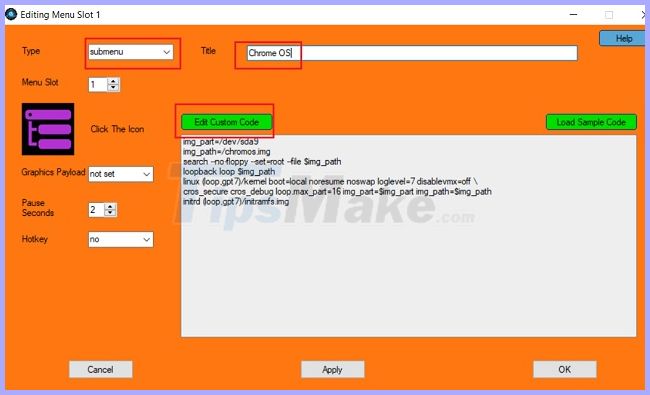
Click Edit Custom Code
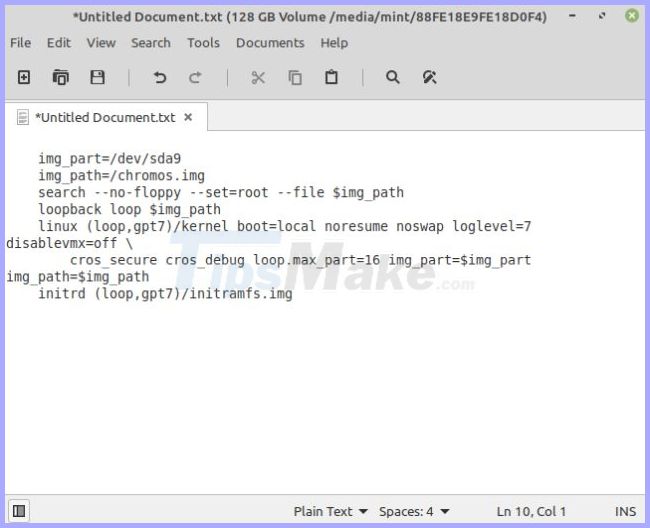
5. Here, paste the command that you copied from the Terminal and save it to the text file. The file should start with img_part and make sure it is not } at the end. Now, click Apply> OK .
6. You have successfully added Chrome OS to the boot menu with Windows 10. You can also move Chrome OS to the top by clicking the arrow icon. Finally, click Apply.
7. Now restart your computer and this time, you’ll find both Chrome OS and Windows 10 in the Grub2Win interface. Select the Chrome OS operating system and it will take some time to set everything up on the first run.
Note : If the Grub2Win interface does not display after a few starts, go to the Troubleshooting section to resolve the issue.
8. You can now set up your Google account and enjoy Chrome OS with Windows 10.
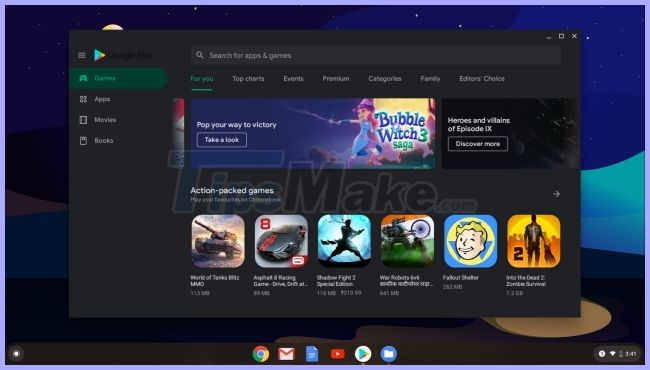
Enjoy Chrome OS with Windows 10
Troubleshoot
If you’re getting an error like ‘Not enough space to create image file’, ‘failed-to-get-canonical-path-of-cow’ or ‘GtkDialog mapped without a transient parent’ , the article recommends following the structure partition in the example.
In addition, many users have complained that after a few initial starts, the Grub2Win interface is not displayed and the computer boots directly into Windows 10. That happens because Windows is overwriting other EFI interfaces. There are solutions like fixing GRUB through Linux Mint, but for now the article doesn’t go into it.
For a quick solution, you can press the boot key (F7, F8, F9, etc.) during the boot process and from there, you can choose the Grub2Win EFI interface. After that, you will be given the multi-boot option. It’s troublesome to press the boot key every time it boots, but for now, it’s a quick and effective solution.