Время на прочтение
3 мин
Количество просмотров 18K
Преамбула: волею судьбы из мира академической науки (медицины) я попала в мир информационных технологий, где мне приходится использовать свои знания о методологии построения эксперимента и стратегиях анализа экспериментальных данных, однако, применять новый для меня стек технологий. В процессе освоения этих технологий я сталкиваюсь с рядом трудностей, которые пока, к счастью, удается преодолевать. Возможно, этот пост будет полезен тем, кто также только начинает работу с проектами Apache.
Итак, к сути. Вдохновившись статьей Юрия Емельянова о возможностях Apache Airflow в области автоматизации аналитических процедур, мне захотелось начать использовать предлагаемый набор библиотек в своей работе. Тем, кто еще совсем не знаком с Apache Airflow, может быть интересна небольшая обзорная статья на сайте Национальной библиотеки им. Н. Э. Баумана.
Поскольку обычные инструкции для запуска Airflow, судя по всему, не применяются в среде Windows, а использовать для решения данной задачи докер в моем случае было бы избыточно, я начала поиск других решений. К счастью для меня, я оказалась не первой на этом пути, поэтому мне удалось найти замечательную видео-инструкцию по установке Apache Airflow в Windows 10 без использования докера. Но, как это часто и бывает, при выполнении рекомендуемых шагов, возникают трудности, и, полагаю, не только у меня. Поэтому я хотела бы рассказать о своем опыте установки Apache Airflow, возможно кому-то это сэкономит немного времени.
Пройдемся по шагам инструкции (спойлер — 5-го шага все шло прекрасно):
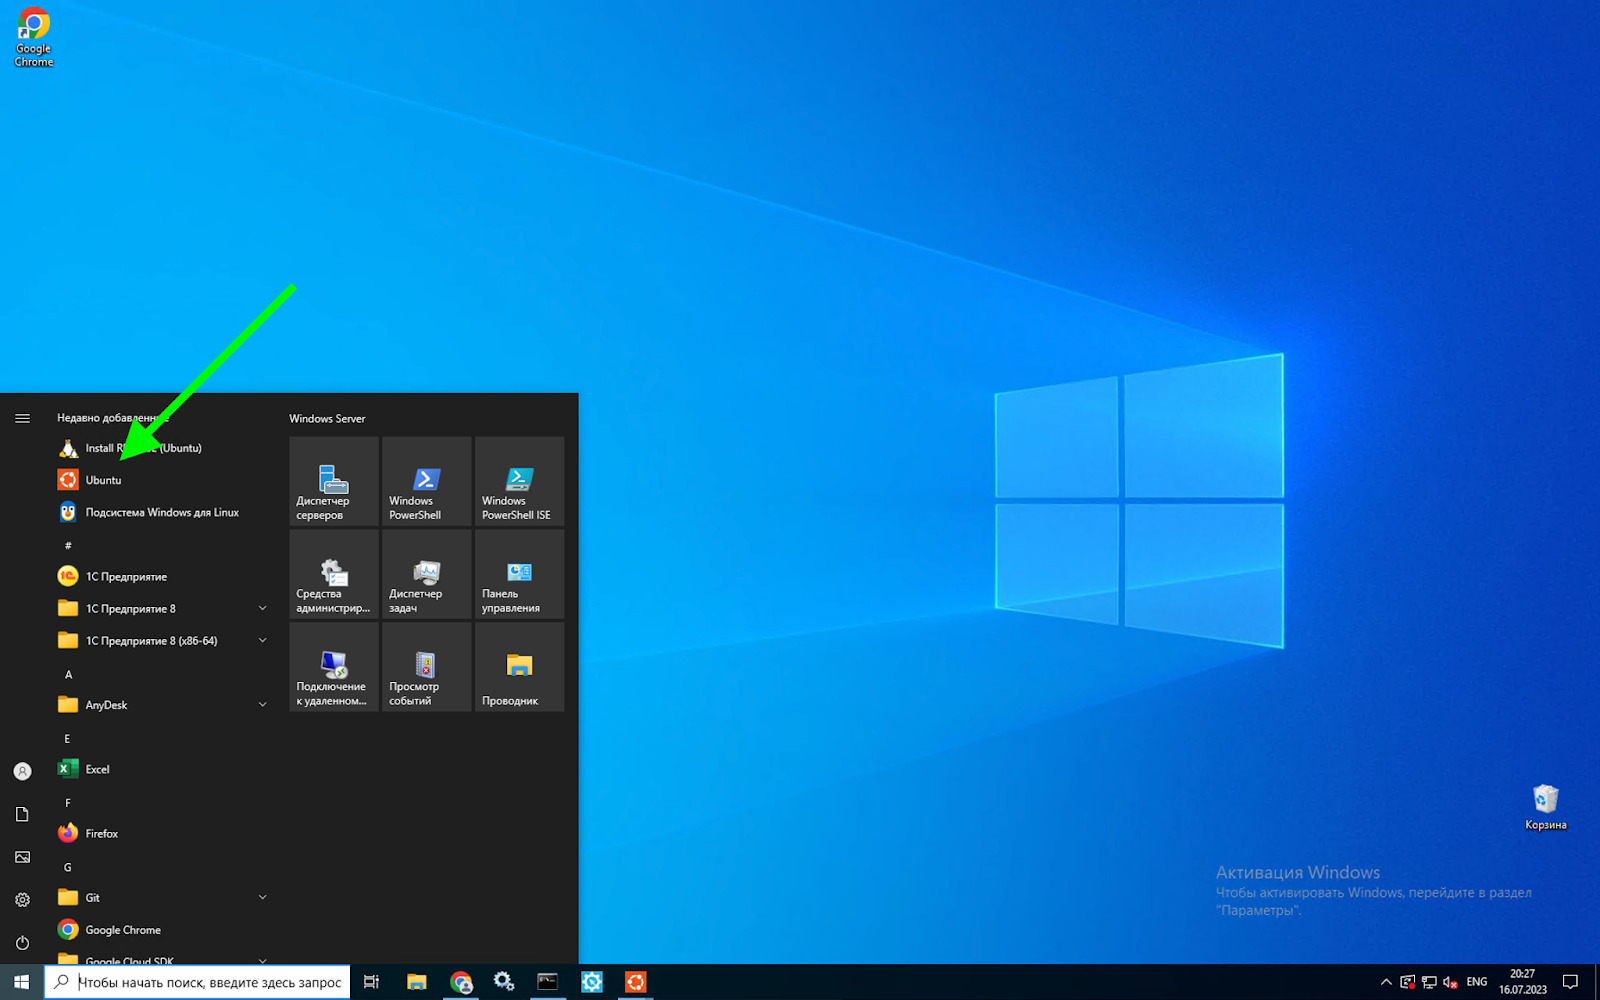
1. Установка подсистемы Windows для Linux для последующей установки дистрибутивов Linux
Это меньшая из проблем, как говорится:
Панель управления → Программы → Программы и компоненты → Включение и отключение компонентов Windows → Подсистема Windows для Linux
2. Установка дистрибутива Linux по выбору
Я воспользовалась приложением Ubuntu.
3. Установка и апдейт pip
sudo apt-get install software-properties-common
sudo apt-add-repository universe
sudo apt-get update
sudo apt-get install python-pip
4. Установка Apache Airflow
export SLUGIFY_USES_TEXT_UNIDECODE=yes
pip install apache-airflow
5. Инициализация базы данных
И вот именно здесь начались мои маленькие трудности. Инструкция предписывает ввести команду airflow initdb и перейти к следующему шагу. Однако я неизменно получала ответ airflow: command not found. Логично предположить, что возникли трудности на этапе установки Apache Airflow и просто нет нужных файлов. Удостоверившись, что все там где и должно быть, я решила попробовать указать полный путь до файла airflow (выглядеть должно так: Полный/путь/до/файла/airflow initdb). Но чуда не произошло и ответ был тем же airflow: command not found. Я попробовала использовать относительный путь к файлу (./.local/bin/airflow initdb), что привело к появлению новой ошибки ModuleNotFoundError: No module named json', которую можно преодолеть, обновив библиотеку werkzeug (в моем случае до версии 0.15.4):
pip install werkzeug==0.15.4Подробнее о werkzeug можно почитать здесь.
После этой нехитрой манипуляции команда ./.local/bin/airflow initdb была выполнена успешно.
6. Запуск сервера Airflow
На этом сложности с обращением к airflow еще не завершились. Запуск команды ./.local/bin/airflow webserver -p 8080 привел к ошибке No such file or directory. Вероятно, опытный пользователь Ubuntu сразу бы попробовал преодолеть такие трудности с обращением к файлу, применив команду export PATH=$PATH:~/.local/bin/ (то есть, добавив к существующему пути поиска исполняемых файлов, определяемому переменной PATH каталог /.local/bin/), но этот пост предназначен для тех, кто преимущественно работает с Windows и, возможно, не считает такое решение очевидным.
После описанной выше манипуляции команда ./.local/bin/airflow webserver -p 8080 была успешно выполнена.
7. URL: localhost:8080/
Если все прошло удачно на предыдущих этапах, то вы готовы покорять аналитические вершины.
Надеюсь, описанный выше опыт установки Apache Airflow на Windows 10 будет полезен начинающим пользователям и ускорит их вхождение во вселенную современных инструментов аналитики.
В следующий раз хотелось бы продолжить тему и рассказать об опыте использования Apache Airflow в сфере анализа поведения пользователей мобильных приложений.
airflow_base_RU
Установка Apache Airflow на Windows 10 и простые первые даги DAG’s
Для установки airflow на windows 10 необходимо сначала установить подсистему Windows для Linux (Windows subsystem for Linux — WSL), т.к. airflow не поддерживает windows((
Шаг 1.
Изначально компонент WSL отключен. Чтобы его включить, вам необходимо зайти в Пуск -> Панель управления -> Программы и компоненты -> Включение и отключение компонентов windows , активировать галочку -> Подсистема Windows для Linux (Windows Subsystem for Linux) , нажать кнопку ОК, и перезагрузить компьютер.
Шаг 2.
Качаем и устанавливаем любой понравившийся дистрибьютив.
Все готово к началу установки.
Шаг 3.
Сама установка описана в официальной документации и разбита на следующие действия:
- сначала в командной строке вводим
wslдля доступа к установленной подсистеме; - затем непостредственно установка —
pip install apache-airflow; - если «по-хорошему» не прошло, то выполняем следующий набор команд для выбора и установки определенной версии:
export AIRFLOW_HOME=~/airflowsource ~/.bashrcAIRFLOW_VERSION=2.2.3PYTHON_VERSION="$(python3 --version | cut -d " " -f 2 | cut -d "." -f 1-2)"CONSTRAINT_URL="https://raw.githubusercontent.com/apache/airflow/constraints-${AIRFLOW_VERSION}/constraints-${PYTHON_VERSION}.txt"pip3 install "apache-airflow==${AIRFLOW_VERSION}" --constraint "${CONSTRAINT_URL}"export PATH=$PATH:~/.local/binsource ~/.bashrc
- инициализация базы данных, по умолчанию sqlite —
airflow db init; - создание пользователя —
airflow users create \ --username admin \ --firstname Peter \ --lastname Parker \ --role Admin \ --email spiderman@superhero.org - запуск локального сервера —
airflow webserver --port 8080 - запуск шедулера в новом окне —
airflow scheduler
Если все сделано верно, то при посещении localhost:8080 и после ввода данных пользователя вам будут доступны для ознакомления с функциональностью стандартные даги, их уже можно покрутить/позапускать и посмотреть на результаты.
П.С.
По умолчанию создается домашняя папка AIRFLOW_HOME=~/airflow, ее можно сменить export AIRFLOW_HOME='ваш путь'. В папку airflow/dags необходимо будет поместить все ваши новые даги для последующей с ними работы.
Для того чтобы получить доступ к папкам подсистемы проделаем следующее cmd -> wsl -> cd ~/ -> explorer.exe .

Apache Airflow is a tool that helps you manage and schedule data pipelines. According to the documentation, it lets you «programmatically author, schedule, and monitor workflows.»
Airflow is a crucial tool for data engineers and scientists. In this article, I’ll show you how to install it on Windows without Docker.
Although it’s recommended to run Airflow with Docker, this method works for low-memory machines that are unable to run Docker.
Prerequisites:
This article assumes that you’re familiar with using the command line and can set up your development environment as directed.
Requirements:
You need Python 3.8 or higher, Windows 10 or higher, and the Windows Subsystem for Linux (WSL2) to follow this tutorial.
What is Windows Subsystem for Linux (WSL2)?
WSL2 allows you to run Linux commands and programs on a Windows operating system.
It provides a Linux-compatible environment that runs natively on Windows, enabling users to use Linux command-line tools and utilities on a Windows machine.
You can read more here to install WSL2 on your machine.
With Python and WSL2 installed and activated on your machine, launch the terminal by searching for Ubuntu from the start menu.
Step 1: Set Up the Virtual Environment
To work with Airflow on Windows, you need to set up a virtual environment. To do this, you’ll need to install the virtualenv package.
Note: Make sure you are at the root of the terminal by typing:
cd ~pip install virtualenv Create the virtual environment like this:
virtualenv airflow_env And then activate the environment:
source airflow_env/bin/activateStep 2: Set Up the Airflow Directory
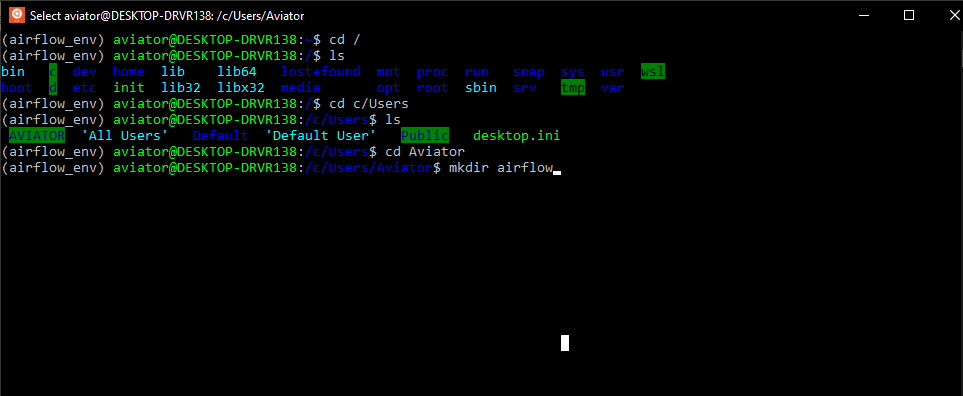
Create a folder named airflow. Mine will be located at c/Users/[Username]. You can put yours wherever you prefer.
If you do not know how to navigate the terminal, you can follow the steps in the image below:
Now that you have created this folder, you have to set it as an environment variable. Open a .bashrc script from the terminal with the command:
nano ~/.bashrc Then write the following:
AIRFLOW_HOME=/c/Users/[YourUsername]/airflow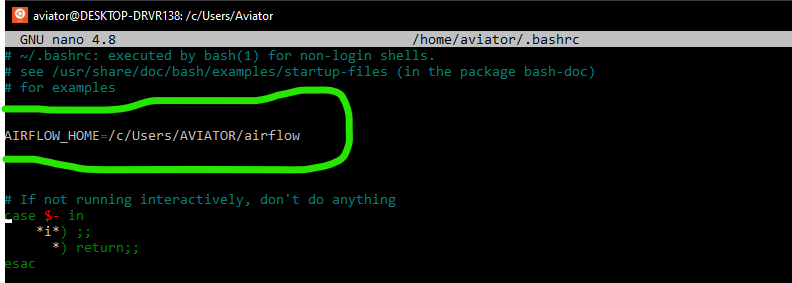
Press ctrl s and ctrl x to exit the nano editor.
This part of the Airflow directory will be permanently saved as an environment variable. Anytime you open a new terminal, you can recover the value of the variable by typing:
cd $AIRFLOW_HOME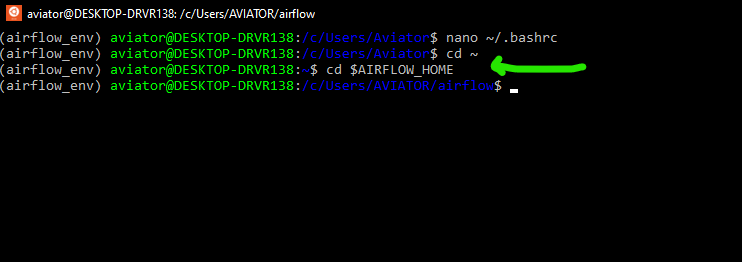
With the virtual environment still active and the current directory pointing to the created Airflow folder, install Apache Airflow:
pip install apache-airflow Initialize the database:
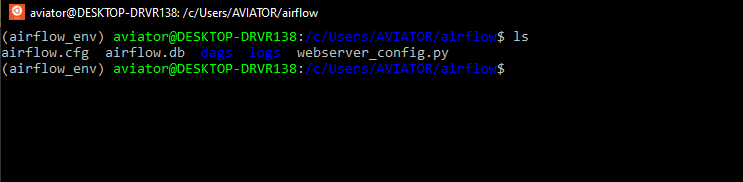
airflow db init Create a folder named dags inside the airflow folder. This will be used to store all Airflow scripts.
Step 4: Create an Airflow User
When airflow is newly installed, you’ll need to create a user. This user will be used to login into the Airflow UI and perform some admin functions.
airflow users create --username admin –password admin –firstname admin –lastname admin –role Admin –email youremail@email.comCheck the created user:
airflow users list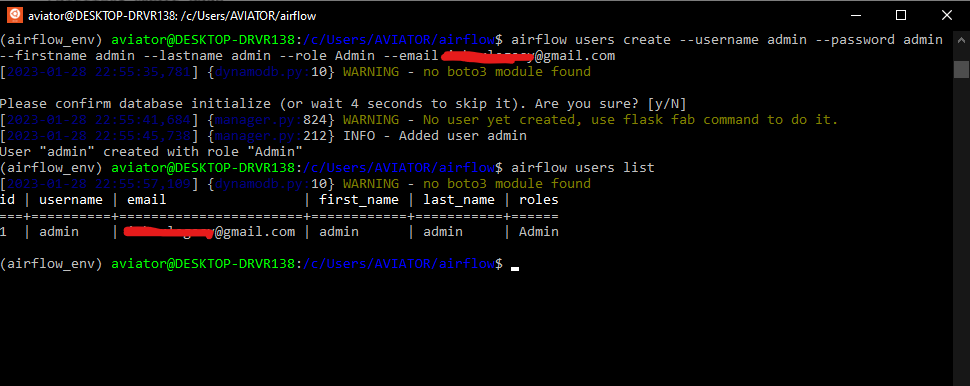
Step 5: Run the Webserver
Run the scheduler with this command:
airflow scheduler Launch another terminal, activate the airflow virtual environment, cd to $AIRFLOW_HOME, and run the webserver:
airflow webserver If the default port 8080 is in use, change the port by typing:
airflow webserver –port <port number>Log in to the UI using the username created earlier with «airflow users create».
In the UI, you can view pre-created DAGs that come with Airflow by default.
How to Create the first DAG
A DAG is a Python script for organizing and managing tasks in a workflow.
To create a DAG, navigate into the dags folder created inside the $AIRFLOW_HOME directory. Create a file named «hello_world_dag.py». Use VS Code if it’s available.
Enter the code from the image below, and save it:
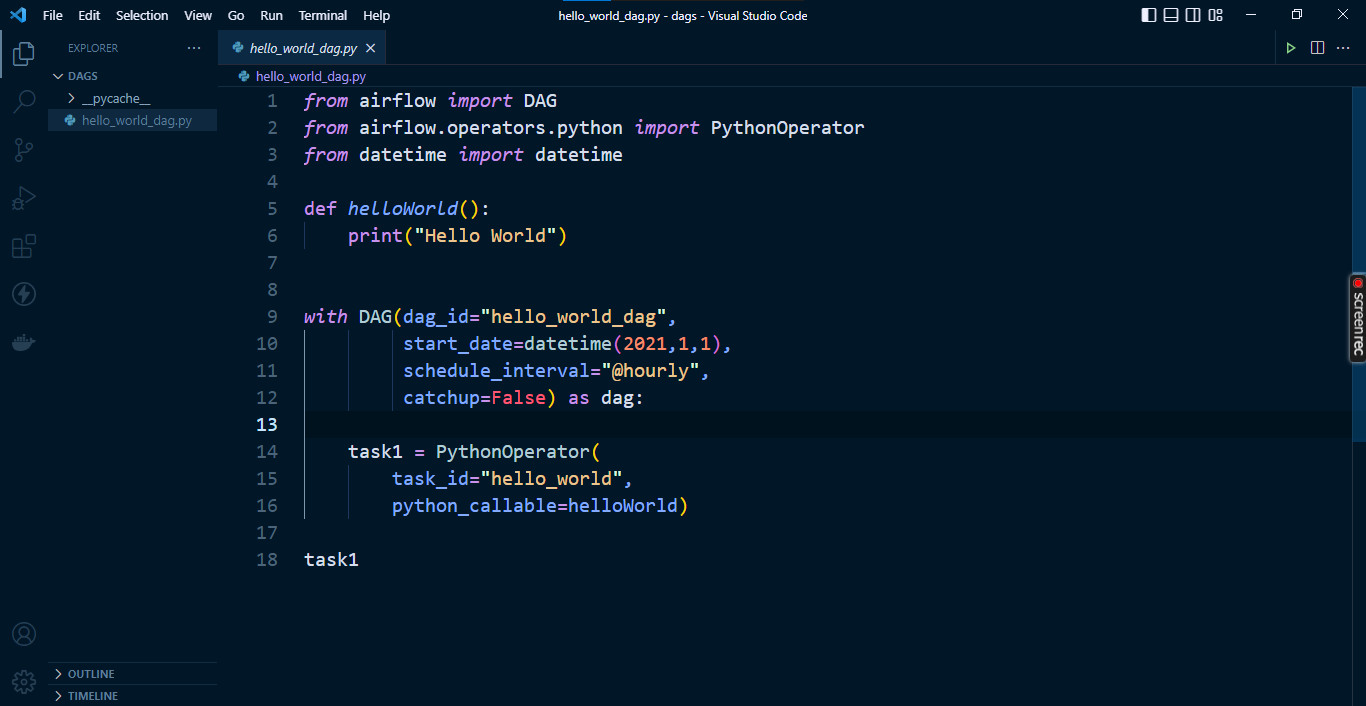
Go to the Airflow UI and search for hello_world_dag. If it does not show up, try refreshing your browser.
That’s it. This completes the installation of Apache Airflow on Windows.
Wrapping Up
This guide covered how to install Apache Airflow on a Windows machine without Docker and how to write a DAG script.
I do hope the steps outlined above helped you install airflow on your Windows machine without Docker.
In subsequent articles, you will learn about Apache Airflow concepts and components.
Follow me on Twitter or LinkedIn for more Analytics Engineering content.
Learn to code for free. freeCodeCamp’s open source curriculum has helped more than 40,000 people get jobs as developers. Get started
Learn how to install Apache Airflow on Windows 10. Step-by-step guide for setting up Airflow on your Windows machine.
Before we start, ensure that you have Python (3.6, 3.7, 3.8, or 3.9) installed on your system. If not, you can download it from the official Python website.
Step 1: Install pip
Pip is a package manager for Python. You can install it by running the following command in your command prompt:
python get-pip.py
Step 2: Install Apache Airflow
Once pip is installed, you can install Apache Airflow using pip. Run the following command:
pip install apache-airflow
This command will install the latest version of Apache Airflow.
Step 3: Initialize the Airflow database
After the installation, you need to initialize the Airflow database. Run the following command:
airflow db init
Step 4: Start the Airflow web server
Finally, you can start the Airflow web server by running the following command:
airflow webserver -p 8080
Now, you can access the Airflow web interface by navigating to localhost:8080 in your web browser.
Please note that these steps are for a basic installation of Apache Airflow on Windows 10. For a production environment, additional configuration might be necessary.
| Step | Command |
|---|---|
| Install pip | python get-pip.py |
| Install Apache Airflow | pip install apache-airflow |
| Initialize the Airflow database | airflow db init |
| Start the Airflow web server | airflow webserver -p 8080 |
By following these steps, you should have Apache Airflow up and running on your Windows 10 system. If you encounter any issues during the installation, feel free to consult the official Apache Airflow documentation.
Before we start, ensure that you have Python (3.6, 3.7, 3.8, or 3.9) installed on your Windows machine. If not, you can download it from the official Python website.
Step 1: Install pip
Pip is a package manager for Python. You can install it by running the following command in your command prompt:
python get-pip.py
Step 2: Install Apache Airflow
Once pip is installed, you can install Apache Airflow using the following command:
pip install apache-airflow
This command will install the latest version of Apache Airflow along with its dependencies.
Step 3: Initialize the Airflow database
After the installation, you need to initialize the Airflow database. Run the following command to do so:
airflow db init
Step 4: Start the Airflow web server
Finally, you can start the Airflow web server by running the following command:
airflow webserver -p 8080
Now, you can access the Airflow web interface by navigating to localhost:8080 in your web browser.
By following these steps, you should have successfully installed Apache Airflow on your Windows machine. If you encounter any issues during the installation, feel free to refer to the official Apache Airflow documentation.
Remember, Apache Airflow is a powerful tool for managing complex workflows. With it installed on your Windows machine, you’re now ready to start creating and scheduling your own workflows.
Prerequisites
Before we begin, ensure that you have the following prerequisites:
- Python (3.6, 3.7, 3.8, or 3.9)
- pip (Python package installer)
Step 1: Set Up a Virtual Environment
First, it’s recommended to create a virtual environment. This isolates your Apache Airflow setup from the rest of your system and prevents any potential conflicts. You can create a virtual environment using the following command:
python -m venv airflow-env
Activate the virtual environment:
On Unix or MacOS, run:
source airflow-env/bin/activate
On Windows, run:
airflow-env\Scripts\activate
Step 2: Install Apache Airflow
Once your virtual environment is activated, you can install Apache Airflow using pip. Run the following command:
pip install apache-airflow
Step 3: Initialize the Database
After the installation, you need to initialize the database before you can run tasks:
airflow db init
Step 4: Start the Web Server
Finally, you can start the web server with the default port 8080:
airflow webserver -p 8080
Now, you should be able to access the Apache Airflow web interface on your local machine at http://localhost:8080.
This Apache Airflow installation guide should help you get started with Apache Airflow and enable you to create, schedule, and monitor your workflows effectively. For more detailed information, refer to the official Apache Airflow documentation.

Prerequisites
Before you start with the installation, make sure you have the following prerequisites:
- Windows 10
- Python 3.6 or above
- pip (Python package installer)
Step 1: Install Python
If you don’t have Python installed, you can download it from the official Python website. Make sure to install version 3.6 or above.
Step 2: Install pip
Pip is a package installer for Python. You can check if pip is installed by running the following command in your command prompt:
pip --version
If pip is not installed, you can install it by following the instructions on the official pip installation guide.
Step 3: Install Apache Airflow
Once you have Python and pip installed, you can install Apache Airflow by running the following command in your command prompt:
pip install apache-airflow
This command will install the latest version of Apache Airflow.
Step 4: Initialize the Airflow database
After installing Apache Airflow, you need to initialize its database by running the following command:
airflow db init
This command will initialize the database used by Apache Airflow to store metadata.
Step 5: Start the Airflow web server
Finally, you can start the Airflow web server by running the following command:
airflow webserver
This command will start the Airflow web server, which you can access by navigating to localhost:8080 in your web browser.
By following these steps, you should now have Apache Airflow installed on your Windows machine. If you encounter any issues during the installation, feel free to consult the official Apache Airflow documentation.
Before you start the installation process, ensure that you have Python (version 3.6 or above) and Pip installed on your system. If not, you can download Python from the official website and install Pip using the following command:
python get-pip.py
Once you have Python and Pip ready, you can install Apache Airflow using the following command:
pip install apache-airflow
This command will install the latest version of Apache Airflow. If you want to install a specific version, you can specify it in the command. For example, to install Apache Airflow version 2.0.1, you would use:
pip install apache-airflow==2.0.1
After the installation is complete, you can verify it by running the following command:
airflow version
This command will display the version of Apache Airflow that you have installed. If the installation was successful, you should see the version number you installed.
Remember, Apache Airflow is a powerful tool for managing and automating workflows and data pipelines. By installing it using Pip, you can leverage its capabilities in your Python projects.
Before we start, it’s important to note that Apache Airflow requires Python (versions 3.6, 3.7, 3.8, or 3.9) and pip, Python’s package installer. Make sure you have these installed on your system.
Step 1: Set Up a Virtual Environment
It’s recommended to install Apache Airflow in a virtual environment. This can be done using the venv module in Python.
python3 -m venv airflow_env
source airflow_env/bin/activate
Step 2: Install Apache Airflow
Once your virtual environment is activated, you can install Apache Airflow using pip. The following command will install the latest version of Apache Airflow.
pip install apache-airflow
Step 3: Initialize the Database
After the installation, you need to initialize the database before you can run tasks. Apache Airflow uses a database to store metadata on the status of your tasks.
airflow db init
Step 4: Start the Web Server
Finally, you can start the web server. By default, the web server is available at localhost:8080, and you can access it using your web browser.
airflow webserver -p 8080
By following these steps, you should now have a working installation of Apache Airflow. Remember to regularly check for updates and upgrade your installation when necessary to benefit from new features and improvements.
This is the best experience of running Airflow I’ve seen for years.
Before you start the download process, ensure that your system meets the following requirements:
- Windows 10 operating system
- Python 3.6 or above
- pip, the Python package installer
If your system meets these requirements, you can proceed with the following steps to download and install Apache Airflow.
- Install Python and pip
If you haven’t installed Python and pip yet, you can download them from the official Python website. After downloading, run the installer and ensure that you check the box that says ‘Add Python to PATH’ during the installation process.
- Install Apache Airflow
Open your command prompt and run the following command to install Apache Airflow:
pip install apache-airflow
This command will download and install Apache Airflow along with its dependencies.
- Initialize the Airflow database
After the installation, you need to initialize the Airflow database by running the following command:
airflow db init
- Start the Airflow web server
Finally, you can start the Airflow web server with the following command:
airflow webserver
Now, you should be able to access the Airflow web interface at localhost:8080.
Remember, Apache Airflow is a powerful tool that can help you manage complex workflows. Whether you’re a data engineer, a data scientist, or a developer, mastering Apache Airflow can significantly enhance your data processing capabilities.
Before you start the Apache Airflow download, ensure that you have Python (version 3.6 or above) and pip installed on your system. You can check your Python version using the following command:
python --version
To install Apache Airflow, use the pip command as shown below:
pip install apache-airflow
This command will download and install the latest version of Apache Airflow. If you want to download a specific version of Apache Airflow, you can specify it as follows:
pip install apache-airflow==1.10.12
After the installation is complete, you can verify it by running the following command:
airflow version
This command will display the version of Apache Airflow that you have installed.
Remember, Apache Airflow is a robust tool that requires some configuration before you can start using it. After you complete the Apache Airflow download and installation, you will need to initialize the database and create a user account.
For more detailed instructions on how to download and install Apache Airflow, you can refer to the official Apache Airflow documentation.
By following these steps, you can easily download and install Apache Airflow on your system and start creating and managing your workflows.
Prerequisites
Before we begin, ensure that you have the following installed on your Windows machine:
- Python (version 3.6 or above)
- pip (Python package installer)
Step 1: Install Apache Airflow
First, open your command prompt and install Apache Airflow using pip. Run the following command:
pip install apache-airflow
Step 2: Initialize the Airflow Database
After the installation, you need to initialize the Airflow database. Run the following command:
airflow db init
Step 3: Start the Airflow Web Server
Next, start the Airflow web server by running the following command:
airflow webserver -p 8080
This will start the web server at port 8080.
Step 4: Access the Airflow Web Interface
Open your web browser and navigate to http://localhost:8080. You should now see the Airflow web interface.
Step 5: Start the Airflow Scheduler
Finally, start the Airflow scheduler by running the following command:
airflow scheduler
Congratulations! You have successfully set up and started using Apache Airflow on your Windows machine. Remember, Apache Airflow is a powerful tool for managing complex computational workflows and data processing pipelines. It’s an essential tool for data engineers and scientists working on Windows.
Prerequisites
Before we start with the Apache Airflow installation, ensure that you have the following prerequisites:
- Python (3.6, 3.7, 3.8, or 3.9)
- pip (Python package installer)
Installation Steps
Follow the steps below to install Apache Airflow:
- Install Apache Airflow using pip
You can install Apache Airflow using pip. Run the following command in your terminal:
pip install apache-airflow
- Initialize the Airflow database
After the installation, you need to initialize the Airflow database. Run the following command:
airflow db init
- Start the Airflow web server
Next, start the Airflow web server by running the following command:
airflow webserver -p 8080
- Access the Airflow web interface
Finally, you can access the Airflow web interface by navigating to http://localhost:8080 in your web browser.
Troubleshooting Apache Airflow Installation
If you encounter any issues during the Apache Airflow installation, check the following:
- Ensure that you have the correct Python version.
- Make sure that pip is updated to the latest version.
- Check if your system meets the minimum requirements for Apache Airflow.
By following this guide, you should be able to successfully complete the Apache Airflow installation and start creating and managing your workflows.
Как развернуть Airflow – замечательное ПО для автоматизации почти всего на Python. Используем в качестве базы Windows 10 + Linux WSL.
В этой части покажу, как развернуть Airflow – замечательное ПО для автоматизации почти всего на Python. Мы будем использовать в качестве базы Windows 10 + Linux WSL (“Windows Subsystem for Linux” – подсистема Linux на Windows).
Это статья из цикла “5 ETL для зоопарка ботов”. В нем я пошагово разбираю, как наладить потоки данных из разных библиотек и конструкторов ботов на разных языках и стеках. В основе лежат Python и его библиотеки.
Вот предыдущие статьи цикла, подводящие к текущей:
- Анонс цикла с перечнем технологий
- Настройка потока логов «Из Dialogflow в BigQuery»
- Python для аналитики ad hoc из BigQuery
Конечно, можно использовать и официальный Docker-контейнер, чтобы точно воспроизводить среду при последующих развертываниях, однако я остановлюсь именно на таком стеке, поскольку это моя реальность, да и много сущностей разворачивать не приходится. Возможно, кому-то да пригодится такой стек.
Для простоты обойдусь без развертки образа на виртуальном частном сервере, разборками с имеющейся и требуемой оперативной памятью и, конечно, падениями контейнеров, до причин которых еще надо уметь докопаться.

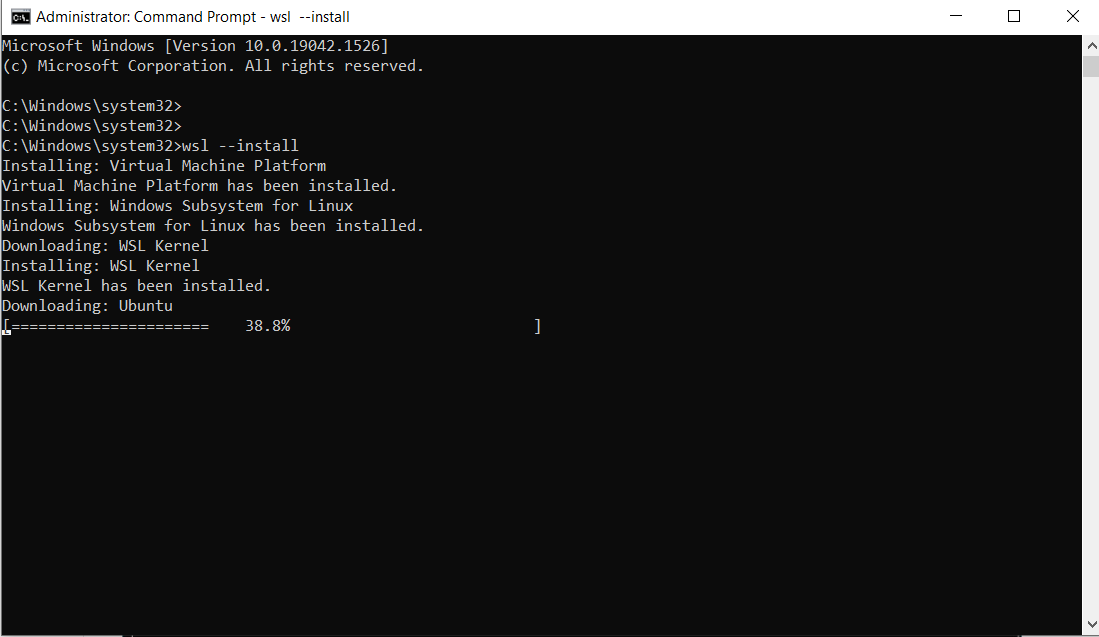
Установка Linux WSL
Некоторые важнейшие компоненты Airflow под Win не адаптированы. Поэтому нам понадобится Linux. откроем командную строку Windows 10 как администратор и наберем:
Процесс скачивания дистрибутива Ubuntu начался:
Чтобы пакет ОС “развернулся”, перезагрузим Windows. Сразу после авторизации окно командной строки откроется само и установка Linux продолжится. Спустя несколько минут потребуется ввести имя пользователя и пароль:
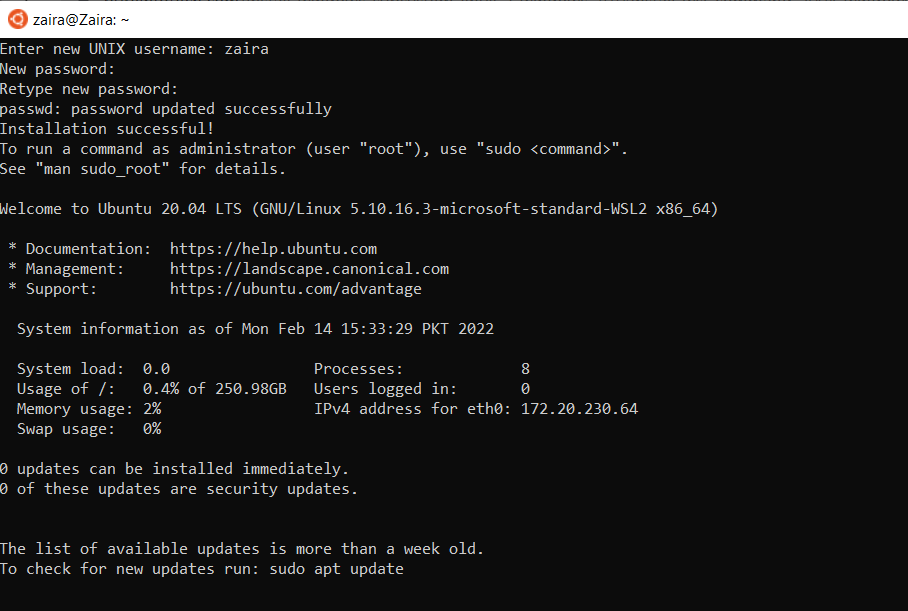
На этом установку подсистемы мы завершаем. Теперь Ubuntu можно запустить из меню “Пуск”:
Прежде чем устанавливать программу, нам потребуется настроить виртуальную среду – некий прообраз контейнера Docker, который позволит воспроизвести на любой другой машине те же условия с версиями языка и пакетов. Установим библиотеку для создания таких образов:
Создадим виртуальное окружение для изоляции проекта от остальных событий и мест в Linux:
			virtualenv airflow_env
source airflow_env/bin/activate
Теперь настало время настроить проект. Для этого создадим отдельную папку и зайдем в нее:
Установим airflow:
pip install apache-airflow
Обязательное условие для запуска утилиты – работающая база данных. Мой проект использует BigQuery API, но использовать следующую команду все равно придется:
Поскольку у Airflow есть и браузерный UI с авторизацией, то создадим пользователя-админа:
airflow users create --username admin -password admin -firstname admin -lastname admin -role Admin -email youremail@email.com
Запустим веб-сервер с экземпляром Airflow:
Так вы сможете поиграться с этой прекрасной программой в браузере, просто перейдя по ссылке http://localhost:8080 (в моем случае 8081 – настроила нестандартный порт, пока разбиралась с мануалом по установке).

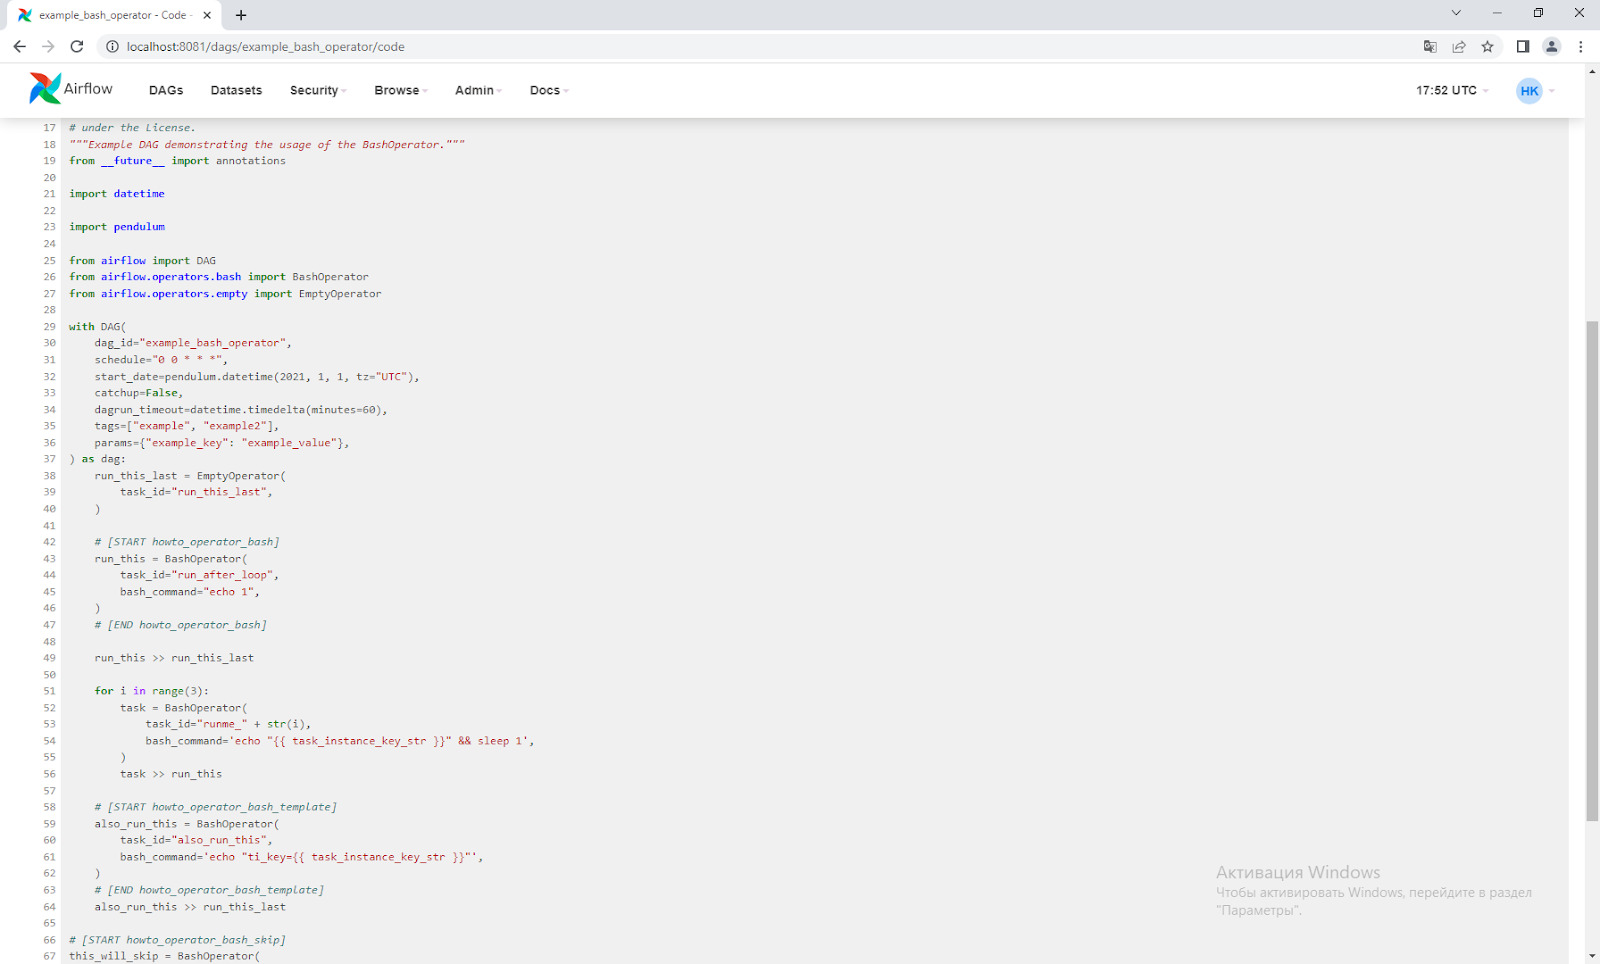
Спустя примерно час в списке DAG’ов (Directed Acyclic Graph) появятся обучающие скрипты (их Airflow подтянет самостоятельно). Прежде чем мы перейти к настройке своего кода, можно “провалиться” в парочку (например, ‘example_bash_operator’) и посмотреть «питоническое» содержимое во вкладке ‘Code’:
Заключение
Конечно, на этом я не остановлюсь, ибо Airflow вызывает у меня любовь. Появилась она, когда отслеживать вручную многочисленные скрипты на crontab (утилита Linux, позволяющая запустить код по расписанию) стало неудобно. Прописывать руками все то, что умеет Airflow, бессмысленно: там и аналитика исполняемости, и дополнительная защита от взлома, и безконсольный доступ к логам, и даже плагины.
Мое пожелание крупным российским компаниям поскорее становиться профессиональнее в вопросах автоматической отчетности, и внедрять такие opensource-решения.
А если вы захотели прокачаться как дата-аналитик, рекомендую курс “Аналитика на Python”.