
- Компьютеры
- Cancel
Купил SSD и установил на него Windows 8 попробовать. Узнал о режиме NCQ для накопителей SATA, который позволяет существенно ускорить работу системы (особенно на SSD) за счет использования родных для диска команд без преобразований. Для его использования необходим контролер и драйверы контроллера поддержвающие работу AHCI интерфейса.
Для Windows 8 все просто — система сама может определить, что установлен режим работы дисков AHCI и установить нужные драйверы из своего комплекта.
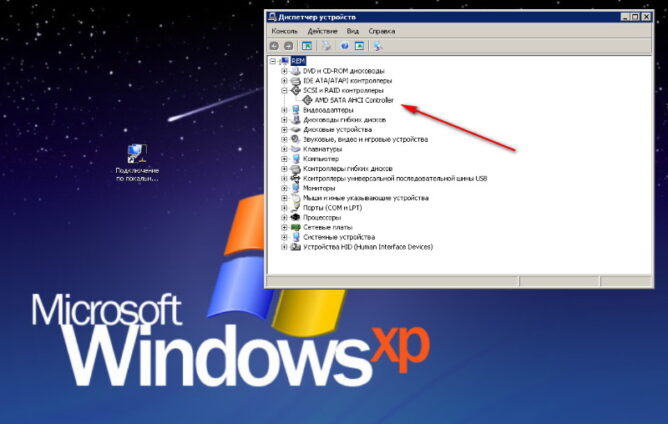
В Windows XP встроенных AHCI драйверов нет, потому их нужну ставить с дискеты при установке по F6 или немного потанцевать с бубном. У меня матринская плата Gigabyte GA-P35-DS3R с контроллером Intel ICH9R, который как раз поддерживает AHCI. В диспечере задач до включения AHCI режима я видел несколько IDE контроллеров и два контроллера:
- Intel(R) ICH9 Family 2 port Serial ATA Storage Controller 2 — 2926,
- ICH9R/DO/DH 4 port Serial ATA Storage Controller 1 — 2920.
Windows 8 на SSD завелась сразу без проблем, а с Windows XP пришлось проделать некоторые манипуляции.
Итак, установка AHCI драйверов на рабочую Windows XP.
Чтобы установить драйвер из установленной системы Windows XP нужно:
- Взять драйверы контроллера с диска к материнской плате, у меня они расположены в <CD>:\BootDrv\ в самораспоковывающимся архиве MSM32.exe (для 64 разрядной системы MSM64.exe).
- Копируем MSM32.exe на диск, например в папку C:\Intel
- Распаковываем архив командой MSM32.exe, на запрос «Continue extraction?» вводим Y.
- 6 файлов: IaStor.sys, IaStor.cat, IaAHCI.sys, IaAHCI.cat, IaAHCI.inf, TXTSETUP.OEM копируем в C:\Windows\System32\Drivers\
- Далее переходим в диспетчер устройств и в разделе IDE ATA/ATAPI контроллеры выбираем Intel(R) ICH9 Family 2 port Serial ATA Storage Controller 2 — 2926.
- Открываем Свойства-Драйвер-Обновить…
- В открывшемся окне отказываемся от автоматической установки дравера, выбираем ручную установку.
- Далее выбираем «Установить с диска».
- Снимаем галочку «Только совместимые».
- Указываем путь к распакованным ранее с диска файлам C:\Windows\System32\Drivers\
- Выбираем из списка драйвер для ICH9R/DO/DH SATA AHCI Controller.
- На предупреждение Windows отвечаем «Продолжить все равно».
- После установки система предлагает перезагрузку.
- Перезагружаемся и входим в BIOS.
- В BIOS включаем режим AHCI для SATA контроллера и сохраняем.
- Во время запуска системы после POST вы увидите экран инициализации SATA AHCI BIOS, будет выведен список каналов и подключенных на них устройств.
- Далее загрузиться Windows XP.
- Обнаружиться новое устройство и Windows предложит установть драйверы автоматом — отказываемся.
- Скачиваем обновленный дравер Intel Matrix Storage Manager (iata89cd.exe или попробуйте iata_cd.exe версия 11.2.0.1006 от 07.06.2012)
- Запускаем iata89cd.exe и наблюдаем установку драйвера.
- В диспетчере устройтсв в разделе IDE ATA/ATAPI контроллеры теперь только: контроллер ICH9R/DO/DH SATA AHCI Controller, вторичный и первичный IDE, Стандартный двухканальный контроллер PCI IDE.
- Установка завершена — Windows XP теперь работает с HDD в AHCI режиме.
Если Windows XP не подцепила AHCI драйвер вы увидите после перезагрузки BSOD c кодом 0х0000007b.
Отключите режим AHCI в BIOS, тогда система загрузиться в рабочем режиме и попробуйте снова.
Спасибо матриалам форума http://forum.3dnews.ru/showthread.php?t=93307&pp=1000
В итоге я получил Windows 8 и Windows XP работающие в режиме AHCI.
В настоящее время Windows XP уже устарела, но значительное количество пользователей ещё продолжает её использовать по причине нежелания расставаться с привычными приложениями и привычной операционной системой, а также слабости аппаратной части не тянущей новые версии Windows.
По умолчанию режим работы жестких дисков AHCI в операционной системе Windows XP не предусмотрен и драйвера в установочном дистрибутиве Microsoft отсутствуют. В интернете существует множество сборок Windows XP, где в дистрибутивах уже внедрены драйвера для AHCI режима и при установке режим AHCI установится автоматически, если он включён в BIOS SETUP.
Другое дело если нужно включить режим AHCI в уже установленной Windows XP. Особенно это актуально для тех, у кого помимо Windows XP установлена другая версия Windows, например Windows 7.
 Для перевода в режим ACHI есть несколько возможностей.
Первая это с помощью программы Acronis True Image, которая имеет в своём составе средство переноса операционной системы на новое железо под названием Universal Restore. С помощью Acronis True Image, делается образ диска с установленной Windows XP. В BIOS SETUP устанавливается режим диска AHCI и запустив Acronis True Image с загрузочной флэшки или загрузочного CD/DVD диска восстанавливается система из образа. При восстановлении из образа на определённом этапе можно подгрузить нужные драйверы либо установить стандартные драйверы и тогда при первой загрузке система заново обнаружит устройство и предложит установить драйвера.
Вторая возможность это установка вручную драйверов на работающей Windows XP.
Подключение AHCI в Windows XP этим методом может быть немного разным в зависимости от оборудования, но в общем случае выглядит примерно следующим образом:
- Нужно определить производителя, модель материнской платы и чипсет.
- Найти необходимые драйверы для AHCI. Сначала ищем на официальном сайте производителя материнской платы. Если на сайте производителя нужные драйверы отсутствуют, то искать нужно драйверы на сайтах производителей контроллера жестких дисков (чипсета). Обычно это либо Intel, либо AMD. Например, драйвер у контроллеров Intel состоит из шести файлов: IaAHCI.sys, IaStor.cat, IaStor.sys, IaAHCI.cat, IaAHCI.inf, TXTSETUP.OEM. Драйверы для 32-х и 64-х битных версий различны и поэтому нужно выбрать версию соответствующую вашей операционной системе.
- Файлы драйвера нужно скопировать в папку C:\Windows\System32\Drivers\ по умолчанию. Путь может отличаться в зависимости от диска и имени папки, куда установлен Windows.
- Заходим в «диспетчер устройств» Windows и в разделе IDE ATA/ATAPI нужно найти текущий контроллер жестких дисков. Правой кнопкой мыши щёлкаем по контроллеру и выбираем свойства, а затем драйвер и обновить. Откроется окно, где нужно выбрать ручную установку и установку с диска. Нужно снять галочку «только совместимые». Теперь нужно указать путь к скопированным ранее файлам драйвера по умолчанию C:\Windows\System32\Drivers. В списке выбираем нужный драйвер. В окне предупреждения нужно выбрать «продолжить всё равно». После того как закончится установка драйвера нужно перезагрузится. Войти в BIOS SETUP и выбрать режим жесткого диска AHCI и сохранить изменения.
После загрузки операционная система заново обнаружит устройство и попытается установить драйвер, но нужно отказаться от этой установки и установить свои драйвера вручную. Если сделано всё правильно, то в диспетчере устройств можно увидеть в разделе IDE ATA/ATAPI запись со словом AHCI. Это означает, что драйвера установлены и жесткий диск работает в режиме AHCI.
Если что-то было сделано не так, то ли драйвер не тот или что-то другое, то при загрузке система выпадет в голубой экран смерти (BSOD) с ошибкой Stop: 0x000007B. В такой ситуации нужно зайти в BIOS выбрать режим работы диска IDE, сохранить, перезагрузиться и попытаться исправить.
Добавь меня в друзья:
AHCI (Advanced Host Controller Interface) — это интерфейс, предназначенный для современных SATA-устройств, который позволяет оптимизировать производительность и улучшить функциональность жестких дисков.
Однако, по умолчанию драйвер AHCI не устанавливается в операционную систему Windows XP. В результате, пользователям приходится работать в режиме совместимости, что может снижать скорость работы системы и функциональность некоторых устройств.
В данной статье мы расскажем, как установить и активировать драйвер AHCI в операционной системе Windows XP, чтобы получить все преимущества этого интерфейса.
Содержание
- Шаг 1: Подготовка
- Шаг 2: Установка и активация драйвера
- Зачем нужно устанавливать AHCI драйвер на Windows XP?
- Раздел 1: Подготовка
- 1. Проверьте совместимость вашего компьютера с AHCI
- 2. Создайте резервную копию данных
- 3. Скачайте AHCI драйвер
- 4. Подготовьте установочный диск или USB-флешку с Windows XP
- Скачивание необходимых файлов
- Раздел 2: Режим работы BIOS
- Включение режима AHCI в BIOS
- Раздел 3: Резервное копирование данных
- Сохранение важных файлов перед установкой драйвера
- Раздел 4: Установка драйвера
- Запуск установочного файла и следование инструкциям
Шаг 1: Подготовка
Перед установкой драйвера AHCI на Windows XP, вам потребуется скачать соответствующий драйвер с официального сайта производителя вашего компьютера или материнской платы. Убедитесь, что выбранный драйвер совместим с вашей версией операционной системы и архитектурой процессора.
Также, перед установкой драйвера, рекомендуется создать резервную копию всех важных данных на компьютере, на случай возникновения проблем во время процесса установки.
Шаг 2: Установка и активация драйвера
После того, как вы скачали драйвер AHCI, запустите его установку. Следуйте инструкциям на экране, чтобы установить драйвер в систему. Обычно установка заключается в запуске исполняемого файла и нажатии кнопки «Установить».
После установки драйвера, вам необходимо активировать его в операционной системе. Для этого выполните следующие шаги:
- Зайдите в «Панель управления» и откройте «Система».
- Перейдите на вкладку «Аппаратное обеспечение» и выберите «Установка драйверов».
- В списке драйверов найдите драйвер AHCI и выберите его.
- Нажмите на кнопку «Установить», чтобы активировать драйвер.
- Перезагрузите компьютер, чтобы изменения вступили в силу.
После перезагрузки компьютера, драйвер AHCI будет активирован и готов к использованию. В результате, ваша система будет работать быстрее и более стабильно, а функциональность устройств SATA будет полностью оптимизирована.
Поздравляем, вы успешно установили AHCI драйвер на Windows XP! Теперь вы можете наслаждаться всеми преимуществами этого интерфейса.
Зачем нужно устанавливать AHCI драйвер на Windows XP?
Установка AHCI драйвера на операционную систему Windows XP может пригодиться в следующих случаях:
- Повышение производительности: AHCI (Advanced Host Controller Interface) — это новая технология, которая предоставляет более высокую скорость передачи данных между жестким диском и компьютером. Установка драйвера AHCI позволяет использовать все преимущества этой технологии и повысить производительность системы.
- Поддержка новых функций: AHCI драйвер предоставляет дополнительные возможности, такие как горячая замена устройств, управление энергопотреблением и т.д. Установка драйвера AHCI позволяет использовать эти функции на компьютере.
- Работа с новыми устройствами: Некоторые новые устройства, такие как SSD (Solid State Drive), требуют наличия драйвера AHCI для полноценной работы на операционной системе Windows XP.
Установка AHCI драйвера на Windows XP может значительно улучшить работу компьютера, особенно если вы используете современные устройства и нуждаетесь в высокой производительности.
Раздел 1: Подготовка
Перед установкой AHCI драйвера на Windows XP необходимо выполнить ряд подготовительных действий. Следуйте инструкциям ниже, чтобы быть уверенными в правильности процедуры установки.
1. Проверьте совместимость вашего компьютера с AHCI
Перед тем, как устанавливать AHCI драйвер, проверьте, поддерживает ли ваш компьютер этот режим. Для этого:
- Зайдите в BIOS компьютера. Для этого при запуске компьютера нажмите соответствующую клавишу (обычно это Del, F2, F10 или Esc).
- Найдите раздел, отвечающий за настройку SATA режима работы (часто он называется «SATA Configuration» или «SATA Mode»).
- Убедитесь, что в этом разделе выбран режим работы AHCI. Если он не выбран или отсутствует, ваш компьютер не поддерживает AHCI.
2. Создайте резервную копию данных
Перед началом установки AHCI драйвера рекомендуется создать резервную копию всех важных данных на компьютере. В процессе установки драйвера может возникнуть потеря данных, поэтому лучше заранее подготовиться и сохранить копии файлов на внешний носитель.
3. Скачайте AHCI драйвер
Перед установкой AHCI драйвера необходимо скачать этот драйвер для вашей операционной системы. Вы можете найти драйвер на официальном сайте производителя вашего компьютера или на сайте производителя материнской платы.
4. Подготовьте установочный диск или USB-флешку с Windows XP
Если у вас нет установочного диска или USB-флешки с Windows XP, нужно предварительно подготовить их. Если у вас уже есть установочный диск или USB-флешка, то этот шаг можно пропустить.
- Вставьте оригинальный установочный диск Windows XP в оптический привод компьютера.
- Подключите USB-флешку к компьютеру.
- Зайдите в BIOS компьютера. Для этого при запуске компьютера нажмите соответствующую клавишу (обычно это Del, F2, F10 или Esc).
- Настройте загрузку компьютера с оптического привода или USB-флешки в первую очередь. Для этого найдите раздел «Boot Order» или «Boot Priority» и измените порядок загрузки.
- Сохраните изменения в BIOS и перезагрузите компьютер.
Теперь вы готовы к установке AHCI драйвера на Windows XP. Перейдите к следующему разделу инструкции, чтобы узнать, как правильно выполнить эту операцию.
Скачивание необходимых файлов
Перед началом установки AHCI драйвера на Windows XP необходимо скачать несколько файлов:
- Драйвер AHCI для конкретной модели материнской платы. Обычно этот файл можно найти на официальном сайте производителя материнской платы или на диске, поставляемом вместе с ней. Драйвер должен быть совместим с операционной системой Windows XP.
- Утилита для создания загрузочной флешки. Для этого можно использовать программу Rufus, которую можно скачать с официального сайта разработчика.
- Образ Windows XP с интегрированным Service Pack 3. Скачать его можно с помощью подходящего торрент-клиента или других источников.
После того, как все необходимые файлы будут загружены, можно переходить к следующему этапу — созданию загрузочной флешки.
Раздел 2: Режим работы BIOS
Прежде чем установить AHCI драйвер на операционную систему Windows XP, необходимо настроить режим работы BIOS. BIOS (Basic Input/Output System) – это набор программ, хранящихся в постоянной памяти материнской платы, которые отвечают за первичную загрузку компьютера и управление аппаратными компонентами системы.
Для установки AHCI драйвера необходимо установить режим работы BIOS в режим AHCI (Advanced Host Controller Interface). Этот режим позволяет получить доступ к дополнительным функциям и возможностям SATA (Serial Advanced Technology Attachment) контроллера, который управляет жестким диском компьютера.
Для настройки режима работы BIOS следуйте следующим шагам:
- Перезагрузите компьютер и нажмите на клавишу Del (или F2, F10, F12 – в зависимости от производителя материнской платы) для входа в BIOS. Обычно необходимо нажимать клавишу до появления логотипа компании производителя компьютера.
- Войдя в BIOS, найдите раздел, отвечающий за настройки хранения данных (Storage или SATA Configuration).
- В этом разделе найдите параметр, отвечающий за режим работы SATA-контроллера. Обычно он называется SATA Mode, SATA Configuration, SATA Operation Mode, SATA Controller Mode и т.д.
- Измените значение параметра с IDE (или Compatibility Mode) на AHCI.
- Сохраните изменения и выйдите из BIOS, нажав на клавишу F10 (обычно есть подсказка на экране о том, как сохранить настройки).
После перезагрузки компьютера в режиме AHCI можно будет установить AHCI драйвер на операционную систему Windows XP.
Включение режима AHCI в BIOS
Перед установкой AHCI драйвера на Windows XP необходимо включить режим AHCI в BIOS. Для этого выполните следующие шаги:
- Перезагрузите компьютер и нажмите определенную комбинацию клавиш, чтобы войти в BIOS. Обычно это Delete, F2 или F10. Но точная комбинация может отличаться в зависимости от производителя материнской платы.
- Войдя в BIOS, найдите раздел Advanced или Integrated Peripherals.
- В разделе Advanced или Integrated Peripherals, найдите опцию, связанную с режимом хранения или SATA. Это может быть SATA Mode, Storage Configuration или что-то похожее.
- Выберите опцию, связанную с режимом хранения или SATA. Обычно доступны следующие варианты: IDE, AHCI или RAID. Выберите режим AHCI.
- Сохраните изменения и выйдите из BIOS. Обычно это делается с помощью комбинации клавиш F10 или похожей.
После включения режима AHCI в BIOS можно приступать к установке AHCI драйвера на Windows XP. Следуйте инструкции, предоставленной производителем драйвера или компьютера, чтобы корректно установить драйвер и включить режим AHCI на вашей операционной системе.
Раздел 3: Резервное копирование данных
Перед установкой AHCI драйвера на Windows XP необходимо сделать резервное копирование своих данных. Это позволит вам восстановить все важные файлы и сохранить их целостность в случае возникновения проблем в процессе установки.
Вот несколько простых шагов для создания резервной копии данных:
- Выберите хранилище — определите, где вы хотите хранить свою резервную копию. Может быть внешний жесткий диск, сетевой диск или облачное хранилище. Убедитесь, что у вас есть достаточно свободного места и что выбранное хранилище надежно.
- Определите данные для резервного копирования — пройдитесь по своему компьютеру и определите, какие данные вы хотите сохранить. Это могут быть фотографии, документы, видео, музыка и другие важные файлы.
- Выберите метод резервного копирования — вам нужно решить, какой метод резервного копирования лучше всего подходит для ваших нужд. Это может быть полное копирование всех файлов, инкрементное копирование или дифференциальное копирование. Важно выбрать метод, который будет удобен для восстановления данных.
- Используйте программное обеспечение для создания резервной копии — для создания резервной копии данных можно использовать специальное программное обеспечение, которое автоматизирует этот процесс. Существуют различные программы, такие как Acronis True Image, EaseUS Todo Backup, Macrium Reflect и др., которые могут помочь вам в этом деле.
- Проверьте резервную копию — после того, как резервная копия будет создана, важно убедиться, что она работает правильно. Проверьте, что все ваши файлы сохранены и доступны для восстановления. Если возможно, протестируйте процесс восстановления, чтобы удостовериться, что он работает без проблем.
После завершения резервного копирования данных вы можете продолжать с установкой AHCI драйвера на Windows XP, зная, что ваши файлы сохранены и защищены от потери.
Сохранение важных файлов перед установкой драйвера
Перед установкой AHCI драйвера на Windows XP рекомендуется сделать резервную копию всех важных файлов, чтобы в случае проблем с установкой можно было восстановить данные.
Вот несколько шагов для сохранения файлов:
- Создайте новую папку на вашем компьютере и назовите ее «Резервная копия».
- Откройте папку «Мои документы» и выберите все важные файлы и папки, которые вы хотите сохранить.
- После выбора файлов скопируйте их в созданную папку «Резервная копия».
- Проверьте, что все файлы успешно скопировались и находятся в папке «Резервная копия».
Теперь у вас есть резервная копия всех важных файлов, которые могут быть удалены или повреждены при установке AHCI драйвера на Windows XP. Если в процессе установки возникнут проблемы, вы можете вернуться к сохраненным файлам и восстановить их на своем компьютере.
Раздел 4: Установка драйвера
После скачивания необходимого AHCI драйвера с официального сайта производителя вашего компьютера или материнской платы, вам потребуется выполнить следующие шаги для его установки:
- Скопируйте скачанный файл драйвера на флэш-накопитель или другое устройство для передачи данных.
- Подключите флэш-накопитель к компьютеру с установленной Windows XP.
- Откройте Проводник, найдите скачанный файл драйвера и скопируйте его в папку на рабочем столе или любую другую доступную директорию.
- Закройте Проводник и откройте меню «Пуск».
- Выберите «Панель управления» и откройте раздел «Система».
- Во вкладке «Аппаратное обеспечение» нажмите на кнопку «Управление устройствами».
- В появившемся окне выберите вкладку «Драйвер».
- Нажмите на кнопку «Обновить драйвер» и выберите опцию «Нет, не в этот раз».
- Выберите опцию «Установить программное обеспечение с заданного места» и нажмите кнопку «Далее».
- Выберите опцию «Не искать. Выбрать из списка драйверов на моем компьютере» и нажмите кнопку «Далее».
- Нажмите на кнопку «Дискетка» и выберите папку, в которую вы скопировали файл драйвера на предыдущих шагах.
- Выберите файл драйвера и нажмите кнопку «Открыть».
- Нажмите на кнопку «Далее» и дождитесь завершения установки драйвера.
- После завершения установки драйвера, перезагрузите компьютер.
После перезагрузки ваш компьютер должен работать в режиме AHCI. Вы можете проверить это, открыв Проводник, щелкнув правой кнопкой мыши на диск и выбрав «Свойства». Во вкладке «Аппаратное обеспечение» должно быть указано, что диск работает в режиме AHCI.
Запуск установочного файла и следование инструкциям
После того, как вы скачали AHCI драйвер для Windows XP, следует запустить установочный файл, чтобы начать процесс установки. При этом, рекомендуется соблюдать некоторые основные шаги для успешной установки драйвера:
- Убедитесь, что у вас есть права администратора на компьютере, чтобы выполнить установку.
- Если у вас уже установлены какие-либо предыдущие версии AHCI драйвера, рекомендуется удалить их перед установкой новой версии. Для этого можно воспользоваться инструментами удаления программ в ОС Windows.
- Запустите установочный файл драйвера. Обычно это файл с расширением .exe или .msi. Перед запуском следует убедиться, что файл не поврежден или испорчен.
- Следуйте инструкциям, которые появляются на экране. Чаще всего вам будет предложено принять соглашения о лицензии и выбрать путь для установки драйвера.
- После выбора пути установки вы можете нажать на кнопку «Установить» или аналогичную, чтобы начать процесс установки. Обычно установка занимает несколько минут.
- По завершению установки вам будет предложено перезагрузить компьютер. Рекомендуется выполнить перезагрузку, чтобы изменения вступили в силу.
Следуя этим шагам, вы сможете успешно установить AHCI драйвер на Windows XP и получить все его преимущества. В случае возникновения проблем или ошибок в процессе установки, рекомендуется обратиться к документации к драйверу или поискать ответы на форумах и сайтах поддержки.
1. What this is about
This is about the installation of AHCI drivers to SATA ports for Windows. AHCI drivers (Advanced Host Controller Interface klick -> http://de.wikipedia.org/wiki/Advanced_Host_Controller_Interface for Wiki) are advanced performance drivers for the SATA controller in your Mac Pro (ICH10R chips for Nehalem — ESB2 for all others). When you go to profiler in OS X and bring up ATA you will see that your disks will all be connected by AHCI protocols.
Windows natively uses legacy drivers instead of AHCI when you install it. It expects a BIOS command to select the AHCI mode. On a BIOS machine you simply use a software switch to select the configuration. On an EFI machine as the Mac, you have to manipulate the boot mechanism because the firmware has no user adjustable features. You actually edit your Master Boot Record (MBR) inside the GUID or MBR partition table with a terminal script. I will come to that later.
If you are making a fresh installation of Windows from the install disk you can pre load the AHCI drivers from the floppy facility (check the download link in section 3). In Vista and Win7 you do this from the installation window where you can format or partition drives. In XP you have to hit the F6 key in the beginning when XP starts to load from the optical disk.
This tutorial is based on the instructions from Ludachris at http://www.insanelymac.com/forum/index.php?showtopic=126089&hl= Many thanks to him.
The shell script for the MBR patch is made by Johnsock. http://www.insanelymac.com/forum/index.php?act=attach&type=post&id=49096 Also a big thank you to him.
2. Some potential traps to avoid
Some people like to use a unused ODD-SATA port for a Windows HDD or SSD. This is possible as soon as the AHCI driver is working. In order to make the AHCI installation you need to fit the Windows drive to a standard HDD port and make the installation according to section 5.
There is a bummer which may hit you if you already use a SW RAID in OS X with a pre 2009 machine. An OS X software RAID array prevents Windows from recognizing other SATA drives as internal. The installation program will tell you that you are installing to an external drive although you are setting your Windows drive properly up on one of the # 1-4 HDD bay.
To work around this problem you can physically remove the RAID disks and put them away for a moment . After installing Windows you can put the array back in and it will run without a problem again, so you need not be concerned to remove the array temporarily.
To substitute for your now missing array clone OS X to a single disk before you remove your array and when you have it taken out, fit that disk. Then you do your Windows installation stuff. When you are finished with Windows you remove the single disk and refit your array.
The 64-bit varieties of Vista and Win7 have 32-bit emulations installed which will allow you to run any 32-bit program. So they are much better to use. A word of warning to 2006 and 2007 Mac Pro owners. Your machines use a 32-bit EFI. It will not be able to read Windows install DVDs with multiple images like the anytime upgrade DVDs. The 32-bit EFI boot loader freezes when you try to load an install disk with multiple images. Known workaround at this time use Jowie’s tweak or a similar method to make the file variables palatable to the EFI32 boot loader. https://forums.macrumors.com/posts/8513769/
3. Preparations
Download the Intel Matrix Storage Manager http://www.intel.com/support/chipsets/imsm/index.htm from this adress. If you run XP you also need the floppy disk facility that you find there. The executable we will need very much later when we are practically done changing the MP to AHCI but get hold of it for now.
Intel have reported that there was a Vista installation issue with their chips driver (Intel Matrixs storage) up to version 7.0. It is therefore recommended to use 8.8 now. Win7 is officially only supported by 8.9.
When you have made those downloads put the folder with the floppy facility on a USB stick or burn it on CD. If you are hell bent to use XP you will actually need floppies because XP will not let you use other means. Generally XP isn’t desirable on a Mac Pro because it is only supported in 32-Bit and not in 64-Bit which will make most of your RAM (above 2 GB) memory useless.
Copy the zipped file with Johnsock’s shell script which is attached to this posting to your OS X drive. You have to unzip it for use.
Next go to disk utility in OS X and make a list of the identifiers of your installed drives. You can right click the drive name or use the info button which tells you the internal name of each drive. If the drive is shown as disk2 note it with the extended code form that the shell script uses ( /dev/disk2 ). Make a paper record of that full name of the disk and make sure you copy exactly that code. You will need this later when you may have no access to disk utility and are doing some delicate terminal work. Finally at this point make a backup of your Windows installation if you care for it. You can use Winclone (free software) for the back up or at minimum set a restore point for Windows to get back to that version if you screw up the next step. Restore points can be set when you enter the program section where you find all the Windows internal backup and restore stuff.
There are reports that the MP3,1 model from 2008 cannot be put into AHCI mode normally. But some users succeeded by exchanging their optical drive from IDE to SATA or removing it completely before trying to boot Windows from the ODD-SATA ports. So it is recommended to take out any IDE drive.
4. A refresher about other drivers
When you have installed Windows load your Apple related drivers from the hybrid Leopard disk. All Leopard disks have a Bootcamp driver image on them which is acessible under Windows only. For 64-bit Windows you need to execute Bootcamp64.msi with admin rights. You find it in the drivers/apple folder on the leopard/SL disk. If it is not there you have a very old version and need to source those drivers somewhere from the internet. There are torrents and downloads from rapidshare available. Google Bootcamp 2.0.1 for that. In Win7 you have to apply the compatibility patch to Vista drivers before you can load the program. To get to compatibility mode right click the file and select the routine for compatibility. When you are done with the general Windows drivers and have installed all the Windows updates you will still need to activate the AHCI drivers for optimum performance. They will not be running at that stage.
5. This is the actual installation
5.1 Editing the registry
Now in case we use Vista or Seven we are going to edit the Windows registry as directed by Ludachris. This only needs to be done in Vista and Seven but not in XP because XP has no MS AHCI driver in the standard.
Vista 32/64 Windows7 32/64
— Run Regedit (from the command prompt)
— Navigate to «High Key Local Machine\System\CurrentControlSet\Services\msahci»
— edit the «Start» key and change the value from what it is to «0»
— this will tell Vista to check for AHCI on next boot and install the AHCI driver if it is in AHCI mode
— this installs the generic AHCI Microsoft driver and it is really a poor driver for your hardware and you will need the Intel ones to get full performance.
This does not yet activate the AHCI driver. If you have pre loaded the Intel driver during the Windows installation it will load a better Intel legacy driver instead of the slow IDE. You can shut down and restart Windows now.
5.2 Installing the driver
After this reboot comes the tricky part. We will force Windows to take an AHCI driver, which it normally rejects and we will patch the master boot record (MBR) of the drive that holds the Windows installation.
In Windows device manager go to IDE/ATA devices. 2006, 2007 and 2008 Mac Pros have one device for the SATA ports; so its no question which to use. 2009 machines have two separate devices for the ODD and the HDD ports. Select the 4 port HDD device for the AHCI updating. Click properties and update the legacy driver to either the Microsoft or the Intel AHCI driver. It doesn’t really matter which one you use. This AHCI installation cannot be done in automatic driver search mode. You have to tell Windows to look in the IDE ATA controller category for them. To find the MS AHCI 1.0 driver in Vista and Seven go to the manufacturer selection and look for Standard. You will have to scroll down to find it. For XP you have to load the Intel driver from from the Intel manufacturer list. If you havn’t pre loaded the Intel drivers you should now use the Floppy utility you downloaded. Load these files from USB floppy or USB stick by clicking the have disk option. For pre 2009 you need to select the ESB2 driver. For Nehalem use the ICH10R driver. After this you must not reboot into Windows until you have patched the MBR. Force Windows to take this driver even if it thinks it is incompatible. It actually is but we will soon take care of this with the patch.
5.3 Patching the MBR in OS X
The next step is executing Johnsock’s script to patch your MBR. This patch is absolutely necessary for every Windows. Pay particular attention to patch the right disk!!! If you patch an OS X disk that holds no Windows you are in serious trouble. The wrong disk selection will screw up your disk count and nothing will work right from there.
In OS X open the terminal utility. Type «sudo» and a blank. Then drag the unzipped script shell file into the terminal with your mouse. Input your admin password and follow the dialogue.
For this you will need the disk codes that you have noted on paper. The program tries to find your Windows disk but you have to make sure it finds the right one. It often suggests a wrong disk. Be really carefull to insert the complete name for the disk!! In our example it was /dev/disk2 for the second disk. Just inserting the number like 2, 0 or 3 or disk3 or disk4 will not work.
When you are done with patching your MBR the program will confirm to you that you were successfull. You shut down OS X and restart Windows. If you have done the patch right and selected the right controller for your chipset Windows should now show SATA drives and get busy to find the real AHCI drivers for them. If you installed MS AHCI 1.0 you can now switch to the Intel driver without problems. If you got it wrong Windows will malfunction with a BSD on loading. You can use special load options to go back to the last known good configuration which you hopefully established by setting the restore point or you can restore Windows by Winclone. Start all over with the registry edit until you got it right.
5.4 Installing the Intel Matrix Storage Manager
To load the Intel Matrix storage driver you can now execute the Intel executable package which we downloaded. It will be accepted by your machine. If you try installing that package before the patch it will tell you that you are loading a wrong package for your machine. Restart Windows after the storage driver has completely installed. In Vista and Win7 you have to run the executable as administrator. Now you should be all set.
6. Trouble shooting
What to do if you patch the wrong drive? I happened to patch my OS X drive which was partitioned in three partitions of which one was NTFS. So the patch program thought I had a Windows on it. I did not check it and so I went ahead and patched it. It turned out to be real bad news because now as long as this drive is in the system I get BSD and the patch method does not work any more.
I went back to the thread at Insanelymac and Johnsock had left instruction how to recover the backup MBR. It is stored in USERS/Yourname/backup.mbr
Johnsock advised to run in terminal:
sudo fdisk -y -u -f ./path/to/backup.mbr /dev/rdisk0
But that command is designed for drives with one partition I guess. So I modified my command to:
sudo fdisk -y -u -f /Users/gugucom/backup.mbr /dev/rdisk0
That command worked for me.
Feel free to challenge everything I have written here. I have only limited experience and will like to discuss any questions you have as good as I can. I tought the issue deserves its own thread so that we can collect the wisdom of all users here.
This question is part of a larger list of things I’ll need to do before installing a new SSD drive, but I think it deserves its own question.
Current setup: A dual-boot machine with Windows XP installed on a SATA 6Gbps HDD. BIOS has always been configured in IDE mode. Because of this, if I try to change to AHCI in BIOS, as Windows doesn’t have AHCI drivers, it won’t boot.
I already know that I can achieve this reinstalling the whole OS. But if possible, I’d like to enable AHCI without reinstalling again.
-
Would it be possible to change the driver to the AHCI one while in Windows? (using the Device Manager, for instance). If it where possible, will the OS crash at the moment the driver is changed while still being BIOS in IDE mode?
-
If not, is there a way to install it doing a partial repair using Windows disk? If such a method exists, will my current settings and applications remain unchanged?
Thanks in advance.
UPDATE
My South Bridge is an Intel(r) ICH10R. I already have the correct drivers which are located in my motherboard disc. Notice that the drivers are different for 32bit and 64bit OSes, so it is important to pick the correct ones. The files are called «iaStor.inf» and «iaAHCI.inf».
asked May 22, 2012 at 8:59
![]()
Mister SmithMister Smith
6935 gold badges11 silver badges24 bronze badges
11
I’ll start with why you cannot use AHCI mode without modification. When Windows is installed, it only installs (enables) AHCI/RAID drivers if you have a storage controller it recognises as AHCI/RAID. Windows Vista and 7 would (usually) have the drivers anyway, but typically disable them. Vista and 7 come with a generic AHCI driver, with a more hardware-specific driver potentially available from the controller manufacturer. A manufacturer provided driver is necessary for ‘FakeRAID’. The generic AHCI driver can be enabled with two quick, easy registry modifications.
However, Windows XP does not come with a generic AHCI driver. That means no out-of-the-box AHCI support. The reason? Intel only released preliminary (not even complete!) specifications to the AHCI standard mid-2003 — a year and a half after XP was first released. Microsoft has apparently not seen fit to include an AHCI driver as part of a service pack.
Motherboard manufacturers often include an AHCI driver on a CD or on their websites. This driver is provided by the manufacturer of the storage controller, typically Intel on systems with an Intel CPU. Some other candidates are nVidia (nForce) and Marvell (on some AMD boards). They are generally not interchangeable.
When installing XP, it is possible to load an AHCI driver from a floppy disk (!!!) or slipstream them onto the install CD. However, you want to add the driver to an existing installation.
-
The first step is to determine the manufacturer of your storage controller, or at least motherboard chipset. This is usually listed in the motherboard specifications.
-
The next step is to make sure you have a System Restore point available. System Restore can usually roll back changes in drivers, which provides a safeguard against mistakes while installing the drivers.
-
Then it’s all dependant on your controller manufacturer. There are many registry scripts that can insert the correct registry entries (the driver file is required, and a download is often provided). Since this is very specific to what hardware you have, you’ll have to provide that information or search yourself (Google is a good place to start).
If the motherboard manufacturer provides a SATA driver installer package specifically for XP, try installing that first. If it doesn’t work, or one isn’t provided, installing a driver manually may be necessary. If they don’t provide the drivers at all, there isn’t much you can do.
Personally, I recommend the non-registry method if you can get away with it. This involves selecting the SATA controller entry(ies?) in the device manager and using the Update Drivers option to select the AHCI/RAID drivers you should obtain from the manufacturer. For Intel, it should be manually extracted from the installer package. Some people note that nVidia change a hardware ID in IDE mode so this method may not be possible for nForce chipsets. It all depends on your controller manufacturer.
Yes, I use storage controller, chipset and motherboard somewhat interchangeably. The controller is often part of the chipset. The chipset (and/or controller) on a specific motherboard model is almost always the same.
answered May 22, 2012 at 12:55
![]()
BobBob
61.1k25 gold badges193 silver badges216 bronze badges
3
After arriving home, and without doing any backup at all XD, I finally got the job done.
It took no more than 10 minutes. My method is based on this blog post so its author is the one that deserves most credit. Also I have to mention Bob which quickly posted this link as a comment (my apologies Bob, yes it worked). Still I’d like to post the steps I followed since there are some differences and it may be helpful for some other people.
I’ve a Gigabyte board and it comes with a Utility DVD that contains, among other things, the AHCI drivers. Here is my installation explained:
-
(This step is only for Gigabyte MB owners. You can get the drivers somewhere else and go to #3) Go to \BootDrv folder and copy the file MSM32.exe to a USB drive or a hard drive partition. This is the correct file for 32bit OS (Windows XP). According to the motherboard manual, it is also the one to choose for Windows Vista 32bit. In case you have a 64bit OS, copy MSM64.exe instead. There’s another one named MSM2k.exe, I suppose it is the driver for Windows 2k, but I’m guessing here.
-
In the folder where you copied that file, double click on it and it will open a command-line prompt asking for confirmation to extract the files. Type «yes» and then enter. Several files will be extracted at that folder. these are the actual drivers.
We’ll need these files to tell the Device Manager where to search for the drivers. Open the Device Manager and expand the «IDE ATA/ATAPI controllers» node. In my case, there were listed the regular IDE channels, and a couple of generic Intel ICH10 SATA controllers. These were the generic drivers installed by Windows, and I can tell you for sure that these don’t work (tested enabling AHCI in BIOS and trying to load the OS resulted in beeps and reboots). -
Select one of the SATA controllers -> Right click over it -> update driver -> Install from a list or specific location (Advanced) -> check the «don’t search» radio button and click next -> click on «Use disc» -> click on «browse» button and select the folder with the drivers from wherever you have copied them. If you have the drivers in a CD or DVD, make sure it doesn’t contain an AUTORUN.INF file at the root folder, because the file picker dialog is looking for .INF files and it won’t let you browse to subfolders.
-
Now the list with drivers is populated with at least a new option. Here I selected the correct one for my chipset (ICH10R). Windows shows a warning message. Click yes.
-
The driver is installed and Windows ask for a reboot, BUT don’t reboot yet. Instead, select the remaining SATA Controller in Device Manager and repeat #3 and #4.
-
After the second driver install, Windows does not ask for a reboot. BUT now it is time for rebooting. Be ready to enter BIOS as soon as the computer starts.
-
Change in BIOS (in my case, under «Integrated peripherals» -> «SATA RAID/AHCI Mode«) from IDE mode to AHCI. This can vary depending on your system and BIOS, and maybe you even need to select RAID if no AHCI option is available. There are better questions on this site where this topic is better explained, so I won’t delve into it. In my case, there was a second option, just after the IDE/AHCI one, named «SATA port0-3 native mode«. It was disabled, I enabled it. The explanation for this option in my motherboard manual is that DISABLED allows the SATA controllers to operate in legacy IDE mode, and that it should be selected for OSes that do not support native mode (like Windows 9X/ME). Windows XP supports native mode so I enabled it. I guess more modern OSes will also support it. Save BIOS and continue with the boot.
-
Windows is loaded correctly. It starts recognising the existent drives in the new AHCI mode, and showing yellow bubbles. After that, it asks for a second reboot. Select OK to reboot.
-
Windows is loaded again and this time everything should be ready.
![]()
answered May 22, 2012 at 19:15
![]()
Mister SmithMister Smith
6935 gold badges11 silver badges24 bronze badges
The «Update driver» method didn’t work for me, but I found another way that’s simple too, and guaranteed to work.
Trying the above method on my pc made it reboot before the driver had updated completely. I have an Ivy Bridge (Z77) motherboard.
So I did it like this
Using your functioning XP in IDE mode do these steps:
-
Find the Intel RST driver package on your motherboard cd (or download latest if you don’t have cd). Extract this to get the 2 files iaAHCI.inf and iaStor.sys.
-
Get a registry file from here. Read his short description and do as it says. And
Edit the _07b-AHCI-SATA-forPE.reg file to add Intel 7 series AHCI SATA. Open iaAHCI.inf that you got in the previous step in Notepad. Copy/paste 2 older entries in the registry file and modify the 2 new entries with values found in iaAHCI.inf. Put the modified _07b-AHCI-SATA-forPE.reg file and iaStor.sys (from step 1) together in their own folder. -
Make a BartPE disc — download and install Bart’s PE builder and get the Registry Editor PE plugin v1.0a here (http://regeditpe.sourceforge.net). Put your XP install cd in a folder. It has to have SP3. You can slipstream SP3 to your cd with nLite from (http://www.nliteos.com/download.html) if you need. Don’t make or burn iso with nLite. We only need the slipstreamed source for BartPE. Run Bart’s PE Builder. In the builder, select the folder with your XP SP3 as source and add the folder where you put _07b-AHCI-SATA-forPE.reg and iaAHCI.inf as source for Custom files so they get included in the BartPE disc we build. And lastly, add Registry Editor PE plugin that you downloaded by clicking on Plugins button. Make sure Registry Editor PE plugin is enabled. Now build the iso and then burn it to an empty cd.
-
Boot with your BartPE cd. In Bart PE menu (in lower left corner) load the registry of your real XP system with Registry Editor PE. Click Ok when it shows a message. In the regular looking Regedit window you then import the _07b-AHCI-SATA-forPE.reg file in File menu/Import … and copy iaStor.sys to \windows\system32\drivers folder on your C: drive.
The 2 file should be in the root folder of your BartPE disc either in a folder or as separate files, depending on how you included them in the PE Builder. -
The registry of your XP installation is changed and saved and iaStor.sys is copied to it’s system32\drivers folder. Now you can reboot into bios and set SATA to AHCI mode and then save bios and reboot into your XP installation. XP will now detect new hardware and install it. Wait, and you’ll be prompted to reboot. After this reboot you can see in the Device Manager that your SATA devices now operate in AHCI mode. You may want to install the Intel RST package the normal way now to get all software from it. All done


Note: for future needs it may be good to include _07b-RAID-SATA-forPE.reg in the process, if you ever should want to run your SATA in RAID. You don’t need to edit that file, just include it in BartPE and import it with Registry Editor PE.
answered Aug 13, 2012 at 8:46
![]()
Some of the options I found here or elsewhere didn’t work for me for a AMD SB750 chipset on an MSI GA-MA790XT-UD4P, so I used an alternative method that is somewhere in-between the fully automatic one and the manual registry hacks.
I downloaded the drivers from the MSI website and unpacked them. Then I manually installed the INF file using:
rundll32 setupapi.dll,InstallHinfSection Napa_Inst 132 .\ahcix86.inf
Right-click install of the INF does not work because there is no DefaultInstall section, Napa_Inst is the section prefix in the INF file. Documentation for the install function is here (there are other function calls that can install an INF from the CLI too if you Google). This copied the driver file to System32\Drivers and created registry entries for the service. However, it was still not present at boot and resulted in BSOD. I used part of these instructions to create a critical device database entry:
HKLM\SYSTEM\CurrentControlSet\Control\CriticalDeviceDatabase\PCI#VEN_1002&CC_0106\Service -> "ahcix86" (REG_SZ)
HKLM\SYSTEM\CurrentControlSet\Control\CriticalDeviceDatabase\PCI#VEN_1002&CC_0106\ClassGUID -> "{4D36E97B-E325-11CE-BFC1-08002BE10318}" (REG_SZ)
The class GUID matches the value in the INF file. The vendor ID is for AMD (also shown in INF file), the compatibility code is for AHCI. As per the link, 0104 could be used for RAID.
Windows then boots properly and detects new devices, asking for another reboot. All is fine now.
answered Sep 15, 2015 at 9:57
![]()
I have a P5GD1 Pro (ASus)motherboardd with dual boot xp and windows 7. The easiest way after many hours of internet searching that I found was through trial and error and reinstall of image, however, there is a simpler way…. If you install CPU Z (cpuid) which you can google, on the mainboard it will tell you the southbridge version. You can then identify your driver from this information.
You need the southbridge version because when you install a driver through the update driver for the ata storage controller through the device manager, it will give you a number of versions… If you choose the wrong one you may find yourself unable to boot and having to reinstall your image like I did…
The procedure that worked for me for the P5GD1 Pro (and so likely any other mother board) was to use the intel AHCI folder on the driver disc (if not got you can could on google or something for 82801FB drivers) then simply update the driver in the device manage for the ATA storage controller. Choose have disc and browse for your driver file for intel, or whatever version you have, and then choose the driver which matches the southbridge version for whats indicated in CPUZ. Using CPUZ to identify your southbridge will save you doing what I did and having ot find out the hard way. Then reboot which windows will ask yu to do anyway, enter the bios and enable AHCI for the IDE configuration. It should then boot and install the discs then ask for another reboot.
Also as a side note, if updating to a solid state drive, this will inrease your speed to 1/3 of its previous…
It should only take 5 mins to do once you identify your driver. To identify which chipset you can use something like CPUID (CPU Z) or some other system information program and identify your southbridge version.
answered Jan 12, 2013 at 11:37
![]()
Enabling AHCI on existing Windows XP installation .
-
Download Intel Sata RAID/AHCI storage driver floppy (used during Windows setup with F6) from your motherboard manufacturer and extract files to a directory on your HD.
-
In device manager change existing IDE ATA/ATAPI controller:
a. open IDE ATA/ATAPI controllers (click on +)
b. right click the first Intel controller listed
c. select «Update driver…»
d. select «No, not this time, Install from a list or specific location (Advanced)»
e. select «Don’t search. I will choose the driver to install»
f. select the Standard Dual Channel PCI IDE Controller and click Next (do not reboot)
g. repeat steps c. to f. for the second controller -
Reboot.
-
In device manager, update the drivers for the existing IDE ATA/ATAPI controller:
a. open IDE ATA/ATAPI controllers (click on +)
b. right click the first Standard Dual Channel PCI IDE Controller
c. select «Update driver…»
d. select «No, not this time, Install from a list or specific location (Advanced)»
e. select «Don’t search. I will choose the driver to install»
f. click on «Have disk» and browse to the directory with the AHCI drivers
g. select the iaAHCI.inf and click Next
h. ignore any warnings and reboot(If you get a blue screen and the system reboots during these steps, repeat them for the second controller)
-
Reboot
-
Enter system bios and change controller to AHCI and save.
Your system should now run in AHCI mode.
Possibly you can install the Intel Matrix Storage Manager. Although I’m not sure, it might improve performance.
![]()
Simon
3,9432 gold badges24 silver badges40 bronze badges
answered May 8, 2013 at 11:25
![]()
1
If you’re installing/repairing from an XP SP3 disk (at least: dunno if SP2 works) you can force AHCI support by pressing F5 when you are prompted to press F6. Select «486» based system and you’re good to go.
![]()
Andrea
1,5164 gold badges17 silver badges19 bronze badges
answered Jul 25, 2013 at 0:04
![]()
1
You must log in to answer this question.
Not the answer you’re looking for? Browse other questions tagged
.
Not the answer you’re looking for? Browse other questions tagged
.