Windows 11‘s compatibility checks for Secure Boot and TPM 2.0 don’t translate well on Intel Mac hardware. So, for example, if you try to use the official Windows 11 ISO from Microsoft in macOS 12 Monterey, the Boot Camp Assistant will fail to procure the necessary drivers or stall at Windows Setup.
Thankfully, you can install Windows 11 in macOS Monterey using Boot Camp with a workaround. It requires upgrading a standard Windows 10 Boot Camp installation to Windows 11 with an automated batch script that bypasses the operating system’s stringent system requirements.

The following method is also secure and less complicated than alternative ways of installing Windows 11 on Mac that you may have read about (such as those involving a modified ISO or bootable USB drive).
Note: If you already have Windows 10 set up on your Intel MacBook Air, MacBook Pro, iMac, or Mac mini, skip to the section that focuses on upgrading it to Windows 11.
Update Your Mac
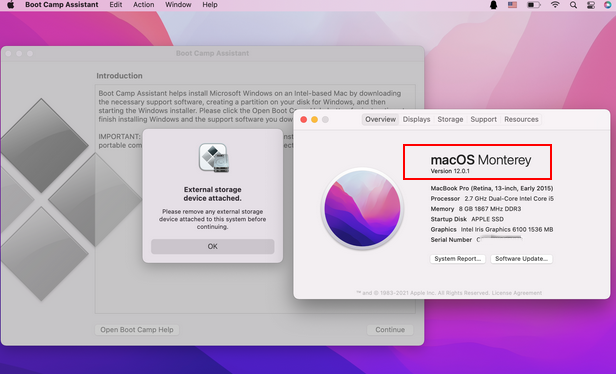
You can use the instructions in this tutorial to run Windows 11 on all macOS Monterey-compatible Intel Macs. However, to minimize the chances of running into any Boot Camp Assistant errors, we recommend that you install all available macOS Monterey point updates before you begin.
1. Open the System Preferences app.
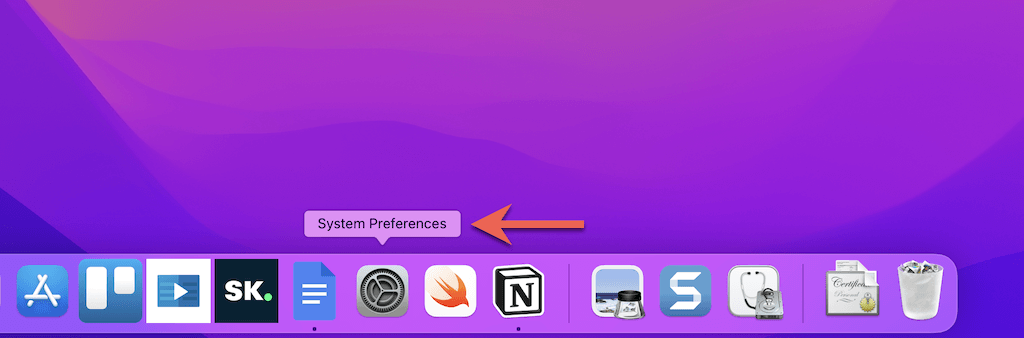
2. Select Software Update.
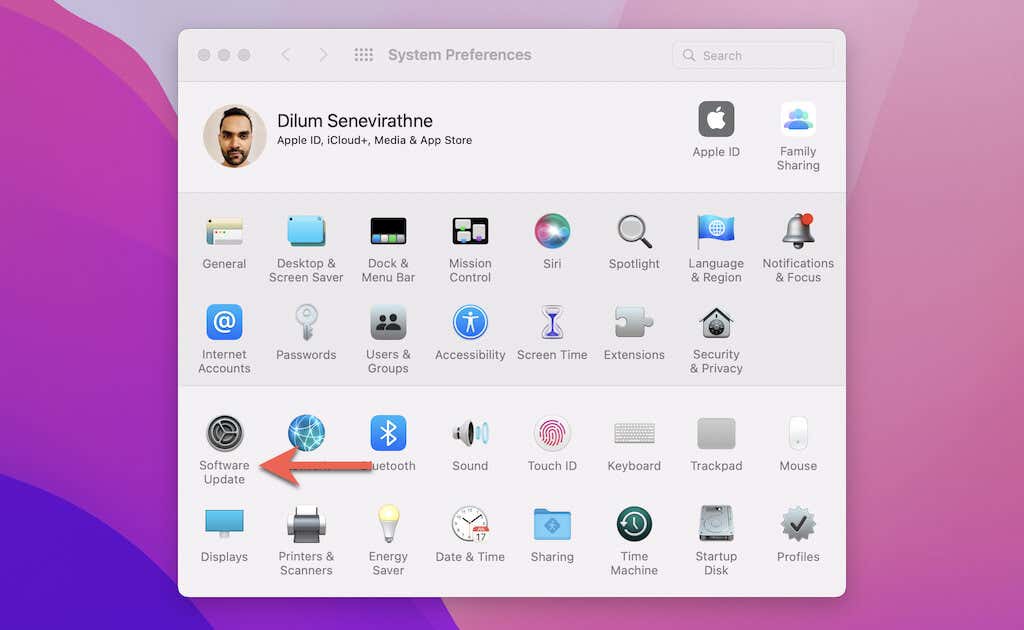
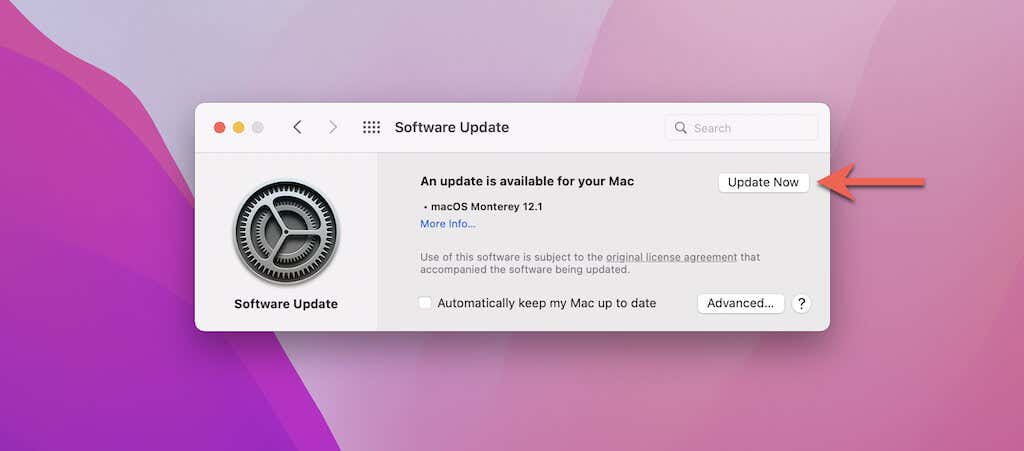
3. Select Update Now to update your Mac to the latest version of macOS Monterey.
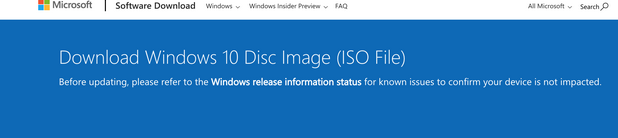
Download Windows 10 ISO
Since you must install Windows 10 on your Mac first, the next step involves downloading an up-to-date copy of a 64-bit Windows 10 ISO image file from Microsoft.
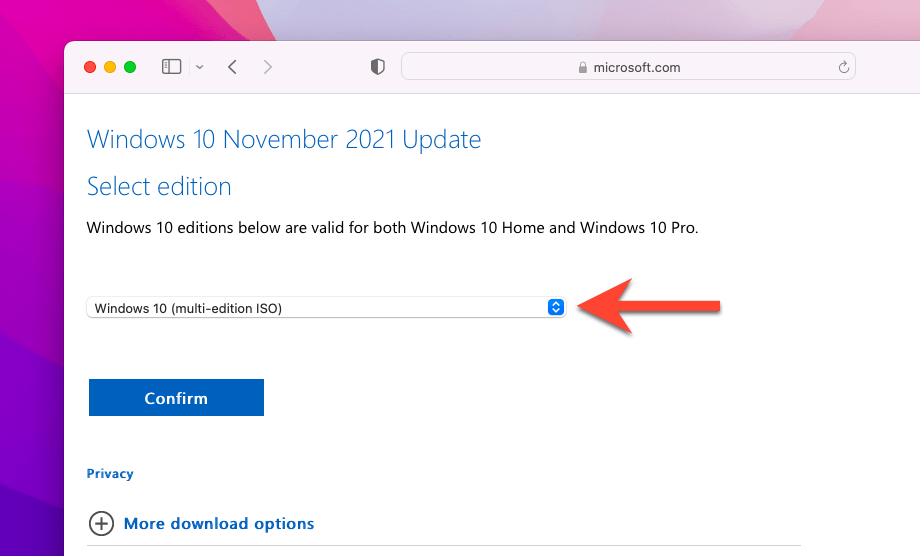
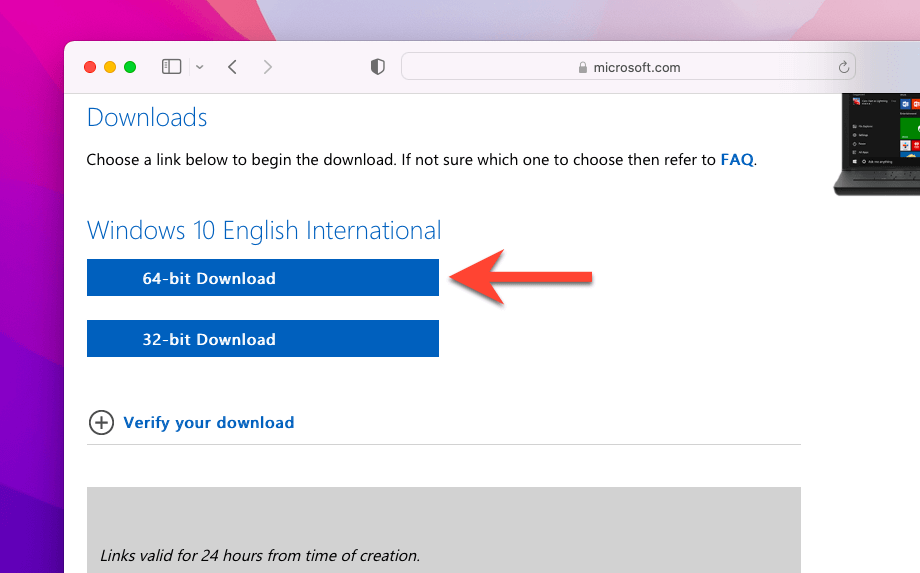
1. Visit the Download Windows 10 Disc Image (ISO File) page on the Microsoft website using Safari or another web browser.
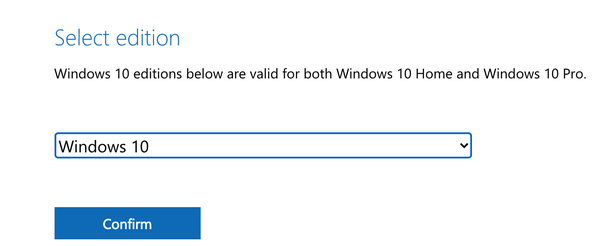
2. Pick the latest version of Windows 10, choose a language (e.g., English or English International), and select Confirm.
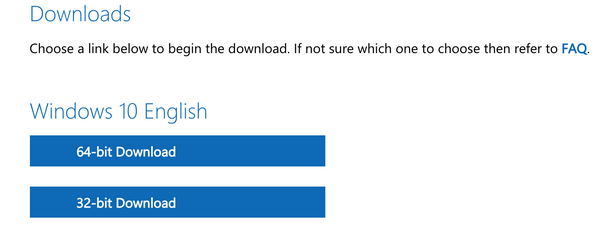
3. Select 64-bit Download and wait until your web browser downloads the ISO file to your Mac.
After downloading the ISO file, you can start installing Windows 10 on your Mac. Just make sure to have at least 50 gigabytes of free space before you begin.
1. Open Boot Camp Assistant via the Mac’s Launchpad.
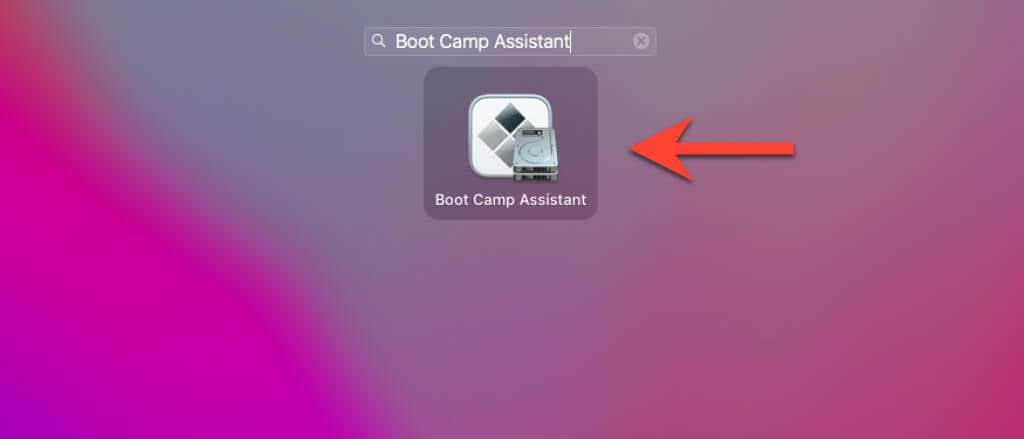
Note: Boot Camp Assistant is only available on Intel-based Macs. If you use an Apple Silicon M1 Mac, you can’t install Windows via Boot Camp.
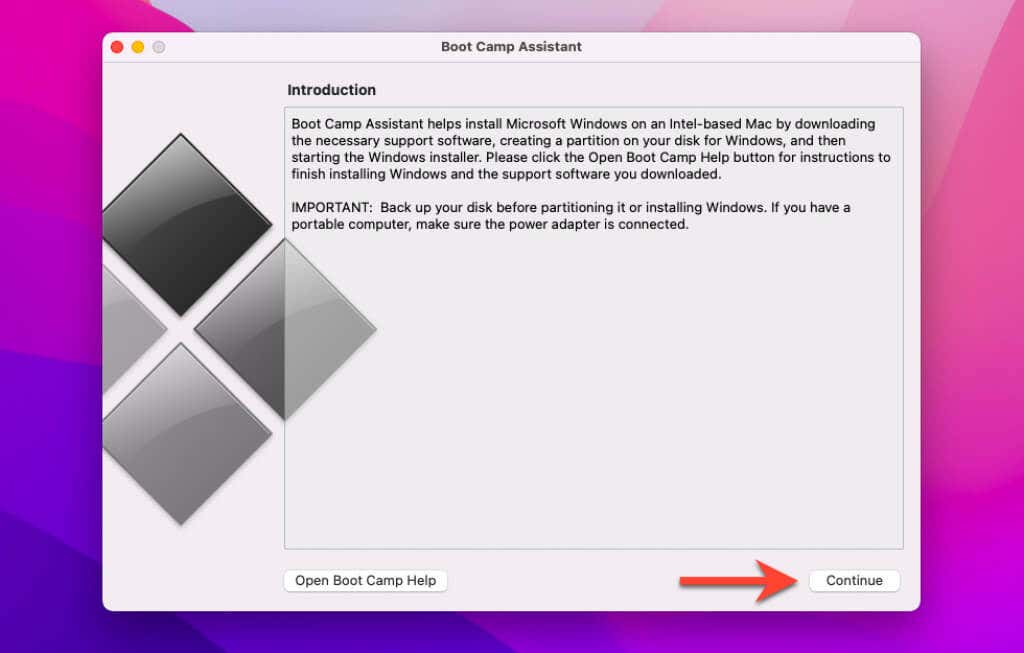
2. Select Continue.
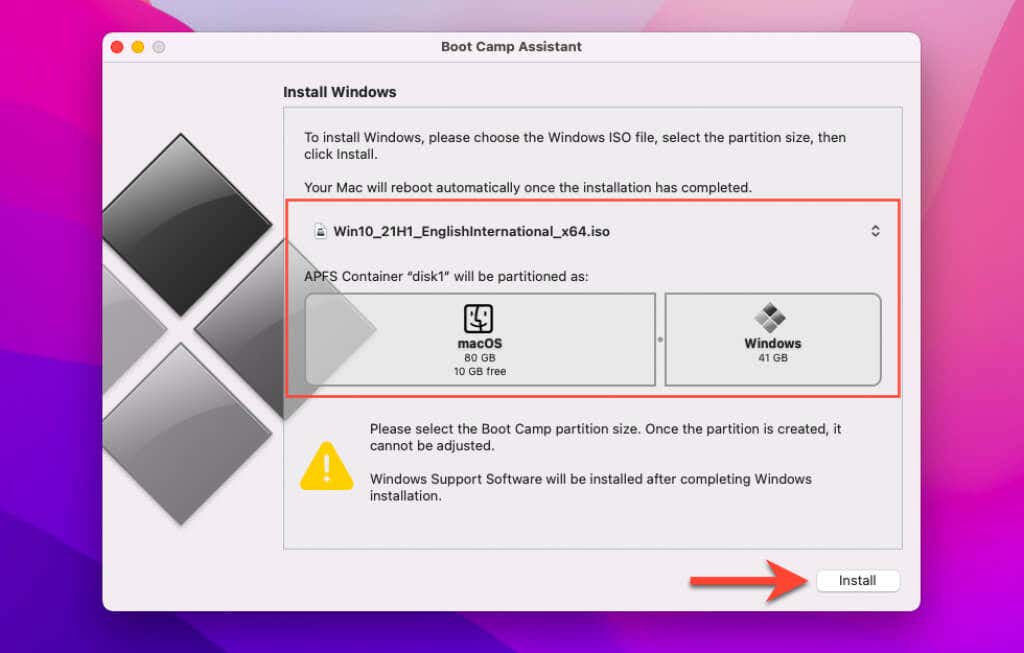
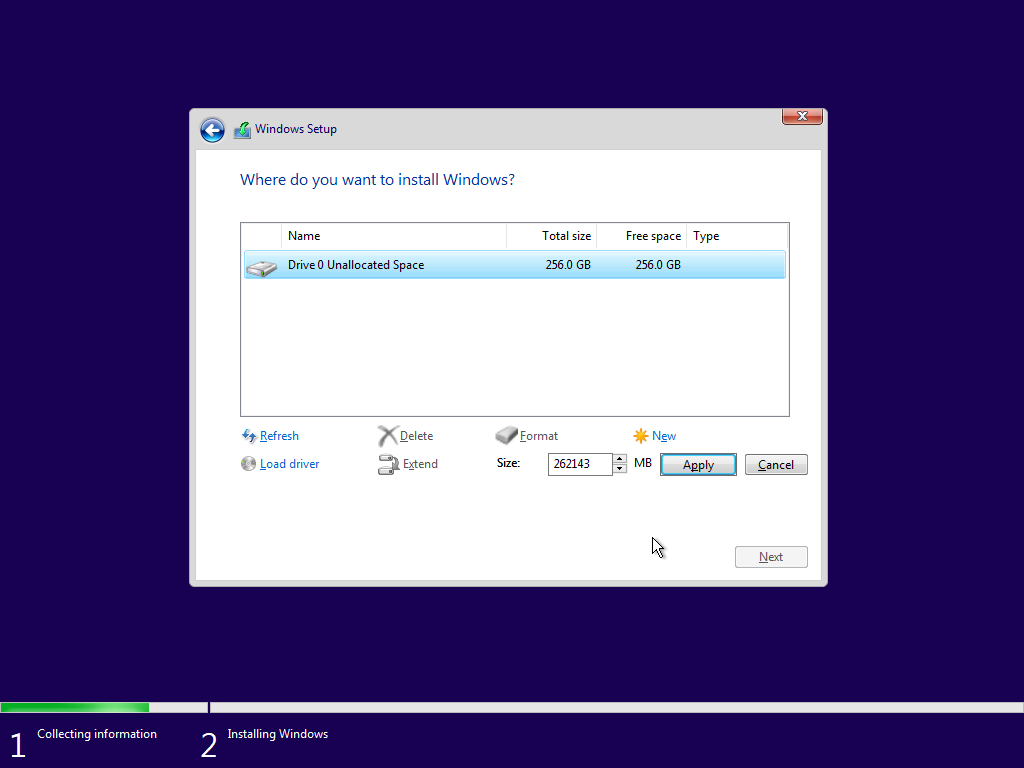
3. Pick the downloaded ISO file from your Mac’s Downloads folder and specify a size for the Windows partition. Then, select Install.
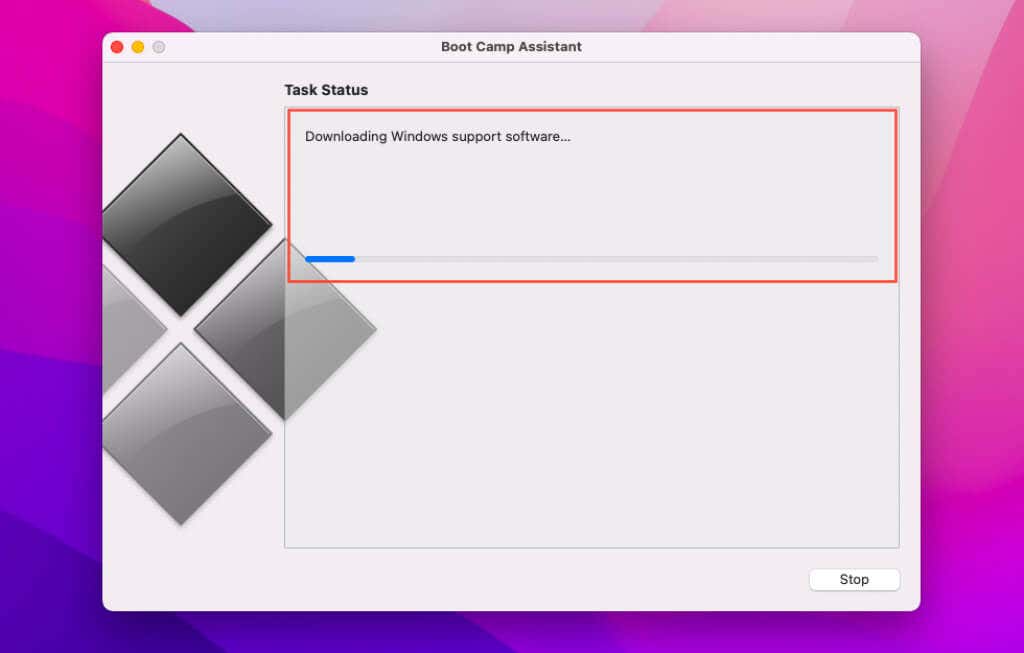
4. Boot Camp Assistant will begin to download Windows support software. Once that finishes, it will create a Windows OS partition and boot your Mac into the Windows Installer.
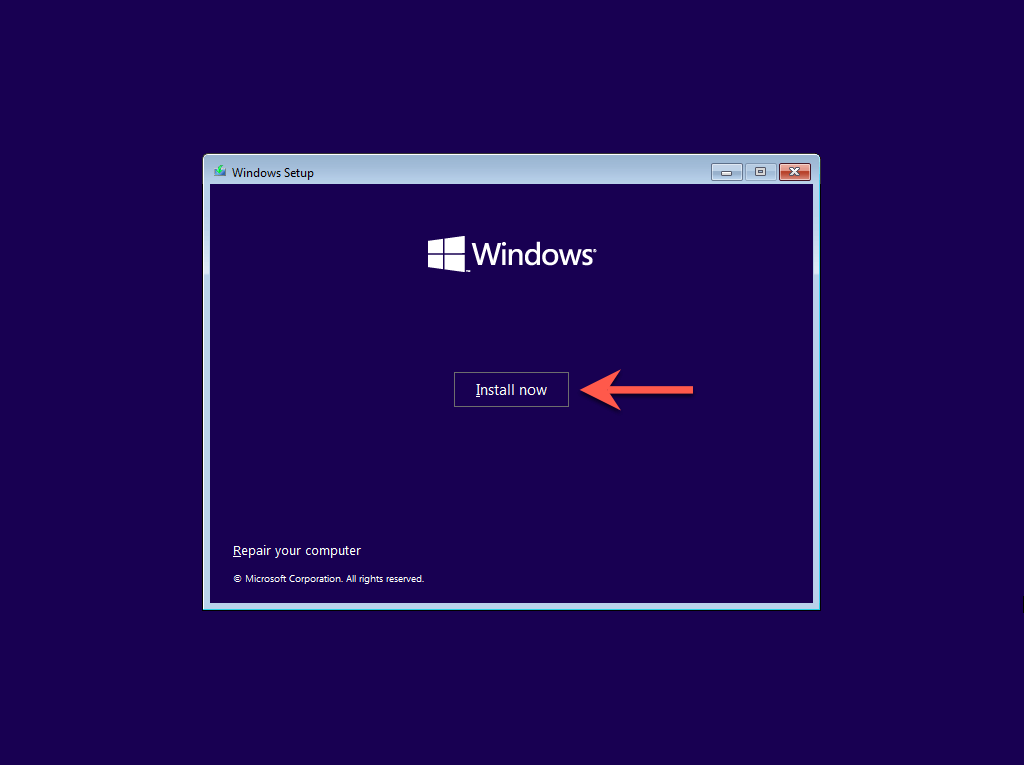
5. Select Install now on the Windows Setup screen.
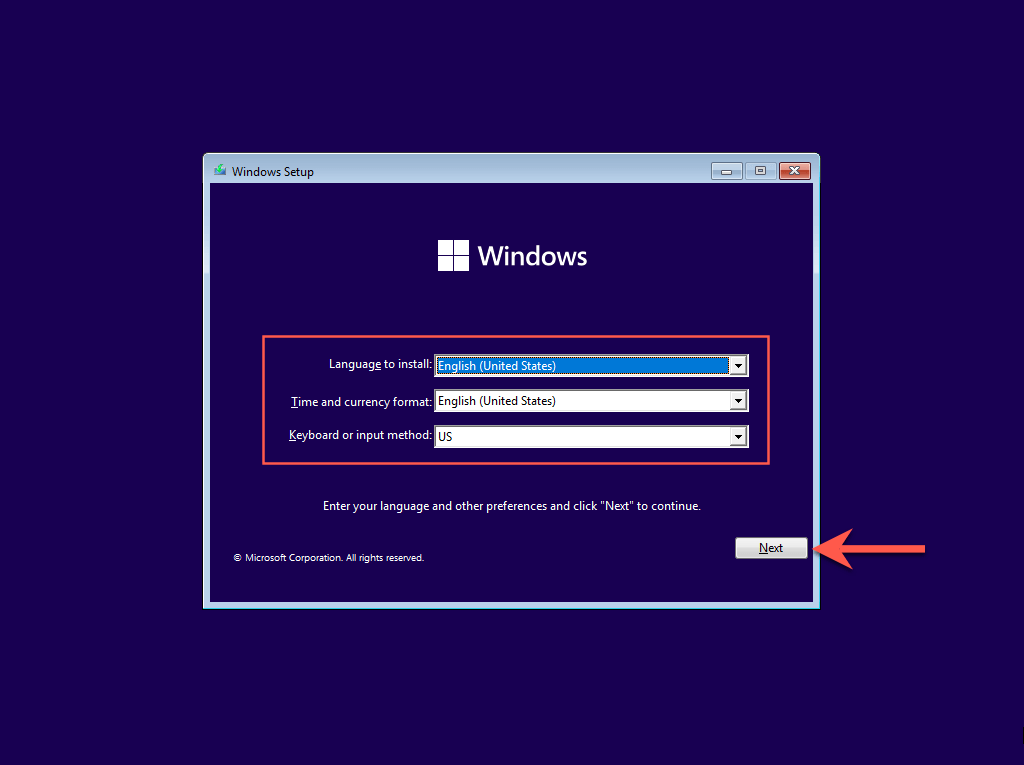
6. Select your language, time and currency format, and keyboard layout. Then, select Next.
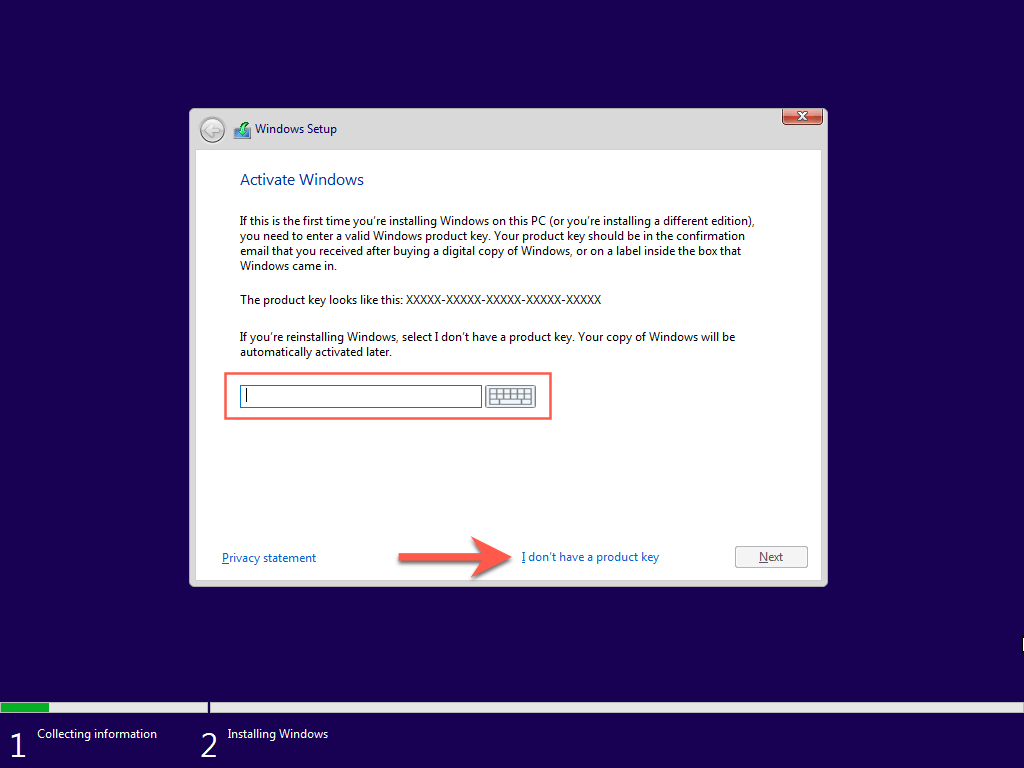
7. Enter your Windows product key. If you don’t have one, select I don’t have a product key.
8. Pick the edition of Windows you want to install—Windows 10 Home or Windows 10 Pro—and select Next. Learn about the difference between the versions.
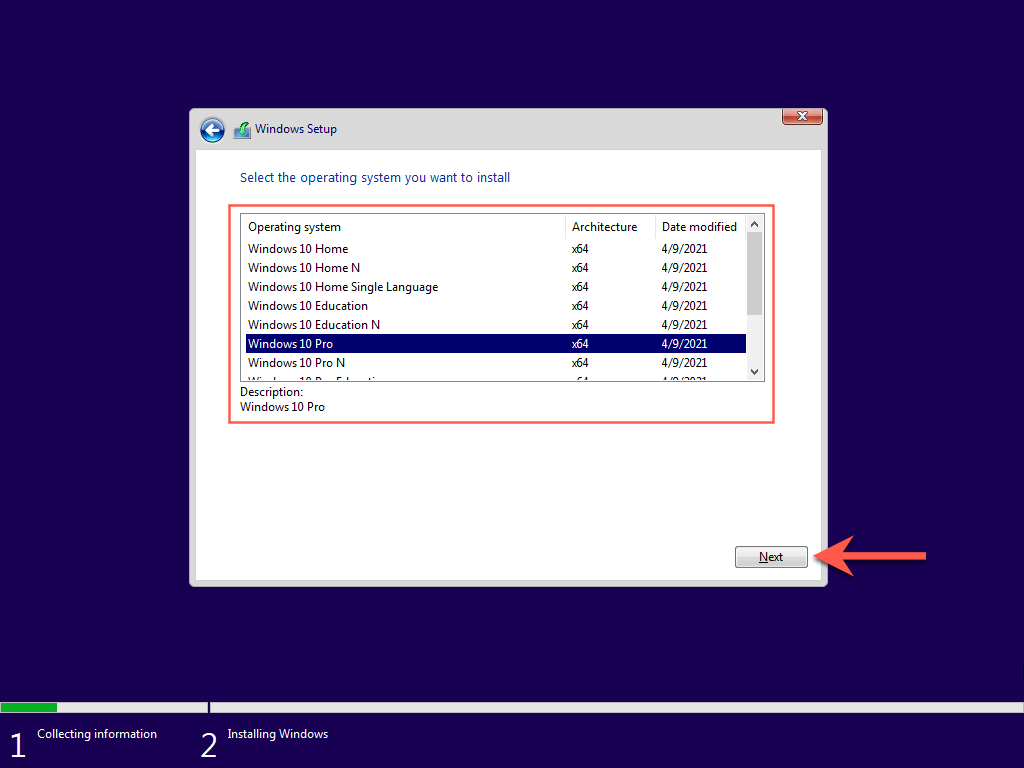
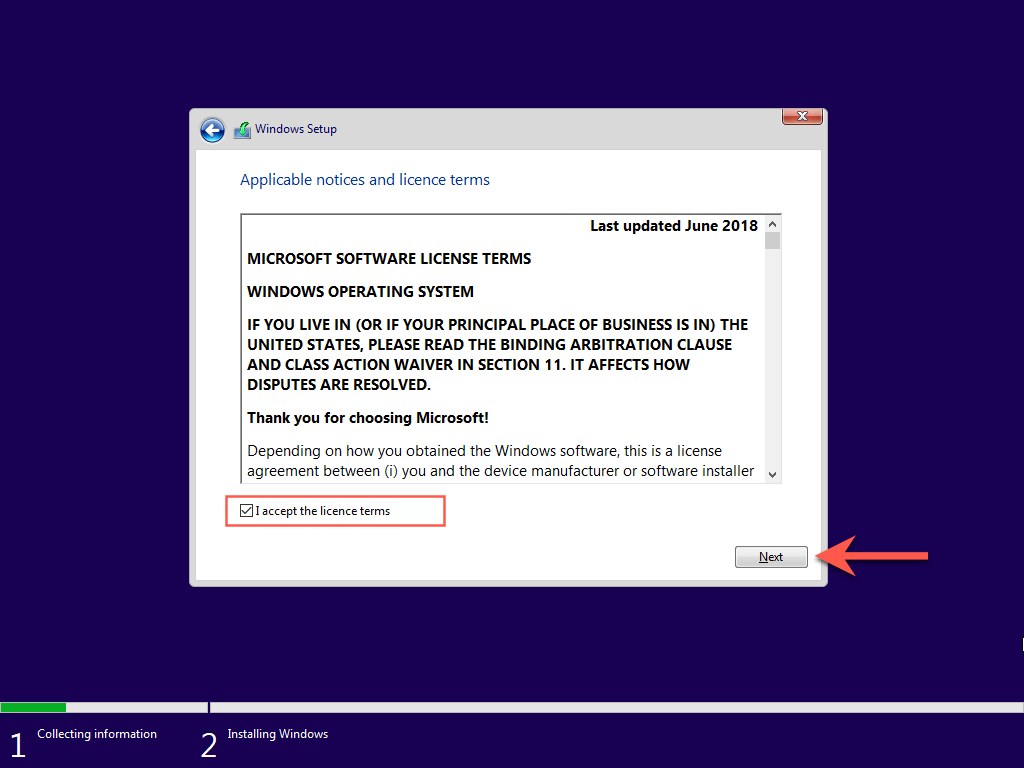
9. Agree to the Microsoft software license terms and select Next.
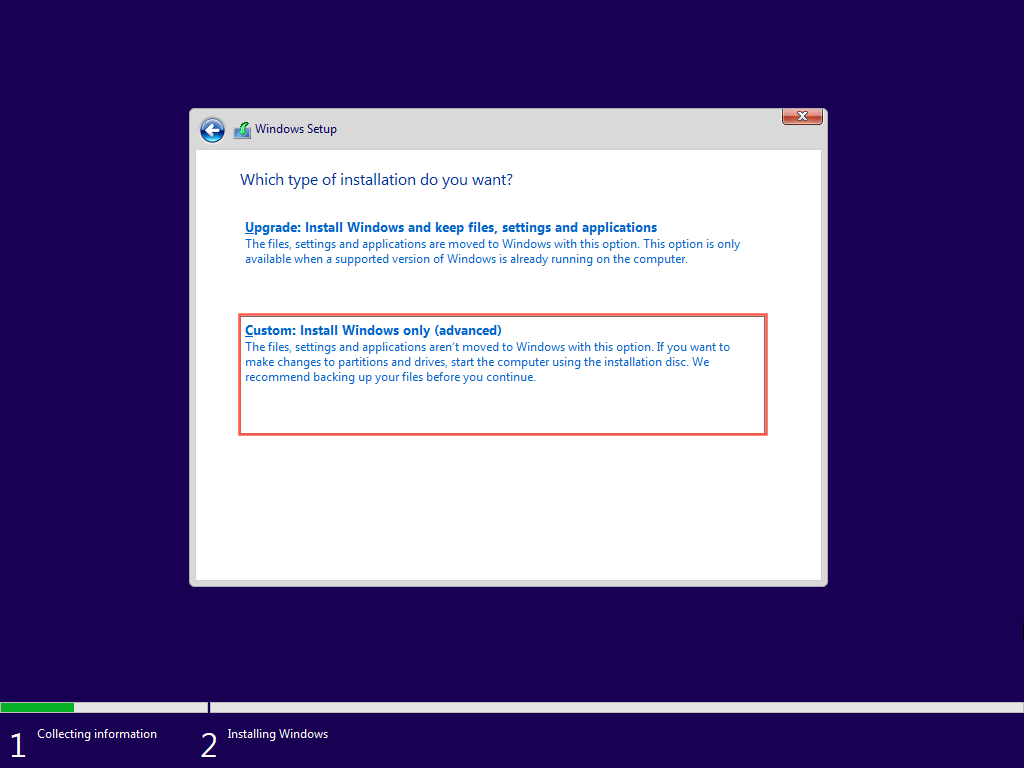
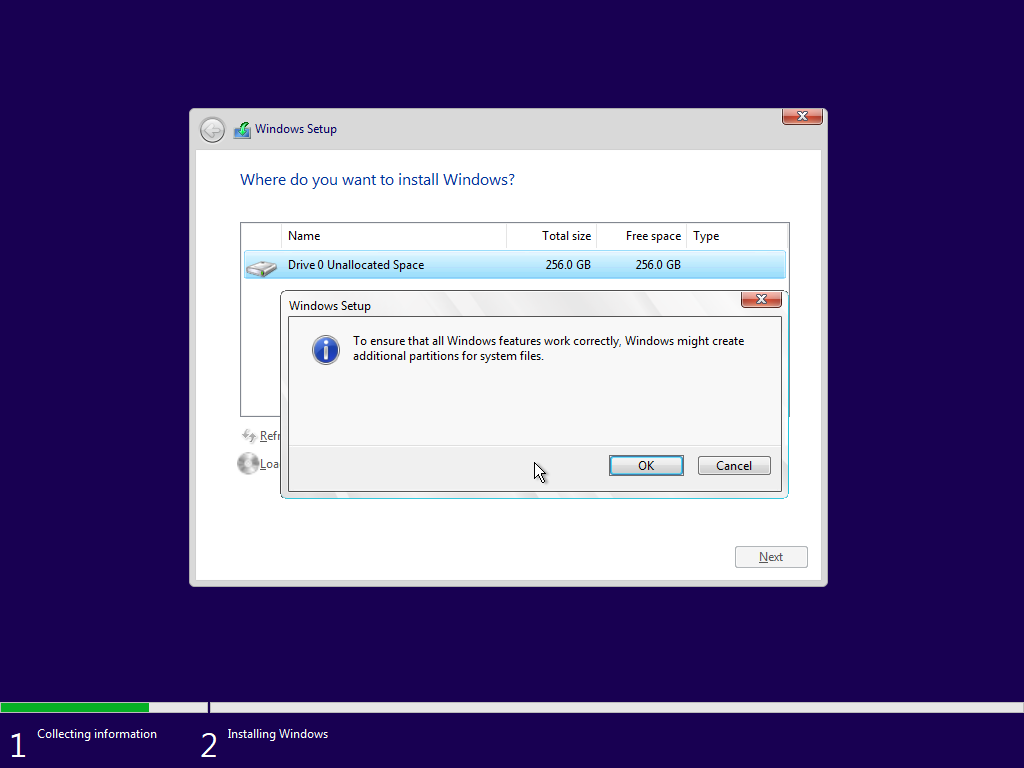
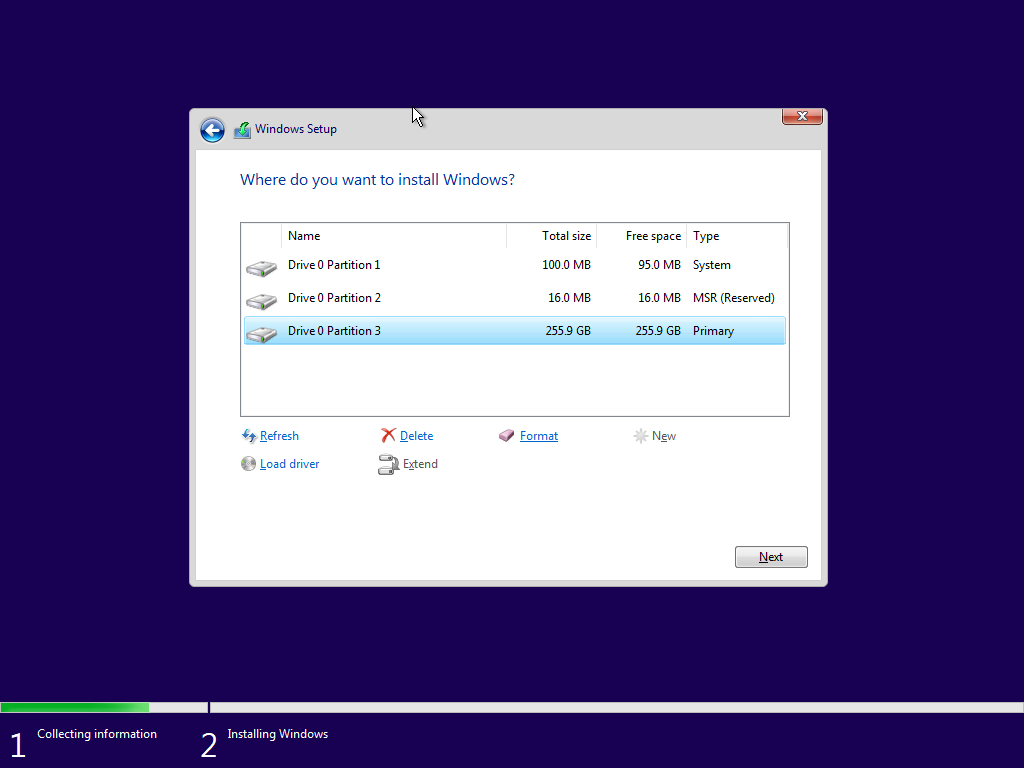
10. Select Custom: Install Windows only (advanced).
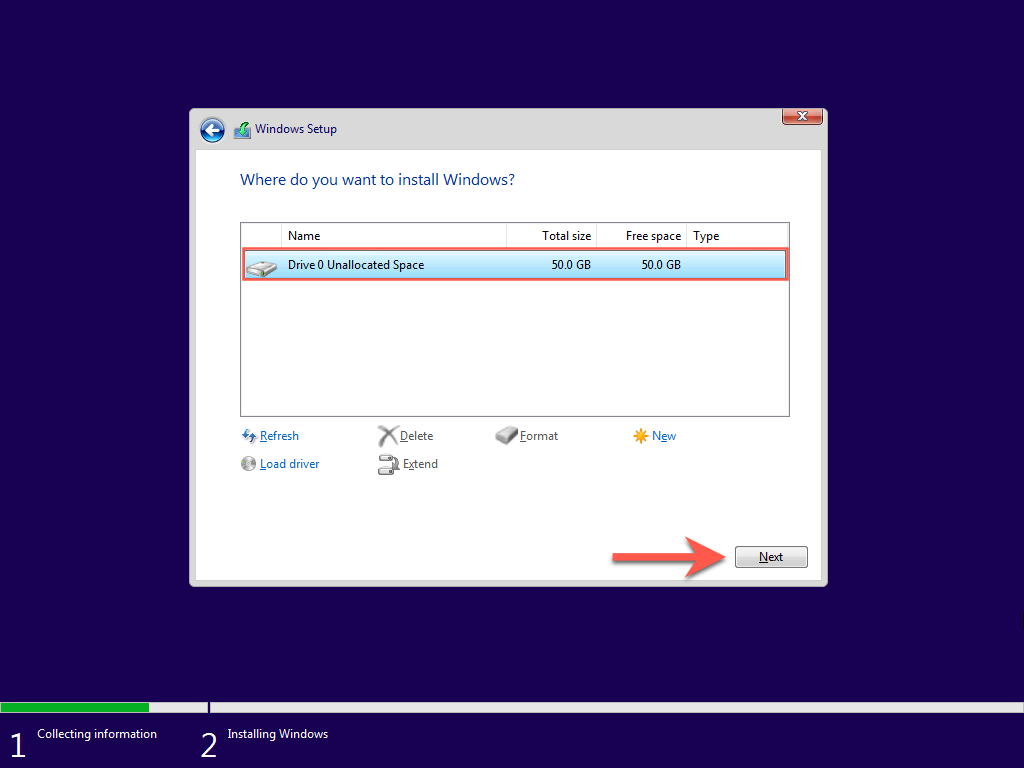
11. Pick your BOOTCAMP (Windows) partition and select Next.
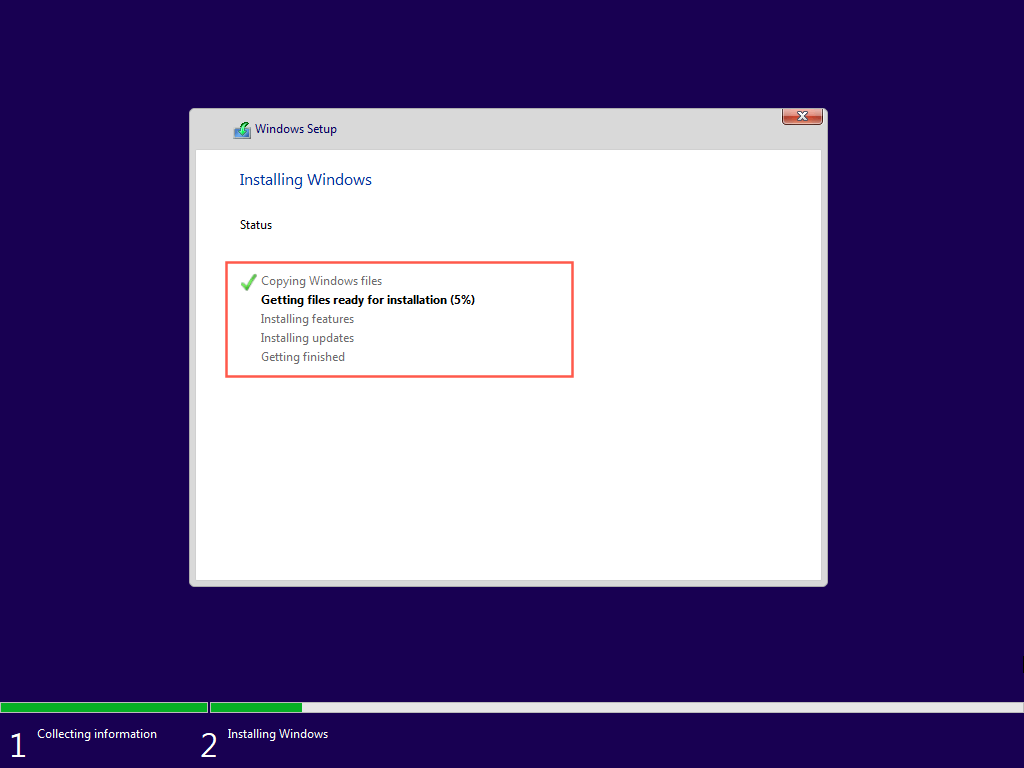
12. Wait until the Windows Setup finishes installing Windows 10 on your Mac.
Set Up Windows 10 on Mac
Once the Windows Setup finishes installing Windows 10, you must specify your language, keyboard, and privacy preferences. You must also create a Windows user account.
Note: Windows Setup will not connect to the internet due to missing network drivers. You can restore online connectivity after reaching the Windows 10 desktop.
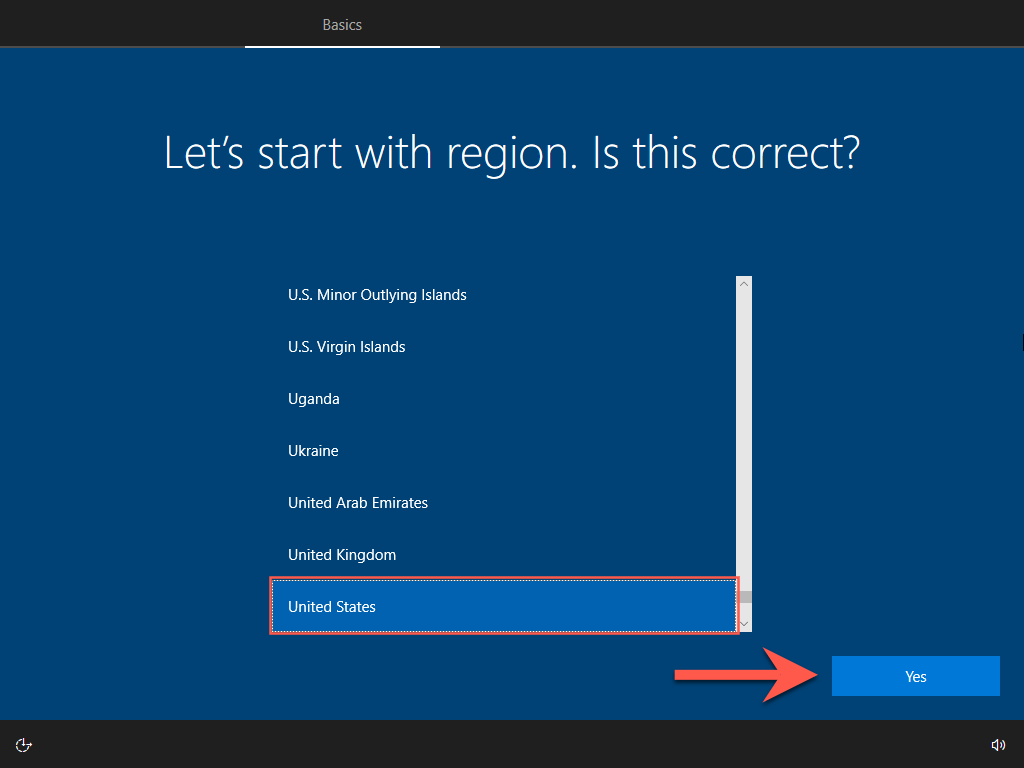
1. Choose a region and select Yes.
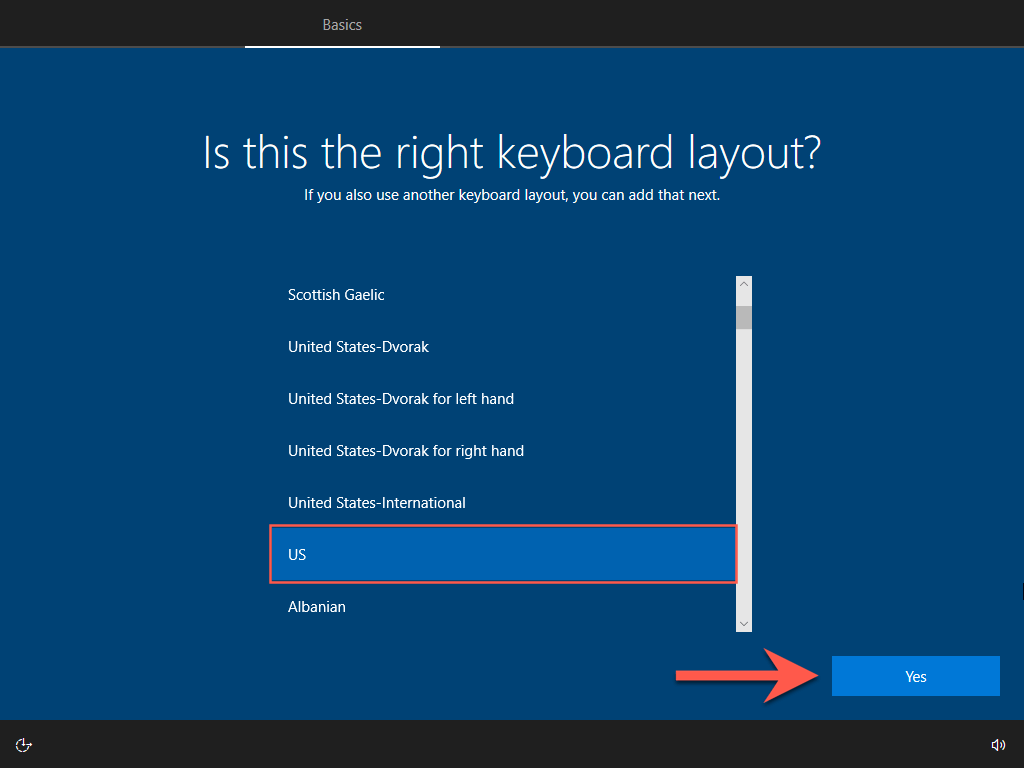
2. Pick a keyboard layout and select Yes.
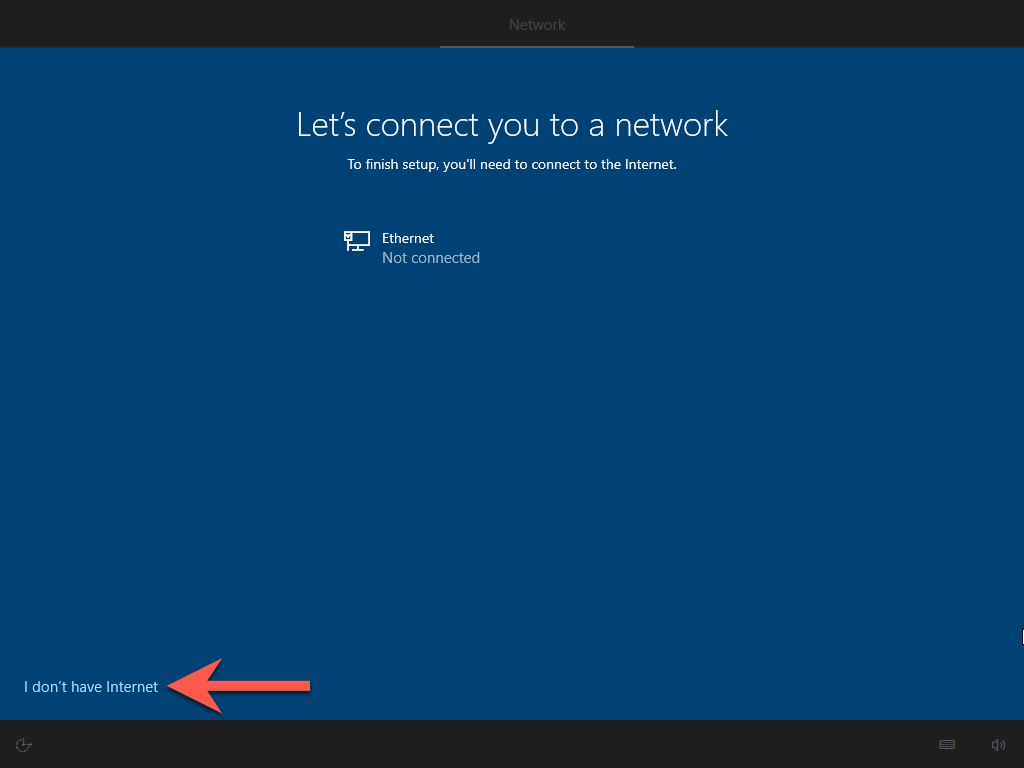
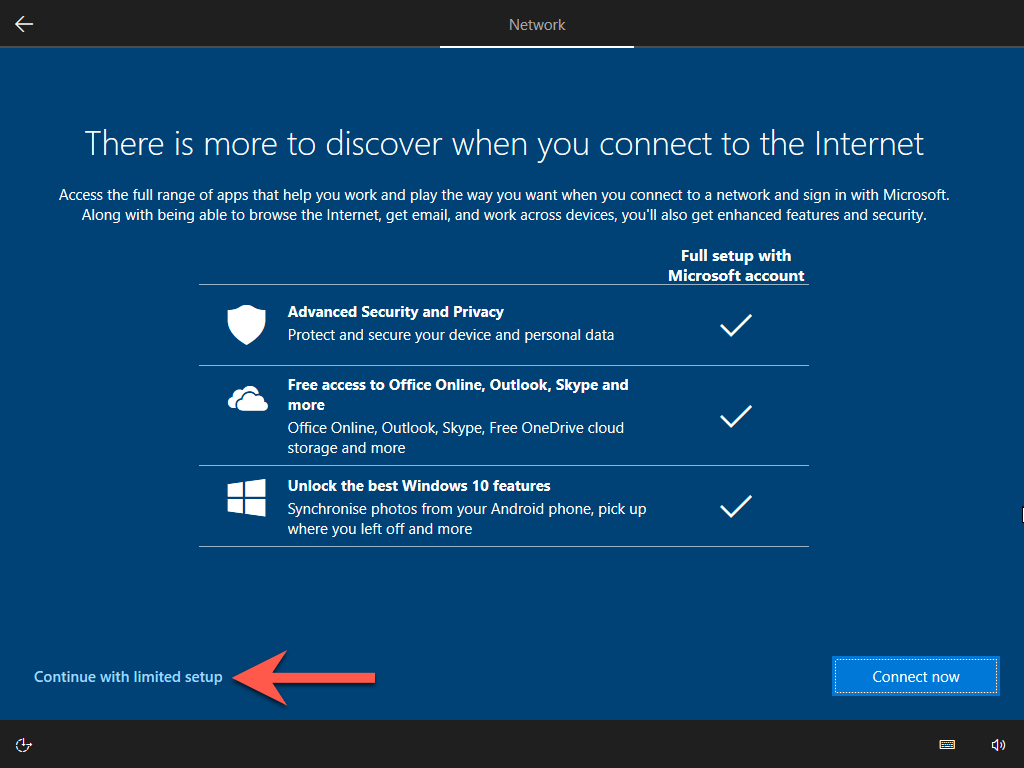
3. Select I don’t have internet.
4. Select Continue with limited setup.
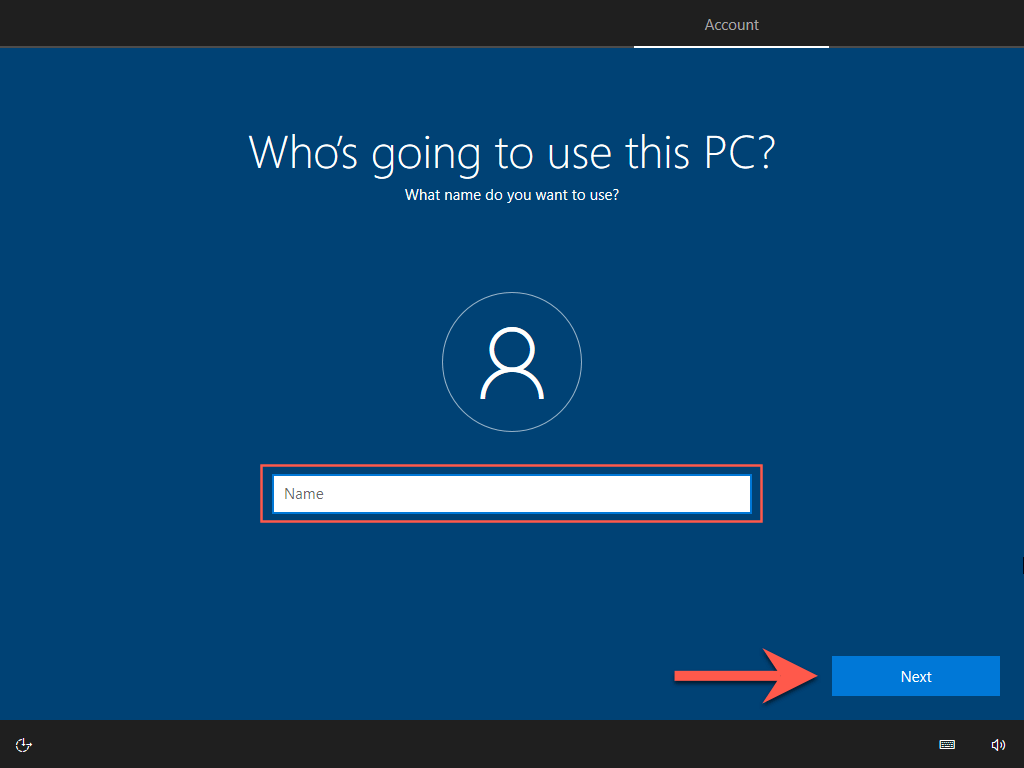
5. Enter your name and select Next to create a local account.
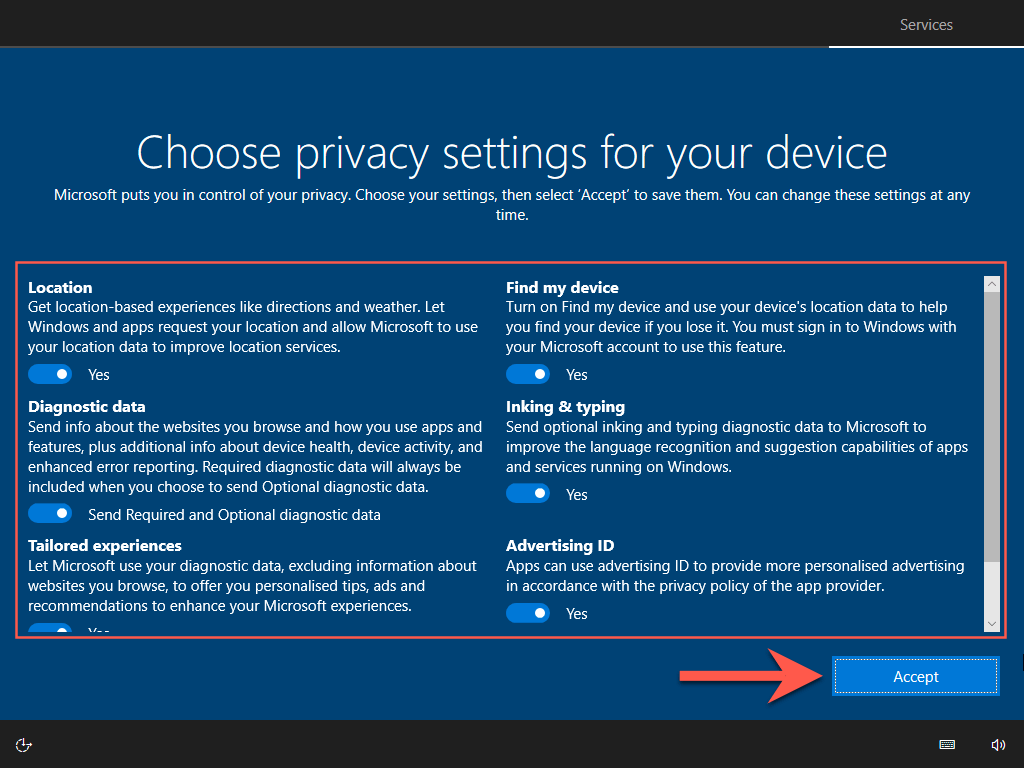
6. Review your privacy settings—e.g., Location, Diagnostic data, and Advertising ID. Disable anything if needed and select Accept.
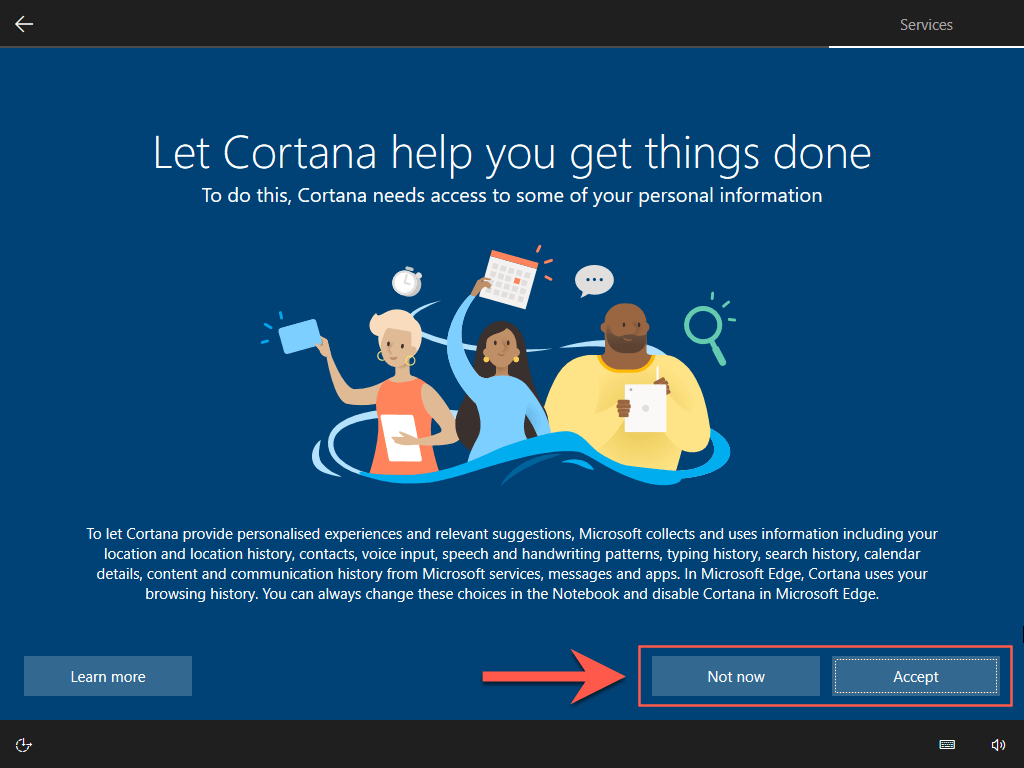
7. Set up Cortana or select Now Now to do that later.
8. Wait for the Windows Setup to finalize the installation.

9. Your Mac will boot into the Windows 10 desktop momentarily. You are halfway there!
Update Windows 10 on Mac
Now that you’ve finished installing Windows 10 on Mac, you must install the hardware drivers, support software, and system updates required to get it working correctly. That also ensures a smooth upgrade to Windows 11.
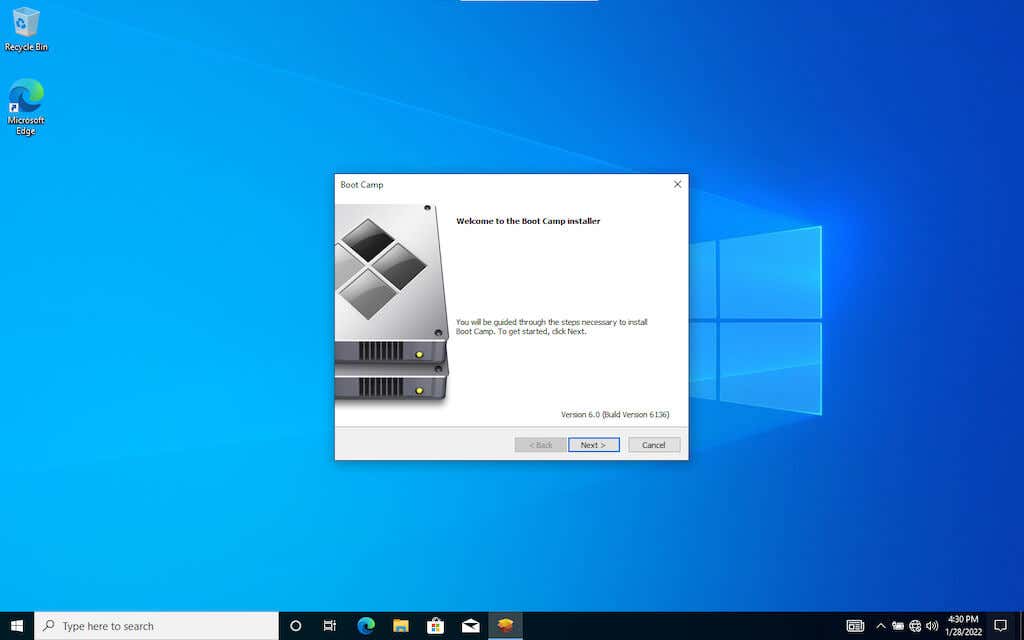
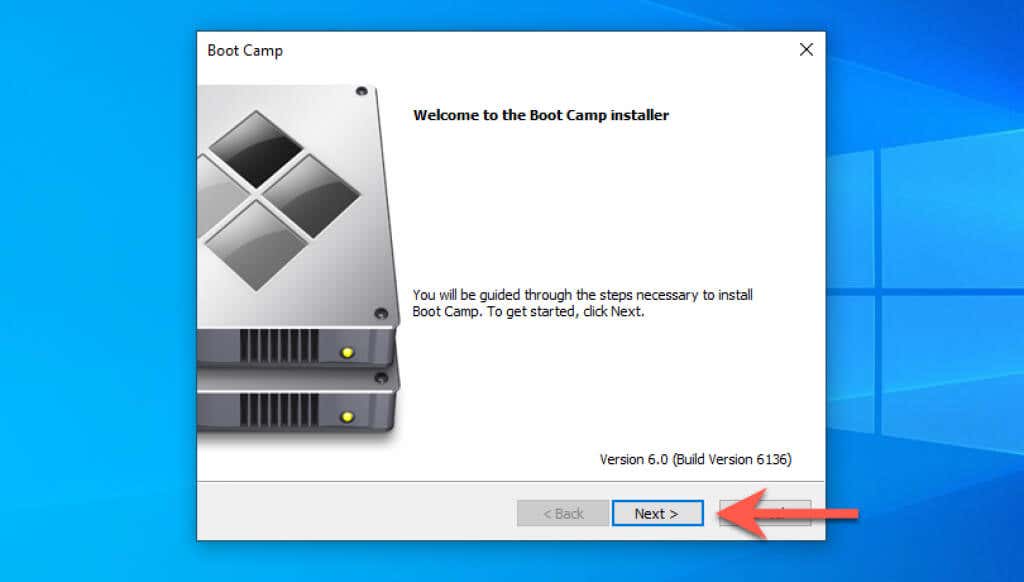
Run Boot Camp Installer
The Boot Camp installer shows up automatically after your Mac boots into Windows 10 for the first time. It contains critical drivers that you must install right away.
1. Select Next.
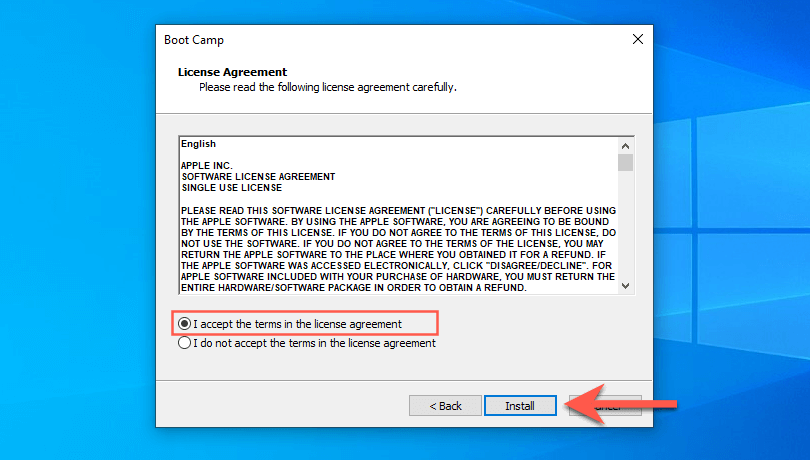
2. Accept the Boot Camp license agreement and select Install.
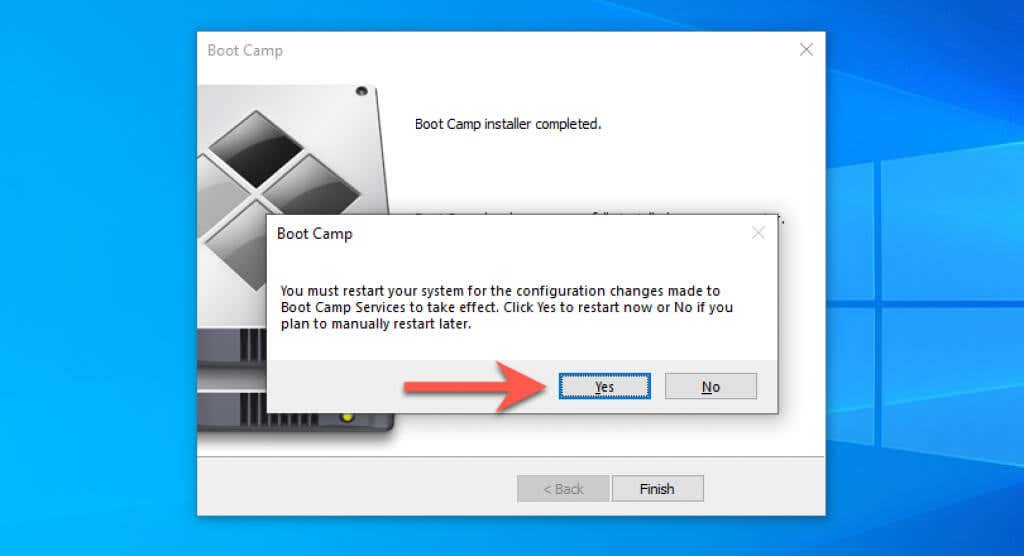
3. Wait for the Boot Camp installer to finish installing all drivers. Then, select Yes to restart your Mac.
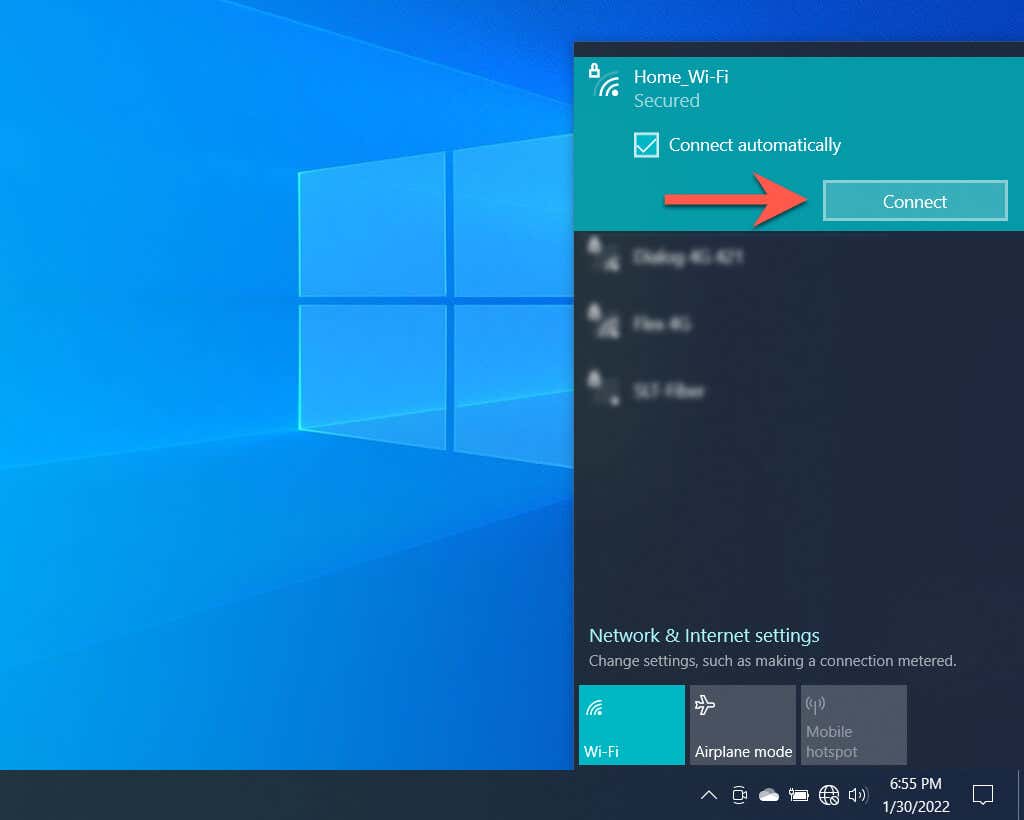
Connect to a Wi-Fi Network
The Boot Camp installer should’ve restored online connectivity in Windows 10. If you don’t use Ethernet, you can connect to Wi-Fi instead. Just select the Globe icon on the system tray (right-corner of the taskbar), pick an available Wi-Fi network, enter its password, and select Connect.
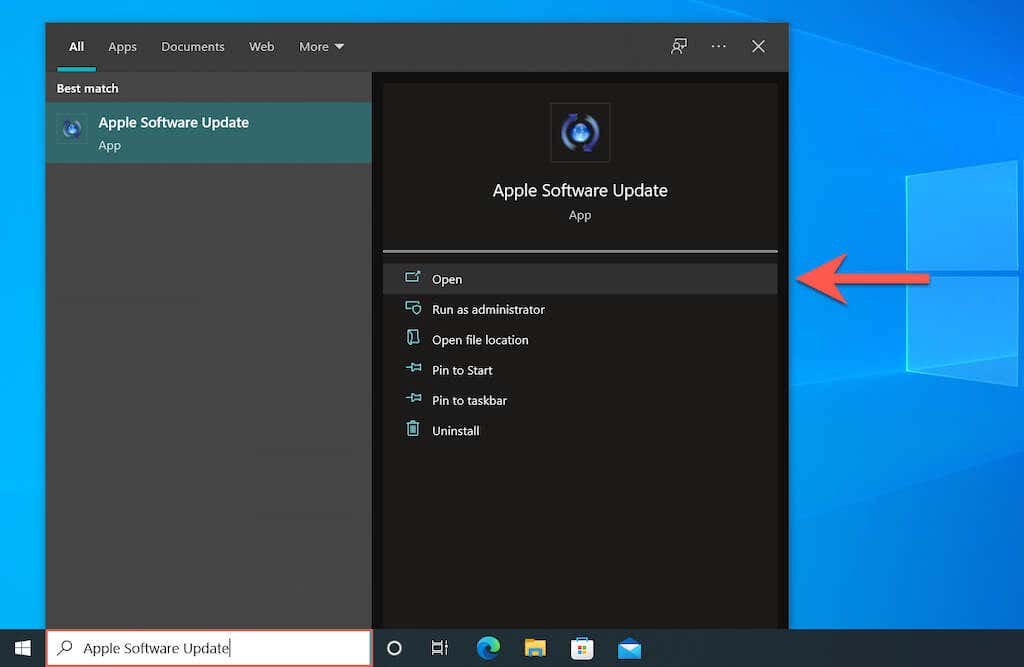
Install Apple Software Update
Next, use the Apple Software Update app to install additional Boot Camp driver updates.
1. Type Apple Software Update into the taskbar and select Open.
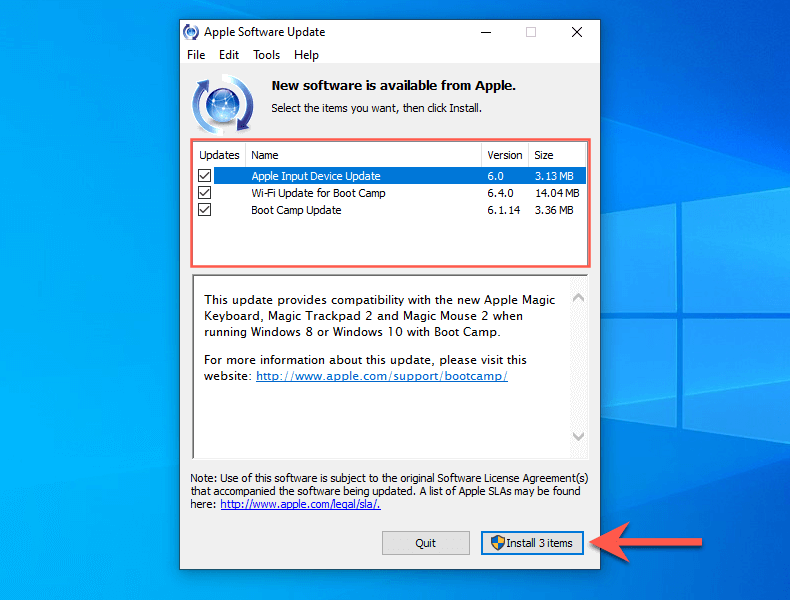
2. Check the boxes next to all available Apple software updates and select Install.
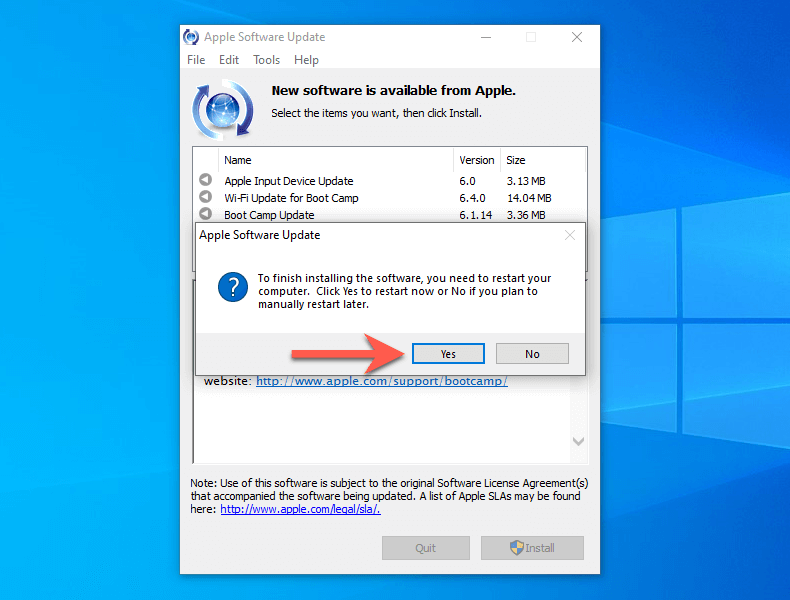
3. Select Yes to restart your PC.
Install Windows Drivers & Updates.
Finally, you must install all Microsoft-verified drivers via Windows Update.
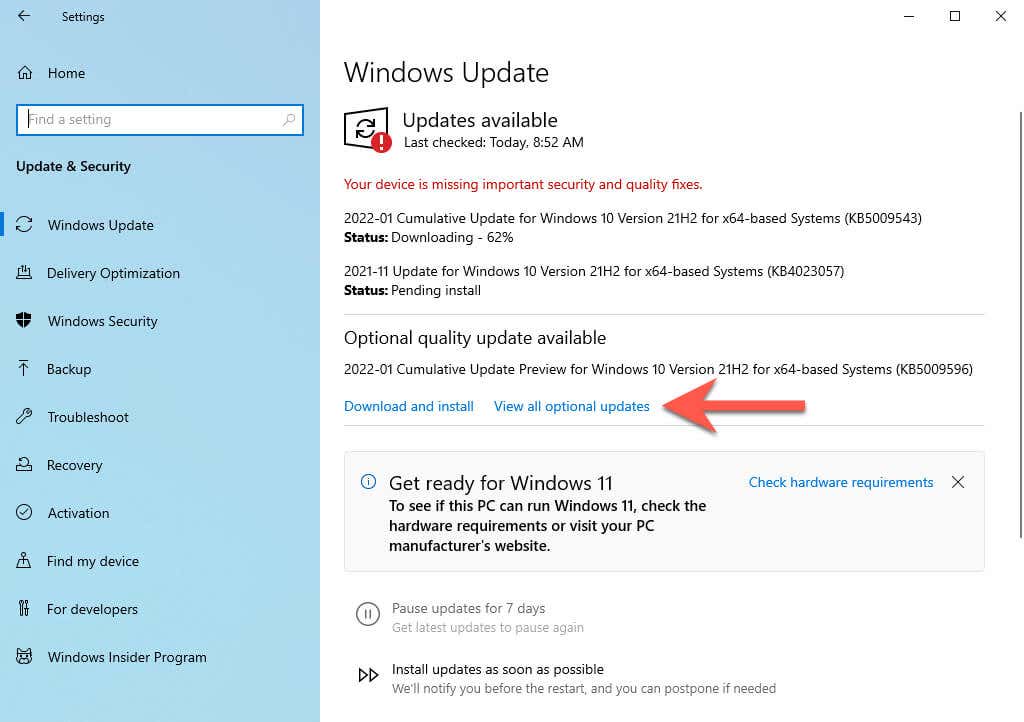
1. Type Windows Update into the taskbar and select Open.
2. Select Check for Updates > View all optional updates.
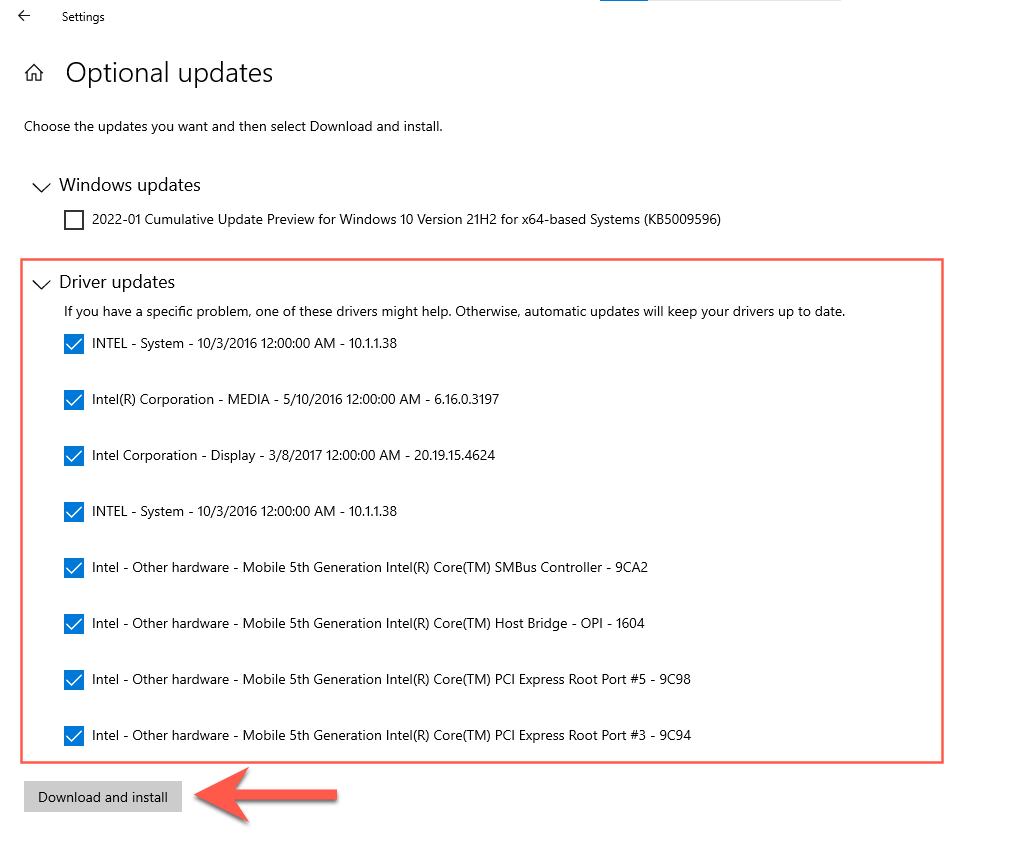
3. Expand Driver updates. Then, check the boxes next to all driver updates and select Download and install.
4. Head back to the previous screen and install the latest Windows 10 updates.
5. Select Restart now.

Download the MediaCreationTool GitHub Script
You’re now ready to make the upgrade to Windows 11. To begin, you must download MediaCreationTool (MCT) from GitHub. It’s an automated script that downloads Windows 11 from the official Microsoft servers and installs it by skipping all compatibility checks.
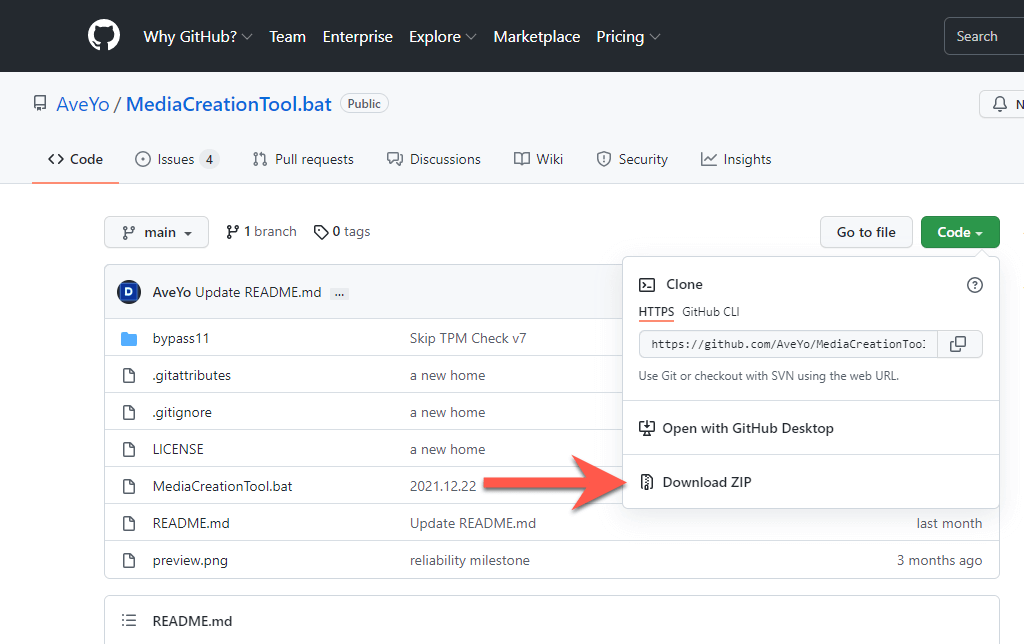
1. Open Microsoft Edge from the Windows 10 taskbar and head over to AveYo’s MediaCreationTool page on GitHub.
2. Select Code and pick the option labeled Download ZIP to download the batch script in ZIP format.
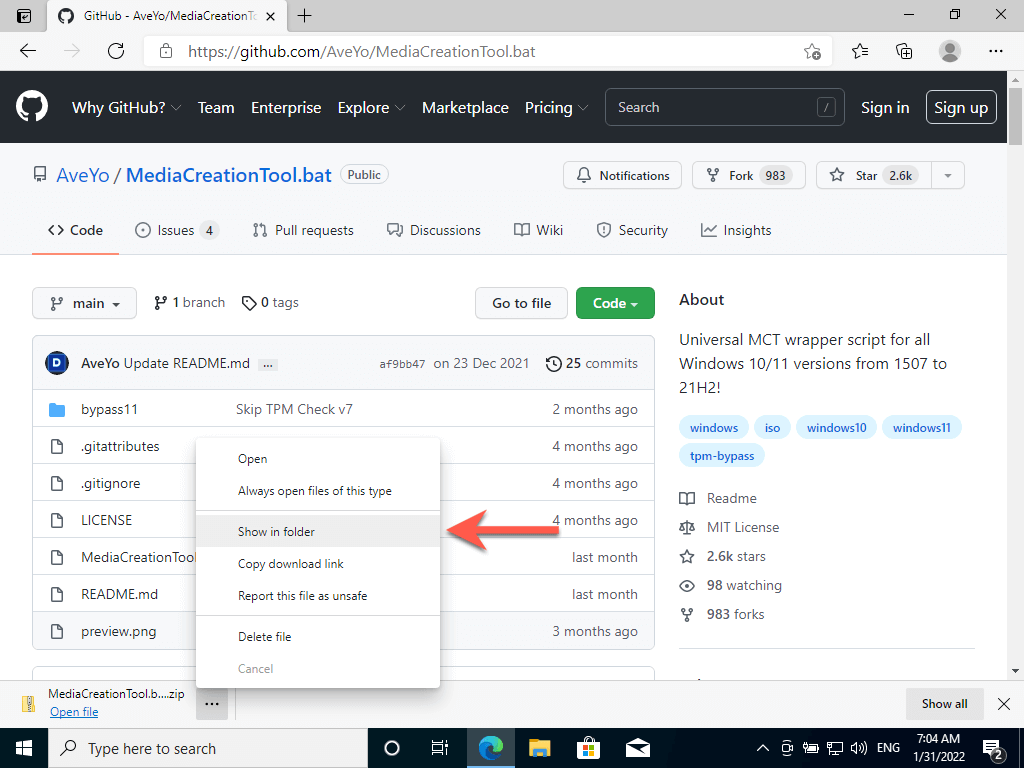
3. Select the More icon (three dots) on the download shelf and choose Show in Folder.
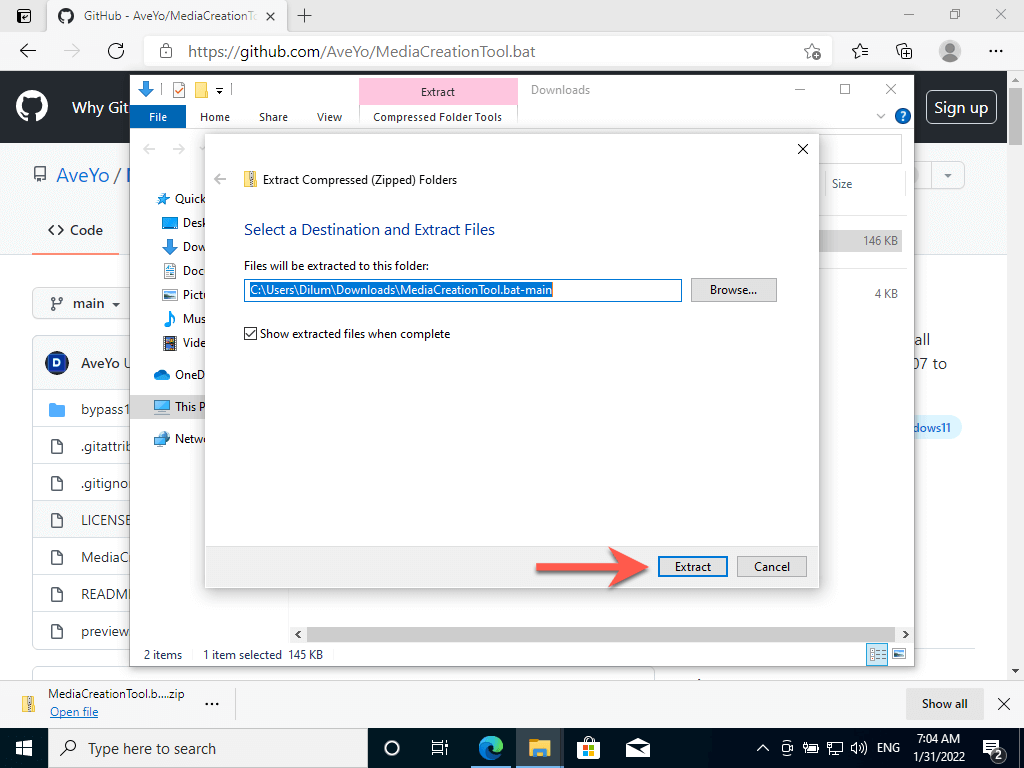
4. Right-click the downloaded ZIP file and select Extract Files. Then, choose Extract. The extracted folder will show up automatically.
Upgrade Windows 10 Installation to Windows 11
Running the batch script will upgrade Windows 10 to Windows 11. If you’re upgrading a previous Windows 10 installation, create a backup of your data before proceeding.
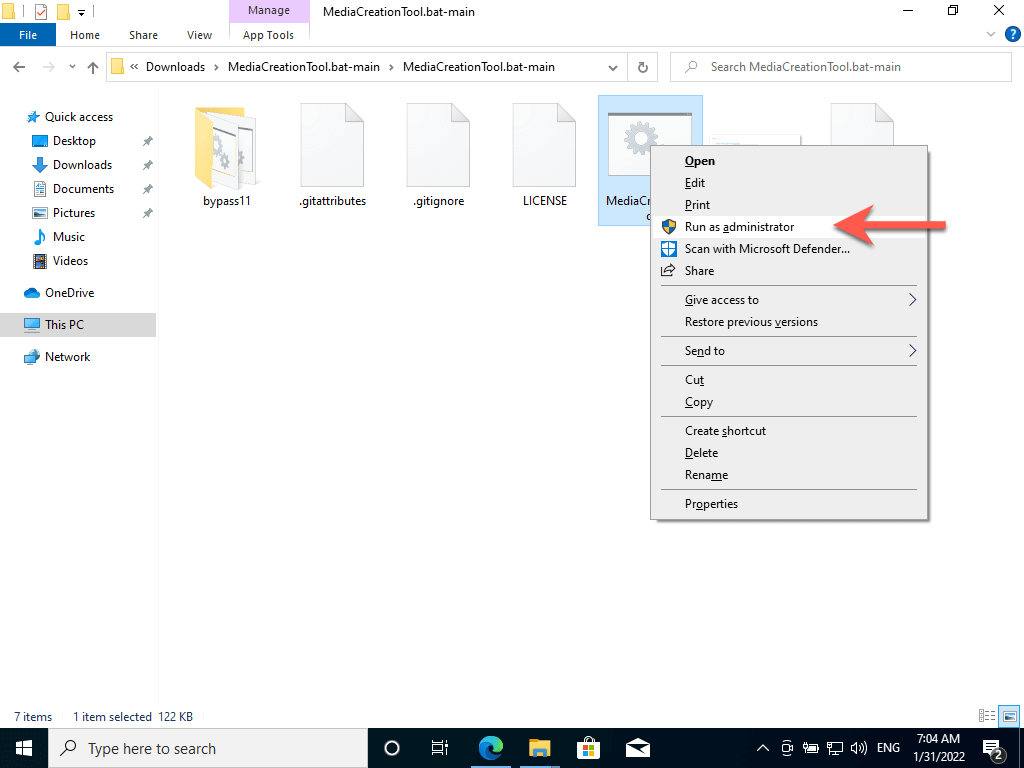
1. Right-click the MediaCreationTool.bat file and select Run as an administrator.
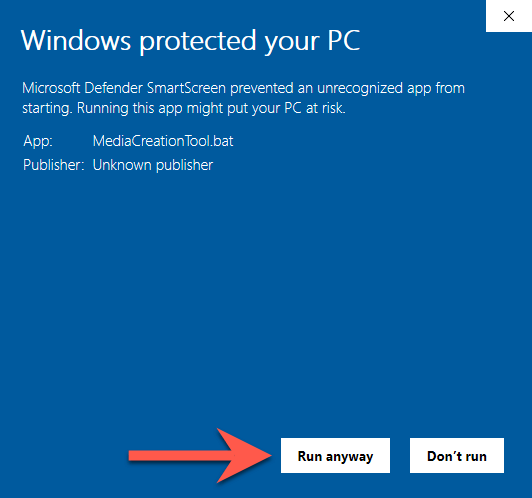
2. Select More info > Run anyway on the Windows SmartScreen pop-up.
3. Select 11.
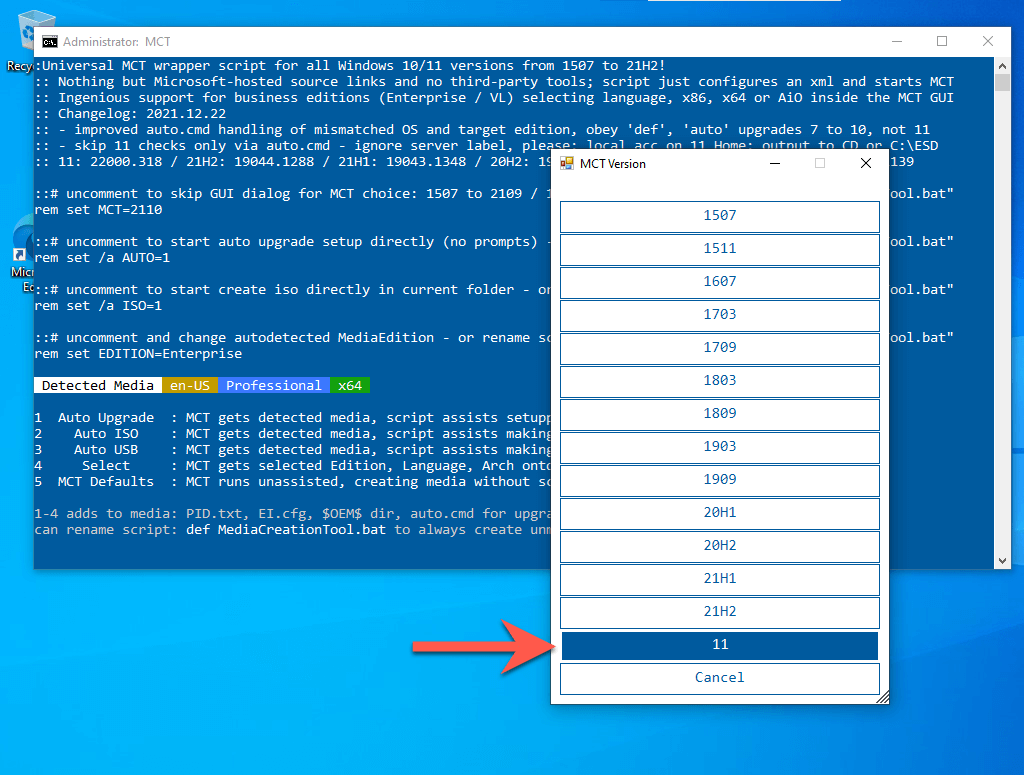
4. Select Auto Upgrade.
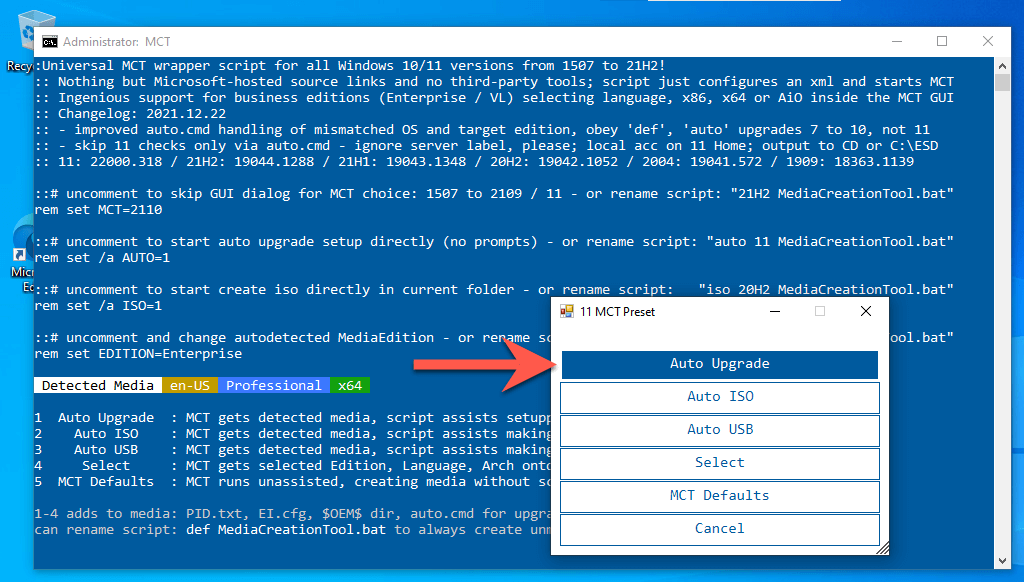
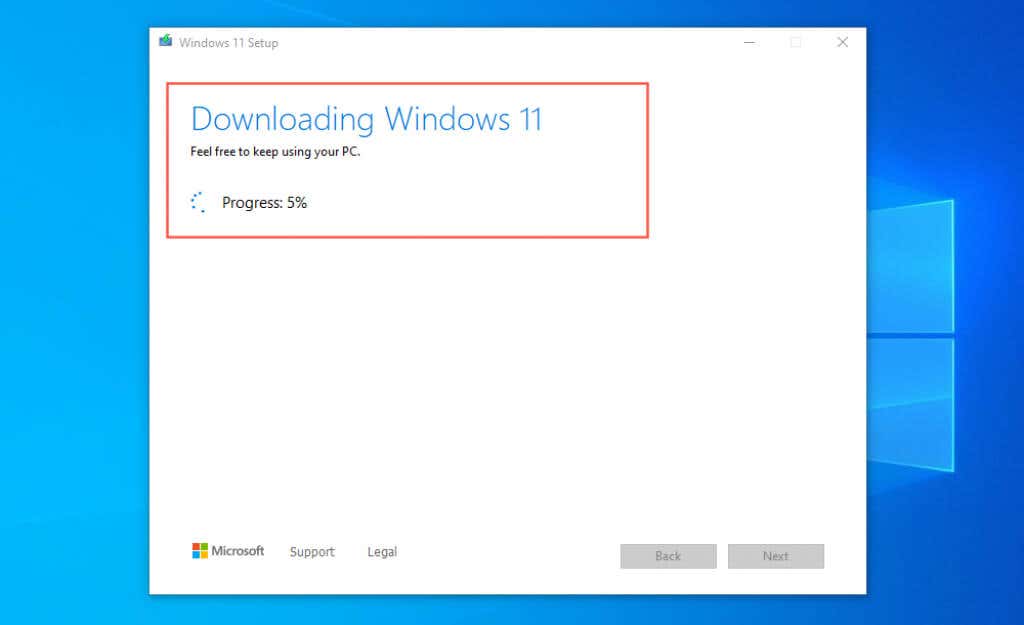
5. Wait until the MediaCreationTool script downloads Windows 11 onto your PC. You don’t have to do anything from this point onward.
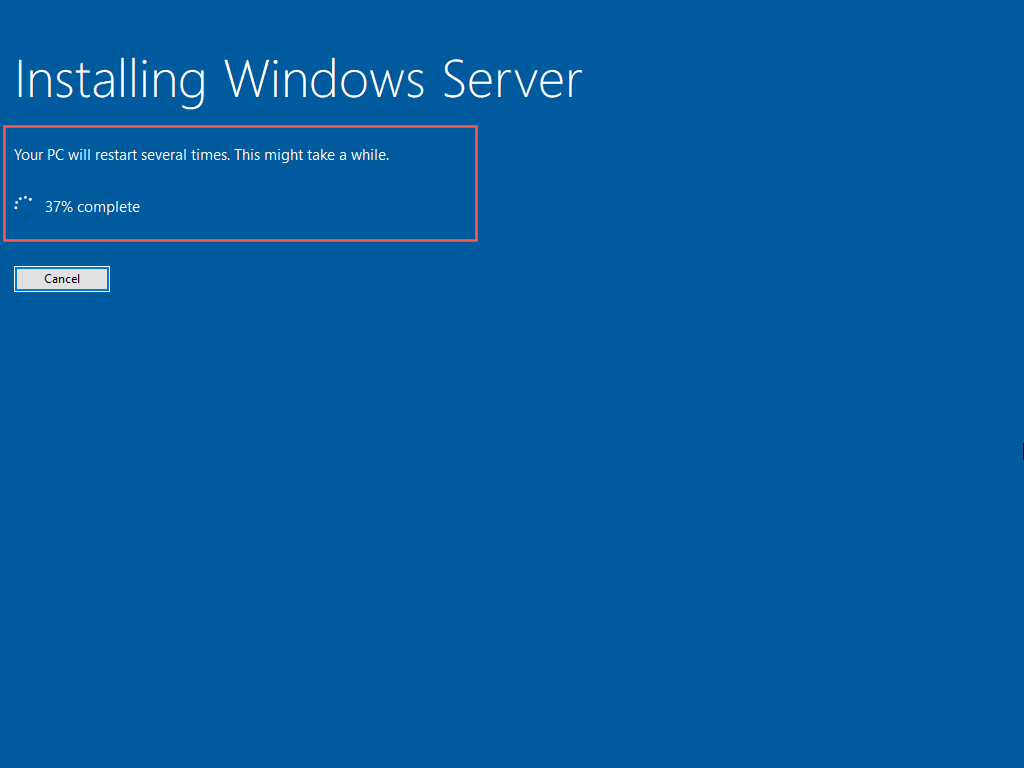
6. The MediaCreationTool will reboot your Mac and begin installing Windows 11. The procedure may take up to an hour or more to complete.
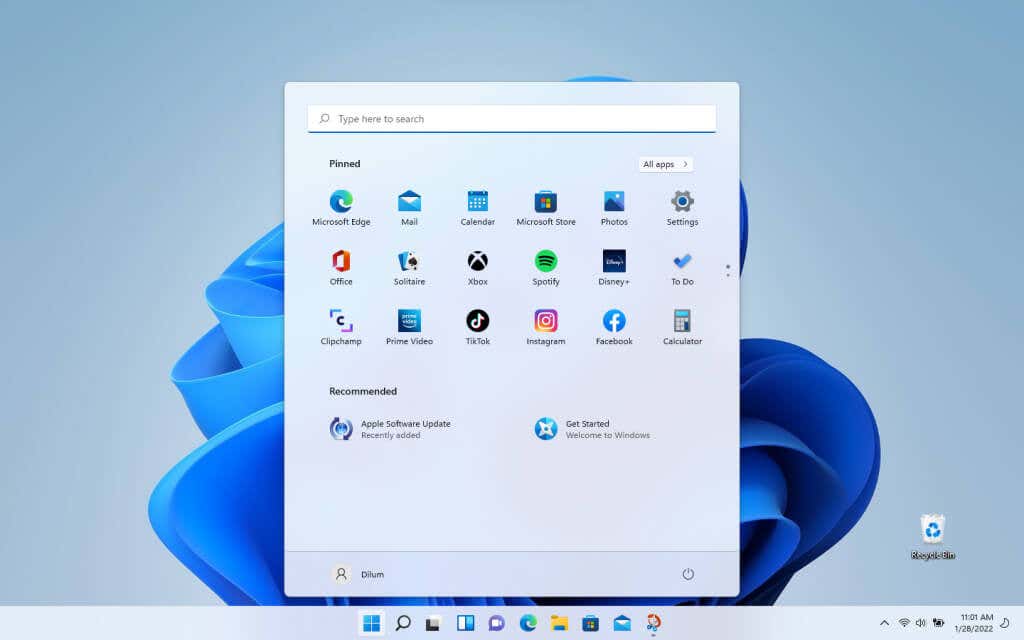
7. Your Mac will boot into the Windows 11 desktop after the upgrade. Congratulations!
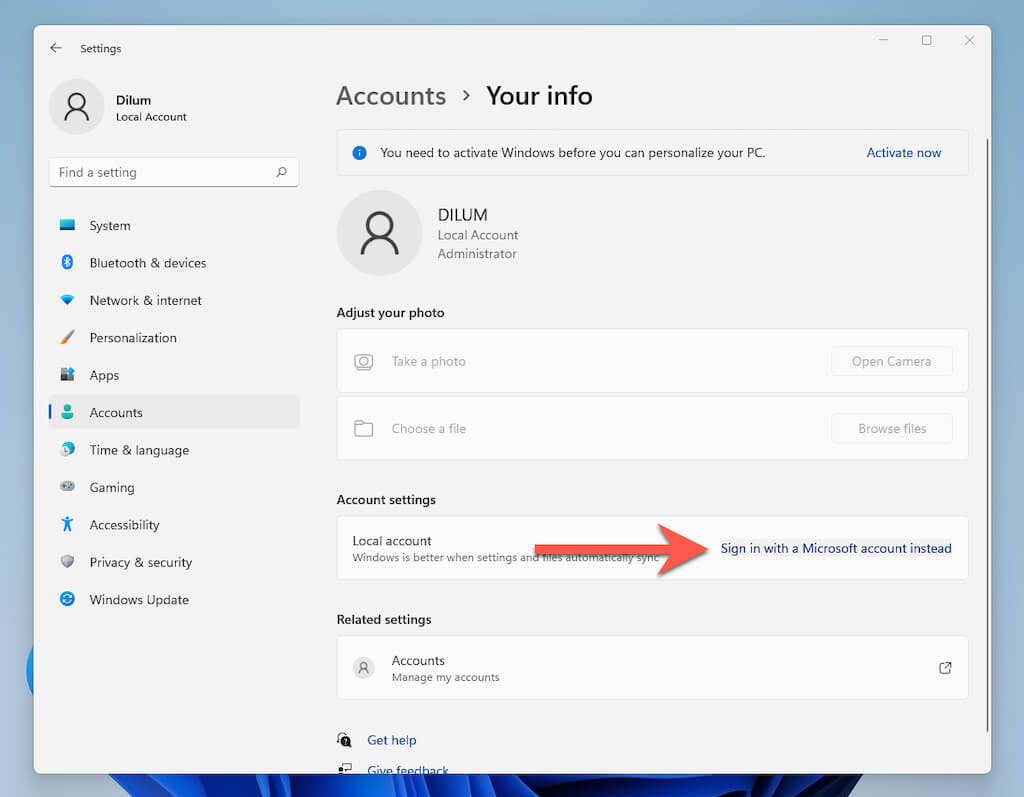
Optional: Sign Into Microsoft Account
You’ve finished setting up Windows 11 on your Mac. You can begin using it immediately since you installed all drivers and updates in Windows 10.
You can also sign into Windows 11 with a Microsoft Account to unlock additional features—such as the ability to sync PC settings and download age-restricted content from the Microsoft Store—or activate Windows if it’s linked with a digital license.
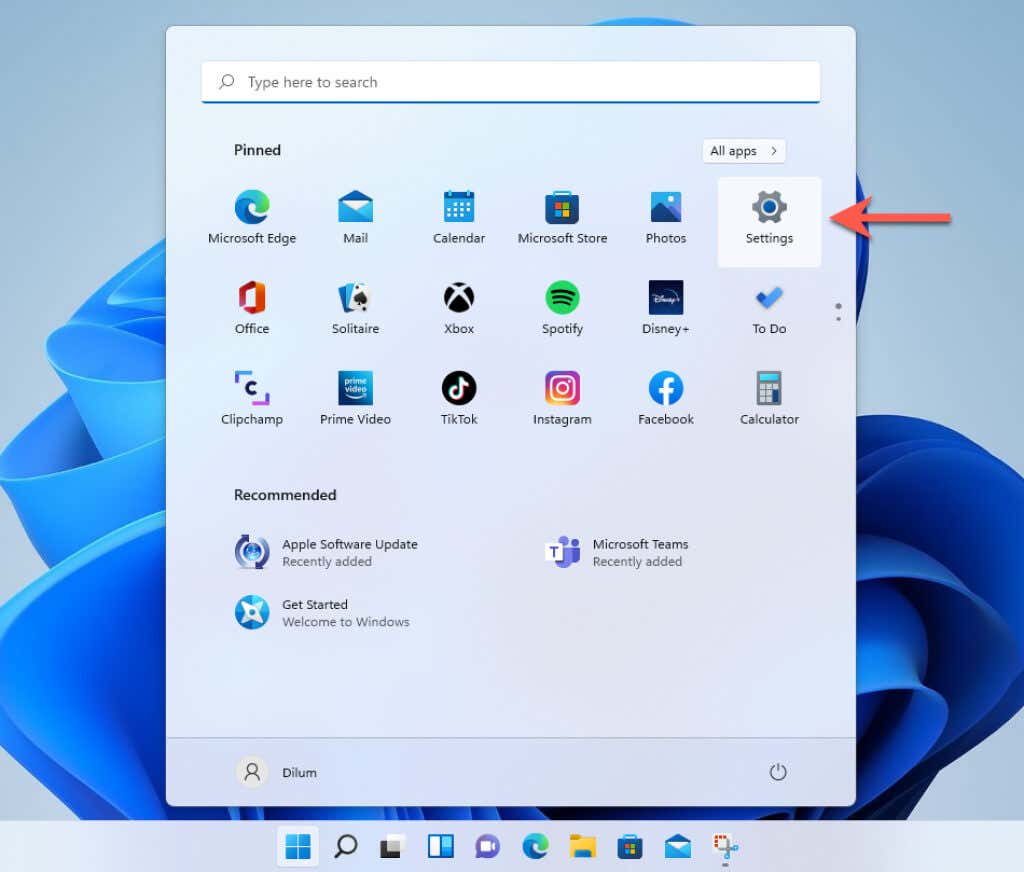
1. Open the Start menu and select Settings.
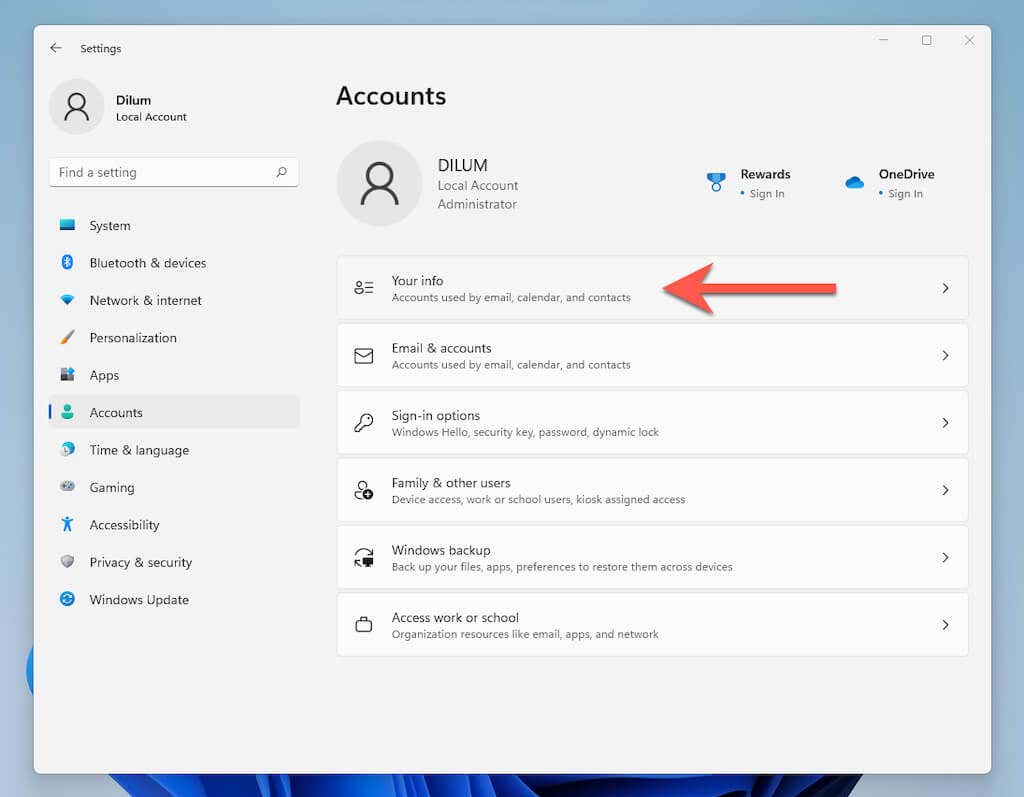
2. Select Accounts > Your info.
3. Select Sign in with a Microsoft Account instead.
4. Enter your Microsoft Account credentials (or choose to create one) and sign in to Windows 10.
Activate Windows 11 on Mac
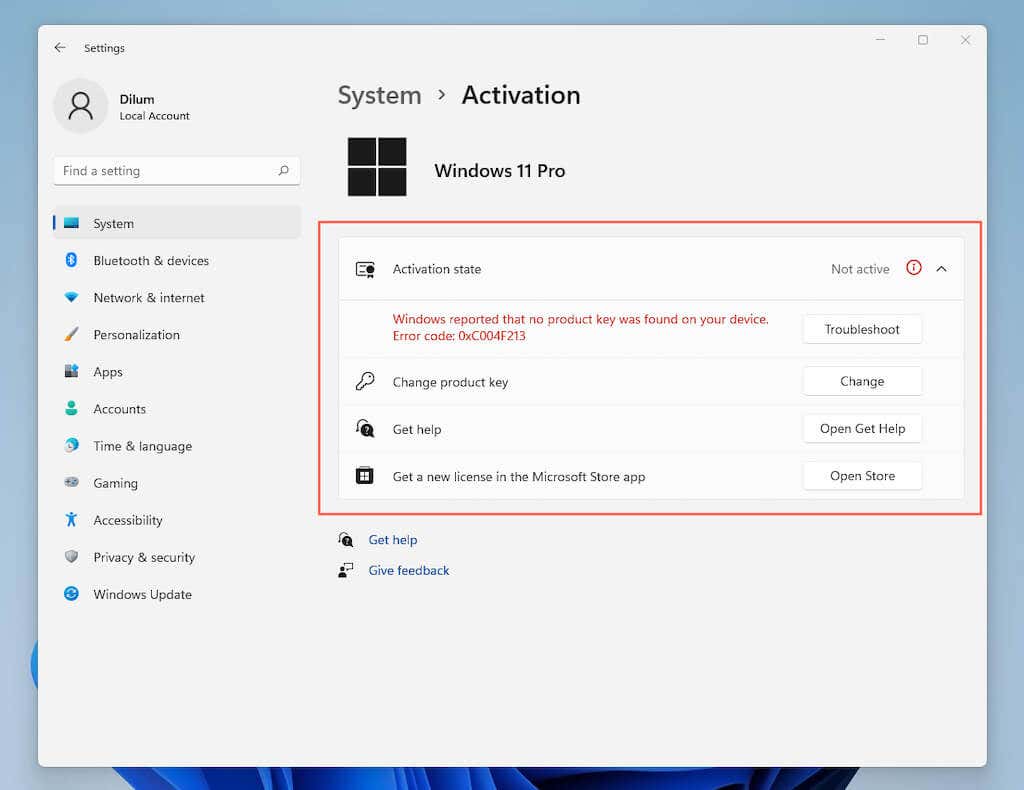
You don’t have to activate Windows 11 to keep using it on your Mac, but you will lose the ability to customize your desktop. Regardless, you can check your activation status and enter/purchase a product key by heading to Start > Settings >System > Activation.
Switch Between Windows and macOS
You can switch between your Windows 11 and macOS Monterey installations on your Mac via the boot selection screen.
1. Open the Start menu and select Power > Restart.
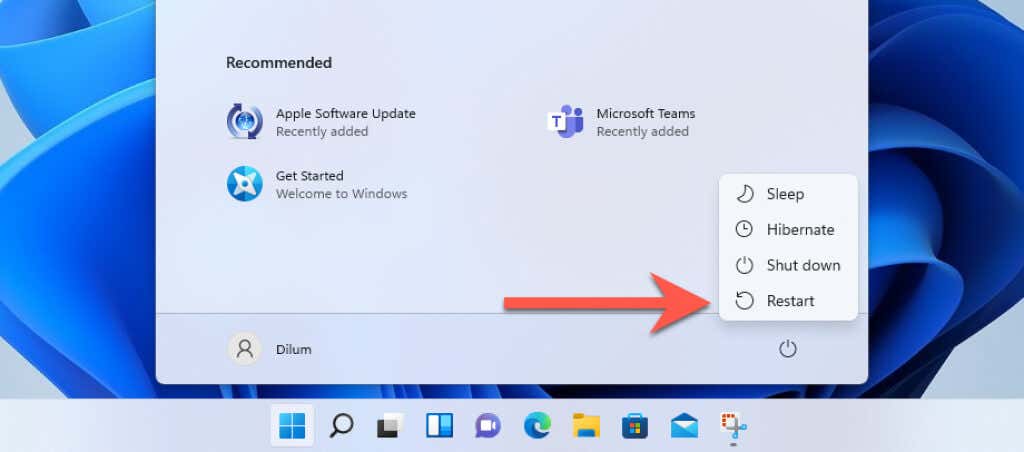
2. Hold down the Option key until you get to the boot selection screen.
3. Select Macintosh HD > Continue to boot into macOS Monterey.
If you want to load Windows 11, restart your Mac while holding down the Option key again and select Boot Camp > Continue.
Note: To manage your default startup disk preferences, open the System Preferences app in macOS Monterey and select Startup Disk.
Using Virtualization Software to Install Windows 11 on Mac
If installing Windows 11 using Boot Camp feels time-consuming and complicated, you can use the following virtualization software to run Windows 11 on Mac.
VirtualBox: Free virtualization software that requires a registry hack to install Windows 11. You can read all about it in the Oracle blog.
Parallels Desktop or VMWare Fusion: Paid virtualization software that works better than VirtualBox. It also lets you install the ARM-based version of Windows 11 on Apple Silicon Macs.
![]()
frankdenneman Follow
Frank Denneman is a Chief Technologist at VMware, primarily focusing on Machine Learning technology. He is an author of the vSphere host and clustering deep dive series, podcast host for the Unexplored Territory podcast, and you can follow him on Twitter @frankdenneman.
2 min read
I need to install Windows 11 on a gaming PC, but I only have a MacBook in my house, as this is my primary machine for work. To make things worse, trying to do this on macOS Monterey is extra difficult due to the heightened security levels that withhold you from running unsigned software. I.e., most free tooling software. However, most tooling is provided by macOS itself. You have to remember the correct steps. And because this is not a process I often do, I decided to document it for easy retrieval, which might help others facing the same challenge.
As I mentioned, most of the tools are installed on macOS. The only missing one is the open-source Windows Imaging Library (wimlib). This tool helps you to split a particular file (install.wim) as it is too large for the filesystem we use on the USB drive. To install wimlib, you need to have Homebrew installed. Homebrew is a package manager for macOS. Some already have it installed, and some don’t, so I will include the install command for Homebrew.
Install Homebrew
Open a terminal window and run the following command:
/bin/bash -c "$(curl -fsSL https://raw.githubusercontent.com/Homebrew/install/HEAD/install.sh)"This can be a lengthy process. My recent model Macbook Pro took about 6 minutes to complete.
To Install wimlib, run the following command:
brew install wimlibInsert a USB key that is large enough to contain Windows 11. I use a 64GB USB drive that can also store extra drivers. Newer motherboards are typically equipped with these Intel 2.5 GbE NICs, and Windows 11 do not have the driver built-in. If you want to store these drivers on the USB drive as well to be able to continue the Windows install process.
To discover which disk identifier macOS assigned to the USB driver, run the following command:
diskutil list external
The option “external” only displays mounted volumes. This helps you to spot your USB drive easily. In my case, macOS assigned the identifier “disk5” to it. Note the disk name. We need that for our erasedisk command.
Erase the USB Drive
The next command is going to erase the USB drive using MS-DOS format. Use a Master Boot Record scheme (MBR) as this is necessary to find all the files during the installation of Windows 11. We need to retain the disk’s name and use the identifier. The name is 64GBUSB, and the identifier is disk5
diskutil eraseDisk MS-DOS "64GBUSB" MBR disk5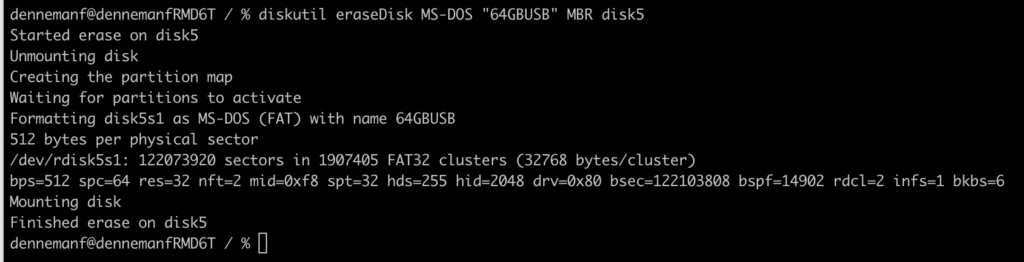
Mount Windows 11 ISO
The next step is to mount the Windows 11 ISO, you can use finder for that and click on the file, but as we are doing everything in the terminal, the command you can use to mount the iso is:
hdiutil mount Win11_22H2_English_x64v1.isoI’ve executed this command in the directory in which the ISO file was stored. You can execute this command anywhere but ensure to include the full path to the Windows 11 ISO file.
The main challenge of creating the Windows 11 bootable USB drive is the install size.wim file in combination with the MS-DOS format of the drive itself. The install.wim file is larger than 4GB and thus incompatible with the file system. To solve that, you can compress or split the file using wimlib. The Windows installation process knows how to deal with split files; thus, this is the preferred method, as compressing files impacts the duration of the installation process.
Copy files Windows ISO to USB Drive
The first step is to copy over all the files of the Windows 11 ISO file that we just mounted EXCEPT the install.wim. The easiest way is using the following rsync command:
rsync -avh --progress --exclude=sources/install.wim /Volumes/CCCOMA_X64FRE_EN-US_DV9/ /Volumes/64GBUSB
The progress option shows each file’s copy progress; the first volume is the source (the windows ISO), and the second volume directory is the destination (the USB drive). The exclude option tells rsync to ignore install.vim during the copy process.
Split Install.wim
The last step is to split the install.wim into two parts and place it into the sources folder onto the USB drive. To do so, execute the following command:
wimlib-imagex split /Volumes/CCCOMA_X64FRE_EN-US_DV9/sources/install.wim /Volumes/64GBUSB/sources/install.swm 4000The key element of this command is the option “4000” this tells the command to split the file into chunks with a maximum size of 4000 MB. The MS-DOS (fat32) maximum file size is 4096MB. You can decide to lower the number if you’re comfortable, but keep it a little bit under the max.

Once this process is complete, you’re done. You can safely unmount the USB drive and use it to install Windows 11.
diskutil unmount /dev/disk5

Понадобилась мне винда, но ноут мой резервный в Москве пылится, а я в Питере. Сел я изучить тему, как мне на макоси запустить винду.
Я не буду здесь копипастить инструкции, расскажу основные моменты, дам ссылки и основу куда и как искать
Обычно такое может понадобиться
- Запустить тулзу, которой нет под мак
- Проверить что-то в винде
- Еще какая-то странная дикая хрень. Это вот мой случай. Мне нужно было хакнуть FCC на пульте DJI. А чуть утилита, которая стоит денег работает только под windows.
Ну вот если вам надо прям работать, то конечно стоит выбрать вариант с Bootcamp
Статья на официальном сайте — добрый знак. Короче гуглить надо. Можно и 11 поставить.
Моя задача запустить один раз, “портить ноут” я для этого не хотел, выделять место на диске и прочее. Больно я привык к macos.
Сразу скажу, у меня Mac на intel процессоре, для apple silicone m1, m2 чипов может не сработать
Из виртуалок есть такие варианты:
- Parallels
- VirtualBox
- VMware
Вроде как самая клевая — первая, но она стоит денег (от $100), а я и так отдаю деньги за патч. Короче не подходит. Третья тоже стоит сколько-то. А вот Oracle решение самое то.

Полетели
- Качаем с официального сайта
- После этого нужно создать виртуальную машину.
Тут все стандартно, даем 2+ ядер процессора, оперативки 2+gb, в настройках выбираем win11 x64. Там уже есть такое
Если что — вот тут с картинками - Там же есть пункт на исправление ошибки с несовместимостью железа. Я попробовал, у меня не получилось, может где-то с именами промазал параметров реестра промазал
Я пошел путем скачать образ win11 компакт с rutracker. И из него уже все накатилось без танцев с бубном - Ставим после этого VirtualBox extension. Без них будет тяжело. И вуаля, у вас «виндовоз» внутри «макоси»
P.S. Не сложные задачи можно решать, с моей — на ура. А так работает туговато конечно.
Modern versions of Windows officially support two types of firmware: UEFI and BIOS. Users may want to boot Windows through the OCLP Bootpicker, but only UEFI Installations of Windows will show up in the OCLP Bootpicker.
Many older Macs do not «officially» support UEFI Windows installations, leading to installation failures and strange behaviour, but OCLP can be used to prevent almost all of these issues.
# Minimum Requirements
This guide will focus on the installation of Windows 10 without using Boot Camp Assistant. Windows 11 should also work, but its quirks will not be covered.
-
Due to hardware and firmware limitations, UEFI Windows installations are only recommended on the following machines:
- 2015 MacBook or newer (MacBook8,x+)
- 2011 MacBook Air or newer (MacBookAir4,x+)
- 2011 MacBook Pro or newer (MacBookPro8,x+)
- 2011 Mac mini or newer (Macmini5,x+)
- 2009[^1] Mac Pro or newer (MacPro4,1+), upgraded GPU is preferred
- 2010 iMac or newer (iMac11,x+), upgraded GPU is preferred
- 2009[^2] Xserve (Xserve3,1), upgraded GPU is preferred
[^1]: MacPro4,1 and MacPro5,1 systems experience issues with the Windows installer, follow the DISM installation section for instructions.
[^2]: Theoretically supported, not tested. Follow DISM installation section
If your machine is not listed, UEFI Windows will likely still install, but you may face stability/driver issues.
# Disk Partitioning and Formatting
The following is required for installation:
- 8GB+ USB Drive for the Windows installer
- 30GB+ Free Space on an existing drive / empty drive for the Windows installation
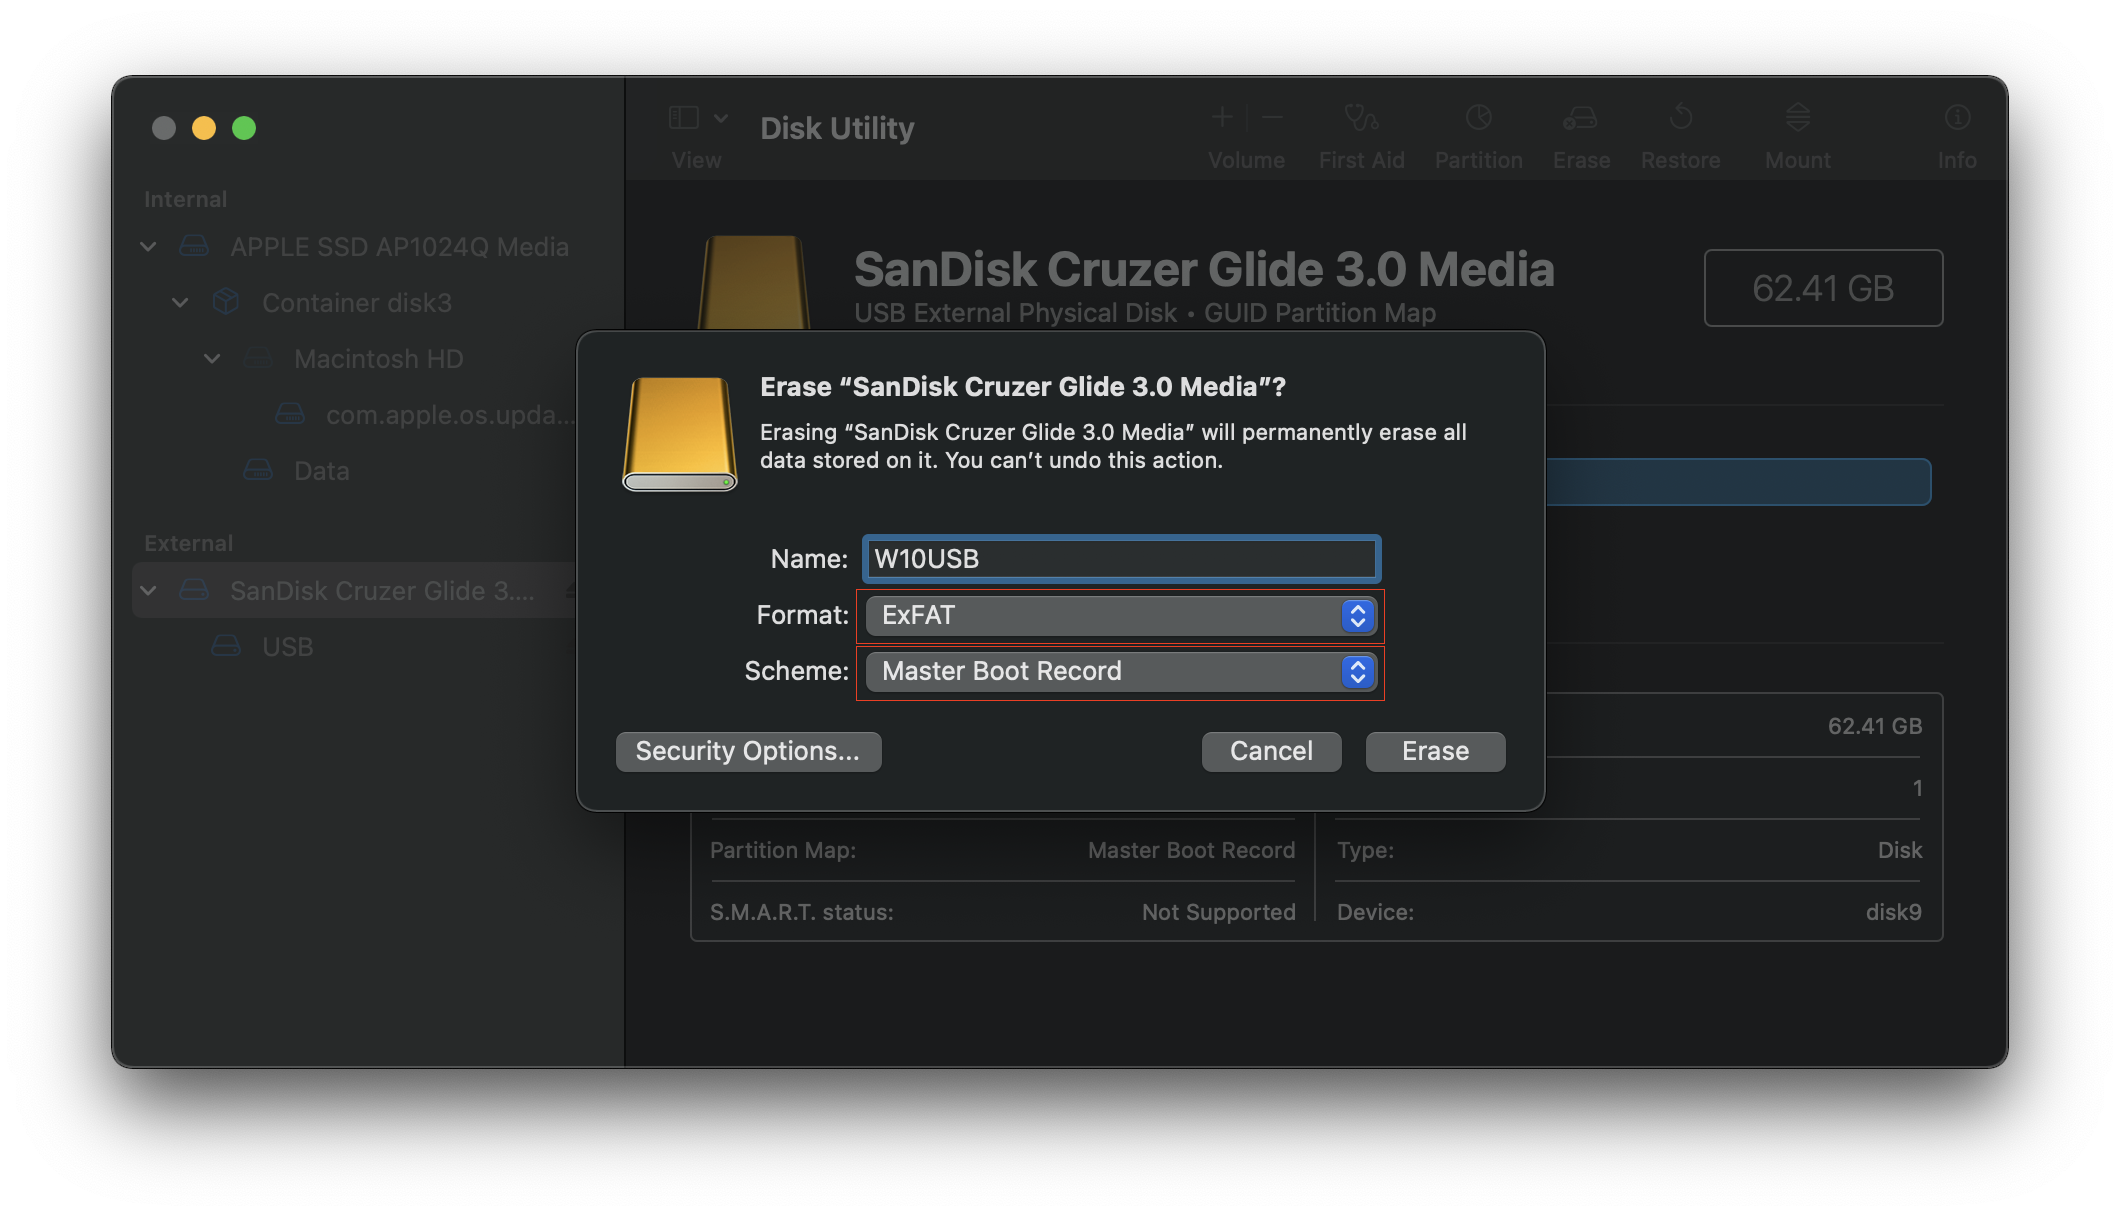
# Formatting the USB Drive
Open Disk Utility in macOS and format the USB Drive as ExFat with the Master Boot Record scheme:
# Formatting the Target Drive
Next, select the drive you wish to install Windows in Disk Utility on and partition it as ExFat (If formatting the entire drive, ensure it’s using the GUID Partition Table scheme):

WARNING
Incorrectly erasing your drive can lead to data loss! Please verify that you are erasing the correct drive/partition.
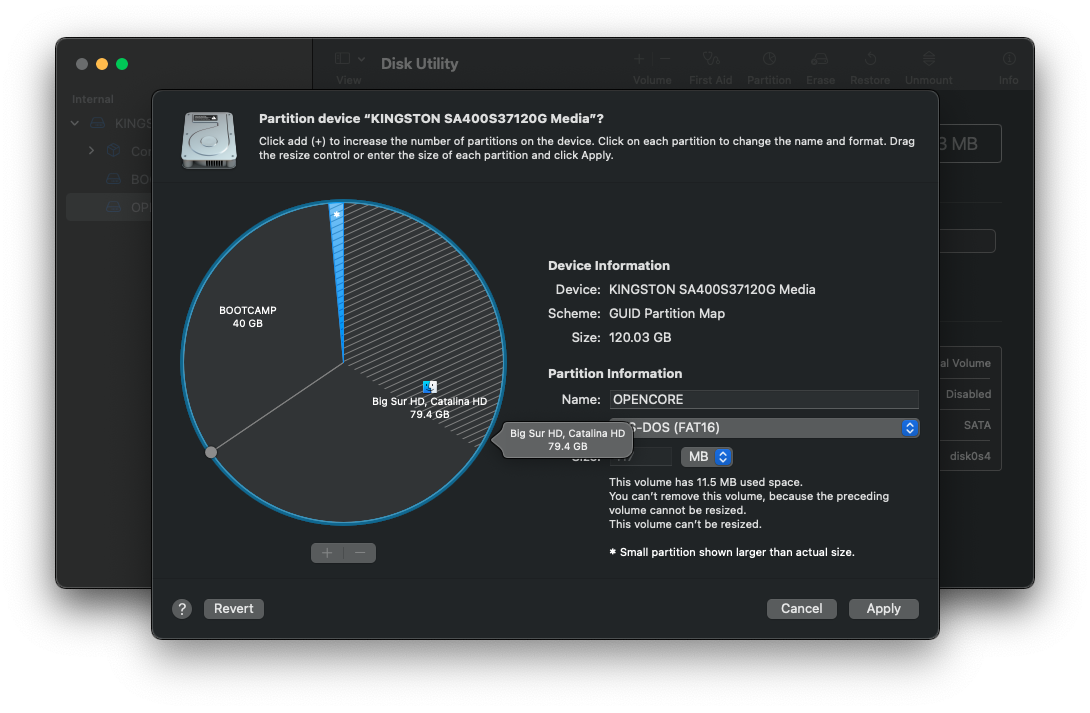
If you plan to use the same hard drive for macOS and Windows, we recommend creating a dedicated partition just for OpenCore. This lets Windows have the ESP to itself and OpenCore can stay within it’s own bubble.
Recommended size is 200MB and the partition format must be FAT32 for OpenCore to operate correctly. You will next want to install OpenCore onto the new partition, either moving from the ESP with MountEFI (opens new window) or rerunning the OpenCore-Patcher.app
- Note 1: For machines with dedicated drives for Windows, having different partitions for OpenCore is not required.
- Note 2: Having different partitions for OpenCore is not required if the Windows boot files detected by the stock Bootpicker are removed. See «Removing the Windows option from the stock bootpicker» for further information.
- Note 3: We recommend uninstalling OpenCore from the ESP/EFI Partition when you create this new OpenCore partition to avoid confusion when selecting OpenCore builds in the Mac’s boot picker.
# Creating the Windows Installer
The latest Windows installation images can be downloaded from Microsoft using the following links:
-
Download Windows 10 Disc Image (ISO File) (opens new window)
-
Download Windows 11 Disc Image (ISO File) (opens new window)
Once the file is downloaded, mount the .iso image:
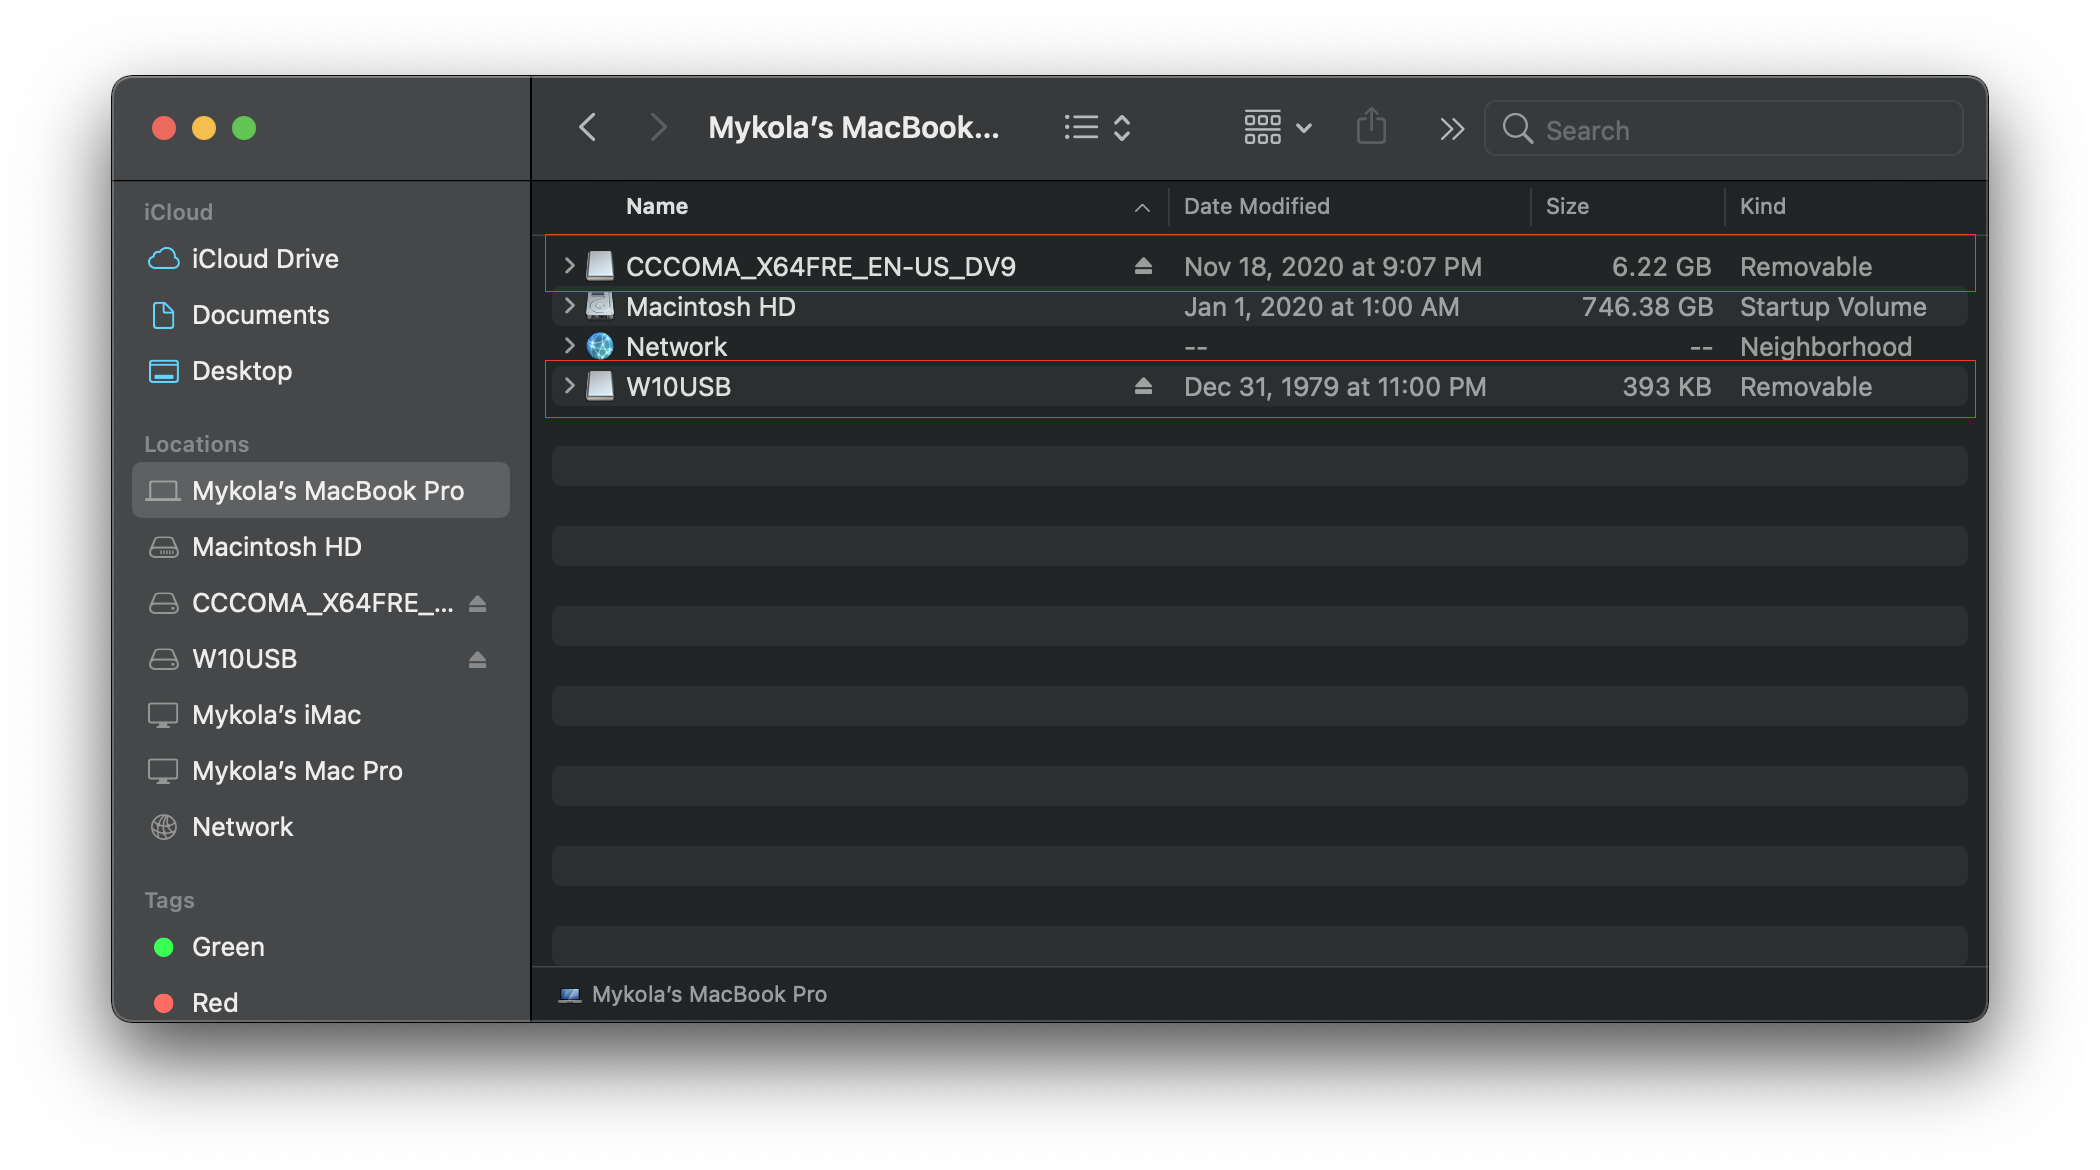
Then open terminal and use the rsync command with the disk image set as the source and your USB drive set as the target. (Replace «CCCOMA_X64» with the mounted image’s partition name, and replace «InstallWin10» with your USB Drive’s name).
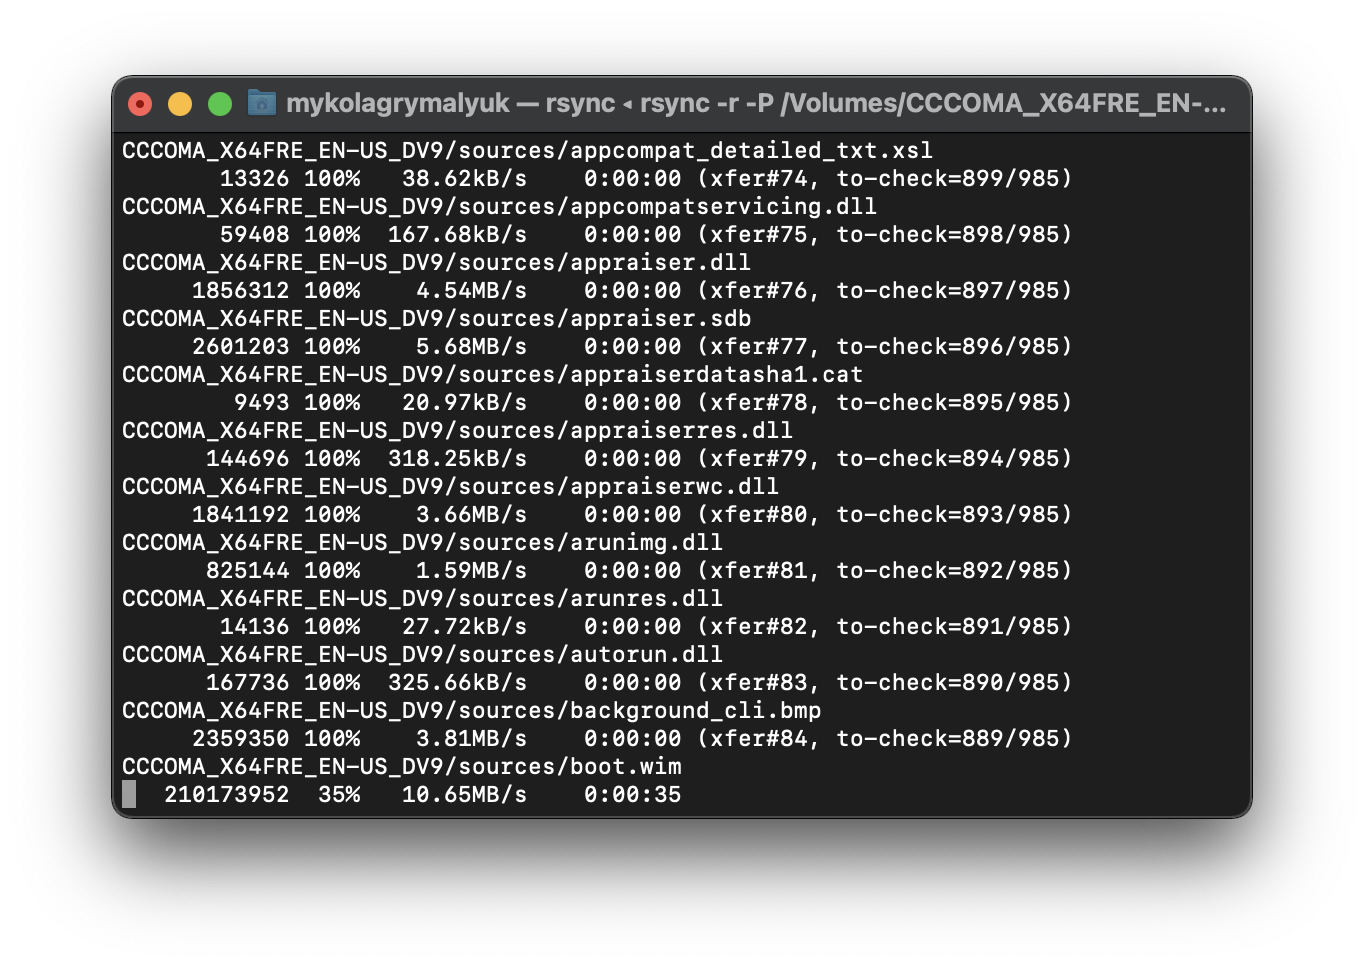
The rsync command will take some time, so get some coffee and sit back. Once finished, the root of the USB drive should look as follows:
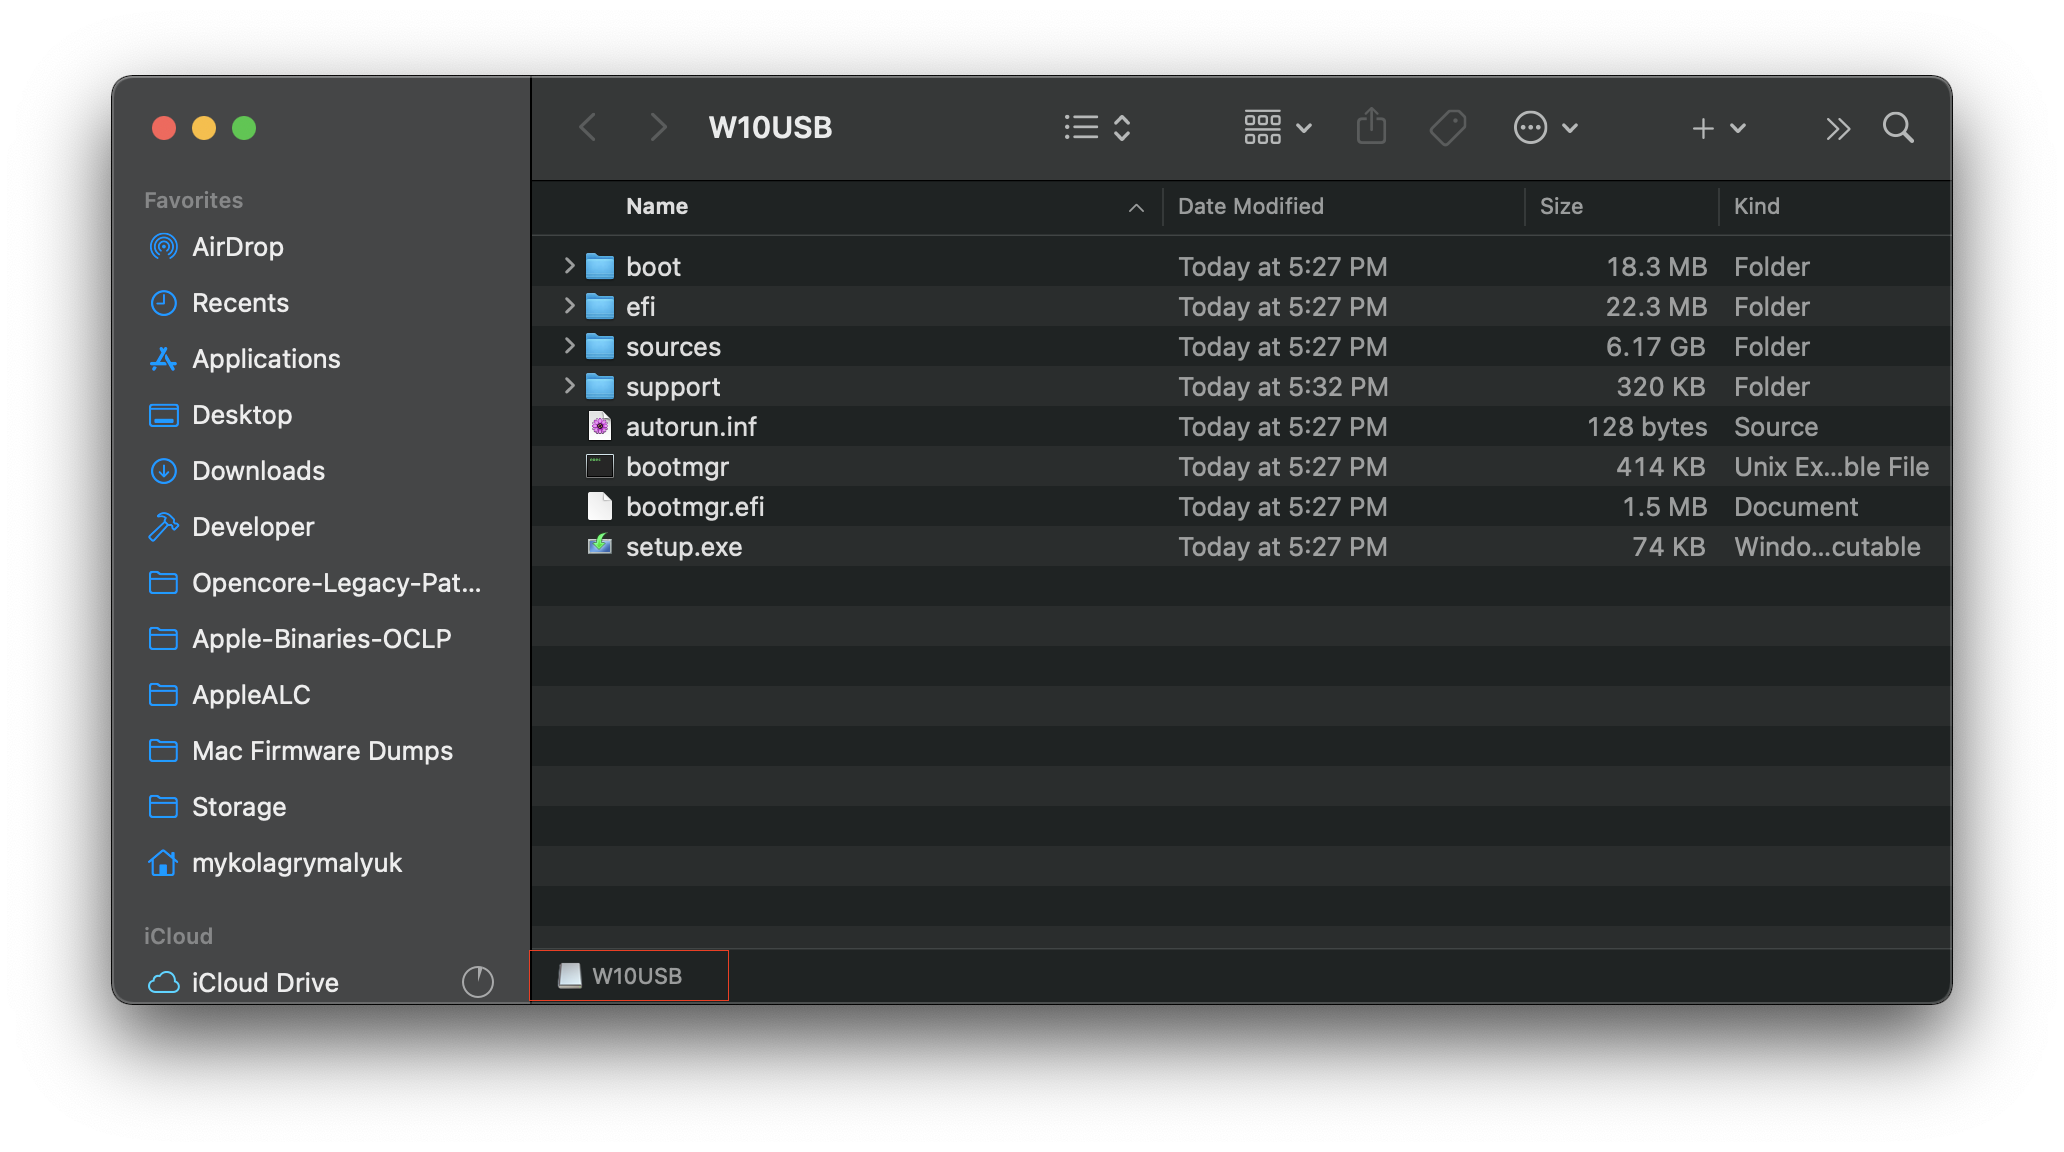
- Ensure that these folders and files are in the root of the USB drive, otherwise the USB will not boot.
# Installation Process
Once you reboot your machine, you should see a new boot option in the OCLP Bootpicker labelled as «EFI Boot». It may or may not have the Boot Camp icon.
WARNING
If you aren’t booted into OCLP, you may see two boot options labelled «Windows» and «EFI Boot». Do not choose either of the options and boot into OCLP to continue.
# Installation: Microsoft Method
Once booted into the Windows installer, proceed as you normally would on any Windows computer. If you see an error message containing “Windows could not prepare the computer to boot into the next phase of installation”, please follow the next portion of this guide (DISM Installation).
# Installation: DISM Deployment Method
Once booted into the Windows installer, proceed as you normally would until you reach the «Where do you want to install Windows» disk formatting section.
When you are prompted to select a drive, select your desired partition and delete it using «Delete». If you want to install Windows to an empty drive, erase every partition currently on the desired drive.
After your drive/partition is erased, press «New» to create the Windows system partitions.
You will be prompted to confirm the creation of the system partitions, press «OK».
Once the partitions are created, select the main (largest) partition and press «Format». This will format the partition using the NFTS file system.
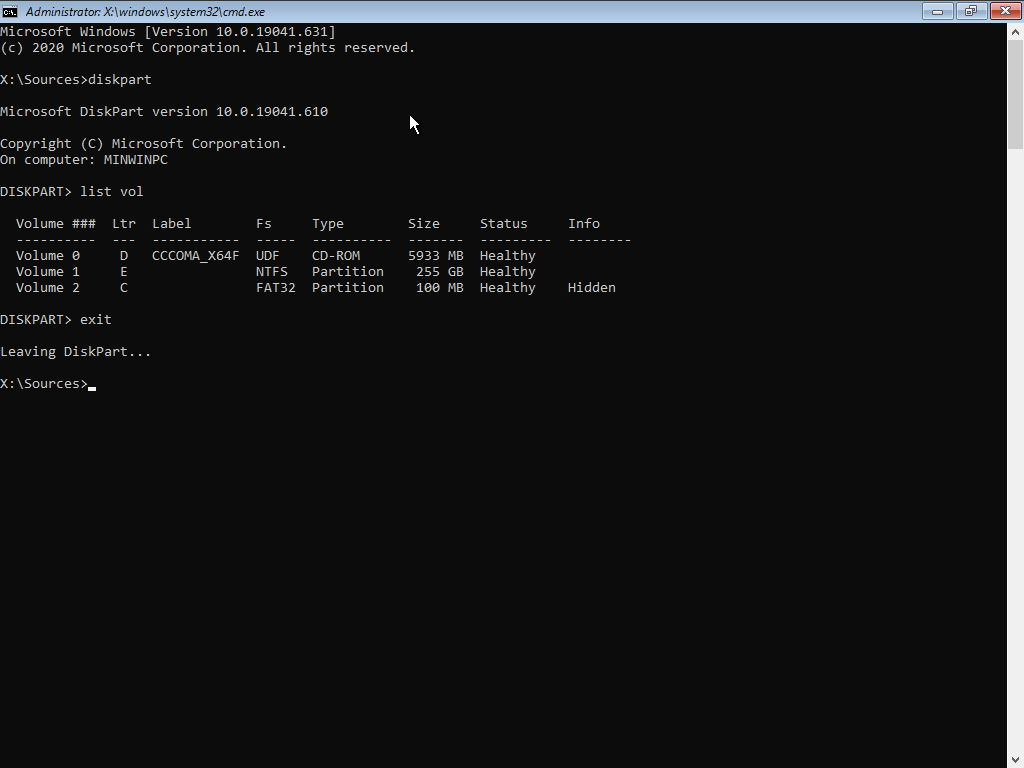
After the installer formats the partition, open up the Command Prompt by pressing SHIFT + F10. Then run the diskpart command, and list vol. This will produce a list of volumes in your system, make sure to keep track of the drive letters of the main Windows partition (largest, NTFS), the EFI partition (100MB, FAT32), and the Windows installer (Usually Drive D). Run exit to close diskpart
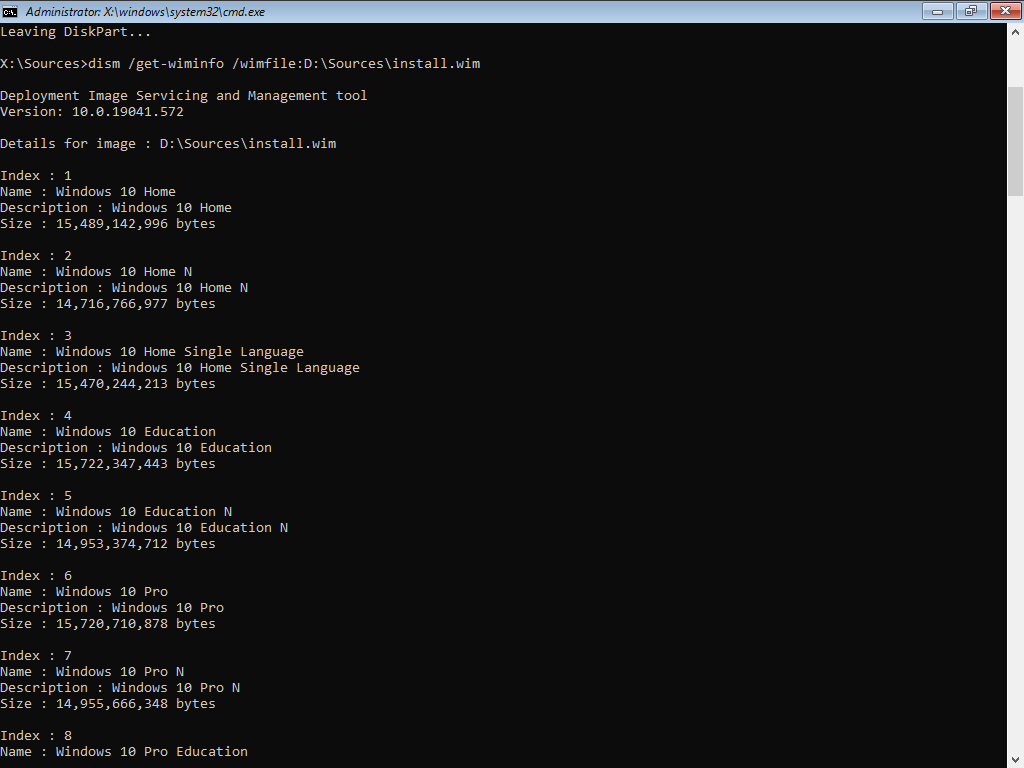
Now, get a list of available Windows editions by running dism /Get-WimInfo /WimFile:D:\Sources\install.wim (substituting D with the Installer Drive Letter). This guide will use Option 6 for Windows 10 Pro.
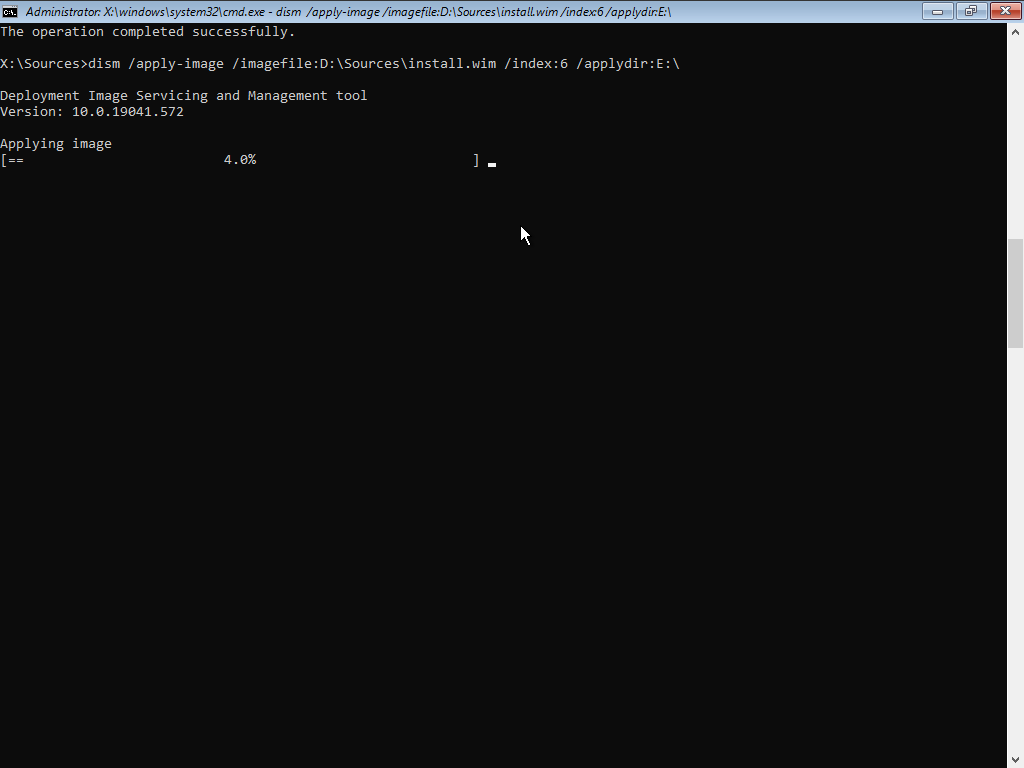
You can now start the deployment process. Run dism /Apply-Image /ImageFile:D:\Sources\install.wim /index:6 /ApplyDir:E:, replacing «D» with the Installer Drive Letter, «6» with the Windows edition option, and «E» with the Windows Partition Drive Letter.
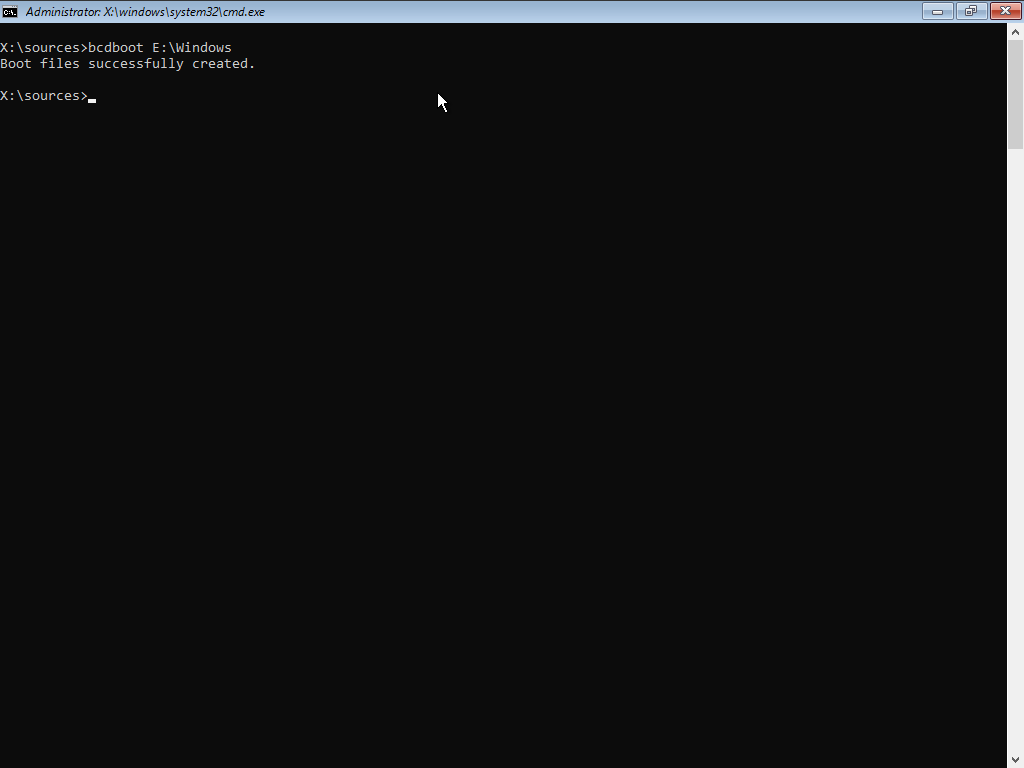
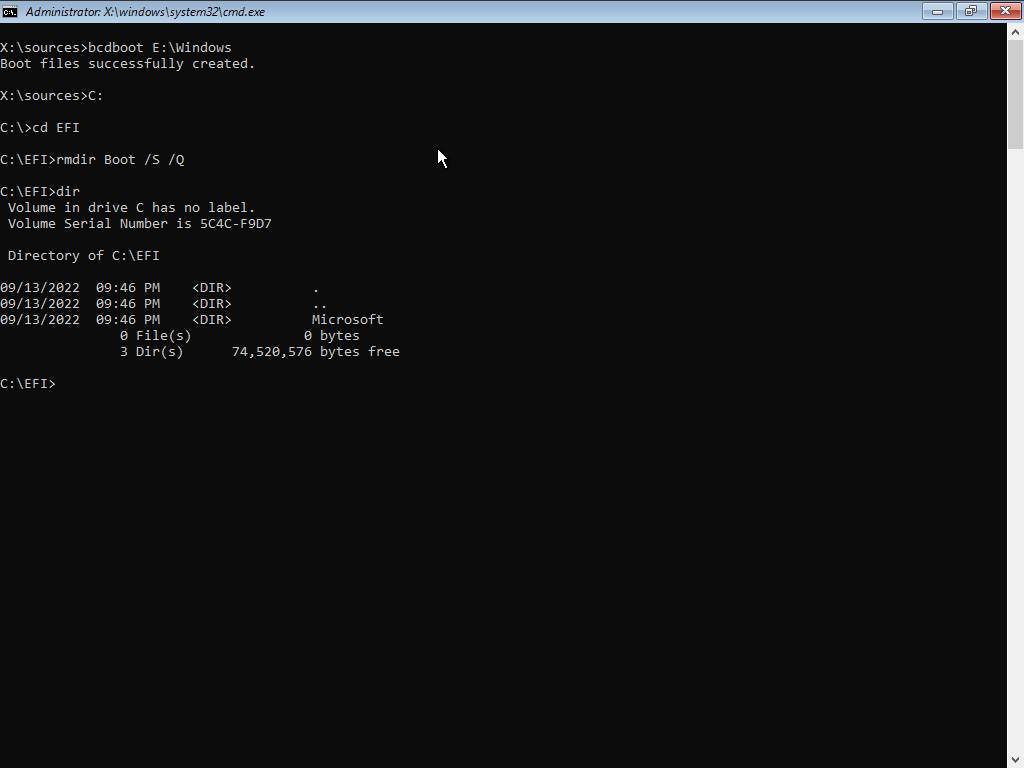
Once dism finishes its thing, run bcdboot E:\Windows, substituting «E» for the drive letter of the main Windows partition to create the boot files.
Windows is now installed. It should be recognized as «EFI Boot» with a Boot Camp icon in the OCLP Bootpicker.
WARNING
After the boot files are created, DO NOT reboot if you are using a MacPro4,1, MacPro5,1, or Xserve3,1 system! A bug in the Windows bootloader exists that will completely brick the system if it is loaded through the stock bootpicker. See the «Installation: Removing the Windows option from the stock bootpicker» section for a workaround.
# Installation: Removing the Windows option from the stock bootpicker
Removing the Windows boot option from the stock bootpicker is HIGHLY RECOMMENDED on MacPro4,1, MacPro5,1, and Xserve3,1 systems in order to prevent Secure Boot NVRAM corruption and bricking.
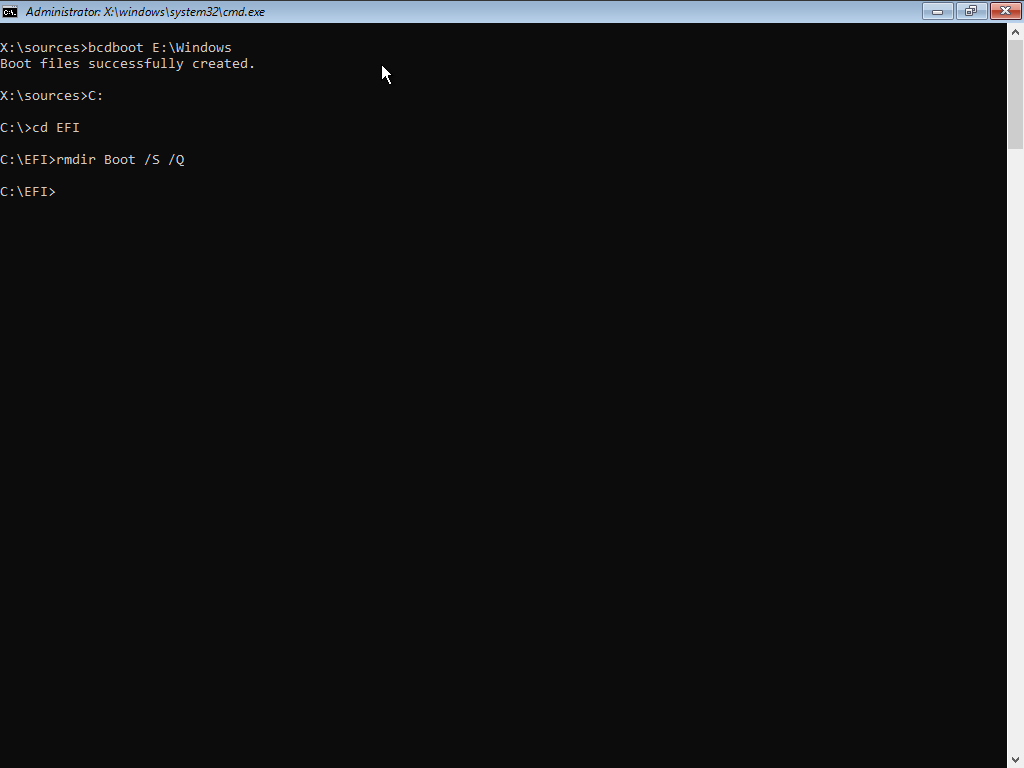
Start up a command prompt window in the Windows Setup environment by running cmd.
Next, enter the EFI Folder by running C:, substituting «C» for the EFI Partition Drive Letter. Then run cd EFI to enter the EFI Partition. Then, run rmdir Boot /S /Q to remove the boot files that can be detected by the stock Bootpicker. The OCLP Picker will still be able to detect and boot Windows.
You can verify that the Boot folder is removed by running the dir command:
If, for whatever reason, you are not able to remove the boot files from the Windows setup, shut down your system, boot into macOS, mount your EFI partition with MountEFI (opens new window), and remove the Boot folder (it should have a recent file modification date, and contain Bootx64.efi).
# Post-Installation
# Installing Boot Camp Software
To get started, download the Brigadier utility from the following link:
- Download Brigadier (opens new window)
Once Brigadier is downloaded, move it to your desktop for easy access.
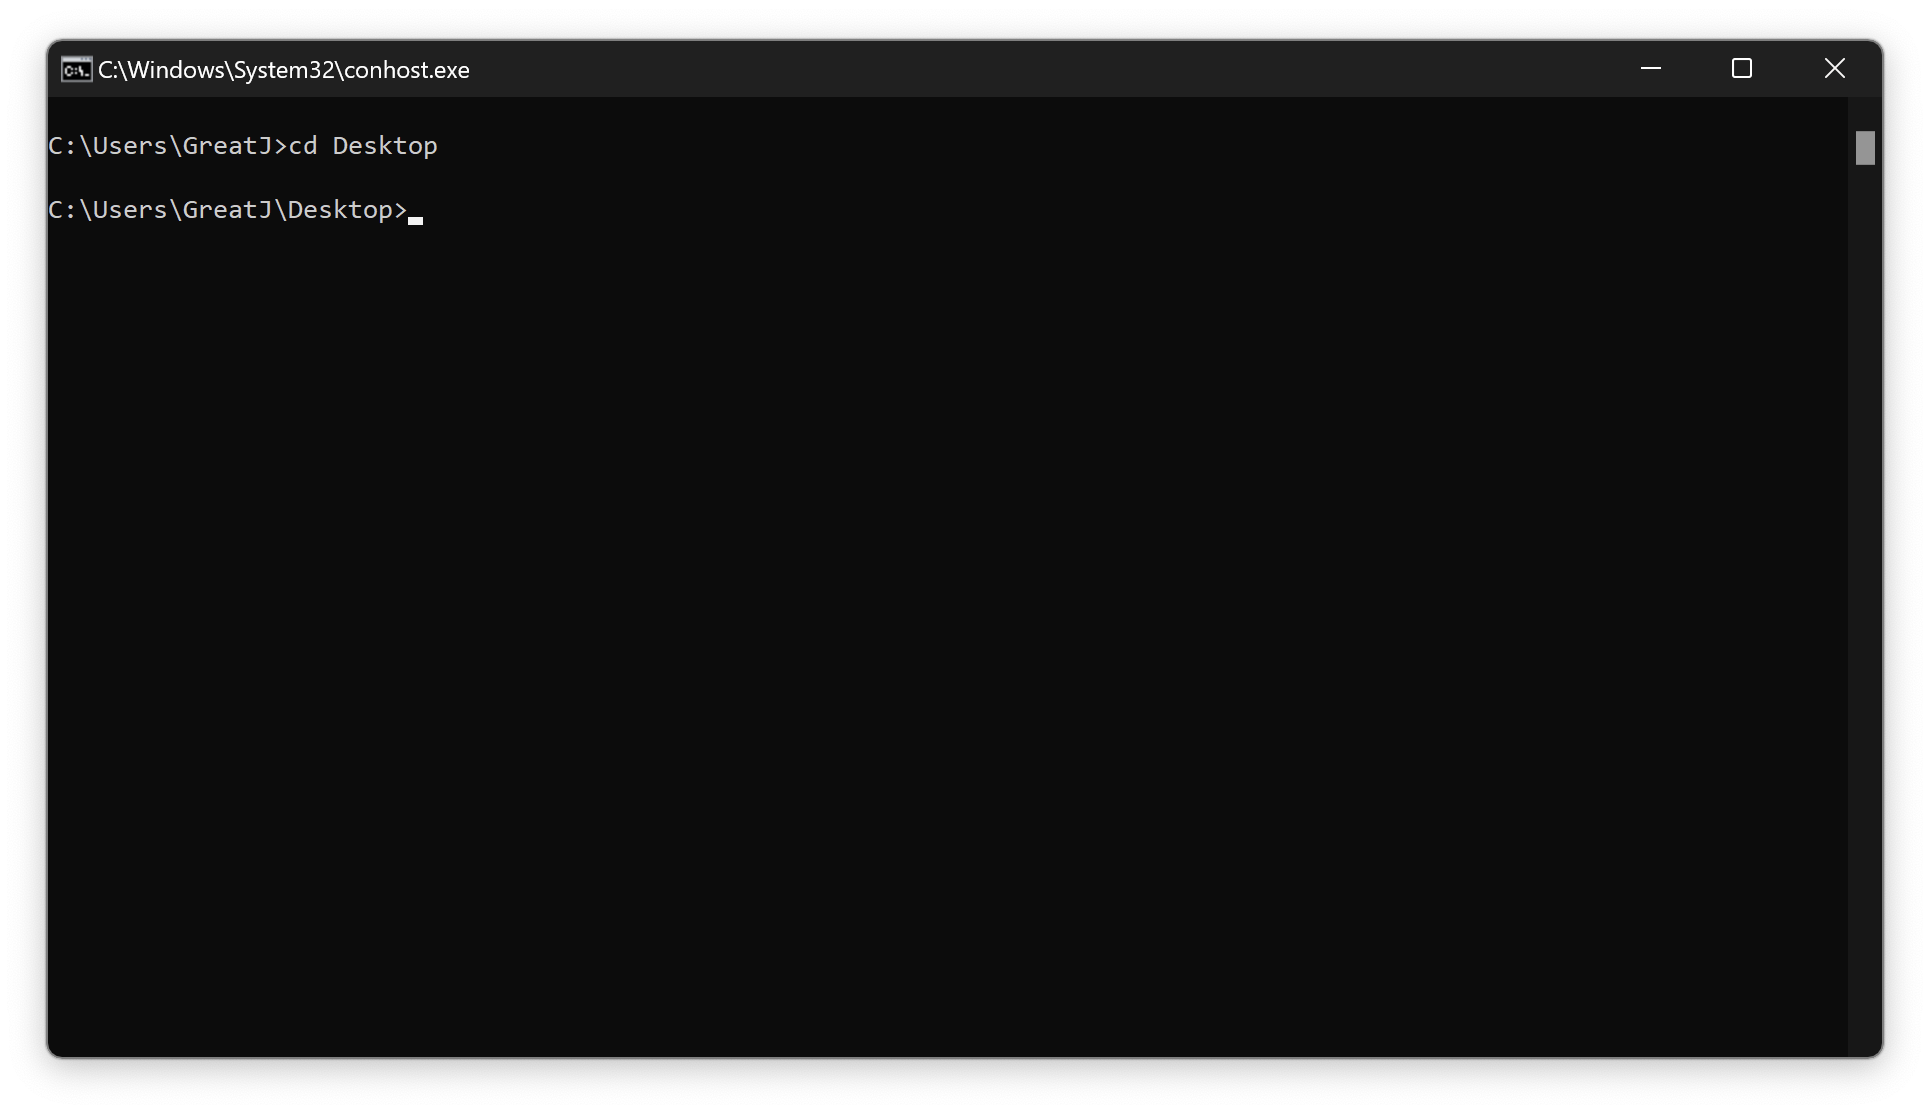
Open up a command prompt window as a standard user and run cd desktop.
Then run .\brigadier.exe --model=MODEL1,1, replacing «MODEL1,1» with your machine’s SMBIOS model.
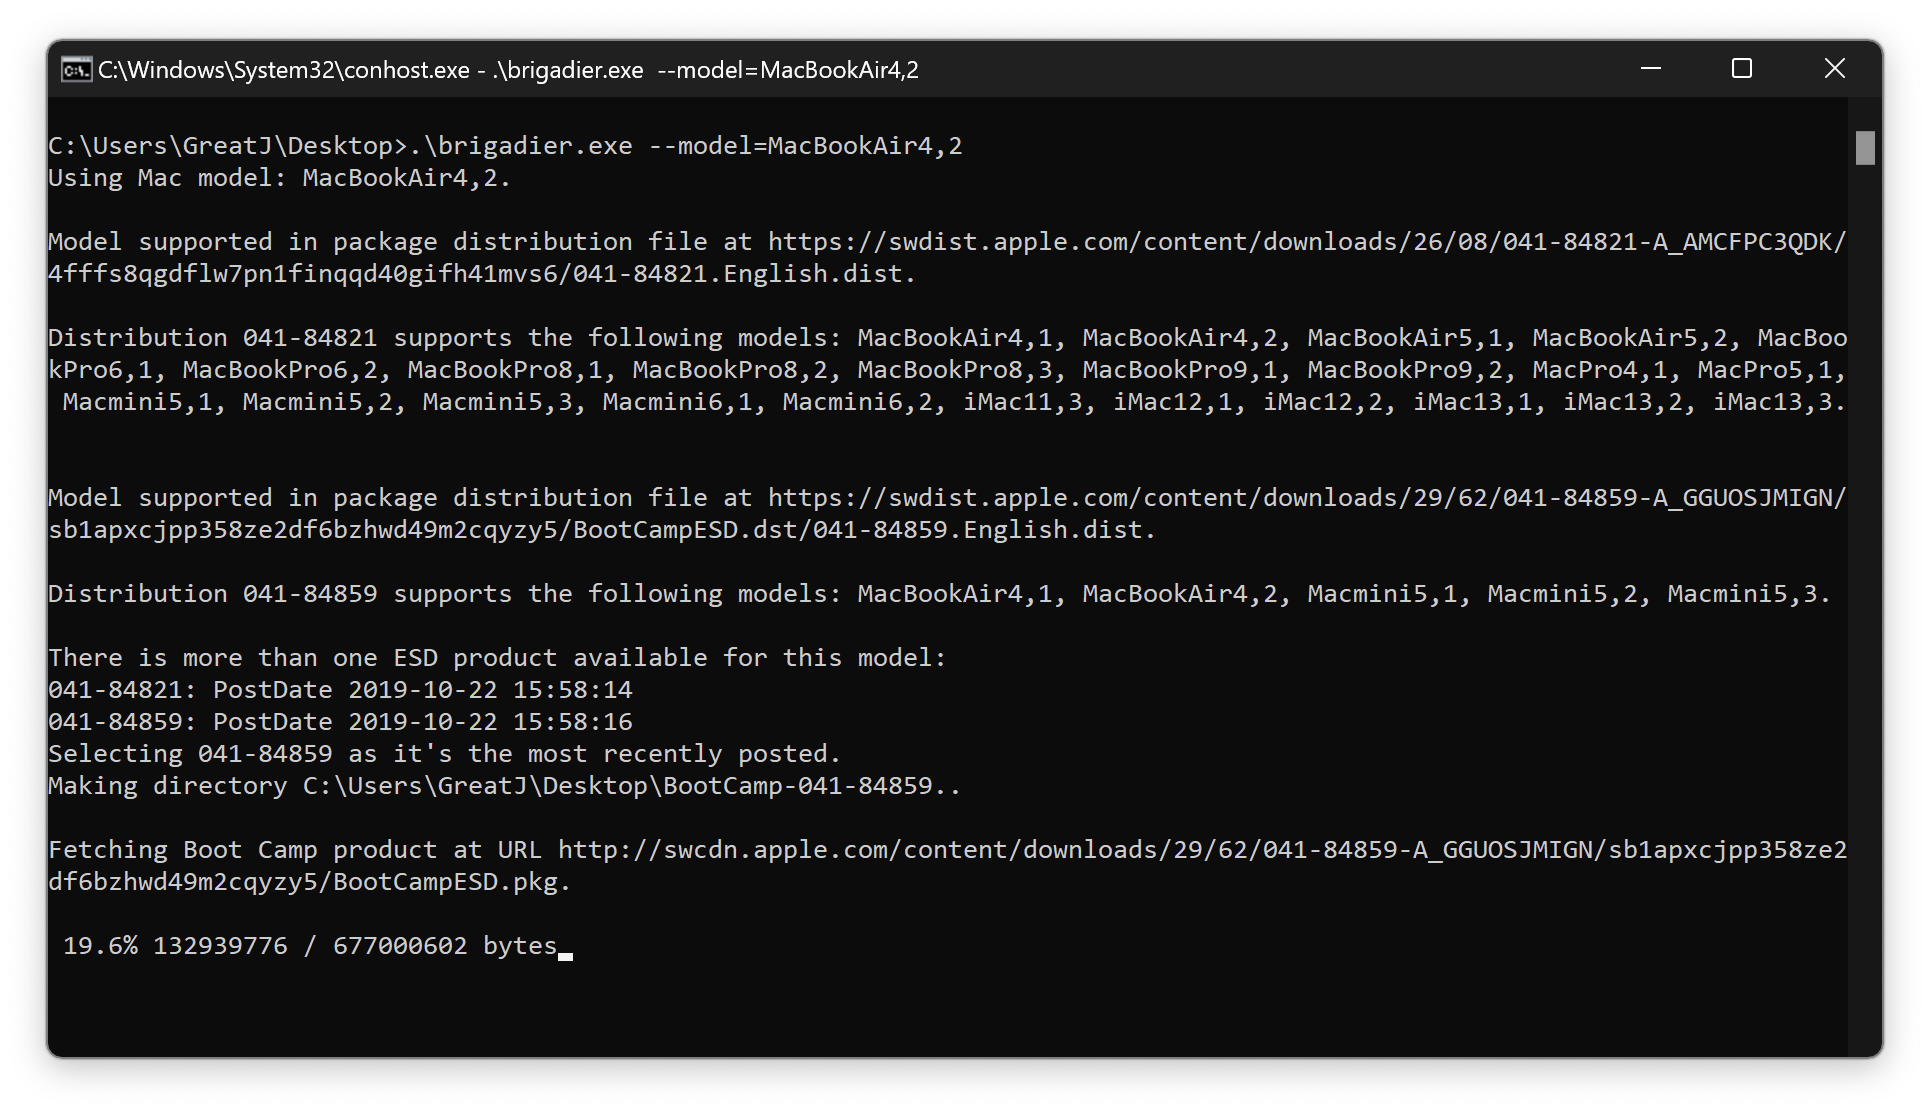
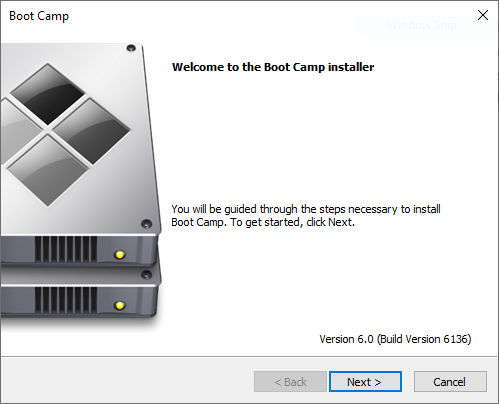
Once the Boot Camp software is downloaded, you can install it by executing Setup.exe or \Drivers\Apple\BootCamp.msi (BootCamp64.msi if present).
# Installing Boot Camp 6 softare on unsupported machines
To get started, download the Brigadier utility from the following link:
- Download Brigadier (opens new window)
Once Brigadier is downloaded, move it to your desktop for easy access.
Open up a command prompt window as a standard user and run cd desktop.
Then run .\brigadier.exe --model=MacPro7,1. This will download the latest BootCamp 6 package.
Once the Boot Camp software is downloaded, you can install Boot Camp 6 by executing \Drivers\Apple\BootCamp.msi in an administrator command prompt window.
# Troubleshooting
# «This version of Boot Camp is not intended for this computer model.»
If you built OpenCore with Moderate or higher SMBIOS spoofing, you’ll get an error when trying to install Boot Camp drivers. You can solve this by either rebuilding OpenCore with a lower spoof level, or running the installer from Drivers/Apple/BootCamp.msi.
| Setup.exe | BootCamp.msi |
|---|---|
 |
BootCamp.msi quirks
If needed, you can run it from the command line as administrator:
Make sure to substitute \path\to with the location of the Boot Camp folder.
You can also open Properties on the file to change the compatibility to Previous version of Windows in case you have Boot Camp 4.0 drivers (the above command does this already.)
# iMac12,x Bluescreen after driver installation
Currently Intel’s iGPU drivers for the HD 3000 series do not support UEFI booting in Windows. The recommended solution is to simply disable the iGPU: iMac 12,1 Windows 10 Boot Loop – Fix Intel Graphics issue (opens new window)
In this post, we are going to discuss on How to create a Windows 10 bootable USB on MacOS Monterey. You will be guided with easy steps/methods to do so. Let’s starts the discussion.
Create a Windows 10 bootable USB on MacOS Monterey:
Windows 10 Bootable USB drive allows you to repair or clean install Windows 10 OS in your PC/laptop. If you facing errors or issues in your Windows PC/laptop like BSOD errors, corruption in system files or registry, and other Windows issues, then repairing or reinstalling Windows OS in your computer can be one possible solution to resolve all your PC/laptop issues. It is quite simple & easy to repair Windows 10 OS or perform clean Windows 10 OS installation using Windows 10 OS Bootable USB/DVD drive.
To do so, you need to insert bootable Windows 10 Installation Media DVD/USB into your computer and boot your computer with it, and then you can perform Windows 10 Repair or perform Windows 10 Clean Installation in order to fix your Windows PC/laptop issues.
However, if you are looking for ways on How to create a Windows 10 bootable USB on MacOS Monterey, then you are in right place for this. Here, you are provided with easy ways to make Windows 10 bootable USB on your Mac computer or MacOS Monterey.
In the post, built-in free app ‘Boot Camp Assistant’ offered to make Windows USB installer or Windows 10 bootable USB on MacOS. However, this option/feature has been removed from Boot Camp App on latest MacOS Monterey. Now, you are allowed to create a bootcamp partition.
If you are not aware, Bootcamp app asks you to eject all external devices when you launched Bootcamp Assistant app and connect USB drive. In sort, you may face some issues when you attempt to perform creating Windows 10 bootable USB using Boot Camp Assistant app. However, it is possible to make a Windows 10 bootable USB on MacOS Monterey with our instructions. Let’s go for the solution.
How to create a Windows 10 bootable USB on MacOS Monterey?
Download Windows 10 ISO DISC Image from Microsoft Official site
Step 1: To do so, you need to open your browser like Safari on Mac and visit ‘Microsoft Official’ site and then go to ‘Windows 10 Disc Image Download’ page.
Step 2: Select ‘Windows 10’ under ‘Select Edition’ and click ‘Confirm’, select the language for Windows 10 installation.
Step 3: Click ’64-bit Download’ or ’32-bit Download’ option to download, depending on your Windows PC/laptop architecture like Windows 32-bit or 64-bit.
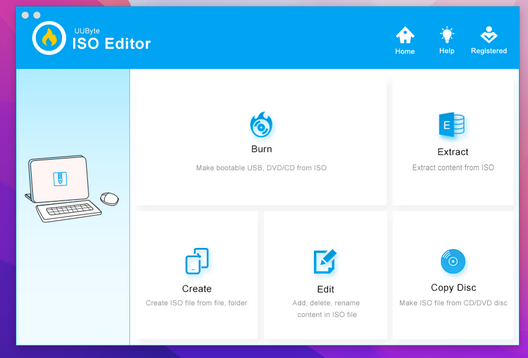
Download and install UUByte ISO Edit for Mac
UUByte ISO Editor: You can use UUByte ISO Editor – third party app offers you to create Windows Bootable USB on Mac. This tool supports Windows 11, 10, 8 and Windows 7 ISO. One core feature of this app is that it can split ‘install.wim’ file contained in Windows 10 ISO by default. UUByte is also able to mount ISO, edit it and create new ISO file on Mac.
Step 4: To get UUByte ISO Editor tool, you need to visit UUByte official site or visit ‘https://www.uubyte.com/download/uubyte-iso-editor.dmg’ page to get DMG Installation file of UUByte ISO Editor.
Step 5: Once downloaded, double-click on file to mount ‘DMG file’ and move app icon to ‘Application’ folder to install.
Make/Create a Windows 10 bootable USB on MacOS Monterey
Step 6: Once Windows 10 ISO Disc Image, and UUByte ISO Editor tool downloaded & installed, eject other external storage device and only connect one USB flash device to your Mac computer.
Step 7: Make sure you have backup of all data stored in USB flash drive on some safe storage media, because burning process will erase and format the USB Flash drive
Step 8: Now, run ‘UUByte ISO Editor’ tool you downloaded, from Launchpad on Mac.

Step 9: Once opened, find and hit ‘Burn’ button to create bootable USB
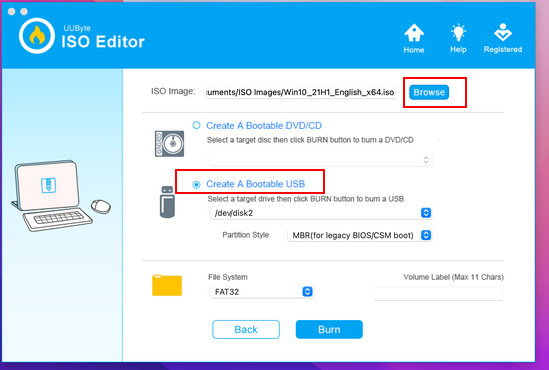
Step 10: Now, click ‘Browse’ button at top to import Windows 10 ISO and choose USB drive letter from dropdown menu. Make sure not to touch other settings and click ‘Burn’ icon to burn Windows 10 ISO to USB
Step 11: UUByte ISO Editor will format USB Flash drive, extract content from Windows 10 ISO, and copy all of them to USB Flash drive. This tool will automatically split Install.wim file into small files if it found install.wim file bigger than 4GB in size.
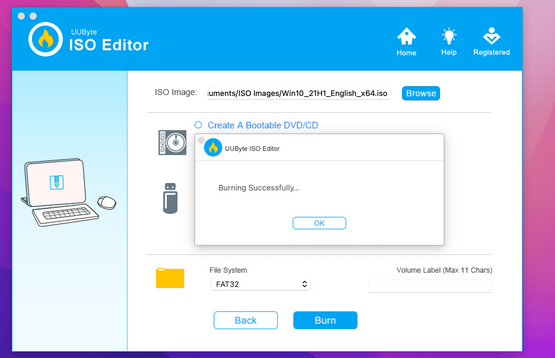
Step 12: Wait to finish creating Windows 10 Installation Bootable USB. It will take few minutes depending on your USB drive-type.
Step 13: Once created, close UUByte ISO Editor Tool and plug out USB flash drive that contains Windows 10 Installation Media.
Now, you can use this Windows 10 Bootable USB to repair or reinstall your Windows PC/laptop. To do so, you need to just plug this newly created Windows 10 Installation Media Bootable USB into your PC/laptop and perform Windows OS Repair or Windows 10 OS clean Installation.
Conclusion
I am sure this post helped you on How to create a Windows 10 bootable USB on MacOS Monterey with several easy steps/methods. You can read & follow our instructions to do so. That’s all. For any suggestions or queries, please write on comment box below.