Уровень сложности
Простой
Время на прочтение
2 мин
Количество просмотров 54K

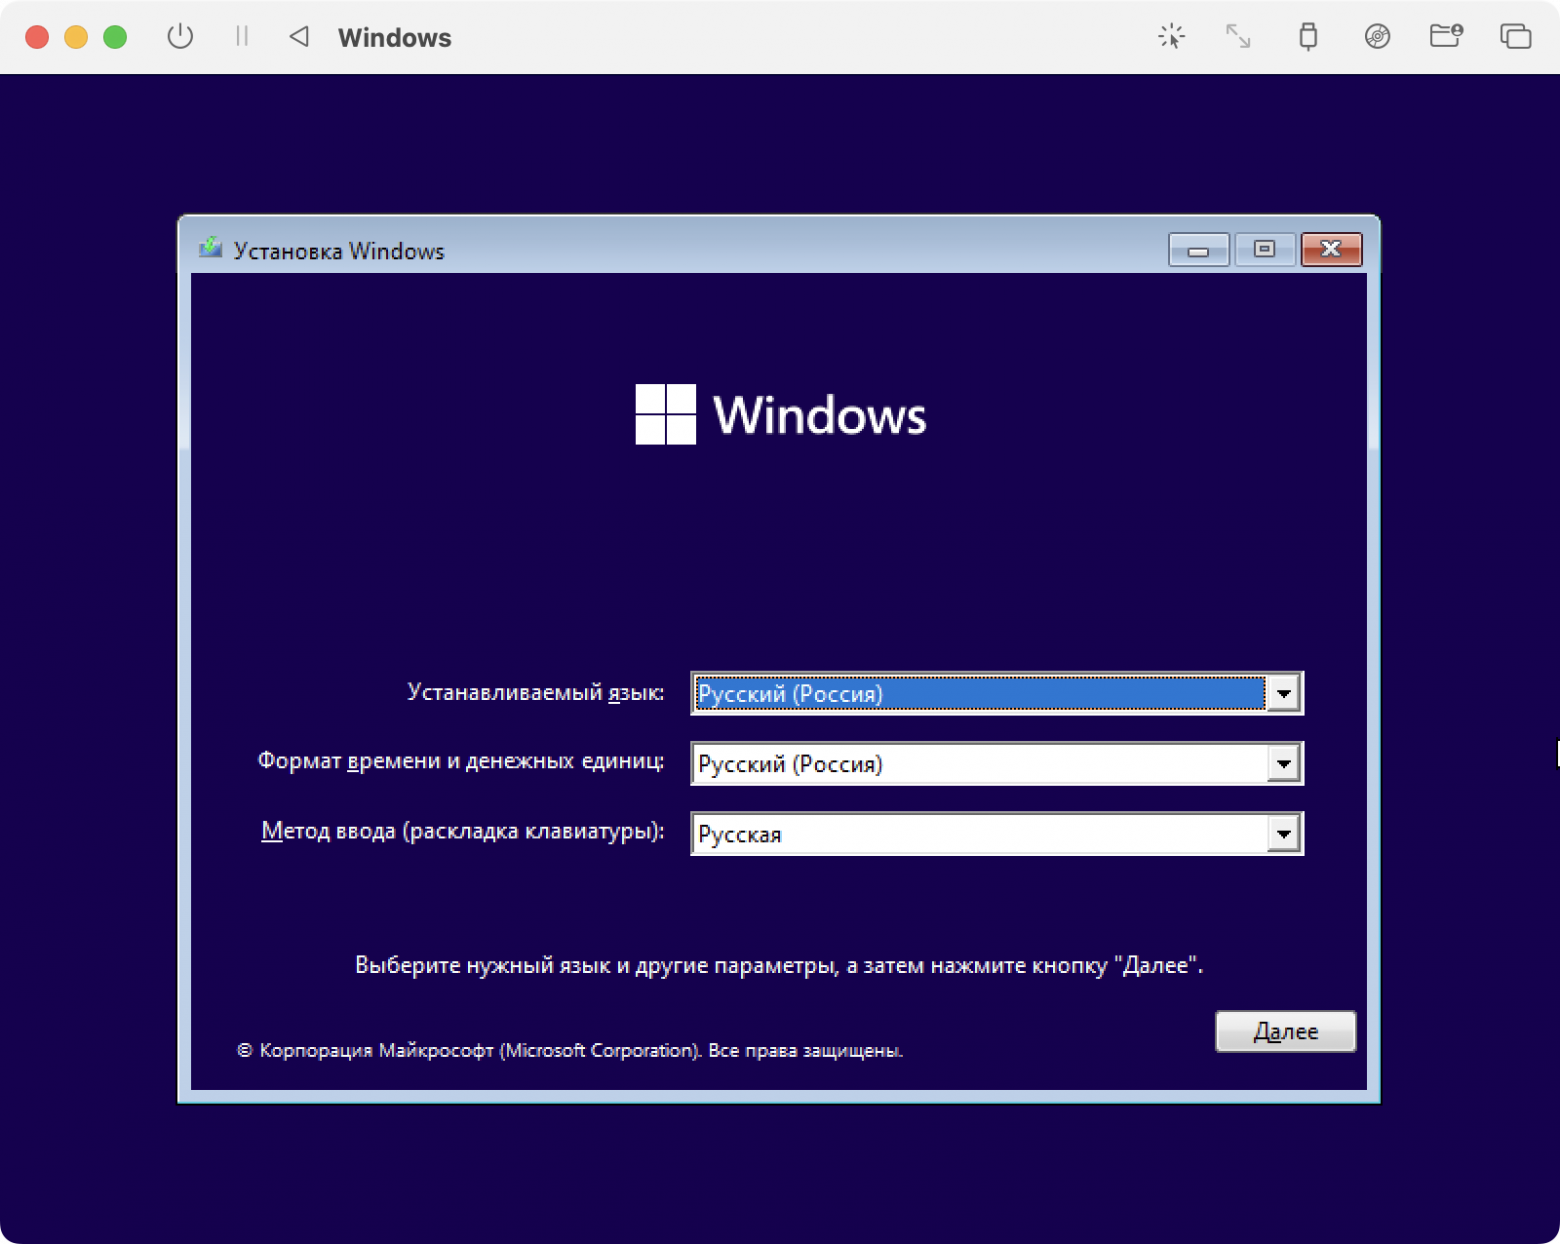
В статье описана инструкция по установке Windows внутри MacOS.
На текущий момент автору статьи известно только два рабочих варианта:
-
Parallels Desktop — всё работает из коробки, но платно;
-
UTM — требует минимальных усилий, бесплатно;
В данной статье будет рассмотрен вариант установки через UTM.
Необходимо:
Установить brew
Необходимо в терминале выполнить команду:
/bin/bash -c "$(curl -fsSL https://raw.githubusercontent.com/Homebrew/install/HEAD/install.sh)"
Детальная инструкция по установке есть на официальном сайте.
Установить инструменты разработчика xcode
Необходимо в терминале выполнить команду:
xcode-select --install
Установить UTM
Необходимо в терминале выполнить команду:
brew install utm
Установить qemu
Необходимо в терминале выполнить команду:
brew install qemu
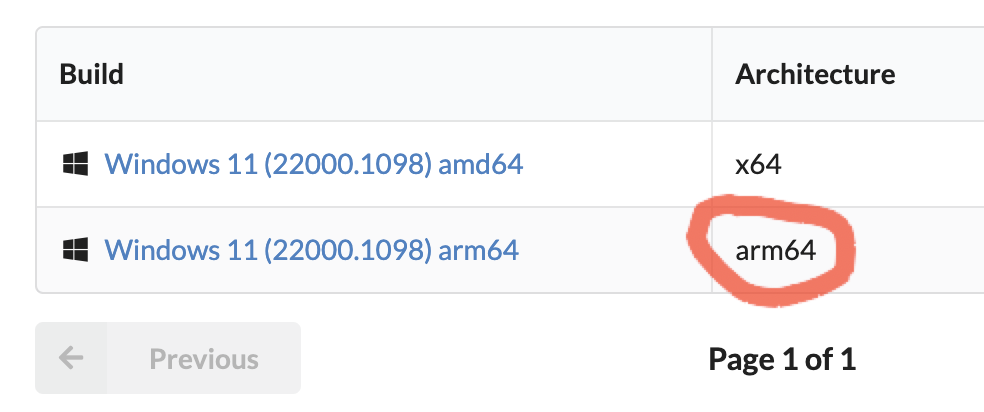
Скачиваем дамп Windows
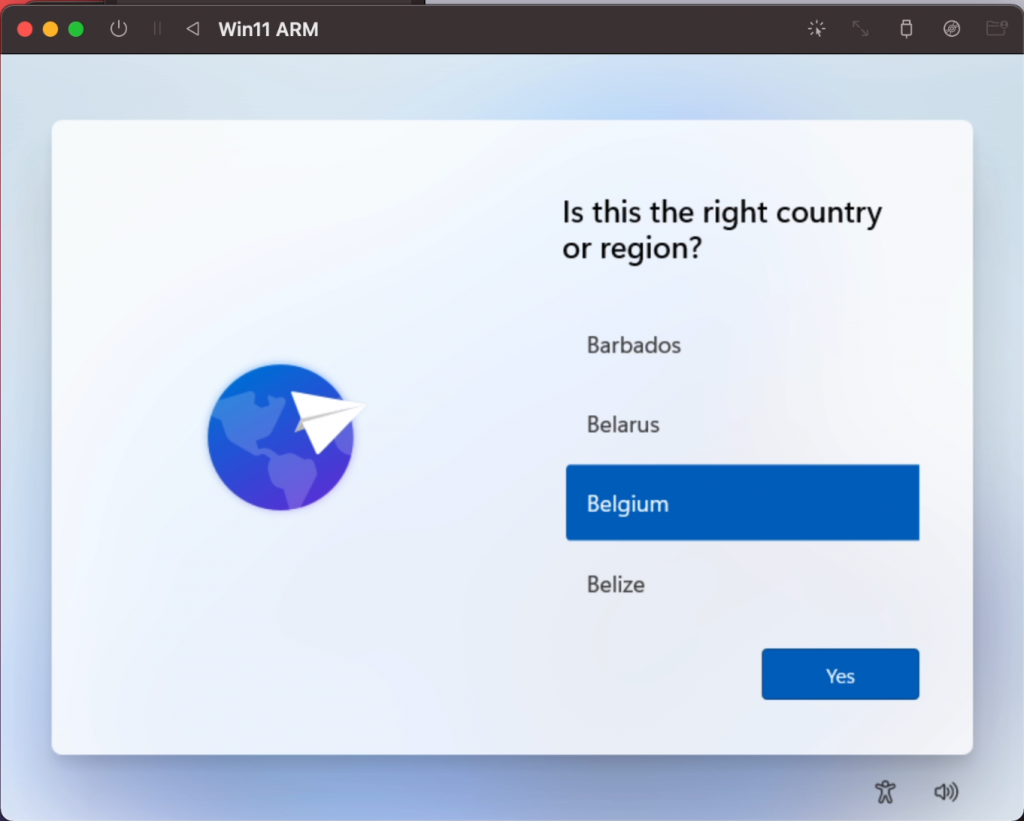
Выбираем версию Windows:
-
Windows 10
-
Windows 11
Скачиваем подходящую версию дампа с архитектурой arm64:
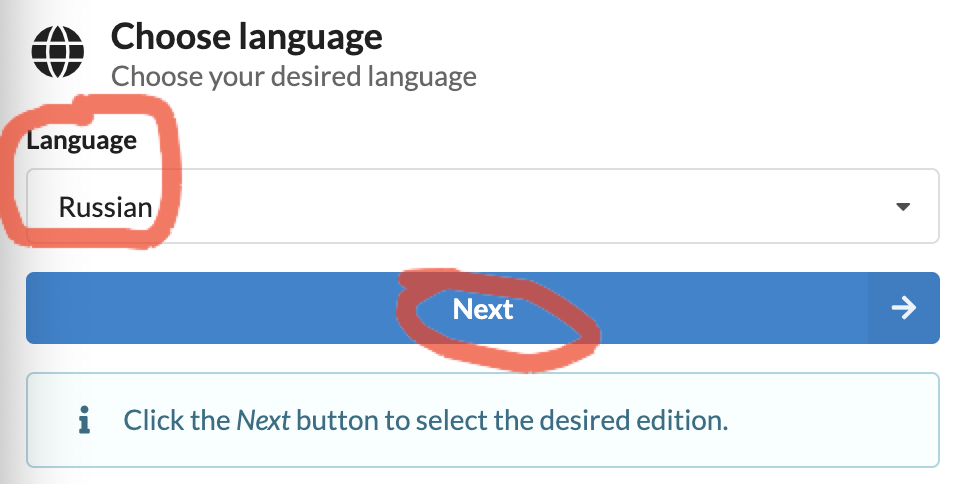
Выбираем язык:
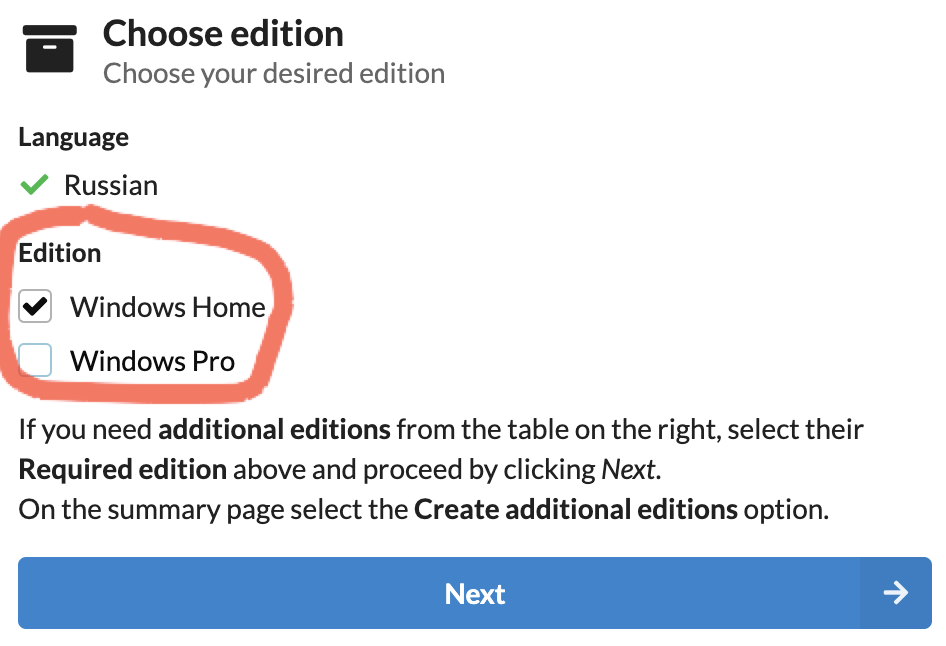
Выбираем выпуск:
Скачиваем package:
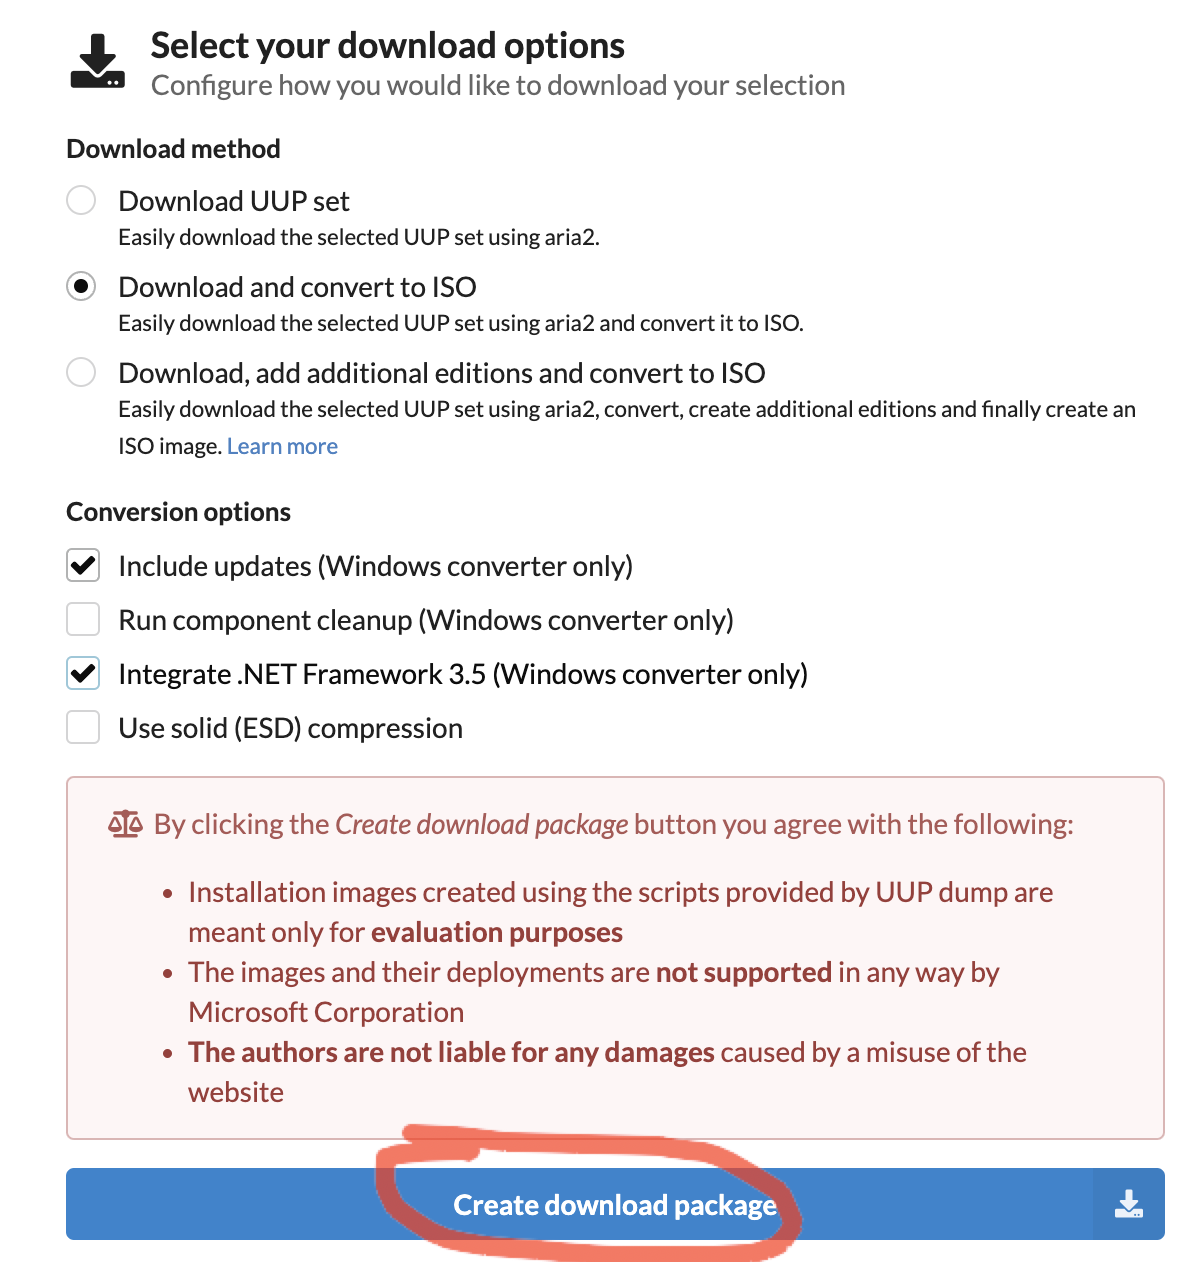
Распаковываем архив, для этого два раза кликаем по нему:

В терминале необходимо перейти в скачанную папку.
И выполнить в ней команды:
brew install aria2
brew tap sidneys/homebrew
brew install cabextract wimlib cdrtools sidneys/homebrew/chntpw
sh uup_download_macos.sh
Ждём окончания загрузки, после этого в папке будет создан новый ISO-файл.
Устанавливаем образ Windows ч.1
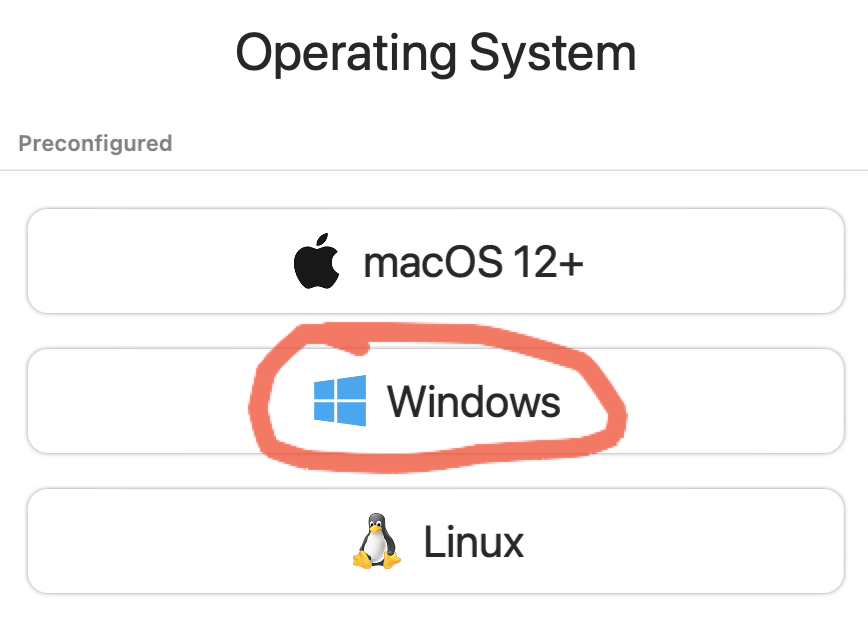
Запускаем ранее установленную программу UTM и выбираем:

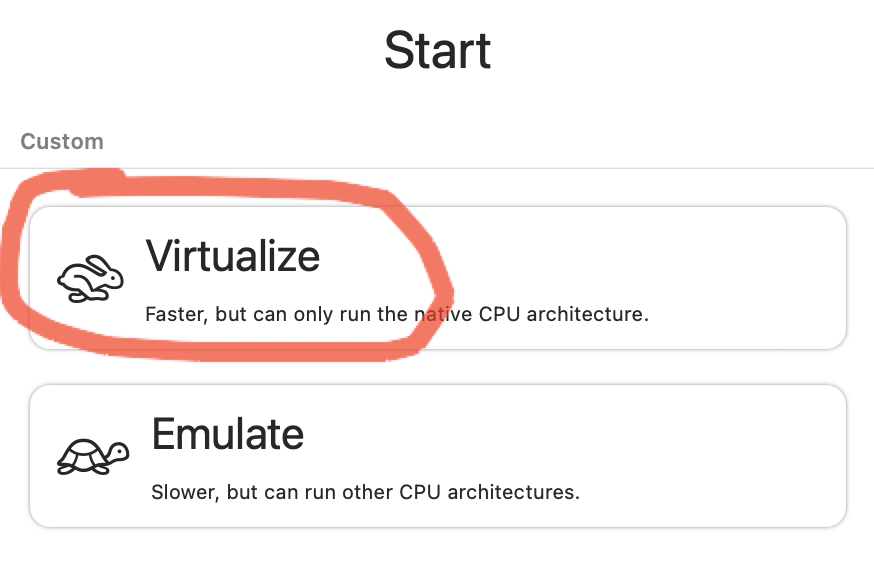

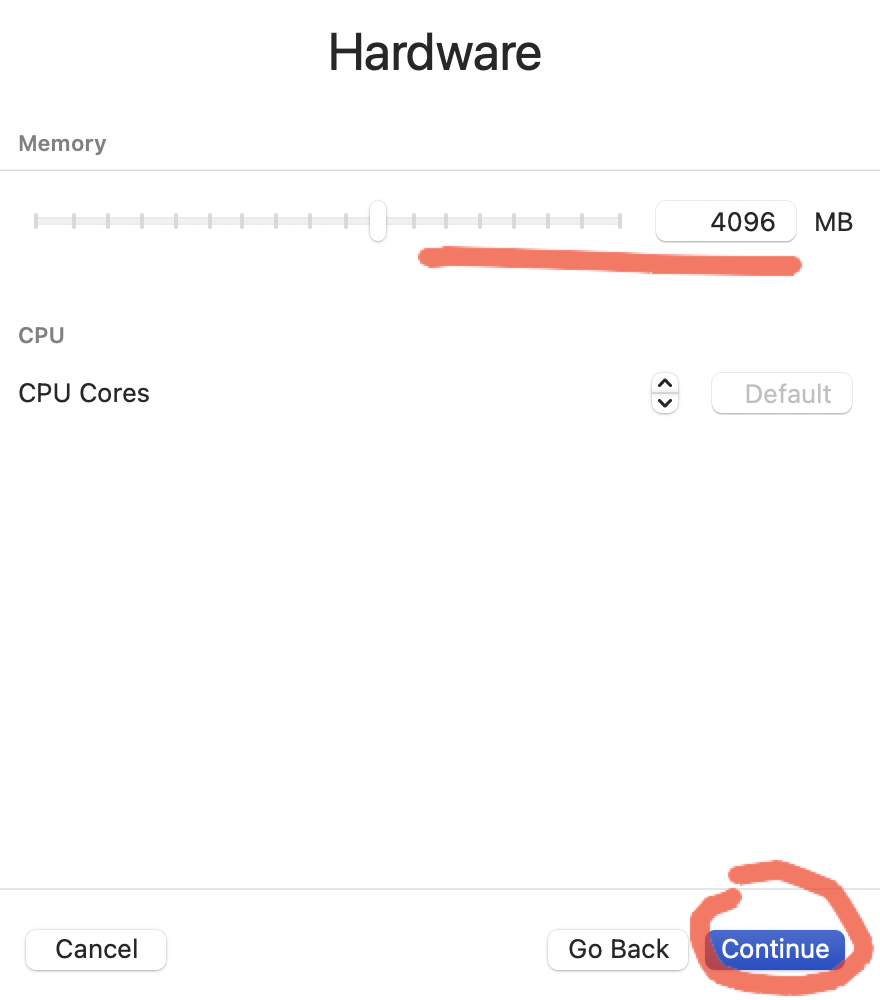
Выбираем количество ресурсов, больше — быстрее будет работать.
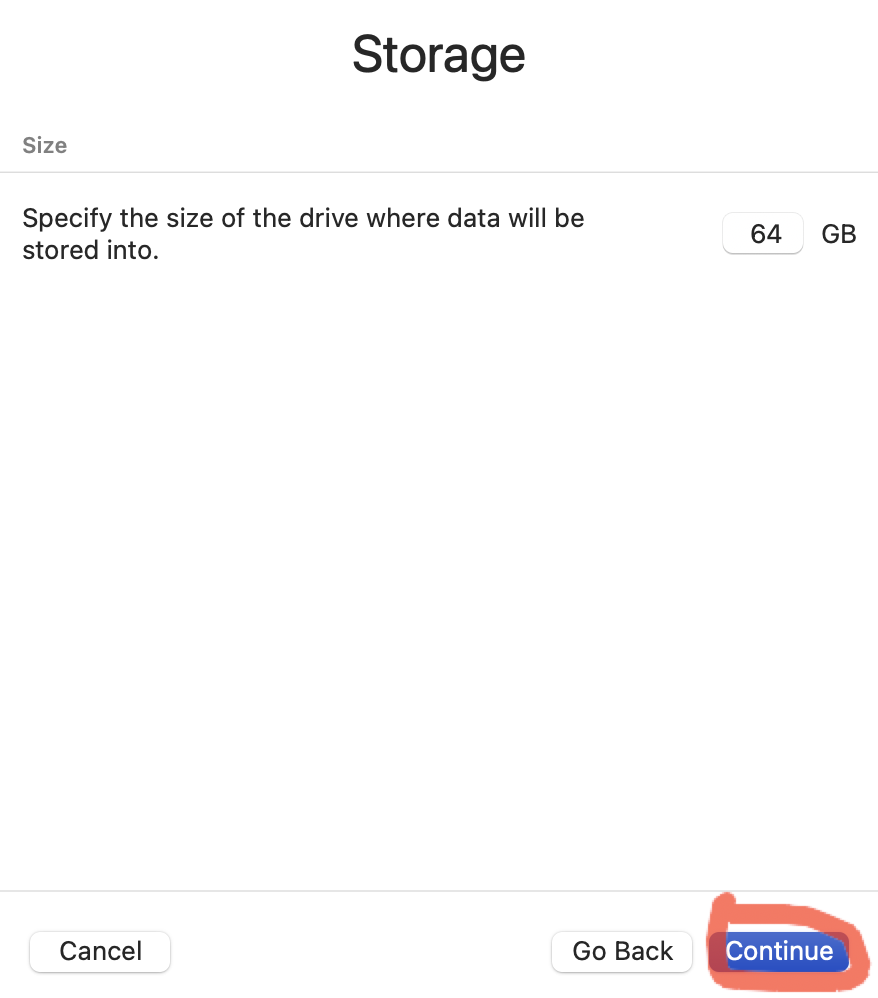
Выбираем размер выделяемого дискового пространства
Выбираем папку, которая будет общей для систем


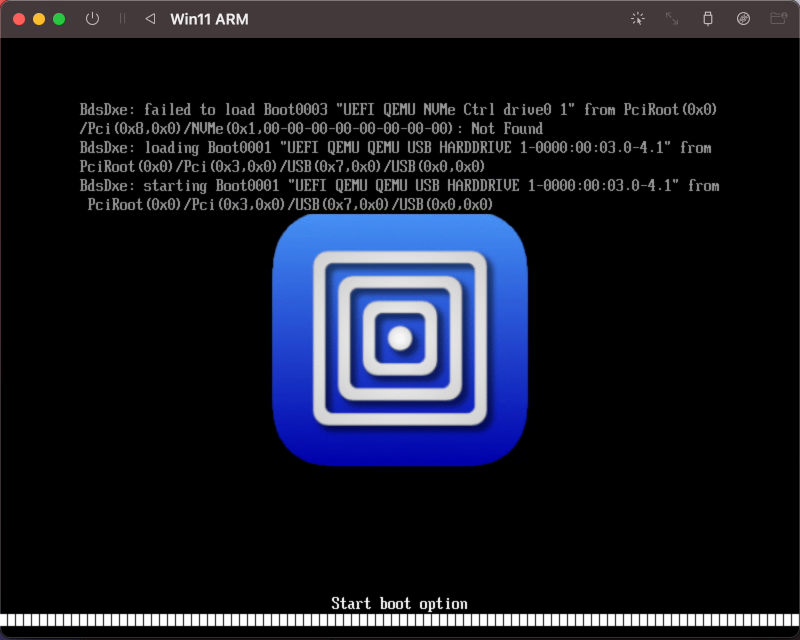
Запускаем Windows!
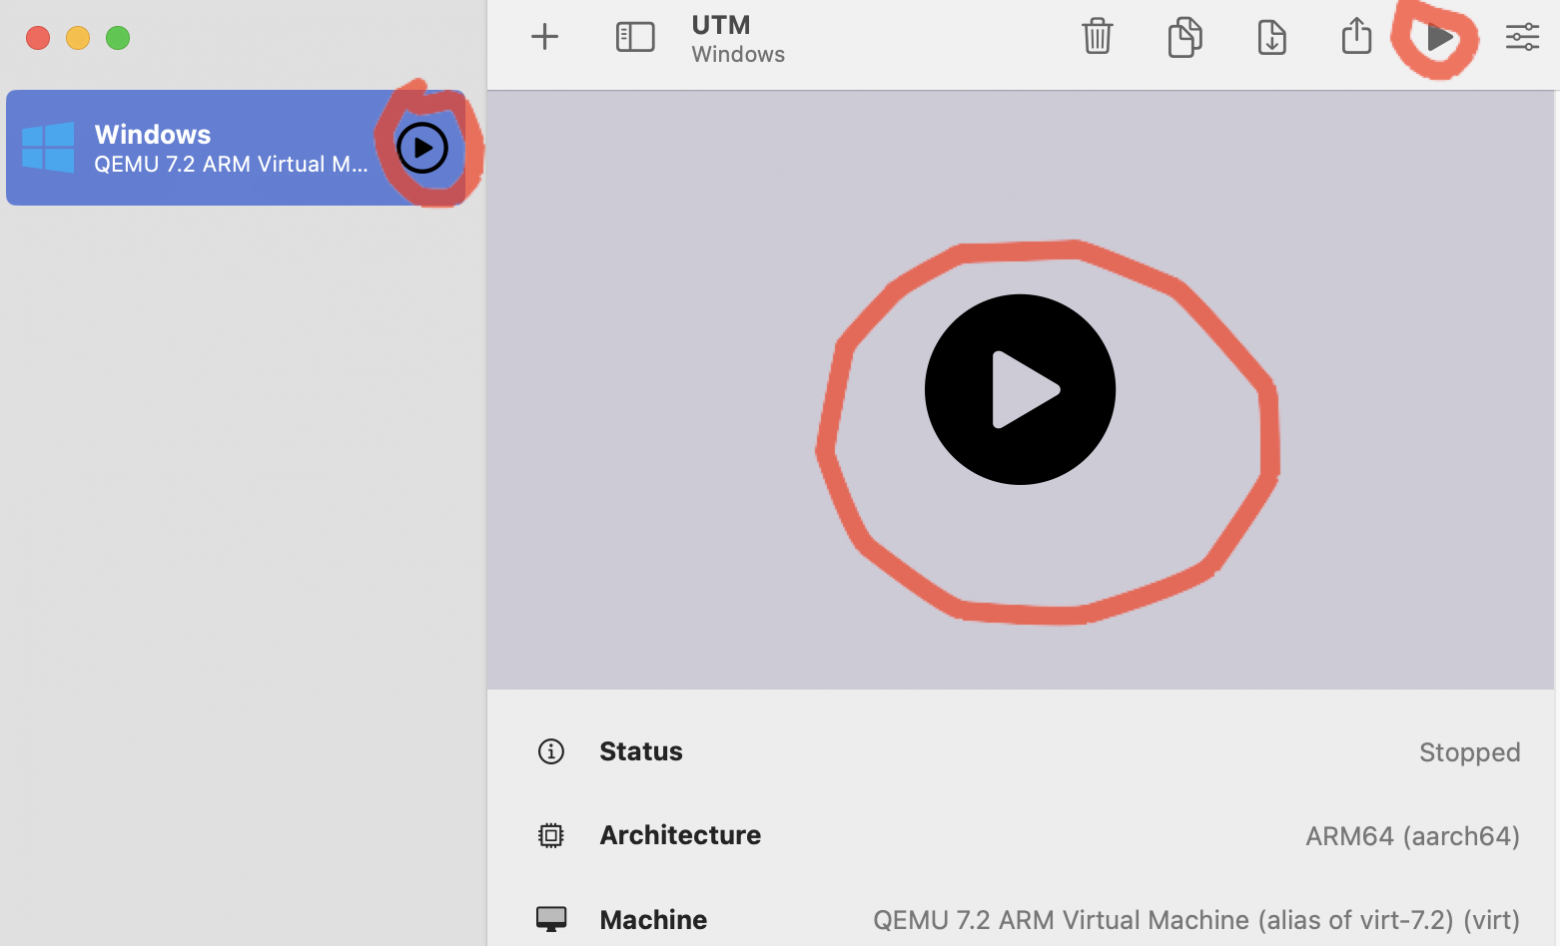
Выйдет вот такое окно и нужно успеть нажать какую-нибудь клавишу! Если не успели, то можно перезапустить виртуальную машину.
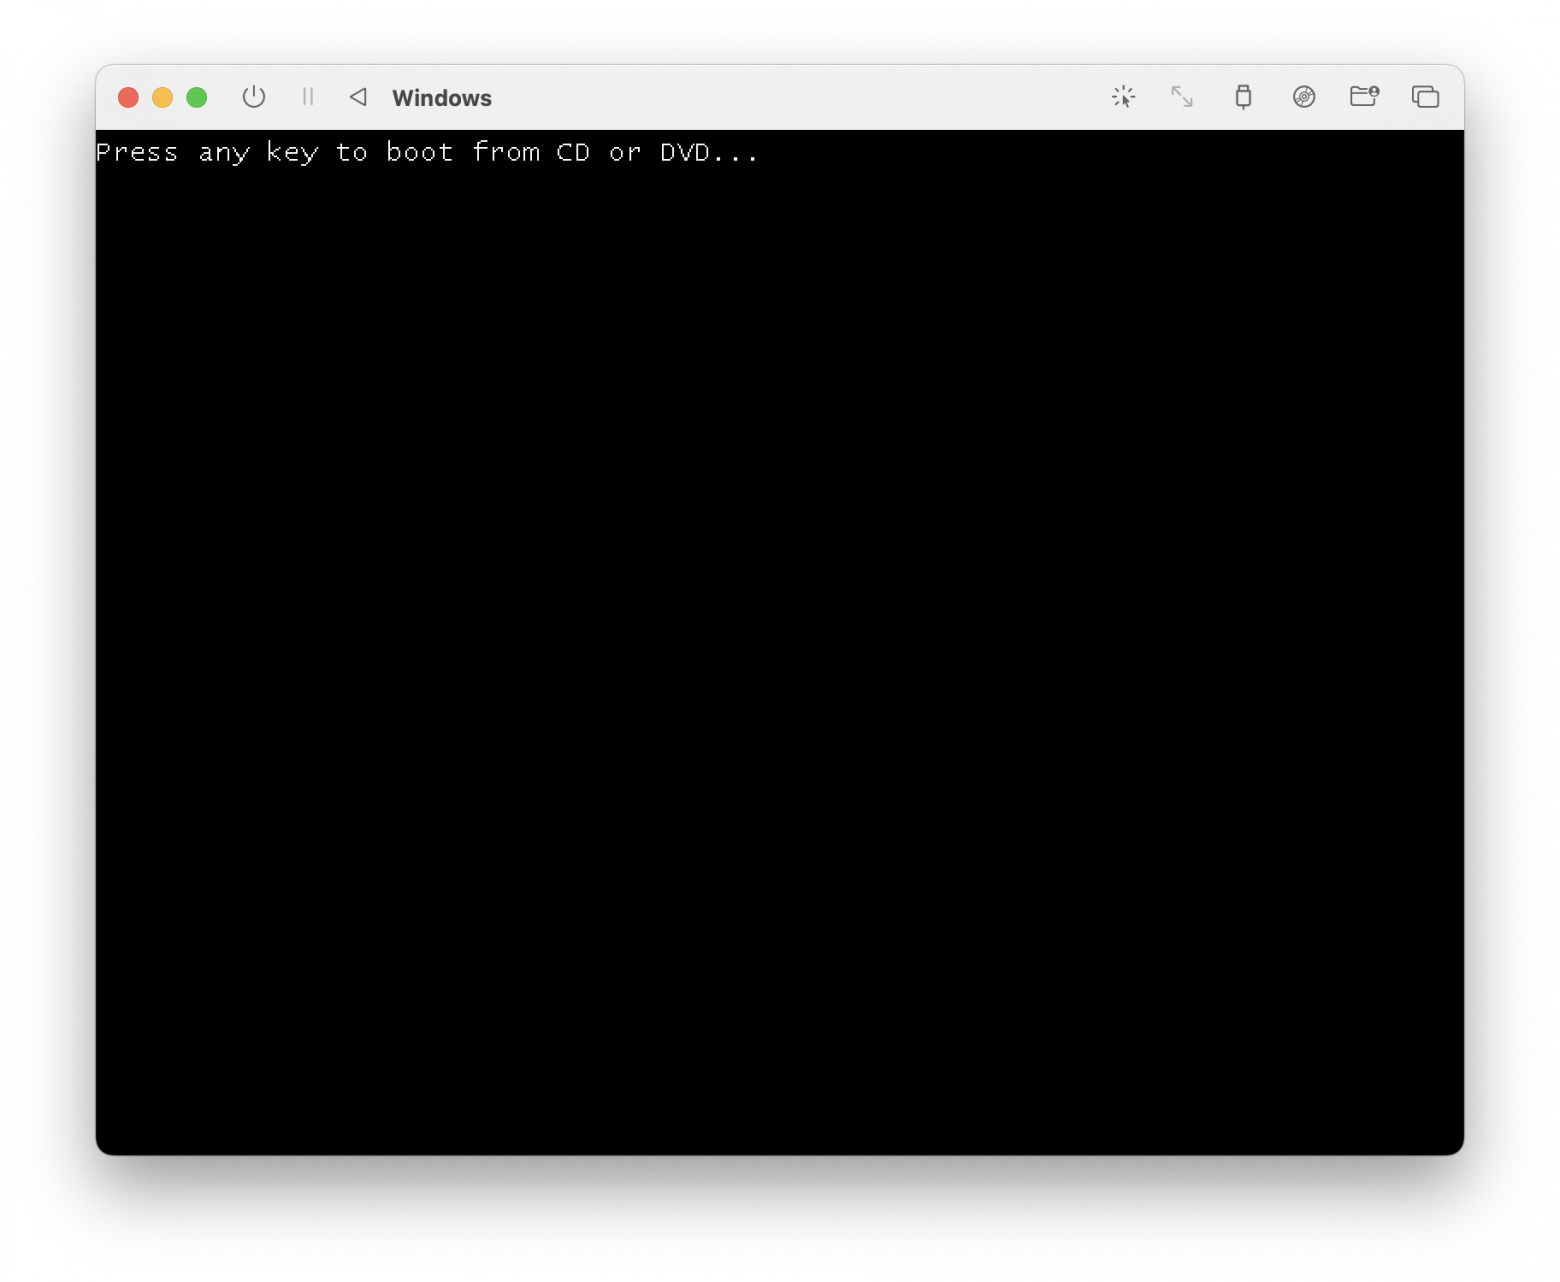
Необходимо набрать команду:
exit

Выбираем Boot Manager
Выбираем первый пункт:


Устанавливаем образ Windows ч.2
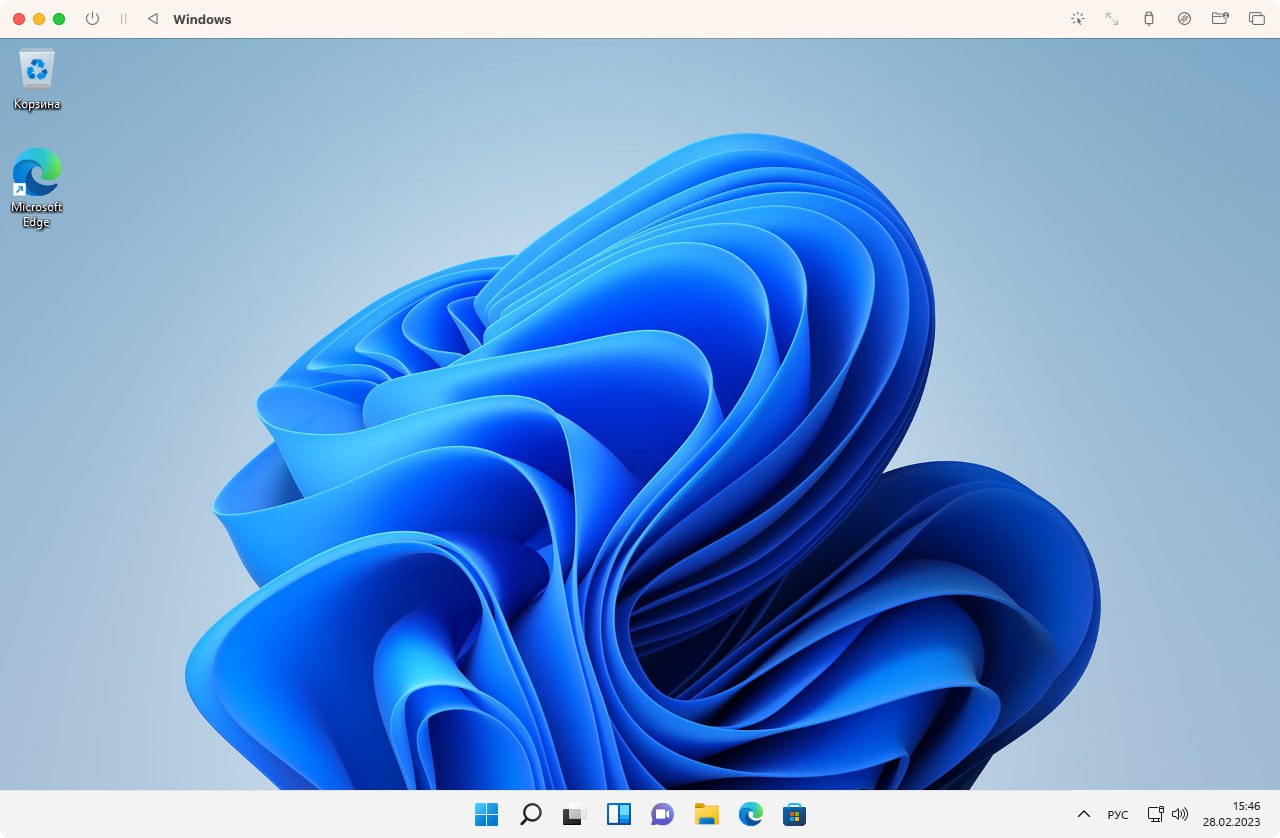
Далее следует стандартная процедура установки windows
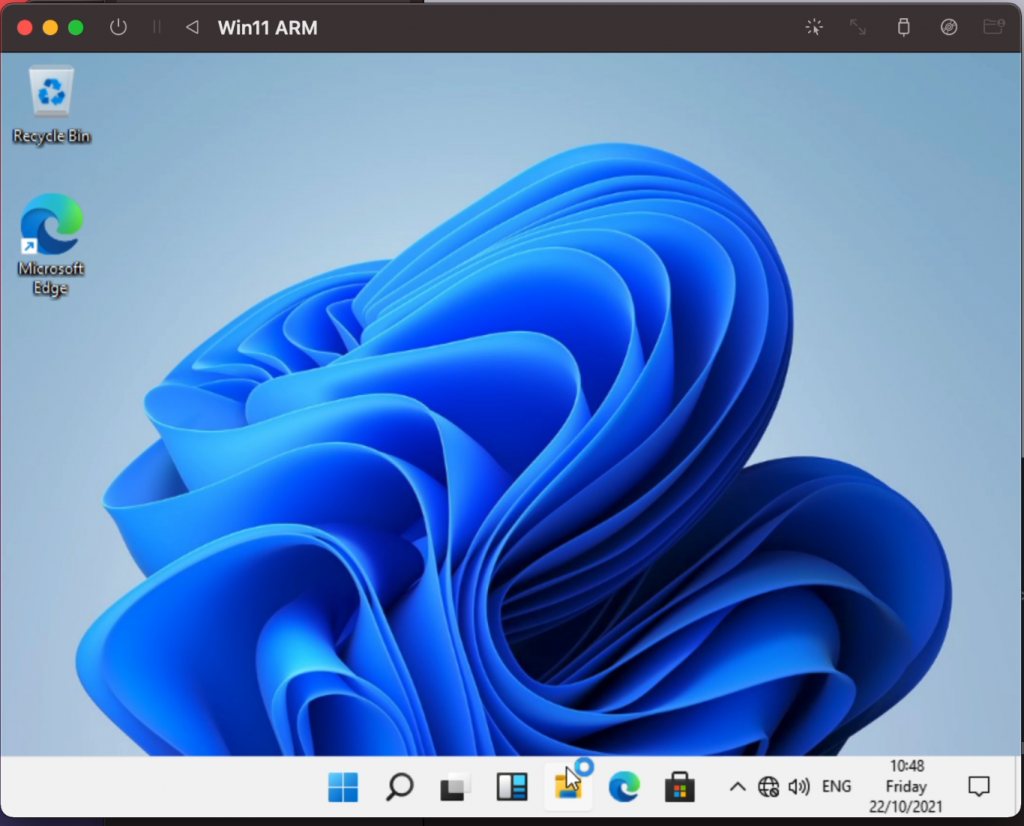
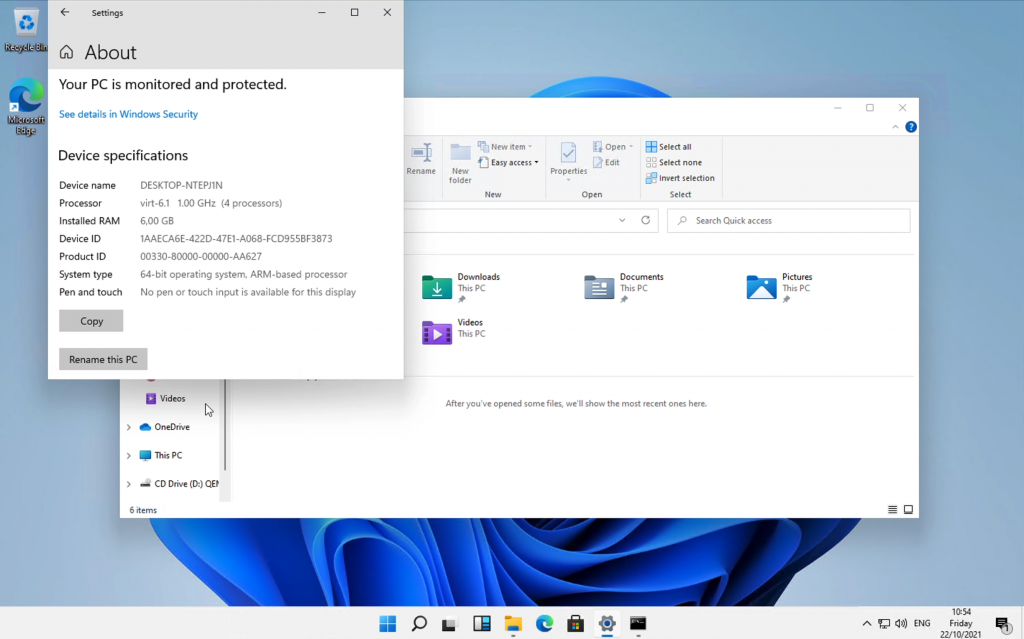
На выходе мы получаем вот такой результат.
Installing Windows on an Intel Mac using Boot Camp is a straightforward process. However, newer Apple devices like Mac Studio, MacBook Air M2, and MacBook Pro M2 cannot utilize Boot Camp since it only supports Intel chips and not Apple Silicon chips. Consequently, users of these new Apple devices face difficulties when they need to use Windows software. In this guide, we will explore how to install Windows 11 ARM on Mac using the M1 and M2 chips, using the free VMware Fusion Player as our preferred virtual machine software. This allows you to take advantage of both Windows 11 and macOS Ventura operating systems, providing the best of both worlds.
Step 1. Install VMware Fusion
You can use VMware Fusion Player for free for personal use. To download VMware Fusion, you need to register a VMware account and download VMware Fusion from the provided link. Make sure to save the free license key to activate VMware during the installation process.

Download VMware Fusion Player for M1 M2 MAC
Step 2: Download Windows 11 ARM
You can currently download the Windows 11 ARM installer for free. To access it, you need to participate in the Windows Insider program by visiting the provided link. Once enrolled, you can download the Windows 11 ARM version specifically designed for Virtual Machines from this location. It is important to note that the Windows 11 ARM installer for Virtual Machines is in VHDX format, which is a Virtual Disk format used by Hyper-V. Furthermore, the Windows 11 ARM installation comes with a pre-configured size of 10GB.

Download Windows 11 ARM Virtual Image
3. Convert Windows 11 ARM to VMware Virtual Disk
Because the Windows 11 ARM installation package is in VHDX format, it is not supported by other virtual machine software. Therefore, we need to convert the VHDX file to VMDK, which is a virtual disk file specifically for VMware.
To convert VHDX to VMDK, we need to use QEMU, a virtualization software for Ubuntu and Linux, to help us with the file conversion. To install QEMU, we can use Homebrew, a package management tool for Mac. If you are a programmer, you may be familiar with these tools. To install Homebrew and then QEMU, we can use the following commands sequentially in the macOS Terminal.
To install Home Brew on Mac, open Terminal in Mac Spotlight search then following the command:
/bin/bash -c «$(curl -fsSL https://raw.githubusercontent.com/Homebrew/install/HEAD/install.sh)»

Install Brew on Mac
To install QEMU, use the following terminal command:
brew install qemu

Install QEMU with Terminal
After installing QEMU, you can use the following commands to easily convert the VHDX image to VMDK:
qemu-img convert -f vhdx ~/Desktop/Windows11_InsiderPreview_Client_ARM64_en-us_25346.VHDX -O vmdk ~/Desktop/Windows11_InsiderPreview_Client_ARM64_en-us_25346.vmdk -p
-f vhdx: Location of the VHDX file.
-O vmdk: The output as a VMDK file with the desired location.
-p: Display the conversion process.

Convert Windows 11 ARM VHDX to VMDK Virtual Image
4. Install Windows 11 ARM on VMware Fusion
Start by installing VMware Fusion Player on your Mac using the provided free key in Step 1. Once installed, launch VMware Fusion Player from your Launchpad or Applications folder.
Next, click on the ‘Create a Custom Virtual Machine’ button to begin setting up a new virtual machine.

Create a Custom Virtual Machine
In the Guest OS section, select ‘Windows 11 x64 ARM’ and click ‘Continue’ to proceed.

Choose Windows 11 64-bit ARM
In the ‘Choose a Virtual Disk’ section, locate and open the converted Windows 11 ARM.VMDK file from Step 3. Then, click ‘Continue’ to finalize the remaining settings. You can customize the RAM and CPU allocation, but the default settings provided by VMware should offer optimal performance for running Windows 11 ARM on your M1 or M2 Mac without excessive resource usage.

Open Windows 11 ARM VMDK Virtual Image
Once you have finished configuring your virtual machine, click the ‘Play’ button to start running Windows 11 ARM on VMware. Since this is a pre-installed setup by Microsoft, you won’t have to wait for the installation process. The first step will be creating a new account on the Windows 11 ARM.VMDK.
Please note that creating a new account on Windows 11 ARM requires an internet connection and a Microsoft account. However, if you don’t have internet access or want to save time, you can bypass the account creation process by following these steps.

Open CMD in Windows 11 ARM
On the Windows 11 ARM welcome screen and language selection in the virtual machine, press Command + Shift + F10. This will open the Command Prompt (CMD). Enter the command ‘oobe\bypassnro‘ and press Enter. After restarting the virtual machine, you can create a Windows 11 account without needing an internet connection.

Run Windows 11 ARM on Mac M1 M2
Step 5. Install VMware Tool and Use Unity mode
Now that you have successfully set up Windows 11 ARM on VMware, you can further optimize its performance and enable convenient features like file drag and drop, seamless integration with macOS Ventura like applications through Unity mode. To achieve this, you need to install VMware Tools.
To install VMware Tools, navigate to the View menu and select «Install VMware Tools.» Then, on your Windows 11 ARM virtual machine, open File Explorer and run the VMware Tools installer to complete the installation process.
Once VMware Tools is installed, you can seamlessly use any Windows application directly on your macOS screen. In this guide, we tested Microsoft Store on macOS Ventura and found no limitations when working between Mac and Windows.

Run Microsoft Store on Mac in VMware Unity Mode
It’s important to note that virtual machines may not fully utilize the GPU’s capabilities. Therefore, resource-intensive applications like Core VideoStudio or Revit may not harness the full power of the M1 or M2 GPU. Virtual machines are better suited for regular applications.
In this guide, we have explored how to utilize Windows 11 ARM on Mac machines with ARM chips such as M1 and M2 Macs. With the assistance of VMware Fusion’s free personal edition, you can confidently enjoy a wide range of Windows applications that were previously exclusive to the Windows platform.
С переходом на собственные процессоры Apple в macOS “отвалились” виртуальные машины и Boot Camp (это утилиты для Big Sur просто нет).
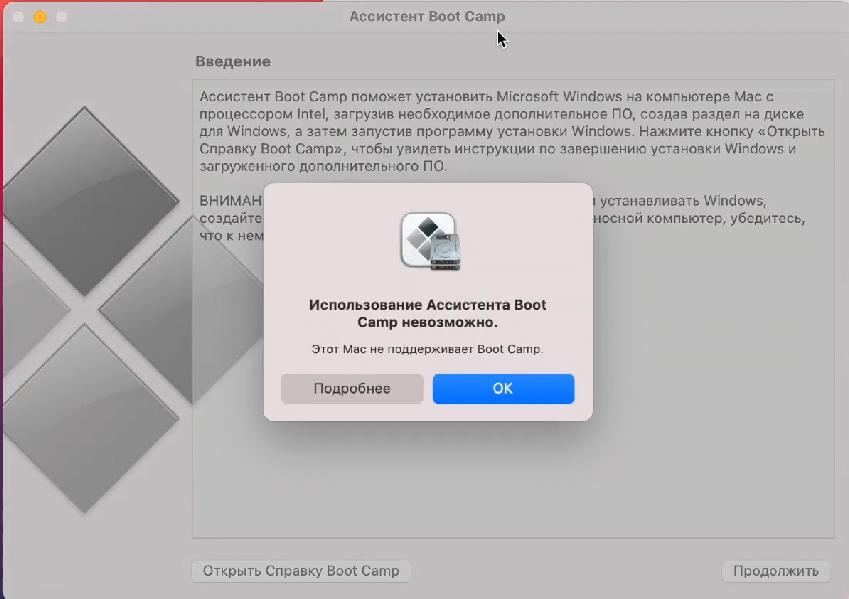
Boot Camp – это утилита для переключения между macOS и Windows, т.е. установки операционной системы в качестве второй полноценной и их раздельного запуска.
Утилита действительно очень крутая. Она подтягивает скачанный образ и в несколько кликов позволяет установить Винду. А после установки также в пару кликов позволяет обновить все драйвера.
Как установить Windows 7 на Mac с помощью Boot Camp.
Содержание
- Виртуальная машина на Mac
- Регистрация в Windows Insider [Шаг 1]
- Скачиваем версию Windows 10 для ARM [Шаг 2]
- Установка Parallels [Шаг 3]
- Установка Windows 10 с поддержкой 64-битных программ [Шаг 4]
- Настройка Windows в Parallels Desktop [Шаг 5]
- Советы по работе с Parallels
Виртуальная машина на Mac
Сейчас виртуальные машины, программы сторонних разработчиков начали обновляться. Уже сейчас на mac оси можно запустить программу, которая позволяет “накатить” Windows.
К недостаткам такого решения можно отнести существенно снижающуюся производительность. Это логично. Ведь помимо винды ресурсы нужно тратить еще и на саму mac ось, в которой и запускается виртуальная машина.
Из достоинств – можно работать в двух ОС одновременно практически “бесшовно”.
Первопроходцем стала виртуальная машина Parallels, которая теперь позволяет установить Windows на Mac с процессорами ARM.
Но есть свои нюансы, о них далее в статье.
Регистрация в Windows Insider [Шаг 1]
Регистрируемся в программе Windows insider, чтобы вы могли скачивать предварительные версии тестируемых ОС.
Далее войдите в свою учетную запись (или создайте новую) и согласитесь с условиями программы.
Важно! Виртуальная машина Parallels не поддерживает обычную версию Windows под архитектуру x86, т.е. для процессоров Intel и AMD.
Нам нужна специальная версия Windows 10 на архитектуре ARM. Она запускает приложения, разработанные для ARM, т.е. под мобильные процессоры. А также запускает через эмулятор только 32-битные программы, разработанные под x86.
64-битные программы, а их большинство, не работают. Например, у нас не запустится VLC видеоплеер, а Win32 – без проблем.
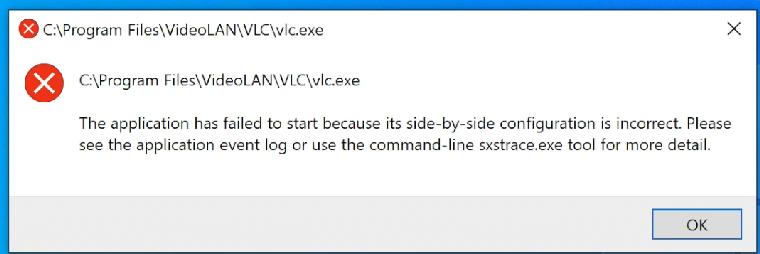
Но есть и хорошая новость. Microsoft уже выпустила свежий Build 21277 Windows 10 для ARM, в котором можно запускать через эмулятор программы, разработанные под 64bit.
Если будете качать эту сборку, количество поддерживаемых программ вырастет в разы.
Скачиваем версию Windows 10 для ARM [Шаг 2]
Официально сейчас доступна версия Windows 11 для процессоров ARM. Скачать Windows 10 ARM64 можно на сайте uupdump.net.
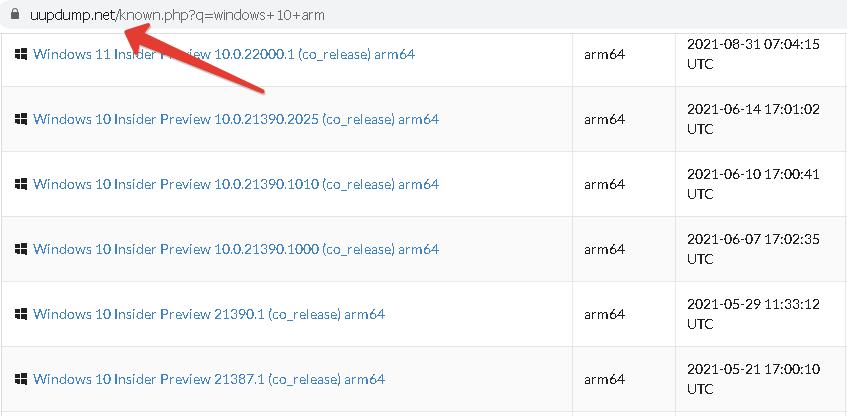
Нам нужна специальная версия Windows 10 для процессоров ARM.
После регистрации в программе Insider Preview у вас не должно возникнуть никаких проблем при скачивании образа. Образ весит около 8 Гб.
Установка Parallels [Шаг 3]
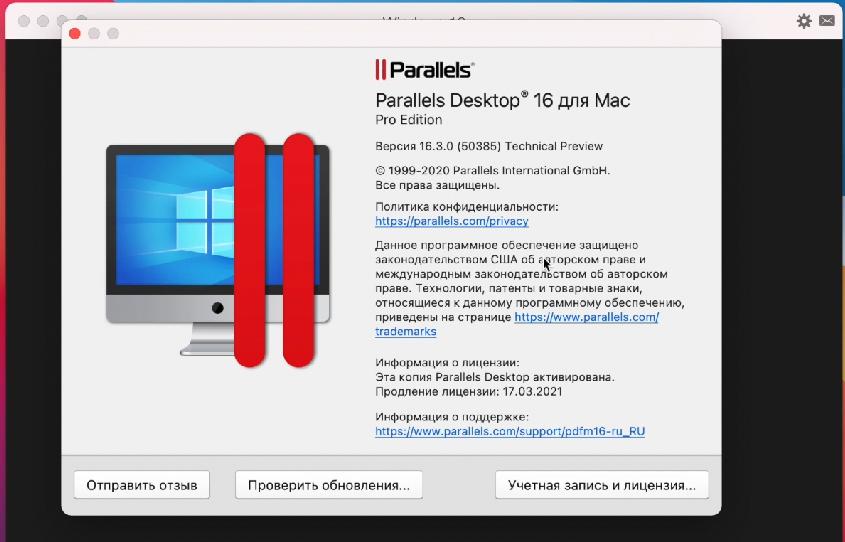
Скачаем виртуальную машину Parallels Desktop 16.
Программа платная, но есть 14-дневный триальный период. Его достаточно для ознакомления и тестирования.
После скачивания установите программу. Если во время установки появится сообщение “Эта версия Parallels Desktop не поддерживается на компьютере Mac…“, это значит, что разработчики еще не выпустили финальную рабочую версию для Mac на чипе M1.

Не беда, есть рабочая версия со статусом Technical Preview (ссылка на программу). Там разработчики оставили и ключ для тестирования.
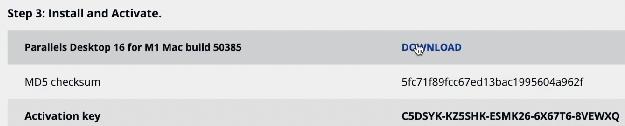
Регистрируетесь и скачиваете программу. Во время установки будет написано, что эта версия программы предназначена именно под процессоры Apple Silicon.
После установки Parallels Desktop программа предложит установить виртуальную машину.
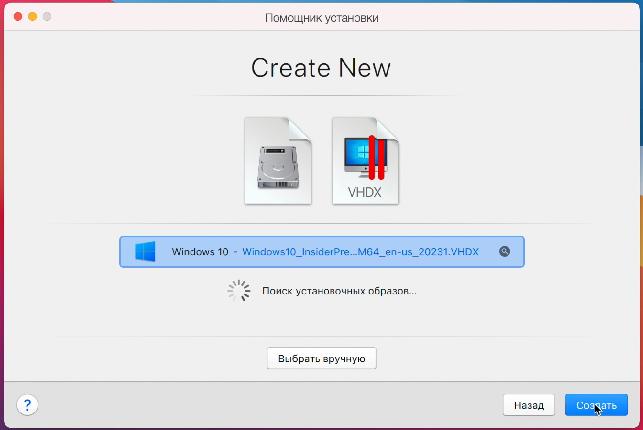
Обычно образ Windows 10 для ARM подтягивается автоматически, но в случае проблем путь к нему можно указать вручную.
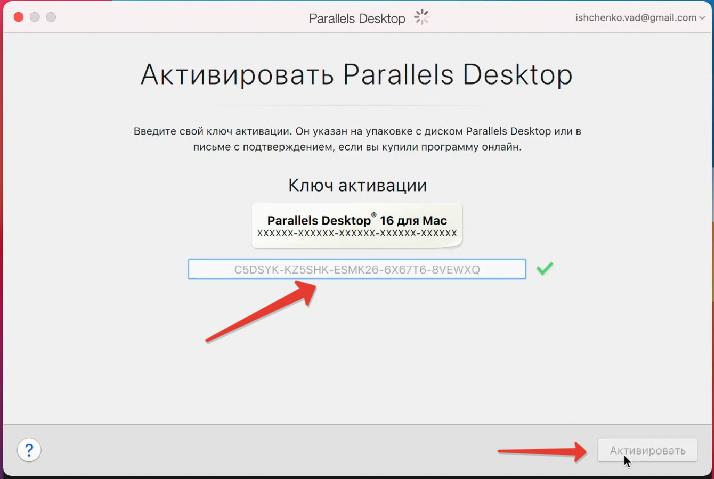
Приложение предложит войти в учетную запись Parallels
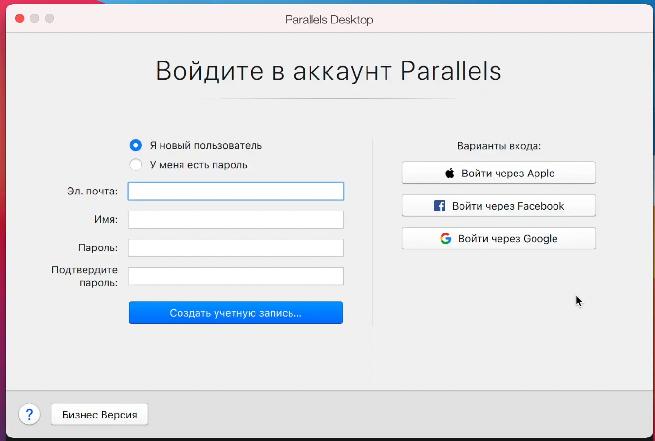
и ввести ключ активации. Если вы скачивали тестовую версию Parallels Desktop для M1, то ключ есть на странице, где вы скачивали программу.
Далее начнется автоматический процесс установки Windows, который занимает около 10 минут на новых MacBook.
Драйвера на внешнюю периферию (мышка и клавиатура) установятся автоматически. И все будет работать без какого-либо участия пользователя.
Установка Windows 10 с поддержкой 64-битных программ [Шаг 4]
Чтоб установить сборку Windows 10, которая поддерживает 64-битные программы, нужно выполнить обновление системы в режиме разработчика..
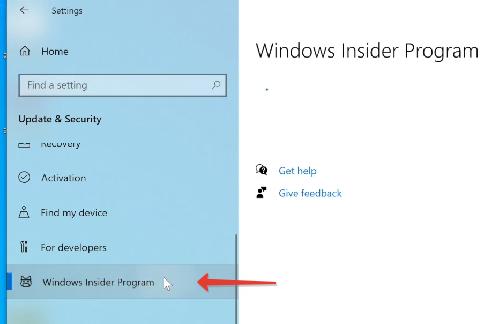
Идем в меню Пуск – Параметры – Обновление и безопасность. При проверке обновлений сборка 21277, поддерживающая запуск через эмулятор программ 64bit, будет недоступна.
- Идем в раздел Windows Insider Program.

- Добавляем зарегистрированный аккаунт.
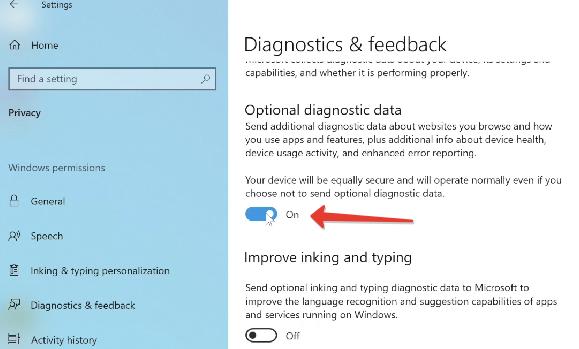
- В разделе “Диагностика и обратная связь” (Diagnostics & feedback) активировать пункт “Optional Diagnostic Data”. Остальное можно не включать.

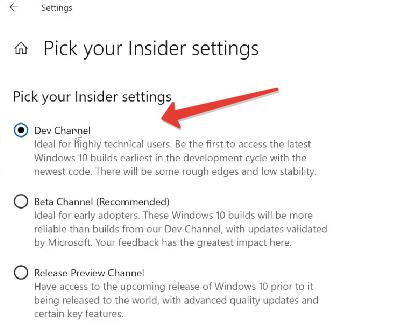
- Возвращаемся в раздел Windows Insider Program и меняем beta-канал на канал для разработчиков (Dev channel).

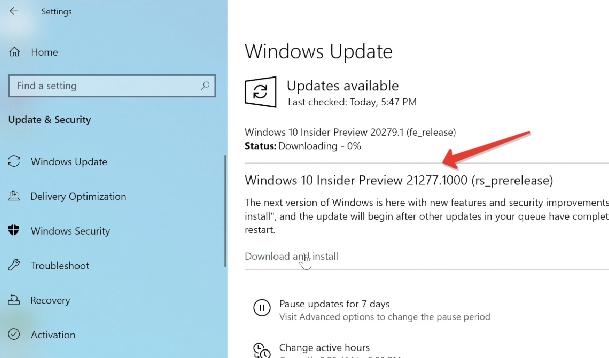
- После этого в разделе Windows Update жмем “Проверить обновления” и скачиваем заветную сборку с поддержкой x64.

Версия Windows 10 под ARM пока доступна только на английском языке. Если вам удастся руссифицировать, пишите в комментариях.
Настройка Windows в Parallels Desktop [Шаг 5]
Parallels выделила для Windows в автоматическом режиме двухядерный процессор (1,5 ГГц), 4 Гб оперативной памяти и 256 Гб пользовательской памяти. Сведений о видеокарте нет. Монитор настраивается в нативной разрешении.
Windows в виртуальной машине вне режима паузы и без запущенных программ практически не “съедает” мощность чипа, но расходует больше 6 Гб оперативной памяти (+ задействует swap файл подкачки).
Так что если планируете пользоваться Windows 10 постоянно, обязательно берите Mac с 16 Гб оперативной памяти.
Чтобы выделить больше ресурсов для виртуальной Windows 10, выключите виртуальную машину и перед новым запуском перейдите в Действия – Настроить.
Во вкладке “Оборудование” можно увеличить производительность процессора, графики и выделяемой памяти.
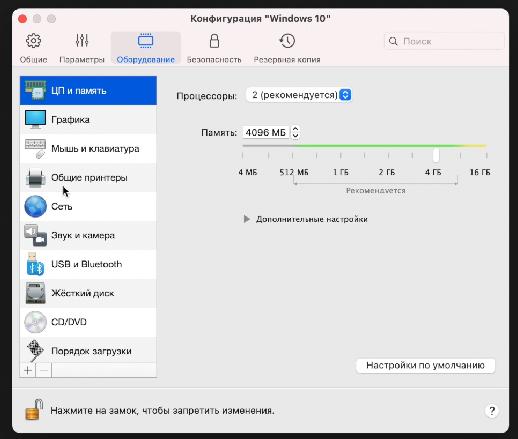
Предупреждаю, некоторые установки могут привести к незапуску Windows. Придется ставить параметры по умолчанию.
Тачбар для Windows из-под Mac выглядит куда лучше, чем для macOS. В нем помещены клавиши F1-F12 и другие вспомогательные клавиши, которых нет на клавиатуре MacBook.
Советы по работе с Parallels
Чтобы запустить окно на весь экран, нажмите на зеленую кнопку в левом верхнем углу (или сочетание клавиш Ctrl+Command+F). Таким образом можно быстро переключаться между двумя операционными системами через нажатие Command+Tab.
Не путайте этот режим с голубой кнопкой, переводящей в режим Coherence. Он позволяет запускать окно приложения Windows в интерфейсе macOS. Это очень крутая штука, когда ты одновременно можешь пользоваться программами Mac и Windows.
Для выхода из этого режима, нажмите Вид – Coherence или сочетание клавиш Ctrl+Command+C.
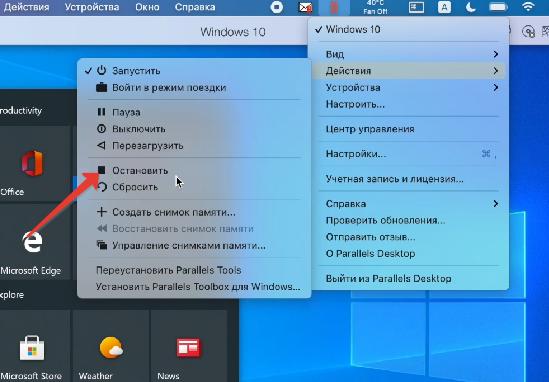
Если вы временно не пользуетесь виртуальной машиной, поставьте ее на паузу (иконка Parallels в строке меню, Действия – Пауза), чтобы она не потребляла ресурсы Mac.

Также Parallels через какое-то время бездействия сделает это автоматически.
Выключить сам Windows можно через меню Пуск или через строку состояния (Действия – Остановить), но это менее безопасный вариант, чем обычное выключение Windows.
На рабочем столе есть папка Mac Files, открывающая пользовательскую папку mac оси, и вы можете иметь доступ ко всем файлам.
После установки любых программ на Windows, Parallels автоматически создает их иконки на рабочем столе macOS. Суть в том, что рабочий стол macOS и виртуальной машины становится общим. Т.е. файлы, размещенные на рабочем столе Mac, будут отображаться и на столе Windows.
В целом виртуальная Windows 10 работает, но не всегда стабильно, особенно при запуске “тяжелых” 64-битных программ и игр. Тут все надо тестировать индивидуально.
В идеале ожидаем, чтобы компания Microsoft дал добро на работу полноценного Boot Camp и начал интенсивно развивать проект Windows 10 для ARM.
One subject that comes up very often is the ability to run Windows on an M1-based Mac. Even though many people swear by macOS, Bootcamp and Windows on a Mac still seems to be a widely used option. As these M1-based devices are using a different architecture: ARM, they are not compatible with Mac’s previous and most-used architecture for Windows-based computers: x86. That means that in order to run Windows on an M1 device, you basically have two options: Use an ARM-based version of Windows or emulate an x86-64 based machine and run a regular Windows version. For this article, I will get Windows 11 for ARM running on an M1 MacBook Air by using UTM.
YouTube Video
If you are interested, I also created a YouTube video from this blogpost. If you prefer classic text, you can just follow the rest of this article:
Introduction
As mentioned above, there are two options to get Windows running on an Apple M1-based device. The first involves virtualization, as we can’t (yet) run Windows natively on an M1-based machine. The second involves emulation, where we will translate instructions between the running operating system (Windows in this case) and the hardware. Both methods have their advantages and disadvantages. Emulation offers maximum compatibility as it doesn’t require software written for ARM specifically but it’s pretty slow. Virtualization is fast(er) but requires software written for the hardware platform it is running on.
Both of these methods can be accomplished with UTM (https://github.com/utmapp/UTM). UTM offers QEMU-based virtaluzation and emulation with a handy GUI for both IOS and macOS. As it’s using QEMU under the hood, it is capable of emulating different processor architectures (like x86-64) but it can do virtualization for the same as the host’s architecture as well.
After a quick test, on which I plan to create a more detailed article in the future, using emulation seems to cause a lot of overhead and turns out to be too slow to be usable currently.
Leaving only virtualization as a real option. The downside for this approach is that there is no official way, currently, to get a license for an ARM-based version of Windows. Microsoft decided that this is only available for sale for system builders. Another negative is that there are very little applications compiled for running on an ARM-based Windows version. Fortunately it is possible to run most 32-bit based Windows applications on the ARM-version of Windows, which are available for most applications out there.
For this article, I’ll be using a 2020 M1-based MacBook Air but this should work in the same way for an iMac, Mac Mini, MacBook Pro and even for the recently announced M1 Max and M1 Pro devices.
Getting Windows for ARM on your M1 device
Step 1) Create a Windows 11 for ARM ISO
The first thing we need is installation media for the ARM-based version of Windows 11. If you are part of the Windows Insider program, there is a version available for download, using a VHDX file. Unfortunately, I didn’t manage to get this to work properly and my VM was always stuck during the first boot in a “Getting Started” screen.
Since this didn’t work, I decided to use the UUP Dump method. UUP stands for Unified Update Platform. This is basically a deployment method that Microsoft introduced a few years ago that allows for a sort of incremental updates on parts of Windows, rather than re-deploying everything completely every time. The UUP Dump site allows you to generate a script that will download these UUPs from Microsoft and will combine them in a working ISO file.
To get this all together, first navigate to the website of UUP dump: https://uupdump.net/. Over there, choose the arm64 version of the latest beta channel build:
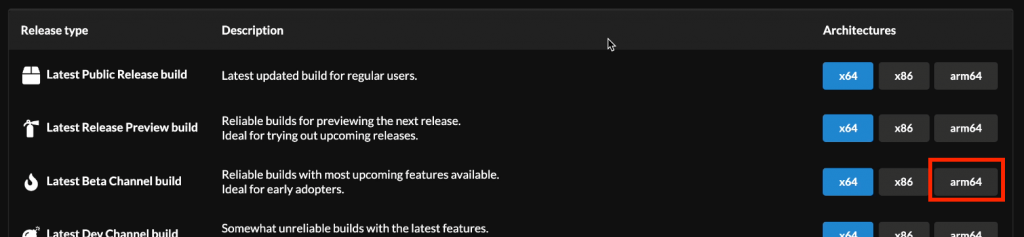
On the next page, choose the Windows 11 version. At the time of writing this article, this was 10.0.22000.160.

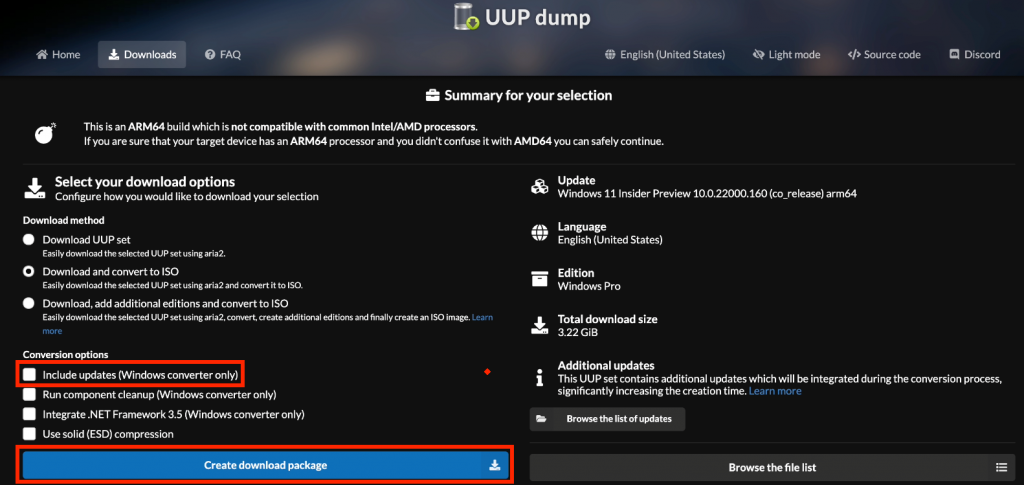
Next, I unchecked “Include updates” but this is not strictly necessary. Then click “Create download package”:
As you will see, this downloads a zip-file with a few scripts in it. The uup_download_macos.sh script is the one which we will need to run:

Before we can run the script, we need to install a few tools on our Mac first. The easiest method to do this, is by using Homebrew. Start by navigating to the Homebrew website (https://brew.sh/) and copy the command listed under “Install Homebrew”:

Open up a terminal window, paste the command in it and press enter. If asked, enter your user’s password:
jensd@jensds-MacBook-Air ~ % /bin/bash -c "$(curl -fsSL https://raw.githubusercontent.com/Homebrew/install/HEAD/install.sh)"
==> Checking for sudo access (which may request your password).
Password:
==> This script will install:
/opt/homebrew/bin/brew
/opt/homebrew/share/doc/homebrew
/opt/homebrew/share/man/man1/brew.1
/opt/homebrew/share/zsh/site-functions/_brew
/opt/homebrew/etc/bash_completion.d/brew
/opt/homebrew
==> The following new directories will be created:
/opt/homebrew/Cellar
/opt/homebrew/Caskroom
...
==> Next steps:
- Run these two commands in your terminal to add Homebrew to your PATH:
    echo 'eval "$(/opt/homebrew/bin/brew shellenv)"' >> /Users/jensd/.zprofile
    eval "$(/opt/homebrew/bin/brew shellenv)"
- Run `brew help` to get started
- Further documentation:
    https://docs.brew.sh
jensd@jensds-MacBook-Air ~ %
At this point, Homebrew is installed on your Mac but you need to add it to your PATH, as suggested in the last output of the previous command:
jensd@jensds-MacBook-Air ~ % echo 'eval "$(/opt/homebrew/bin/brew shellenv)"' >> /Users/jensd/.zprofile
jensd@jensds-MacBook-Air ~ % eval "$(/opt/homebrew/bin/brew shellenv)"
jensd@jensds-MacBook-Air ~ %
Now that is taken care of, we can install the required tools, using Homebrew, to be able to run the UUP dump script:
jensd@jensds-MacBook-Air ~ % brew tap sidneys/homebrew
==> Tapping sidneys/homebrew
...
Tapped 8 casks and 22 formulae (42 files, 157.3KB).

jensd@jensds-MacBook-Air ~ % brew install aria2 cabextract wimlib cdrtools sidneys/homebrew/chntpw
==> Downloading https://ghcr.io/v2/homebrew/core/ca-certificates/manifests/2021-09-30-1
######################################################################## 100.0%
...
x86_64cpuid.s:273:10: error: invalid operand
 cmpq $0,%rax
         ^
x86_64cpuid.s:274:9: error: unknown token in expression
 cmoveq %rcx,%rax
        ^
x86_64cpuid.s:274:9: error: invalid operand
 cmoveq %rcx,%rax
        ^
make[1]: *** [x86_64cpuid.o] Error 1
make: *** [build_crypto] Error 1

Do not report this issue to Homebrew/brew or Homebrew/core!

These open issues may also help:
Mac M1 chntpw not building (Openssl 1.0 requirement not satisfied) https://github.com/sidneys/homebrew-homebrew/issues/2
As you notice, the chntpw tool cannot be installed as it throws an error. The OpenSSL requirement is the issue but the error message also points us to the solution, which is to build OpenSSL ourselves. More details can be found on the Github link that is shared above. In essence, this is what needs to be executed:
jensd@jensds-MacBook-Air ~ % curl -LO https://gist.github.com/minacle/e9dedb8c17025a23a453f8f30eced3da/raw/908b944b3fe2e9f348fbe8b8800daebd87b5966c/openssl@1.0.rb
curl -LO https://gist.github.com/minacle/e9dedb8c17025a23a453f8f30eced3da/raw/908b944b3fe2e9f348fbe8b8800daebd87b5966c/chntpw.rb
brew install --formula --build-from-source ./openssl@1.0.rb
brew install --formula --build-from-source ./chntpw.rb
rm ./openssl@1.0.rb ./chntpw.rb
...
patching file Makefile
==> make
🍺  /opt/homebrew/Cellar/chntpw/0.99.6: 5 files, 296.3KB, built in 2 seconds
Removing: /Users/jensd/Library/Caches/Homebrew/chntpw--patch--dbf09ccee4eaf401e2680554990ee924bb0ad1dd7661a3c97d67bf796089fbbe.patch... (211B)
jensd@jensds-MacBook-Air ~ %
So far that were quite a lot of steps… But finally we are ready to execute the script which we got from the UUP Dump website. First navigate to the directory where you downloaded and extracted the files, then execute the macOS version of the script:
jensd@jensds-MacBook-Air ~ % cd Downloads
jensd@jensds-MacBook-Air Downloads % cd 22000.160_arm64_en-us_professional_fdb8a3c7_convert
jensd@jensds-MacBook-Air 22000.160_arm64_en-us_professional_fdb8a3c7_convert % bash uup_download_macos.sh
Retrieving aria2 script...

10/22 11:46:10 [NOTICE] Downloading 1 item(s)
[#8c33b1 0B/0B CN:1 DL:0B]
...
 99.63% done, estimate finish Fri Oct 22 11:51:38 2021
 99.86% done, estimate finish Fri Oct 22 11:51:38 2021
Total translation table size: 2048
Total rockridge attributes bytes: 0
Total directory bytes: 0
Path table size(bytes): 10
Max brk space used 0
2198094 extents written (4293 MB)
Done.
jensd@jensds-MacBook-Air 22000.160_arm64_en-us_professional_fdb8a3c7_convert %
As a result, you should end up with an ISO file in the directory from where you executed the script:
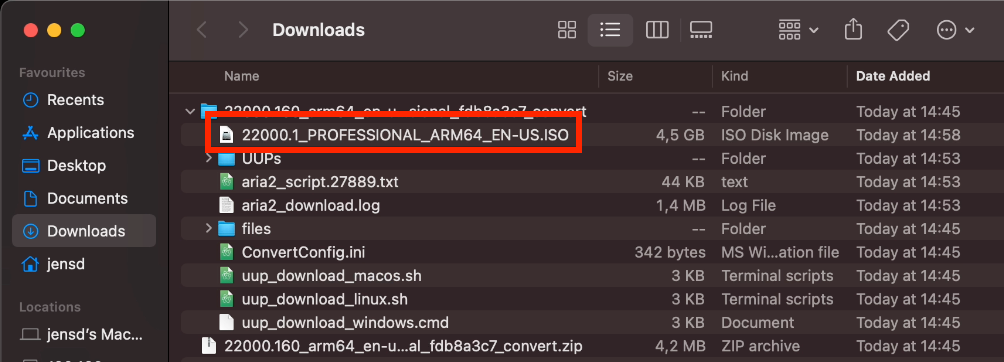
You can move this file to wherever you want, as long as you remember where for the next steps.
Step 2) Downlad and install UTM
Now that we have the ISO which we will use to get Windows installed, we need a way to create a virtual machine in which we can run the installer. There are several options available for this. The more known ones like Parallels or VMWare Fusion for example. Unfortunately these are not free but they should work as well. Instead, I will go for UTM.
UTM, as mentioned in the beginning, offers QEMU-based virtaluzation and emulation for both IOS and macOS. I tried to find what the UTM abbreviation stands for but was not able to find it.
You can download UTM from Github using: https://github.com/utmapp/UTM/releases/latest/download/UTM.dmg
Once downloaded, simply open the .dmg file by double clicking on it and move UTM.app to your Applications folder using Finder:
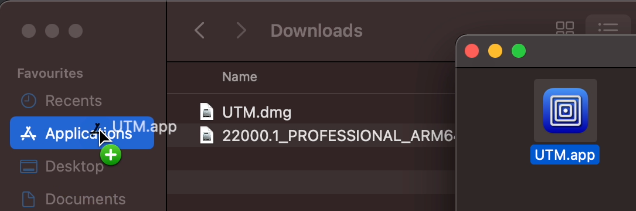
Then start UTM, simply by launching it as any other application on your Mac.
Step 3) Create a VM for your Windows 11 ARM installation
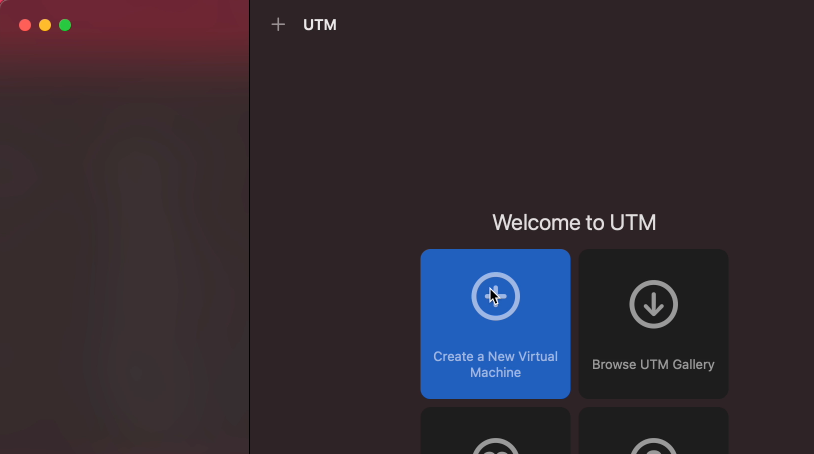
At this point we have both the ISO file for installing Windows and we have our hypervisor, UTM, ready. Now we need to create a new virtual machine with UTM for use with the next step.
Start UTM and click on “Create a New Virtual Machine”:
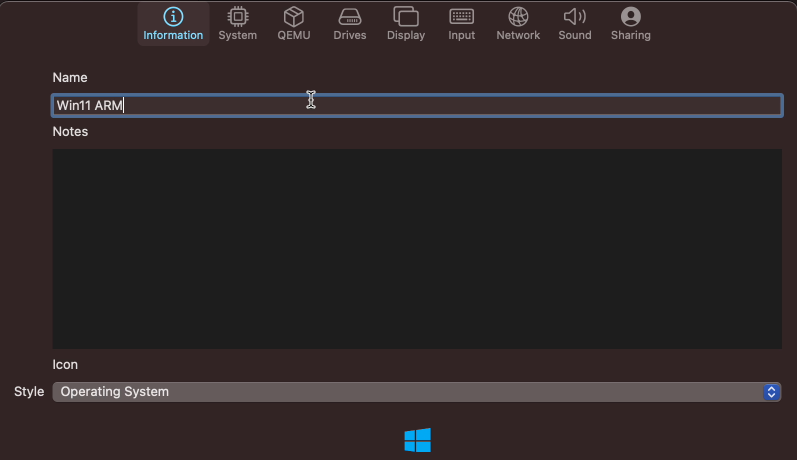
In the first tab: Information, choose a name for your VM and optionally choose a matching icon:
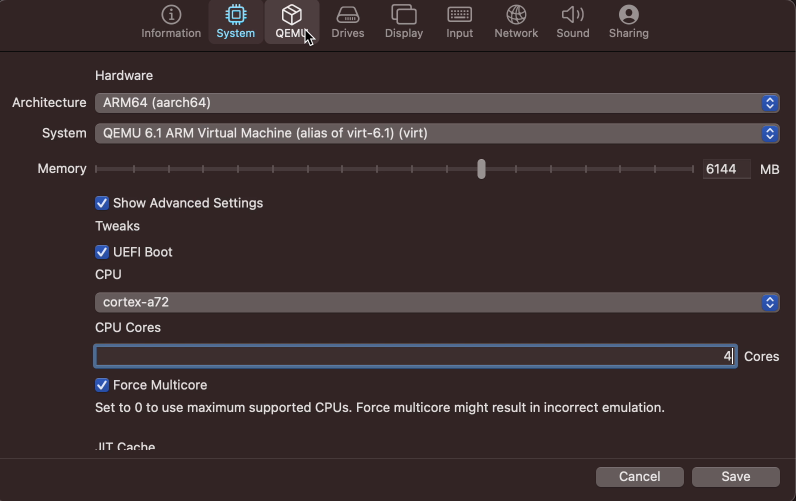
Navigate to the second tab: Sytem and select ARM64 (aarch64) as architecture. This matches the architecture of the M1-chip so we will not use emulation. Change the memory slider to have at least 4GB. I did notice that slightly more is really better (I took 6GB here for example). Optionally, click “Show Advanced Settings” and set a number of CPU cores (I chose 4 here) and enable “Force Multicore”:
Now navigate to the Drives tab, click “New Drive” and change the interface to NVMe and give a size of at least 55GB. Then click “New Drive” again, check the removable option and choose “None (Advanced)” as interface:
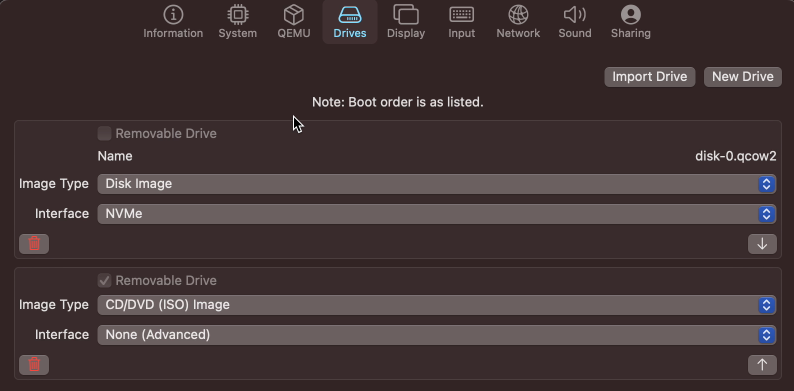
Selecting None as interface is needed due to an issue/bug in QEMU. I’ve opened this on the UTM Github page but so far a workaround is still needed. Type None allows to specify the required parameters to give an interface for our virtual CD/DVD drive.
To do so, navigate to the QEMU tab and scroll all the way down in the list, until you reach the last line saying New…, then add two lines as follows:
-device
usb-storage,drive=drive1,removable=true,bootindex=1,bus=usb-bus.0
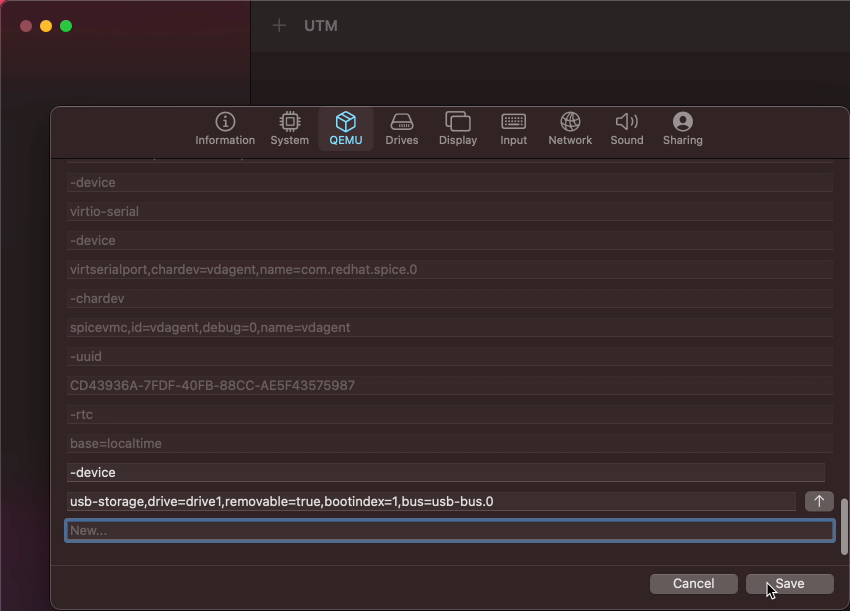
After all these steps, click Save to create the new VM in UTM.
Only thing which is left, is to mount the Windows 11 ARM installation ISO, which we created in the first step to the VM. To do so, select the VM you just created from the list and on the CD/DVD dropdown, choose Browse:
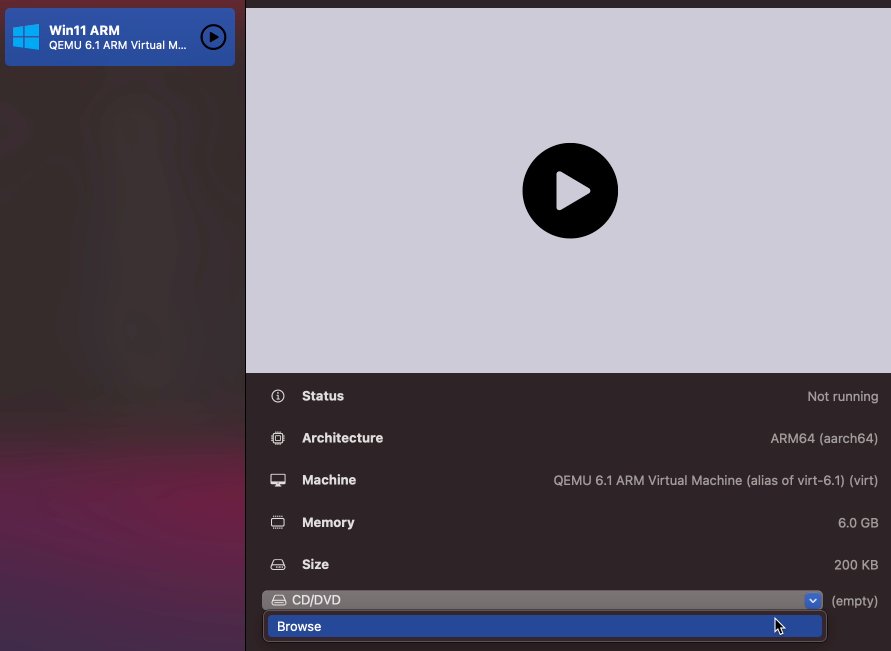
Then navigate to your Downloads folder (or other location where you move the ISO file afterwards) and select the ISO which got created in step 1:

Step 4) Install Windows 11 ARM on your M1-based device
Now that we have our VM created, let’s get it started and run through the Windows 11 installation.
Start the VM by clicking on the large play icon (see previous two images). The VM will boot and you should see a large UTM logo.
Make sure you click in the VM immediately as it will ask to press a key to boot from the ISO:

After pressing any key, the installer will start from the ISO and if all goes well, you should be able to see the standard Windows 11 installer, where you can select a language, locale and keyboard settings:
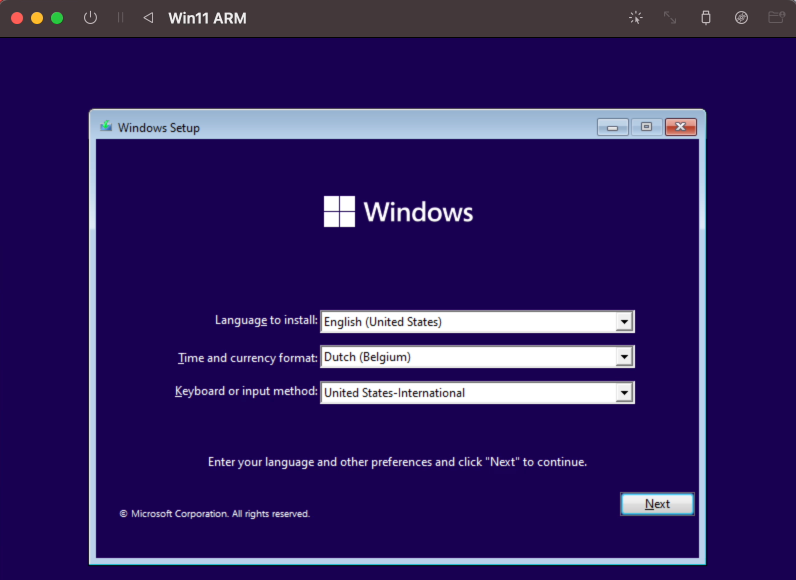
Set these as desired and click Next.
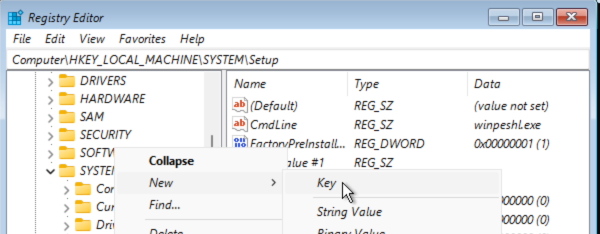
In the next screen, we need to do some modifications before we can click “Install Now”. Windows 11 has some strict requirements for the hardware it is allowed to run on. As our Macbook, and the VM, does not have Secure Boot nor TPM, we need to work around that by adding some keys in the register.
So on the screen where you seen Install Now, press Shift + F10. It might be that you need to use Fn+F10, depending on how you configured your function keys. This should bring up a command prompt where we can open regedit:

In the registry editor, navigate to: Computer\HKEY_LOCAL_MACHINE\SYSTEM\Setup and add a new key there called LabConfig. To do this, right click on Setup and choose New > Key:
Give it the name LabConfig and in the key, right click and choose New – DWORD (32-bit) Value:
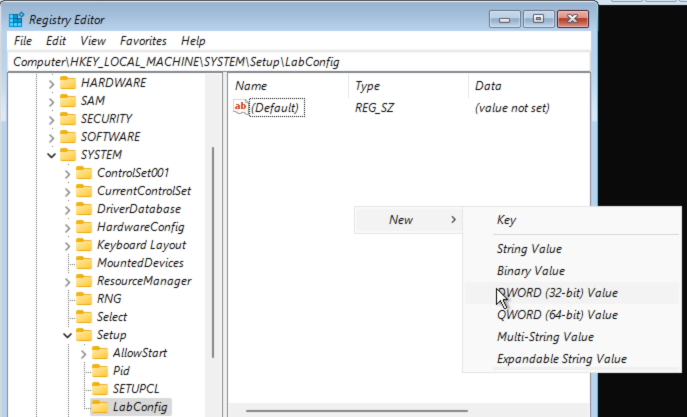
Give the name BypassTPMCheck to this DWORD. Repeat these steps a second time but nowgive the name BypassSecureBootCheck. Then double-click on each of these two DWORDs and change the value to 1. As a result, you should get the following:
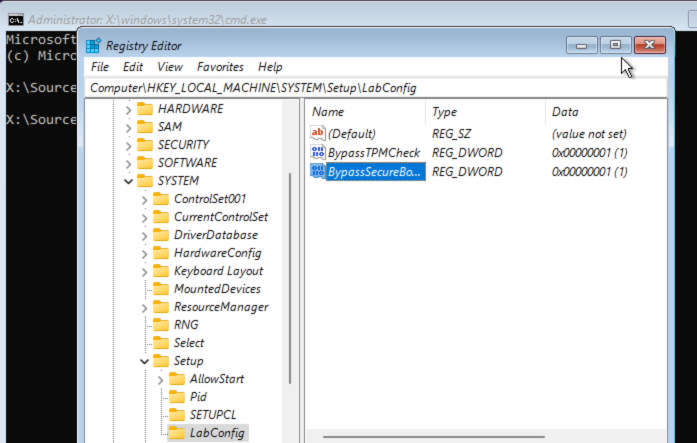
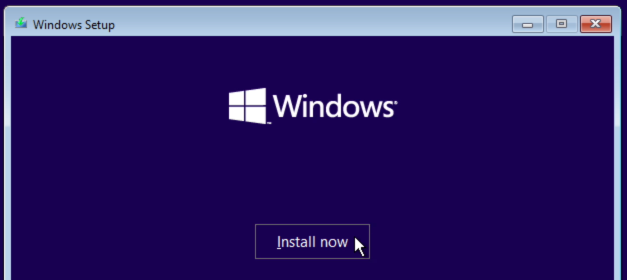
Now that’s done, we can close the Registry Editor and the command prompt we opened and continue with the install by clicking “Install Now”:
In the next screens, choose: “I don’t have a product key”, accept the license and choose for: “Custom: Install Windows only (advanced)”. You should end up with the “Where do you want to install Windows?” dialog:
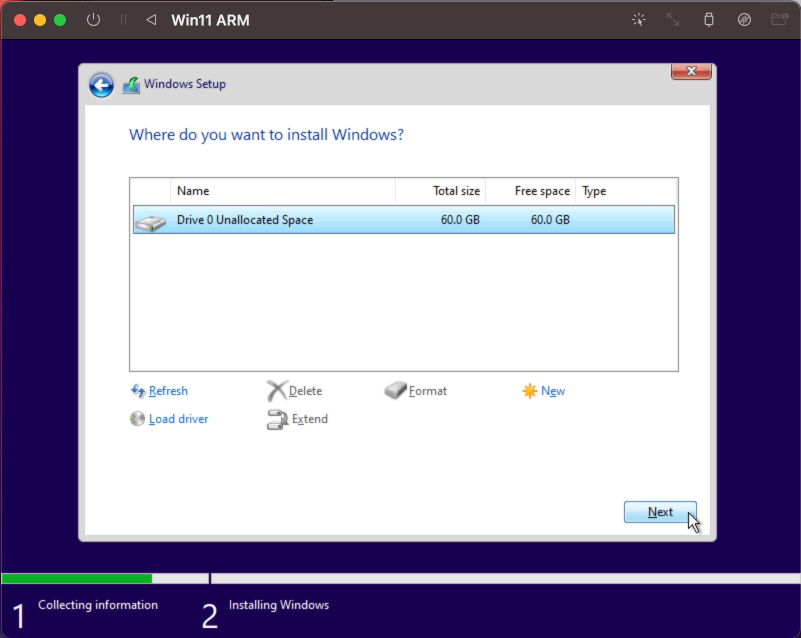
Here you can simply click next and let the installer create the necessary volumes on the virtual drive which we added in UTM. After that, Windows should copy the files to the drive and continue the installation:
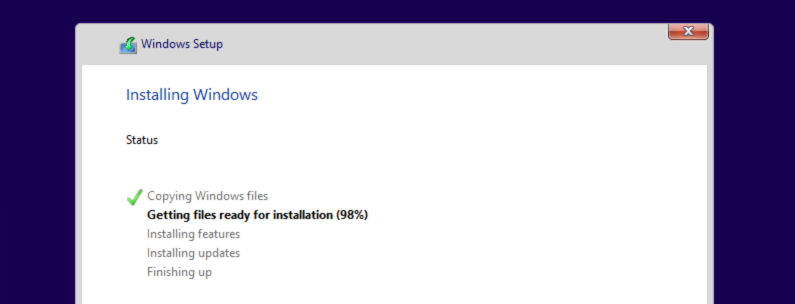
In case you run into an issues during the “Getting files read for installation” and the installer ends with an error like 0x800701B1 (Windows cannot install required files. Make sure all files required for installation are available.), Restart the VM and give it another try. This issue is the main reason for the custom QEMU-parameters for the USB-connected virtual CD/DVD drive. They seem to help but the issue still shows in some cases. Two tries at max. should do it normally.
Once this all completes, the VM will reboot and you should be greeted with the following dialog where you need to answer the questions regarding location, keyboard layout, username, password and privacy settings:
After completing the questions, the installation is getting finalized:

and you should end up with your fresh Windows 11 ARM desktop:
Step 5) Perform some post-installation tasks
In the previous steps, we managed to get a working Windows 11 installation on the M1-based device. But if you work a bit with it, you will notice that the system is not working very optimal yet. There is no network/internet connectivity and the resolution is stuck at 800×600.
Both these issues can be resolved by installing the SPICE Guest Tools and QEMU Drivers. These can be downloaded from the Support section on UTMs website:
Open your browser on macOS, navigate to https://mac.getutm.app/support/ and download the guest tools and drivers:

Then in UTM, go to your VM in the list, select it and change the ISO for the virtual CD/DVD drive to the downloaded ISO:
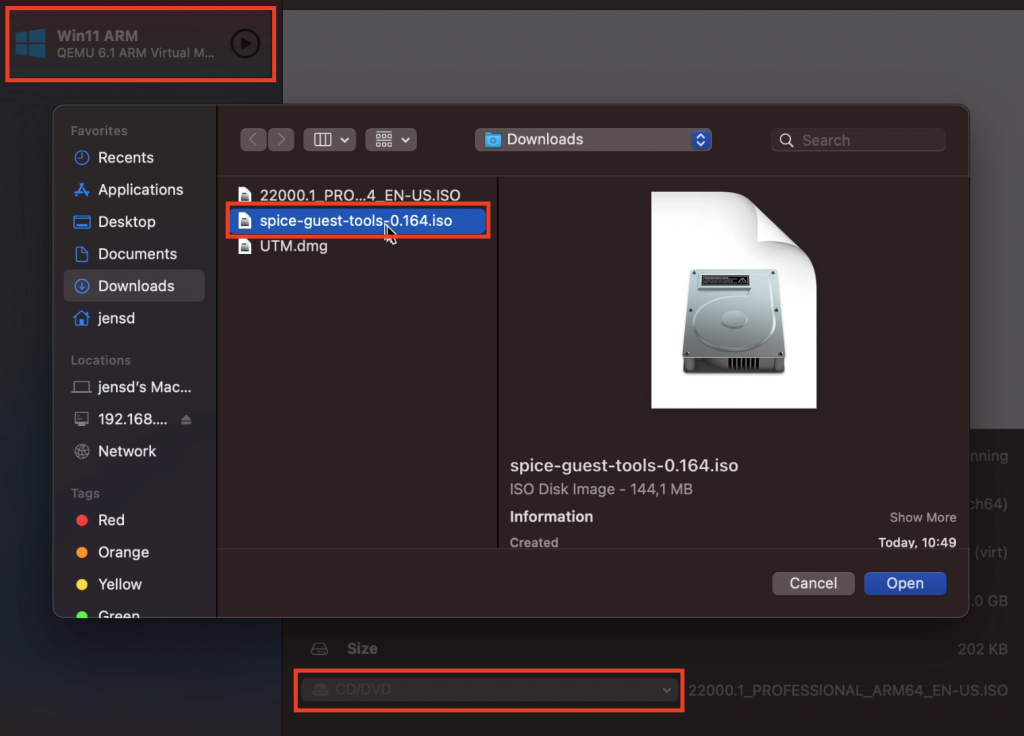
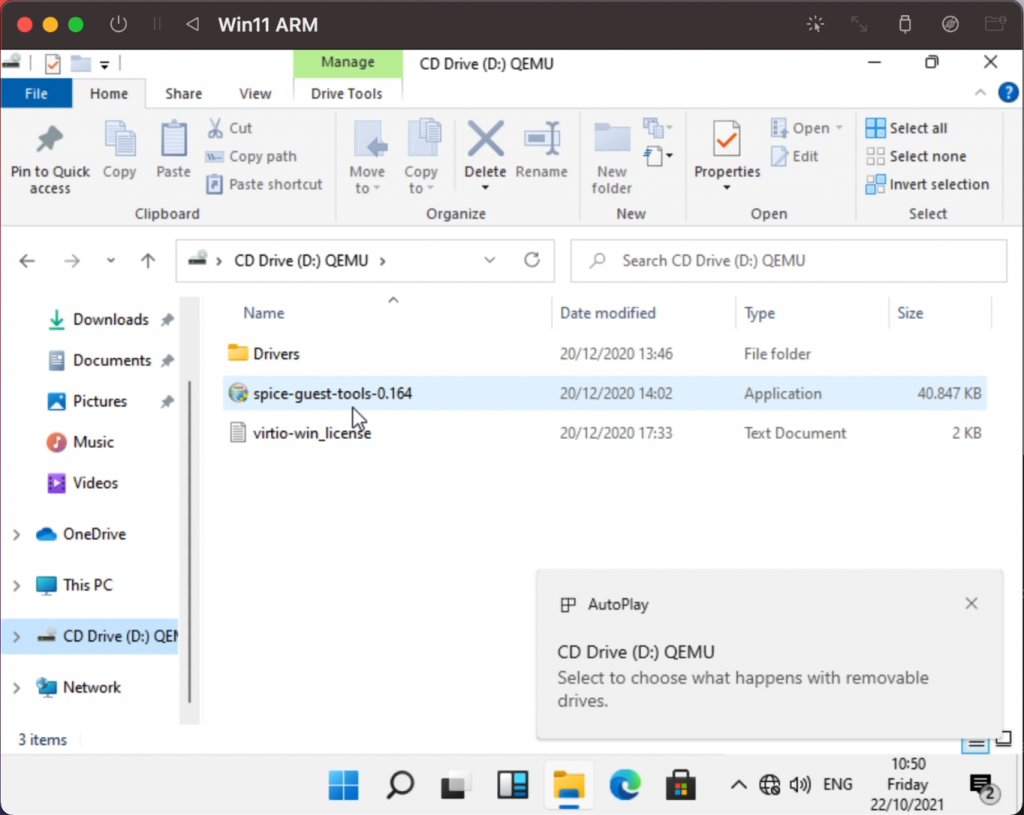
Then in your Windows 11 VM, navigate to the CD/DVD drive and run spice-guest-tools.0.164 (or the version you downloaded):
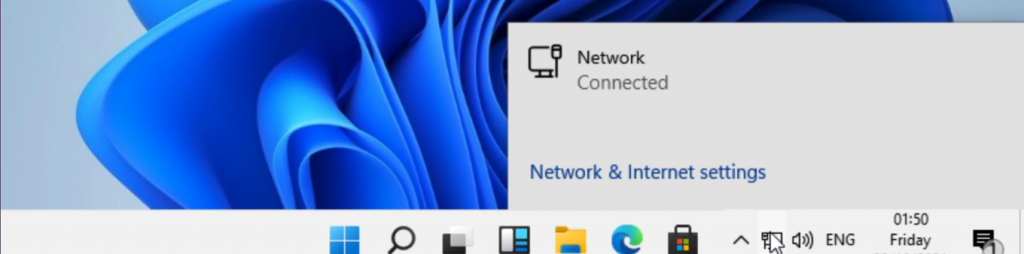
After that, you will notice that the network adapter will be available and connected:
After this step you can also change the resolution and size of the VM. To do so, right click on the desktop and choose “Display settings”. You will see that you have an additional virtual display now. Here you need to scroll down and choose to “Show only on 1”:
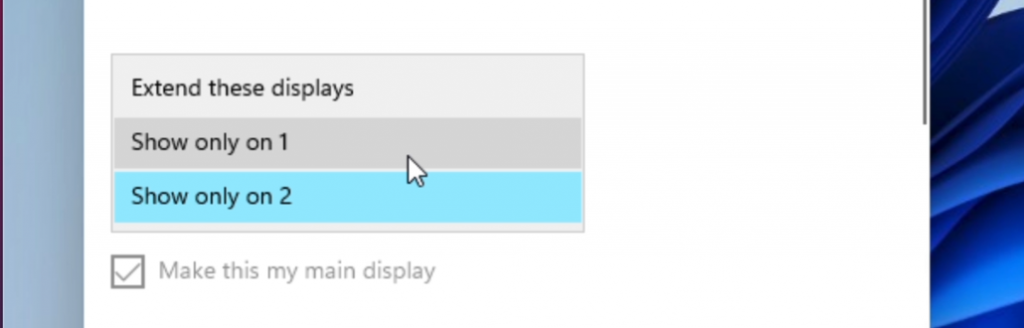
The display will flicker and you should end up with a better resolution already. When asked, choose to keep the changes. If desired, you can change the resolution to a higher value but you might notice that there can be issues with the mouse pointer being misaligned.
Best to do at this stage is a reboot. If you don’t manage with the mouse, just press Alt+F4 and reboot.
Step 6) Profit!
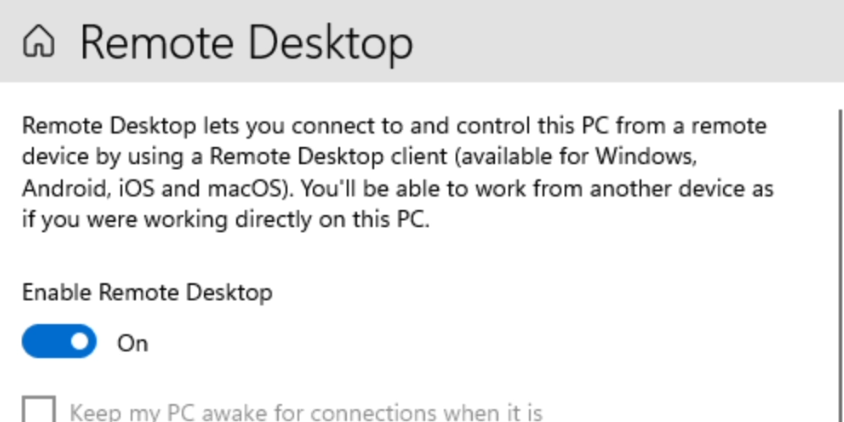
Using the VM directly might not give you the expected feeling. It feels a bit bulky/laggy although the performance really isn’t that bad. To my idea it works a lot better if you enable remote desktop and connect to it with Microsoft Remote Desktop from macOS instead.
First enable remote access on your VM:
Find the IP-address that your VM received. You can do so by opening a command prompt and run “ipconfig” or use the Settings dialogs:
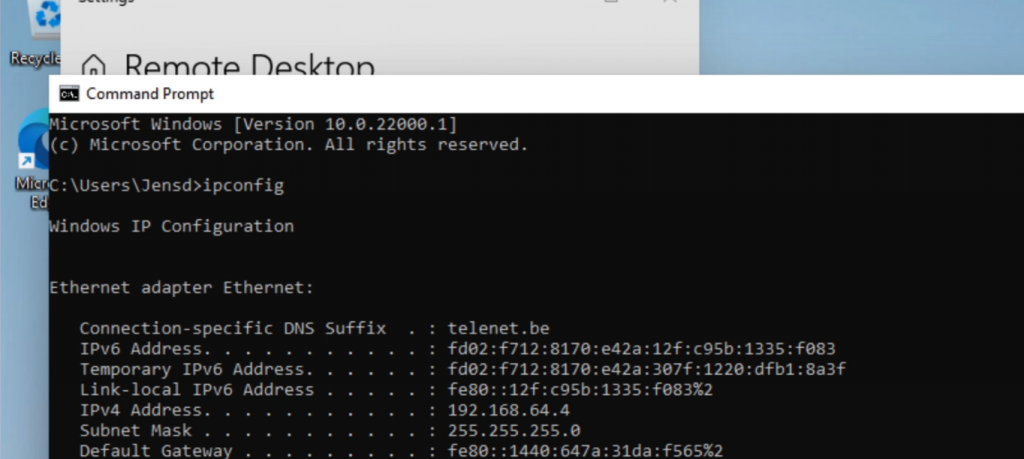
On macOS, install Microsoft Remote Desktop, you can find it in the App Store and add a PC with the IP-address which you found (192.168.64.4 in my case):

Connect to the VM’s IP address using Microsoft Remote Desktop and enter your Windows username and password. This will give you a good looking fullscreen Windows 11 experience:
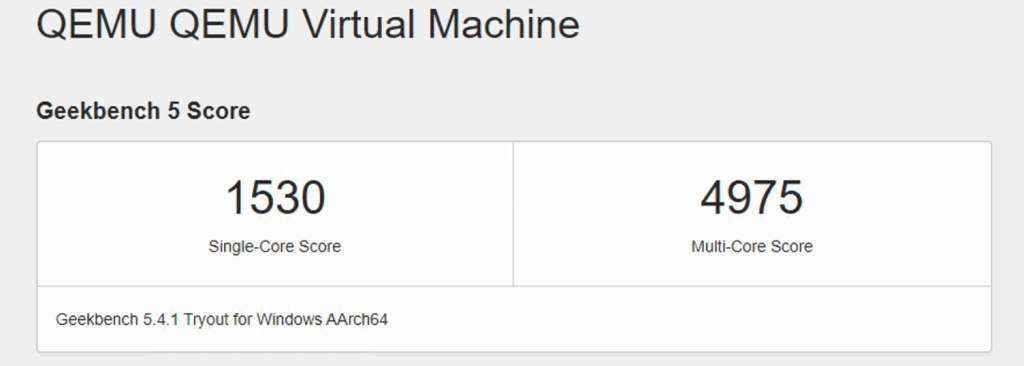
Looking briefly at the performance, with the 4 cores reserved for the VM and 6GB of RAM, the scores I managed to get from some basic benchmarks are really above expectation.
I’ll probably do another post going a bit deeper in performance but this is what I saw for Geekbench 5 for example, which is able to test on AArch64 native:
Browserbench gave a nice result as well:
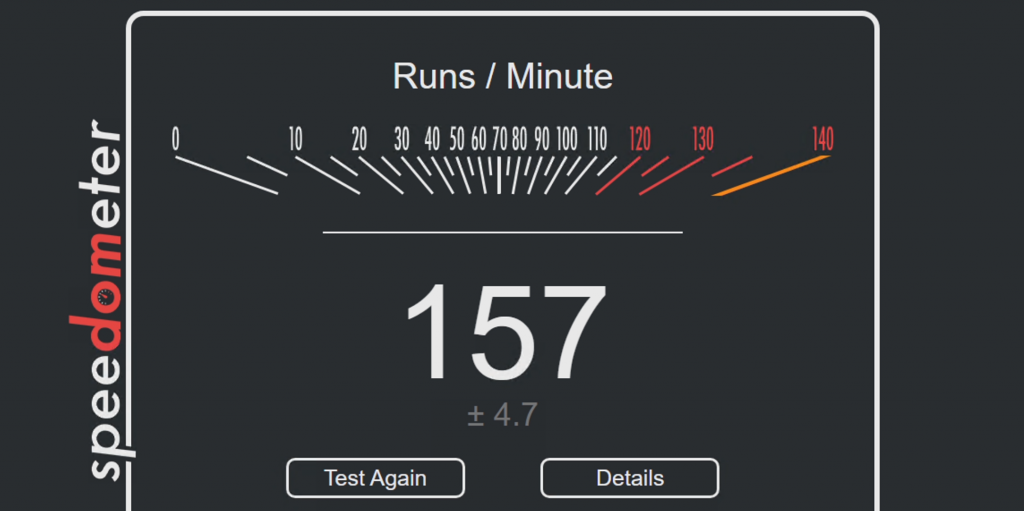
As you can see, a machine with these scores is not a punishment to work with for sure.
Although it takes quite some steps and time, this process should allow you to get a Windows 11 ARM-based VM on your M1 based device.
Windows 11 лучше всего работает на компьютере, предназначенном для Windows. Если такой параметр недоступен, ниже приведены два разных способа использования Windows с Mac.
облачные компьютеры Windows 11 и Windows 365
Вы можете безопасно передавать полный, персонализированный интерфейс Windows 11 на многие устройства, включая компьютеры Mac, созданные с процессорами серии M, на облачном компьютере с помощью нашей службы Windows 365. Windows 365 — это решение «программное обеспечение как услуга» для организаций всех размеров, предлагаемое на ежемесячной основе для каждого пользователя. Существуют различные варианты ценообразования и конфигурации облачных компьютеров в зависимости от потребностей в производительности.
Windows 365 поддерживает вложенную виртуализацию для тестирования, запуска эмуляторов, обеспечения полной совместимости приложений и многого другого. Дополнительные сведения о настройке рабочих нагрузок на основе виртуализации с помощью Windows 365.
Windows 11 и Parallels Desktop
Parallels® Desktop версии 18 — это авторизованное решение для запуска версий Windows 11 Pro и Windows 11 Корпоративная Arm® в виртуальной среде на своей платформе на компьютерах Apple M1 и M2.
Версия arm Windows 11 имеет ограничения, которые могут повлиять на возможность использования различных типов оборудования, игр и приложений, включая те, которые используют DirectX 12 или OpenGL3.3 или более поздней версии. Дополнительные сведения см. в разделе Часто задаваемые вопросы в этой статье.
Возможности, зависящие от дополнительного уровня виртуализации (вложенной виртуализации), не поддерживаются, в том числе:
-
подсистема Windows для Android, которая позволяет устройству Windows 11 запускать приложения Android, доступные в Amazon Appstore
-
подсистема Windows для Linux, которая включает среду GNU/Linux на Windows 11
-
Песочница Windows, упрощенная среда рабочего стола для безопасного запуска приложений в изоляции
-
Безопасность на основе виртуализации (VBS), которая позволяет клиентам создавать и изолировать безопасный регион памяти от обычной операционной системы.
DirectX 12, набор мультимедийных технологий, часто используемых в играх для Windows и других приложениях, не поддерживается.
32-разрядные приложения Arm, доступные в Магазине в Windows, не поддерживаются компьютерами Mac с микросхемами M1 и M2. 32-разрядные приложения Arm находятся в процессе устаревания для всех версий Windows Arm. Рекомендуется запускать 64-разрядные приложения Arm, но клиенты также могут использовать приложения в эмуляции x64 или x86 на компьютерах Mac M1 и M2.
Примечание: Вам потребуется приобрести отдельную лицензию на Windows 11 Pro, если у вас ее еще нет. Для каждого экземпляра Windows 11 Pro, который вы используете, требуется уникальная лицензия на оборудовании или на виртуальной машине. Вы можете приобрести лицензию в магазине Майкрософт или приобрести лицензию в розничной торговле. Windows 11 Pro ключи продуктов не зависят от платформы (x64 и Arm). Чтобы использовать Windows 11 Enterprise с этим решением, сначала необходимо приобрести лицензию на Windows 11 Pro, а затем перейти на Windows 11 Корпоративная с помощью соглашения о корпоративном лицензировании (за дополнительной информацией обратитесь к ИТ-администратору).
Apple, Apple M1, Apple M2 и Mac являются товарными знаками Apple Inc.
Parallels является зарегистрированной торговой маркой Parallels International GmbH.
Нужна дополнительная помощь?
Нужны дополнительные параметры?
Изучите преимущества подписки, просмотрите учебные курсы, узнайте, как защитить свое устройство и т. д.
В сообществах можно задавать вопросы и отвечать на них, отправлять отзывы и консультироваться с экспертами разных профилей.