
Microsoft has released a new version of Windows 10, dubbed version 21H1. This version brings new functionality that many organizations are eager to utilize. In many organizations, Windows-based devices are joined to Active Directory Domain Services (AD DS), so devices can be managed centrally and end-users can sign-in on any domain-joined device of their liking.
A new Windows version means that Active Directory needs to be properly prepared. In this blogpost, I’ll show you how to prepare Active Directory for Windows 10, version 21H1:
Group Policy
Windows 10, version 21H1 comes with ten new Group Policy settings. To centrally manage Group Policy, you can update the Group Policy Central Store with the new Group Policy template (*.admx) and Group Policy language (*.adml) files. This way, you can centrally manage the versioning of Group Policy templates.
Note:
If your organization doesn’t use the Group Policy Central Store feature, yet, now is a good time to implement it.
You can download the Download Administrative Templates (.admx) for Windows 10 May 2021 Update (21H1) from the Microsoft Download Center. This download includes *.adml files for the Czech, Danish, German, Greek, English, Spanish, Finnish, French, Hungarian, Italian, Japanese, Korean, Norwegian, Dutch, Polish, Portuguese, Russian, Swedish, Turkish and Chinese languages.
Copy the new PolicyDefinitions folder over the existing PolicyDefinitions folder in the Active Directory System Volume (SYSVOL) share to update the Group Policy Central Store.
When you’re a fan of Microsoft’s security baselines, you can download and implement the Security baseline (final) for Windows 10, version 21H1.
Windows Activation
Active Directory-based Activation (ADbA) is available since Windows Server 2012 as a replacement for Microsoft’s Key Management Services (KMS).
Note:
If your organization doesn’t use Active Directory-based Activation, yet, now is a good time to implement it.
You can download the product keys for your organization from the Volume Licensing Service Center (VLSC). Enter the product keys to automatically activate Windows 10 when it comes into scope of your Windows activation method.
Remote Server Administration Tools
In previous Windows 10 version, the Remote Server Administration Tools (RSAT) needed to be downloaded manually to allow admins to manage Windows Server features from these devices. However, since Windows 10, version 1809, the RSAT are included as Features on Demand in Windows 10 itself.
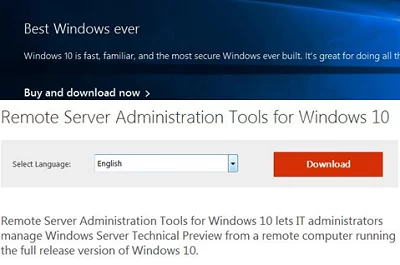
Do not download an RSAT package from this page. Instead, perform the following steps on a device running Windows 10, version 21H1:
- Press the Start button.
- Search for Manage optional features.
Click the search result with the same name - Click Add a feature.
You now see the list of available optional features. - Select and install the specific RSAT tools you need. All RSAT tools names are prefixed with RSAT: , so this makes for easy filtering.
Важно, чтобы системные администраторы знали, как включить оснастку Active Directory на ПК с Windows 10. Эта программа помогает защищать данные, управлять ими и контролировать работу объектов в их сети. Чтобы активировать оснастку, вам необходимо загрузить инструмент RSAT на свой компьютер. Вы можете установить эту программу только на компьютер с Win 10 Professional или Enterprise.
В Windows 10 не предусмотрена отдельная установка оснастки Active Directory Users and Computers (ADUC) из коробки. Однако, есть несколько способов, чтобы получить доступ к Active Directory на компьютере под управлением Windows 10:
- Установка удаленного сервера администрирования (RSAT) на компьютер под управлением Windows 10: RSAT – это набор инструментов для управления удаленными серверами, в том числе и Active Directory. RSAT можно скачать с официального сайта Microsoft по ссылке https://www.microsoft.com/en-us/download/details.aspx?id=45520. После установки RSAT на компьютере, вы можете получить доступ к Active Directory через консоль управления сервером (Server Manager).
- Использование сторонних программ для управления Active Directory: на рынке есть много сторонних программ для управления Active Directory, которые можно скачать и установить на компьютере под управлением Windows 10. Некоторые из них, например, Adaxes или ManageEngine ADManager Plus, предоставляют расширенный функционал и удобный интерфейс для управления Active Directory.
- Использование облачных сервисов Active Directory: если вы используете облачную версию Active Directory, такую как Azure Active Directory, то вы можете управлять ею через облачный портал Microsoft Azure.
Независимо от того, какой метод вы выберете, перед использованием инструментов для управления Active Directory, убедитесь, что вы имеете соответствующие права доступа и учетные данные для доступа к Active Directory.
Как включить оснастку Active Directory в Windows 10
Для включения оснастки Active Directory Users and Computers (ADUC) на компьютере под управлением Windows 10 необходимо установить набор инструментов RSAT (Remote Server Administration Tools). Для этого следуйте этим шагам:
- Перейдите на страницу загрузки RSAT на официальном сайте Microsoft: https://www.microsoft.com/en-us/download/details.aspx?id=45520.
- Выберите язык и версию Windows, установленную на вашем компьютере.
- Скачайте установочный файл RSAT для Windows 10.
- Запустите скачанный файл и следуйте инструкциям мастера установки.
- В окне “Возможности” найдите пункт “Active Directory-удаленные инструменты сервера” и выберите нужные для установки компоненты, включая “Active Directory Users and Computers”.
- Нажмите “Установить” и дождитесь окончания процесса установки.
- После установки RSAT найдите ярлык “Active Directory Users and Computers” в меню “Пуск” или в списке установленных программ на компьютере.
- Запустите ADUC и введите учетные данные для подключения к домену Active Directory.
После выполнения этих действий вы сможете использовать ADUC для управления Active Directory на компьютере под управлением Windows 10.
Что такое Active Directory в Windows 10 и для чего это нужно
Microsoft разработала новую программу, которая позволяет объединить все сетевые объекты (компьютеры, маршрутизаторы, принтеры, профили пользователей, серверы) в одну систему. Это хранилище называется Active Directory или Active Directory (сокращенно AD).

Для реализации этой программы вам понадобится специальный сервер, а точнее контроллер домена. В нем будет храниться вся информация. С его помощью выполняется аутентификация (по протоколу Kerberos) пользователей и различных устройств в сети. Контроллер домена будет отслеживать доступ к объектам в своей сети, то есть разрешать запрошенное действие или, наоборот, блокировать его.
Использование Active Directory дает несколько преимуществ. Эта программа обеспечивает безопасную работу, упрощает взаимодействие различных объектов в одной сети. С помощью AD вы можете ограничить количество функций для определенных пользователей. Данные, хранящиеся на этом сервере, защищены от внешнего доступа. Сервисы AD обеспечивают удобный обмен файлами (на основе технологии DFS), объединяют все объекты в одну систему (поддерживается стандарт LDAP). Возможна интеграция с Windows Server по протоколу RADIUS.

Active Directory можно использовать в Win10 Professional Edition. Существует специальный инструмент управления доменом (оснастка ADUC), который позволяет адаптировать AD к вашей операционной системе. Этот адаптер позволяет отслеживать сетевые объекты и управлять ими. Перед использованием ADUC рекомендуется установить службу RSAT, которая включает командную строку, Power Shell и средства удаленного администрирования сервера.
Active Directory служит каталогом, хранилищем информации о пользователях и сетевой инфраструктуре. Этот проект реализуется через контроллер домена. Этот сервер контролирует доступ (разрешает или блокирует запросы) к объектам в своей сети. AD рекомендуется для крупных компаний.
Где скачать и как установить
Во-первых, вам нужно установить RSAT на свой компьютер. По умолчанию этого инструмента нет в Win 10. RSAT можно использовать для удаленного управления сетевыми объектами с помощью диспетчера сервера. Эту услугу нельзя загрузить на ноутбук с версией Home или Standard. RSAT можно загрузить на мощные ПК с выпуском Win 10 Professional или Enterprise.
Как скачать RSAT самостоятельно:
- перейти на сайт Microsoft»;
- найдите «Средства удаленного администрирования сервера» (для конкретной редакции Win 10);
- выбрать пакет, соответствующий определенной разрядности (x64 или x86);
- нажмите Скачать;
- добавить RSAT на свой компьютер;
- во время установки активируйте установку соответствующих обновлений;
- в конце перезагрузите ПК.
После завершения загрузки RSAT рекомендуется активировать этот инструмент на своем ПК:
- вызвать Панель управления;
- найдите подпункт «Программы и возможности»;
- нажмите «Активировать или деактивировать функции Windows»;
- появится окно «Win Feature»;
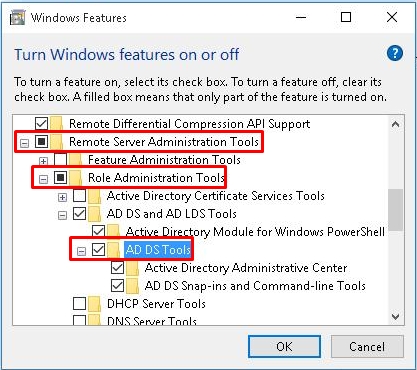
- найдите «Инструменты удаленного администрирования сервера»;
- открыть филиал;
- найдите «Инструменты администрирования ролей»;
- флажок «AD DS и AD LDS Tools» и другие строчки в этой ветке (по умолчанию должны быть активны);
- выделите «Инструменты AD DS» и нажмите «ОК».
Установку ADUC можно выполнить из «Командной строки» с помощью следующих команд:
- “Dism / online / enable-feature / featurename: RSAT Client-Roles-AD»;
- “Dism / online / enable-feature / featurename: RSAT Client-Roles-AD-DS»;
- Dism / online / enable-feature / featurename: RSAT Client-Roles-AD-DS-SnapIns».
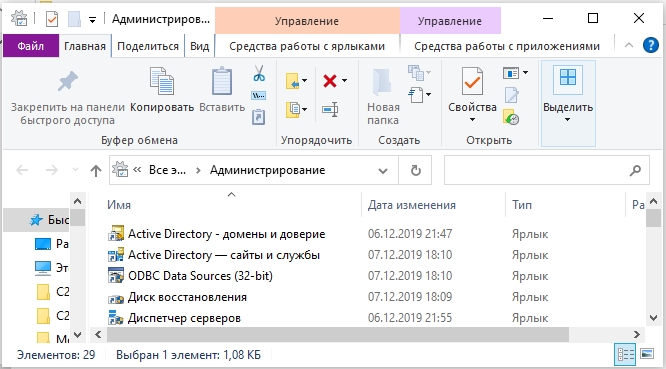
После скачивания инструментов необходимо открыть Панель управления и перейти в подпункт «Администрирование». Должна появиться новая опция под названием «Пользователи и компьютеры Active Directory». После появления этого инструмента разрешено подключение к контроллеру. Пользователь сможет выполнить это действие самостоятельно.
Подключение консоли ADUC к домену из рабочей группы
Как подключиться к контроллеру с ПК:
- вызвать командную строку;
- запустите команду для запуска оснастки от имени другого пользователя;
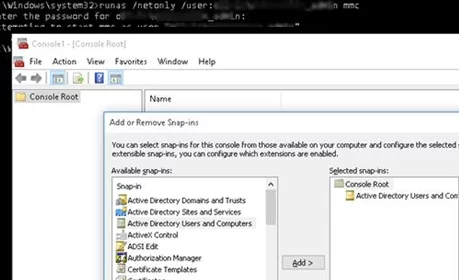
- введите: “runas / netonly / user: winitpro \ aaivanov mmc»;
- появится окно «MMC»;
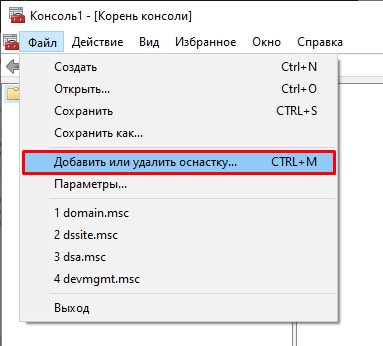
- открыть в окне «Файл»;
- выберите «Добавить / удалить оснастку»;
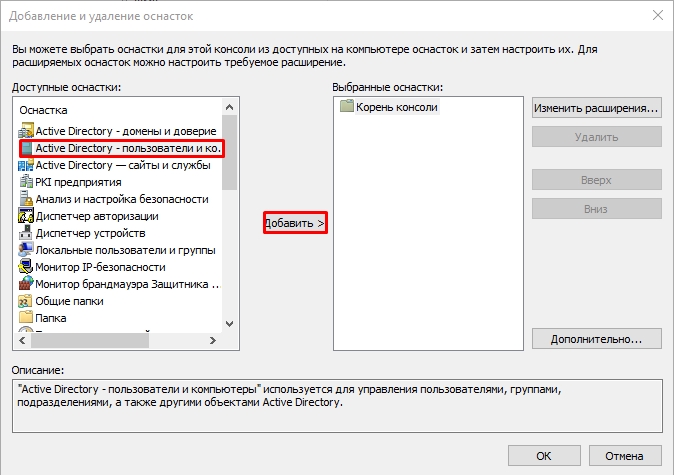
- откроется окно «Добавить или удалить оснастку»;
- в левом списке «Ловушка» этого окна найдите «Пользователи и компьютеры Active Directory»;
- переместите найденный инструмент в правый список «Корень консоли»;
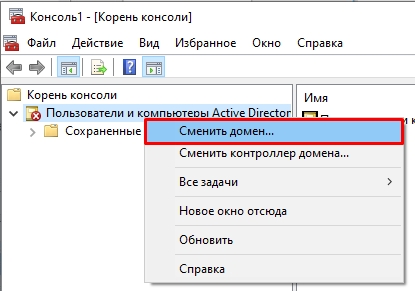
- после переноса нажмите «Active Directory – пользователи и компьютеры»;
- появится выпадающее меню;
- выберите «Сменить домен»;
- укажите ваше доменное имя;
- подключите ADUC к контроллеру домена.
Основные понятия, встречающиеся в ходе работы
В процессе активации инструментов встречаются следующие термины:
- леса: члены структуры AD, которые содержат домены;
- DNS – доменное имя разрешенное в AD;
- сервер: компьютер (который выполняет определенные функции в домене);
- Контроллер домена – контроллер домена (сервер, внутри которого находится Хранилище данных – каталог, в который поступают запросы пользователей);
- домен – это элемент AD, который включает сетевые объекты (ПК, принтеры, профили пользователей.
Возможные проблемы
В процессе активации AD и RSAT может возникнуть ряд трудностей, например, возможность запускать программы от имени другого пользователя заранее не активируется. Также следует помнить, что средство удаленного управления не может быть установлено на ПК с домашней или стандартной версией Win 10. Средство RSAT можно добавить только в деловую или профессиональную операционную систему.
Этот инструмент можно найти на веб-сайте Microsoft. Разработчики предлагают программы для конкретной версии Win 10. Если тип ревизии не указан, вам необходимо использовать RTM (полную версию ОС Windows) для загрузки RSAT.
Чтобы скачать надстройки для работы на удаленном сервере, вам не нужно искать специальное программное обеспечение. Это действие можно выполнить с помощью мастера добавления компонентов. Рекомендуется заранее добавить резервный контроллер домена, чтобы избежать возможных сбоев в работе.
Основные принципы работы
Инструмент Active Directory – это главный узел инфраструктуры, который управляет и контролирует доступ к объектам в сети. В случае отказа AD все устройства и серверы будут недоступны. Вы можете защитить свою систему от этой проблемы, используя один или несколько дублирующих контроллеров домена.
Принципы Active Directory:
- работает бесперебойно и круглосуточно;
- вся информация хранится в каталогах на контроллере домена и в их дубликатах;
- позволяет сделать резервную копию для восстановления производительности сервера;
- обеспечивает взаимодействие объектов в сети;
- контролирует доступ к объектам (защищает информацию).
Источник изображения: it-tehnik.ru
Всем привет! Сегодня мы поговорим с вами об оснастке и консоли управления доменами Active Directory – пользователи и компьютеры (ADUC). Данную оснастку используют для управления доменом Active Directory. Сама оснастка по умолчанию не установлена в системе Windows, но её можно инсталлировать несколькими способами. В статье я расскажу где скачать и как установить оснастку Active Directory для Windows 10, 11 и 8.1. Также я очень коротко расскажу, как работать с ней и как подключить компьютер к домену Active Directory из-под рабочей группы.
Содержание
- Установка в Windows
- Способ 1: Через параметры системы
- Способ 2: PowerShell
- Способ 3: Для Windows 10 1803/1709 (Более старых сборок) и Для Windows 8.1
- Как её пользоваться?
- Подключение к домену из рабочей группы
- Видео
- Задать вопрос автору статьи

Итак, в первую очередь нам нужно установить центр администрирования Active Directory. По умолчанию в Windows 10 и Windows 11 они не установлены в системе и являются дополнительными компонентами ОС. Есть несколько способов выполнить установку. Можете выбрать любой из представленных.
Способ 1: Через параметры системы
Вы можете скачать Active Directory для Windows 10 (сборка 1809 старше) и Windows 11 через меню системы.
ВНИМАНИЕ! Если у вас Windows 10 со сборкой до 1809 – смотрите 4 способ.
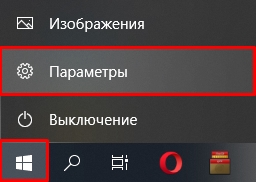
- Откройте меню «Пуск» и нажмите по шестеренке, чтобы открыть основные параметры ОС.
- Переходим в раздел «Приложения» (Apps).

- Вас сразу же перебросит во вкладку «Приложения и возможности». Далее в левом блоке найдите ссылку «Дополнительные компоненты» (Optional Features).
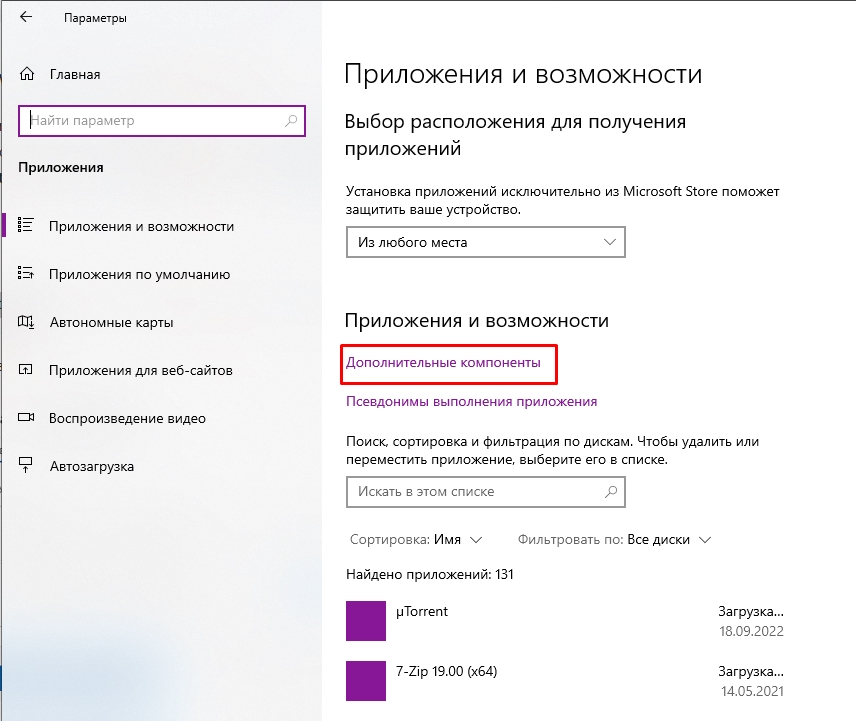
- Жмем по кнопке с плюсиком «Добавить компонент» (Add an optional feature (View features)).

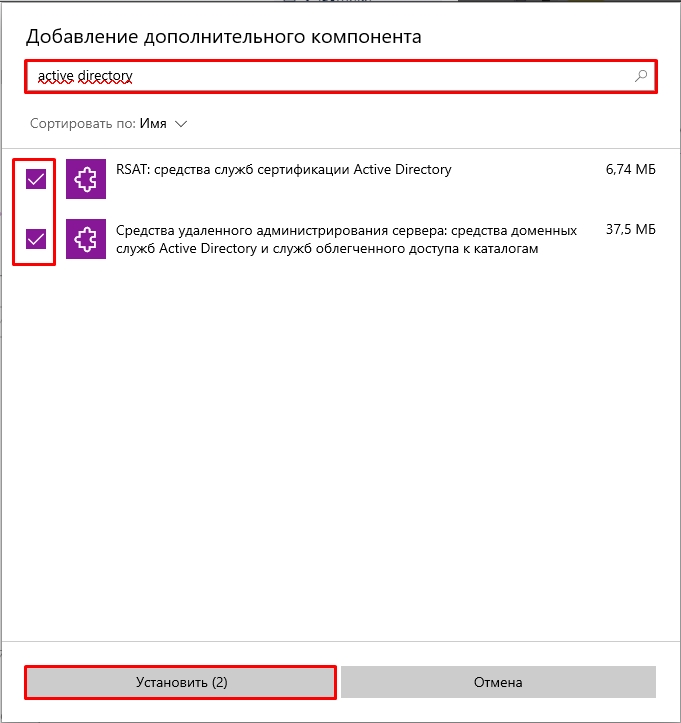
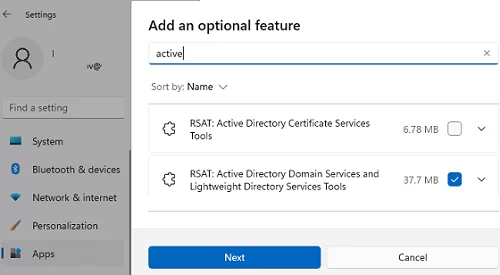
- Дабы не искать их вручную вводим в поисковую строку запрос:
Active Directory
- Вы увидите два компонента. Первый – это RSAT или средства службы сертификации. Второй – инструменты для работы с удаленными администрированием и дополнительные службы. Устанавливаем обе галочки и жмем по кнопке «Установить».
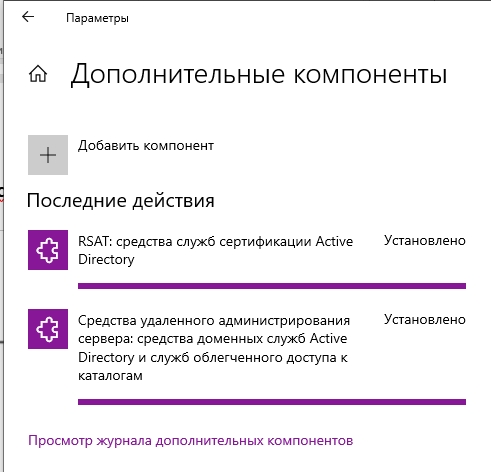
- Они будут скачены с интернета с серверов Microsoft, поэтому в данный момент нужно быть подключенным к глобальной сети. Подождите пока оба компонента установятся.
Способ 2: PowerShell
Запустите дополнительную консоль, нажав правой кнопкой мыши по меню «Пуск» и выбрав из контекстного меню нужную команду. Запускаем PowerShell с правами администратора.
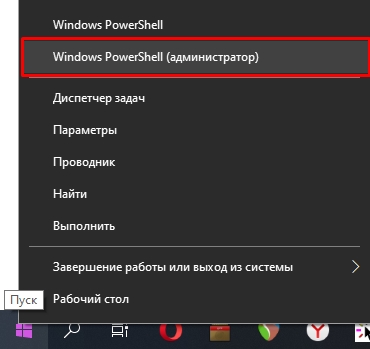
Используем команду:
Add-WindowsCapability –online –Name Rsat.ActiveDirectory.DS-LDS.Tools~~~~0.0.1.0

Способ 3: Для Windows 10 1803/1709 (Более старых сборок) и Для Windows 8.1
Если у вас более старая версия Windows 10 или установлена Windows 8.1 – вам нужно скачать пакеты по ссылкам ниже. Скачиваем компоненты для своей разрядности (32 или 64 бита).
- Windows 10.
- Windows 8.1.
После этого просто устанавливаем пакет, дважды щелкнув левой кнопкой мыши. После установки компоненты нужно будет активировать.
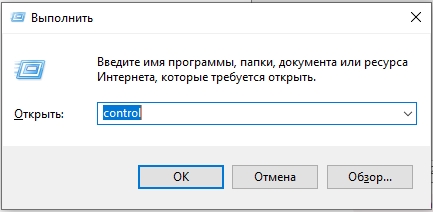
- Используем клавиши, нажав одновременно:
+ R
- Вводим команду, чтобы зайти в «Панель управления»:
control
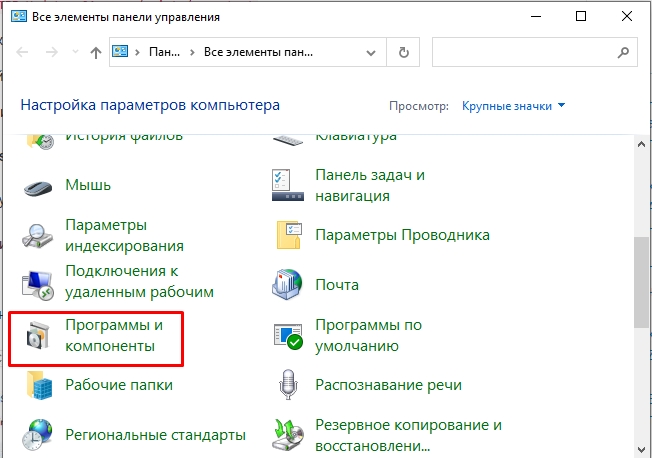
- «Программы и компоненты».
- «Включение и отключение компонентов Windows».
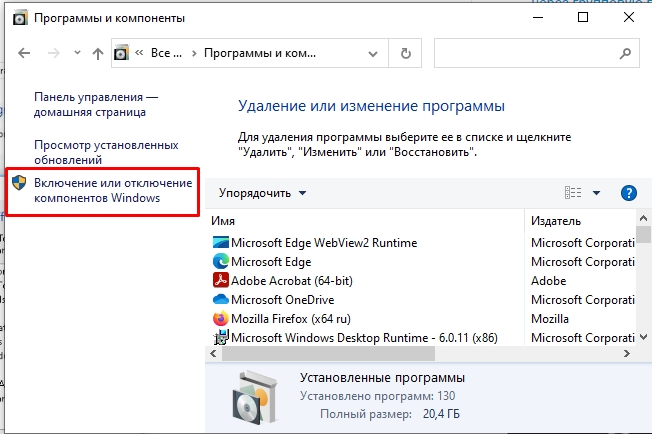
- Откройте основную папку «Remote Server Administration Tools», в ней раскрываем ветку «Role Administration Tools» и находим «AD DS and AD LDS Tools» – «AD LDS Tools» – ставим обе галочки и жмем «ОК».
Дополнительно нужно установить оснастку ADUC через командную строку – запускаем её с правами администратора. Используем команды:
dism /online /enable-feature /featurename:RSATClient-Roles-AD
dism /online /enable-feature /featurename:RSATClient-Roles-AD-DS
dism /online /enable-feature /featurename:RSATClient-Roles-AD-DS-SnapIns
В разделе администрирования в панели управления (control) можно будет увидеть две ссылки на консоли.
Как её пользоваться?
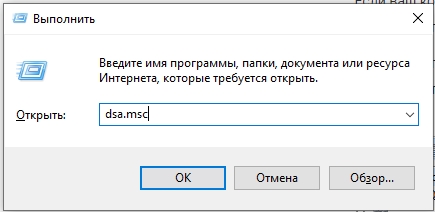
Чтобы запустить саму оснастку консоли, можно использовать команду:
dsa.msc
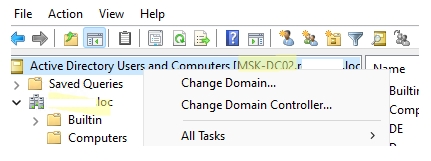
Второй вариант – это зайти в «Панель управления» – «Администрирования» – далее находим консоль там. Если ваш компьютер уже находится в домене Active Directory, то он автоматически подключится к серверу, который в свою очередь и будет являться контроллером домена. Имя сервера находится в самом верху в квадратных скобках. Если вы хотите изменить домен, кликните по нему правой кнопкой мыши и выберите соответствующую команду.
В качестве корня является сам домен организации. В каждом домене можно создать основные группы или подгруппы какой-то компании. Например, можно создать основную группу, которая будет филиалом в городе. Вы можете создавать новые объекты. Каждый объект может быть как целой группой, так и пользователем с определенными контактами.
Каждый объект можно создавать, перемещать и изменять его характеристики или свойства. Например, конечного пользователя можно добавить в определенную группу, выключить его аккаунт или сбросить пароль. После сброса пароля ему на рабочем месте придется придумывать новый ключ, который он будет использовать при аутентификации в системе (при входе на начальном экране).
Можно зайти в свойства пользователя и изменить некоторые атрибуты. Даже есть возможность добавить фото юзера. Я советую внимательно ознакомиться со всеми вкладками и возможностями.
Представим себе ситуацию, что ваш компьютер находится в рабочей группе, которая никаким образом не связана и не подключена к основному серверу управления домена ADUC.
- Запускаем стандартную командную строку винды с правами админа.
- Используем команду для запуска оснастки другого пользователя:
runas /netonly /user:wifigid\aaivanov mmc
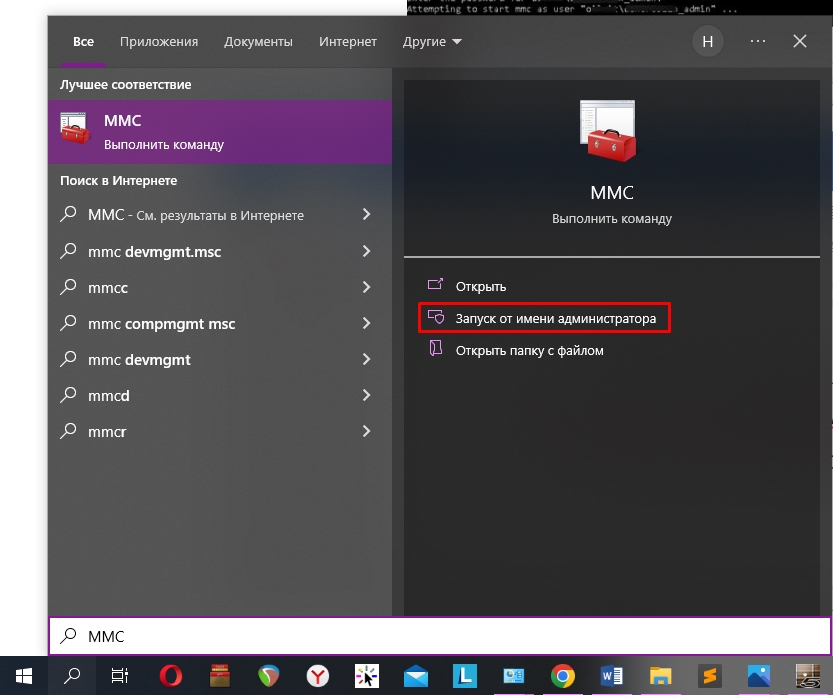
- Теперь открываем MMC консоль – проще всего воспользоваться поиском системы.
- На панели жмем «Файл» – «Добавить или удалить оснастку». Или используем клавиши:
Ctrl + M
- В левом блоке выбираем «Active Directory – пользователи и компьютеры» и кликаем по кнопке добавления. После этого жмем «ОК».
- Кликаем правой кнопкой по созданному пункту, выбираем «Сменить домен». Далее останется ввести наименование домена и компьютер к нему подключится.
Видео
Any Windows Server administrator must have used the Active Directory Users and Computers (ADUC) Microsoft Management Console on a Domain Controller (DC). Using this console, you can control and manage users, user groups, computers, and the Organizational Units (OUs) in the domain.
The ADUC console is no longer limited to servers anymore. You can install the Active Directory Users and Computers snap-in on a Windows 11 or Windows 10 computer as well, which performs the same functions as the original Server console. This snap-in is part of the Remote Server Administration Tools (RSAT) for Windows operating systems.
We have written separate posts for installing any RSAT tools on Windows 11 and Windows 10. This article focuses on installing specifically the Active Directory Users and computers snap-in on a Windows PC and then using it to manage your domain.
Table of contents
- How to Install Active Directory Users and Computers (ADUC) on Windows
- Install Active Directory Users and Computers from Settings App
- Install Active Directory Users and Computers from Command Prompt
- Install Active Directory Users and Computers from PowerShell
- How to Use Active Directory Users and Computers
- How to Open Active Directory Users and Computers Snap-In
- Connect ADUC to Domain Controller
- Manage Users, Computers, Organizational Unit using ADUC
- What is Active Directory Users and Computers Used For
How to Install Active Directory Users and Computers (ADUC) on Windows
All RSAT tools, including the Active Directory Users and Computers snap-in, allow you to manage the different Active Directory components as if you are on the server itself. This way, you do not always have to access the server, neither physically nor remotely, to perform an action.
You can download and install the Active Directory Users and Computers snap-in using the Settings app, from the Command Prompt, and Windows PowerShell.
Note: On Windows 10 v1803 and older, you must download and install all RSAT tools using the MSI files. You can find the MSI files for your version of Windows here.
Install Active Directory Users and Computers from Settings App
The easiest way to install the ADUC snap-in on a Windows PC is from the settings app. It does involve more steps than the other methods shared below, but this is the only method using the Windows GUI.
Use these steps to install the ADUC snap-in from the Settings app:
-
Navigate to the following:
Settings app >> Apps >> Optional Features
-
Click “View features.”
 Snap-In On Windows 11/10 1")
Add an optional feature -
Search for “Active Directory,” select “RSAT: Active Directory Domain Services and Lightweight Directory Services Tools,” and click Next.
Select Active Directory Users and Computers -
Click “Install.”
Install Active Directory Users and Computers from the Settings app -
Once installed, restart the computer.
 Snap-In On Windows 11/10 1")
 Snap-In On Windows 11/10 2")
 Snap-In On Windows 11/10 3")
The Active Directory Users and Computers snap-in will now be installed. If you prefer installing it using the command line, refer to the sections below. To learn how to use the snap-in, continue reading down.
Install Active Directory Users and Computers from Command Prompt
Below are the simple steps to install Active Directory Users and Computers snap-in using the Command Prompt:
-
Open an elevated Command Prompt instance.
-
Run the following command:
DISM /Online /Add-Capability /CapabilityName:Rsat.ActiveDirectory.DS-LDS.Tools~~~~0.0.1.0 Snap-In On Windows 11/10 4")
Install Active Directory Users and Computers snap-in using Command Prompt
 Snap-In On Windows 11/10 4")
The ADUC snap-in should now be installed. Run the following command in Command Prompt to confirm that the Active Directory Users and Computers snap-in has been installed:
DISM.exe /Online /Get-CapabilityInfo /CapabilityName:Rsat.ActiveDirectory.DS-LDS.Tools~~~~0.0.1.0 Snap-In On Windows 11/10 5")
You should see “Installed” in front of Status.
Install Active Directory Users and Computers from PowerShell
Use the following steps to install the Active Directory Users and Computer snap-in using PowerShell:
-
Launch an elevated PowerShell instance.
-
Run the following command to install ADUC:
Add-WindowsCapability -Online -Name Rsat.ActiveDirectory.DS-LDS.Tools~~~~0.0.1.0Install Active Directory Users and Computers snap-in using PowerShell
 Snap-In On Windows 11/10 6")
The ADUC snap-in should now be installed. To confirm its status, run the following command in PowerShell:
Get-WindowsCapability -Online | Where-Object {$_.Name -like "RSAT.ActiveDirectory*"} Snap-In On Windows 11/10 7")
You should see “Installed” in front of State.
These are all the methods to install the Active Directory Users and Computers snap-in on a Windows 11/10 PC. Let us now continue to see how to use this tool.
How to Use Active Directory Users and Computers
How to Open Active Directory Users and Computers Snap-In
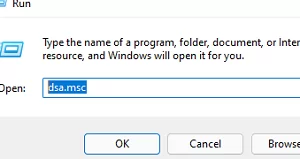
Now that Active Directory Users and Computers is installed, you can open it by searching for it in the Start menu, or running the following in the Run Command box:
dsa.msc Snap-In On Windows 11/10 8")
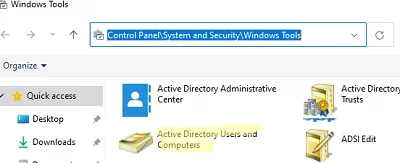
Alternatively, you can also open the ADUC snap-in through the Control Panel at the following location:
Control Panel >> System and Security >> Windows Tools
 Snap-In On Windows 11/10 9")
If your computer is connected to a domain and you are logged in from an authorized domain account, then the ADUC snap-in will automatically connect to the server. However, if one is not connected, then you must connect to the Domain Controller.
Connect ADUC to Domain Controller
Use these steps to connect to a Domain Controller. You can also use these to change your domain/Domain Controller.
-
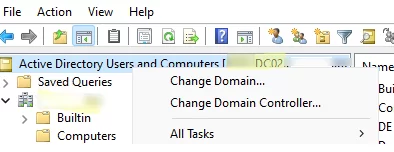
From the ADUC console, click “Action,” and then click “Change Domain Controller.”
Change or connect to Domain Controller The Change Directory Server window will now open.
-
Select the “This Domain Controller or AD LDS instance” radio button, then select the Domain Controller from the give list and click Ok.
Select and connect to Domain Controller
 Snap-In On Windows 11/10 10")
 Snap-In On Windows 11/10 11")
The ADUC will now connect to the Domain Controller and populate the fields.
 Snap-In On Windows 11/10 12")
Now that you are connected to the Domain Controller, you can now begin making changes and managing the different components of the domain.
Manage Users, Computers, Organizational Unit using ADUC
 Snap-In On Windows 11/10 13")
You can now begin adding new users, computers, printers, and Organizational Units to the domain. Simply right-click on the OU that you want to add the new device/user to, expand “New”, and select the element that you want to add.
Once you have selected the element to add, the respective window will open, where you can then configure the component to add.
You can now also use other operators to manage the users, devices, and other elements configured inside the domain directly from your Windows PC.
Additionally, you can also manage what you see inside the snap-in. Click “View” from the top menu and select the things that you want to see. You can then also click “Filter options” to open the advanced viewing options.
 Snap-In On Windows 11/10 14")
The list does not end here. There are a bunch of other management options you can perform directly from the ADUC snap-in on a Windows PC. We suggest that you play around to discover all the options. However, we advise caution and only use the console if you know what you are doing.
What is Active Directory Users and Computers Used For
By now, we have a pretty good understanding of what the ADUC snap-in can be used for. However, there is more to it than meets the eye. The Active Directory Users and Computers RSAT tool can be used to perform the following actions:
- Create and manage user accounts, computers, and Active Directory groups.
- View and edit AD object attributes with ADSI Edit.
- Search for AD objects.
- Change or reset user password in Active Directory.
- Create organizational units and build hierarchical structures for AD objects. You can also delegate administrative permission on these OUs to other domain users.
- Delegate administrative permissions.
- Raise domain functional level, and transfer FSMO roles with PowerShell to another domain controller.
From this, it is understood how useful the ADUC snap-in is for administrators that use Windows client PCs.
Active Directory Users and Computers (ADUC or DSA.msc) is one of the most commonly used tools for managing objects in an Active Directory domain. You can install ADUC on both Windows Server hosts and Windows 10 and 11 computers. The ADUC MMC snap-in is a part of the Microsoft Remote Server Administration Tools (RSAT). In this article, we’ll show how to install and use the Active Directory Users and Computers console on Windows.
Contents:
- How to Install Active Directory and Computers on Windows 10 and 11?
- How to Use Active Directory Users and Computers Console?
- ADUC: Connecting Domain from a Workgroup Computer?
How to Install Active Directory and Computers on Windows 10 and 11?
In modern builds of Windows 10 (1809+) and Windows 11, RSAT is installed online as Features on Demand. To install the Active Directory RSAT on Windows 10/11, go to Settings -> Apps -> Optional Features -> Add an optional feature (View features).
Type ‘Active Directory’ in the search bar and select RSAT: Active Directory Domain Services and Lightweight Directory Services Tool.
Click Next-> Install to start the installation.
Then Windows connects to Microsoft servers, downloads and installs the Active Directory Remote Server Administration Tools (including Active Directory graphical consoles, command prompt tools, and Active Directory PowerShell module).
Or, you can install AD administration tools using PowerShell:
Add-WindowsCapability –online –Name Rsat.ActiveDirectory.DS-LDS.Tools~~~~0.0.1.0
On a disconnected network, you can install Active Directory tools from Windows 10 Features on Demand ISO image (the FoD image is available in your personal section of the Microsoft Licensing Center).
To install the Active Directory tools from a network share containing the contents of the FoD image, run:
Add-WindowsCapability -Online -Name Rsat.ActiveDirectory.DS-LDS.Tools~~~~0.0.1.0 -LimitAccess -Source \\mun-fs1\Images\Windows10-FOD\
In previous Windows 10 builds, as well as in Windows 8.1, you can install RSAT using an MSU update. You can download RSAT here:
- RSAT for Windows 10 1803/1709 — https://www.microsoft.com/en-us/download/details.aspx?id=45520
- RSAT for Windows 8.1 — https://www.microsoft.com/en-us/download/details.aspx?id=39296
Download the RSAT version that matches the bitness of your operating system. Double-click the file to start installation:
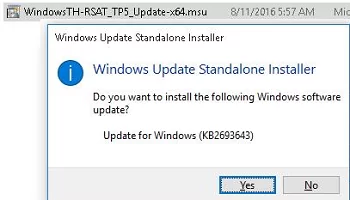
Or install the MSU file from in the command prompt in the quiet mode:
wusa.exe C:\Install\WindowsTH-RSAT_TP5_Update-x64.msu /quiet /norestart
After the RSAT installation is complete, restart your computer.
Then you just have to activate the necessary options. To do it:
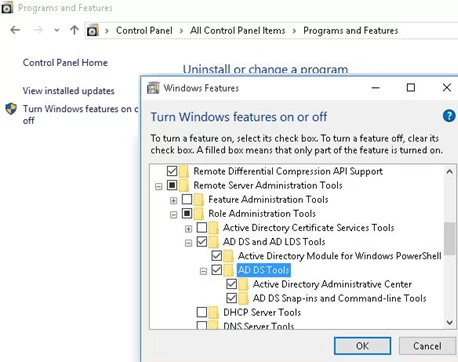
- Right-click Start and select Control Panel;
- Click Programs and Features;
- Click Turn Windows features on or off on the left pane.
- Expand Remote Server Administration Tools-> Role Administration Tools -> AD DS and AD LDS Tools in the features tree;
- Check AD DS Tools and click OK.

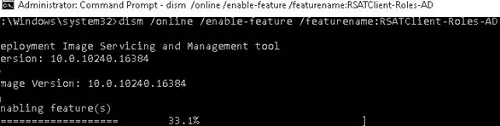
You can install ADUC from the command prompt as well. Run the commands below one by one:
dism /online /enable-feature /featurename:RSATClient-Roles-AD
 dism /online /enable-feature /featurename:RSATClient-Roles-AD-DS
 dism /online /enable-feature /featurename:RSATClient-Roles-AD-DS-SnapIns
After the administrative tools have been installed, you will see a link to Active Directory Users and Computers snap-in in the Administrative Tools section of the Control Panel.
How to Use Active Directory Users and Computers Console?
To open the ADUC console, click the icon in the Control Panel or run this command:
dsa.msc
All authenticated domain users can use ADUC to view Active Directory objects.
If your computer is joined to an Active Directory domain, then the ADUC connects to a domain controller depending on the current Logon server ($env:LOGONSERVER). The name of the domain controller you are connected to is at the top of the console.
You can connect to another AD domain controller or another domain by clicking the console root and selecting the Change option you want in the context menu.
The Active Directory console shows a tree-like Organizational Unit (OU) structure of your domain (and a separate section containing AD Saved Queries).
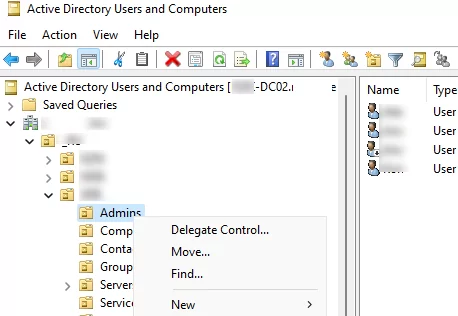
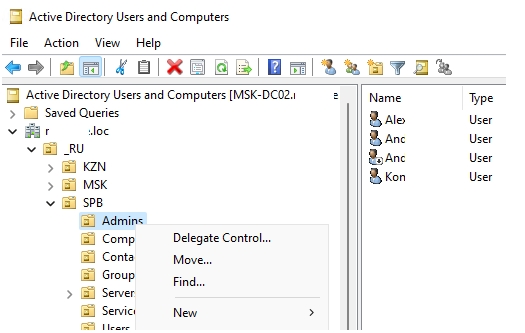
A domain administrator may create containers (OUs) based on a physical or logical organization structure. Using a context menu, you can create new AD objects (users, groups, computers, OUs, contacts), rename, move, or delete objects. Depending on the selected object type, context menu options may vary.
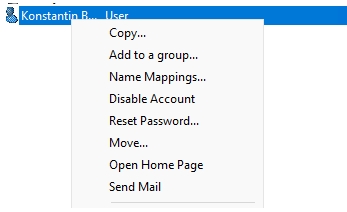
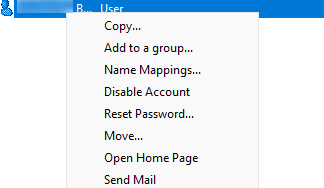
For example, a user has options to reset the AD password or enable/disable the account.
You can use the Search context menu to search for objects in AD.
An administrator can delegate permissions to create/edit/delete objects in Active Directory to other users or groups.
Using the View -> Add/Remove columns menu, you can add object attributes you want to see in the ADUC console.
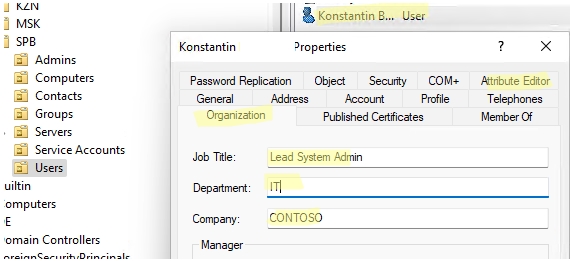
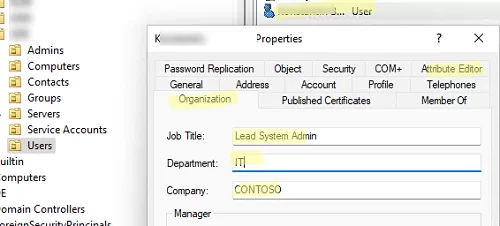
In ADUC, you can view or change domain object properties. For example, you can open user properties and edit its settings. Some user properties are located in the corresponding tabs, and the full list of user attributes is available in the AD Attribute Editor tab.
You can add a separate tab with an AD user photo.
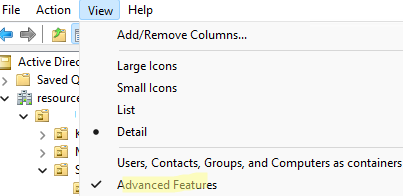
To show system containers and object properties in the Active Directory snap-in (they are hidden by default), check View -> Advanced Features.
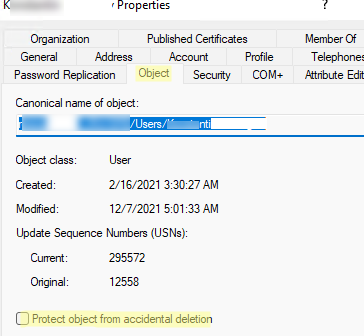
Then all AD objects get a number of system tabs. For example, you can get a canonical object name, view an account creation date, or check Protect object from accidental deletion in the Object tab.
ADUC: Connecting Domain from a Workgroup Computer?
If you want to connect to a domain controller from a computer outside your domain (a workgroup computer) using ADUC, follow the instructions below:
- Open the command prompt and run the mmc console as a different user:
runas /netonly /user:woshub\jsmith mmc - In the empty MMC console, select File->Add/Remove Snap-In;
- Move the Active Directory Users and Computers snap-in to the right panel and click Add;
- To connect to a domain, click the console root and select Change domain. Enter the domain name.
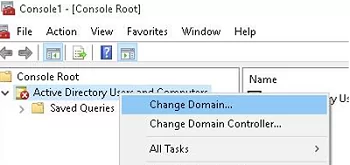
Then the ADUC console connects to the domain controller, gets, and displays the container (OU) structure of the Active Directory domain.