Время на прочтение
5 мин
Количество просмотров 155K
В данной статье я хочу рассмотреть вопросы, которые могут возникнуть у человека, приступившего к изучению ассемблера, связанные с установкой различных трансляторов и трансляцией программ под Windows и Linux, а также указать ссылки на ресурсы и книги, посвященные изучению данной темы.
MASM
Используется для создания драйверов под Windows.
По ссылке переходим на сайт и скачиваем пакет (masm32v11r.zip). После инсталляции программы на диске создается папка с нашим пакетом C:\masm32. Создадим программу prog11.asm, которая ничего не делает.
.586P
.model flat, stdcall
_data segment
_data ends
_text segment
start:
ret
_text ends
end start
Произведём ассемблирование (трансляцию) файла prog11.asm, используя ассемблер с сайта masm32.
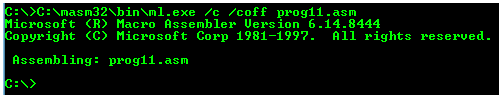
Ключ /coff используется здесь для трансляции 32-битных программ.
Линковка производится командой link /subsystem:windows prog11.obj (link /subsystem:console prog11.obj)
Как сказано в Википедии
MASM — один из немногих инструментов разработки Microsoft, для которых не было отдельных 16- и 32-битных версий.
Также ассемблер версии 6. можно взять на сайте Кипа Ирвина kipirvine.com/asm, автора книги «Язык ассемблера для процессоров Intel».
Кстати, вот ссылка на личный сайт Владислава Пирогова, автора книги “Ассемблер для Windows”.
MASM с сайта Microsoft
Далее скачаем MASM (версия 8.0) с сайта Microsoft по ссылке. Загруженный файл носит название «MASMsetup.exe». При запуске этого файла получаем сообщение -«Microsoft Visual C++ Express Edition 2005 required».
Открываем этот файл архиватором (например 7zip). Внутри видим файл setup.exe, извлекаем его, открываем архиватором. Внутри видим два файла vc_masm.msi,vc_masm1.cab. Извлекаем файл vc_masm1.cab, открываем архиватором. Внутри видим файл FL_ml_exe_____X86.3643236F_FC70_11D3_A536_0090278A1BB8. Переименовываем его в файл fl_ml.exe, далее, произведём ассемблирование файла prog11.asm, используя ассемблер fl_ml.exe.

MASM в Visual Studio
Также MASM можно найти в папке с Visual Studio (у меня VS 10) вот здесь: C:\Program Files\Microsoft Visual Studio 10.0\VC\bin\ml.exe.

Для того, чтобы запустить на 32- или 64-разрядной системе и создавать программы, работающие как под 32-, так и под 64-разрядной Windows, подходит MASM32 (ml.exe, fl_ml.exe). Для того, чтобы работать на 32- и 64-разрядных системах и создавать программы, работающие под 64-разрядной Windows, но неработающие под 32-разрядной нужен ассемблер ml64.exe. Лежит в папке C:\Program Files\Microsoft Visual Studio 10.0\VC\bin\amd64 и вот здесь — C:\Program Files\Microsoft Visual Studio 10.0\VC\bin\x86_amd64.
TASM
Программный пакет компании Borland, предназначенный для разработки программ на языке ассемблера для архитектуры x86. В настоящее время Borland прекратила распространение своего ассемблера.
Скачать можно, например, здесь. Инсталлятора нет, просто извлекаем программу. Вот исходник из книги Питера Абеля (рис. 3.2) «Язык Ассемблера для IBM PC и программирования».
stacksg segment para stack 'stack'
    db 12 dup ('stackseg')
stacksg ends
codesg segment para 'code'
begin proc far
 assume ss:stacksg,cs:codesg,ds:nothing
 push ds
 sub ax,ax
 push ax
 mov ax, 0123h
 add ax, 0025h
 mov bx,ax
 add bx,ax
 mov cx,bx
 sub cx,ax
 sub ax,ax
 nop
 ret
begin endp
codesg ends
 end begin
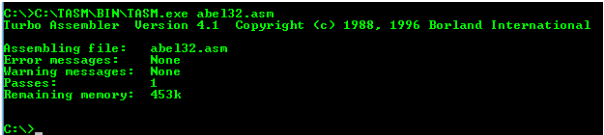
Выполним ассемблирование (трансляцию) файла abel32.asm.
Корректность работы программы можно проверить, произведя линковку (tlink.exe) объектного файла и запустив полученный файл в отладчике.
Как было сказано выше, MASM можно использовать для работы с 16-битными программами. Выполним ассемблирование (трансляцию) программы abel32.asm с помощью ассемблера MASM:

Ключ /coff здесь не используется.
Линковка производится файлом link16.exe
Вот здесь приводится порядок действий, которые необходимо выполнить для запуска TASM в DOSbox. Для линковки понадобится файл DPMI16BI.OVL
FASM
В статье Криса Касперски «Сравнение ассемблерных трансляторов» написано, что «FASM — неординарный и весьма самобытный, но увы, игрушечный ассемблер. Пригоден для мелких задач типа „hello, world“, вирусов, демок и прочих произведений хакерского творчества.»
Скачаем FASM с официального сайта. Инсталлятора нет, просто извлекаем программу. Откроем fasm editor — C:\fasm\fasmw.exe. В папке C:\fasm\EXAMPLES\HELLO есть файл HELLO.asm.
include 'win32ax.inc'
.code
  start:
 invoke    MessageBox,HWND_DESKTOP,"Hi! I'm the example program!",invoke GetCommandLine,MB_OK
    invoke    ExitProcess,0
.end start
Откроем файл HELLO.asm из fasmw.exe. Изменим строку include ‘win32ax.inc’ на строку include ‘c:\fasm\INCLUDE\WIN32AX.INC’. Запускаем из меню Run → Run.

Вот ссылки на ресурсы, посвященные FASM:
→ FASM на Cyberforum’е
→ FASM на asmworld .com программы под Dos
→ Цикл статей «Ассемблер под Windows для чайников»
→ Сайт на narod’е
FASM в Linux
Для того, использовать FASM в Linux (у меня Ubuntu), скачаем соответствующий дистрибутив (fasm-1.71.60.tgz), распакуем его, в папке у нас будет бинарный файл fasm, копируем этот файл в /usr/local/bin для того, чтобы можно было запускать его из консоли, как любую другую команду.Выполним ассемблирование программы hello.asm из папки fasm/examples/elfexe/hello.asm.

Корректность работы программы можно проверить в отладчике.
Nasm
Nasm успешно конкурирует со стандартным в Linux- и многих других UNIX-системах ассемблером Gas.
Nasm в Linux можно установить с помощью менеджера пакетов или из командной строки: в дистрибутиве Debian (Ubuntu) командой apt-get install nasm, в дистрибутивах Fedora, CentOS, RedHat командой yum install nasm.
Создадим программу, которая 5 раз выводит сообщение “Hello”. Пример взят из книги Андрея Викторовича Столярова “Программирование на языке ассемблера NASM для ОС UNIX”. Учебник, а также библиотека “stud_io.inc” есть на личном сайте автора.
%include "stud_io.inc"
global _start
section .text
_start: mov eax, 0
again:  PRINT "Hello"
PUTCHAR 10
inc eax
cmp eax, 5
jl again
FINISH
Выполним ассемблирование и линковку и запустим файл hello.asm.
$ nasm -f elf hello.asm
$ ld hello.o -o hello
$ ./hello
Для 64bit необходимо использовать команду nasm -f elf64 hello.asm
NASM для Windows
NASM для Windows можно установить, скачав соответствующий дистрибутив с соответствующего сайта.
Ассемблирование:
nasm -f bin имя_файла.asm -o имя_файла.com
Ссылки на ресурсы, посвященные Nasm:
→ Сайт А.В. Столярова
→ Сайт, на котором лежит электронный учебник (в архиве)
→ То же самое
AS
Стандартный ассемблер практически во всех разновидностях UNIX, в том числе Linux и BSD. Свободная версия этого ассемблера называется GAS (GNU assembler). Позволяет транслировать программы с помощью компилятора GCC.
Из учебников удалось найти только книгу на английском «Programming from the ground up». На русском удалось найти только одну главу из книги С. Зубкова «Assembler для DOS, Windows и UNIX».
Возьмем пример программы, которая ничего не делает, с сайта. Создадим программу gas.s
.section .text
   .globl _start
   _start:
      movl  $1, %eax
      movl  $2, %ebx
      int   $0x80
Выполним ассемблирование (трансляцию), линковку и запуск программы:
$ as -o gas.o gas.s
$ ld -o gas gas.o
$ ./gas
Если в данной программе изменить _start на main, то можно выполнить ассемблирование (трансляцию) и линковку компилятором gcc.
.section .text
   .globl main
   main:
      movl  $1, %eax
      movl  $2, %ebx
      int   $0x80
Выполним ассемблирование (трансляцию), линковку и запуск программы:
$ gcc gas.s -o gas
$ ./gas
Выводы: если вы изучаете программирование под Windows, то вы можете остановить свой выбор на Masm; Tasm больше не поддерживается, но для обучения по старым классическим учебникам подойдёт.
Под Linux Gas подойдет тем, кто использует GCC, а тем, кому не нравится синтаксис Gas, подойдёт Nasm.
P.S. Про обработку строк в ассемблере на примере создания транслятора простого «эзотерического» языка можно прочитать здесь.
P.P.S. Упрощенный ограниченный набор ассемблерных инструкций используется в учебной модели компьютера Little Man Computer, которому у меня также посвящено несколько статей ссылка.
In this guide you will learn how to install MASM32 on a Windows 10 machine, and also how to modify the Path environment variable to use the MASM tools directly from the command prompt. By the end of the guide you will have an environment to start writing software in assembly.
Let’s begin.
Download MASM for Windows 10
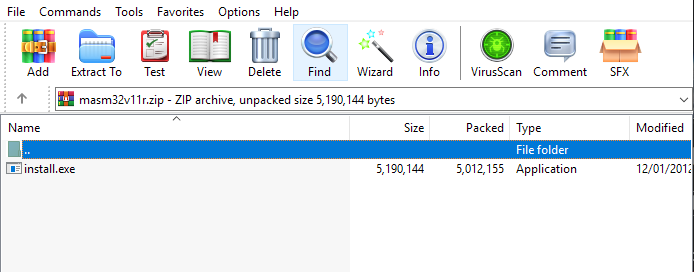
The first thing you need to do is head over to the MASM32 SDK download page. Select a mirror and your download should begin.
Next open up the archive and extract the installer to your desktop.
Installing MASM on Windows 10
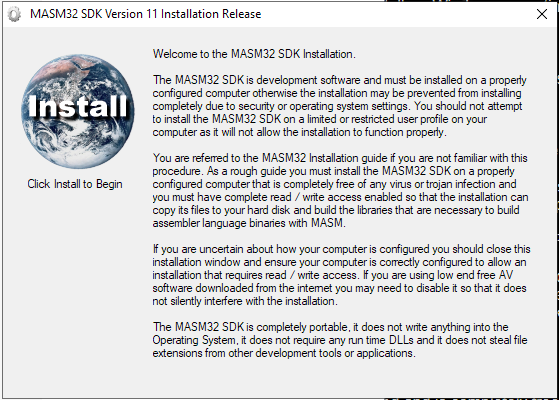
Double click on the installer. It will ask for administrator privileges. This application is deemed to be safe so you can safely press yes. After you have granted permissions you will see a dialog similar to the one below:
Click on the install icon on the top left and select the drive you want to use to install MASM. I will select my D:\ partition. MASM will install all the necessary files to the root directory of whatever partition you select.
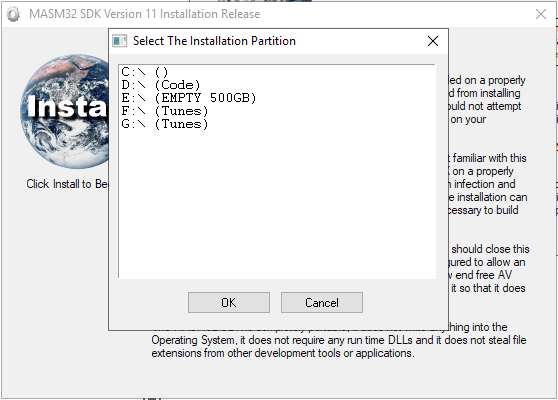
Tip: I like to create a separate partition for my assembly projects and install MASM to the root directory of the partition. This makes it much easier to include libraries and includes such as windows.inc and friends.
MASM will proceed to run a bunch of tests to see if you’re computer is compatible and able to run MASM32. You will see a number of dialog boxes appear that require you to press the ok button.

Once the tests are complete press the extract button.
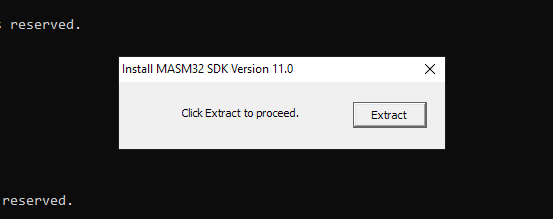
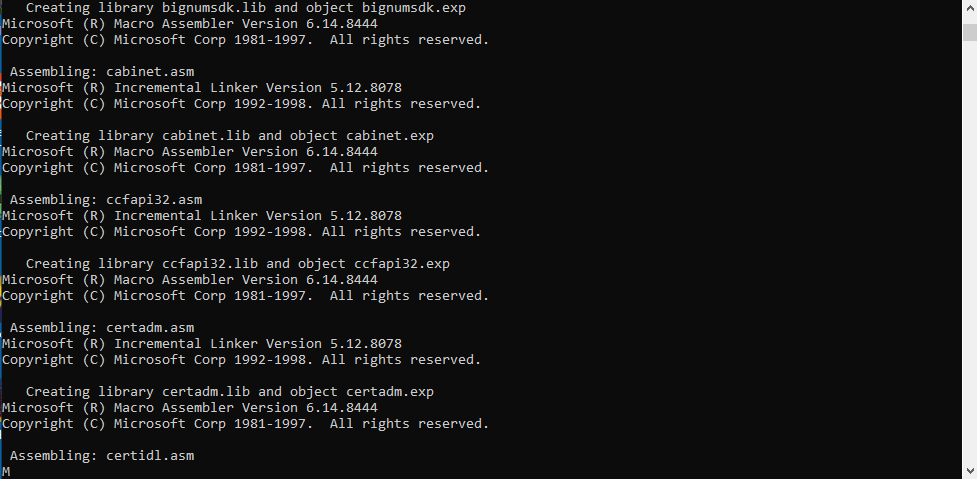
After the extraction has completed you will see another dialog box that informs you a command prompt will appear to complete the installation. Press ok and let the installation finish. It should only take a few moments.
After the installation has finished you will once again see a couple of dialog boxes that require you to press ok. You will also see a different type of dialog box similar to the one below. This runs a VB script to add an icon to your desktop for the MASM editor. If you want an icon on your desktop press yes.
![]()
Finally if everything went well you will see the final dialog box telling you the installation is complete.
Don’t run off just yet
I don’t use the default MASM editor. Instead I use Vim, or Sublime. This means I need to call the MASM compiler and linker directly from the command line to build my code. To do this you need to add the location of the MASM32 installation directory to your Path environment variable.
Adding a directory to environment variable Path on Windows 10
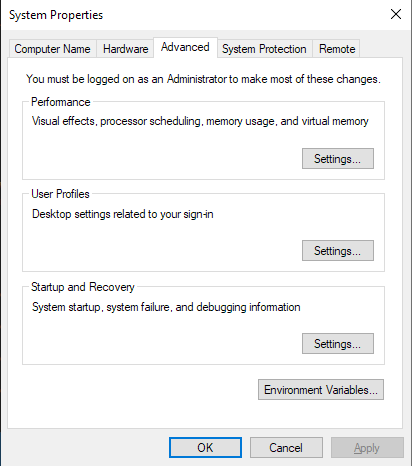
Open up the system properties dialog by entering the following command on the command prompt:
sysdm.cpl SystemProperties
Click the advanced tab, and click the Environment Variables button.
Next select the Path item from the list and click Edit.
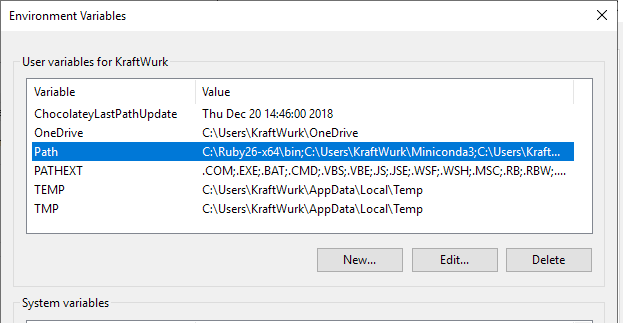
On the next dialog press New and enter the path to the MASM bin directory. This contains the tools needed to compile and link assembly. For me the path is D:\masm32\bin. In most cases just change the drive letter if you installed to a different partition. The rest of the path is the same.

Press the ok button, and then then the apply button to save and close the system properties dialog.
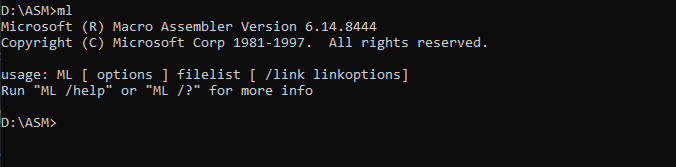
Open a new command prompt and enter the following command to run the MASM assembler:
ml
If everything installed correctly and your Path is setup correctly you will see some output similar to the image below:
💡 Assembly Language Weekly Newsletter
Every week I publish a newsletter that contains tutorials, tips, tricks and resources related to assembly language. If you would like to receive this newsletter subscribe here: http://eepurl.com/ghximb
All Done!
And that’s all there is to it folks. If you want to hit the ground running check out my guide on how to compile and link MASM assembly to produce an executable on Windows 10.
If you’re having any issues following this guide please leave a comment and I will help you the best I can. You can also check out the official documentation includes detailed installation instructions and FAQ’s to solve common problems.
Welcome to this tutorial on how to install MASM in Windows! MASM is an assembler developed and maintained by Microsoft, and is a powerful tool for writing low-level code. However, installing MASM on newer versions of Windows can be tricky. In this post, I’ll show you how to install MASM on Windows 10, 8.1, 8, and 7 in just a few easy steps.
MASM is an assembler developed and maintained by Microsoft. MASM (8086) won’t run on Windows 7 or newer versions easily whereas it runs well on Windows XP. That is why in this post I am going to show you how to install MASM in Windows.
This tutorial is valid for Windows 10, 8.1, 8, 7.
So, Let’s begin.
Here are 5 steps to Install MASM in Windows.
1. Setup DOSBox on your OS
First, you have to download DOS Box for your PC
- Visit this link (click here)
- Click on Download
- Wait 5-second download will start automatically
 1")
After that install DOSBox if you have any doubts about how to install DOSBox, Here is a Guide on how to install DOSBox on Windows.
2. Download 8086.rar
Visit this link (click here)
Click on Download
3. Setup 8086.rar
Open the zip file that you downloaded in step 2.
Copy the 8086 folders in drive C:
4. Create an Assembly file (.asm)
Open your favorite code editor,
Enter the following code
; Hello World program by 360 Tech Explorer’s

DATAS  SEGMENT
     STRING  DB  'Hello World!',13,10,'$'

DATAS  ENDS

CODES  SEGMENT
     ASSUME    CS:CODES,DS:DATAS

START:
     MOV  AX,DATAS
     MOV  DS,AX

     LEA  DX,STRING

     MOV  AH,9
     INT  21H

     MOV  AH,4CH
     INT  21H
CODES  ENDS
END   START
Save this file with the “.asm” file extension.
5. Run the Assembly file (.asm) in Windows
- Open DOSBox by clicking on it.
- Enter the following command in DOSBox
Z:> mount c c:\8086This command will mount the 8086 directory as a C drive for DOSBox
- Then, execute the following command to navigate into drive C
Z:> c:If you want to write a new assembly file, execute the following command
C:> edit file_name.asmIf you already have the Assembly file, follow the following steps
- Copy your Assembly file to the “C:/8086” folder (remember the name)
- Then execute the following to run that file
C:> masm your_file_here.asm
C:> link your_file_here.obj
C:> your_file_here.exe
That’s it! You should now be able to run your assembly files using MASM on your Windows PC. I hope this tutorial was helpful in getting you up and running with MASM. If you have any questions or comments, feel free to leave them below. Happy coding!
NASM (Netwide Assembler) is a popular assembler used for writing low-level code in the Assembly language. Installing NASM on Windows 10 is relatively straightforward, but there are a few different methods to do so. In this article, we will discuss the following methods to install NASM on Windows 10:
Method 1: Installing NASM using Chocolatey Package Manager
-
Open PowerShell as Administrator.
-
Install Chocolatey by running the following command:
Set-ExecutionPolicy Bypass -Scope Process -Force; iex ((New-Object System.Net.WebClient).DownloadString('https://chocolatey.org/install.ps1')) -
Once Chocolatey is installed, run the following command to install NASM:
-
Verify that NASM is installed by running the following command:
This should display the version of NASM that is installed.
-
To uninstall NASM, run the following command:
This will remove NASM from your system.
That’s it! You have successfully installed NASM using Chocolatey Package Manager on Windows 10.
Method 2: Installing NASM manually from the official website
Here are the steps to install NASM manually on Windows 10 from the official website:
- Download NASM installer from the official website: https://www.nasm.us/pub/nasm/releasebuilds/2.15.05/win64/nasm-2.15.05-installer-x64.exe
- Run the installer and follow the on-screen instructions to install NASM.
- After installation, add the NASM installation directory to your system’s PATH environment variable:
- Open the Start menu and search for «Environment Variables».
- Click on «Edit the system environment variables».
- Click on the «Environment Variables» button.
- Under «System Variables», find the «Path» variable and click «Edit».
- Add the path to the NASM installation directory (e.g. «C:\Program Files\NASM») at the end of the «Variable value» field, separated by a semicolon (;).
- Click «OK» to close all the windows.
Now you can use NASM in your command prompt or terminal. Here are some example commands:
-
To assemble a file named «hello.asm» and create an object file «hello.obj»:
nasm -fwin64 hello.asm -o hello.obj -
To link the object file «hello.obj» and create an executable file «hello.exe»:
gcc hello.obj -o hello.exe -
To run the executable file «hello.exe»:
That’s it! You have successfully installed NASM manually on Windows 10 and can start using it for your assembly programming needs.
Method 3: Installing NASM using Windows Subsystem for Linux (WSL)
To install NASM on Windows 10 using WSL, follow these steps:
Step 1: Install WSL
If you haven’t already, install the Windows Subsystem for Linux (WSL) by following the instructions on Microsoft’s website.
Step 2: Install Ubuntu
Once WSL is installed, install Ubuntu by opening the Microsoft Store app and searching for «Ubuntu». Click «Get» to install it.
Step 3: Open Ubuntu
Open the Ubuntu app from your Start menu or by typing «ubuntu» in the search bar.
Step 4: Update Ubuntu
Type the following command in the Ubuntu terminal to update Ubuntu:
Step 5: Install NASM
Type the following command in the Ubuntu terminal to install NASM:
sudo apt-get install nasmStep 6: Verify NASM installation
Type the following command in the Ubuntu terminal to verify that NASM is installed:
This should output the version of NASM that is installed on your system.
Congratulations! You have successfully installed NASM on Windows 10 using WSL.
The Netwide Assembler is an assembler and disassembler for the Intel x86 architecture. It can be used to write 16-bit, 32-bit and 64-bit programs. NASM is considered to be one of the most popular assemblers for Linux.
NASM stands for the net assembler. if you want to type edit and execute an assembly language program you need to install NASM on Windows 10 using DosBox. in this tutorial you will be guided about how to install NASM on Windows 10 using dosbox. you will also be guided to type an assembly language program and how to to assemble it and then execute the Assembly language program in AFD.
NASM can be used to write 16 bit, 32-bit and 64-bit programs. NASM is one of the most popular assemblers for Linux.
NASM Installation on Windows 10 using DOSBOX
Here are steps to Install NASM on Windows
- Click to download NASM and DOSBOX
- Install DOXSBOX
- Extract NASM in a Folder
- Run DoxBox
- Mount NASM folder to a Drive using “ mount [driveletter] [NASM Path]
For example we have extracted NASM on F:\Assebmly then here is command to mount it to X Drive
---> mount X f:\assembly
Type x:
x:\>
First Program to Add two Numbers in Assembly Language
Type following first program of Assembly Language in any Editor. Like Notepad
;assembly language program to add two numbers
org 0x100
mov ax,5
mov bx,10
add ax,bx
mov ax, 0x4c00
int 0x21
- Save it with name “newf1.asm” in the same folder you have installed NASM
- Open DosBox and Assemble it using NASM (like compile in C++)
x:\>NASM newf1.asm -o nf1.com
x:\>AFD nf1.com
- Program will be loaded in Debugger. USE F2 to run the program and to see the values of registers.
NASM Installation Windows 10 | Run Assembly Program | ADD two numbers | How to Install NASM