1. What is Oracle Home User account?
Oracle Home User account is a low privileged non-administrator account, which is to host Oracle Services. Oracle services use Oracle Home User privileges.
2. What is the purpose of introducing Oracle Home User account?
In prior releases, all Oracle Services are running with Local System privileges, which is a very high-privileged built-in account.
Therefore anyone gaining unauthorized access to the server via the Oracle Service did so with complete privileges.
To avoid this security vulnerability, a low privileged non-administrator account, Oracle Home User is introduced to host Oracle Services.
3. Who can be Oracle Home User?
Any local or domain user without admin privileges, a built-in account, or an a MSA account can be Oracle Home User.
If DBA prefers built-in account as Oracle Home User, then all Oracle services will be running with Local System Privileges.
4. What are Windows Built-in user accounts?
Local System account is a very high-privileged built-in account.
It has extensive privileges on the local system and acts as the computer on the network.
The actual name of the account is “NT AUTHORITY\SYSTEM”.
Local Service account is a built-in account that has the same level of access to resources and objects as members of the Users group.
This limited access helps safeguard the system if individual services or processes are compromised.
Services that run as the Local Service account access network resources as a null session without credentials.
Be aware that the Local Service account is not supported for SQL Server or SQL Server Agent services.
The actual name of the account is “NT AUTHORITY\LOCAL SERVICE”.
Network Service account is a built-in account that has more access to resources and objects than members of the Users group.
Services that run as the Network Service account access network resources by using the credentials of the computer account.
The actual name of the account is “NT AUTHORITY\NETWORK SERVICE”.
5. How Oracle Home User can be associated to Oracle Home?
During installation OUI provides three options to associate an Oracle Home User to the Oracle Home:
1. Let OUI create a new user account to be made as Oracle Home User.
Selecting this option the newly created user will not have login privileges to the server.
This can only be used for Single Instance databases.
2. Select an existing local or domain account to be the Oracle Home User.
If the existing account has login privileges, then Oracle Home User will have login privileges to the server.
This should be a non adminstrator user.
3. Select a built-in account to be the Oracle Home User.
In this option Local System/Local Service built-in account will become Oracle Home user.
6. How to create Oracle Home User in silent installation?
Following are the parameters for creating Oracle Home User in silent installation.
12c introduces these new variable names:
oracle.install.IsBuiltInAccount= false | true
oracle.install.OracleHomeUserName=
oracle.install.OracleHomeUserPassword=
Eg:
oracle.install.IsBuiltInAccount= false
oracle.install.OracleHomeUserName= <homeuser>
oracle.install.OracleHomeUserPassword=<password> ( ** Note: password can be passed in the shell using -promptForPassword flag )
Note:
Set oracle.install.IsBuiltInAccount to true if you want to use Built-In Account, if not set it false.
Invoke setup.exe with “-promptForPassword flag”, if you do not want to embed the password in the response file.
Example of invoking OUI in 12c for Silent Installation Without Response File:
setup.exe -silent -debug -promptForPassword ^
oracle.install.option=INSTALL_DB_SWONLY ^
ORACLE_HOSTNAME=WIN-OQ40SUNBJQU ^
INVENTORY_LOCATION=”C:\Program Files\Oracle\Inventory” ^
SELECTED_LANGUAGES=en ^
ORACLE_HOME=E:\app\homeowner4\product\12.1.0\dbhome_1 ^
ORACLE_BASE=E:\app\homeowner4 ^
oracle.install.db.InstallEdition=EE ^
oracle.install.IsBuiltInAccount=false ^
oracle.install.OracleHomeUserName=homeowner4 ^
SECURITY_UPDATES_VIA_MYORACLESUPPORT=false ^
DECLINE_SECURITY_UPDATES=true ^
oracle.installer.autoupdates.option=SKIP_UPDATES
(Note: Character ‘^’ is command continuation character in Windows Command prompt)
7. What are the roles of Oracle Home User?
Though the Oracle Home User owns the Oracle Home directory, it should not be used to administer the Oracle Home.
Since most of Oracle Services are running with Oracle Home User privileges, this user can stop and start the services in part or in total.
Oracle administrative tasks must use an administrator account per Oracle documentation (site reference guide).
The Oracle Home User account is only to be used for hosting oracle services with low privileges to avoid potential threats to the server hosting Oracle Database.
8. Can Oracle Home User be used to apply patches to the Oracle Home?
Oracle Home User only has permission on Oracle Home directory, it does not have any permissions on the Central Inventory.
So it cannot be used to apply any patches on Oracle Home.
It is not supported to apply any patches on the Oracle Home using this account.
All patching and upgrading has to be done by the same user with administrator privileges that installed the Oracle Home.
9. Which services will not be running with Oracle Home User privileges?
Oracle Collection Manager (OCM) and Listener Services will not be running with Oracle Home User privileges.
Listener service requires the least privileges on system and hence it will run as LocalService.
OCM needs system level privileges and hence it will still be running as Local System.
10. What are the default permissions of Oracle Home User on Oracle Home?
Oracle Home User has full control on Oracle Home directory.
Since Oracle services are running with this accounts privileges it needs access to most binaries in Oracle Home.
11. What Groups are created by OUI during installation?
The following groups will be created by OUI:
ORA_ASMDBA ( Default Members, Installed user )
ORA_ASMOPER ( Default Members, None )
ORA_CLIENT_LISTENERS ( Default Members, None )
ora_dba ( Default Members, Installed user )
ORA_GRID_LISTENERS ( Default Members, None )
ORA_INSTALL ( Default Members, Oracle Home User )
ORA_OPER ( Default Members, None )
ORA_<oracle home name>_DBA ( Default Members, Oracle Home User )
ORA_<oracle home name>_OPER ( Default Members, None )
ORA_<oracle home name>_SYSBACKUP ( Default Members, Installed user )
ORA_<oracle home name>_SYSDG ( Default Members, Installed user )
ORA_<oracle home name>_SYSKM ( Default Members, Installed user )
12. What groups is the Oracle Home User a member of by default?
ORA_INSTALL
ORA_<oracle home name>_DBA
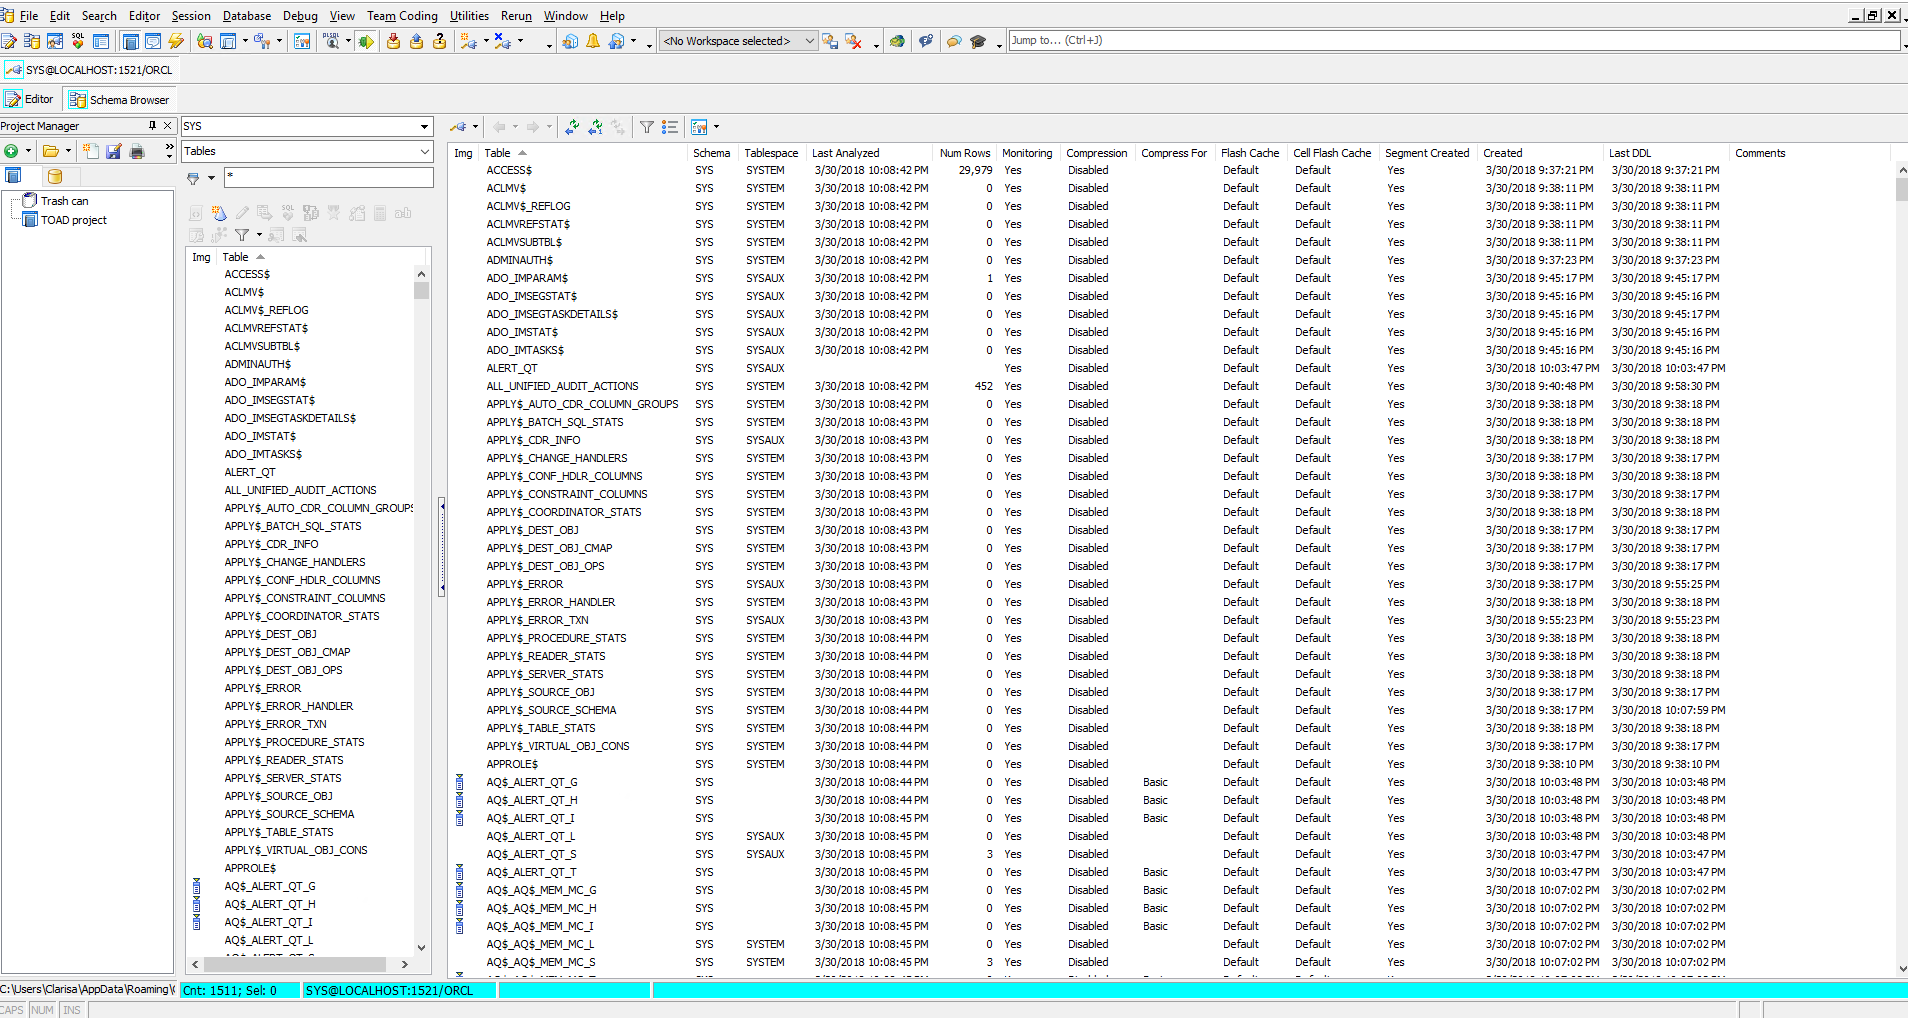
Skip to content
Built-in Account is a type of user account that is created during installation.
What is Built-in Account (computer networking)?
In Microsoft Windows, Built-in user account is a type of user account that is created during installation. All computers running Windows 7 or Windows 10 have two built-in user accounts:
- The Administrator account: Used to provide administrative access to all features of the operating system
- The Guest account: Intended to provide occasional users with access to network resources
Depending on whether the computer is a domain controller, a member server, or a workstation, built-in accounts will be either local user accounts or global user accounts. A built-in account on a domain controller is a global user account that exists everywhere within the domain.
Users can log on to any machine in the domain using such an account, which provides administrators with the capability of administering a Windows NT–based or Windows 2000–based network from anywhere on the network.
On a member server or workstation, the Administrator and Guest accounts are local user accounts and exist only on those machines.
Rename the Administrator Account
Rename the Administrator built-in user account to make it more secure.
Recent Posts
In this article we will learn how to install Oracle Database 18c on Windows 10 Enterprise for research and education.
Before we start installing, we need to know the minimum requirements for Oracle Database 18c.
Windows x64 Minimum Hardware Requirements
System Architecture: Processor: AMD64 and Intel EM64T
Physical memory (RAM): 2 GB minimum
Virtual memory (swap):
- If physical memory is between 2 GB and 16 GB, then set virtual memory to 1 times the size of the RAM
- If physical memory is more than 16 GB, then set virtual memory to 16 GB
Disk space:
- Typical Install Type total: 10 GB
- Advanced Install Types total: 10 GB
Video adapter: 256 colors
Screen Resolution: 1024 X 768 minimum
It’s important to know that Oracle Database 18c is only available for 64 bit Windows systems, just as for Oracle 12c. Therefore, we can’t install Oracle Database 18c in our PC if it’s running a 32 bit Windows OS.
Moreover, Oracle Database 18c is only available for Windows 10 Professional, Enterprise and Education Editions. This means we can’t install Oracle Database 18c if we are using Windows 10 Home Edition.
As we mentioned before, we will be installing Oracle Database 18c on Windows 10 Enterprise 64 bit version, but if you want to install it on Windows 7 or 8 then you can still follow these steps as the installation process is the same, but first please check the compatibility.

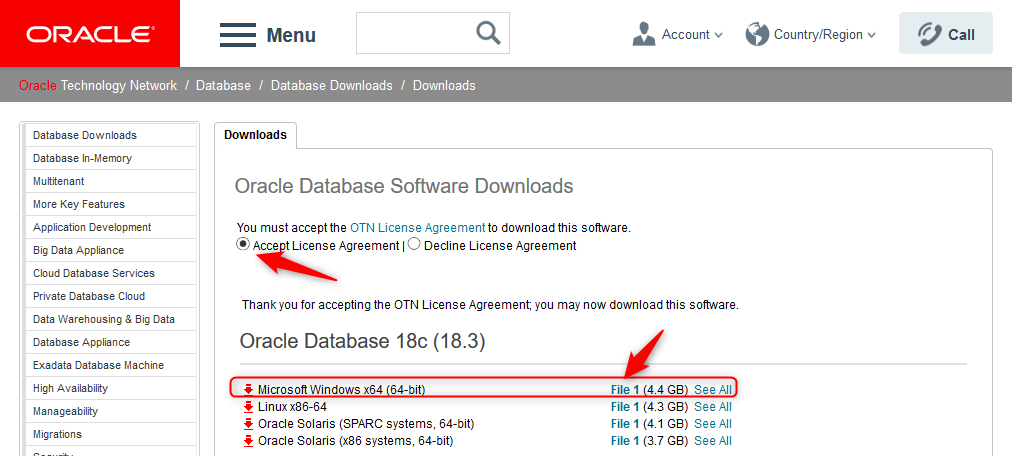
Download Software from OTN
To install Oracle Database 18c we have to download the software, which we can do by visiting the OTN page: http://www.oracle.com/technetwork/database/enterprise-edition/downloads/index.html
We accept the license agreement and choose the Windows version to download ->Click on File 1
To download the files, we must login to the Oracle website. If we have a valid account on this site, we can download the software; otherwise we can register on the page and create an account, which is completely free.
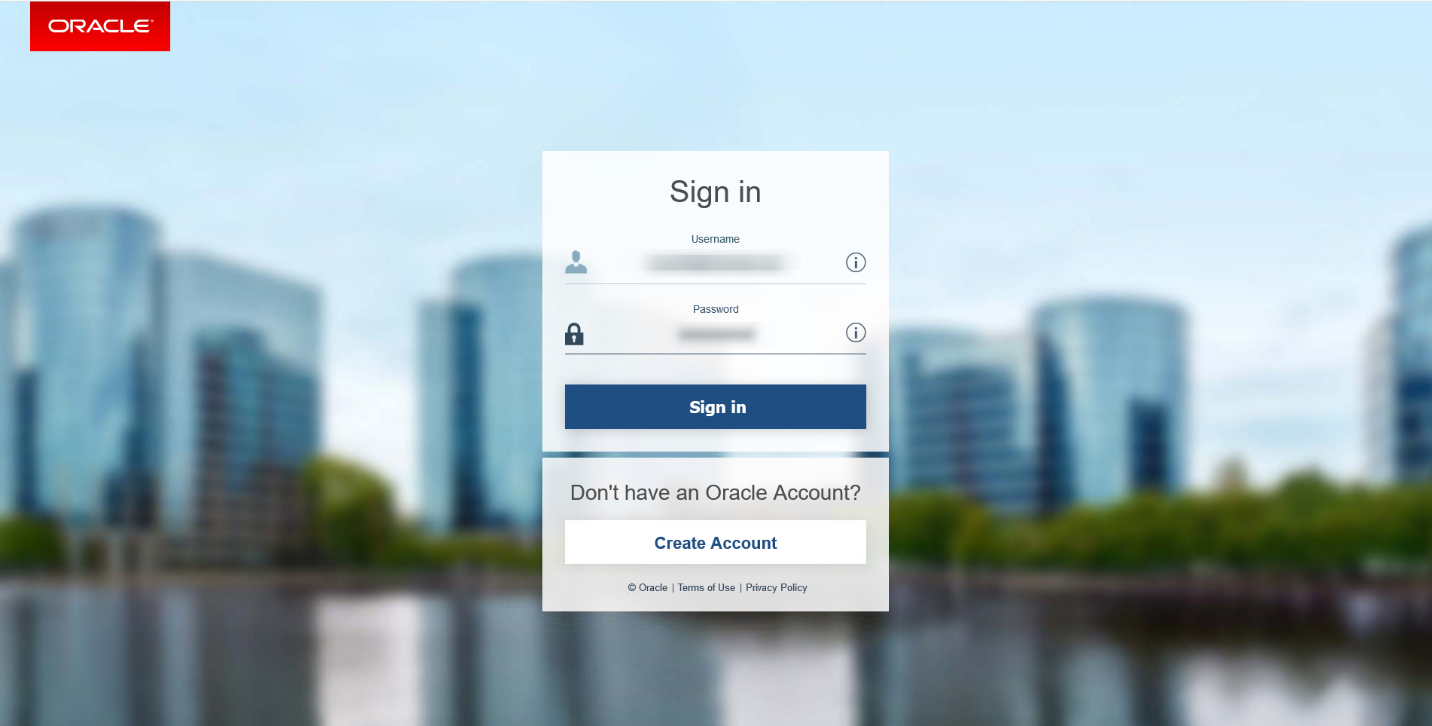
After we fill in the username and password and click on the Sign In button, the files will start downloading automatically.
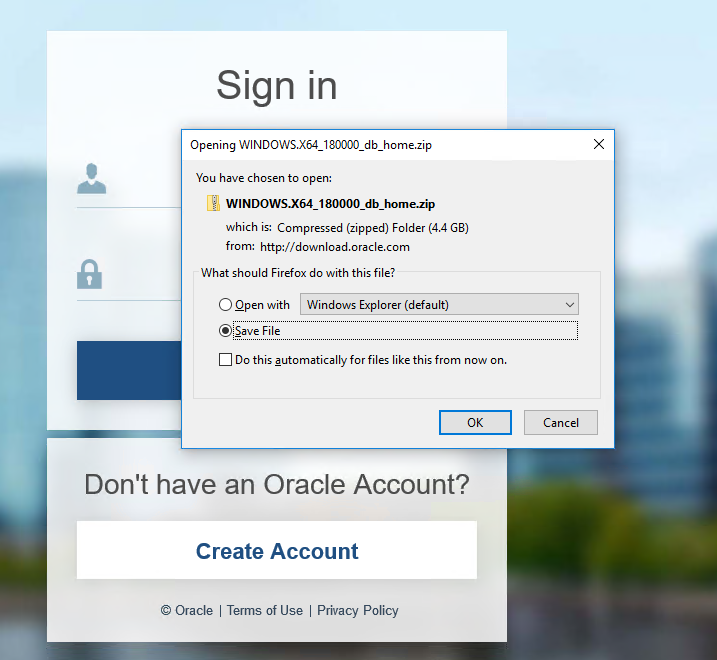
As we can see the file is compressed and zipped.
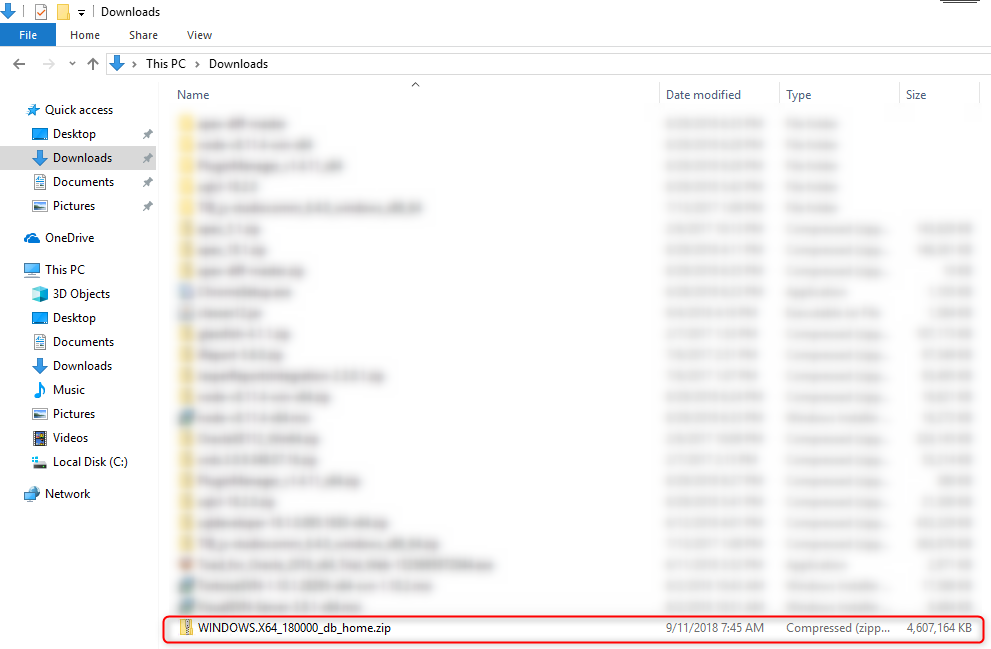
Extracting the Files
To proceed to the next step, we need to extract the content of file, but before doing that it’s very important to know that with Oracle 11g or 12c we were allowed to set the location of our db_home directory, but starting with Oracle Database 18c we are introduced to a new concept: Image Based Installation.
In Image Based Installation the Oracle Universal Installer of 18c takes the location of our setup.exe file and assigns it as its db_home location. That’s why before we start extracting the content of this file, we first need to decide where we want to create our db_home directory.
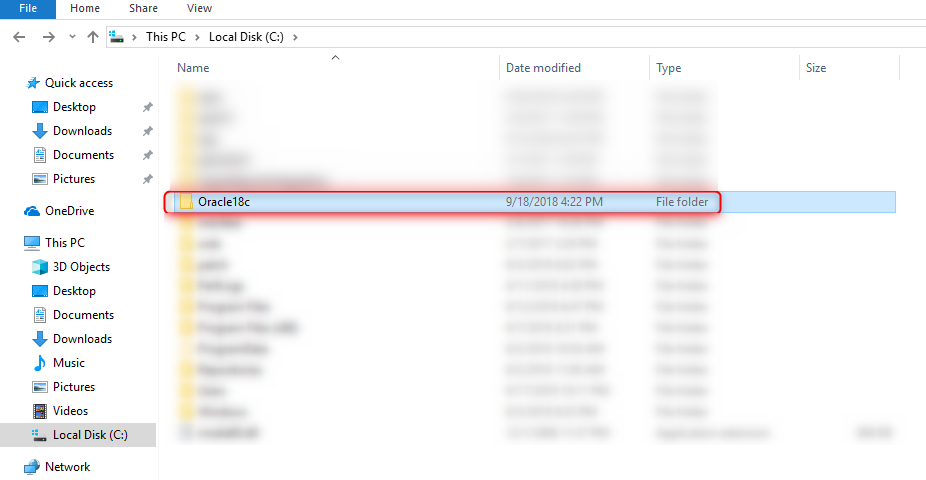
We don’t want to create our db_home in the downloads folder. That’s why we will first create a folder inside the C drive and name it Oracle18c.
The name for this folder cannot contain any spaces.
Now we are going to extract the contents of the file that we just downloaded into this folder. As the file is approximately 10 GB in size, this extraction process will take some time.
Before beginning the installation of Oracle Database 18c, we need to verify that we are connected to our Windows as an administration user. If we are not, we must log in to our Windows as an administrative user. Not doing so will cause an installation error and crash the entire process.
Oracle Database 18c Installation
To begin the installation of the Oracle Database 18c, we must first go to the Oracle18c folder; for example, in my case, C:\Oracle18c. and then locate the setup.exe file.
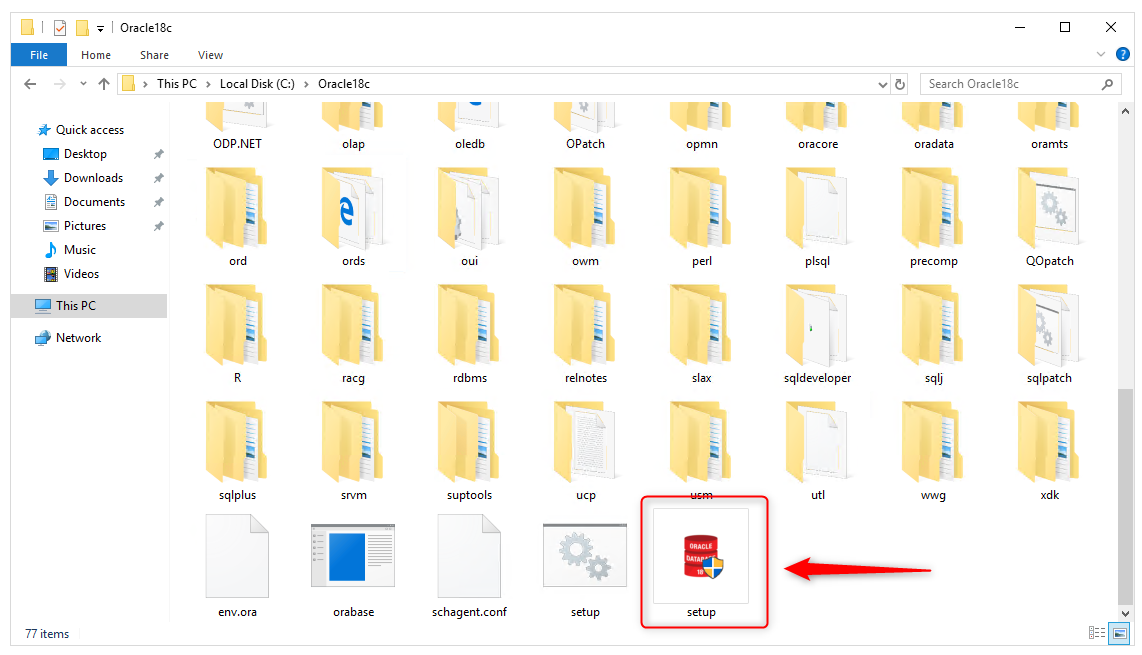
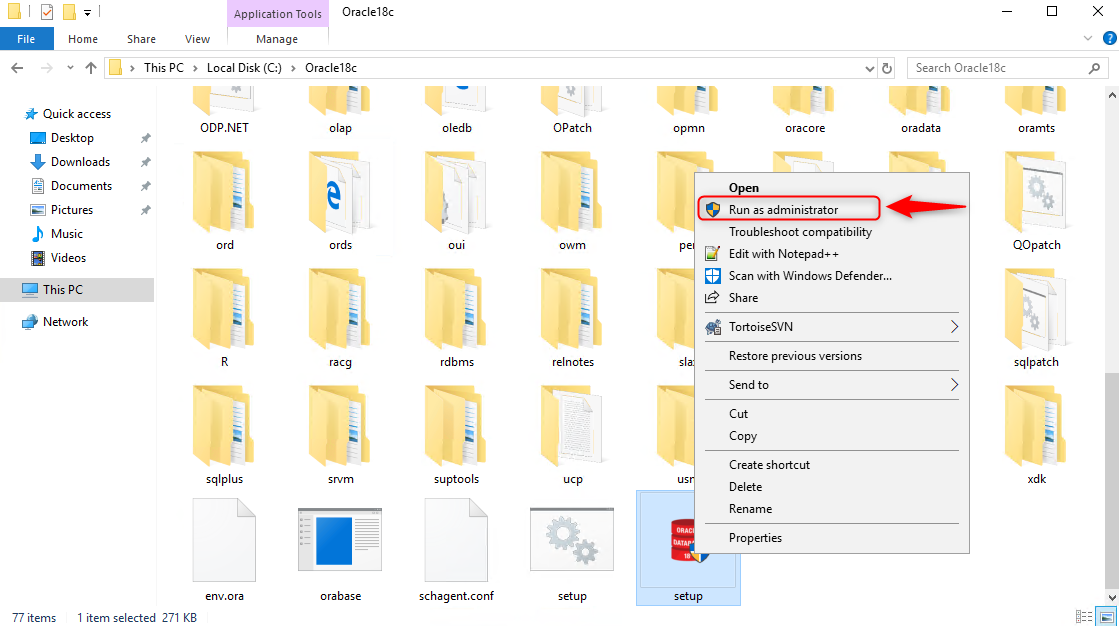
Right click on setup.exe file and choose run as administrator.
We see Screen 1: “Configuration Option”
Here we are presented with two installation options:
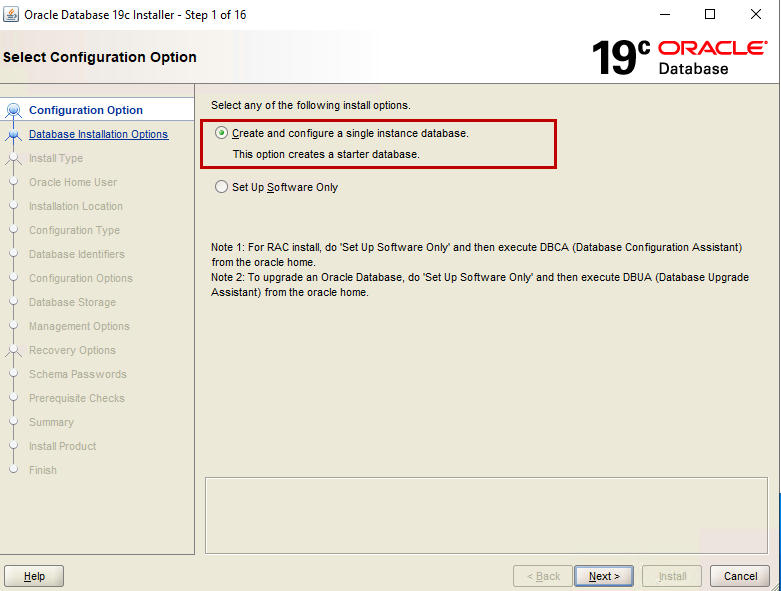
The first is to “Create and configure a single instance database”. Choosing this option will not only configure an Oracle Database Server on our machine but also create a starter database for us. We can choose this database for learning and practice purposes.
The second option is “Set Up Software Only”. As the name suggests, it will only configure the Oracle Server software on our machine. No database will be created. We need to create the database manually using the DBCA utility. We choose this option when we are configuring a RAC or planning to perform an upgrade.
For our demo, we will choose the first option, which will configure the software as well as create a database for us.
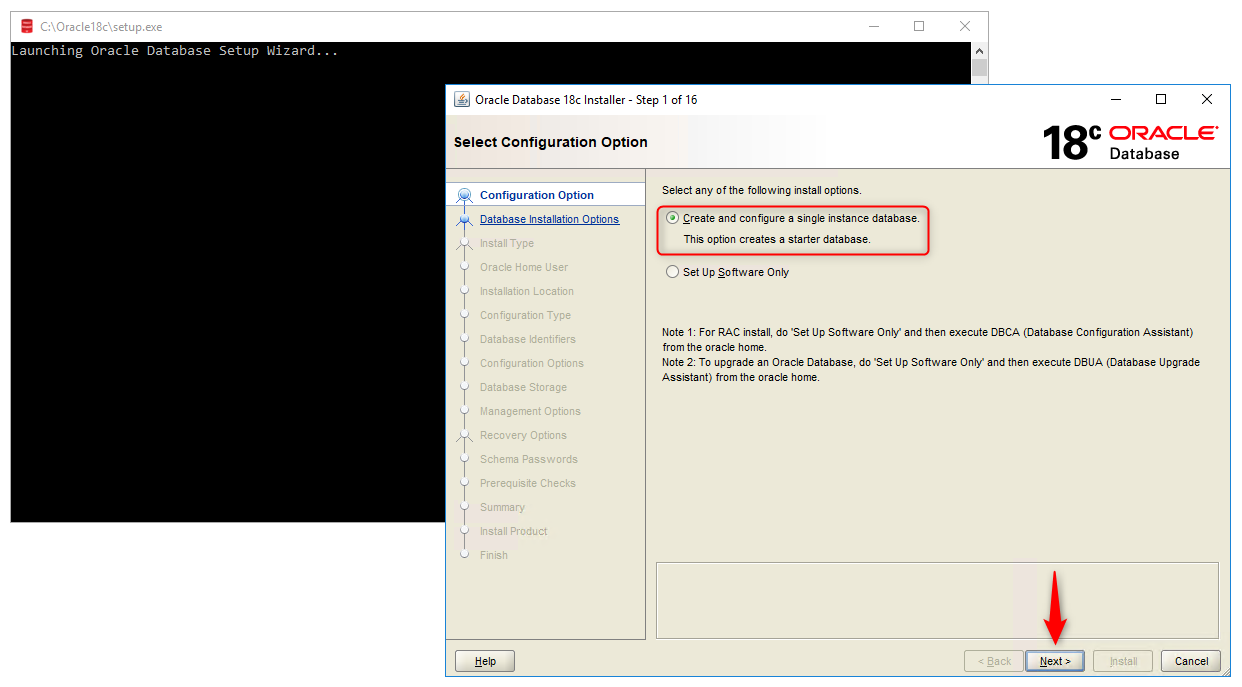
Click on Next button to move next screen.
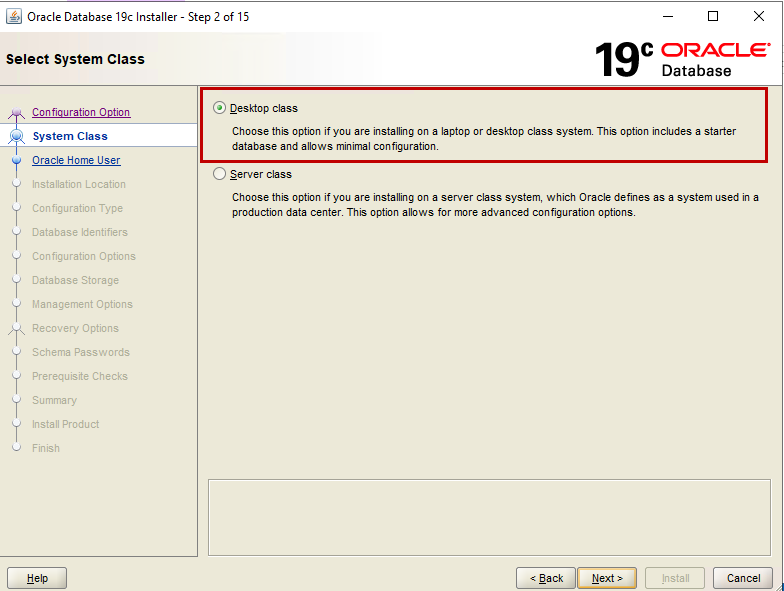
We see Screen 2: “System Class”.
Here we are presented with two class options:
Desktop class: We choose this option if we are installing on a laptop- or desktop-class system. This option includes a starter database and allows minimal configuration.
Server class: We choose this option if we are installing on a server-class system, which Oracle defines as a system used in a production data center. This option allows us for more advanced configurations options.
We select the first option, Desktop class, because we will be installing the Oracle Database 18c on Windows 10 Enterprise 64bit.
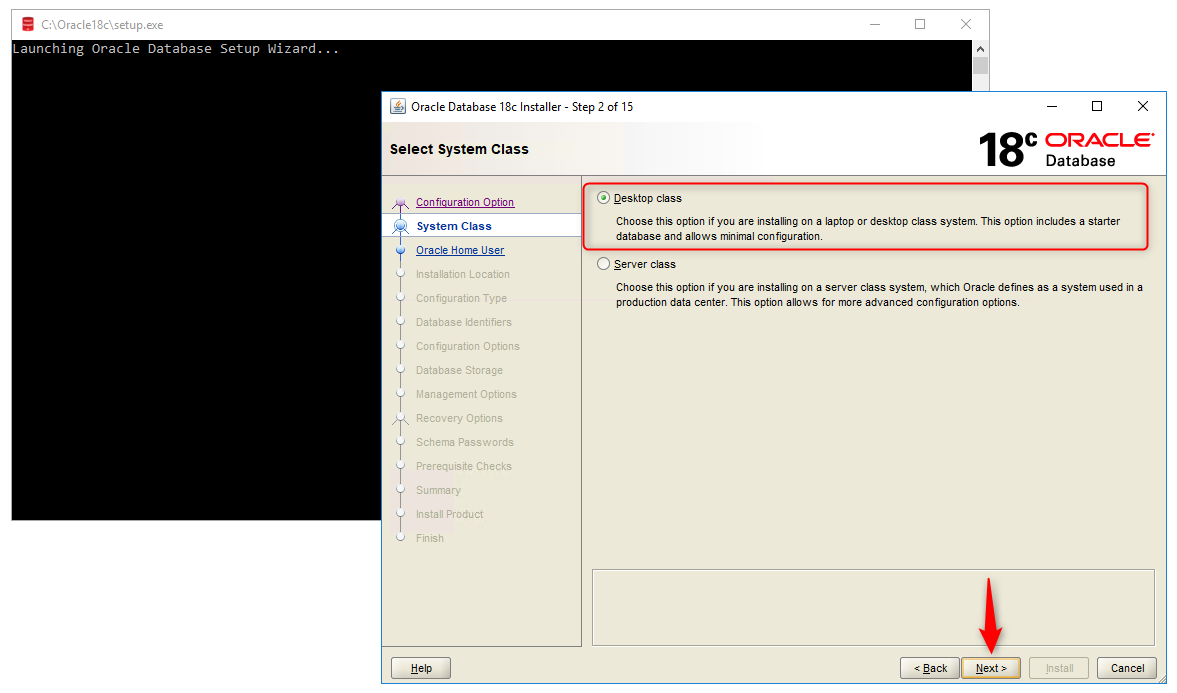
Click on the Next button to move to the next screen.
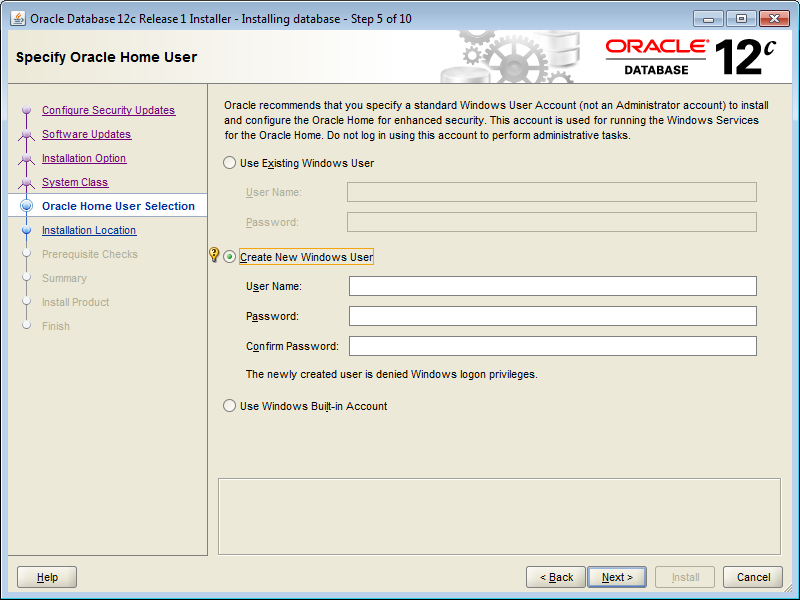
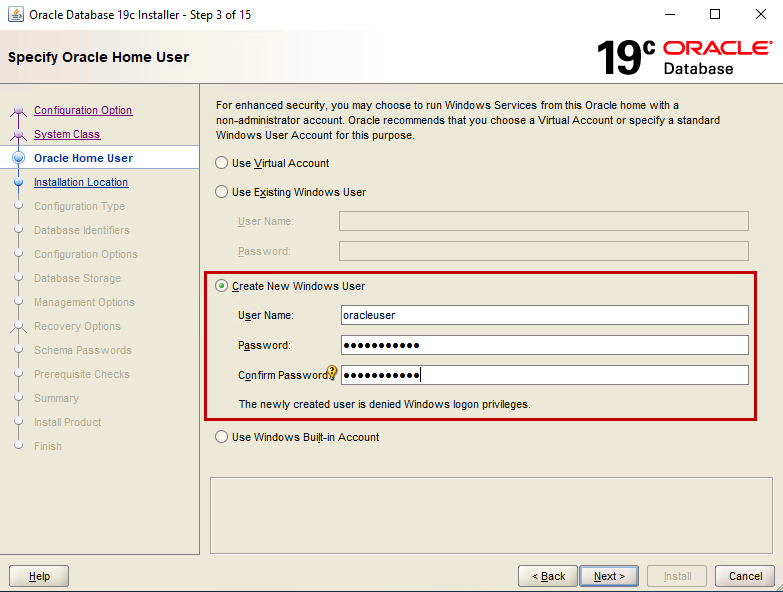
We see Screen 3: “Oracle Home User”. The Oracle server creates four Windows User Groups:
User Virtual Account: This type of account is the Oracle Home User for Oracle Database Single Instance installation. The account allows us to install Oracle Database, and create and manage database services without passwords.
Use Existing Windows User: This type of account can be a Windows Local User, a Windows Domain User or a Windows Managed Services Account (MSA). We must provide a username and password for a Windows Local or Domain User. For the MSA account, which is a managed domain account, we only need to provide the username. For an Oracle RAC Database or an Oracle Grid Infrastructure installation, we can only use a Windows Domain User Account.
Create New Windows User: Here we need to provide the username and password for the Windows Local User that we want Oracle Universal Installer to create, and then confirm the password. The new user that is created is denied interactive logon privileges to the Windows computer. However, a Windows administrator can manage this account like other Windows accounts.
Use Windows Built-in Account: In this case, no username or password is required. Oracle creates Windows Services using Windows Built-in Accounts (LocalSystem or LocalService).
For Database Server installations, Oracle recommends that we use a standard Windows User Account (instead of a Windows Built-in Account) as the Oracle Home User for enhanced security.
In this step, we will to create a new user which will be completely dedicated to our Oracle Database 18c. We select the third option, “Create a New Windows User”.
Username: Oracle
Password: <mypassword>
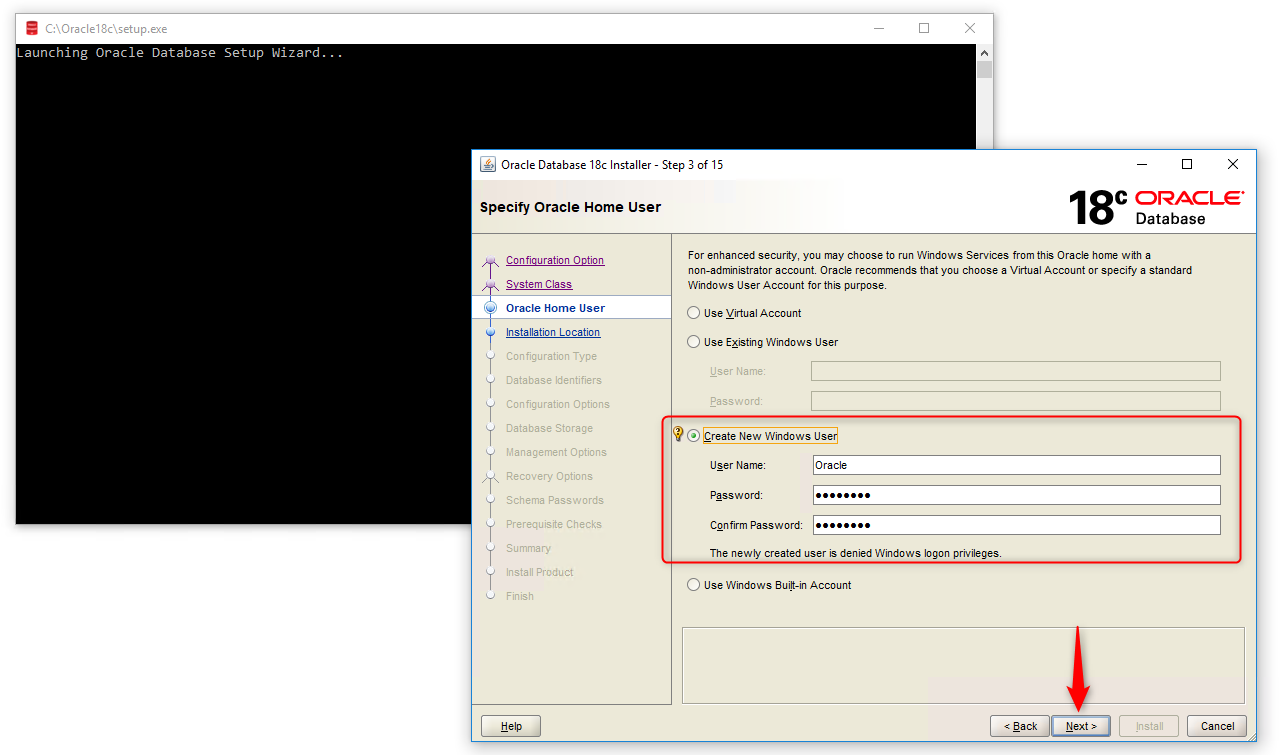
As we mentioned before, the newly created user is denied Windows logon privileges, so we don’t login to Windows using this account. We will name this user as Oracle. However, we can manage this user like any other Windows user we have.
Note that we can’t change this Oracle Home user once the installation is done, so be careful when creating it.
Click on the Next button.
Screen 4: “Typical Installation”.
This step is very important because here we will be configuring the installation settings.
The Oracle Base directory is a top-level directory for Oracle software installations. We can set whatever location we want as our Oracle Base.
The Software Location is the Oracle home path where the Oracle Database binaries for this installation are placed. Prior to 18c we were allowed to set this Oracle Home location, but now, as we can see, the location is already set and we can’t modify it.
The installer takes the location of the Setup files and assigns it as the Oracle Home location. That’s why we extracted our installation files in a separate directory.
Database File Location is the location where Oracle Database files such as data files, redo log files, control files, server parameter files and password file are stored. These are the most important files of Oracle Database. The default data file location is $ORACLE_BASE/oradata for a single node Oracle Real Application Clusters (Oracle RAC), single instance, and desktop-class installations. For multi-node Oracle RAC installations, the default location is under any shared mount point discovered across the selected set of nodes.
We will use the default location.
Database Edition: There are two options here. Enterprise Edition and Standard Edition 2. We will select the Enterprise Edition.
Character set: we will use the default Unicode standard.
Starting with Oracle Database 12c Release 2 (12.2), the default database character set of a database created from the General Purpose/Transaction Processing or the Data Warehousing template is Unicode AL32UTF8.
Unicode is the universal character set that supports most of the currently spoken languages of the world. It also supports many historical scripts (alphabets). Unicode is the native encoding of many technologies, including Java, XML, XHTML, ECMAScript, and LDAP. Unicode is ideally suited for databases supporting the Internet and the global economy.
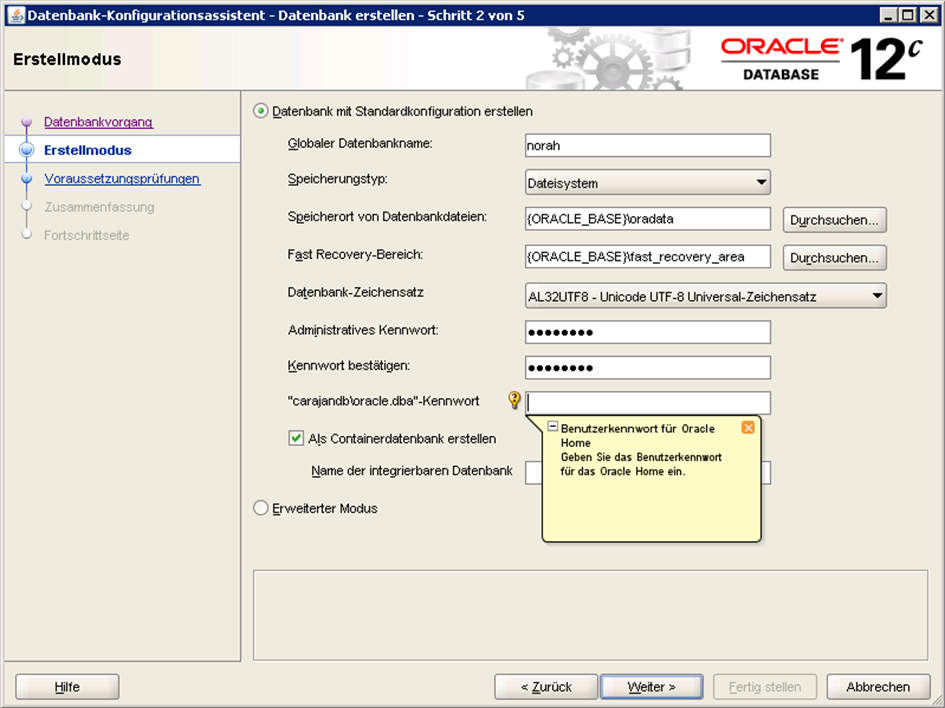
Below, we have three fields: Global Database Name, Password and Pluggable Database Name; these fields are the most import settings. We will need them in the future to connect with our database. Therefore, it’s very important that write them down somewhere.
Global Database Name is the name that identifies the database. It must be unique to distinguish the database from all other databases in a network.
The Global Database Name will be the name of our database as well as serve as our database SID. We will need this while making connection with our database using tools such as Toad for Oracle. By default, it’s set as ORCL.
If we want, we can change and give it any other name, but make sure to remember it. It’s a good practice to write it down somewhere as our Database SID.
Global Database Name is composed of a database unique name (db_unique_name), a delimiter (a period), and a database domain name (db_domain). The name has the following format: db_unique_name.db_domain.
Where:
- db_unique_name is the name of the database. It can contain a maximum of 30 characters, as long as the first eight characters are unique. The characters can be alphanumeric (a-z, 0-9), underscore (_), dollar ($), and pound (#).
- db_domain is the computer environment used for the database. It should contain no more than 128 characters; alphanumeric (a-z, 0-9), underscore (_), pound (#), and periods (.).
Now we need to enter the passwords. This password is for the SYS and SYSTEM database privilege, write it down somewhere to remember it.
Minimum Password Requirements
We must provide usernames and passwords that comply with the following requirements:
- Password cannot exceed 30 characters.
- No empty password fields.
- Username cannot be the same character string as a password.
- The SYS account password cannot be change_on_install. (case-insensitive)
Password Recommendations
Oracle recommends the following guidelines when prompted for a password.
- Contains at least one lowercase letter.
- Contains at least one uppercase letter.
- Contains at least one digit.
- Is at least 8 characters in length.
- Uses the database character set, which can include the underscore (_), dollar ($), and pound sign (#) characters.
- Should not be an actual word.
Next, we need to make sure to check “Create as Container database” to create our database as a container database.
Pluggable Database Name: Here we have to specify a unique name for a pluggable database, in this case, we use the default name, orclpdb.
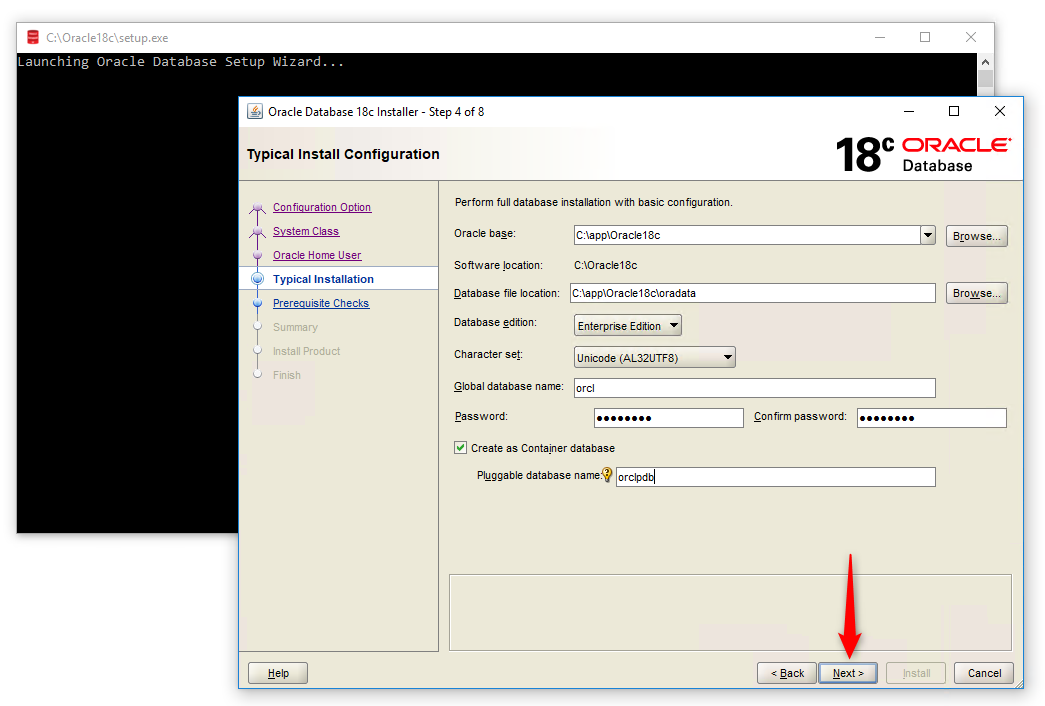
Click on the Next button.
In the next step, Oracle Universal Installer (OUI) will check the prerequisites, such as hardware compatibility. If everything goes well, we can install it, but if there are any errors, the OUI will show us the errors in this screen. As we can see, we don’t have errors!
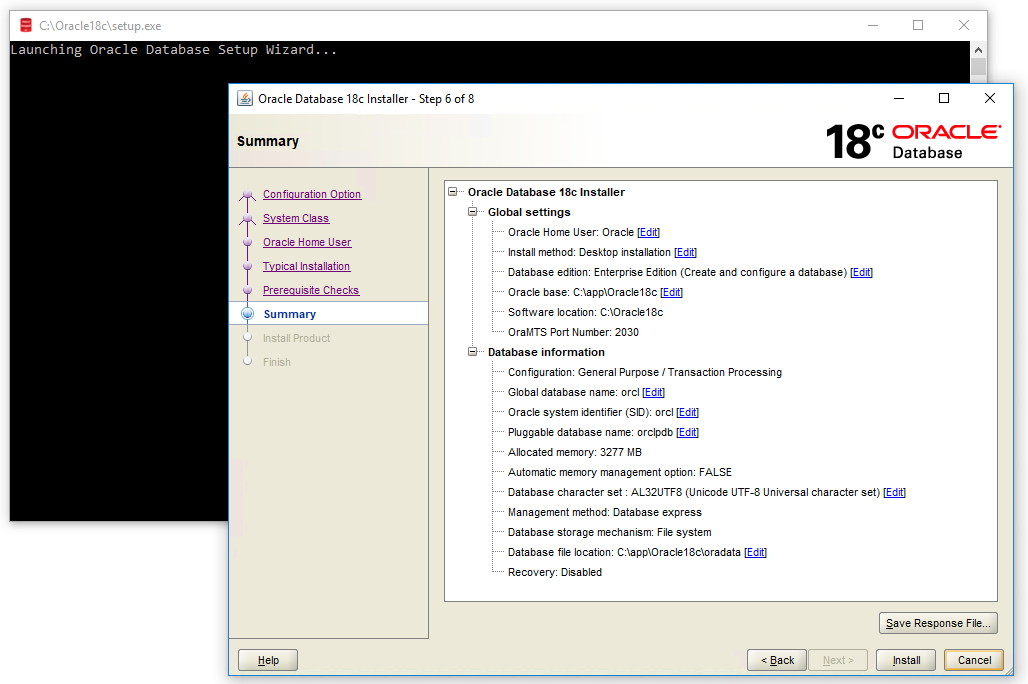
Now, click on the Install button and the installation of Oracle Database 18c will start.
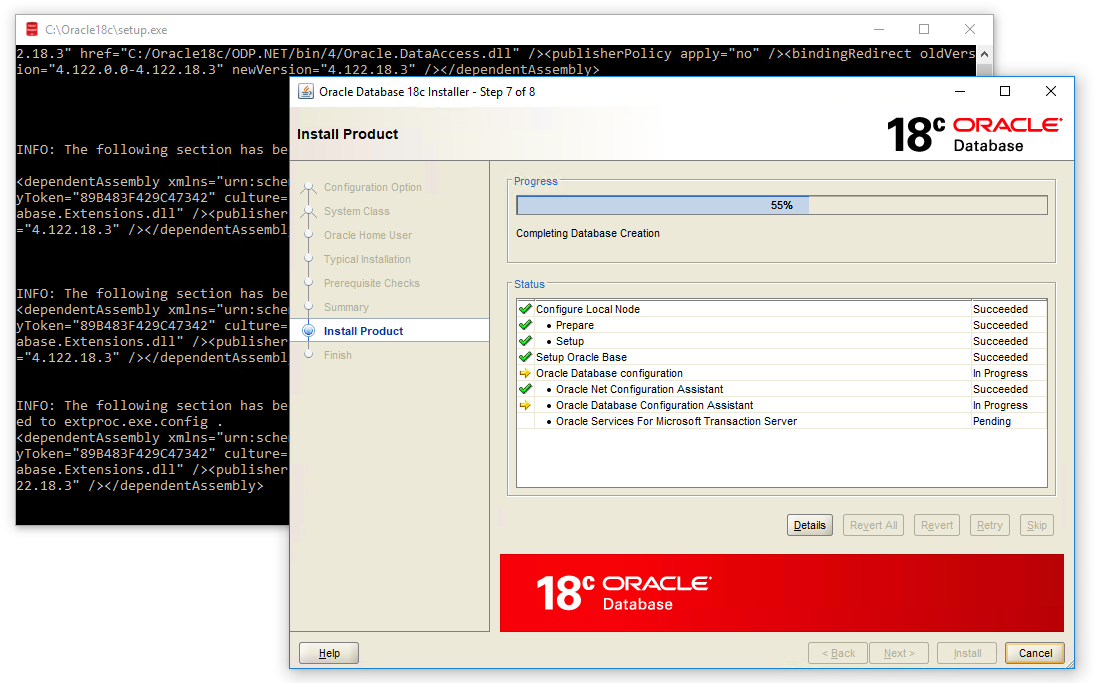
As Oracle Database 18c is very robust software, this installation will take some time depending on our hardware.
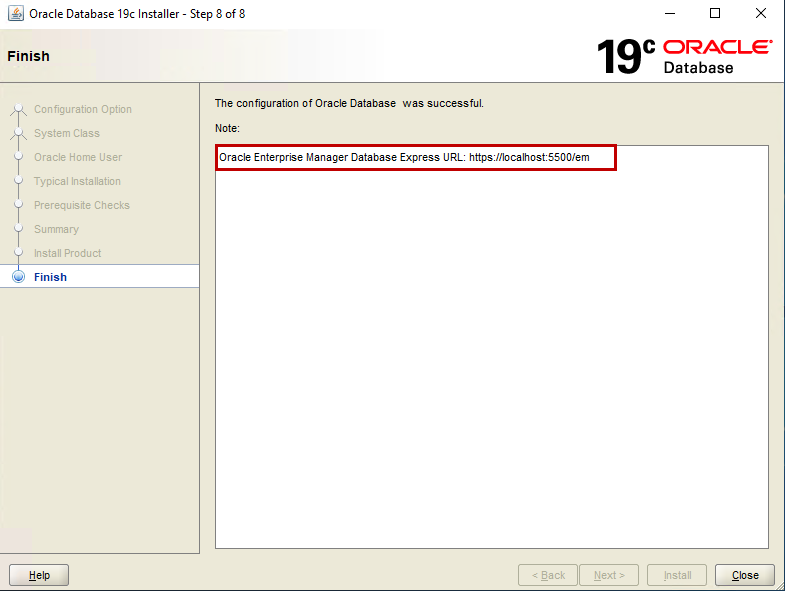
The installation is done.
In this installation we don’t get DBCA for database creation as we did with Oracle 12c or 11g. The new Oracle Database 18c Universal Installer has simplified the process.
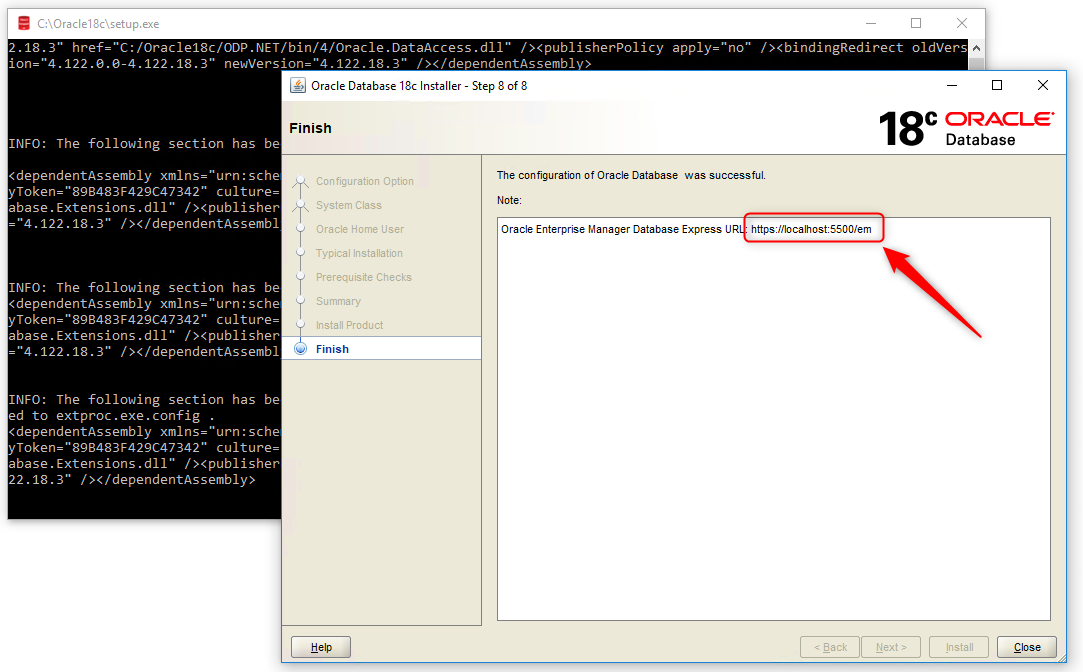
The last thing that we need to do is to copy and save the link: https://localhost:5500/em
This is the link for Oracle Database 18c Enterprise Manager.
Now we have Oracle Database 18c installed on our machine.
Connect to Oracle Database 18c using Toad for Oracle
We open the Toad for Oracle tool and the Login window appears.
User / Schema: SYS or SYSTEM
Password: <my_password>
Select the TNS tab:
Database: ORACLR_CONNECTION_DATA
Or you can select the Direct tab:
Host: localhost
Port: 1521
SID: orcl
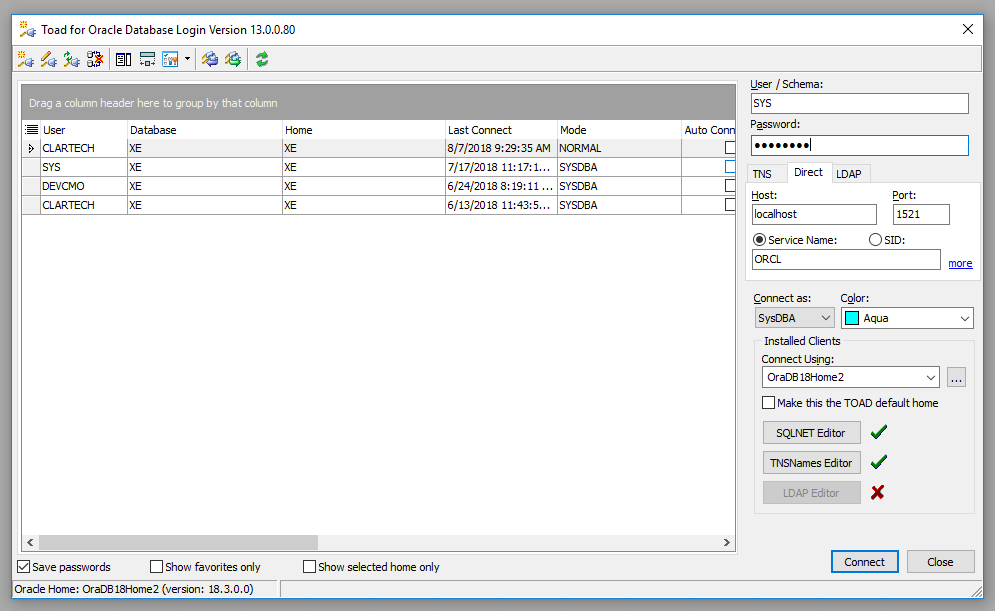
Now, we can see the objects in our new Oracle Database 18c.
Conclusion
We have reached the end of this tutorial, where we have learned how to install the Oracle Database 18c in a Windows environment.
Most Fortune 500 companies choose Toad
Tool for Oracle Application Developers, more widely known as Toad®, was designed by Oracle developer, Jim McDaniel, to make his job easier. It was so helpful that Jim decided to share it. Fast forward to more than 20 years later, Toad is a trusted tool used in most Fortune 500 companies and across the globe.
There are many reasons why people buy Toad rather than staying with the “free” SQL Developer tool Oracle offers. One main reason developers and DBAs choose Toad for Oracle is to reduce time and effort to develop and manage Oracle databases. But did you know that with Toad for Oracle you can automate administration tasks and proactively manage your databases while embracing performance optimization and risk mitigation? Did you know Toad can now find and control sensitive data across all your Oracle databases? What else can Toad do that you didn’t know about? Which edition will benefit you the most?
We’re so confident that you will love Toad, we’re offering our top 2 editions to you to try for free for 30 days.

Содержание
- 3 Supporting Oracle Home User on Windows
- Managing Oracle Home User
- Using Oracle Home User for Oracle Single-Instance Database and Oracle Database Client
- Using Oracle Home User for Oracle RAC Database
- Use windows built in account что это
- Контроль учетных записей: использование режима одобрения администратором для встроенной учетной записи администратора User Account Control: Admin Approval Mode for the Built-in Administrator account
- Справочные материалы Reference
- Возможные значения Possible values
- Рекомендации Best practices
- Местонахождение Location
- Значения по умолчанию Default values
- Управление политикой Policy management
- Необходимость перезапуска Restart requirement
- Вопросы безопасности Security considerations
- Уязвимость Vulnerability
- Противодействие Countermeasure
- Возможное влияние Potential impact
3 Supporting Oracle Home User on Windows
Starting with Oracle Database 12 c Release 1 (12.1), Oracle Database supports the use of Oracle Home User, specified at the time of Oracle Database installation. Oracle Home User is used to run the Windows services for the Oracle home. Oracle Home User can be Windows built-in account or a standard Windows User Account (not an Administrator account). Oracle Home User cannot be changed post installation.
If a Windows built-in account is used, then no user name or password is required during installation and administration. However, if a Windows User Account is used as Oracle Home User, then you must provide the user name and password during installation and some of the administration tasks.
Oracle Home User is different from Oracle Installation User. Oracle Installation User is the user who requires administrative privileges to install Oracle products. Oracle Home User is used to run the Windows services. You must not log into the Oracle Home User to perform administrative tasks.
Note that the Windows administrator privilege is still required to perform Oracle administrative functions such as installation, upgrade, patching, and other functions.
A Windows User Account used as Oracle Home User cannot have administrator privileges as it causes the Oracle Universal Installer to display an error message.
See the Microsoft documentation for more information on different types of Windows user accounts.
Oracle Database Installation Guide for Microsoft Windows
See the following sections for more information:
Managing Oracle Home User
If you use a Windows User Account as the Oracle Home User, then you must ensure that this user account is present in the Windows system and its password is managed securely to ensure the proper operation and security of the database.
You must secure the password of this Windows User Account and ensure that only database administrators have access to this password as one can log on to the database as the database administrator from this Windows User Account. You must also change the password for this Windows User Account at regular intervals as a part of security. You can change the password using Windows tools. However, when you change the password for this Windows User Account, you must also update the password for all Oracle services running under the Windows User Account.
This release has introduced a new Windows utility called the Oracle Home User Control. This is a command-line tool that displays the Oracle Home User name associated with the current Oracle home and updates the password for all Oracle services running under a specific Windows User Account (used as Oracle Home User). See section «Using the Oracle Home User Control Tool» for more information.
Using Oracle Home User for Oracle Single-Instance Database and Oracle Database Client
For single-instance Oracle Database and Oracle Database Client installations, you can use Windows built-in account or a standard Windows User Account as Oracle Home User.
The Windows User Account can be an existing Windows Local User, Windows Domain User or Managed Services Account (MSA) with no administration privileges. For a Windows Local User Account or a Windows Domain User Account, you must provide both the user name and password during installation. For a Managed Services Account, you must provide the user name only.
For a Windows Local User, you also have the option of creating a new Windows user during installation. You must provide the user name and password for the user account and Oracle Universal Installer creates the Windows user during installation. The newly created Windows account is denied interactive logon privileges to the Windows computer. However, a Windows administrator can still manage this account like any other Windows account.
Note that if a Windows Local User Account is chosen as the Oracle Home User during single-instance Oracle Database installation, Windows NT Native Authentication (NTS) cannot be used for authenticating Windows domain users or users from remote computers.
For single-instance Oracle Database installations, Oracle recommends that you use a standard Windows User Account (instead of Windows built-in account) as Oracle Home User for enhanced security. For Oracle Database Client installations, it is not necessary to use a Windows User Account as Oracle Home User for reasons of security. Even when the Windows built-in account is chosen as the Oracle Home User, Oracle services for a client home are run using the built-in low-privileged LocalService account.
Using Oracle Home User for Oracle RAC Database
See Oracle Grid Infrastructure Installation Guide for Microsoft Windows x64 (64-Bit) for information about using Oracle Home User for Oracle RAC Installation.
During Oracle Database Client installation, you can specify an optional Oracle Home User associated with the Oracle home.
For example, assume that you use an Administrator user named OraSys to install the software (Oracle Installation user), then you can specify the ORADOMAINOraDb domain user as the Oracle Home User for this installation. The specified Oracle home domain user must exist before you install the Oracle Database Client software.
The Oracle Home User can be either the Windows Built-in Account (LocalService) or a Windows User Account. This account is used for running the Windows services for the Oracle home. Do not log in using this account to perform administrative tasks.
Windows User Account can be a Windows Local User, Windows Domain User, Managed Services Account (MSA), or Group Managed Services Account (gMSA). Starting with Oracle Database 12 c Release 2 (12.2), Group Managed Services Account (gMSA) is introduced as an additional option.
Using Windows built-in account, MSA, or gMSA enables you to install Oracle Database Client, and create and manage Database services without passwords.
If you specify an existing user as the Oracle Home User, then the Windows User Account you specify can either be a Windows Domain User or a Windows Local User. If you specify a non-existing user as the Oracle Home User, then the Windows User Account you specify must be a Windows Local User. The new user is then created during installation and the created user is denied interactive logon privileges to the Windows computer. However, a Windows administrator can manage this account like any other Windows account.
For enhanced security, Oracle recommends that you use the standard Windows User Account or Windows Built-in Account (LocalService), which is not an administrator account, to install Oracle Database Client.
You cannot change the Oracle Home User after the installation is complete. If you must change the Oracle Home User, then you must reinstall the Oracle Database Client software.
When you specify an Oracle Home User, the installer configures that user as the Oracle Service user for all software services that run from the Oracle home. The Oracle Service user is the operating system user that the Oracle software services run as, or the user from which the services inherit privileges.
Silent installation is enhanced to support password prompt for the Oracle Home User. So, customers and independent software vendors (ISV) can use response files without hard coding the password into the source code.
Контроль учетных записей: использование режима одобрения администратором для встроенной учетной записи администратора User Account Control: Admin Approval Mode for the Built-in Administrator account
Относится к: Applies to
Описывает лучшие практики, расположение, значения, управление политикой и соображения безопасности для управления учетной записью пользователя: режим утверждения администратора для параметра политики безопасности учетной записи встроенного администратора. Describes the best practices, location, values, policy management and security considerations for the User Account Control: Admin Approval Mode for the Built-in Administrator account security policy setting.
Справочные материалы Reference
Этот параметр политики определяет поведение режима утверждения администратора для встроенной учетной записи администратора. This policy setting determines the behavior of Admin Approval Mode for the built-in administrator account. Когда включен режим утверждения администратора, учетная запись местного администратора функционирует как стандартная учетная запись пользователя, но она имеет возможность повысить привилегии без входа в систему с помощью другой учетной записи. When the Admin Approval Mode is enabled, the local administrator account functions like a standard user account, but it has the ability to elevate privileges without logging on by using a different account. В этом режиме любая операция, требуемая повышения привилегий, отображает подсказку, позволяющую администратору разрешить или запретить высоту привилегии. In this mode, any operation that requires elevation of privilege displays a prompt that allows the administrator to permit or deny the elevation of privilege. Если режим утверждения администратора не включен, встроенная учетная запись администратора запускает все приложения по умолчанию с полными административными привилегиями. If Admin Approval Mode is not enabled, the built-in Administrator account runs all applications by default with full administrative privileges. По умолчанию режим утверждения администратора настроен на отключение. By default, Admin Approval Mode is set to Disabled.
Если компьютер обновлен из предыдущей версии операционной системы Windows, а учетная запись администратора является единственной учетной записью на компьютере, встроенная учетная запись администратора остается включенной, и этот параметр также включен. If a computer is upgraded from a previous version of the Windows operating system, and the administrator account is the only account on the computer, the built-in administrator account remains enabled, and this setting is also enabled.
Возможные значения Possible values
Встроенная учетная запись администратора входит в режим утверждения администратора так, чтобы любая операция, требуемая для повышения привилегий, отображала запрос, который предоставляет администратору возможность разрешить или запретить повышение привилегии. The built-in administrator account logs on in Admin Approval Mode so that any operation that requires elevation of privilege displays a prompt that provides the administrator the option to permit or deny the elevation of privilege.
Если режим утверждения администратора не включен, встроенная учетная запись администратора запускает все приложения по умолчанию с полными административными привилегиями If Admin Approval Mode is not enabled, the built-in Administrator account runs all applications by default with full administrative privileges
Рекомендации Best practices
Рекомендуется не включить встроенную учетную запись администратора на клиентский компьютер, а использовать стандартную учетную запись пользователя и управление учетной записью пользователя (UAC). It is recommended not to enable the built-in Administrator account on the client computer, but to use the standard user account and User Account Control (UAC) instead. Если вы хотите включить встроенную учетную запись администратора для выполнения административных задач, в целях безопасности также следует включить режим утверждения администратора. If you want to enable the built-in Administrator account to carry out administrative tasks, for security reasons you should also enable Admin Approval Mode. См. отчет UAC-Admin-Approval-Mode-for-the-Built-in-Administrator-account See UAC-Admin-Approval-Mode-for-the-Built-in-Administrator-account
Чтобы включить режим утверждения администратора, необходимо также настроить параметр локальной политики безопасности: Управление учетной записью пользователя: поведение запроса на повышение для администраторов в режиме утверждения администратора, чтобы получить согласие на безопасном рабочем столе, а затем нажмите кнопку ОК. **** To enable Admin Approval Mode, you must also configure the local security policy setting: User Account Control: Behavior of the elevation prompt for administrators in Admin Approval Mode to Prompt for consent on the secure desktop and then click OK.
После включения режима утверждения администратора, чтобы активировать параметр, необходимо сначала войти и выйти. Кроме того, вы можете выполнять gpupdate /force из команды с повышенным запросом. After enabling Admin Approval Mode, to activate the setting, you must first log in and out. Alternatively, You may perform gpupdate /force from an elevated command prompt.
Местонахождение Location
Конфигурация компьютераПараметры WindowsПараметры безопасностиЛокальные политикиПараметры безопасности Computer ConfigurationWindows SettingsSecurity SettingsLocal PoliciesSecurity Options
Значения по умолчанию Default values
В следующей таблице перечислены фактические и эффективные значения по умолчанию для этой политики. The following table lists the actual and effective default values for this policy. Значения по умолчанию также можно найти на странице свойств политики. Default values are also listed on the policy’s property page.
| Тип сервера или объект групповой политики Server type or GPO | Значение по умолчанию Default value |
|---|---|
| Default Domain Policy Default Domain Policy | Не определено Not defined |
| Политика контроллера домена по умолчанию Default Domain Controller Policy | Не определено Not defined |
| Параметры по умолчанию для автономного сервера Stand-Alone Server Default Settings | Отключено Disabled |
| Эффективные параметры по умолчанию DC DC Effective Default Settings | Отключено Disabled |
| Действующие параметры по умолчанию для рядового сервера Member Server Effective Default Settings | Отключено Disabled |
| Действующие параметры по умолчанию для клиентского компьютера Client Computer Effective Default Settings | Отключено Disabled |
Управление политикой Policy management
В этом разделе описываются функции и средства, доступные для управления этой политикой. This section describes features and tools that are available to help you manage this policy.
Необходимость перезапуска Restart requirement
Нет. None. Изменения в этой политике становятся эффективными без перезапуска устройства при локальном сбережении или распространении через групповую политику. Changes to this policy become effective without a device restart when they are saved locally or distributed through Group Policy.
Вопросы безопасности Security considerations
В этом разделе описывается, каким образом злоумышленник может использовать компонент или его конфигурацию, как реализовать меры противодействия, а также рассматриваются возможные отрицательные последствия их реализации. This section describes how an attacker might exploit a feature or its configuration, how to implement the countermeasure, and the possible negative consequences of countermeasure implementation.
Уязвимость Vulnerability
Один из рисков, которые пытается смягчить функция UAC, — это вредоносное программное обеспечение, запущенное под повышенными учетными данными, без того, чтобы пользователь или администратор не знали о его деятельности. One of the risks that the UAC feature tries to mitigate is that of malicious software running under elevated credentials without the user or administrator being aware of its activity. Вектор атаки для вредоносных программ — обнаружение пароля учетной записи администратора, так как учетная запись пользователя была создана для всех установок Windows. An attack vector for malicious programs is to discover the password of the Administrator account because that user account was created for all installations of Windows. Для устранения этого риска встроенная учетная запись администратора отключена на компьютерах, работающих по крайней мере в Windows Vista. To address this risk, the built-in Administrator account is disabled in computers running at least Windows Vista. На компьютерах с windows Server 2008 включена учетная запись администратора, и пароль необходимо изменить при первом входе администратора. In computers running at least Windows Server 2008, the Administrator account is enabled, and the password must be changed the first time the administrator logs on. При установке по умолчанию компьютера, на который работает по крайней мере Windows Vista, если компьютер не присоединяется к домену, первая создаемая учетная запись пользователя имеет эквивалентные разрешения локального администратора. In a default installation of a computer running at least Windows Vista, if the computer is not joined to a domain, the first user account you create has the equivalent permissions of a local administrator.
Противодействие Countermeasure
Включить управление учетной записью пользователя: режим утверждения администратора для параметра встроенной учетной записи администратора, если включена встроенная учетная запись администратора. Enable the User Account Control: Admin Approval Mode for the Built-in Administrator account setting if you have the built-in Administrator account enabled.
Возможное влияние Potential impact
Пользователям, входя в систему с помощью учетной записи местного администратора, запрашивается согласие, когда программа запрашивает повышение привилегии. Users who log on by using the local administrator account are prompted for consent whenever a program requests an elevation in privilege.
10. January 2014
Johannes Ahrends
Beginning with Oracle Database 12c Release 1, Oracle introduces the new Oracle Home User account under Windows. But why? Unitl now, everything runs really fine without any special accounts. Those who work with Oracle databases on UNIX-like operating systems knows the clear seperation of root user and Oracle DBA (oracle). Everyone has their tasks, the DBA takes care of the database or the software installation (usually oinstall group) and only the root can make changes tot he server. On Windows this is different so far. It is difficult to design a granular assignment of rights sometimes and in doubt the administrator account has to serve. With 12c Oracle is now trying to bring the similar rights concept on UNIX to Windows database servers.
Home User Account
The Oracle Home User Account is a low privileged account without administrator rights. It is used to manage the database (not the database software) and the associated services. When you install the database software Oracle provides us with three choises.
For selection is firstly „Use Exisiting Windows User“, either a local user, a domain user or a so-called managed service account (MSA). The second option is to „Create New Windows User“, where a local user account is created on the computer. However, the account has no resgistration or login permission. The third option „Use Windows Built-in Account“ means the built-in acocunt that Windows uses internally to manage ist services and privileges. In general Oracle uses SYSTEM or local system for this. This last selection would then correspond to the configuration as it was made up to Oracle 11g. This practically defines to set up Home User account. No matter what choice you make, after installation, there is no way back. You can not change the Oracle Home User anymore!
I can not give an clear answer in which case you should choose which account. It really makes sense, if you’re in a domain to define a domain user account or a msa. The benefits of centrelized managagement through Active Directory to the local variant need no discussion here. However you should consider, distinguishing features between msa and „normal“ domain account. But what impact will now have the different options? In concrete terms, the new home user has full access to the entire Oracle Base directory. This permission will be inherited to all sub-directories and files. The patching of the software remains the task of the administrator. As already said the home user must not have administrative privileges and is excluded here. This distinction gets clearly when you look at the owner of the Oracle Home. It is the one administrator who installed the software. Owner of the data file directory and the data files is the Oracle Home User.

Another major change is that the Home User has the authority over services led by the database instance itself and the listener.
The Home User can therefore start and stop the appropriate services. As a consequence, the Home User is also required when creating a new listener
or when a new database is to be created.
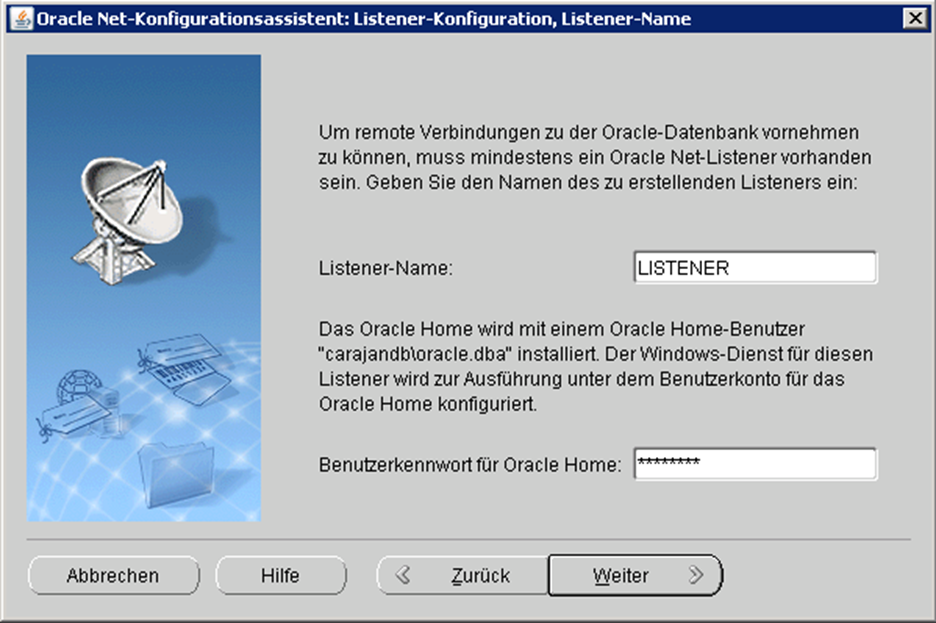
At the end I like to refer to the Oracle Home User Control Tool. If the password of the Home User Account changes Oracle would like to be aware of this circumstance. Therefore you can find a shortcut to a Batch in the Oracle program folder „Update password of the Oracle Home User“.
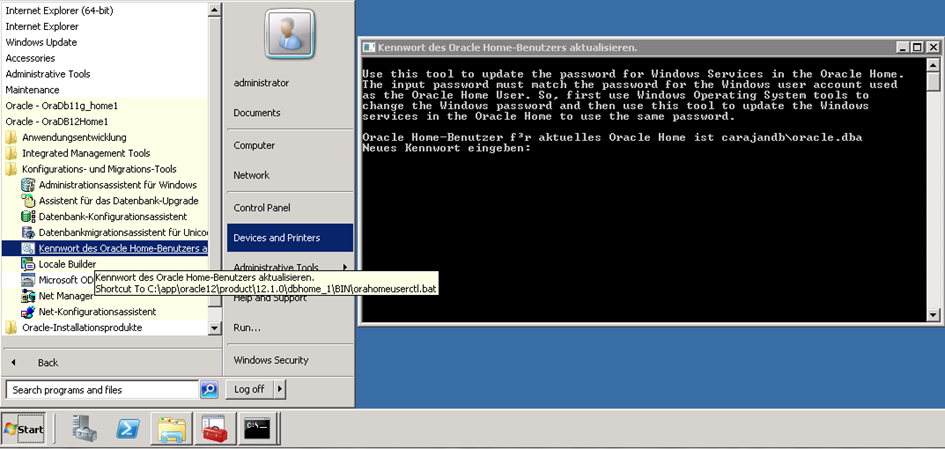
Alternatively, you have to enter „orahomeuserctl“ on the command line and with „list“ you can initially display the Home User:
C:UsersAdministrator> orahomeuserctl list
And announce the new password with the following syntax:
orahomeuserctl updpwd [-user username] [-host hostname1, hostname2, …] [-log logfilename]
Very important additional information you will find here:
Caution, 12c Oracle Home User cannot be changed!

Johannes Ahrends
Managing Director, Oracle ACE and specialist for topics like HA, migration, Standard Edition, backup and more
J just installed a new copy of Oracle Database 12c Enterprise Edition with following basic install time settings:
- Skip software updates
- install database software only
- single instance database installation
- English language
- Enterprise edition
- use windows built-in account
- install path: C:Oracle
The installation went smoth without any critical warnings or errors.
After installation when I start SQL*Plus command line it requires me
User Name:
Password:
I have not specified any of these during installation. S, what could probably be the credentials?
I tried using my windows log-in user & password to login (Nte: My windows log-in name has a white space in middle as: FirstName LastName) but it issued me an ERROR message as:
Enter user-name: ******* ********
SP2-0306: Invalid option.
Usage: CONN[ECT] [{logon|/|proxy} [AS {SYSDBA|SYSOPER|SYSASM|SYSBACKUP|SYSDG|SYSKM}] [edition=value]]
where <logon> ::= <username>[/<password>][@<connect_identifier>]
      <proxy> ::= <proxyuser>[<username>][/<password>][@<connect_identifier>]
Then I tried using same user name without white space but got another Error message as:
Enter user-name: ***************
Enter password:******
ERROR:
ORA-12560: TNS:protocol adapter error
Is there anywhere I am going wrong? Please suggest me the solution
Thanks…
asked May 23, 2014 at 13:25
![]()
My suggestions:
1: First ensure that you have specified ORACLE_SID AND ORACLE_HOME environment variable before trying to login. You can try following commands to set those environment variables:
Put correct path and sid_name for the following commands and insert them system environment variable. Don’t forget to check the value of respective environment variable before login attempt.
ORACLE_BASE=C:oracle;
ORACLE_HOME=$ORACLE_BASEproduct11.2db_1;
ORACLE_SID=sid_name_here;
PATH=$PATH:ORACLE_HOMEbin;
Now, issue should get resolved if you getting trouble because of environment variable.
2: Next, verify the status of listener. See the output of following commands to confirm the status of listener:
lsnrctl status
lsnrctl services
Above command show the status of listener and associated service. If you didn’t see SID and associated service name, You need to start listener service (i.e. from services.msc).
3: Sometimes, you might be getting this issue because of TNS_ADMIN not setup properly. Configure TNS_ADMIN in system environment variable and also mention in the tnsnames.ora file. Refer link for the discussion configuring TNS_ADMIN in windows environment.
answered May 26, 2014 at 6:24
![]()
3
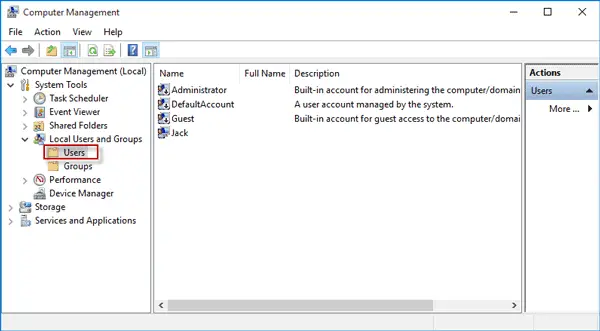
Use the Command Prompt instructions below for Windows 10 Home. Right-click the Start menu (or press Windows key + X) > Computer Management, then expand Local Users and Groups > Users. Select the Administrator account, right-click on it, then click Properties. Uncheck Account is disabled, click Apply then OK.
How To Enable the Built-In Administrator Account in Windows 10
- Click the Start menu, type Local Users and Groups and hit Return.
- Double click on the Users folder to open it.
- Right click on Administrator in the right column and select Properties.
- Make sure that Account is disabled is unchecked.
How do I enable the built-in administrator account in Windows 10?
How to Enable the Administrator Account in Windows 10
- Click Start and type command in the Taskbar search field.
- Click Run as Administrator.
- Type net user administrator /active:yes, and then press enter.
- Wait for confirmation.
- Restart your computer, and you will have the option to log in using the administrator account.
What is built-in administrator account in Windows 10?
Windows 10 includes a built-in Administrator account that, by default, is hidden and disabled for security reasons. Sometimes, you need to perform a bit of Windows management or troubleshooting or make changes to your account that requires administrator access.
Does Windows 10 have a built-in administrator account?
In Windows 10, the built-in Administrator account is disabled. You can open a Command Prompt window and enable it with two commands, but think twice before you go down that road. Enabling the local Administrator account adds it to the sign-in screen.
How do I activate administrator?
In the Administrator: Command Prompt window, type net user and then press the Enter key. NOTE: You will see both the Administrator and Guest accounts listed. To activate the Administrator account, type the command net user administrator /active:yes and then press the Enter key.
How do I find my administrator username and password?
Press Windows key + R to open Run. Type netplwiz into the Run bar and hit Enter. Select the User account you are using under the User tab. Check by clicking “Users must enter a user name and password to use this computer” checkbox and click on Apply.
Double-click on the Administrator entry in the middle pane to open its properties dialog. Under the General tab, uncheck the option labelled Account is disabled, and then click Apply button to enable the built-in admin account.
How do I unlock local administrator account in Windows 10?
1. Press the Win+R keys to open Run, type lusrmgr. msc into Run, and click/tap on OK to open Local Users and Groups. If Account is locked out is grayed out and unchecked, then the account is not locked out.
How do I fix administrator permissions in Windows 10?
Administrator permission issues on window 10
- your User profile.
- Right click on your User profile and select Properties.
- Click the Security tab, under Group or user names menu, select your user name and click on Edit.
- Click on Full control check box under Permissions for authenticated users and click on Apply and OK.
How do I disable local administrator?
Enabling/Disabling Built-in Administrator Account in Windows 10
- Go to Start menu (or press Windows key + X) and select “Computer Management”.
- Then expand to “Local Users and Groups”, then “Users”.
- Select the “Administrator” and then right-click and select “Properties”.
- Uncheck “Account is disabled” to enable it.
How do I get Windows to stop asking for Administrator permission?
Go to the System and Security group of settings, click Security & Maintenance and expand the options under Security. Scroll down until you see the Windows SmartScreen section. Click ‘Change settings’ under it. You will need admin rights to make these changes.
How do I change the administrator name on Windows 10?
To change the administrator name on your Microsoft account:
- In the search box on the taskbar, type Computer Management and select it from the list.
- Select the arrow next to Local Users and Groups to expand it.
- Select Users.
- Right-click Administrator and select Rename.
- Type a new name.
Windows OS Hub / Windows 10 / How to Enable/Disable the Built-in Administrator Account on Windows 10?
As you know, during Windows 10 installation the system prompts creating a user account and grants local administrator privileges to this account. However, during the installation another built-in (hidden) administrator account is created, which is disabled for security reasons. In this article we’ll tell about the built-in Windows 10 Administrator account, what it is used for, how to enable or disable it, and reset the password.
Contents:
- What is Built-in Administrator Account on Windows?
- How to Enable the Built-in Administrator Account on Windows 10?
- Lost Administrator Privileges (Password) on Windows 10
What is Built-in Administrator Account on Windows?
The Administrator account is created automatically during Windows installation and is used to initialize the operating system. This account is then disabled and the user is prompted to create their own account, which is added to the local Administrators group.
The built-in administrator account has full unlimited privileges on a computer. This account is not subject to UAC (User Account Control), and all programs are executed without a UAC prompt (this is an important difference from user accounts with administrator privileges). The built-in Administrator in Windows is somewhat similar to root in Linux – it has maximum rights on the system (not as NT AUTHORITYSYSTEM, of course, but close ones).
You can enable UAC for the built-in Windows administrator by using the Group Policy option User Account Control: Admin Approval Mode for the Built-in Administrator account.
The built-in Administrator is disabled by default in Windows 10 and Windows Server 2016. This account cannot be removed or excluded from the Administrators group.
If you boot Windows in Safe or Recovery Mode, the administrator account is automatically enabled.
For security reasons, it is recommended to rename the built-in administrator account. This can be done manually, using LAPS or the GPO parameter Accounts: Rename administrator account under Computer Configuration -> Policies -> Windows Settings -> Security Settings -> Local Policies -> Security Options.
Renaming the administrator account somewhat reduces the risks, but the main problem is that its SID doesn’t change. The built-in administrator account always has the well-known SID S-1-5-domain-500.
Tip. By default, the Administrator password is not set (empty).
Important. Microsoft doesn’t recommend keeping the Administrator account enabled (active), or constantly work under it. You only need to enable the “Administrator” account if absolutely necessary to perform a specific task or troubleshoot. Don’t use it to automatically log in to Windows.
How to Enable the Built-in Administrator Account on Windows 10?
Let’s take a look at some simple ways to enable the built-in Administrator account in Windows 10.
The quickest and easiest way to activate the administrator account is from the command prompt (or PowerShell console) running with elevated privileges.
To do this, run the command:
net user administrator /active:yes

The command completed successfully.
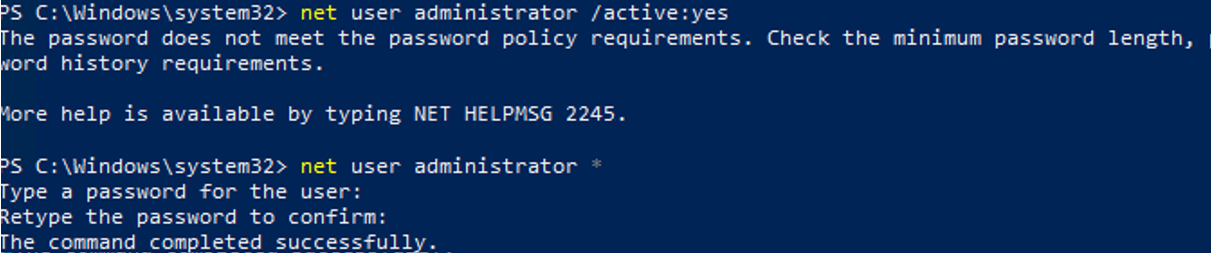
As we said earlier, in modern versions of Windows, there is no password set for the administrator account. If a domain password complexity policy is applied to your computer, you may see the following message when you try to enable the administrator account:
The password does not meet the password policy requirements. Check the minimum password length, password complexity and password history requirements.
In this case, before enabling the administrator account, you need to set a password for it:
net user administrator *
Don’t use a weak password for the built-in administrator (you can generate it using a simple PowerShell script).
If the previous command returns “The user name could not be found”, most likely the administrator account on the computer has been renamed.
You can find out the name of the built-in administrator account on your computer by its known SID (at the end it necessarily contains -500). Use the command:
wmic useraccount where "SID like 'S-1-5-%-500'" get name

In this case, the built-in account has been renamed to admin. To enable it, run:
net user admin /active:yes
In order to list all local accounts:
net user
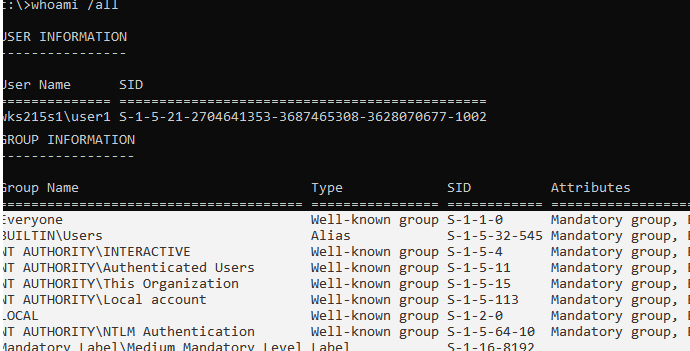
If you get an “System error 5 has occurred. Access is denied” when you try to enable the built-in Windows administrator, make sure that the cmd.exe or powershell.exe console is running as an administrator (elevated). Also check that your account is a member of the local Administrators group.

List the groups your account is member of:
whoami /all
In this example, user1 is not a member of the local Administrators group, and therefore doesn’t have permissions to enable the administrator account.
You can display a list of users in the local administrators group in Windows like this:
net localgroup administrators
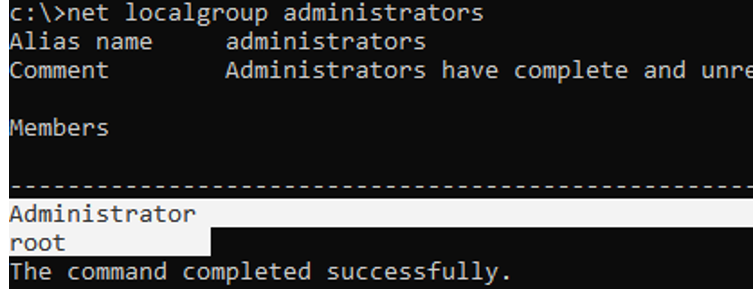
In this example, there are only two accounts in the Administrators group. If you don’t know the password for any of them, then you don’t have administrator rights on the computer. To enable the built-in administrator account and grant your user account local admin permissions, see the next section of the article
Note. This way to activate the built-in administrator account works in all Windows 10 editions. The other methods described below are not applicable to Home editions of Windows 10 which don’t have the Computer and User Management snap-ins (compmgmt.msc and lusrmgr.msc) and the Local Group Policy Editor (gpedit.msc).
Open the MMC snap-in Local Users and Groups by entering lusrmgr.msc in the search bar or in the command prompt. In the console window, expand the Users section. Find the account named Administrator and double-click it, then uncheck Account is Disabled. Save the changes.

The administrator account is now enabled. You can change its password in this console by selecting Set Password option in the context menu.
You can enable the built-in administrator account through the local GPO. Open the Local Group Policy Editor gpedit.msc (or Local Security Policy Editor — secpol.msc). Go to Computer Configuration -> Windows Settings -> Security Settings -> Local Policies -> Security Options. Find Accounts: Administrator account status policy and set it to Enable.

Update the Group Policy settings with the command: gpupdate /force or just reboot your computer.
After enabling the administrator account in any of the above ways, it will be displayed on the Windows logon screen.
To disable the built-in administrator account, use the command
net user administrator /active:no
If you enabled the built-in Administrator through the Accounts: Administrator account status policy, you will have to disable it (or completely reset all local GPO settings).
Lost Administrator Privileges (Password) on Windows 10
There are situations when you have accidentally disabled your user account with administrator privileges or removed your account from local admins group. Let’s look on how to enable the built-in Administrator or add your account to the local Administrators group (even if you can’t logon Windows).
You need to boot your computer from a LiveCD (but not an MSDaRT recovery image) or a Windows 10 install media. The easiest way to create a bootable USB stick with a Windows 10 install image is using the Media Creation Tool.
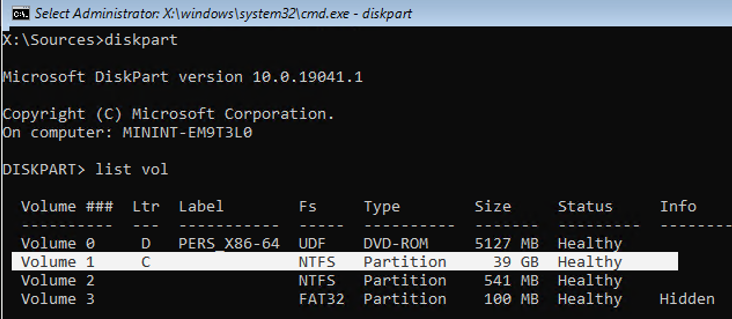
Press Shift + F10 on the Windows Setup screen. A command prompt will open.
Now you need to determine which drive your Windows is installed on. Run diskpart and enter list vol. In my example, you see that Windows is located on the C: drive. This is the drive letter I will use in the following commands. Type exit to close the diskpart session.
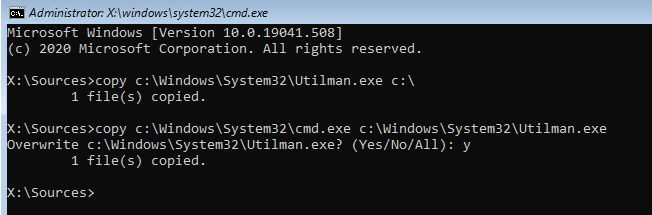
Run the following commands to create a copy of utilman.exe (Ease of Access applet) and replace it with the executable cmd.exe:
copy c:windowsSystem32utilman.exe c:

copy c:windowsSystem32cmd.exe c:windowsSystem32utilman.exe
Reboot your computer:
wpeutil reboot
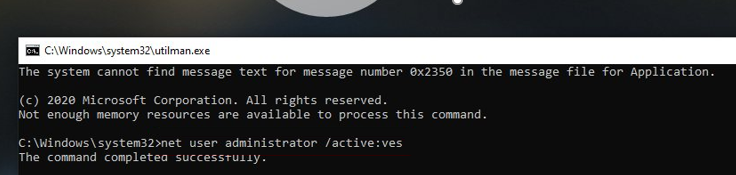
Boot Windows normally. On the Windows login screen (with a list of accounts), press the Win + U keys combination.
A command prompt window will open with System privileges. To add your account to the local Administrators group, enable the built-in Windows administrator and reset its password, run the commands:
net localgroup administrators user1 /add

net user Administrator /active:yes

net user administrator *
Now you can logon Windows under built-in Administrator or your user account, which has been assigned the local administrator permissions.
Be sure to replace the original utilman.exe file. Boot from the install media again and run the command:
copy c:utilman.exe c:windowsSystem32utilman.exe
In this article, we understand the step-by-step installation process of Oracle 19c on Windows Server 2019. The minimum hardware requirement to install an Oracle database server is following:
Server hardware requirements:
- Processor: Intel EM64T or AMD64
- RAM: Minimum 2 GB
- Available Disk space: 12 GB or more
- Swap (Virtual Memory): Same size as the physical memory size (Minimum 2GB)
- Screen Resolution: Minimum screen resolution must be 1024×768
Hard disk requirements:
The oracle recommends installing oracle home on the NTFS file system or ACFS. The amount of space required by the single instance of the oracle database is 12GB or higher. Space includes
- Temp space: 595 MB
- Oracle Home: 6.5 GB
- Oracle inventory files: 53 MB
- Oracle data files (oradata, admin data files, flash_recovery_area): 4.4 GB
The Oracle product family contains the following editions:
- Oracle database standard edition one
- Oracle database standard edition
- Oracle database enterprise edition
- Oracle database express editions
You can read Database Licensing Information User Manual to learn more about the licensing information and
list of features supported by the above-listed editions.
Now, let us understand the installation process. For demonstration, I have created a virtual machine and installed
Windows Server 2019 on it.
Download oracle database setup files
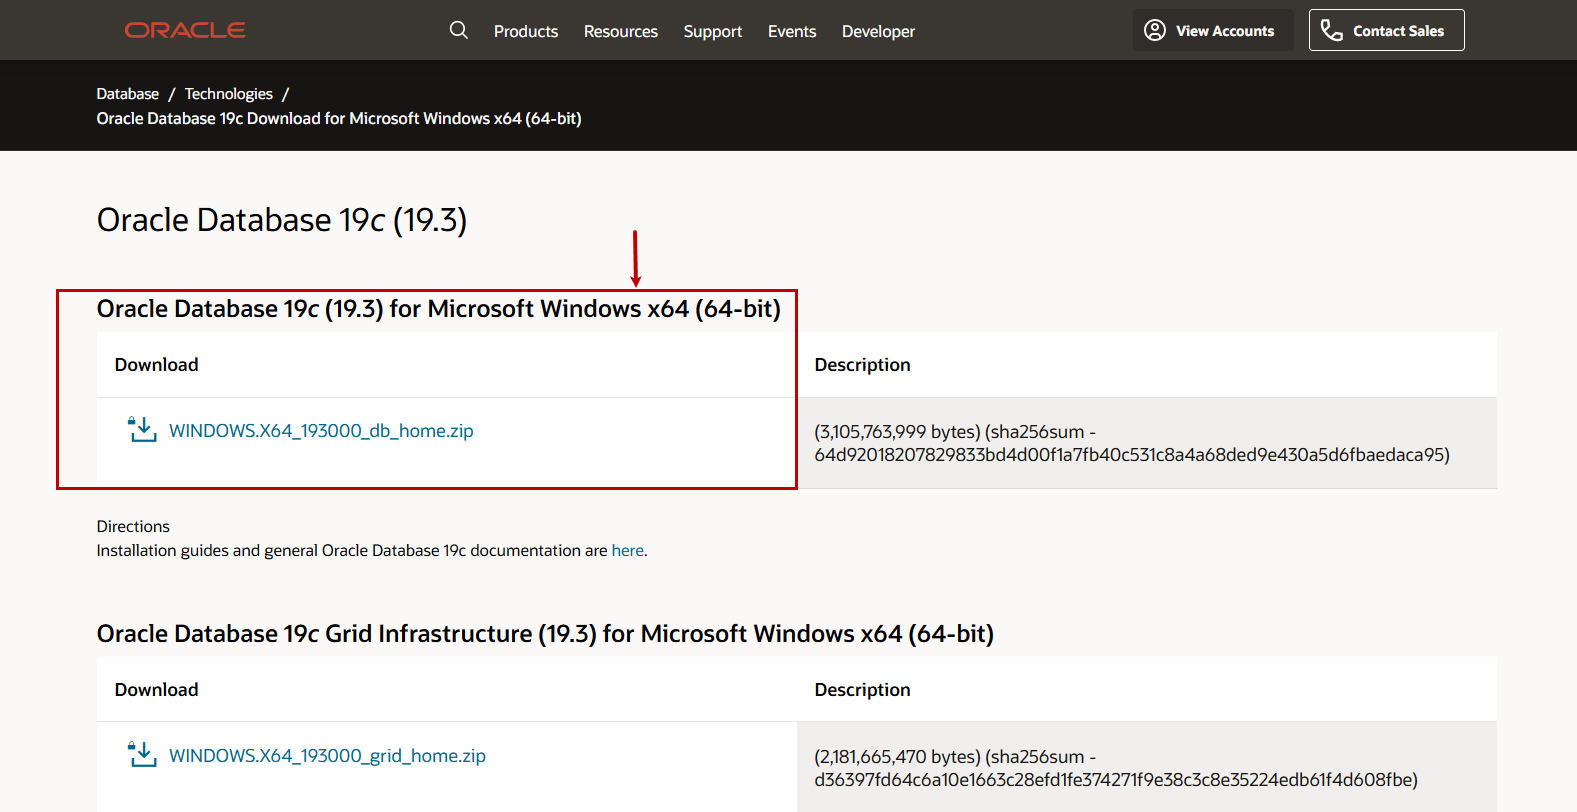
First, let us download the oracle setup files. The setup files are available on the Oracle download page. On the
download page, you can see the various installation packages. We are installing the oracle database only, so click
on the link under the Oracle Database 19c (19.3) for Microsoft Windows x64.
Install Oracle software and starter database
Once installation files are downloaded, copy them to the desired location and unzip the installation files. Once
files are extracted, run the Setup.exe file to start the Oracle Universal Installer.
The installation process begins. On the configuration options screen, you can choose any of the following
installation options.
- Install oracle software and starter database
- Install oracle software
In our example, we are installing oracle software and starter database; therefore, select Create and configure
single instance database option.
On the Select System Class screen, you can choose the class of machine on which you are installing
the oracle database. If you are installing it on the server-class machine, select Server Class, and if you are
installing it on the Desktop class machine, choose Desktop class. In our case, we are installing oracle on a
workstation, so I have chosen the Desktop class.
On Specify oracle Home User screen, you can set up an account used to run the oracle services on Windows. You can
choose any of the following options:
- Virtual Account: If you do not want to create a separate account for oracle home, you can choose the Virtual account. For enhanced security, Oracle recommends using a Virtual account
- Existing Windows User: If you have created an administrator or non-administrator Windows
account and you want to use it, then select the Existing Windows User option. We must specify the username and password of the account - Create New Windows User: If you want to create a new account, you can choose the Create New
Windows User option. The Oracle Universal Installer will create a user. You must specify the desired username
and password - Use Windows Built-In account: If you want to use the account created by the Windows server, you
can choose to use Windows built-in account option
In our case, we are creating a separate user for oracle services; then, I have selected Create New Windows User.
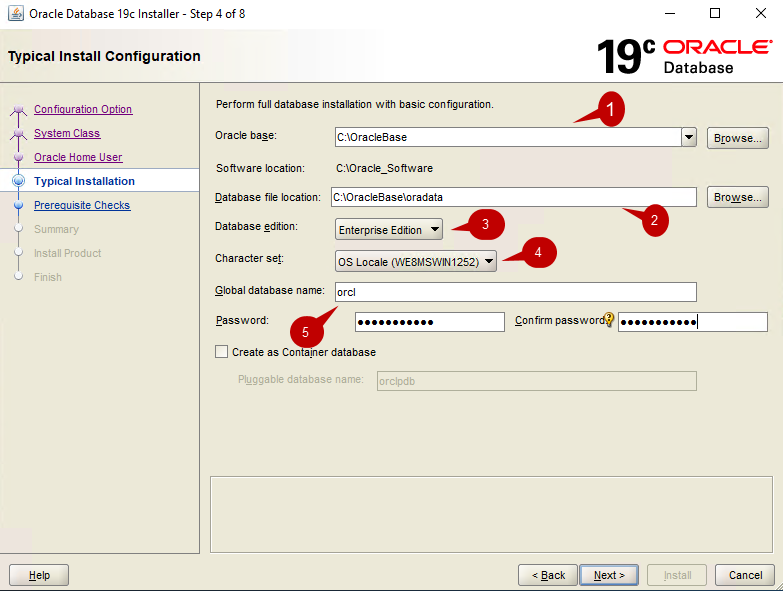
In the Typical install Configuration screen, you can provide the values of the following parameters.
- Oracle base: Specify the location of the Oracle base directory. In our case, the location is
C:OracleBase - Database file location: Specify the location where you want to keep the database files. In our
case, the location is C:OracleDBFiles - Database edition: Specify the edition of the oracle software. You can choose Enterprise edition
or standard edition. In our case, I have selected Enterprise Edition - Character set: Specify the character set that you want to use. You can choose UNICODE or OS
Locale. I have selected OS Locale - Global database name: Specify the global database. The default database name is
ORCL. I have not changed the global database name - Password: Specify the password to access the global database
- Create as Container database: If you want to configure the database as a container database,
you can enable the Create as Container database option. I have disabled it
Following is the screenshot of the configuration option.
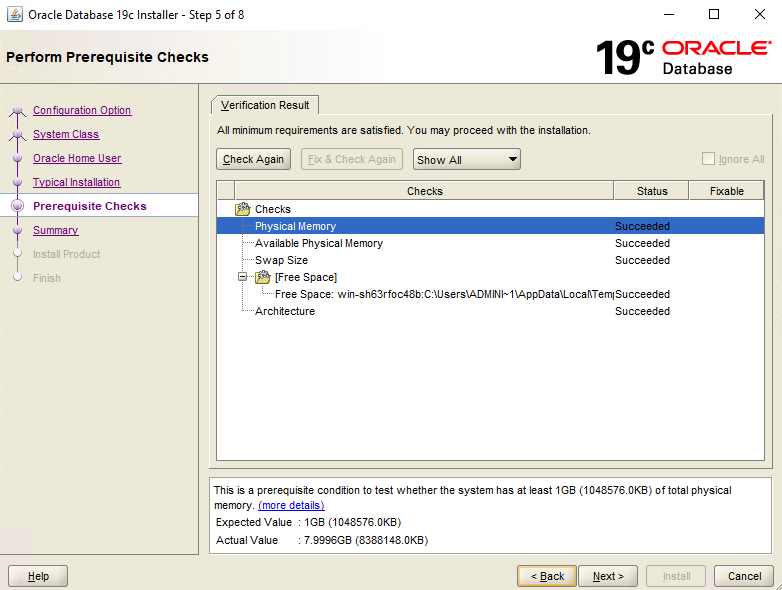
On the performance prerequisite check screen, the wizard verifies minimum prerequisites to install oracle software
are fulfilled or not. OUI check following parameters:
- Physical memory
- Available Physical memory
- Swap Size
- Free space on the disk
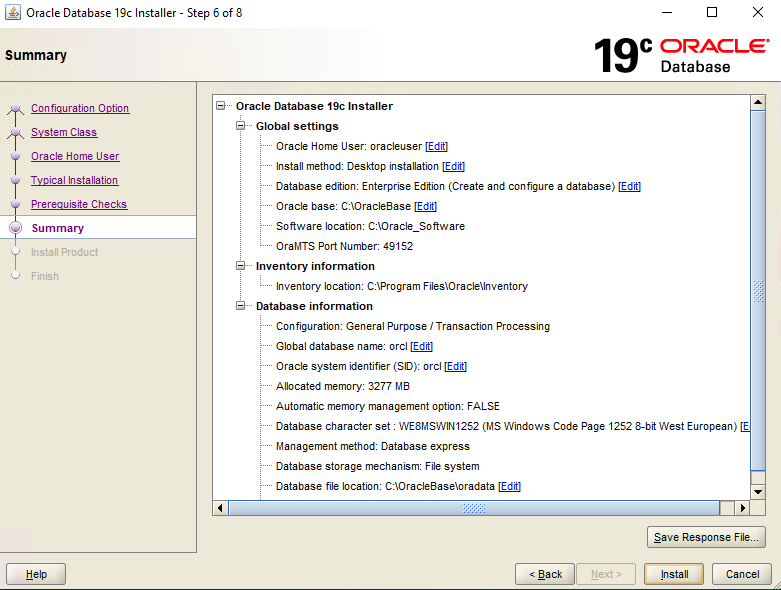
On the Summary screen, you can view the summary of the configuration parameters. You can review the settings and, if
required, make changes. Click install to begin the installation process of Oracle 19c.
The installation process begins. The time to complete the installation depends on the configuration of the
Server/workstation.
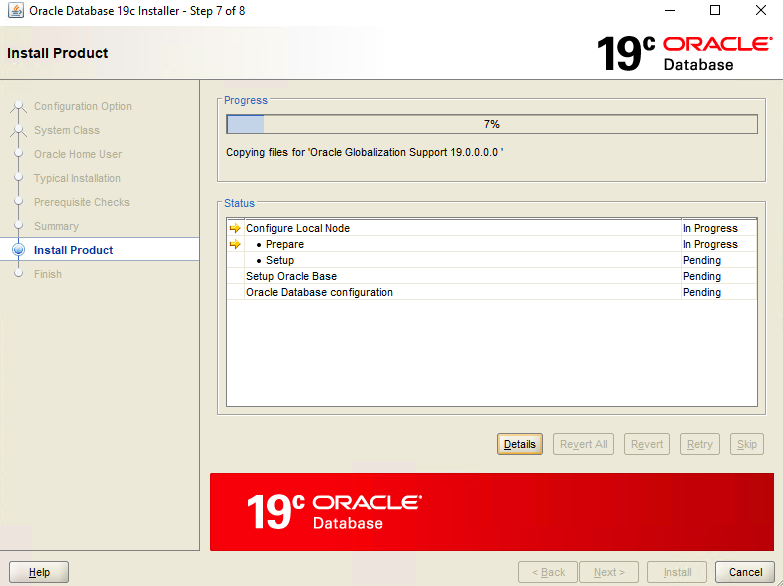
Once installation completes, you can close the installer. The setup installs oracle enterprise manager. It is a
web-based tool that is used to monitor and configure the Oracle 19c database.
Connect to Oracle 19c Enterprise Manager Database Express
Let us take a quick look at an oracle Enterprise Manager Database express. In our case, we can launch it by
accessing the https://localhost:5500/em URL.
First, the enterprise prompts for the username and password. Specify the SYS as username (It is created during the
installation of the oracle) and master password used on the Typical Installation screen. Once authenticated, you can
view the status of the Oracle services and performance and resource matrix.
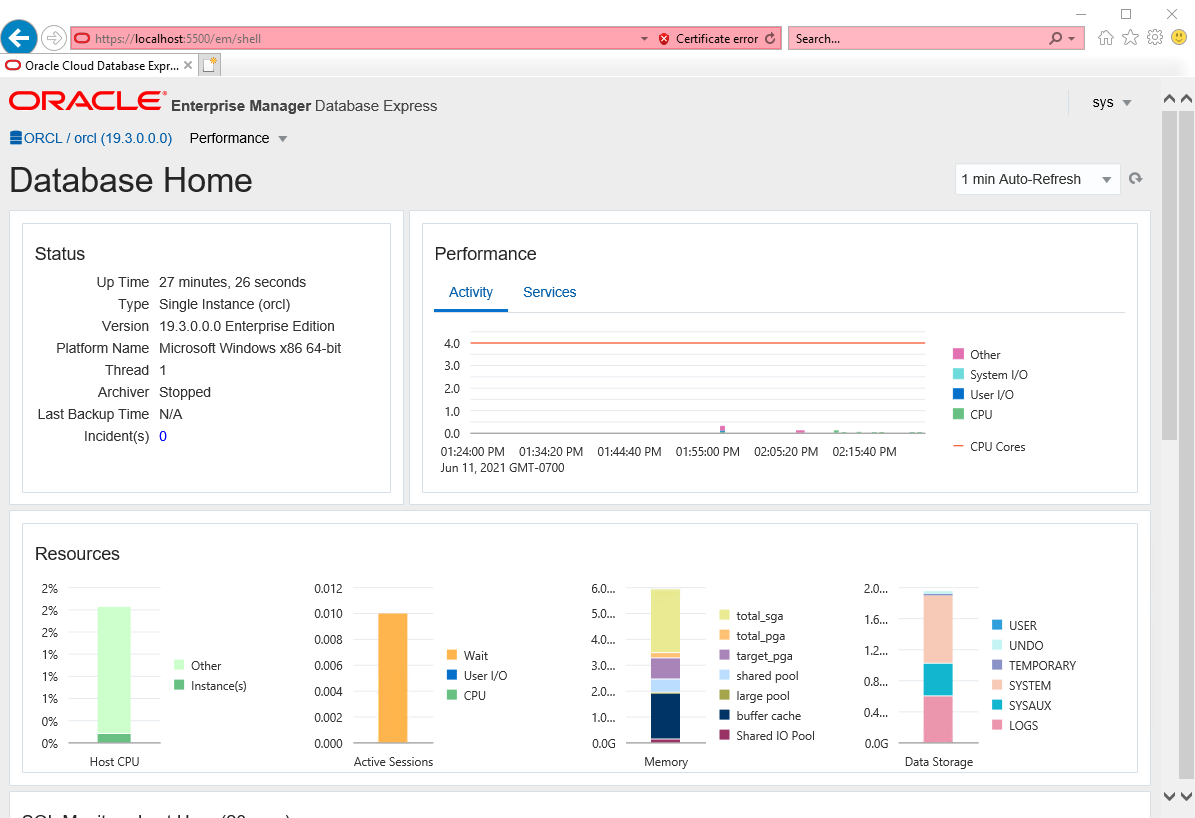
In the SQL monitor Section, you can view the top 20 SQL Queries along with the query execution duration, SQL Plan hash, Username, SQL Text, and IO requests. In our case, you will not see details of the queries because we have not run any query using the SYS account.
Connect to ORACLE using SQL*Plus
SQL*Plus is a command line utility that can run the queries and PL/SQL script on the oracle database. When we install oracle software, the SQL*Plus installs automatically. If you use client tools from a separate machine, you
can download and install the SQL*Plus package from the official oracle download page.
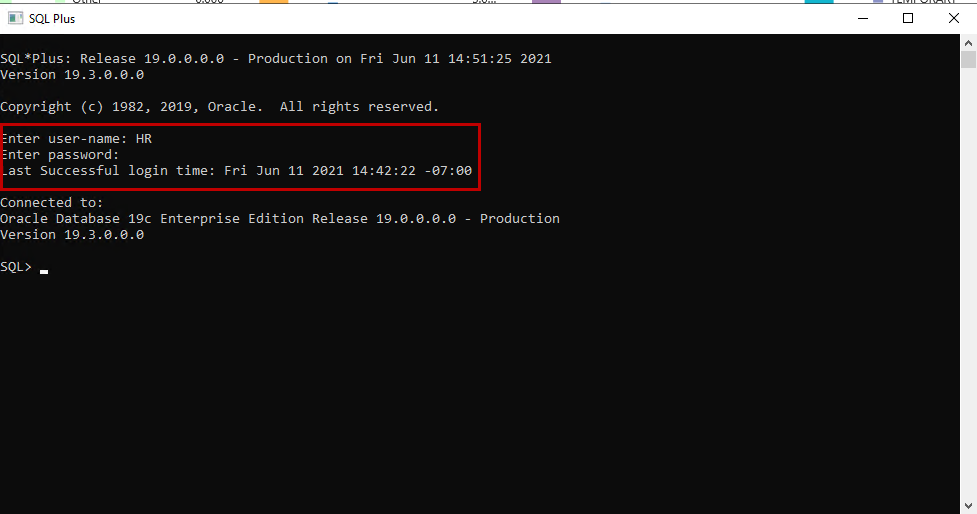
When we execute the SQL*Plus utility, it prompts for the username and password. You must specify the appropriate username and password. Suppose we want to connect to the Oracle 19c instance using the sys user. To connect, open SQL*Plus and specify the appropriate username and password.
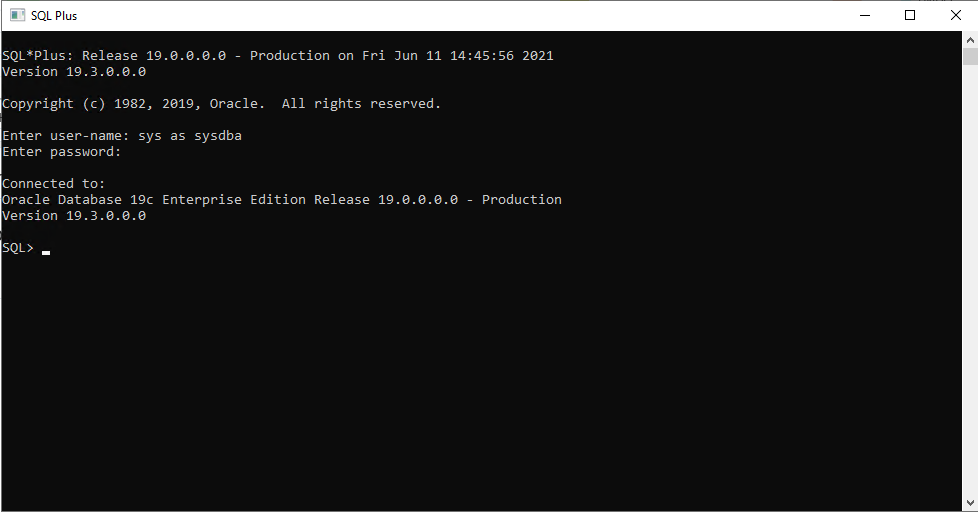
As you can see, we are connected to the oracle using the sys user. Now, let us run some simple queries.
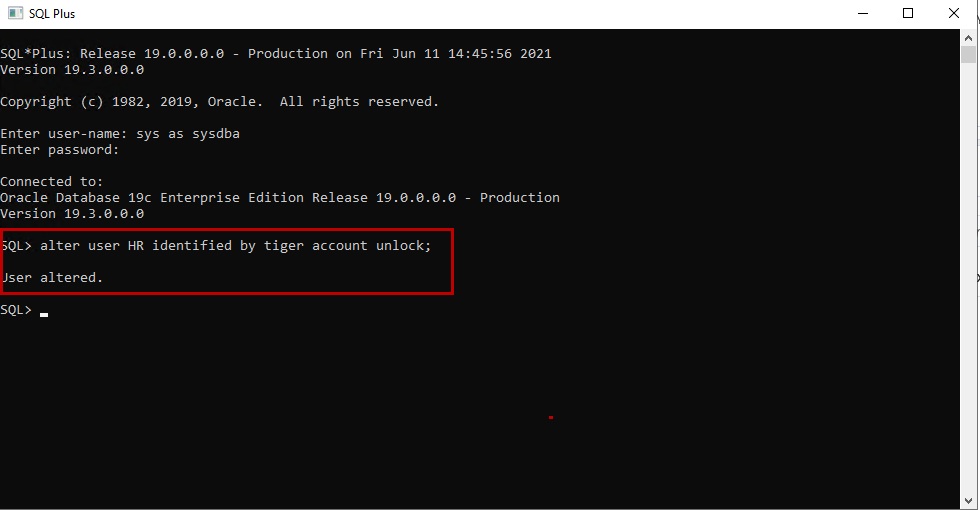
Enable HR schema and Run basic Queries
We have installed a starter database, so we can use the HR schema to run a simple query. The HR user is disabled, so
we must enable it. To do that, open SQL*Plus and connect to sysdba user.

Once connected, run the following query
SQL> alter user HR identified by tiger account unlock;
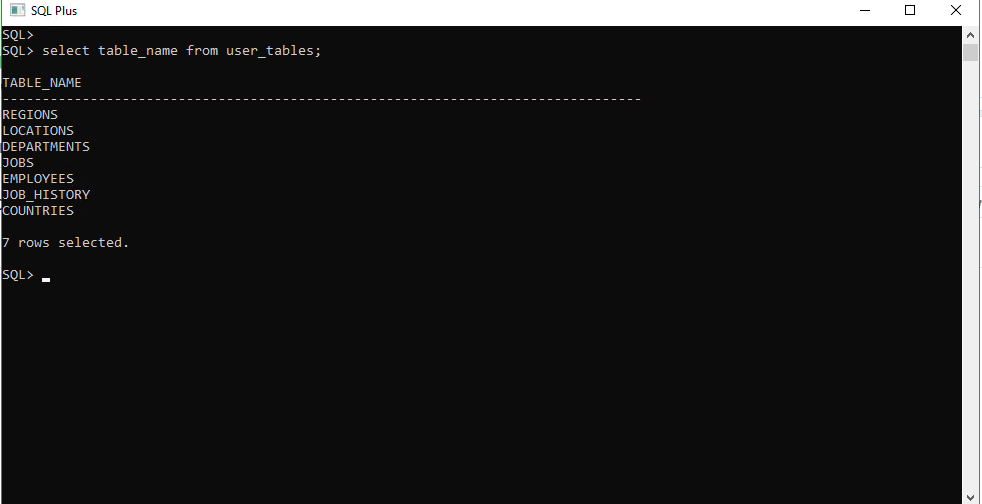
Once the user is enabled, let us view the tables created in the HR schema. First, connect to HR user using SQL*Plus.
To view the tables, we can use user_tables. Run the following query:
SQL> select table_name from user_tables;
As you can see, the query has returned the list of the tables. Now, let us view the structure of the Employees table. To view the structure of any table in oracle, we can use DESCRIBE command.
Query:
SQL> Describe EMPLOYEES;
Output:
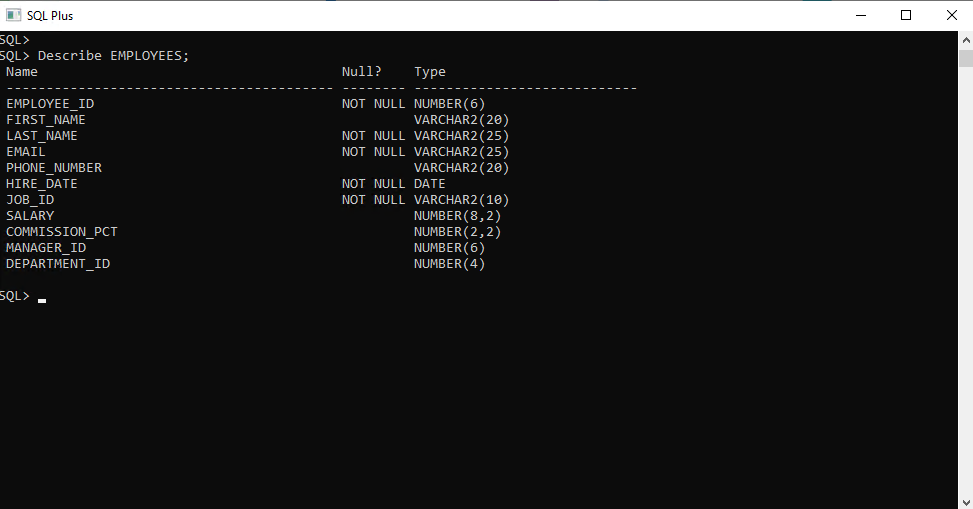
As you can see, the query has returned the structure of the EMPLOYEES table.
Summary
In this article, we learned the step-by-step installation process of the Oracle 19c. This article covers the basic installation process and can be used by junior developers or DBAs who want to kick start their career in oracle. In my upcoming articles, we will learn advanced concepts of administrating the oracle database. Stay Tuned..!!
References
- How to Install Oracle Database 18c on Windows
- Oracle 11g/12c Client Install on Windows: Lightweight and Locked Down
- Author
- Recent Posts

Nisarg Upadhyay is a SQL Server Database Administrator and Microsoft certified professional who has more than 8 years of experience with SQL Server administration and 2 years with Oracle 10g database administration.
He has expertise in database design, performance tuning, backup and recovery, HA and DR setup, database migrations and upgrades. He has completed the B.Tech from Ganpat University. He can be reached on nisargupadhyay87@outlook.com
1. What is Oracle Home User account?
Oracle Home User account is a low privileged non-administrator account, which is to host Oracle Services. Oracle services use Oracle Home User privileges.
2. What is the purpose of introducing Oracle Home User account?
In prior releases, all Oracle Services are running with Local System privileges, which is a very high-privileged built-in account.
Therefore anyone gaining unauthorized access to the server via the Oracle Service did so with complete privileges.
To avoid this security vulnerability, a low privileged non-administrator account, Oracle Home User is introduced to host Oracle Services.
3. Who can be Oracle Home User?
Any local or domain user without admin privileges, a built-in account, or an a MSA account can be Oracle Home User.
If DBA prefers built-in account as Oracle Home User, then all Oracle services will be running with Local System Privileges.
4. What are Windows Built-in user accounts?
Local System account is a very high-privileged built-in account.
It has extensive privileges on the local system and acts as the computer on the network.
The actual name of the account is “NT AUTHORITYSYSTEM”.
Local Service account is a built-in account that has the same level of access to resources and objects as members of the Users group.
This limited access helps safeguard the system if individual services or processes are compromised.
Services that run as the Local Service account access network resources as a null session without credentials.
Be aware that the Local Service account is not supported for SQL Server or SQL Server Agent services.
The actual name of the account is “NT AUTHORITYLOCAL SERVICE”.
Network Service account is a built-in account that has more access to resources and objects than members of the Users group.
Services that run as the Network Service account access network resources by using the credentials of the computer account.
The actual name of the account is “NT AUTHORITYNETWORK SERVICE”.
5. How Oracle Home User can be associated to Oracle Home?
During installation OUI provides three options to associate an Oracle Home User to the Oracle Home:
1. Let OUI create a new user account to be made as Oracle Home User.
Selecting this option the newly created user will not have login privileges to the server.
This can only be used for Single Instance databases.
2. Select an existing local or domain account to be the Oracle Home User.
If the existing account has login privileges, then Oracle Home User will have login privileges to the server.
This should be a non adminstrator user.
3. Select a built-in account to be the Oracle Home User.
In this option Local System/Local Service built-in account will become Oracle Home user.
6. How to create Oracle Home User in silent installation?
Following are the parameters for creating Oracle Home User in silent installation.
12c introduces these new variable names:
oracle.install.IsBuiltInAccount= false | true
oracle.install.OracleHomeUserName=
oracle.install.OracleHomeUserPassword=
Eg:
oracle.install.IsBuiltInAccount= false
oracle.install.OracleHomeUserName= <homeuser>
oracle.install.OracleHomeUserPassword=<password> ( ** Note: password can be passed in the shell using -promptForPassword flag )
Note:
Set oracle.install.IsBuiltInAccount to true if you want to use Built-In Account, if not set it false.
Invoke setup.exe with “-promptForPassword flag”, if you do not want to embed the password in the response file.
Example of invoking OUI in 12c for Silent Installation Without Response File:
setup.exe -silent -debug -promptForPassword ^
oracle.install.option=INSTALL_DB_SWONLY ^
ORACLE_HOSTNAME=WIN-OQ40SUNBJQU ^
INVENTORY_LOCATION=”C:Program FilesOracleInventory” ^
SELECTED_LANGUAGES=en ^
ORACLE_HOME=E:apphomeowner4product12.1.0dbhome_1 ^
ORACLE_BASE=E:apphomeowner4 ^
oracle.install.db.InstallEdition=EE ^
oracle.install.IsBuiltInAccount=false ^
oracle.install.OracleHomeUserName=homeowner4 ^
SECURITY_UPDATES_VIA_MYORACLESUPPORT=false ^
DECLINE_SECURITY_UPDATES=true ^
oracle.installer.autoupdates.option=SKIP_UPDATES
(Note: Character ‘^’ is command continuation character in Windows Command prompt)
7. What are the roles of Oracle Home User?
Though the Oracle Home User owns the Oracle Home directory, it should not be used to administer the Oracle Home.
Since most of Oracle Services are running with Oracle Home User privileges, this user can stop and start the services in part or in total.
Oracle administrative tasks must use an administrator account per Oracle documentation (site reference guide).
The Oracle Home User account is only to be used for hosting oracle services with low privileges to avoid potential threats to the server hosting Oracle Database.
8. Can Oracle Home User be used to apply patches to the Oracle Home?
Oracle Home User only has permission on Oracle Home directory, it does not have any permissions on the Central Inventory.
So it cannot be used to apply any patches on Oracle Home.
It is not supported to apply any patches on the Oracle Home using this account.
All patching and upgrading has to be done by the same user with administrator privileges that installed the Oracle Home.
9. Which services will not be running with Oracle Home User privileges?
Oracle Collection Manager (OCM) and Listener Services will not be running with Oracle Home User privileges.
Listener service requires the least privileges on system and hence it will run as LocalService.
OCM needs system level privileges and hence it will still be running as Local System.
10. What are the default permissions of Oracle Home User on Oracle Home?
Oracle Home User has full control on Oracle Home directory.
Since Oracle services are running with this accounts privileges it needs access to most binaries in Oracle Home.
11. What Groups are created by OUI during installation?
The following groups will be created by OUI:
ORA_ASMDBA ( Default Members, Installed user )
ORA_ASMOPER ( Default Members, None )
ORA_CLIENT_LISTENERS ( Default Members, None )
ora_dba ( Default Members, Installed user )
ORA_GRID_LISTENERS ( Default Members, None )
ORA_INSTALL ( Default Members, Oracle Home User )
ORA_OPER ( Default Members, None )
ORA_<oracle home name>_DBA ( Default Members, Oracle Home User )
ORA_<oracle home name>_OPER ( Default Members, None )
ORA_<oracle home name>_SYSBACKUP ( Default Members, Installed user )
ORA_<oracle home name>_SYSDG ( Default Members, Installed user )
ORA_<oracle home name>_SYSKM ( Default Members, Installed user )
12. What groups is the Oracle Home User a member of by default?
ORA_INSTALL
ORA_<oracle home name>_DBA
Just like with previous versions, Windows 11 includes a hidden built-in Administrator account that tech-savvy users can use without needing UAC (User Account Control) access. It’s a super useful way of avoiding the need for elevation approval.
Unlike local or Microsoft accounts, the built-in Administrator account is not protected by a password or PIN – However, you can add a password to the account if you want to ensure that unauthorized users are not permitted to use it.
What can I do with a built-in administrator account?
The built-in administrator account will give you full control over the files, directories, services, and any other resources that are stored locally. You can use the built-in admin account to assign permissions, assign different rights to different users, and even create other Local users.
Additionally, you can use the built-in administrator account to take full control of any type of local resources or change the user rights and permissions. But unlike other administrator accounts, you won’t be able to Delete, rename, or restrict the built-in Admin account.
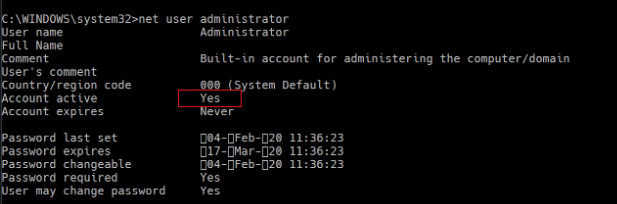
IMPORTANT: The built-in administrator account will give you the same kind of permissions and rights as a normal Admin account. This means that you can also expose your PC to the same kind of security risks.
With that being said, it’s not recommended to use the built-in Admin account as your main choice. Our advice is to only enable the built-in admin account when you actually need to use it and disable it right back when you’re finished using it.
If you’re looking to enable or disable the built-in administrator account on your Windows 11 computer, there are actually 5 different ways to do this:
- Enable / Disable the Built-in Administrator account on Windows 11 via Powershell
- Enable / Disable the Built-in Administrator account on Windows 11 via Command Prompt
- Enable / Disable the Built-in Administrator account on Windows 11 from Local Users and Groups
- Enable / Disable the Built-in Administrator account on Windows 11 using a Local Security Policy
- Enable / Disable the Built-in Administrator account on Windows 11 using CMD at boot
Regardless of your preferred approach to doing things on Windows 11, we’ve created step-by-step instructions for each method, so feel free to stick with your favorite approach.
Enable or Disable the Built-in Admin on Windows 11 via Powershell
Note: The Windows account that you’re using needs to have admin privileges to be able to use this method.
- Press Windows key + X to open up the quick selection menu, then click on Windows Terminal (Admin) from the list of available options.

Accessing the Windows Terminal with admin access - If you’re prompted by the User Account Control window, click Yes to grant administrator privileges.
- Once you’re inside the elevated Powershell window, type or paste one of the following commands depending on if you want to Enable or Disable the built-in administrator account:
Disable Admin Account
Disable-LocalUser -Name "Administrator"

Enable Admin Account
Enable-LocalUser -Name "Administrator"
Note: If you previously renamed the built-in admin account, you will need to replace “Administrator” with the actual name of the account.
Note 2: If you’ve selected a different language when you first installed Windows 11, you will need to change “Administrator” with the equivalent for your language.
- Close the elevated PowerShell prompt and reboot your computer to enforce the change.
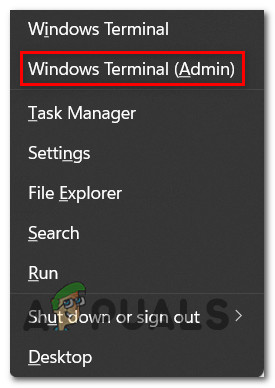
Enable or Disable the Built-in Admin on Windows 11 via Command Prompt
- Press Windows key + R to open up a Run dialog box. Next, type ‘cmd’ inside the text box and press Ctrl + Shift + Enter to ensure that you open Command Prompt with administrative privileges.

Opening a CMD prompt - At the User Account Control prompt, click Yes to grant administrative privileges.
- Inside the elevated Command Prompt window, type one of the following commands depending on if you want to Disable or Enable the built-in administrator account:
Enable Admin Account
net user Administrator /active:yes

OR

Disable Admin Account
net user Administrator /active:no
Note: Replace “Administrator” with the actual name of the built-in account if you previously changed it. Also if your default language is not English, you’ll need to change “Administrator” with the equivalent word in your language.
- Once the status of the built-in Admin account is changed, you can close the elevated CMD and restart your computer to allow the changes to take effect.
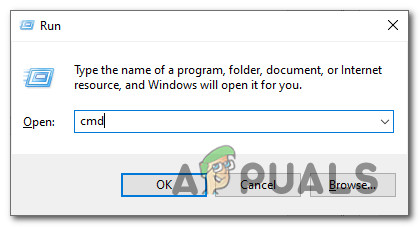
Enable or Disable the Built-in Admin on Windows 11 from Local Users and Groups
Note: The utility needed for this method (Local Users and Groups) is ONLY available with Windows 11 Pro, Windows 11 Enterprise, and Windows 11 Education. You also need to use an administrator account to use this method.
- Open a Run dialog box by pressing Windows key + R. Inside the text box, type ‘lusrmgr.msc’ and press Enter to open up the Local Users and Groups utility.

Opening the Local Users and Groups utility - At the UAC prompt, click Yes to grant yourself admin access.
- Inside the Local Users and Groups utility, click on the Users tab from the left, then double-click on Administrator from the central pane.

Accessing the Admin account - Inside the Administrator Properties screen, access the General tab, then check or uncheck the Account is disabled checkbox depending if you want to Enable or Disable the account.

Enabling or disabling account using the Local Users and Group utility - Once the modification has been scheduled, enforce it by clicking on Apply.
- You can safely close the Local Users and Groups utility as the status of the built-in admin account should be already changed on Windows 11.
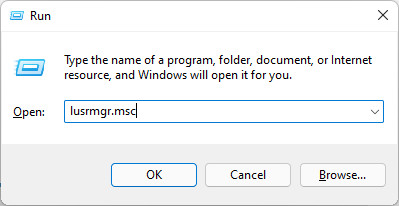
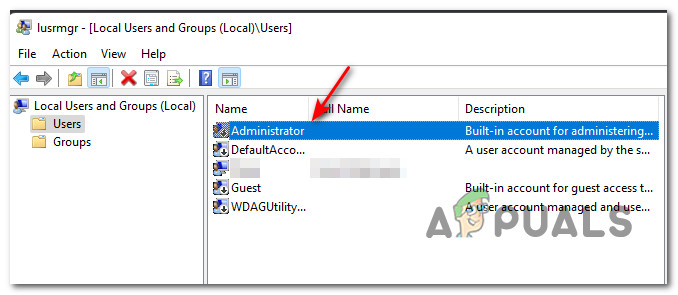
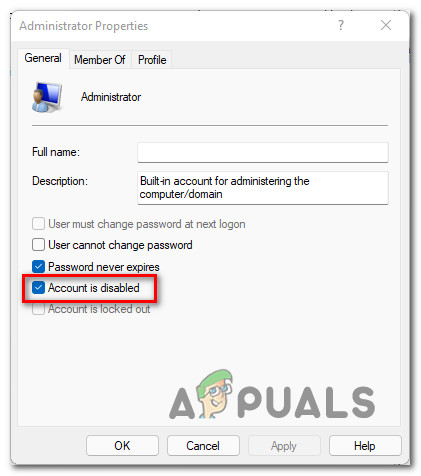
Enable or Disable the Built-in Admin on Windows 11 using a Local Security Policy
Note: You will not be able to follow this method on the Home version of Windows 11. The tool that we used below (Local Security Policy) is only available on Windows 11 Pro, Windows 11 Enterprise, and Windows 11 Education.
- Press Windows key + R to open up a Run dialog box. Next, type ‘secpol.msc’ inside the text box and press Ctrl + Shift + Enter to open up the Local Security Policy tool with admin access.
Open the SecPool utility - When you’re prompted by the User Account Control, click Yes to grant administrative access.
- Once you’re inside the Local Security Policy utility, use the expand the Local Policies menu on the left, then click on Security Options from the left-hand pane.
- Next, from the central pane, double-click on Accounts: Administrator account status.

Configure the Administrator account - Inside the Accounts: Administrator account status Properties, window, access the Local Security Setting tab from the menu at the top, then change the status of the setting to Enabled or Disabled depending on what you want.

Enabling or disabling the Policy - Click on Apply to save the changes, then you can safely close the Local Security policy utility.
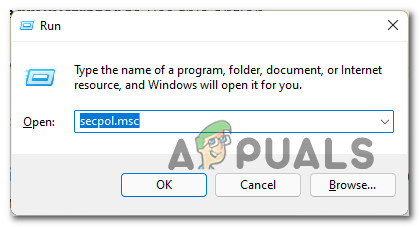
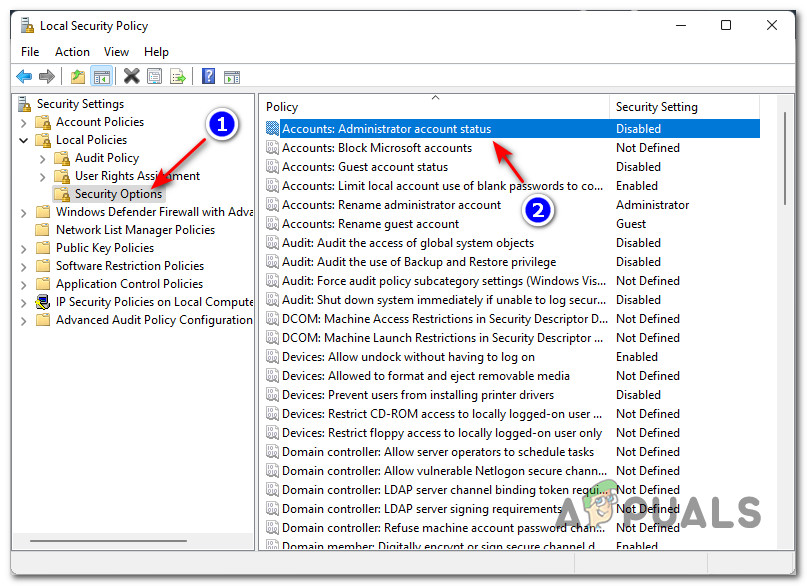
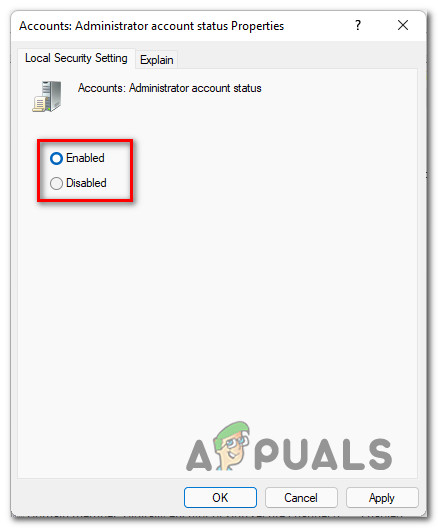
Enable / Disable the Built-in Admin on Windows 11 using CMD at boot
Note: Use this method if you are unable to sign in to Windows 11.
- Boot from a compatible Windows installation media (USB or DVD) and press Shift + F10 once you get to the initial Windows Setup screen to access an elevated Command Prompt window.

Opening CMD window from the Windows Setup screen - Inside the elevated CMD prompt, type Regedit and press Enter to open up a Registry Editor prompt.
- Inside the Registry Editor, use the menu on the left to access the HKEY_LOCAL_MACHINE key.

Accessing the HKEY_LOCAL_MACHINE key - With the HKEY_LOCAL_MACHINE key selected, use the ribbon bar at the top to click on File > Load Hive.
- Inside the Load Hive dialog box, open the letter that Windows 11 is installed on (most likely C:) and navigate to the following location:
C:\Windows\System32\config
- Inside the config folder, click on Sam from the list of items inside, then click Open to load it up inside Registry Editor.

Loading the Sam hive inside Registry Editor - When you’re prompted to name the recently imported hive, name it ‘REM_SAV’ and click Ok to save the changes.
- After the registry hive is successfully imported, use the navigation panel on the left side to reach the following location:
HKEY_LOCAL_MACHINE\REM_SAM\SAM\Domains\Account\Users\000001F4
- With the 000001F4 key selected, move over to the right-hand pane and double-click on the F binary value.
- To enable the Bult-In Admin account, change the 10 value to 11 from the 00000038 column and press Ok to save the changes.
Note: To disable the Built-in Admin account, select the 11 value from the 00000038 column and press the Delete key to get rid of it. - Close the Registry Editor and hit Continue to boot Windows 11 normally.
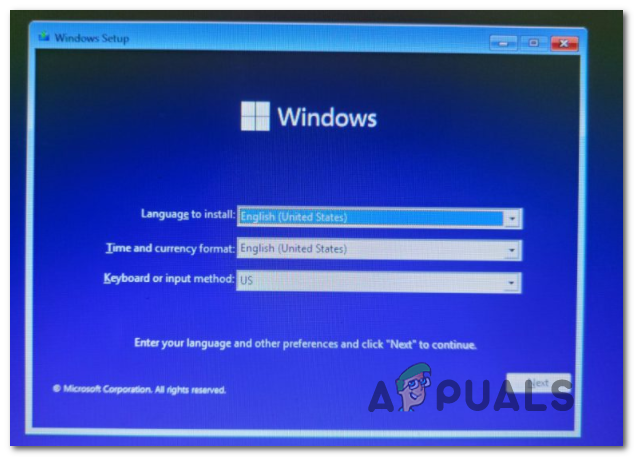
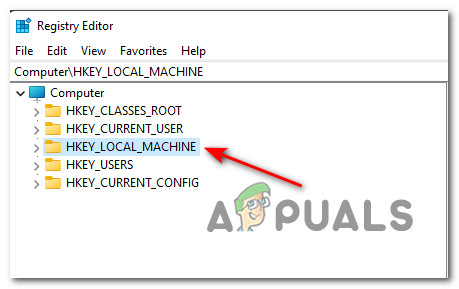
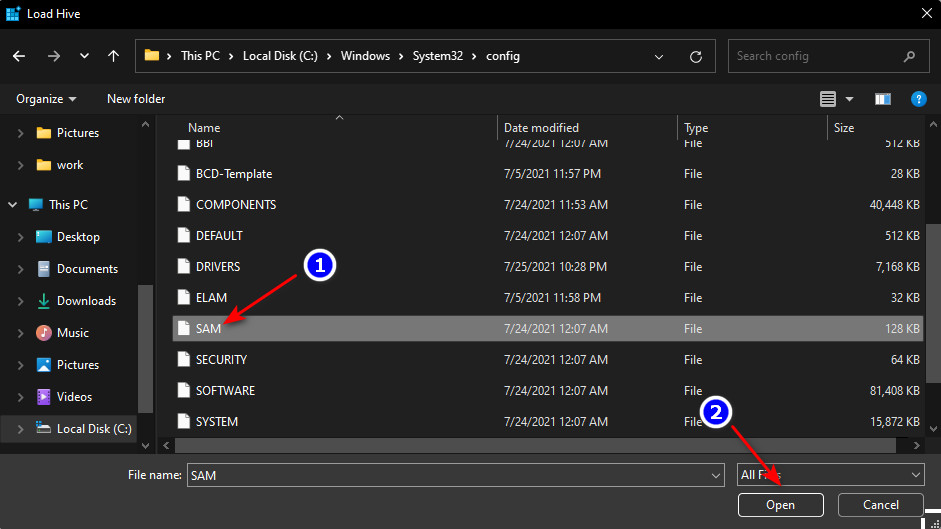

Kamil Anwar
Kamil is a certified MCITP, CCNA (W), CCNA (S) and a former British Computer Society Member with over 9 years of experience Configuring, Deploying and Managing Switches, Firewalls and Domain Controllers also an old-school still active on FreeNode.