I traveled to a couple of Microsoft Ignite The Tour stops and was not just presenting but also speaking to a lot of IT admins around the globe. I was surprised at how many didn’t know about our new Windows Server management tools. In this blog post, I am going to show you how you can manage Windows Server 2019 and even previous Windows Server versions with Windows Admin Center and PowerShell.
Classic Windows Server Management
First, let me start by saying the classic Windows Server management tools, like Server Manager, the Microsoft Management Console (MMC), sconfig on Windows Server Core, Perfmon, and the local-only tools are still part of Windows Server. And if you have built some automation and process using these tools, they are still going to work.
 Classic Windows Server Management Tools
However, most of these tools have some limitations, especially when it comes to efficient remote management or automation. That is why I want to show you more modern ways to manage Windows Server 2019.
PowerShell
Windows PowerShell 5.1 is built-in into Windows Server, and it does not only provide an excellent automation experience to write scripts but also provides a secure way of remote managing your Windows Server environment. And with PowerShell Core 6 and PowerShell 7, you also get cross-platform support, to manage your Linux and macOS systems as well, using SSH remoting.
 PowerShell
Many of the new Windows Server features get their PowerShell module. For example, if you look at the new Systems Insights feature, which locally analyzes Windows Server system data, such as performance counters and events and provides you with insight into the functioning of your servers using machine-learning models, can be managed directly through PowerShell.
Windows Admin Center
Windows Admin Center is a locally deployed, browser-based app for managing Windows servers, clusters, hyper-converged infrastructure, as well as Windows 10 PCs. It comes at no additional cost beyond Windows and is ready to use in production. This is what it says on the official Microsoft Docs page of Windows Admin Center. I simply call it the next generation of your Windows Server management tools.
 Windows Admin Center
You can download and install Windows Admin Center locally, in Azure or where ever you need to manage your Windows Server. Windows Admin Center runs in a web browser and manages and manages different versions of Windows Server, Clusters, and Windows 10, through the Windows Admin Center Gateway. The gateway manages servers by using Remote PowerShell and WMI over WinRM, with no agent required.
So next to having a fast and elegant way to manage Windows Server systems remotely from basically any device, what are the other advantages of using Windows Admin Center?
Lightweight and easy to install
Windows Admin Center is very lightweight and easy to install. You can even install it on Windows 10, Windows Server 2016, Windows Server 2019, and start managing your machines in minutes. There is no need for an agent, and if you don’t want to use Windows Admin Center anymore, you simply uninstall it.
Functionally you know, but remotely and secure
 Windows Admin Center Performance Monitor
Windows Admin Center provides you with the evolution of the classic and well-known management tools like MMC or local-only tools in a modern web-based experience. Besides, it also allows you to use these tools remotely, without connecting to your servers using Remote Desktop (RDP). This and many other enhancements, make your management platform more secure.
Extensible
 Windows Admin Center Extensions
Windows Admin Center was built with extensibility in mind from the beginning, with the ability for Microsoft and 3rd party developers to develop tools and solutions beyond the current offerings. Microsoft offers an SDK that enables developers to build their own tools for Windows Admin Center.
Manage Azure Stack HCI and Storage Spaces Direct
Windows Admin Center does not only allow you to manage single server instances but also Windows Server Failover Clusters and hyper-converged clusters such as Azure Stack HCI, which is part of the Azure Stack portfolio.
Azure Hybrid integration
 Integrate Azure Hybrid services
If you want to take advantage of the Azure Hybrid services, to make your on-premises environment even better using Microsoft Azure, Windows Admin Center makes it easy to take advantage of services like Azure Active Directory, Azure Backup, Azure Site Recovery, Azure Update management and many more. You can find more about integrating Azure Hybrid services in Windows Server using Windows Admin Center on our blog.
Manage modern Windows Server 2019 features
 Windows Server System Insights
The management UI for new features like System Insights and the Storage Migration Services, which allows you to easily migrate file servers, are built-in to Windows Admin Center.
You also get an extension to manage your Windows Containers. You can find a video about that here.
Get updates and new functionality
Windows Admin Center gets monthly updates, including new features, to improve the management experience. Check out the Windows Admin Center release history here.
Windows Admin Center complements existing management solutions like Azure management, System Center, RSAT, Remote Desktop, and other in-box tools. You can find more about related management tools on Microsoft Docs.
System Center 2019
 System Center Overview
System Center is an on-premises data center management solution for deployment, configuration, management, monitoring your entire data center. Windows Admin Center and System Center are complementary management solutions.
I hope this gives you an overview of the different management tools you can use with Windows Server 2019, depending on your needs. If you have any questions, please let me know in the comments.
Время на прочтение
5 мин
Количество просмотров 30K
В данной статье мы продолжаем рассказывать про работу с Windows Server Core 2019. В прошлых постах мы рассказали как готовим клиентские виртуальные машины на примере нашего нового тарифа VDS Ultralight с Server Core за 99 рублей. Затем показали как работать с Windows Server 2019 Core и как установить на него GUI. Сегодня мы поговорим про управление с помощью Windows Admin Center.
 Фото: ТАСС
Головной болью было, наверное, по соображениям безопасности, разделять роли серверов. Заводить несколько машин, чтобы физически разделить контроллер домена и файловый сервер.
Благо нам на помощь пришла виртуализация, и теперь изолированно друг от друга могут работать несколько служб, которые из соображений безопасности не могут работать на том же сервере. Виртуализация принесла массу удобства, развертывание виртуальных машин из одного шаблона экономит время специалистам, и физически, все в одной коробке с мощным железом.
Машин все меньше, а серверов все больше, даже у меня, для «просто посмотреть» образовалось два контроллера домена, файловый сервер, сервер под Java приложения и еще пачка веб серверов, поэтому давайте поговорим о том, как можно эффективно управлять серверами на Windows, не отрывая левой руки от кофе.
— С помощью Powershell!
Конечно да, но… нет. Продукт позиционируется как удобный инструмент управления гигантской инфраструктурой. Понятно, что это не совсем так, для таких случаев есть Powershell ISE и скрипты, поэтому хотелось бы рассмотреть действительно полезные юзкейсы. Если у вас есть свой опыт, которым вы вы хотели поделиться, мы можем добавить его в эту статью.
TL;DR
Windows Admin Center лучше подходит для управления стоковыми компонентами. На текущий момент только RSAT может управлять установленными ролями.
Используя WAC, можно улучшить безопасность вашей инфраструктуры, если будете использовать его как шлюз.
Сводная таблица того, он умеет и не умеет:
Управление системой
Управление ролями
Превью — установка бета версий компонентов для WAC, не входит в состав сборки. Перечислять все не нужно, потому что буквально все компоненты управляются только с помощью RSAT.
Нюансы
Powershell в Windows Admin Center не имеет своей среды сценариев аналогичной Powershell ISE.
Windows Admin Center не поддерживает Powershell ниже 5.0, на старых машинах обязательно нужно ставить новый Powershell, если хотите использовать его.
Главным минусом Windows Admin Center в микро инстансах является потребление оперативной памяти сервера. Он создает четыре сессии по 50-60 мегабайт каждая, и каждая эта сессия остается даже после закрытия Windows Admin Center.
Та же самая проблема и с Powershell через Enter-PSSession, он так же создает новую сессию, и если просто закрыть окно терминала, сессия весом и 70 мегабайт так и останется на удалённом сервере, если её не закрыть её перед выходом с помощью Exit-PSSession или Remove-Pssession.
При использовании Windows Admin Center с этим придется мириться, он отнимет около 170 мегабайт ОЗУ, RSAT таким не страдает.

(См. wsmprovhost.exe)
Упрощаем работу
Максимальное удобство управления достигается если ваша рабочая станция, на которой установлен WAC находится в домене. Он берет учетные данные пользователя, который зашел в систему, подключение к серверам осуществляется по одному щелчку мыши.
Импортировать список серверов можно с помощью txt файла, перечислив имена серверов переносом строки, как и в RSAT.
Что тоже радует, ранее, чтобы интегрировать в AD виртуальную машину на Server Core, приходилось делать это через sconfig, а это значит нужен прямой доступ к его экрану. В случае с хостингами приходилось делать все это через VNC. Теперь, при переходе на главную страницу можно нажать «Изменить идентификатор компьютера» и ввести в домен.
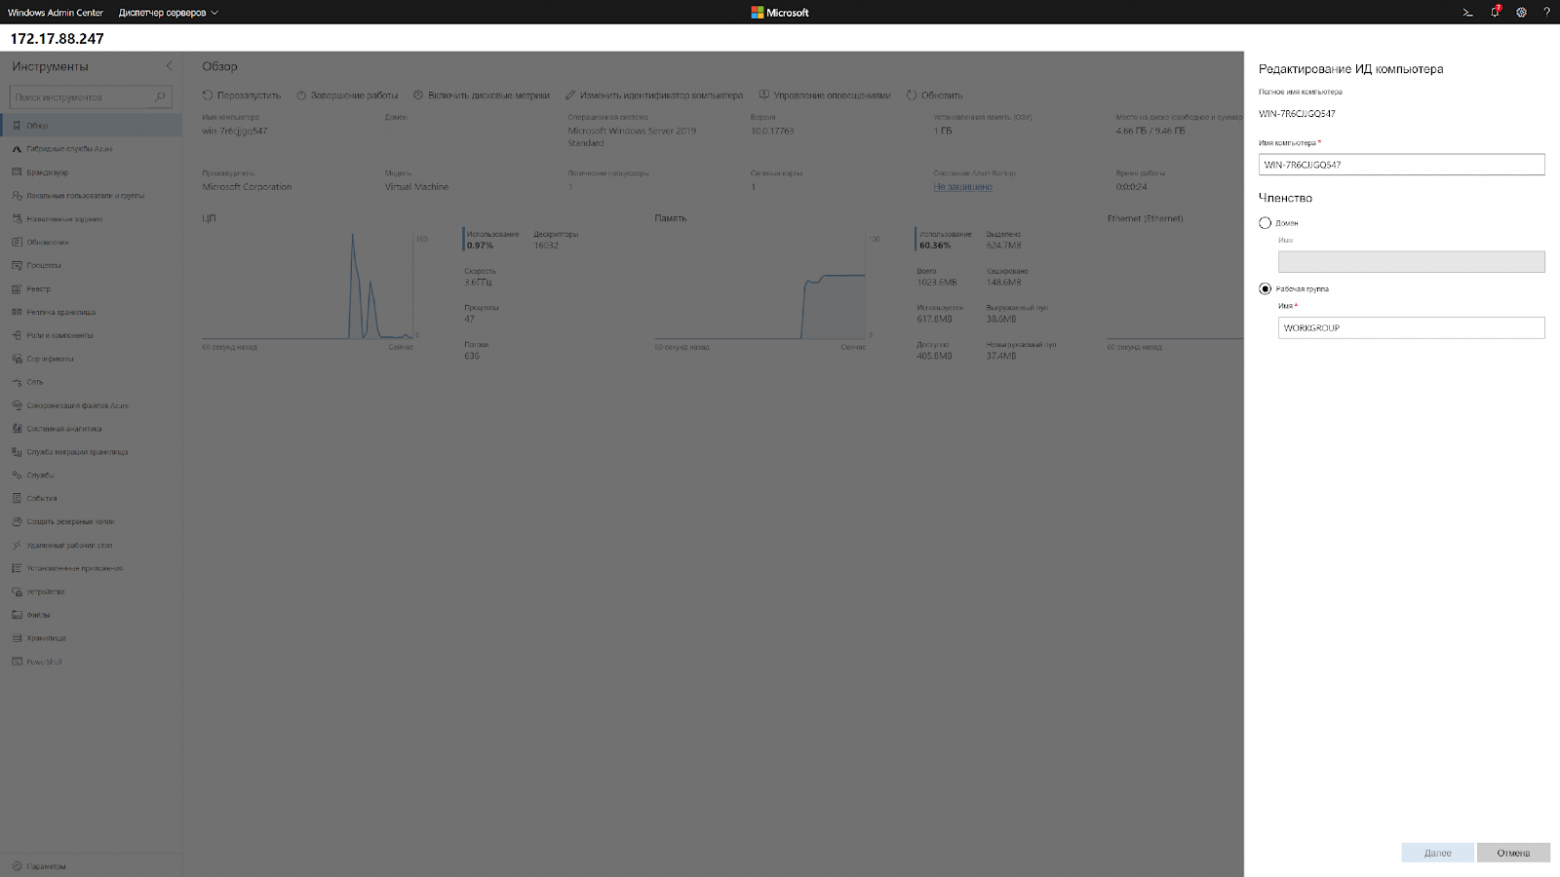
Кстати, чтобы ввести в домен Windows Server 2019, больше не требуется делать Sysprep, потому что Sysprep тоже нужно было завершать через VNC.
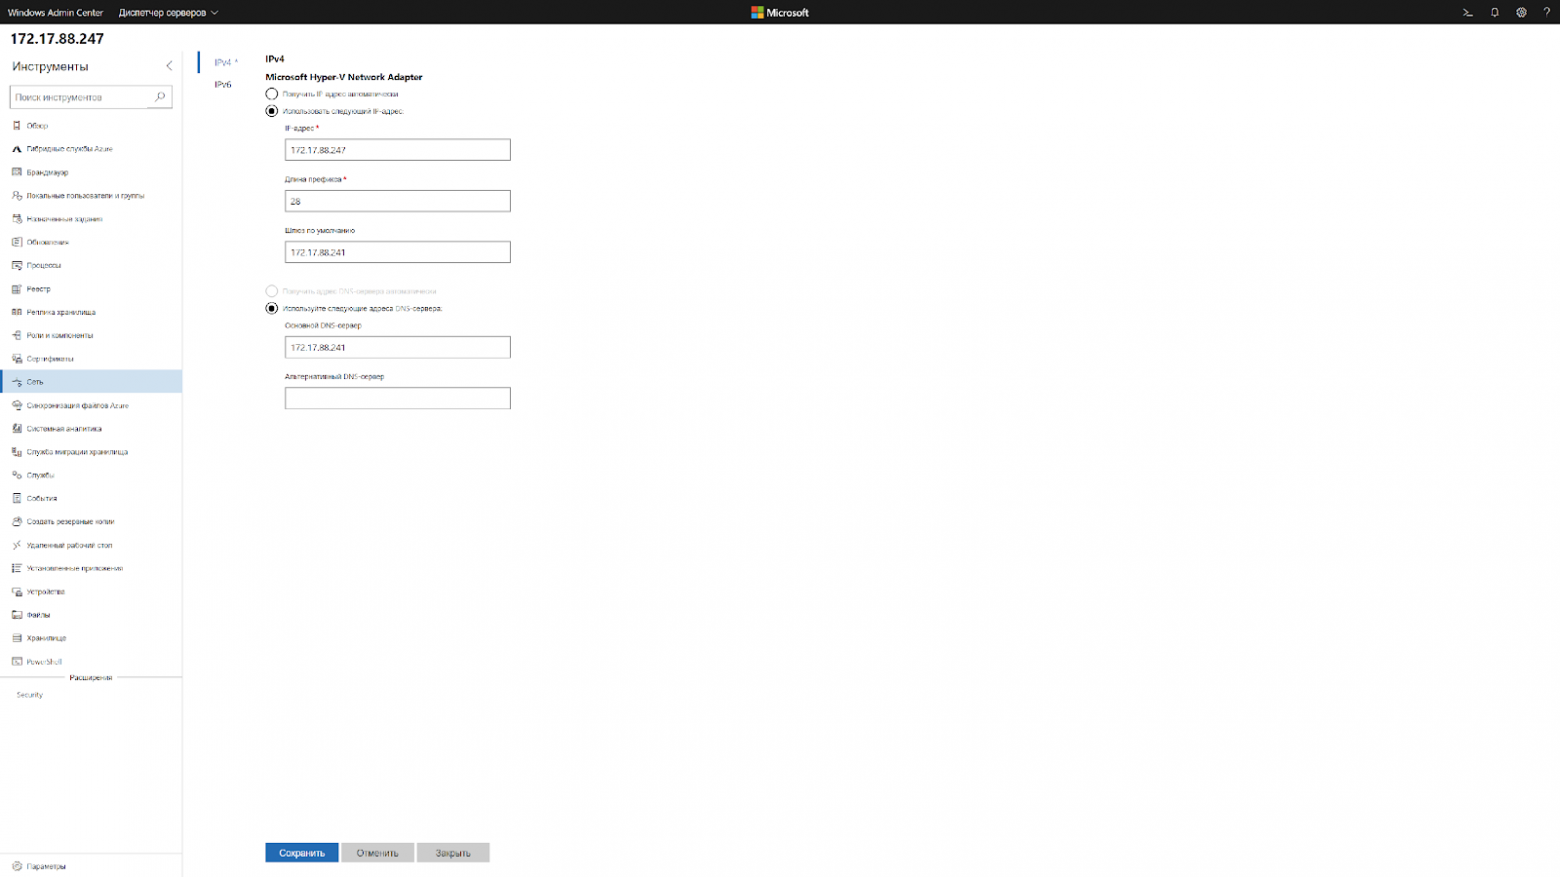
Чтобы изменить сетевые настройки теперь нужно сделать два клика. Подключаешься к серверу и меняешь.
Это выходит так же быстро, как и через WinRM, только одной рукой.
Повышаем безопасность
На текущий момент есть четыре типа развертывания. Локальный, в качестве шлюза, установка на один из продакшн серверов и в составе кластера.

*Картинка с сайта майкрософт
Установка в качестве шлюза, на отдельный сервер, наиболее безопасный и рекомендуемый вариант. Это аналог схемы с VPN, когда доступ к управлению имеется только с определенного IP адреса или участка сети.
Согласитесь, гораздо удобнее держать на одной вкладке видосы и мемасы, а на другой Windows Admin Center, нежели целиком терять подключение к ютубу из-за входа в защищенную сеть.
Как же обезопасить все свои N серверов? С помощью следующего скрипта:
## Список серверов через запятую ##
$servers = Get-Content -Path .\Servers.txt
## Список правил через перенос строки ##
$rules = Get-Content -Path .\Rules.txt
## IP адрес нашего гейта с установленным WAC ##
$gate = "1.1.1.1"

$MySecureCreds = Get-Credential

foreach ($server in $servers.Split("`n")) {
    foreach ($line in $rules.Split("`n")) {
        Invoke-Command -ComputerName $server -ScriptBlock {
            Set-NetFirewallRule -Name $Using:line -RemoteAddress $Using:gate
        } -Credential $MySecureCreds
    }
}

# список правил, RULES.txt#

RemoteDesktop-UserMode-In-TCP
RemoteDesktop-UserMode-In-UDP
WINRM-HTTP-In-TCP
WINRM-HTTP-In-TCP-PUBLIC

# список ваших серверов, SERVERS.txt#

1.1.1.1, 1.1.1.2, 1.1.1.3
Этот скрипт изменит стандартные правила брандмауэра таким образом, что вы сможете использовать RDP и WinRM только с определенного IP адреса, понадобится для организации безопасного доступа к инфраструктуре.
Powershell в Windows Admin Center не имеет своей среды сценариев аналогичной Powershell ISE, можно только вызывать готовые скрипты.

Кстати, вот так выглядит RDP на Windows Server Core.

Выводы
На текущий момент Windows Admin Center не способен заменить RSAT, однако в нём уже присутствуют функции, которых нет у RSAT. Добавляются старые оснастки, которые не так удобны для управления через браузер.
Странным является приоритет разработки, наиболее активно добавляются функции интегрированные с Azure, хостингом от Майкрософт, вместо реально полезных функций.
К сожалению, пока что, управлять всеми функциями Windows Server с удобствами можно только подключившись к нему по RDP.
Не смотря на все минусы, у Windows Admin Center есть свой SDK, с помощью которого можно писать свои собственные модули и управлять своим собственным ПО через него, что однажды сделает его лучше RSAT.

Learn how to administer Windows Server 2019 running in the Server Core configuration. We will focus on the new Windows Admin Center and PowerShell remoting.
Contents
- The sconfig utility
- Install PowerShell Core
- Install Windows Admin Center
- Wrap-up
In my opinion, the Windows Server Core installation option is mature enough such that Windows administrators should standardize all of their servers to run as Core. Why? It makes sense that the fewer operating systems you have present, the better your performance and the smaller your system attack surface.
The bottom line though is that you had better start to enjoy Server Core because as of the 1709 update, Windows Server 2016 (semi-annual update channel) no longer allows you to add the GUI layer to a Server Core installation.
In Windows Server 2019 (in Insider Preview build 17650 as of this writing in late April 2018), we have Server Core and that’s it. The long-term servicing branch (LTSB) of Windows Server 2016 still has the Desktop Experience option; I’m not sure what the feature’s status is in Windows Server 2019.
In today’s lesson I will teach you how to manage your Windows Server 2019 Server Core box with the greatest of ease. Yes, I mean that! Let’s begin.
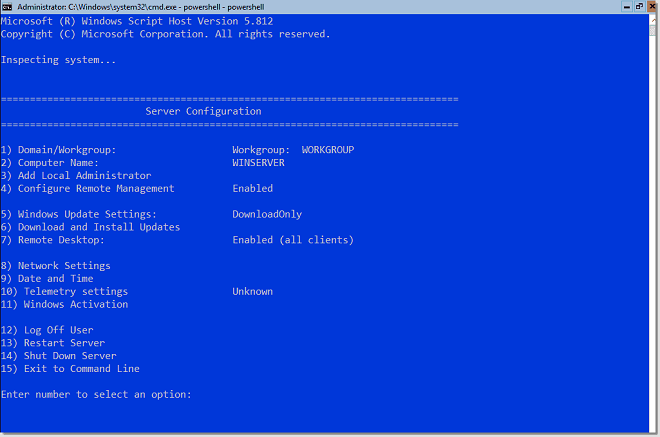
The sconfig utility
Of course, Server Core does not have a Desktop Experience GUI, so you need to navigate using command-line tools. After you log into the server, type sconfig to open the sconfig.cmd configuration utility, shown in the next screenshot.

The sconfig utility
With sconfig, you use the numbered menu to configure the most important server properties, including:
- Hostname
- Time, time zone, and date
- Domain membership
- IP addressing
- Remote access
While we’re at it, we should ensure WinRM-based PowerShell remoting is enabled. Type 15 to exit to a command line, type powershell to start PowerShell, and run the following command:
Enable-PSRemoting -SkipNetworkProfileCheck -Force
Install PowerShell Core
I verified Windows Server 2019 ships with PowerShell 5.1 Desktop edition. Let’s make sure we have the latest PowerShell 6 Core build on our new server, shall we?
On your Windows 10 administrative workstation, fire up an administrative PowerShell console and run the following command to ensure we can perform remote management of our Server Core box:
Set-Item -Path WSMan:\localhost\Client\TrustedHosts -Value * -Force
Download the latest x64 PowerShell Core release from Microsoft’s GitHub releases page. Next, let’s define a persistent PowerShell remoting session with the Server Core box (substituting your own server’s IPv4 address, naturally) and copy the .msi to the root of its drive C:
$session = New-PSSession -ComputerName 192.168.176.130 -Credential (Get-Credential)
Copy-Item PowerShell-6.1.0-preview.1-win-x64.msi C:\ -ToSession $session
To install PowerShell Core, I’m going to cheat by running the following commands directly on the Windows Server 2019 server. Yes, I know you can run cmd.exe and msiexec remotely, but it’s a bit of a hassle. My friend and fellow MVP Max Trinidad wrote a blog post using a mapped drive as a workaround.
cmd
msiexec /i C:\ PowerShell-6.1.0-preview.1-win-x64.msi
exit
Install Windows Admin Center
Windows Admin Center, formerly called Project Honolulu, has been a long time coming in Windows Server. I never liked Server Manager, and the Server Management Tools in Azure were woefully misguided.
Given that, I was skeptical of Honolulu—browser-based management of local and remote server and desktop systems. Yawn. My biggest concern was speed—was this tool going to be responsive?
I’m grateful to report that Windows Admin Center is super-fast, flexible, and yes, I am now a fan—big time.
What we’ll do now is install Windows Admin Center in Desktop mode on our Windows 10 administrative workstation. Here’s the procedure:
Download the software, run the .msi installer, and select a management port. That’s it!
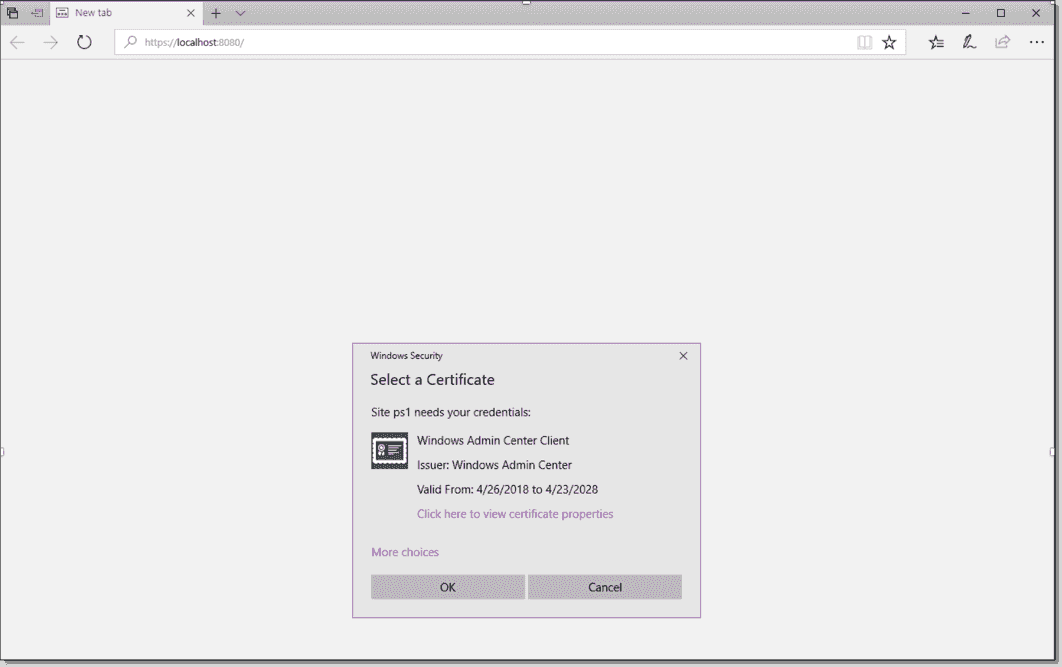
Windows Admin Center can manage Windows Server 2019, Windows Server 2016, Windows Server 2012 R2, and Windows 10 hosts from a central web console. On first launch, be sure to accept the self-signed management certificate as shown in the next screenshot.

Connecting to Windows Admin Center
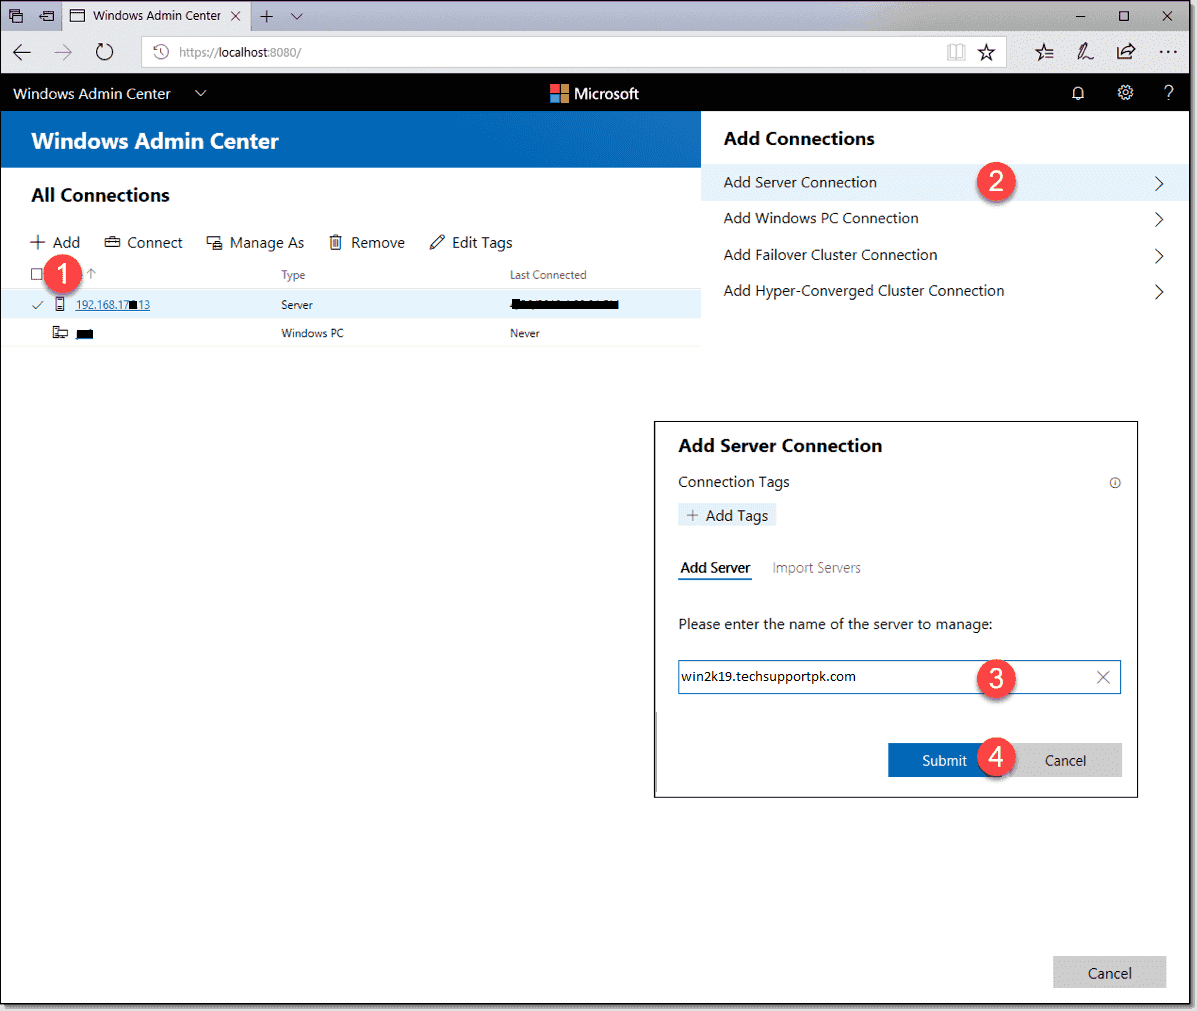
Logging in takes you to the All Connections list by default. Windows Admin is a modular web application; the default solutions included (as of this writing in late April 2018) are:
- Server Manager (to manage Windows Servers)
- Computer Management (to manage Windows 10 hosts)
- Failover Cluster Manager
- Hyper-Converged Cluster Manager
Click Add, select Add Server Connection, specify the DNS name or IP address of your new Windows Server 2019 host, and click Submit. Here’s a composite screenshot that shows the process:
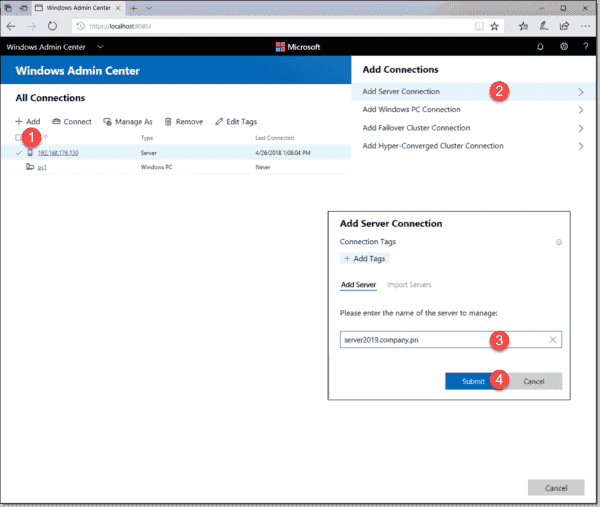
Creating a remote server connection
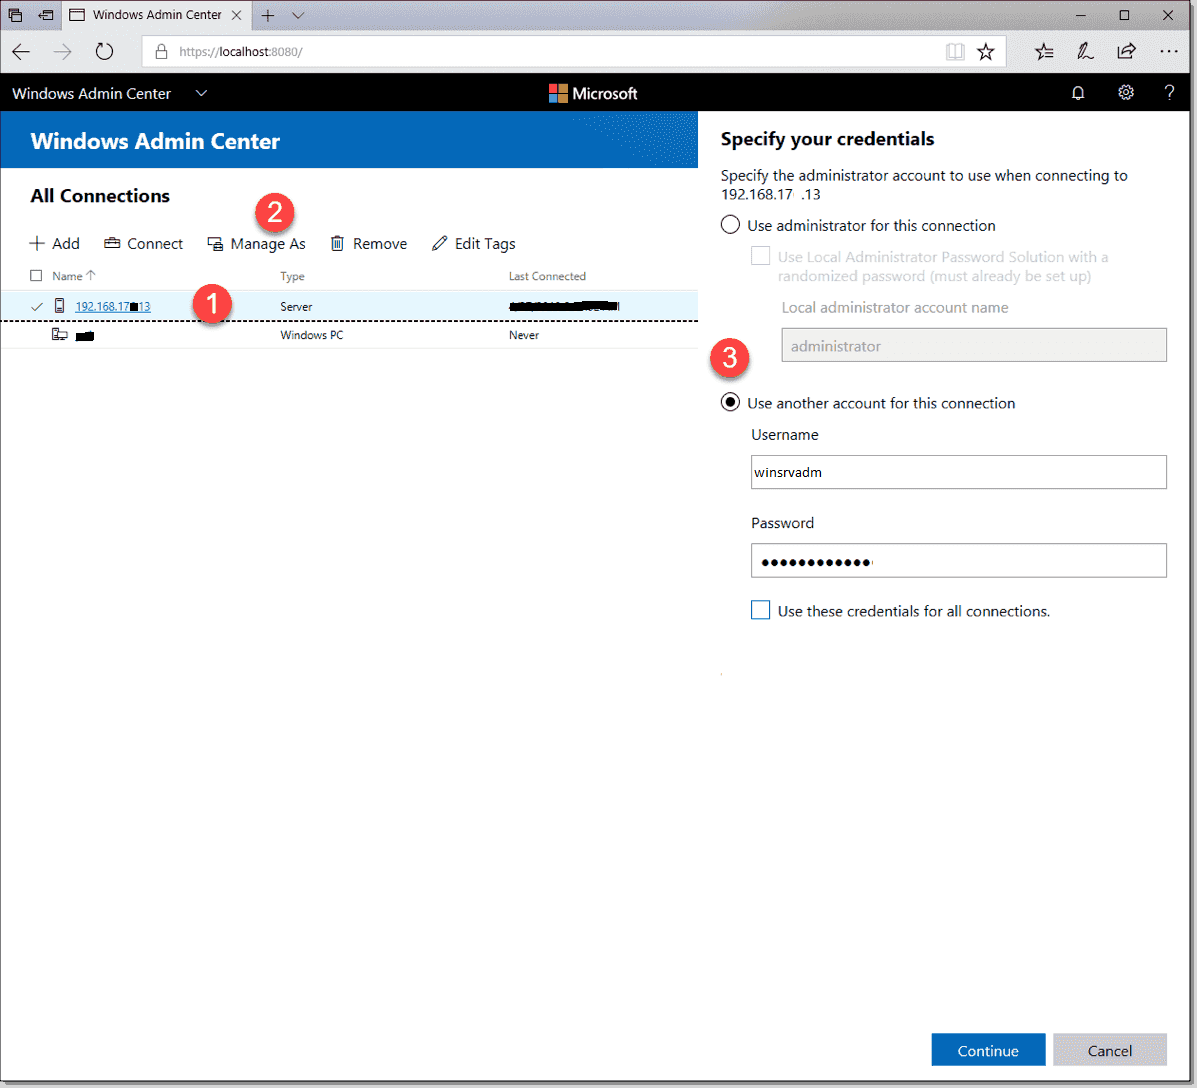
Click Connect to authenticate to the remote server. As you can see in the next screenshot, your options include:
- Your current credentials, with or without Local Administrator Password Solution (LAPS)
- Alternate credentials
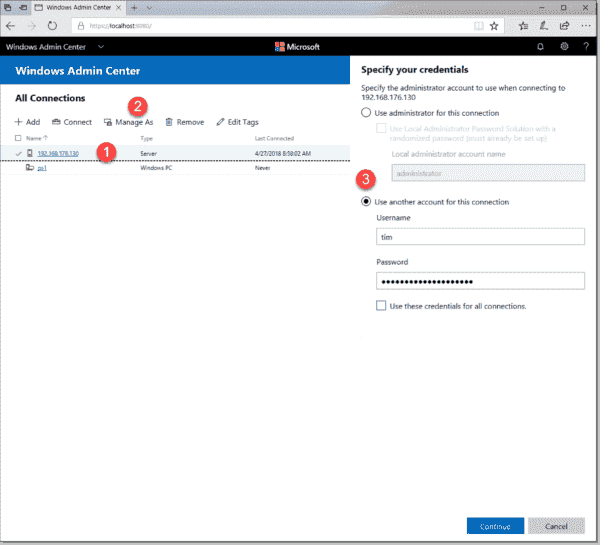
Authenticate to the remote server
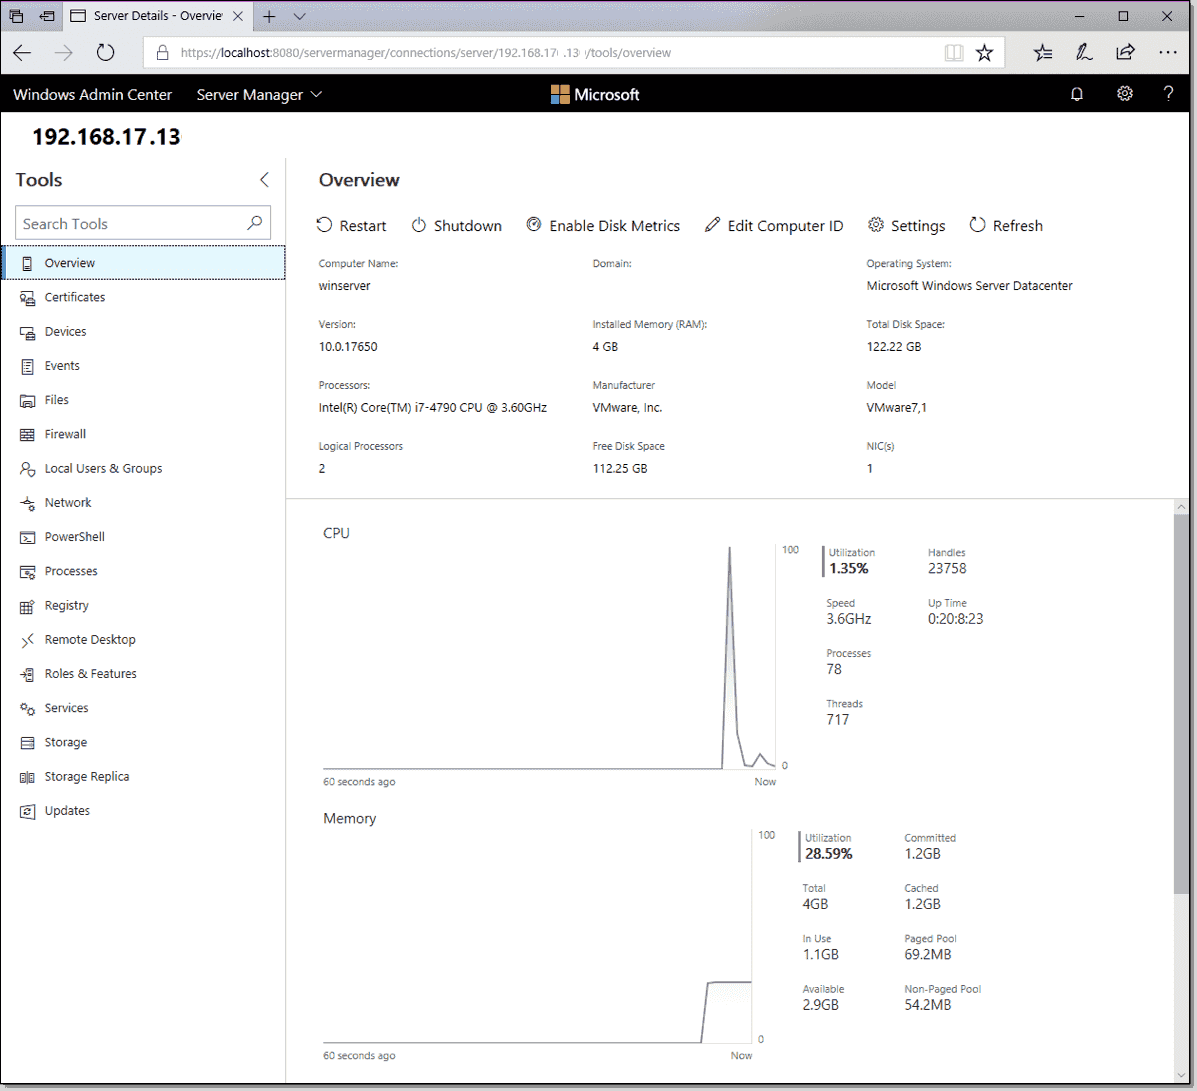
Finally, you reach the Server Manager installed solution. Check out the following screenshot and appreciate all the administrative goodness available to you. I’m a particularly strong fan of the integrated PowerShell console and file system browser.

Remote management goodness
Wrap-up
For my part, I don’t plan to use the Desktop Experience with Windows Server ever again. For that matter, Features on Demand and PowerShell allow you to remove unneeded Windows Server role and feature bits from the system entirely:
Subscribe to 4sysops newsletter!
Remove-WindowsFeature <feature-name> -Remove
Our goal is to reduce the attack surface of our servers. Also, in keeping with the DevOps mantra of managing our servers as a herd rather than pets, the combination of PowerShell and the Windows Admin Center make for a forward-thinking solution.
![]()
![]()
Windows Server Core installation option is good enough such that Windows administrators should standardize all of their servers to run as Core. It makes sense that the fewer operating systems you have present, the better your performance and the smaller your system attack surface. As of the 1709 update,Windows Server 2016 (semi-annual update channel) no longer allows you to add the GUI layer to a Server Core installation.
This tutorial will show you how to manage your Windows Server 2019 using Admin Center, PowerShell Core and sconfig utility.
Sconfig Utility
Windows 2019 Server Core does not have a Desktop GUI, so you need to navigate using command-line tools. After you log into the server, type sconfig to open the sconfig.cmd configuration utility, as shown in image below.
With sconfig, you use the numbered menu to configure the most important server properties, including:
Hostname
Time, time zone, and date
Domain membership
IP addressing
Remote access
While we’re at it, we should ensure WinRM-based PowerShell remoting is enabled. Type 15 to exit to a command line, type powershell to start PowerShell, and run the following command:
Enable-PSRemoting -SkipNetworkProfileCheck -Force
Install PowerShell Core
On your Windows 10 administrative workstation, open up an administrative PowerShell console and run the following command to ensure we can perform remote management of our Windows 2019 Server Core:
Set-Item -Path WSMan:\localhost\Client\TrustedHosts -Value * -Force
Download the latest x64 PowerShell Core release from Microsoft’s GitHub releases page. Next, let’s define a persistent PowerShell remoting session with the Server Core box (substituting your own server’s IPv4 address) and copy the .msi to the root of its drive C:
$session = New-PSSession -ComputerName 192.168.17.13 -Credential (Get-Credential)
Copy-Item PowerShell-6.1.0-preview.1-win-x64.msi C:\ -ToSession $session
To install PowerShell Core, run the following commands directly on the Windows Server 2019 server:
cmd
msiexec /i C:\ PowerShell-6.1.0-preview.1-win-x64.msi
exit
Install Windows Admin Center
Windows Admin Center, formerly called Project Honolulu, has been a long time coming in Windows Server. We’ll install Windows Admin Center in Desktop mode on our Windows 10 administrative workstation.
Download the software, run the .msi installer, and select a management port.
Windows Admin Center can manage Windows Server 2019, Windows Server 2016, Windows Server 2012 R2, and Windows 10 hosts from a central web console. On first launch, be sure to accept the self-signed management certificate as shown in the image below.
Logging in takes you to the All Connections list by default. Windows Admin is a modular web application comes with the following features:
Server Manager (to manage Windows Servers)
Computer Management (to manage Windows 10 hosts)
Failover Cluster Manager
Hyper-Converged Cluster Manager
Click Add, select Add Server Connection, specify the DNS name or IP address of your new Windows Server 2019 host, and click Submit.
Click Connect to authenticate to the remote server, your options include:
Your current credentials, with or without Local Administrator Password Solution (LAPS)
Alternate credentials
Finally, you reach the Server Manager installed solution as shown in image below.
Wrapping up
I am sure, once you go-ahead with browser based Windows Admin Center, you will never use the Desktop GUI with Windows Server ever again.
Предположим, что у нас уже установлена операционная система Windows Server 2019. Рассмотрим базовую настройку.
Минимальные требования:
- 64-разрядный процессор с тактовой частотой 1,4 ГГц;
- ОЗУ 512 МБ (2 ГБ для варианта установки «Сервер с рабочим столом»);
- диск 32 ГБ;
- доступ к Интернет.
Первоначальные настройки Windows Server 2019 можно разделить на несколько пунктов:
- Создание новой учетной записи Администратора.
- Настройка статического IP-адреса сервера.
- Проверка правильности настройки времени и часового пояса.
- Установка всех обновлений системы.
- Задать понятное имя для сервера и, при необходимости, ввести его в домен.
- Активировать лицензию Windows Server 2019.
- Настроить основные параметры безопасности.
Создание новой учетной записи Администратора
Первым шагом будет создание новой учетной записи администратора. Сервер может быть подвергнут атакам, т.к. предполагается, что вы используете “Администратор” в качестве основной учетной записи администратора. Поэтому создадим новую учетную запись и выдадим ей права администратора.
Нажимаем сочетание клавиш WIN+R, чтобы у вас открылось окно Выполнить, в котором для вызова панели Управление компьютером, вам нужно написать:
Затем на вкладке “Локальные пользователи и группы” переходим в “Пользователи” и по клику правой кнопки мыши в основном окне выбираем пункт “Новый пользователь”. После создаем пользователя, задаем ему пароль и выдаем права Администратора. Затем выходим из учетной записи “Администратор” и заходим в свою новую учетную запись.
Повторите все описанные действия выше до момента создания нового пользователя, отключите базовую учетную запись “Администратор” в целях безопасности сервера, так как вы будете выполнять остальные действия по настройке под учетной записью нового администратора.
Настройка статического IP-адреса сервера
Серверы должны иметь фиксированные IP-адреса. Это требование для многих служб (Active Directory,DNS,DHCP).
Нажимаем сочетание клавиш WIN+R, чтобы у вас открылось окно выполнить, в котором для вызова сетевых настроек, вам нужно написать:
У вас появится окно «сетевые подключения» со списком доступных вам сетевых адаптеров. Щелкните по нужному левой кнопкой мыши дважды.
В окне “Состояние” выберите Свойства -> IP версии 4(TCP/IP) -> Использовать следующий IP-адрес -> Введите данные статического адреса -> Нажмите “Ок”.
Настройка времени и часового пояса
В целях безопасности, таких как правильная работа двухфакторной аутентификации и правильной работы журналов, служб, отдельных программ на Windows Server 2019 — нужно, чтобы время на всех серверах совпадало и было верным по часовому поясу. Иначе неправильное системное время будет отражено во всех программах, где время является критически важным показателем.
Для настройки времени и часового пояса нажмите на: Пуск -> Параметры -> Время и язык.
Установка обновлений
Обновление Windows Server является обязательной ежемесячной рутиной, которая устраняет дыры в безопасности и исправляет неправильно работающие на сервере службы, программное обеспечение. Но, обновляя сервер на последние не протестированные патчи, будьте предельно внимательны, читайте отзывы. Для первоначальной настройки сервера, установить обновления нужно обязательно. Установите обновления Windows: Пуск -> Параметры -> Обновление и безопасность.
В нижней части экрана Центра обновления Windows есть опция “Изменить период активности”. Установите этот параметр, иначе вы станете свидетелем перезагрузки вашего рабочего сервера в рабочее время.
Настройка имени сервера и ввод в домен
Сервер настраивается для определенных целей, ему нужно имя, по которому можно будет проще понимать что это за сервер, отследить его статистику в сетевых подключениях, подключиться к нему, настроить службы и т.д. Меняем имя сервера и его описание (если нужно), вводим в домен.
Нажимаем сочетание клавиш WIN+R, чтобы у вас открылось окно Выполнить, в котором вам нужно написать:
В окне Панель управления -> Система и безопасность -> Система.
Переходим в свойства системы -> Изменить параметры -> Изменить. Задаем «Имя компьютера», и если нужно, то имя домена. После изменения параметров нужно перезагрузиться.
Активация лицензии
Без активированной лицензии, после того как закончится пробный период пользования, сервер будет перезагружаться каждые 30 минут, чтобы этого не происходило, нужно обязательно активировать сервер для дальнейшей его эксплуатации. Для активации операционной системы нужно: Пуск -> Параметры -> Обновление и безопасность -> Активация -> Изменить ключ продукта. Введите ключ продукта от Windows Server 2019.
Основные параметры безопасности
Как правило, необходимые параметры безопасности связаны с защитой сети, поэтому Брандмауэр Windows должен быть включен, узнайте какие порты нужны вашим службам для работы, настройте его соответствующим образом, но не выключайте брандмауэр.
Дальнейшая настройка заключается в настройке локальной политики безопасности сервера.
Нажимаем сочетание клавиш WIN+R, чтобы у вас открылось окно Выполнить, в котором для вызова панели локальной политики безопасности, вам нужно написать:
В локальной политике безопасности мы установим несколько параметров в разделе Политики учетных записей и Локальные политики. Политика первой учетной записи -> Политика паролей. Установим минимальный срок действия пароля равным 0 (нулю) дней, а минимальную длину пароля — 12 символов.
Политика учетных записей -> Политика Блокировки Учетной Записи -> Порог блокировки учетной записи -> 3 недопустимые попытки входа в систему. Продолжительность блокировки учетной записи и сброса блокировки учетной записи установлена на 30 минут. Если кто-то попытается принудительно ввести ваш пароль Windows Server, то после трех промахов, этот IP-адрес не сможет войти в систему в течение 30 минут.
Перейдем к следующему Локальные политики -> Политика Аудита. Здесь мы установим параметры ведения журнала. У каждого из вариантов, которые установлены, есть карточка с описанием, которую вы можете увидеть для получения более подробной информации.

Рисунок 1 — Политика аудита
Нужна помощь? Настройки Windows Server и обслуживание серверов мы осуществляем в рамках услуги ИТ-аутсорсинг. Также возможны разовые проектные работы.