Прочитано:
10 750
Задача: настроить квоту ограничивающую размер файлового ресурса.
Файловый сервер на базе Windows Server 2008 R2.
Для выполнения поставленной задачи необходимо будет до установить в систему роль:
File Server Resource Manager.
Заходим «Start» – «Control Panel» – «Administrative Tools» – «Server Manager» – «Roles» – выбираем пункт «File Server», а далее «File Server Resource Manager».

Нажимаем «Next», дальше предстоит определиться за какими дисками производить мониторинг, в моем случае это будет диск Data (D:). В меню «Options» выбираем какие отчеты создавать:
Quota Usage Report
Files by Owner Report
Files by File Group Report

Снова нажимаем «Next», далее снова «Next» (отправку отчетов сделаем позже), далее «Next», «Install» – настройка завершена.
Далее запускаем саму оснастку для дальнейшей настроки:
«Start» – «Control Panel» – «Administrative Tools» – запускаем «File Server Resource Manager».
Первым делом создадим шаблоны квоты:
Перейдем в меню: «File Server Resource Manager» – «Quota Management» – «Quota Templates» – «Create Quota Templates».
Здесь все достаточно просто:
Указываем название шаблона – dc1_file_resource_1Gb, я настраиваю шару на контроллере домена, хотя это в принципе не правильно. Вы же можете использовать любой другой сетевой ресурс.
Указываем комментарий к шаблоны – так будет в дальнейшем более понятно.
Указываем размер квоты – 1Gb
Указываем тип квоты — Для себя я делаю жесткую квоту, чтобы при достижении заполненности в 1Gb запись не производилась, Вы же можете выбрать более щадящий режим.
Указываем, как уведомлять по событиям – запись уведомлений в системный лог.

И так шаблон создали. Теперь привязываем к указанному расшаренному ресурсу наш шаблон:
Переходим «File Server Resource Manager» – «Quota Management» – и создаем квоту:

указываем путь до расшаренной папки, шаблон квоты:

После заполнения всех параметров, создаем нажав пункт «Create» и перед нами настроенная квота на расшаренный ресурс:

Вот собственно и все. Опираясь на эту заметку, Вы можете всегда вспомнить, как делаются квоты в Windows Server 2008 R2.
На чтение 4 мин Опубликовано Обновлено
Управление квотами на сервере Windows Server 2008 R2 является важной задачей для системных администраторов. Квоты позволяют ограничить объем использования дискового пространства или количество файлов, которое может занимать каждый пользователь или группа пользователей. Правильно настроенные квоты позволяют предотвратить использование дискового пространства более чем необходимого и обеспечить более эффективное использование ресурсов сервера.
В данном практическом руководстве мы рассмотрим основные принципы управления квотами на Windows Server 2008 R2 и покажем, как настроить и контролировать использование дискового пространства различными пользователями и группами. Мы также рассмотрим функции отчетов о использовании квот, которые позволяют получить информацию о том, как используется дисковое пространство на сервере.
Для начала мы рассмотрим, как установить квоты на диски и как настроить параметры квот для разных пользователей и групп. Затем мы рассмотрим, как использовать функции отчетов о квотах для мониторинга использования дискового пространства и предотвращения его излишнего использования. В заключение мы покажем, как управлять нарушениями квот и применять административные действия для поддержания эффективного использования ресурсов сервера.
Содержание
- Управление квотами на Windows Server 2008 R2
- Что такое квоты и зачем они нужны?
- Установка квот на диски
Управление квотами на Windows Server 2008 R2
Для управления квотами в Windows Server 2008 R2 можно использовать инструменты администрирования квот, встроенные в операционную систему. При установке роли «Файловые службы» на сервере автоматически устанавливаются все необходимые компоненты для работы с квотами.
Основные функции управления квотами в Windows Server 2008 R2 включают:
- Установка квот на определенные директории или диски.
- Установка лимитов на размер директорий и файлов.
- Уведомление пользователей о приближающихся предельных значениях.
- Отслеживание использования дискового пространства и отчетность.
- Исключения из квот для определенных пользователей или групп.
Для установки квот на определенную директорию необходимо выполнить следующие шаги:
- Открыть «Панель управления» на сервере.
- Перейти в раздел «Файловые службы» и выбрать «Управление квотами».
- Выбрать нужный диск или директорию и нажать «Свойства квоты».
- Установить необходимые ограничения для квоты, например, максимальный размер или предупреждения.
- Нажать «ОК» для сохранения настроек.
После установки квот на директорию или диск, система будет автоматически контролировать использование дискового пространства и применять установленные ограничения. Пользователям будут отображаться предупреждения о приближающемся лимите или запрет на создание новых файлов и папок, если квота полностью заполнена.
Управление квотами на Windows Server 2008 R2 дает возможность более эффективно управлять дисковым пространством на сервере, уменьшая риск его исчерпания и обеспечивая более эффективное использование ресурсов.
Что такое квоты и зачем они нужны?
Зачем нужны квоты? Главная цель квот — контроль и ограничение использования дискового пространства. По умолчанию, каждый пользователь или группа пользователей имеют неограниченный доступ к диску, что может привести к его быстрому заполнению и общей неэффективной работе системы. Квоты позволяют детально настроить и ограничить использование диска, сохраняя необходимую гибкость для пользователей и групп.
Квоты могут быть полезны во многих случаях:
- Ограничение использования дискового пространства: квоты позволяют установить максимально допустимое количество данных, которые могут быть сохранены на диск. Это предотвращает заполнение диска нежелательными файлами и обеспечивает свободное место для работы системы.
- Распределение ресурсов: с помощью квот можно ограничить использование дискового пространства различными пользователями или группами. Например, можно установить разные лимиты для руководителей и обычных сотрудников.
- Аудит использования диска: квоты позволяют отслеживать, какие пользователи или группы используют большую часть дискового пространства. Это может быть полезно для анализа использования ресурсов и принятия соответствующих мер для оптимизации процессов.
В целом, квоты помогают управлять дисковым пространством и обеспечивают более эффективную работу системы, предотвращая его заполнение ненужными данными и обеспечивая равномерное распределение ресурсов между пользователями и группами. В Windows Server 2008 R2 доступны различные инструменты управления квотами, которые позволяют настроить квоты для конкретных пользователей или групп, а также позволяют аудитировать и мониторить использование дискового пространства.
Установка квот на диски
Для установки квот на диски в Windows Server 2008 R2 следуйте следующим шагам:
- Откройте «Серверный менеджер».
- Выберите «Роли», а затем «Серверный квотирование».
- В правой части окна выберите «Включить квотирование».
- Выберите диск, на который хотите установить квоты, и нажмите «Свойства».
- На вкладке «Общие» нажмите «Квотирование» и затем «Включить квотирование диска».
- Выберите тип квоты, который вы хотите использовать (например, квотирование по размеру или по количеству файлов).
- Настройте параметры квоты, такие как максимальный размер или количество файлов.
- Нажмите «ОК», чтобы применить изменения.
Теперь вы установили квоты на выбранный диск. При превышении установленных ограничений пользователи будут получать уведомления и ограничения на создание новых файлов.
Не забудьте регулярно проверять и анализировать статистику использования диска для оптимального управления квотами и предотвращения возможных проблем.
В первой статье, я вкратце рассказал Вам о том, что такое сервер, для чего он необходим и какие базовые возможности Windows Server Foundation 2008 R2, далее по тексту WSF, можно достаточно быстро запустить в эксплуатацию на малом предприятии, чтобы сделанное приобретение как можно быстрее стало приносить пользу.
Эту часть статьи хочу посвятить одной из возможностей сервера, которая позволяет сэкономить время, деньги и нервы руководителя предприятия, сотрудников и ИТ-специалистов.
Не для кого не является секретом, что дисковое пространство сервера не бесконечно и очень дорого, как в денежном выражении, так и в его наличия.
У серверных дисков, которые, кстати, как правило (так уж у нас повелось), доступны всем пользователям, работающим в сети предприятия, есть еще одна не приятная особенность.
На них скапливается масса очень «нужной» для работы предприятия информации. Это личные фото сотрудников их друзей и знакомых, свежевыкаченные фильмы, музыкальные произведения.
Объем этой «полезности» растет не по дням, а по часам, съедая с огромной скоростью дисковое пространство сервера.
В результате, через некоторое время встает вопрос о том, что НАДО СРОЧНО, ПОКУПАТЬ (ох, как не любят директора это слово!) еще диски в сервер! Во что это выльется для предприятия?
В первой части статьи мы примерно прикидывали цену серверного железа. Решили, что для экономии денежных средств установим в сервер два диска и организуем их в «Зеркало» оно же RAID-1. В конфигурацию брались 1500 GB SATA диски. Выбор был связан еще и с тем, что более-менее скоростных дисков (7200 оборотов/мин) большего объема, по приемлемой цене, пока нет. Стоит такая дисковая подсистема около 6000 руб. (Цены привожу в Омске). Подобный диск объемом 2 Tb стоит почти 9000 ОДНА штука.
Увидев счет даже на 6000 рублей директор сильно призадумается, и задаст вопрос своему ит-специалисту: «А ЧЕМ ТАКИМ у нас забит сервер?» ИТ-шнику придется предоставить отчет об объемах пользовательских папок и их содержимом. Директор даст команду очистить диски от ненужной (хе-хе, сказали пользователи) информации. Пользователи что-то удалят, но проблема не решится. Через некоторое время все вернется на круги своя.
Возникает законный вопрос: «А можно ли средствами WSF сделать так ,чтобы пользователю не возможно было складывать в свои папки на сервере то, что не относится к его работе?»
Второй вопрос : «Можно ли выделить на серверных дисках каждому пользователю определенное количество места, больше которого он не сможет занять?»
Можно и то, и другое! Таков будет предельно краткий ответ.
Какие же службы сервера обеспечивают те возможности, о которых рассказано?
Для начала, разберемся с возможностью блокировки записи нежелательных файлов.
Для этого, необходимо в «Мастере добавления ролей» выбрать установку роли «Файловые службы».

Далее, выбираем «Файловый сервер»

Для того, чтобы обеспечить возможность контроля за содержимым сервера,
нам необходимо установить «Диспетчер ресурсов файлового сервера»

Обозначаем диск, за которым необходимо вести наблюдение.

Настраиваем отчеты. Обратите внимание, что появилась возможность получения отчетов по электронной почте!
Для этого необходимо, чтобы в сети уже был сервер для отправки почты (SMTP-сервер)

Еще раз проверяем выбранные нами параметры для установки и подтверждаем их нажатием кнопки «Установить».

После того, как сервер установил все необходимы компоненты, в Диспетчере Сервера мы получаем Роль «Файловые службы».
С ее помощью мы можем управлять всеми, необходимыми нам параметрами.
.
Для запрета записи на файловый сервер аудио и видео файлов в WSF имеется готовый фильтр «Блокировка файлов аудио и видео»

Таким образом фильтр выглядит «из нутри». Так что, если предоставляемый с WSF фильтра чем-то не устраивает, то его настройки всегда можно подкорректировать.

Второй вопрос, в начале статьи звучал так:
«Можно ли выделить на серверных дисках каждому пользователю определенное количество места, больше которого он не сможет занять?»
Обратимся к «Диспетчеру ресурсов файлового сервера». К его разделу «Управление квотами».

Так выглядят шаблоны квот, имеющиеся в поставке WSF.

Так выглядит раздел с квотами.

Воспользовавшись одним из имеющихся шаблонов создадим квоту для папки, в которой находятся документы отдела маркетинга.

В случае, если нам необходимо что-либо изменить в уже настроенной квоте, то это можно сделать войдя в «Свойства квоты» .

Хочу заметить, что материал, изложенный в статье является обзором, а не руководством по настройке «Диспетчер ресурсов файлового сервера».
Надеюсь, что мне удалось убедил Вас в том, что с помощью «Диспетчер ресурсов файлового сервера» можно достаточно эффективно изолировать серверные диски предприятия он ненужной информации как по составу, так и по количеству.
File system Quotas are used to restrict the amount of space users can consume or to report on the space consumed by them. They are useful for reporting on those users or folders that are consuming large amounts of disk space on a file server. Ben Lye shows that File system quotas are quick and easy to set up, with three different methods available for configuring them
Disk quotas have been available in Windows since Windows 2000 was released, and could be used by administrators to limit the amount of space users could use on an NTFS volume. Disk quotas are based on file ownership rather than folder structure and because of this they are not particularly useful in all situations. For example, if your server had a single storage volume and you need to apply quotas to different folders on the volume then disk quotas will not help.
File system quotas, which were first introduced in Windows Server 2003 R2, and are a part of the File Server role in Windows Server 2008 (and Windows Server 2008 R2), offer many benefits over disk quotas. With file system quotas we can set quotas for specific folders on the volume, we can use templates to ensure consistent application of quotas, and we can set quotas which are automatically applied to all sub-folders of a folder.
Additionally, file system quotas are useful not just for limiting the amount of space users can consume, but also for reporting on space used – quotas can be set with so-called “soft” limits which are used for monitoring rather than enforcing limits. This functionality can be extremely useful for quickly determining which users or folders are consuming large amounts of disk space on a file server.
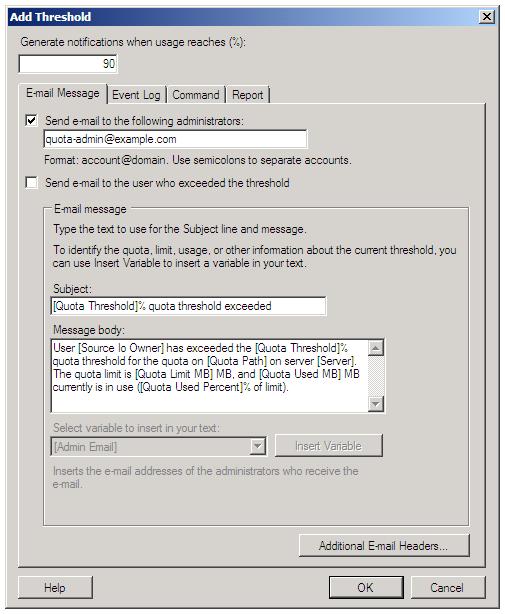
Quota thresholds can be configured so that users or administrators receive notifications when quotas have been reached or are about to be reached. Multiple thresholds can be configured for individual quotas, and actions can include sending e-mail messages, logging to the Windows event log, running commands or scripts, or generating storage reports.
In Windows Server 2008 file system quotas are managed with the File Server Resource Manager (FSRM) console (which is installed as a role service in the File Services role), the command line utility dirquota, or with Windows PowerShell using a COM API.
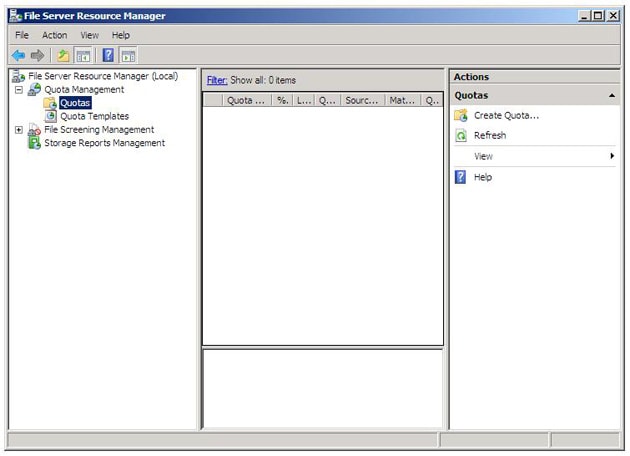
Figure 1: Windows Server 2008 File Server Resource Manager
There are two kinds of quota available – hard quotas which set a limit and enforce it, and soft quotas which set a limit but only report on it. Soft quotas are useful for monitoring disk space use. Quotas are commonly applied using quota templates, which are a mechanism for easily applying the same quota settings to one or more folders. Quota Templates are the recommended way to configure quotas and FSRM includes some example templates which cover a range of scenarios, including using both hard and soft quota types.
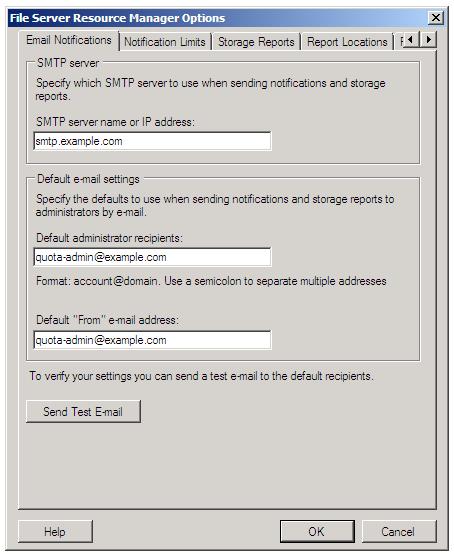
Before we start to configure quotas which will generate e-mail messages, the quota File Server Resource Manager needs to be configured with an SMTP server, and optionally, the default administrator recipients, and the default “from” address.
Like all aspects of quota management, the FSRM settings can be applied using three different tools and you can choose the method appropriate to your needs.
To configure FSRM using the FSRM console:
- Launch the File Server Resource Manager
- Select the root node, labelled “File Server Resource Manager”
- In the Action Pane click “Configure Options…”
- Enter an SMTP server and if desired configure the other settings

- Click the “OK” button
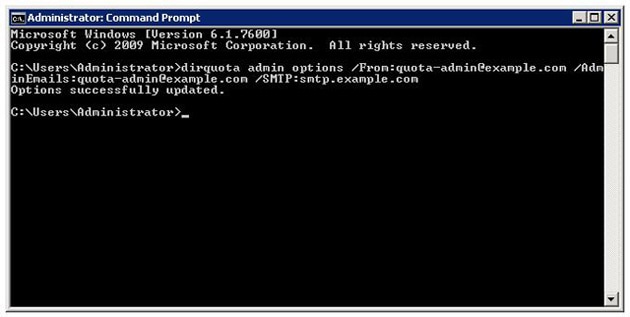
To configure FSRM using the command line:
- Open an elevated command prompt window
- Enter the command “dirquota admin options /From:quota-admin@example.com /AdminEmails:quota-admin@example.com /SMTP:smtp.example.com”
To configure FSRM using Windows PowerShell:
- Open Windows PowerShell
- Enter these commands (or save them as a script and run it):
|
# Create a new COM object to access the FSRM settings $fsrm = New—Object —com Fsrm.FsrmSetting # Set the default administrators e—mail address $fsrm.AdminEmail = «quota—admin@example.com« # Set the from address $fsrm.MailFrom = «quota—admin@example.com« # Set the SMTP server $fsrm.SmtpServer = «smtp.example.com« |
Quota Example – Home directories with a 5GB limit
A common use of file system quotas is to put limits on the size of user’s personal storage space (folders which are often referred to as home directories) on a file server. The requirements of this scenario are to limit the space each user can use to 5GB, alert administrators when 90% of the quota has been reached, and automatically apply quotas to new home directories. The solution requires the implementation of new quota template and an auto apply quota.
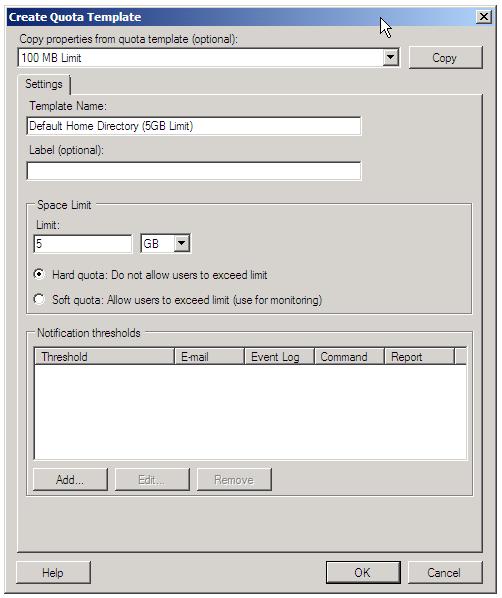
Step 1: Create the new quota template
The first step is to create a new template, which we will use later to apply the quota to the file system. Using a template means we can easily make changes to all folders where we have applied the template quota settings. The template can be created using the FSRM, the dirquota command line tool, or PowerShell, meaning you can choose the tool with which you feel comfortable with and that fits most of your scenarios.
To create the new quota template using the FSRM:
- Launch the File Server Resource Manager
- Expand “Quota Management” -> “Quota Templates”
- In the Action Pane click “Create Quota Template”
- Enter the template name and set the space limit
Note: To set a soft quota (for monitoring only) check the “Soft Quota” radio button
- Click the “Add” button to add a notification threshold
- Set the notification percentage to 90, check the “Send e-mail to the following administrators”, and enter an appropriate destination e-mail address. You can also customise the message text.
- Click the “OK” button twice
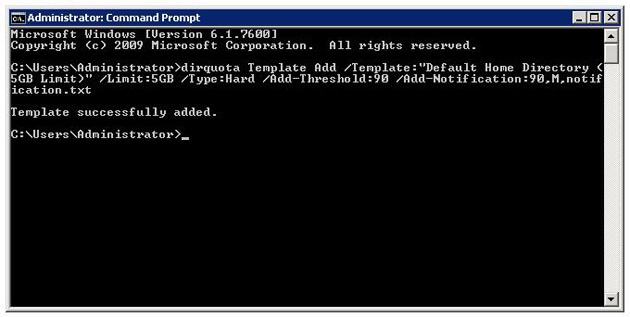
To create the new quota template using the dirquota command line utility:
- Open an elevated command prompt (or Windows PowerShell) window
- Create a text file called notification.txt containing the text of the notification message (an example of this text message can be downloaded from this article)
- Enter this command:
|
dirquota Template Add /Template:«Default Home Directory (5GB Limit)« /Limit:5GB /Type:Hard /Add—Threshold:90 /Add—Notification:90,M,notification.txt |
Note: To set a soft quota (for monitoring only) change “/Type:Hard” to “/Type:Hard”
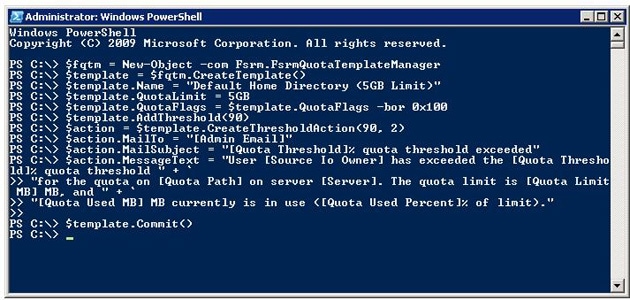
To create the new quota using Windows PowerShell:
- Open Windows PowerShell
- Enter these commands (or save them as a script and run it):
|
1 2 3 4 5 6 7 8 9 10 11 12 13 14 15 16 17 18 19 20 21 22 23 24 25 26 27 28 29 30 31 32 |
# Create a new COM object to access quota templates $fqtm = New—Object —com Fsrm.FsrmQuotaTemplateManager # Create a new template object $template = $fqtm.CreateTemplate() # Set the template‘s name $template.Name = «Default Home Directory (5GB Limit)« # Set the quota limit $template.QuotaLimit = 5GB # Set the quota type to hard limit (the flag for a hard limit is 0x100) $template.QuotaFlags = $template.QuotaFlags —bor 0x100 # Add a quota threshold $template.AddThreshold(90) # Add a threshold e—mail action $action = $template.CreateThresholdAction(90, 2) # Set the e—mail message recipient $action.MailTo = «[Admin Email]« # Set the e—mail message subject $action.MailSubject = «[Quota Threshold]% quota threshold exceeded« # Set the e—mail message text $action.MessageText = «User [Source Io Owner] has exceeded the [Quota Threshold]% « + ` «quota threshold for the quota on [Quota Path] on server [Server]. The quota limit « + ` «is [Quota Limit MB] MB, and « + ` «[Quota Used MB] MB currently is in use ([Quota « + ` «Used Percent]% of limit).« |
Note: To set a soft quota (for monitoring only) change “$template.QuotaFlags = $template.QuotaFlags -bor 0x100” to “$template.QuotaFlags = $template.QuotaFlags -bxor 0x100” to disable the hard limit flag.
Step 2: Create the Quota
The next step is to use the new quota template to apply the quota to the file system.
In this example we’ll say that the home directories are all subfolders of C:\Home. Because we want any new home folders to automatically have the quota applied we need to create an Auto apply Quota. Auto apply quotas are applied to all existing subfolders and any future folders.
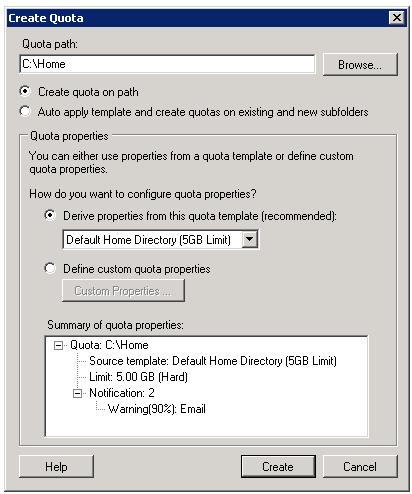
To create the quota using the FSRM:
- Launch the File Server Resource Manager
- Expand “Quota Management” -> “Quotas”
- In the Action Pane click “Create Quota”
- Enter the quota path and choose the appropriate template
- Click the “Create” button
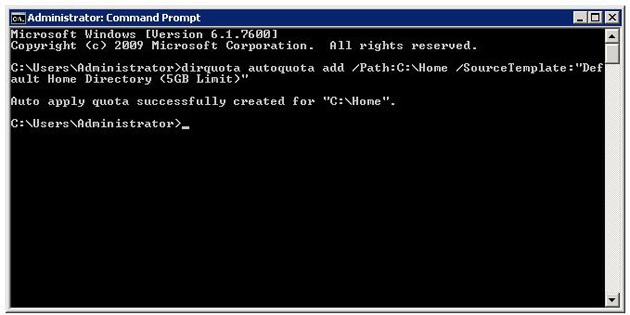
To create the quota using the dirquota command line tool:
- Open an elevated command prompt window
- Create a text file called notification.txt containing the text of the notification message (an example of this text message can be downloaded from this article)
- Enter the command “dirquota autoquota add /Path:C:\Home /SourceTemplate:”Default Home Directory (5GB Limit)””
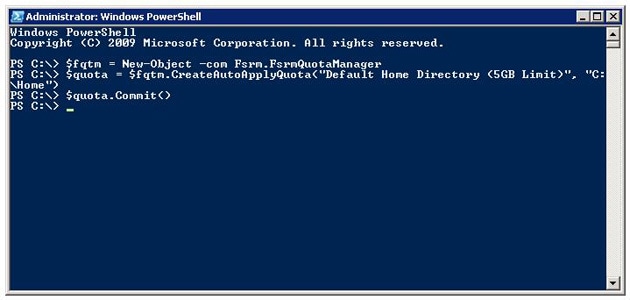
To create the quota using Windows PowerShell:
- Open Windows PowerShell
- Enter these commands (or save them as a script and run it):
|
# Create a new COM object to access quotas $fqtm = New—Object —com Fsrm.FsrmQuotaManager # Create the new quota $quota = $fqtm.CreateAutoApplyQuota(«Default Home Directory (5GB Limit)«, «C:\Home«) # Save the new quota $quota.Commit() |
Quota Exceptions / Folder-Specific Quotas
Naturally there will be occasions when a folder needs to be excluded from a template or auto apply quota. In these situations you can easily add a specific quota for that folder to either increase the limit or to disable the quota entirely.
To create the quota exception using the FSRM:
- Launch the File Server Resource Manager
- Expand “Quota Management” -> “Quotas”
- Select the folder you wish to make the exception for
- In the Action Pane click “Edit Quota Properties…”
- Enter new limit for the quota
- Click “OK”
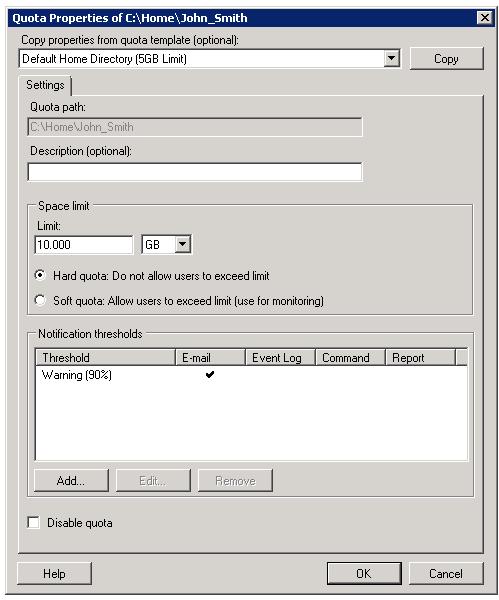
Note: Check the “Disable quota” box to disable the quota
To create the quota exception using the dirquota command line tool:
- Open an elevated command prompt window
- Enter the command …
“dirquota quota add /Path:C:\Home\John_Smith /SourceTemplate:”Default Home Directory (5GB Limit)” /Limit:10GB /Overwrite”
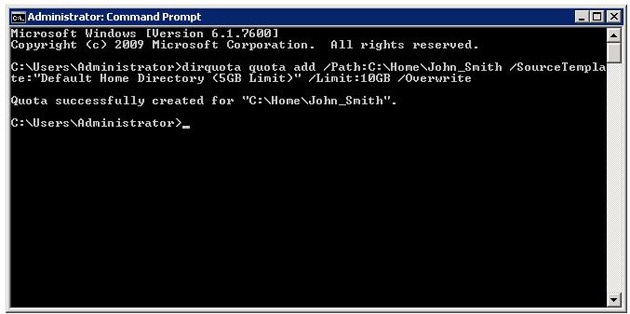
Note: To disable the quota append the command with “/status:disabled”.
To create the quota exception using Windows PowerShell:
- Open Windows PowerShell
- Enter these commands (or save them as a script and run it):
|
# Create a new COM object to access quotas $fqtm = New—Object —com Fsrm.FsrmQuotaManager # Get the existing quota $quota = $fqtm.GetQuota(«C:\Home\John_Smith«) # Set the new quota limit $quota.QuotaLimit = 10GB # Save the quota $quota.Commit() |
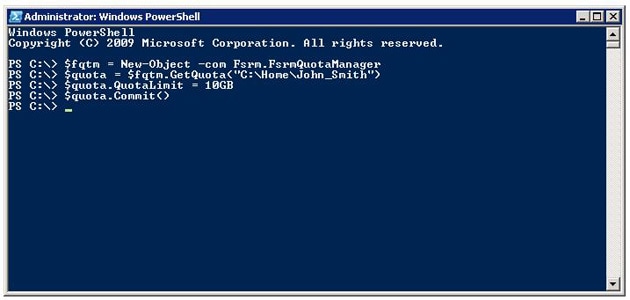
Note: To disable the quota, insert the line “$quota.QuotaFlags = $quota.QuotaFlags -bor 0x200” before saving the quota
How Quotas Affect Clients
When a client maps a network drive to a folder which has a hard quota applied the size of the volume and the amount of available disk space shown is equal to the quota settings.

Figure: Mapped drive showing hard quota limit as volume size
When a hard quota is met or exceeded clients will receive a message telling them that the volume is out of disk space.

Figure: Insufficient disk space message
Viewing Quotas
Administrators can view hard and soft quotas using FSRM, and viewing quotas this way can be a quick method for finding large folders or large consumers of space.
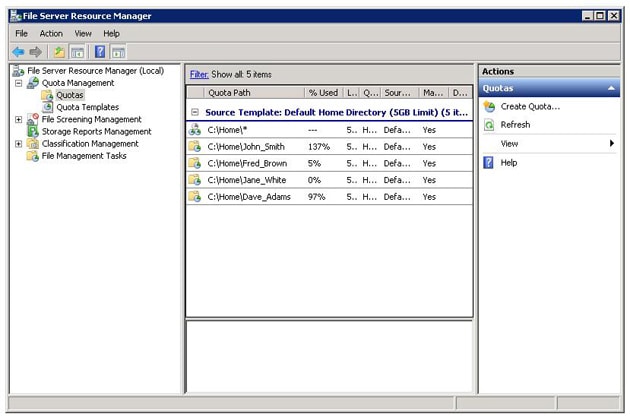
Figure: Quotas in File Server Resource Manager
File system quotas are quick and easy to set up, with three different and flexible methods available for configuring them. Properly applied they can be a good tool to help ensure efficient use of storage resources, a convenient countermeasure against storage waste, and a useful tool for reporting on storage utilisation. There is an IO performance penalty for using quotas, but the benefits will probably outweigh the small performance cost.
- More information about File Server Resource Manager is available in Microsoft TechNet:
http://technet.microsoft.com/en-us/library/cc771092%28WS.10%29.aspx - More information about the dirquota command line tool is also available in TechNet:
http://technet.microsoft.com/en-us/library/cc754836%28WS.10%29.aspx - More information about the COM API for working with FSRM is available in MSDN:
http://msdn.microsoft.com/en-us/library/bb972746%28VS.85%29.aspx
| Previous | Table of Contents | Next |
| Configuring a Windows Server 2008 R2 Remote Desktop Services License Server | Repairing and Defragmenting Windows Server 2008 R2 Disks |
<google>BUY_WINSERV_2008R2</google>
Even in today’s world of cheap and abundant disk storage space, it is still important to monitor and control the disk space usage of users. This is especially important in enterprise environments where the sheer number of users can quickly consume even the largest quantities of disk space. As such this chapter of Windows Server 2008 R2 Essentials will cover the topic of configuring and managing disk quotas on Windows Server 2008 R2.
Contents
Contents
|
||
An Overview of Disk Quotas
First, it is important to appreciate that disk quotas are actually a feature of the NTFS disk file system rather than a specific feature of Windows Server 2008 R2, although Windows does provide the tools necessary to configure and manage disk quotas.
In essence, disk quotas allow Windows administrators to monitor and control the use of disk space by users. Disk quotas can be deployed in a number of different ways depending on the requirements of the administrator:
- Disk Usage Monitoring — Allows the administrator to monitor the usage of disk space on a user by user basis. No action is taken by the operating system to warn users that they are approaching a limit or prevent further disk writing when the limit is exceeded.
- Disk Usage Monitoring and Warning — Also allows the administrator to monitor disk usage but also warns offending users when their disk usage on a particular volume exceeds a specified limit.
- Disk Usage Enforcement — Allows monitoring of disk usage, issues warnings top users when thresholds are reached and denies disk space when the user exceeds limit.
Disk quotas are configured on a per-volume basis. It is not, therefore, possible to specify a quota that encompasses multiple volumes. Once a volume has disk quotas specified, those quotas apply to all users of the volume unless exceptions are configured for individual users. For example, a user in the video editing department would probably need more disk space than someone in the accounts department. Members of the Administrators group can never be denied access to disk space. The most an administrator will ever receive is a warning.
Configuring Disk Quotas
Since disk quotas are a feature built into NTFS, any volume on which quotas are to be configured must be formatted as NTFS. Assuming this to be case, disk quotas may be enabled on a volume from within the Disk Management interface via the Computer Management or Server Manager tools. Computer Management is accessed by selecting Start -> All Programs -> Administrative Tools -> Computer Management. Once Computer Management is running, select the Storage option from the tree in the left hand pane followed by Disk Management. In the disk management interface, right click on the volume in the graphical view to which disk quotas are to be applied. From the resulting menu, select Properties. In the Properties dialog click on the Quota tab to display the quota settings for the current volume:
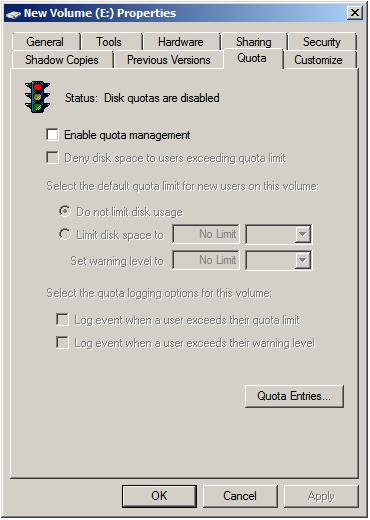
As illustrated in the above figure, disk quotas are disabled by default. The first step, therefore, is to set the Enable quota management check box. Once selected, the other settings will activate so that they can be changed. The first setting controls whether users will be denied disk space when the specified limit is reached. If not selected, the user will simply receive a warning. The Limit disk space to setting allows the amount of allowed space for users to be set using either KB, MB, GB, TB, PB or EB. Set the desired limit for this setting and then decide on a limit level at which the user will receive a warning. This value enables you to have a warning issued to the user as they approach the limit giving them time to free up space before they are denied space. Typically the warning level should be set to trigger when the user reaches 85 — 95% of the of the quota limit. The final settings allow the administrator to control whether events are recorded in the logs when users receive warnings or exceed specified limits.
On completion of the quota settings, click on Apply to apply the settings. Windows will subsequently display a dialog warning that the disk quota system needs to be enabled before the settings can take effect. Respond affirmatively to enable changes and implement the settings.
Configuring Disk Quotas for Individual Users
As previously mentioned, disk quotas on a volume apply, by default, to all users storing data on that volume (with the exception of members of the Administrators group). It is, however, possible to customize quota limits for individual users. To achieve this, return once again to Disk Management in the Computer Management tool, right click on the volume in question and select Properties. In the Properties dialog select the Quota tab and then click on the Quota Entries button to display the quota entries dialog for the selected volume:
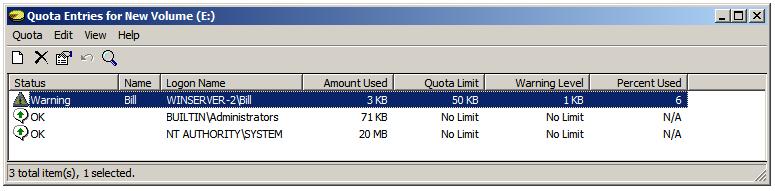
The Quota Entries dialog lists quota entries for all the users who have stored data on the NTFS volume in question. As shown above, user Bill has already received warnings that disk usage is approaching his quota limit (hardly surprising given the extremely low quota limit specified for the volume). To increase quota limits for a single user, right click on the user in entries list and select Properties from the menu to invoke the Quota settings dialog as illustrated in the following figure:
<google>WIN28BOX</google>

With the quota settings dialog displayed increase the quota for the selected user to the appropriate amount for the user’s needs and click on Apply to implement the change. Alternatively, remove quota limits entirely for the specified user by selecting the Do not limit disk usage option.
From the list of users it is clearly only possible to configure quotas for users who have already written something to the disk. In order to customize quota settings for a user who has yet to store anything on the selected volume begin by selecting Quota -> New Quota Entry… to display the user selection dialog:
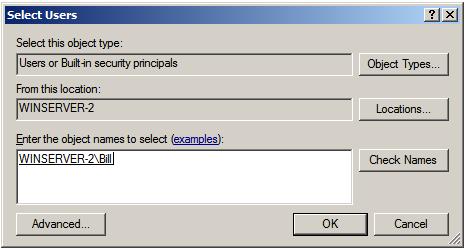
Enter the name of the user into the object name field and click on Check Names to obtain a list of matching names. Select the correct name if more than one are listed and click on OK to proceed to the Add New Quota Entry dialog:
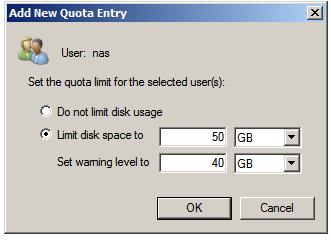
Configure the settings as required and click on OK to implement the settings.
Querying Quotas from the Command Prompt
In addition to using the Disk Management tool, disk quota status can be also be checked from the command prompt using the fsutil quota query command which takes as an argument the designator of the drive on which the quotas are to be queried. For example, the following command displays output of the current quota settings both for the specified disk and individual users:
C:\Windows\system32>fsutil quota query e:
FileSystemControlFlags = 0x00000002
    Quotas are tracked and enforced on this volume
    Logging for quota events is not enabled
    The quota values are up to date

Default Quota Threshold = 0x0000000000000400
Default Quota Limit     = 0x000000000000c800

SID Name        = BUILTIN\Administrators (Alias)
Change time     = Friday, August 08, 2008   14:21:13 PM
Quota Used      = 72704
Quota Threshold = 18446744073709551615
Quota Limit     = 18446744073709551615

SID Name        = NT AUTHORITY\SYSTEM (WellKnownGroup)
Change time     = Friday, August 08, 2008   14:35:02 PM
Quota Used      = 20976640
Quota Threshold = 18446744073709551615
Quota Limit     = 18446744073709551615

SID Name        = WINSERVER-2\Bill (User)
Change time     = Friday, August 08, 2008   20:02:47 PM
Quota Used      = 3072
Quota Threshold = 1024
Quota Limit     = 102400

SID Name        = WINSERVER-2\nas (User)
Change time     = Friday, August 08, 2008   20:09:58 PM
Quota Used      = 0
Quota Threshold = 42949672960
Quota Limit     = 53687091200
In order to obtain a list of quota violations on a particular disk simply run fsutil quota violations:
C:\Windows\system32>fsutil quota violations
Searching in System Event Log...
Searching in Application Event Log...
No quota violations detected
The above output indicates that no violations have occurred. If violations had, in fact, occurred, the output would have listed the violations. It is important, however, to keep in mind that by default violations are only written to the log files once every hour. If a violation has only recently occurred it may not, therefore, show up immediately in the list of violations. To verify the current update frequency, use the fsutil behavior query quotanotify command:
C:\Windows\system32>fsutil behavior query quotanotify
quotanotify = 3600
To change the frequency simply use the fsutil behavior set quotanotify command. For example:
fsutil behavior set quotanotify 1800
<google>BUY_WINSERV_2008R2_BOTTOM</google>