Задача: Проработать обновление Windows Server 2016 до Windows Server 2019
Как по мне использовать обновление серверной операционной системы Windows с одного релиза на другой с установленными сервисами – это обрекать себя на получение дополнительных проблем и порой не понимания, а почему сервисы перестали работать. Уж лучше развернуть их заново с нуля по своим наработкам, да долго и время, но так Вы будете уверены, что работает как нужно. Я хочу в тестовых условиях под Debian 10 + Proxmox 6 проработать процедуру обновления виртуальной машины Windows Server 2016 Standard установленной из образа: SW_DVD9_Win_Server_STD_CORE_2016_64Bit_English_-4_DC_STD_MLF_X21-70526.ISO. Возможно и буду использовать данную заметку, а возможно и нет, все решит случай.
Требования:
RAM: не менее 4GbHDD: на логическом диске C: должно быть свободно не менее 40GbEth: потребуется выход в интернет или доступ к WSUS сервису для выкачивания обновлений.Права локального администратора в системеСлужба Windows Updates должна быть включена
Шаг №1: Запускаю VM srv-s2016 под Debian 10 + Proxmox 6
Шаг №2: Копирую дистрибутив Windows Server 2019 в систему.
У меня в моей локальной сети есть ресурс где лежат книги, программы, образа. С этого ресурса копирую образ Windows Server 2019 Std (SW_DVD9_Win_Server_STD_CORE_2019_1809.18_64Bit_English_DC_STD_MLF_X22-74330.ISO)
Шаг №3: Проверяю, что VM той редакции, которая нужна:
|
C:\Windows\system32>reg query «HKLM\SOFTWARE\Microsoft\Windows NT\CurrentVersion» /v EditionID HKEY_LOCAL_MACHINE\SOFTWARE\Microsoft\Windows NT\CurrentVersion EditionID REG_SZ ServerStandard C:\Windows\system32>systeminfo | findstr /I «OS Name» Host Name: WIN—AAURVT4CB0C OS Name: Microsoft Windows Server 2016 Standard OS Version: 10.0.14393 N/A Build 14393 OS Manufacturer: Microsoft Corporation OS Configuration: Standalone Server OS Build Type: Multiprocessor Free BIOS Version: SeaBIOS rel—1.14.0—0—g155821a1990b—prebuilt.qemu.org, 4/1/2014 Time Zone: (UTC+03:00) Moscow, St. Petersburg, Volgograd Connection Name: Ethernet |
Все правильно.
Шаг №4: Распаковываю образ Windows Server 2019 Std, понадобится архиватор 7zip и запускаю процедуру обновления:
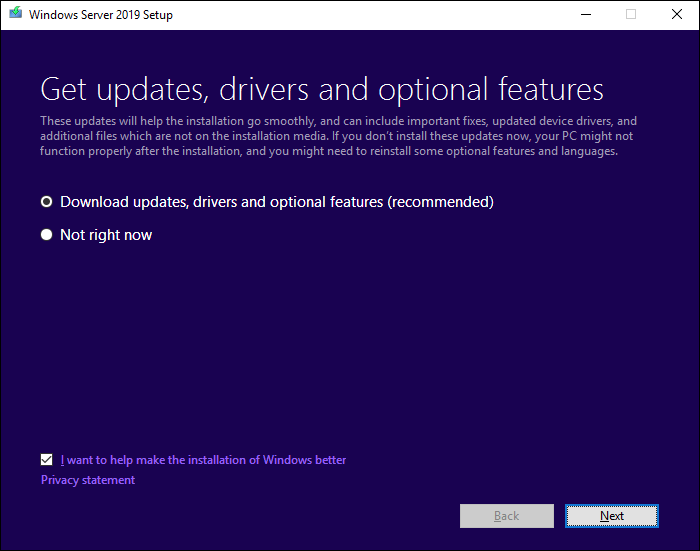
Запускаю C:\Soft\SW_DVD9_Win_Server_STD_CORE_2019_1809.18_64Bit_English_DC_STD_MLF_X22-74330\setup.exe – Run as Administrator — выбираю вариант "Download updates, drivers and optional features (recommended) / Скачать обновления, драйверы и дополнительные компоненты (рекомендуется)"
I want to help make the installation for Windows better Privacy statement: снимаю галочку
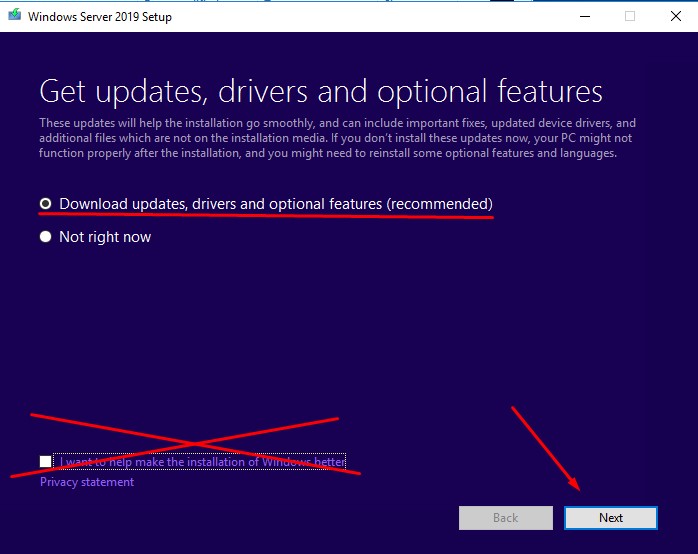
И нажимаю Next
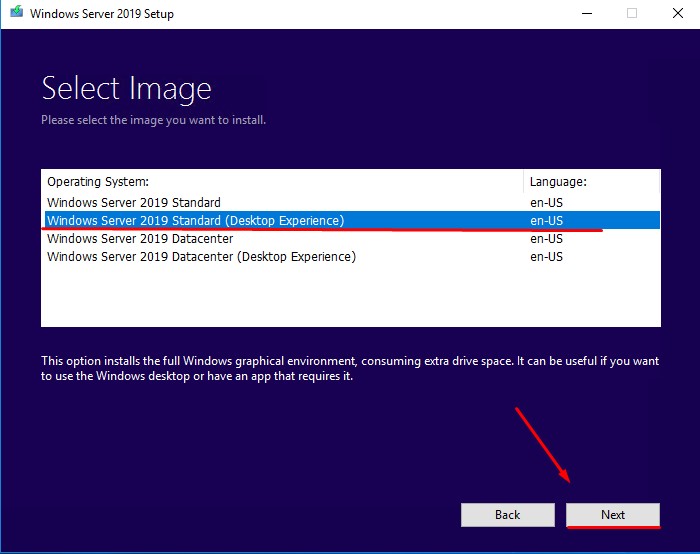
Выбираю выпуск Windows Server 2019 который в итоге будет, для меня это Windows Server 2019 Standard (Desktop Experience) и нажимаю Next
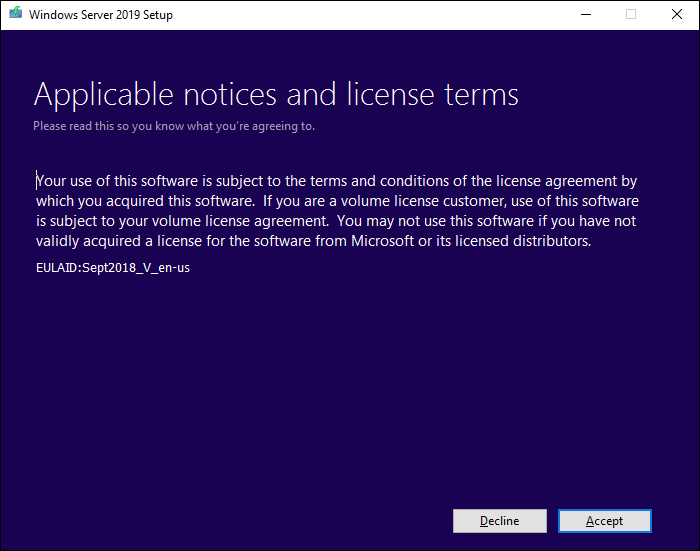
Нажимаю Accept
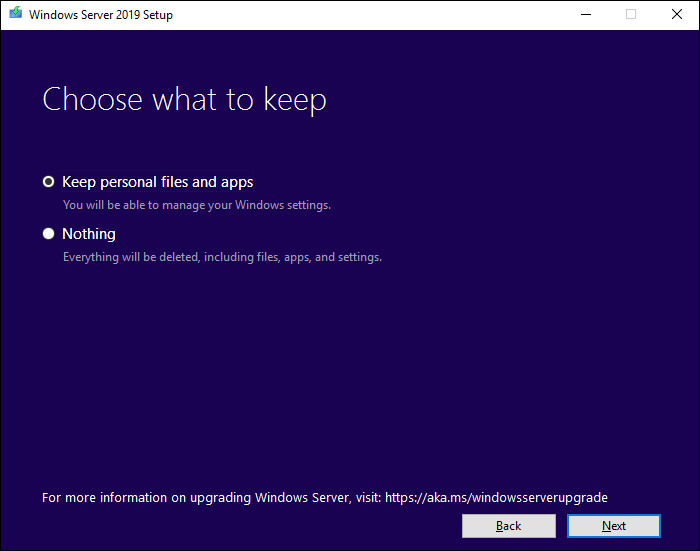
Choose what to keep: выбираю Keep personal files and apps (Сохранить личные файлы и приложения)
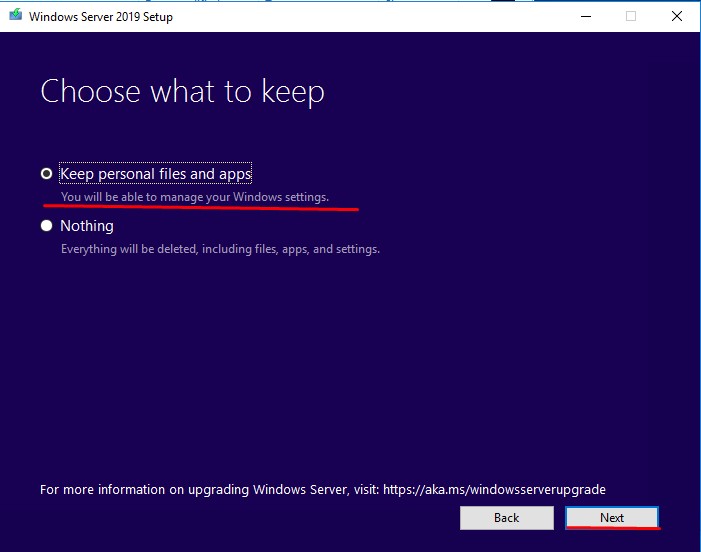
И нажимаю Next
Ожидаю, идет проверка
Getting updates
This may take a few minutes.
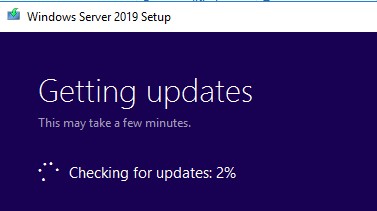
В итоге проверка завершается успешно, и установщик готов приступить
Ready to install
You won’t be able to use your PC while Windows installs. Save and close your files before you begin.
To recap, you’ve chosen to:
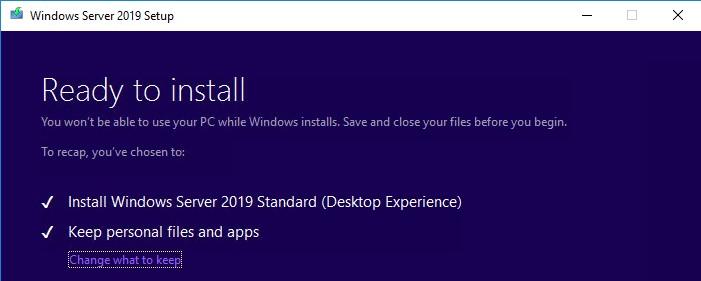
И нажимаю Install
Система по завершении самостоятельно отправится в перезагрузку
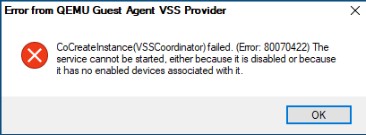
Вот что я получил в консоли Proxmox по этой VM, когда наблюдал за процессом обновления, но после снова продолжился процесс обновления как ни в чем не бывало.
Шаг №5: Система загрузилась, и я проверяю какая сейчас редакция:
|
C:\Users\Administrator>systeminfo | findstr /I «OS Name» Host Name: WIN—AAURVT4CB0C OS Name: Microsoft Windows Server 2019 Standard OS Version: 10.0.17763 N/A Build 17763 OS Manufacturer: Microsoft Corporation OS Configuration: Standalone Server OS Build Type: Multiprocessor Free BIOS Version: SeaBIOS rel—1.14.0—0—g155821a1990b—prebuilt.qemu.org, 4/1/2014 Time Zone: (UTC+03:00) Moscow, St. Petersburg Connection Name: Ethernet |
Отлично в тестовых условиях процесс обновления прошел успешно, а что до боевого, ну знаете я, пожалуй, пасс. Лучше работающий сервис чем после обновления не работающий вовсе. На этом заметка завершена, с уважением автор блога Олло Александр aka ekzorchik.
Categories
- Transfer Programs from C Drive to D Drive
- Transfer Installed Software to New PC
- Transfer Files from Old PC to New PC
- Transfer Microsoft Office
- Find Office Product Key
- Move User Folder
- Move Google Chrome Bookmarks
This article covers in-place server upgrade solutions and Server data migration from an old PC to a new PC. Figure out your target first:
If you want to start an in-place upgrade from Windows Server 2016 to Server 2019 or 2022, and keep all existing apps and files, locate Part 1.
If you want to change old devices and plans to migrate applications, databases, domain accounts, user profiles from one server to another, see Part 2.
| Workable Solutions | Step-by-step Troubleshooting |
|---|---|
| Part 1. How to Upgrade Windows Server to 2019/2022 | Start Server setup > Click setup.exe…Full steps |
| Part 2. How to Migrate Server 2016 to 2019 of 2022 | Download EaseUS Todo PCTrans > Click «Backup»…Full steps |
According to Microsoft, Windows Server 2016 will continue to update until Jan 12, 2027. And the end of life for Windows server 2019 is Jan 9, 2029. Windows Server 2022 has released in Sep 2021.
Even though Windows Server 2016 still acts as the main workhorse on many companies, we recommend upgrading to the latest version due to the new security function and better performance.
Comparison of Windows Server 2016 vs. 2019
Windows 2019 updates storage migration service, Kubernetes platform support, unified management, virtual network peering, enhanced Windows Defender ATP, etc. However, Window Server 2016 has removed iSNS, business scanning, remote desktop connection broker, remote desktop virtualization host, print components, and more.
Read Microsoft guide about editions comparison window server 2019.
Comparison of Windows Server 2019 vs. 2022
Server 2022 unveils four advanced functions of improved security: Hypervisor-based code integrity, secured-core server, hardware-enforced stack protection, and transport Layer Security (Enable TLS 1.3).
It also provides better platform flexibility, a new Windows admin center, upgraded Hyper-V Manager, Hybrid Cloud Support, and Enhanced Kubernetes Experience.
Learn more: check editions comparison server 2022.
Part 1. How to Upgrade Windows Server to 2019/2022
A step-by-step guide to performing In-Place Server Upgrade:
Phase 1: Start Server setup.
Step 1. Go to the Windows Server 2019 setup media, and then click setup.exe.
Step 2. Click Yes to Confirm the setup process.
Step 3. Then you can see the windows of «Get updates, drives, and optional features.» Select «Download updates, drivers and optional features (recommend)» and then click «Next.»
Step 4. Wait for setup to check the device configuration. When it finishes, select «Next.»
Step 5. Enter the Server license key to continue. (If you are confused about finding the Windows server product key, you can check this guide.)
Step 6. Select the wanted Windows Server 2019 image and then choose «Next.»
Step 7. Click «Accept» to agree with the Applicable notices and license terms.
Step 8. Choose what to keep and click Next:
Please choose «Keep personal files and apps» to keep data.
«Nothing» will cause all data to be deleted, including files, apps, and settings.
Step 9. After analyzing finish, you can click «Install» to prompt.
Phrase 2: Check whether the system is successfully upgraded.
Type Registry Editor on the search box and click to open it:
Follow the path to see ProductName: Computer\HKEY_LOCAL_MACHINE\SOFTWARE\Microsoft\Windows NT\CurrentVersion

Your ProductName should be Windows Server 2019. Remember to check all applications are running well. If apps or files are lost, EaseUS Todo PCTrans can help you create image files to keep everything.
If you find Windows Server goes wrong, you can follow the path (C:\Windows\Panther) and zip the files. Then, contact Microsoft to help you.
Part 2. How to Migrate Server 2016 to 2019 of 2022
If the in-place upgrade is not your option, please shed light on Server Migration to move data quickly. For Server users, it is a headache to find a cost-effective and flexible method to transfer files and data, even users’ accounts and domain accounts, to a new PC.
This part will give you another choice to migrate all programs, files, and settings — Download the Windows Server migration tool. Advanced Windows Server PC transfer utility — EaseUS Todo PCTrans Technician is capable of Windows Server transfer solution between Server 2003/2008/2012/2016/2019/2022.
EaseUS Todo PCTrans Technician
- ☆ Deploy & install Todo PCTrans on multiple PCs.
- Transfer unlimited files, programs, apps between Servers.
- Transfer account, domain account, and settings.
- Data rescue, find product key of installed programs.
- One license for multiple PCs.
Still, hesitate to use EaseUS Todo PCTrans? Check the video guide. Get more info about this advanced Windows Server file & app transfer software.
Steps about migrating to Windows Server 2019/2022:
Step 1. Launch EaseUS Todo PCTrans on your source and target computers, connect both PCs via the internet.
1. At the «PC to PC» section, click «PC to PC» to continue.

2. Select your target computer via its device name, then enter its account password or verification code and select the transfer direction. Then click «Connect» to continue.
You can check the verification code on the right top of «PC to PC» mainscreen on the target computer.

Step 2. Select the categories Applications, Files, and Accounts to transfer via the internet.
If you want to transfer data selectively, click «Edit» under each category, and choose the specific items.

Step 3. Click «Transfer» to start transferring your apps/files/accounts from one computer to another computer via the Internet.

Final Thoughts
This post provides two parts in Server upgrade and Server migration. If you focus on upgrading Windows Server 2016 to 2019 or 2022, a Windows built-in method is enough to complete the task. One more important thing — here is a case that in-place upgrade turns to wrong and your data lost. So, to protect your data, we recommend making a backup image by EaseUS Todo PCTrans.
In addition, data transfer also becomes the client’s purpose. Therefore, you can enjoy the direct migration to Server 2019 or 2022.
In this blog I am sharing how I upgraded my Windows Server 2016 Hyper-V host that been running an Intel NUC for a solid 3 years now to Windows Server 2019. Before anything else I’m taking my collecting my current server info (reference link: here)
- Open a command prompt and type systeminfo.exe.

- Copy, paste the info to a notepad or OneNote save to another device or storage other than the machine that will be upgrading.
- Type ipconfig /all and take note of the IP settings.
- Open the Registry Editor this this hive:
HKLM\SOFTWARE\Microsoft\Windows NT\CurrentVersionand take note the Windows Server BuildLabEx (version) and EditionID (edition).
It’s also worth the trouble to that we backup the operating system, apps, and virtual machines.

As you can see above, we can’t have any virtual machines running during the in-place upgrade process, so we have to make sure that they are turned off.
Now, after this checklist are met, it’s time to launch the Windows Server 2019 installer.

If you are prompted a UAC – click Yes.

The next screen will ask for either Download updates, drivers and optional features (recommended) or Not right now options, if your device is internet-connected you may select the first option and then select Next.

Enter your Windows Server 2019 Product, in this example I have a Standard License (you won’t see any Datacenter options here).
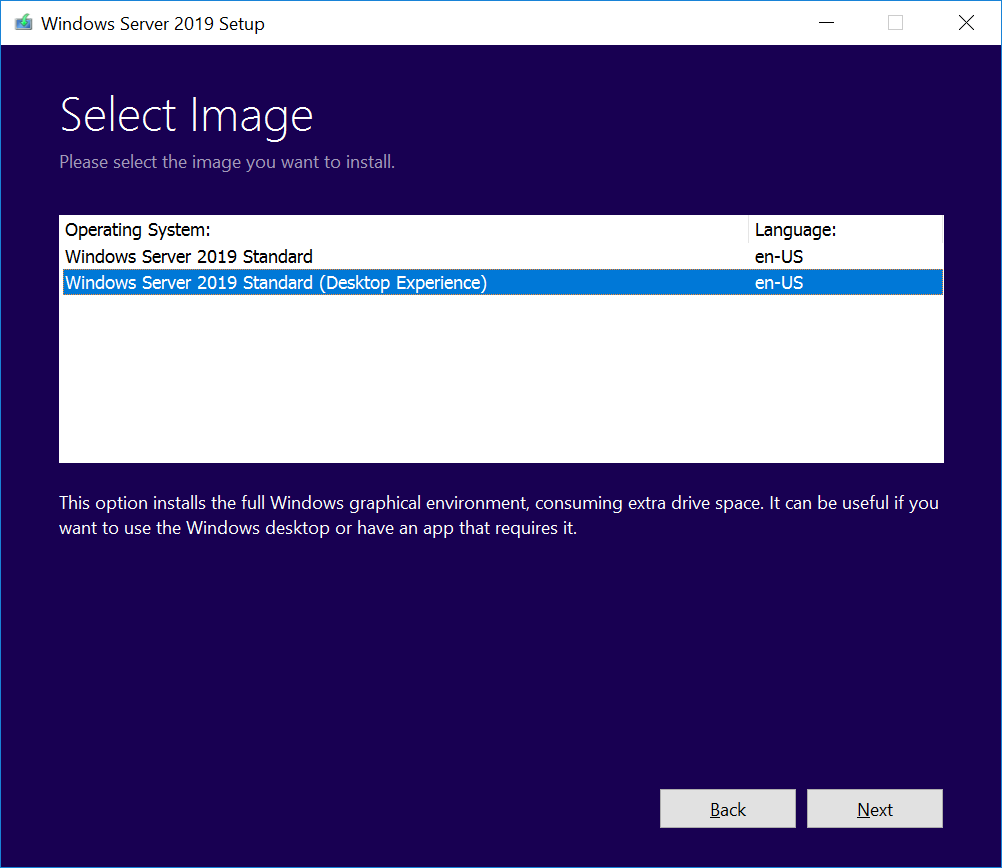
I selected the Windows Server 2019 Standard (Desktop Experience) then clicked Next.

Select Accept to accept the terms of your licensing agreement

On the next screen you may select to Keep your personal files and apps or just wipe everything, I have chosen the keep my files, then I clicked Next.

The setup will then analyzes the device and will call your attention if needed (same in the example above of the running VMs), once all is good to go it will prompt you to proceed with the Installation.

Click install to proceed.

After the upgrade is completed, verify that the upgrade to Windows Server 2019 was successful by going the the System Properties.

Now this Windows Server 2019 is ready.

The Windows Server 2016 is a cloud-ready operating system that delivers new layers of security and Azure-inspired innovation for the applications and infrastructure. If you would like to try this out in a lab environment, download it here. In some of my other posts, We have gone through the installation of Windows Server 2016 and the installation of Windows Server 2019. Also, I have configured and deployed Windows 10 via Windows Deployment Services (WDS). In this article, I will show you how to perform an in-place upgrade from Windows Server 2016 to Windows Server 2019.
See how to perform an Upgrade from Windows Server 2019 to 2022 via iDRAC, how to configure Windows LAPS, Learnt About installing Server 2016, how to install Windows Server 2016 Operating System on VirtualBox, and how to block upgrade to Windows 11 through Local Group Policy or Registry Editor from Windows 10.
Running the latest version of Windows Server allows you to use the latest features. This includes running the latest security features that deliver the best performance. You can upgrade to a newer version of Windows Server by up to two versions at a time. The table below shows the supported upgrade paths, based on the version you’re currently on. See these guides for more information on how to set up a VM via PXE boot on a Generation 1 VM and how to set up a VM via PXE boot on a Generation 2 VM. Note: You can do an in-place upgrade from Windows Server 2012 R2 to Server 2019.
Perform upgrade from Windows Server 2016 to 2019
On my Windows Server 2016 lab VM. I mounted the Windows Server 2019 iso file, so let’s upgrade. In my next article, I will be demonstrating how a server can be upgraded from WS 2012 to 2019. As you can see below, we are currently running Windows Server 2016, Datacenter Evaluation Edition.

Windows Server 2019 Install Options
1: Server Core: It’s a smaller installation that includes the core components of Windows Server and supports all server roles, but does not include a graphical user interface (GUI).
2: Server with Desktop Experience: This is the complete installation and includes a full GUI for customers. Please see how to fix “The virtual machine has terminated unexpectedly during startup with exit code 1 (1×0): Failed to open a session for the virtual machine Windows Server 2019“-
Windows Server 2016 requires a direct upgrade process unlike Windows Server 2012. We will be proceeding with the installation as shown below.
Mount the ISO File
Mount the WS 2019 ISO Image on WS 2016 VM as shown below. Download Virtual Clone in order to do this.

Double-click on the mounted ISO in order to continue the setup

This will open up the Windows Server 2019 setup as shown below. Click on Download Updates, drivers and Optional Features (recommended). Click on Next

This will check for updates and also check your PC

Select The Image to Install
This will launch the setup “Select Image” window as shown below. Click on Next. See how to install Windows Server 2022 on VMware Workstation

Accept the License as shown below

Decide on what to keep
This will open up a new window instructing you on what to keep. I will go with “Nothing”. Click on Next

When you choose nothing, this will prompt you to select yes in order to be very sure you want to continue

Windows will collect updates and when prepare the system for installation.


This will make sure your system has enough space to install the Operating System and ensure everything is ok.

Install the Operating System
This will prompt the Read to Install Window as shown below. Click on Install as shown below.

Now the server upgrade process begins as shown below. This can take a while!


The following windows below show Windows Server 2019 is still installing.
Note: Your server will restart multiple times.


Customise the server
Let’s customise the server by entering the following information as it relates to you. When you are done, click on Next

Enter the password to your Administrators account as shown below. This step will finalise the Windows Server 2016 to Windows Server 2019 Upgrade

When Windows is done applying settings, you can now log on to your server a shown below.

Now we are logged on to the server, let’s access the server system properties as shown below.

Now we are done upgrading to Windows Server 2019. You can install additional roles and features needed to make this server operational. For some examples, see the following links below. how to set up a Domain Controller, how to add a second Domain Controller to your environment, how to install and configure Active Directory Federation Service (ADFS) in Windows Server, and how to install Dynamic Host Configuration Protocol on Windows Server 2019.
Here you can have a look at the basic settings such as the time zone, ITÉ security setting, firewall, and Remote Desktop, etc. For the configuration of a new server, see this guide “Post-installation of this server“.

To ensure everything was successfully upgraded, we need to access the registry.
On the server, run RegEdit. Check the value of the HKEY_LOCAL_MACHINE\SOFTWARE\Microsoft\WindowsNT\CurrentVersion hive. The version should show Windows Server 2019. See the following articles below for more information about the Windows registry.
- How to search through the Windows registry.
- For what Registry Editor is and how to access the registry hives.
I hope you found this blog post helpful on how to perform an in-place upgrade from Windows Server 2016 to Windows Server 2019. If you have any questions, please let me know in the comment session.
Upgrading your Windows Server operating system is an important task to ensure that you have access to the latest features and security updates. In this blog post, we will discuss the challenge of upgrading Windows Server 2016 to 2019 and provide you with several methods to successfully carry out the upgrade. Whether you are a system administrator or an individual user, this guide will help you navigate through the upgrade process efficiently and effectively.
Video Tutorial:
The Challenge of Upgrading Windows Server 2016 to 2019
Upgrading an operating system is typically not a simple task, and the same holds true for upgrading Windows Server 2016 to 2019. There are certain considerations and potential challenges that you should be aware of before you begin the upgrade process. These challenges may include compatibility issues with existing software and hardware, potential data loss, and downtime during the upgrade process. However, with careful planning and execution, these challenges can be minimized or overcome.
Things You Should Prepare for
Before you proceed with upgrading Windows Server 2016 to 2019, there are a few things you should prepare for. Here is a list of items you should have in place before starting the upgrade process:
1. Backup your data: Before making any major changes to your server, it is essential to back up all your important data. This will ensure that you have a failsafe in case anything goes wrong during the upgrade process.
2. Check compatibility: Review the compatibility of your current software and hardware with the Windows Server 2019 operating system. Some older applications or devices may not be compatible, and you may need to consider upgrades or alternative solutions.
3. Review system requirements: Verify that your server meets the minimum system requirements for Windows Server 2019. This includes factors such as processor speed, RAM, and available disk space. Upgrading to a new operating system may require additional hardware resources.
4. Plan for downtime: Understand that during the upgrade process, your server may experience downtime. It is important to communicate this to your users and plan for any necessary system or service interruptions.
Method 1: via Windows Server Update Services (WSUS)
Windows Server Update Services (WSUS) is a tool that allows you to manage the distribution of updates released through Microsoft Update to computers in a corporate environment. Here are the steps to upgrade Windows Server 2016 to 2019 using WSUS:
1. Ensure that you have installed the latest updates on your Windows Server 2016 using Windows Update or WSUS.
2. Open the WSUS administration console and connect to your WSUS server.
3. Navigate to the «Update Services» node and select the server that you want to upgrade.
4. Right-click on the server and select «Import Updates» to import the Windows Server 2019 updates into WSUS.
5. Approve the imported updates for installation.
6. Once approved, the Windows Server 2019 updates will be available for installation on the server.
7. Open a Command Prompt as an administrator and run the following command: «wuauclt /detectnow /updatenow«. This will trigger the server to check for updates from the WSUS server and initiate the Windows Server 2019 upgrade process.
8. Follow the on-screen instructions to complete the upgrade.
Pros:
– Managed upgrade process through WSUS.
– Ability to distribute updates to multiple computers in a corporate environment.
Cons:
– Requires WSUS to be set up and configured.
– May encounter issues with the WSUS server or its connectivity.
Method 2: using Installation Media
Using installation media is another method to upgrade Windows Server 2016 to 2019. Here are the steps to follow:
1. Insert the Windows Server 2019 installation media into the server’s DVD drive or mount the ISO file.
2. Run the setup.exe file to start the upgrade process.
3. Select the «Upgrade» option when prompted.
4. The installation wizard will check for compatibility and validate your product key.
5. Review the license terms and accept them to proceed.
6. Choose the edition of Windows Server 2019 that you want to upgrade to.
7. Select the «Keep personal files and apps» option to ensure that your data and installed applications are preserved during the upgrade.
8. Follow the on-screen instructions to complete the upgrade.
Pros:
– Direct upgrade method without the need for additional tools or services.
– Data and applications are preserved during the upgrade process.
Cons:
– May encounter compatibility issues with certain applications or hardware.
– Longer upgrade process compared to other methods.
Method 3: using Windows Server Migration Tools
Windows Server Migration Tools is a set of Windows PowerShell cmdlets that can be used to migrate server roles, features, operating system settings, and data from one server to another. Here are the steps to upgrade Windows Server 2016 to 2019 using Windows Server Migration Tools:
1. Install Windows Server Migration Tools on both the source (Windows Server 2016) and destination (Windows Server 2019) servers.
2. Create a migration package on the source server using the New-SmigServerPackage cmdlet.
3. Copy the migration package to the destination server.
4. Install any necessary server roles and features on the destination server using the Install-WindowsFeature cmdlet.
5. Import the migration package on the destination server using the Import-SmigServerSetting cmdlet.
6. Follow the on-screen instructions to complete the migration and upgrade process.
Pros:
– Allows for a more controlled and customized migration and upgrade process.
– Provides the ability to migrate specific server roles, features, and settings.
Cons:
– Requires familiarity with PowerShell cmdlets and scripting.
– May encounter issues with specific server roles or features during the migration process.
Method 4: via Microsoft Deployment Toolkit (MDT)
The Microsoft Deployment Toolkit (MDT) is a free collection of tools, processes, and guidance for automating desktop and server operating system deployments. Here’s how to upgrade Windows Server 2016 to 2019 using MDT:
1. Download and install MDT on a management workstation or server.
2. Create a deployment share in MDT and import the Windows Server 2019 installation files.
3. Configure the deployment task sequence and customize any required settings.
4. Create a bootable media using the MDT deployment share.
5. Boot the source server from the MDT bootable media.
6. Follow the on-screen instructions to start the deployment wizard and select the upgrade option.
7. Specify the deployment share and task sequence to use.
8. The deployment wizard will guide you through the upgrade process.
Pros:
– Provides a centralized and automated deployment process.
– Flexibility to customize deployment settings and configurations.
Cons:
– Requires set up and configuration of MDT.
– May have a learning curve for users unfamiliar with MDT.
Additional Tips
Here are some additional tips to help ensure a successful upgrade from Windows Server 2016 to 2019:
1. Make sure to have a backup of all critical data before starting the upgrade process.
2. Test the compatibility of your applications and hardware with Windows Server 2019 in a non-production environment before upgrading your production server.
3. Prepare a rollback plan in case the upgrade fails or causes unexpected issues.
4. Communicate the scheduled downtime to users and plan for any necessary service interruptions during the upgrade process.
5. Consider performing the upgrade during off-peak hours to minimize the impact on users and services.
5 FAQs about Upgrading Windows Server 2016 to 2019
Q1: Can I upgrade directly from Windows Server 2012 to 2019?
A: No, a direct upgrade from Windows Server 2012 to 2019 is not supported. You will need to first upgrade to Windows Server 2016 and then proceed with upgrading to Windows Server 2019.
Q2: Is it possible to roll back to Windows Server 2016 after upgrading to 2019?
A: No, once you have upgraded from Windows Server 2016 to 2019, there is no official rollback option. It is recommended to have a backup of all critical data and test the upgrade in a non-production environment before performing it on your production server.
Q3: Will my existing server roles and features be preserved during the upgrade?
A: In most cases, your existing server roles and features should be preserved during the upgrade process. However, it is recommended to verify the compatibility of your server roles and features with Windows Server 2019 before proceeding with the upgrade.
Q4: How long does the upgrade process typically take?
A: The duration of the upgrade process can vary depending on various factors, such as the server’s hardware specifications, the amount of data and applications installed, and any potential compatibility issues encountered during the upgrade. It is best to allocate sufficient time for the upgrade process.
Q5: Can I perform an in-place upgrade from a 32-bit version of Windows Server to a 64-bit version?
A: No, it is not possible to perform an in-place upgrade from a 32-bit version of Windows Server to a 64-bit version. A 64-bit version of Windows Server must be installed from scratch.
In Conclusion
Upgrading Windows Server 2016 to 2019 may seem like a daunting task, but with proper planning and execution, it can be a smooth and successful process. We have explored several methods, including using Windows Server Update Services (WSUS), installation media, Windows Server Migration Tools, and the Microsoft Deployment Toolkit (MDT). Each method has its pros and cons, and it is essential to choose the one that best suits your needs and requirements. Remember to prepare adequately, test compatibility, and have a backup plan in case any issues arise during the upgrade process. By following these guidelines and tips, you can upgrade your Windows Server with confidence and take advantage of the latest features and enhancements offered by Windows Server 2019.