This video will perform an in-place upgrade of Windows Server 2012 Domain Controller to Windows Server 2012 R2. An in-place upgrade will keep the existing documents and settings on the server. Windows Server 2012 R2 is consider an incremental upgrade as it adds features to the operating system rather than make major changes to the operating system.
Requirements
Before you deploy your first Windows Server 2012 R2 Domain Controller, either upgrading an existing Domain Controller or promoting an existing Windows Server 2012 R2 Domain Controller, there are a few requirements that need to be met before the first Domain Controller is deployed.
1) Before installing the first Windows Server 2012 R2 Domain Controller, all existing Domain Controllers need to be upgraded to Windows Server 2003 or above.
2) ADPrep /ForestPrep needs to be run once in the forest. ADPrep can be found on the Windows Server 2012 R2 DVD. It only needs to be run once before the first Windows Server 2012 R2 Domain Controller is deployed. You should use the latest DVD that you have to make sure that your schema is the most recently update as possible.
3) ADPrep /DomainPrep needs to be run in each domain that you plan to deploy Windows Server 2012 R2 Domain Controllers. It only needs to be run once.
If you want to try Windows Server 2012 R2, you can add it at any time to the domain as a member server. You do not need to run ADPrep before adding the Windows Server 2012 R2. This is only required if the server is a Domain Controller or being promoted to a Domain Controller.
Demonstration
In this demonstration NYDC1, which is running Windows Server 2012, will be upgraded to Windows Server 2012 R2.
1) In order to perform an in-place upgrade, the operating system that you want to upgrade needs to be booted. When this is booted the setup program needs to be run from the DVD to start the upgrade process.
2) Once the setup has started, select the option install now.
3) Since an operating system is already loaded, setup has access to the networking on the operating system and thus can download updates before the install starts. It is a good idea to download updates before the install as this may help the upgrade run smoother.
4) The next screen will ask for your product key. The product key will determine which edition of Windows will be installed.
5) The next screen will ask which edition for Windows Server you will install. Generally the option here will be server core and GUI. The particular edition that will show is the editions on the DVD that are compatible with the product key that you entered.
6) This screen will ask you to accept the license agreement. It is just a matter of ticking the tick box and moving on.
7) On the “what type of installation do you want”, the top option “Upgrade: Install Windows and keep files, settings and applications” needs to be selected. This will upgrade the existing operating system. The second option “custom: install Windows only (advanced)” will install a fresh copy of Windows and thus any programs, documents or settings will not be kept.
 Setup will perform a compatibility check of the system. This will check for any known problems that may cause problems with the upgrade. For example, if there is not enough memory in the computer this will be reported. However, 3rd party software is not tested, so you will need to check with your vendor if this software is compatible.
ADPrep
ADPrep is found on the setup DVD in the folder source\ADPrep\ADPrep.exe
Run ADPrep /ForestPrep once in the forest.
Run ADPrep /DomainPrep once in each domain.
Once complete, you can run the command RepAdmin /SyncAll /APeD
This command will force a sync to all the other Domain Controllers in the domain. It is a good idea to wait for a domain sync after running ADPrep if you are planning to deploy a Domain Controller shortly after running ADPrep
References
“Install and Deploy Windows Server 2012” http://technet.microsoft.com/library/hh831620.aspx
“System Requirements and Installation Information for Windows Server 2012 R2 Preview” http://technet.microsoft.com/en-US/library/dn303418.aspx
Credits
I’ve been trying to understand how to upgrade from from Windows Server 2012 to Windows Server 2012 R2 (Standard Edition) and I can’t find the installer/upgrade to download anywhere.
Does someone know where to get the upgrade?
Thanks!
![]()
Ob1lan
1,9163 gold badges18 silver badges35 bronze badges
asked Apr 16, 2014 at 16:53
![]()
2
To upgrade from Windows Server 2012 to Windows Server 2012 R2, you can use the installation media of Windows Server 2012 R2. During the setup process, you will be prompted to choose whether you want to perform a clean install or an Upgrade.
If you have a valid license but no installation media, you should be able to download it via the official site. Choose to try the product, you will be redirected to the download page.
http://www.microsoft.com/en-us/server-cloud/products/windows-server-2012-r2/default.aspx
Here is an additional post that will interest you. It contains a link to the TechNet article about the upgrade path.
Microsoft License Windows 2012 R2
Hope this helps.
![]()
Dave M
13.1k25 gold badges36 silver badges48 bronze badges
answered Apr 29, 2014 at 9:09
![]()
Ob1lanOb1lan
1,9163 gold badges18 silver badges35 bronze badges
You must log in to answer this question.
Not the answer you’re looking for? Browse other questions tagged
.
Not the answer you’re looking for? Browse other questions tagged
.
- Remove From My Forums
-
Question
-
Hi
I want to know how can i upgrade my windows server 12 to windows server 2012R2 . Just put media installation and click on Upgrade ,
or i have do some configuration before update ?
I want to upgrade in-place Windows Server 2012 .
in addition i have hyper-v and AD DC and DNS and DHCP and IIS 8 on this server .(this server is for test environment. )
I Love God,because he help me to find Technet.
Answers
-
Hi,
From the previous upgrading, we do not need to configure such settings.
Upgrade Existing Domain Controllers
http://technet.microsoft.com/en-us/library/cc732825(v=ws.10).aspx
However as the articles you listed said, some compatible issue may occur specifically it is still a preview version.
TechNet Subscriber Support in forum |If you have any feedback on our support, please contact tnmff@microsoft.com.
-
Marked as answer by
Thursday, July 4, 2013 10:17 AM
-
Marked as answer by
 Windows Server 2012 R2 вышел 18 октября 2013 года. С тех пор на эту серверную операционную систему Microsoft выпущено несколько сотен обновлений исправляющих уязвимости и дефекты продукта, а так же улучшающие функционал.
Огромное количество обновлений — источник головной боли. Наиболее актуальный дистрибутив сервера, так называемый «Update2», в который интегрированы обновления по ноябрь 2014 года, безнадежно устарел. Установив с него операционную систему, вы получите вдогонку еще 200+ обновлений, которые будут устанавливаться 2-4 часа.
В этой короткой инструкции мы освежим ноябрьский дистрибутив, интегрировав в него все кумулятивные пакеты обновлений и обновления безопасности.
Помимо дистрибутива мы освежим и память администратора, вспомнив как обновляется носитель для установки, зачем выполняется каждый шаг, и какие нас может ожидать подвохи на разных этапах.
Делать будем по максимуму просто, используя штатные инструменты.
Все работы лучше проводить на сервере с уже развернутом Windows Server 2012 R2, чтобы не было накладок с версией утилиты DISM. Так же на нем удобно подключать ISO файлы, не распаковывая их.
Готовим рабочие директории
Для работы потребуются следующие каталоги:
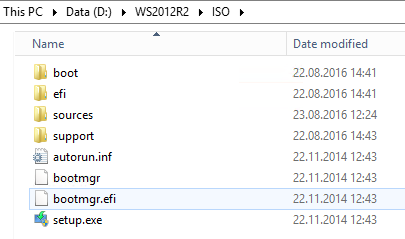
ISO — в этот каталог копируются файлы дистрибутива. В скопируйте в него содержимое дистрибутива SW_DVD9_Windows_Svr_Std_and_DataCtr_2012_R2_64Bit_English_-4_MLF_X19-82891.ISO, предварительно смонтировав образ, а затем размонтировав.
MOUNT — пустой каталог, в него будут монтироваться образы из wim-файла.
CU — в этот каталог поместим кумулятивные обновления
SU — в этом каталоге будут находиться обновления безопасности и другие обновления
mkdir D:WS2012R2ISO
mkdir D:WS2012R2MOUNT
mkdir D:WS2012R2CU
mkdir D:WS2012R2SU
Скачиваем кумулятивные обновления
Tip & Trick #1. Microsoft выпускает для Windows Server 2012 R2 кумулятивные пакеты обновлений, но в них входят только обновления, исправляющие ошибки и улучшающие функционал. Обновления безопасности не включены. При этом обновления и не особо кумулятивны. Некоторые не включают в себя предыдущие обновления, и надо ставить «кумулятивное» за каждый месяц. Бардак. В октябре эта ситуация изменится к лучшему.
Со списком кумулятивных обновлений вы можете ознакомиться на этой wiki странице.
С ноября 2014 года нам потребуется интегрировать следующие обновления:
1. December 2014 Windows RT 8.1, Windows 8.1, and Windows Server 2012 R2. KB3013769, cкачать.
2. July 2016 Windows RT 8.1, Windows 8.1, and Windows Server 2012 R2. KB3172614, скачать.
Пакеты за май и июнь поглощены этим июльским пакетом. Но перед установкой обязательно обновление April 2015 servicing stack update for Windows 8.1 and Windows Server 2012 R2. KB3021910, скачать.
3. August 2016 Windows RT 8.1, Windows 8.1, and Windows Server 2012 R2. KB3179574, скачать.
Обновленный клиент центра обновления можно не интегрировать
Свежий Windows Update Client for Windows 8.1 and Windows Server 2012 R2: June 2016 вошел в KB3161606
KB3161606 поглощен KB3172614.
UPD: Я несколько преувеличил то, насколько Microsoft качественно подготовила дистрибутив. Обновления April 2014 и November 2014 действительно интегрированы. А все промежуточные — нет. Поэтому добавляем
May 2014 update rollup for Windows RT 8.1, Windows 8.1, and Windows Server 2012 R2. KB2955164, скачать
June 2014 update rollup for Windows RT 8.1, Windows 8.1, and Windows Server 2012 R2. KB2962409, скачать.
July 2014 update rollup for Windows RT 8.1, Windows 8.1, and Windows Server 2012 R2. KB2967917, скачать.
August 2014 update rollup for Windows RT 8.1, Windows 8.1, and Windows Server 2012 R2. KB2975719, скачать.
September 2014 update rollup for Windows RT 8.1, Windows 8.1, and Windows Server 2012 R2. KB2984006, скачать.
October 2014 update rollup for Windows RT 8.1, Windows 8.1, and Windows Server 2012 R2. KB2995388, скачать.
Tip & Trick #2. В разных статьях для интеграции обновлений предлагается извлечь из msu cab-файл. Делать это для offline-образа необязательно — интегрируйте msu без распаковки.
В папку CU разместите упомянутые выше msu файлы — Windows8.1-KB3013769-x64.msu, Windows8.1-KB3021910-x64.msu, Windows8.1-KB3138615-x64.msu, Windows8.1-KB3172614-x64.msu, Windows8.1-KB3179574-x64.msu.
Скачиваем обновления безопасности
Помимо кумулятивных обновлений интегрируем обновления, которые способна скачать утилита WSUS Offline Update.
Для этого:
- Скачиваем программу download.wsusoffline.net
- Выбираем обновления для Windows Server 2012 R2

- После скачивания открываем каталог wsusofflineclientw63-x64glb и *.cab файлы копируем в каталог C:WS2012R2SU

ОСТОРОЖНО: Если в список попали KB2966828 или KB2966827, удалите их, иначе после установки не получится добавить компонент Net Framework 3.5 (подробности).
Обновления готовы, приступим к интеграции.
Интеграция обновлений
Для интеграции обновлений нам потребуется:
- Смонтировать содержимое одного из образов в install.wim
dism /mount-wim /wimfile:{путь к wim файлу} /Index:{N} /mountdir:{путь к директории монтирования} - Интегрировать в offline установку каждое обновление
dism /image:{путь к директории монтирования} /add-package /packagepath:{путь к *.msu или *.cab файлу} - Сохранить изменения
dism /Unmount-WIM /MountDir:{путь к директории монтирования} /Commit
Этот процесс легко следующим автоматизировать командным файлом:
for /l %%N in (1,1,4) do (
dism /mount-wim /wimfile:"D:WS2012R2ISOsourcesinstall.wim" /Index:%%N /mountdir:D:WS2012R2MOUNT
for %%f in (D:WS2012R2CU*.*) DO (dism /image:D:WS2012R2MOUNT /add-package /packagepath:%%f)
for %%f in (D:WS2012R2SU*.*) DO (dism /image:D:WS2012R2MOUNT /add-package /packagepath:%%f)
dism /unmount-WIM /MountDir:D:WS2012R2MOUNT /Commit
)
Tip: Запуская командный файл, перенаправьте вывод в журнал
UpdateWIM.cmd >>log.txt 2>>&1
В результате мы получим файл D:WS2012R2ISOsourcesinstall.wim размером в 6.15Gb. Можем ли мы его уменьшить? Да, с помощью экспорта можно получить оптимизированный файл размером в 5.85Gb.
Экономия небольшая, кроме того после этого не очень красиво выглядит диалог выбора операционной системы при установке, поэтому следующий шаг опционален.
Что надо сделать?
Для получения сжатого образа необходимо:
- Экспортировать первый образ из оригинального wim-файла в новый файл
dism /export-image /sourceimagefile:{путь к исходному файлу wim} /sourceindex:1 /destinationimagefile:{путь к новому файлу wim} /compress:max - Подключить следующий образ из оригинального wim-файла в точку монтирования
dism /mount-wim /wimfile:"D:WS2012R2ISOsourcesinstall.wim" /Index:2 /mountdir:{директория для монтированния образа} - Добавить в новый файл следующий образ методом «захвата»
dism /append-image /imagefile:{путь к новому файлу wim} /captureDir:{директория с смонтированным образом} /name:{оригинальное имя} /description:{оригинальное описание} - Размонтировать образ, повторить итерацию добавления для каждого дополнительного образа
dism /unmount-WIM /MountDir:{директория с смонтированным образом} /Discard
Автоматизируем скриптом:
dism /export-image /sourceimagefile:D:WS2012R2ISOsourcesinstall.wim /sourceindex:1 /destinationimagefile:D:WS2012R2ISOsourcesinstall1.wim  /compress:max

dism /mount-wim /wimfile:"D:WS2012R2ISOsourcesinstall.wim" /Index:2 /mountdir:D:WS2012R2MOUNT

dism /append-image /imagefile:D:WS2012R2ISOsourcesinstall1.wim /captureDir:mount /name:"Windows Server 2012 R2 SERVERSTANDARD" /description:"Windows Server 2012 R2 SERVERSTANDARD"

dism /unmount-WIM /MountDir:D:WS2012R2MOUNT /discard

dism /mount-wim /wimfile:"D:WS2012R2ISOsourcesinstall.wim" /Index:3 /mountdir:D:WS2012R2MOUNT

dism /append-image /imagefile:D:WS2012R2ISOsourcesinstall1.wim /captureDir:mount /name:"Windows Server 2012 R2 SERVERDATACENTERCORE" /description:"Windows Server 2012 R2 SERVERDATACENTERCORE"

dism /unmount-WIM /MountDir:D:WS2012R2MOUNT /discard

dism /mount-wim /wimfile:"D:WS2012R2ISOsourcesinstall.wim" /Index:4 /mountdir:D:WS2012R2MOUNT

dism /append-image /imagefile:D:WS2012R2ISOsourcesinstall1.wim /captureDir:mount /name:"Windows Server 2012 R2 SERVERDATACENTER" /description:"Windows Server 2012 R2 SERVERDATACENTER"

dism /unmount-WIM /MountDir:D:WS2012R2MOUNT /discard
Удалите оригинальный install.wim, а сформированный install1.wim переименуйте в install.wim
Создание компактного образа install.esd
По совету D1abloRUS, если вы хотите получить инсталляционный диск минимального размера умещающийся на DVD5, можно экспортировать один (и только один) из образов в esd файл. Например, для экспорта Windows Server 2012 R2 Standard, используйте команду
dism /export-image /sourceimagefile:D:WS2012R2ISOsourcesinstall.wim /sourceindex:2 /destinationimagefile:D:WS2012R2ISOsourcesinstall.esd /compress:recovery
Оригинальный install.wim можно удалить.
Сборка ISO-файла
Для сборки нам потребуется утилита oscdimg.exe из комплекта Windows ADK. Если у вас ее не оказалось, можно просто скачать утилиту по ссылке (не используйте из этого комплекта ничего, кроме самой утилиты).
Tip & Trick #3. Для того, чтобы не было проблем с загрузкой из образа, следует расположить загрузочные файлы в пределах первых 4 гигабайт образа. Для этого используем файл bootorder.txt
bootbcd
bootboot.sdi
bootbootfix.bin
bootbootsect.exe
bootetfsboot.com
bootmemtest.exe
booten-usbootsect.exe.mui
bootfontschs_boot.ttf
bootfontscht_boot.ttf
bootfontsjpn_boot.ttf
bootfontskor_boot.ttf
bootfontswgl4_boot.ttf
sourcesboot.wim
Пути в этом файле указываются относительно корневой директории с образом, поэтому подстраивать пути на ваши фактические не требуется.
Tip & Trick #4. Если install.wim имеет размер больше 4700Mb, то инсталлятор вылетит с ошибкой «Windows cannot open the required file D:sourcesinstall.wim. Error code: 0x8007000D».
Нас учили что жизнь — это бой, поэтому разделим исходный install.wim на два командой
dism /split-Image /imagefile:D:WS2012R2ISOsourcesinstall.wim /swmfile:D:WS2012R2ISOsourcesinstall.swm /filesize:4096
Оригинальный файл install.wim можно удалить.
Tip & Trick #5. Вообще Microsoft говорит, что
пить
так делать нельзя.
In Windows 8.1 and Windows 8, Windows Setup does not support installing a split .wim file.
Мы говорим, что будем! Инсталлятор прекрасно подхватывает swm-файл. Проблем с установкой не будет.
Собираем образ командой:
oscdimg -m -n -yoD:WS2012R2bootorder.txt -bD:WS2012R2ISOBOOTetfsboot.com -lIR5_SSS_X64FREV_EN-US_DV9 D:WS2012R2ISO en_windows_server_2012R2_August_2016.iso
Уважаемый ildarz подсказывает, что для создания образа, одинаково хорошо работающего с BIOS и EFI, следует руководствоваться KB947024 и создавать образ так:
oscdimg -m -u2 -udfver102 -yoD:WS2012R2bootorder.txt -bootdata:2#p0,e,bD:WS2012R2ISOBOOTEtfsboot.com#pEF,e,bD:WS2012R2ISOEFImicrosoftBOOTefisys.bin -lIR5_SSS_X64FREV_EN-US_DV9 D:WS2012R2ISO en_windows_server_2012R2_August_2016.iso
Работоспособность проверена в ESXi с любым типом загрузки (BIOS/EFI).
Все получилось? Поздравляю!

Но решена ли проблема полностью? Для идеала необходимо интегрировать еще сотню «опциональных» и «рекомендованных» обновлений, но с этим не будем торопиться. Дадим Microsoft шанс самим разобраться в том бардаке, который они устроили с обновлениями.
PS. Зачем мы все это делали? Для того, чтобы освежить память, сделать работу чуть удобнее и получить несколько простых командных файлов, при помощи которых в дальнейшем можно практически автоматизированно интегрировать обновления в серверный дистрибутив, экономя время ввода сервера в эксплуатацию. Тем более есть надежда, что начиная с октября интегрировать обновления станет гораздо проще.
Точно так же вы сможете интегрировать Windows 7 convenience rollup и не наступить на грабли распаковки обновлений, невозможности загрузки из образа, превышения размера install.wim.
Спасибо за внимание и до новых встреч, друзья.
Если есть возможность поделиться опытом — жду вас в комментариях.
There are basically two approaches when it comes to server upgrades for going to Windows Server 2012 R2 – performing an in-place upgrade, or creating a new server and migrating over the applications/data.
While some administrators are adamant that proper server upgrades –must- be done this way, or that way, truthfully, both approaches come with their own share of advantages and disadvantages. Perhaps the biggest advantage of doing an in-place server upgrade is that most upgrades can be completed in a mere two hours or less; which includes not only the upgrade itself but also the time necessary to install all applicable Windows Updates, post-upgrade. The alternative of creating a new server and migrating over the applications/data, is typically going to take FAR longer to accomplish (but in some cases, may still be the wisest choice!).
Today, we’re going to focus on some of the pesky things that might cause you some grief when doing an in-place upgrade from Windows 2008 R2 to Windows 2012 R2. I’ve probably done about 20 of these in-place upgrades over the last year or two. So far, the vast majority of them are completed with little headache and virtually no post-troubleshooting required. Please note, however, IF your server is:
- Bloated with useless and unnecessary software/applications/data… -or-
- Experiencing technical issues or performance problems… -or-
- Is one of those “mystery” servers that hardly anyone knows anything about
…then I’d strongly advise against doing an in-place server upgrade on that server. However, if you believe your server is still a good candidate for an in-place upgrade, here are some important things you should know about BEFORE doing an in-place upgrade in hopes of making your life as an IT administrator easier.
WSUS
If the server you’re planning on doing an in-place upgrade directly to Windows Server 2012 R2, and the server is currently running the WSUS (Windows Server Update Service) role version 3.2 (Windows 2008 R2 and earlier), you MUST uninstall the WSUS role before upgrading. If you do not, your WSUS installation will be completely broken afterwards and there is no known fix from Microsoft. The only known resolution is to format the drive and reinstall the operating system from scratch. Not fun. I learned that one the hard way on my first upgrade.
MMC
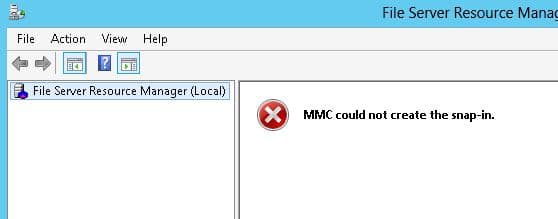
In some unexplained cases, certain MMC snap-ins will be broken post-upgrade. This has happened to me on occasion for the File Server Resource Manager MMC snap-in, and the Network Policy Server MMC snap-in (Figure 1).
The generic error message received will usually be “MMC could not create the snap-in”. This issue can be easily fixed by uninstalling the role, rebooting your server, and reinstalling the server.
The configuration settings you previously had for that server role will NOT be lost however. When uninstalling and reinstalling FSRM, you still retain your quota templates as well as folder/user quotas that had been defined. When uninstalling and reinstalling NPS, the policy settings and RADIUS clients you had configured will also remain and won’t be lost.
Windows Firewall
If you typically turn off the Windows Firewall services on your server, be aware that after an in-place server upgrade, you may suddenly find that the Windows Firewall services are now enabled and therefore blocking specific applications from properly running on your server. This doesn’t seem to happen every time you perform an in-place upgrade, but it’s happened enough for me to take note of it during my routine post-installation checks.
NIC card settings
Why on earth this little foible happens, I’ve absolutely no idea. But please, double-check your NIC card settings after an in-place upgrade. There have been numerous times that my Server 2012 R2 upgrades have resulted in the server’s NIC card settings getting changed from using a static IP address to a DHCP address without any explanation as to why. For what it’s worth, I’ve only experienced this problem in a virtual (VMWare) environment so far (although, to be honest, I don’t really manage too many physical servers or Hyper-V virtual machines anymore).
Services
Before upgrading, I always make sure I take a screenshot of all the services and their individual “Startup-Type” that appears in the services.msc applet so I can see whether a service was set for Automatic, Manual, or Disabled. Then I compare the services and their “Startup-Type” before and after the upgrade. Why? Unfortunately, there are times when doing an in-place server upgrade to Windows 2012 R2 will inexplicably set random services as Disabled, even though they were previously set for Automatic before the upgrade. This has happened to services such as:
- Net.Msmq Listener Adapter
- Net.Pipe Listening Adapter
- Net.TCP Listener Service
- Net.TCP Port Sharing Services
- Windows Process Activation Services
- SQL Services
- World Wide Web Services
Furthermore, -please- be aware… Services in Windows 2012 can no longer contain an underscore character (“_”). I learned this the hard way while doing an upgrade on an application server, and a key service for that application just completely disappeared (poof!), resulting in the application a full reinstall after the upgrade.
KMS
If your server is acting as a KMS server, be aware that the KMS services will no longer be functioning properly post-upgrade. You will need to re-enter your KMS keys (using the /IPK parameter) and run the activation (using the /ATO parameter) against those keys. Furthermore, in some cases, you may need to recreate the VLMCS record in DNS as the current VLMCS record may end up getting deleted once its TTL value has expired. Paying attention to those peculiarities will allow your desktops and servers to continue functioning without interruption or warning that they can no longer contact the local KMS licensing server.
Windows updates
You may find that your server will no longer be able to perform Windows Updates after an in-place upgrade to Windows Server 2012 R2. Checking for updates may result in an 8024404C error. Most often this is quickly fixed by running the following command (regardless of whether the updates come from Microsoft or from your local WSUS server)
- Wuauclt /detectnow
- Wuauclt /resetauthorization /detectnow
- Wuauclt /reportnow
Reclaiming disk space
You can delete the Windows.old directory on your system partition after the upgrade. However, you will not be able to delete the folder completely without first taking complete ownership of the Windows.old folder and all its subfolders, and then applying Full Control permissions at the NTFS level for your Administrator account to the Windows.old folder and all its’ subfolders. At least it’s an easy fix…
Management Agents
If your server is not virtualized (believe it or not, there are still a few of those floating around here and there!), you will very likely want to re-install, or update, the HP/Dell Management Agents. In the case of HP servers, that means, updating the following software:
- System Management Homepage
- WBEM Providers
- Insight Manager Agents
- Integrated Management Log Viewer
Conclusion
For the most part, those are the stumbling blocks I’ve come across during my in-place Windows Server 2012 R2 upgrades. None of them are too critical or destructive, although some are more than others obviously, so long as you’re adequately prepared to deal with them if the issues arise. As with any upgrade, please be sure you take appropriate data backups, bare metal recovery backups, snapshots, etc. using whatever backup application you choose to rely on, BEFORE you start the in-place upgrade process. It very well may save your bacon and countless hours of rebuilding a botched upgrade.
Думаю, все уже используют Windows Server 2012 R2 и активно тестируют Windows server 2016, но возможно, кому-то данная статья еще пригодится.
В статье «Варианты обновления для Windows Server 2012 R2» мы видим требования и варианты обновления
до Windows Server 2012 R2 с предыдущих версий. К сожалению, в ней не говорится ничего об обновлении с предыдущей пробной версии до коммерческой Windows Server 2012 R2. И при попытке осуществить обновление используя официальный дистрибутив Windows server 2012
R2, вы получите сообщение о том, что данное обновление невозможно.
Итак, у вас установлен Windows Server 2012 (Пробная) и вам нужно обновиться на Windows Server 2012 R2, который вы легально получили от компании Microsoft.
- Запускаем командную строку от имени Администратора, выполняем: DISM /online /Get-CurrentEdition и определяем имя текущего выпуска.
- Далее, повышаем установку с помощью команды: DISM /online /Set-Edition:”Полученное значение Current Edition” /ProductKey:Указываем соответсвующий релизу КМС ключ” / AcceptEula. Ключ берем из списка Ключи
установки клиента KMS - После выполнения команды, сервер несколько раз перезагрузится, и у Вас появится возможность обновиться до Windows server 2012 R2
После обновления до Windows Server 2012 R2, проверяем работоспособность установленных ролей, дополнительного программного обеспечения и можем активировать нашу покупку
с помощью локального сервиса активации или вводим ключ, который получили при приобретении данного продукта: slmgr /ipk <key> где <key> — соответствующий ключ продукта корпоративной, розничной версии или версии для изготовителей оборудования.
1 ответ. Чтобы обновить Windows Server 2012 до Windows Server 2012 R2, вы можете использовать установочный носитель Windows Server 2012 R2. В процессе установки вам будет предложено выбрать, хотите ли вы выполнить чистую установку или обновление.
Подробные инструкции для Windows 8.1 и Windows Server 2012 R2
В поле поиска введите Центр обновления Windows, а затем коснитесь или выберите Центр обновления Windows. В области сведений выберите Проверить наличие обновлений и подождите, пока Windows выполнит поиск последних обновлений для вашего компьютера.
Как мне обновить версию Windows Server?
Windows Server 2016
- Щелкните значок Windows, чтобы открыть меню «Пуск».
- Щелкните значок «Настройки» (он выглядит как шестеренка и находится чуть выше значка питания)
- Нажмите «Обновление и безопасность».
- Нажмите кнопку «Проверить наличие обновлений».
- Windows проверит наличие обновлений и установит все необходимые.
- При появлении запроса перезагрузите сервер.
Можно ли обновить Windows 2012 до 2019?
Можно ли обновить Windows Server 2012 r2 до 2019? Во-первых, ответ Да. Обновление на месте позволяет вам обновлять старую систему до новой напрямую, сохраняя при этом то же оборудование и все настройки, роли сервера и данные без изменений, не выравнивая сервер.
Какие системы нельзя напрямую обновить до Windows Server 2012 R2?
Какие системы нельзя напрямую обновить до Windows Server 2012 R2? Если существующая система работает под управлением Windows 2000 Server или Windows Server 2003, вы не можете выполнить обновление до Windows Server 2012 R2 напрямую.
Выпускает ли Microsoft Windows 11?
Microsoft собирается выпустить Windows 11, последнюю версию своей самой продаваемой операционной системы, на Октябрь 5. Windows 11 включает несколько обновлений для повышения производительности в гибридной рабочей среде, новый магазин Microsoft и является «лучшей Windows для игр».
Почему чистая установка лучше обновления?
По мнению многих пользователей, основным преимуществом обновления на месте является что все сохраняется на с другой стороны, при чистой установке все стирается. Это может показаться большим недостатком чистой установки, но на самом деле это рекомендуемый способ обновления большинством технических экспертов.
Какие есть версии Windows Server 2019?
Windows Server 2019 имеет три редакции: Essentials, Standard и Datacenter. Как следует из их названий, они предназначены для организаций разного размера и с различными требованиями к виртуализации и центрам обработки данных.
Получает ли Windows Server 2019 обновления функций?
Хотя они и получают обновления безопасности, они не получают много (если таковые имеются) обновлений функций. Идея этой версии Windows Server заключается в том, что она является стабильной, поэтому это хороший выбор для вашей базовой инфраструктуры. … В этой версии Windows Server есть новые функции, но гораздо более короткий период поддержки.
Что я могу делать с Windows Server 2019?
Общие
- Центр администрирования Windows. …
- Рабочий стол. …
- Системная аналитика. …
- Функция совместимости приложений Server Core по запросу. …
- Расширенная защита от угроз (ATP) в Защитнике Windows…
- Безопасность с помощью программно определяемой сети (SDN)…
- Улучшения экранированных виртуальных машин. …
- HTTP / 2 для более быстрого и безопасного Интернета.
Поддерживает ли Microsoft обновление на месте?
Обновление на месте с Windows Storage Server Editions до Windows Server 2019 не поддерживается. Вместо этого вы можете выполнить либо миграцию, либо установку.
Как мне обновить свой сервер?
Выполнение обновления Windows Server на месте
- Создайте снимок.
- Подготовьте конфигурацию Windows Server.
- Прикрепите установочный носитель.
- Запустите обновление.
- Наблюдайте за процессом обновления.
- Выполните действия после обновления.
- Отсоедините установочный диск.
- Установите обновления и восстановите доступ.

on
December 20, 2013, 4:14 PM PST
Tips for an easy upgrade from Windows Server 2012 to Windows Server 2012 R2
Moving from Windows Server 2012 to Windows Server 2012 R2 is fairly straightforward. Here are some tips to make sure the process goes smoothly.

If you’re like me, you may prefer to be latest and greatest
in some IT situations. What really gets me are those occasional situations
where I want to deploy something new but have to wait a few weeks or longer for
full support. With later versions of Windows Server, you may have noticed that
there is an upgrade feature that comes with the server operating system. I
recently ran the upgrade on a production application (I did a full image backup
first!) and found the Windows Server 2012 R2 upgrade process quite easy.
One of the good things about Windows Server is that you can
now natively mount .ISO files in the operating system. This particular system
was a virtual machine, and there have been nice mechanisms to mount .ISO files
for a while. But now it’s simply a right-click inside the guest operating
system. The upgrade starts from the setup process on the .ISO and running the
setup.exe file, so you’ll want to make sure that the drive letter doesn’t
change. Mounting the image as a physical optical drive or from the
virtualization platform are good additional steps.
There are a few options to consider. One is to check for
updates to the installer. Given that Windows Server 2012 R2 code was finalized
in August 2013 with the release to market (RTM) edition, there are surely some
small tweaks that may need to be corrected. So I think checking for updates is
a good idea. The first option you will get on the setup is to check for these
updates, then whether to do an upgrade or a new install. If you are going to do
a new install, it’s advisable to use a new system image unless you have a data
volume you plan to hand off directly to the newly installed system. Figure A shows the option to do the
upgrade on an existing Windows Server.
Figure A

It is recommended that you perform the upgrade directly
connected to the console, either KVM or a virtual machine console. The system
reboots a number of times, and that will help you ensure that the process is
going as expected. The boot menu offers a one-time option to roll back the
update. With luck, you won’t need it, but it’s there in case something doesn’t
go as expected. Once the upgrade process starts, you’ll see a progress bar and
a few reboots, as shown in Figure B.
Figure B

There are plenty of scenarios to consider. Be sure to check TechNet post 303416. This KB article outlines a lot of considerations for the upgrade,
including what is and is not a supported upgrade path. For instance, you can’t
change editions during the upgrade, such as from Standard to Datacenter.
Further, you can’t come from an older operating system that was only x86
compatible to the current offering, which is x64 only. Most important, you need
to use the same type of product in terms of licensing configuration for the
upgrade. For example, if you downloaded a trial of Windows Server 2012 (the
180-day evaluation), you can’t use your corporate licensing .ISOs and keys to
correctly do the upgrade. It may work, but trust me: It’s not correct.
When the upgrade process is complete, check the newly
upgraded Windows Server 2012 R2 Server to make sure everything is functioning
as expected. For starters, look to see whether the network configuration
changed. Was a new interface assigned and was the DNS information removed? Did
Group Policy and Domain Membership apply successfully? A thorough checkout
before calling the upgrade a success would be a wise thing to do!
Other tips?
Have you taken the plunge with Windows Server 2012 R2 and
used the upgrade feature? Share your tips below.
-
Data Centers