Вы хотите перейти на более новую версию Windows Server? Пришло время обновить Windows Server 2012 до Windows Server 2016. В Windows Server 2016 появилось множество полезных функций и улучшений.
Отметим основные особенности Windows Server 2016 – данная платформа поддерживает только 64-битную архитектуру, версия Itanium не поддерживается. Кроме того, имеется всего четыре редакции Windows Server 2012 и 2016.
Обновление Windows Server – это сложный процесс. Поэтому Microsoft рекомендует администраторам переносить роли и настройки на новый сервер с Windows Server 2016 не используя обновление (в режиме новой установки и миграции ролей), из-за возможности появления ошибок.
В нашей статье мы расскажем, как проапгрейдить Windows Server 2012 до Server 2016 без переустаноки (хотя это и не рекомендуется).
- Особенности обновления и конвертации Windows Server
- Запуск апгрейда Windows Server 2012 до Windows Server 2016
- Установка Windows Server 2016
Содержание:
Особенности обновления и конвертации Windows Server
Чтобы обновить Windows Server 2012 до Server 2016, вам необходимо учесть следующие требования:
Все редакции Windows Serer 2016 бывают только 64 битные (обновление с 32-разрядной Windows Server 2008 до 64-разрядной версии невозможно).
Windows Server 2012 можно обновить до Server 2016, более ранние версии Windows Server такой сценарий не поддерживают.
Не поддерживается обновление с одной редакции на другую ( т.е. нельзя обновить Windows Server 2012 Standart до версии Windows Server 2016 Datacenter).
- Обновление с одного языка на другой не поддерживается.
- Обновление, с переключением из режима Server Core в режим полноценного GUI (и наоборот) также не поддерживается.
- Обновление ранее установленной Windows Server на пробную версию Windows Server не поддерживается. Ознакомительные версии должны быть установлены в режиме чистой установки.
- При апгерейде отключите антивирусную защиту, поскольку она замедляет процесс, так как антивирус сканирует каждый файл, копируемый на диск.
- Если сервер использует NIC Teaming, отключите его. Вы можете включить NIC Teaming после завершения обновления ОС сервера.
- Прежде чем обновлять сервер создайте его резервную копию. При возникновении ошибок или проблем у вас будет возможность откатить систему к исходному состоянию.
- Проверьте, нет ли у в журналах сервера проблем и ошибок, если они есть – их необходимо устранить. В противном случае это может привести к ошибкам, которые способны спровоцировать сбой процесса обновления.
Запуск апгрейда Windows Server 2012 до Windows Server 2016
Теперь, когда вам известны и понятны правила апгрейда версий, давайте начнем.
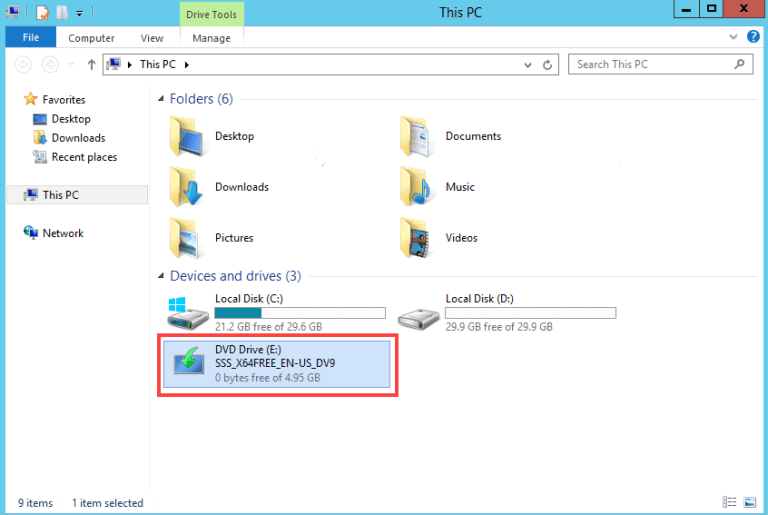
Авторизуйтесь на Windows Server 2012 и подключите к серверу установочный диск с Windows Server 2016 (в виде iso образа, или установочном DVD диске или USB флешке). Смонтируйте диск, откройте проводник и дважды щелкните по диску в устройстве DVD, чтобы запустить установку Windows Server 2016.
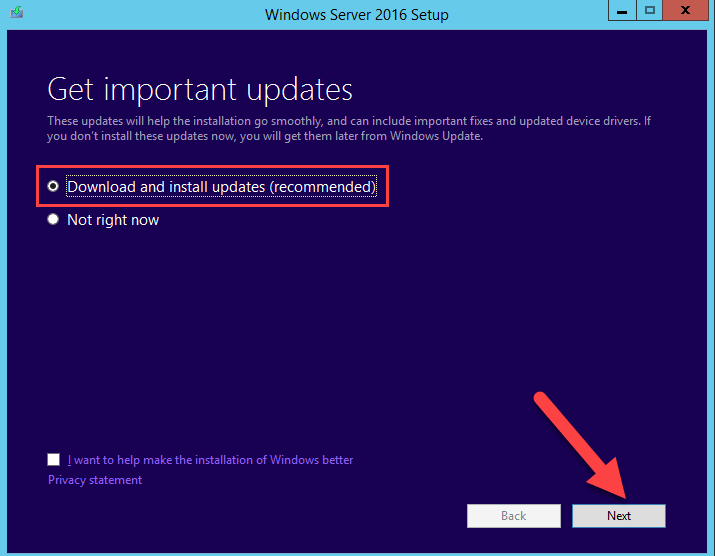
Выберите «Download & install updates», поставьте галочку напротив «I want to help make installation of Windows better». Нажмите кнопку «Next».
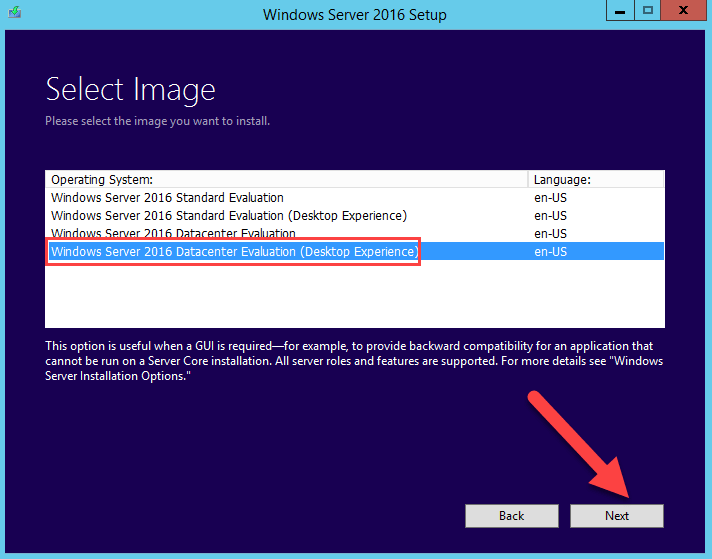
Выберите необходимую редакцию Windows Server 2016, которая соответствует ранее установленной редакции ОС. Нажмите кнопку «Next».
Прочитайте условия лицензионного соглашения. Если вы не согласны нажмите на кнопку «Decline», после чего вы вернетесь назад. Если вы согласны, нажмите кнопку «Accept».
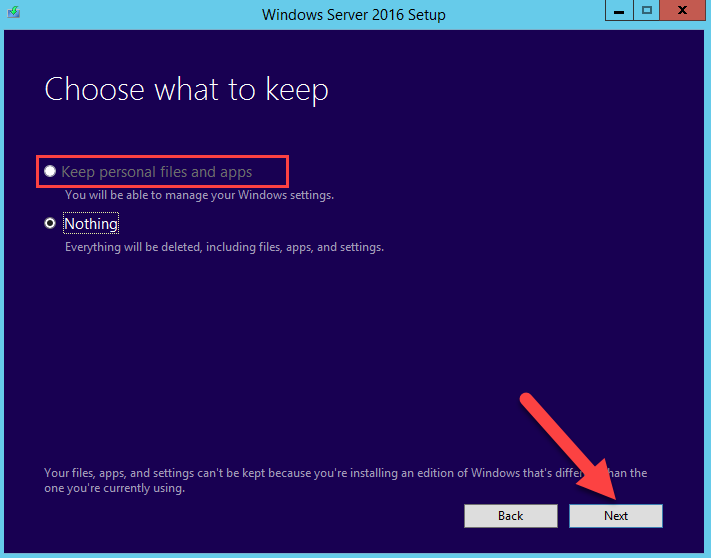
Если вы выбрали туже самую редакцию, которую используете в данный момент, вы можете сохранить свои приложения и файлы. Как уже упоминалось ранее, если вы выбрали неправильную редакцию, вы не сможете сохранить свои приложения и файлы. Выберите «Keep personal files and apps», если вы используете ту же редакцию или выберите «Nothing», чтобы затереть все. Затем нажмите кнопку «Next».
Установка Windows Server 2016
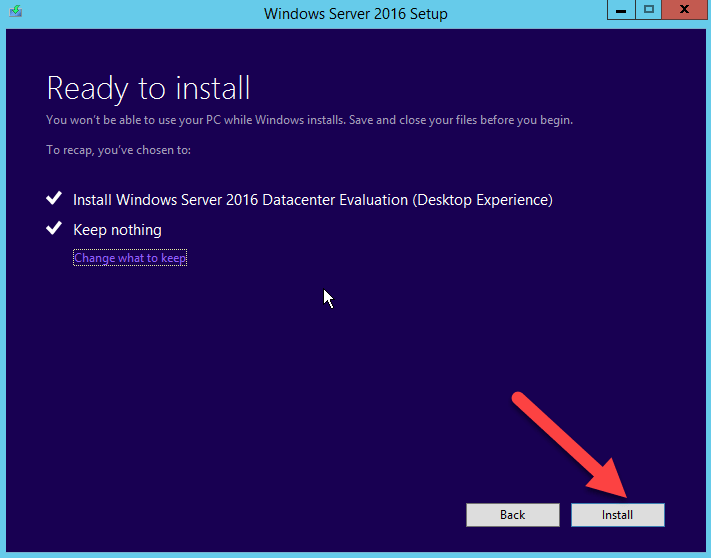
Windows Server автоматически проверит вашу систему на совместимость, поэтому просто нажмите кнопку «Install», чтобы начать установку.
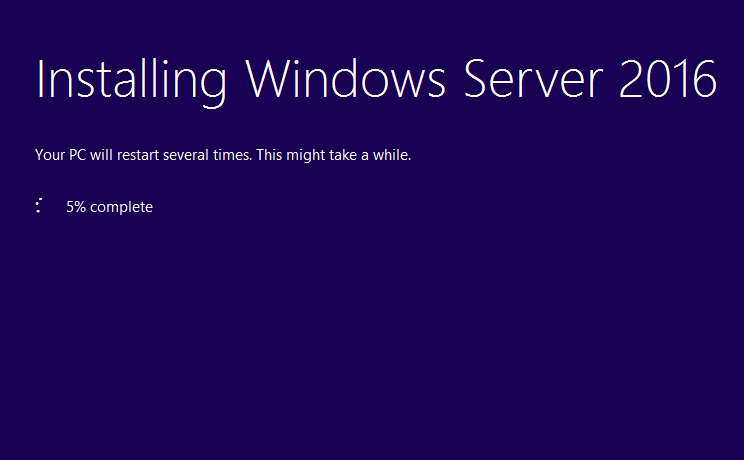
Будьте терпеливы, потому что процесс установки Windows Server занимает достаточно много времени. В процессе установки ваша система может перезагрузится несколько раз.
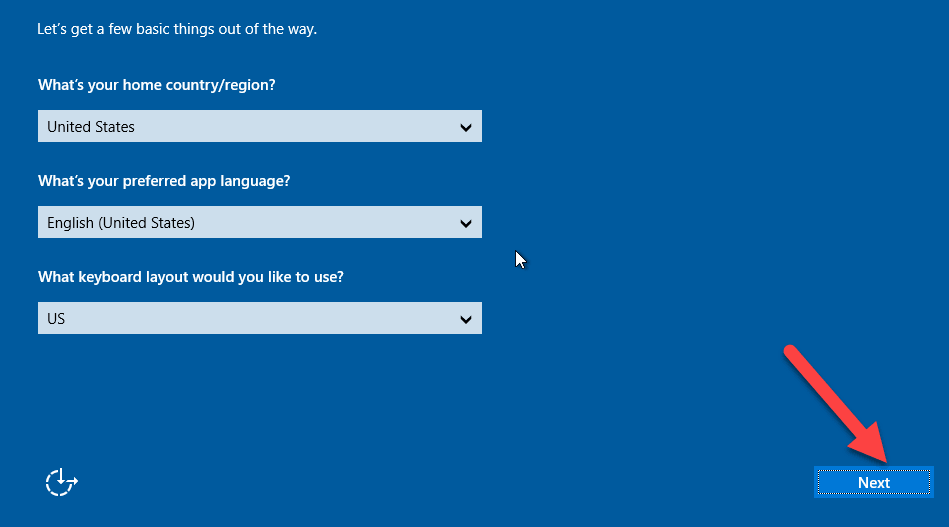
Выберите страну и предпочитаемую раскладку клавиатуры сервера.. Нажмите кнопку «Next», чтобы перейти к следующей странице.
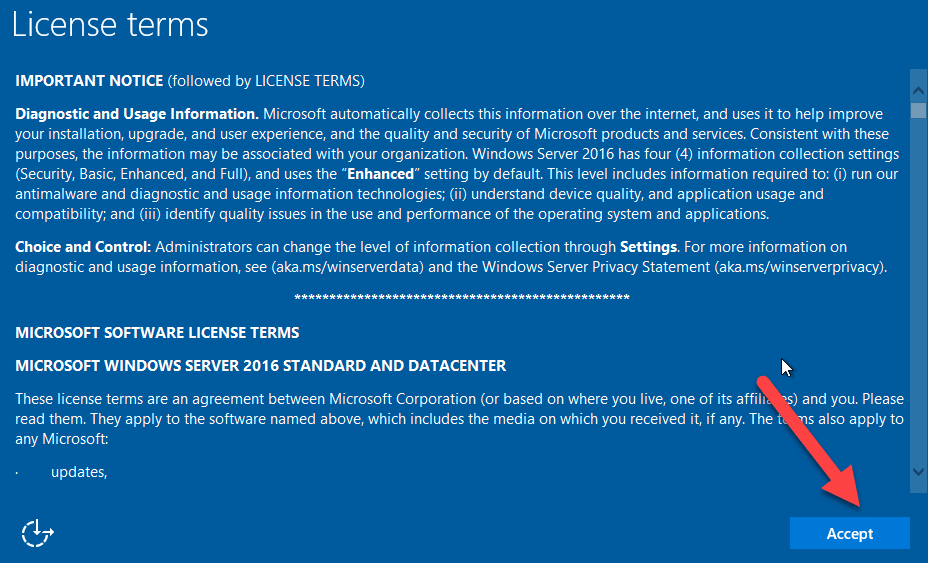
Внимательно прочитайте условия лицензии и нажмите кнопку «Accept».
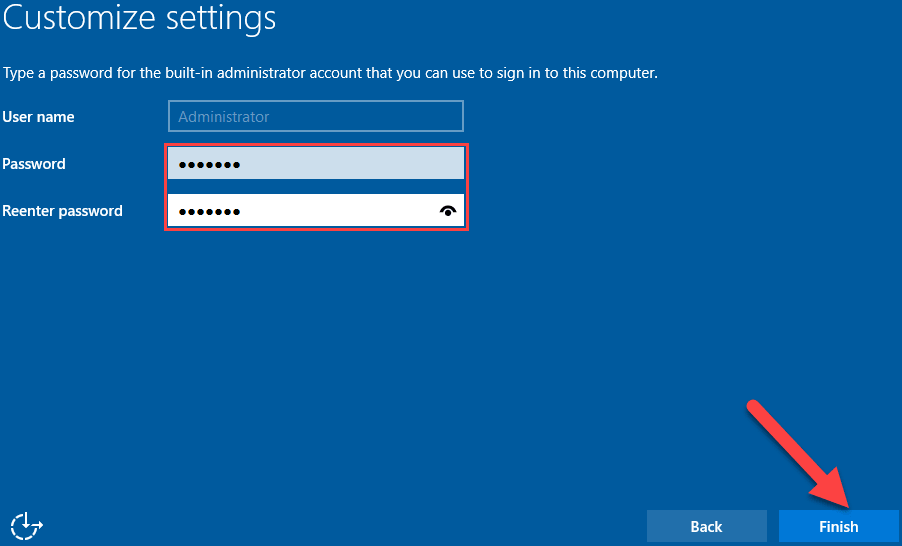
По умолчанию имя пользователя — «Administrator», придумайте ему сложный пароль (пароль, состоящий из строчных букв, прописных букв, цифр и символов). Повторно введите пароль. Затем нажмите кнопку «Finish». Используя эти имя пользователя и пароль, вы можете авторизоваться на сервере.
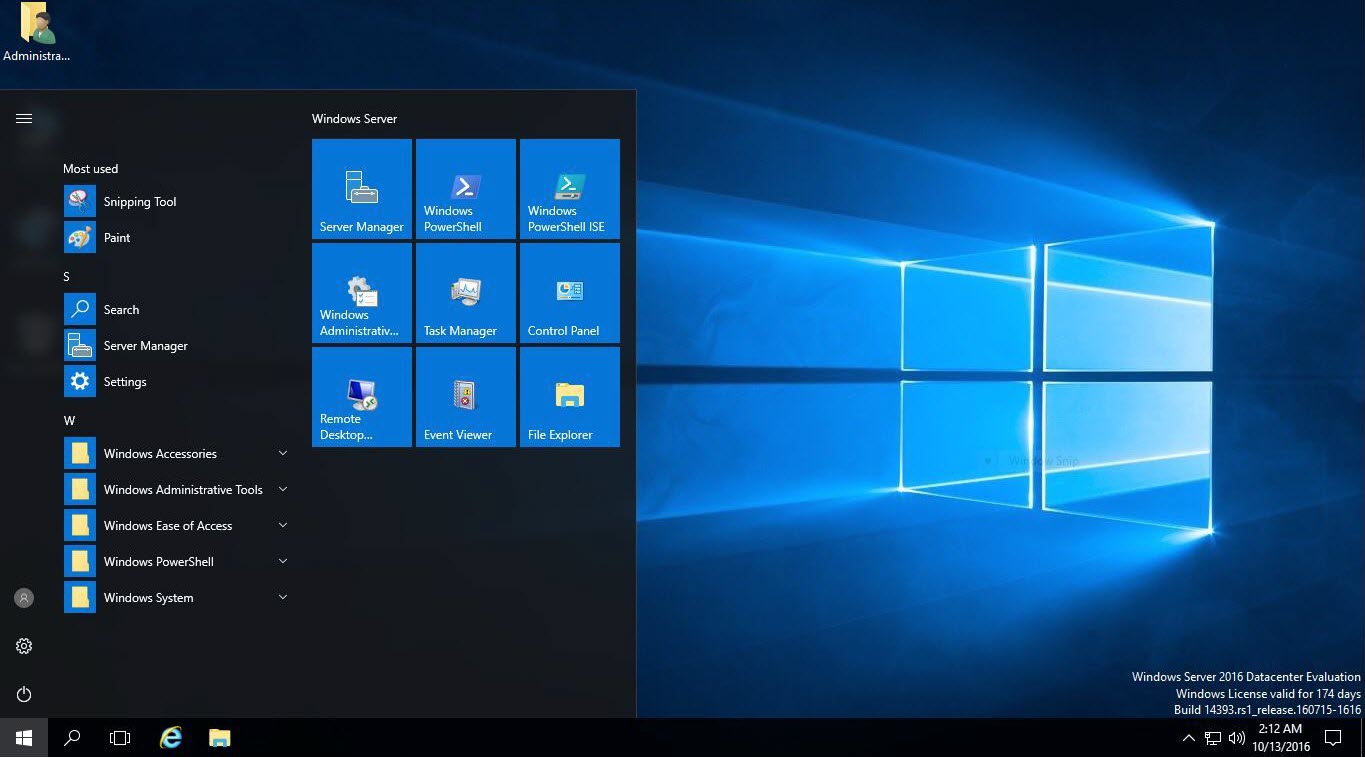
На экране входа нажмите нажатием клавиш Ctrl + Alt + Del, затем авторизуйтесь в системе, используя ранее созданную учетную запись.

Добро пожаловать в Server Windows 2016. На этом процесс обновления Server Windows 2012 до Server Windows 2016 завершен. Теперь вы можете увидеть домашнюю страницу сервера Windows Server 2016 и оценить все нововведения.
Можете глубоко вдохнуть, процесс обновления прошел без ошибок. Не стесняйтесь, задавайте ваши вопросы и оставляйте комментарии ниже.

Introduction
Unlike upgrading previous versions of Windows Server to 2012, Windows Server 2016 only supports 64-bit architecture. In addition, Windows Server 2012 and 2016 have only 4 versions. Upgrading Windows Server is a complicated process. So, Microsoft recommends that instead of updating the entire Windows server, it upgrades the roles and settings of the Windows 2016 server. Hence, we are going to learn you How to upgrade Windows Server 2012R2 to Windows Server 2016.
Prerequisites for the upgrade Windows 2012R2 to 2016
1. Upgrading from 32-bit to 64-bit is not possible.
2. All Windows Server versions before to 2012 are incompatible with the 2016 upgrade.
3. A version to version upgrade is not supported. You can’t upgrade the standard version of Windows Server 2012 to the Data Center version of Windows Server 2016.
4. It is not possible to upgrade from one language to another. For example, you can’t upgrade the German version of Windows Server to Chinese.
5. Upgrades between Server Core and Desktop versions (or vice versa) are not supported.
6. Upgrading from older versions of Windows Server to trial versions of Windows Server is not supported. Trial versions must be installed manually.
7. If this server uses NIC Teaming, disable it and reactivate it.
8. Make a full backup of the server, as you may have a problem during the upgrade and want to go back to the previous version.
————————————————————————-
Check out disk allocation steps in case you need them after the server upgrade.
————————————————————————-
Step 1. Log in to Windows Server 2012 and install DVD or Flash. You can also mount an ISO of Windows Server 2016 that we will be using to upgrade the server from 2012R2 to 2016. Open File Explorer and click on DVD Drive as shown below:

Step 2. Select Download & install updates to begin the Windows installation process.

Step 3. Choose a version of Windows Server 2016 that suits your needs. You may need to enlarge the network in the future and require more roles and licenses. So be careful at this point.

Step 4. In the license stage, click Accept. You will enter the next step.

Step 5. If you have selected the same version as the previous version, you can keep all the applications and files in the system. The apps and files will be erased if the prior version is not selected. Select Keep personal files and apps to save files and apps, otherwise, click Nothing to delete all files. Then click Next.

Step 6. Microsoft will check for updates.

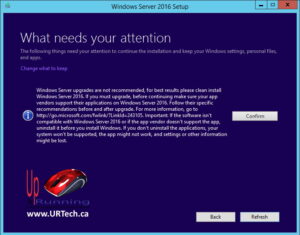
Step 7. You receive a warning prior to beginning the installation, which you must ignore (confirm) before it can proceed.

Step 8. The install check disk space.

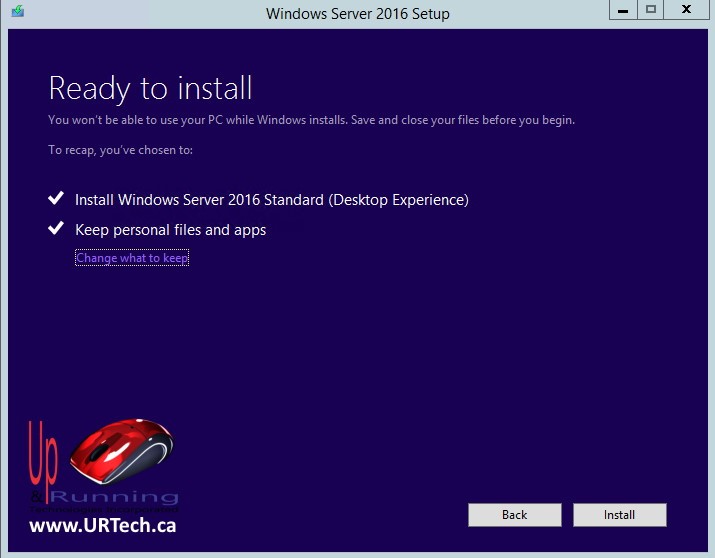
Step 9. Now the critical moment, review the settings that we have been specified and then select Install to start the process:

Step 10. Windows Server 2016 Installation begins

Step 11. The Server will restart several times after that. The whole process will take some time to complete the process.


Step 12. The new Windows Server 2016 login screen will appear following the upgrade.

Windows Server 2012R2 successfully upgraded to Windows Server 2016
Thank You!
[Updated on Date: 2021-01-27] Do you want to migrate to the new version of Windows Server? Since Windows Server 2016 offers new features compared to Windows Server 2012, your answer is probably yes. These new features have greatly improved the management of Windows Server. That’s why we decided to learn you How to upgrade Windows Server 2012 to 2016. You can choose your perfect Windows VPS Server Packages from Eldernode to install your required windows server.
Table of Contents
Unlike upgrading previous versions of Windows Server to 2012, Windows Server 2016 only supports 64-bit architecture. In addition, Windows Server 2012 and 2016 have only 4 versions. Upgrading Windows Server is a complicated process. So, Microsoft recommends that instead of updating the entire Windows server, it upgrades the roles and settings of the Windows 2016 server.
Requirements for upgrading Windows 2012 to 2016
In order to be able to upgrade Windows Server 2012 to 2016, you must follow the following requirements:
1. All versions of Windows Server 2016 are 64-bit (upgrading from 32-bit to 64-bit is not possible.)
2. Only Windows Server 2012 can be upgraded to 2016, other versions cannot be upgraded.
3. Upgrades are not supported from one version to another. For example, you can’t upgrade the standard version of Windows Server 2012 to the Data Center version of Windows Server 2016.
4. It is not possible to upgrade from one language to another. For example, you can’t upgrade the German version of Windows Server to Chinese.
5. The upgrade from Server Core to Desktop version (or vice versa) is not supported.
6. Upgrading from older versions of Windows Server to trial versions of Windows Server is not supported. Trial versions must be installed manually.
7. Disable antivirus, because it scans every file that is copied to the disk and slows down the processing speed.
8. If this server uses NIC Teaming, disable it and reactivate it.
9. Make a full backup of the server, as you may have a problem during the upgrade and want to go back to the previous version.
10. Check that the server has no problems, if you see any problems, try to solve them. Otherwise, you may encounter an error that will cause the entire installation process to fail.
Upgrade with Step By Step :
Now that you understand the rules of the upgrade, let’s move on.
Log in to Windows Server 2012 and install DVD or Flash. Open File Explorer and click on DVD Drive as shown below:
Select Download & install updates to begin the Windows installation process.
Choose a version of Windows Server 2016 that suits your needs. You may need to enlarge the network in the future and require more roles and licenses. So be careful at this point.
In the license stage, click Accept. You will enter the next step.
If you have selected the same version as the previous version, you can keep all the applications and files in the system. As we said, if you don’t want to select the previous version, the apps and files will be deleted. Select Keep personal files and apps to save files and apps, otherwise, click Nothing to delete all files. Then click Next.
How to install Windows Server 2016
Windows Server automatically checks your system for compatibility. So, click Install to start the installation.
Wait a bit, because it will take a very long time to install Windows Server on your system. Your system will be reset several times during installation.
Select the country and keyboard language. Note that you cannot change the language. Click Next.
Click Accept on the License Terms page.
Username is the default Administrator, enter a password (code that contains uppercase and lowercase letters, numbers, and symbols), and re-enter the password. Then click Finish. You can log in to the server locally using this username and password.
Press Ctrl + Alt + Del to enter the login page and log in with the username and password.
Here we have successfully upgraded from Windows Server 2012 to 2016. By entering the Windows Server 2016 page, you can see the differences and improvements.
Conclusion
Before explaining how to upgrade Windows Server 2012 to 2016, we first needed to mention some of the requirements for updating to Windows Server 2016. Then, you were completely taught how to upgrade from Windows Server 2012 to Windows Server 2016.
October will be the last (unpaid) update available for Windows Server 2012R2 which means if you patch your servers every quarter, you have until January 2024 to upgrade them… if you want to stay safe.
We have upgraded many servers from Server 2012R2 to Server 2016 and while the process is simple we thought it was worth documenting because there are a few unexpected bumps.
MYTH: In-Place Upgrades of Windows Server Is Not Support By Microsoft
The fact is that Microsoft fully supports in-place upgrades of Windows servers. They simply don’t recommend it and if you have apps that are not supported on Windows Server 2016, that is your problem, not theirs.
What is true is that Microsoft has additional requirement to do an in-place upgrade on any server that is running in Azure.
They don’t they recommend upgrading because some features of the old operating system are maintained after an upgrade to allow for compatibility. From Microsoft’s end that’s a bad thing but from your end that’s a very good thing and probably the very reason why you want to do an in place upgrade. You want your old servers to work just using the new operating system.
A clean install is always the ‘cleaner’ way to go, but it is also dramatically more complex and usually unnecessary.
PREWORK
Before you actually start the upgrade there are ten things you really should do first:
- Note the IP addresses (and possibly the MAC addresses) of your NIC’s, and take note of any special hardware configurations you have.
- especially with VM’s it is common for ‘new’ NIC’s to be installed causing you to loose your existing IP addresses
- We typically just export the configuration to a file using the CMD
ipconfig /all > c:\temp\pre-ipconfig.txt - You also might want to take note of which services were actually running
- Update the operating system with any patches that are pending in Windows Update
- Update any applications you have running on that server to reduce the likelihood that they will be incompatible with the Windows Server 2016
- If this is a virtual machine, upgrade any VMTools to the latest build
- Clean up the current install as much as possible in advance and make as much free space as possible:
- Uninstall any unused software or unnecessary utilities
- Delete any temporary files
- ie. often admins have C:\TEMP folder that is full of old junk
- Delete any old user profiles
- Go to C:\WINDOWS\TEMP, press CNTL+A, the press the DELETE key
- Contrary to what you may have heard this will not cause a problem. Files that are currently in use will simply fail to delete and that’s a good thing
- Empty the Recycle Bin
- Now is a great time to upgrade the current hardware as much as is reasonable:
- If your machine has 4GB of RAM, spring the big $100 and double it to 8GB 🙂
- Perhaps add a few more CPU cores
- Move the disk from spinning array to an SSD
- Take a full backup of the machine. Nearly everyone is running their servers as virtual machines so the easiest thing to do here is simply take a snapshot just before you start the upgrade, so you can roll back if something goes wrong.
- Know how to disable your antivirus / antimalware tools BEFORE you start
- Source an ISO or an actual DVD of Server 2016
WHAT COULD GO WRONG WITH AN INPLACE UPGRADE?
You are changing the entire operating system, so things could definitely go wrong. That being said I have never had an in place upgrade fail to the point where I needed to roll back.
- It’s possible that some application you have won’t work on the new operating system so you need to validate that in advance as much as you can
- If the upgrade files end up on a part of the hard drive that is bad, it is possible the whole machine will just crash and be unrecoverable
- If you are still on spinning disk, now is a great time to check it with even old tools like chkdsk and to improve the layout using defrag
- If there is a power outage or something forces the machine to power off during the upgrade, it could be ugly to recover
STEPS TO UPGRADE WINDOWS SERVER 2012R2 TO SERVER 2016
- Do all of the PREWORK specified above
- Reboot the server and make sure it comes up without errors
- Click START, type WINVER.EXE and press ENTER so you know which version of Server 2012R2 you have now as you will need to choose the same version later in the process
- Disable any antivirus / antimalware / monitoring software
- Turn off any ‘heavy’ services that are not necessary
- i.e. if the server runs SQL, you can stop the SQL services before the upgrade starts just to free up resources and make the upgrade run faster
- you do not NEED to stop any services in advance
- Mount the ISO or the DVD and launch SETUP.EXE
- Click next through all of the defaults being careful to select
- KEEP PERSONAL FILES AND APPS
- The version of Windows Server 2016 that matches your current Windows Server 2012R2.
- For most people that are running Server 2012R2 in a virtual machine, they will select WINDOWS SERVER 2016 STANDARD DESKTOP EXPERIENCE
- DOWNLOAD AND INSTALL UPDATES
- This prompt comes up twice, once early in the process to upgrade the install files on the ISO/DVD and later to update the new Server 2016 OS
In most cases, the last screen before the in-place upgrade will look like:
HOW LONG DOES THE UPGRADE FROM 2012R2 TO 2016 TAKE?
Typically the upgrade will take anywhere from 30 to 90 minutes to complete but do not panic it if takes longer… just keep waiting.
CREDSSP ERROR on RDP
After the upgrade is complete you will be scared or annoyed (or both!) to find that you cannot RDP with the server and will see the CredSSP Error:
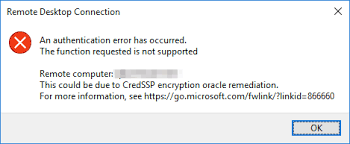
Fortunately the CredSSP error is easy to fix. You just need to patch your Windows Server 2016. The easiest way to do this is through Windows Update, which you need to run next anyway.
However, if you get stuck on a server that could not see the internet, like our last upgrade, you can download KB4103723 directly from the Microsoft catalog.
CHECK NETWORK SETTINGS
This is the point where you are glad you saved your NIC information before you started. If you have “new” NIC’s they will be set to DHCP and that is likely a very bad thing, so you will need to correct them.
PATCH PATCH PATCH, TEST TEST TEST
Typically, there will be four large patches that need to be applied after the upgrade, including .NET patches and Cumulative Updates.
Now is a great time to:
- check your services and make sure they are happy
- check your applications
- activate Windows Server 2016
- confirm that other servers and desktops can talked to it (i.e. check file shares, printing…)
Do one last reboot and make sure everything comes up as you expect.
Go have a nice cold drink and relax because Server 2016 does go complete end of life until 2027.
This article will helps you to upgrade from Windows Server 2012 to Windows Server 2016. If you need to keep the same hardware & all the server roles you have already setup without flattening the server, you will want to do an in-place upgrade. In-place upgrades permit you to go from an older OS to a newer one while keeping your settings, server roles, & data intact.
To upgrade to Windows Server 2019, use this topic first to upgrade to Windows Server 2016, and then upgrade windows server 2016 to 2019.
Before you begin your in-place upgrade
Before you began upgrade Windows Server, we suggest that you collect some information from your server, for diagnostic and troubleshooting purposes. Through this intelligence is purpose for use only if your upgrade fails, please make sure that you have store the information somewhere that you can get to it off of your device.
To collect your info
1- Run a command prompt, go to c:\Windows\system32, and then type systeminfo.exe.
Copy, paste & store the resulting system information somewhere off of your device.

2- Type ipconfig /all, and then copy & paste the resulting configuration information into the same location as above.

After you have collected all the Windows Server-related information, we highly recommend that you take backup of your operating system, apps, and virtual machines. You can’t have any VM (virtual machines) running during the in-place upgrade.
Upgrade Windows Server 2012 to Server 2016
1- Please make sure that you are running Windows Server 2012. Right click on my computer (This PC) and then properties

2- Enter Windows Server 2016 Setup media, and then double click to run.

3- It is always best practice to get the latest updates, in case any important security patches have been released, so I would recommend keep the default setting. Click next.

4- Checking the updates.

5- Enter your Server 2016 Product Key and then click next.

6- Here you can decide what type of operating system you want to upgrade, and click next.

7- Accept the license terms.

8- In this window, the Keep personal files and apps default option was chosen, so I cannot advise on the impact of choosing nothing. I would imagine that selecting this would delete everything, including any installed Server Roles. Proceed with this step at your own risk. Click next

9- Here you will get a rather lengthy Getting Updates window.

10- Finally, before starting the installation, you are prompted with an interesting warning, which you have to dismiss (confirm) before the installation will start.

11- The install check disk space.

12- Now the critical moment, review the settings that we have been specified and then select Install to start the process:

13- The full-screen setup will start, preventing you from doing anything else on the Server throughout the process.

14- This Server will restart several times after that. The whole process will take some time to complete the process.

15- After the upgrade, you will be greeted with the new Windows Server 2016 login screen.

Watch Video: How to upgrade Windows Server 2012 to Server 2016.
For more details please visit Microsoft
Related: Upgrade Windows Server 2008 r2 to 2012