If you are still running Windows Server, you should upgrade to Windows Server 2019 since Windows Server 2012 R2 will end the support. In this post from MiniTool Solution, you can see a full guide on the Windows Server upgrade. Also, some things that should be done before the upgrade are described here.
Windows Server is a family of operating systems created by Microsoft specifically for use on servers. Servers are extremely powerful machines designed to run continuously and provide resources to other computers. This means that in almost all cases, Windows Server is only used in business environments.
It Is Necessary to Upgrade Windows Server 2012 R2 to 2019
Since Windows Server 2012 R2 has ended mainstream support in 2018 and extended support in 2023, it’s recommended to upgrade Windows 2012 R2 to 2019.
Besides, there are other significant reasons.
1. The new system is more compatible with new services and applications.
Windows Server 2019 makes it easier to integrate Linux with new features such as Linux Containers on Windows, Windows Subsystem for Linux (WSL), and the new Windows Server 2019 application platform.
2. The new system is safer.
Windows Server 2019 is built on its strong security foundation. Now it not only blocks threats but also monitors and reacts to perceived threats. Windows Server 2019 is designed to be used with or in the cloud. Users can more easily connect their existing on-premises environments to Microsoft Azure.
Can You Upgrade Windows Server 2012 R2 to 2019?
Can you upgrade Windows Server 2012 R2 to 2019? The answer is Yes. You can upgrade Windows Server 2012 R2 to 2019. However, if you are upgrading Windows Server 2012 to 2019, you will need to upgrade Windows Server 2012 to 2016, and then upgrade from 2016 to 2019. Otherwise, you can only do a fresh install of 2019 to overwrite the existing OS and avoid data loss, it is necessary to back up the server in advance.
Before you upgrade Windows Server 2012 R2 to 2019, the following are some system requirements you need to meet:
Processor:
- 1.4 GHz 64-bit processor
- Compatible with x64 instruction set
- NX and DEP support
- Supports CMPXCHG16b, LAHF/SAHF and PrefetchW
- Supports secondary address translation (EPT or NPT)
Memory:
- 512 MB (2 GB for servers with Desktop Experience install option)
- ECC (Error Correcting Code) type or similar technology for physical host deployments
Disk space for system partition: A fresh or fresh installation requires 32 GB of free disk space. To perform an in-place upgrade, you should plan for at least 60 GB of free disk space.
Network Adapter Requirements:
- Ethernet adapter with at least gigabit throughput
- Compliant with PCI Express Architecture Specification
Other demands: DVD drive (if you plan to install the operating system from DVD media)
Another point you may need to consider is the price. How much will it cost to upgrade Windows Server 2012 R2 to 2019?
There are many factors affecting price, such as hardware, virtualization, etc. However, if you’re referring to the cost of upgrading licenses, the answer is clear. Microsoft typically doesn’t offer an upgrade sale, so you’ll need to buy a copy of Windows Server 2019 separately.
Tips:
If you want to know the exact price, you can go to the Microfost official website.
Another issue worth considering is that some third-party applications may not be compatible with Windows Server 2019. So you had better check if the third-party applications support Windows Server 2019 before upgrading.
Public or private cloud companies may also support an in-place upgrade of Server 2012 R2 to 2019, but you will need to consult your cloud provider for details. Also, you cannot perform an in-place upgrade on any Windows Server that is configured to boot from a VHD. In-place upgrades from Windows Storage Server editions to Windows Server 2019 are also not supported. In this case, you can do a migration or a fresh install.
How to Upgrade Windows Server 2012 R2 to 2019
Before You Upgrade
If you decide to upgrade Windows Server 2012 R2 to 2019, there are some things you should pay attention to before the update to avoid some potential problems.
- Patch your Windows Server 2012 R2 with the latest updates.
- Insert and install Windows Server 2019 installation media.
- Before upgrading, Microsoft recommends that you collect some information about your device. You can use it for troubleshooting when an upgrade fails.
- Cannot run any virtual machines during an in-place upgrade.
- Create a system image for your system so that you can restore the system to a normal state if the update causes some system issues.
To create a system image, you can use the professional Windows backup software, MiniTool ShadowMaker. It is designed to back up the system by default. Besides, you can use it to back up files, disks, and partitions. Just download it by following the button below.
It is compatible with Windows 1110/8/8.1/7 and Windows Server 2019/2016/2012/2012 R2/2008/2008 R2/2003/2003 R2. Now get its trial edition by clicking the following download button and install it on your Windows Server.
MiniTool ShadowMaker TrialClick to Download100%Clean & Safe
How to back up your PC before starting to update Windows Server 2012 R2 to 2019:
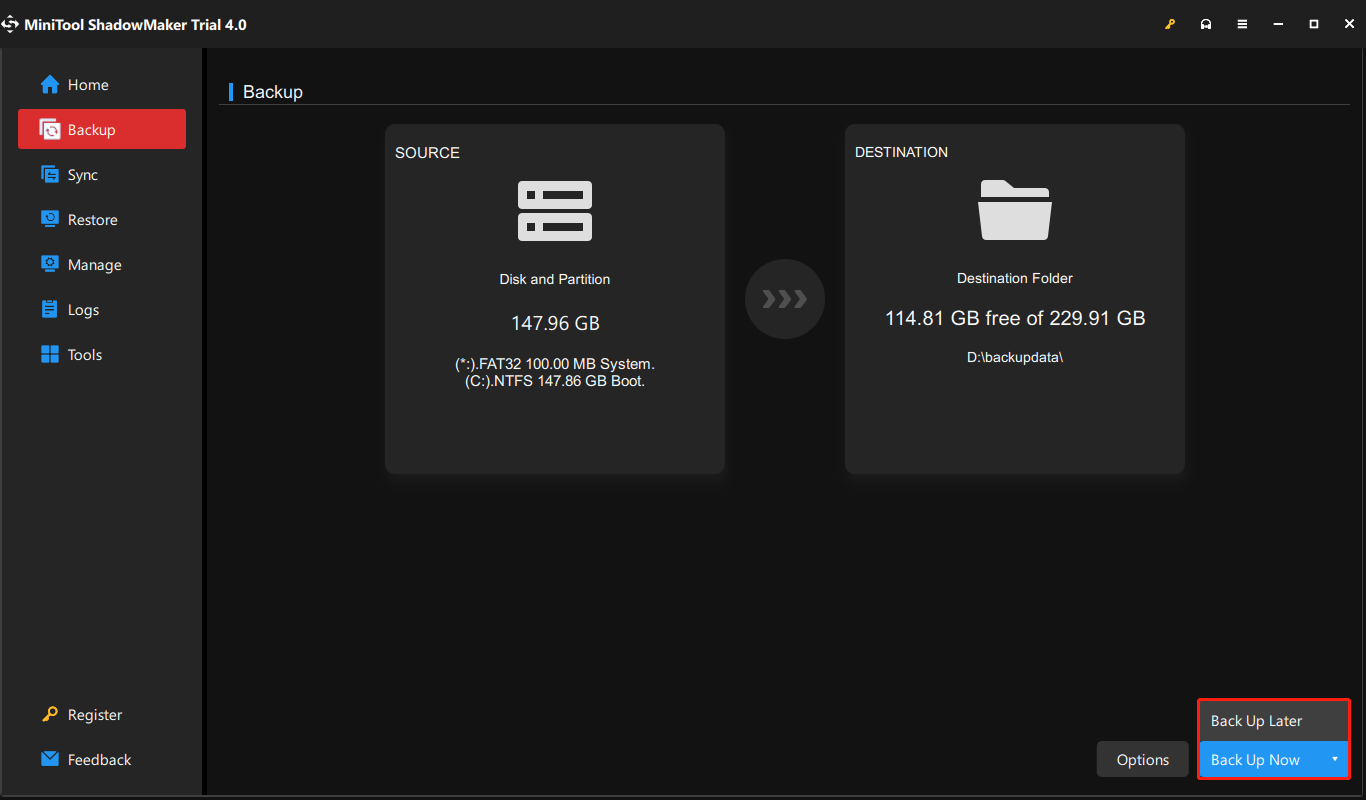
1. Double-click the icon of MiniTool ShadowMaker to launch it to its main interface.
2. When going to the Backup tab, you can see this software backs up the system by default. You only need to choose a destination to store the system image.
If you need to back up files, go to SOURCE to choose items that you want to back up and go to DESTINATION to select a storage path.
3. Click Back Up Now to start backing up immediately or click Back Up Later to delay the task.
Tips:
It is recommended to create a bootable USB flash drive with MiniTool Media Builder so that you can perform a system recovery when your PC doesn’t work properly after Windows Server 2012 R2 to 2019 update.
Start to Upgrade
Now that you have completed the prerequisites you can perform the upgrade. In this section, you will use Windows Server Setup to choose upgrade settings. Windows Server Setup will use these settings to upgrade your version of Windows Server, during which time your computer will restart several times. Follow the guide below:
Step 1: Open File Explorer, and go to the Windows Server Setup media. Then open setup.exe. For example, if you’re using removal media the file path might be D:\setup.exe.
Tips:
Depending on your security settings, User Account Control may prompt you to allow setup to make changes to your device. If you’re happy to continue select Yes.
Step 2: By default, the setup will automatically download updates for the installation. After checking the default settings, click Next to continue.
If you don’t want Setup to automatically download updates, you can select Change how Setup downloads updates and choose the option appropriate to your environment, then select Next.
Step 3: If prompted, enter your product key, then select Next.
Step 4: Select the edition of Windows Server you want to install, then select Next.

Step 5: Review the applicable notices and license terms, if you agree to the terms, select Accept.
Step 6: Select Keep personal files and apps to choose to do an in-place upgrade, then select Next.
Step 7: After Setup finishes analyzing your device, the setup will display the Ready to install screen, to continue the upgrade select Install.
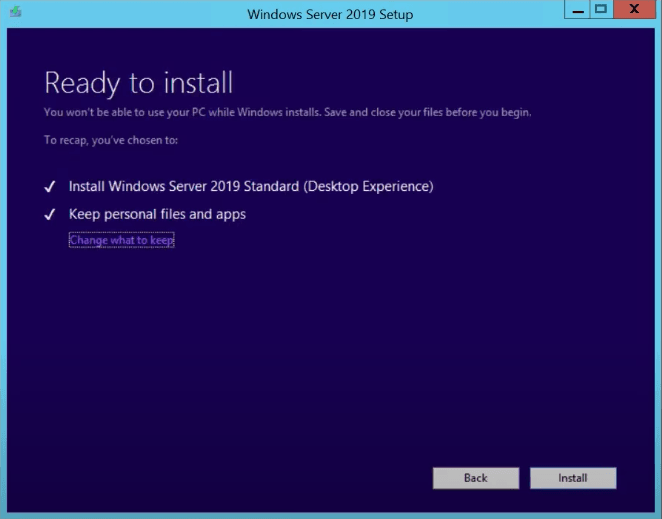
The in-place upgrade will start, and you should see a progress bar. After the upgrade finishes, your server will restart.
Check If Your Upgrade Was Successful
After the upgrade to Windows Server is done, you must make sure the upgrade was successful. To make sure your upgrade was successful:
Step 1: Open an elevated PowerShell prompt, and run the following command to verify the version and edition match the media and values you selected during setup.
PowerShellCopy
Get-ComputerInfo -Property WindowsProductName
Step 2: Make sure all of your applications are running and that your client connections to the applications are successful.
Bottom Line
Do you need to upgrade Windows Server 2012 R2 to 2019? How to Windows Server 2012 R2 to 2019? After reading this post, you know it. Also, what to do before the update is also told to you. Now, don’t hesitate to perform the Windows Server update by following the guide above.
On the other hand, if you have any questions or suggestions, remember to let us know. Leaving a comment below or contacting [email protected] is for you to choose.
Upgrade Windows Server 2012 R2 to 2019 FAQ
Can Windows Server 2016 be upgraded to 2019?
Yes, you can upgrade Windows Server 2016 to 2019. The steps are similar to is the same as the steps for upgrading 2012 R2 to 2019. You can take a reference from the content above.
Is Server 2012 R2 still supported?
The support for Windows Server 2012 R2 will end on October 10, 2023. After this date, Windows Server 2012 and 2012 R2 will stop receiving regular patches or critical security updates. Thus, you had better upgrade your Windows Server 2012 R2 as soon as possible.
How long can a server last?
However, according to a report by a leading analyst firm, the potential useful life of servers is between 7 and 10 years (typically 6 years for rack-mounted servers and 10 years for integrated systems).
Can SQL Server 2019 run on Windows Server 2012 R2?
In this article I will guide you How to upgrade Windows Server 2012 R2 to 2019
Before you upgrade Windows Server 2012 R2 to 2019, you read Windows Server 2019 systyem requires.
System requirements of Windows Server 2019
- At least 1.4GHz 64-Bit processor.
- 2GB RAM (for GUI-based installation).
- A minimum of 32GB of free space on the hard drive.
- Network adapter(s) compliant with PCIe architecture.
Note: This method only upgrades upgrade Windows Server 2012 R2 to Windows Server 2019. After you do it, you need to buy Windows Server 2019 Standard product key to activate it. You can buy Windows Server 2019 Standard product key for $70/key here: https://cheapproductkeys.com/product/windows-server-2019-standard-product-key/
You can watch this video to know how to upgrade Windows Server 2012 R2 to 2019
Step 1: If you want to keep your files and apps you convert Windows Server 2012 R2 Evaluation to Windows Server 2012 R2 non Evaluation
(If your Windows Server 2012 R2 is Standard/Datacenter version, you can skip step 1)
Step 2: You download Windows Server 2019 setup file here: https://www.mediafire.com/file/5rww0wn2uzb1ppz/en_windows_server_2019_x64_dvd_3c2cf1202.iso/file
Step 3: You open this file you download. Then you click setup
Step 4: You copy and paste Windows Server 2019 setup key: N69G4-B89J2-4G8F4-WWYCC-J464C
Step 5: You select “Windows Server 2019 Standard (Destop Experience)
Step 6: You select “Keep personal files and apps”
Step 7: You confirm your pc meets requirements of Windows Server 2019. Then you click install
Done. You wait for a moment.
After you upgrade Windows Server 2012 R2 to 2019, you need buy Windows Server 2019 Standard product key to activate it. You can buy Windows Server 2019 Standard product key for $70/key here: https://cheapproductkeys.com/product/windows-server-2019-standard-product-key/
Tag: in place upgrade windows server 2012 r2 to 2019, how to upgrade windows server 2012 r2 to 2019, upgrade windows server 2012 r2 to 2019 step by step, upgrade server 2012 r2 to 2019
Read more:
- Download Windows Server 2012 R2
- Download Windows Server 2016
- Download Windows Server 2019
- Download Windows Server 2022
Обновление операционной системы Windows Server может быть важным шагом для улучшения безопасности, производительности и функциональности вашего сервера. В данной статье мы рассмотрим подробную инструкцию по обновлению Windows Server 2012 R2 до Windows Server 2019.
Переход с Windows Server 2012 R2 на Windows Server 2019 предоставит вам доступ к новым функциям и улучшениям, таким как улучшенная безопасность и защита данных, улучшенная производительность, новые возможности хранилища данных и многое другое.
Перед тем как начать процесс обновления, важно заранее подготовиться. Необходимо сделать резервные копии всех важных данных, сохранить список установленных программ и проверить совместимость оборудования с новой операционной системой.
Приступая к обновлению, рекомендуется следовать инструкциям производителя и установить все необходимые обновления перед запуском процесса. Отдельно стоит отметить, что обновление операционной системы может потребовать значительного времени, поэтому важно быть готовым к возможной недоступности сервера во время обновления.
Содержание
- Как обновить Windows Server 2012 R2 до Windows Server 2019
- Почему стоит обновиться до Windows Server 2019
- Как подготовиться к обновлению
- Шаги по обновлению Windows Server 2012 R2 до Windows Server 2019
- После обновления: что нужно проверить
- Вопрос-ответ
- Какую версию Windows Server можно обновить до Windows Server 2019?
- Какая система должна быть установлена на сервере перед обновлением до Windows Server 2019?
- Какие действия необходимо выполнить перед обновлением?
- Какие способы обновления существуют?
- Какие есть возможные проблемы при обновлении?
Как обновить Windows Server 2012 R2 до Windows Server 2019
Обновление операционной системы Windows Server 2012 R2 до Windows Server 2019 может быть выполнено в несколько шагов. Важно убедиться, что перед началом обновления все необходимые файлы и данные были сохранены и резервные копии созданы.
-
Подготовка к обновлению:
- Убедитесь, что у вас установлена самая последняя версия Windows Server 2012 R2 и все пакеты обновления. Если нужно, выполните обновление.
- Загрузите образ Windows Server 2019 с официального сайта Microsoft.
- Установите все необходимые обновления и исправления перед началом обновления.
-
Создание резервного копирования:
- Создайте полное резервное копирование всех важных данных и файлов на сервере.
- Удостоверьтесь, что резервная копия успешно создана и доступна для восстановления, если это потребуется.
-
Запуск установки нового образа:
- Откройте образ Windows Server 2019 и запустите файл установки.
- Выберите опцию «Обновление», чтобы выполнить обновление сервера.
- Следуйте инструкциям мастера установки, принимая все необходимые лицензионные соглашения и параметры конфигурации.
- Подтвердите выбор поставщика программного обеспечения и нажмите «Далее».
-
Завершение обновления:
- Дождитесь завершения процесса обновления и перезагрузки сервера.
- Войдите в систему с помощью учетных данных администратора.
- Проверьте работоспособность всех служб и приложений на сервере.
- Установите необходимые обновления и пакеты для новой версии операционной системы.
После завершения всех этих шагов ваш сервер будет обновлен до операционной системы Windows Server 2019. Важно периодически выполнять резервное копирование и обновление операционной системы, чтобы улучшить безопасность, функциональность и производительность сервера.
Это лишь краткая инструкция по обновлению Windows Server 2012 R2 до Windows Server 2019. Перед выполнением обновления рекомендуется ознакомиться с документацией Microsoft и проконсультироваться со специалистами, чтобы убедиться, что все действия выполняются правильно и безопасно.
Почему стоит обновиться до Windows Server 2019
Windows Server 2019 — это последняя версия серверной операционной системы от Microsoft. Обновление до Windows Server 2019 предлагает ряд преимуществ, которые могут быть полезными для организаций и предприятий. Вот несколько причин, по которым стоит рассмотреть обновление до Windows Server 2019:
- Безопасность: Windows Server 2019 предлагает улучшенные механизмы безопасности, что особенно важно в наше время, когда угрозы в сети все еще актуальны. Усиленная защита данных и возможность обнаружения и предотвращения атак помогут обеспечить безопасность вашего сервера и сохранить конфиденциальность данных.
- Производительность: Сравнительно с предыдущими версиями, Windows Server 2019 предлагает улучшенную производительность. Новые технологии, такие как Storage Spaces Direct, улучшенный Hyper-V и масштабирование горячего обновления, способствуют повышению производительности сервера и улучшению его отказоустойчивости.
- Улучшенное управление: Windows Server 2019 предлагает новые инструменты для управления сервером, такие как Windows Admin Center. Он предоставляет централизованный инструментарий для управления различными серверами через веб-интерфейс. Это упрощает управление серверами и повышает эффективность работы администраторов.
- Новые функции: В Windows Server 2019 добавлено множество новых функций и возможностей. Например, режим Shielded Virtual Machines для обеспечения безопасности виртуальных машин, интеграция с контейнерами Docker для упрощения развертывания приложений, а также улучшенный механизм резервного копирования и восстановления данных.
Обновление до Windows Server 2019 может быть ценным вложением для вашей организации, улучшая безопасность, производительность и управление серверами. Это поможет повысить эффективность работы и обеспечить стабильность вашей IT-инфраструктуры.
Как подготовиться к обновлению
Перед началом процесса обновления Windows Server 2012 R2 до Windows Server 2019 необходимо выполнить несколько подготовительных шагов. Эти действия помогут вам убедиться, что ваша система готова к обновлению и минимизировать возможные проблемы в процессе.
- Проверьте системные требования: Перед обновлением убедитесь, что ваш сервер соответствует системным требованиям Windows Server 2019. Учтите, что для новой версии ОС могут потребоваться больше ресурсов, поэтому проверьте, достаточно ли у вас процессора, оперативной памяти и свободного места на диске.
- Сделайте резервную копию данных: Прежде чем обновлять операционную систему, рекомендуется сделать резервную копию всех важных данных на сервере. Это поможет избежать потери данных в случае неудачного обновления.
- Отключите антивирусное программное обеспечение: Антивирусные программы могут мешать процессу обновления и вызывать ошибки. Перед началом обновления рекомендуется временно отключить антивирусное программное обеспечение на вашем сервере.
- Удалите ненужное ПО и обновления: Перед обновлением рекомендуется удалить все ненужные программы и обновления на вашем сервере. Это поможет избежать конфликтов и снизить вероятность возникновения проблем во время обновления.
- Проверьте доступность обновлений: Перед началом обновления убедитесь, что ваш сервер имеет доступ к необходимым обновлениям и пакетам качества Windows Server 2019. Проверьте наличие интернет-соединения и активность служб обновлений Windows.
Выполнение указанных действий поможет вам успешно подготовиться к обновлению Windows Server 2012 R2 до Windows Server 2019. Будьте внимательны и следуйте указаниям процесса обновления, чтобы избежать потенциальных проблем.
Шаги по обновлению Windows Server 2012 R2 до Windows Server 2019
- Шаг 1: Резервное копирование данных
- Шаг 2: Проверка наличия необходимых требований
- Шаг 3: Получение установочного образа Windows Server 2019
- Шаг 4: Установка обновления с помощью установочного образа
- Шаг 5: Настройка и восстановление данных
Перед обновлением рекомендуется создать резервные копии всех важных данных на сервере, включая настройки, конфигурации и файлы. Это позволит обезопасить информацию в случае каких-либо проблем в процессе обновления.
Убедитесь, что ваш сервер соответствует минимальным требованиям для установки Windows Server 2019. Это включает поддержку аппаратных компонентов, свободное место на жестком диске, наличие достаточного объема оперативной памяти и другие совместимые компоненты.
Скачайте установочный образ Windows Server 2019 с официального сайта Microsoft или используйте другой доступный источник. Убедитесь, что загруженный образ соответствует архитектуре вашего сервера (32-битная или 64-битная).
Подключите или отмонтируйте установочный образ Windows Server 2019 к серверу. Запустите установочный файл и следуйте инструкциям мастера установки, выбирая опцию «Обновление» при предложении выбора типа установки. В процессе обновления сервер будет перезагружен несколько раз.
После завершения обновления установите все необходимые драйверы и программное обеспечение, а также настройте сервер в соответствии с вашими требованиями. Восстановите ранее созданные резервные копии данных, чтобы вернуть сервер в рабочее состояние.
После обновления: что нужно проверить
После успешного обновления операционной системы Windows Server 2012 R2 до Windows Server 2019, необходимо провести ряд проверок, чтобы убедиться в правильной установке и функционировании сервера. В этом разделе представлены основные шаги, которые рекомендуется выполнить после обновления.
- Проверка работоспособности сервера: После обновления важно убедиться, что сервер успешно перезагрузился и все службы запустились без ошибок. Проверьте работу различных сервисов и приложений, которые используются на сервере, чтобы убедиться, что они функционируют корректно.
- Анализ журналов событий: Просмотрите журналы событий операционной системы, чтобы обнаружить какие-либо ошибки или предупреждения, связанные с обновлением. Особое внимание следует обратить на журналы «Система» и «Приложения». В случае обнаружения проблемных записей, их необходимо проанализировать и решить соответствующие проблемы.
- Обновление драйверов и программного обеспечения: Проверьте доступность последних версий драйверов и программного обеспечения для оборудования и приложений, используемых на сервере. Обновите их до актуальных версий, чтобы обеспечить совместимость с новой операционной системой и улучшить производительность.
- Проверка безопасности: После обновления операционной системы, необходимо убедиться в правильной настройке безопасности сервера. Проверьте наличие и корректность установки антивирусного программного обеспечения, настройки брандмауэра и других механизмов защиты. Также рекомендуется провести тестирование на наличие уязвимостей и внедрение исправлений, если это необходимо.
- Резервное копирование данных: После обновления операционной системы, рекомендуется создать резервные копии всех важных данных и проверить их целостность. Это поможет восстановить данные в случае возникновения проблем после обновления.
- Проверка сетевых настроек: Убедитесь, что все сетевые настройки на сервере корректно сконфигурированы после обновления. Проверьте наличие и настройки сетевых интерфейсов, IP-адресов, DNS-серверов, сетевых шлюзов и других параметров связи сети. В случае необходимости, внесите необходимые изменения.
Проверка и выполнение указанных шагов после обновления операционной системы Windows Server 2012 R2 до Windows Server 2019 поможет обеспечить стабильное и безопасное функционирование сервера. Это также позволит избежать возможных проблем и обеспечить максимальную производительность вашей IT-инфраструктуры.
Вопрос-ответ
Какую версию Windows Server можно обновить до Windows Server 2019?
Windows Server 2012 R2 можно обновить до Windows Server 2019.
Какая система должна быть установлена на сервере перед обновлением до Windows Server 2019?
Перед обновлением до Windows Server 2019 на сервере должна быть установлена Windows Server 2012 R2.
Какие действия необходимо выполнить перед обновлением?
Перед обновлением до Windows Server 2019 необходимо выполнить резервное копирование всех важных данных, отключить антивирусную программу и установить все обновления для текущей версии Windows.
Какие способы обновления существуют?
Существует два основных способа обновления: вариант во время работы и вариант с использованием загрузочного диска. Выбор способа зависит от наличия времени и возможности выключить сервер.
Какие есть возможные проблемы при обновлении?
При обновлении до Windows Server 2019 могут возникнуть следующие проблемы: совместимость старого оборудования, конфликты с установленными программами, проблемы с сертификатами и настройками безопасности. Поэтому перед обновлением стоит проверить совместимость оборудования и программного обеспечения, а также создать точку восстановления.
Greetings, Dev! If you’re reading this article, chances are, you’re planning on upgrading your Windows Server 2012 R2 to the latest version, Windows Server 2019. Upgrading your server can be a daunting task, especially if you haven’t done it before. But don’t worry, we’ve got you covered! In this guide, we’ll walk you through the entire process, step by step, and help you make the transition smoothly. So, let’s get started!
Why Upgrade to Windows Server 2019?
Before we dive into the upgrade process, let’s first discuss why you should consider upgrading to Windows Server 2019. There are several compelling reasons to do so:
Improved Security
Windows Server 2019 comes with a host of security features that can help protect your server and data from cyber threats. These include Windows Defender ATP, Shielded VMs, and improved auditing capabilities. Upgrading can help you stay ahead of the ever-evolving threat landscape.
Better Performance
Windows Server 2019 has several performance enhancements that can help your server run faster and more efficiently. These include improved networking performance, faster storage, and better Hyper-V performance. Upgrading can help you get the most out of your server hardware.
New Features and Functionality
Windows Server 2019 has several new features and functionality that can help you take advantage of the latest technologies. These include support for Kubernetes, improved support for Linux containers, and a new Storage Migration Service. Upgrading can help you stay current and competitive.
Pre-Upgrade Preparation
Before you start the upgrade process, there are several things you need to do to prepare your server. These include:
Backing Up Your Data
Before you make any changes to your server, it’s always a good idea to back up your data. This will ensure that you have a copy of your important files in case something goes wrong during the upgrade process. You can use Windows Server Backup or any other backup solution of your choice.
Checking System Requirements
Before you upgrade to Windows Server 2019, you need to make sure your server meets the system requirements. These include:
|
System Requirements |
Minimum |
Recommended |
|---|---|---|
|
Processor |
1.4 GHz 64-bit processor |
2 GHz or faster multi-core processor |
|
RAM |
512 MB |
4 GB or more |
|
Storage Space |
32 GB |
64 GB or more |
|
Network Adapter |
1 Gbps |
10 Gbps or more |
Make sure your server meets these requirements before proceeding with the upgrade.
Checking Application Compatibility
Before you upgrade to Windows Server 2019, you need to make sure your applications are compatible with the new operating system. Check with your software vendors to ensure that their applications are supported on Windows Server 2019. If you’re using custom applications, test them in a non-production environment before upgrading.
Checking Driver Compatibility
Make sure all your hardware drivers are compatible with Windows Server 2019. Check with your hardware vendors to ensure that they have drivers available for the new operating system. Installing incompatible drivers can cause system instability and other issues.
Upgrade Process
Once you’ve completed the pre-upgrade preparation, you’re ready to start the upgrade process. Here’s how:
Step 1: Download Windows Server 2019
The first step is to download the Windows Server 2019 ISO file from the Microsoft website. You can download the evaluation version or purchase a license if you’re ready to upgrade. Make sure you download the correct version based on your server’s architecture (x86 or x64).
Step 2: Mount the ISO File
After downloading the ISO file, you need to mount it on your server. You can do this by right-clicking on the file and selecting “Mount” or by using a third-party tool like Daemon Tools or WinCDEmu.
Step 3: Run the Setup Program
Once the ISO file is mounted, navigate to the root folder and run the setup.exe file. This will launch the Windows Server 2019 setup program. Follow the on-screen instructions to start the upgrade process.
Step 4: Select Upgrade Option
When prompted, select the “Upgrade” option to perform an in-place upgrade. This will preserve your existing applications, data, and settings. Alternatively, you can perform a clean install if you prefer to start from scratch.
Step 5: Follow On-Screen Instructions
Follow the on-screen instructions to complete the upgrade process. The setup program will copy files, install updates, and reboot your server several times. Make sure you don’t interrupt the process or turn off your server during this time.
Step 6: Verify Upgrade
Once the upgrade process is complete, verify that your server is running Windows Server 2019. You can do this by checking the version number in the System Properties dialog box or by running the “winver” command in the Command Prompt.
Frequently Asked Questions (FAQ)
1. Can I upgrade from Windows Server 2012 to Windows Server 2019 directly?
No, you cannot upgrade directly from Windows Server 2012 to Windows Server 2019. You must first upgrade to Windows Server 2016 and then to Windows Server 2019.
2. What happens to my applications and data during the upgrade process?
If you choose the “Upgrade” option during the setup process, your applications, data, and settings will be preserved. However, it’s always a good idea to back up your data before upgrading, just in case.
3. How long does the upgrade process take?
The upgrade process can take several hours, depending on the size of your server and the speed of your hardware. Make sure you have enough time set aside for the upgrade and don’t interrupt the process once it’s started.
4. What if I encounter issues during the upgrade process?
If you encounter any issues during the upgrade process, such as error messages or system crashes, make sure you have a backup of your data and try the process again. If the issues persist, you may need to seek help from a professional.
5. Do I need to upgrade all my servers at once?
No, you can upgrade your servers one at a time if you prefer. However, make sure you plan the upgrade process carefully to avoid any compatibility issues between different versions of Windows Server.
Conclusion
Upgrading your server can be a complex process, but with the right preparation and guidance, you can make the transition smoothly. We hope this guide has helped you understand the steps involved in upgrading from Windows Server 2012 R2 to Windows Server 2019. If you have any questions or comments, feel free to leave them below. Happy upgrading!
If you want to keep the same hardware, settings,files and all the server roles you’ve already set up without flattening the server, you’ll need to do an in-place upgrade. it allows you to go from an older operating system to a newer one, while keeping your settings, server roles, and datas . Here is how you can free move from Windows Server 2012 R2 to Windows Server 2019.
Before your do the in-place upgrade , the first and most important thing is back up all your files and data
Then lets start to upgrade :
- Make sure the ProductName value says you’re running Windows Server 2012 R2.
- Locate the Windows Server 2019 ISO file , You can ask for the free download link for Server 2019 ISO from keyingo.com, and then you can open it with winrar, then select setup.exe, then follow the steps !

3. Select Yes to start the setup process.
4. For internet-connected devices, select the Download updates, drivers and optional features (recommended) option, and then select Next.

5.Setup checks your device configuration, you must wait for it to finish, and then select Next.
6. you may be prompted to enter a licensing key to continue. here is the free Windows server version product Keys:
Windows Server 2019 Standard Key:
9CNVC-9CQDM-VX3K4-46JTP-DDDD3
W4BWF-9N3WQ-HXYMT-98MR9-MHCHQ
TTMT6-PKNWR-RFQ4B-2WPCM-BBKQ3
F2KDT-NJBC2-3FGP3-2WTK9-2YWVQ
7NRXJ-P7J97-Q6P2W-76BBR-6Q9Q3
TDNPR-26K7F-G8HKR-68VYK-3RVYD
Windows Server 2019 Datacenter Key :
J869N-XG6TV-KHPR3-8FBV8-MTF8F
FNF6B-T2X89-GK7P3-2G7TB-TX2JF
WN6RD-H7TV9-K68QX-YVXFH-KHMM4
B2MTH-XNT3B-Y6XMB-4G743-MDYM4
NVTWY-B2FJ8-383DJ-3G4WD-49FB4
34N4H-W8MXF-MHTV8-THW6Q-FM7Y4
If you need your own Unique Windows Server 2019 product Key, you can try to get it from the microsoft partner online store www.keyingo.com, it is much cheaper but 100% genuine !
and if you need the windows server 2019 RDS Cals , you can also get it from keyingo
7. Select the Windows Server 2019 edition you want to install, and then select Next.

8. Select Accept to accept the terms of application notice and license terms
9. Setup will recommend that you remove Microsoft Endpoint Protection using Add/Remove programs. Because this feature isn’t compatible with Windows Server 2019.
10. Select Keep personal files and apps to choose to do an in-place upgrade, and then select Next.

11. After Setup analyzes your device, it will prompt you to proceed with your upgrade by selecting Install.
the the upgrade will complete less than half an hour ,and during the upgrade , the sever might restart a few times ,no worries !

Last but not the Least, Make sure your upgrade is successful
-
Open the Registry Editor, go to the HKEY_LOCAL_MACHINE\SOFTWARE\Microsoft\WindowsNT\CurrentVersion hive, and view the ProductName. You should see your edition of Windows Server 2019, for example Windows Server 2019 Datacenter.
-
Make sure all of your applications are running and that your client connections to the applications are successful.