Windows 10 is available in two different versions: 32-bit and 64-bit. Generally, running your operating system using the 64-bit version can provide better performance and more system resources, but upgrading from a 32-bit version to a 64-bit version can sometimes be challenging.
If you are currently running the 32-bit version of Windows 10, but want to upgrade to the more powerful and versatile 64-bit version, this guide will walk you through the steps needed to make the switch.
Whether you need to upgrade your system due to technical limitations or simply want access to more advanced features, this guide will show you how to seamlessly transition from one version of Windows 10 to the other. Let’s get started!
What’s the Difference Between 32-Bit and 64-Bit Windows?
There is a significant difference between the 32-bit and 64-bit versions of Windows 10. The primary benefit of using the 64-bit version is that it can take advantage of increased memory capabilities, allowing it to access up to 264 different memory addresses, which corresponds to 18 quintillion bytes of RAM. With a 64-bit system, applications that need large data processing can run faster and more effectively than they would on a 32-bit system.
Additionally, the 64-bit version has improved security features over its 32-bit counterpart due to its expanded address space. Though viruses and malware are still present in the form of harmful code, a 64-bit system is less vulnerable because its address space is larger. This extra security measure makes it more difficult for malicious programs to exploit holes in the operating system.
In addition, some performance improvements are only available when using the 64-bit version of Windows 10. For example, support for higher resolution displays and multitasking capabilities that take advantage of multiple CPUs or multi-core processors.
Is Upgrading From a 32-Bit Windows to 64-Bit Worth It?
Upgrading from a 32-bit version of Windows 10 to a 64-bit version is well worth the effort. The advantages of utilizing a 64-bit operating system far outweigh any potential obstacles in the form of transition time. As the majority of applications and games are best suited for a 64-bit OS, users can look forward to better performance across multiple files and processes.
Furthermore, if you have over 4GB of random-access memory (RAM), having a 64-bit OS installed is not only recommended but essential to taking full advantage of your computer’s capabilities. All-in-all, upgrading to a 64-bit version of Windows 10 provides you with more reliability, greater speed, and improved efficiency in your day-to-day computing endeavors.
New Deals: Buy Windows 10 for Cheap
- Microsoft Windows 10 Home Edition (64-bit) — $73.99 (47% Off)
- Microsoft Windows 10 Home Edition (32-bit) — $73.99 (47% Off)
- Microsoft Windows 10 Pro Edition (64-bit) — $89.99 (55% Off)
- Microsoft Windows 10 Pro Edition (32-bit) — $89.99 (55% Off)
How to Check if You’re Running a 32-Bit or a 64-Bit Version of Windows
You can easily find out which version of Windows 10 you have by checking your system. If you’re lucky, you’re already running the 64-bit version and reaping its benefits! However, those who are using the 32-bit version can upgrade using the steps in this article.
To determine whether you’re running a 32-bit or a 64-bit version of Windows 10, follow these steps:
If you are running 32-bit Windows 10, and want to upgrade to 64-bit Windows 10, you will need to make sure that your computer has 64-bit hardware. Your computer may not have the same specifications as a computer that originally came with 64-bit (x64) Windows installed on it. We’ve created this guide for computers that originally came with 32-bit (x86) Windows installed on them and need to upgrade to the 64-bit version.
Upgrade Windows 10 From 32-Bit to 64-Bit
There are a few simple steps you need to take to upgrade your system from a 32-bit version of Windows 10 to a 64-bit version:
- Check your CPU compatibility with 64-bit architecture
- Determine driver and system compatibility with 64-bit architecture
- Create a new installation media with a USB flash drive
- Boot Windows from the installation media
- Follow the setup and install the 64-bit version of Windows 10
Let’s go over each of these steps in more detail.
Step 1. Check Your CPU Compatibility
Ensure that you have a 64-bit compatible CPU before starting the upgrade process. Otherwise, you may not be able to upgrade your computer from 32-bit to 64-bit, as your hardware doesn’t meet the minimum system requirements.
Here’s how you can check whether your device is compatible:
- Press the Windows + R keys on your keyboard to bring up a utility called Run. Here, simply type in “control” and click on the OK button. This will open up the classic Control Panel application.
- Make sure that your view mode is set to Category, and then click on the System and Security heading.
- Next, click on the System link. This is where you can view general information about your device.
- Check and note the brand of your processor in the System section. The most common brands are Intel and AMD. Make sure to also note down your System type, which is either 64-bit or 32-bit.
After checking your system information, proceed to the next step.
Step 2. Check Driver Compatibility
After checking the compatibility of your processor, you should also check the compatibility of your drivers and other system components. This is important, as many 64-bit versions of Windows require updated device drivers in order to run properly.
Before upgrading to the 64-bit version of Windows 10, double-check that your device manufacturer provides driver support for it. Go to their website and explore the support section for download links of matching drivers. This is essential to avoid any issues during or after installation.
Step 3. Create Windows 10 Installation Media
After you’ve made sure that both your hardware and software are compatible with 64-bit architecture, the next step is to create a new installation media. This can be done by downloading an ISO image of Windows 10 from Microsoft, then using a USB flash drive or optical disc to boot your computer and run the setup process.
- Open the Download the Windows 10 installation media Microsoft page using any web browser on your computer.
- Under the Create Windows 10 installation media heading, click on the Download tool now button.
- Save the Media Creation Tool to your computer. When the download is finished, launch the file and click Accept when prompted to agree to the software license terms.
- Select Create installation media (USB flash drive, DVD, or ISO file) for another PC and click the Next button.
- Follow any on-screen instructions to set your preferred Language, Windows edition, and pick 64-bit (x64) for your System Architecture. When done, click Next.
- Choose the USB flash drive, and then select your USB from the list. The Windows installation files will start to download to your USB drive. Click Next.
- Note that the download may take a long time depending on your internet connection. Make sure not to disrupt the process until the bootable USB drive is created.
Step 4. Install Windows 10 64-Bit Version
Now that you have an installation media, you can finally install the 64-bit version of Windows 10 on your system and upgrade from 32-bit. This can be done by following the on-screen prompts that appear during the setup process. Here’s everything you need to do:
- Change the boot order in your computer’s BIOS to boot from USB. The next time you start up, instead of going to your usual operating system, it will go directly to the Windows installation process using the media you created.
- Plug the USB stick into your device’s USB port, and power the computer on. You may be prompted to press a key to confirm you want to boot from a USB.
- Select your preferred language, timezone, currency, and keyboard settings. After customizing these settings, click Next.
- Click Install Now and select the Windows 10 edition you want to install. The version has to match the 32-bit version you have previously activated on your computer. Now, click Next to start the installation process.
- Follow any further instructions until the Windows 10 installation begins. Your computer may reboot a few times during the process. After the installation is complete, your computer will automatically restart and you’ll have the 64-bit version on your computer.
Note that during the installation process, you may be asked to enter your product key. In this case, if you don’t have your product key, just click “I don’t have a product key”. Your system will remain activated if you’re upgrading from a licensed version.
FAQ
How do I know if I have a 32-bit or 64-bit version of Windows 10?
You can check your system bit version by navigating to Settings > System > About > Device specifications > System type.
What is the difference between 32-bit and 64-bit versions of Windows?
The key differences include greater system compatibility and better performance. Additionally, running a 64-bit version provides greater security and stability compared to 32-bit versions of Windows.
What are the benefits of upgrading to the 64-bit version of Windows 10?
Some of the benefits of upgrading to a 64-bit version of Windows 10 include improved system performance, more efficient memory usage, and enhanced security features. Additionally, many 64-bit programs may not run properly on a 32-bit system, so you’ll gain access to them after migrating.
Can I upgrade from 32-bit to 64-bit Windows 10 without losing data?
Yes! The upgrade process typically takes only a few minutes and doesn’t cause any loss of data. You get to keep all of your personal files and applications.
How much does it cost to upgrade Windows 10 from 32-bit to 64-bit?
Upgrading your OS from 32-bit to 64-bit is totally free, even if you don’t have access to your original product key!
What are the system requirements for 64-bit Windows 10?
The system requirements for Windows 10 (64-bit version) are:
- Processor: 1 gigahertz (GHz) or faster processor
- Memory: 2 GB RAM
- Hard disk: 20 GB available space
- Graphics card: DirectX 9 or later with WDDM 1.0 driver
- Display: 800 x 600 or greater resolution
Conclusion
If you are looking to upgrade from a 32-bit version of Windows to the more powerful and feature-rich 64-bit version, there are several important steps that you need to take. These include checking your CPU for compatibility with 64-bit architecture, checking your drivers and system components for compatibility, creating new installation media with a USB flash drive or optical disc, and finally installing the 64-bit version of Windows 10.
With these steps in mind, you can successfully upgrade your computer to a more powerful and secure version of Windows. We hope that our guide has been helpful, and wish you all the best in your upgrade process! If you need assistance, reach out to SoftwareKeep for expert advice and support.
One More Thing
Looking for more tips? Check out our other guides in the SoftwareKeep Blog and our Help Center! You’ll find a wealth of information on how to troubleshoot various issues and find solutions to your tech problems.
Sign up for our newsletter to become a part of the SoftwareKeep community and get notified first about special offers and discounts, plus other unique perks. Keep yourself updated with the latest trends, best practices, and industry insight.
Recommended Articles
» How To Find Your Windows 10 Product Key
» How to Upgrade Windows 10 Home to Pro Using an Upgrade Key and SLMGR
» How To Remove the Activate Windows 10 Watermark
Feel free to reach out with questions or requests you’d like us to cover.
Некоторые пользователи ищут ответ на вопрос о том, как перейти с 32 на 64 бита в операционной системе Windows. Дело в том, что начиная с Windows 7, стала выпускать редакции системы одновременно в 32 bit (x86) и 64 bit (x64) версиях операционной системы.
Ранее операционная система Windows имела 32 битную разрядность. Постепенно, с развитием архитектуры процессоров, появилась возможность поддержки 64 битной разрядности системы (начало было положено с выпуска Windows XP Professional x64 Edition).
Содержание:
- Основные различия между 32 битной Windows и 64 битной Windows
- Необходимое условие для перехода Windows с 32 bit на 64 bit
- Как узнать поддержку процессором инструкций x64 в Windows 10
- Как узнать поддержку процессором 64 разрядной Windows 8.1 (Windows

- Как узнать имеет процессор 64 разрядную поддержку в Windows 7 или нет
- Плюсы и минусы перехода на 64 разрядную Windows
- Как перейти с 32 бит на 64 битную Windows
- Выводы статьи

В настоящее время, производители компьютеров (настольных компьютеров, ноутбуков), в основном, устанавливают на выпускаемые устройства 64 разрядные операционные системы Windows, потому что все современные центральные процессоры поддерживают x64 наборы инструкций.
Microsoft предоставляет возможность смены 32 разрядной системы на 64 разрядную Windows. При смене разрядности системы, активация Windows не слетит, потому что лицензия не зависит от разрядности операционной системы.
Основные различия между 32 битной Windows и 64 битной Windows
Операционная система Windows имеет две версии разрядности: 32 битную и 64 битную, которые имеют обозначения: 32-bit (x86). 64-bit (x64).
64 битная система более эффективно обрабатывает большие объемы вычислений, чем 32 битная ОС. В Windows 64-bit ресурсоемкие приложения затрачивают на работу меньшее количество времени, чем в аналогичной 32 битной системе. Система работает быстрее при одновременной работе нескольких приложений.
Главным отличием, кроме повышения общей производительности, является поддержка работы с определенным количеством памяти. В 32 битной версии Windows, из-за особенности архитектуры системы, используется только менее 4 ГБ оперативной памяти, установленной на компьютере.
Если на компьютере с Windows x86 установлено до 3 ГБ оперативной памяти, операционная система использует всю доступную память. Если, на ПК установлена память объемом в 4 ГБ, то система будет использовать объем оперативной памяти размером, чуть более 3 ГБ. Даже при наличии общей оперативной памяти (ОЗУ), размером в 6 ГБ, 8 ГБ и т.д., в Windows 32-bit, все равно будет доступно только менее 4 ГБ памяти.
В Windows с разрядностью 64 бита эта проблема не существует, потому что подобная система поддерживает объем оперативной памяти (до 16 Тб), достаточный для любой современной конфигурации компьютера.
Работа приложений в операционной системе Windows разного типа (х86 и х64) имеет отличия:
- в Windows x64 можно установить 64 и 32 битные программы (64 битные приложения, по умолчанию, устанавливаются в папку Program Files, а 32 битные в папку Program Files (x86) на системном диске);
- в Windows х86 устанавливаются только 32 битные программы, а установка 64 битных приложений не поддерживается.
Большая часть программ, созданных для Windows, поддерживает 32 битную разрядность. Эти приложения можно установить на компьютер с любой разрядностью, они будут работать, при условии поддержки программой определенной версии Windows (Windows 10, Windows 8, Windows 7 и т. д.).
В последнее время многие разработчики приложений выпускают программы двух видов: для 32 и 64 битных систем. Поэтому имеет смысл устанавливать программы на компьютер, в соответствии с разрядностью операционной системы. 64 битные приложения работают более эффективно, чем 32 битные программы в 64 разрядной Windows.
Имея в виду эти соображения, осталось узнать, как перейти с 32 бит на 64. Но не все так просто.
Необходимое условие для перехода Windows с 32 bit на 64 bit
Можно ли изменить 32 битную систему на 64 битную Windows? Да это возможно, но при смене разрядности системы, есть нюансы. Без соблюдения некоторых условий сменить 32 бита на 64 битную систему не получится.
Главное условие для перехода на другую разрядность системы: поддержка центральным процессором (ЦП), установленным на компьютере, 64 битных инструкций. Без соблюдения этого условия, установка 64 разрядной Windows на ПК будет невозможна.
Как определить разрядность операционной системы Windows, какую разрядность поддерживает процессор, установленный на компьютере? Проще всего это определить с помощью операционной системы. Для определения параметров процессора в плане поддержки 64 битной разрядности, можно воспользоваться сторонними приложениями, например, CPU-Z, AIDA64 и т. д.
Основные отличия типа процессоров, в зависимости от поддержки инструкций для соответствующей разрядности (х86 и х64):
- Процессор x64 — поддерживается установка на компьютер 64 и 32 разрядной Windows.
- Процессор x86 — на компьютер можно установить только 32 битную версию Windows.
Из этого следует, что 32 битную версию Windows можно установить на любой компьютер (при соблюдении минимальных требований к оборудованию ПК), а 64 битная Windows, устанавливается только на компьютеры, имеющие 64 битные процессоры.
Для установки 64 разрядной Виндовс на компьютере должно быть минимум 2 ГБ оперативной памяти.
Узнать тип процессора на своем компьютере можно по инструкции ниже для операционных систем Windows 10, Windows 8.1 (Windows 8), Windows 7.
Как узнать поддержку процессором инструкций x64 в Windows 10
Для того, чтобы узнать поддерживает ли процессор, установленный на компьютере, 64 битные инструкции в операционной системы Windows 10, выполните следующие шаги:
- На Рабочем столе кликните по значку «Этот компьютер» (Мой компьютер). Если на Рабочем столе вашего компьютера данного значка нет, с помощью этого способа верните значок «Мой компьютер» на Рабочий стол.
- В открывшемся контекстном меню выберите «Свойства».
- В окне «Система» (Просмотр основных сведений о вашем компьютере), в разделе «Система», в параметре «Тип системы» вы увидите тип разрядности операционной системы и поддержку типа инструкций процессора.
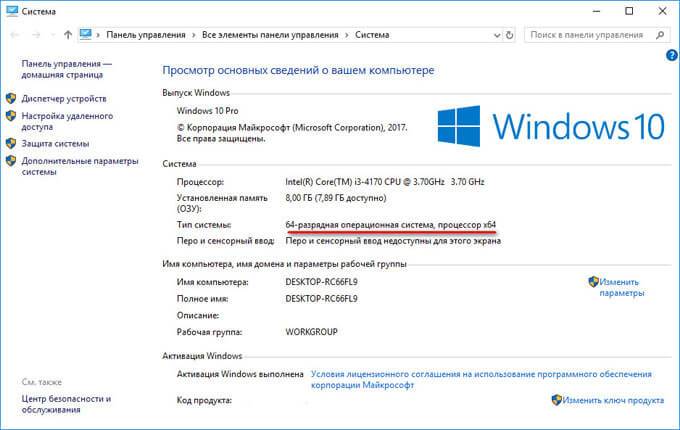
В данном случае, обозначение: «процессор х64», означает, что центральный процессор поддерживает установку 64 разрядной операционной системы (на компьютере установлена Windows 10 64-bit).
Как узнать поддержку процессором 64 разрядной Windows 8.1 (Windows
В операционной системе Windows 8.1 или Windows 8, проделайте следующее:
- Подведите курсор мыши к правому нижнему углу экрана, выберите «Параметры».
- В окне «Система» отобразится «Просмотр основных сведений о вашем компьютер». В параметрах «Система» => «Тип системы», указаны разрядность Windows и какую разрядность поддерживает центральный процессор.
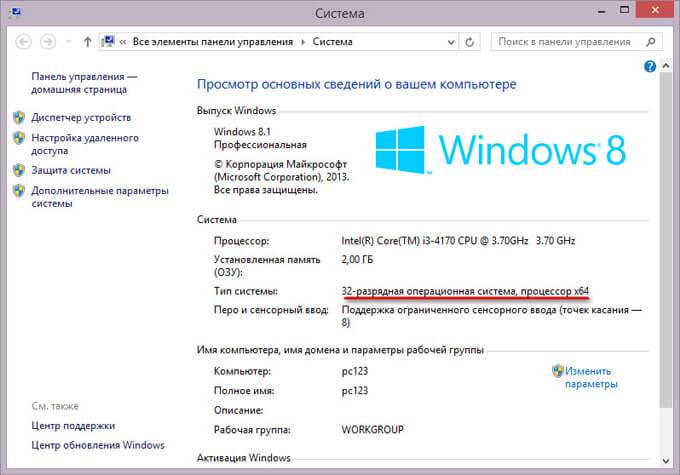
На данном компьютере установлена 32 разрядная ОС Windows 8.1, на ПК имеется процессор с поддержкой x64 инструкций. На эту систему можно установить 64 разрядную Windows 8.1.
Как узнать имеет процессор 64 разрядную поддержку в Windows 7 или нет
В операционной системе Windows 7 выполните следующее:
- Щелкните правой кнопкой мыши по значку «Компьютер» (Мой компьютер) на Рабочем столе.
- В контекстном меню выберите «Свойства».
- В окне «Просмотр основных сведений о вашем компьютере» нажмите на «Индекс производительности Windows».
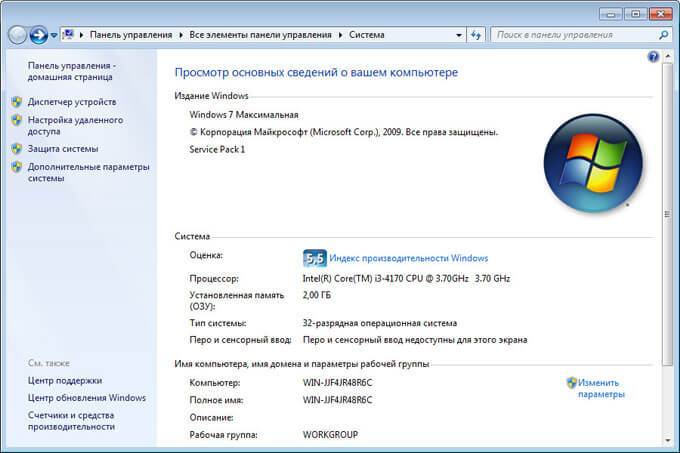
- В окне «Оценка и увеличение производительности компьютера» нажмите на «Отображение и печать подробных сведений о производительности компьютера и системе».
- В открывшемся окне «Счетчики и средства производительности», в разделе «Дополнительные сведения о компьютере», в параметре «Система», напротив пункта «64-разрядная поддержка», будет написано «Да» или «Нет».
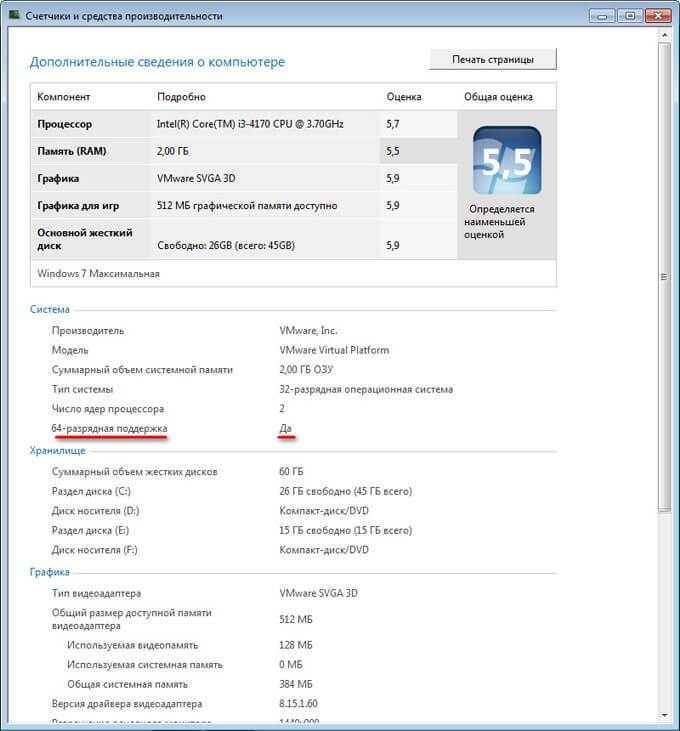
На компьютере стоит 32-разрядная операционная система, процессор поддерживает 64 разрядные ОС. Этот компьютер поддерживает переход на Windows 7 64-bit.
Плюсы и минусы перехода на 64 разрядную Windows
Перед тем, как изменить тип системы с 32 бит на 64 бита, необходимо взвесить все плюсы и минусы данного решения. На первый взгляд кажется, что выгода в смене разрядности системы очевидна, но не все так однозначно.
Основные преимущества 64 битной операционной системы:
- Использование всего объема оперативной памяти (более 4 ГБ), установленной на компьютере.
- Более высокая скорость работы системы и программ.
Основные недостатки 64 битной операционной системы:
- Потребление системой и приложениями большего объема оперативной памяти.
- Отсутствие x64 драйверов для устаревшего оборудования.
Большинство пользователей, после смены Виндовс 32 бит на 64 битную систему, хотят получить выигрыш в производительности работы компьютера. В современных играх, в тяжелых графических приложениях наиболее оптимально реализовано использование ресурсов компьютера в 64 разрядной системе. Поэтому многие пользователи заинтересованы в переходе из-за компьютерных игр, программ, работающих только на Windows с 64 битной разрядностью и т. п.
Если на достаточно современном компьютере имеется более 4 ГБ оперативной памяти, а на нем по какому-то недоразумению установлена 32 битная версия Windows, очевидно имеет смысл перейти на 64 разрядную систему.
Пользователям компьютеров с устаревшим железом, с памятью в 2-4 ГБ нужно все тщательно взвесить. В большинстве случаев, играть в современные игры или пользоваться «тяжелыми» программами не получится из-за недостатка памяти. Система и работающие программы займут больше места в памяти компьютера, чем аналогичные приложения в 32 битной Windows. Слабый процессор не даст положительного эффекта. В некоторых случаях, 64 разрядная система будет работать медленнее на компьютере, чем 32 битная Windows.
Обратите внимание на наличие драйверов, необходимых для нормальной работы оборудования компьютера. Заранее скачайте драйвера с сайта производителя. Если такой возможности нет, для установки необходимых драйверов, после установки системы, воспользуйтесь специализированными программами, например, DriverPack Solution, Snappy Driver Installer и т. д.
В зависимости от оборудования, драйверы могут поддерживать обе разрядности, или необходим отдельный драйвер для каждой разрядности.
Как перейти с 32 бит на 64 битную Windows
Для перехода на 64 разрядную систему есть только один вариант: чистая переустановка Windows с потерей данных на системном диске. Порядок действий следующий:
- Скачайте на компьютер операционную систему Windows, 64 битной разрядности. Прочитайте здесь, откуда можно скачать оригинальный образ Windows 10, Windows 8.1, Windows 7.
- Создайте загрузочную флешку или запишите образ системы на DVD диск.
- Включите компьютер, перед загрузкой системы, войдите в BIOS (UEFI), выберите для загрузки загрузочный носитель с Windows.
- Установите операционную систему на компьютер.
- После завершения установки системы, установите необходимые драйвера.
Новая версия Windows должна соответствовать редакции, установленной на компьютере, например, с Windows 10 Home x86 можно перейти на Windows 10 Home x64.
Для создания загрузочной флешки используйте программы: Rufus, Media Creation Tool, WinSetupFromUSB и т. д.
Как войти в BIOS (UEFI) на вашем устройстве, узнайте в интернете, по имени производителя ноутбука или по модели материнской платы для настольного ПК.
Для получения более подробной информации, перейдите по ссылкам на статьи, в которых подробно описан процесс установки соответствующих версий Windows: Windows 10, Windows 8.1, Windows 7.
Во время установки операционной системы обратите внимание на два момента:
- В одном из окон установки необходимо выбрать подходящую редакцию Windows подходящей разрядности (сейчас распространены мультиобразы Windows, включающие в одном образе системы разные редакции, разной разрядности).
- В окне «Выбор типа установки» следует выбрать «Выборочная: только установка Windows (для опытных пользователей)» в Windows 10 или в Windows 8.1, или «Полная установка (дополнительные параметры) в Windows 7.
После завершения установки, на компьютере появится Windows 10 64-bit.
Выводы статьи
Существует возможность поменять 32 разрядную операционную систему на 64 разрядную Windows, в пределах одной редакции. Для успешного перехода на компьютере должен быть установлен процессор, поддерживающий инструкции x64, достаточный объем оперативной памяти.
Похожие публикации:
- Сравнение версий Windows 10: таблица
- Как скрыть раздел диска в Windows — 4 способа
- Как установить обновление до новой версии Windows 10 — 5 способов
- 7 способов как узнать ключ продукта Windows
- Автозагрузка Windows 10: как добавить или удалить программу из автозагрузки
 Если вы обновляетесь с 32-битной Windows 7 или 8 (8.1) до Windows 10, то в процессе устанавливается 32-бит версия системы. Также, некоторые устройства имеют предустановленную 32-разрядную систему, однако процессор поддерживает 64-бит Windows 10 и имеется возможность поменять ОС на неё (и иногда это может быть полезно, особенно если вы увеличили объем оперативной памяти на вашем компьютере или ноутбуке).
В этой инструкции о том, как поменять 32-битную Windows 10 на 64-битную. Если вы не знаете, как узнать разрядность вашей текущей системы, подробно об этом в статье Как узнать разрядность Windows 10 (как узнать сколько бит 32 или 64).
Установка Windows 10 x64 вместо 32-битной системы
При обновлении ОС до Windows 10 (или покупке устройства с Windows 10 32-бит) вы получили лицензию, которая подходит и к 64-разрядной системе (в обоих случаях она зарегистрирована на сайте Майкрософт за вашим оборудованием и ключ вам знать не нужно).
К сожалению, без переустановки системы изменить 32-бит на 64-бит не получится: единственный путь поменять разрядность Windows 10 — выполнить чистую установку x64 версии системы в той же редакции на компьютер, ноутбук или планшет (при этом вы можете не удалять уже имеющиеся данные на устройстве, но драйверы и программы придется переустановить).
Примечание: если на диске есть несколько разделов (т.е. есть условный диск D), будет хорошим решением перенести свои пользовательские данные (в том числе с рабочего стола и системных папок документов) на него.
Порядок действий будет следующим:
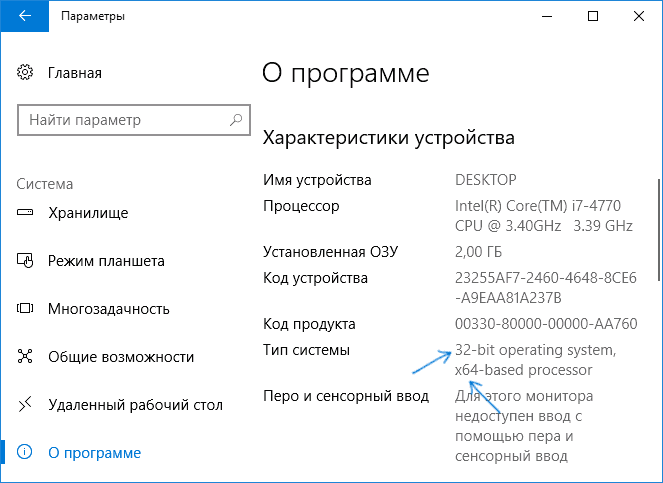
- Зайдите в Параметры — Система — О программе (О системе) и обратите внимание на параметр «Тип системы». Если там указано, что у вас 32-bit operating system, x64-based processor, это означает, что ваш процессор поддерживает системы 64-бит (Если процессор x86 — то не поддерживает и дальнейшие шаги не следует выполнять). Также обратите внимание на выпуск (редакцию) вашей системы в разделе «Характеристики Windows».

- Важный шаг: если у вас ноутбук или планшет, убедитесь, что на официальном сайте производителя есть драйверы для 64-бит Windows для вашего устройства (если разрядность не указано, как правило поддерживается оба варианты системы). Желательно сразу скачать их.
- Скачайте оригинальный ISO образ Windows 10 x64 с сайта Майкрософт (на настоящий момент в одном образе содержатся сразу все редакции системы) и создайте загрузочную флешку (диск) или сделайте загрузочную флешку Windows 10 x64 официальным способом (с помощью Media Creation Tool).
- Запустите установку системы с флешки (см. Как установить Windows 10 с флешки). При этом, если вы получите запрос о том, какую редакцию системы установить — выберите ту, которая отображалась в сведениях о системе (на шаге 1). Ключ продукта при установке вводить не нужно.
- Если на «диске C» были важные данные, то для того, чтобы они не удалились, не форматируйте диск C при установке, просто выберите этот раздел в режиме «полная установка» и нажмите «Далее» (файлы предыдущей Windows 10 32-бит будут помещены в папку Windows.old, которую в дальнейшем можно будет удалить).
- Завершите процесс установки, после неё установите оригинальные драйверы системы.
На этом процесс перехода с 32-бит Windows 10 на 64-бит будет завершен. Т.е. основная задача — правильно пройти этапы с установкой системы с USB-накопителя и последующей установкой драйверов, чтобы получить ОС в нужной разрядности.
Have a need to upgrade Windows to 64 bit from 32 bit in Windows 10/8/7 since your memory is not used? How to upgrade 32 bit to 64 bit? This post shows you some things that you should check out, as well as the way to perform Windows 64 bit upgrade.
Why Upgrade 32 Bit to 64 Bit in Windows 10/8/7
Microsoft offers both 32-bit and 64-bit versions of Windows 10/8/7. The 32-bit version is also known as the x86 version while the 64-bit version is known as the x64 version.
When installing Windows 7, 8 or Windows 10, you can choose to install 32-bit or 64-bit version of Windows. But most of you may choose to install the 64-bit version instead of the 32-bit version. If you have installed a 32-bit operating system, you may change it to a 64-bit system.
Why change 32 bit to 64 bit of Windows OS? This is because the 32-bit version is limited to 4GB of RAM (Ramdon Access Memory), which is a small amount these days when PCs usually have 8GB or more. If you installed many applications at the same time, “your computer is low on memory” error message may appear.
If you want to actually use more than 4GB of RAM resources, probably you need a 64-bit version of Windows. With the additional access to memory, you can run more apps simultaneously and improve performance. And the system improves productivity with memory-intensive tasks, such as virtual machines, video editing, Office-working, and web browsing when dealing with a lot of open tabs.
What’s more, 64-CPU may have backward compatibility, allowing it to run 32-bit programs and may also support running 32-bit operating systems. In this aspects, 64-bit version of Windows may have more benefits than 32-bit.
Besides, it’s not surprising that many applications now require a 64-bit operating system due to that limitation. Moreover, you can run x64 and x86 applications on a 64-bit OS, but that is not possible on a 32-bit OS.
Related article: Is My Computer 64 Bit or 32 Bit? Try the 5 Ways to Judge out
How to Convert 32 Bit to 64 Bit Windows 7/8/10 without Data Loss
In the following paragraphs, we will walk you through four steps to upgrade Windows to 64 bit.
- Make Sure Your Processor Is 64-Bit Capable
- Ensure Your PC Hardware Has 64-Bit Drivers Available
- Back up Your PC
- Upgrade 32 Bit to 64 Bit
Tip: The ways to upgrade Windows 7 32 bit to 64 bit free, change 32 bit to 64 bit in Windows 8 and update Windows 10 32 bit to 64 bit are similar. So here we take Windows 10 64 bit upgrade process as an example. Besides, if you have a need to downgrade Windows 10 64 bit to 32 bit, the steps are similar.
Move 1: Make Sure Your Processor Is 64-Bit Capable
Note: You can only install the 64-bit (x64) version of Windows 10/8/7 on compatible hardware, that is to say, you have to determine if your computer has a 64-bit processor. This is the first step you must note.
To do this work, go to Settings > Systems > About. On the right-hand side of the interface, navigate to the System type entry.
Then, you will see one of the following system type:
- 64-bit operating system, x64-based processor: Your CPU support 64-bit and you have already installed the 64-bit edition of Windows 10. So, you don’t need to upgrade to 64 bit.
- 32-bit operating system, x64-based processor: Your CPU supports 64-bit, but you have installed the 32-bit version of Windows.
- 32-bit operating system, x86-based processor: Your CPU supports 32-bit and you have installed the 32-bit version of Windows.
To be specific, if you see the second entry, you are in luck and you can move on to the next section to continue Windows 10 64 bit upgrade since your 64-bit Central Processing Unit can run a 64-bit version. But if you see the third entry, you cannot install a 64-bit OS since your CPU doesn’t support 64-bit.
Move 2: Ensure Your PC Hardware Has 64-Bit Drivers Available
In addition, you should check whether other components, for example, video and sound cards, can work properly with a 64-bit version of Windows 10. Simply speaking, 64-bit OS requires 64-bit hardware drivers and the 32-bit drivers won’t work.
Modern hardware should certainly offer 64-bit drivers but some old hardware may no longer support and manufacturers may haven’t offered 64-bit drivers. To check for this, please go to your manufacturer support website to see if 64-bit drivers are available for download.
Move 3: Back up Your PC
Tip: Unlike upgrading from Home Edition to Pro Edition of Windows, there is no need for purchasing a new license when switching 32-bit to 64-bit. But, the in-place upgrade path to switch also doesn’t exist. This means that you must perform a clean install of the Windows OS if you are planning to change the architecture.
Since you are making major changes to your operating system, it is indispensable to make a full backup of Windows 10. When you upgrade 32 bit to 64 bit in Windows 10/8/7, your personal files, settings, and applications will be deleted. And the best thing is to back up all the affected files to your external storage devices or USB drive to avoid data loss.
To back up your important files, you need a free backup program to help you. Which one is worth recommending? MiniTool ShadowMaker, a piece of professional file backup software, will be a good option, coming with many powerful features.
With the help of this freeware, you can create an image file for files & folders, Windows operating system, disk or partition. Besides, it can help you to sync files to other locations for backup. Above all, automatic file backup, differential & incremental backup can be created.
Right now, before you free change 32 bit to 64 bit of Windows 10/8/7, get MiniTool ShadowMaker Trial Edition from the following button to back up your crucial files. Note that this edition only allows you to free use for 30 days. If you want to keep this software all the time, get its Pro Edition.
MiniTool ShadowMaker TrialClick to Download100%Clean & Safe
Step 1: Double-click on this program to open it.
Step 2: Which feature should you use to back up files, Backup or Sync? Both are available. And here, you take the first feature as an example.
In the Backup window, you need to decide which files to back up and where to save the backup image file. Just go to the Source section and choose personal files you want to back up.
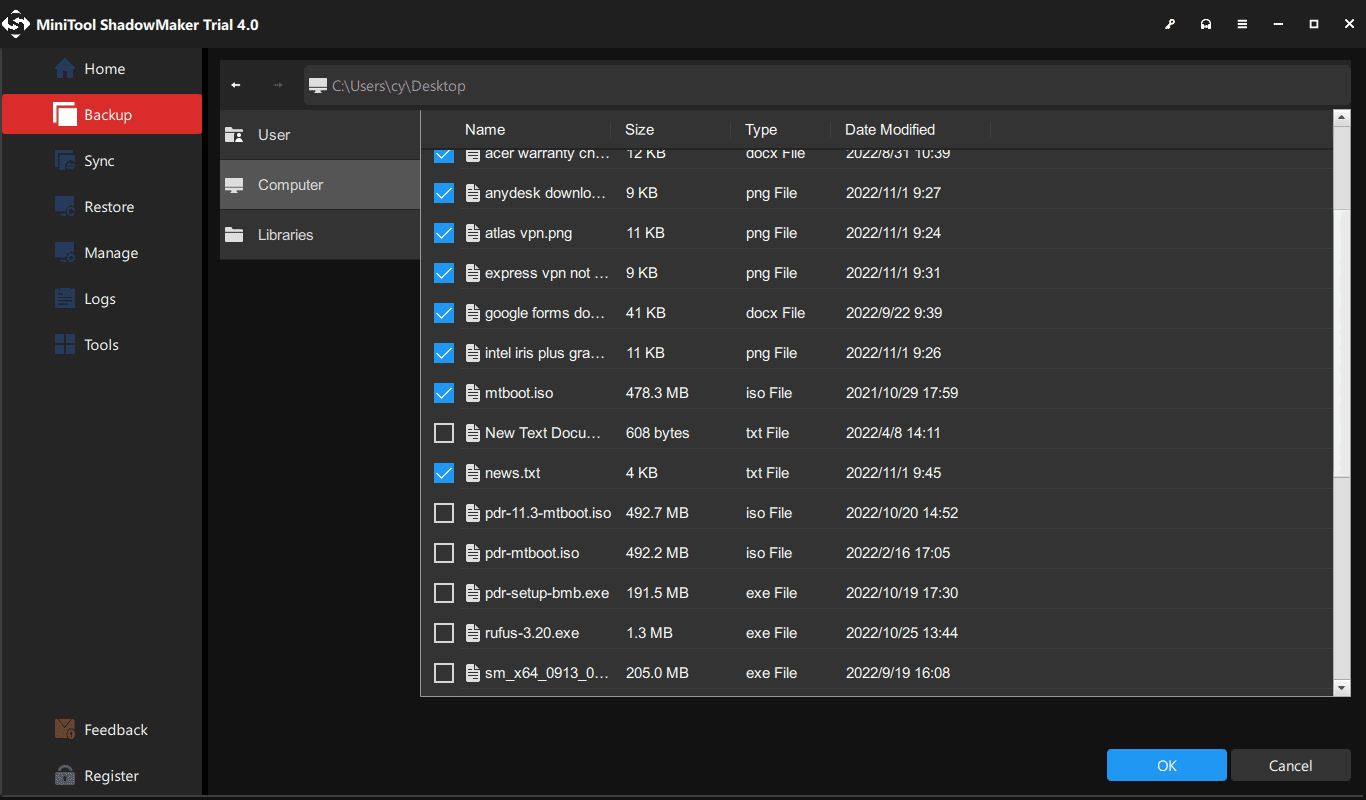
Then, go to the Destination section and choose an external hard drive, USB flash drive, or NAS as the storage path.
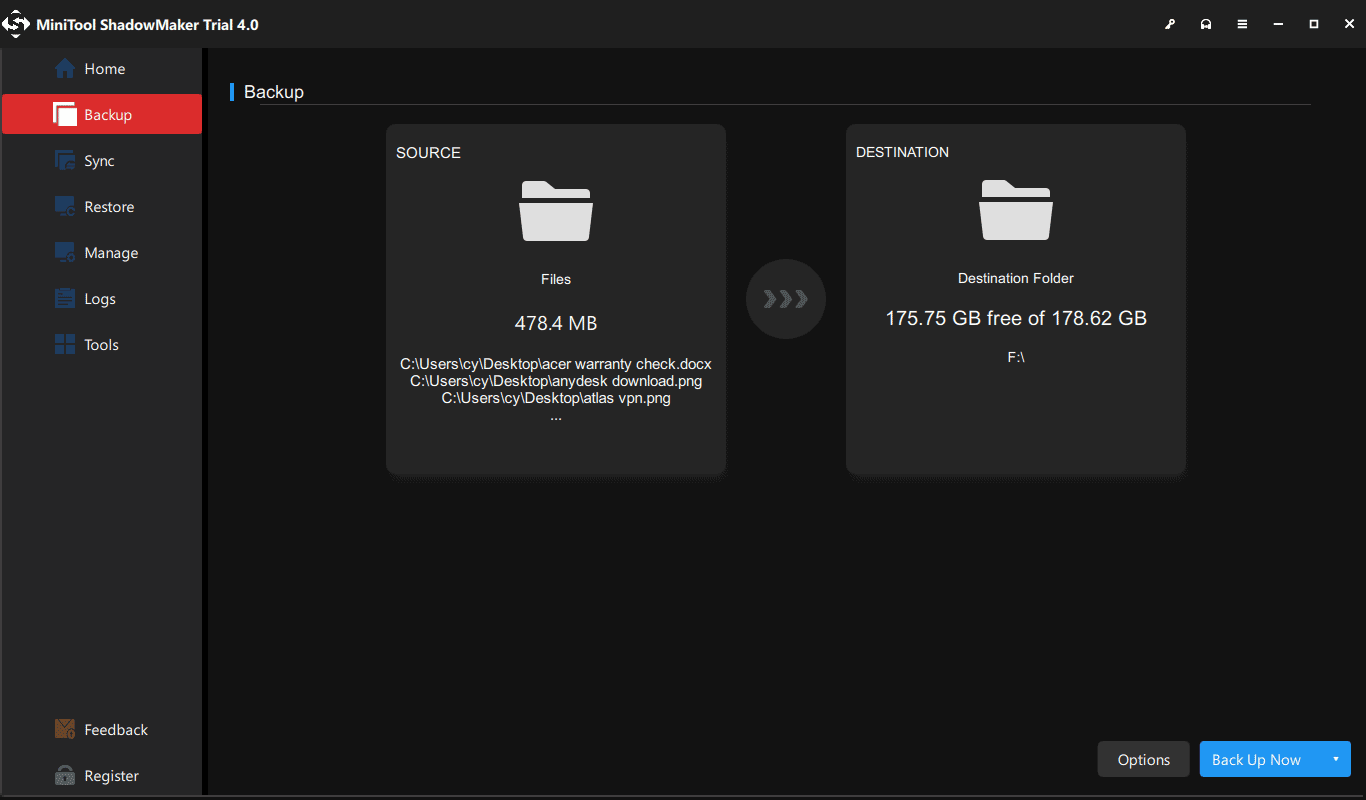
Step 3: Finally, start the full backup process of your important files by hitting the Back Up Now button.
Tip: Of course, in addition to file backup via imaging, there is another choice. You can choose to sync files for backup. This post – The Best File Synchronization Software – MiniTool ShadowMaker shows you many details.
Now, all operations to back up files are told to you. If you are planning to convert 32 bit to 64 bit of Windows 10/8/7 operating system, don’t hesitate to free download this backup software to prevent your data from losing after upgrading to the 64-bit version of Windows.
MiniTool ShadowMaker TrialClick to Download100%Clean & Safe
“I want to upgrade Windows 7 32 bit to 64 bit. After checking my CPU and drivers, I decide to back up files. Thankfully, MiniTool ShadowMaker helps a lot before the upgrade.” Click to Tweet
Right now, the previous three steps are told to you. Reading here, it is time for you to take action to upgrade Windows 10 32 bit to 64 bit. Just go to the next move to follow the corresponding steps for Windows 10 64-bit version upgrade.
Move 4: Upgrade Windows to 64 Bit
How to convert 32 bit to 64 bit Windows 7/8/10? As mentioned above, performing an upgrade from 32-bit to 64-bit version of Windows is actually clean install. Now, follow the steps below to make a reinstallation.
Create a Bootable USB Drive
Tip: To upgrade Windows 7 32 bit to 64 bit or upgrade Windows 10 32 bit to 64 bit, you need to create a 64-bit installation media. But the tools that you need are different in various systems. For Windows 7, you can get an ISO file by following the guide – Windows 7 ISO File Safe Download: All Editions (32 & 64 Bit). For Windows 10, Media Creation Tool is useful. For Windows 8, you need to go to the website, download an ISO file and burn it to a USB drive or CD/DVD.
Here, take Windows 10 64 bit upgrade as an example and we will show you the step-by-step instructions. Right now, insert your USB flash drive with at least 4GB of storage space to your device and to create the 64-bit Windows 10 installation media.
Step 1: Open the official web page to download Windows 10 Media CreationTool.
Step 2: Click Download tool now under Create Windows 10 installation media.
Step 3: Double-click on the MediaCreationTool.exe to run this utility and then accept the Microsoft terms.
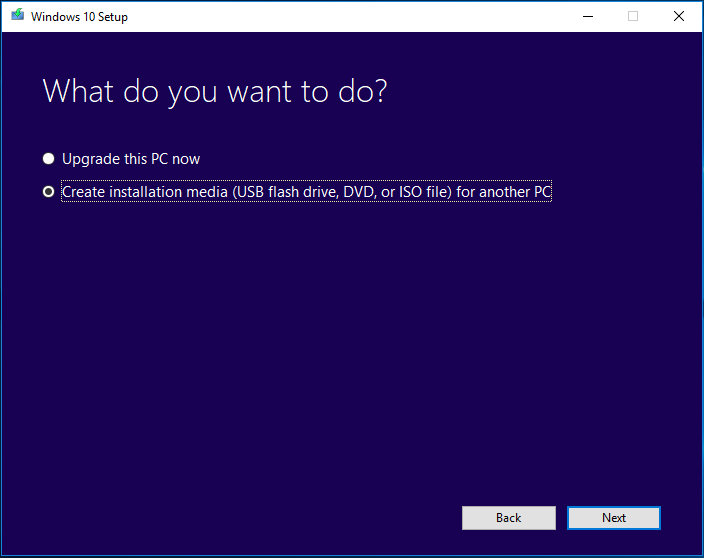
Step 4: There are two options. Check the option Create installation media (USB flash drive, DVD or ISO file) for another PC.
Tip: According to users, if you choose Upgrade this PC now, choosing the same partition as on previous Windows while installing 64-bit version, you will have the Windows.old folder after upgrade where your old data is located. This method do not wipe your hard drive.
Step 5: Please choose language and edition. To upgrade Windows 10 to 64 bit, here please specify the 64-bit (x64) option for 64-bit Architecture.

Step 6: Choose the USB flash drive option so as to create a bootable USB drive. Additionally, you can also check the option ISO file but you need to burn the file to a USB drive or CD/DVD. Here, we recommend the first one.
Step 7: Next, all your drives on your computer will be listed. Just choose the USB flash drive from the list to continue.
Step 8: Then, this tool will start downloading needed files and creating a bootable drive from ISO file that is compatible with Windows 10 64 bit. Wait for the process to be finished.
Install Windows 10 64 Bit from Scratch
How to upgrade Windows 7 32 bit to 64 bit without CD or upgrade Windows 8/10 to 64 bit without disk? Now, restart your computer with the bootable USB drive and then follow these steps:
Tip: To upgrade Windows 7 32 bit to 64 bit or change 32 bit to 64 bit in Windows 8, you also need to get the 64-bit installation file and create a bootable USB drive, as mentioned above. Then, boot the 32-bit Windows from the created bootable drive, and start a clean install.
Step 1: After booting your PC from the USB drive, choose language, time and currency format and keyboard.
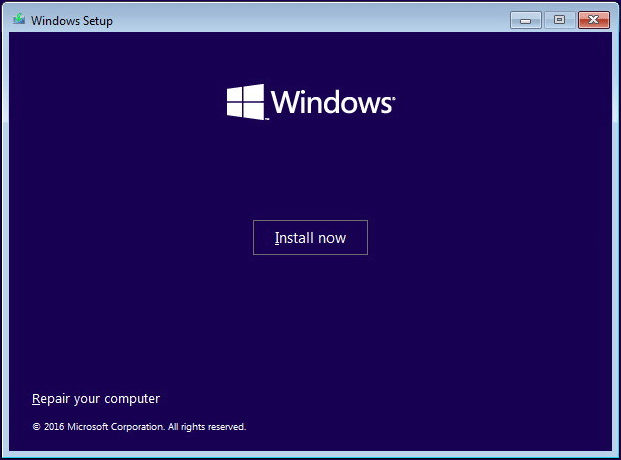
Step 2: Click Install now to continue.
Step 3: Your purpose is to upgrade 32 bit to 64 bit for Windows 10, so you should click the I don’t have a product key link (assuming your PC has been already properly activated).
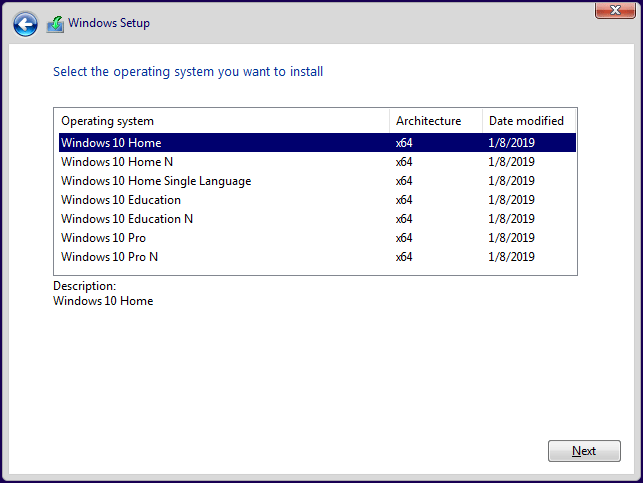
Step 4: Choose the edition of Windows 10 to go on.
Tip: The operating system that you choose must match the edition your license activates.
Step 5: Accept the license terms. To upgrade Windows 10 32 bit to 64 bit, please choose Custom: Install Windows only (advanced).

Step 6: You may ask: how to upgrade 32 bit to 64 bit Windows 7/8/10 without formatting? Actually, it is easy. In the following drive list option page, choose the partition(s) with the current installation of Windows, and click the Delete button instead of formatting operation to remove it from the hard drive.
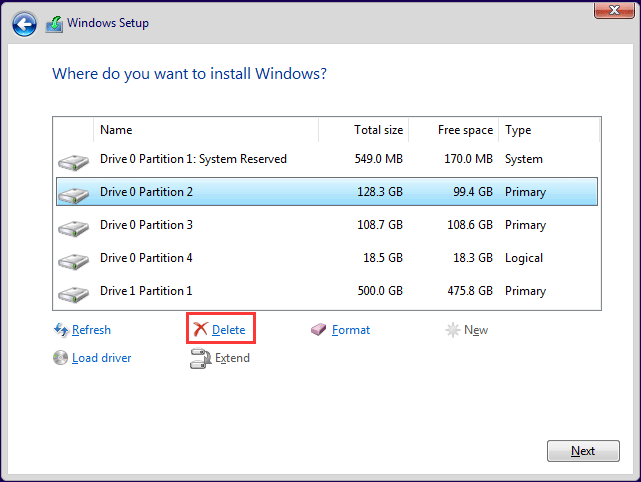
Tip: In addition to system partitions, you can also choose to delete all the data partitions on Drive 0 based on your needs.
Step 7: Then, click the unallocated space to continue. Then, the setup will install the 64-bit version of Windows 10 on your computer. Later, you need to complete the Out-of-box experience (OOBE) setup the OS with your preferences by following the on-screen directions.
More information feel free to watch this video guide:
“It is quite easy to upgrade 32-bit to 64-bit version of Windows 10/8/7. Just share the way with your friends on Twitter.” Click to Tweet
Bottom Line
Want to upgrade 32 bit to 64 bit? Here is the overview that you should do before the upgrade and how to convert 32 bit to 64 bit Windows 7/8/10. Just follow the above guides to start the upgrade operation. Remember to leave a comment below or contact [email protected] if you have any different idea or question when you change 32 bit to 64 bit.
Upgrade Windows 10 32 Bit to 64 Bit FAQ
Can I change from 32 bit to 64 bit?
If you are running the 32-bit version of Windows 10/8/7, you can upgrade to the 64-bit version and no new license is required. But you should ensure the processor is compatible and memory is enough. To do this upgrade, a clean install should be performed and there is no direct upgrade path.
Is there a 32-bit version of Windows 10?
If you upgrade to Windows 10 from the 32-bit version of Windows 7 or 8.1, Microsoft automatically gives you the 32-bit version of Windows 10.
Is 32 bit obsolete?
The 32-bit versions of the Windows operating system are already out-of-date in the field of traditional desktops and laptops. New computers almost always come with a 64-bit processor, even with a 64-bit Intel’s Core M processors. But for smartphones or tablets, 32-bit systems have held out longer.
Which is better 32 bit or 64 bit?
In short, 64-bit is better than 32-bit since it can handle more data at once while the 32-bit version is limited to 4GB of RAM.
(Image credit: Future)
Windows 10 can run on both 32-bit and 64-bit processor architectures. If you have a computer with a 32-bit setup, you can upgrade to the 64-bit version without acquiring a new license. The only caveat is that there is no in-place upgrade path to make the switch. The only option is to perform a clean installation of Windows 10.
Although each version delivers the same features, when you upgrade to the 64-bit (x64) version, the device will be able to take advantage of large amounts of memory (up to 2TB) instead of the 4GB limitation with 32-bit (x86).
Accessing more memory allows you to run more apps simultaneously without affecting the experience, and you can work with a mix of 64-bit and 32-bit programs. Also, perhaps, more importantly, it will help you improve productivity on memory-intensive tasks. For instance, rendering videos, running virtual machines, and opening many tabs on your web browser.
This guide will walk you through the steps to upgrade a computer from a 32-bit to a 64-bit version using an existing genuine license.
How to check 64-bit hardware support on Windows 10
If you want to upgrade a system from Windows 10 32-bit to the 64-bit version, you first need to determine whether the processor has 64-bit support, 2GB of memory, or more, and whether the remaining parts have support for 64-bit drivers.
Determine 64-bit compatibility from Settings
To check whether the processor can run the 64-bit of Windows 10, use these steps:
- Open Settings.
- Click on System.
- Click on About.
- Check the Installed RAM details.
- Confirm that the information reads 2GB or higher.
- Under the «Device specifications» section, check the System type details.
- Confirm the information reads «32-bit operating system, x64-based processor.»
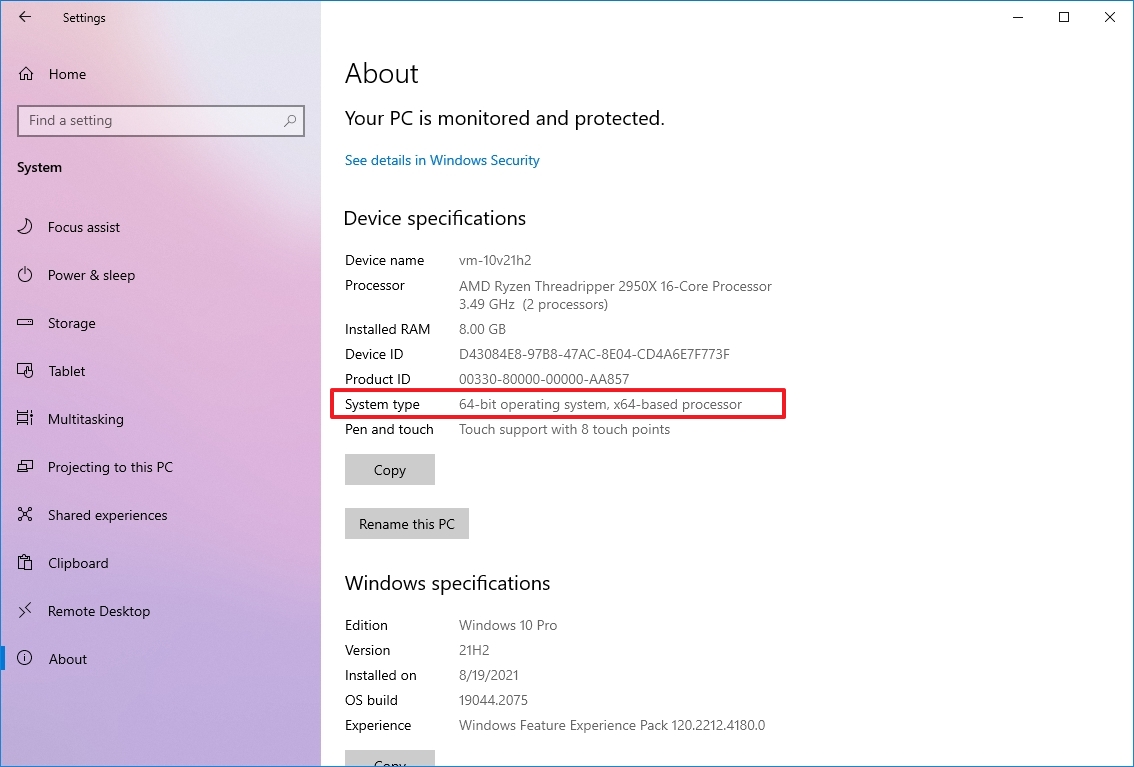
Once you complete the steps, you can determine whether the device runs the 32-bit version of Windows 10 on a 64-bit processor. However, if it reads «32-bit operating system, x86-based processor,» the computer does not support the 64-bit version of Windows.
If the device can’t run the 64-bit version, consider purchasing a new device that meets the system requirements.
Determine CPU compatibility from Coreinfo
Although most computers using relatively modern hardware can work with any version of Windows 10, you still want to confirm that the four essential features are present on the processor:
- Physical Address Extension (PAE).
- No-eXecute (NX).
- Streaming SIMD Extensions 2 (SSE2).
- CMPXCHG16b (CX16).
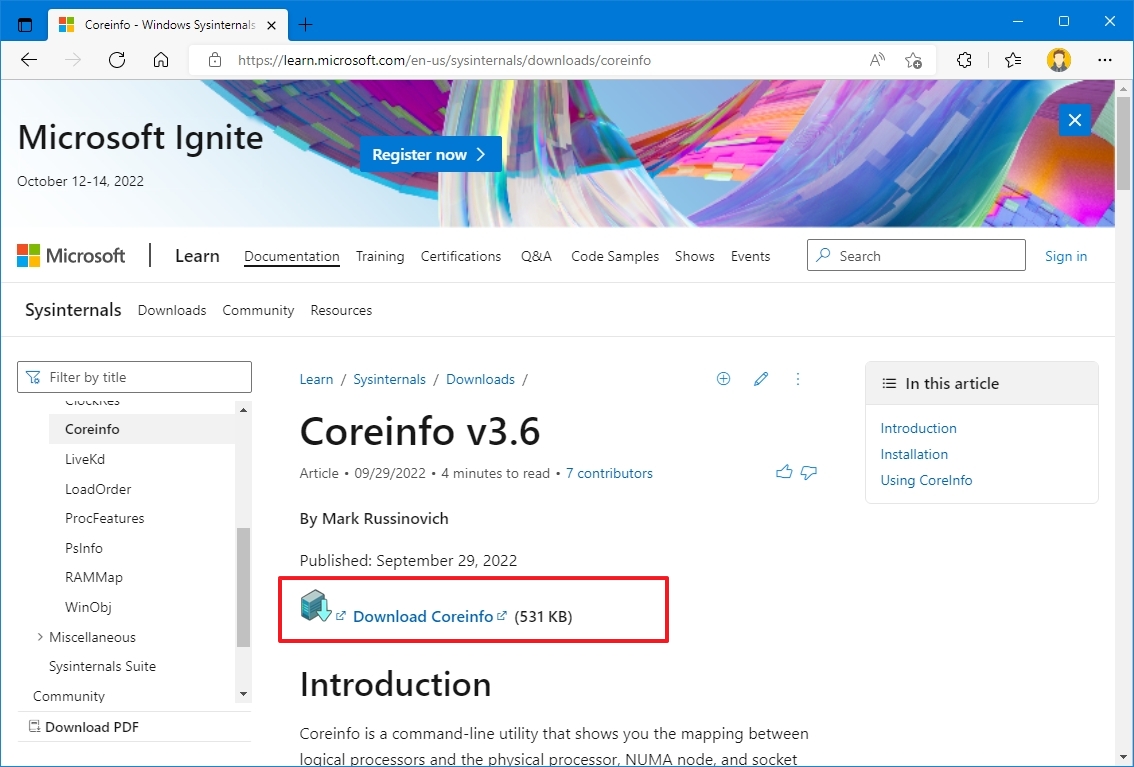
To confirm the processor has the required features, you can use the Microsoft Coreinfo command-line tool with these steps:
- Open the Microsoft Sysinternals website.
- Click the Download Coreinfo link.
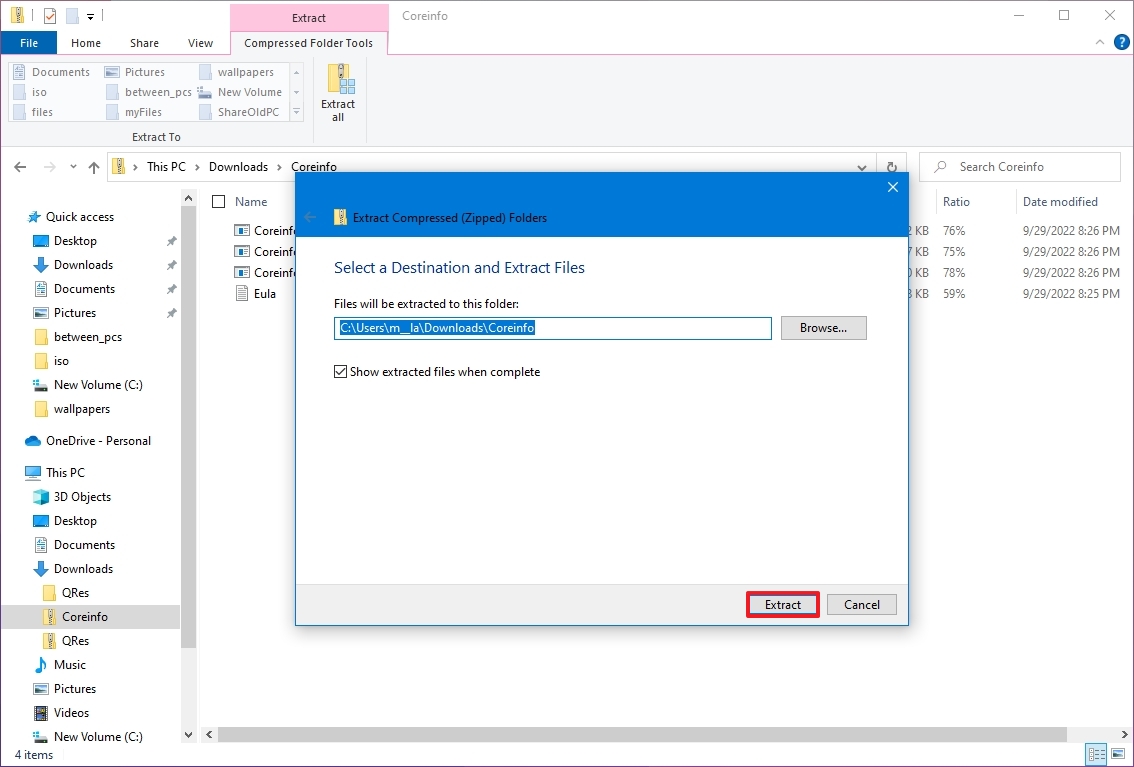
- Right-click the Coreinfo.zip folder and select the Extract all option.
- Click the Extract button.
- Type the following command in the address bar and press Enter to open Command Prompt in this folder location.
cmd
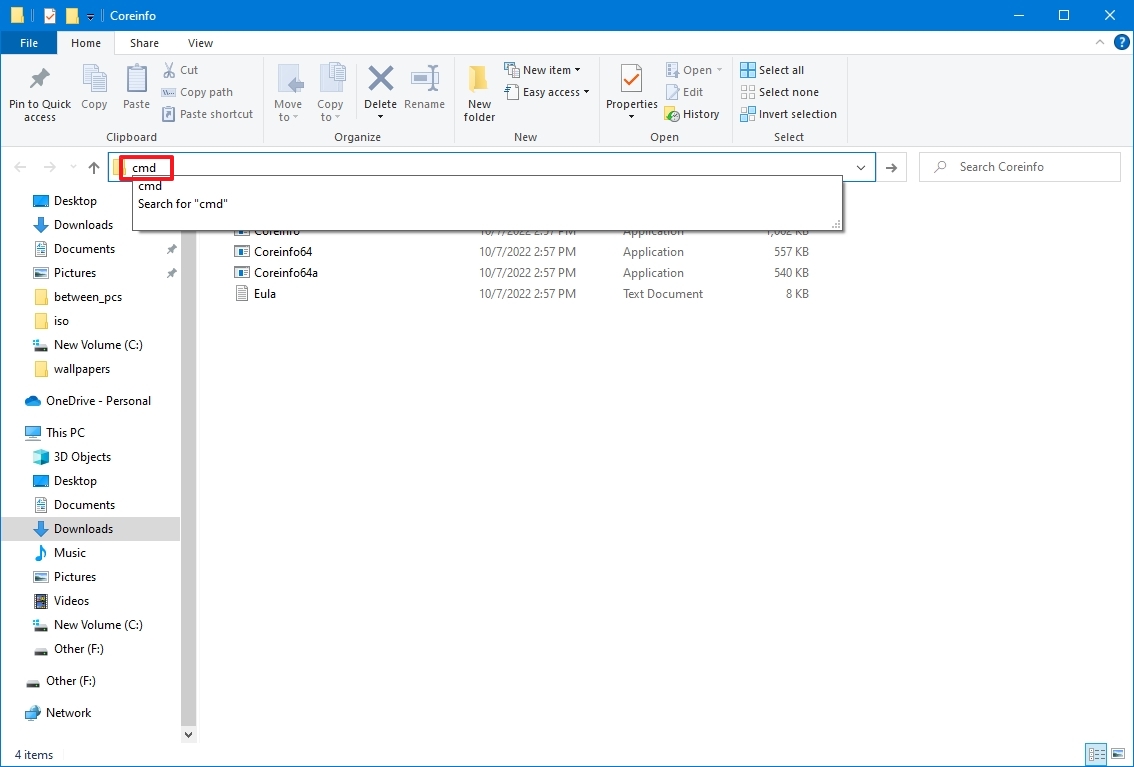
- Type the following command and press Enter: coreinfo
- Search (Ctrl + F keyboard shortcut or Ctrl + Shift + F on Terminal) for these features:
- PAE.
- NX.
- SSE2.
- CX16.
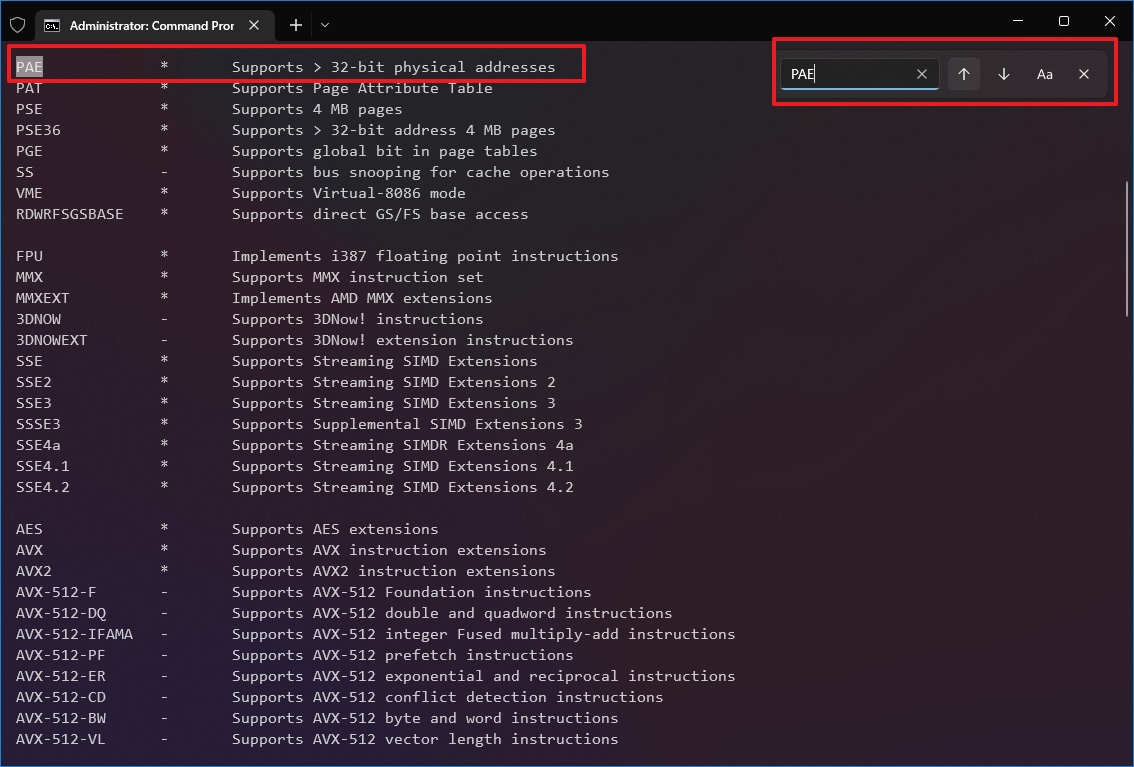
After you complete the steps, if the tool confirms that the features are available, you can upgrade to the 64-bit version of Windows 10.
While the upgrade process should be able to confirm the processor compatibility, the «Coreinfo» tool allows you to check these features ahead of time.
Determine driver compatibility
Also, it’s recommended to check whether other components (such as graphics and sound cards) are compatible with the 64-bit version of Windows 10.
If the computer has the 32-bit version of Windows 10 and the hardware is relatively new, there is a good chance that you will find 64-bit versions of the drivers. You can check the device manufacturer support website to confirm that the components have drivers for the x64 architecture.
How to upgrade from 32-bit to 64-bit on Windows 10
A Windows 10 product key allows you to install the 32-bit or 64-bit version. The only caveat is that you can’t perform an in-place upgrade. Instead, you must delete the previous setup and perform a clean installation to change architectures.
Create installation media
As part of the architecture upgrade process, you have to use the Microsoft Media Creation Tool to create a USB bootable media by connecting a USB flash drive of at least 8GB of space to the computer, and then use these steps:
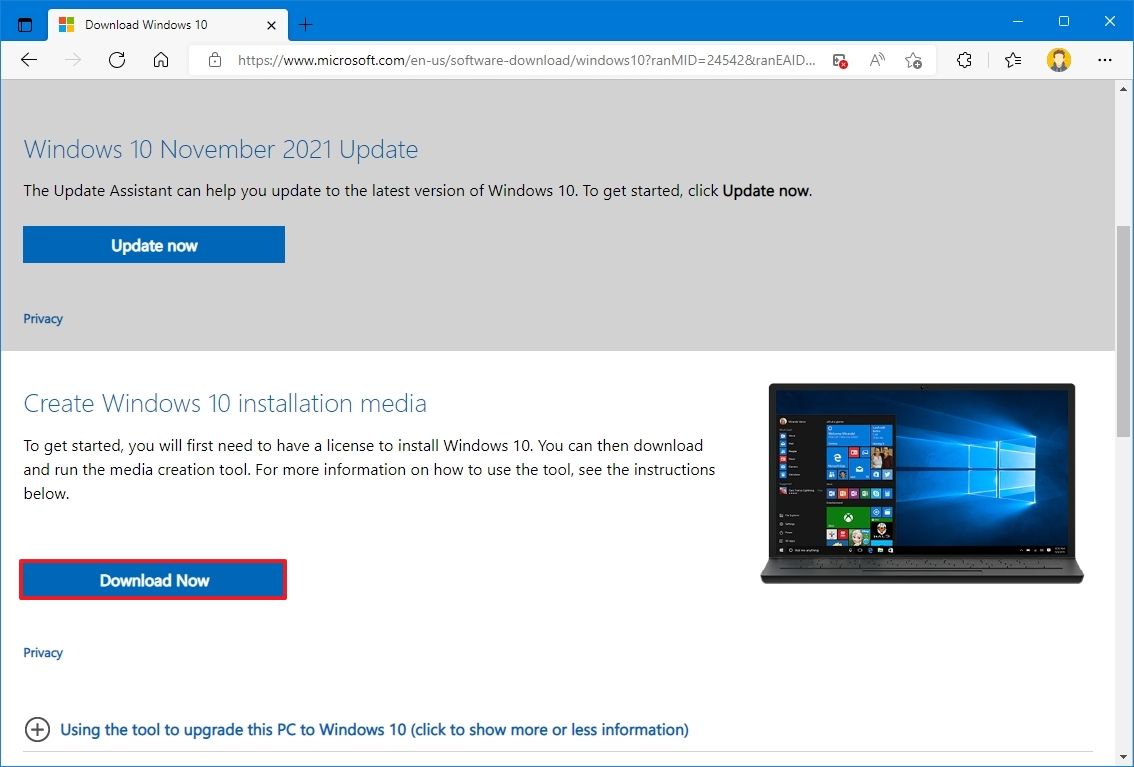
- Open Microsoft download page.
- Under the «Create Windows 10 installation media» section, click the Download Now button.
- Double-click the MediaCreationToolxxxx.exe file to launch the tool.
- Click the Accept button to agree to the terms.
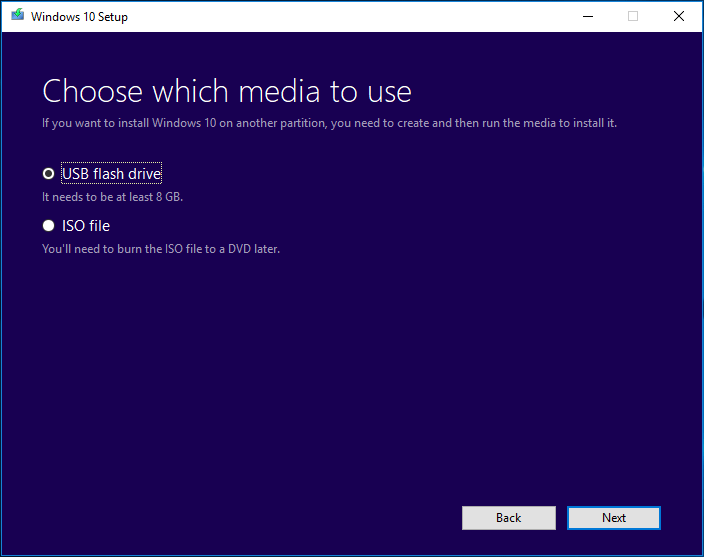
- Select the «Create installation media (USB flash drive, DVD, or ISO file) for another PC» option.
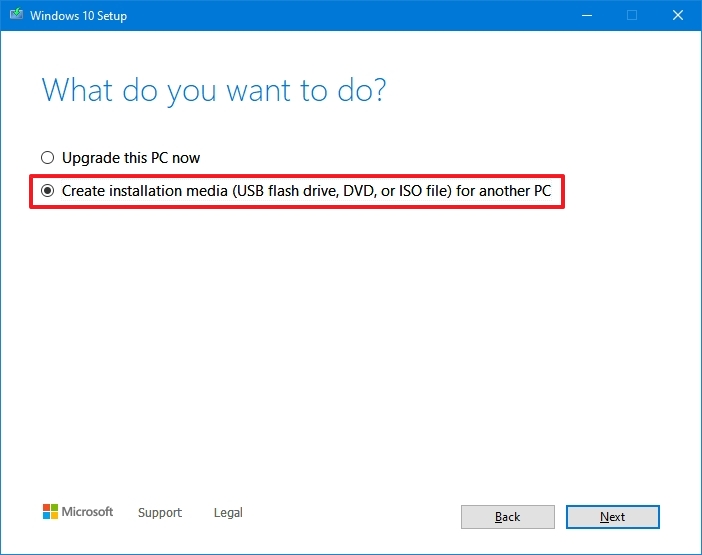
- Click the Next button.
- Clear the «Use the recommended options for this PC» option.
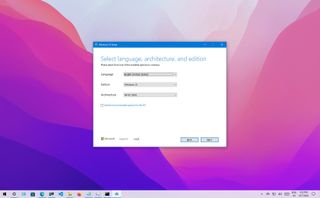
- Select the correct language and edition of Windows 10 for the new installation.
- Select the 64-bit (x64) option for «Architecture.»
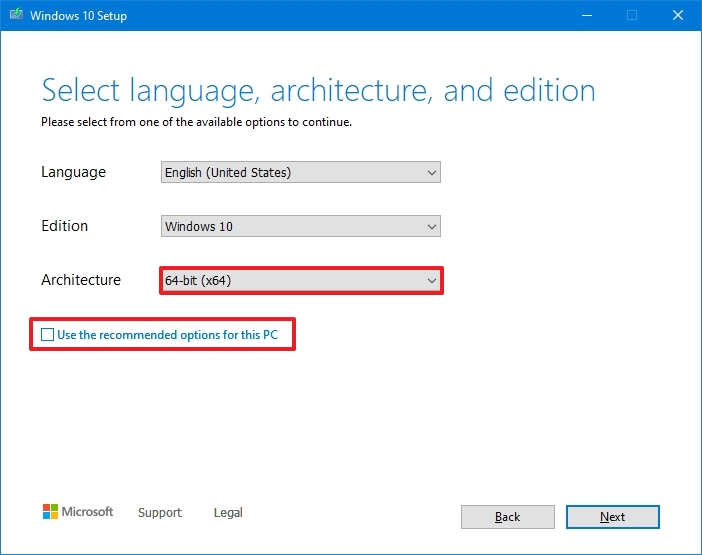
- Click the Next button.
- Select the «USB flash drive» option.
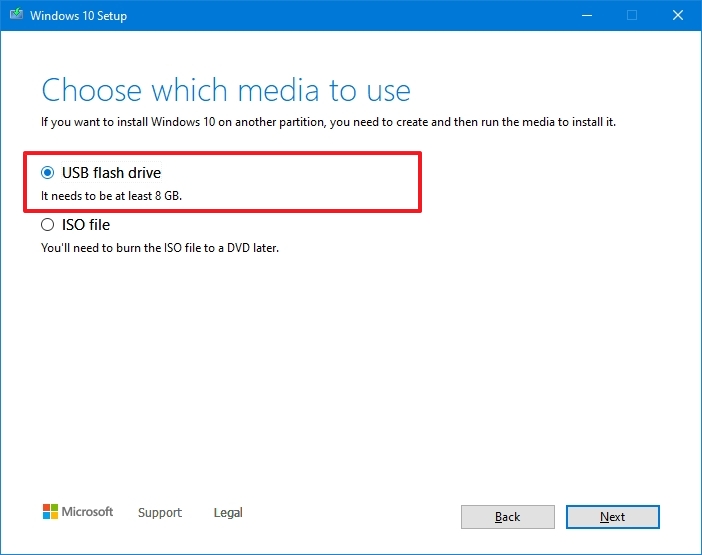
- Click the Next button.
- Select the USB flash drive to create the bootable media.
- Quick tip: If you don’t see the flash drive, reconnect the device, click the «Refresh drive list» option, and select the drive from the list.
- Click the Next button.
- Click the Finish button.
Once you complete the steps, the tool will proceed to download the installation files, and it’ll create the bootable media compatible with Windows 10 64-bit.
If you don’t have a USB flash drive, you can find many reliable and inexpensive drives (for example, the SanDisk Cruzer Glide CZ60 32GB) on Amazon.

SanDisk Cruzer Glide CZ60
If you need a flash drive to create a Windows 10 bootable media, the Cruzer Glide CZ60 by SanDisk is a good option. The flash drive offers 32GB of storage and reliable data transfer speed to perform a Windows installation and store files on the go.
Windows 10 32-bit to 64-bit install
When you are ready to upgrade to Windows 10 64-bit from 32-bit, before proceeding, you may need to change some settings to allow the computer to start from a USB flash drive. This requires accessing the Basic Input/Output System (BIOS) or Unified Extensible Firmware Interface (UEFI) on the motherboard to change the boot order.
Usually, the process requires hitting one of the function keys (F1, F2, F3, F10, or F12), Esc, or Delete key as soon as you start the computer. However, the instructions can be different depending on the manufacturer and even per device model. As a result, you may need to check the manufacturer’s support website for more specific details.
After accessing the firmware, open the «Boot» menu page, configure the boot order to start from the USB flash drive, and save the changes.
Warning: This is a friendly reminder that you will be making changes to the current setup, which may cause problems and even data loss if you don’t do this correctly. Before proceeding, it’s recommended to make a temporary full backup of your PC. It’s also a good idea to create a copy of your files to an external drive or OneDrive, as you’ll have to restore them after the upgrade.
To switch from the 32-bit to the 64-bit version of Windows 10, use these steps:
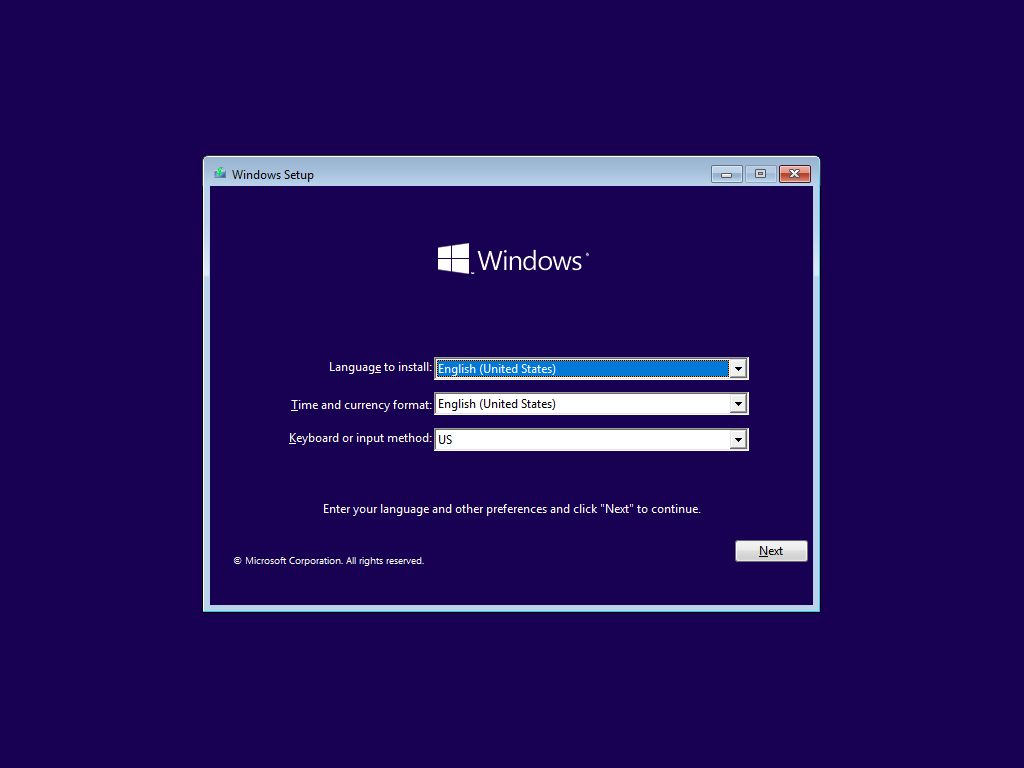
- Start PC with USB flash drive.
- On «Windows Setup,» click the Next button.
- Click the Install Now button.
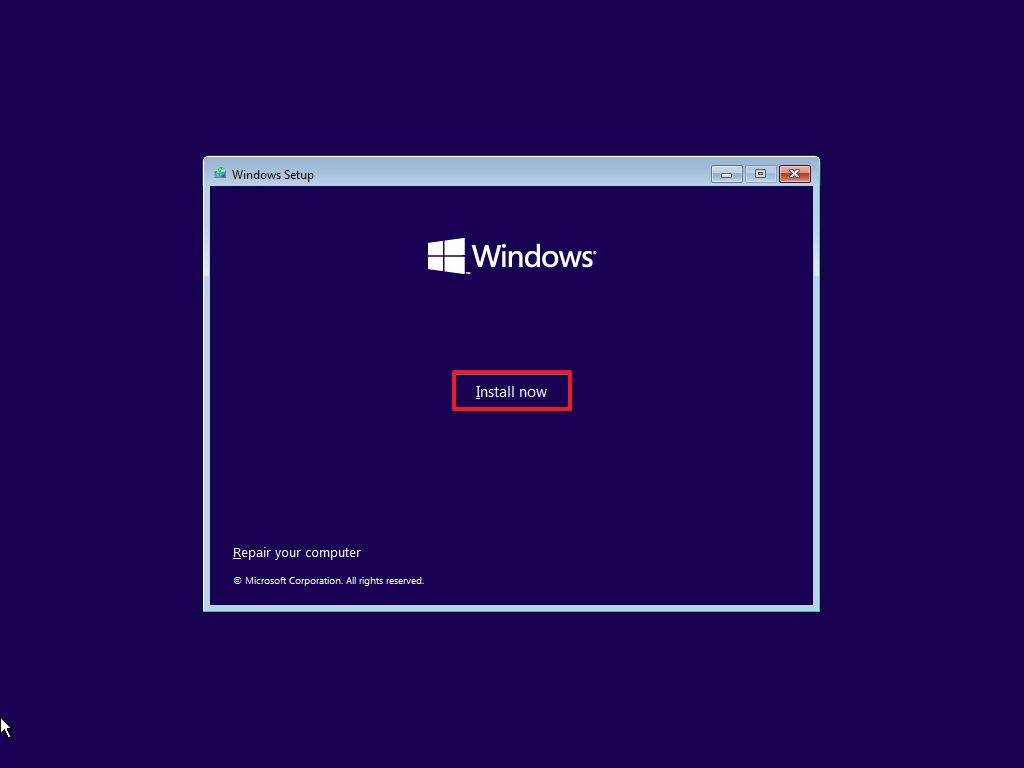
- Click the «I don’t have a product key» link to continue (assuming that the computer was already properly activated).

- Select the edition of Windows 10 (if applicable). This selection must match the edition of the license activated.
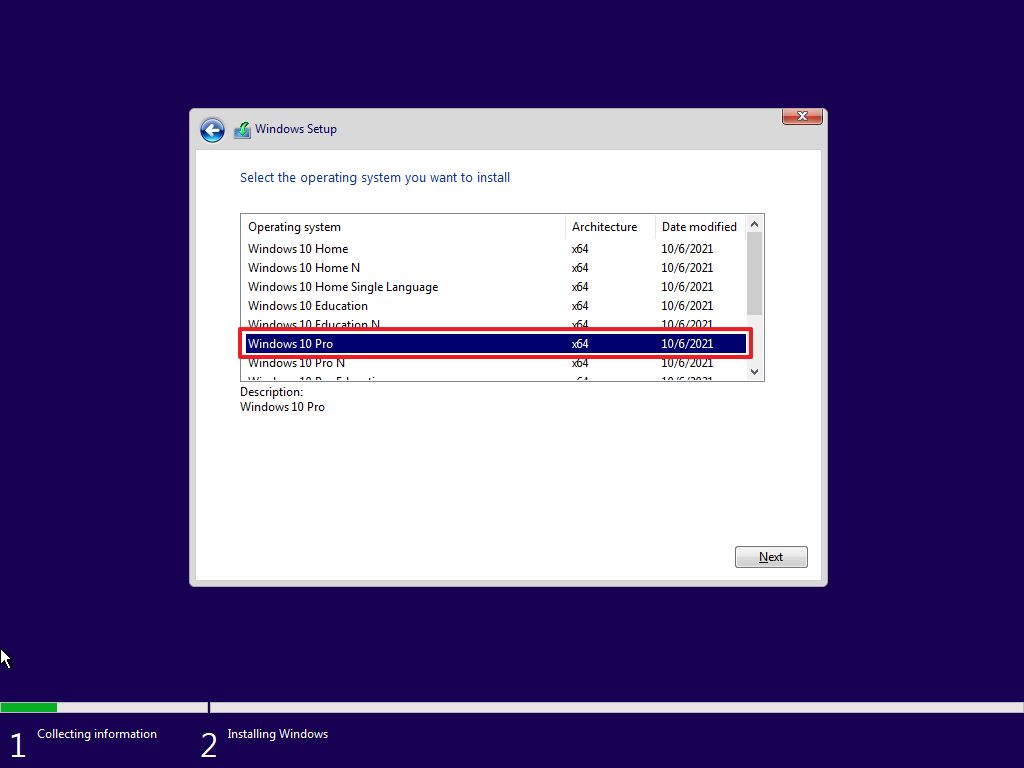
- Click the Next button.
- Check the «I accept the license terms» option to continue.
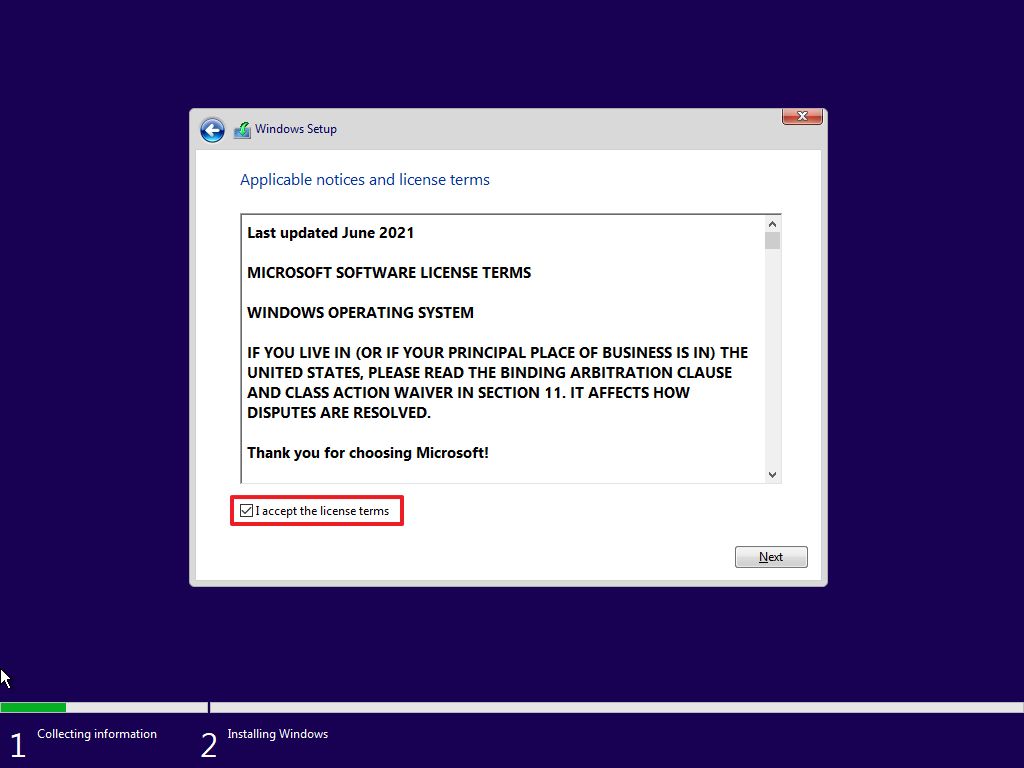
- Click the Next button.
- Click the «Custom: Install Windows only (advanced)» option.
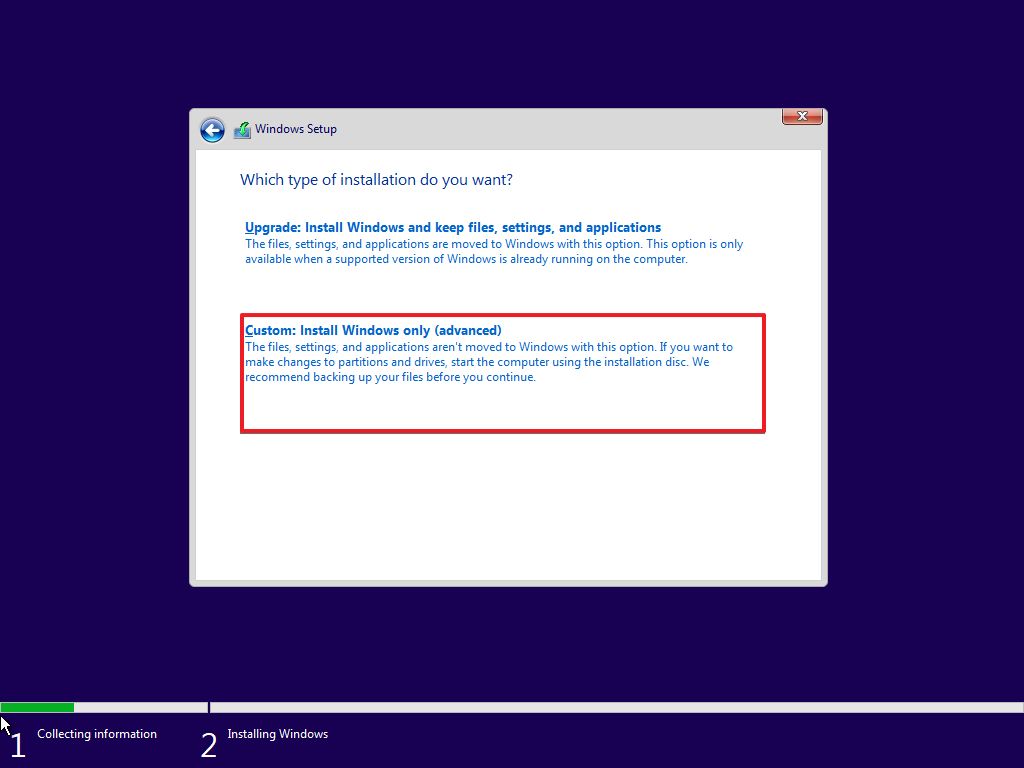
- Select the partition with the current installation of Windows 10 (usually «Drive 0»), and click the Delete button to remove the partition from the hard drive.
- Quick tip: If you see multiple partitions on the primary hard drive (Drive 0), select and delete each one. Windows 10 will recreate the required partitions during the installation process automatically. It’s not necessary to remove the partitions on secondary drives.
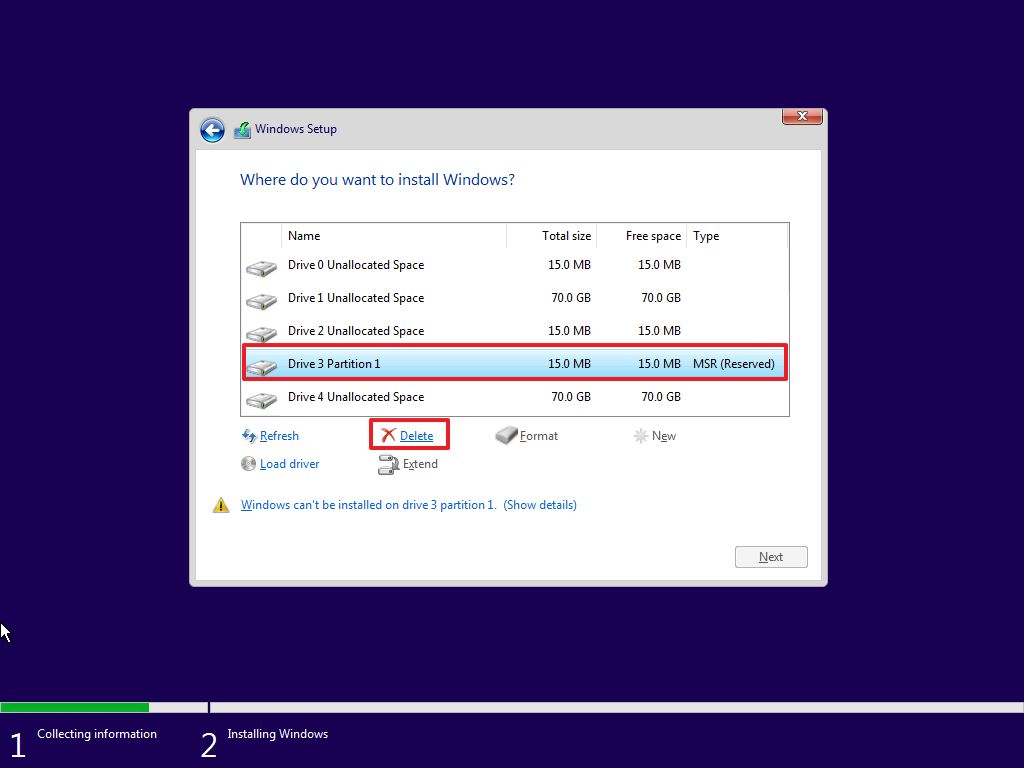
- Select the empty drive labeled «Drive 0 Unallocated Space.»
- Click the Next button.
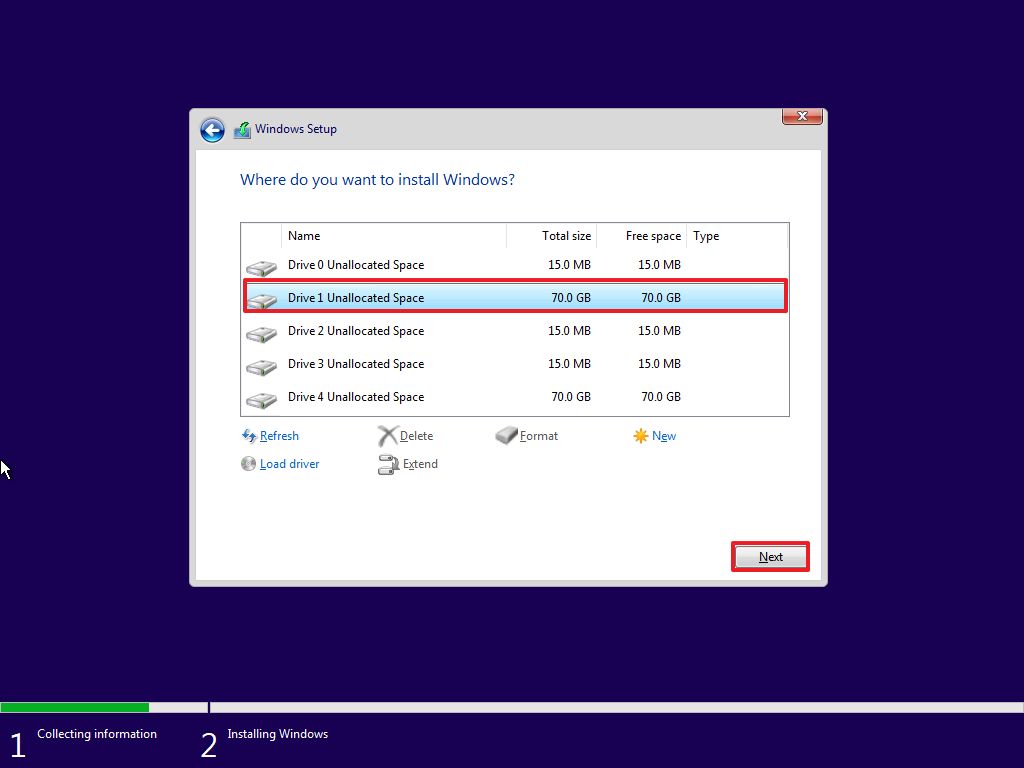
After you complete the steps, the setup will install the 64-bit version of Windows 10.
Once the installation completes, you will have to continue with the on-screen directions to finish the out-of-box experience (OOBE), which allows you to create a new account, configure the preferences, and choose the privacy settings.
It’s also a good idea to check for updates on Settings > Update & Security > Windows Update to ensure that the latest patches and drivers are installed.
Finally, remember to restore your files from a previous backup and reinstall your applications, including those designed for the 32-bit or 64-bit version of Windows 10.
More resources
For more helpful articles, coverage, and answers to common questions about Windows 10 and Windows 11, visit the following resources:
- Windows 11 on Windows Central — All you need to know
- Windows 10 on Windows Central — All you need to know
All the latest news, reviews, and guides for Windows and Xbox diehards.
Mauro Huculak is technical writer for WindowsCentral.com. His primary focus is to write comprehensive how-tos to help users get the most out of Windows 10 and its many related technologies. He has an IT background with professional certifications from Microsoft, Cisco, and CompTIA, and he’s a recognized member of the Microsoft MVP community.