 Если попробовать выполнить обновление до Windows 11 на компьютере или ноутбуке, где отсутствует или отключен доверенный платформенный модуль TPM 2.0, установлен процессор неподдерживаемого поколения или имеются другие проблемы с совместимостью, вы получите сообщение «Этот компьютер не соответствует минимальным требованиям к системе для установки Windows 11». Однако, это можно обойти.
В этой инструкции о простом способе выполнить автоматическое обновление системы до Windows 11 без TPM 2.0 и в случае, если есть другие несоответствия минимальным требованиям к системе. Также может быть полезным: обновление до Windows 11 22H2 на компьютере, не отвечающем системным требованиям.
Автоматическое обновление до Windows 11 без проверки совместимости с помощью Universal Media Creation Tool
Вы можете найти различные способы обхода минимальных системных требований Windows 11 для обновления для установки на несовместимый компьютер, например редактирование образа ISO или реестра. Также можно использовать чистую установку ОС с флешки, однако это не всегда удобно.
Я предлагаю использовать Universal Media Creation Tool — простой скрипт, изначально разработанный для возможности загрузки старых версий системы, но позволяющий также выполнить обновление до Windows 11 на неподдерживаемых компьютерах, минуя проверку наличия TPM 2.0, поколения процессора и других аппаратных характеристик. Способ обновления состоит из следующих шагов:
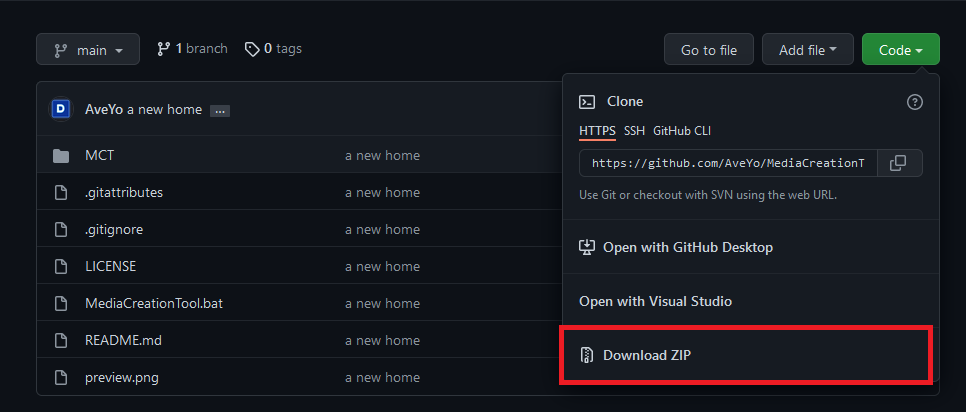
- Зайдите на официальную страницу скрипта Universal Media Creation Tool официальную страницу скрипта Universal Media Creation Tool и скачайте архив с файлами, нажав по стрелке рядом с кнопкой Code, а затем — кнопку Download ZIP.
- Распакуйте архив в удобное вам расположение.
- Запустите файл MediaCreationTool.bat из папки.
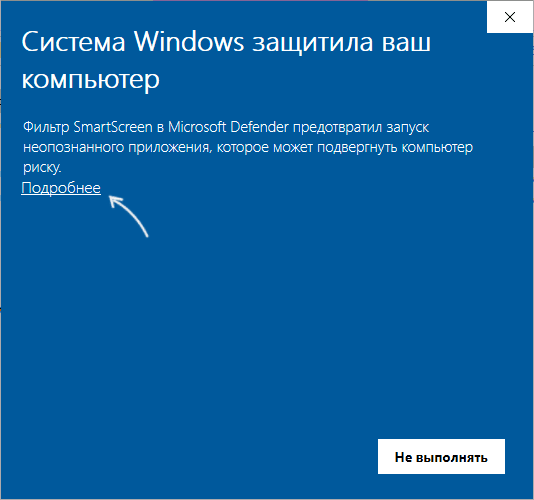
- После запуска файла вы можете получить уведомление фильтра SmartScreen, связанное с тем, что программа неизвестна системе. Нажмите «Подробнее», а затем — выполнить в любом случае.

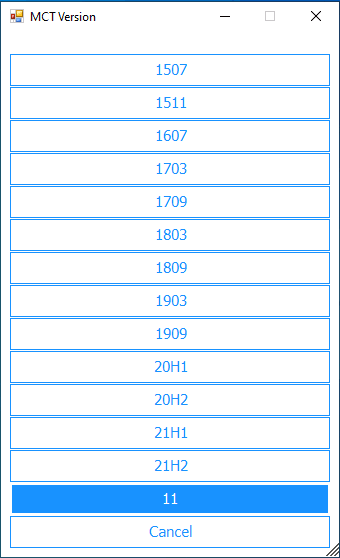
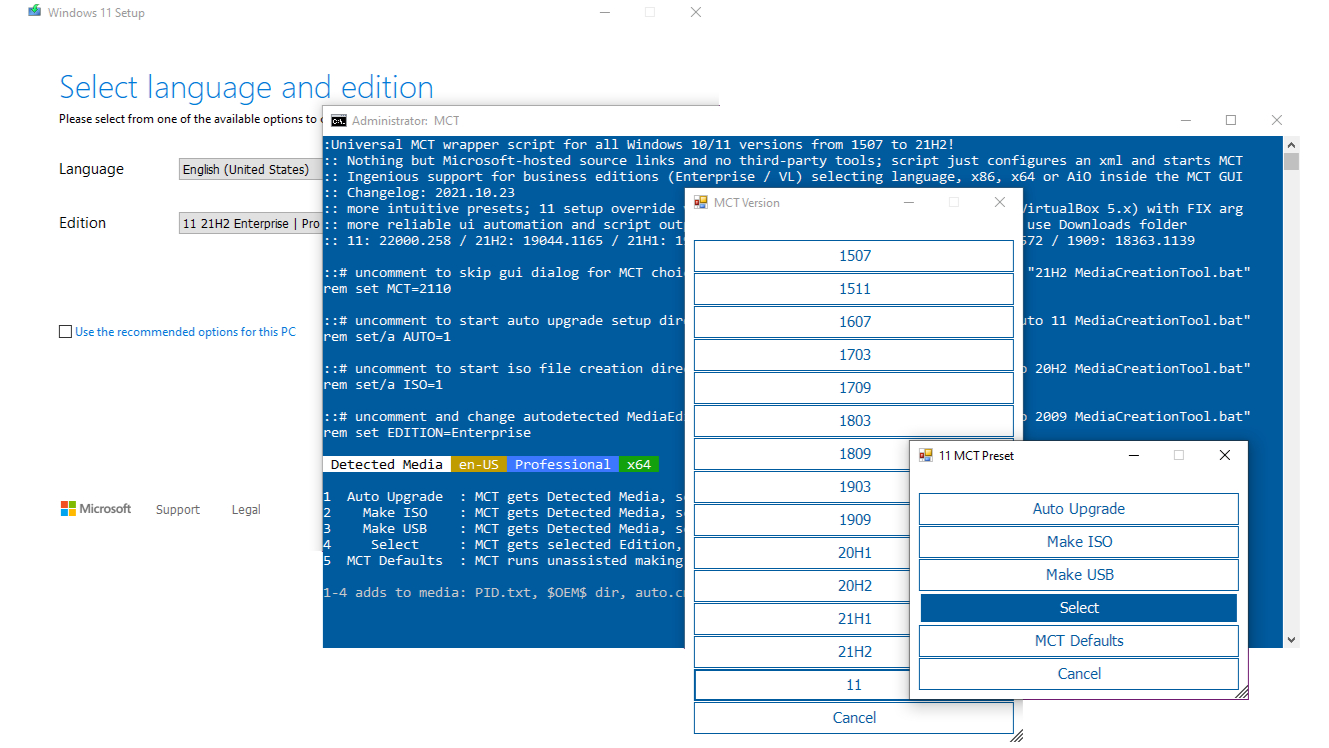
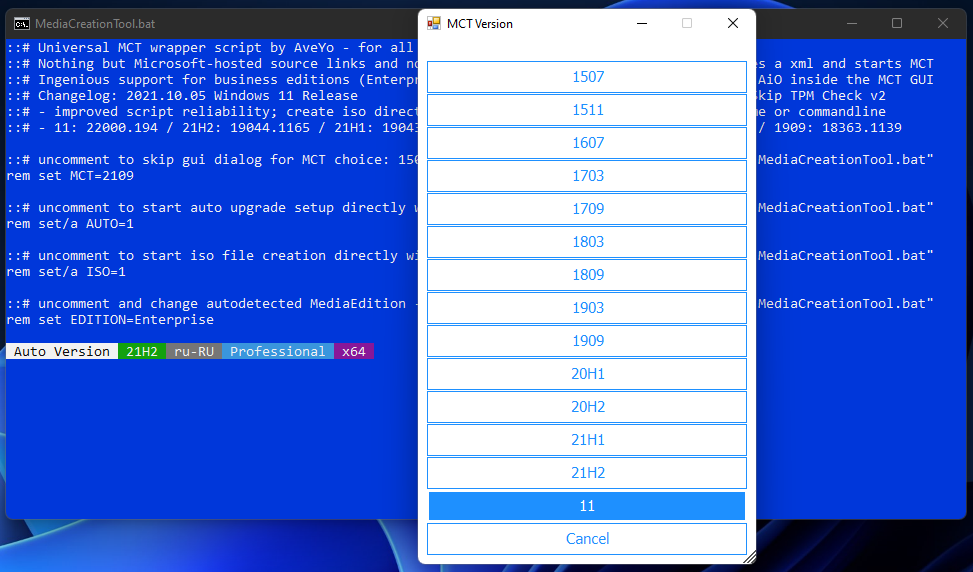
- После запуска откроется командная строка и окно, в котором требуется выбрать версию системы, выбираем Windows 11.

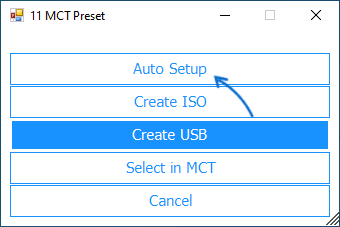
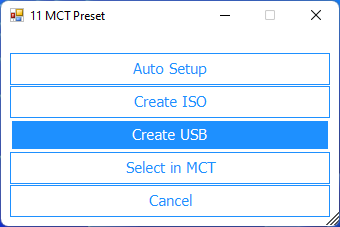
- В следующем окне предлагается выбрать необходимое действие, в нашем случае — Auto Setup (автоматическая установка).

- После запуска автоматической установки сначала будут загружены необходимые файлы напрямую с сайта Майкрософт (что можно будет увидеть в окне командной строки), затем, после подтверждения в PowerShell запустится программа установки.
- Несмотря на то, что в программе установки будет указано, что выполняется загрузка Windows 10, по факту загружается обновление до Windows 11: суть в том, что для установки используется Media Creation Tool от предыдущей системы.

- Останется лишь дождаться завершения загрузки, «создания носителя» (по факту, никакой носитель не записывается и установки Windows 11 — всё это будет выполнено полностью автоматически, компьютер будет перезагружаться в процессе.
- После этапа «Работа с обновлениями» вы попадете на экран входа в Windows 11, а после входа будет выполнена подготовка к первому запуску.


В результате вы получите обновлённую до Windows 11 систему с возможностью отката обновления при необходимости, всё что потребуется с вашей стороны после 6-го шага — дождаться завершения процесса и не выключать компьютер. При «зависании» на каком-либо проценте, лучше не торопитесь что-либо предпринимать, подождите (даже если это займёт около часа). Читатели сообщают, что первые накопительные обновления на установленную таким образом систему успешно пришли.

Официальный способ пропустить проверку модуля TPM и поколения процессора от Майкрософт
На официальной странице, посвященной установке Windows 11, Майкрософт предлагает собственный метод обхода проверки наличия модуля TPM 2.0, однако указывается, что наличие как минимум TPM 1.2 всё равно требуется. Поколение процессора проверяться не будет. Необходимые шаги:
- Нажмите клавиши Win+R на клавиатуре и введите regedit в окно Выполнить, после чего нажмите Enter.
- Перейдите к разделу реестра
HKEY_LOCAL_MACHINE\SYSTEM\Setup\MoSetup
- Нажмите правой кнопкой мыши в правой панели редактора реестра, выберите Создать — Параметр DWORD (32 бита) и создайте параметр с именем AllowUpgradesWithUnsupportedTPMOrCPU
- Дважды нажмите по параметру и задайте значение 1 для него.
- Закройте редактор реестра и запустите помощник по установке Windows 11 с официального сайта для обновления.
Как поведёт установка обновления в случае отсутствия модуля TPM даже версии 1.2 — сказать не могу, жду ваших отзывов в комментариях.
Помощник по установке Windows 11 в режиме совместимости
Ещё один способ (в комментариях сообщают, что уже не срабатывает) — использовать официальный помощник по установке Windows 11 с официального сайта https://www.microsoft.com/ru-ru/software-download/windows11, но запустить его в режиме совместимости с Windows 7. Для этого:
- Скачиваем помощник по установке в удобное расположение.
- Нажав правой кнопкой мыши по загруженному файлу выбираем пункт Свойства в контекстном меню
- На вкладке «Совместимость» отмечаем пункт «Запустить программу в режиме совместимости с» и указываем Windows 7.
- Применяем настройки и запускаем помощник по установке.
Сообщали, что в этом случае проверка совместимости системы с Windows 11 не производится и установка обновления выполняется успешно, но, похоже, уже нет.
В случае, если вы будете использовать один из предложенных способов обновления неподдерживаемой системы до Windows 11, прошу поделиться результатами, особенно интересны следующие моменты: обновление на Legacy-системах с MBR диском, а также результаты при обновлении не с Windows 10, а с более ранних систем (в этих сценариях скрипт мною опробован не был). Также вы можете создать загрузочный ISO или загрузочную флешку для чистой установки без проверки TPM 2.0 или TPM 1.2, поколения процессора и состояния безопасной загрузки.

Contents
- 1 How to install Windows 11 without TPM 2.0 / TPM 1.2
- 2 How to auto-create a Windows 11-ISO without TPM-check for installation
- 3 How to upgrade to Windows 11 with unsupported CPU / without TPM 1.2
- 4 How to upgrade to Windows 11 without any TPM (TPM 2.0 / TPM 1.2)
- 5 Windows 11 supported Intel processors
- 6 Windows 11 supported AMD processors
Much controversy has come from Microsoft’s decision to restrict Windows 11 to machines that support TPM 2.0, with the company itself even seeming uncertain about the move.
The upgrade or installation of Windows 11 also fails on other unsupported hardware such as certain older CPUs.
We have already shown you how to check if your PC has a TPM chip. Today, we’ll be teaching you how to install Windows 11 without TPM 2.0 chip or how to install it if your PC has only TPM 1.2 or an unsupported CPU. If you are unsure about the Windows 11 processor requirements, please check the official lists of Intel and AMD CPUs that will work with Windows 11 at the end of this article.
What is a TPM 2.0 Chip?
TPM stands for Trusted Platform Module, which may not mean much to you alone. Essentially, TPM is a security module typically soldered onto the motherboard in the form of a chip. It acts as a cryptographic processor and offers a hardware-based approach to generating hashes and storing cryptographic keys, biometric data, user data, and more.
Rooting the cryptography in hardware makes it all but impossible for attackers to tamper with and access this data, protecting against malware, ransomware, and sophisticated nation-state attacks. While older PCs might use a TPM 1.2 chip, most PCs using TPM usually run with a newer TPM 2.0 chip. There are no other public versions in between.
Is it safe to install Windows 11 without TPM 2.0 Chip?
Despite what Microsoft’s Windows 11 compatibility tool may tell you, installing Windows 11 without TPM is quite simple. All it requires is putting a few registry entries or using a script based tool to activate a Windows 11 TPM 2.0 bypass.
Before you do so, however, you should consider that TPM 2.0 is used to power many of Windows 11’s security features. This includes measured boot, Windows Hello, SecureBIO, WD System Guard, and Device Health Attestation. When you run Windows 11 without a TPM chip, you won’t have access to these features and may be putting your data more at risk as a result.
If possible, then, we recommend that you install a discrete TPM 2.0 module or wait and upgrade your hardware. It’s likely Windows 11 will only rely on TPM more in the future and we can’t guarantee that Microsoft won’t disable this bypass at a later point.
The Windows 11 TPM 2.0 bypass
If you really can’t do the above or just want to take the new OS for a test drive, however, this is how you install Windows 11 on unsupported hardware. You can either tweak the installation routine yourself (methods 1 & 3), use a wrapper-tool for Microsoft´s Media Creation Tool to get an ISO/USB without the Windows 11 TPM-check (method 2) or apply a Windows 11 TPM 2.0 bypass for upgrading a running Windows 10 system to Windows 11 (method 4).
As mentioned, installing Windows 11 without TPM requires a few registry entries. The easiest way to bypass the Windows 11 TPM check this is to try to install Windows 11 via an ISO or the Insider program, then follow the steps below if you get a “This PC can’t run Windows 11” message.
If you see the message “This PC does not meet the system requirement”, minimize the installer, go to registry, edit the entries, then go back to the installer, Press back button once, and continue. If you prefer to do this the easy way you can avoid the standard setup/installation provided by Microsoft and use one of the methods shown after this one.
- Press Shift + F10 to open Command Prompt and run the “regedit” command

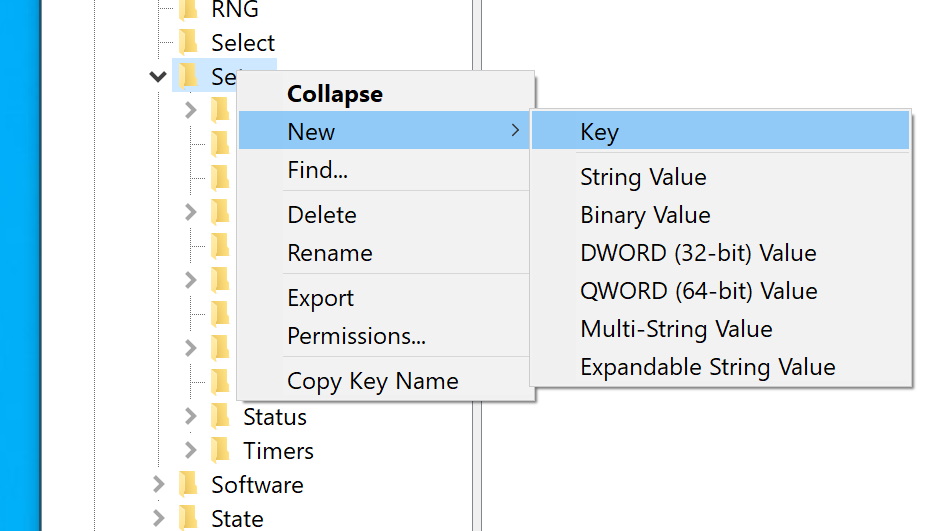
- Add a new key in the “Setup” key
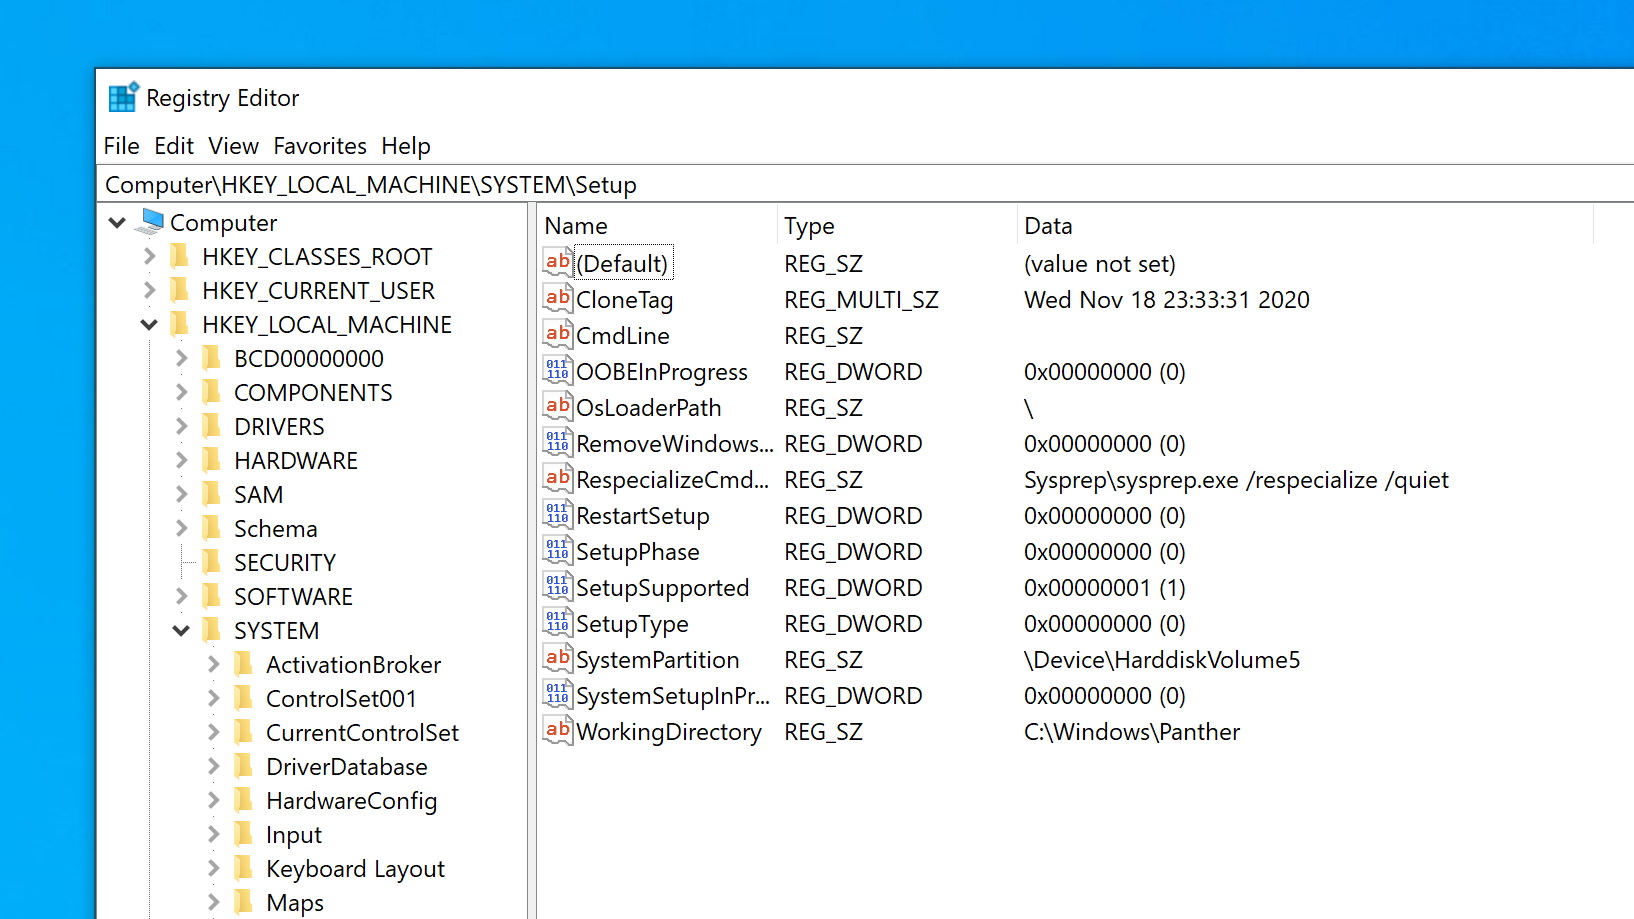
In the Registry Editor, navigate to
Computer\HKEY_LOCAL_MACHINE\SYSTEM\Setup. Right-click on the “Setup” folder in your sidebar and select “New > Key”.
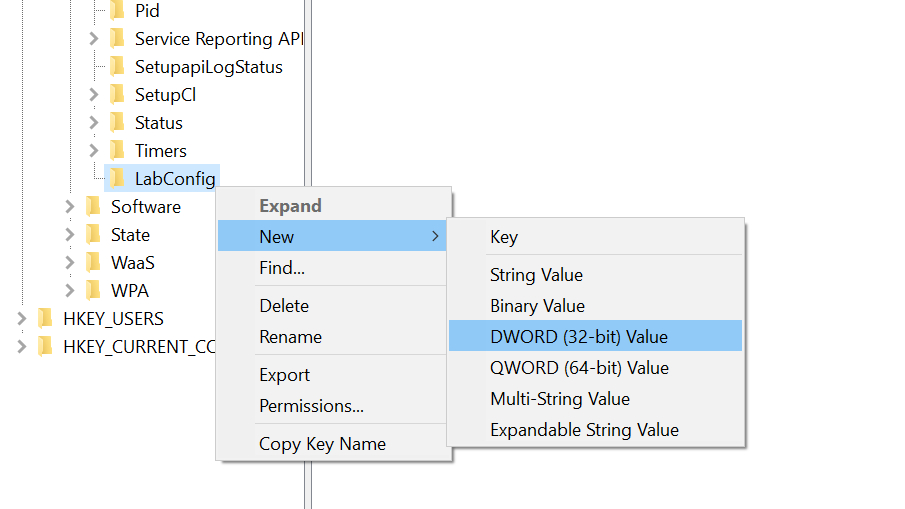
- Name the key “LabConfig” and add a new DWORD
After you name your folder, you can create the DWORD by right-clicking in any blank space in the main pane and selecting “DWORD (32-bit) Value”.
- Name the value “BypassTPMCheck” and set the value data to 1.
It’s important the capitalization and spelling are exactly the same. You can modify the value data by double-clicking your new DWORD and changing the “Value data” text box. Press “OK” when you’re done to save the changes.
- Create another DWORD called “BypassRAMCheck”
Again, make sure the capitalization and spelling is exactly the same as above.
- Change the value data to 1
Remember, you can access the value data field by double-clicking on the “BypassRAMCheck” key. Press “OK” to apply it.
- Create a new DWORD called “BypassSecureBootCheck”
- Change the value data of SecureBootCheck to 1 and press “OK”
- Close the Registry Editor and press the back button on your Windows 11 setup
You’ll find the back button in the top-left corner.

- Install Windows 11 on your unsupported hardware
You can now go through the setup process as normal. Your installer should no longer tell you your PC is incompatible.


How to auto-create a Windows 11-ISO without TPM-check for installation
You can use Microsoft´s Media Creation Tool with the script-based tool Universal MediaCreationTool wrapper (Universal MCT wrapper) to automatically download Windows 11 from Microsoft´s servers and create ISO-files where the TPM check has been removed. If you want to use this ISO to upgrade Windows 10 to Windows 11 dynamically from a running system, you will additionally need to activate the TPM bypass shown in method 4 below.
- Download and unzip Universal MCT wrapper
Download Universal MCT wrapper from GitHub, unpack the ZIP-file and run “MediaCreationTool.bat”. If you want to learn more about the project, you find everything here.

- Click on “11” to select “Windows 11”
- Choose “Create ISO” or “Create USB” based on your preference.
“Create USB” will automatically create a bootable USB-stick which can be used for a fresh installation of “Windows 11”.
- Wait until the Media Creation Tool has finished downloading Windows 11
After the download of Windows 11 has been finished, the Media Creation Tool will close automatically and Universal MCT wrapper will create an ISO/USB which allows installing Windows 11 without TPM.
- Wait for Universal MCT wrapper to finish
- Use ISO/USB to install Windows 11 without TPM
The ISO to install Windows 11 without TPM can be found in the main folder of Universal MCT wrapper.
- Install Windows 11 without Trusted Platform Module
You use the ISO/USB to either install Windows 11 without TPM-check on a PC or as a virtual machine with VMware, Virtualbox, or Hyper-V.


How to upgrade to Windows 11 with unsupported CPU / without TPM 1.2
If your PC fails to upgrade to Windows 11 because of an unsupported CPU and/or that your device only has TPM 1.2 instead of TPM 2.0, you can fix that quickly. Just apply the following registry-tweak to add a bypass for unsupported CPU and TPM 1.2.
- Open Regedit
- Navigate to folder and check for existing DWORD
Use the address bar to navigate to “HKEY_LOCAL_MACHINE\SYSTEM\Setup\MoSetup” and check if the DWORD “AllowUpgradesWithUnsupportedTPMOrCPU” is located there. If it is missing, right-click in the right pane, select “New > DWORD (32-bit) Value”, and name the new DWORD “AllowUpgradesWithUnsupportedTPMOrCPU”.
- Edit DWORD “AllowUpgradesWithUnsupportedTPMOrCPU”
Double click on “AllowUpgradesWithUnsupportedTPMOrCPU”, type “1” in “Value data” and save with “OK”.


How to upgrade to Windows 11 without any TPM (TPM 2.0 / TPM 1.2)
If you want to directly upgrade Windows 10 to Windows 11 without a TPM 2.0 chip, you can use the wrapper tool from the previous step to activate a bypass with a simple click. This method is also needed if you run the Windows 11 upgrade from a previously created ISO created with method 2.
- Run the Windows 11 TPM 2.0 bypass
Double-click on “Skip_TPM_Check_on_Dynamic_Update_v2.cmd” as admin to remove the TPM-check for updates. If this does not work, you can try alternatively “Skip_TPM_Check_on_Dynamic_Update_v1.cmd”.
- Wait for confirmation
If you see a PowerShell window popping up with a green bar stating “Skip TPM Check on Dynamic Update [Installed]…” the TPM 2.0 bypass has been activated and you should be able to upgrade from Windows 10 to Windows 11 without TPM 2.0. Running the respective CMD-script again will re-activate the TPM-check.

![Skip TPM Check on Dynamic Update [Installed]](https://cdn-chilj.nitrocdn.com/gYFaTcLxknXlucWgXPjHDdhAuyobJjHx/assets/images/optimized/rev-63bdcfb/winbuzzer.com/wp-content/uploads/2021/10/Skip-TPM-Check-on-Dynamic-Update-Installed.jpg.webp)
Windows 11 supported Intel processors
Windows 11 supports intel processors from Intel’s 8th generation or newer which means CPUs from mid-2017 onwards. Here we provide a selection of the most popular consumer-level CPUs. Microsoft has a full list of all supported Intel processors for Windows 11, including chips from the Atom, Celeron, Pentium, Xeon and Core series.
Intel 8th generation (Coffee Lake; Whiskey Lake; Amber Lake)
Desktop
- Core i3-8100
- Core i5-8400
- Core i5-8600
- Core i5-8600K
- Core i7-8700
- Core i7-8700K
- Core i7-8086K
Mobile
- Core m3-8100Y
- Core i5-8200Y
- Core i3-8130U
- Core i3-8145U
- Core i3-8100H
- Core i5-8250U
- Core i5-8250U
- Core i5-8400H
- Core i7-8650U
- Core i7-8665U
- Core i7-8750H
Intel 9th generation (Coffee Lake Refresh)
- Core i3-9100
- Core i5-9400
- Core i5-9600
- Core i5-9600K
- Core i7-9700
- Core i7-9700K
- Core i9-9900
- Core i9-9900K
Intel 10th generation (Comet Lake; Ice Lake; Amber Lake)
Desktop
- Core i3-10100
- Core i5-10400
- Core i5-10600
- Core i5-10600K
- Core i7-10700
- Core i7-10700K
- Core i9-10900
- Core i9-10900K
Mobile
- Core i3-10100Y
- Core i3-10100U
- Core i5-10210U
- Core i5-10200H
- Core i5-10400H
- Core i7-10510U
- Core i7-10710U
- Core i7-10750H
- Core i7-10850H
- Core i9-10980HK
Intel 11th generation (Tiger Lake)
Desktop
- Core i3-11100
- Core i5-11400
- Core i5-11600
- Core i5-11600K
- Core i7-11700
- Core i7-11700K
- Core i9-11900
- Core i9-11900K
Mobile
- Core i3-1115G4
- Core i5-1135G7
- Core i5-11300H
- Core i7-1165G7
- Core i7-1185G7
- Core i7-11375H
Windows 11 supported AMD processors
For AMD, Windows 11 CPU compatibility goes back to processors released in 2018 or later. This includes 2nd generation Ryzen (Zen+) chips and above. Microsoft also has a full AMD list, including chips from AMDs Athlon, EPYC, Ryzen and Ryzen Threadripper series. Below is a list of the more common consumer-level CPUs. Unfortunately CPU like the 3300X, 3700, 4600HS and 5900H are missing, even though all are all very recent.
AMD Ryzen 2000 series (Zen+; Zen)
Desktop
- Ryzen 3 2300X
- Ryzen 5 2600
- Ryzen 7 2700
- Ryzen 7 2700X
- Ryzen Threadripper 2920X
- Ryzen Threadripper 2950X
- Ryzen Threadripper 2970WX
- Ryzen Threadripper 2990X
AMD Ryzen 3000 series (Zen 2; Zen+)
Desktop
- Ryzen 3 3100
- Ryzen 5 3600
- Ryzen 7 3700X
- Ryzen 9 3900
- Ryzen 9 3900X
- Ryzen 9 3950X
- Ryzen Threadripper 3960X
- Ryzen Threadripper 3970X
- Ryzen Threadripper 3990X
- Ryzen Threadripper 3995WX
- Ryzen 3 3200G**
- Ryzen 5 3400G**
- Ryzen 3 3300U
- Ryzen 5 3500U
- Ryzen 5 3550H
- Ryzen 7 3700U
- Ryzen 7 3750H
AMD Ryzen 4000 series (Zen 2)
Desktop
- Ryzen 3 4300G
- Ryzen 5 4600G
- Ryzen 7 4700G
Mobile
- Ryzen 3 4300U
- Ryzen 5 4500U
- Ryzen 5 4600H
- Ryzen 7 4700U
- Ryzen 7 4800HS
- Ryzen 7 4800H
- Ryzen 9 4900HS
- Ryzen 9 4900H
AMD Ryzen 5000 series (Zen 3)
Desktop
- Ryzen 5 5600X
- Ryzen 7 5800X
- Ryzen 9 5900X
- Ryzen 9 5950X
Mobile
- Ryzen 3 5400U
- Ryzen 5 5600U
- Ryzen 5 5600HS
- Ryzen 5 5600H
- Ryzen 7 5800U
- Ryzen 7 5800HS
- Ryzen 7 5800H
- Ryzen 9 5900HS
- Ryzen 9 5900HX
- Ryzen 9 5980HS
- Ryzen 9 5980HX
That’s it for this Windows 11 tutorial. Now that you have it installed, you may want to check out all the major features coming to the OS, including focus sessions and the new snipping tool.
If you decide it’s not for you, you may instead want to check out our tutorial on how to roll back a Windows update. Technically, it’s for Windows 10, but as you’ll notice not much has changed between versions, so the process is more or less the same.

If you want to upgrade your PC to Windows 11, but you don’t have a Trusted Platform Module 2.0 chip on your computer’s motherboard, don’t worry: you’re not alone. Plenty of people have been upset by Microsoft’s decision to restrict access to their new OS to machines that support TPM 2.0, but fortunately there is a workaround.
If you’ve already got one of the best computers or best Windows laptops and you bought it after 2014, odds are it already has a TPM 2.0 chip. If not, this guide will help you get Windows 11 up and running on your old system — but bear in mind that there are some potential issues here, since TPM 2.0 is used by the OS to provide better data security for your PC.
Steps for how to upgrade to Windows 11 without TPM 2.0
- Go to the Windows 11 download page and select ‘Download Now’
- When you get an error message, open the Registry Editor and enter ‘HKEY_LOCAL_MACHINE\SYSTEM\Setup’
- Right-click ‘Setup’ and select New > Key, name the new key ‘LabConfig’
- Right-click the key and select New > DWORD (32-bit), creating values for ‘BypassTPMCheck’, ‘BypassRAMCheck’, and ‘BypassSecureBootCheck’. Set the ‘Value data’ for all of these to 1.
- Close the Registry Editor, click ‘Back’ in the Windows 11 installation tool, and attempt the install again.
Tools and Requirements
- A PC or laptop without a TPM 2.0 module. If your computer was made before 2014, it definitely won’t have one.
- An internet connection.
- A willingness to put your system integrity at risk!
Step by step guide
Start the install process and open the Registry Editor
(Image: © Microsoft)
To start out, go to the Windows 11 download page on the Microsoft website, and click ‘Download Now’ under the section marked ‘Windows 11 Installation Assistant’. This will download the Windows 11 installer. Run it, and you’ll get an error message. When this happens, press the Windows Key and R to open up the Run dialogue box. Type in ‘regedit’ (without quotation marks) to open the Registry Editor.
Create a new LabConfig key
(Image: © Microsoft)
With the Registry Editor open, find the text box at the top of the window and type in: ‘HKEY_LOCAL_MACHINE\SYSTEM\Setup’ (again, you can assume that all of these entries should be input without quote marks). Press Enter. You should see ‘Setup’ highlighted in the menu on the left side of the screen. Right-click it and select New > Key. Name the key ‘LabConfig’ and press Enter to create it.
Set the key values and proceed to install
(Image: © Microsoft)
Right-click the LabConfig key you just made, and select New > DWORD (32-bit) value. Name it ‘BypassTPMCheck’ and set the ‘Value data’ to 1, then click ‘OK’. Do the same for ‘BypassRAMCheck’ and ‘BypassSecureBootCheck’, and make sure those keys also have ‘Value data’ set to 1.
Then, close the Registry Editor and return to the Windows 11 installation tool. Click ‘Back’, then try to install Windows 11 again. It should work this time!
An Alternative Method
Get a script to do all this for you
(Image: © AveYo, GitHub)
If all that sounds a bit too complicated, you could try a script that does roughly the same thing – but automatically. It’s called Universal MediaCreationTool wrapper, and you just need to download and run it before trying to install Windows 11. However, you should always be wary about running other people’s scripts that change things on your PC.
FAQs
Should I really run Windows 11 without TPM 2.0?
There are plenty of good reasons why Microsoft has insisted upon TPM 2.0 for Windows 11 — for starters, you’ll miss out on key security updates that may leave your data vulnerable. Microsoft has also issued a Windows 11 warning that mentions possible ‘damage’ to unsupported PCs.
Microsoft also notes: “Your device might malfunction due to these compatibility or other issues. Devices that do not meet these system requirements will no longer be guaranteed to receive updates, including but not limited to security updates.”
So, even if you get Windows 11 to run without TPM 2.0, you may find that you no longer get any updates in the future, which could put your security and system stability at risk.
Final thoughts
So, it is indeed possible to upgrade to Windows 11 without TPM 2.0 – but should you? While it’s understandably very frustrating if you have a decent PC, but it’s unable to upgrade to Windows 11, you should only try this workaround if you’re absolutely certain you want to force the Windows 11 upgrade.
For most people, then, we recommend you don’t force the Windows 11 upgrade on a PC without TPM 2.0. Sure, it’s frustrating, but Microsoft will continue to update and improve Windows 10, and you won’t be putting yourself or your PC at risk.
Sign up to receive daily breaking news, reviews, opinion, analysis, deals and more from the world of tech.
Christian is TechRadar’s UK-based Computing Editor. He came to us from Maximum PC magazine, where he fell in love with computer hardware and building PCs. He was a regular fixture amongst our freelance review team before making the jump to TechRadar, and can usually be found drooling over the latest high-end graphics card or gaming laptop before looking at his bank account balance and crying.
Christian is a keen campaigner for LGBTQ+ rights and the owner of a charming rescue dog named Lucy, having adopted her after he beat cancer in 2021. She keeps him fit and healthy through a combination of face-licking and long walks, and only occasionally barks at him to demand treats when he’s trying to work from home.
With contributions from
- Matt HansonManaging Editor, Core Tech
Most Popular
![]()
5 октября 2021 года состоялся официальный релиз Windows 11, а значит система начала распространяться в качестве бесплатного обновления для Windows 10. Но если вы хотите опробовать новую систему на своём компьютере, то с этим могут возникнуть сложности из-за новых минимальных системных требований.
Ключевая проблема заключается в том, что поддержка Secure Boot и наличие включённого TPM 2.0 проверяется как при попытке обновления системы, так и при чистой установке Windows 11. За время тестирования Microsoft несколько раз подтверждала приверженность новым системным требованиям, так что с момента начала тестирования они почти не изменились.
К счастью, энтузиасты нашли целый ряд способов, позволяющих обойти проверку на соответствие требованиям при установке или обновлении до Windows 11. Кстати, отсутствие Secure Boot и TPM 2.0 сейчас никак не влияет на работоспособность системы, так что можете смело использовать все описанные методы.
P. S. Статья была обновлена 5 октября 2021 года в связи с релизом Windows 11. Первая версия публикации датируется 28 июня.
Метод 1: Universal MediaCreationTool
Энтузиасты подготовили неофициальный инструмент под названием Universal MediaCreationTool, который создаёт ISO-образ любой версии Windows 10 или 11. Сами файлы загружаются с сервера Microsoft, так что беспокоиться по этому поводу не стоит.
- Скачайте Universal MediaCreationTool, перейдя по по этой ссылке и нажав на кнопку «Code» -> «Donwload ZIP».
- Распакуйте скачанный архив в любую папку на вашем компьютере.
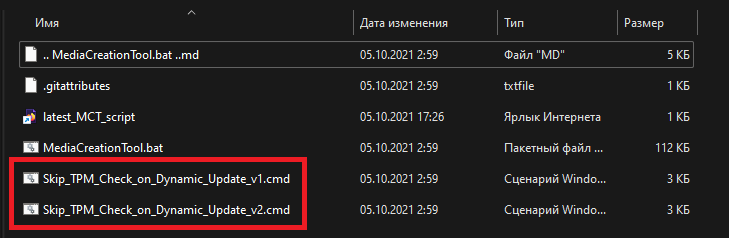
- [Только для обновления] Перейдите в папку MCT, нажмите правой кнопкой мыши по файлу
Skip_TPM_Check_on_Dynamic_Update_v1.cmdи выберите «Запустить от имени администратора».
Этот скрипт внесёт изменения в вашу текущую систему, чтобы при обновлении до Windows 11 не производилась проверка наличия TPM 2.0, UEFI, Secure Boot и так далее.
- Если в дальнейшем программа обновления сообщит о несовместимости, то запустите от имени администратора файл
Skip_TPM_Check_on_Dynamic_Update_v2.cmd, после чего повторите попытку.
- Если в дальнейшем программа обновления сообщит о несовместимости, то запустите от имени администратора файл
- Запустите файл
MediaCreationTool.bat. - В появившемся окне выберите Windows 11.
- В следующем окне выберите один из следующих пунктов:
- Auto Setup — предназначен для обновления системы без каких-либо запросов.
- Create ISO — создаёт ISO-образ с интегрированным DIR2ISO, включающим в себя кастомные OEM-настройки.
- Create USB — создаёт загрузочный USB-накопитель через MCT, включающий в себя кастомные OEM-настройки.
- Select in MCT — запускает инструмент Media Creation Tool. Образ будет создан без каких-либо модификаций. Если выбрать этот пункт, то работа скрипта автоматически завершится.
Метод 2: Удаление файла appraiserres.dll для обновления
- Скачайте ISO-образ Windows 11.
- Создайте загрузочную флешку (например, с помощью UltraISO или Rufus) или просто распакуйте ISO-образ как обычный архив (например, с помощью 7-Zip) в любую папку на жёстком диске.
- Перейдите к файлам установщика Windows 11 либо на флешке, либо в папке на жёстком диске.
- Откройте папку Sources.
- Найдите и удалите файлы с названиями appraiserres.dll и appraiser.sdb.
- Вернитесь в корневую папку установщика Windows 11 (там, где находятся файлы setup.exe, autorun.inf и пр.).
- Запустите Setup.exe, чтобы начать обновление до Windows 11.
- Если всё сделано правильно, то при обновлении проверки TPM 2.0 и Secure Boot не будет, так что процесс должен завершиться корректно.
Прежде всего хотелось бы сказать отдельное спасибо St1ckys, который нашёл этот способ обхода проверки TPM 2.0 и Secure Boot при чистой установке ОС. До этого наилучшим вариантом было использование утилиты DISM.
- Скачайте ISO-образ и создайте загрузочную флешку (например, с помощью UltraISO или Rufus).
- Перейдите к файлам на вашем флеш-накопителе.
- Скачайте архив windows_11_bypass.zip [303 b] (cкачиваний: 5395)
(либо с Cloud.Mail.ru), откройте его и поместите файл Windows_11_Bypass.reg в корень флеш-накопителя (рядом с файлами setup.exe, autorun.inf и пр.). Можно поместить и в любое другое место, но в корне его будет проще найти.
- Перезагрузите ПК, выставите в BIOS загрузку с флешки и начните стандартную установку системы.
- Для начала выбираем язык и регион.
- После этого нажимаем «Установить сейчас».
- Нажимаем на кнопку «У меня нет ключа продукта».
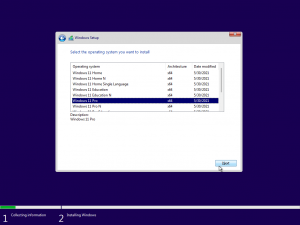
- Выбираем нужную редакцию операционной системы.
- Если на этом этапе появляется сообщение «Windows 11 не может быть запущена на этом ПК», то переходим к следующему шагу. Если ошибки нет, то просто продолжайте установку.
- Если вы увидели ошибку, то в окне установщика нажмите «Далее». Вы вернётесь на этап выбора редакции системы.
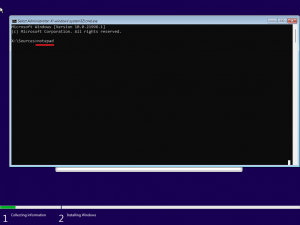
- После этого нажмите комбинацию Shift + F10 для запуска «Командной строки».
- В открывшемся окне введите notepad.
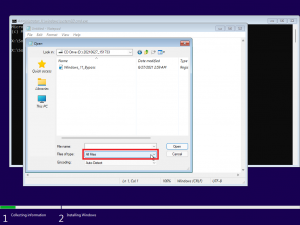
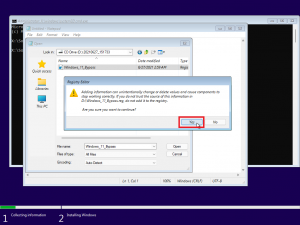
- В окне блокнота нажмите «Файл» -> «Открыть…».
- В нижней части диалогового окна установите «Все файлы», как показано на скриншоте ниже.
- В левой части нажмите на «Этот компьютер», найдите и откройте свой флеш-накопитель.
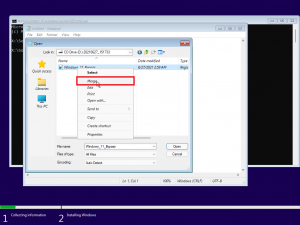
- Щелкните правой кнопкой мыши по файлу Windows_11_Bypass.reg (из шага 3) и выберите «Слияние».
- В диалоговом окне подтвердите внесение изменений в реестр (это коснётся только этапа установки и никак не повлияет на установленную систему).
- Закройте «Блокнот» и «Командную строку».
- Вновь сделайте выбор редакции Windows 11 и нажмите «Далее».
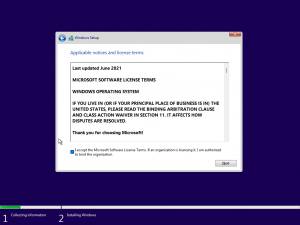
- Если всё прошло успешно, то вы должны увидеть лицензионное соглашение. Далее проверка на TPM 2.0 и Secure Boot проводиться не будет. Продолжайте установку системы.


Метод 4: Программа Windows Insider
Также обновиться до Windows 11 можно по программе Windows Insider, выбрав в ней канал Beta. Однако на неподдерживаемых устройствах в «Параметрах» такой опции не будет, поэтому нам потребуется утилита OfflineInsiderEnroll от abbodi1406 и aleks242007, которая задействует недокументированные параметры программы Windows Insider. Кстати, этот способ будет работать даже с локальными учётными записями.
- Скачайте ORM-Insider 2.9.7 от aleks242007 по этой ссылке.
- Распакуйте скачанный архив.
- Запустите скрипт OfflineInsiderEnroll.cmd от имени администратора.
- В окне командной строки выберите нужный канал:
- Для канала Dev введите цифру 1.
- Для канала Beta введите цифру 2.
- Для канала Release Preview введите цифру 3.
- Нажмите Enter.
- Для полного отключения проверки совместимости введите цифру 1.
- Нажмите Enter.
- Перезагрузите компьютер.
Не исключено, что Microsoft в будущем изменит систему проверки и сделает её более жёсткой, но даже в этом случае энтузиасты скорее всего найдут способ обойти ограничения. Пока что все указанные способы работают, что не может не радовать.
Для установки Windows 11 (или при обновлении с Windows 10), ваш компьютер должен соответствовать определённом минимальным системам требованиям: наличие чипа TPM 2.0 (Trusted Platform Module), режим UEFI + Secure Boot, 4 Гб RAM, 64 Гб диск и совместимый двухъядерный процессор 1 ГГц (не все процессоры поддерживаются!). Microsoft ограничивает установку Windows 11 на несовместимые компьютеры, выполняя проверку на соответствие системным требования перед началом установки Windows. В этой статье мы покажем, как установить Windows 11 на несовместимые устройства без проверки требований к CPU, TPM, Secure Boot (и т.д.)
Если компьютер не соответствует минимальным требованиям для Windows 11, то при установке ОС появится ошибка:
Запуск Windows 11 на этом компьютере не возможен
. Этот компьютер не соответствует минимальным требованиям к системе для установки этой версии Windows. Дополнительные сведения см. на сайте aka.ms/WindowsSysReq
This PC can’t run Windows 11
. This PC doesn’t meet the minimum system requirements to install this version of Windows. For more information, visit aka.ms/WindowsSysReq<
Чтобы понять, каким конкретно требованиям не соответствует вашим компьютер, нужно изучить лог ошибок установки Windows 11 setuperr.log. В этом файле содержаться только ошибки установки Windows (полный лог установки находится в файле setupact.log, но изучать его сложно из-за большого объема).
Чтобы открыть файл лога ошибок установки Windows, откройте командную строку прямо на экране установки, нажав
Shift + F10
и выполните команду:
notepad x:\windows\panther\setuperr.log
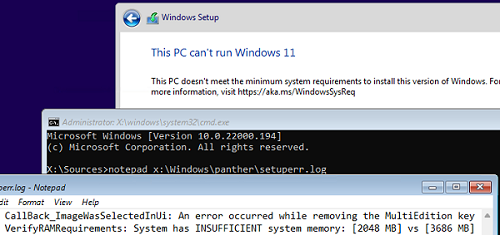
В нашем случае ошибка говорит, что на компьютере недостаточно оперативной памяти (всего 2 Гб вместо 3).
2021-11-11 10:57:51, Error VerifyRAMRequirements: System has INSUFFICIENT system memory: [2048 MB] vs [3686 MB]
Обратите внимание, что если ваш компьютер не соответствует нескольким системным требованиям для установки Windows, то в логе будет указана только первая из причин. Т.е. если вы исправили (или пропустили) одну из ошибок несовместимости, то при следующем запуске установки Windows 11 в логе будет содержаться следующая ошибка совместимости.
После того, как мы добавили RAM появилась другая ошибка:
2021-11-11 11:13:37, Error VerifyTPMSupported:Tbsi_GetDeviceInfo function failed - 0x8028400f[gle=0x0000007a]
Т.е. установщик определил, что на компьютере отсутствует TPM чип.
Если вы устанавливаете Windows 11 в виртуальную машину VMWare, вы можете добавить виртуальный TPM чип в соответствии с этой статьей. Для Hyper-V используется другая инструкция.
Однако вы можете продолжить установку Windows 11, просто игнорировал одно или все требования совместимости.
Для этого нужно в командной строке на экране установки Windows 11:
- Запустить редактор реестра
regedit.exe
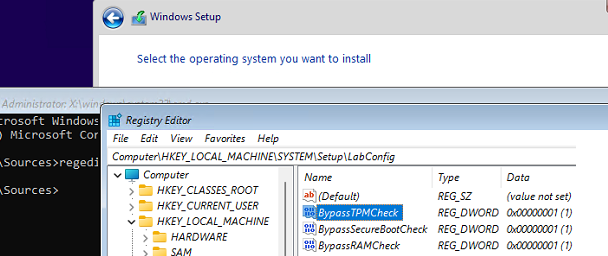
; - Перейти в раздел HKEY_LOCAL_MACHINE\SYSTEM\Setup и создать новую ветку с именем LabConfig;
- В этой ветке нужно создать DWORD параметры со значением 1 для тех проверок совместимости, которые вы хотите пропустить при установке
Доступны следующие параметры, позволяющие установить Windows 11 на устройства:
-
BypassCPUCheck
– с несовместимыми процессорами; -
BypassTPMCheck
– без чипа TPM 2; -
BypassRAMCheck
– не проверять минимальное количество RAM -
BypassSecureBootCheck
–с Legacy BIOS (или UEFI с отключенным Secure Boot) -
BypassStorageCheck
– не проверять размер системного диска
Например, чтобы не проверять наличие TPM модуля при установке, нудно создать параметр реестра BypassTPMCheck со значением 1. Параметр можно создать с помощью графического редактора реестра или с помощью команды:
reg add HKLM\SYSTEM\Setup\LabConfig /v BypassTPMCheck /t REG_DWORD /d 1
Аналогичным образом нужно создать другие параметры для проверок, который вы хотите пропустить при установке Windows 11.
Затем вернитесь в окно установки Window 11, вернитесь на шаг назад и продолжите обычную установки без проверки совместимости.
Вы можете модифицировать установочный ISO образ Windows 11, чтобы все эти проверки TPM, SecureBoot, диск, память, CPU) пропускались автоматически при установке ОС.
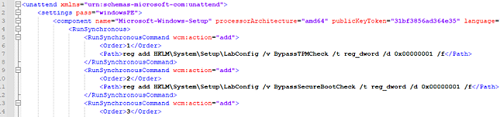
Для этого создайте текстовый файл AutoUnattend.xml со следующим содержимым:
<unattend xmlns="urn:schemas-microsoft-com:unattend">
<settings pass="windowsPE">
<component name="Microsoft-Windows-Setup" processorArchitecture="amd64" publicKeyToken="31bf3856ad364e35" language="neutral" versionScope="nonSxS" xmlns:wcm="http://schemas.microsoft.com/WMIConfig/2002/State" xmlns:xsi="http://www.w3.org/2001/XMLSchema-instance">
<RunSynchronous>
<RunSynchronousCommand wcm:action="add">
<Order>1</Order>
<Path>reg add HKLM\System\Setup\LabConfig /v BypassTPMCheck /t reg_dword /d 0x00000001 /f</Path>
</RunSynchronousCommand>
<RunSynchronousCommand wcm:action="add">
<Order>2</Order>
<Path>reg add HKLM\System\Setup\LabConfig /v BypassSecureBootCheck /t reg_dword /d 0x00000001 /f</Path>
</RunSynchronousCommand>
<RunSynchronousCommand wcm:action="add">
<Order>3</Order>
<Path>reg add HKLM\System\Setup\LabConfig /v BypassRAMCheck /t reg_dword /d 0x00000001 /f</Path>
</RunSynchronousCommand>
<RunSynchronousCommand wcm:action="add">
 <Order>5</Order>
<Path>reg add HKLM\System\Setup\LabConfig /v BypassCPUCheck /t reg_dword /d 0x00000001 /f</Path>
</RunSynchronousCommand>
<RunSynchronousCommand wcm:action="add">
<Order>4</Order>
<Path>reg add HKLM\System\Setup\LabConfig /v BypassStorageCheck /t reg_dword /d 0x00000001 /f</Path>
</RunSynchronousCommand>
</RunSynchronous>
<UserData>
<ProductKey>
<Key></Key>
</ProductKey>
</UserData>
</component>
</settings>
</unattend>
Если вы хотите отключить экран создания онлайн аккаунта Microsoft при установке Windows 11, добавьте в файл следующий секцию компонента:
<component name="Microsoft-Windows-Shell-Setup" processorArchitecture="amd64" publicKeyToken="31bf3856ad364e35" language="neutral" versionScope="nonSxS" xmlns:wcm="http://schemas.microsoft.com/WMIConfig/2002/State" xmlns:xsi="http://www.w3.org/2001/XMLSchema-instance">
<OOBE>
<HideOnlineAccountScreens>true</HideOnlineAccountScreens>
<HideWirelessSetupInOOBE>true</HideWirelessSetupInOOBE>
<ProtectYourPC>3</ProtectYourPC>
</OOBE>
</component>
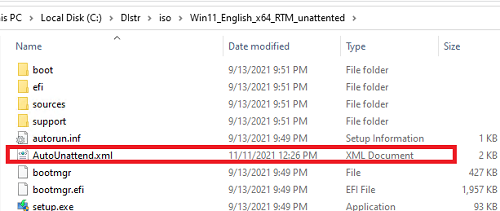
Скопируйте данный файл в корень установочной USB флешки с Windows 11.
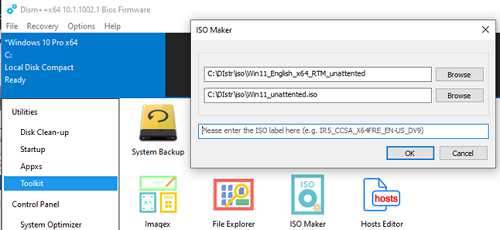
Если вам нужно добавить файл ответов в ISO образ Windows 11, распаккуйте его содержимое в любую папку на компьютере, скопируйте в этот каталог файл AutoUnattend.xml и пересоберите ISO образ.
Я использовал для создания образа бесплатную утилиту DISM++ (Toolkit -> ISO maker).
Теперь никакие проверки совместимости не будут производится при установке Windows 11.
В новой версии утилиты Rufus, использующейся для создания загрузочных USB флешек, появилась специальная опция Extended Windows 11 Installation (no TPM/no Secure Boot/8Gb- RAM). Данная опция позволяет создать образ для установки Windows 11 без проверки TPM и Secure Boot:
