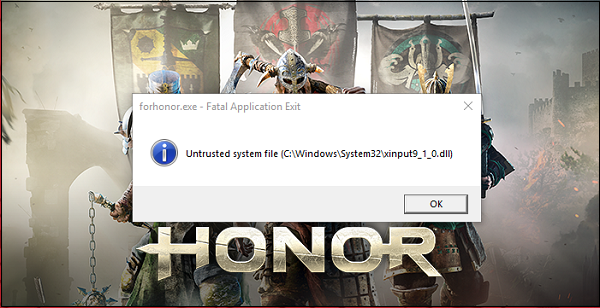
Во время пуска различных игр может появиться критическая ошибка, при которой окно сразу закрывается. Крит сопровождается уведомлением «Untrusted system file (C:\Windows\System32\…)». В подавляющем большинстве случаев причиной является сбой или неправильная работа анти-чит приложения – EasyAntiCheat. Ещё проблему может вызывать нарушение целостности системных файлов Windows. Сейчас обо всём поподробнее.
Причины сбоя
На суть проблемы не двояко намекает само сообщение. В переводе оно говорит: «Подозрительный системный файл». После данной записи обычно указывается ссылка на расположение файла по пути C:\Windows\System32. Естественно, в сообщении передаётся и наименование сомнительного файла.
Чаще всего у пользователей появляются проблемы со следующими dll-файлами:
- apphelp;
- aticfx64;
- avifil32;
- dwmapi;
- normalize;
- safeips64;
- vcruntime140;
- wldap32 и прочие.
Чтобы описать проблему понятнее, лучше сказать так – EasyAntiCheat выявил повреждение системного файла (не обязательно одного из вышеперечисленных). Приложение для защиты от читов, производимое Valve, выявляет какие-то нарушения целостности файлов, от чего его подвергает сомнению. Программа утрачивает доверие к конкретному файлу, из-за чего и появляется ошибка «Untrusted system file…».
Основные причины сбоя:
- Повреждение системных файлов из-за работы антивируса, вируса или повреждения секторов на диске;
- Неправильная работа приложения EasyAntiCheat;
- Заблокирована или выключена служба EasyAntiCheat.
Исправление перечисленных причин ошибки поможет исправить и последствие – вылет из игры.
Проверка целостности системы
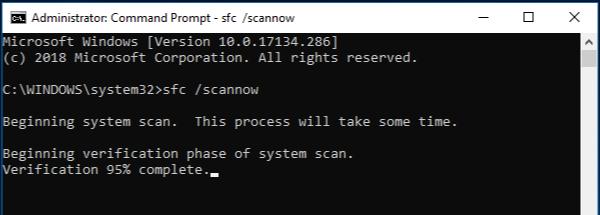
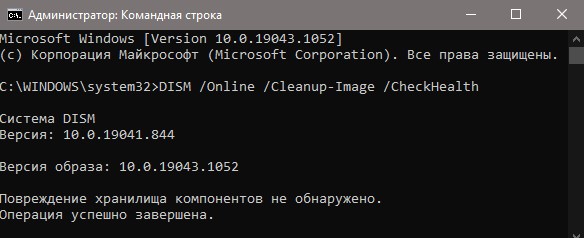
В Windows есть предустановленная утилита под названием sfc, которая автоматически проверяет целостность системных файлов. Если она найдёт какие-то сбои или повреждения, автоматически исправит их. Для запуска функции нужно воспользоваться консолью (ПКМ по Пуску и клик на «Командная строка»). Внутрь появившегося окна нужно вставить sfc /scannow и нажать кнопку Enter.
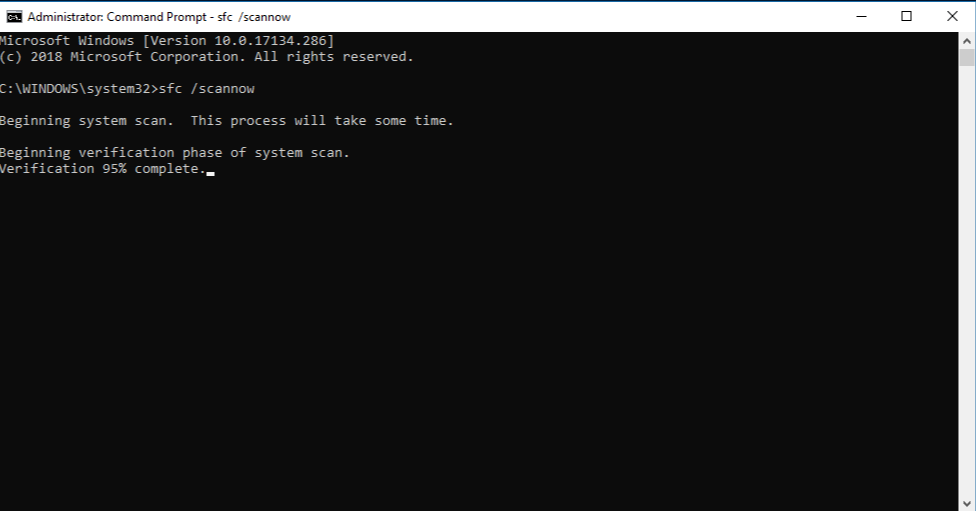
Больше от пользователя ничего не нужно, лишь дождаться завершения процедуры, и перезагрузить компьютер. В качестве альтернативы функции sfc есть DISM. Её имеет смысл использовать, если во время сканирования через sfc появились сбои. Команда в консоль – DISM.exe /online /cleanup-image /restorehealth.
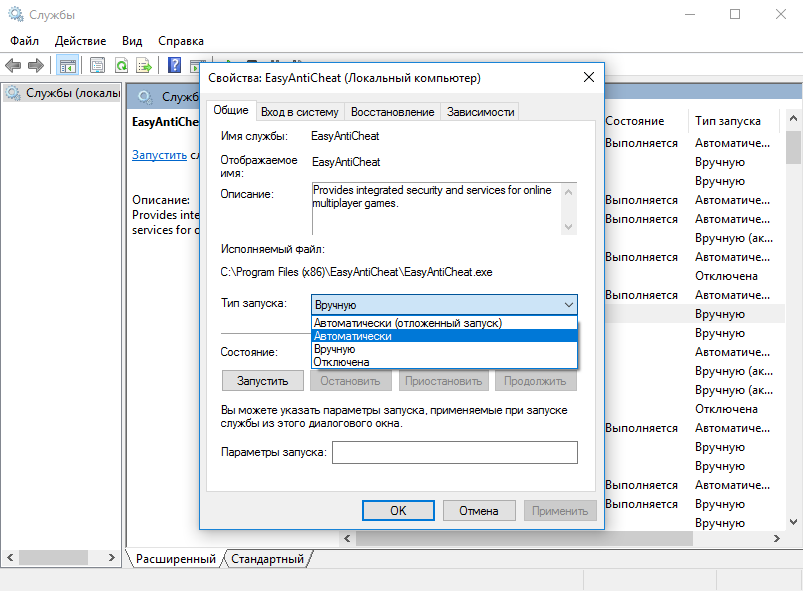
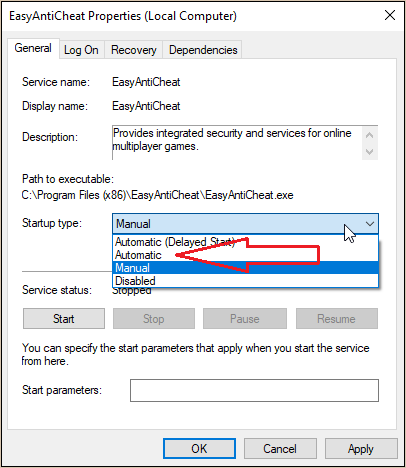
Проверка состояния службы EasyAntiCheat
Задача пользователя – удостовериться, что служба активна.
Пошаговое руководство:
- Нажать Win + R, вставить services.msc и щёлкнуть Ввод.
- Среди списка доступных служб нужно найти EasyAntiCheat.
- Сделать двойной клик по службе и заменить «Тип запуска» на «Автоматически».

- Перезагрузить службу.
Временное выключение средств защиты
Следует удостовериться, что антивирусное ПО и брандмауэр не блокирует нормальную работу приложения EasyAntiCheat. Для этого стоит временно выключить антивирус с брандмауэром и проверить, работает ли игра.
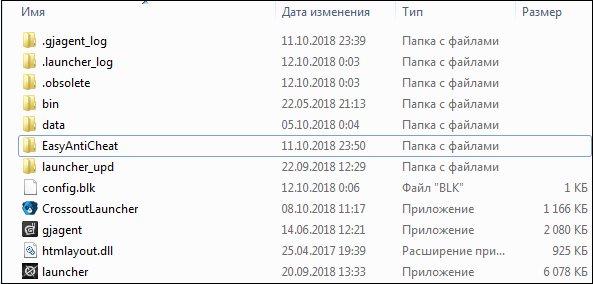
Удаление файлов EasyAntiCheat
Суть способа в том, чтобы перейти в каталог с игрой и удалить внутри него директорию с названием «EasyAntiCheat». Сразу после удаления папки нужно попробовать запустить игру.
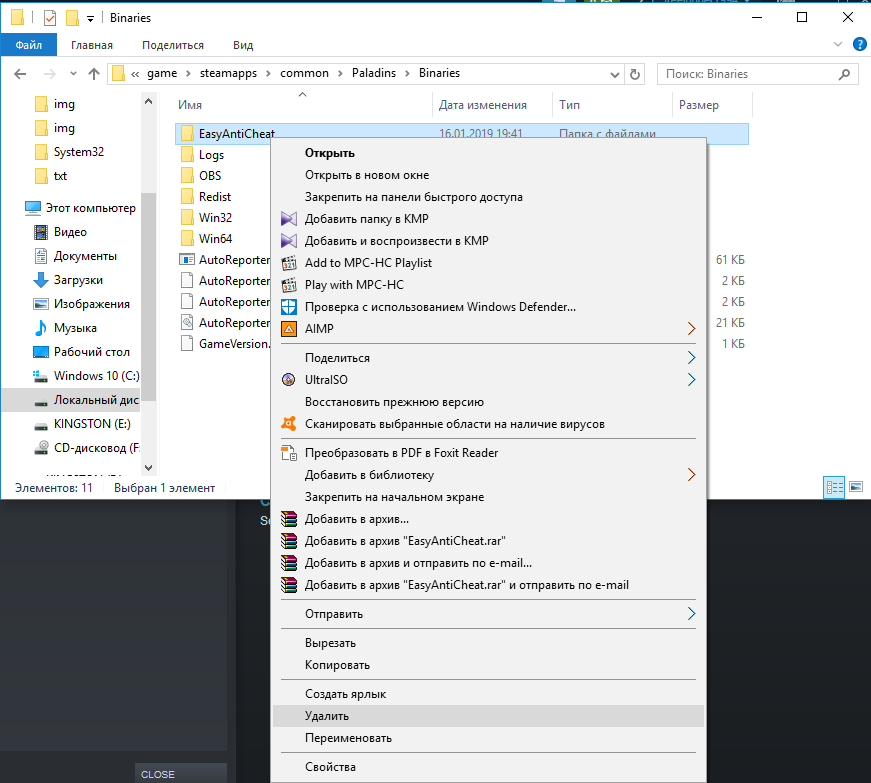
Важно! Удаление может не получиться, вместо него часто появляется сообщение – папка используется. Чтобы исключить её из работы, стоит перезагрузить компьютер и не запускать игру до удаления каталога.
Переустановка EasyAntiCheat
Довольно часто помогает переустановка анти-чит утилиты EasyAntiCheat.
Что нужно делать:
- Открыть каталог с игрой и перейти в раздел bin.
- Найти и открыть здесь папку EasyAntiCheat.
- Запустить установочный файл EasyAntiCheat_Setup.exe.
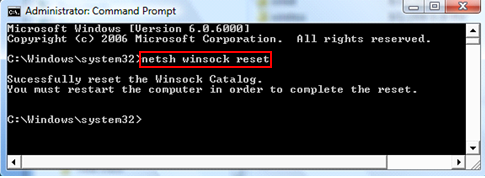
Сброс сетевых протоколов
Всё предельно просто:
- Сделать ПКМ по Пуску и выбрать «Командная строка (Администратор)».
- Вставить запись netsh winsock reset.

- Нажать на клавишу Enter и ожидать завершения процедуры.
Сканирование системы на наличие вирусов
Повреждение важных для системы файлов может произойти из-за наличия в Windows вредоносного кода. Зловреды могут изменять файлы, от чего они теряют работоспособность. Чтобы удалить вирусы, стоит использовать сканеры AdwCleaner или Dr.Web.
Уже сейчас ошибку «Untrusted system file (C:\Windows\System32\…)» можно считать поверженной. Один из прошлых способов должен был исправить проблему с некорректной работой анти-чита или повреждением файлов. Теперь игра должна работать исправно и стабильно.
Во время пуска различных игр может появиться критическая ошибка, при которой окно сразу закрывается. Крит сопровождается уведомлением «Untrusted system file (C:WindowsSystem32…)». В подавляющем большинстве случаев причиной является сбой или неправильная работа анти-чит приложения – EasyAntiCheat. Ещё проблему может вызывать нарушение целостности системных файлов Windows. Сейчас обо всём поподробнее.
Содержание
- Причины сбоя
- Проверка целостности системы
- Проверка состояния службы EasyAntiCheat
- Временное выключение средств защиты
- Удаление файлов EasyAntiCheat
- Переустановка EasyAntiCheat
- Сброс сетевых протоколов
- Сканирование системы на наличие вирусов
Причины сбоя
На суть проблемы не двояко намекает само сообщение. В переводе оно говорит: «Подозрительный системный файл». После данной записи обычно указывается ссылка на расположение файла по пути C:WindowsSystem32. Естественно, в сообщении передаётся и наименование сомнительного файла.
Чаще всего у пользователей появляются проблемы со следующими dll-файлами:
- apphelp;
- aticfx64;
- avifil32;
- dwmapi;
- normalize;
- safeips64;
- vcruntime140;
- wldap32 и прочие.
Чтобы описать проблему понятнее, лучше сказать так – EasyAntiCheat выявил повреждение системного файла (не обязательно одного из вышеперечисленных). Приложение для защиты от читов, производимое Valve, выявляет какие-то нарушения целостности файлов, от чего его подвергает сомнению. Программа утрачивает доверие к конкретному файлу, из-за чего и появляется ошибка «Untrusted system file…».
Основные причины сбоя:
- Повреждение системных файлов из-за работы антивируса, вируса или повреждения секторов на диске;
- Неправильная работа приложения EasyAntiCheat;
- Заблокирована или выключена служба EasyAntiCheat.
Исправление перечисленных причин ошибки поможет исправить и последствие – вылет из игры.
Проверка целостности системы
В Windows есть предустановленная утилита под названием sfc, которая автоматически проверяет целостность системных файлов. Если она найдёт какие-то сбои или повреждения, автоматически исправит их. Для запуска функции нужно воспользоваться консолью (ПКМ по Пуску и клик на «Командная строка»). Внутрь появившегося окна нужно вставить sfc /scannow и нажать кнопку Enter.
Больше от пользователя ничего не нужно, лишь дождаться завершения процедуры, и перезагрузить компьютер. В качестве альтернативы функции sfc есть DISM. Её имеет смысл использовать, если во время сканирования через sfc появились сбои. Команда в консоль – DISM.exe /online /cleanup-image /restorehealth.
Проверка состояния службы EasyAntiCheat
Задача пользователя – удостовериться, что служба активна.
Пошаговое руководство:
- Нажать Win + R, вставить services.msc и щёлкнуть Ввод.
- Среди списка доступных служб нужно найти EasyAntiCheat.
- Сделать двойной клик по службе и заменить «Тип запуска» на «Автоматически».
- Перезагрузить службу.
Временное выключение средств защиты
Следует удостовериться, что антивирусное ПО и брандмауэр не блокирует нормальную работу приложения EasyAntiCheat. Для этого стоит временно выключить антивирус с брандмауэром и проверить, работает ли игра.
Удаление файлов EasyAntiCheat
Суть способа в том, чтобы перейти в каталог с игрой и удалить внутри него директорию с названием «EasyAntiCheat». Сразу после удаления папки нужно попробовать запустить игру.
Важно! Удаление может не получиться, вместо него часто появляется сообщение – папка используется. Чтобы исключить её из работы, стоит перезагрузить компьютер и не запускать игру до удаления каталога.
Переустановка EasyAntiCheat
Довольно часто помогает переустановка анти-чит утилиты EasyAntiCheat.
Что нужно делать:
- Открыть каталог с игрой и перейти в раздел bin.
- Найти и открыть здесь папку EasyAntiCheat.
- Запустить установочный файл EasyAntiCheat_Setup.exe.
Сброс сетевых протоколов
Всё предельно просто:
- Сделать ПКМ по Пуску и выбрать «Командная строка (Администратор)».
- Вставить запись netsh winsock reset.
- Нажать на клавишу Enter и ожидать завершения процедуры.
Сканирование системы на наличие вирусов
Повреждение важных для системы файлов может произойти из-за наличия в Windows вредоносного кода. Зловреды могут изменять файлы, от чего они теряют работоспособность. Чтобы удалить вирусы, стоит использовать сканеры AdwCleaner или Dr.Web.
Уже сейчас ошибку «Untrusted system file (C:WindowsSystem32…)» можно считать поверженной. Один из прошлых способов должен был исправить проблему с некорректной работой анти-чита или повреждением файлов. Теперь игра должна работать исправно и стабильно.
При запуске какой-либо игры пользователь может столкнуться с вылетом программы, сопровождающимся сообщением «Untrusted system file (C:WindowsSystem32…). Обычно это связано с некорректной работой античитингового инструмента «EasyAntiCheat» или повреждением одного из системных файлов ОС Виндовс. Давайте разберём суть возникшей проблемы и методы её решения.
Содержание
- Untrusted system file – суть и причины дисфункции
- Используйте утилиту SFC
- Проверьте работоспособность службы «EasyAntiCheat»
- Временно отключите ваш антивирус и брандмауэр
- Удалите директорию EasyAntiCheat
- Переустановите EasyAntiCheat
- Сбросьте сетевые протоколы
- Проверьте ваш PC на наличие зловредов
- Заключение
В переводе текст данного сообщения выглядит как «Системный файл, которому нет доверия». В текст ошибки обычно указывается расположение данного файла (C:WindowsSystem32), а также его название (например, apphelp.dll).
Наиболее часто в тексте ошибки Untrusted system file (C:WindowsSystem32…) встречаются следующие файлы:
- apphelp.dll
- aticfx64.dll
- avifil32.dll
- dwmapi.dll
- normaliz.dll
- safeips64.dll
- vcruntime140.dll
- wldap32.dll и другие.
Появление рассматриваемого нами сообщения обычно означает, что античитинговый инструмент от компании «Valve» под названием «EasyAntiCheat» обнаружил повреждение системного файла. Этот файл признан не заслуживающим доверия, вследствие чего пользователь получил вышеозначенную ошибку «Untrusted system file…»
Данная дисфункция может иметь следующие причины:
- Системные файлы повреждены (деятельность антивирусных программ, осыпание диска);
- Программа «EasyAntiCheat» работает некорректно;
- Служба «EasyAntiCheat» не запущена;
- В пользовательской ОС Виндовс не установлены все необходимые обновления.
Учитывая вышеозначенное давайте разберёмся, как исправить ошибку «Untrusted system file» (C:WindowsSystem32aticfx64.dll) и других файлов-аналогов на вашем ПК.
Это интересно: Windows Kernel modification detected – что делать.
Используйте утилиту SFC
Функционал системной утилиты SFC предназначен для выявления и исправления повреждённых системных файлов. Рекомендуем воспользоваться её возможностями, для чего запустите от админа командную строку, и там наберите:
![]()
Нажмите ввод, и дождитесь окончания проверки. Затем перезагрузите ПК, и запустите нужную игру.
Если при вышеупомянутой проверке появляется следующее сообщение:
![]()
Тогда в командной строке выполните следующую команду:
![]()
Проверьте работоспособность службы «EasyAntiCheat»
Нажмите на Win+R, введите там «services.msc» и нажмите ввод. В перечне служб найдите «EasyAntiCheat», дважды кликните на неё, и установите тип запуска на «Автоматически». Перезапустите данную службу, это может помочь избавиться от ошибки «Untrusted system file» (C:WindowsSystem32normaliz.dll).
Временно отключите ваш антивирус и брандмауэр
Временно деактивируйте ваш антивирус и брандмауэр с целью убедиться, что они не препятствуют корректной работе программы «EasyAntiCheat».
Удалите директорию EasyAntiCheat
Перейдите в директорию запускаемой вами игры, и там найдите папку «EasyAntiCheat». Удалите данную папку, а потом попытайтесь запустить вашу игру. Если в ходе удаления появится сообщение о том, что папка используется, тогда сначала перезагрузите PC, а потом удалите папку.
Переустановите EasyAntiCheat
Неплохие результаты даёт полная переустановка программы «EasyAntiCheat». Для этого перейдите в директорию игры, затем в папку bin, и в данной папке найдите директорию «EasyAntiCheat». В данной директории запустите исполняемый файл «EasyAntiCheat_Setup.exe», и переустановите данную программу. Это поможет устранить ошибку «Untrusted system file» (C:WindowsSystem32vcruntime140.dll) в вашей системе.
Сбросьте сетевые протоколы
Запустите командную строку от админа, и там наберите:
netsh winsock reset
Нажмите ввод, и после окончания процедуры попытайтесь запустить нужную игру.
Проверьте ваш PC на наличие зловредов
Поскольку причиной повреждения вирусных файлов могут быть различные зловреды, проверьте вашу систему на их наличие. В этом помогут программы уровня «AdwCleaner» и «Dr.Web CureIt!», обладающие признанной репутацией в деле удаления зловредов.
Читайте также: The system seems to lack either network cards – как исправить.
Заключение
Появление ошибки «Untrusted system file (C:WindowsSystem32wldap32.dll)» (и файлов аналогов) обычно сигнализирует о повреждение системных файлов или некорректной работе античитингового инструмента «EasyAntiCheat». Для решения возникшей проблемы рекомендуем использовать функционал утилиты SFC, а также выполнить остальной комплекс советов, перечисленных нами выше. Обычно их выполнение позволяет устранить рассматриваемую ошибку, и добиться стабильной работы запускаемой вами игры.
В данном руководстве разберем, как устранить ошибку с библиотекой ucrtbase.dll в Windows 10.
Ошибка разнообразная и звучит в разных контекстах в зависимости от ситуаций. К примеру, играя в игры или запуская некоторые программы появится сообщение, что запуск приложения невозможен, так как отсутствует ucrtbase.dll. В таких программах как 1С, ошибка может звучать «имя сбойного модуля ucrtbase.dll«. В других ситуациях файл ucrtbase.dll может быть не найден, не удается найти его, прекращена работа программы с указанием имени данного файла.
Виновником данной ошибки может быть повреждение системных файлов, отсутствие самого файла ucrtbase.dll, регистрация данной библиотеки слетела, несовместимость системной библиотеки ucrtbase.dll с таким же файлом в корне игры или программы.
1. Обновление системы
Обновите Windows 10 до последней версии, так как с обновлениями поступают необходимые DLL библиотеки. Перейдите в центр обновления и проверьте наличие загрузок.

2. Проверка системных файлов
Системные файлы могут повредиться, что вызовет много проблем, помимо ошибки с файлом ucrtbase.dll. По этому, мы автоматически проверим и восстановим их.
Запустите командную строку от имени администратора и введите ниже команды по очереди, дожидаясь окончание процесса:
DISM /Online /Cleanup-Image /RestoreHealthsfc /scannow
3. Регистрация библиотеки
Запустите командную строку от имени администратора и введите:
regsvr32 ucrtbase.dll

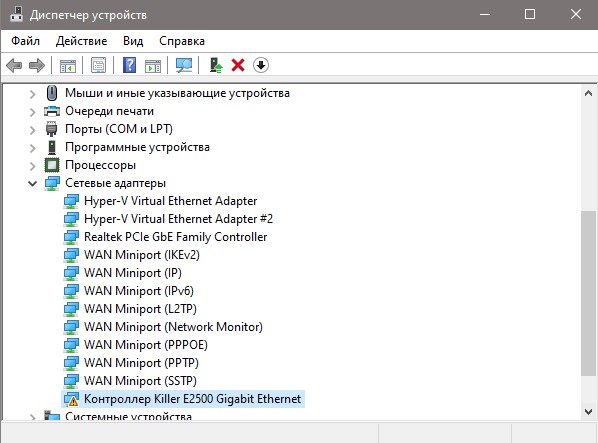
4. Обновите драйверы
Почитав много веток про данную ошибку на форуме Microsoft и вот список виновников из драйверов: сетевые, монитора, принтеры, сканеры. Я бы рекомендовал обновить все старые драйвера и убедиться, то нет драйверов с желтым восклицательным знаком.
Нажмите Win+X и выберите диспетчер устройств. Пробегитесь по списку и посмотрите наличие желтого знака. Также, совету вспомнить и обновить все старые.
5. Установка Microsoft Visual C ++
Если в ошибке указан путь сбойного модуля C:WINDOWSSystem32ucrtbase.dll, то нужно установить одним пакетом Microsoft Visual C ++ 2015, 2017 и 2019, но удалив уже установленные одиночные, если они имеются.
Перейдите на официальный сайт microsoft и скачайте две разрядности x86:vc_redist.x86.exe и x64: vc_redist.x64.exe.
6. Проблемы с проводником
Если у вас имеются проблемы с проводником, когда графический интерфейс закрывается и выдает ошибку на путь C:Windowsexplorer.exe, то нужно очистить кэш, так как проблема в драйвере дисплея/видеокарте.
Нажмите Win+R и вставьте сразу путь %AppData%MicrosoftWindowsRecentAutomaticDestinations или перейдите по нему вручную, если получается. Удалите все содержимое в данной папке, после чего перезагрузите ПК. Затем нажмите Win+X и выберите диспетчер устройств и удалите драйвер видеокарты.

Смотрите еще:
- Как исправить ошибку ISDone.dll при установке игр в Windows 10
- Как исправить ошибку UnityPlayer.dll для Windows 10/7
- Исправить ошибку nvwgf2umx.dll в Windows 10
- Отсутствует d3dx9_42.dll в Windows 10/7 — Решение
- Как зарегистрировать DLL библиотеки (x32-64 bit) в Windows 10/7
[ Telegram | Поддержать ]
The error message ‘Untrusted system file’ in Easy Anti Cheat occurs while loading some game through Steam or Origin.

This error message is vast because it occurs in several variations. The error message indicates some issues with games powered by Easy Anti-Cheat. So, if you play Apex Legends, Fortnite, New World, Rust, War Thunder, Wildlands, or any other game powered by Easy Anti-Cheat, you would have come across this issue.
But before fixing this error message, let’s discuss the probable reasons for this issue.
Why does this Error Message occur?
There are several variations of this error message and, generally, the reasons for its occurrence vary according to its type. But the following are the most common ones observed:
- This error message occurs when Easy Anti-Cheat flags certain game files as ‘untrusted.’
Important: Although Easy Anti-Cheat is a prevention system against hacks and cheats, it is not always correct. Because sometimes, it flags the perfectly normal files incorrectly
- The update of the Steam client on October 8, 2021, changed the ‘steamclient64.dll’ file. Several users have reported the issue after installing this update. So, this updated file could be another reason for this message.
- Sometimes, people face this error message because the servers are down for maintenance. So, in that case, you can check whether Easy Anti-Cheat is down or not on Twitter or other forums.
- This error message also occurs due to some bug in the ‘2.50.1001.0’ version of ‘Xbox Insider Hub.’
How to Fix the ‘Untrusted File System’ Issue?
Make sure to follow up with the description of the error message before proceeding.
Pre-requisite: Running the ‘SFC’ and ‘DISM’ Scans
As we’ve already mentioned, this error message occurs when Easy Anti-Cheat marks some game files as untrusted. So, if you think that the claim of the system is wrong, you can run the ‘SFC’ and ‘DISM’ scans to find out what is causing the ‘.dll’ files corruption.
1. Deleting the Certificates Folder from EasyAntiCheat Directory
Tested for ‘Origin’ Users of ‘Apex Legends’ and ‘The Division 2’
If you face the ‘Type:7’ or some other Easy Anti-Cheat error message with Apex Legends on Origin, we recommend deleting the Certificates folder inside the root directory of ‘EasyAntiCheat’. Because sometimes Easy Anti-Cheat incorrectly flags the perfectly normal files. So, when you delete the ‘Certificates’ folder, it will delete the data of the flagged files.
- First of all, right-click on the ‘Apex Legends’ icon from the desktop and choose the ‘Properties’ option.

Right-Clicking on the ‘Apex Legends’ icon and choosing the ‘Properties’ option - Now, click on the ‘Open File Location’ button to open the file location of ‘Apex Legends.’

Clicking on the ‘Open File Location’ button in the ‘Shortcut’ tab of the ‘Properties’ window of ‘Apex Legends’ - Double-click on the ‘EasyAntiCheat’ folder inside the root folder of ‘Apex.’

Double-Clicking on the ‘EasyAntiCheat’ folder in the root directory of ‘Apex’ - Now, right-click on the ‘Certificates’ folder and choose the ‘Delete’ option to delete this folder.

Deleting the ‘Certificates’ folder inside the ‘EasyAntiCheat’ folder - After that, open the ‘Apex Legends’ again to find out whether the error persists or not.


Important: If you are dealing with the ‘System32/phd.dll’ error in ‘The Division 2,’ we recommend going to the ‘Ubisoft Game Launcher’ folder first. Then, navigate to the ‘games’ folder and open the required (game) folder to delete the ‘Certificates’ folder
If this solution has resolved the ‘Easy Anti Cheat Untrusted system file Apex’ error messages, then good for you. Otherwise, try the next solution.
2. Upgrading Windows 10 to Version 1909
Tested for The Division 2
If you see a black screen after following the steps of Solution # 1 for Division 2, we recommend updating your Windows-10 version to 1909.
Important: You can also apply this solution if your game crashes on the desktop after deleting the ‘Certificates’ folder
The conventional way of updating the Windows is through ‘Settings’ < ‘Update & Security’ < ‘Windows Update’ options. But this way will not work for everyone because everyone would be using a different version of Windows 10. So, in that case, we will install Windows-10 version 1909 manually.
After installing the mentioned version, check whether this solution has proved useful or not. If yes, then good for you. Otherwise, try the next solution.
3. Reinstalling the ‘Microsoft Visual C++ Redistributable Package’
If you face the phd.dll Untrusted system file error with Division 2, it might be because of the supporting software called Microsoft Visual C++ Redistributable Package. So, reinstalling this supporting software will fix this issue because it has worked for other users.
- First, open any browser and type ‘Microsoft Visual C++ Redistributable Package’ in the search bar.
- Once the browser has opened the required result, choose the one with ‘Latest supported Visual C++ Redistributable downloads’ as its title.

Typing the required query and opening the link for downloading the ‘Visual C++ Redistributable downloads’ - The browser will take you to the official documentation website of Microsoft. So, scroll down and choose the version of ‘vc_redist’ according to your system architecture.

Important: Click on the link against your required system architecture to begin the downloading

- Once the downloading is complete, double-click on the file to begin the installation.
- Then, check the ‘I agree to the license terms and conditions’ option and click on the ‘Install’ button.

Checking the ‘I agree to the license terms and conditions’ option and clicking on the ‘Install’ button - The system will initialize the process and, after some time, you will see the progress bar moving. Wait for the system to complete the installation procedure

The system is initializing the installation of ‘Microsoft Visual C++ Redistributable Package’ - Once the process is complete, click on the ‘Restart’ button to restart your system because it is necessary for the proper installation and working of the ‘Microsoft Visual C++ Redistributable Package.’

Clicking on the ‘Restart’ button to restart the PC after completion of the installation


After the system restarts, check whether or not this solution has solved this error message. If yes, then good for you. Otherwise, try the next solution.
4. Disabling the Process ‘xgameruntime’
Temporary Solution
If you face the error message along with the (C:WindowsSystem32xgameruntime.dll) error message from Easy Anti-Cheat, we recommend killing the (specified) process. But this is a temporary solution and you will have to apply the same procedure whenever this error message occurs.
- First of all, open the ‘Task Manager’ from the ‘Start menu.’

Opening the ‘Task Manager’ from the ‘Start menu’ - Then, click on the ‘More details’ option in the ‘Task Manager.’

Clicking on the ‘More details’ option in ‘Task Manager’ - After that, find the ‘xgameruntime’ process in the ‘Process’ tab of ‘Task Manager.’


Important: This process should be under ‘Gaming Services’ and you need to expand it to find out the ‘xgameruntime’ process
- Once you have found the required process, right-click on it and choose the ‘End task’ option.

Choosing the ‘End task’ option after right-clicking on the process

Note: You can apply the same procedure for different processes, causing the same error message
If the error message persists or you don’t want to use this temporary solution, we recommend trying the next solution.
5. Unregistering the System from ‘Xbox Insider Hub’
Downloading the Newer Version of ‘Gaming Services’
As mentioned earlier, this error message occurs in the 2.50.1001.0 version of Xbox Insider Hub. So, if you face this error message, we recommend unregistering your system from Xbox Insider Hub and downloading the ‘2.47.10001.0’ version of ‘Gaming Services.’
Steps for Unregistering from ‘Xbox Insider Hub’
- First of all, open the ‘Xbox Insider Hub’ application from the ‘Start menu.’

Opening the ‘Xbox Insider Hub’ application from the ‘Start menu’ - Then, navigate to the ‘Previews’ section and unenroll from ‘Windows Gaming.’

Navigating to the ‘Previews’ section and unenrolling from ‘Windows Gaming’


Important: You can also choose to unenroll from everything you have joined
- Once unenrolled, restart your system by going to the ‘Start’ < ‘Power’ < ‘Restart’ options.

Restarting the system

Note: Don’t skip the system restarting. Otherwise, this solution will not work for you
Steps for Removing and Reinstalling the ‘Gaming Services’ Application
- After the system restarts, open ‘Windows PowerShell’ as ‘Administrator.’

Clicking on ‘Run as administrator’ to run ‘Windows PowerShell’ as Administrator - Now, type the following command in ‘Windows PowerShell’ and hit the ‘Enter’ key to execute this command:

get-appxpackage Microsoft.GamingServices | remove-AppxPackage -allusers
Important: The above command will call the ‘Gaming Services’ and remove it from your system
- Now, type the following command and hit the ‘Enter’ key (again) for executing it:
start ms-windows-store://pdp/?productid=9MWPM2CQNLHN
- The system will directly open the install page of ‘Gaming Services’ from ‘Microsoft Store.’ So, click on the ‘Install’ button to install the ‘Gaming Services’ application on your system.

Clicking on the ‘Install’ button to install the ‘Gaming Services’ - Once you have successfully installed the application, go back to the ‘Windows PowerShell’ and execute the following command:

get-appxpackage Microsoft.GamingServices
- Now, ‘Windows PowerShell’ will list all the information regarding the ‘Gaming Services’ application. So, make sure the ‘Version’ entry says ‘2.47.10001.0’ because it is the stable version that has worked for others.

Windows PowerShell has executed commands and is now, displaying the information of the ‘Gaming Services’ application

After that, execute the game again and check whether the error persists or not. If yes, then try the next solution.
6. Repairing ‘Easy Anti-Cheat’ Software
If the error message persists, we recommend repairing the Easy Anti-Cheat according to the game that causes this issue. So, try the following steps.
- First of all, open File Explorer and navigate to the game installation folder.
Important: Typically, Steam installs the games in the ‘Program Files (x86)’ folder. So, we will follow the next steps according to the default location of the games. But you should apply the next steps according to the installation directory of your game
- Then, double-click on the ‘C’ drive, and after that, double-click on the ‘Program Files (x86)’ folder.

Double-clicking on ‘C’ drive to open it 
Opening the ‘Program Files (x86)’ folder - Now, find the ‘Steam’ folder inside the newly opened folder and open it.

Opening the ‘Steam’ folder inside the ‘Program Files (x86)’ folder - Then, open the ‘steamapps’ folder inside the ‘Steam’ folder.

Opening the ‘steamapps’ folder inside the ‘Steam’ folder - After that, open the ‘common’ folder and, inside the newly opened folder, you will find your games folders. So, open the folder of that game, which is creating this issue.

Opening the ‘common’ folder inside the ‘steamapps’ folder 
Opening the game folder which causes this error message (inside the ‘common’ folder) - Now, double-click on the ‘EasyAntiCheat’ folder inside the game folder.

Opening the ‘EasyAntiCheat’ folder inside the game folder - Then, right-click on the setup file of ‘Easy Anti-Cheat’ and choose the ‘Run as administrator’ option.

Selecting the ‘EasyAntiCheat_Setup.exe’ file 
Choosing the ‘Run as administrator’ option after right-clicking on the setup file of ‘Easy Anti-Cheat Service’


Important: The system will ask for confirmation. So, click on the ‘Yes’ button to allow

- Once the setup opens, click on the ‘Repair Service’ button to start the repairing procedure.
Note: Make sure that you have selected the correct game before hitting the ‘Repair’ button

- After the repair operation completes, click on the ‘Finish’ button.

Clicking on the ‘Finish’ button after the completion of the repairing procedure

Now, open the game again and check whether or not the error message persists. If not, then good for you. Otherwise, try the next solution.
7. Running the ‘Easy Anti-Cheat launcher’ as ‘Administrator’
Tested for Wildlands and Rust
Running Easy Anti-cheat as an administrator will make sure that all different files are run elevated. If the issue is occurring because of the loss of UAC, this will fix the problem.
- First, go to the game (which causes this error) in your Steam library.
- Then, right-click on it and choose the ‘Properties’ option.

Right-clicking on the game from Steam’s game library and choosing the ‘Properties’ option - After that, a sub-window will open. So, click on the ‘Browse’ button.

Clicking on the ‘Browse’ button to load the game directory from Steam - Now, Steam will open the root directory of the game. So, scroll down to find a file named ‘EasyAntiCheat_launcher’ and select it.
- Then, right-click on it and choose the ‘Properties’ option.

Right-clicking on the ‘EasyAntiCheat_launcher’ file and choosing the ‘Properties’ option - Now, switch to the ‘Compatibility’ tab in the ‘Properties’ window.
- Then, check the box against the ‘Run this program as an administrator’ option.
- After that, click on the ‘Apply’ and ‘OK’ buttons to save the changes.

Switching to the ‘Compatibility’ tab, then checking the checkbox against ‘Run this program as an administrator’ and applying the new settings - Go to the ‘Steam’ application again and run the game.

Clicking on the ‘PLAY’ button to run the game after saving the changes


8. Replacing the Current ‘steamclient64.dll’ File with the Previous One
Steam released an update on October 8, 2021, in which they changed the ‘steamclient64.dll’ file, which is causing this issue. So, replacing the updated file with the previous version will fix this issue.
Important: Apply this procedure while keeping the ‘Steam’ open. Otherwise, this solution will not work
- First, open the following link in any browser.
https://drive.google.com/file/d/1r0oZzcThFj35faS1BobqyoA5eu4rS9iZ/view?usp=sharing
- Then, download the ‘steamclient64.dll’ file from the opened webpage.

Downloading and saving the ‘steamclient64.dll’ file - Once the download is complete, open the download location and copy the ‘steamclient64.dll’ file.

Copying the ‘steamclient64.dll’ file - Now, paste the copied file in the ‘Steam’ directory by going to ‘C: < Program Files (x86) < Steam’ location.

Pasting the ‘steamcleint64.dll’ file in ‘C < Program Files (x86) < Steam’ location - The system will ask whether you want to replace the file or skip it. So, click on the ‘Replace the file in the destination’ option.

Clicking on the ‘Replace the file in the destination’ option for replacing the copied file


Important: The ‘Steam’ directory location depends on whether or not you have changed the location during installation. So, if you have changed the location, choose the location according to your use case
9. Updating the Radeon Software Adrenalin Edition
For AMD Radeon Graphics Card Users
If you use an AMD graphics card and are facing the Anti-cheat message followed by the ‘C:WindowsSystem32amdihk64.dll’ error code, we recommend updating the drivers of your graphics card. Because AMD mentioned in the release notes of ‘Radeon Software Adrenalin 2019 Edition 19.7.1’ that they fixed the issues with ‘Easy Anti-Cheat.’ So, try the following steps.
- First, open the following link in your browser.
https://www.amd.com/en/technologies/radeon-software
- Now, scroll down to find the ‘DOWNLOAD NOW’ button and click on it to open the download page of ‘AMD Radeon Software.’

Clicking on the ‘DOWNLOAD NOW’ button to open the download page of ‘AMD Radeon Software’ - Once you are on the download page, scroll down and select the drivers according to your system. Then, click on the ‘SUBMIT’ button.

Selecting the drivers according to our system and clicking on the ‘SUBMIT’ button - Now, the website will take you to the operating system choice page. So, expand the operating system entries and click on the ‘DOWNLOAD*’ button.

Expanding the operating system and clicking on the ‘DOWNLOAD*’ button - Once the download is complete, open the download location and double-click on the downloaded file to open it.

Double-clicking on the downloaded ‘Radeon Software Adrenaline’ file to open it - Then, click on the ‘Install’ button to begin the procedure.

Clicking on the ‘Install’ button - Once the initial extraction is complete, the ‘AMD Radeon Software Installer’ will detect your system configuration.

The Installer of ‘AMD Radeon Software’ is detecting the system configuration - After system detection, click on the ‘Additional Options’ first and check the box that says ‘Factory Reset (Optional)’ because it will remove the previous versions and perform a clean install.
- Then, click on the ‘Install’ button to begin the installation procedure.

Checking the ‘Factory Reset (Optional)’ option and clicking on the ‘Install’ button


Important: The display of your system may flicker during installation, but don’t worry because it is normal
- After some time, the software will ask you to restart the system. So, click on the ‘Restart Now’ button to restart the system.

Clicking on the ‘Restart Now’ button to restart the system - The installation will be complete upon restarting the system. So, you can click on the ‘Finish’ button to close the installation window. But you can choose to select or deselect the checkboxes in this window.

Clicking on the ‘Finish’ button after the completion of the installation procedure


Now, check whether the (under-discussed) error message persists or not. However, if you have the same problem with a system using an NVIDIA graphics card, we recommend performing a clean installation of NVIDIA drivers as well.
Иногда при входе в различные игры возникает ошибка «untrusted system file». После этого загрузка останавливается, и игра в экстренном режиме прекращает работу. В данном материале мы рассмотрим основные пути, как обойти эту проблему.
Данная проблема часто возникает после выхода новых обновлений, но могут быть и другие причины: начиная от неправильной установки игры и заканчивая блокировкой загрузочных файлов антивирусом. Мы лишь рассмотрим самые распространенные способы, которые помогут решить проблему. К сожалению, единой инструкции нет. В каждой конкретной игре могут быть свои тонкости и нюансы. Если у вас лицензионная версия игры, лучше обратиться в тех поддержку.
Способы решения
Ошибка чаще всего возникает после запуска клиента с игрой. Загрузка доходит до 99%, после этого резко останавливается и появляется окно с надписью: «untrusted system file (C/Windows/System32/cryptul.dll). В вашем случае адрес системного файла, на который «жалуется» игра может быть другой.

Внешний вид ошибки
Первое, что необходимо сделать — это удалить сам Еasyanticheat. Для этого заходим в папку с игрой, далее переходим в папку с бинарными файлами «Binarius» — «Win64» — «Еasyanticheat». В сети есть много мнений, что достаточно лишь удалить папку с сертификатами «Certificates» и проблема будет решена. На самом деле, это не всегда помогает. На некоторое время ошибка действительно пропадет, но вскоре будет появляться снова. Впрочем, в некоторых случаях этот способ действительно может помочь в решении проблемы. Нужно пробовать.

Переустановка Еasyanticheat
Далее попробуйте переустановить Еasyanticheat. Для этого запустите .exe файл. В выплывающем списке найдите нужную игру, а затем нажмите на кнопку «Помощь в восстановлении». Иногда целесообразнее полностью удалить паку с Еasyanticheat, а затем установить программу заново.
Другие способы
Если вышеперечисленные методы не помогли решить проблему, то она, скорее всего, кроется в самой системе. Нужно проверить Windows на целостность. Подробная инструкция как это сделать находится на официальном сайте Microsoft. Если же у вас Windows 7, то делается эта процедура максимально просто:
- Нажмите сочетание клавиш Win + R, наберите в появившемся окне cmd и нажмите Enter.
- В командной строке введите Sfc /Scannow и нажмите Enter.
- Дождитесь окончания проверки системы.
- Перезагрузите компьютер.
- Если проблема сохранится, свяжитесь со службой поддержки EasyAntiCheat.
Если ошибка вновь появляется, просканируйте компьютер на наличие вредоносных программ с помощью антивируса. Также убедитесь, что на вашем компьютере установлены все самые свежие обновления и драйверы. Для этого можете воспользоваться встроенным инструментом Windows либо отдельными утилитами.
Итог
Надеемся, данная статья помогла вам в решении проблемы с ошибкой Еasyanticheat untrusted system file. Если у вас остались вопросы или предложения, то добро пожаловать в комментарии.
Оценка статьи:


 (10 оценок, среднее: 3,30 из 5)
![]() Загрузка…
Загрузка…
Самое читаемое:

10.02.2023
Как включить комментарии в Телеграмм канале
В последних версиях приложения Telegram появилось новшество – возможность оставления комментариев к посту….
Далее

17.03.2022
Как установить дополнительные виджеты на экран телефона Андроид
Если у Вас возникли сложности с тем, чтобы добавить виджеты приложений на смартфон, то это пошаговое руководство…
Далее

17.03.2022
Как очистить кэш телеграмма на телефоне Андроид
Люди, которые активно используют мессенджеры, зачастую не догадываются о том, что в их мобильных гаджетах…
Далее

17.03.2022
Как скопировать ссылку на свой телеграмм Андроид
Любой из пользователей мессенджера Телеграм в тот или иной момент времени задавался вопросом, как узнать, где…
Далее
При запуске какой-либо игры пользователь может столкнуться с вылетом программы, сопровождающимся сообщением «Untrusted system file (C:\Windows\System32\…). Обычно это связано с некорректной работой античитингового инструмента «EasyAntiCheat» или повреждением одного из системных файлов ОС Виндовс. Давайте разберём суть возникшей проблемы и методы её решения.
Содержание
- Untrusted system file – суть и причины дисфункции
- Используйте утилиту SFC
- Проверьте работоспособность службы «EasyAntiCheat»
- Временно отключите ваш антивирус и брандмауэр
- Удалите директорию EasyAntiCheat
- Переустановите EasyAntiCheat
- Сбросьте сетевые протоколы
- Проверьте ваш PC на наличие зловредов
- Заключение
Untrusted system file – суть и причины дисфункции
В переводе текст данного сообщения выглядит как «Системный файл, которому нет доверия». В текст ошибки обычно указывается расположение данного файла (C:\Windows\System32), а также его название (например, apphelp.dll).
Наиболее часто в тексте ошибки Untrusted system file (C:\Windows\System32\…) встречаются следующие файлы:
- apphelp.dll
- aticfx64.dll
- avifil32.dll
- dwmapi.dll
- normaliz.dll
- safeips64.dll
- vcruntime140.dll
- wldap32.dll и другие.
Появление рассматриваемого нами сообщения обычно означает, что античитинговый инструмент от компании «Valve» под названием «EasyAntiCheat» обнаружил повреждение системного файла. Этот файл признан не заслуживающим доверия, вследствие чего пользователь получил вышеозначенную ошибку «Untrusted system file…»
Данная дисфункция может иметь следующие причины:
- Системные файлы повреждены (деятельность антивирусных программ, осыпание диска);
- Программа «EasyAntiCheat» работает некорректно;
- Служба «EasyAntiCheat» не запущена;
- В пользовательской ОС Виндовс не установлены все необходимые обновления.
Учитывая вышеозначенное давайте разберёмся, как исправить ошибку «Untrusted system file» (C:\Windows\System32\aticfx64.dll) и других файлов-аналогов на вашем ПК.
Это интересно: Windows Kernel modification detected – что делать.
Используйте утилиту SFC
Функционал системной утилиты SFC предназначен для выявления и исправления повреждённых системных файлов. Рекомендуем воспользоваться её возможностями, для чего запустите от админа командную строку, и там наберите:
![]()
Нажмите ввод, и дождитесь окончания проверки. Затем перезагрузите ПК, и запустите нужную игру.
Если при вышеупомянутой проверке появляется следующее сообщение:
![]()
Тогда в командной строке выполните следующую команду:
![]()
Проверьте работоспособность службы «EasyAntiCheat»
Нажмите на Win+R, введите там «services.msc» и нажмите ввод. В перечне служб найдите «EasyAntiCheat», дважды кликните на неё, и установите тип запуска на «Автоматически». Перезапустите данную службу, это может помочь избавиться от ошибки «Untrusted system file» (C:\Windows\System32\normaliz.dll).
Временно отключите ваш антивирус и брандмауэр
Временно деактивируйте ваш антивирус и брандмауэр с целью убедиться, что они не препятствуют корректной работе программы «EasyAntiCheat».
Удалите директорию EasyAntiCheat
Перейдите в директорию запускаемой вами игры, и там найдите папку «EasyAntiCheat». Удалите данную папку, а потом попытайтесь запустить вашу игру. Если в ходе удаления появится сообщение о том, что папка используется, тогда сначала перезагрузите PC, а потом удалите папку.
Переустановите EasyAntiCheat
Неплохие результаты даёт полная переустановка программы «EasyAntiCheat». Для этого перейдите в директорию игры, затем в папку bin, и в данной папке найдите директорию «EasyAntiCheat». В данной директории запустите исполняемый файл «EasyAntiCheat_Setup.exe», и переустановите данную программу. Это поможет устранить ошибку «Untrusted system file» (C:\Windows\System32\vcruntime140.dll) в вашей системе.
Сбросьте сетевые протоколы
Запустите командную строку от админа, и там наберите:
netsh winsock reset
Нажмите ввод, и после окончания процедуры попытайтесь запустить нужную игру.
Проверьте ваш PC на наличие зловредов
Поскольку причиной повреждения вирусных файлов могут быть различные зловреды, проверьте вашу систему на их наличие. В этом помогут программы уровня «AdwCleaner» и «Dr.Web CureIt!», обладающие признанной репутацией в деле удаления зловредов.
Читайте также: The system seems to lack either network cards – как исправить.
Заключение
Появление ошибки «Untrusted system file (C:\Windows\System32\wldap32.dll)» (и файлов аналогов) обычно сигнализирует о повреждение системных файлов или некорректной работе античитингового инструмента «EasyAntiCheat». Для решения возникшей проблемы рекомендуем использовать функционал утилиты SFC, а также выполнить остальной комплекс советов, перечисленных нами выше. Обычно их выполнение позволяет устранить рассматриваемую ошибку, и добиться стабильной работы запускаемой вами игры.
The error message Untrusted System File in Easy Anti-Cheat occurs while loading some games through Steam or Origin.
This error message is vast because it occurs in several variations. The error message indicates some issues with games powered by Easy Anti-Cheat. So, if you play Apex Legends, Fortnite, New World, Rust, War Thunder, Wildlands, or any other game powered by Easy Anti-Cheat, you would have come across this issue.
Related: FIFA 23 Anti Cheat Error [Solved]
But before fixing this error message, let’s discuss the probable reasons for this issue.
Why does this Error Message occur?
There are several variations of this error message and, generally, the reasons for its occurrence vary according to its type. But the following are the most common ones observed:
- This error message occurs when Easy Anti-Cheat flags certain game files as ‘untrusted.’
Important: Although Easy Anti-Cheat is a prevention system against hacks and cheats, it is not always correct. Because sometimes, it flags the perfectly normal files incorrectly
- The update of the Steam client on October 8, 2021, changed the ‘steamclient64.dll’ file. Several users have reported the issue after installing this update. So, this updated file could be another reason for this message.
- Sometimes, people face this error message because the servers are down for maintenance. So, in that case, you can check whether Easy Anti-Cheat is down or not on Twitter or other forums.
- This error message also occurs due to some bug in the ‘2.50.1001.0’ version of ‘Xbox Insider Hub.’
Pre-requisite: Running the ‘SFC’ and ‘DISM’ Scans
As we’ve already mentioned, this error message occurs when Easy Anti-Cheat marks some game files as untrusted.
So, before you start dealing with any further solutions, the first step you will take is to run the SFC and DISM system scans, to find out what is causing the .dll file corruption.
SFC Scan
Running an SFC scan is extremely simple. If it works, it can potentially save you hours of your time, that you would have spent troubleshooting. You can run the scan by following the steps below.
- Press Win, and search for Command Prompt.
- Open the Command Prompt by clicking Run As Administrator.

Running as administrator - Now that you are inside the command prompt, type the following and press enter:
-
sfc /scannow
- Quit the Command Prompt, and restart your PC.

See if this worked. If it did not, do not lose hope. We still have the DISM tool. Since using the DISM tool is a bit more complex, we crafted a separate guide. The guide features in-depth steps on how to run both, the SFC Scan, and the DISM tool.
Running Your Game Client As Administrator
Giving The Game Client Additional Permissions
Before we move on to complicated solutions, let us start off with some simple ones. When you run an application as administrator, the system gives that application extra permissions.
This can often fix glitches, just like this one. So it is worth a shot, isn’t it? Follow the steps below to run your game client as an administrator.
- Press Win.
- Search for your game client. For example Steam.
- Instead of pressing Open, click on Run As Administrator.
See if the error persists. Even if it does, do not lose hope. Move on to the next solution.
Errors fixed for Steam: Steam Client, not Opening, and Steam Error 29
Deleting the Certificates Folder from EasyAntiCheat Directory
Tested for ‘Origin’ Users of ‘Apex Legends’ and ‘The Division 2’
If you face the ‘Type:7’ or some other Easy Anti-Cheat error message with Apex Legends on Origin, we recommend deleting the Certificates folder inside the root directory of ‘EasyAntiCheat’. Sometimes Easy Anti-Cheat incorrectly flags the perfectly normal files. So, when you delete the ‘Certificates’ folder, it will delete the data of the flagged files.
- First of all, right-click on the ‘Apex Legends’ icon from the desktop and choose the ‘Properties’ option.
Right-clicking on the ‘Apex Legends’ icon and choosing the ‘Properties’ option - Now, click on the ‘Open File Location’ button to open the file location of ‘Apex Legends.’
Clicking on the ‘Open File Location’ button in the ‘Shortcut’ tab of the ‘Properties’ window of ‘Apex Legends’ - Double-click on the ‘EasyAntiCheat’ folder inside the root folder of ‘Apex.’
Double-Clicking on the ‘EasyAntiCheat’ folder in the root directory of ‘Apex’ - Now, right-click on the ‘Certificates’ folder and choose the ‘Delete’ option to delete this folder.
Deleting the ‘Certificates’ folder inside the ‘EasyAntiCheat’ folder - After that, open the ‘Apex Legends’ again to find out whether the error persists or not.
Important: If you are dealing with the ‘System32/phd.dll’ error in ‘The Division 2,’ we recommend going to the ‘Ubisoft Game Launcher’ folder first. Then, navigate to the ‘games’ folder and open the required (game) folder to delete the ‘Certificates’ folder
If this solution has resolved the ‘Easy Anti Cheat Untrusted system file Apex’ error messages, then good for you. Otherwise, try the next solution.
Upgrading Windows 10 to Version 1909
Tested for The Division 2
If you see a black screen after following the steps of Solution # 1 for Division 2, we recommend updating your Windows 10 version to 1909.
Important: You can also apply this solution if your game crashes on the desktop after deleting the ‘Certificates’ folder
The conventional way of updating the Windows is through ‘Settings’ < ‘Update & Security’ < ‘Windows Update’ options. But this way will not work for everyone because everyone would be using a different version of Windows 10. So, in that case, we will install Windows 10 version 1909 manually.
After installing the mentioned version, check whether this solution has proved useful or not. If yes, then good for you. Otherwise, try the next solution.
Reinstalling the ‘Microsoft Visual C++ Redistributable Package’
If you face the phd.dll Untrusted system file error with Division 2, it might be because of the supporting software called Microsoft Visual C++ Redistributable Package. So, reinstalling this supporting software will fix this issue because it has worked for other users.
- First, open any browser and type ‘Microsoft Visual C++ Redistributable Package’ in the search bar.
- Once the browser has opened the required result, choose the one with ‘Latest supported Visual C++ Redistributable downloads’ as its title.
Typing the required query and opening the link for downloading the ‘Visual C++ Redistributable downloads’ - The browser will take you to the official documentation website of Microsoft. So, scroll down and choose the version of ‘vc_redist’ according to your system architecture.
Important: Click on the link against your required system architecture to begin downloading.
- Once the downloading is complete, double-click on the file to begin the installation.
- Then, check the ‘I agree to the license terms and conditions’ option and click on the ‘Install’ button.
Checking the ‘I agree to the license terms and conditions’ option and clicking on the ‘Install’ button - The system will initialize the process and, after some time, you will see the progress bar moving. Wait for the system to complete the installation procedure
The system is initializing the installation of ‘Microsoft Visual C++ Redistributable Package’ - Once the process is complete, click on the ‘Restart’ button to restart your system because it is necessary for the proper installation and working of the ‘Microsoft Visual C++ Redistributable Package.’
Clicking on the ‘Restart’ button to restart the PC after completion of the installation
After the system restarts, check whether or not this solution has solved this error message. If yes, then good for you. Otherwise, try the next solution.
Disabling the Process ‘xgameruntime’
Temporary Solution
If you face the error message along with the (C:\Windows\System32\xgameruntime.dll) error message from Easy Anti-Cheat, we recommend killing the (specified) process. But this is a temporary solution and you will have to apply the same procedure whenever this error message occurs.
- First of all, open the ‘Task Manager’ from the ‘Start menu.’
Opening the ‘Task Manager’ from the ‘Start menu’ - Then, click on the ‘More details’ option in the ‘Task Manager.’
Clicking on the ‘More details’ option in ‘Task Manager’ - After that, find the ‘xgameruntime’ process in the ‘Process’ tab of ‘Task Manager.’
Important: This process should be under ‘Gaming Services’ and you need to expand it to find out the ‘xgameruntime’ process
- Once you have found the required process, right-click on it and choose the ‘End task’ option.
Choosing the ‘End task’ option after right-clicking on the process
Note: You can apply the same procedure for different processes, causing the same error message
If the error message persists or you don’t want to use this temporary solution, we recommend trying the next solution.
Unregistering the System from ‘Xbox Insider Hub’
Downloading the Newer Version of ‘Gaming Services’
As mentioned earlier, this error message occurs in the 2.50.1001.0 version of Xbox Insider Hub. So, if you face this error message, we recommend unregistering your system from Xbox Insider Hub and downloading the ‘2.47.10001.0’ version of ‘Gaming Services.’
Steps for Unregistering from ‘Xbox Insider Hub’
- First of all, open the ‘Xbox Insider Hub’ application from the ‘Start menu.’
Opening the ‘Xbox Insider Hub’ application from the ‘Start menu’ - Then, navigate to the ‘Previews’ section and unenroll from ‘Windows Gaming.’
Navigating to the ‘Previews’ section and unenrolling from ‘Windows Gaming’
Important: You can also choose to unenroll from everything you have joined
- Once unenrolled, restart your system by going to the ‘Start’ < ‘Power’ < ‘Restart’ options.
Restarting the system
Note: Don’t skip the system restarting. Otherwise, this solution will not work for you
Steps for Removing and Reinstalling the ‘Gaming Services’ Application
- After the system restarts, open ‘Windows PowerShell’ as ‘Administrator.’
Clicking on ‘Run as administrator’ to run ‘Windows PowerShell’ as Administrator - Now, type the following command in ‘Windows PowerShell’ and hit the ‘Enter’ key to execute this command:
get-appxpackage Microsoft.GamingServices | remove-AppxPackage -allusers
Important: The above command will call the ‘Gaming Services’ and remove it from your system
- Now, type the following command and hit the ‘Enter’ key (again) for executing it:
start ms-windows-store://pdp/?productid=9MWPM2CQNLHN
- The system will directly open the install page of ‘Gaming Services’ from ‘Microsoft Store.’ So, click on the ‘Install’ button to install the ‘Gaming Services’ application on your system.
Clicking on the ‘Install’ button to install the ‘Gaming Services’ - Once you have successfully installed the application, go back to the ‘Windows PowerShell’ and execute the following command:
get-appxpackage Microsoft.GamingServices
- Now, ‘Windows PowerShell’ will list all the information regarding the ‘Gaming Services’ application. So, make sure the ‘Version’ entry says ‘2.47.10001.0’ because it is the stable version that has worked for others.
Windows PowerShell has executed commands and is now, displaying the information of the ‘Gaming Services’ application
After that, execute the game again and check whether the error persists or not. If yes, then try the next solution.
Repairing ‘Easy Anti-Cheat’ Software
If the error message persists, we recommend repairing the Easy Anti-Cheat according to the game that causes this issue. So, try the following steps.
- First of all, open File Explorer and navigate to the game installation folder.
Important: Typically, Steam installs the games in the ‘Program Files (x86)’ folder. So, we will follow the next steps according to the default location of the games. But you should apply the next steps according to the installation directory of your game
- Then, double-click on the ‘C’ drive, and after that, double-click on the ‘Program Files (x86)’ folder.
Double-clicking on ‘C’ drive to open it Opening the ‘Program Files (x86)’ folder - Now, find the ‘Steam’ folder inside the newly opened folder and open it.
Opening the ‘Steam’ folder inside the ‘Program Files (x86)’ folder - Then, open the ‘steamapps’ folder inside the ‘Steam’ folder.
Opening the ‘steamapps’ folder inside the ‘Steam’ folder - After that, open the ‘common’ folder and, inside the newly opened folder, you will find your games folders. So, open the folder of the game, that is creating this issue.
Opening the ‘common’ folder inside the ‘steamapps’ folder Opening the game folder which causes this error message (inside the ‘common’ folder) - Now, double-click on the ‘EasyAntiCheat’ folder inside the game folder.
Opening the ‘EasyAntiCheat’ folder inside the game folder - Then, right-click on the setup file of ‘Easy Anti-Cheat’ and choose the ‘Run as administrator’ option.
Selecting the ‘EasyAntiCheat_Setup.exe’ file Choosing the ‘Run as administrator’ option after right-clicking on the setup file of ‘Easy Anti-Cheat Service’
Important: The system will ask for confirmation. So, click on the ‘Yes’ button to allow
- Once the setup opens, click on the ‘Repair Service’ button to start the repairing procedure.
Note: Make sure that you have selected the correct game before hitting the ‘Repair’ button
- After the repair operation completes, click on the ‘Finish’ button.
Clicking on the ‘Finish’ button after the completion of the repairing procedure
Now, open the game again and check whether or not the error message persists. If not, then good for you. Otherwise, try the next solution.
Running the ‘Easy Anti-Cheat launcher’ as ‘Administrator’
Tested for Wildlands and Rust
Running Easy Anti-cheat as an administrator will make sure that all different files are run elevated. If the issue is occurring because of the loss of UAC, this will fix the problem.
- First, go to the game (which causes this error) in your Steam library.
- Then, right-click on it and choose the ‘Properties’ option.
Right-clicking on the game from Steam’s game library and choosing the ‘Properties’ option - After that, a sub-window will open. So, click on the ‘Browse’ button.
Clicking on the ‘Browse’ button to load the game directory from Steam - Now, Steam will open the root directory of the game. So, scroll down to find a file named ‘EasyAntiCheat_launcher’ and select it.
- Then, right-click on it and choose the ‘Properties’ option.
Right-clicking on the ‘EasyAntiCheat_launcher’ file and choosing the ‘Properties’ option - Now, switch to the ‘Compatibility’ tab in the ‘Properties’ window.
- Then, check the box against the ‘Run this program as an administrator’ option.
- After that, click on the ‘Apply’ and ‘OK’ buttons to save the changes.
Switching to the ‘Compatibility’ tab, then checking the checkbox against ‘Run this program as an administrator’ and applying the new settings - Go to the ‘Steam’ application again and run the game.
Clicking on the ‘PLAY’ button to run the game after saving the changes
Replacing the Current ‘steamclient64.dll’ File with the Previous One
Steam released an update on October 8, 2021, in which they changed the ‘steamclient64.dll’ file, which is causing this issue. So, replacing the updated file with the previous version will fix this issue.
Important: Apply this procedure while keeping the ‘Steam’ open. Otherwise, this solution will not work
- First, open the following link in any browser.
https://drive.google.com/file/d/1r0oZzcThFj35faS1BobqyoA5eu4rS9iZ/view?usp=sharing
- Then, download the ‘steamclient64.dll’ file from the opened webpage.
Downloading and saving the ‘steamclient64.dll’ file - Once the download is complete, open the download location and copy the ‘steamclient64.dll’ file.
Copying the ‘steamclient64.dll’ file - Now, paste the copied file in the ‘Steam’ directory by going to ‘C: < Program Files (x86) < Steam’ location.
Pasting the ‘steamcleint64.dll’ file in ‘C < Program Files (x86) < Steam’ location - The system will ask whether you want to replace the file or skip it. So, click on the ‘Replace the file in the destination’ option.
Clicking on the ‘Replace the file in the destination’ option for replacing the copied file
Important: The ‘Steam’ directory location depends on whether or not you have changed the location during installation. So, if you have changed the location, choose the location according to your use case
Updating the Radeon Software Adrenalin Edition
For AMD Radeon Graphics Card Users
If you use an AMD graphics card and are facing the Anti-cheat message followed by the ‘C:\Windows\System32\amdihk64.dll’ error code, we recommend updating the drivers of your graphics card. Because AMD mentioned in the release notes of ‘Radeon Software Adrenalin 2019 Edition 19.7.1’ that they fixed the issues with ‘Easy Anti-Cheat.’ So, try the following steps.
- First, open the following link in your browser.
https://www.amd.com/en/technologies/radeon-software
- Now, scroll down to find the ‘DOWNLOAD NOW’ button and click on it to open the download page of ‘AMD Radeon Software.’
Clicking on the ‘DOWNLOAD NOW’ button to open the download page of ‘AMD Radeon Software’ - Once you are on the download page, scroll down and select the drivers according to your system. Then, click on the ‘SUBMIT’ button.
Selecting the drivers according to our system and clicking on the ‘SUBMIT’ button - Now, the website will take you to the operating system choice page. So, expand the operating system entries and click on the ‘DOWNLOAD*’ button.
Expanding the operating system and clicking on the ‘DOWNLOAD*’ button - Once the download is complete, open the download location and double-click on the downloaded file to open it.
Double-clicking on the downloaded ‘Radeon Software Adrenaline’ file to open it - Then, click on the ‘Install’ button to begin the procedure.
Clicking on the ‘Install’ button - Once the initial extraction is complete, the ‘AMD Radeon Software Installer’ will detect your system configuration.
The Installer of ‘AMD Radeon Software’ is detecting the system configuration - After system detection, click on the ‘Additional Options’ first and check the box that says ‘Factory Reset (Optional)’ because it will remove the previous versions and perform a clean install.
- Then, click on the ‘Install’ button to begin the installation procedure.
Checking the ‘Factory Reset (Optional)’ option and clicking on the ‘Install’ button
Important: The display of your system may flicker during installation but don’t worry because it is normal
- After some time, the software will ask you to restart the system. So, click on the ‘Restart Now’ button to restart the system.
Clicking on the ‘Restart Now’ button to restart the system - The installation will be complete upon restarting the system. So, you can click on the ‘Finish’ button to close the installation window. But you can choose to select or deselect the checkboxes in this window.
Clicking on the ‘Finish’ button after the completion of the installation procedure
Now, check whether the (under-discussed) error message persists or not. However, if you have the same problem with a system using an NVIDIA graphics card, we recommend performing a clean installation of NVIDIA drivers as well.
Final Words
We hope we helped you get around the issue of Untrusted System File in Easy Anti-Cheat. We realize how frustrating it can be, and we are proud to say that we exhausted every possible solution in this guide.
FAQs
What is the unknown file in Easy Anti-Cheat? This infers that Easy Anti-Cheat was not expecting the file contents as it were. I was expecting something different. An easy fix is to remove that specific file. This should be followed by validating the game installation. This can be done by game clients, such as Steam or Origin. This will cause the file to be re-downloaded.
How do I fix untrusted system files hidden DLL? The simplest thing to do is run the SFC /scannow command on Windows PowerShell or its Command Prompt. This should be followed by running the DISM tool.
Solving other gaming-related errors:
- Can’t Connect after Accepting Match in Dota 2
- Elden Ring Error Code 23
★★ Novice

октября 2019
Всем привет, срочно нужна помощь. При попытке войти в игру возникает ошибка untrusted system file, причем такая проблема во всех играх с Easy Anti cheat, и файлы постоянно указывает разные, все они системные и удалить как в официальных рекомендациях. Проверку системы, да и все, что пишут на офф сайте античита перепробовал, ничего не помогло.
![]()
![]()
Сообщение 1 из 7
(7 212 просмотров)
Hero

Сообщение 6 из 7
(7 120 просмотров)
Hero
октября 2019
это делали?
— проверка системы дисм-командами
— установка всех крит. обновлений системы
— удаление видеодрайвера с использованием ДДУ, установка последней его версии
— добавление во все исключения системного / стороннего антивируса папок игры, Ориджина и античита.
Сообщение 2 из 7
(7 166 просмотров)
★★ Novice
октября 2019
Да, делал все, что рекомендовали на офф сайте античита, + воспользовался некоторыми советами из других постов, все также. Вирусов не обнаружено (проверял касперским), винда лицензионная последней версии, драйверы тоже все обновлены
Сообщение 3 из 7
(7 160 просмотров)
Hero
октября 2019
Пожалуйста, прикрепите к следующему вашему сообщению отчеты в виде txt файлов от Dxdiag и MSInfo.
Сообщение 4 из 7
(7 154 просмотров)
★★ Novice
октября 2019
Вот файлы, надеюсь не перепутал
Сообщение 5 из 7
(7 139 просмотров)
Hero
Сообщение 6 из 7
(7 121 просмотров)
★★ Novice
октября 2019
В общем что-то из этого помогло, но точно не видеодрова, так как я их вчера после скана и обновил. Спасибо большое! Но этот античит Г, ибо ни в Siege, ни в других играх ничего так не влияет.
Сообщение 7 из 7
(7 099 просмотров)