
Have you acquired a new monitor only to find out it’s not displaying anything from your computer? Or maybe the monitor suddenly stops working?
On many occasions, this problem is caused by a faulty generic PNP monitor driver.
Apart from driver issues, the monitor might not be working due to an improper connection associated with cables. IT could also happen because the monitor is faulty.
In response to this error, most monitors would show “No signal” or “Check connection cable”. That gives you a clue as to the first thing you should do – check the connection cables.
Make sure all cables are properly connected
First, make sure all cables are connected properly. If you’re using a VGA or HDMI, or display port cable, look at the connection ports for the cables on both the monitor and computer and make sure they are not loose.
If you are sure the cables are connected the right way and the monitor still shows nothing, then you might need to switch cables.
If you were using HDMI at first, switch to VGA or display port. And if you were using a display port but the monitor still won’t show anything, then switch to VGA or HDMI.
How to Fix Generic PNP Monitor by Updating Drivers
If your monitor is not working, then you should update your display adapter drivers and monitor drivers.
How to Update the Display Adapter Driver
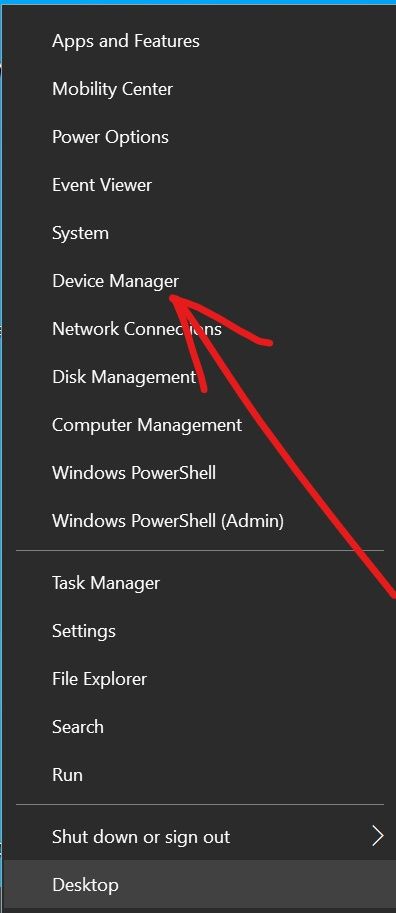
To update the display adapter driver, head over to the device manager by right-clicking on Start and selecting device manager.
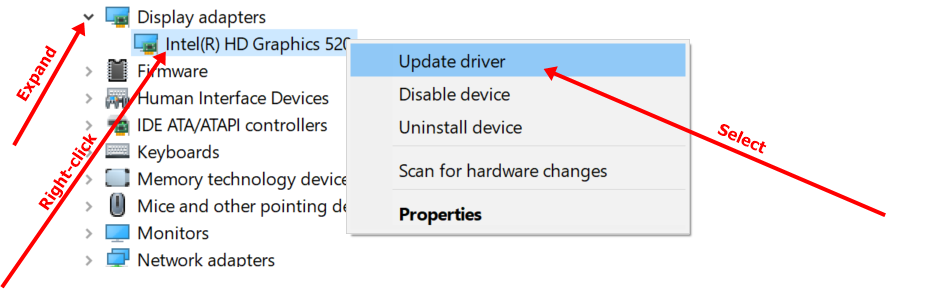
Expand Display adapters, right-click on the device you see (mostly “Intel(R) HD Graphics…”), and select “Update driver”.
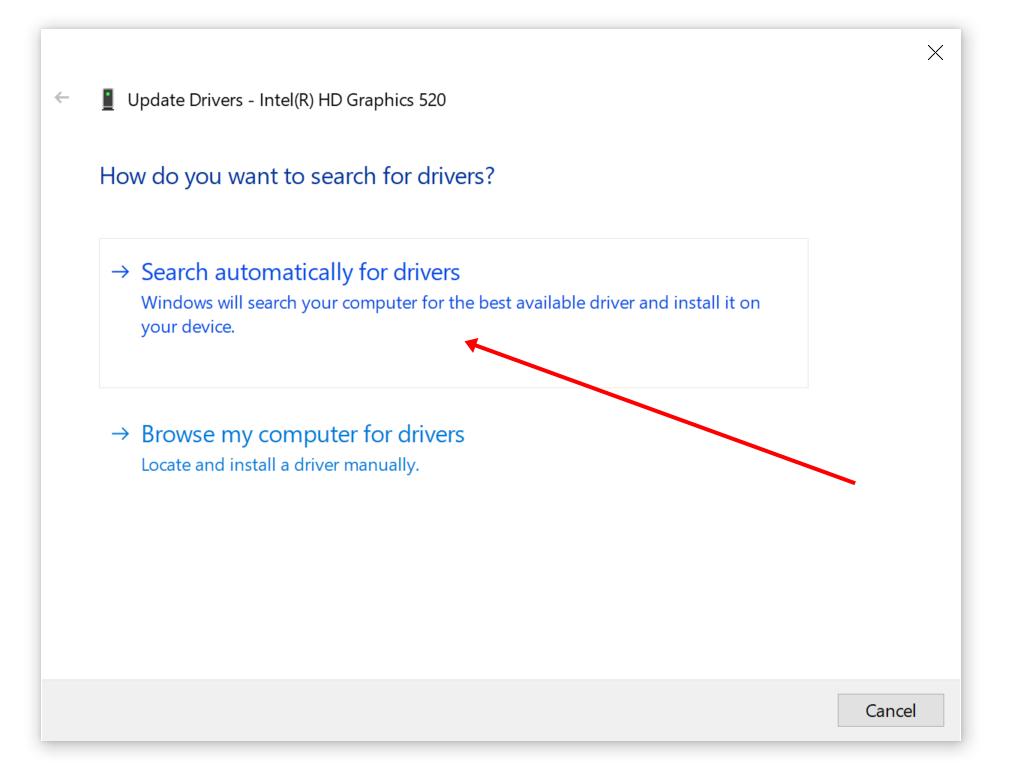
Select “Search automatically for drivers” so your computer can check the internet for the latest driver.
If the driver is really not up to date, your computer will download an updated version of the driver and prompt you to install it.
How to Update the Generic PnP Monitor Driver
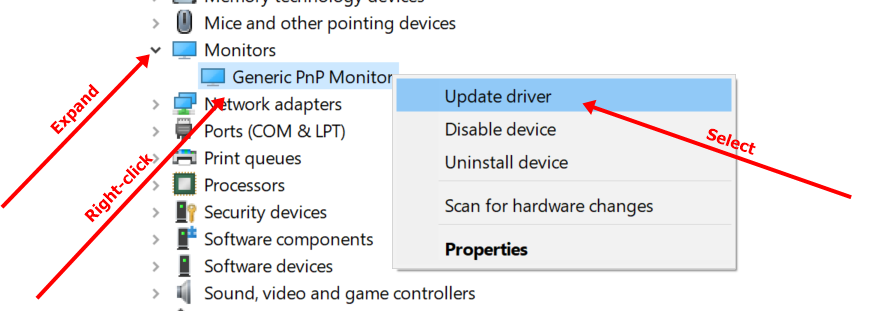
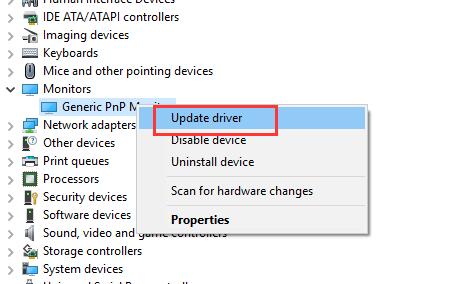
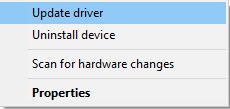
Head over to Device driver again and expand Monitors. Right-click on Generic PnP Monitor” and select Update driver.
PnP means Plug and Play. It’s the driver your computer installs for a monitor it doesn’t recognize.
Select “Search automatically for drivers”.
Your computer will prompt you to install the updated driver once it’s downloaded.
If you update the necessary drivers and the monitor fails to work, then it’s an issue with your cable connections. This time around, you might need to get an external adapter or external converter.
Use an External Adapter or Converter with your Connection Cables
If you try every possible cable and the monitor still doesn’t show anything, then it might mean your monitor won’t work unless you connect a display adapter to the part of the cable attached to your laptop or system unit.
In that case, there are several adapters you can use:
- VGA to HDMI
- USB to HDMI
- VGA to display port
You can get the adapters from any tech store in your area or online.
On most occasions, VGA to HDMI or VGA to display port works. When I had the same issue, VGA to HDMI adapter was what worked for me.
Final Thoughts
I hope this article helps you fix any issue you have with your monitor.
Bear in mind that once you update the necessary drivers (Monitor driver and Display adapter driver) and the monitor still fails to display, then it’s likely an issue with your connection cables.
Thank you for reading.
Learn to code for free. freeCodeCamp’s open source curriculum has helped more than 40,000 people get jobs as developers. Get started
The Generic PNP Monitor problem in Windows 10 occurs because the connected monitor is not properly recognized by the system. The «Generic PNP Monitor» problem appears on desktops computers or when you ‘re using an external monitor with your laptop, and is caused for one of the following three (3) reasons:
-
-
The driver for the display adapter (VGA) is incorrect or not installed.
-
The driver for the Monitor is not properly installed.
-
The Video Cable has problem.
-

This tutorial contains step-by-step instructions on how to resolve the ‘Generic PNP Monitor’ problem on Windows 10.
How to FIX: Generic PNP Monitor in Windows 10.
Method 1. Install all available Windows 10 Updates.
If the Generic PNP monitor problem, appears after installing or after updating Windows 10, proceed and install all the available updates. To do that,
1. Go to Start ![]() -> Settings -> Update and Security -> and click Check for Updates.
-> Settings -> Update and Security -> and click Check for Updates.

2. Download and install all Windows updates and then restart your PC.
Method 2. Install or Rollback the Display Adapter’s Drivers.
The second step to fix the Generic PNP Monitor problem, is to install (or to roll back), the graphic adapter’s drivers. To do that:
1. Open Device Manager. To do that:
-
- Press Windows
 + R keys to open the run command box.
 - In the «Open» box, type: devmgmt.msc & click OK.
- Press Windows

2. In Device Manager expand the Display Adapters.
3. Now perform the corresponding action, according your case:
Case A. If the installed display adapter is listed as «Microsoft Basic Display Adapter» (like in the screenshot below), this means that the drivers for your graphics card are not installed.

At this case, to fix the ‘Generic PNP Monitor’ problem:
a. Right-click on the Microsoft Basic Display Adapter and select Update Driver.

b. At the next screen, click Search automatically for drivers and let Windows to download and install the drivers for the display device. *

* Note: If Windows cannot find a different driver for your graphics adapter, then navigate to your computer (or graphics card) manufacturer’s support site, and download and install the latest drivers for your graphics card.
-
- For NVIDIA based GPU’s, navigate to NVIDIA Advanced Driver Search page.
- For AMD based GPU’s, navigate to AMD (ATI) Driver Download Center.
- For Intel based GPU’s, navigate to Intel Graphics Download center.
Case B. If you see that your graphics adapter is properly recognized from Windows 10, then probably the installed graphic driver is incorrect.
At this case, proceed and install the latest drivers for your graphics card from the manufacturer’s support site, or, if the «Generic PNP Monitor» problem, appears after a Windows 10 update, proceed and rollback the video drivers.
To Rollback the Graphics drivers:
a. Right-click on the installed display adapter, and click Properties.

b. Select the Driver tab and then click Roll Back Driver.

c. Select a reason for the driver package rollback and click Yes.

d. When the driver rollback is completed, restart your computer.
Method 3. Uninstall the Generic PNP Monitor device & Reconnect the Monitor.
1. Navigate to Device Manager.
2. Expand Monitors.
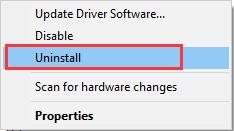
3. Right-click at Generic PnP Monitor and select Uninstall device.

4. Click Uninstall to confirm your decision.

5. Shutdown your computer.
6. Turn off your monitor and remove its power cord from the plug.
7. Disconnect the video cable from the computer.
8. Leave the cords unplugged for 2-3 minutes and then reconnect all the cables.
9. Power on your PC, and check if the problem is solved.
Method 4. Install the Generic Non-PNP Monitor Driver.
1. Navigate to Device Manager.
2. Expand Monitors.
3. Right-click on Generic PNP Monitor and select Update driver.

3. Click Browse my computer for drivers.

4. Select Let me pick from a list of available drivers on my computer.

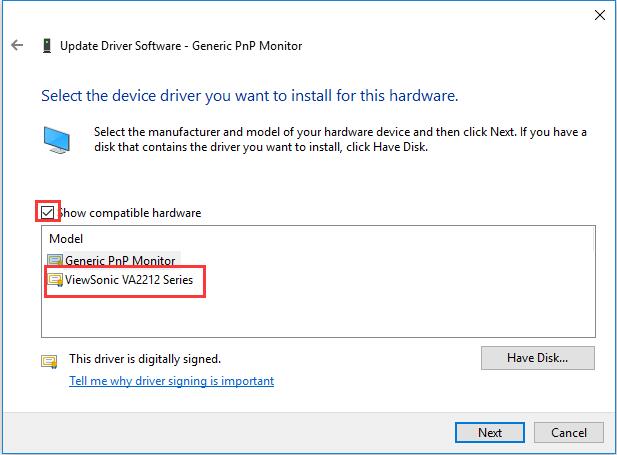
5. Check the Show compatible hardware checkbox, and select and install one of the other compatible drivers, or the ‘Generic Non-PNP Monitor’ driver.

Method 5. Try with Another Video Cable.
The final method to resolve the ‘Generic PNP Monitor’ issue in Windows 10, is to connect your PC with your monitor with a different cable. To do that:
* Note: This method applies only to desktops, or when you use an external monitor with your laptop.
1. Shutdown your PC.
2. Replace the video cable with a similar one, but from a different manufacturer.
3. Power On your PC.
That’s all folks! Did it work for you?
Please leave a comment in the comment section below or even better: like and share this blog post in the social networks to help spread the word about this solution.
If this article was useful for you, please consider supporting us by making a donation. Even $1 can a make a huge difference for us.

Sometimes, when you expand Monitors in Device Manager, you will find it shows you the Generic PnP Monitor rather than the real monitor of your PC. And for some users, it shows as the Generic Non-PNP Monitor.
Generic PnP Monitor Overview
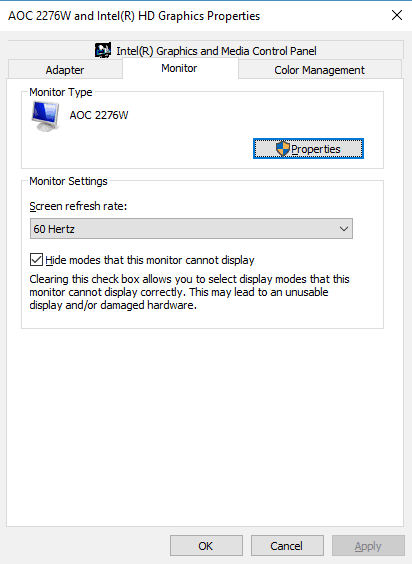
When you enter the display settings on the Windows 10/11, your real monitor is not listed here, and you cannot find it in the advanced settings. Click the display adapter Properties, and tap the Monitor tab, it changes to Generic PnP Monitor.
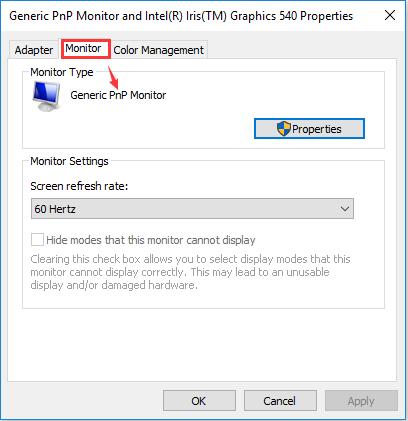
And the screen refresh rate is locked, you are unable to run the 144Hz screen refresh rate for your monitor.
After that, when you retun to device manager, the real monitor is missing, it is replaced by Generic PnP Monitor.
At this moment, you may wonder what Generic PnP Monitor is and how can you find the real monitor and solve the Generic PnP Monitor problems?
Therefore, it is necessary for you to know what a Generic PnP Monitor means and what you can do to fix this Monitor error on Windows 10.
What is Generic PnP Monitor Windows 10/11?
The PNP is short for Plug and Play. In computer, it is used to connect the external devices (Monitor, USB Devices) to Windows PC. So when you plug a monitor (Dell, ASUS, Other brands) or USB devices (keyboard, mouse) into a computer, the system will recognize the device automatically and install the right drivers for the device to make it run properly.
And the Generic PnP Monitor Driver for Windows 10 means Windows 10 has installed one of the basic monitor drivers and it can run smoothly, although it may function not as perfectly as the manufacturer’s monitor driver. For example, you may cannot set the best monitor resolution and screen refresh rate with this kind of PnP monitor driver.
Usually, people would find out the monitor in display settings > Advanced settings > Monitor > Properties.
But unfortunately, when the monitor driver is missing or it is install failed on Windows 10, your monitor will shows as Generic PnP Monitor, and in device manager you will see the generic pnp/non-pnp monitor with a yellow exclamation.
If it occurs to you, maybe there is a Generic PnP Monitor driver issue, it is time for you to fix this device manager problem on Windows 10.
How Does the Generic PNP Monitor Appear?
For laptop, when you open device manager, you will see a generic PNP monitor list, and there is no yellow exclamation. It is normal, because most of the laptop monitor are show as the Generic PNP monitor. All of the things such as your screen, monitor settings work properly.
But as a common problem, the generic PNP/Non-PnP monitor problem will emerge in the following situations:
1. After upgrading the System from Windows 7, 8 to Windows 10, the desktop monitor or All-in-one PC monitor replaced by the generic PNP monitor or the generic Non-PnP monitor, sometimes, with the yellow error.
2. When you are connecting monitor to pc via the HDIMI cable or VGA cable, it does not be recognized by PC, and the monitor is not showing up in device manger, too. After you uninstall the graphic card driver, the generic PnP monitor appears.
3. When add the second monitor to PC, you will one shows as the real monitor, but another one shows as Generic PnP monitor in device manager.
4. Someone reported that after added a new hardware such as a SSD and update the Windows 10 version, the monitor is unstable, the PC seems changes from the real monitor and generic PnP monitor.
If it occurs to you, maybe there is a Generic PnP Monitor driver issue, it is time for you to fix this device manager problem on Windows 10.
How to Fix Generic PNP Monitor Driver Issue
Here if you feel like to remove the generic pnp monitor issue quickly, you are supposed to combine the hardware methods with the software driver ones. It is to say, you need to check your settings and at the same time, concentrate on Generic PnP Monitor driver updates, such as updating ASUS monitor or Acer or Dell monitor drivers.
Solution 1: Reconnect the Monitor to Computer
If your find the monitor shows as the generic PnP monitor, it may lie in that your system does not recognize it. You can try to reconnect the monitor and restart computer to solve the generic PnP monitor problem.
1. Turn off the computer and monitor.
2. Plug out the monitor cable and the monitor power supply.
3. Plug in the monitor power supply and VGA or HDMI cable again.
4. Reboot the computer.
Then the Windows 10 pc will detect your monitor model and install the windows 10 monitor drivers again.
This will help fix the Generic PnP Monitor issue easily and fast. If it cannot make your unrecognized monitor change from the Generic PnP Monitor to your real monitor, go ahead to find a solution.
Related: How to Connect Monitor to Laptop on Windows 10
Solution 2: Update the Monitor and Graphic Driver
Just as you can see, when your monitor driver is missing, the generic PnP monitor will appear. So updating Generic PnP Monitor driver will help Windows make the real monitor back again.
1. Open Device Manager.
2. Expand the Monitors and find the Generic PnP monitor.
3. Right-click it to choose Update driver.
4. After that, Windows will search automatically to update the Generic PnP monitor driver for your Windows 10 system. Then the real monitor will back again.
If you are using a desktop, you can follow the next steps if above steps cannot help.
5. After you click Update driver, you can goes to :
Browse my computer for driver software > Let me pick from a list of device drivers on my computer.
6. Check the option Show Compatible Hardware. In the result, you will see the real monitor is listed here. Choose the monitor.
7. Follow the same way to update the graphic driver by the Display Adapters > Graphic card > Update Driver to update it.
8. After that, you will see the real monitor is coming back again.
If the device manager cannot find the monitor driver and install it for you, use the automatic way to help you.
Driver Booster can help you fix the monitor driver missing or disabled error easily. It is a professional Windows driver finder, downloader, and updater. As the toptenreviews top 1 driver update software, it can detected the most outdated and missing drivers for your computer and update them automatically.
1. Download, install and run Driver Booster on your computer.
2. Scan. Driver Booster will scan all your hardware devices including the monitor and graphic card.

3. Click Update Now.
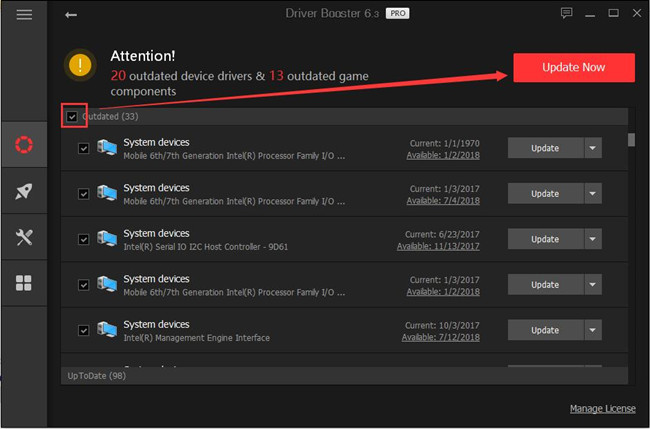
After that, Driver Booster will update all the outdated and missisng driver including the monitor driver.
Normally, update the monitor driver may not necessary, but it will helps computer to set the best resolution and refresh rate for your monitor.
Solution 3: Uninstall Generic PNP Monitor Driver
Some people may see there is only a generic PnP monitor with no exclamation, but someone reported that they see generic PnP monitor with a yellow triangle or a generic non-PnP monitor will a yellow exclamation. So if there is driver error with Generic Monitor, you can uninstall it.
1. Follow these steps: Device Manager > Monitors > Generic PNP Monitor > Uninstall to uninstall the monitor.
2. Click View > Scan for hardware changes.
After that, the yellow exclamation will disappear and your generic PNP monitor changes to the real monitor.
Solution 4: Uninstall and Reinstall Graphic Driver
The generic pnp monitor is about showing, so it is related to the graphic driver. If updating the graphic driver cannot fix it, you should uninstall the video driver and reinstall it to see if the generic PnP monitor is removed.
You can uninstalling the graphic driver from control panel and device manager, but it will not uninstall it completely, so you can uninstall graphic driver completely with Display Driver Uninstaller.
After that, go to the manufacturer’s site to get the latest video driver and install it step by step.
Now you can reboot computer and go to device manager to see if the generic monitor is still showing up. If yes, try the next solution.
Solution 5: Run the System File Checker
The System file checker is a built-in tool for users to scan the conflict driver and system files, and then restore the corrupted files. Run this tool to scan if there are some files corrupted with the monitor driver files.
1. Type command prompt in search box, then you will see the result. Right-click it and select Run as administrator.
2. Type sfc/scannow and press Enter.
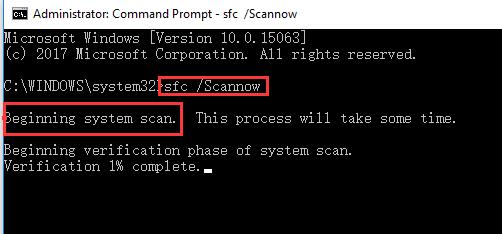
Then Windows system will begin scan your system file and recovery the problem.
Related: Unknow Hard Error on Windows 10/11
Solution 6: Check for Windows 10/11 Update
The Windows 10 update can solve many problems such as system bugs, driver error, hardware issues, etc. If the generic PnP monitor error occurs, try to update the Windows 10 version to solve it.
1. Go to here: Start > Settings > Update & Security > Windows Update.
2. Click Check for updates.
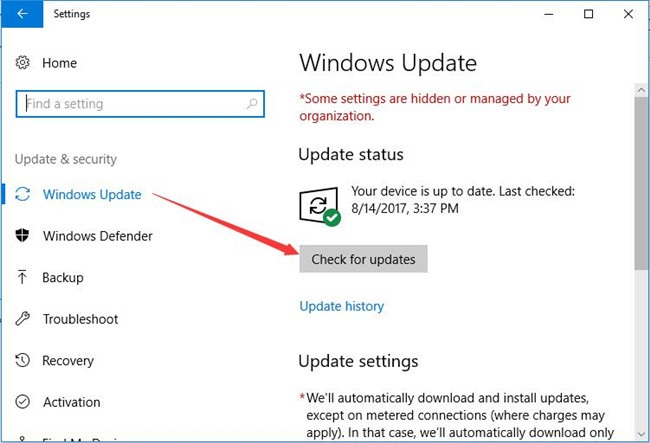
Windows system will help to download the new drivers, new system files. After that, you need to check if the real monitor back in device manager. And here is 4 things you should know about Windows 10 Update.
Solution 7: Perform the Clean Reboot
Windows clean reboot means start your computer within the basic drivers and startup programs. This will helps reduce software conflicts. And you can identify if there is one or more third-party applications or startup items cause this monitor issue.
Here is the way to help you do a clean boot. You are able to make use of this way to fix Windows generic PnP monitor driver issue.
Wish this article can help you fix generic PnP/Non-PnP monitor driver error and get the real monitor back.
More Articles:
How to Connect Laptop to TV?
Fixed: AOC USB Monitor Not Working on Windows 11, 10, 8, and 7
Fixed: Generic Bluetooth Adapter Problems on Windows 10/11
A monitor is one of the most important parts of any computer. You can’t get a visual output without one. Some users like to work or play with more than one display and it can be difficult for them when one monitor goes down.
If that monitor is a Generic Plug and Play device, you might run into some connection issues. Though it is not usual, it needs to be fixed and it can be done at home. This article is your guide to fixing this issue on Windows 10 PCs.
What is the Generic PnP Monitor?
When a device is connected to a computer, it recognizes the device and installs a driver to run without any issues. Likewise, when a monitor is connected to your CPU with the help of a VGA or an HDMI cable, the type of monitor is detected. One such type of monitor is the Generic PnP monitor. Here, PnP stands for Plug and Play.

What is the Generic PnP Monitor Yellow Triangle error?
When a PnP device is connected to your system, it doesn’t need a driver to run on the computer. If the Device Manager tool shows the Generic PnP monitor, this means that the Operating System (OS) couldn’t recognize the monitor.
There is also a chance that drivers are installed on your computer but they aren’t as effective as the driver software developed by the monitor manufacturers.
This may not seem like a very important issue. But one of the biggest symptoms of this issue is that users may not be able to adjust the display resolution on applications or change the screen refresh rate.
Follow these steps to check if your display is recognized as a generic PnP monitor.
- Right-click on the desktop screen and select the Display Settings option.
- Scroll down on the Display Settings page and click on the Advanced settings link, in the Multiple Displays section.
- Under the Display Settings section, select the monitor and click on the Display adapter properties link.
- In the Monitor properties window, go into the Monitor tab and on top of the window, you will be able to see the type of display that is connected to your system.

If there is a problem with the Generic PnP monitor, you’ll see a small yellow triangle, with a black exclamation mark in the middle.
Why do I see the Generic PnP monitor?
These are the possible scenarios that can make you see the Generic PnP monitor device on your computer, even when the display hardware you use isn’t one.
- The Generic PnP monitor appears when the GPU driver software is uninstalled from the computer.
- If a monitor is connected to a PC with the help of an HDMI or VGA cable, the Generic PnP monitor is shown. The exceptions are laptops.
- When you get a system upgrade, the available monitor is replaced with a Generic PnP monitor device on your computer. This may or may not have the yellow triangle exclamation.
- When two monitors are being used as a screen expansion or external projection display, they are allotted by the PC as Display 1 and Display 2, the first one being the main display. In some computers, Display 1 is set as the real monitor, and Display 2 is a Generic PnP monitor.
- The installation of a new SSD can make the monitor device driver unstable at times and the real monitor becomes the Generic PnP monitor.
Steps to Fix the Generic PnP Monitor driver error on Windows 10
These are your solutions to the small yellow triangle error for the Generic PnP monitor on your Windows 10 computer.
- Disconnect the Monitor and attach it back
- Remove and reconnect the GPU
- Update the Generic PnP Monitor’s driver software
- Remove and reinstall the Generic PnP Monitor device driver
- Update the Display card driver software
- Start a System File Checking Scan
- See if you have Windows Updates
- Do a clean boot of the system
If none of these steps work for you, there is the possibility of considering hardware damage inside the monitor. You will have to send it to a service center or get a new one. The dealer who sold you the monitor should know more about this issue. Make sure you have the warranty for the monitor on you.
Fixing the Generic PnP Monitor driver issue on Windows 10
The Generic PnP monitor problem is a common issue and not something that will damage your computer. However, it will reduce the system user experience and could even make things harder for those who are trying to get something done. The following are the possible solutions that can make your Generic PnP monitor work, normally.
Disconnect the Monitor and attach it back
Any form of wired computer hardware can be faulty when not connected properly. This is because when a loose connection is detected, the system refuses to recognize the hardware changes unless it is plugged in properly.
This will result in the device driver not being installed. Since all computer devices do not function without a driver that supports their functioning, users will see issues related to the monitor.
Try disconnecting the display monitor video cable from the CPU ports and the ports behind the monitor. Wait for a while. Check if there is dust in the slots and clean them out, gently. Reconnect the cables and check if the monitor is no longer the Generic PnP monitor.
This will download the monitor drivers again and you will not face the monitor problems again. The unknown monitor (Generic PnP monitor/ Generic Non-PnP monitor) will be recognized at the real monitor again.
Remove and reconnect the GPU
The Graphics Card and its respective display driver play a very important role in producing output through the monitor. The higher the GPU power, the faster and better the output. So it is not unusual to know that the GPU can be used to fix the Generic PnP monitor issue on Windows 10.

Computer users with a desktop computer and not a laptop can open the CPU cabinet and remove the GPU. However, this operation must be executed with extreme caution as some parts of the graphics card are extremely brittle or bendable. Sudden movements can dent the graphics card or chip the motherboard.
Removing the Video card will remove the graphics card driver from your Windows 10 computer. When it is reconnected, the graphic driver will be reinstalled on your computer.
Note: If you do not know how to remove the GPU card, take it up with someone who knows how to do it or with a technical professional.
Update Generic PnP Monitor driver software
The Generic PnP Monitor has a driver that can be accessed through the Windows 10 Device Manager. This is a standby driver that is available for updates and making small changes in the configurations. You can update this driver to the latest version of the available driver software and fix Generic PnP monitor issue on your Windows 10 computer.
Follow these steps to update the Generic PnP monitor driver.
- Open Device Manager on your computer, with the help of the Quick Link menu (Windows key + X) or the Run tool (devmgmt.msc command). The Device Manager window has a list of all the components present on your computer and the drivers that they use to run.
- Locate the section named Monitors and unfold it into a list of the monitors on your computer by clicking on it.
- Right-click on the Generic PnP Monitor driver and select the Update driver option from the context menu.

- The Update Driver Software – Generic PnP monitor wizard will open.

You will be shown two options here –
- Search Automatically for updated driver software
This option will make the system scan for a driver update for your Generic PnP monitor and then, install it onto your computer.
- Browse my computer for driver software
This will show you all the driver updates available on your computer and you can choose one of them. You’ll have to select the Let me pick from a list of device drivers on my computer option and check the Show compatible hardware checkbox.
Restart your computer after this process to save the changes in the driver configuration.
You can also get the latest driver software for your display from the internet or with third-party apps. You’ll just have to locate the correct driver and then, click on its download button. The downloaded executable file has to be run, in order to install the latest driver.
Remove and reinstall the Generic PnP Monitor driver software
If updating the Generic PnP Monitor did not work, try installing it and reinstalling the hardware monitor driver to see if you’re able to fix Generic PnP Monitor issue on your Windows 10 PC.
Use these steps to uninstall and then, reinstall the Generic PnP monitor driver software.
- Open Device Manager with the help of the Quick Link menu (Windows + X) or the Run utility (devmgmt.msc).
- Click on the Monitors category to expand it.
- Right-click on the Generic PnP monitor driver and select the Uninstall Device option.
- Confirm that you want to remove this device driver from your computer, in the small Uninstall prompt dialog box.

Click on the Uninstall button.
- Now, go back to the Device Manager window and right-click on the Monitors section itself.
- From the small pop-up menu, choose Scan for hardware changes.
This will make the computer detect the monitor again and now, it will be recognized as a real monitor, without the Generic PnP monitor problem.
To install the monitor device drivers again, you can download them from the internet or with the help of a third-party application.
Update the Display card driver software
The Generic PnP monitor driver issue can also be fixed by getting the latest version of the drivers for the graphics card. This can become a little complicated when it is done manually, so we recommend using interface applications for getting graphics driver updates.
Interface applications like the Geforce Experience (Nvidia) and the Radeon Adrenaline (AMD) can be used to download updates, safely and without any issues.

The driver developer’s websites will also have installers for the latest graphics driver versions. You should be able to find them on the Nvidia or AMD support page. You can install the driver software by running the installer executable file.
Start a System File Checking scan
The System File Check (SFC) is a Windows feature that is executed to detect corruption of the Windows 10 system files and swap them with a newer version of the corrupt file so that the computer can function without the Generic PnP monitor issue.
These are the steps to perform an SFC scan on a Windows 10 computer.
- Launch Command Prompt or the Windows PowerShell tool in the elevation mode (with system administrator privileges). You can use the search bar to search for one of these tools and click on the Run as administrator option.
- Type this command in the command prompt window and execute it by pressing Ente.
sfc /scannow

Perform this scan two or three times, to flush out all the corrupt files and give new ones on your computer.
Note: We will have to run the Windows PowerShell or Command Prompt as the system administrator, as the System File Checker will make configurational changes in the Windows 10 Operating System (OS).
See if you have Windows Updates
A Windows update can provide solutions to almost all problems, that exist in the current version of the Windows 10 OS. This method might not work towards fixing the Generic PnP Monitor issue on your computer but it is safe to be on the latest version and having the latest patch updates.
Follow the below steps on how to install a Windows update on Windows 10.
- Launch the Windows Settings and go to
Update & Security > Windows Update

- On the Windows Update page, click on the Check for updates page. Your system will access the internet and check if any updates are available.
- If you have updates, click on the Download and install button. You will need a proper internet connection for this.
- Once the download is complete, you’ll see a notification asking you to restart your system.
- Open the Start menu, click on the power button and Select Update and Restart or Update and Shutdown from the Shutdown dialog box.

The Windows update method is not a guaranteed fix for the Generic PnP monitor driver issue. You might have to talk with a service center to see what can be done.
Do a clean boot of the system
A clean boot process is similar to the booting up in safe mode process. When a clean boot is done, only the most important programs and drivers are running as the computer is booted. There are no third-party applications running in a clean boot. Since a lot of drivers are involved in this process, a clean boot of the Windows 10 OS can be used to fix the Generic PnP monitor driver issue.
This is the easiest method to do a clean boot on Windows 10.
- Open it and choose the Run option from the Quick Link menu (Windows + X). You can also right-click on the Start button to open this window.
- Click on the Ok button or hit the Enter key to run the msconfig command and open the System Configuration dialog box.
- In the General tab, disable the Load Startup items option.

- Then, go into the Services tab and enable the Hide all Microsoft services checkbox and click on the Disable all button.

- Go into the Startup tab and click on the Open Task Manager link.
- Open the Startup tab in the Task Manager and disable every process that is enabled in this window.

- Close the Task Manager by clicking on Apply and Ok buttons.
After the clean boot, the monitor should no longer be the Generic PnP Monitor device on your computer. It should have been detected by the system and you should be able to set the desired screen resolutions and change the refresh rate.
These are the different steps to fix the Generic PnP Monitor issue on a Windows 10 computer. If these procedures do not work, you have to consult with a professional, who knows their way around computer hardware.
We hope you found this article helpful. Happy browsing!
FAQs
What is a generic PnP monitor?
A Generic PnP Monitor is a Windows 10 driver that is used to connect monitor hardware with the Windows 10 OS. PnP stands for Plug and Play. It means that this driver is pre-installed on your computer to support your monitor, even before a dedicated driver is installed on your computer after being attached with the help of a cord.
Are generic PnP monitors good?
Generic PnP monitors are not a piece of hardware. It is a driver that is installed in Windows computers before the monitor’s actual drivers are installed. Without this driver, Plug and Play (PnP) monitors will not be able to be used. However, the Generic PnP monitor driver is one of the most basic versions of the monitor drivers. You will have to upgrade to a better one, after connecting the monitor, for better resolutions and higher frames.
Why is my monitor generic PnP?
Your monitor driver could be a Generic PnP monitor because a different monitor driver was not installed on your computer. You can continue using this driver as there is no problem regarding this until the graphics card and its drivers stop detecting this driver. If this driver is not detected, you will stop seeing the visual output.
Is generic PnP monitor bad?
The Generic PnP monitor driver is a good driver. It can be updated to a different driver, which will make the OS detect the monitor as a real monitor. The Generic PnP Monitor has been known to support 1080p and 1440p in computers and around 144 frames on high refresh rate display.
Если ваш монитор не подключается, ознакомьтесь с этими быстрыми и простыми способами устранения ошибки Generic PnP Monitor

Вы подключаете внешний монитор к компьютеру и видите ошибку ‘не удалось загрузить драйвер аппаратного монитора’? Или ваш ПК испытывает трудности с обнаружением внешнего монитора? Если это так, то вы можете столкнуться с проблемой драйвера Generic PnP Monitor
Читайте далее, чтобы узнать о причинах и способах устранения ошибок Generic PnP Monitor в Windows 10
PnP (Plug and Play) – это часть вашего ПК, которая позволяет системе адаптироваться к изменениям аппаратного обеспечения. Она позволяет добавлять и удалять внешние устройства без необходимости настраивать или устанавливать соответствующие драйверы вручную
Драйвер монитора Generic PnP помогает конкретно облегчить процесс подключения внешних мониторов к вашему устройству. Когда он работает правильно, вы сможете подключать внешние мониторы без каких-либо проблем
Что вызывает ошибку драйвера монитора Generic PnP?
Проблема с драйвером Generic PnP Monitor возникает, когда ваш компьютер не может распознать внешний монитор. Определить эту проблему очень просто. Она начинается с сообщения об ошибке ‘не удалось загрузить драйвер аппаратного монитора’. Также вы увидите желтый восклицательный знак рядом с драйвером Generic PnP Monitor в диспетчере устройств
Вот несколько причин этой ошибки:
- Поврежденный или устаревший драйвер Generic PnP Monitor.
- Неисправный кабель VGA/HDMI/DVI.
- Неисправный внешний монитор.
- Неисправность или неправильное подключение.
Теперь, когда вы знаете несколько причин ошибки драйвера Generic PnP Monitor, давайте рассмотрим, как ее можно устранить
1. Проверьте подключение к внешнему монитору

Прежде чем приступать к продвинутым способам устранения неполадок, проверьте основные. Проверьте, правильно ли подключен видеокабель как к внешнему монитору, так и к компьютеру. Или же отключите монитор и перезагрузите устройство. После этого снова подключите монитор
Также проверьте, является ли это проблемой, зависящей от системы, или нет. Для этого подключите внешний монитор к другому ПК и проверьте, работает ли он. Если проблема сохраняется, то неисправен либо монитор, либо кабель. Проверьте монитор, используя различные кабели. Если это все еще не решит проблему, то проблема может быть связана с внешним монитором
2. Обновите драйвер монитора Generic PnP
Высока вероятность того, что причиной этой проблемы является неисправный или поврежденный драйвер. Чтобы решить проблему, обновите драйвер Generic PnP Monitor, выполнив следующие действия:
- Введите Диспетчер устройств в строке поиска меню Пуск и выберите Лучшее соответствие.
- Раскройте раздел Мониторы.
- Щелкните правой кнопкой мыши по Generic PnP Monitor driver и выберите опцию Update Driver.

В следующем окне выберите Search automatically for updated driver software. Далее следуйте инструкциям на экране для завершения процесса. После завершения перезагрузите компьютер
3. Удалите драйвер монитора Generic PnP Monitor Driver и Scan For Hardware Changes
Вместо обновления драйвера PnP Monitor можно удалить его и просканировать компьютер на предмет аппаратных изменений. Это поможет установить совместимый драйвер
Выполните следующие шаги, чтобы удалить драйвер Generic PnP Monitor:
- Введите Диспетчер устройств в строке поиска меню Пуск и выберите Лучшее соответствие.
- Раскройте раздел Мониторы.
- Щелкните правой кнопкой мыши Generic PnP Monitor driver и выберите опцию Uninstall device.

Далее перейдите на вкладку Action и выберите опцию Scan for hardware changes

После завершения процесса перезагрузите компьютер
4. Обновите адаптеры дисплея
Ошибка ‘не удалось загрузить драйвер аппаратного монитора’ обычно связана с драйвером Generic PnP Monitor. Однако проблема может быть связана и с адаптерами дисплея. В этом случае может помочь обновление адаптеров дисплея
Вот как обновить адаптеры дисплея:
- Введите Диспетчер устройств в строке поиска меню Пуск и выберите Лучшее соответствие.
- Раскройте раздел Адаптеры дисплея.
- Щелкните правой кнопкой мыши адаптер дисплея вашего ПК и выберите опцию Обновить драйвер.

В следующем окне выберите Search automatically for updated driver software. Далее следуйте инструкциям на экране для завершения процесса. После завершения перезагрузите компьютер
5. Запустите средство устранения неполадок оборудования и устройств
Средства устранения неполадок Windows могут помочь вам решить различные системные проблемы. В данном случае эту ошибку можно устранить с помощью средства устранения неполадок оборудования и устройств
- Для начала работы нажмите Windows Key + I , чтобы открыть панель настроек, затем перейдите в раздел Обновление & Безопасность > Устранение неполадок.
- Выберите Hardware & Devices в списке опций. Затем нажмите Запустить средство устранения неполадок.

Подключение внешних мониторов без проблем
Подключение внешнего монитора к вашему устройству может помочь оптимизировать вашу работу и облегчить многозадачность. Если вы когда-нибудь столкнетесь с проблемой драйвера Generic PnP Monitor, приведенные выше исправления помогут вам быстро устранить ошибку с минимальным временем простоя