Ad Mediation in unity 3D Windows Phone 8/8.1 Games or Apps
The Ad Mediator aims to maximize your revenue and improves the monetization by making sure you are always showing a live ad with higher fill rates. This extension enables different ad network solutions into a single project.
Mediation is a technique that enables your apps or games to use multiple Ad-networks. This means, your app will make a call to one ad control, and if that ad control cannot serve an ad, the app will then call a second ad control, then a third, and so on depends on your logic.
The new ad mediation control for windows phone 8 provides a simple way to implement this capability. It offers a wide range of advantages over sticking with a single ad network, giving you control to integrate multiple Ads Networks and optimize them based on performance.
The highest revenue return can be achieved by choosing the ad network with highest eCPM first, then serving the unfilled ads from other ad networks. Here are some attractive features offered by Ad Mediation for Windows Phone
- App level configuration
- Global and optional market-specific configuration
- Ad refresh rate (recommended 45-60 secs )
- We can Pause/Resume ads
- Disable ads option will improves the performance
- Ad network prioritization (consider 80% for highest and 10% as low priority)
- Ad network Optimization (can remove the unnecessary ad networks which offer low ecpm and fill rates)
- Real time reporting
- You are not guaranteed to get 100% fill rate
- Simple and easy integration drag and drop
- You can configure the rate of ads shown per provider through Dev Center
Windows ad mediation will help you:
- Increase ad revenue through higher fill rates
- Tailor ad experiences based on market-specific dynamics, using different ad SDKs
- Dynamically optimize ad configuration to drive the highest yield
Step 1: Download and install the Windows Ad Mediator Extension for visual studio:

Microsoft Windows phone 8 Ad Mediator
First of all, In order to set up the environment we have to install the connected service get the extension from here.
Step 2. Build the unity windows phone project by targeting windows phone 8 :

Unity windows phone build setting menu
Then open the generated project and right click on the project and click on the add->connected Service as follows

Configuration for unity game (Adding ad mediator extension)
Step 3. Selecting and managing the Ads Networks :
After selecting the connected service Service Manager will be appeared and there you can set the required ads Networks if at all they are not fetched properly get them here.

Service Manager for selecting ads networks
As per the above pictorial representation choose the select ad networks option second option from top and select the required ads networks and hit OK Button you will find the following popup.

Ad Mediator Service Manager : Select ad Networks
Generally all the ads networks DLLs would be successfully added, if at all any thing is missing they need to be added manually.
Step 4. Add the Capabilities in the WMAppManifest file :
after adding all the required DLLs ,select the required capabilities in the WMAppManifest.xml. To do so just right click on WMAppManifest.xml file and select view code and replace the capabilities as follows:
<Capabilities>
<Capability Name="ID_CAP_IDENTITY_DEVICE" />
<Capability Name="ID_CAP_MEDIALIB_AUDIO" />
<Capability Name="ID_CAP_MEDIALIB_PLAYBACK" />
<Capability Name="ID_CAP_NETWORKING" />
<Capability Name="ID_CAP_SENSORS" />
<Capability Name="ID_CAP_WEBBROWSERCOMPONENT" />
<Capability Name="ID_CAP_IDENTITY_USER" />
<Capability Name="ID_CAP_LOCATION" />
<Capability Name="ID_CAP_MEDIALIB_PHOTO" />
<Capability Name="ID_CAP_PHONEDIALER" />
</Capabilities>
Step 5. Configure the add networks along with id and keys in service manager
As shown bellow we have to setup each and every add networks one by one,have to add the ids and hit OK button.
Right click on project->add->Connected service->select the add network and click the configure option as follows

Ad Mediator Configuration Settings
Step 6. Setup and Adding the Ad Mediator Controller by using ToolBox
Open the MainPage.xaml by double clicking on it, then open the ToolBox (short cut -> Ctrl+Alt+X)

Ad Mediator Controller
From the Toolbox, drag a new AdMediatorControl into the designer. Position the control in the location where you’d like your ads to display. You can add multiple controls if you want to display ads in more than one area of your app. Code will be generated for the control, including a unique ID and a name for the control. Here is how it can be done in a unity generated Windows Phone 8 Silver light application:
 <DrawingSurfaceBackgroundGrid x:Name="DrawingSurfaceBackground" Loaded="DrawingSurfaceBackground_Loaded">
 <WindowsPhone8:AdMediatorControl x:Name="CustomAdMediatorControl" HorizontalAlignment="Left" Height="80" Id="AdMediator-Id-573993CF-B98E-4430-B516-C39060D2F224" Margin="218,664,0,0" VerticalAlignment="Top" Width="480"/>
</DrawingSurfaceBackgroundGrid>
Note: I renamed the unique generated ad controller name “AdMediator_494E60” as CustomAdMediatorControl
Step 7. Handle the unhand-led exceptions from Multiple ads networks
private void Application_UnhandledException(object sender, ApplicationUnhandledExceptionEventArgs e)
 {
 if (e != null)
 {
 Exception exception = e.ExceptionObject;
 if ((exception is XmlException || exception is NullReferenceException) && exception.ToString().ToUpper().Contains("INNERACTIVE")) //inneractive
 {
 Debug.WriteLine("Handled Inneractive exception {0}", exception);
 e.Handled = true;
 return;
 }
 else if (exception is NullReferenceException && exception.ToString().ToUpper().Contains("SOMA")) //smato
 {
 Debug.WriteLine("Handled Smaato null reference exception {0}", exception);
 e.Handled = true;
 return;
 }
 else if ((exception is System.IO.IOException || exception is NullReferenceException) && exception.ToString().ToUpper().Contains("GOOGLE")) //Google
 {
 Debug.WriteLine("Handled Google exception {0}", exception);
 e.Handled = true;
 return;
 }
 else if (exception is ObjectDisposedException && exception.ToString().ToUpper().Contains("MOBFOX")) //mobfox
 {
 Debug.WriteLine("Handled Mobfox exception {0}", exception);
 e.Handled = true;
 return;
 }
 else if ((exception is NullReferenceException) && exception.ToString().ToUpper().Contains("MICROSOFT.ADVERTISING")) //microsoft
 {
 Debug.WriteLine("Handled Microsoft.Advertising exception {0}", exception);
 e.Handled = true;
 return;
 }

 }
 // APP SPECIFIC HANDLING HERE

 if (Debugger.IsAttached)
 {
 // An unhandled exception has occurred; break into the debugger
 Debugger.Break();
 }
 //e.Handled = true;
 }
Step 8. Finally, Call the ads to display from unity code and check them
In my previous post i mentioned about the basic communication between the unity game and native code,Here.
Now run the application will see the add on the bottom as follows

Further, if you want to control the adds depends on the screens just follow as bellow:
//To display the ads

CustomAdMediatorControl.Resume();

CustomAdMediatorControl.VerticalAlignment = VerticalAlignment.Top; //Display the ads on top

CustomAdMediatorControl.VerticalAlignment = VerticalAlignment.Bottom; //Display the ads on bottom

//To Hide the ads

CustomAdMediatorControl.Pause();

CustomAdMediatorControl.Visibility = Visibility.Collapsed;

//To Remove the Ads

if (CustomAdMediatorControl != null)
      CustomAdMediatorControl.Disable();//will remove the ads
Step 9. Congrats! Successfully completed,Let’s Optimize & mediate them in Dash board
Once you’ve built your app to include all of the ad networks you may want to use, and tested it to ensure everything’s working, you’re ready to submit the app.

Add Mediation and Configuration , Dash board in Dev Center
When you upload your packages, Dev Center automatically detects that you’re using ad mediation and identifies which ad networks you’re using. On the package upload page, you’ll see an Ad mediation configuration section. This is where you’ll configure your mediation logic. The first time you submit your app, you’ll create a baseline configuration. After that’s set up, you can add market-specific configurations to take advantage of specific ad networks’ strengths in different markets.

Base line Configuration & Mediation at Dev Center Dash board
If you want to adjust your ad mediation for a specific app, you can do so at any time without having to resubmit the app. This is useful if you’ve already added ad networks into your app that you hadn’t previously set up accounts for, or if you’re finding that one ad network is not able to fill ads reliably in specific markets.
Note: Build a new app or existing app with Ad mediation and get the 500 reward point in DVLUP.
Thanks !
Murthy Veera
Время на прочтение
6 мин
Количество просмотров 22K
Виртуальная реальность на Windows Phone с помощью Unity3d
 На последней Game Developer Conference было много новостей связанных с виртуальной реальностью. Это и новые устройства, такие как Microsoft HoloLens, борьба за признание между Oculus Rift и Project Morfeus, анонс SteamVR. Все это говорит о том, что тема очень интересная и горячая. Хотя понятие виртуальной реальности включает в себя очень много всего, технологически это в первую очередь очки или шлем которые показывают стереоскопическое изображение и реагируют на движение. Многие из нас хотели бы поэкспериментировать в этой области, но без устройства, например, Oculus Rift это затруднительно. К счастью существуют технологии, которые могут превратить ваш телефон Windows Phone в шлем виртуальной реальности.
С чего начать
Самое главное это конечно шлем, или если угодно очки. Их надо изготовить так чтобы они позволяли держать телефон перед глазами. Можно воспользоваться Google Cardboard или изготовить их самостоятельно из картона, акрила и пластика.
После того как вы изготовите очки, или шлем, в общем то, что будет держать у вас телефон перед глазами, возникает вопрос что же необходимо сделать чтобы погрузиться в ту самую виртуальную реальность:
- Создать стереоскопическую картинку
- Менять ее в зависимости от положения головы
- Взаимодействовать с виртуальным миром
Для создания нашего приложения будет использован Unity3d 4.6 и Windows Phone. В готовом примере уже проведены все настройки и в рамках статьи хотелось бы отметить самые важные моменты.
Создаем проект Unity3d
Создайте пустой Unity3d проект и создайте по вкусу какие-либо 3D объекты, добавьте освещение. С другой стороны, можно воспользоваться готовым бесплатным Medieval Home пакетом, импортируйте его и откройте сцену пример (Scene/Sample Scene).

Далее следует сконфигурировать экспорт проекта. Для этого зайдите в меню Edit / Project Settings / Player и выберите иконку Windows Store.

Самый главный пункт это кнопка «TestCertificate». Нажмите на кнопку Create и создайте новый. К сожалению, в Unity присутствует небольшой баг, связанный с тем что диалог Create в некоторых случаях не работает. Чтобы обойти эту проблему, запустите Visual Studio 2013, создайте новый проект Windows Phone 8.1, откройте папку в которой находится этот проект и найдите файл *.PFX. Переименуйте его в WSATestCertificate.pfx и скопируйте в папку Assets текущего проекта Unity.
Далее следует сконфигурировать билд. Зайдите в меню File / Build Settings и выберите следующие значения для Windows Store:

Не забудьте предварительно сохранить текущую сцену (File / Save Scene) и нажать кнопку «Add Current» в этом диалоговом окне, чтобы в результирующем проекте появилась стартовая сцена. После нажатия на кнопку Build будет создан проект Visual Studio 2013 который для проверки следует открыть в Visual Studio, скомпилировать и запустить на устройстве.
Создаем стереоскопическую картинку
Первое что необходимо сделать в проекте – создать стереоскопическое изображение. И это очень легко сделать так как у нас есть трехмерная сцена, которую можно просчитать для каждого глаза.
Найдите в проекте First Person Controller и продублируйте основную камеру (правая кнопка мыши, Duplicate).
У вас должно получиться следующее:

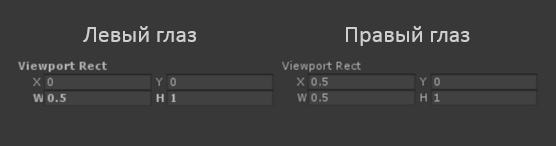
Далее в свойствах для каждой камеры необходимо указать что рендер изображения ведется только на половину так называемого въюпорта (viewport). Для левого и правого глаза соответственно в начале экрана, и в его второй половине:
Но на этом конечно не все, стерео-изображение так не получить, картинки которые сейчас отображаются этими камерами, одинаковы.
Для того чтобы появился стерео-эффект, необходимо ввести параллакс между этими камерами.
Добавим в проект новый C# скрипт:

Назовите его FPSVRBehavior.cs и после того как он будет создан, перетащите его мышью на «First Person Controller». Созданный скрипт будет подключен к этому обьекту.

Теперь можно приступить к задаче создания параллакса между камерами. В методе Start() класса FPSVRBehavior просто зададим смещение «левого глаза» от основного объекта «родителя» на небольшую величину:
var leftEye = GameObject.Find("LeftEye");
leftEye.transform.Translate(Vector3.left * 0.1f);
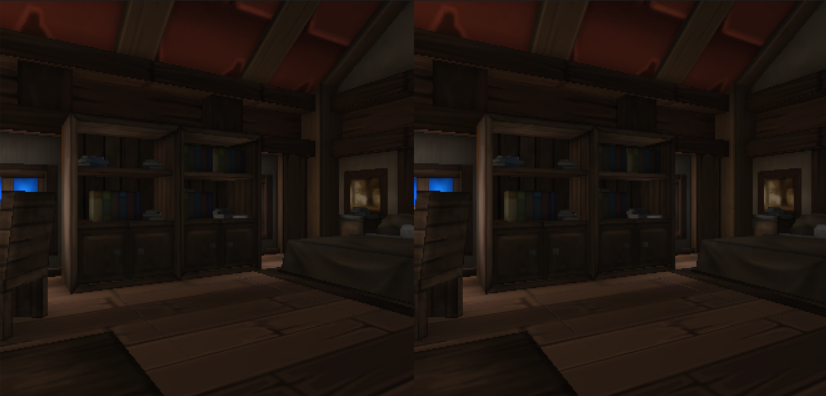
Стереоизображение готово, создайте новый билд, опубликуйте его на телефон и насладитесь стереоизображением в ваших виртуальных очках! Правда изображение это статичное, а в настоящих шлемах отслеживается положение головы и в зависимости от него меняется изображение на экране.
Учитываем положение головы
В телефонах Windows Phone есть датчик гироскопа. Его можно использовать для наших целей. Осталось только научиться использовать данные которые возвращает этот датчик.
Некоторое отступление от основной темы, пишем плагин для Unity
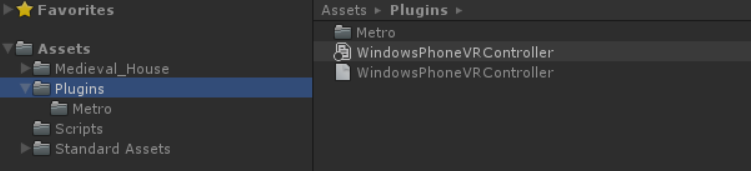
Как известно, Unity3d это кроссплатформенный инструмент создания приложений. При всей его универсальности, некоторые узкие моменты и специфичные для устройств API недоступны. Для того чтобы нам добраться до значений данных датчика гироскопа, придется подготовить плагин. Не вдаваясь в детали, плагин это два DLL с одинаковым именем которые размещаются в каталоге Assets/Plugins и Assets/Plugins/Metro.
Файл WindowsPhoneVRController.dll который находится в каталоге /Assets/Plugins это стандартная сборка .NET Framework 3.5 которая предназначена для работы во время дизайнера Unity.
Аналогичный файл который находится в каталоге /Assets/Plugins/Metro это Windows Store 8.1 Class Library, и он используется средой Unity для создания Visual Studio solution, чтобы наш проект на целевой платформе получил нужные функции. Более подробно о том как создавать плагины можно почитать в моем блоге.
Исходный код для обеих DLL одинаков:
#if NETFX_CORE
using System.Threading.Tasks;
using Windows.Devices.Sensors;
#endif

namespace WindowsPhoneVRController
{
    public class Controller
    {

#if NETFX_CORE
        Gyrometer gyro;
#endif


        public Controller()
        {
#if NETFX_CORE
            gyro=Gyrometer.GetDefault();
#endif
        }

        public static void Vibrate()
        {
            Vibrate(8);
        }

        public double AngularVelocityX
        {
            get
            {
#if NETFX_CORE
                return gyro.GetCurrentReading().AngularVelocityX;
#else
                return 0;
#endif

            }
        }
        public double AngularVelocityY
        {
            get
            {
#if NETFX_CORE
                return gyro.GetCurrentReading().AngularVelocityY;
#else
                return 0;
#endif

            }
        }
        public double AngularVelocityZ
        {
            get
            {
#if NETFX_CORE
                return gyro.GetCurrentReading().AngularVelocityZ;
#else
                return 0;
#endif
            }
        }

        public static void Vibrate(int _milliseconds)
        {
#if NETFX_CORE
            var vibrationDevice = Windows.Phone.Devices.Notification.VibrationDevice.GetDefault();
            vibrationDevice.Vibrate(TimeSpan.FromMilliseconds(_milliseconds));
#endif
        }

    }
}
В зависимости от #CONDITION при компиляции для .NET Framework 3.5 получаем «заглушку», а при компиляции для Windows Store – рабочую логику. В готовом примере, ссылка на который находится внизу, подготовлен Visual Studio solution который компилирует оба DLL и раскладывает их по соответствующим каталогам Assets/Plugins
Учитываем значения датчика
Как уже становится понятно из исходного кода, работа с датчиком гироскопа очень проста. Опрашиваем значения ускорений вращения телефона и далее останется только повлиять на изображение на экране с помощью этих данных.
Для этого опять откроем файл FPSVRBehavior.cs и в методе Update добавим следующий код:
void Update ()
{

    float vertical_angle_delta = (float)gyroscopePlugin.AngularVelocityY * 0.05f;
    float horisontal_angle_delta = (float)gyroscopePlugin.AngularVelocityX * 0.05f;


    transform.localEulerAngles = new
    Vector3(transform.localEulerAngles.x+vertical_angle_delta ,
    transform.localEulerAngles.y-horisontal_angle_delta,
    transform.localEulerAngles.z);
}
gyroscopePlugin это экземпляр нашего плагина, не забудьте объявить переменную в этом классе и создать этот объект в методе Start();
Как стало понятно из кода, просто опрашиваем данные датчиков, и меняем положение объекта — в нашем случае это First Person Controller. Магический коэффициент 0.05f влияет на то, с какой скоростью будет реагировать изображение на вращения телефона.
После того как вы соберете билд и запустите приложение на телефоне, камера оживет и теперь будет отслеживать положение головы!
Движение это жизнь
Теперь у нас есть практически полноценное приложение виртуальной реальности, но в этой виртуальной реальности пока можно только вращать головой. Для того чтобы двигаться вперед, необходимо предусмотреть какой-то механизм. Дотрагиваться до экрана нет возможности (телефон у нас перед глазами), подключать дополнительные устройства к телефону затруднительно, да и не удобно. Поэтому предусмотрим элегантный и простой способ, как нам ходить внутри нашего виртуального мира.
Способ этот очень прост – если наклонить немного голову (телефон), так чтобы виртуальная камера смотрела в пол, на определенном угле First Person Controller двигается вперед. Естественно, с учетом коллизий в нашем виртуальном мире, чтобы не проходить сквозь стены.
Добавим следующий код в метод Update класса FPSVRBehavior:
var motor = GetComponent<CharacterMotor>();

if (transform.localEulerAngles.x > 30 && transform.localEulerAngles.x < 40)
{
    motor.inputMoveDirection = transform.rotation*(Vector3.forward * 0.1f);

    WindowsPhoneVRController.Controller.Vibrate();
}
Код самоочевиден – если наклоняем голову, то где-то между 30 и 40% градусами есть зона, которая приводит к движению вперед. Чтобы «ощущать» где эта зона, помогаем пользователю вибрацией телефона.
Загружайте готовый проект и погружайтесь в виртуальную реальность!
Windows Store: Windows SDKs
Windows Phone 8.1: Debugging
| WARNING: LEGACY DOCUMENTATION |
|---|
| Note that that from Unity 2017.1 this documentation is out-dated. 2017–06–30 |
Windows Phone 8.1 is the latest edition of Microsoft’s Windows Phone mobile operating system, succeeding Windows Phone 8. Windows Phone 8.1 focuses a lot on convergence between Windows Phone and Windows Store platforms into a single developer platform that runs the same types of apps. Windows Phone 8.1 and Windows Store share a similar app model and life cycle, a shared toolset, a common XAML UI(User Interface) Allows a user to interact with your application. More info
See in Glossary framework and CLR runtime (which replaced Silverlight, used in Windows Phone 8.0). Windows Phone 8.1 uses AppX packaging for applications, rather than the old XAP package.
Windows Phone 8.1 introduces a new notification center, along with a set of capabilities developers can use to manage toast notifications through local API calls or by using push. Through these APIs and mechanisms, an app can manage the toast notifications they send to users. Operations include add, remove, replace, and expire. All notification classes are in the Windows.UI.Notifications namespace.
Windows Phone 8.1 supports many more DirectX features when compared to Windows Phone 8. These include:
Direct2D APIs
DirectWrite APIs
Windows Imaging Component APIs
Runtime shaderA small script that contains the mathematical calculations and algorithms for calculating the Color of each pixel rendered, based on the lighting input and the Material configuration. More info
See in Glossary compilation and reflection
GPU access to YUV shaders
GPU performance counters
Graphics diagnostics support
Windows Phone 8.1 has adopted the SwapChainPanel XAML control in favor of BackgroundDrawingSurfaceGrid, which was used on Windows Phone 8.
Windows Phone 8.1 provides APIs that you can use to create an app that records images or videos of the phone’s screen activity. This way games can upload and share in-game activities. This feature is enabled through enhancements to the Windows.Media.Capture APIs already available to Windows Store apps.
Windows Phone 8.1 emulator adds support for SD card emulation, and multi-touch with mouse, improved networkingThe Unity system that enables multiplayer gaming across a computer network. More info
See in Glossary support to simplify setup, configuration, and access to network resources and to reduce troubleshooting.
Windows Phone 8.1 adds support for remote performance monitoring, ETW logging, and App Verifier. Existing Windows Phone 8 command-line tools – Isolated Storage Explorer, the deployment tool, and the phone registration tool – are still supported. The Simulation Dashboard is not updated for Windows Phone (code-named “Blue”).
- 2017–06–30 Page amended with no editorial review
Did you find this page useful? Please give it a rating:
Windows Store: Windows SDKs
Windows Phone 8.1: Debugging
Copyright © 2023 Unity Technologies
优美缔软件(上海)有限公司 版权所有
«Unity»、Unity 徽标及其他 Unity 商标是 Unity Technologies 或其附属机构在美国及其他地区的商标或注册商标。其他名称或品牌是其各自所有者的商标。
We are pleased to announce the full support for Windows Phone 8.1 and Universal Windows Applications with the release of Unity 4.5.3. We’ve been working very hard to put our finishing touches on it since its beta program announcement back in April. It is available for download today!
What is it all about?
With the help of Universal Windows Applications, you can now build your Unity game once and target all Windows devices – desktops, laptops, tablets and phones running Windows/Windows Phone 8.1 or higher. On Windows devices, Universal Apps behave identically to Windows 8.1 apps, which Unity has supported since 4.3. On Windows Phone devices, Universal Apps run as Windows Phone 8.1 apps, which is a new feature of Unity 4.5.3.
Figure 1. Universal Applications build window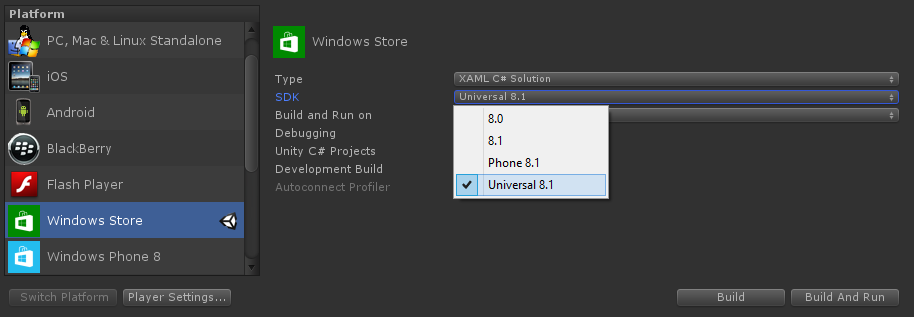
What does Windows Phone 8.1 bring to table?
If you worked on Windows Phone 8 and Windows Store games in the past, you know that even though the two platforms are similar, they still have their differences. With Windows Phone 8.1, that changes. There are no longer two separate platforms; they have converged to a single one. To reflect that, building for Windows Phone 8.1 is located under Windows Store platform in our Editor.
Other features of Windows Phone 8.1 player include:
- Access the full power of .NET 4.5.1 in your C# scripts (Windows Runtime APIs, async/await, etc.);
- Efficient multithreaded renderer – up to 33% less time per frame (measured on Angry Bots on Nokia Lumia 520 running Windows Phone build 8.10.12359.845);
- GPU profiling is now available thanks to a new graphics driver for Windows Phone 8.1 (On devices which received the driver update).
Figure 2. GPU profiler running on Windows Phone 8.1
How do Universal applications work?
Figure 3. Universal app Visual Studio solution
So what does the name «Universal» mean? When you press build, Unity will generate a Universal app Visual Studio solution, which will contain 3 projects: ProjectName.Windows, ProjectName.WindowsPhone and ProjectName.Shared (as illustrated in Figure 3).
The shared project, as its name implies, contains all the shared elements: XAML layout, Unity data and asset files.
Target specific projects (ProjectName.Windows and ProjectName.WindowsPhone) contain platform specific files: application manifests, icons, splash screen and tile images. Since Windows 8.1 and Windows Phone 8.1 aren’t binary compatible, each project will also contain their own set of DLLs. Fear not — Unity will automatically make your managed plugins compatible with either target.
When you press the deploy button in Visual Studio, only the necessary files will get copied to the target device (or local machine, if you prefer), thus minimizing the application size which the user would have to download from the Windows Store.
Great, what do I need to get started?
You will need:
- Unity 4.5.3 or later;
- Windows 8.1 (any edition);
- Visual Studio 2013 with Update 2 installed (Express for Windows, Professional, Premium or Ultimate edition).
If you want to test your application on Windows Phone 8.1 emulator (rather than a physical phone), you’ll also need:
- Windows 8.1 Pro;
- At least 4 GB RAM;
- CPU that supports Second Level Address Translation (SLAT) and Data Execution Prevention (DEP).
As always, before updating Unity, backup your project and don’t forget to read the docs:
http://docs.unity3d.com/Manual/WP8-1.html http://docs.unity3d.com/Manual/WindowsUniversalApps.html
Have fun!
Source: Internet
Recently, in an existing game to the Windows Phone platform porting, temporarily completed a small phase, to do a summary.
Development environment:
- Windows 8.1 System and above, if you like, with Windows 10 early adopters can also.
- Microsoft account to get a development certificate for free when you build a Windows Phone project. http://signup.live.com/
- Microsoft Development Account, for uploading applications to the store, http://dev.windowsphone.com/, 19 knives permanently works.
- Visual Studio 2013, if you use the flagship version, bring your own Windows Phone 8.1 SDK, as much as possible with the latest update.
- Windows Phone SDK, if you are using Express VS2013, you need to download the SDK for Windows Phone 8.1 separately, HTTPS://DEV.WINDOWSPHONE.COM/EN-US/DOWNLOADSDK
- Unity, Http://unity3d.com/unity/download, try to download the latest stable version.
- Windows Phone 8.1 Device, the game is relatively more memory to eat, try to buy more than 1G memory of the machine, such as 636,638.
Theory:
- Mono is an open-source, cross-platform framework with the goal of achieving an open source. NET Framework, called the Mono Runtime, develops languages primarily but not just C #.
- The bottom of unity is implemented in C + +, but embedded in the Mono runtime as its scripting engine.
- Unity’s embedded mono is customized, meaning it is not exactly the same as the official mono, whose current mono version is 2.6 and is not open source.
- Unity’s runtime on Windows Phone 8.1 is primarily Windows runtime, and Ms’s own. NET subset, and mono, which can be compatible with this part of. NET subset.
- The official mono,unity. NET subset of Mono,ms. There is a overlap between the three, but the main process of migration is their non-intersecting parts.
- It is a shame that unity’s mono cannot be directly run on the Windows Phone without modification, but can run on the ios/android.
Porting process:
- Open an existing game project with unity, and then switch Platform, file-building&settings, select Phone 8.1 under Windows Store. After this step, unity will change the conditional compilation symbol to Unity_wp_8_1
- Setting up the Player Settings, mainly setting the manifest file, is worth noting the compilation options.
- With Unity C # Projects and development build selected, click Build and create a new folder (such as WP81) to create a project that VS2013 can open.
- If the build succeeds, open the newly generated sln with VS2013 and continue with the VS2013 build.
- If the compilation is successful, you can deploy the generated game to your phone for testing.
- If you can run as normal as any other platform, you can upload the game to the Windows store.
Of course, except the 1th step will be smooth (depending on the number of assets in the game, it may take a long time), and depending on the game, the 2nd to 6th step will be a lot of trouble and confusion. This section is not in depth. The next step is to summarize and delve into the specifics of the process. A new group of Q groups devoted to the UNITY->WP transplant was created: 307409538, for the time being, it is necessary to have an actual game project for those who are in the crowd.
Porting an existing Unity3d game to Windows Phone 8.1 (Basic)