Время на прочтение
3 мин
Количество просмотров 29K
Многие разработчики Unity3D использует Windows, и при сборке игры под iOS возникает много проблем и танцев с бубном вокруг виртуальных машин с OS X.
Ребята из юнити сделали нам большой шаг навстречу: они дали возможность собирать билды под различные устройства в облаке, абсолютно не обращая внимания на то, на каком устройстве мы работаем.
Логика работы следующая:
1. Проводите первоначальную настройку
2. Заливаете исходники проекта в систему контроля версий
3. Создаете специальную ветку для билда и заливаете в нее текущую версию игры
4. Облако выкачивает эту версию и производит сборку

Вот как это делается:
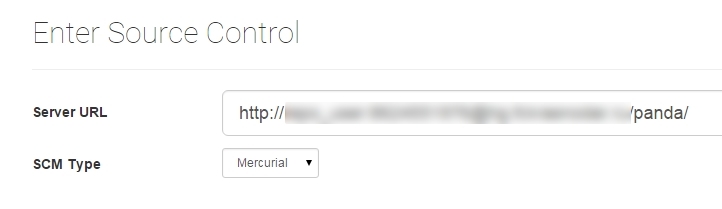
Выбираем систему контроля версий, сейчас поддерживается git mercurial svn perfoce. Я перепробовал все и остановился на mercurial. Создаем репозиторий и заливаем на выбранный хостинг наши исходники. Выбор системы, создание репозитория и прочии основы работы с системы контроля версий я опущу, на Хабре достаточно статей на эту тематику.
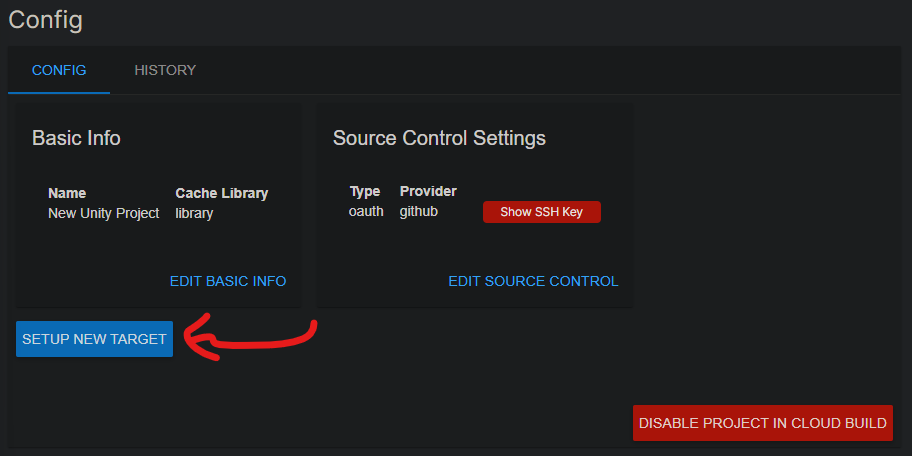
В репозитории создаем ветку для билдов из которой Unity Cloud будет выкачивать исходники и заливаем в нее рабочую версию. Устанавливаем последнюю версию Unity3D и нажимаем кнопку с облаком, затем проходит авторизацию на облаке Unity и создаем новый проект:

Переходим в раздел Cloud Build и жмем на внешний линк:

Мы попадем в веб интерфейс управления проектами, я перешел в новую бета версию:

Указываем адрес нашего репозитория, его тип и пользователя для подключения:
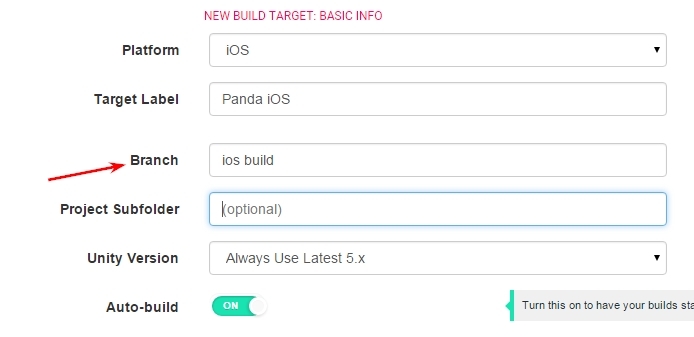
Далее выбираем платформу под которую будет собираться билд, в нашем случае ios:

Заполняем информацию о билде, тут важно отметить раздел Branch в нем указывается имя ветки из которой будут выкачиваться исходники для сборки.
На следующем шаге нам потребуется компьютер с OS X, нам нужно будет получить сертификат, .mobileprovision и указать Bundle ID:
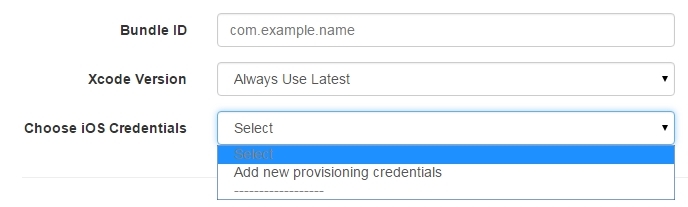
Давайте по порядку, Bundle ID можно узнать на сайте itunesconnect.apple.com/:
Сертификат p12 разработчика нужно заранее создать с помощью xcode, инструкций так же предостаточно и описывать здесь я их не буду, укажу только где их скачать. Найдя машину с OS X или используя виртуальную машину с этой операционкой, нужно зайти на сайт https://developer.apple.com, далее в раздел Certificates, Identifiers & Profiles. Далее выбираем раздел сертификаты:

В разделе Provisioning Profiles. В разделе All скачиваем наш iOS Distribution сертификат. На OS X открываем его и добавляем в раздел login/вход:
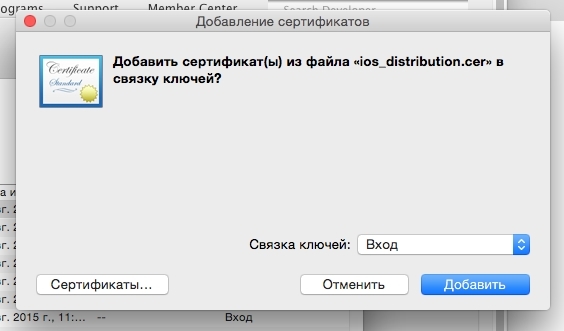
В приложении Keychain Access в левой колонке выбираем разделы Вход и Мои сертификаты. Выбираем наш сертификат и жмем File -> Export Items… В появившемся окне экспорта нужно удостовериться что формат выбран Personal Information Exchange (.p12). Далее Вы создадите пароль сертификату, который вы будете указывать в Unity Cloud Build при его добавлении.
Теперь создадим .mobileprovision файл. Заходим так же на портал https://developer.apple.com
нас интересует раздел iOS Provisioning Profiles, в нем нажимаем на +

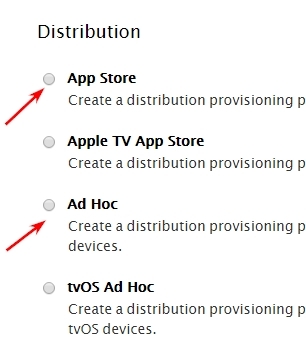
И выбираем один из этих вариантов, один для публикации в App Store второй для тестирования на устройствах тестировщиков:
Далее выбираем учетку разработчика, приложение и список устройств для тестирования, в конечном результате получаем заветную кнопку download.
Следующий шаг загрузить полученный mobileprovision и сертификат в Unity Cloud Build и указать его пароль. Если Вы все сделали правильно появится сообщение start building и в списке проектов появится запись о текущем состоянии билда:

Вот и все, по окончанию билда можно получить подробную информацию о ее ходе. В следующей статье я опишу работу с остальными облачными сервисами Unity3d.
Made by Nima Jamalian
Table of Contents
Step 1
Unity ID
Make sure you have made a Unity ID, if you don’t have one you can click on the link bellow and make an account.
https://id.unity.com/en/conversations/5b084117-1746-4386-ae3c-dc2b7a9ef7fc01bf
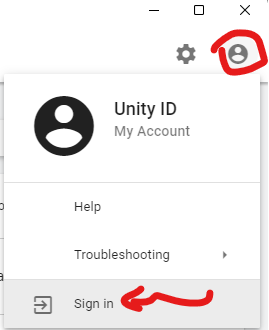
Sign in with your Unity ID to Unity Hub
Open Unity Hub → Top right corner → Click on Avatar Icon → Sign In
Set 2
Create a GitHub
In order build Unity iOS application on Windows, we are going to need to use GitHub. Click on the link bellow and create a GitHub account.
GitHub: Where the world builds software
GitHub is where over 65 million developers shape the future of software, together. Contribute to the open source community, manage your Git repositories, review code like a pro, track bugs and features, power your CI/CD and DevOps workflows, and secure code before you commit it.
 https://github.com/

Download GitHub
Next step is to download GitHub application and install it on your Windows computer. Click on the link bellow to download the application.
GitHub Desktop
Checkout branches with pull requests and view CI statuses See all open pull requests for your repositories and check them out as if they were a local branch, even if they’re from upstream branches or forks. See which pull requests pass commit status checks, too!
https://desktop.github.com/

Once you downloaded the application sign in to your account inside the GitHub app.
Step 3
Create Apple Certificates
⚠️
Note: for this section you need to have apple developer account or be part of a team that has apple developer account.
University can provide you with apple developers account by adding your iCloud account to University developer account so you don’t need to buy one.
⚠️
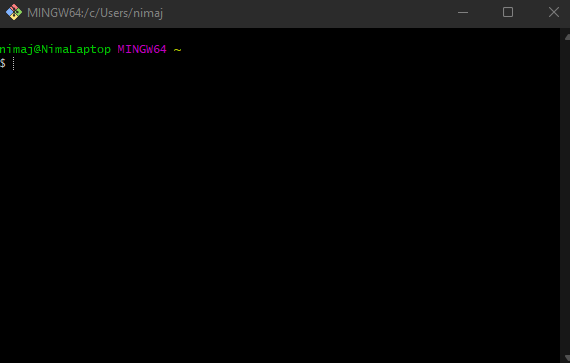
You also need to install git for Windows, click on https://gitforwindows.org/ and download the application and install. Follow the default installation setting you don’t need to change any thing. Once the installation has finished you should have a application called Git Bash. If you open it you should get a Windows similar to picture below.
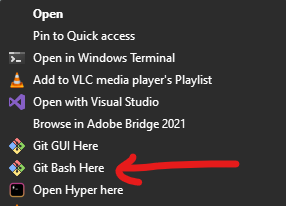
Create a new fold call it Apple Certificates → Right Click on it → Git Bash Here
⚠️
If you are on Windows 11 → Right Click on the folder → Show more options →Select «Git Bash Here»
Create key
Now we need to create .key file, in order to that run the following command in Git Bash that we opened.
openssl genrsa -out YourApp.key 2048Yous should get a message similar to below
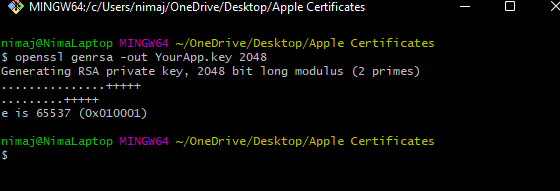
And a new file called YourApp.key should be created in your Apple Certificates folder.
Now run the command bellow
⚠️
Note the code highlighted in red you need to change that with your information
youremail → Write you email here (This should be iCloud email)
yourname → Write you name here
GB → Set your region if you are in the UK leave it as GB
openssl req -new -key YourApp.key -out YourApp.certSigningRequest -subj "//emailAddress=youremail, CN=yourname, C=GB"This command will create another file in your Apple Certificate Folder called «YourApp.certSigningRequest»
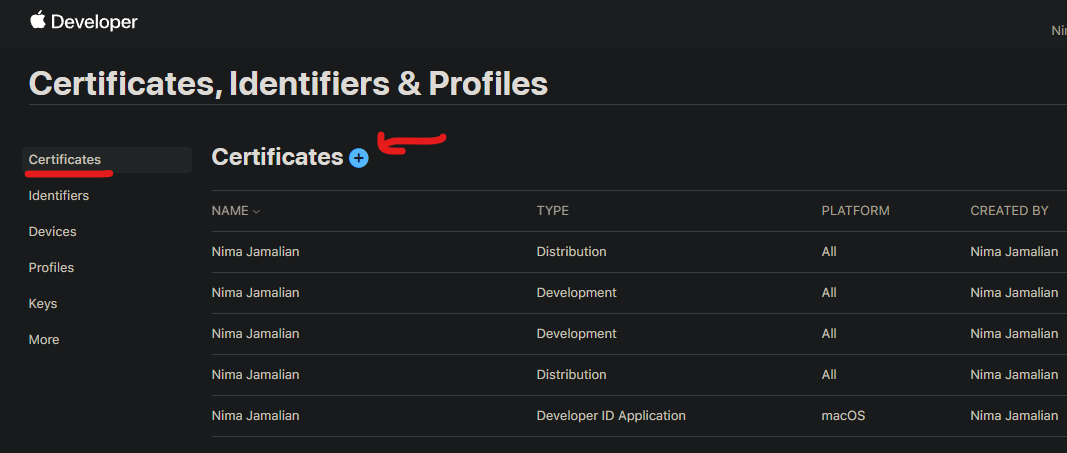
Now go to Apple developer console click on link bellow
Sign in with your Apple ID
Sign in with your Apple ID
 https://developer.apple.com/account/resources/certificates/list
Go to Certificates → Click on Plus icon to create a new certificate →
Select Apple Development («This covers building application for iOS, macOS and etc.») → Click on Continue
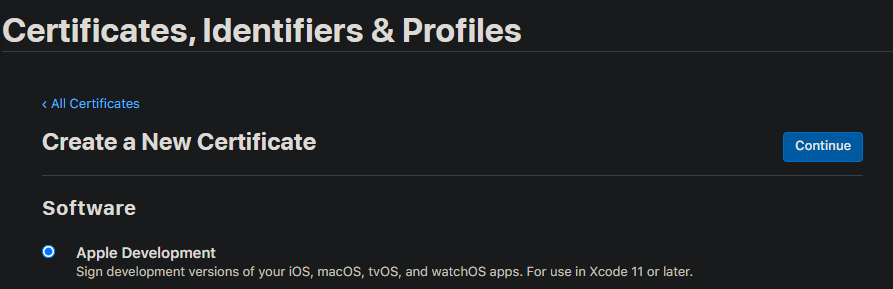
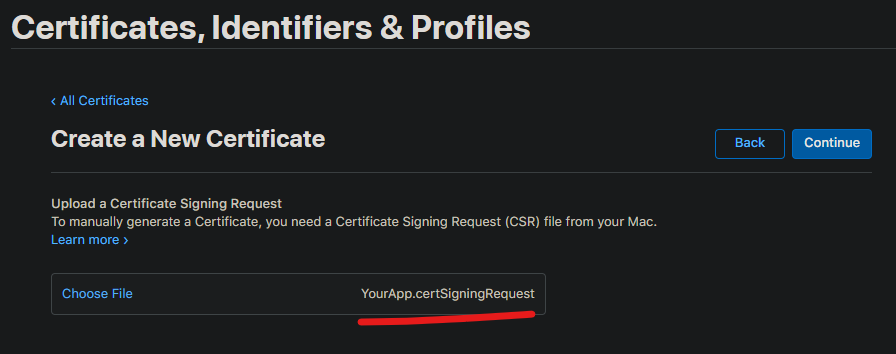
Now we need upload the YourApp.certSigningRequest file that we created this should be in your Apple Certificate Folder. Once the file uploaded click on continue.
Apple will generate a certificate for you. Then you can download this. Click on Download.
The file downloaded is called «development.cer» move this to Apple Certificate Folder.
Create an Apple ID for your app
Go to apple developer console → Identifiers section → Click on Plus Icon → Select App IDs → Click on Continue → Select App for Type → Click on Continue →
fill in the information
Description: WRITE YOU APP NAME HERE
Bundle ID: com.yourname.appename (don’t use capital word here)
App ID Prefix → Select you team ID
Example:

once you have filled the information click on continue. Click on Register. Now you should be able to see your app in the identifiers section.
‼️
Write these information we are going to need them later.
Bundle ID
App Name
Team ID
Adding our phone as a tester device
Go to apple developer console → Devices section → Click on pulse icon →
Select Platform → For iPhone set to → iOS, tvOS,watchOS
Device Name → Give it a name
Device ID → Now we are going to learn how to get our phone UDID
Open the link below
https://appforshare.io/get-udid
Scan the QR code in this website using your iPhone.
A website will open on your phone → Click on «Click for your UDID»
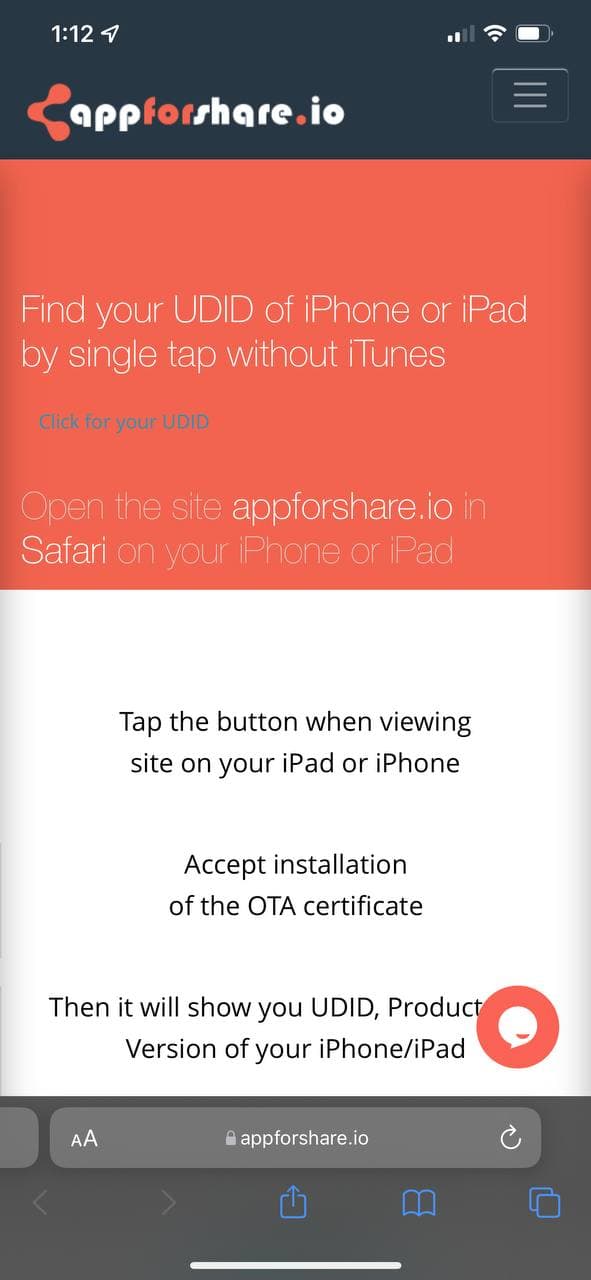
This will download a profile into your phone. → Go to Settings → General → VPN & Device Management → Select Get you UDID Profile
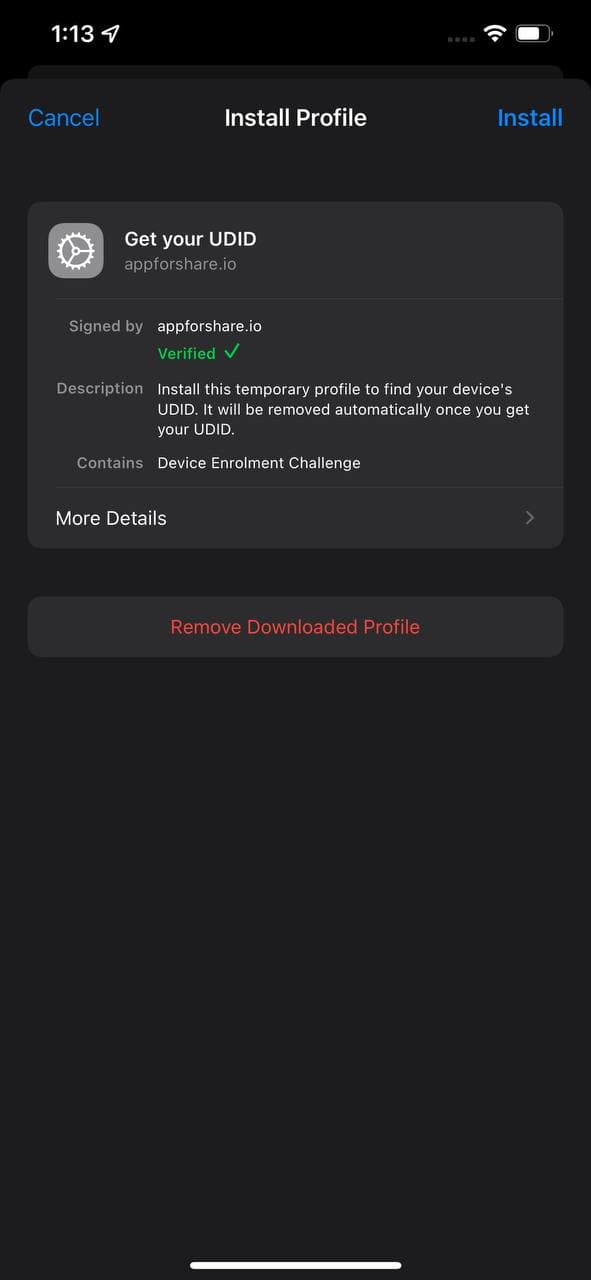
Click on install. After installing a web page would open that show your device UDID save that.
After this you can go back and delete the profile we just installed on phone since we don’t need it any more.
Now enter the UDID in Apple developer console and click on continue and add you device register your device. This allows us to install our application on the device.
Creating Provisioning Profile
Go to apple developer console → Profile Section → Click on Pulse Icon → Select iOS App Development → Now you need to chose App ID → Select the App ID you created in the previous section → Click on continue → Select the apple development profile that we selected previously → Select your mobile device → Give the Provisioning Profile a name for example «YourName Profile» → Click on Generate → Click on Download → A new file will get downloaded with .mobileprovison extension → Move this file to our Apple Certificates folder
Creating .p12 certificate
Git Bash to Apple Certificates folder → and run the bellow command
openssl x509 -in development.cer -inform DER -out YourApp.pem -outform PEMThis will create a file called «YourApp.pem» in our Apple Certificates folder
Now we are are to create .p12 certificate folder, this will require you to enter a password. Make sure you remember this password as we need to use later.
⚠️
Chane 0 to your password
openssl pkcs12 -password pass:0 -export -inkey YourApp.key -in YourApp.pem -out YourApp.p12This will create a file called «YourApp.p12» in out Apple Certificates Folder.
🎉
Finally we have everything ready for build!! 😅
Step 4
Create/open your Unity project.
Create a Unity project, we are going to use this project to build for our iOS device using Windows and Unity. If you already have a Unity project you can just open that.
Setting up project Build Setting
Click File → Build Setting → Player Settings → iOS Section → Other Settings → Go to Identification section → select Override Default bundle identifier → Set your bundle identifier (we made this previously in apple developer console) → Set you Signing Team ID (You can find this in apple developer console → Member ship → Team ID) → Enable Automatically Sign In
Step 5
Activate Could Build
Instead of building project on our machine we are going to use Unity service that build iOS application using could services.
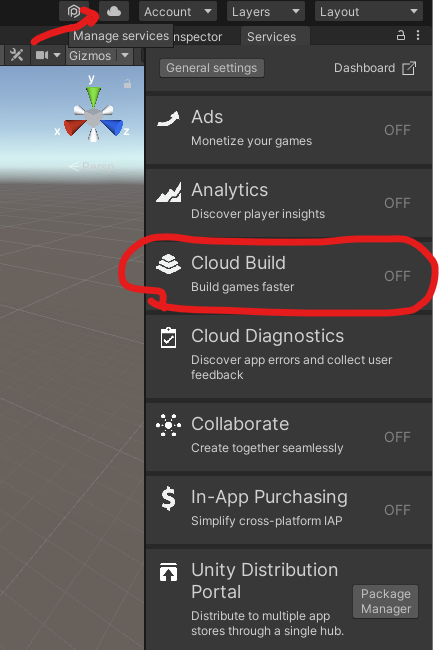
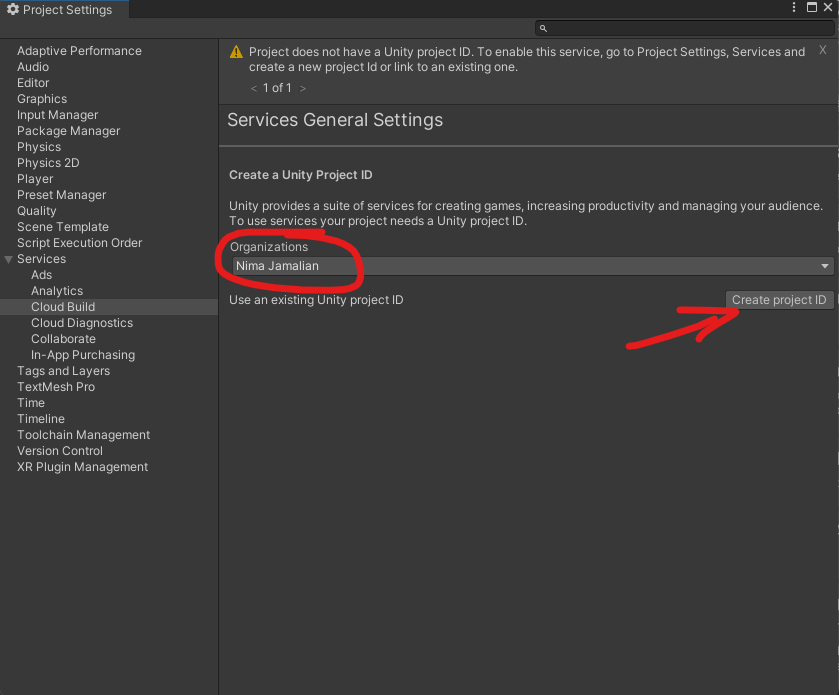
Click on → Mange Services (Button with cloud icon in Unity) → Then click on could build and turn it on
A new windows will open → here you need to select your organization → set to you account → click on create project ID
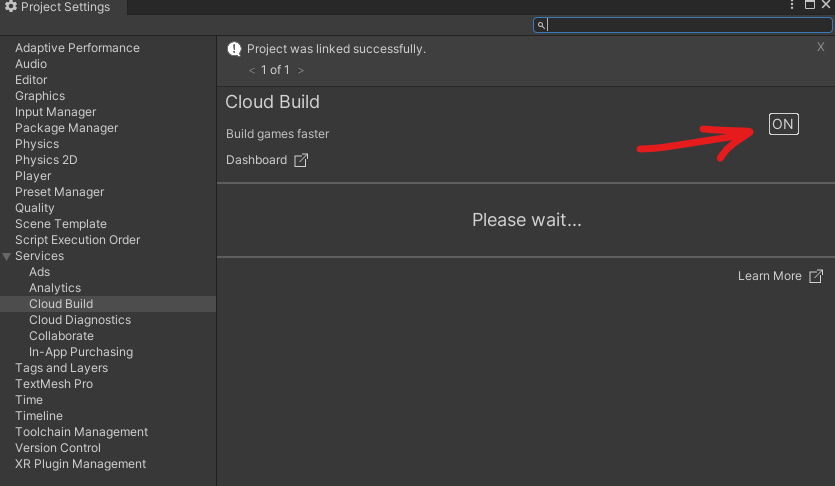
After that make sure you click on cloud build again to turn it on
Step 6
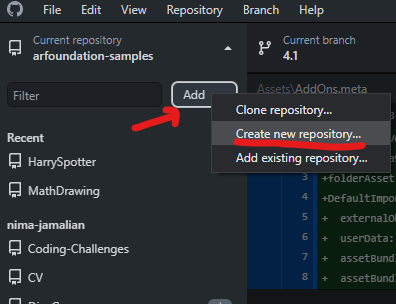
Uploading our Unity Project to Git
In order to use could build we need to upload our Unity project to a git repository.
Open Git application → Click on Add → Create a new repository
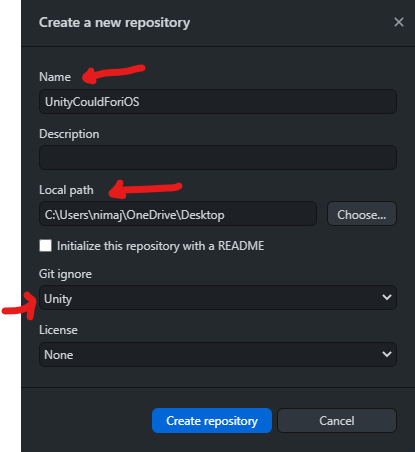
Give it a name
Chose a location for it
Select Git ignore → Select Unity
Click on Create repository
Click on Publish repository
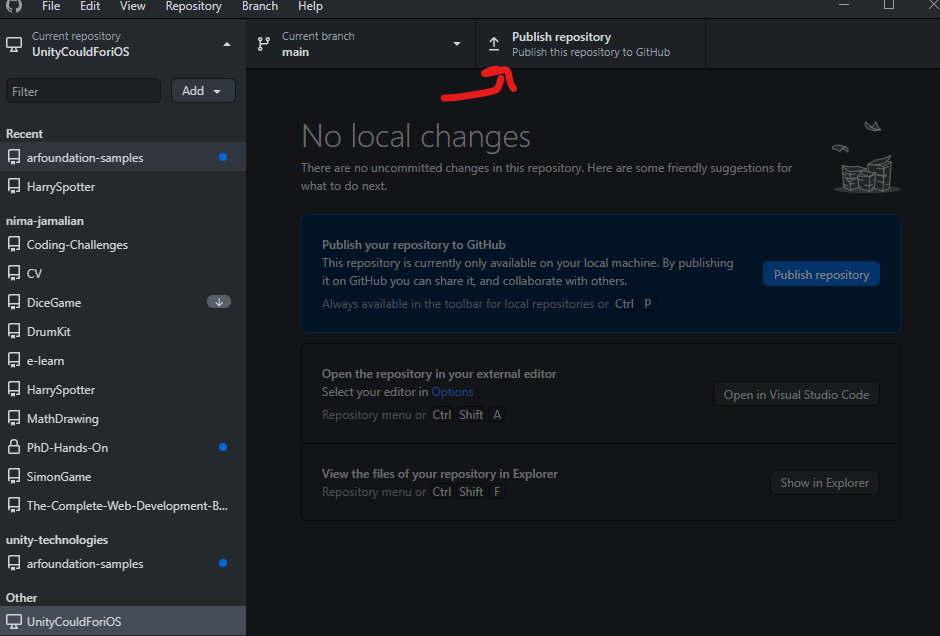
Deselect → Keep this code private → Publish repository
Now move your Unity project to this repository
⚠️
Note after this when you open your Unity project again for the first time you need to relocate it since we change the location.
Now go to GitHub select the repository that we created → you should see some file change that is being highlighted by the GitHub
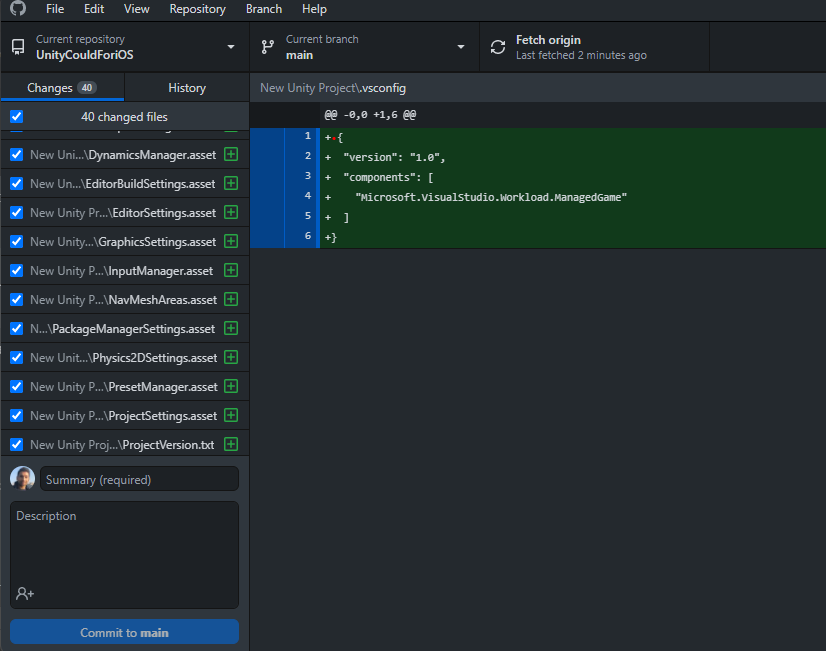
In Summary section write down project file → Click on Commit to main → Click on Push origin → Now we have uploaded our project file to out repository
Step 7
Setting Up Unity Could Build
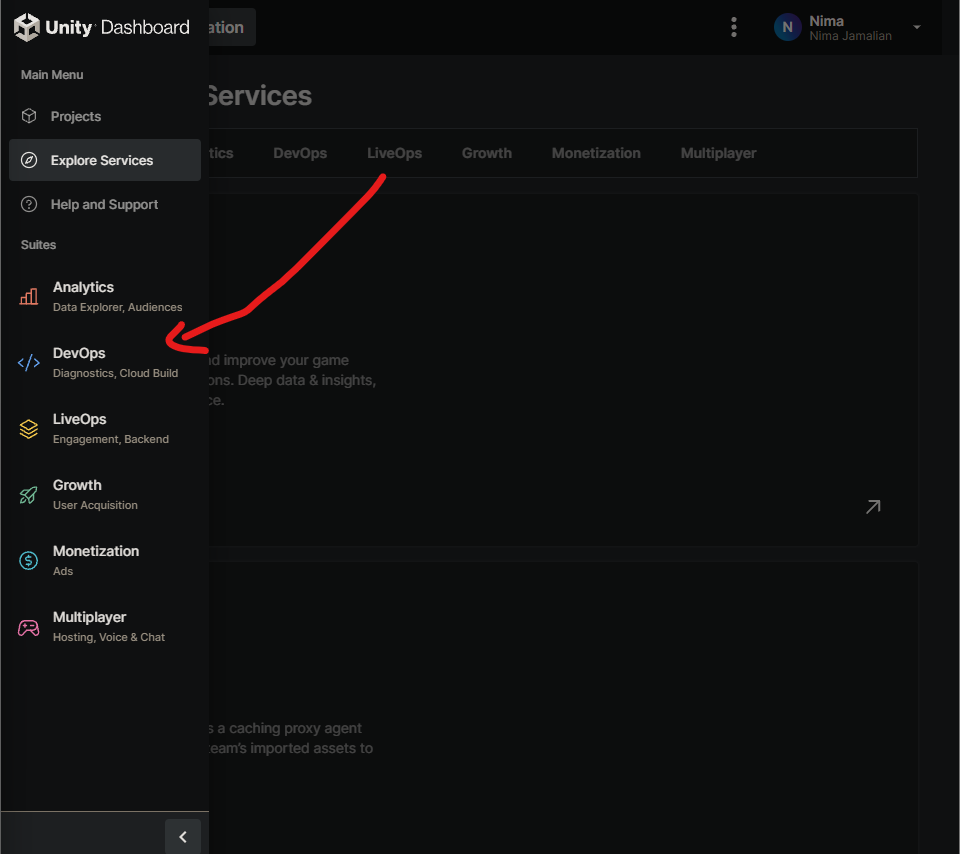
Go to link below
Unity Dashboard
Use Unity Dashboard to develop and operate your games.
https://dashboard.unity3d.com/organizations/757893/projects/1e50ca93-6e30-49e6-b9fc-078463e66108/explore
Click on DevOps
Select you app in the bar and then select set up could build
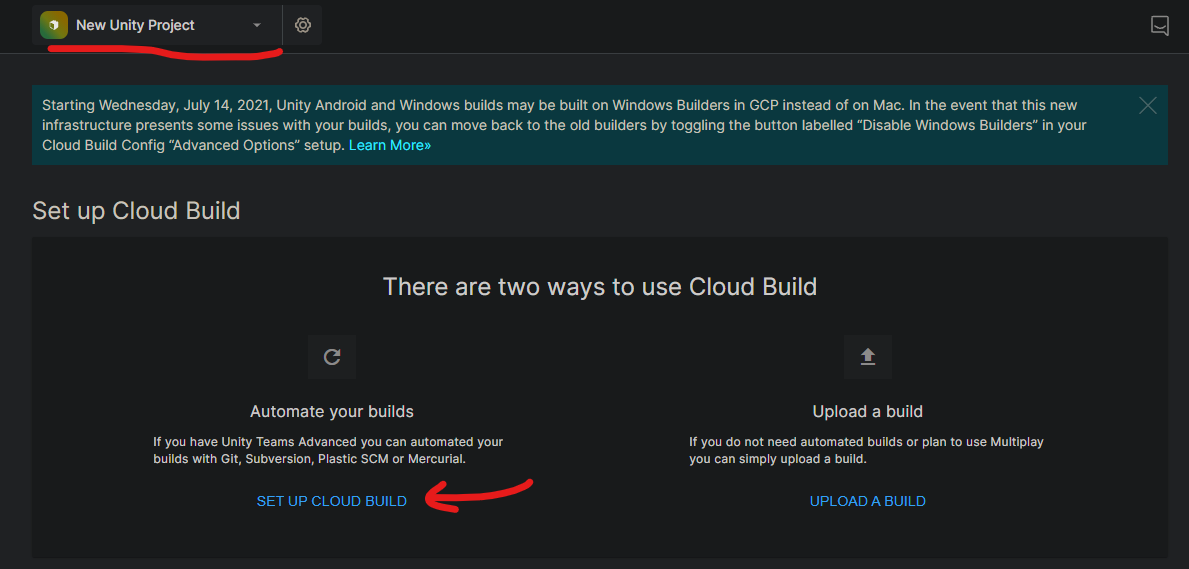
Select GitHub → Here you need to sign to your GitHub and give unity permission to access it.
Chose the repository we created → Click on Next: TARGET SETUP
In Cofig panel Click a new Setup New Target →
Click on iOS →
Project Subfolder → This should be change to folder name of your project folder. If you are not sure open your repository and see the folder name inside
Unity version → Select the unity version which your project was made in
→ Click on Next: Credentials
Now write down Bundle ID, we created this before in apple developer console
Give your device a name.
Upload the mobile prov file and p12 file from the Apple Certificates folder.
Enter the p12 Password which we created.

Click Next:Build → Now Unity will start building your application
⚠️
This might take a while depending on the size of your project . Unity could build is a bit slow.
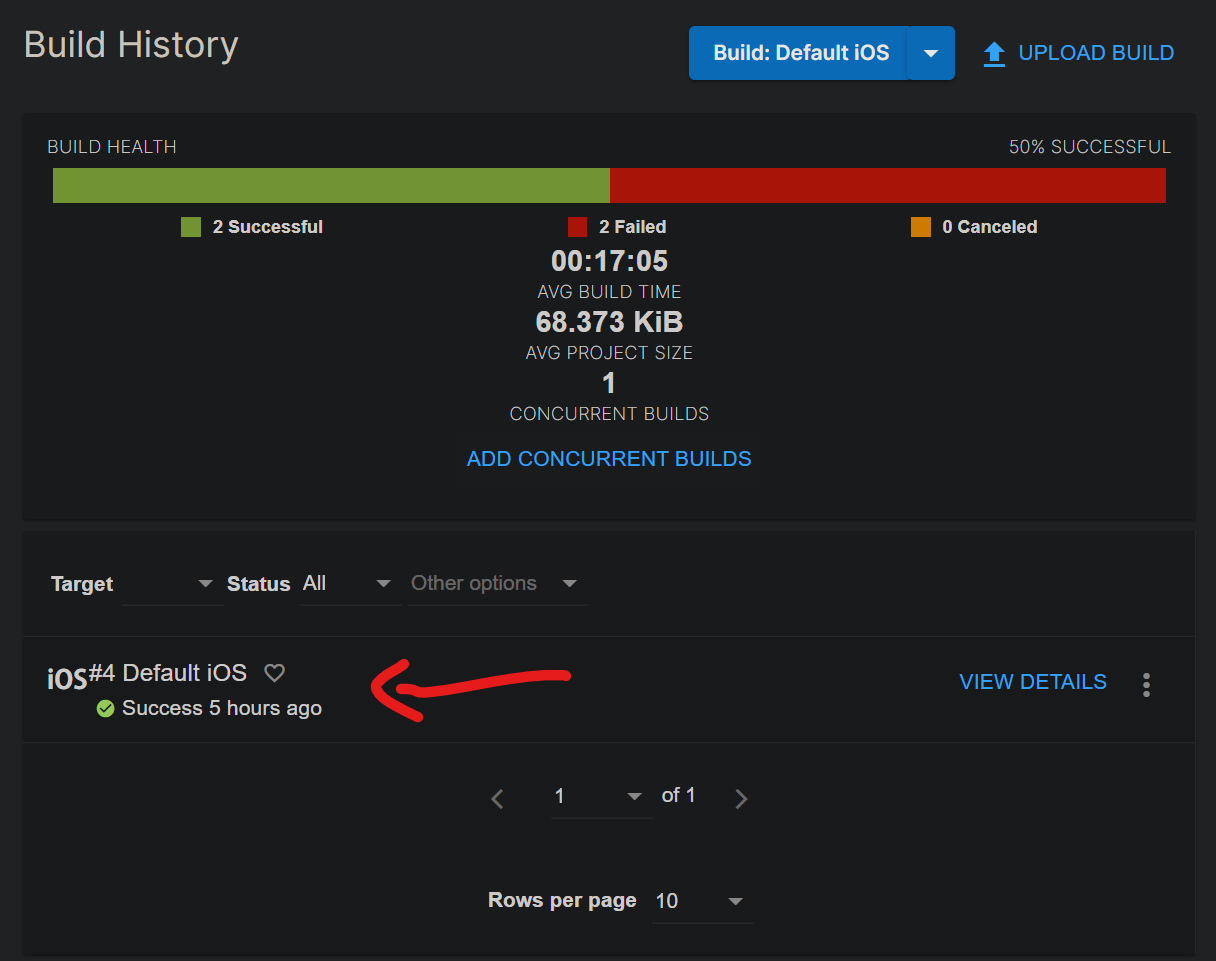
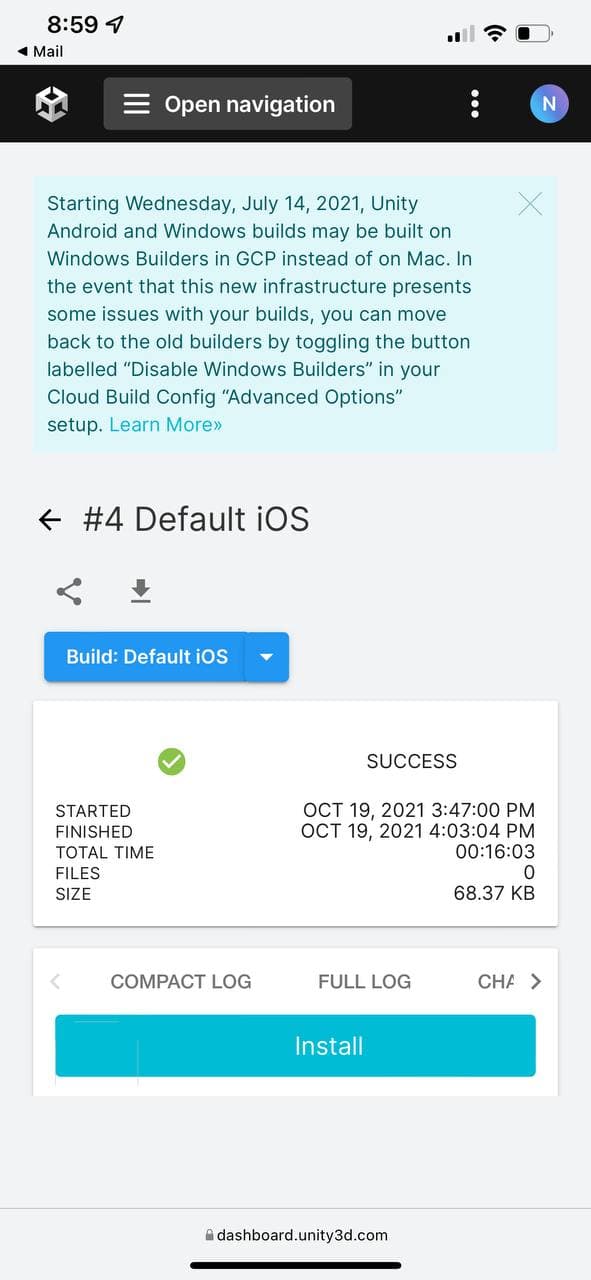
If build is successful you get this message
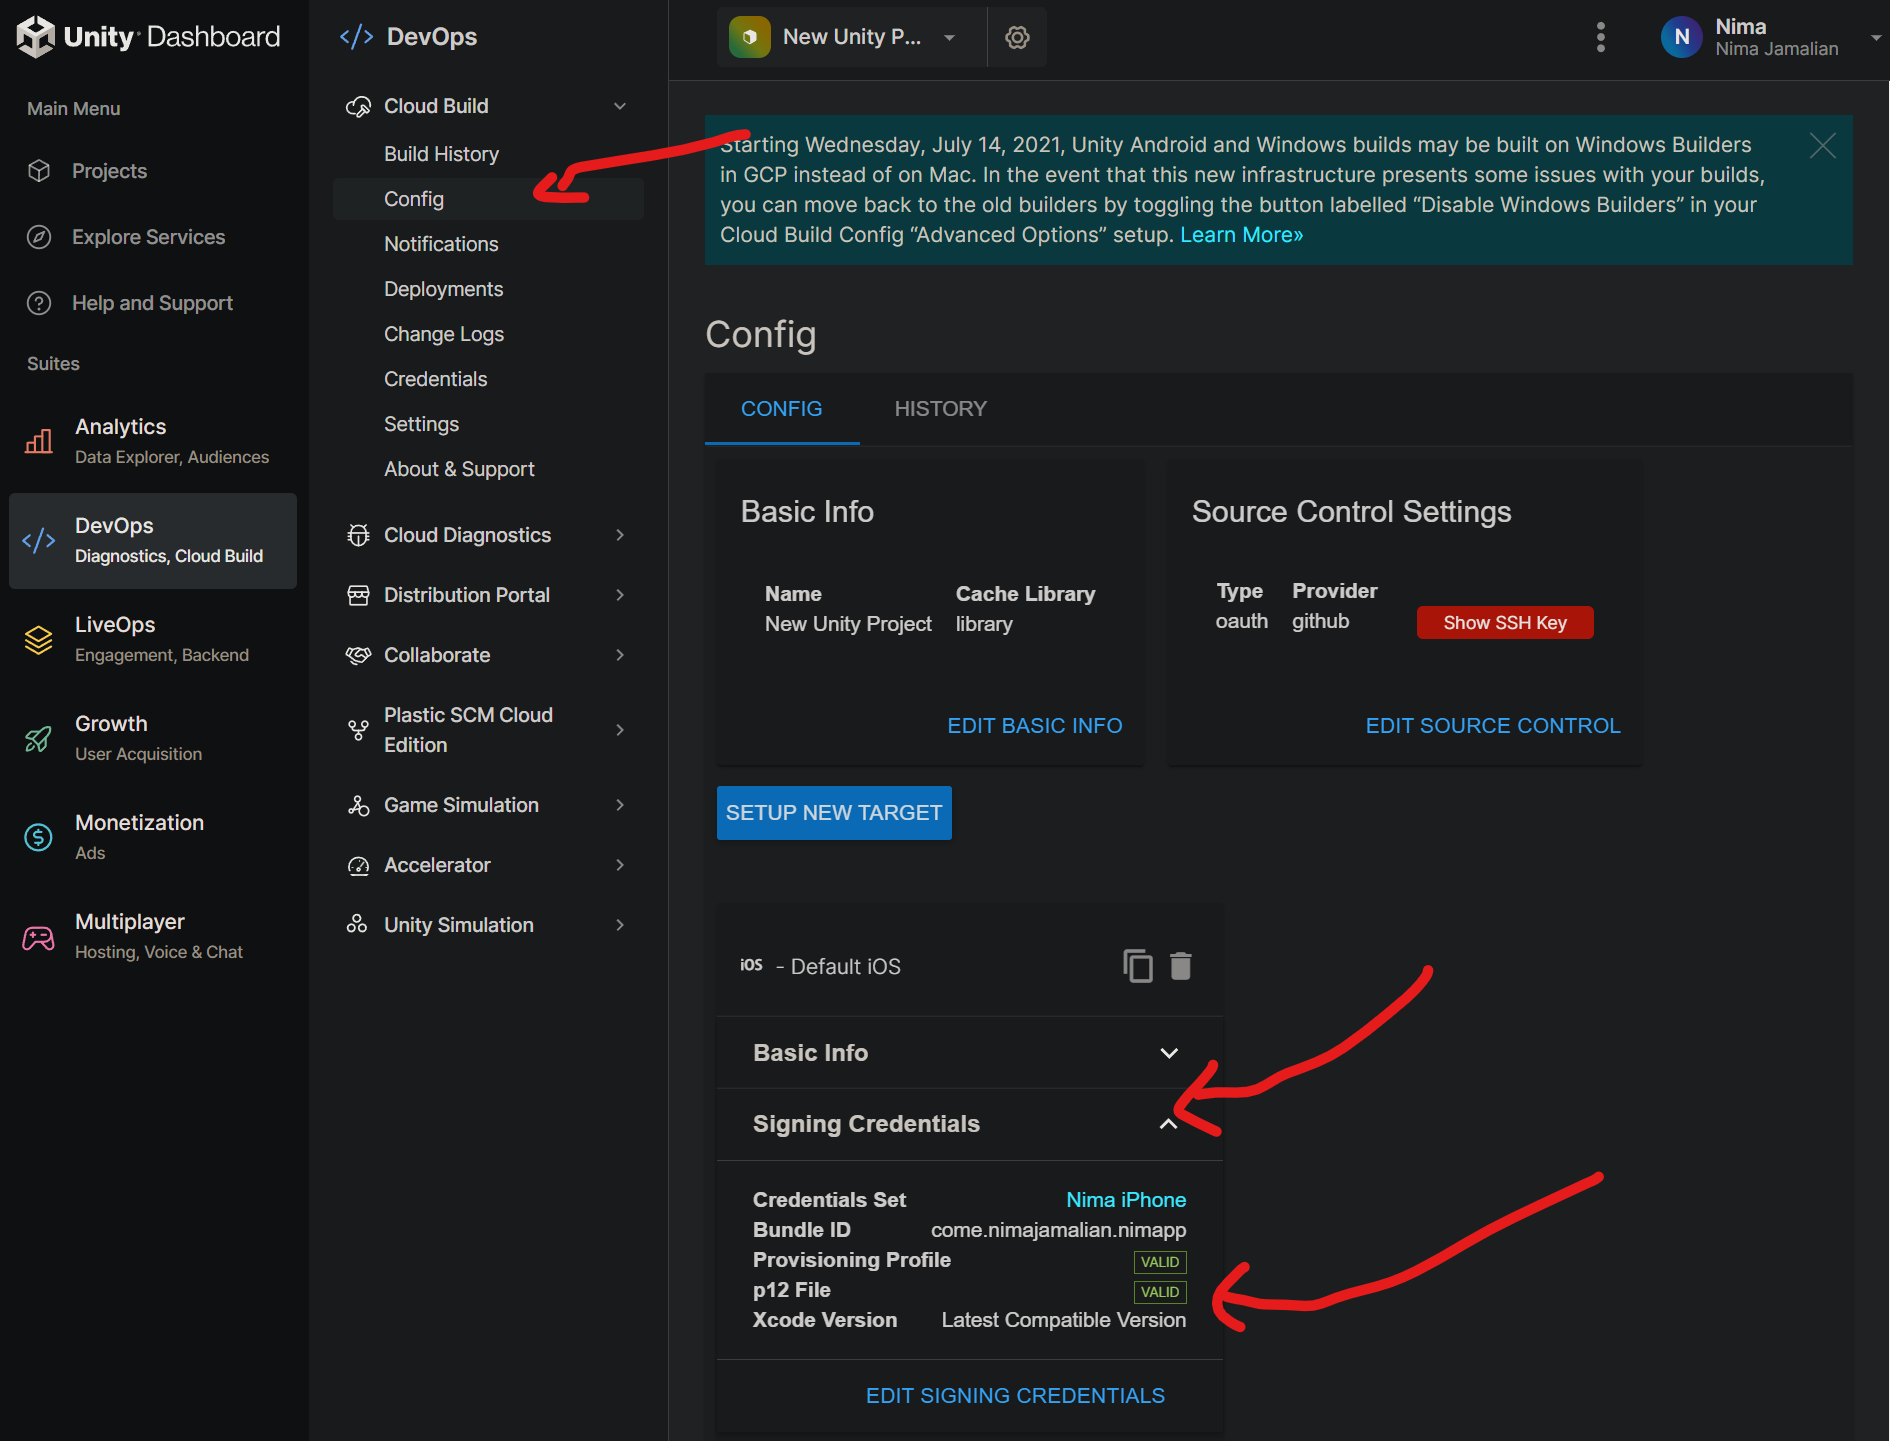
Let’s make sure if your apple developer credential have been accepted by unity →
Go to Config → Signing Credentials→
If you see Provisioning Profile and p12 File marked as VALID it means your profile has been setup correctly. 🥳🎉
Checking the status of Build
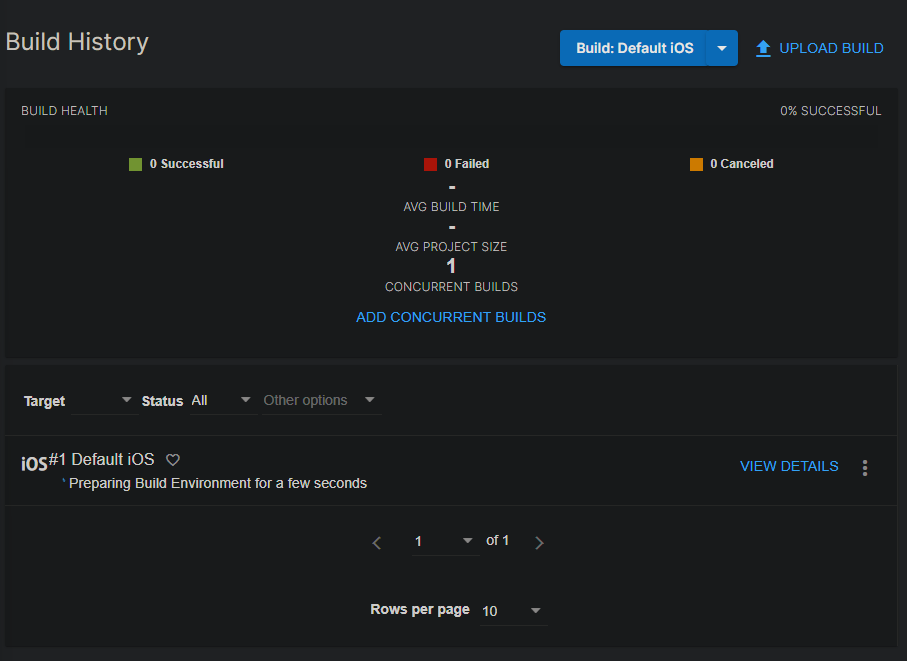
In Unity dashboard just go Build History and you can see if your project has been build or not.
Build Successful, Phone Install
Once the build has been finished, if it is successful. Unity will send you an email to your email address with the link to download the application.
❗
If you build fail Unity will tell the error message so you can try to resolve it.
Open that email on your phone → Click on Install → A web page will open → Here you need to sign in into your Unity account
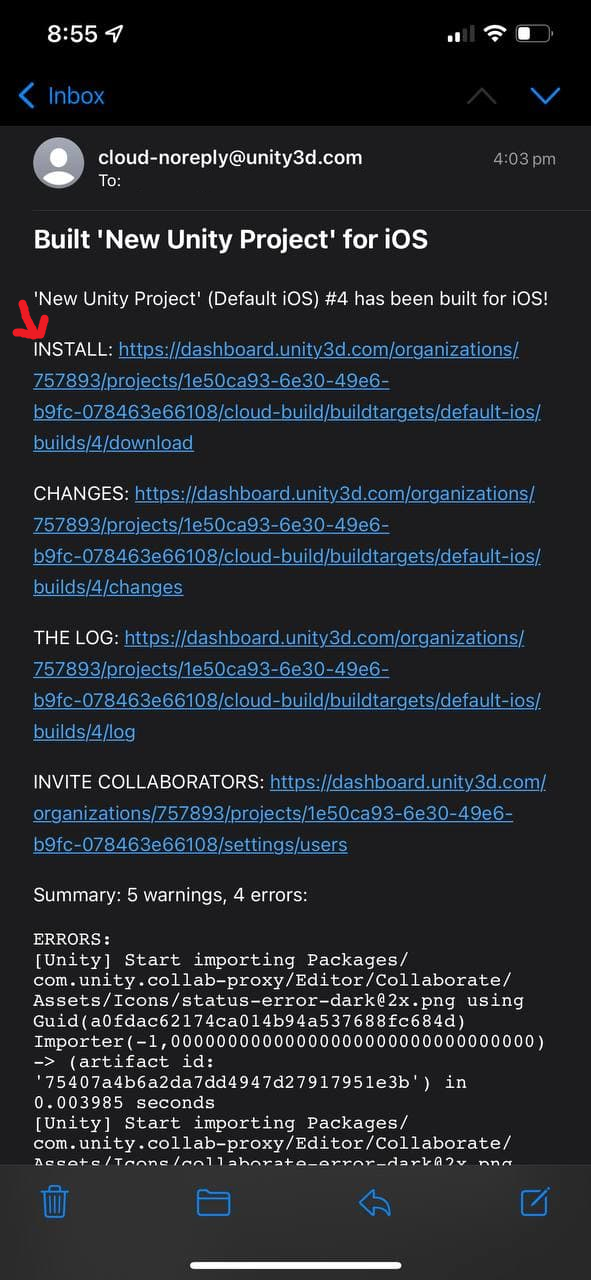
Click on Install
Unity will ask you to install a profile on your phone to verify your UDID. Go to your phone setting → General → VPN & Device Management → Click on Unity Profile and install it
Now go back to the Unity page and click on install. Unity will start downloading the app and install it on your phone.
❗
Unity doesn’t really give any indication that the app is being download and installing.
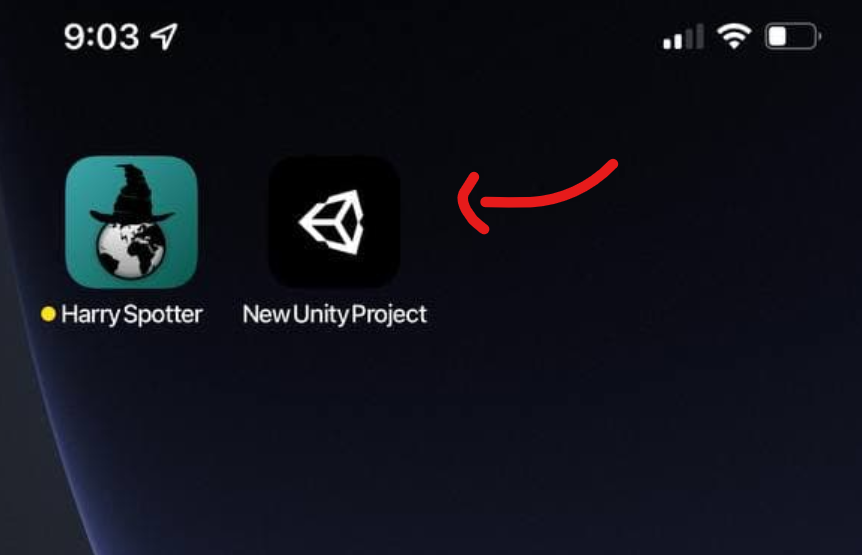
Wait for a bit and the app should show up in your home screen.
Click on the app and it should open!
Step 8
How to build the project again
You might add some changes to your project and might need to build it again then all you have to do push the changes to git repository we created. So just add your changes to Unity file and close Unity once you are done.
Open GitHub → Select your repository → In the Summary section write down a brief description of your changes → Click commit → Click on Push origin
This will upload the file to repository. Unity will automatically build the file every time the repository changes so you don’t have to do anything.
Once the build finished Unity will send you an email. You can also check the status of build in Unity dashboard build history section.
Unity Dashboard
Use Unity Dashboard to develop and operate your games.
https://dashboard.unity3d.com/organizations/757893/projects/1e50ca93-6e30-49e6-b9fc-078463e66108/explore
Using the Unity Developer Dashboard to configure Unity Cloud Build for Plastic
Set up a Gymfile in Unity Cloud Build
Cloud Build helps you automate the process of building your Unity Project for iOS devices.
This article describes the prerequisites necessary to build your Project for iOS and create the supporting components to configure Cloud BuildA continuous integration service for Unity projects that automates the process of creating builds on Unity’s servers. More info
See in Glossary. Topics covered include:
- Joining the Apple Developer Program
- Creating an iOS certificate and p12 file
- Adding devices to your profile
- Creating a provisioning profile
- Configuring your app to build for iOS
Joining the Apple Developer Program
To develop iOS apps, you must be a member of the Apple Developer Program. This lets you build, test, and eventually release your apps in the Apple App Store.
Note: You must have an Intel-based Mac running OS X Yosemite (v10.10) or later to develop and distribute iOS apps and Mac apps.
After you sign in to the Apple Developer program portal, you’ll see a list labeled Program Resources on the left. Click Certificates, IDs & Profiles to manage the certificates, identifiers, profiles, and devices you need to develop and distribute apps.
Provisioning profiles
A provisioning profile ties developers and devices to an authorized Development Team and enables you to use a device for testing. You must install a Development Provisioning Profile on each device you plan to run your application code.
Each Development Provisioning Profile contains a set of Development Certificates, Unique Device Identifiers (UDID), and an App ID.
To use a device for testing, you must also include your Development Certificate in the profile. A single device can contain multiple provisioning profiles.
Components of a provisioning profile
Certificates determine whether your app is development-only or a release candidate for the App Store. You should use an Ad Hoc Production Certificate so that you can test all the features of your game (such as GameCenter).
Identifiers are the unique IDs that identify your project. For basic projects, or if this is your first iOS project, you should make an App ID. This is often the same as your Unity3D Project’s Bundle ID.
Tip: For more information on signing identities and certificates, see Maintaining Your Signing Identities and Certificates on the Apple developer website.
Devices are the hardware—such as an iPhone, iPad, or iPod—on which you plan to test your project. You must retrieve the UDID for each device on which you plan to test your game. You then add the UDID to the Devices section in the iOS developer portal.
Note: Each year, you can register a fixed number of devices. The maximum number of devices you can register is 100 devices per product family per membership year. For more information see, Registering Devices Using Your Developer Account in the Maintaining Identifiers, Devices, and Profiles topic on the Apple developer website.
Creating an iOS certificate and p12 file
When you create a certificate, you must decide whether to create a Development Certificate (used only for testing), or a Production Certificate, which you use to distribute your app via the App Store.
Tip: Create a Production Certificate. While either certificate type works for development, Production Certificates make it easier to release your app to the App Store.
Create a certificate
- Sign in to your Apple Developer Program.
- Click Member Center > Certificates > Identifiers & Profiles > Certificates.
- In the left-hand column, under Certificates, click All.
- In the screen labeled What type of certificate do you need, choose the type of certificate to generate. Typically, if you’re starting, you should to pick an App Store and Ad Hoc production certificate.
- Use the Keychain Access program on your Mac (open your Finder and find it in Applications/Utilities) to generate a Certificate Signing Request (CSR) file. Follow the instructions in the iOS portal to complete this step. Make a note of where you save the CSR file.
- In the Generate your certificate screen, upload your CSR file (which might have the extension .certSigningRequest). Click the Choose File button and select your CSR file, and then click the Generate button.
- To download your certificate to your Mac, click the Download button on the Your Certificate is Ready screen. Store this file somewhere safe and back it up.
To add the certificate to a keychain, locate the certificate file and double-click it. This opens the Keychain Access program. If you get a popup with the message “Do you want to add the certificate to a keychain?”, choose login and click the Add button.
Export a p12 file
To create apps using Unity Cloud Build, you must convert your certificate file to a p12 file. A p12 file is a file that contains your private key and certificate and is used to sign your code. Typically, if you develop a project in native Xcode, this process is handled behind the scenesA Scene contains the environments and menus of your game. Think of each unique Scene file as a unique level. In each Scene, you place your environments, obstacles, and decorations, essentially designing and building your game in pieces. More info
See in Glossary.
To generate a p12 file:
-
On your Mac, open up your Finder and in Applications/Utilities, open the Keychain Access program.
-
In the left-hand column, under keychains, verify that Login is selected.
-
In the left-hand column, under Category, verify that My Certificates is selected. In the main Keychain Access pane, select your certificate.
Note: Typically, your certificate is located under My Certificates. If it is not there, check under Certificates.
-
From the File menu, select File > Export Items, or right-click and select Export.
-
Select Personal Information Exchange (.p12) from the File Format drop-down menu.
Note: If Login under Keychains and My Certificates under Category is not selected, the p12 option is greyed out.
-
Ceate a password for the p12 file.
Note: Record the password somewhere safe as you must supply it when setting up iOS builds on Unity Cloud Build.
Adding devices
For development purposes, Apple requires the UDID for each device on which you intend to install your app. Once your app is accepted into the App Store, anyone can download and install it; provided they have the correct version of iOS and meet any other requirements.
Finding your UDIDs
You can use iTunes to retrieve the UDID of your device. For a walkthrough of the retrieval process, see WhatsMyUDID.com.
The basic steps are:
- Open iTunes on your Mac.
- Connect the device (iPhone, iPad, etc) to the computer.
- In iTunes, select the device.
- You should see a screen with the device name, capacity, and other details about the device. To display the UDID, click the Serial # field.
- Copy and paste the UDID into a document where you can retrieve it later.
- Close iTunes and disconnect your device.
Add the UDID in the Apple developer portal
To add your device UDID(s) to the Apple Developer Portal:
- Click the All section under Devices in the left column of the Apple Developer Portal.
- To add a new UDID, click the Add button (+) in the upper-right corner
- Give the device a name you will recognize, and copy-paste the UDID you got from iTunes into the UDID field.
- Click Continue.
Repeat the steps for each of your devices.
Create App ID
Now that you’ve created your iOS Certificate, you can create an App ID:
-
In the left-hand column of the Apple Developer Portal, click App ID.
-
In the Register iOS App IDs pane, at the top right, click the Add button (+).
- In the Registering an App ID pane, enter the following information:
- App ID Description: The name of your app, without any special characters.
- App ID Suffix: If you intend to incorporate specific services such as Game Center or In-App Purchases, create an Explicit ID. If you don’t need these services, then create a Wildcard App ID. A Wildcard App ID lets you re-use the App ID for multiple projects.
- App Services: Optional. Indicate whether you plan to use any of the Apple App Services.
For more information on registering an App ID, see Maintaining Identifiers, Devices, and Profiles.
-
Click the Continue button.
-
On the Confirm your App ID page, check the information you’ve provided and then click the Submit button.
Create a provisioning profile
The next step is to generate a .mobileprovision file. The .mobileprovision file combines your p12 certificate, App ID, and identifies the UDIDs of the devices on which you are testing your app.
- In the Apple Developer portal, click Certificates, IDs & Profiles.
- In the left-hand column of the Apple Developer Portal, under Provisioning Profiles, select All.
- To add a new Provisioning Profile, click the Add button (+) in the upper-right corner.
- Under Development, select the type of provisioning profile to create and click Continue.
Note: If you’re just getting started, you should use a Distribution > Ad Hoc certificate, as this lets you build your game and test it on devices. - Select the App ID to use for development, and click the Continue button.
- Select one or more development certificates, and click the Continue button.
- Select one or more devices, and click the Continue button.
- Enter a profile name, and click the Generate button.
- Click Done.
Download the generated .mobileprovision file to your desktop machine.
Configuring your app to build for iOS
To configure your iOS Cloud Build, you need the following items:
- Your provisioning profile (.mobileprovision)
- Your .p12 file
- The password for your .p12 file
For basic iOS usage this process should be sufficient. For projects that include Xcode frameworks, you must perform some additional configuration.
Using Xcode Frameworks
To add Xcode frameworks manually, use the Xcode Manipulation API. The API lets you manage external Xcode frameworks.
For an example of a Unity Project that uses the API, see the UpdateXcodeProject example Project on BitBucket. You can use the example to experiment and to learn from.
One of the plugins of the example Project is an external Xcode project manipulation DLL. The DLL is the build product of the source available in Unity’s Bitbucket repository. A preferred way to include Xcode project manipulation functionality is to copy the C# source code files to the Assets/Editor folder in your Project.
You can use the Xcode Manipulation API in the following ways:
- Use the built-in Unity PostProcessBuildAttribute, which is executed before the Unity Cloud Build Post-Export method runs.
- Use the Unity Cloud Build Post-Export method (requires access to advanced settings).
Using the Unity Developer Dashboard to configure Unity Cloud Build for Plastic
Set up a Gymfile in Unity Cloud Build
My unity application is developed for iOS devices, but for some reason at this moment I have only Windows PC.
I searched around and found similar information, but not clear for what I want.
My query is
I will do development of the game in Windows PC using C#.
Then will build and deploy to iOS device using MAC.
Is that possible? I like to make sure.
asked Oct 12, 2017 at 10:06
![]()
4
I have made several Unity3D projects for iOS using a Windows.
When installing Unity, don’t forget to check «iOS deployment» and your Unity (on Windows) will be able to build an Xcode project.
Then, just transfer this Xcode project on a Mac with Xcode installed and you will be able to compile the project in order to be run on your iOS device.
Note : I just have to run chmod 777 MapFileParser.sh on the Mac folder containing the Xcode project before compiling with Xcode.
answered Oct 12, 2017 at 10:22
![]()
HelliumHellium
7,2062 gold badges20 silver badges49 bronze badges
7
You can always use Unity Cloud to build you games. Their server will build it either from your own repo (git, svn, etc) or you can use their Collaborate feature by going into the unity editor -> services -> collaborate on.
Before getting to use Unity Cloud to build for iOS, you will need to generate your certificates just as you do when building using XCode. On the config page you can choose the version of unity you want the build to use, the version of xcode and if you want Unity to build your game on every push ( auto-build).

As far as I know when building for ios the ipa will have a ridiculous size. If you encounter this problem please refer to the following link: how to disable bitecode
Even though Unity allows us to use their system to build for any platform, in order to upload your *.ipa to app store you will need to do it through application loader.
answered Oct 12, 2017 at 12:33
![]()
RostinRostin
1616 bronze badges

There are different way to build for ios from unity on windows.
Disclaimer: Running any macOS on non-Apple hardware is against the Apple EULA. Please acknowledge the risk and proceed on your own responsibility.
Xcode Method:
While installing Unity, don’t skip to check «iOS deployment» and your Unity (on Windows) will be ready to build an Xcode project.
Next, just assign this Xcode project on a Mac with Xcode installed and you will be ready to compile the project to be run on your iOS device.
Complete Tutorial here https://medium.com/@ryoichirooka/unity-ios-on-windows-deploying-to-iphone-from-within-unity-editor-on-windows-machine-using-vmware-15eb7cbcbf83
Unity Asset:
iOS Project Builder for Windows
No longer need to switch to your Mac and fire up Xcode to build your games for iOS. Save time and build them directly from Windows.

This one-stop build tool takes as input:
— an Xcode project directory created by Unity
— (optionally) a digital signing identity
…and creates an IPA package of your iOS app and immediately serves it for OTA (over the air) deployment, AND a .deb package of your iOS app ready to be deployed with Cydia. Upload your fresh app instantly to any iOS device connected to your network!
Debug made simple
The Remote Debug Console receives all your application logs and displays them live on your computer’s screen, while your app is running on your device. Even stack dumps are transferred when it crashes !
No jailbreak needed!
Simply reuse your digital signing identity from Apple’s iOS Developer Program (or create a new one). If your device is jailbroken, it’s even simpler: in this case, no signing identity is required.