 В этой инструкции подробно о способах исправить ошибку UNEXPECTED STORE EXCEPTION на синем экране (BSoD) в Windows 10, с которой время от времени сталкиваются пользователи компьютеров и ноутбуков.
Ошибка проявляет себя по-разному: иногда появляется при каждой загрузке, иногда — после завершения работы и включения, а после последующей перезагрузки пропадает. Возможны и иные варианты появления ошибки.
Исправление синего экрана UNEXPECTED STORE EXCEPTION, если при перезагрузке ошибка исчезает
Если при включении компьютера или ноутбука через какое-то время после предыдущего завершения работы вы видите синий экран UNEXPECTED_STORE_EXCEPTION, но после перезагрузки (выключения долгим удержанием кнопки питания и последующего включения) он пропадает и Windows 10 работает нормально, с большой вероятностью вам поможет простое отключение функции «Быстрый запуск».

Для того, чтобы отключить быстрый запуск, выполните следующие простые шаги
- Нажмите клавиши Win+R на клавиатуре, введите powercfg.cpl и нажмите Enter.
- В открывшемся окне, слева, выберите «Действия кнопок питания».

- Нажмите по «Изменение параметров, которые сейчас недоступны».
- Отключите пункт «Включить быстрый запуск».

- Примените настройки и перезагрузите компьютер.
С большой вероятностью, если ошибка проявляет себя так, как описано выше, после перезагрузки вы больше с ней не столкнетесь. Более подробно о быстром запуске: Быстрый запуск Windows 10.
Другие причины ошибки UNEXPECTED STORE EXCEPTION
Прежде чем приступать к следующим методам исправления ошибки и в том случае, если она стала проявлять себя недавно, а до этого всё работало исправно, проверьте, возможно, на вашем компьютере есть точки восстановления, чтобы быстро откатить Windows 10 на работоспособное состояние, см. Точки восстановления Windows 10.
Среди прочих, часто встречающихся причин, вызывающих появление ошибки UNEXPECTED STORE EXCEPTION в Windows 10, выделяются следующие.
Неправильная работа антивируса
Если в последнее время вы устанавливали антивирус или обновляли его (или же обновлялась сама Windows 10), попробуйте удалить антивирус, если запуск компьютера возможен. Такое замечено, например, за McAfee и Avast.
Драйверы видеокарты
Странным образом, неоригинальные или не установленные драйверы видеокарты могут вызывать эту же ошибку. Попробуйте обновить их.
При этом обновить — не значит нажать «Обновить драйверы» в диспетчере устройств (это не обновление, а проверка наличия новых драйверов на сайте Майкрософт и компьютере), а означает скачать их с официального сайта AMD/NVIDIA/Intel и установить вручную.
Проблемы с системными файлами или жестким диском
При наличии каких-либо проблем с жестким диском компьютера, а также при повреждении системных файлов Windows 10, вы также можете получить сообщение об ошибке UNEXPECTED_STORE_EXCEPTION.
Попробуйте: выполнить проверку жесткого диска на ошибки, выполнить проверку целостности системных файлов Windows 10.
Дополнительная информация, которая может помочь исправить ошибку
В завершение, некоторая дополнительная информация, которая может оказаться полезной в контексте рассматриваемой ошибки. Приведенные варианты встречаются редко, но возможны:
- Если синий экран UNEXPECTED_STORE_EXCEPTION появляется строго по расписанию (через определенный промежуток времени или четко в определенное время), изучите планировщик заданий — что запускается в это время на компьютере и отключите это задание.
- Если ошибка появляется только после режима сна или гибернации, попробуйте либо отключить все опции режима сна, либо вручную установить драйверы управления электропитанием и чипсета с сайта производителя ноутбука или материнской платы (для ПК).
- Если ошибка появилась после каких-то манипуляций с режимом работы жесткого диска (AHCI/IDE) и других параметров БИОС, очистки реестра, ручных правок в реестре, попробуйте вернуть параметры БИОС и восстановить реестр Windows 10 из резервной копии.
- Драйверы видеокарты — частая причина ошибки, но не единственная. Если в диспетчере устройств есть неизвестные устройства или устройства с ошибками, установите драйверы и для них.
- При появлении ошибки после изменения меню загрузки или установки второй операционной системы на компьютер, попробуйте выполнить восстановление загрузчика ОС, см. Восстановление загрузчика Windows 10.
Надеюсь, один из методов поможет вам исправить проблему. Если же нет, на крайний случай можно попробовать сбросить Windows 10 (при условии, что проблема вызвана не неисправным жестким диском или другим оборудованием).
With the update to Windows 10, you got a fancy set of additional features and improve aesthetics but they didn’t come without the unwanted exceptions and errors that we could have lived without. One such example is the “unexpected store exception” that forces you to restart every time it shows up.
The unexpected store exception has troubled many users after they updated from previous versions of Windows 10. It is normally accompanied by the dreaded BSOD or the blue screen of death. Most of the time this exception has been raised because of an anti-virus program. We will discuss removing the anti-virus to stop the blue screen of death from reoccurring. If you want to confirm that it’s actually the anti-virus being the guilty party, you can do that by going through your bug details. In there, you should be able to see the “raw stack” which contains the traces that have been produced by the operating system. In there, you should be able to find errors that might correspond to the drivers that are used by your anti-virus or malware-protection programs. (We will be sharing two other methods along with this so if the anti-virus removal method doesn’t work for you, don’t worry, we have still got you covered)

Method 1: Uninstall Anti Virus Program
Windows 10 has “Microsoft Defender” as a default and powerful virus protection application, so even if you remove your anti-virus, don’t worry, your PC will be guarded. To be more specific, users running McAfee reported that McAfee was the culprit.
Perform the following steps to uninstall:
Press the “Windows key + X” to pull up the pop-up menu above the start button appear.
Select “Control panel” from the list.
In the control panel, you should be able to see a section that goes by the name “Programs”. Click on it.
Here you will find a list of programs installed on your computer. From the list, go ahead and find your anti-virus software. If you have installed multiple versions of protection software then you should ideally uninstall all of them. To do so, right click on your selection and click on “Uninstall”.
You will be asked whether you really want to proceed with the uninstallation; say yes.
Follow the onscreen steps to complete the uninstallation.
Restart your computer.
Once you perform the above mentioned steps, the chances of this error to come become very low. If however you are still facing this issue, then there are two other methods that we are going to discuss so get your bug-fixing hats on and continue reading.
Method 2: Check Hard Disk Health
Some users also reported having this issue appear after they found some issues with their hard drive’s health. There were some important files that were present in a bad sector of the hard drive and that was the primary cause of the issue; some users also reported that a dying hard drive was the cause. If the above method didn’t fix the error for you, then it’s probably your hard drive that’s the guilty party. We will be running a health diagnostic test using a third-party tool to prove more. Follow these steps:
For the health diagnosis, we will be using Crystal Disk info which is a small tool that can let you know about the status of your hard drive. Download it from this link.
The downloaded file will be an executable one. Double click on it and follow the on-screen instructions to install it.
The tool should install pretty quickly. Once it does, launch it and the main window should be able to give you the status of your hard drive. On normal hard drives, it says “Good”, but if you are having some issues, it will have scarier things to say like “Bad” for example.
If the tool diagnoses your hard drive to be “bad” then that’s the cause of your problem. We recommend replacing the hard drive to solve the issue. If however you got a “Good” status report and this method too didn’t work for you, then we have one last method to recommend.
Method 3: Check Driver Issues
If you have the same issue and have a Lenovo machine, then you can follow these steps to remove the exception:
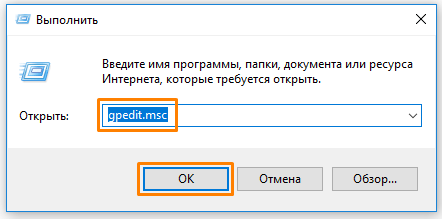
As a first step, we will be disabling the automated installation of drivers. For this, type “gpedit.msc” in the start menu search. If you don’t have the global policy editor installed then you can follow this comprehensive guide to install it first click (here)
In the left-hand side of the window, you should see “Computer Configuration”. Expand that.
Expand “Administrative Templates”, then expand “System” and follow that by expanding “Device Installation”.
Click on “Device installation”.
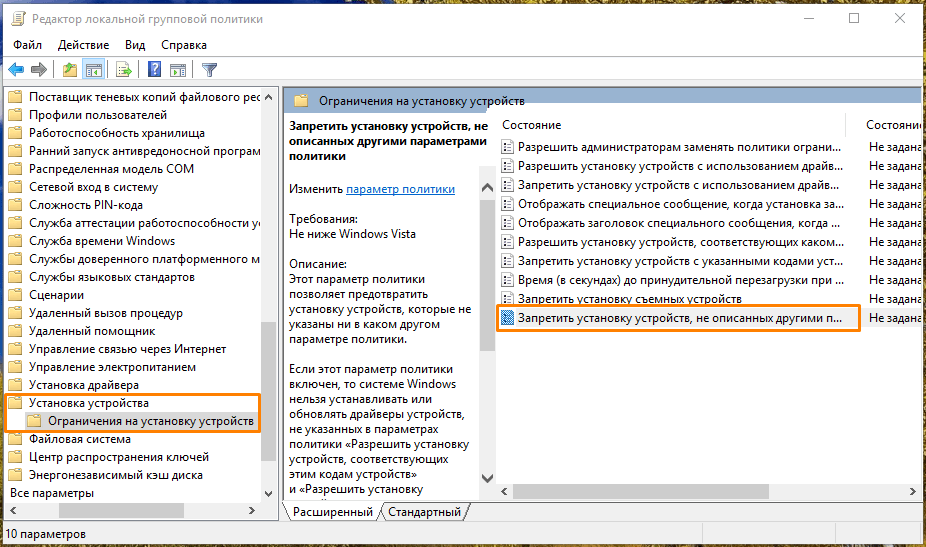
In the window on the right-hand side, you should see “Prevent installation of devices not described by other policy settings”. Double click on it.
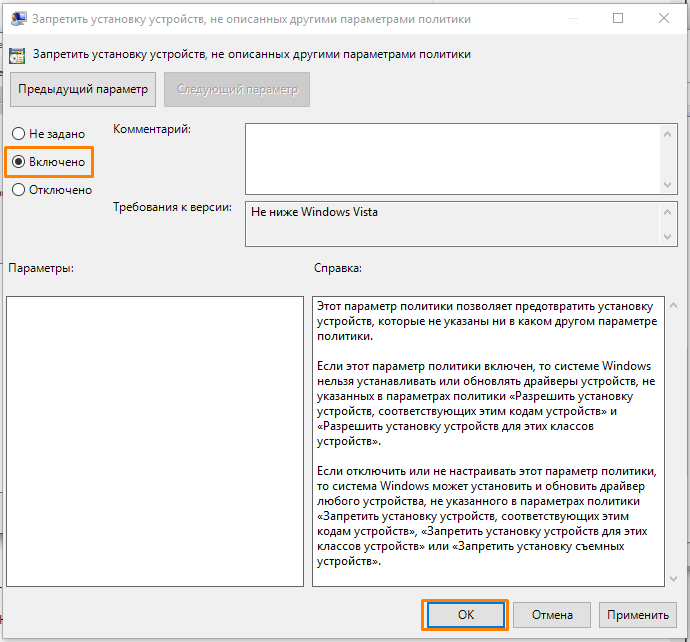
In the window that appears, select “Enabled” and click “Ok”.
Restart your computer now.
Invoke the start menu pop-up by pressing “Windows key + X” and select “Device manager”.
Now from the device manager window, go to “Sound video and game controllers” and right click on “Conexant SmartAudio” or “IDT High Definition Audio”. Click on uninstall from the list and ensure that “Delete the driver software for the device” checkbox is checked.
Now press “Windows key + X” again and select “Programs and Features”. From the list of apps, uninstall everything that you can find related to “Conexant/IDT and Dolby”.
Reboot the computer.
Once you have rebooted, you have to download the following driver for the Dolby and audio component from this link:
Audio driver (Conexant) for 64 bit Windows- Lenovo G410, G510
Install the downloaded driver and restart your machine.
Once you have reinstalled the latest driver, you should no longer face the unexpected store exception on Windows 10 again.
Solution 4: Turning off Fast Startup
Windows 10’s Fast Startup (also called fast boot) works similarly to the hybrid sleep modes of previous versions of windows. It combines the elements of a cold shutdown and the hibernate feature. When you shut down your computer, Windows logs off all users and closes all applications similar to the cold boot. At this point, Window’s state is similar to when it is freshly booted up (as all users are logged off and applications are closed). However, the system session is running and the kernel is already loaded up.
Then Windows sends a notification to devise drivers to prepare for hibernation and saves the current system state to hibernation and turns off the computer. When you restart the computer, Windows doesn’t have to reload the kernel, system state or the drivers. It just refreshes your RAM with the loaded image in the hibernation file and navigates you to the startup screen.
This feature makes Windows boot faster so you don’t have to wait the traditional time. However, this feature is also known to cause problems by not loading the required drivers properly each time. As it doesn’t reload the drivers, some drivers might not be already be loaded. Due to this, we might be experiencing the problem.
- Press Windows + R to launch the Run application. In the dialogue box type “control panel” and hit Enter. This will launch your computer’s control panel.
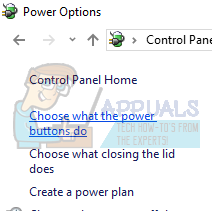
- Once in the control panel, click on Power Options.

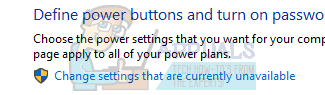
- Once in the Power Options, click on “Choose what the power buttons do” present at the left side of the screen.
- Now you will see an option which requires administrative privileges named as “Change Settings that are currently unavailable”. Click it.
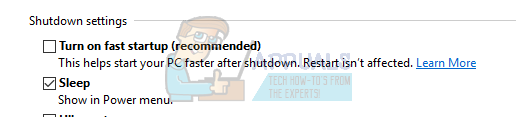
- Now head to the bottom of the screen and uncheck the box which says “Turn on fast startup”. Save changes and exit.
- You might need to restart your computer. Check if the problem at hand got fixed.
Solution 5: Updating your Display Drivers
We will start your computer in Safe Mode and delete the currently installed drivers for your display card. Upon the restart, the default display drivers would automatically be installed upon the detection of your display hardware.
- Follow the instructions in our article on how to boot your computer into safe mode.
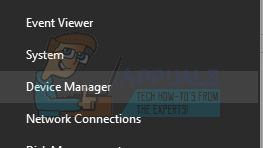
- Once booted in the safe mode, right click on Windows key and select Device Manager from the list of options available.
Another way to launch the device manager is by pressing Windows + R to launch the Run application and typing “devmgmt.msc”.
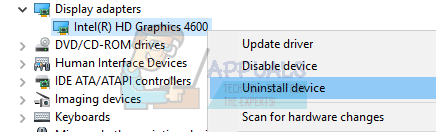
- Once in the device manager, expand the Display adapters section and right click on your display hardware. Select the option of Uninstall device. Windows will pop a dialogue box to confirm your actions, press Ok and proceed.
- Restart your PC. Press Windows + S button to launch your start menu’s search bar. In the dialogue box type “Windows update”. Click the first search result which comes forward.

- Once in the update settings, click on the button which says “Check for updates”. Now Windows will automatically check for updates available and install them. It may even prompt you for a restart.
- After updating, check if your issue got fixed.
Windows Update always tries its best to deliver the latest drivers available for your hardware. But it also doesn’t mean that they are the latest ones available. Alternatively to the Windows Update, you can also head over to your graphics card’s manufacturer website and download the latest drivers manually.
If the latest drivers also don’t solve the problem in question, you can try downloading and installing an older driver for your hardware. Manufacturers have all the drivers listed according to date and you can try installing them manually. Follow the instructions below to install the drivers manually.
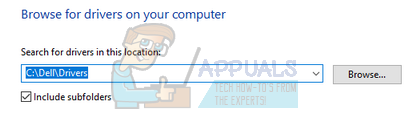
- Open your Device manager as explained above in the solution and right click on your driver and select “Update Driver”.

- Now a new window will pop up asking you to whether update the driver manually or automatically. Select “Browse my computer for driver software”.

- Now browse through the folders to where you downloaded the drivers. Select it and Windows will install the required drivers. Restart your computer and check if the problem got solved.
Note: You should also check each of the devices connected to your computer via the device manager and update their drivers one by one. The error could be generated due to any one of them; you have to do hit and trial until you find the badly configured driver.
Solution 6: Running System File Checker
System File Checker (SFC) is a utility present in Microsoft Windows which allows the users to scan their computers for corrupt files in their operating system. This tool has been there in Microsoft Windows since Windows 98. It is a very useful tool for diagnosing the problem and checking if any problem is due to corrupt files in windows.
We can try running SFC and see if our problem gets solved. You will get one of the three responses when running SFC.
- Windows didn’t find any integrity violations
- Windows Resource Protection found corrupt files and repaired them
- Windows Resource Protection found corrupt files but was unable to fix some (or all) of them
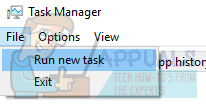
- Press Windows + R to launch the Run application. Type “taskmgr” in the dialogue box and hit Enter to launch your computer’s task manager.
- Now click on File option present at the top left side of the window and select “Run new task” from the list of options available.
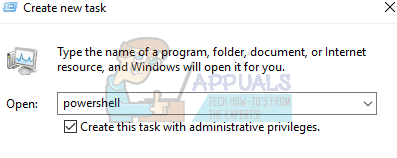
- Now type “powershell” in the dialogue box and check the option underneath which states “Create this task with administrative privileges”.
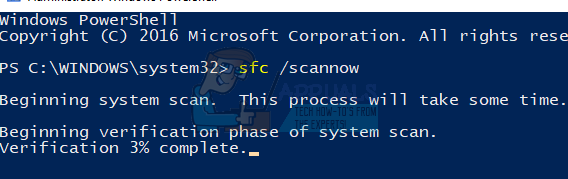
- Once in the Windows Powershell, type “sfc /scannow” and hit Enter. This process may take some time as your entire Windows files are being scanned by the computer and being checked for corrupt phases.
- If you encounter an error where Windows states that it found some error but was unable to fix them, you should type “DISM /Online /Cleanup-Image /RestoreHealth” in the PowerShell. This will download the corrupt files from the Windows update servers and replace the corrupt ones. Do note that this process can also consume some time according to your internet connection. Don’t cancel at any stage and let it run.
If an error was detected and was fixed using the above methods, restart your computer and check if the process started working normally.
Solution 7: Turning off Sleep Mode
Another fix which worked for the majority of the users was disabling sleep mode. The error seems to be related to the computer sleeping or saving predefined data (as in fast startup). We can try disabling the sleep mode completely and check if this fixes the problem. Do note that if this doesn’t make a difference, you can always revert the changes.
- Right click on the battery icon present at the bottom right of your screen and click “Power Options”.
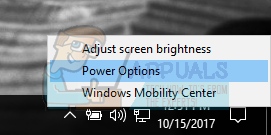
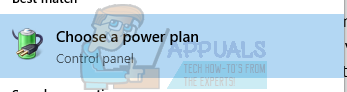
If you own a PC and don’t see this option, press Windows + S and type “choose a power plan”. Click on the most relevant result.
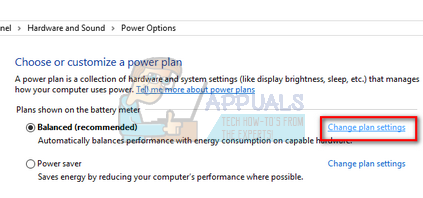
- There will be many plans listed in the window. Click on “Change plan settings” in front of the power plan which is currently active on your computer.
- On this window, you will see an option “Put the computer to sleep”. Make sure that the option is set to as “Never” in both conditions (on battery and plugged in). Click “Save changes” and exit.
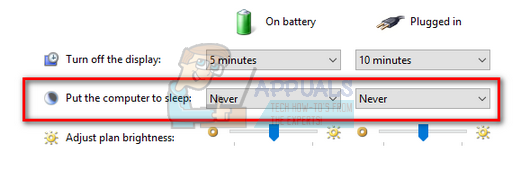
- Now reboot your computer and check if the problem went away.
Solution 8: Reconnecting your hard drive (only for towers)
You can also try reconnecting your hard drive and check if this solves the problem. Many users reported that the problem was with their hard drive. If you own a tower, turn off your computer, unplug the power, then carefully take off the lid and disconnect the black and white wires going to your motherboard from your hard drive. Wait for a couple of minutes before plugging them back in. After rebooting your computer, check if the issue got fixed.
If you have already installed Windows again and the problem still persists, we recommend having your hard drive checked. It is possible that the problem lies with the hard drive and prompts the error even though you installed a fresh copy of Windows on your machine.
Кому из пользователей операционной системы Windows 10 незнаком синий экран смерти — BSoD, от англ. «Blue Screen of Death», появляющийся при возникновении критических ошибок в работе ОС? Сегодня будем разбираться, из-за чего может случиться ошибка с кодом «UNEXPECTED_STORE_EXCEPTION» и как от нее избавиться.
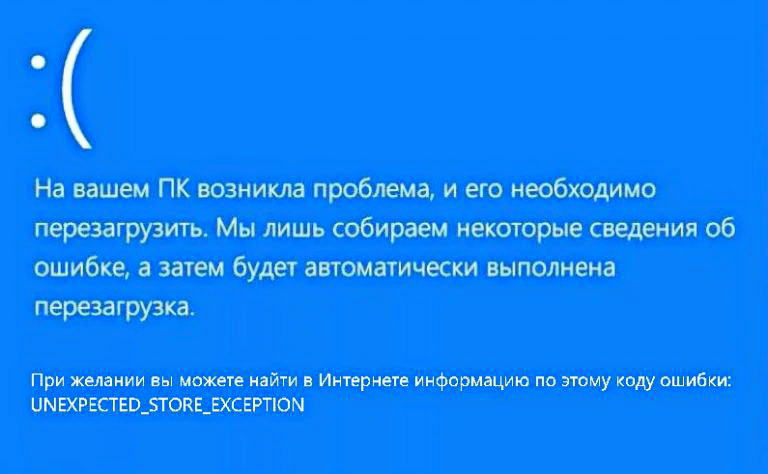
Синий экран смерти с кодом ошибки «UNEXPECTED_STORE_EXCEPTION»
Отключаем быстрый запуск
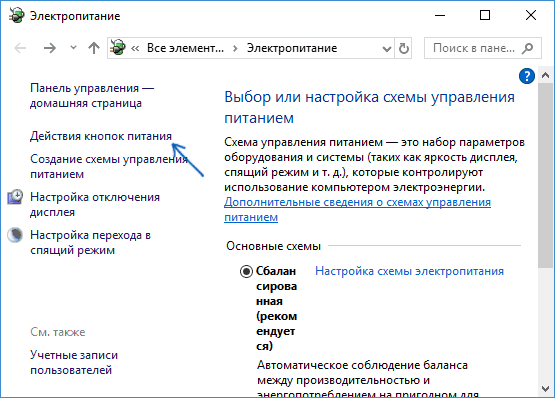
Нередко такая ошибка появляется через некоторое время после предыдущего завершения работы ПК в том случае, если в настройках электропитания включена функция быстрого запуска. Попробуйте отключить ее и посмотреть, исчезнет ли проблема. Для этого:
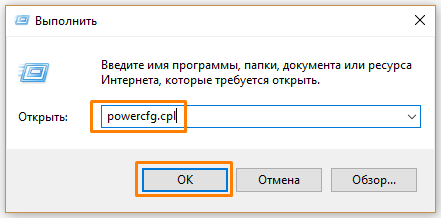
- Откроем раздел настроек «Электропитание» панели управления Windows: нажмем клавиши «Windows» + «R», введем в окно «Выполнить» команду powercfg.cpl и подтвердим ее кнопкой «ОК» или нажатием клавиши «Enter».

Открываем настройки электропитания
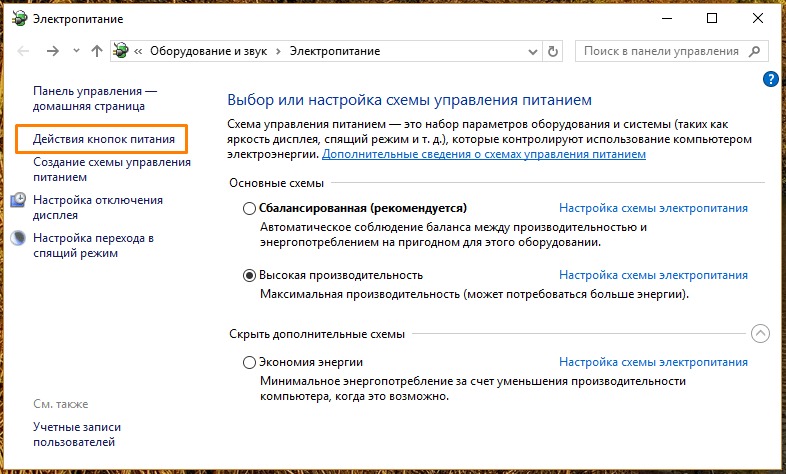
- В появившемся окне нас интересует пункт «Действия кнопок питания» в левой части окна.

Кликаем пункт «Действия кнопок питания»
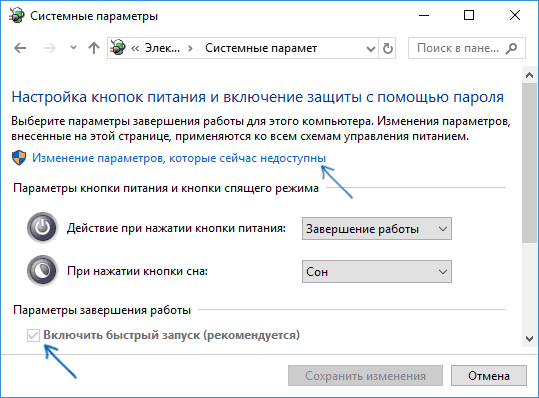
- Далее нажимаем на ссылку «Изменение параметров, которые сейчас недоступны».
Жмем на ссылку «Изменение параметров, которые сейчас недоступны»
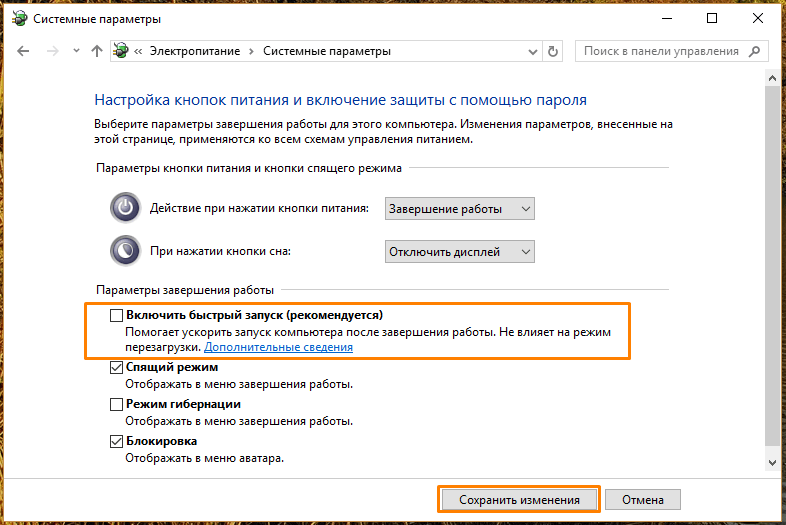
- При этом настройки в секции «Параметры завершения работы» станут активными. Снимаем флажок «Включить быстрый запуск» и нажимаем кнопку «Сохранить изменения».

Убираем галочку «Включить быстрый запуск»
- После перезагрузки компьютера ошибка может больше не появиться. Если же вы снова наблюдаете BSoD «UNEXPECTED_STORE_EXCEPTION», читайте дальнейшие инструкции.

Проверяем диск и системные файлы на наличие ошибок
Причиной подобного сбоя может стать повреждение системных файлов ОС либо ошибки на жестком диске. Для проверки воспользуемся оболочкой «Windows PowerShell», запущенной от имени администратора.
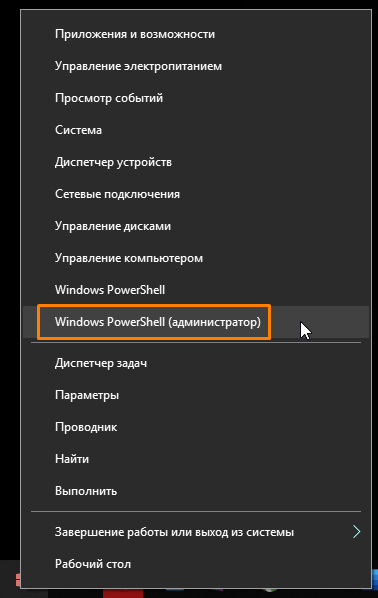
- Откроем утилиту «PowerShell», кликнув кнопку «Пуск» правой клавишей мыши и выбрав в контекстном меню пункт «Windows PowerShell (администратор)».

Запускаем «Windows PowerShell» от имени администратора
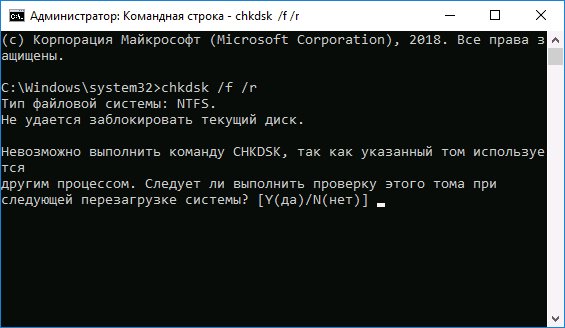
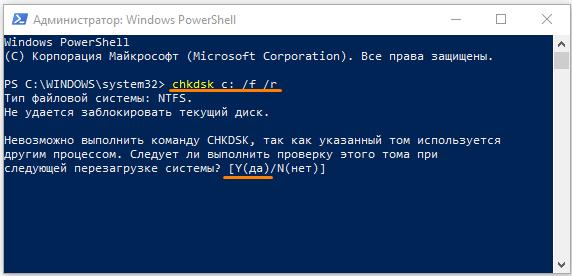
- Для проверки жесткого диска на наличие логических ошибок и битых секторов и исправления этих проблем введем в командную строку: chkdsk c: /f /r, а затем нажмем «Enter». Появится сообщение, что указанный том используется. Нажмите клавишу «Y», чтобы выполнить проверку при следующей перезагрузке системы. Программа исправит ошибки автоматически.

Вводим команду для проверки жесткого диска
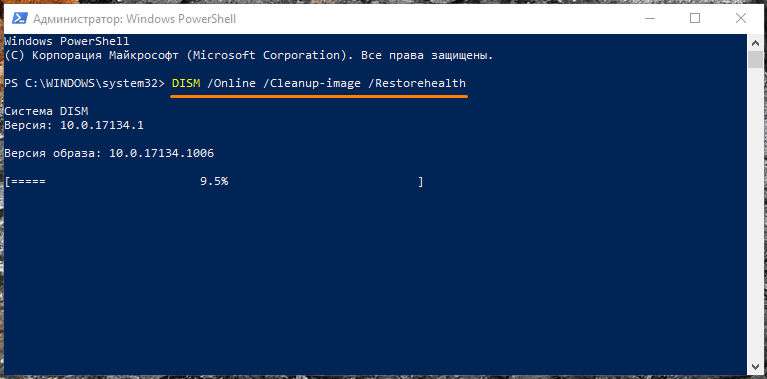
- Если дело было не в ошибках на диске, и синий экран смерти появился снова, может помочь сканирование и автоматическое восстановление системных файлов. Запустим этот процесс из оболочки «Windows PowerShell» с полномочиями администратора с помощью команды DISM /Online /Cleanup-image /Restorehealth. После нажатия клавиши «Enter» начнется сканирование. Нужно лишь дождаться окончания процесса.

Запускаем проверку системных файлов
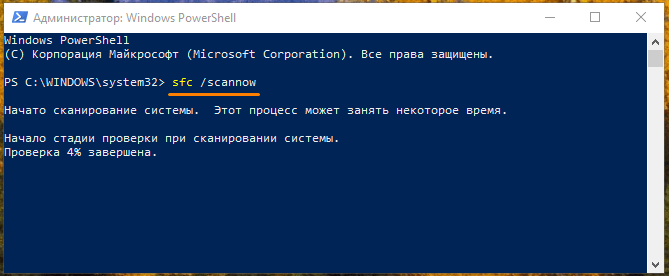
- По завершении работы инструмента «Deployment Image and Service» (DISM) запустим еще одно средство проверки системных файлов «System File Checker» (SFC). Для этого введем в командную строку другую команду: SFC /scannow и подтвердим ее клавишей «Enter». Процедура занимает определенное время, дожидаемся окончания проверки и восстановления.

Запускаем сканирование системных файлов командой «sfc /scannow»
Если не удалось решить проблему, двигаемся дальше.
Отключаем автообновление драйверов и обновляем их вручную
Нередко сообщение «UNEXPECTED_STORE_EXCEPTION» появляется после того, как Windows 10 автоматически обновила какой-либо драйвер. Для отключения автоустановки драйверов обратимся к помощи «Редактора локальной групповой политики».
- Вызовем окно «Выполнить» горячими клавишами «Windows» + «R», введем в поле ввода «Открыть» gpedit.msc и нажмем кнопку «ОК» или клавишу «Enter».

Открываем «Редактор локальной групповой политики»
- В левой части окна переходим в папку «Конфигурация компьютера», «Административные шаблоны», «Система», «Установка устройства», «Ограничения на установку устройств» и дважды кликаем по пункту «Запретить установку устройств, не описанных другими параметрами политики» в правой части окна.

Находим параметр «Запретить установку устройств, не описанных другими параметрами политики»
- В открывшемся окне устанавливаем переключатель в положение «Включено» и нажимаем кнопку «ОК».

Включаем запрет на автообновление драйверов
- После отключения автоматического обновления драйверы следует обновить вручную. Например, часто виновником ошибки «UNEXPECTED_STORE_EXCEPTION» является некорректно установленный или неправильно работающий драйвер видеокарты. Скачайте последнюю версию драйвера с сайта производителя вашего видеоадаптера — NVIDIA, AMD или Intel (владельцы ноутбуков могут загрузить нужный драйвер с сайта производителя ноутбука) и установите его.
- Также стоит проверить, нет ли в «Диспетчере устройств» неизвестных устройств или устройств с ошибками и установить драйверы для них. Запустить «Диспетчер устройств» можно, выбрав соответствующую команду в контекстном меню кнопки «Пуск».

Открываем «Диспетчер устройств»

Нужно заметить, что критические ошибки могут быть вызваны множеством причин и описать их все в рамках одной статьи невозможно. Мы рассказали о часто встречающихся случаях, при которых появляется BSoD «UNEXPECTED_STORE_EXCEPTION», и надеемся, наши советы помогут вам решить проблему.
Напоследок хотим напомнить, что не будет лишним проверить компьютер на наличие вредоносного ПО. Если ошибка стала появляться после установки какой-либо программы, удалите ее. Можно воспользоваться ранее созданной точкой восстановления системы, чтобы вернуть компьютер к состоянию, когда он работал стабильно. Ну а если ничего не помогает, придется переустановить Windows 10.
![]() Загрузка …
Загрузка …
Post Views: 1 087
When the Unexpected Store Exception Error occurs in Windows 10, it comes with a Blue Screen of Death, which has scared many Windows users. Fortunately, you can solve this error.
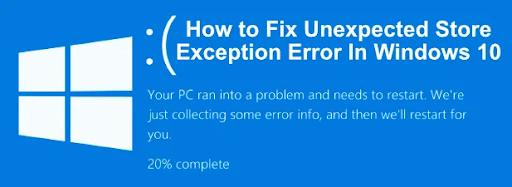
Table of Contents
- What is Unexpected Store Exception Error in Windows 10
- What causes Unexpected Store Exception Error in Windows 10
- How to fix Unexpected Store Exception Error in Windows 10
- Fix #1: Uninstall your third-party antivirus software
- Fix #2: Check your system hardware
- Fix #3: Check hard disk (SSD) health
- Fix #4: scan your system for corrupted files
- Fix #5: Run check disk utility
- Fix #6: Check for Windows or driver updates
- Wrapping Up
What is Unexpected Store Exception Error in Windows 10
Windows 10 is the most feature-rich version of the Windows operating system, with significant improvements. However, even with the improvements, there are still some unwanted exceptions and errors, such as the “unexpected store exception error” that almost always you to restart your PC every time it shows up.
Unexpected Store Exception Error is a blue screen of death (BSOD). It has different versions and error messages depending on what has caused the error or your PC model.
The common error message says:
“Your PC ran into a problem and needs to restart. We’re just collecting some error info, and then we’ll restart for you.”
Usually, the Unexpected Store error occurs when you’re using your computer, such as during:
- Normal computer usage
- Unexpected Store exception error hard drive, SSD — related to your hard drive or SSD
- Unexpected Store exception error while gaming
- Blue screen Unexpected Store exception error, usually caused by hardware issues or a faulty driver.
- Unexpected Store exception error: No bootable device is a specific device error message that shows up when you’re booting your device.
- Unexpected Store exception error, “critical process died,” occurs when trying to access an application or program.
What causes Unexpected Store Exception Errors in Windows 10
It is not easy to identify the cause of the dreaded BSOD. However, most BSOD scenarios are caused by hardware issues or hardware failures such as faulty graphics cards or hard drives.
Other possible causes include:
- Corrupted system files
- Software bugs
- Antivirus program on your computer
- Outdated hardware drivers
How to fix Unexpected Store Exception Error in Windows 10
Whether the causes of Unexpected Store Exception Error in Windows 10 are hardware issues or software failures, you can use the following solutions to fix the error.
Fix #1: Uninstall your third-party antivirus software
A few users have reported that their antivirus software causes the Unexpected Store Exception Error in Windows 10. This is particularly associated with McAfee’s antivirus software. Removing the software can help sort the issue immediately.
You will need to follow the manufacturer’s instructions to uninstall the software.
Note: Windows 10 has a built-in antivirus software called Windows defender. So disabling your third party antivirus won’t expose you to vulnerabilities.
Fix #2: Check your system hardware

One of the main causes of unexpected store exception error, as reposted by many users, is system hardware failures. To solve this problem, you need to check your system hardware for issues.
Many users reported that after replacing their hard drive or SSD, their problem was solved. You can simply disconnect and reconnect your hard drive or test the hard drive on a different computer to fix this problem.
Fix #3: Check hard disk (SSD) health
Checking the hard disk health will help you identify and fix the problem automatically. There are two ways to check the hard disk health.
To check your hard disk health in Windows 10:
- Right-click Windows start.
- Select Powershell (Admin)
- Type this command: wmic > then press Enter.
- Wait for the wmic command to run to completion.
- Now, type this command: diskdrive get status, then press Enter.
If the hard disk status is fine, you’ll see a message in the command prompt, OK.
If your Windows OS faces an issue in retrieving the SMART information, it is an indication that the hard disk has issues. This will be reflected in the message that will be returned after the command runs into completion.
If your hard disk has an issue, you may need to back up your data then replace it with a new, well functioning hard disk.
Fix #4: scan your system for corrupted files
If hardware has no faults or issues, then the unexpected store exception error could have been caused by corrupted system files. You can check if this is true using the Window’s built-in system file checker (sfc) command using the elevated command prompt or PowerShell terminal.
- Right-click Windows start
- Select PowerShell (admin)
- If prompted for user account protection, click Yes.
- Type sfc /scannow > then press Enter.

Let the command line scan the system to complete and check if there are any corrupted files. The sfc scan will tell if it found and fixed any errors.
Fix #5: Run check disk utility
You can also check the disk health through the check disk utility chkdsk. Like the sfc scan tool, chkdsk helps you to scan your system drive for errors.
- Right-click Windows start > select Powershell (Admin), or you can select command prompt (Admin)
- Click Yes if prompted with user account protection.
- Type chkdsk and press Enter

Note: The chkdsk Windows tool runs as a boot scan. This means you’ll need to reboot your computer and let the tool scan your drive before Windows boots. This is to ensure there is no conflicts during the scan. If it detects any issues chkdsk will automatically fix them, then boot Windows automatically when it completes.
Fix #6: Check for Windows or driver updates

System conflicts that cause BSODs may be caused by outdated software or drivers. If you’ve encountered an unexpected store exception error on your PC, it is important to check for Windows updates or any available driver updates.
Windows and driver updates usually come with important fixes for software buys and important PC improvements that can help you stop BSOD errors.
- Click Windows start > select Settings
- Got to Updates and Security
- Click Windows Update on the left pane.
- Now check if there are queued Windows Update that needs download and installation.
- If any, click on Download and install
Wrapping Up
We believe this tutorial has given you enough information regarding how to fix unexpected store exception errors in Windows 10. If you enjoyed reading this article, share it with your friends, colleagues, and family. Return to us for more informative articles all related to productivity and modern-day technology!
If you need any further help, just reach out to our customer service team, available 24/7 to assist you.
We also have promotions, deals, and discounts on our products for the best price. Would you like to receive these great deals? Please subscribe to our newsletter by entering your email address below! Receive the latest technology news in your inbox and be the first to read our tips to become more productive.
You may also like to read.
> What is Windows Service Host SuperFetch, and how do you fix it
> How to Fix High CPU Usage By Antimalware Service Executable (MsMpEng)
> What is Modern Setup Host, and how to fix problems with it?
Ошибка «Unexpected Store Exception» в ОС Windows 10 возникает довольно редко. Обычно проблема связана с повреждением системных файлов, жёсткого диска или сектора памяти, а также возникает в результате конфликта программного обеспечения, неверно установленных драйверов. Чтобы исправить эту ошибку, вы можете использовать встроенные инструменты или попытаться восстановить рабочее состояние ПК самостоятельно.

Решение ошибки «Unexpected Store Exception» в Windows.
Причины возникновения ошибки
Ошибка с кодом Unexpected Store Exception аналогична любой другой ошибке BSOD. Она может быть вызвана следующими причинами:
- проблемы с драйверами;
- проблемы с оборудованием;
- стороннее программное обеспечение и службы.
Как правило, пользователи грешат на антивирусное программное обеспечение, такое как McAfee, Avast, AVG и т. д. В некоторых случаях к ошибке также приводит функция быстрого запуска окон.
Варианты решения проблемы
Рассмотрим некоторые из вариантов решения проблемы «синего экрана». Вам, возможно, придётся выполнять все решения в безопасном режиме, если вы не можете нормально заходить в ОС. Безопасный режим – это возможность запуска ОС в чрезвычайной ситуации только с базовыми функциями. Система Windows, запущенная в безопасном режиме, загружает только необходимые драйверы и службы. Аварийный режим с сетью запускает ПК только с базовыми драйверами и службами, а также с поддержкой сети. Чтобы запустить компьютер в безопасном режиме или в аварийном режиме с загрузкой сетевых драйверов, выполните следующие действия:
Запуск в безопасном режиме с загрузкой сетевых драйверов Windows 7/Vista/XP:
- сразу после нажатия кнопки питания или перезапуска компьютера (обычно сразу после звука), нажимайте клавишу F8 с интервалом в 1 секунду;
- после того как компьютер отобразит аппаратную информацию и запустит тест памяти, появится меню дополнительных опций Windows;
- с помощью клавиш со стрелками выберите «Безопасный режим» или «Аварийный режим с загрузкой сетевых драйверов» и подтвердите выбор клавишей ENTER.

Запуск в безопасном режиме с загрузкой сетевых драйверов Windows 8:
- на экране входа нажмите и удерживайте клавишу SHIFT и нажмите кнопку «Питание», а затем выберите параметр «Перезагрузка»;
- на клавиатуре нажмите клавиши Windows + C, а затем на появившейся панели нажмите «Настройки» – «Устранение неполадок» – «Перезагрузка»;
- выберите «Дополнительные параметры» – «Параметры загрузки»;
- на клавиатуре – цифру 5 или клавишу F5, чтобы запустить ПК в безопасном режиме с загрузкой сетевых драйверов.
Компьютер начнёт работать в безопасном режиме с поддержкой сети. Запуск в безопасном режиме с загрузкой сетевых драйверов Windows 10:
- «Пуск» – «Питание», нажмите и удерживайте на клавиатуре клавишу Shift, а затем выберите «Перезагрузить»;
- «Исправить проблемы»;
- «Дополнительные параметры»;
- «Параметры загрузки» – «Перезагрузка»;
- после перезагрузки компьютера – F5 на клавиатуре, чтобы выбрать «Безопасный режим с поддержкой сетевых драйверов»;
- введите имя пользователя и пароль для входа в ОС.

Чистка вашего ПК
Сначала попробуйте очистить ПК от ненужного мусора. Это можно сделать с помощью встроенных или специальных дополнительных инструментов. Также необходимо удалить недавно установленные программы. Возможно, они являются причиной конфликта программного обеспечения. Вызвать проблему может антивирус, поэтому желательно его тоже удалить.
ВАЖНО. Удаление антивирусного ПО должно быть выполнено правильно, чтобы не возникали новые проблемы.
Для очистки от ненужных файлов и мусора зайдите в «Мой компьютер», кликните правой кнопкой мыши на диске «С», выберите «Свойства». В открывшемся окне найдите кнопку «Очистка диска», проставьте все флажки и нажмите «ОК». ОС просканирует диск на наличие мусора и предложит его очистку. Примите и дождитесь окончания операции.

Удаляем антивирусное ПО
Антивирусное программное обеспечение, которое вы установили на свой компьютер, также может привести к возникновению ошибки Unexpected Store Exception. Вы можете устранить её, удалив антивирусное программное обеспечение. В основном всё антивирусное ПО также содержит своё собственное программное обеспечение для удаления. Это может помочь вам полностью удалить этот антивирус с вашего компьютера.
Восстанавливаем повреждённые системные файлы
С помощью «Командной строки» вы можете проверить целостность важных системных файлов и восстановить их:
- Нажмите сочетание клавиш Win + S и в поле поиска введите «cmd».
- Щёлкните правой кнопкой мыши «Командная строка» и выберите «Запуск от имени администратора».
- В чёрном окне введите sfc/scannow и нажмите клавишу Enter.
- В командной строке начнётся сканирование важных компонентов.
- Подождите, пока процесс проверки будет завершён.

Также может помочь проверка жёсткого диска, которую можно выполнить с помощью «Командной строки».
- Запустите «Командную строку» с правами администратора.
- Скопируйте и вставьте следующую команду: chkdsk с: /f/r/x
- В командной строке запустится проверка повреждённых секторов жёсткого диска.

Переустанавливаем драйверы
Система может автоматически обновлять драйверы, но процесс может завершиться неправильно. Исправить Unexpected Store Exception в Windows 10 поможет их переустановка или обновление. Но сначала нужно отключить их автоматическое обновление. Это можно сделать во всех выпусках Windows 10, за исключением «Home».
- Нажмите сочетание клавиш Win + R и введите gpedit.msc.
- Нажмите «ОК».
- Откроется «Редактор локальной групповой политики» – здесь можно отключить автоматическое обновление в ОС Windows
- Перейдите по пути «Административные шаблоны» – «Система» – «Установка устройства» – «Ограничения на установку устройств».
- Откройте «Запретить установку устройств, не описанных другими параметрами политики».
ВНИМАНИЕ. Этот пункт открывает необходимый параметр для отключения автоматического обновления с помощью локального редактора групповой политики.
- Выберите параметр «Включено» и примените настройки.

Здесь происходит редактирование параметра, который запрещает установку устройств, не описанных в других параметрах политики Windows. Теперь вы можете переустановить или обновить драйвер. Это можно сделать вручную или с помощью специальных инструментов и программ. Чтобы обновить драйверы устройств, нажмите сочетание клавиш Win + X и выберите «Диспетчер устройств». Далее найдите устройство, которое следует обновить, нажмите на него правой кнопкой мыши и выберите «Обновить драйвер».
Восстановление системы
Если вы заметили, что столкнулись с непредвиденной ошибкой после некоторых изменений, которые были сделаны на вашем компьютере, может потребоваться восстановить систему. Восстановление системы вернёт предыдущее состояние компьютера. Для этого нажмите «Пуск», в строке поиска введите «Восстановление» и нажмите Enter. В открывшемся окне выберите «Запуск восстановления системы» и следуйте подсказкам мастера по восстановлению системы.

Переустановка операционной системы
Переустановка Windows решает подавляющее большинство проблем с компьютером. Для этого вам понадобится установочный диск Windows. Вставьте диск в привод и дождитесь запуска автозагрузки. Дальше следуйте подсказкам мастера. Переустановка ОС обычно занимает 1,5 – 2 часа, так что наберитесь терпения. Если это не помогло, проверьте операционную систему на наличие вредоносного программного обеспечения с помощью соответствующих инструментов. В крайних случаях вам необходимо переустановить Windows 10.