Многие из приложений-оптимизаторов, а также те приложения, которые следят за актуальностью версий установленного на ПК программного обеспечения, создают во встроенном планировщике заданий соответствующие задачи, выполняющиеся даже когда запланировавшие их приложения неактивны. Если такая самодеятельность вам не по нраву или созданная задача не была удалена после деинсталляции приложения, вы можете удалить ее из планировщика самостоятельно как минимум тремя способами.
Через сам планировщик заданий
Начнем с самого очевидного и простого способа.
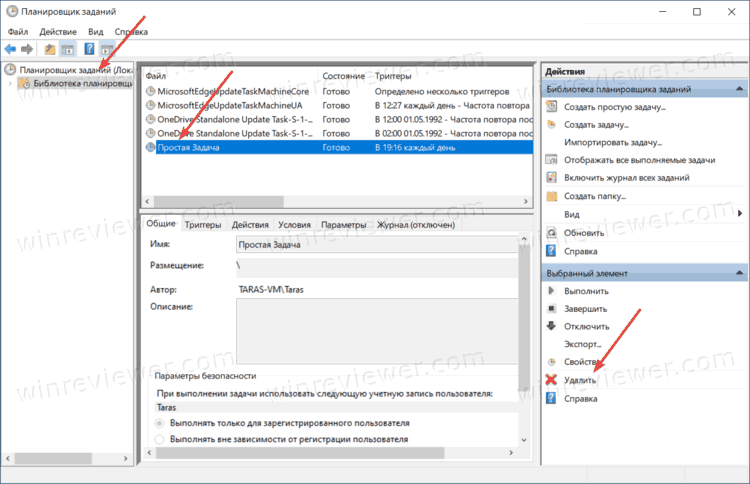
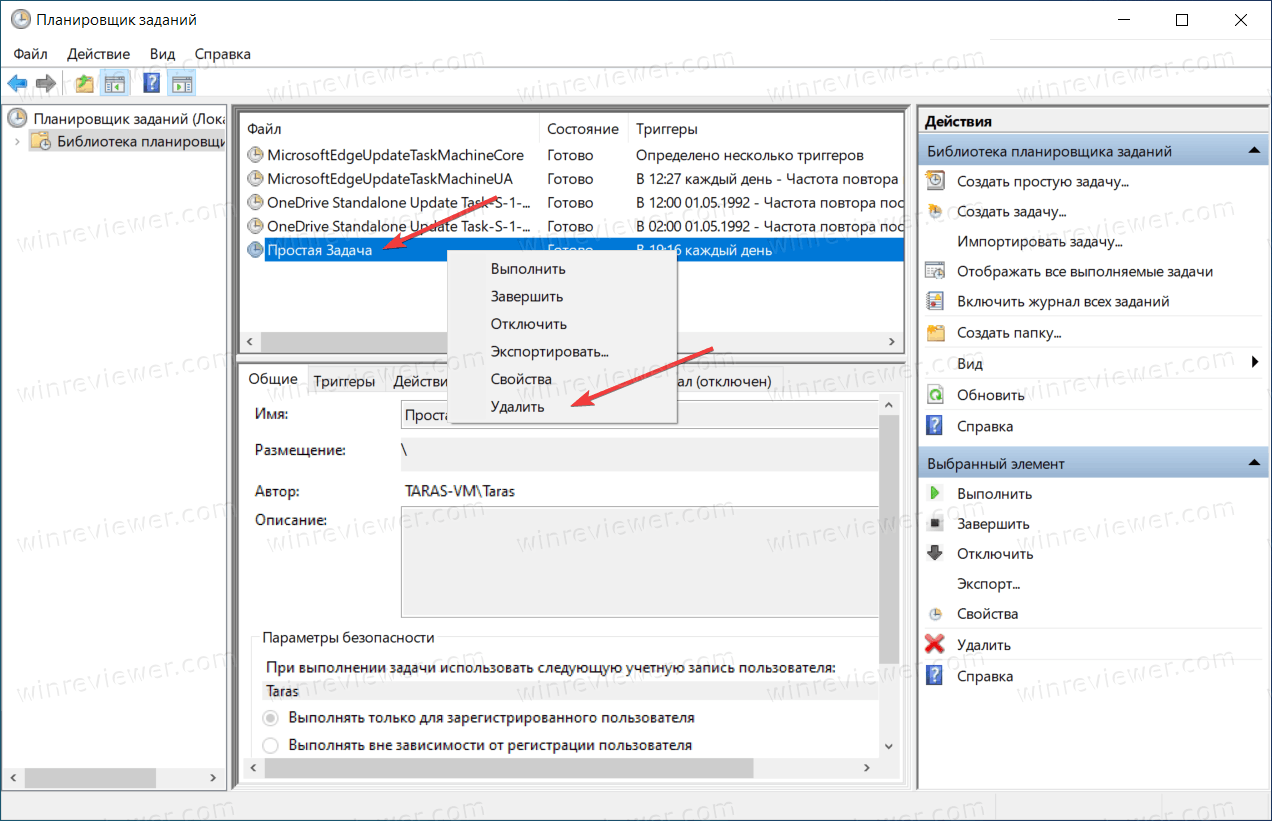
Открываем штатный планировщик выполненной в окошке Run (Win + R) заданий командой taskschd.msc и в левой колонке нажмите мышкой по родительскому каталогу «Библиотека планировщика заданий». Именно в ней сохраняют свои задания сторонние приложений.
Отыщите в средней колонке задание, имя которого указывает на создавшую его программу, нажмите по нему правой кнопкой мыши и выберите «Удалить».
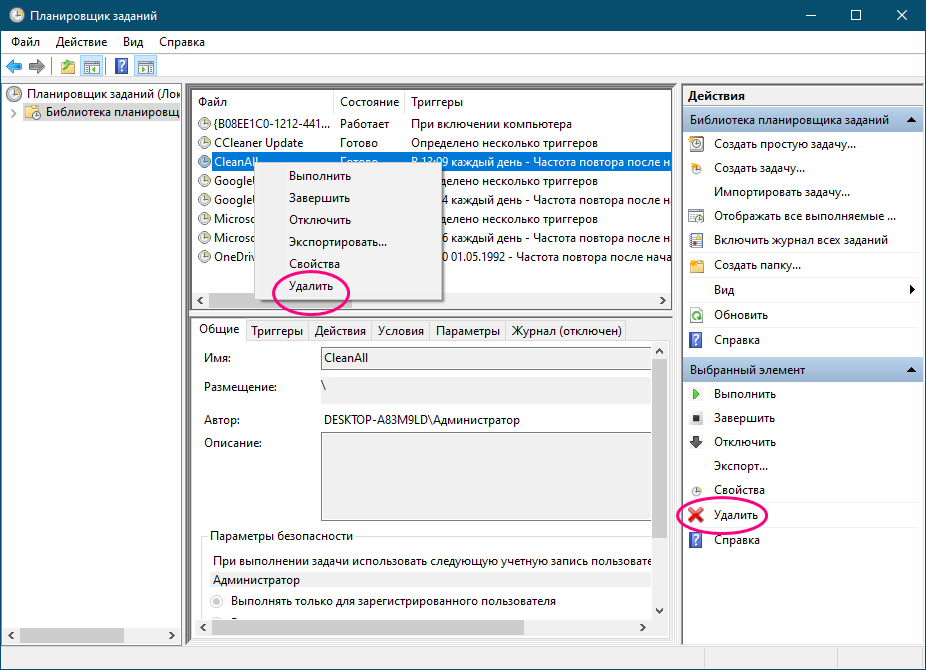
Также можно нажать «Удалить» в правой колонке управления элементами.
В командной строке
Удалить запланированную задачу можно с помощью командной строки.
Это менее удобный способ, к тому же вам нужно знать точное название задачи.
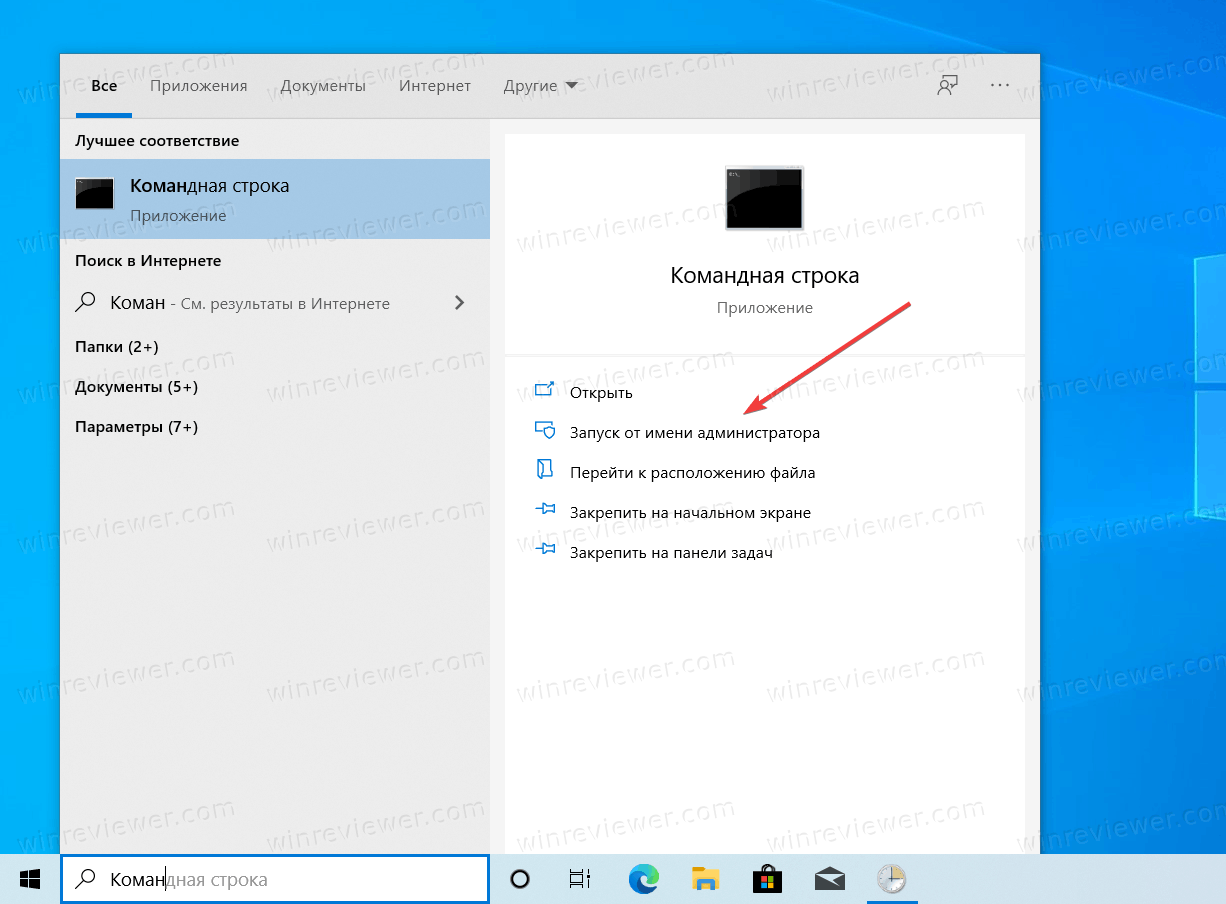
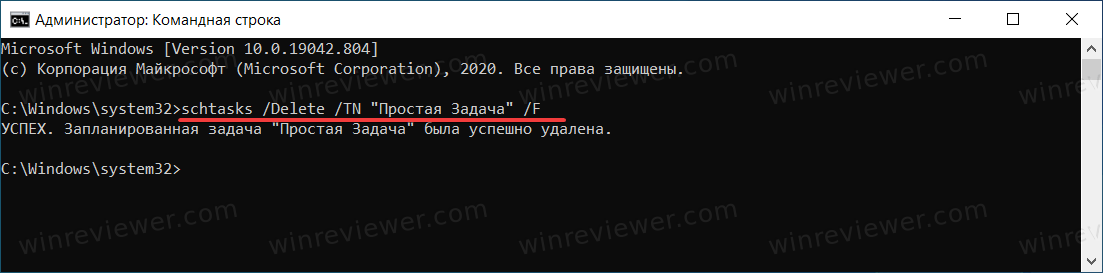
Удаление выполняется в запущенной от имени классической командной строке с использованием консольной утилиты schtasks.exe, распложенной в папке System32.
Команда удаления выглядит следующим образом:
schtasks /Delete /TN «путь/имя-задачи» /F
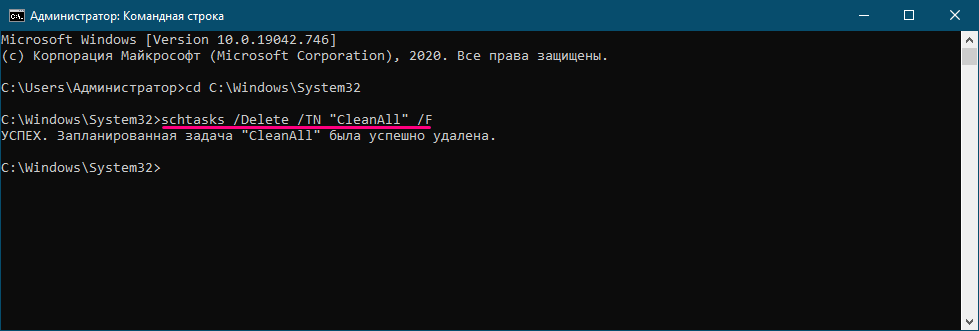
Задача будет тут же удалена.
Путь указывать не нужно, если запись задачи располагается в корневом каталоге «Библиотека планировщика заданий».
Удаление задач с помощью командной строки чаще всего находит применение в скриптах.
В PowerShell
Аналогичным целям может служить и консоль PowerShell, в которой предусмотрен ряд командлетов, предназначенных как раз для взаимодействия с запланированными в taskschd.msc задачами.
Команда удаление задания выглядит так:
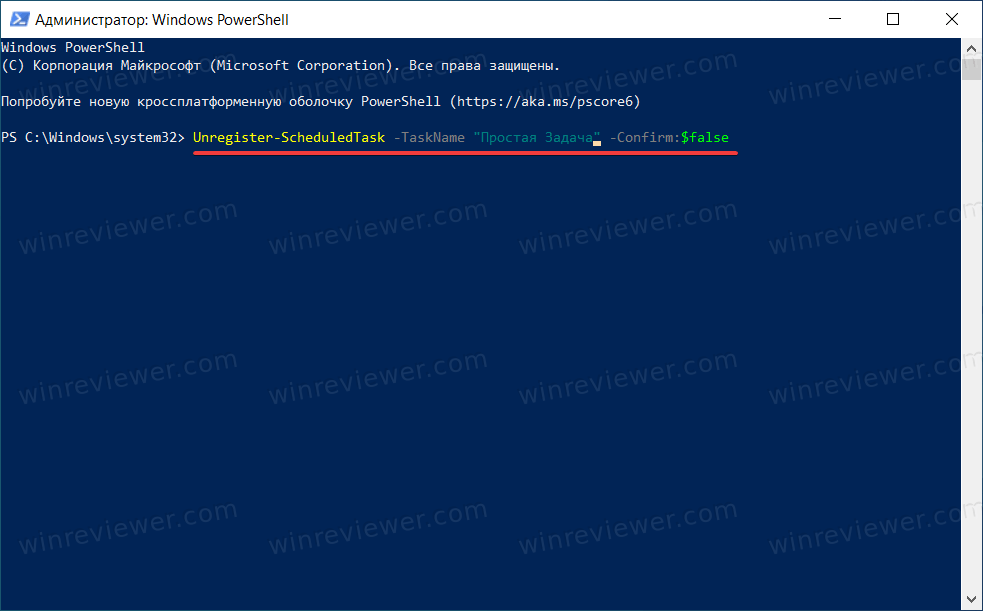
Unregister-ScheduledTask -TaskName «имя-задачи» -Confirm:$false
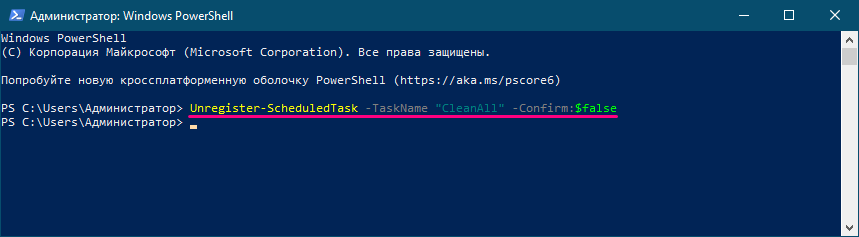
Если задание располагается не в корне, в команду добавляется строка -TaskPath «путь-к-папке», путь указывается относительный, обратные слеши справа и слева удалять не нужно, смотрите скриншот ниже.

В редакторе реестра
Наконец, избавиться от запланированной задачи можно, удалив соответствующий ей ключ реестра.
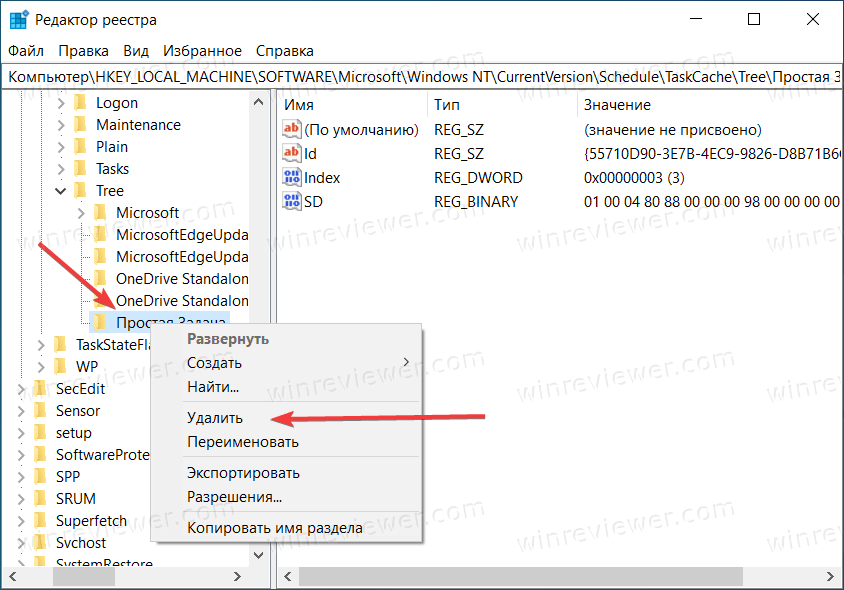
Откройте редактор реестра командой regedit и разверните ветку:
HKLM\SOFTWARE\Microsoft\Windows NT\CurrentVersion\Schedule\TaskCache\Tree
Подраздел Tree содержит дочерние подразделы с именами расположенных в корне планировщика заданий.
Кликните по выбранной папке ПКМ и выберите «Удалить».
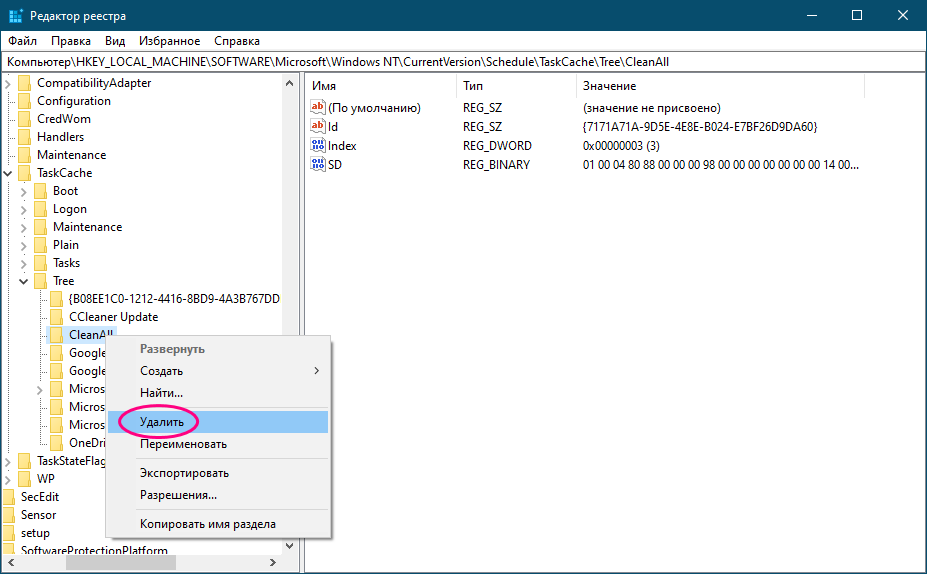
В результате задача будет удалена также из планировщика.
![]() Загрузка…
Загрузка…
Может потребоваться удалить запланированное задание в Windows 10, если оно потеряло актуальность или связано с приложением, которое вы ранее удалили. Для этого можно использовать несколько методов.
Планировщик заданий – это инструмент, встроенный в каждую современную версию Windows. Он отвечает за выполнение определенных задач (заданий) по расписанию или так называемых триггерах (обработка событий, таких как вход в систему). К примеру, запуск приложений, скриптов или файлов. Вы можете управлять запланированными заданиями с помощью специального интерфейса или командной строки. В этой статье вы найдете информацию о том, как удалить задание из Планировщика заданий в Windows 10.
Зачем удалять задание в Windows 10?
При обычной работе с компьютером пользователю не надо беспокоиться подобными вопросами. Все же, порой возникают ситуации, когда надо удалить запланированное событие. К примеру, если после удаления приложения в системе остались связанные с ним события или задачи. В таком случае пользователь будет наблюдать ошибки, когда система пытается выполнить задачу для уже несуществующего приложения или при невыполнимых условиях. Также необходимость удалить событие в Windows 10 может возникнуть по простой ненадобности такового.
Обратите внимание: удаляйте только те события, смысл и предназначение которых вы понимаете. Не стоит удалять задачи наобум, поскольку такие действия могут существенно нарушить работу операционной системы или приложений.
- Откройте Планировщик событий. Для этого можно нажать Win+ R и ввести команду
taskschd.msc. - В левой части появившегося окна разверните папку Библиотека Планировщика задачи и найдите в ней нужную вам задачу. Возможно, она будет в одной из подпапок.
- Выделите нужную задачу (щелкните на ней).

- В правой части окна в разделе Выбранный элемент выберите Удалить.

- Удалить запланированную задачу в Windows 10 также можно простым правым кликом по задаче. Выберите Удалить и подтвердите действие.

Готово.
Зачастую интерфейса Планировщика заданий более чем достаточно для периодического удаления одного или нескольких событий. Однако бывают случаи, когда удобнее воспользоваться командной строкой или PowerShell. Этот не самый простой на первый взгляд способ нужен, когда пользователю надо автоматизировать процессы или избавиться от большого количества событий.
Как удалить запланированную задачу в Windows 10 в командной строке
- Запустите командную строку от имени Администратора.

- В окне Командной строки введите следующее:
schtasks /Delete /TN "Папка\Задача" /F. Замените Папка на путь к задаче, а Задача на событие, которое надо удалить. Если задача расположена в корне библиотеки Планировщика заданий, путь указывать не надо. В таком случае команда будет выглядеть следующим образом:schtasks /Delete /TN "Задача" /F.
- Нажмите Enter. Командная строка должна сообщить об успешном удалении задачи.
Готово. Окно командной строки можно закрыть.
Вы можете удалить нужную задачу и через PowerShell. Суть такая же, только другие команды. Важно при этом соблюдать синтаксис и не пропускать все спец символы.
Как удалить запланированное задание в Windows 10 в PowerShell
- Запустите PowerShell с правами Администратора. Для этого нажмите Win + X и выберите PowerShell (Администратор).

- Введите следующую команду:
Unregister-ScheduledTask -TaskName "Задача" -Confirm:$false. Вместо Задача введите название события, которое вы хотите удалить.
- В дополнение к этому вы можете удалить сразу целую папку со всеми задачами внутри. Для этого используйте вот эту команду:
Get-ScheduledTask-TaskPath "\Путь к папке\в планировщике" | Unregister-Scheduled Task -Confirm:$false.

Готово. Теперь окно PowerShell можно закрыть.
Последний способ удалить запланированное задание подразумевает использование Редактора реестра. Мы рекомендуем использовать его только в том случае, если предыдущие методы по каким-то причинам не сработали.
Как удалить запланированное задание в Windows 10 через Редактор реестра
- Откройте Редактор реестра Windows удобным вам способом. К примеру, Win + R – regedit.
- Перейдите по следующему пути:
HKEY_LOCAL_MACHINE\SOFTWARE\Microsoft\Windows NT\CurrentVersion\Schedule\TaskCache\Tree. Чтобы ускорить переход, просто скопируйте путь и вставьте его в адресную строку Редактора реестра. - В левой части окна разверните ключ Tree. В нем вы найдете список запланированных задач. Найдите в нем нужное вам задание и нажмите по нему правой кнопкой мыши.
- Выберите Удалить.

- Подтвердите операцию и закройте Редактор Реестра.
Готово.
💡Узнавайте о новых статьях быстрее. Подпишитесь на наши каналы в Telegram и Twitter.
Судя по тому, что вы читаете этот текст, вы дочитали эту статью до конца. Если она вам понравилась, поделитесь, пожалуйста, с помощью кнопок ниже. Спасибо за вашу поддержку!
Here is how to delete a scheduled task in Windows 10. You may want to remove a task from the Task Scheduler if it has become redundant, or when it is related to an app you have uninstalled. There are a number of methods you can use for that.
Task Scheduler is a special tool which comes bundled with all modern versions of Microsoft Windows. It allows the user to schedule the launch of apps, batch files, PowerShell scripts etc after specified time intervals or when certain system events occur. The Task Scheduler has a graphical MMC version (taskschd.msc) which is the most popular tool managing tasks.
If you are not familiar with creation of tasks in Task Scheduler, we have a good tutorial here: Create elevated shortcut to skip UAC prompt in Windows 10.
This post will show you how to delete a Scheduled Task in Windows 10. You can use the Task Scheduler app, Command Prompt, PowerShell, and the Registry editor for that.
- Open Administrative Tools.
- Click the Task Scheduler icon.

- In the Task Scheduler library, find a task you would like to remove. You may need to browse folders to find the task.
- Select the task, and click Delete in the right pane under Actions > Selected items.

- Alternatively, you can right-click the task and select Delete from the context menu, or select Actions > Delete from the toolbar menu.

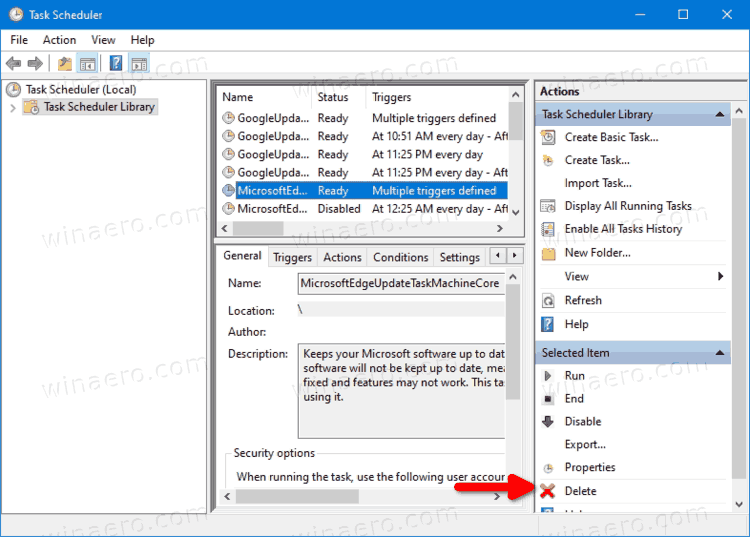
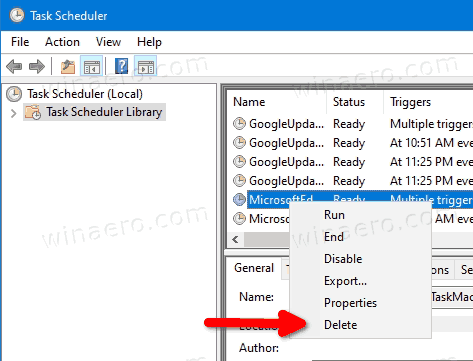
You have successfully deleted the task.
Alternatively, you can use the command prompt for the same. This can be done with schtasks, a console tool that allows managing scheduled tasks in Windows. It is also useful for various automation scenarios.
Remove a Scheduled Task in Command Prompt with Schtasks
- Open a new command prompt as Administrator.
- Type the following:
schtasks /Delete /TN "<task folder path>\<task name>" /Fto disable the task. Substitute the «<task name>» portion with the appropriate task name.
- If your task is located in the root folder of the task scheduler library, you can omit the
<task folder path>\string and specify only the task name. - The task is now removed. You can close the command prompt.
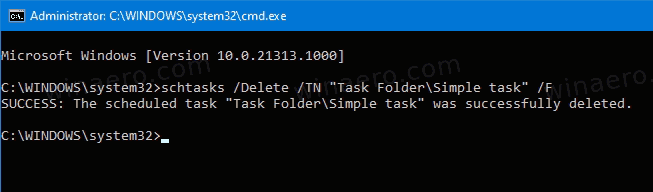
You are done.
Additionally, you can use PowerShell to remove a scheduled task. In includes a number of cmdlets that allow interacting with scheduled tasks.
Delete Scheduled Tasks with PowerShell
- Open PowerShell as Administrator.
- Type
Unregister-ScheduledTask -TaskName "<task name>" -Confirm:$falseto delete a task. Replace the «<task name>» portion with the actual task name you want to remove. - Similar to the above, run this command to remove a task in a folder:
Unregister-ScheduledTask -TaskPath "\<task folder full path>\" -TaskName "<task name>" -Confirm:$false. Specify the full task path and the task name.
- Additionally, there is a way to remove all tasks in a folder with this command:
Get-ScheduledTask -TaskPath "<task folder path>\" | Unregister-ScheduledTask -Confirm:$false - You can now close the PowerShell window.

You are done.
Note: You should specify the task folder location staring with a back slash and ending with the same. For example:
Unregister-ScheduledTask -TaskPath "\Task Folder\" -TaskName "Simple Task" -Confirm:$false
Finally, there is a way to delete a scheduled task in the Registry. Let’s review it.
Delete a Scheduled Task in the Registry Editor
- Open the Registry Editor app.
- Go to the following Registry key.
HKEY_LOCAL_MACHINE\SOFTWARE\Microsoft\Windows NT\CurrentVersion\Schedule\TaskCache\Tree. See how to go to a Registry key with one click. - On the left, expand the Tree subkey. Task folders here are subkeys of Tree key, and root tasks are also similar subkeys, named as the task name.

- Right-click on the task name you want to remove, and select Delete from the menu.

- Click on Yes to confirm the operation.
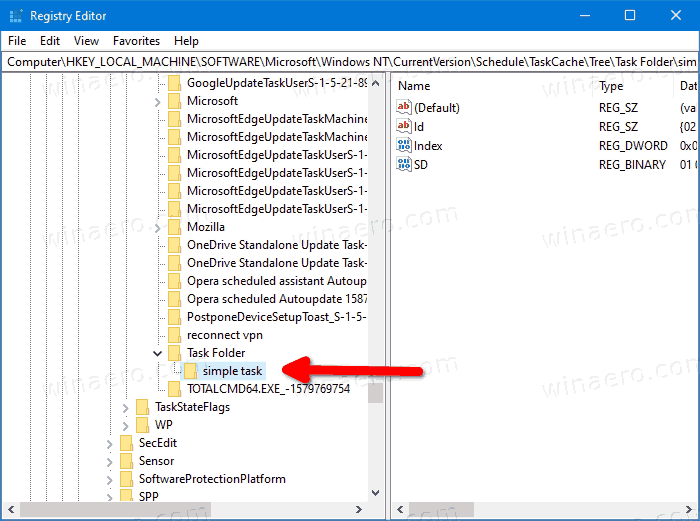
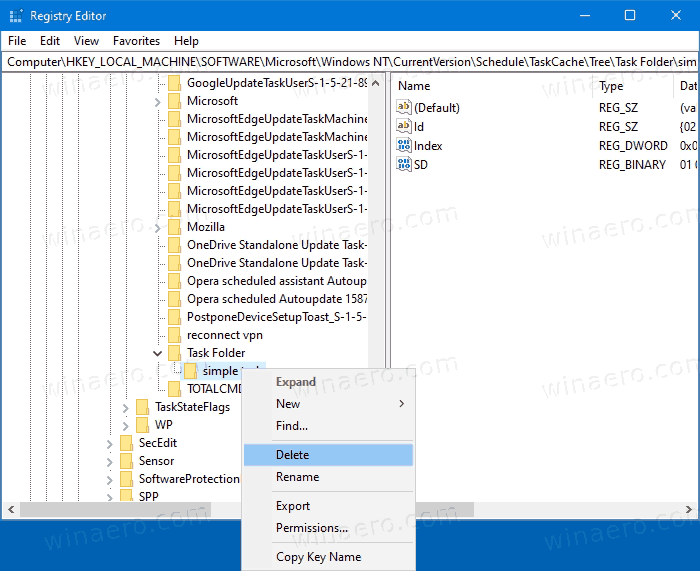
You have removed the task. You can close the Registry editor app.
That’s it.
Support us
Winaero greatly relies on your support. You can help the site keep bringing you interesting and useful content and software by using these options:
If you like this article, please share it using the buttons below. It won’t take a lot from you, but it will help us grow. Thanks for your support!
Download Windows Speedup Tool to fix errors and make PC run faster
When you enable Scheduled Task on your Windows 11 or Windows 10 computer, you can create an automated Task using Task Scheduler on your system. In this post, we will show you how to delete Scheduled Task in Windows 11/10 using Task Scheduler, Command prompt, PowerShell, or Registry.
If you no longer need or want a scheduled task, you can delete them from your computer. We can delete Scheduled Task in Windows 11/10 in easy ways. We’ll explore this topic under the methods outlined below in this section as follows.
1] Delete Scheduled Task via Task Scheduler

To delete Scheduled Task via Task Scheduler in Windows 11/10, do the following:
- Press Windows key + R keys to invoke the Run dialog.
- In the Run dialog box, type taskschd.msc and hit Enter to open Task Scheduler.
- In the left pane of Task Scheduler, expand the Task Scheduler Library.
- Now, select the folder that contains the task(s) you want to delete.
- In the middle pane of the opened folder, select one or more task(s) you want to delete.
Note: If you want to delete more than one task, you can press and hold the Ctrl key while clicking on the tasks one after the other to highlight all.
- Once you have selected all the tasks you want to delete, you can either click on Delete under Selected Items in the right Actions pane or click on Action (Alt+A) on the toolbar, and click Delete (Alt+D), or right-click on the selected task(s), and click Delete on the context menu.
- Click Yes on the prompt that pops up to confirm.
- Exit Task Scheduler when done.
Read: How to rename scheduled task in Windows Task Scheduler.
2] Delete Scheduled Task via Command Prompt

To delete Scheduled Task via Command Prompt in Windows 11/10, do the following:
- Press Windows key + R to invoke the Run dialog.
- In the Run dialog box, type cmd and then press CTRL + SHIFT + ENTER to open Command Prompt in elevated mode.
- In the command prompt window, type either of the command below and hit Enter.
schtasks /Delete /TN "<task name>" /F
This command is for the task in root Task Scheduler Library folder.
schtasks /Delete /TN "\<folder location>\<task name>" /F
This command is for tasks in a folder other than the root folder.
Be sure to replace the <folder location> placeholder in the command above with the actual folder path the task is located in Task Scheduler. And replace the <task name> placeholder with the actual task name
- Exit command prompt when done.
Related: How to use PowerShell to Delete or Create a Scheduled Task.
3] Delete Scheduled Task via Registry Editor

To delete Scheduled Task via Registry Editor in Windows 11/10, do the following:
Since this is a registry operation, it is recommended that you back up the registry or create a system restore point as necessary precautionary measures. Once done, you can proceed as follows:
- Press Windows key + R to invoke the Run dialog.
- In the Run dialog box, type regedit and hit Enter to open Registry Editor.
- Navigate or jump to the registry key path below:
HKEY_LOCAL_MACHINE\SOFTWARE\Microsoft\Windows NT\CurrentVersion\Schedule\TaskCache\Tree
- At the location, in the left pane, expand the subkey for the folder containing the task(s) you want to delete.
- Next, right-click on the task name you want to delete.
- Click Delete on the context menu.
- Click Yes on the prompt to confirm.
- Exit Registry Editor when done.
That’s it on how to delete Scheduled Task in Windows 11/10!
Related post: How to enable, view, and clear Task Scheduler History.
How do I permanently delete a scheduled task?
To permanently delete a scheduled task in Windows 11/10 PC, you can follow the aforementioned steps. That said, open the Task Scheduler first and select the task you want to delete. Right-click on the select the task and choose the Delete option from the context menu. Then, click on the Yes button to confirm.
How do I delete a scheduled task folder?
If you want to delete a scheduled task folder entirely, you can use the Command Prompt or PowerShell method. That said, you need to open an elevated prompt of the CMD or PowerShell. Then, enter this command: schtasks /Delete /TN “\<folder location>” /F. Make sure that you replace the folder location before entering this command.
Obinna has completed B.Tech in Information & Communication Technology. He has worked as a System Support Engineer, primarily on User Endpoint Administration, as well as a Technical Analyst, primarily on Server/System Administration. He also has experience as a Network and Communications Officer. He has been a Windows Insider MVP (2020) and currently owns and runs a Computer Clinic.
Windows 10 ships with Task Scheduler, which is an advanced tool that allows you to create and run routines automatically. Using this tool, you can automate tasks to perform all sorts of things, including launching an app, running a specific command, or executing a script at a specified day and time, or when a particular condition is met using triggers.
Although there’s a graphical experience to use Task Scheduler, you can also use Command Prompt to create, edit, and delete tasks, which can come in handy in many situations. For instance, when you need to speed up the process to create the same task on multiple computers, and when building an application or script that needs to connect with the tool — just to name a few.
In this Windows 10 guide, we’ll walk you through the steps to get started managing scheduled tasks using the schtasks.exe tool on Command Prompt.
- How to create a scheduled task using Command Prompt
- How to change a scheduled task using Command Prompt
- How to delete a scheduled task using Command Prompt
How to create a scheduled task using Command Prompt
To create a scheduled task with Command Prompt on Windows 10, use these steps:
- Open Start.
- Search for Command Prompt, right-click the top result, and select the Run as administrator option.
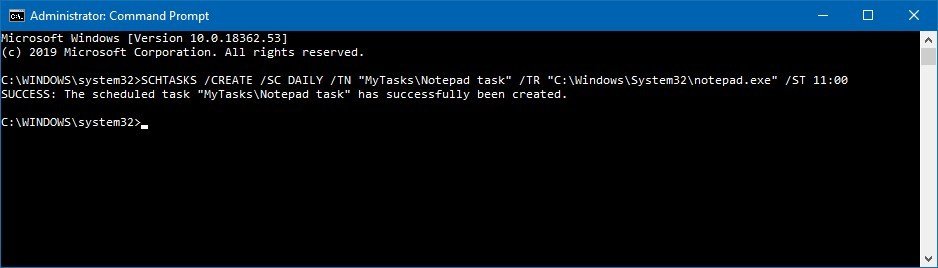
- Type the following command to create a daily task to run an app at 11:00am and press Enter:Syntax
SCHTASKS /CREATE /SC DAILY /TN "FOLDERPATH\TASKNAME" /TR "C:\SOURCE\FOLDER\APP-OR-SCRIPT" /ST HH:MMExampleSCHTASKS /CREATE /SC DAILY /TN "MyTasks\Notepad task" /TR "C:\Windows\System32\notepad.exe" /ST 11:00Quick tip: The folder path before the task name, under the /TN option, is not a requirement, but it’ll help you to keep your tasks separate. If you don’t specify a path, the task will be created inside the Task Scheduler Library folder.
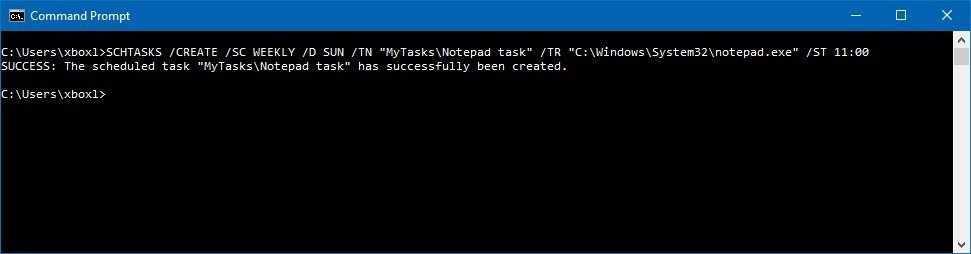
- Type the following command to create a weekly task to run an app at 11:00am and press Enter:Syntax
SCHTASKS /CREATE /SC WEEKLY /D SUN /TN "FOLDERPATH\TASKNAME" /TR "C:\SOURCE\FOLDER\APP-OR-SCRIPT" /ST HH:MMExampleSCHTASKS /CREATE /SC WEEKLY /D SUN /TN "MyTasks\Notepad task" /TR "C:\Windows\System32\notepad.exe" /ST 11:00
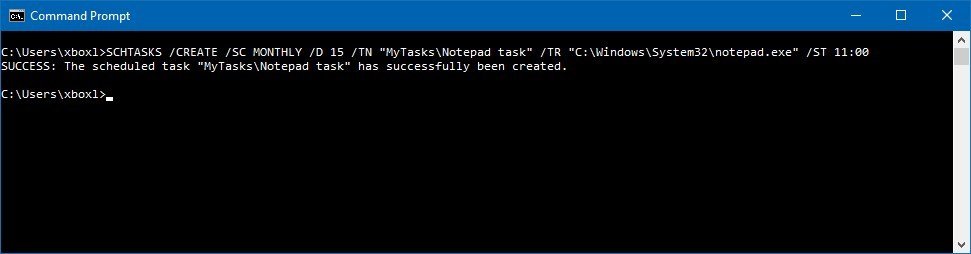
- Type the following command to create a monthly task to run an app at 11:00am and press Enter:Syntax
SCHTASKS /CREATE /SC MONTHLY /D 15 /TN "FOLDERPATH\TASKNAME" /TR "C:\SOURCE\FOLDER\APP-OR-SCRIPT" /ST HH:MMExampleSCHTASKS /CREATE /SC MONTHLY /D 15 /TN "MyTasks\Notepad task" /TR "C:\Windows\System32\notepad.exe" /ST 11:00
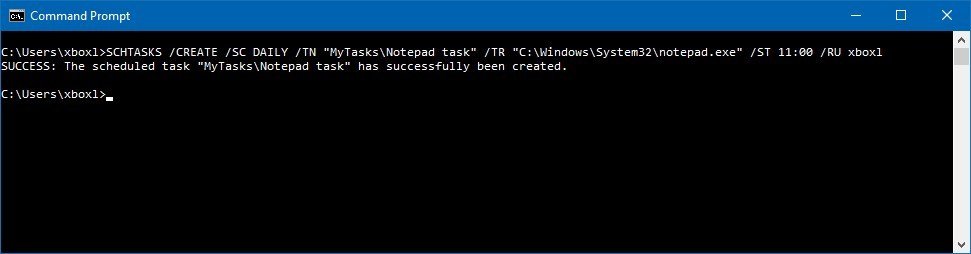
- Type the following command to create a scheduled task that runs daily as a specific user and press Enter:Syntax
SCHTASKS /CREATE /SC DAILY /TN "FOLDERPATH\TASKNAME" /TR "C:\SOURCE\FOLDER\APP-OR-SCRIPT" /ST HH:MM /RU USER-ACCOUNTExampleSCHTASKS /CREATE /SC DAILY /TN "MyTasks\Notepad task" /TR "C:\Windows\System32\notepad.exe" /ST 11:00 /RU admin
Once you complete the steps, the task will run during the intervals you specified.
Task Scheduler create options
The command line version of Task Scheduler ships with many options allowing to customize many aspects of a task, and in this guide, we are using the following options to change a scheduled task:
- /CREATE — specifies that you want to create a new an automated routine.
- /SC — defines the schedule for the task. Options available, include MINUTE, HOURLY, DAILY, WEEKLY, MONTHLY, ONCE, ONSTART, ONLOGON, ONIDLE, and ONEVENT.
- /D — specifies the day of the week to execute the task. Options available, include MON, TUE, WED, THU, FRI, SAT, and SUN. If you’re using the MONTHLY option, then you can use 1 — 31 for the days of the month. Also, there’s the wildcard «*» that specifies all days.
- /TN — specifies the task name and location. The «MyTasks\Notepad task» uses the «Notepad task» as the name and stores the task in the «MyTasks» folder. If the folder isn’t available, it’ll be created automatically.
- /TR — specifies the location and the name of the task that you want to run. You can select an app or custom script.
- /ST — defines the time to run the task (in 24 hours format).
- /QUERY — displays all the system tasks.
- /RU — specifies the task to run under a specific user account.
These are just some of the available options. You can learn more about the options to create a scheduled task running the
SCHTASKS /CREATE /?command.
How to change a scheduled task using Command Prompt
To modify a scheduled task on Windows 10 with Command Prompt, use these steps:
- Open Start.
- Search for Command Prompt, right-click the top result, and select the Run as administrator option.
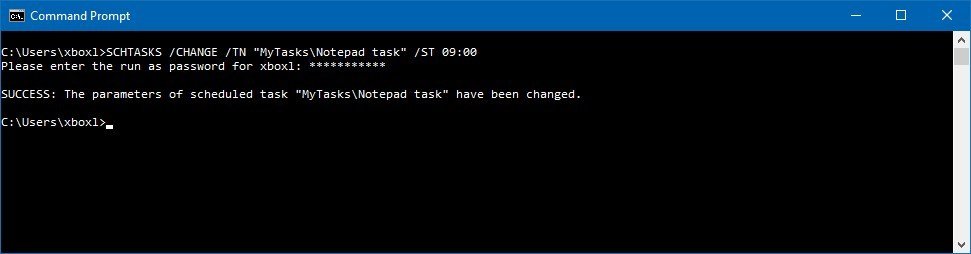
- Type the following command to change the time to run the task 9:00am and press Enter:Syntax
SCHTASKS /CHANGE /TN "FOLDERPATH\TASKNAME" /ST HH:MMExampleSCHTASKS /CHANGE /TN "MyTasks\Notepad task" /ST 09:00
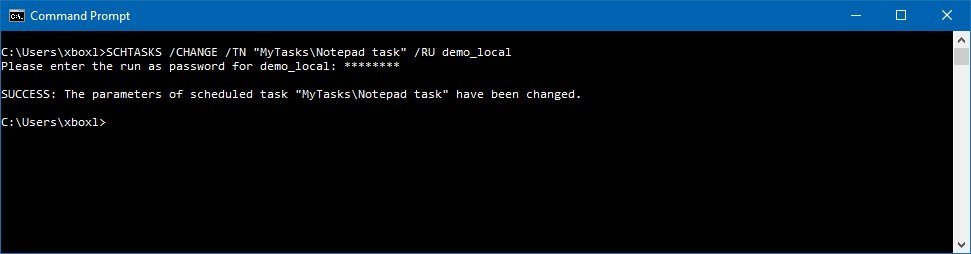
- Type the following command to change the task user information and press Enter:Syntax
SCHTASKS /CHANGE /TN "FOLDERPATH\TASKNAME" /RU NEW-USERNAMEExampleSCHTASKS /CHANGE /TN "MyTasks\Notepad task" /RU admin2
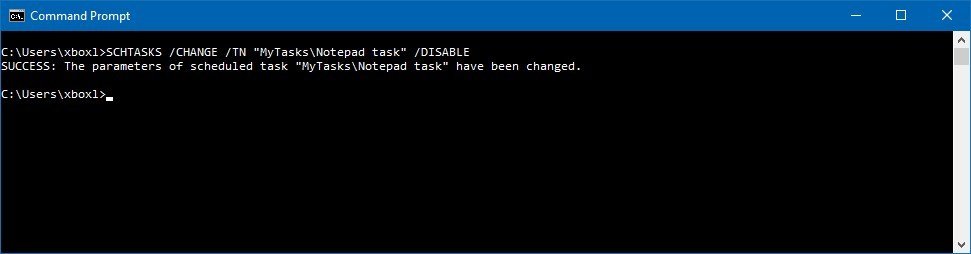
- Type the following command to disable a scheduled task and press Enter:Syntax
SCHTASKS /CHANGE /TN "FOLDERPATH\TASKNAME" /DISABLEExampleSCHTASKS /CHANGE /TN "MyTasks\Notepad task" /DISABLEQuick tip: If you want to re-enable the task, you can use the same command, but make sure to use the/ENABLEoption instead.
After completing the steps, the task will be modified with the information that you’ve specified.
Task Scheduler change options
In this guide, we are using the following options to create a scheduled task:
- /CHANGE — specifies that you want to edit an existing task.
- /TN — specifies the name and location of the task that you want to modify.
- /ST — defines the new time to run the automated routine.
- /DISABLE — disables the task.
These are just some of the available options. You can learn more about the options to change a scheduled task running the
SCHTASKS /CHANGE /?command.
How to delete a scheduled task using Command Prompt
If you no longer need a particular task, you can delete it using these steps:
- Open Start.
- Search for Command Prompt, right-click the top result, and select the Run as administrator option.
- Type the following command to delete a scheduled task and press Enter:Syntax
SchTask /DELETE /TX "FOLDERPATH\TASKNAME"ExampleSCHTASKS /DELETE /TN "MyTasks\Notepad task"
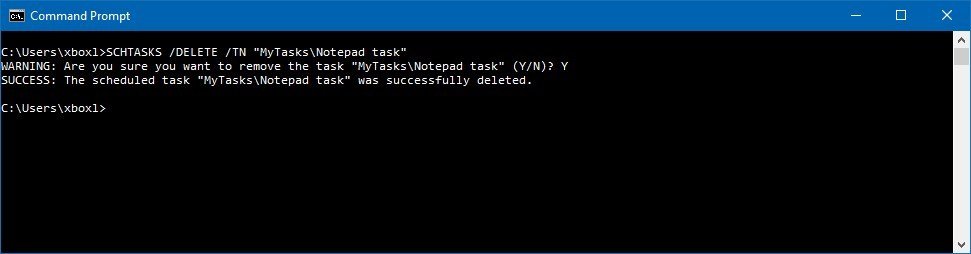
- Press the Y key to confirm.
Once you complete the steps, the task will be removed, and it’ll no longer be available on your device.
Task Scheduler delete options
In this guide, we are using the following options to delete a scheduled task:
- /DELETE — specifies that you want to delete an existing task.
- /TN — specifies the name and location of the task that you want to delete.
We’re focusing this guide on Windows 10, but the ability to use Task Scheduler with Command Prompt has been around for a long time, which means that you can also use these steps on Windows 8.1 and Windows 7.
All the latest news, reviews, and guides for Windows and Xbox diehards.
Mauro Huculak is technical writer for WindowsCentral.com. His primary focus is to write comprehensive how-tos to help users get the most out of Windows 10 and its many related technologies. He has an IT background with professional certifications from Microsoft, Cisco, and CompTIA, and he’s a recognized member of the Microsoft MVP community.