Table of Contents
- Registry configuration
- Disable Defender: the Microsoft way
- DisableAntiSpyware
- GPO
- Temporary solution
- Disable Defender: the hacker way
- How it works
- Scripting in PowerShell
Once again, after a Windows update, Windows Defender activated itself again. It finally bothered me enough to take an actual look at how to disable it permanently and reliably, in a fully automated way (a PowerShell script), on my Windows 10 20H2 (build 19042).
WARNING (please read me):
This script is not intended as a “stop/start” solution. It aims at disabeling permanently windows defender, even removing its files if you chose to. I made it as a malware analyst, for my usage, and decided to share it to help others. The “general public” might find another, easier to use solution that suit their need better.
I would also add that some alternative working solutions have been added in the comments of this article (many thanks to their writers !) : it’s definitly worth checking.
TL;DR : the final script can be found here : https://github.com/jeremybeaume/tools/blob/master/disable-defender.ps1
Registry configuration
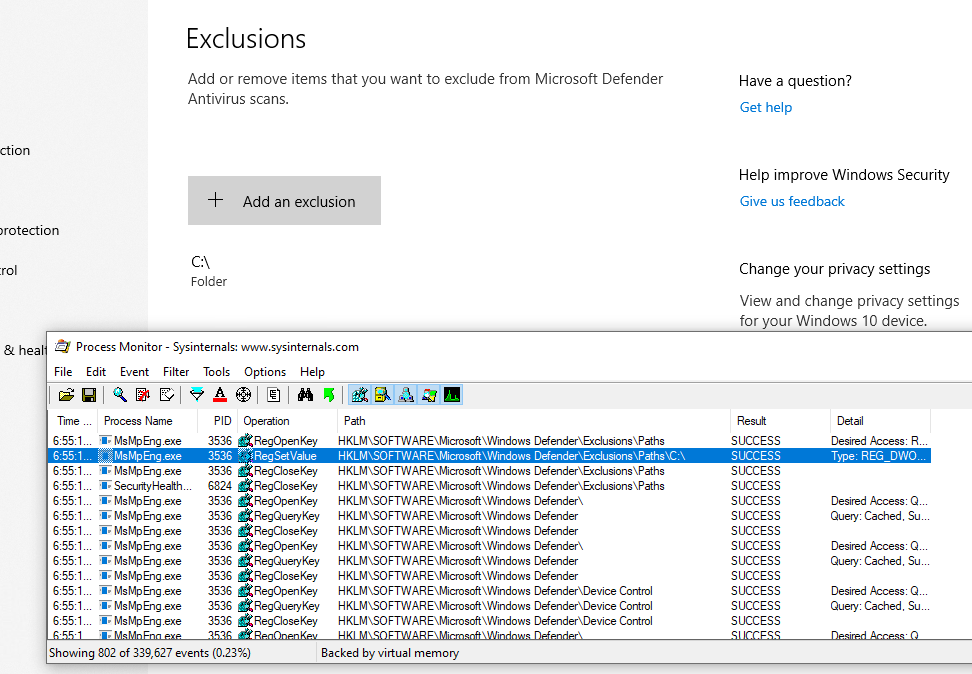
First, I took some time to look at the registry configuration, where are the parameters located, and how/when the values were changed. Procmon, from SysInternals, is a very convenient tool for this kind of research.
I looked for registry access with “Defender” in the path, and this is the result:
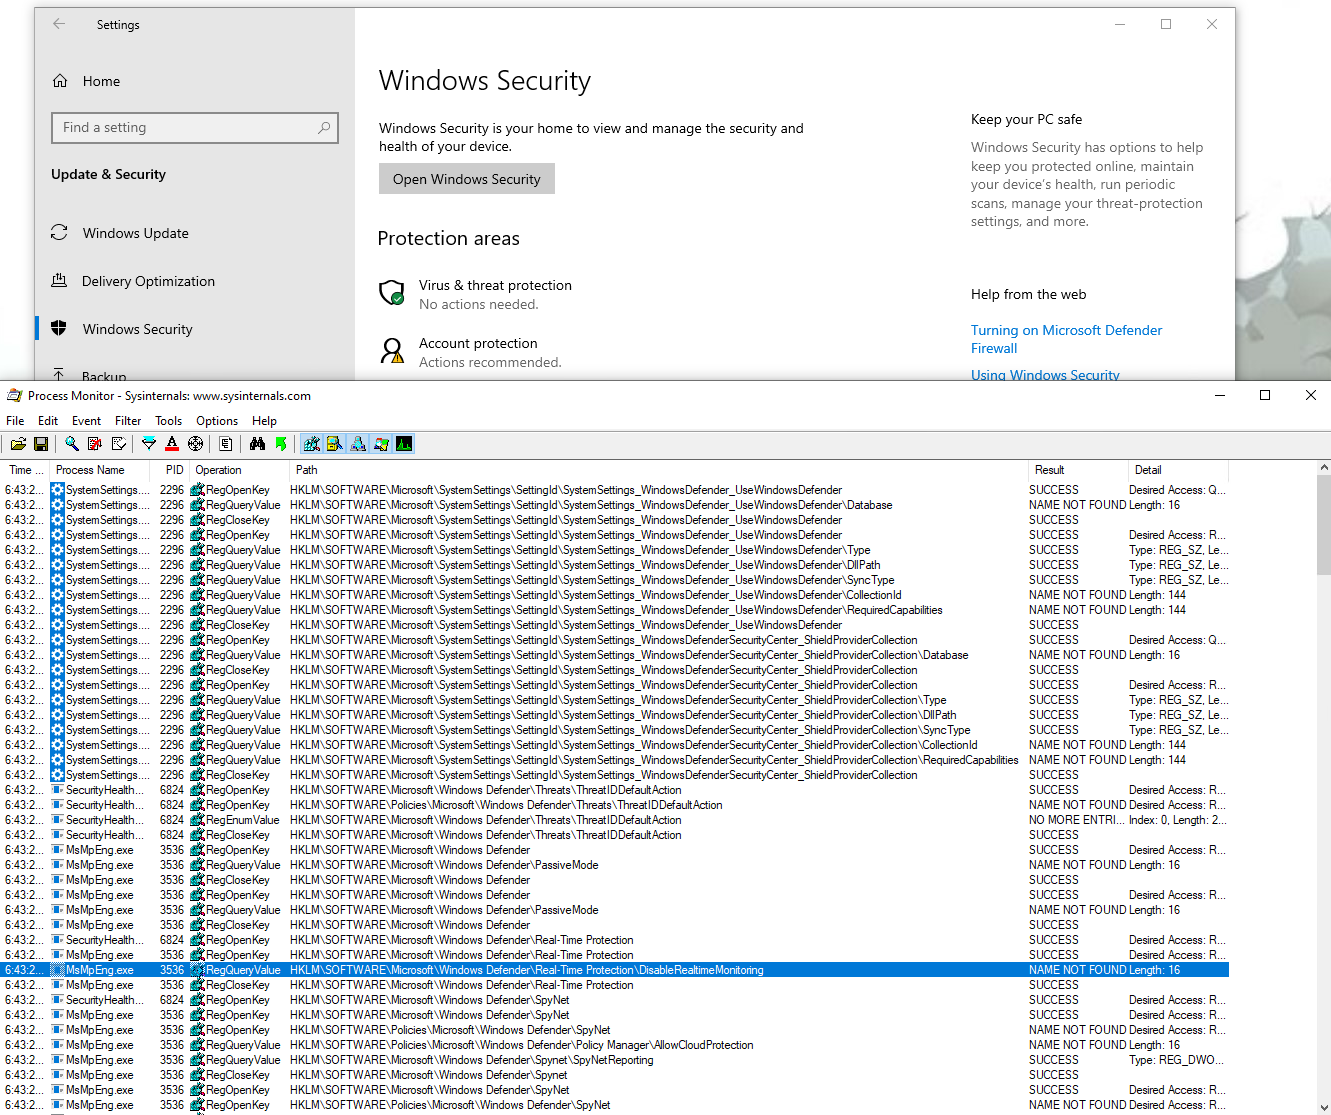
We get a first idea of the configuration location, most interesting keys seems to be under HKLM\SOFTWARE\Microsoft\Windows Defender.
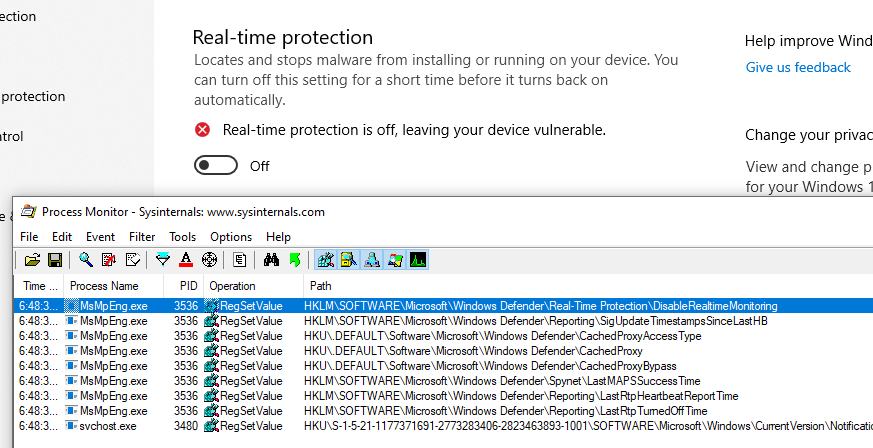
Then I proceeded to check the keys for each parameter.
First on the list is the “Real-Time protection”, modifying the key HKLM\SOFTWARE\Microsoft\Windows Defender\Real-Time Protection\DisableRealtimeMonitoring
Then the “cloud-delivered protection”, with the key HKLM\SOFTWARE\Microsoft\Windows Defender\SpyNet\SpyNetReporting :
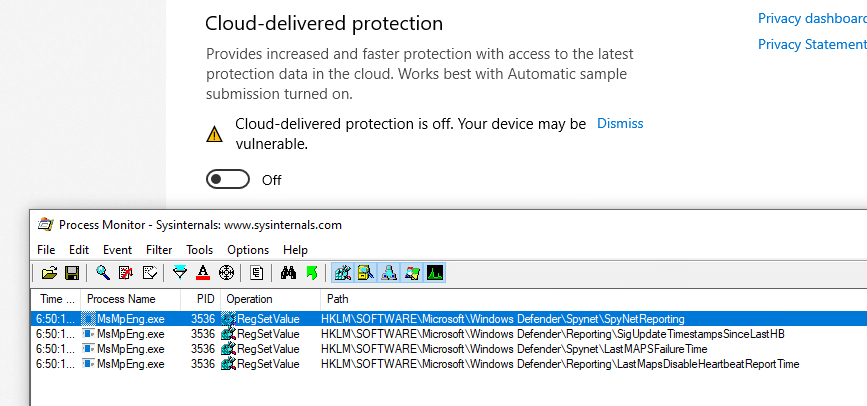
(For reference, the key for “Automatic sample submission” is HKLM\SOFTWARE\Microsoft\Windows Defender\SpyNet\SubmitSampleConsent)
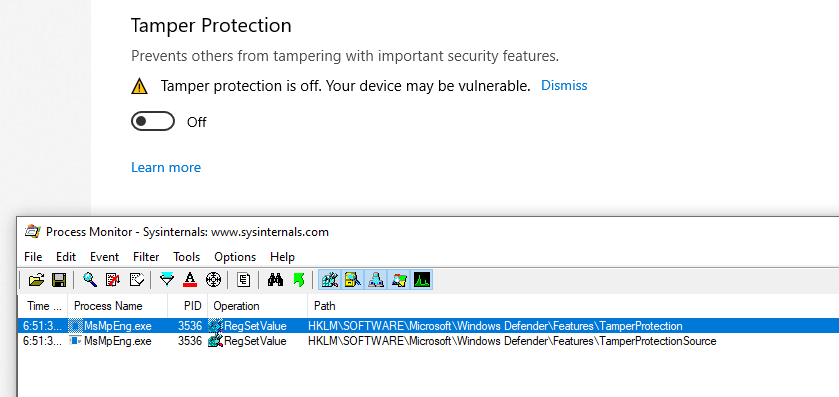
The “Tamper Protection” is next, using 2 keys: HKLM\SOFTWARE\Microsoft\Windows Defender\Features\TamperProtection (4 when disabled) and HKLM\SOFTWARE\Microsoft\Windows Defender\Features\TamperProtectionSource (2 when disabled)
And lastly, exclusions are stored in subkeys of HKLM\SOFTWARE\Microsoft\Windows Defender\Exclusions depending on their type:
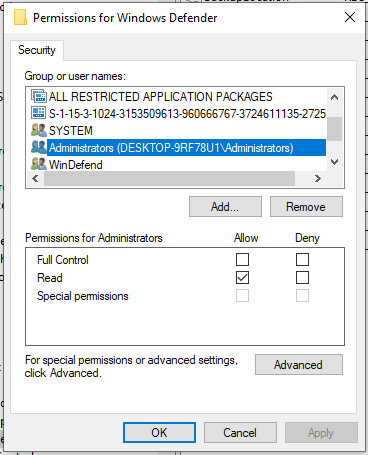
Now, one thing to note is that the Administrator (meaning members of the BUILTIN\Administrators group) cannot change those keys (only SYSTEM can):
An even as SYSTEM, with tamper protection off, writing is still not authorized:
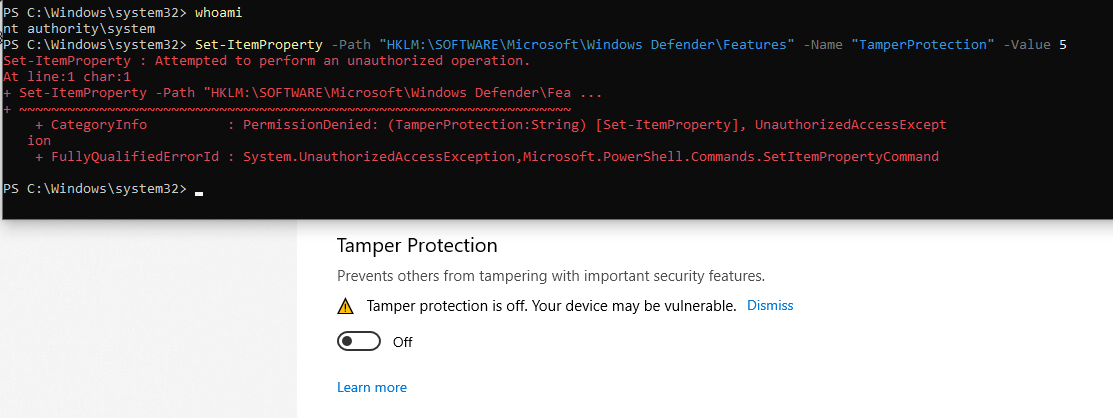
So here we are :
- There is not option to disable “Tamper Protection” in powershel (that’s the point ….).
- We can’t edit the configuration directly in the registry, even as SYSTEM.
What I used to do was using Set-MpPreference to add whole drives as exception, but sometimes I would still get alerts : Defender is still running and analyzing my actions.
Of course, Microsoft provides ways and documentation to disable Defender, so let’s check them out.
Disable Defender: the Microsoft way
DisableAntiSpyware
Searching on the internet (like  ), there seems to be a registry key for that, named
 DisableAntiSpyware. It is indeed read when opening the configuration:
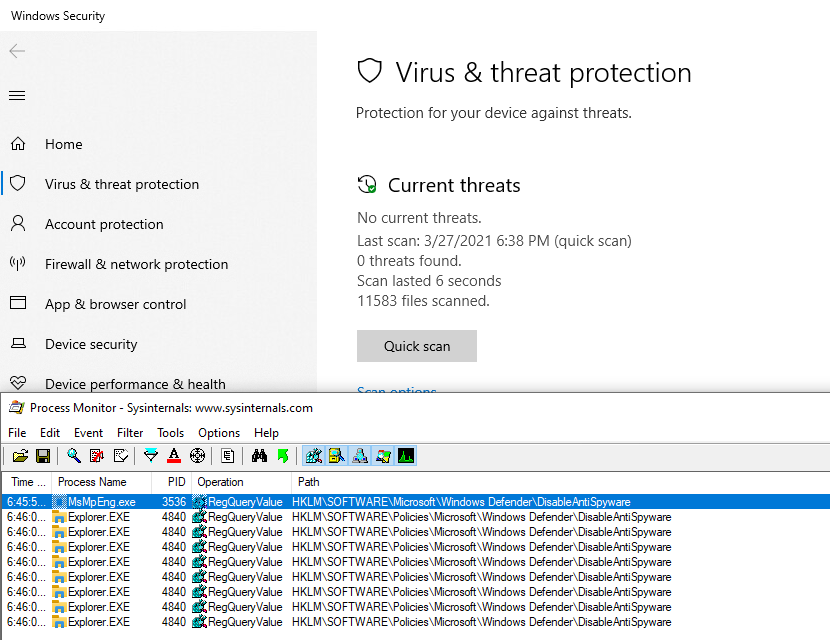
2 Keys are read, one in the “main configuration” key, and one under HKLM\SOFTWARE\Policies. This second one, we can write, to let’s go for it!
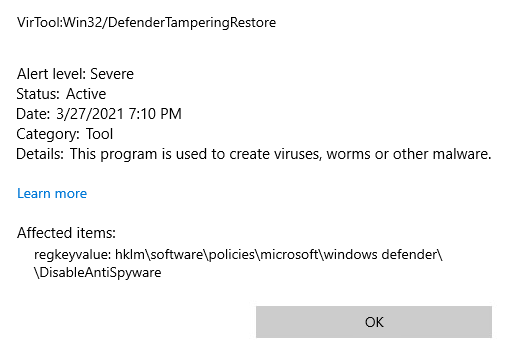
I created it, Defender was still running, without warning or anything, so it doesn’t seem to have any effect. But it gets better, it is actually considered a Severe security alert!
Maybe we need to be more subtle, and use gpedit to edit this policy, let’s try that!
GPO
Here is what we get when editing the policy with gpedit :
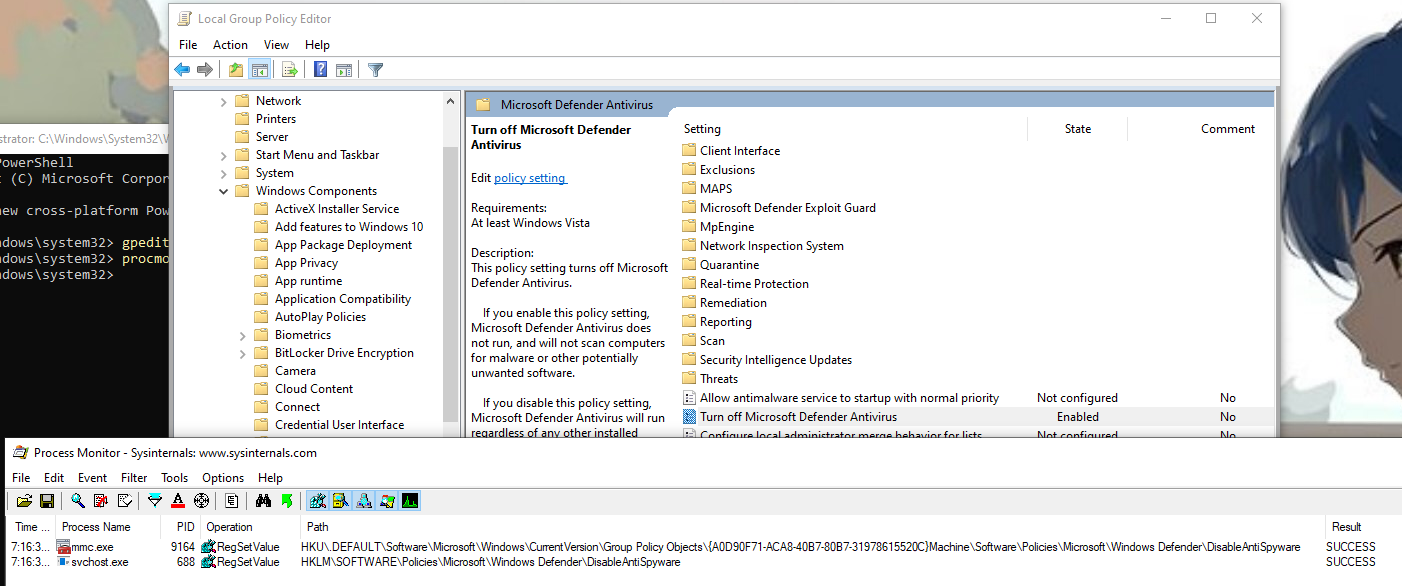
The previous key is actually written by a service (svchost.exe -k netsvcs -p -s gpsvc) and another one is written in a policy object. This time is doesn’t raise a security alert, so the second key must be necessary. I also noted that a 3rd key is written when the tamper protection is off:

This 3rd key is written by MsMpEng.exe which happens to be the binary run by the Microsoft Defender service: this is the Defender userland engine. So, we should be good to go then?
Well, nothing is disabled yet, and after reboot …. the policy is removed! So this seems to be completely ignored.
Temporary solution
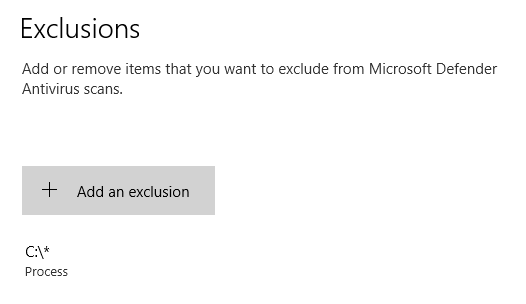
I finally managed to disable it, by adding a process exclusion (including regedit.exe):
Then, with “Tamper Protection” off, and as SYSTEM, the key HKLM\SOFTWARE\Microsoft\Windows Defender\DisableAntiSpyware finally becomes writable. Setting its value to 1 immediately stops Windows Defender:
So here we are! But …. no 🙂 This is still overwritten on reboot! This a good enough temporary solution, but as we need to disable the “Tamper Protection”, it cannot be scripted in PowerShell.
Disable Defender: the hacker way
How it works
So I did not found any way to configure Defender itself to stop running. But it actually runs in a Service, so maybe there is something there. The service cannot be modified using services.msc as we would usually do:
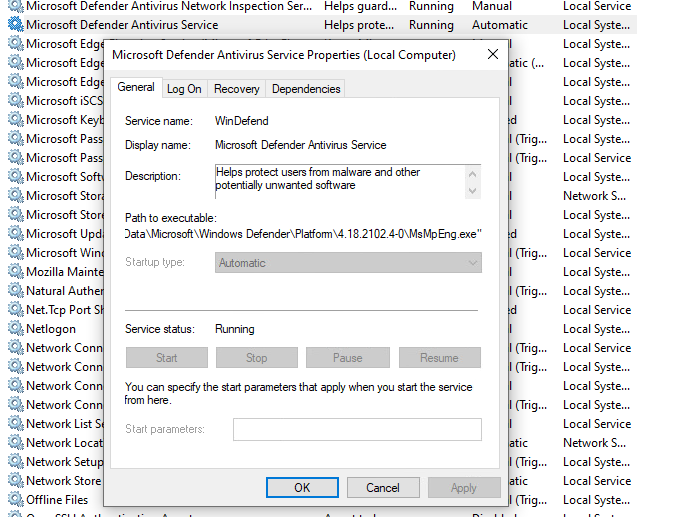
See how everything is greyed out?
We can also find the kernel drivers used by Defender, with msinfo32:

But, and that’s what we’re going to use : we can edit (at least for now) the registry keys associated to those services and drivers, in HKLM\SYSTEM\CurrentControlSet\Services\. We set they Start value to 4, meaning “Disabled”, and after next reboot, the services and driver will not be loaded / started, and so Defender will not be working anymore ! And indeed, after the reboot :

We’re good to go, finally! It’s weird that we can edit those registry keys, when services.msc doesn’t let us modify the service, but well … It works! Let’s script the whole thing.
Scripting in PowerShell
I put everything in a convenient script that disables what it can directly in defender (Set-MpPreference), then modify the registry to disable the services, and set itself up to run again after reboot, to complete the removal. I’ll break it down below.
First, I make sure to elevate to Administrator (mandatory, and actually used when the scripted is run after rebooting), and SYSTEM if psexec is available. SYSTEM is optional, but we need it to write in the registry to modify the parameters in case Defender would still re-enable itself one day (because it sure will …).
if(-Not $($(whoami) -eq "nt authority\system")) {
    $IsSystem = $false

    # Elevate to admin (needed when called after reboot)
    if (-Not ([Security.Principal.WindowsPrincipal] [Security.Principal.WindowsIdentity]::GetCurrent()).IsInRole([Security.Principal.WindowsBuiltInRole] 'Administrator')) {
        Write-Host "    [i] Elevate to Administrator"
        $CommandLine = "-ExecutionPolicy Bypass `"" + $MyInvocation.MyCommand.Path + "`" " + $MyInvocation.UnboundArguments
        Start-Process -FilePath PowerShell.exe -Verb Runas -ArgumentList $CommandLine
        Exit
    }

    # Elevate to SYSTEM if psexec is available
    $psexec_path = $(Get-Command PsExec -ErrorAction 'ignore').Source
    if($psexec_path) {
        Write-Host "    [i] Elevate to SYSTEM"
        $CommandLine = " -i -s powershell.exe -ExecutionPolicy Bypass `"" + $MyInvocation.MyCommand.Path + "`" " + $MyInvocation.UnboundArguments
        Start-Process -WindowStyle Hidden -FilePath $psexec_path -ArgumentList $CommandLine
        exit
    } else {
        Write-Host "    [i] PsExec not found, will continue as Administrator"
    }

} else {
    $IsSystem = $true
}
Then the script use the Set-MpPreference command to disable everything we can, adding exception for all drive leter, and disabling all available engines.
67..90|foreach-object{
    $drive = [char]$_
    Add-MpPreference -ExclusionPath "$($drive):\" -ErrorAction SilentlyContinue
    Add-MpPreference -ExclusionProcess "$($drive):\*" -ErrorAction SilentlyContinue
}

Write-Host "    [+] Disable scanning engines (Set-MpPreference)"

Set-MpPreference -DisableArchiveScanning 1 -ErrorAction SilentlyContinue
Set-MpPreference -DisableBehaviorMonitoring 1 -ErrorAction SilentlyContinue
Set-MpPreference -DisableIntrusionPreventionSystem 1 -ErrorAction SilentlyContinue
Set-MpPreference -DisableIOAVProtection 1 -ErrorAction SilentlyContinue
Set-MpPreference -DisableRemovableDriveScanning 1 -ErrorAction SilentlyContinue
Set-MpPreference -DisableBlockAtFirstSeen 1 -ErrorAction SilentlyContinue
Set-MpPreference -DisableScanningMappedNetworkDrivesForFullScan 1 -ErrorAction SilentlyContinue
Set-MpPreference -DisableScanningNetworkFiles 1 -ErrorAction SilentlyContinue
Set-MpPreference -DisableScriptScanning 1 -ErrorAction SilentlyContinue
Set-MpPreference -DisableRealtimeMonitoring 1 -ErrorAction SilentlyContinue

Write-Host "    [+] Set default actions to Allow (Set-MpPreference)"

Set-MpPreference -LowThreatDefaultAction Allow -ErrorAction SilentlyContinue
Set-MpPreference -ModerateThreatDefaultAction Allow -ErrorAction SilentlyContinue
Set-MpPreference -HighThreatDefaultAction Allow -ErrorAction SilentlyContinue
Then the services and drivers are disabled, and the script checks if it need to reboot :
$need_reboot = $false

# WdNisSvc Network Inspection Service
# WinDefend Antivirus Service
# Sense : Advanced Protection Service

$svc_list = @("WdNisSvc", "WinDefend", "Sense")
foreach($svc in $svc_list) {
    if($(Test-Path "HKLM:\SYSTEM\CurrentControlSet\Services\$svc")) {
        if( $(Get-ItemProperty -Path "HKLM:\SYSTEM\CurrentControlSet\Services\$svc").Start -eq 4) {
            Write-Host "        [i] Service $svc already disabled"
        } else {
            Write-Host "        [i] Disable service $svc (next reboot)"
            Set-ItemProperty -Path "HKLM:\SYSTEM\CurrentControlSet\Services\$svc" -Name Start -Value 4
            $need_reboot = $true
        }
    } else {
        Write-Host "        [i] Service $svc already deleted"
    }
}

Write-Host "    [+] Disable drivers"

# WdnisDrv : Network Inspection System Driver
# wdfilter : Mini-Filter Driver
# wdboot : Boot Driver

$drv_list = @("WdnisDrv", "wdfilter", "wdboot")
foreach($drv in $drv_list) {
    if($(Test-Path "HKLM:\SYSTEM\CurrentControlSet\Services\$drv")) {
        if( $(Get-ItemProperty -Path "HKLM:\SYSTEM\CurrentControlSet\Services\$drv").Start -eq 4) {
            Write-Host "        [i] Driver $drv already disabled"
        } else {
            Write-Host "        [i] Disable driver $drv (next reboot)"
            Set-ItemProperty -Path "HKLM:\SYSTEM\CurrentControlSet\Services\$drv" -Name Start -Value 4
            $need_reboot = $true
        }
    } else {
        Write-Host "        [i] Driver $drv already deleted"
    }
}

# Check if service running or not
if($(GET-Service -Name WinDefend).Status -eq "Running") {
    Write-Host "    [+] WinDefend Service still running (reboot required)"
    $need_reboot = $true
} else {
    Write-Host "    [+] WinDefend Service not running"
}
To execute after reboot, a shortcut is added in C:\ProgramData\Microsoft\Windows\Start Menu\Programs\StartUp\, and deleted after use.
$link_reboot = "C:\ProgramData\Microsoft\Windows\Start Menu\Programs\StartUp\disable-defender.lnk"
Remove-Item -Force "$link_reboot" -ErrorAction 'ignore' # Remove the link (only execute once after reboot)

if($need_reboot) {
    Write-Host "    [+] This script will be started again after reboot." -BackgroundColor DarkRed -ForegroundColor White

    $powershell_path = '"C:\Windows\System32\WindowsPowerShell\v1.0\powershell.exe"'
    $cmdargs = "-ExecutionPolicy Bypass `"" + $MyInvocation.MyCommand.Path + "`" " + $MyInvocation.UnboundArguments

    $res = New-Item $(Split-Path -Path $link_reboot -Parent) -ItemType Directory -Force
    $WshShell = New-Object -comObject WScript.Shell
    $shortcut = $WshShell.CreateShortcut($link_reboot)
    $shortcut.TargetPath = $powershell_path
    $shortcut.Arguments = $cmdargs
    $shortcut.WorkingDirectory = "$(Split-Path -Path $PSScriptRoot -Parent)"
    $shortcut.Save()
Finally, if we don’t need to reboot, we can finish cleaning up : configure the registry, and delete the files if we wish to :
} else {
    if($IsSystem) {

        # Configure the Defender registry to disable it (and the TamperProtection)
        # editing HKLM:\SOFTWARE\Microsoft\Windows Defender\ requires to be SYSTEM

        Write-Host "    [+] Disable all functionnalities with registry keys (SYSTEM privilege)"

        # Cloud-delivered protection:
        Set-ItemProperty -Path "HKLM:\SOFTWARE\Microsoft\Windows Defender\Real-Time Protection" -Name SpyNetReporting -Value 0
        # Automatic Sample submission
        Set-ItemProperty -Path "HKLM:\SOFTWARE\Microsoft\Windows Defender\Real-Time Protection" -Name SubmitSamplesConsent -Value 0
        # Tamper protection
        Set-ItemProperty -Path "HKLM:\SOFTWARE\Microsoft\Windows Defender\Features" -Name TamperProtection -Value 4

        # Disable in registry
        Set-ItemProperty -Path "HKLM:\SOFTWARE\Microsoft\Windows Defender" -Name DisableAntiSpyware -Value 1
        Set-ItemProperty -Path "HKLM:\SOFTWARE\Policies\Microsoft\Windows Defender" -Name DisableAntiSpyware -Value 1

    } else {
        Write-Host "    [W] (Optional) Cannot configure registry (not SYSTEM)"
    }


    if($MyInvocation.UnboundArguments -And $($MyInvocation.UnboundArguments.tolower().Contains("-delete"))) {

        # Delete Defender files

        function Delete-Show-Error {
            $path_exists = Test-Path $args[0]
            if($path_exists) {
                Remove-Item -Recurse -Force -Path $args[0]
            } else {
                Write-Host "    [i] $($args[0]) already deleted"
            }
        }

        Write-Host ""
        Write-Host "[+] Delete Windows Defender (files, services, drivers)"

        # Delete files
        Delete-Show-Error "C:\ProgramData\Windows\Windows Defender\"
        Delete-Show-Error "C:\ProgramData\Windows\Windows Defender Advanced Threat Protection\"

        # Delete drivers
        Delete-Show-Error "C:\Windows\System32\drivers\wd\"

        # Delete service registry entries
        foreach($svc in $svc_list) {
            Delete-Show-Error "HKLM:\SYSTEM\CurrentControlSet\Services\$svc"
        }

        # Delete drivers registry entries
        foreach($drv in $drv_list) {
            Delete-Show-Error "HKLM:\SYSTEM\CurrentControlSet\Services\$drv"
        }
    }
}

Write-Host ""
Read-Host -Prompt "Press any key to continue"
And we are done ! Final result can be downloaded here : https://github.com/jeremybeaume/tools/blob/master/disable-defender.ps1
It can be executed from anywhere in the file system. The parameter -Delete will delete the files linked to Defender after reboot. And it should work fine, until the Tamper Protection also protects the services ergistry key, which is bound to happen someday. I’m actually surprised it doesn’t already …
Microsoft Defender Antivirus (Защитник) — это встроенный антивирус в Windows 10/11 и Windows Server, который включен и настроен по умолчанию. В этой статье мы рассмотрим, как полностью отключить Защитник в Windows 11 или временно (приостановить).
В Windows 11 и 10 при установке стороннего антивируса, встроенный стандартный Защитника Microsoft должен отключаться. В некоторых случаях это не происходит автоматически и вам может потребоваться ручное отключение Microsoft Defender.
Содержание:
- Временная приостановка защиты Microsoft Defender в Windows 11 и 10
- Как полностью отключить Защитник Defender в Windows 11 и 10?
Временная приостановка защиты Microsoft Defender в Windows 11 и 10
В некоторых случаях вам может понадобится временно отключить защиту Microsoft Defender, не затрагивая важные системные службы. Например, запуск или установка какой-то системной программы или утилиты блокируется Microsoft Defender. Чтобы запустить такое приложение, нужно остановить защиту Windows Defender в реальном времени.
- Перейдите в следующий раздел настроек Windows 11: Settings -> Privacy and Security -> Windows Security -> Open Windows Security (или выполните команду быстрого доступа к настройкам
ms-settings:windowsdefender
);Если приложение службы безопасности Microsoft Defender не запускается, его можно восстановить (под капотом находится UWP приложение
Microsoft.SecHealthUI
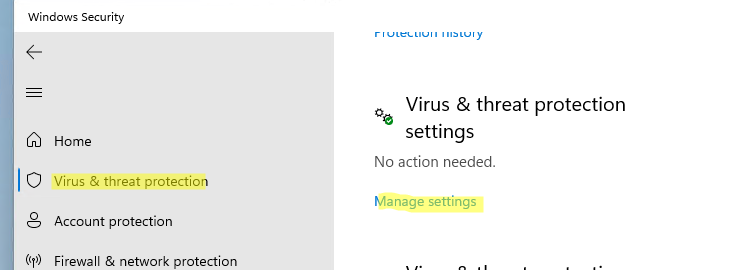
). - Откройте раздел Virus and threat protection, и нажмите на кнопку Manage Settings в разделе Virus and Threat protection settings;
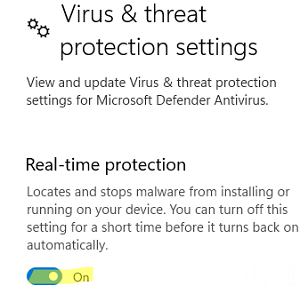
- Переведите переключатель Real-time protection в положение Off;
- Подтвердите приостановку антивирусной защиты в окно с подтверждением повышения привилегий UAC.
Чтобы восстановить защиту компьютера Windows Defender, нужно включить переключатель. Также защита в реальном времени Microsoft Defender будет включена автоматически после перезагрузки компьютера.
Ранее мы рассматривали, как управлять настройками антивируса Windows Defender с помощью PowerShell. В статье была рассмотрена PowerShell команда для отключения защиты в реальном времени:
Set-MpPreference -DisableRealtimeMonitoring $true
Однако это команда не отрабатывает, как вы ожидаете в Windows 11 и последних билдах Windows 10. Дело в том, что в Windows 10, начиная с билда 1903, по умолчанию включена новая фича Defender, которая называется Microsoft Defender Tamper Protection (Защита от подделок).
Tamper protection обеспечивает дополнительную защиту основных элементов безопасности Microsoft Defender. В частности, она блокирует несанкционированное изменение настроек антивируса, приостановку защиты в реальном времени, отключение облачной защиты. Это означает, что при включенной Защите от подделок вы не сможете отключить Real Time Protection в Microsoft Defender с помощью PowerShell.
Отключить Tamper Protection можно только вручную из графической панели управления Windows Security.
Перейдите в раздел настроек Virus and threat protection settings, промотайте список компонентов и измените переключатель параметра Tamper Protection на Off.

После отключение Tamper Protection вы сможете отключить защиту в реальном времени указанной выше командой PowerShell.
Как полностью отключить Защитник Defender в Windows 11 и 10?
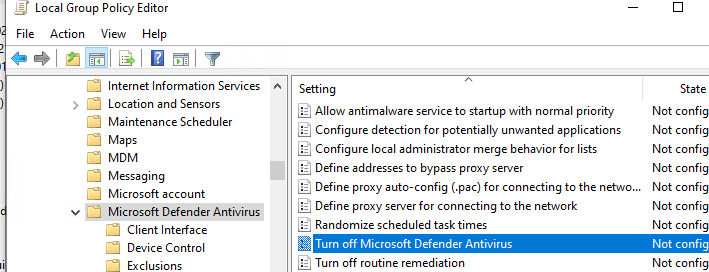
В ранних билдах Windows 10 и в Windows Server 2016 можно было полностью отключить Windows Defender через параметр групповой политики Turn off Windows Defender Antivirus в разделе Computer Configurations -> Administrative Template -> Windows Component -> Windows Defender Antivirus редактора локальных групповых политик gpedit.msc. Или ключом реестра DisableAntiSpyware в HKEY_LOCAL_MACHINE\SOFTWARE\Policies\Microsoft\Windows Defender, соответствующий этому параметру GPO:
New-ItemProperty -Path “HKLM:\SOFTWARE\Policies\Microsoft\Windows Defender” -Name DisableAntiSpyware -Value 1 -PropertyType DWORD -Force
Для отключение защиты в реальном времени использовалась политика Turn on behavior monitoring или параметр реестра DisableBehaviorMonitoring =1 в указанной выше ветке реестра.
Во всех билдах, начиная с Windows 10 1903, и в Windows 11 эти параметры GPO и ключи реестра нельзя использоваться для отключения Microsoft Defender, так как его настройки защищены новой опцией Tamper Protections (рассмотрена выше). Методы, используемые ранее для отключения Microsoft Defender Antivirus, не работают в Windows 11.
Для полного отключения компонентов Windows Defender нужно загрузить ваш компьютер в безопасном режиме. Для этого:
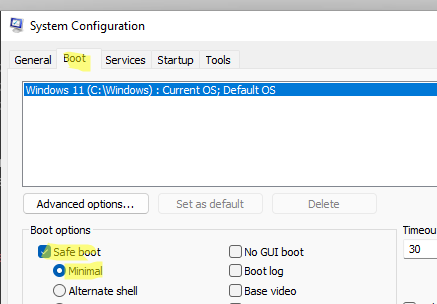
- Запустите утилиту
msconfig
; - Перейдите на вкладку Boot;
- Выберите опцию Safe boot -> Minimal в разделе настройки параметров загрузки;
- Нажмите OK и перезагрузите компьютер;
- Ваш компьютер загрузится в безопасном режиме;
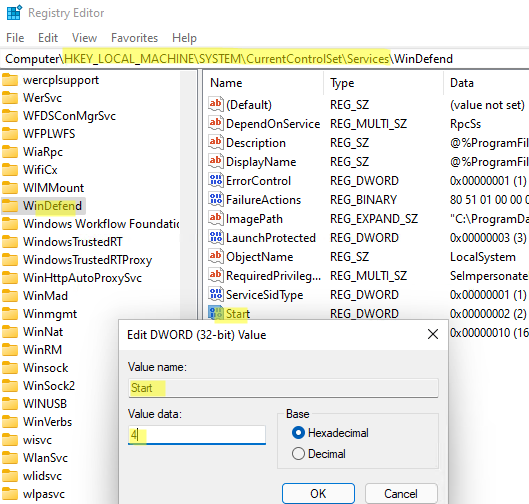
- Теперь нужно открыть редактор реестра (
regedit.exe
), перейдти в ветку HKEY_LOCAL_MACHINE\SYSTEM\CurrentControlSet\Services и отключить запуск следующих служб:- Sense
- WdBoot
- WdFilter
- WdNisDrv
- WdNisSvc
- WinDefend
Для этого нужно изменить значение параметра Start на 4;
Измените параметр Start для всех указанных служб вручную или воспользуйтесь скриптом PowerShell:
$regpath='HKLM:\SYSTEM\CurrentControlSet\Services'
Set-ItemProperty -Path ($regpath+"\WinDefend") -Name Start -Value 4
Set-ItemProperty -Path ($regpath+"\Sense") -Name Start -Value 4
Set-ItemProperty -Path ($regpath+"\WdFilter") -Name Start -Value 4
Set-ItemProperty -Path ($regpath+"\WdNisDrv") -Name Start -Value 4
Set-ItemProperty -Path ($regpath+"\WdNisSvc”) -Name Start -Value 4
Чтобы включить Microsoft Defender в Windows, нужно установить следующие дефолтные значение параметра Start в ветке каждой службы:
- Sense — 3
- WdBoot — 0
- WdFilter — 0
- WdNisDrv — 3
- WdNisSvc — 3
- WinDefend — 2
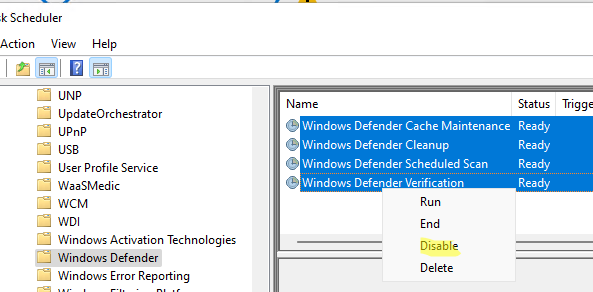
- Запустите msconfig и отключите безопасный режим, перезагрузите компьютер в обычном режиме;
- Отключите все четыре задания в разделе Microsoft –> Windows –> Windows Defender Task Scheduler (
taskschd.msc
);
Get-ScheduledTask “Windows Defender Cache Maintenance” | Disable-ScheduledTask
Get-ScheduledTask “Windows Defender Cleanup” | Disable-ScheduledTask
Get-ScheduledTask “Windows Defender Scheduled Scan” | Disable-ScheduledTask
Get-ScheduledTask “Windows Defender Verification” | Disable-ScheduledTask
Можно отключить задания планировщика с помощью PowerShell:
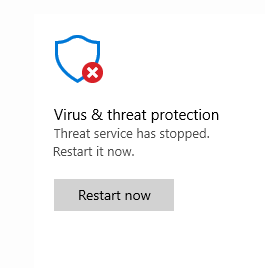
Запустите приложение Windows Security и убедитесь, что антивирус Microsoft Defender теперь отключен. Здесь должна появиться надпись Threat service has stopped. Restart it now (Служба работы с угрозами остановлена). 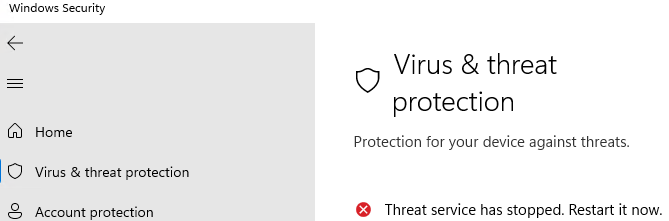
Итак, мы рассмотрели, как отключить защиту Microsoft Defender в Windows 10 и 11.

![]()
Вместе с Windows Server 2016/2019 по умолчанию устанавливается встроенный антивирус Windows Defender. Иногда он очень к месту, например, когда согласно правилам информационной безопасности на сервере должна быть установлена антивирусная защита. А иногда он совсем не нужен, поскольку снижает производительность высоконагруженных сервисов.
Удалим Windows Defender с сервера Windows Server 2016/2019.
Проверим, что Defender установлен и работает:
sc query windefend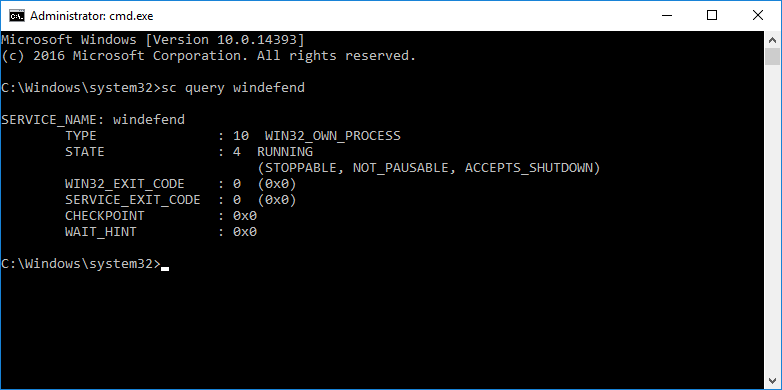
Служба антивируса в состоянии RUNNING.
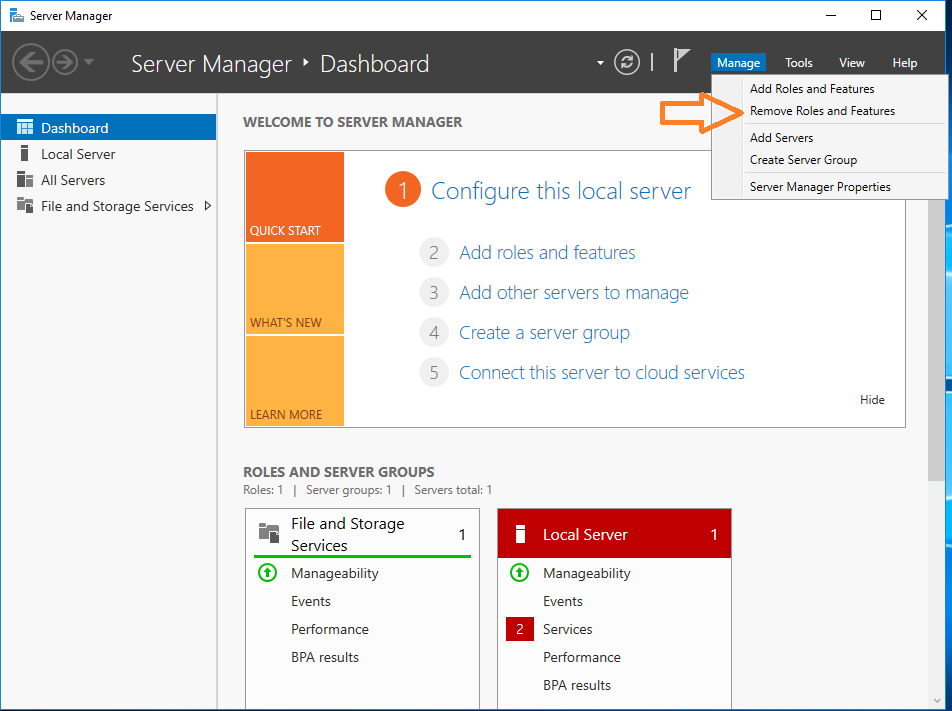
Запускаем графическую консоль Server Manager.
Manage → Remove Roles and Featires.
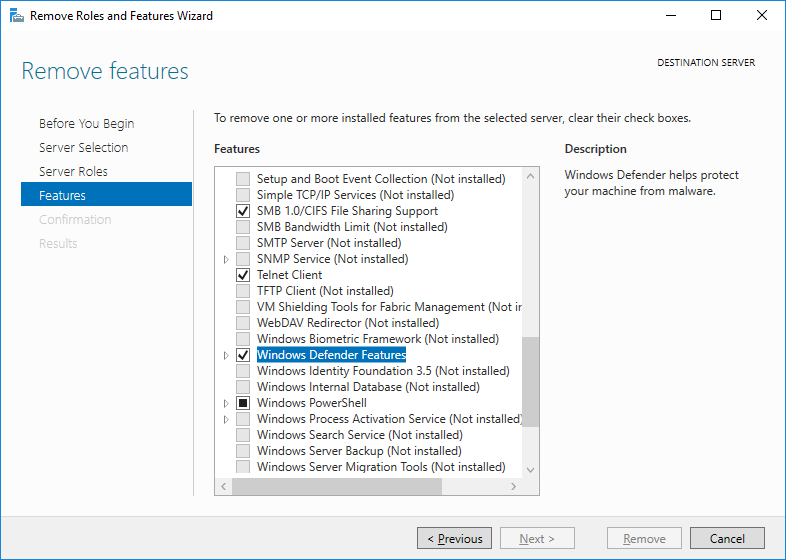
В разделе Features находим компонент Windows Defender Features, снимаем с него галку, нажимаем Next и следуем дальнейшим инструкциям по удалению компонениа.
Сервер потребует перезагрузки.
Проверка
Проверим, что Defender удалён:
sc query windefend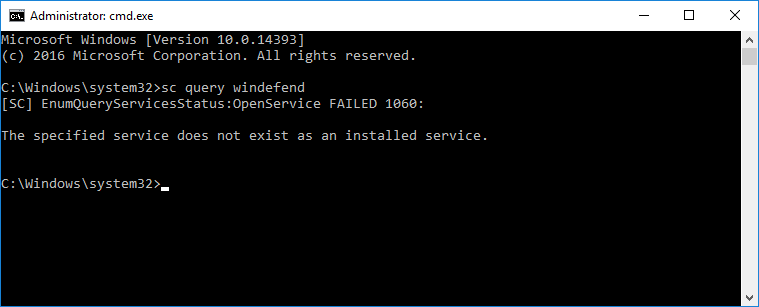
Служба антивируса не найдена.
Примечание
Удалить компонент Windows Defender в Windows Server 2016/2019 можно PowerShell командой:
Uninstall-WindowsFeature -Name Windows-DefenderThis tutorial shows how to remove or disable the Windows Defender Antivirus protection in Windows Server 2016. As you may know, the Server 2016 has built-in antivirus and malware protection through the Windows Defender Application.
In Server 2016, if you want to use another another antivirus program to protect your Server, the Windows Defender will not disable itself (as it happens in Window 10) in order to maximize the protection in Server 2016. So, if you want to remove or disable Defender Antivirus in Server 2016, you have to do that, manually.

How to Disable or Uninstall Windows Defender Antivirus in Server 2016.
Part 1. How to Disable Windows Defender Real Time Protection in Windows Server 2016.
Part 2. How to Uninstall Windows Defender in Server 2016.
Part 1. How to Turn OFF Real Time Protection in Windows Defender in Server 2016.
To temporarily turn off the Windows Defender Real Time Protection in Server 2016 though GUI, go to Settings –> Update & security –> Windows Defender and set the Real Time Protection to OFF. *

To permanently disable Windows Defender in Windows Server 2016:
1. Open PowerShell as Administrator.
2. Type the following command:
- Set-MpPreference -DisableRealtimeMonitoring $true

Note: To turn on again, the real time protection give the following command in Windows PowerShell (Admin) and then restart the server:
- Set-MpPreference -DisableRealtimeMonitoring $false
Part 2. How to Uninstall Windows Defender in Server 2016.
To completely remove Windows Defender from the Windows Server 2016, you can use one of the following methods:
- Method 1. Uninstall Windows Defender using PowerShell.
- Method 2. Remove Windows Defender in Server 2016 using DISM command prompt (DISM).
- Method 3. Remove Windows Defender using the Remove Roles & Features wizard.
Method 1. Uninstall Windows Defender using PowerShell.
To remove Windows Defender using PowerShell:
1. Open PowerShell as Administrator.
2. Type the following command and press Type the following command and press Enter:
- Uninstall-WindowsFeature -Name Windows-Defender

3. Restart the server. *
* Note: To reinstall the Windows Defender feature, then give the following command in PowerShell:
- Install-WindowsFeature -Name Windows-Defender
Method 2. Remove Windows Defender in Server 2016 using DISM in command prompt.
To remove Defender using DISM: *
* Advice: Do not use this way (DISM), to remove the Windows Defender Feature, because the command removes also the Windows Defender installation package and makes impossible to reinstall the Windows Defender (of you want) in the future.
1. Open Command Prompt as Administrator.
2. Type the following command and press Enter:
- Dism /online /Disable-Feature /FeatureName:Windows-Defender /Remove /NoRestart /quiet

3. Restart the server.
Method 3. Remove Windows Defender using the Remove Roles & Features wizard.
To Uninstall Windows Defender in Windows Server 2016.
1. Open Server Manager.
2. From Manage menu, click Remove Roles and Features.

3. Press Next at the first three (3) screens.

4. At Features options, uncheck the Windows Defender Features and click Next.

5. Click Remove to remove the Windows Defender.

6. Restart your server.
* Note: To reinstall Windows Defender Antivirus on Server 2016, follow the instructions below:
1. Open Server Manager and click Add Roles and Features.
2. Click Next at the first for (4) screens of the wizard.
3. At Features screen, check the Windows Defender Features, plus the ‘Windows Defender’ and the ‘GUI for Windows Defender’ checkboxes and click Next.
![image_thumb[33]_thumb](https://www.wintips.org/wp-content/uploads/2018/12/image_thumb33_thumb_thumb.png "image_thumb[33]_thumb")
4. At Confirmation screen click Install.

5. When the installation is completed click Close and restart your server.

That’s all folks! Did it work for you?
Please leave a comment in the comment section below or even better: like and share this blog post in the social networks to help spread the word about this solution.
On your Windows Server 2019, you can uninstall Windows Defender using a PowerShell command. In this short post, I will show you how to remove Windows Defender from your Windows Server 2019 OS.
The Windows Defender Antivirus is available on Windows Server 2016 and Windows Server 2019. You can also use the same steps to uninstall the Windows Defender on your Windows Server 2016 OS.
Windows Defender antivirus comes preinstalled with Windows Server 2016 and Windows Server 2019. In addition, the AV has built in ransomware protection feature that keeps your computer secure. However if you have a third-party antivirus or security software that you prefer to use, you may want to uninstall Defender anti-virus on your server.
Most of all in Windows Server, Windows Defender Antivirus does not automatically disable itself if you are running another antivirus product. For example when you install Sophos cloud protection on your Windows Server 2019, the Windows Defender services will still run on the server. You don’t want to run 2 security products that pretty much does same functions and eat your CPU.
We know that with other third-party anti-virus this is not the case. When you install any third-party anti-virus, it disables the other security products by default. You cannot uninstall this AV from add or remove programs. So to uninstall Windows Defender feature, you can use either PowerShell or use remove roles and features wizard.
If you want to use Windows Defender later, you can always run Install-WindowsFeature -Name Windows-Defender in PowerShell and restart the server to reinstall Windows Defender.
To uninstall or remove Windows Defender using PowerShell on Server 2019.
- Login to Windows Server 2019 with administrator account.
- Right click Start and click Windows PowerShell (admin).
- Enter the command Uninstall-WindowsFeature Windows-Defender.
- A server restart is required when you remove Windows Defender feature.
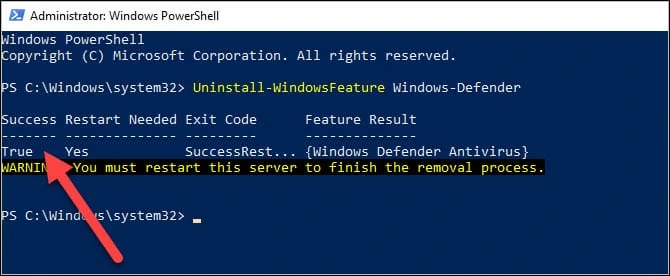
Restart the Windows Server 2019 and now you will notice Windows Defender is removed.
Back to top button