Microsoft официально заверила поддержку Internet Explorer (IE) для большинства современных версий Windows 10 и 11 (кроме LTSC редакций и Windows Server) с 15 июня 2022. Классическое приложение Internet Explorer 11 будет постепенно перенаправляться во встроенный браузер Microsoft Edge. В ближайших обновлениях, распространяемых через Windows Update, MSFT обещает полностью отключить IE на современных билдах Windows. В этой статье мы рассмотрим, как отключить или удалить Internet Explorer в Windows 11/10/8.1 и Windows Server.
Содержание:
- Удаляем Internet Explorer в Windows 10 и 11
- Как удалить Internet Explorer в Windows Server?
- Как отключить Internet Explorer 11 с помощью групповых политик?
Удаляем Internet Explorer в Windows 10 и 11
Internet Explorer 11 в Windows 10 и 11 поставляется в виде отдельного компонента, доступного как Feature on Demand/FoD (по аналогии с RSAT или NetFx3). Вы можете установить или удалить IE через приложение Параметры.
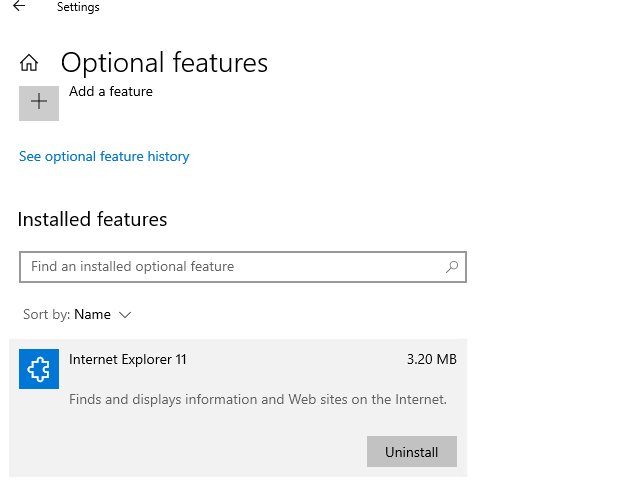
- Перейдите в Settings -> Apps -> Apps and Feature -> Optional Features или выполните команду быстрого доступа
ms-settings:appsfeatures - Найдите в списке Internet Explorer 11 и нажмите кнопку Uninstall;

Также вы можете с помощью PowerShell проверить, установлены ли компоненты IE на компьютере:
Get-WindowsOptionalFeature -Online –FeatureName Internet-Explorer-Optional-amd64

FeatureName : Internet-Explorer-Optional-amd64 DisplayName : Internet Explorer 11 Description : Finds and displays information and Web sites on the Internet. RestartRequired : Required

State : Enabled CustomProperties : \SoftBlockLink : http://go.microsoft.com/fwlink/?LinkID=142507
В данном примере компоненты IE11 устанговлены, чтобы удалить IE11, выполните команду:
Disable-WindowsOptionalFeature -FeatureName Internet-Explorer-Optional-amd64 –Online
Перезагрузите компьютер.
После удаления Internet Explorer исчезнут ассоциации для файлов .html (и других веб-форматов) с IE. При этом Windows Store и другие встроенные приложения будут работать, даже если на компьютере не установлено другого веб браузера.
При удалении компонентов Internet Explorer 11 в Windows, вы не сможете использовать режим совместимости Internet Explorer в браузере Microsoft Edge. Если вам нужен этот режим для просмотра устаревших сайтов, вместо удаления IE, отключите его с помощью групповых политик (описано в последнем разделе этой статьи).
Вы можете использовать такой скрипт для удаления IE на компьютере:
RemoveIE.ps1
#PowerShell script to remove Internet Explorer
#Check If IE is Installed
$check = Get-WindowsOptionalFeature -Online | Where-Object {$_.FeatureName -eq "Internet-Explorer-Optional-amd64"}
If ($check.State -ne "Disabled")
{
#Remove Internet Explorer
Disable-WindowsOptionalFeature -FeatureName Internet-Explorer-Optional-amd64 -Online -NoRestart | Out-Null
}
Для удаления Internet Explorer на удаленных компьютерах, можно использовать команду Invoke-Command (требует настроенного WinRM/PowerShell Remoting):
Invoke-Command -ComputerName PC01,PC02,PC03 -FilePath C:\PS\RemoveIE.ps1
Как удалить Internet Explorer в Windows Server?
IE уже отсутствует в Windows в Windows Server 2022. В более старых версиях Windows Server (2019/2016/2012R2) вы можете удалить Internet Explorer 11 с помощью DISM:
dism /online /disable-feature /featurename:Internet-Explorer-Optional-amd64

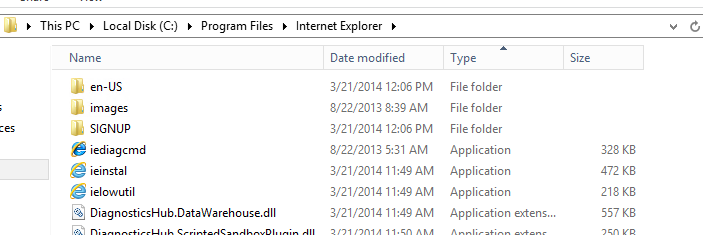
Перезагрузите Windows Server и убедитесь, что файл iexplore.exe успешно удален из
C:\Program Files\Internet Explorer
.
Как отключить Internet Explorer 11 с помощью групповых политик?
Если вы не хотите полностью удалять IE в Windows (например, вы хотите использовать IE Mode в Microsoft Edge), вы можете запретить запуск браузера Internet Explorer 11 с помощью групповых политик:
-
- Создайте новую доменную GPO и назначьте ее на OU с компьютерами/серверами с помощью консоли
GPMC.msc
или воспользуйтесь редактором локальной групповой политики (
gpedit.msc
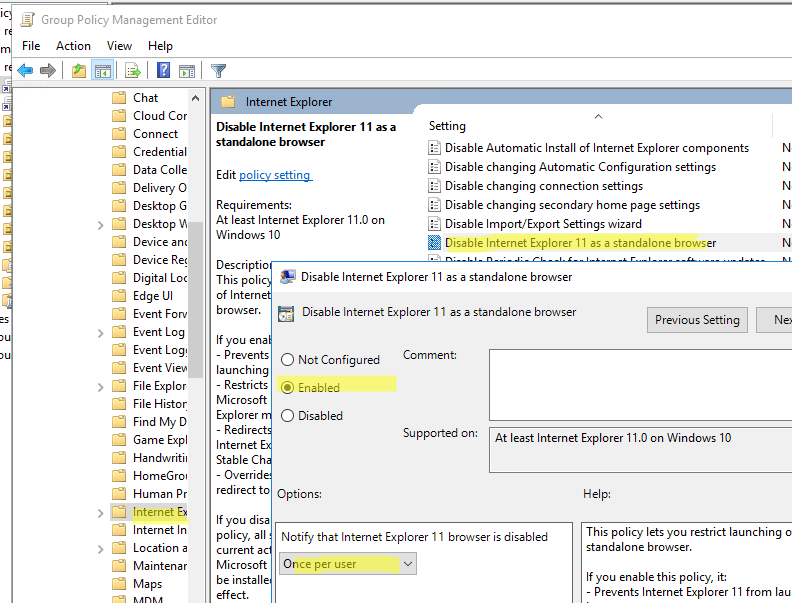
); - Перейдите в раздел Computer Configuration -> Administrative Templates -> Windows Components -> Internet Explorer;
- Найди параметр GPO Disable Internet Explorer 11 as a standalone browser, включите его и выберите тип уведомления пользователя об отключении IE:Never – пользователи не будут уведомлены о том, что IE 11 отключен;
Always – при каждом запуске IE пользователи будут получать уведомление об отключенном Internet Explorer 11 и перенаправляться в альтернативный браузер Microsoft Edge;
Once per user – пользователи оповещаются только один раз (рекомендовано);
- Создайте новую доменную GPO и назначьте ее на OU с компьютерами/серверами с помощью консоли
- Обновите настройки GPO на компьютерах;
Данная политика запрещается запуск браузера Internet Explorer 11 (через файловые ассоциации Windows или прямым запуском iexplore.exe) и запускает вместо него Microsoft Edge (при этом режим совместимостей IE в Edge полностью работоспособен). Иконки IE 11 удаляются из стартового меню и панели задач.
При попытке запустить IE вручную, появляется уведомление:
Internet Explorer
This action is restricted. For more information, please contact your system administrator.

- Remove From My Forums
-
Вопрос
-
Добрый день!
Хотел удалить Internet Explorer 10 из Windows Server 12 по инструкции
Чтобы удалить Internet Explorer 10 в Windows Server 2012, выполните следующие действия:
- Откройте командную строку с повышенными привилегиями.
- Из командной строки выполните команду:
dism /online /Disable-Feature /FeatureName:Internet-Explorer-Optional-amd64
Примечание.Internet-Explorer-Optional-amd64 вводится с учетом регистра.
- В ответ на приглашение перезагрузить компьютер нажмите кнопку Да.
Но программа удалила не полностью и теперь я не могу восстановить программу не установить Internet Explorer 9.
Для работы нам нужен Internet Explorer 9, поэтому и удалял Internet Explorer 10. Подскажите что делать дальше.
-
Изменено
27 июня 2013 г. 9:56
опечатка
Ответы
-
Здравствуйте,
IE9 не поддерживается в Windows Server 2012. Про это говорится в этой
ветке форума.-
Изменено
SemenovA
27 июня 2013 г. 11:24
Удалил лишнее -
Предложено в качестве ответа
Dmitriy VereshchakMicrosoft contingent staff, Moderator
27 июня 2013 г. 11:28 -
Помечено в качестве ответа
Иван ПродановMicrosoft contingent staff, Moderator
1 августа 2013 г. 6:27
-
Изменено
Internet Explorer – это браузер, который поставляется вместе с операционной системой Windows. Однако, в некоторых случаях пользователи могут захотеть удалить Internet Explorer с их сервера Windows Server 2019. Это может быть связано с безопасностью, несовместимостью с другими приложениями или просто предпочтением другого браузера.
В данном практическом руководстве мы расскажем, как удалить Internet Explorer на Windows Server 2019. Помимо основных шагов удаления, мы также предоставим советы по безопасности и альтернативные варианты использования, чтобы помочь вам принять взвешенное решение.
Шаг 1: Проверьте зависимые приложения
Перед удалением Internet Explorer убедитесь, что на вашем сервере Windows Server 2019 нет зависимостей от этого браузера. Некоторые приложения и программы могут требовать его присутствие для корректной работы. Проверьте все установленные приложения и обратитесь к документации, чтобы узнать о возможных проблемах при удалении.
Шаг 2: Отключите Internet Explorer
Прежде чем удалить Internet Explorer, вы можете попробовать отключить его. Это может быть полезным в случаях, когда вы не хотите полностью удалять браузер, но хотите предотвратить его использование. Для отключения Internet Explorer перейдите в «Панель управления» -> «Программы» -> «Включение или отключение функций Windows» и снимите галочку возле «Internet Explorer 11».
Шаг 3: Удалите Internet Explorer
Если вы все же решили удалить Internet Explorer, то выполните следующие шаги:
- Нажмите на кнопку «Пуск» и выберите «Просмотреть установленные обновления».
- Найдите и щелкните правой кнопкой мыши обновление «Internet Explorer 11».
- Выберите «Удалить».
После выполнения этих шагов Internet Explorer будет удален с вашего сервера Windows Server 2019.
Обратите внимание, что удаление Internet Explorer может повлиять на некоторые системные функции и возможности ОС Windows Server 2019. Перед удалением рекомендуется создать точку восстановления, чтобы в случае проблем можно было вернуть систему к предыдущему состоянию.
Теперь вы знаете, как удалить Internet Explorer на Windows Server 2019. Следуйте этим рекомендациям и принимайте взвешенные решения в соответствии с вашими потребностями и требованиями безопасности.
Подготовка к удалению Internet Explorer
Перед тем как удалить Internet Explorer с компьютера на Windows Server 2019, необходимо выполнить несколько предварительных шагов. Это поможет сохранить информацию и избежать непредвиденных проблем.
1. Создайте резервные копии данных: Прежде чем начать удаление, рекомендуется создать резервные копии всех важных данных и файлов на компьютере. Это позволит восстановить информацию, если что-то пойдет не так.
2. Проверьте зависимости приложений: Удаление Internet Explorer может повлиять на работу некоторых приложений или сервисов. Поэтому перед удалением рекомендуется проверить, есть ли зависимости с другими программами, и принять необходимые меры для их обновления или замены.
3. Получите права администратора: Удаление Internet Explorer требует прав администратора. Убедитесь, что вы вошли в систему с учетной записью, имеющей права администратора.
4. Отключите автоматические обновления: Чтобы избежать автоматической установки Internet Explorer, рекомендуется отключить автоматические обновления операционной системы. Вы можете сделать это через настройки Windows.
При выполнении этих шагов вы убережете свои данные, предотвратите возможные проблемы с другими программами и будете иметь необходимые права для удаления Internet Explorer с Windows Server 2019.

Uninstall Internet Explorer and explore the latest Microsoft announcement on IE11 on June 15, 2022. Certain Windows 10 versions will stop supporting the application. Alternatively, switch to Microsoft Edge – serving traditional and cutting-edge websites and apps. The Edge browser’s IE mode provides legacy support for sites requiring the application.
Additionally, Microsoft will give one year’s notice before retiring IE mode. There are many ways to uninstall Internet Explorer from Windows or Windows Server. Kindly refer to some of these interesting links: how to forcefully remove Microsoft Edge Browser the hard way from your device, and how to Block downloads on Microsoft Edge using GPO on Windows Server 2019 and 2022.
However, going to Apps > Optional Features would be the simplest way to remove IE from the server. The Deployment Image Service and Management (DISM) can be used to uninstall the IE11 application from Windows Server and even PowerShell. In this write-up, I will show you how to uninstall Internet Explorer from your Windows or Windows Server PC.
Note that Microsoft Edge’s Internet Explorer mode, which enables backward compatibility, will be supported at least until 2029. Take a look at some of the following related guides: Internet Explorer: How to disable IE via Group Policy or Windows Registry Settings, and how to Activate Full-Screen (Kiosk Mode) in Internet Explorer.
Why Do You Need to Uninstall Internet Explorer?
- Microsoft Edge is a reliable browser that receives regular updates and offers more features than IE.
- Doing so is secure because Microsoft Edge has already replaced Internet Explorer on Windows Server and Windows OS. To access websites that work in IE, you can simply use Microsoft Edge in IE mode.
- Although Internet Explorer has reached the end of its support life, updates will still be provided for Windows Server 2012 R2, Windows 10, and later versions.
- Allowing Internet Explorer to remain on your PC might pose some security risks as it is no longer supported, which means it won’t be receiving security updates from Microsoft again.
Removing Explorer from Windows
Click Start on your Windows or Windows Server PC and type ‘Internet Explorer’ into the search box to check for its presence. If the Internet Explorer app appears in the search results, it means it is installed on the Windows or server.

Removing from Windows Server
In this section, I will show you how to uninstall Internet Explorer from your Windows Server. Uninstalling from Windows also follows the same methods for Windows Server.
To uninstall Internet Explorer from Windows Server, we will explore two methods:
- Uninstalling Internet Explorer through the Settings App
- Uninstalling Internet Explorer from Windows Server using DISM
Removing through the Settings App
Here, we’ll examine how to remove Internet Explorer from Windows Server through the Settings app. To do so, open the Settings App by pressing Win + i. When the Settings app opens up, click on Apps

Next, click on Manage Optional Features in the Apps & Features window.

Now, scroll down to where you will locate Internet Explorer

Once you locate it, click to reveal the Uninstall option. Click on the Uninstall button to uninstall from your Windows Server.

Note: You need to restart your Server to completely remove Internet Explorer from your ServerUninstallation from Windows Server using DISM
Using DISM is an alternative way to remove Internet Explorer. You can remove IE11 from Windows Server with just one command. Launch the command prompt on your Windows server while logged in as an administrator, then enter the command listed below to remove Internet Explorer using DISM.
dism /online /disable-feature /featurename:Internet-Explorer-Optional-amd64

To complete the uninstallation of Internet Explorer using DISM, restart the server. To uninstall Internet Explorer from Windows, use the same method as stated above.
Internet Explorer (IE) is an integral part of the Windows operating system and cannot be completely uninstalled. However, it is possible to disable it through the «Turn Windows features on or off» feature.
To disable IE on Windows Server 2012 R2, follow these steps:
1. Open the Server Manager and select «Add roles and features«.
2. Click through the first few screens until you reach the «Features» section.
3. Scroll down to «User Interfaces and Infrastructure» and expand it.
4. Uncheck the box next to «Internet Explorer 11«.
5. Click «Next» and then «Install» to complete the process.
Once the process is complete, Internet Explorer will no longer appear in the Start menu or taskbar. It is important to note that some applications may still rely on IE components for certain functions, so disabling IE should be done with caution and only if necessary.
How do I Uninstall Internet Explorer from Windows 2012 R2?
How do I Uninstall a service in Windows Server 2012 R2?
To uninstall a service in Windows Server 2012 R2, follow these steps:
1. Open the Services console by typing «services.msc» in the Windows search bar and pressing Enter.
2. Locate the service you want to uninstall in the list of services.
3. Right-click on the service and select «Properties.«
4. In the Properties window, click the «Stop» button to stop the service if it is currently running.
5. Change the «Startup type» option to «Disabled.«
6. Click «Apply» and then «OK» to save the changes.
7. Close the Services console.
8. Open a Command Prompt with administrative privileges.
9. Type «sc delete [service name]» and press Enter, where [service name] is the name of the service you want to uninstall.
10. Press Enter again to confirm the deletion of the service.
11. Close the Command Prompt.
The service will now be uninstalled from your Windows Server 2012 R2 system. It is important to note that you should only uninstall services that you are sure you no longer need, and that you should always be cautious when making changes to system-level settings.
How do I disable IE Enhanced Security server 2012 R2?
Internet Explorer Enhanced Security Configuration (IE ESC) is a feature in Windows Server 2012 R2 that can help protect your server by reducing the ability of users to download and install malicious software. However, if you need to disable it to allow for easier access to certain websites or applications, you can follow these steps:
1. Open the Server Manager dashboard and select the Local Server category.
2. In the Security Information section, click on the IE Enhanced Security Configuration link.
3. This will bring up the IE Enhanced Security Configuration window. To disable it for administrators or users, simply toggle the switch to Off for the relevant option.
Note that disabling IE ESC for all users is not recommended from a security perspective, so it is advisable to only disable it for individual accounts as needed.
How to reinstall Internet Explorer in Windows Server 2012 R2?
To reinstall Internet Explorer in Windows Server 2012 R2, you can follow the steps below:
1. Open Server Manager on the server that needs IE reinstalled.
2. Click on the Manage menu, and then select Add Roles and Features.
3. In the Add Roles and Features Wizard, click Next until you reach the Features page.
4. Scroll down the list of features until you find Internet Explorer 11, and then select the checkbox next to it.
5. Click Next to continue through the wizard, and then click Install to begin the installation of Internet Explorer.
6. Once the installation is complete, click Close to exit the wizard.
After completing these steps, Internet Explorer will be reinstalled and should be available for use. If you still have issues with Internet Explorer, you may need to troubleshoot further or seek additional support.
How to Uninstall and reinstall IIS on Windows Server 2012 r2?
Uninstalling and reinstalling Internet Information Services (IIS) on a Windows Server 2012 r2 machine can be done through the «Server Manager» utility. First, open «Server Manager» and select «Manage» in the top right corner. From the drop-down menu, select «Remove Roles and Features«. In the wizard that appears, click «Next» until you reach the «Server Roles» screen. Here, uncheck the box next to «Web Server (IIS)» and click «Next» until you can click «Remove» to initiate the uninstallation process.
To reinstall IIS, go back to the «Add Roles and Features» wizard in «Server Manager» and select «Web Server (IIS)» from the list of server roles. Click «Next» until you reach the «Features» screen, where you can select any additional features you wish to include with IIS. Follow the remaining prompts to complete the installation process.
It is important to note that uninstalling and reinstalling IIS will remove any previously configured settings, websites, and web applications. Be sure to backup any necessary data before proceeding with these steps.
Internet Explorer 8 can be uninstalled from Windows Server 2008 r2 through the server manager console or command line. Here are the steps to uninstall IE 8 through server manager console:
1. Open the server manager console from the taskbar or start menu.
2. Click on «Features» in the left navigation pane.
3. In the right navigation pane, click on «Remove Features.«
4. In the Remove Features Wizard, scroll down and uncheck the box next to «Internet Explorer 8.«
5. Click on «Next» to confirm the removal process and follow the prompts to complete the uninstallation.
Alternatively, here are the steps to uninstall IE 8 through the command line:
1. Open the command prompt as an administrator.
2. Type «servermanagercmd -r ie-8» and press enter.
3. Follow the prompts to complete the uninstallation process.
It is important to note that after uninstalling IE 8, a reboot of the server is required for the changes to take effect. Additionally, it is recommended to have another web browser installed on the server as many features and tools may rely on web-based interfaces.
How to disable IIS service in Windows Server 2012 r2?
To disable IIS (Internet Information Services) on a Windows Server 2012 R2, follow these steps:
1. Open the Server Manager by clicking on the icon in the taskbar, or by searching for it in the Start menu.
2. In the Server Manager, click on the Manage menu and select the Remove Roles and Features option.
3. In the Remove Roles and Features Wizard, click on the Next button until you get to the Features section.
4. Scroll down and find the entry for «Internet Information Services (IIS)» and uncheck the box next to it.
5. You will be presented with a dialog box asking if you want to also remove the dependent features. Click on the Remove Features button.
6. Click on the Next button to continue through the wizard and complete the removal process.
7. Once the removal process has completed, IIS will no longer be available on your Windows Server 2012 R2 system. If you want to re-enable it in the future, you can go back to the Add Roles and Features Wizard and re-install the IIS feature.
How to delete unnecessary files in Windows Server 2012 r2?
Deleting unnecessary files in Windows Server 2012 R2 can help improve the performance and free up storage space on the server.
Here are the steps to delete unnecessary files on Windows Server 2012 R2:
1. Open the Server Manager and click on Storage in the left panel.
2. Click on Disk Cleanup in the middle panel.
3. Select the drive that you want to clean up and click OK.
4. Wait for the Disk Cleanup utility to calculate the amount of space that can be freed up.
5. Check the boxes next to the types of files that you want to delete, such as temporary files, recycle bin, and log files.
6. Click OK to confirm and start the cleanup process.
7. Wait for the cleanup process to complete and click Delete Files when prompted.
Note: It is recommended to review the files before deleting them to ensure none of them are important or critical to the system. It is also recommended to perform regular cleaning of unnecessary files to maintain optimal system performance.
{«@context«:»https://schema.org”,»@type»:»FAQPage»,»mainEntity»:[{«@type«:»Question»,»name»:»How do I Uninstall a service in Windows Server 2012 R2?»,»acceptedAnswer»:{«@type«:»Answer»,»text»:»To uninstall a service in Windows Server 2012 R2, follow these steps:nn1. Open the Services console by typing «services.msc» in the Windows search bar and pressing Enter.nn2. Locate the service you want to uninstall in the list of services.nn3. Right-click on the service and select «Properties.«nn4. In the Properties window, click the «Stop» button to stop the service if it is currently running.nn5. Change the «Startup type» option to «Disabled.«nn6. Click «Apply» and then «OK» to save the changes.nn7. Close the Services console.nn8. Open a Command Prompt with administrative privileges.nn9. Type «sc delete [service name]» and press Enter, where [service name] is the name of the service you want to uninstall.nn10. Press Enter again to confirm the deletion of the service.nn11. Close the Command Prompt.nnThe service will now be uninstalled from your Windows Server 2012 R2 system. It is important to note that you should only uninstall services that you are sure you no longer need, and that you should always be cautious when making changes to system-level settings.»}},{«@type«:»Question»,»name»:»How do I disable IE Enhanced Security server 2012 R2?»,»acceptedAnswer»:{«@type«:»Answer»,»text»:»Internet Explorer Enhanced Security Configuration (IE ESC) is a feature in Windows Server 2012 R2 that can help protect your server by reducing the ability of users to download and install malicious software. However, if you need to disable it to allow for easier access to certain websites or applications, you can follow these steps:nn1. Open the Server Manager dashboard and select the Local Server category.nn2. In the Security Information section, click on the IE Enhanced Security Configuration link.nn3. This will bring up the IE Enhanced Security Configuration window. To disable it for administrators or users, simply toggle the switch to Off for the relevant option.nnNote that disabling IE ESC for all users is not recommended from a security perspective, so it is advisable to only disable it for individual accounts as needed.»}},{«@type«:»Question»,»name»:»How to reinstall Internet Explorer in Windows Server 2012 R2?»,»acceptedAnswer»:{«@type«:»Answer»,»text»:»To reinstall Internet Explorer in Windows Server 2012 R2, you can follow the steps below:nn1. Open Server Manager on the server that needs IE reinstalled.n2. Click on the Manage menu, and then select Add Roles and Features.n3. In the Add Roles and Features Wizard, click Next until you reach the Features page.n4. Scroll down the list of features until you find Internet Explorer 11, and then select the checkbox next to it.n5. Click Next to continue through the wizard, and then click Install to begin the installation of Internet Explorer.n6. Once the installation is complete, click Close to exit the wizard.nnAfter completing these steps, Internet Explorer will be reinstalled and should be available for use. If you still have issues with Internet Explorer, you may need to troubleshoot further or seek additional support.»}},{«@type«:»Question»,»name»:»How to Uninstall and reinstall IIS on Windows Server 2012 r2?»,»acceptedAnswer»:{«@type«:»Answer»,»text»:»Uninstalling and reinstalling Internet Information Services (IIS) on a Windows Server 2012 r2 machine can be done through the «Server Manager» utility. First, open «Server Manager» and select «Manage» in the top right corner. From the drop-down menu, select «Remove Roles and Features«. In the wizard that appears, click «Next» until you reach the «Server Roles» screen. Here, uncheck the box next to «Web Server (IIS)» and click «Next» until you can click «Remove» to initiate the uninstallation process. nnTo reinstall IIS, go back to the «Add Roles and Features» wizard in «Server Manager» and select «Web Server (IIS)» from the list of server roles. Click «Next» until you reach the «Features» screen, where you can select any additional features you wish to include with IIS. Follow the remaining prompts to complete the installation process.nnIt is important to note that uninstalling and reinstalling IIS will remove any previously configured settings, websites, and web applications. Be sure to backup any necessary data before proceeding with these steps.»}},{«@type«:»Question»,»name»:»How to Uninstall IE 8 from Windows Server 2008 r2?»,»acceptedAnswer»:{«@type«:»Answer»,»text»:»Internet Explorer 8 can be uninstalled from Windows Server 2008 r2 through the server manager console or command line. Here are the steps to uninstall IE 8 through server manager console:nn1. Open the server manager console from the taskbar or start menu.n2. Click on «Features» in the left navigation pane.n3. In the right navigation pane, click on «Remove Features.«n4. In the Remove Features Wizard, scroll down and uncheck the box next to «Internet Explorer 8.«n5. Click on «Next» to confirm the removal process and follow the prompts to complete the uninstallation.nnAlternatively, here are the steps to uninstall IE 8 through the command line:nn1. Open the command prompt as an administrator.n2. Type «servermanagercmd -r ie-8″ and press enter.n3. Follow the prompts to complete the uninstallation process.nnIt is important to note that after uninstalling IE 8, a reboot of the server is required for the changes to take effect. Additionally, it is recommended to have another web browser installed on the server as many features and tools may rely on web-based interfaces.«}},{«@type«:»Question»,»name»:»How to disable IIS service in Windows Server 2012 r2?»,»acceptedAnswer»:{«@type«:»Answer»,»text»:»To disable IIS (Internet Information Services) on a Windows Server 2012 R2, follow these steps:nn1. Open the Server Manager by clicking on the icon in the taskbar, or by searching for it in the Start menu.nn2. In the Server Manager, click on the Manage menu and select the Remove Roles and Features option.nn3. In the Remove Roles and Features Wizard, click on the Next button until you get to the Features section.nn4. Scroll down and find the entry for «Internet Information Services (IIS)» and uncheck the box next to it.nn5. You will be presented with a dialog box asking if you want to also remove the dependent features. Click on the Remove Features button.nn6. Click on the Next button to continue through the wizard and complete the removal process.nn7. Once the removal process has completed, IIS will no longer be available on your Windows Server 2012 R2 system. If you want to re-enable it in the future, you can go back to the Add Roles and Features Wizard and re-install the IIS feature.»}},{«@type«:»Question»,»name»:»How to delete unnecessary files in Windows Server 2012 r2?»,»acceptedAnswer»:{«@type«:»Answer»,»text»:»Deleting unnecessary files in Windows Server 2012 R2 can help improve the performance and free up storage space on the server. nnHere are the steps to delete unnecessary files on Windows Server 2012 R2:nn1. Open the Server Manager and click on Storage in the left panel.n2. Click on Disk Cleanup in the middle panel.n3. Select the drive that you want to clean up and click OK.n4. Wait for the Disk Cleanup utility to calculate the amount of space that can be freed up.n5. Check the boxes next to the types of files that you want to delete, such as temporary files, recycle bin, and log files.n6. Click OK to confirm and start the cleanup process.n7. Wait for the cleanup process to complete and click Delete Files when prompted.nnNote: It is recommended to review the files before deleting them to ensure none of them are important or critical to the system. It is also recommended to perform regular cleaning of unnecessary files to maintain optimal system performance.»}}]}