Содержание
- Вариант 1: Удаление Grub в MBR
- Способ 1: «Командная строка» в WinPE
- Способ 2: Сторонние программы
- Вариант 2: Удаление Grub в UEFI
- Способ 1: Сторонние программы
- Способ 2: «Командная строка»
- Вопросы и ответы
Вариант 1: Удаление Grub в MBR
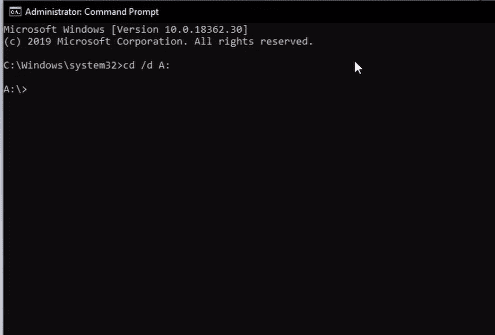
К удалению линуксового загрузчика Grub обычно приходится прибегать после удаления раздела с операционной системой Linux, установленной рядом с Windows 10. Если на жестком диске используется таблица разделов MBR, для удаления загрузчика Grub можно воспользоваться следующими двумя способами.
Способ 1: «Командная строка» в WinPE
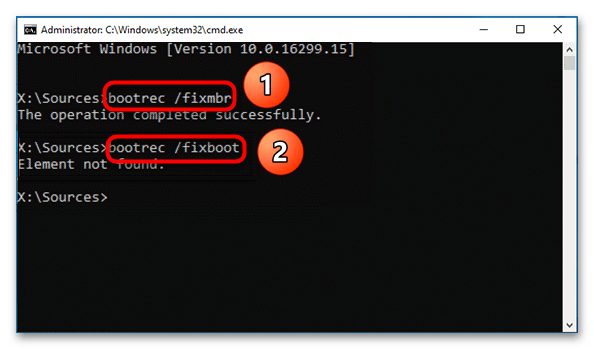
- Загрузите компьютер с установочной флешки Windows, а когда на экране появится окно мастера-установщика, нажмите комбинацию клавиш Shift + F10, чтобы вызвать «Командную строку».
- Выполните в открывшейся консоли одну за другой команды
bootrec /fixbootиbootec /fixmbr. - Закройте «Командную строку», выйдите из программы-установщика и загрузите компьютер в обычном режиме.

Способ 2: Сторонние программы
Гораздо более простым способом является использование бесплатной сторонней утилиты Bootice, позволяющий удалить загрузчик Grub без входа в режим восстановления и перезагрузки компьютера.
Скачать Bootice с официального сайта
- Скачайте утилиту с сайта разработчика и запустите. Поскольку сайт Bootice на китайском языке, либо используйте переводчик, либо ищите утилиту на сторонних сайтах.
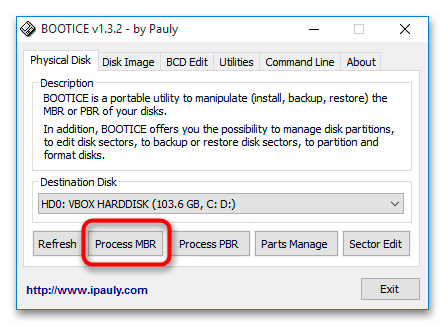
- В окне утилиты на вкладке «Physical Disk» из выпадающего списка выберите накопитель с загрузчиком Grub (если физических дисков несколько) и нажмите кнопку «Proccess MBR».
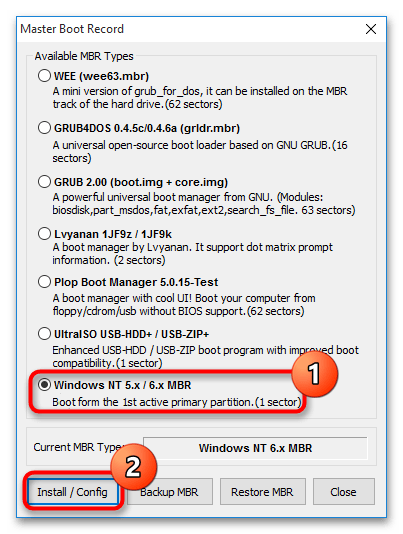
- Откроется окно мастера выбора типа загрузочной записи. Выберите в нем опцию «Windows NT 5.x / 6.x MBR» и нажмите кнопку «Install / Config».
- Подтвердите запись нажатием в открывшемся диалоговом окошке кнопки «Windows NT 6.x MBR».
- Нажмите «OK» в окошке с уведомлением об успехе операции.

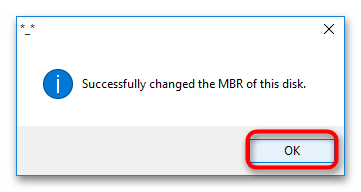
Чтобы проверить корректность удаления линуксового загрузчика, перезагрузите Windows 10.
Вариант 2: Удаление Grub в UEFI
Процедура удаление загрузчика Grub на компьютере с жестким диском GPT и на базе UEFI немного отличается и имеет свои особенности.
Способ 1: Сторонние программы
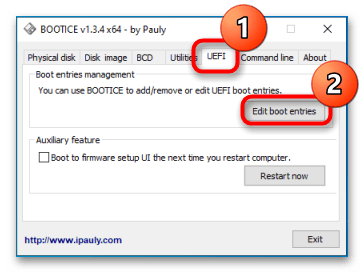
Проще всего избавиться от загрузочной записи второй операционной системы с помощью уже упомянутой бесплатной утилиты Bootice.
- Скачав и запустив утилиту, переключитесь на вкладку «UEFI» и нажмите кнопку «Edit Boot entries».
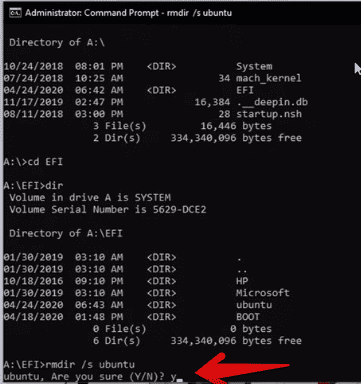
- В открывшемся окне выделите загрузчик Grub и нажмите кнопку «Del». Как правило, он имеет название второй операционной системы Linux и располагается в самом верху списка.
- Закройте окно утилиты и перезагрузите компьютер.
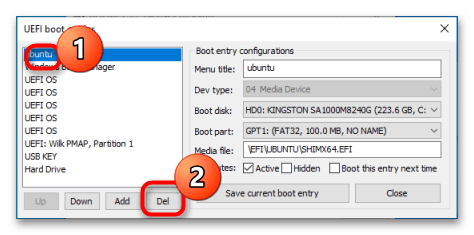
К сожалению, данный способ имеет один недостаток. Он удаляет лишь загрузочную запись, однако физически файлы загрузчика остаются на накопителе. Если их нужно удалить полностью, используйте следующий вариант.
Способ 2: «Командная строка»
Способ не слишком сложный, однако он требует внимания и последовательности. Используйте его, если хотите удалить загрузочные файлы UEFI физически.
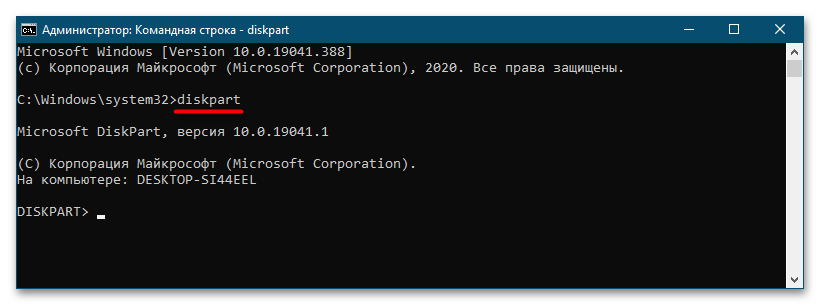
- Откройте «Командную строку» от имени администратора из поиска Windows или другим способом.
- Запустите встроенную утилиту управления дисками и разделами командой
diskpart. - Командой
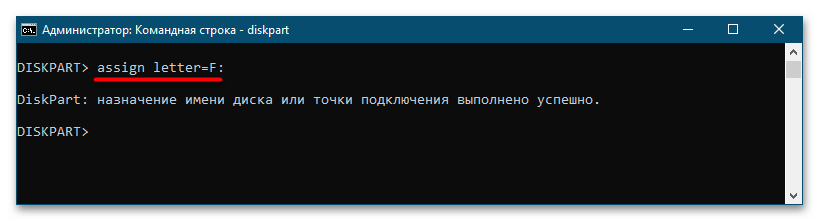
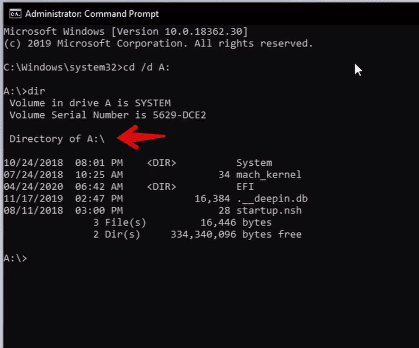
list volвыведите список разделов на дисках, после чего выберите раздел с файлами EFI, используя для этого командуsel vol №. Найти его нетрудно: он имеет файловую систему FAT32, тип «Системный» и небольшой размер в пределах 100 МБ. Исключение составляют жесткие диски расширенного формата 4K Native, на которых размер раздела EFI составляет 260 МБ. - Так как EFI-раздел не имеет буквы, чтобы работать с ним дальше, присвойте ему литеру командой
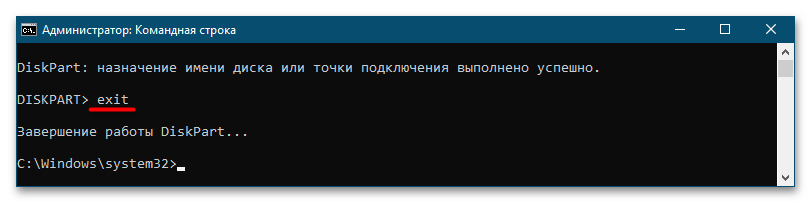
assign letter=F:. Буква может быть любой незанятой. - Выйдите из «Diskpart» командой
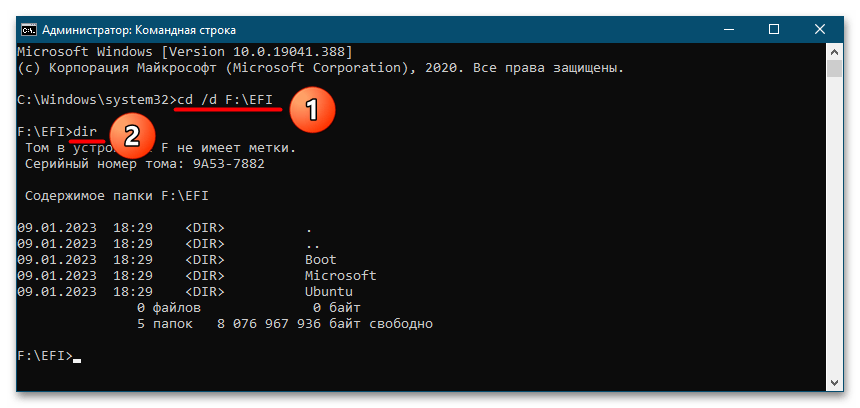
exit. - Перейдите в расположение каталога EFI на диске, для чего выполните команду
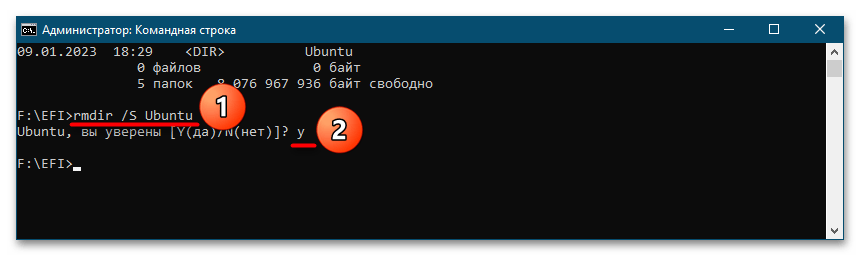
cd /d F:\EFI, а затем выведите ее содержимое командойdir. - Удалите каталог с названием операционной системы, использующей загрузчик Grub. В данном примере это папка Ubuntu. Удаление выполняется командой
rmdir /S Ubuntu. Чтобы подтвердить удаление, введите Y и нажмите клавишу ввода.


Готово. На этом удаление загрузчика Grub из Windows 10 можно считать завершенным.
Еще статьи по данной теме:
Помогла ли Вам статья?
If you are one of those frustrated users who is searching for how to remove grub loader files from Windows 10/11 then you are in the right place! Guess what? You can do it without cd. Many users want to install both Ubuntu and Windows on their computer systems as we know that these both are different Operating System OS for a Computer. I have tried several times to install both of these OS on the same PC, but due to some reasons I always fail to do it.
After these failed attempts, I came to know that these failed attempts might be occurring because of the GRUB folder which can be found in the Boot EFI folder. I deleted the Ubuntu folder from the Boot EFI folder, to complete the installation. Unfortunately, it didn’t work for me.
So, I tried another technique or method on “How to delete GRUB files in a Windows 10/11 Boot EFI Partition.” It can be done by using Microsoft Windows 10/11 by using the command line. In this article, I am going to tell you how you can apply this method. In the previous guide, we talked about how to install the software in Kali Linux.
Before we begin with our primary topic, the first thing that we are going to do is discuss EFI Partition. EFI Partition system (also known as ESP) is a partition that is OS independent which also acts as a storage place for the EFI applications, bootloaders, and drivers to be started and used by the UEFI firmware.
The UEFI specification orders to provide support for the FAT32, FA16, and FAT12 file systems. The additional file systems can be supported by any conformant vendor optionally. Just like Apple Mac can support the HFS+ file system.
What is Grub and Grub Loader?
GRUB which is also known as Grand Unified Bootloader is a boot loader package that is created or developed by GNU Project. It is a reference exercise or implementation of Multi-Boot Specification which provides its user with a service. That service is a beneficial choice that depends upon the users of this software. This choice is about booting one or multiple Operating Systems (OS) which are installed on a single computer system. The user can also select a particular kernel configuration that is available on specific partitions of an operating system.
GRUB is software that was programmed or developed from a package which is known as Grand Unified Bootloader. It is broadly used for Unix-like systems. The Operating System of GNU uses or works with GNU GRUB as a boot loader, just like most Solaris OS and other Linux Distributions. The Solaris operating system is available for x86 based systems, with its first starting release named Solaris 10 1/06 release.
Linux Hardening Guide: How to Secure Linux Server and Keep it Safe from Hackers.
What is a Grub File?
GRUB is designed to boot an expanded range of Operating Systems which are arising out of file systems of wide range as it is a boot loader. The number of possible root file-systems is increasing which reside upon Linux and due to this file-system GRUB is becoming really popular these days. Grub is permanently documented in an info file of GNU.
How to Delete Grub from Windows 10/11 (Using Command Line)
As I have discussed above the GRUB and about the GRUB files after we also talked about their purpose and working. So now I am going to explain to you about deleting GRUB files from Windows 10/11 with the help of Command-Line which is available in Windows.
The first thing that you have to do is work on the Command-Line and search for all of the available hard drives or partitions available on PC. Then after listing all of the available partitions on the hard drive of your PC you have to target a folder that consists of GRUB files.
Another reason for deleting this folder is that you won’t have to delete the Linux Partitions. Which would not delete the GRUB files automatically from the Boot EFI folder?
Now let’s get started and get rid of these GRUB files. The first step that you have to do is click on start and then move your mouse to the Menu and click it. Then after that, you have to type CMD in the search or run the bar. Then the next thing that you have to do is right-click on the icon of the application and then select the option “run as administrator.”
Read Also: Best Windows 7 Themes 2022 Free Download.
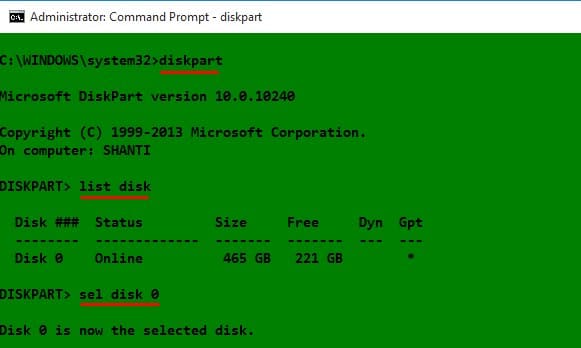
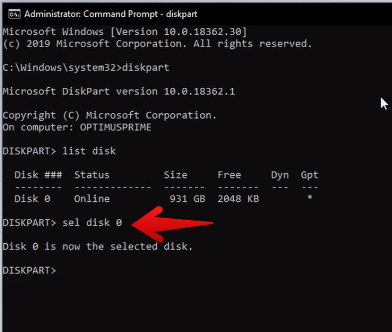
In the 1st image or figure, I have underlined some commands which are used to achieve or complete the first step, such as: selecting and listing the hard drive. The target disk (disk from which we are going to delete GRUB files) is of 465 GB hard drive which consists of GPT partition.
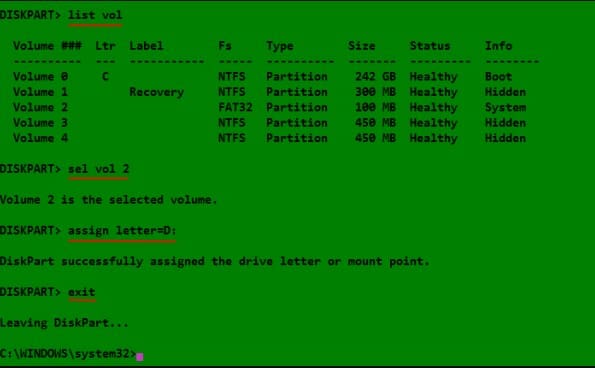
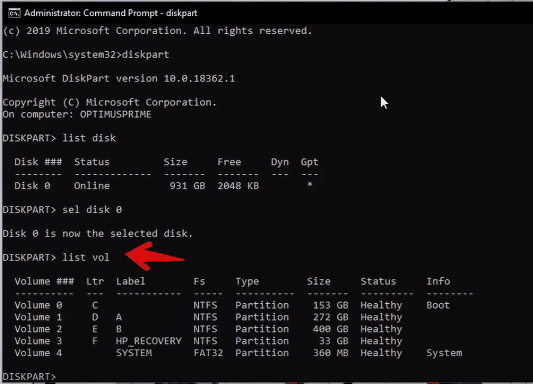
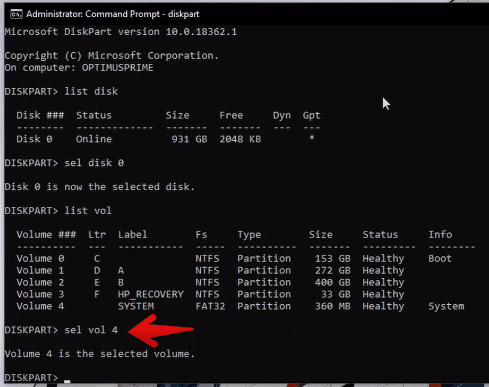
Once you have selected the target disk, then all of its partitions will be listed in the CMD, now you can identify the partition or volume which corresponds to the Boot EFI folder. In the 2nd figure, the partition in which our GRUB files are present is Volume 2. The type of this single volume is mostly “FAT32” in the File System Fs column and it is denoted as System in the column named Info.
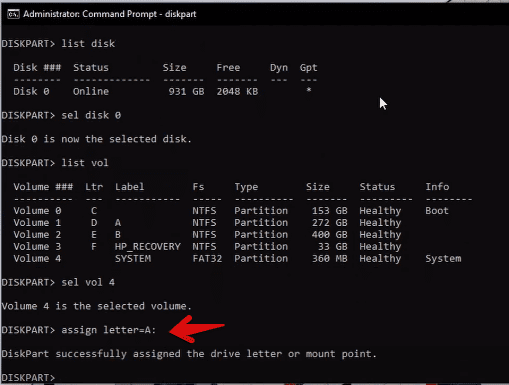
Once this partition has been selected and identified, then the next step that you have to perform is to assign a drive letter because it makes it really easy and straightforward to work. I have entrusted my disk or partition with the D letter.
Read Also: Commando VM – Windows 10 Based Hacking OS.
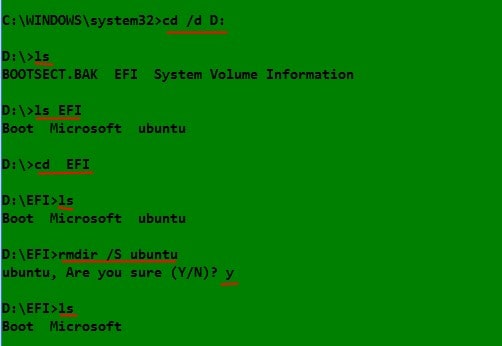
The last step is the most important step and this step is the essential full stop to all of this process. This final or previous step requires some changes to the Boot EFI folder, it will again list its contents, but this time it is going to identify the folder which contains GRUB files. These GRUB files will be available or installed under or in the folder with an identical name same as the distribution.
Also Read: Top 6 GNOME Desktop Environments for Linux Distros.
As an illustration, if Ubuntu has been installed just like the example, then the folder name in which there are GRUB files will be of the name “Ubuntu” same as the distribution. Then the next step that you have to perform is to delete the folder by entering or using the following command “rmdir/s.” This command in Windows is equivalent of the Linux/Unix rm or –r command.
Now I am going to write the code which you can copy from here and paste it into your Command Prompt or CMD and run it to delete GRUB files from your PC.
The code which is required to be entered in CMD to remove grub from Windows 10:
The following commands are used or required to select and identify the hard drive:
- diskpart
- list disk
- self disk
These following commands are required or used to select the Boot EFI partition, list the partitions:
Read Also: 10 Best Android Emulators for Linux Distros – Run Android on Linux.
First, assign the partition with any drive letter.
- list vol
- sel vol 2
- assign letter=D;
- exit
These following commands are required to open or select the Boot EFI folder and then locate and delete the GRUB folder
- Cd /d D:
- Ls
- lsEFI
- cd EFI
- ls
- rmdir /s Ubuntu
Another working fix:
There is another fix that has been suggested to me by one of our readers below:
- You will need to start “cmd” first of all.
- Once in command prompt run “diskpart”
- Next, you will need to type “list disk”
- Now run “sel disk XYZ”, where XYZ is your drive
- Now it is time to select the EFI volume
- For selecting the volume type “sel volume XYZ”
- Now type “exit” so you can stop diskpart
- Now open the back command prompt and type “XYZ:” and hit enter
- Now you will need to enter “dir” so you can list all the directors which are mounted in that volume, in our case its “XYZ”.
- Now you will need to change directory to EFI, and do rmdir /S ubuntu.
You can find more information about the above steps here.
The method above has been tested on the latest Windows 10 builds including 1909, 2004 and 20H2.
More Linux Guides to enhance your knowledge:
- 10 Useful Ubuntu Commands for Every Linux Beginner.
- 8 Best Kali Linux Terminal Commands used for Hacking.
Wrapping Up
In today’s tutorial, we discussed a very interesting topic that is very useful for the user who wants to install Windows 10 and Ubuntu in a single computer system without any problems. The topic which we discussed was “Deleting GRUB files from a Boot EFI partition in Windows 10/11”. However, no matter what version of Windows you are running make sure it is activated. You can read on how to activate Windows 10 for a lifetime using just CMD. The above guide will help you in removing grub rescue too without a cd.
I have tried several times to delete the GRUB files from my PC because I was really excited to install two different OS on a single computer system. But whenever I tried to do it there were some errors which I had to face. But now I found a way to install it by deleting these GRUB files. In this article, I explained to you what is GRUB and I also described the history of GRUB. Then furthermore we discussed the GRUB files and their importance and usage. After that, I showed you a way to delete all do these GRUB files from Windows 10/11 using CMD.
How To Remove GRUB for Windows 10 Bootloader
If you’ve installed Ubuntu or any Other Linux based OS along with Windows 10, Grub Bootloader is also installed along with it to boot the OS. Grub Bootloader lets you Boot the OS along with Windows 10.
After uninstall Ubuntu or any other Linux Based OS Grub Bootloader remains installed. You can Uninstall and Remove Grub Bootloader from Windows 10. Once you’ve done this, Grub Bootloader will no longer available on your computer.
1. Type Windows Key + R to open Run box and type cmd inside it.
2. type diskpart in cmd window and click yes when prompted.
3. This will opens the new window
4. Type command «list vol» this will show you all the disk volume. one of this will be EFI/System volume, it will always in FAT32 format
5. Select the volume by «Select Volume X» command where X will be replaced by volume number or EFI/System volume.
7. Assign the letter to volume using «Assign Letter=X» command, where x will be replaced by any letter. For convenience I’m assigning letter Z. Type «Exit» command to close the window after assigning the letter.
8. Now Open Command Prompt as an Administration. If prompted press Yes.
9. Type «Z:» command to access the EFI drive.
10. Type the command «dir» to find the directory inside the drive.
11. Now type «cd EFI» command to go inside the EFI directory.
12. Type «dir» to view the directory the directory inside. There will be more than 2 directory one will be Microsoft, second will Boot and third will be the OS directory that was uninstalled it may be Ubuntu if you uninstalled ubuntu. In my case the third directory is Android.
13. Type «rmdir /s OSNAME» command, where OSNAME will be replaced by your OSNAME, to delete the GRUB bootloader from your computer. If prompted press Y.
14. Exit the command prompt and restart the computer the GRUB bootloader is not longer available.
To see the complete tutorial watch video
Before we start talking about removing grub from Windows, let us start by understanding what grub is. Grub stands for GRand Unified Boot-loader. It is a boot loader package that supports the installation of different operating systems on the same computer. We can also say that this is the first program your computer runs whenever it starts.
If you install a Linux distro, for instance, Ubuntu alongside Windows, the grub boot loader also gets installed, allowing you to choose the operating system would wish to boot.
Grub Bootloader
If grub lacks the grub folder, you might get some of the errors as shown below:
Sample 1
error: no such partition.
Entering rescue mode…
grub rescue > _
Sample 2
error: unknown filesystem.
grub rescue > _
Causes of Grub rescue
Grub rescue means the grub files are corrupted, and you can no longer boot into your operating system. You simply need to “rescue” the grub boot-loader. Some of the causes of these errors occur due to deleting the Linux partition and forgetting to update the bootloader. Secondly, this might occur in the scenario where one is installing Windows after installing Linux. This is not the recommended method to dual-boot a PC. Windows initiates its own Master Boot Record. The grub is no longer available, and you will be unable to boot from Linux/Ubuntu.
With that said, to avoid getting the “grub rescue”, let’s look at how to remove grub from windows 10 after uninstalling the Linux operating system.
Removing grub from Windows 10
The first thing you want to do is open the “command prompt”. You can do this by clicking the start button and typing ‘command prompt’, it should come at the top, right-click and select ‘Run as administrator.
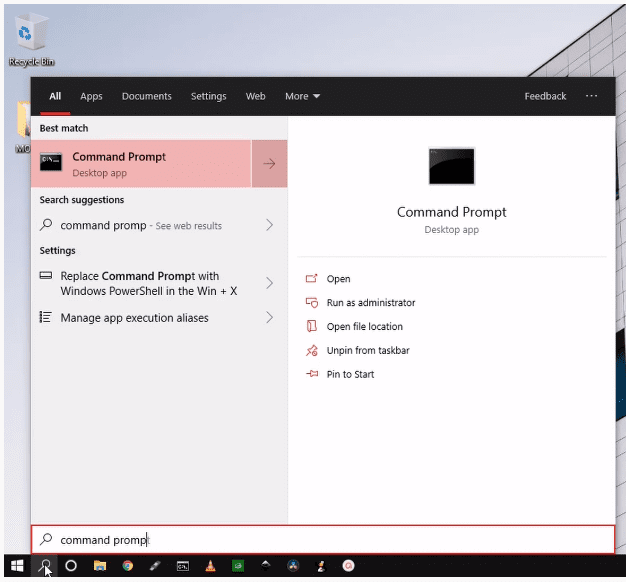
Command search
You can also achieve this by pressing Windows key + R simultaneously, which pens the run box. Type in “cmd”
Command Prompt Administrator
Now that the command prompt is open, we will use some commands to achieve what we desire. Let’s get to it.
In the first command, in the command prompt, type ‘diskpart’ and press Enter, as shown below. This command lets you manage disk partitions or volumes in windows. We intend to do just that.
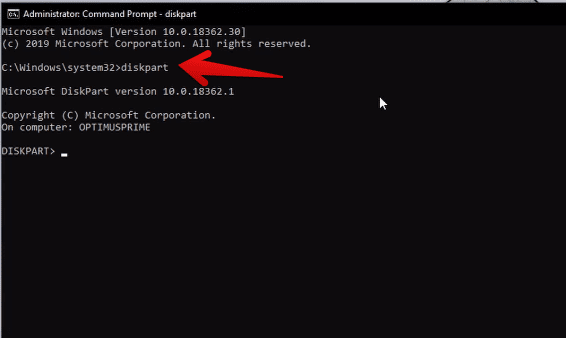
Diskpart
The second command is ‘list disk’. This command lists all the volumes installed on your computer. Type ‘list disk’ as shown below and press Enter after.
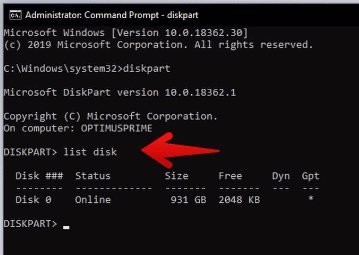
List disk partitions
The next command is ‘select disk’. This command lets you select the disk or partition you want to manage from the list of your disks. In our case, we have only one disk on the list, disk 0. This means we only have one disk installed on our computer: type ‘select disk 0’ and press Enter.
Select Disk
List Volume
The next command is ‘list vol’. These commands list all the volumes in the selected disk. Some people would think ‘list disk’ and ‘list vol’ are the same commands, but they are not. When you refer to ‘disk,’ it is the whole storage device and cannot shrink or expand. ‘Volumes’ are partitions of a disk. A disk, therefore, can have several volumes. Volumes can shrink and expand. So, type ‘list vol’ and press Enter.
From the list of volumes, you can see volume 4 has the label ‘System. You will also note that all the other partitions are in NTFS, but this is an EFI/system volume; hence it’s always in FAT32 format. This is the volume that has Grub boot loader, and this is why you have to select this volume in the next step. So, type ‘select vol 4’ and press Enter.
Select specific partition
Now that we have a volume selected, we want to assign a letter of the alphabet to manage it using an easier name easily. So, in the command prompt, type ‘assign letter=A:’ and press Enter.
Assign letter
Exit the command prompt and open it again as administrator.
This time, we are using different commands. The first command is ‘cd /d A:’ or just “A:” to access the EFI drive. This is just selecting the path of the volume we assigned a letter to—press Enter.
Cd to assigned letter
The command is ‘dir’ which basically displays details about the volume we selected and assigned a letter. You should have results similar to mine below. Type ‘dir’ in the command prompt and press Enter.
dir command and file system
If you have more partitions, you can then type in “cd EFI” to go inside the EFI directory and then “dir” to view the directory inside. You will get more than one directory, one been for Ubuntu, second for Microsoft Windows.
The second last command is ‘rmdir /s’. This command removes all directories and files in the selected volume, in our case ‘volume A’, in addition to the directory itself. Therefore in our command prompt, type ‘rmdir /s ubuntu and press Enter. If it is another operating system listed, make sure to type the label there instead of Ubuntu. Remember Ubuntu is the operating system I installed to duo boot with windows. So I am specifying to remove it from my volumes.
Remove Ubuntu
Lastly, you will be asked if you are sure. This is to confirm if you really want to remove everything from the volume specified, that is, volume A, and you have to say ‘yes’ by typing ‘Y’ and pressing Enter as shown below.
Conclusion
In this tutorial, we have discussed how to remove grub from Windows 10. Users assume that all is done, and their PC is back to normal after deleting the Linux partition, but that is not the case. They actually deleted the Linux partition but not the grub bootloader.
На чтение 2 мин Опубликовано
У моего ноутбука Razer 2016 были установлены Windows 10, Kali и Ubuntu, но после того, как обновление Windows стало недоступным, разделы Linux стали недоступными также.
Я удалил разделы Kali и Ubuntu, включая SWAP, но GRUB там был.
Мне нужно было безопасно удалить GRUB, не нарушая зависимости, и для меня работал следующий метод удаления загрузчика GRUB из Windows 10.
Он также работает на Windows 7.
Я использовал его до сих пор 2/3 раза с прошлого года на моем ноутбуке под управлением Windows 10 несколько раз, и он никогда не падал.
У меня отключена Secure boot, и я использую загрузку Legacy в BIOS.
Содержание
- Удалить загрузчик GRUB из Windows
- Шаг 1 (необязательно): используйте diskpart для очистки диска
- Шаг 2. Запуск командной строки администратора.
- Шаг 3: Исправьте загрузочный сектор MBR на Windows 10
Удалить загрузчик GRUB из Windows
Выполните следующие шаги, чтобы удалить GRUB из Windows 10.
Шаг 1 (необязательно): используйте diskpart для очистки диска
Отформатируйте свой раздел Linux с помощью инструмента управления дисками Windows.
Затем вы можете увеличить размер диска на своем основном разделе (т. Е. C :), чтобы утвердить это пространство.
Если вы сделаете этот шаг, безопаснее будет сделать перезагрузку после того, как вы это сделали.
Шаг 2. Запуск командной строки администратора.
В Windows 10, Windows 8.1 и Windows 7 найдите команду и просто щелкните правой кнопкой мыши на значок командной строки из результатов поиска и выберите «Запуск от имени администратора».
Не используйте Powershell, поскольку PS не работает для нескольких команд.
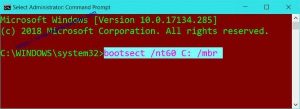
Шаг 3: Исправьте загрузочный сектор MBR на Windows 10
Просто введите следующую команду, чтобы удалить загрузчик GRUB из bootsector на MBR и вернуться к загрузчику Windows. В командной строке (администратор):
C:\> bootsect /nt60 <drive name>: /mbr
Если ваш диск C: \ эта команда будет такой:
C:\> bootsect /nt60 C: /mbr
Пожалуйста, не спамьте и никого не оскорбляйте.
Это поле для комментариев, а не спамбокс.
Рекламные ссылки не индексируются!