Вы можете использовать встроенный OpenSSH сервер в Windows для проброса портов через SSH-туннель (SSH туннелирования). Перенаправление портов в SSH позволяет туннелировать (пробрасывать) порты приложений с локального компьютера на удаленный сервер и наоборот. Проброс портов через SSH туннель широко используется в среде Linux/Unix, а теперь вы можете воспользоваться этим возможностями и в Windows. В этом примере мы покажем, как пробросить RDP подключение через OpenSSH на хосте Windows Server.
Содержание:
- Для чего нужны SSH-туннели?
- Защищенный доступ к RDP через SSH туннель (local TCP forwarding)
- SSH туннель в Windows с помощью Putty
- Переброс удаленного порта на локальную машину (Remote TCP forwarding)
Для чего нужны SSH-туннели?
SSH-туннель обеспечивает защищенное шифрованный TCP соединение локальных хостом и удалённым сервером SSH. SSH Port Forwarding позволяет туннелировать поверх SSH подключение к локальному порту на локальном компьютере к любому TCP порту на удаленном сервере (или наоборот)
Порт форвардинг в SSH-туннелях применяются для:
- Обхода межсетевых экранов;
- Открытия бэкдоров в частные сети;
- Организации простых VPN/прокси сценариев для безопасного удаленного подключения;
- Защиты трафика устаревших приложений (протоколов), которые передают данные в открытом тексте (без шифрования).
Вы можете перенаправить в SSH туннель только TCP трафик/порт (UDP и ICMP протоколы не поддерживаются).
Проброс портов через SSH туннель можно использовать в сценариях, когда нужно подключиться к удаленному компьютеру, который защищен межсетевым экраном. Например, у вас имеется сервер c Windows, на котором наружу открыт только SSH порт (TCP 22). Все остальные порты блокируются аппаратным межсетевым экраном или Windows Defender Firewall Windows. Ваша задача подключиться к рабочему столу этого Windows сервера с помощью клиента RDP. Казалось бы, невозможная задача, т.к. порт RDP 3389 блокируется брандмауэром. Однако вы можете получить доступ к любому открытому порты на удаленном хосте через SSH-тунель.
Чаще всего используются следующие сценарии проброса через SSH:
- Local TCP forwarding — проброс локального порта на удаленный сервер;
- Remote TCP forwarding — проброс удаленного порта на локальный компьютер;
- Двойной SSH туннель – позволяет соединить между собой через SSH сервер компьютеры без выделенных белых IP адресов или находящиеся за NAT (если не подходит решение с OpenVPN)
Защищенный доступ к RDP через SSH туннель (local TCP forwarding)
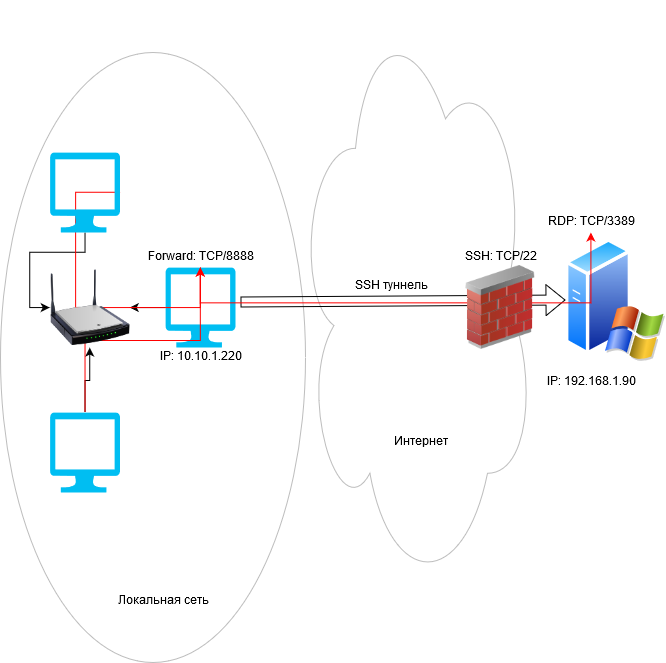
В этом режиме вы создаете на своем компьютере локальный TCP порт, подключения к которому перенаправляются через SSH туннель на указанный порт удаленного сервера. В этом примере мы создадим локальный порт 8888, при подключении к которому выполняется перенаправление на RDP порт 3389 на удаленном компьютере. Общая схема подключения выглядит так:
Для проброса портов нам потребуется SSH клиент. Можно использовать сторонний клиент (например, Putty), но я буду использовать встроенный SSH клиент в Windows. Чтобы установить клиенте OpenSSH, выполните в консоли PowerShell команду:
Get-WindowsCapability -Online | ? Name -like 'OpenSSH.Client*'
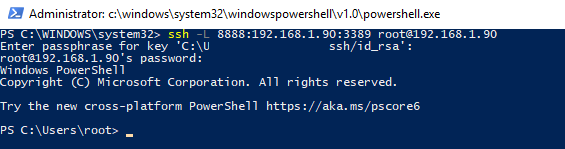
Чтобы создать SSH туннель с удаленным компьютером 192.168.1.90, выполните команду:
ssh -L 8888:192.168.1.90:3389 [email protected]
В этом примере используется формат
LOCAL_PORT:DESTINATION:DESTINATION_PORT
и
USER@DEST_SERVER_IP
(имя пользователя и адрес удаленного SSH сервера)
Чтобы SSH туннель работал в фоновом режиме, нужно добавит параметр –f.
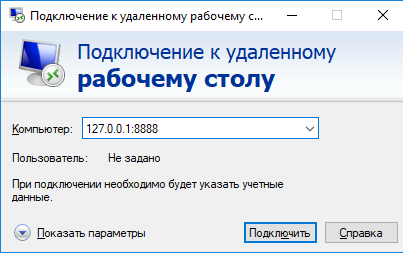
Теперь, чтобы подключится к удаленному компьютеру по RDP через SSH туннель, вам запустить RDP-клиент (mstsc.exe) и подключиться на локальный порт 8888 своего компьютера:
127.0.0.1:8888
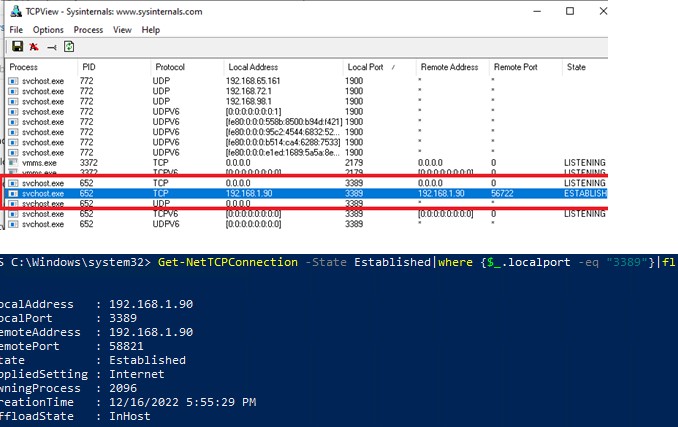
Выполните аутентификацию на удаленном компьютере и можете спокойно работать в RDP-сессии. С помощью команды Get-NetTCPConnection или утилиты TCPView вы можете убедиться, что RDP подключение установлено локально (RDP подключение инициировано запущенным локально SSH сервером):
Get-NetTCPConnection -State Established|where {$_.localport -eq "3389"}|fl
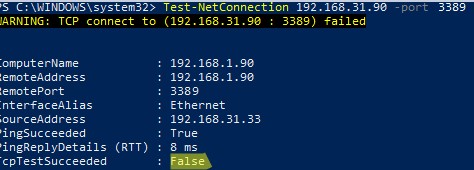
При этом порт TCP/3389 на сервере не доступен с удаленного компьютера. Вы можете проверить доступность порта с помощью командлета Test-NetConnection:
Test-NetConnection 192.168.1.90 -port 3389
TcpTestSucceeded : False
Обратите внимание, что если вы перенаправляете таким образом незашифрованный трафик приложения, то по сети он передается в зашифрованном виде. Трафик шифруется на одном конце SSH соединения и расшифровывается на другом.
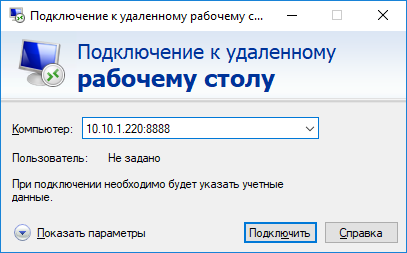
Другие компьютеры в вашей локальной сети смогут одновременно подключиться к удаленному RDP серверу Windows, даже если у них полностью заблокирован прямой доступ к удаленному серверу (как по SSH, так и по RDP). Для этого, они должны подключиться RDP клиентом к порту 8888 на компьютере, на котором создан SSH туннель:
mstsc.exe /v 10.10.1.220:8888
Защита RDP подключения с помощью SSH туннеля может быть хорошей альтернативой VPN для доступа к публичным Windows хостам в Интернете. В этом случае вам не нужно открывать прямой доступ к порту RDP/3389 из Интернета к хосту Windows. Достаточно открыть только порт SSH/22, что защитит вас от атак подбора пароля по RDP и эксплуатации 0-day RDP уязвимостей.
Для автоматического ввода пароля для подключения к SSH можно использовать утилиту sshpass. Ее можно запустить через подсистему WSL2 для Windows.
Установите sshpass в Ubuntu WSL:
$ sudo apt-get -y install ssphass
Запустите клиент Remote Desktop Connection (mstsc.exe) и сохраните в Windows RDP файл с настройками подключения:
Computer : localhost:8888
User name : remoteusername
Для автоматического подключения к удаленном RDP хосту с сохранённым паролем SSH, используйте такой bat файл:
start /min wsl sshpass -p "password" ssh -L 8888:192.168.31.90:3389 [email protected]
powershell sleep 5
start mstsc C:\rdp\localhost-33389.rdp
Или (предпочтительно) настройте SSH аутентификацию по ключам.
SSH туннель в Windows с помощью Putty
Рассмотрим, как настроить SSH туннель в Windows с помощью популярного SSH клиента Putty.
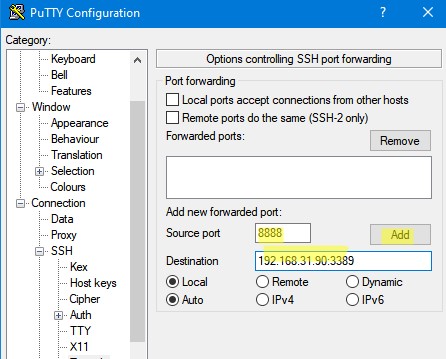
- Запустите PuTTY и перейдите в раздел Connection -> SSH -> Tunnels;
- В поле Source port укажите локального порта (в нашем примере это 8888);
- Укажите IP адрес сервера SSH и порт на удаленном хосте, на который нужно выполнить переадресацию:
192.168.31.90:3389 - Выберите Local в качестве Destination и нажмите Add;

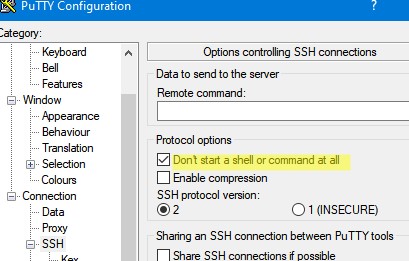
- Чтобы не открывать shell удаленного хоста при подключении через туннель, включите опцию Don’t start a shell or command at all в разделе SSH;

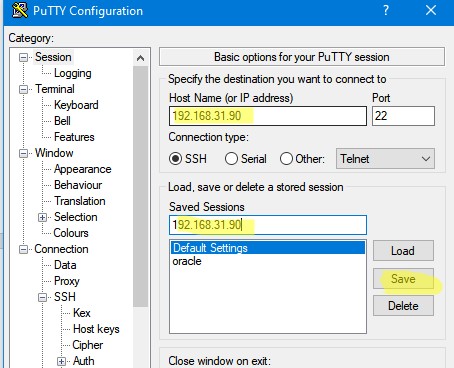
- Вернитесь на вкладку Session, укажите имя или IP адрес удаленного SSH хоста и порт подключения (по умолчанию порт 22). Чтобы сохранить настройки подключения, укажите имя сессии в поле Saved Session и нажмите Save;

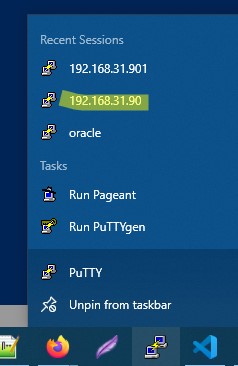
- Теперь вы можете запустить сохраненный SSH туннель в Putty прямо и панели задач Windows.

Переброс удаленного порта на локальную машину (Remote TCP forwarding)
Есть еще один вариант применения SSH туннеля – remote TCP forwarding. Через SSH туннель вы можете открыть доступ удаленному серверу к локальному порту на вашем компьютере или порту на другом компьютере в вашей локальной сети. Например, вы хотите, чтобы внешний сервер (192.168.1.90) получил доступ к вашему Интранет сайту (не опубликованному в Интернете). Для создания обратного туннеля, используйте такую команду:
ssh -R 8080:internalwebsever:80 [email protected]
Теперь, чтобы на удаленном SSH сервер получить доступ к веб серверу internalwebsever достаточно в браузере набрать адрес
http://localhost:8080
.
С помощью SSH туннелей вы можете строить целые цепочки для форвардинга портов. Включить или отключить SSH туннелирование можно в конфигурационном файле OpenSSH (sshd_config) с помощью директив:
AllowStreamLocalForwarding yes
AllowTcpForwarding remote
PermitTunnel no
Данные опции неприменимы для текущей версии OpenSSH в Windows.
How to tunnel Remote Desktop over SSH with PuTTY? Have you ever been in a situation where you needed to perform remote administration on a Windows Server, and the RDP port 3389 is blocked on a firewall? You can tunnel RDP over SSH with PuTTY. This particularly comes in handy when there is no VPN available to the remote network…
Proxy connections with SSH
SSH can proxy connections both forward and backwards. It creates a secure connection between a local computer and a remote machine through which services can be relayed. Because the connection is encrypted, SSH tunneling is useful for transmitting information that uses an unencrypted protocol, such as IMAP, VNC, or IRC. And RDP 
SSH can proxy connections both forward and backwards, by opening a port on either the local machine running the SSH client, or the remote SSH server. If you have privileges to do so of course.
For example, if you want to connect to a remote host on RDP port 3389, but you don’t have direct access to reach that machine because of firewall or network restrictions, the SSH client can listen on a local port and pretend that it is the remote machine. All connections to that port will be sent through the SSH server to the remote host.
Reconfigure PuTTY for Remote Desktop Protocol (RDP) tunneling through ssh
To tunnel Remote Desktop Protocol over ssh using PuTTY, all you need is an account on the premises. For example a firewall or Linux server with ssh access, and PuTTY on your Windows desktop. PuTTY is a nifty ssh client for Windows that you can download here.
For Windows, PuTTY is the de-facto standard SSH client.
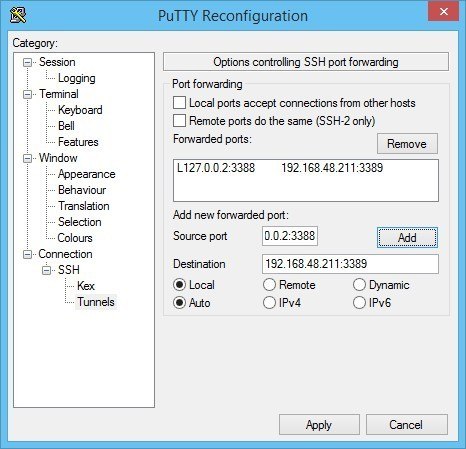
Once you are connected to your remote network with ssh/PuTTY, you need to reconfigure the connection to support SSH-tunneling. In the PuTTY Reconfiguration screen, go to Connection → SSH → Tunnels. This is where we can set up an SSH tunnel for Remote Desktop.
Under Source port, add your local IP address and port. Because the RDP 6+ client in Windows has issues with the loopback to TCP Port 3390, you need to use a different port. I use TCP port 3388 on IP address 127.0.0.2, and my remote internal IP address and RDP port 3389 as Destination (192.168.48.211:3389). See the image:
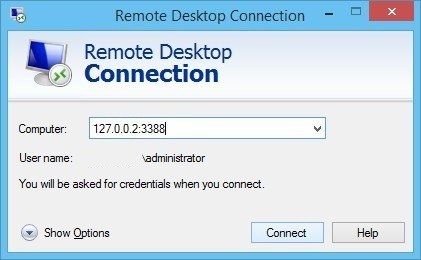
After clicking Apply, the SSH-tunnel for remote desktop is active, and you can connect the Remote Desktop Connection to 127.0.0.2:3388:
For Windows, PuTTY is the de-facto standard SSH client.
Tunnel RDP using OpenSSH and PowerShell in Windows 10
If you have the OpenSSH client installed in Windows 11/10, then you can use a command similar to Linux’ ssh tunnel:
ssh -N -L 13389:[Windows Server RDP address]:3389 [address ssh server] -l [ssh username]To ease the usage, I wrapped in a PowerShell script, that connects to my on-premises stepping-stone host with ssh:
$remHost = (Read-host -Prompt ("RDP host: "))
Write-Output "Setting up an SSH RDP tunnel with ${remHost}"
Start-Process ssh -ArgumentList "-N -L 13389:${remHost}:3389 -l [ssh username] steppingstone-host.example" -Verb open
[void](Read-Host 'Press Enter to continue...')
&mstsc /V:localhost:13389 /w:800 /h:600 /prompt
Use this PowerShell one-liner to verify whether OpenSSH client is installed on your Windows 10 system. It should print Installed.
(Get-WindowsCapability -Online | ? Name -like 'OpenSSH.Client*').StateYou find more ssh tips in my post Windows 11/10 and WSL 2 DevOps environment.
How to tunnel Windows Remote Desktop (RDP) through ssh on Linux
When you are in a situation where you are on a Linux work station and need to tunnel RDP through ssh in Linux, you can use the following ssh port forwarding, or tunnel (assuming you have an on-premise Linux server to SSH into to set up the port forward):
ssh port forwarding / tunnel set-up for RDP
ssh -N -L 13389:[Windows Server RDP address]:3389 [address ssh server] -l [ssh username]Now you can connect your RDP client to 127.0.0.1:13389 as if it were the remote server.
Some Remote Desktop clients for Linux are:
- KRDC – KRDC is a client application that allows you to view or even control the desktop session on another machine that is running a compatible server. VNC and RDP is supported
- Remmina – A feature rich Remote Desktop Application for Linux and other Unixes
- rdesktop – rdesktop is an open source UNIX client for connecting to Windows Remote Desktop Services, capably of natively speaking Remote Desktop Protocol (RDP) in order to present the user’s Windows desktop
- xfreerdp – FreeRDP is a free implementation of the Remote Desktop Protocol (RDP), released under the Apache license
Or do you need to change port forwarding options in an existing ssh connection?
Tunnel ssh using sshuttle
Another great option is to tunnel ssh using sshuttle, on GNU/Linux. From its manpage:
sshuttle allows you to create a VPN connection from your machine to any remote server that you can connect to via ssh, as long as that server has python 2.3 or higher.
To work, you must have root access on the local machine, but you can have a normal account on the server.It’s valid to run sshuttle more than once simultaneously on a single client machine, connecting to a different server every time, so you can be on more than one VPN at once.
If run on a router, sshuttle can forward traffic for your entire subnet to the VPN.
If you have a hop (steppingstone) on-premises, you can use the following sshuttle example:
sshuttle -r [email protected] 192.168.0.0/16This’ll easily create a VPN (Virtual Private Network) connection from your machine to any remote server that you can connect to via ssh.
You need to connect to the server via SSH (for servers based on Linux) or via RDP (for servers based on Windows) to manage it remotely (for example, from your local computer).
Connection via SSH
SSH protocol is used to connect to the servers running Linux. SSH protocol allows you to securely manage the server over the network.
You can connect to the server:
- using login and password from the Control panel – in this case, each time you connect to the server, you need to enter your password;
- using a pair of generated SSH keys – in this case, you do not need to enter your password, the user is identified at the first connection. A key pair is used: the public key is hosted on the server, and the private key is stored on the user’s PC. Please note that you can connect to the server via SSH only from the computer where the private SSH key is stored.
The data specified on the Operating system tab of the server page in the Control panel are used to connect to the server:
- server’s public IP address (IP field);
rootlogin and password for accessing the system (Username and Password fields).
Connection via SSH on Linux / macOS
To connect to the server via SSH, run the following command in the terminal:
ssh root@<server IP>
Where server IP is server’s public IP address.
The system will request a password from the server, you need to enter it. If you have previously created a key pair, then you do not need to specify the password to connect to the server.
Connection via SSH on Windows
In Windows 10, the connection is the same as in Linux and macOS, but through the command line (cmd.exe).
In earlier versions of Windows, the server is connected using PuTTY:
- Launch PuTTY.
- Go to the Session tab. Enter the public IP address of the server in the Host Name field, enter 22 in the Port field.
- Specify the SSH connection type in the Connection type field.
- If you connect using the previously generated keys, go to the SSH — Auth tab, click Browse and select the file with a private key.
- Click Open to connect.
- Confirm the connection. In the opened console, specify the
rootlogin and password to log into the server. If you have previously created a key pair, then you do not need to specify a password to connect to the server.
Creating a Key Pair on Linux / macOS
To create a key pair:
- Open the terminal and run the command:
ssh-keygen -t rsa
- The following dialog will be displayed on the console:
Enter file in which to save the key (/home/user/.ssh/id_rsa):
Specify the name of the file where the keys will be saved, or use the default name and path `/.ssh/id_rsa`.
- The system will offer you to enter a passphrase for advanced protection of the SSH connection:
Enter passphrase (empty for no passphrase):
Enter same passphrase again:
You can skip this step.
- After that, a private (
~/.ssh/id_rsa) and public (~/.ssh/id_rsa.pub) key will be created. The following message will be displayed on the console:
Your identification has been saved in /home/user/.ssh/id_rsa.
Your public key has been saved in /home/user/.ssh/id_rsa.pub.
The key fingerprint is:
476:b2:a8:7f:08:b4:c0:af:81:25:7e:21:48:01:0e:98 user@localhost

The key's randomart image is:

+---[RSA 2048]----+
|      ..o   o    |
|      .. * * = . |
|     .  o O o B .|
|    . .  + = = o |
|     oo S o = . .|
|    .. B . = . . |
|   .  B   o =  ..|
|  . .o.o.. o .. .|
|   .oooE    o.   |
+----[SHA256]-----+
- To display the public key on the console, run the command:
cat ~/.ssh/id_rsa.pub
_Please note that `~/.ssh/id_rsa.pub` is the path to the file where the public key is stored. If you changed the path in step 2, specify it._
- Add the public key in the Selectel Сontrol panel. Click Change OS configuration on the Operating system tab of the server page and enter the key in the SSH public field.
After creating the keys, you can connect to the server without a password.
Creating a Key Pair on Windows
In Windows 10, you can create a key pair in the same way as in Linux and macOS, but through the command line (cmd.exe).
In earlier versions of Windows, the keys are generated using PuTTY:
- Install PuTTY and launch the PuTTYgen app.
- From the Type of key to generate menu, select the RSA key type and click Generate. Move the cursor around the screen until the keys are generated.
- After the key pair has been created, the public key will be displayed. Click Save public key and save it in a text file, for example, in a new file
id_rsa.pub. - Enter a passphrase for additional security in the Key passphrase field. You can skip this step.
- Click Save private key to save the private key.
- Add the public key in the Selectel Сontrol panel. Click Change OS configuration on the Operating system tab of the server page and enter the key in the SSH public field.
After creating the keys, you can connect to the server without a password.
Connection via RDP
RDP stands for Remote Desktop Protocol. RDP is used to remotely connect to servers running Microsoft Windows.
The remote desktop connection feature is available in Windows by default. You do not need to create specific keys.
The following data is used to connect to the server:
- public server IP address;
- login and password for accessing the system.
Connection via RDP on Windows
To connect to a Windows server via RDP:
- In the search box (Start menu), type Connect to remote desktop.
- Enter the public IP address of the server in the Computer field in the opened window.
- Click Connect.
- Enter your login and password.
- Press OK.
Connection via RDP on Linux
To connect via RDP through the terminal, run the command:
rdesktop <server IP> -u <user> -p <password>
Where:
server IPis the public IP address of your server;userandpasswordare the login and password.
Connection via RDP on macOS
To connect to a server:
- Install and run Microsoft Remote Desktop.
- Click +. In the PC name field, enter the public IP address, in the Username and Password fields, enter your username and password.
- Click Save and save your changes.
- To connect to a remote server, double-click on the created connection in the list.
NOTE: If you’re not yet using Windows 10 Fall Creators Update, please follow this article instead.
The recent OS X High Sierra iamroot vulnerability reminded me just how many people don’t secure their remote desktop connections. While Windows Remote Desktop is more secure than VNC, neither RDP, ADP nor VNC should be directly exposed to the Internet.
Securing RDP
My favorite way to secure RDP is RD Gateway which uses SSL for encryption.
But another way to secure remote connections is SSH tunneling. SSH Tunneling is not as complex as it sounds; setup is basically this:
- Setup an SSH Server, be it on Windows, OS X or Linux
- Setup port forwarding on your router to that SSH port
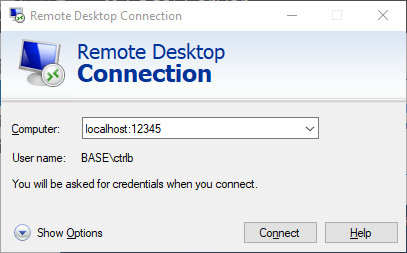
- Setup your SSH client to forward a local port (12345) to a remote port (sql2016:3389)
- Connect Remote Desktop Client to localhost:12345 which connects to sql2016
In order to introduce the concept, we’ll set this up using Windows which now includes OpenSSH! Once you’re comfortable with the concept, you’re free to branch out to use other versions of OpenSSH Server, like the ones that come with OS X or Linux.
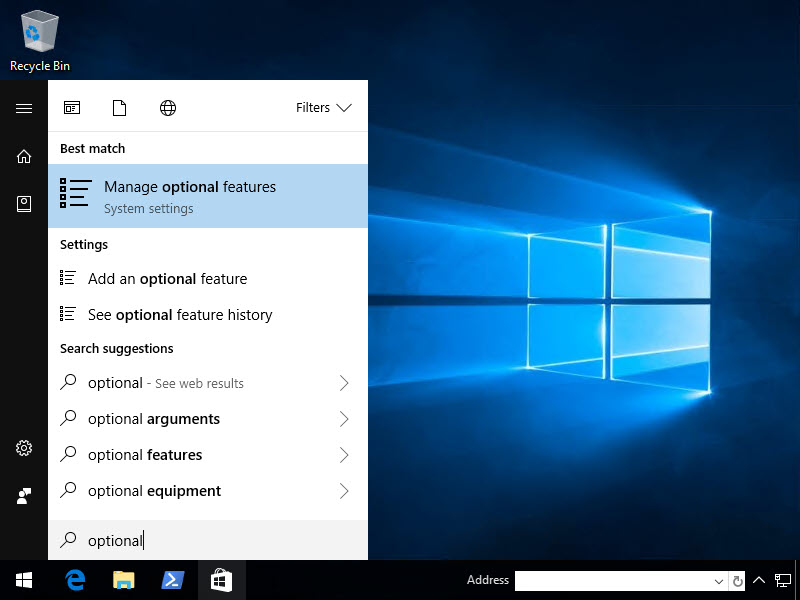
Install OpenSSH on Windows 10 Fall Creators Update
How cool, OpenSSH Server and Client is now built-in to Windows 10 Fall Creators Update! So let’s install them. Hit Start then type Optional
Now install both the Server and the Client
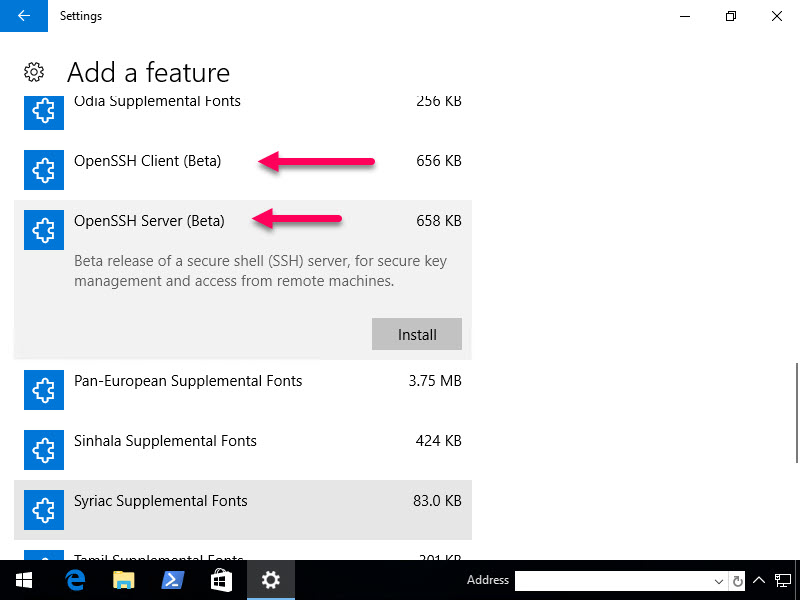
Once you click Install, nothing will really happen. Click the arrow in the upper left hand corner and it’ll take you back to the previous page where you can see the features being installed.
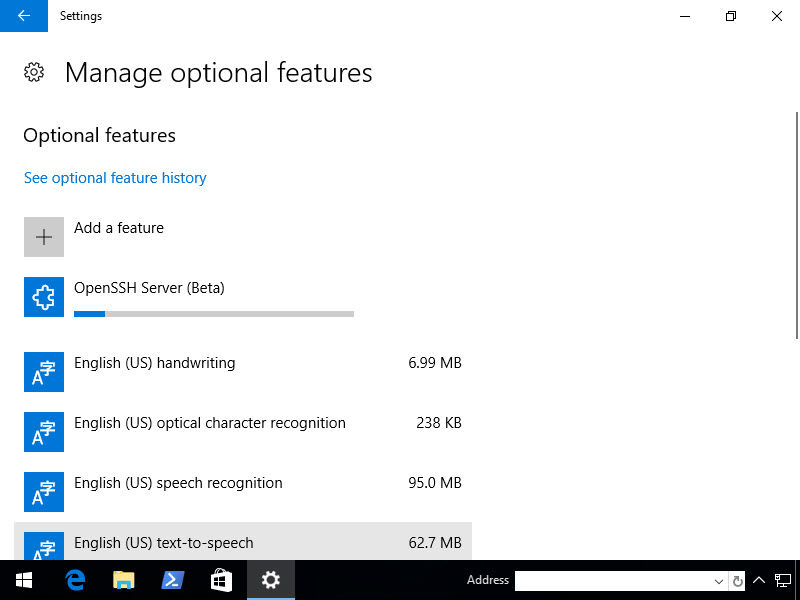
Once the Server and Client have finished installing, you must reboot.
Configure OpenSSH
Gotta say I’m super thankful for Chris K’s blog post «Enabling the hidden OpenSSH server in Windows 10 Fall Creators Update (1709) — and why it’s great!», otherwise this would have taken me far longer to figure out.
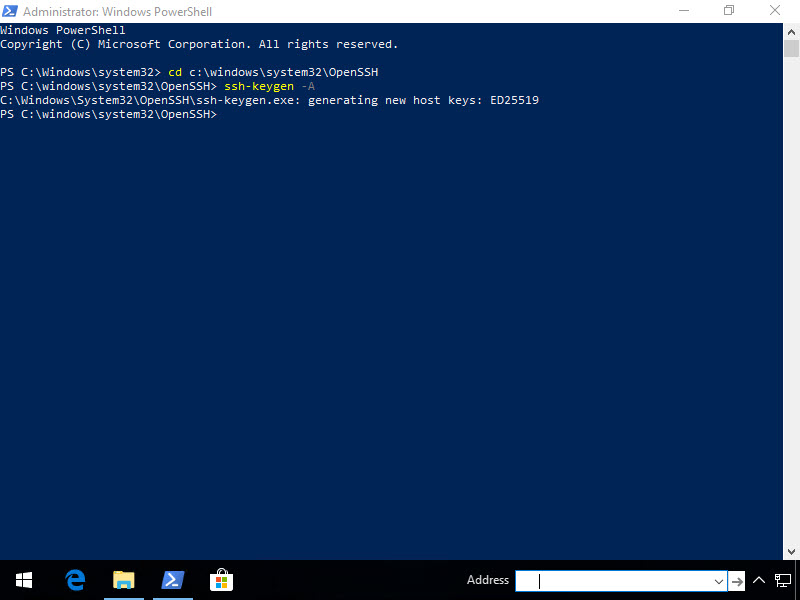
So next, Run PowerShell As Administrator, then generate a key.
cd C:\windows\system32\OpenSSH ssh-keygen -A
Now, we’ve got to tighten permissions and start the service. Note that if you try to skip this step, the SSH Server will fail to start with «The sshd service terminated unexpectedly.»
$filename = «$env:windir\System32\OpenSSH\ssh_host_ed25519_key»
$permission = «NT Service\sshd», «Read», «Allow»
$account = New-Object System.Security.Principal.NTAccount(«NT Service», «sshd»)
$accessRule = New-Object -TypeName System.Security.AccessControl.FileSystemAccessRule -ArgumentList $permission
$acl = Get-Acl -Path $filename
foreach ($access in $acl.access) {
$null = $acl.RemoveAccessRule($access)
}
$null = $acl.SetOwner($account)
$null = $acl.AddAccessRule($accessRule)
$null = Set-Acl -Path $filename -AclObject $acl
Get-Service *ssh* | Start-Service
If you encounter issues and need to troubleshoot, Event Viewer won’t be of much help. Try C:\windows\system32\OpenSSH\Logs instead.
Security
There doesn’t seem to be a lot of documentation on the web on this specific implementation of OpenSSH Server, unfortunately. There is an sshd_config in the OpenSSH directory but I couldn’t figure out how to edit it (kept getting access denied).
That being said, I didn’t make my usual changes to the config file and, since it’s all commented it, I don’t even know what configuration it’s running with, so I’m trusting Microsoft on this for now.
Set up port forwarding on your router
An in-depth tutorial on how to do this is out of scope for this article. Note that whatever you do, don’t use the default SSH port, meaning don’t forward external 22 to internal 22.
Bots bang on port 22 all day, every day. This can fill up your logs and maybe even break a shitty password but hopefully you’re using a solid password.
Configuring OpenSSH client
Usually, I do this part with PuTTY but here, we’ll use the newly available OpenSSH Client.
Now let’s say your external IP is 24.0.175.222 (my first broadband IP back in ’97), you’ve forwarded port 22222 to your Windows 10 port 22 and you’d like to connect to domain computer sql2016’s RDP port (3389).
ssh -f [email protected] -p 22222 -L 12345:sql2016:3389 -N

Let’s break this down (thanks to Frank Wiles for the simplified tutorial).
- -f sends the ssh command to the background so that you don’t have to keep PS open
- «chrissy» is a local Windows account on the Windows 10 workstation
- 24.0.175.222 is the public IP
- 22222 is the public port you’ve published SSH to
- -L is local port, so localhost:12345 will be forwarded sql2016:3389
- -N instructs OpenSSH to not execute a command on the remote system
Once you’ve made a successful connection, fire up Remote Desktop Connection!
Remote Desktop Connection
Now for your RDC/mstsc, use localhost:12345 as the hostname. If you recall, this will forward the connection to sql2016:3389.
Next, the hostname will be mismatched, of course. So accept it.
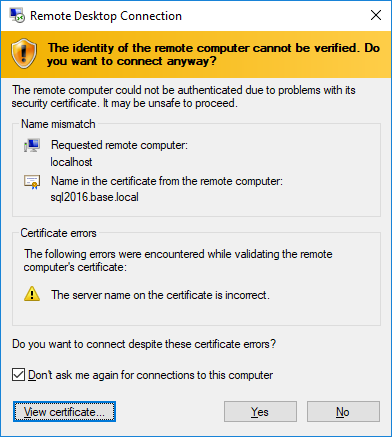
And voilà! MAGIC!
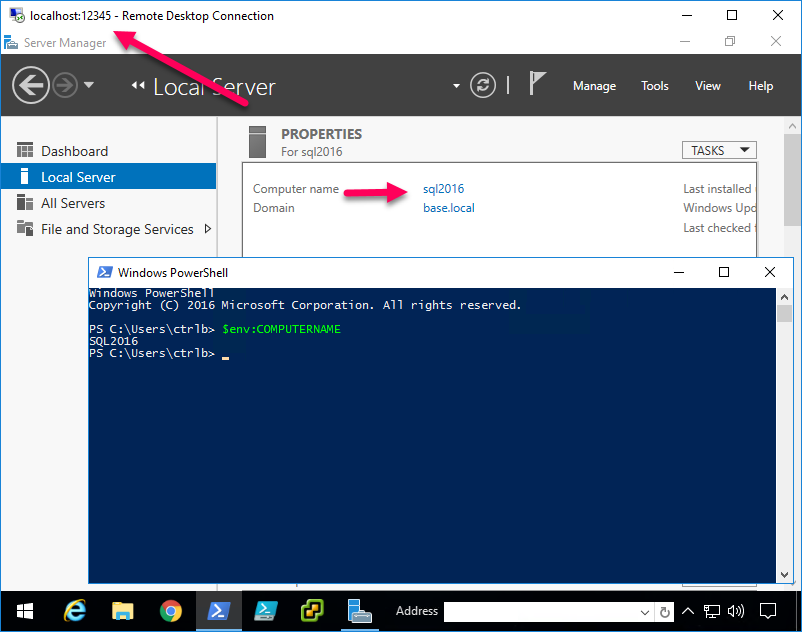
Now imagine all of the possibilities of encrypting insecure protocols! You can even jump to an OSX VNC server from here. And it’s nice and secure that you just have to open one (encrypted) port to securely gain access to your network.
In conclusion
If you’ve been exposing insecure protocols to the net, please consider wrapping them in the loving arms of SSH 💞👍
ssh-rdp is an open source project to control a remote graphical session over SSH, which can be used like Steam Link for streaming games to other devices in your home over a local network by forwarding all kinds of device inputs, including controllers.
This guide aims to clearly document the install, setup, and run processes in order to make ssh-rdp more accessible.
Getting ssh-rdp
- On Arch-based Linux distributions run
from the terminal on the local machine, and
$ yay -S ssh-rdp-host-git
on the remote machine.
- On other Linux distributions clone the GitHub repo via
$ git clone https://github.com/kokoko3k/ssh-rdp.git
and then run commands from the path/to/ssh-rdp directory where the ssh-rdp.sh script is (or better yet copy /path/to/ssh-rdp/ssh-rdp.sh into /usr/bin to execute it from anywhere).
Also be sure to install all of the required software in the GitHub readme on the proper machines.
SSH setup
- log into your remote machine and get its network address via
$ ip a(hint: it’s not the 127.0.0.1 one) - create an entry for this machine in the
~/.ssh/configfile of the local machine (the one receiving the streamed content) and create the file if it doesn’t exist, adding the linesHost <alias for remote machine> User <remote username> Hostname <the IP address of the remote machine> - make sure this SSH connection works by trying to open a normal SSH
tunnel$ ssh <remote machine alias>if this doesn’t work there may be a variety of issues better treated by a guide specifically for setting up SSH (the most common issues are: not starting the sshd/openssh daemon and enabling it to run on startup of the remote [if you haven’t used SSH server side on the remote machine before], firewall [some distros])
ssh-rdp setup (remote machine)
- give access to the uinput device via
$ echo 'KERNEL=="uinput", SUBSYSTEM=="misc", OPTIONS+="static_node=uinput", TAG+="uaccess", OPTIONS+="static_node=uinput"' > tempfile && sudo mv tempfile /etc/udev/rules.d/70-uinput.rulesthen reboot the remote machine (mine wasn’t working one night even after multiple reboots, but after coming back to it the next night it seemed to be fine)
ssh-rdp setup (local machine)
- add local user to the input group via
$ sudo usermod -a -G input <local_username> - log out of session/reboot computer for the group change to take effect
- run
$ ssh-rdp.sh inputconfigwith only a keyboard and mouse plugged in, and no other devices (wireless controllers, etc.) paired or connected - when prompted, hit any key on the keyboard being careful not to touch the mouse (if anything goes wrong in the inputconfig step just
Control + cto get out of it, and rerun$ ssh-rdp.sh inputconfig - when it asks if you’d like to forward another device, enter
ythen hitEnterthen touch your mouse or trackpad - it will again ask if you’d like to forward another device, (if you are gaming, you’d probably like to forward a controller), while this prompt is still up pair your controller and only then answer
yand hitEnter, it may now detect the controller automatically (if your controller is anything like my wired PS3 controller, it’s always generating inputs which is why I paired it after the keyboard was found) or you may have to press a button on it
Running ssh-rdp
- make sure your remote machine is logged in and running a graphical session
- determine the display number of your remote machine by running
on the remote machine itself or after SSHing in (determining the display number is a one time step unless your monitor setup changes)
- on your local machine, attempt to stream/control the remote session by running
$ ssh-rdp.sh --user <remote username> --server <remote machine alias> --display <value of $DISPLAY>.0 <other flags and options>(you’ll probably want to create a bash function or alias for this in your shell configuration file [
~/.bashrc, etc.]) - play around with options like encoders, framerates, etc. (all documented in the
ssh-rdpreadme) to optimize your experience