В этом руководстве мы расскажем, как установить xRDP на удаленный компьютер CentOS 7 и как подключиться к нему через Remote Desktop Connection. Мы также покажем вам, как установить и подключиться к различным окружениям рабочего стола на удаленном компьютере CentOS 7.
xRDP — это бесплатный сервер протоколов удаленных рабочих столов с открытым исходным кодом, который позволяет другим операционным системам, отличным от Windows, предоставлять полнофункциональные возможности удаленного рабочего стола.
xRDP полностью совместим с rdesktop, FreeRDP и даже с клиентом удаленного рабочего стола Microsoft (mstsc.exe).
Требования:
- Хотя это и не является обязательным требованием, мы рекомендуем действовать от имени пользователя без полномочий root при выполнении каких-либо серьезных изменений в вашей системе.
- Машина под управлением CentOS 7 с минимум 2 ГБ оперативной памяти.
Установите xRDP на CentOS 7
Обновите установленные в системе пакеты:
$ sudo yum -y update
Затем установите необходимые пакеты:
$ sudo yum install -y epel-release

$ sudo yum install -y xrdp

$ sudo systemctl enable xrdp

$ sudo systemctl start xrdp
Если вы используете FirewallD, откройте порт 3389/TCP для RDP:
$ sudo firewall-cmd --add-port=3389/tcp --permanent

$ sudo firewall-cmd --reload
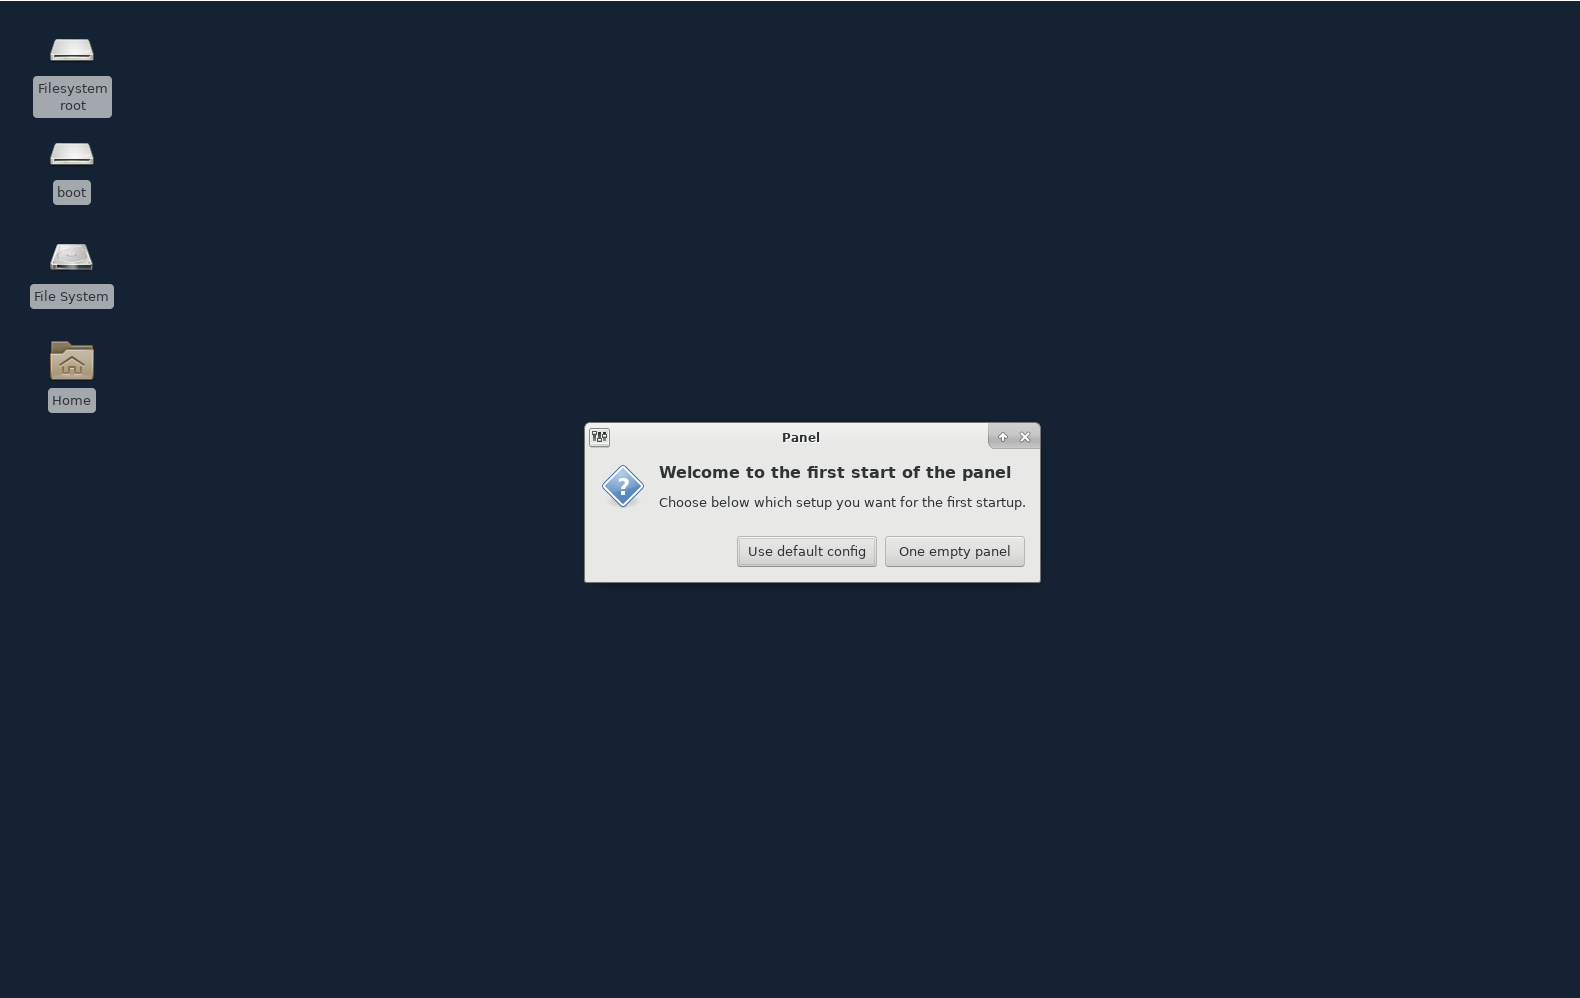
Установите предпочитаемую среду рабочего стола
Теперь мы можем установить среду рабочего стола, которую будем использовать. В этом руководстве мы опробуем Xfce, MATE и GNOME.
Примечание: если вы не можете подключиться через Remote Desktop Connection после установки среды рабочего стола, откройте порт 3389/TCP с помощью команды firewall-cmd, упомянутой выше.
Установите рабочую среду XFCE
Xfce — одна из самых легких настольных сред. Она быстрая, потребляет мало системных ресурсов, но все же остается визуально привлекательной. Кроме того, у неё очень активное сообщество, поэтому доступно множество вариантов настройки.
Чтобы установить Xfce, выполните следующие команды:
$ sudo yum install -y epel-release

$ sudo yum groupinstall -y "Xfce"

$ sudo reboot
Затем создайте файл .Xclients в каталоге пользователя, с помощью которого будет осуществлено подключение:
$ echo "xfce4-session" > ~/.Xclients

$ chmod a+x ~/.Xclients
Теперь вы можете подключиться к серверу, используя Remote Desktop Connection. Вот как выглядит Xfce:
Удаление Xfce
Чтобы удалить Xfce с вашего CentOS 7, выполните следующие команды:
$ sudo yum groupremove -y "Xfce"

$ sudo yum remove -y libxfce4*
Установите MATE Desktop Environment
Чтобы установить MATE, выполните следующие команды:
$ sudo yum install -y epel-release

$ sudo yum groupinstall -y "MATE Desktop"

$ sudo reboot
Затем создайте файл .Xclients в каталоге пользователя, с которым вы соединяетесь:
$ echo "mate-session" > ~/.Xclients

$ chmod a+x ~/.Xclients
Теперь вы можете подключиться к серверу, используя Remote Desktop Connection. Вот как выглядит MATE:
Удаление MATE
Чтобы удалить MATE с CentOS 7, выполните следующие команды:
$ sudo yum groupremove -y "MATE Desktop"

$ sudo yum autoremove -y
Установите GNOME Desktop Environment
Теперь попробуем установить GNOME 3. Для этого нам необходимо установить группу пакетов GNOME Desktop, которая установит все пакеты, необходимые для установки с графическим интерфейсом:
$ sudo yum groupinstall "GNOME DESKTOP" -y
Это может занять некоторое время. На минимальной конфигурации дистрибутива CentOS 7 будет установлено около 1000 пакетов.
Запустите графический интерфейс
Хотя мы установили группу пакетов GNOME Desktop, графический интерфейс не будет загружаться по умолчанию при перезагрузке. Мы можем проверить это, запустив:
$ systemctl get-default
Если значением по умолчанию является multi-user.target, это означает, что графический интерфейс не будет загружен. Поменяем значение по умолчанию на graphical.target. Для этого выполните следующие команды:
$ sudo systemctl set-default graphical.target
Вывод:
Removed symlink /etc/systemd/system/default.target.
Created symlink from /etc/systemd/system/default.target to usr/lib/systemd/system/graphical.target.
После этого выполните следующую команду, для незамедлительного перехода к графическому интерфейсу:
$ sudo systemctl isolate graphical.target
Теперь вы можете подключиться через xRDP к вашему CentOS 7 с помощью GNOME.
Вот как выглядит GNOME 3 при первом подключении после установки. Просто следуйте начальным шагам настройки, чтобы завершить настройку:

Примечание: Если до момента установки графической оболочки GNOME Desktop для подключения к CentOS 7 использовались Xfce или MATE Desktop, выполните следующую команду:
$ sudo rm -f ~/.Xclients
Удаление GNOME
Чтобы удалить GNOME с вашего CentOS 7, выполните следующие команды:
$ sudo yum groupremove -y "GNOME Desktop"

$ sudo yum autoremove -y
Подключитесь к компьютеру с помощью подключения к удаленному рабочему столу
После установки xRDP и среды рабочего стола вы можете подключаться с локального компьютера к удаленному.
Подключение из Windows
Чтобы подключиться к серверу из Microsoft Windows, просто найдите и запустите приложение Remote Desktop Connection (mstsc.exe) и введите свое имя хоста или IP:

Если вы подключаетесь впервые, вы получите несколько предупреждений безопасности. Предполагая, что это ваш сервер и он безопасен, просто согласитесь с этими предупреждениями:

220140
Минск
ул. Домбровская, д. 9
+375 (173) 88-72-49
![]()
700
300
ООО «ИТГЛОБАЛКОМ БЕЛ»
220140
Минск
ул. Домбровская, д. 9
+375 (173) 88-72-49
![]()
700
300
ООО «ИТГЛОБАЛКОМ БЕЛ»
XRDP is an open-source implementation of the Microsoft Remote Desktop (RDP) that allows you to graphically control your system. With RDP, you can log in to the remote machine the same as you had logged into the local machine. It uses Port 3389 for its connection. In this tutorial, we will look at how to set up the Remote desktop Connection on CentOS 8.
Installing Desktop Environment
I’ll be using a CentOS server for this tutorial which did not has a Desktop environment installed yet. So the first step on my system is to install the Desktop environment. If you have already a GNOME Desktop installed on your CentOS system, then proceed with the next chapter to install XRDP.
To install GNOME on your remote machine, open up the terminal and run the following command:
# dnf groupinstall "Server with GUI"

Depending on your system, downloading and install the GNOME packages and dependencies may take some time.
Installing XRDP RDP Server
XRDP is available in the EPEL software repository. If EPEL is not enabled on your system, enable it by typing the following command:
# dnf install epel-release

Now install the XRDP package.
# dnf install xrdp

Once the installation is complete enable and start the XRDP service.
# systemctl enable xrdp
# systemctl start xrdp
To verify the XRDP is running, type the following command:
# systemctl status xrdp
If the XRDP service is running, the output should be like this as shown in the figure below:

You can also verify the XRDP service state by using the following command:
# netstat –atnp | grep 3389

Port should be Listening like below:
![]()
Configuring XRDP
The configuration file is /etc/xrdp/xrdp.ini. By default, XRDP uses Linux desktop, which is in our case is GNOME. For the connection, you don’t need to make any changes in the configuration file. This file is divided into different sections and allows you to set global configuration settings such as security and listening address and you can also create different XRDP login sessions.
Open up configuration file /etc/xrdp/xrdp.ini and add the following line at the end of the file.
exec gnome-session
After adding above line restart the XRDP service, using the following command:
# systemctl restart xrdp
Configuring the Firewall
If your firewall is running on your Centos 8, just add the rule to allow the XRDP port/service to allow traffic for the XRDP connection.
# firewall-cmd --add-port = 3389/tcp -- permanent
# firewall-cmd –reload
Connecting to the XRDP using Windows Machine
Windows, by default, uses the remote desktop client. To connect through Centos 8 using remote desktop type Remote desktop connection in the windows search bar and press enter.

Enter the IP address of the remote machine and click on connect.

It will prompt you to the login screen for the credentials. Enter username and password and click on Ok.

Once logged in, you should see the default GNOME Desktop. Now you can start interacting with the remote machine.
If you are using Mac OS, install the Microsoft Remote Desktop application from Mac App Store, whereas the Linux user can use RDP clients like Remmina or Vinagre.
Conclusion
In this tutorial, we have learned how to configure Remote desktop Connection in CentOS 8 and access using a windows machine. Using XRDP, allows you to manage and control your machine remotely from your local desktop machine with the use of a graphical interface.
Время на прочтение
6 мин
Количество просмотров 64K
Что делать, если нужно получить удалённый доступ к серверу или десктопу Linux? Или подключиться к Windows-машине с Linux-десктопа? Какие клиенты RDP и FTP подходят лучше всего под Debian и Red Hat / CentOS? Интересно посмотреть, что нового появилось в последнее время.
Как известно, Remote Desktop Protocol (RDP) — проприетарный протокол Microsoft для удалённого управления десктопом. Ориентирован на передачу по сети графического интерфейса и всех функций управления.
Хотя протокол выпустила Microsoft, к настоящему моменту создано множество свободных серверов и клиентов RDP с открытым исходным кодом, под свободной лицензией и для всех операционных систем. В последние годы появились достойные серверы RDP под Linux, хотя раньше хосты всегда работали под Windows, а под Linux выпускались только клиенты. Однако к 2022 году ситуация сильно изменилась, так что стали возможно и противоположные сценарии.
Выбор сервера и клиента зависит от операционной системы хоста. RDP-сессия устанавливается между клиентом и сервером. Соответственно, для серверной и клиентской части RDP и FTP существуют разные инструменты, в том числе доступные в репозиториях Debian, Red Hat, CentOS и др.
Сервер RDP под Linux
В современных системах GNOME — сервер RDP уже интегрирован, но там много чего не хватает, так что приходится пока использовать сторонние решения. Судя по всему, сервер RDP в GNOME пока не доработан до окончательного вида. По крайней мере, там отсутствуют некоторые важные функции. Руководство по использованию и планы на доработку программы см. здесь.
▍ xRDP
Неплохой вариант для Linux-сервера — xRDP. Последняя версия 0.9.20 вышла 15 сентября 2022 года.
Эта программа специализируется на управлении Linux-десктопом по RDP, при этом xRDP как бы мимикрирует под Windows-систему, нативную для данного протокола.
Предполагается, что клиенты — это обычно системы под Windows, мобильные устройства или дешёвые RDP-терминалы типа Wyse Winterm (на Windows CE), которые можно дёшево купить б/у на «Авито» или найти списанные вообще бесплатно.

Старый терминал WYSE-530 Winterm S30 на процессоре AMD Geode 366 МГц (ноябрь 2008)
Поднимаете RDP-сервер под Linux с десятком X-сессий — и практически без усилий получаете сеть из десятка компьютеров, которые могут вводить информацию на сервер. Это просто пример, как использовать RDP-клиенты под Windows для доступа к Linux-серверу.
xRDP обеспечивает удалённый доступ по Microsoft Remote Desktop Protocol (RDP) и принимает соединения по порту 3389/tcp от следующих RDP-клиентов:
- FreeRDP.
- rdesktop.
- KRDC.
- NeutrinoRDP.
- Windows MSTSC (Microsoft Terminal Services Client, она же
mstsc.exe). - Microsoft Remote Desktop (есть Microsoft Store, отличается от MSTSC).
Некоторые из этих клиентов доступны только на определённых ОС, например, только на Windows. Другие поддерживают более широкий список платформ, включая Linux, MacOS, iOS и/или Android.
xRDP поддерживает повторные подключения к прерванной сессии, изменение размера дисплея, функцию RDP/VNC-прокси (подключение к другому серверу RDP/VNC через xrdp), двусторонний буфер обмена между хостом и клиентом, в том числе передачу через него туда и обратно текста, изображений и файлов, перенаправление аудиопотока и микрофона (требует сборки дополнительных модулей), перенаправление дисков (монтирование локальных клиентских дисков на удалённой машине).
В большинство популярных дистрибутивов включены последние версии пакетов xrdp и xorgxrdp, они есть также в Debian и CentOS.
▍ Установка на Ubuntu / Debian
apt install xrdp▍ Установка на RedHat / CentOS / Fedora
На RedHat / CentOS сначала нужно активировать пакеты EPEL:
yum install epel-release
Потом можно установить xrdp
yum install xrdpogon
Один из многочисленных альтернативных вариантов сервера RDP под Linux — проект ogon. Это набор инструментов на C/C++, которые предоставляют удобный GUI для удалённого десктопа по RDP. Проект поддерживает большинство современных расширений протокола RDP, кодеки сжатия растровых изображений, отключение и повторное подключение к сессиям, перенаправление устройств.
Сервер совместим практически со всеми существующими клиентами RDP, сессии можно устанавливать через приложение X11, Weston или QT. Благодаря модульной конструкции, сервер легко расширяется, в него можно добавить новые функции или новые бэкенды. Ставится на Debian, CentOS и т. д.
xpra
Известный сервер под Linux с терминальными GUI-сессиями (экран для X11) — xpra. Во многом работает как xRDP, хотя и не поддерживает RDP. Но мы решили помянуть его здесь для сравнения с решениями на RDP и VNC.
Тут встроенный HTML5-клиент, аппаратное ускорение графики, поддержка множества пользователей, GUI для настройки, синхронизация клавиатуры и буфера обмена, перенаправление принтера, курсора, звука, системных уведомлений, поддержка IPv6, SSL, десктопный режим и проч.
Официальные стабильные сборки:
- Microsoft Windows: EXE, ZIP, MSI
- MacOS: DMG, PKG
- Linux: RPM, DEB
Клиенты RDP и FTP под Linux
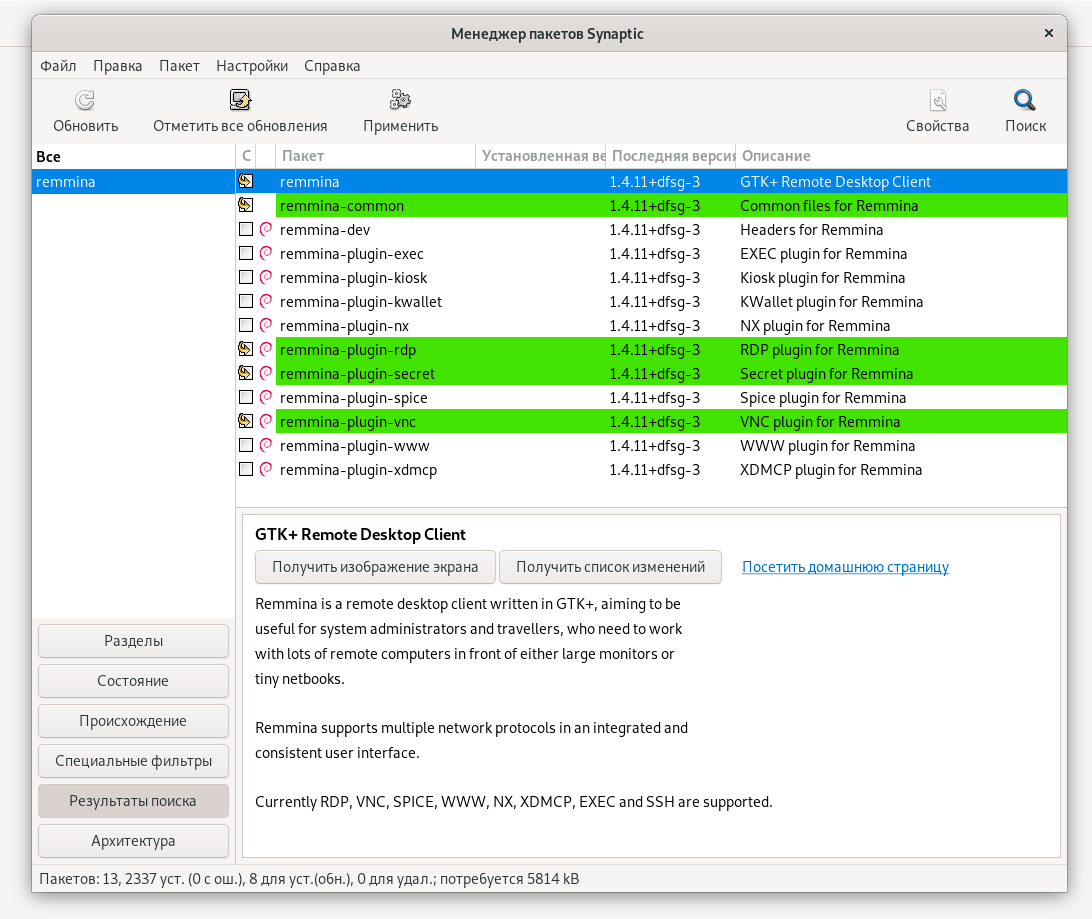
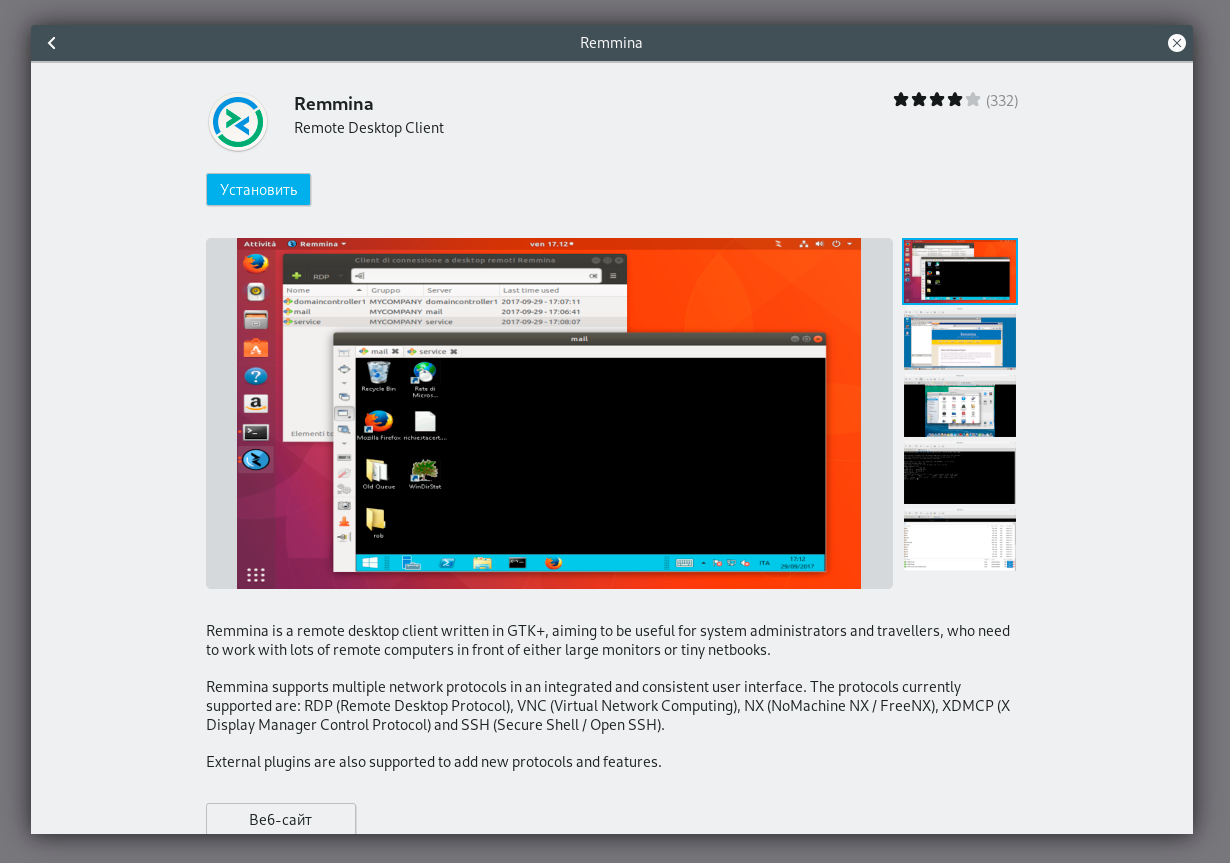
Пожалуй, лучшие клиенты RDP под Debian — это Remmina и Apache Guacamole, хотя есть и другие варианты.
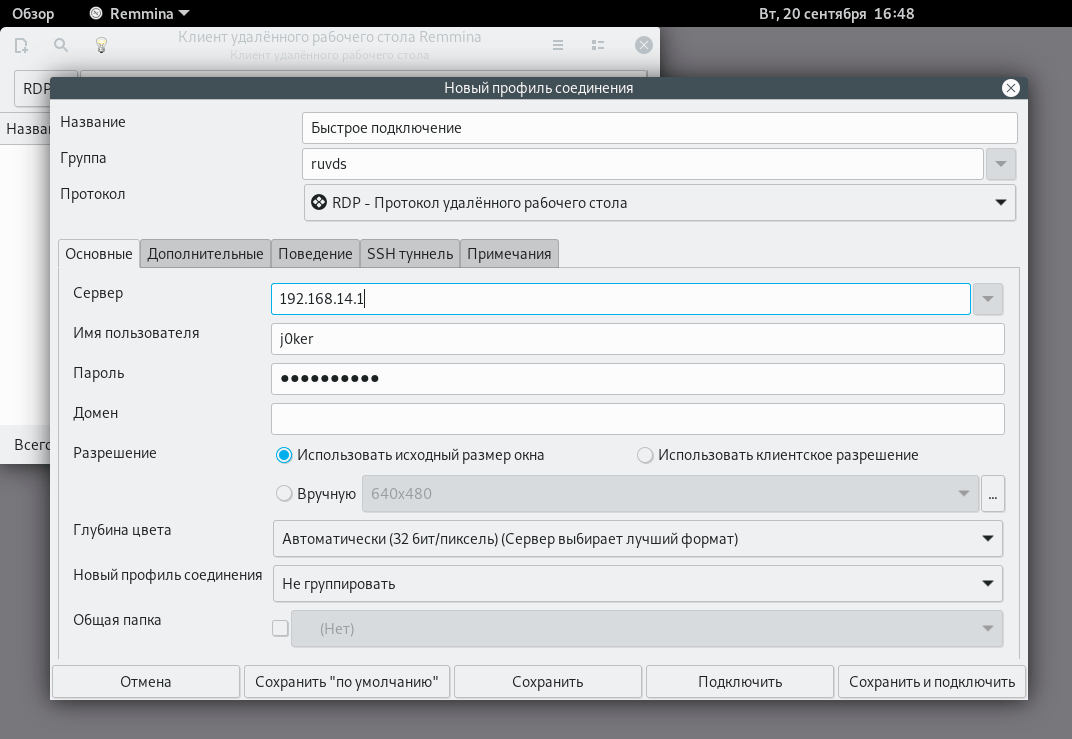
Remmina
Remmina — клиент RDP по умолчанию в некоторых дистрибутивах, в том числе в Ubuntu. Это одна из самых удобных и функциональных программ для удалённой работы, поддерживает RDP, SSH, SPICE, VNC, X2Go, HTTP/HTTPS.
В июне 2022 вышла последняя версия 1.4.27 с исправлением ошибок и рядом не самых существенных изменений вроде новых цветовых схем для SSH.
Некоторые из основных функций Remmina, которые можно настраивать на стороне клиента RDP:
- Запоминание последнего режима просмотра для каждого соединения.
- Конфигурация двойным щелчком.
- Качество масштабирования.
- Размер шага автоматической прокрутки.
- Максимальное количество последних элементов.
- Нажатия клавиш.
- Папка для скриншотов.
- Предотвращение попадания скриншотов в буфер обмена.
- Настройка разрешения экрана.
- Конфигурация вкладок.
- Видимость панели инструментов.
- Режим просмотра по умолчанию.
- Настройка поведения в полноэкранном режиме.
- Строка поиска в главном окне.
- Установка горячих клавиш для хоста: включение полноэкранного режима, автоподгонка окна, переключение страниц вкладок, переключение режима масштабирования, захват клавиатуры, минимизировать окно, показать/скрыть панель инструментов, сделать скриншот, режим просмотра.
- Локальный порт SSH-туннеля.
- Парсинг
~/.ssh/config. - Логи SSH.
- Выбор шрифта терминала.
- И др.
В наборе плагинов есть SFTP для защищённой передачи файлов.
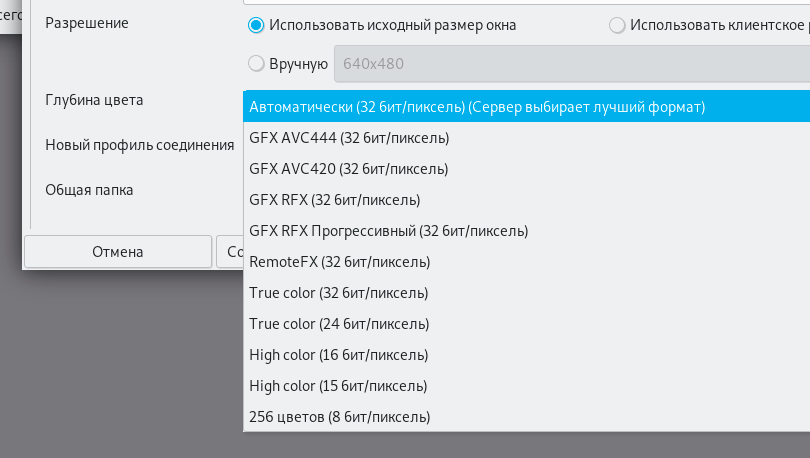
Из специфических настроек RDP — установка глубины цвета, качества передачи видео и звука, редирект локального микрофона, подключение консоли, распознавание сервера через Remote Desktop Gateway, возможность отключить автоматические реконнекты, синхронизацию буфера обмена и некоторых других функций.
Remmina входит в состав большинства популярных дистрибутивов, включая Debian 11:
В старых версиях Debian для установки Remmina можно скопировать строки в консоль:
echo 'deb http://ftp.debian.org/debian stretch-backports main' | sudo tee --append /etc/apt/sources.list.d/stretch-backports.list >> /dev/null
sudo apt update
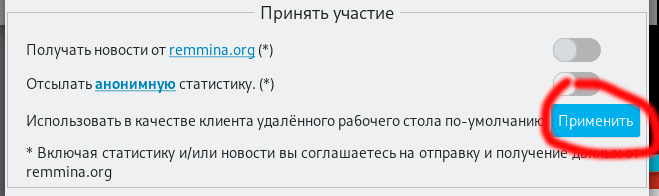
sudo apt install -t stretch-backports remmina remmina-plugin-rdp remmina-plugin-secret remmina-plugin-spiceСразу после установки предлагается сделать Remmina клиентом RDP по умолчанию:
Инструкции по установке для всех систем см. на этой странице, а руководство по сборке из исходников — в справочном вики.
На CentOS есть вариант установки из репозитория EPEL, вставив в консоль следующие строчки:
wget http://dl.fedoraproject.org/pub/epel/epel-release-latest-7.noarch.rpm
rpm -ivh epel-release-latest-7.noarch.rpm
В качестве альтернативы — Remmina устанавливается через универсальный пакет Flatpak, который работает буквально на всех дистрибутивах:
flatpak remote-add --user --if-not-exists flathub https://flathub.org/repo/flathub.flatpakrepo
# In order to have H.264 codecs
flatpak install org.freedesktop.Platform
flatpak install org.freedesktop.Platform.openh264
flatpak install --user flathub org.remmina.Remmina
flatpak run --user org.remmina.Remmina
Apache Guacamole
Apache Guacamole (HTML5, в браузере) предоставляет доступ к хосту без клиента, то есть без инсталляции на компьютер клиентской части. Работает просто через браузер. Последняя версия 1.4.0 вышла 1 января 2022 года.
Понятно, что браузерный клиент имеет определённые преимущества, поскольку запускается абсолютно на любом устройстве, где есть браузер, независимо от операционной системы.
Более того, сам десктоп необязательно должен существовать физически, это может быть просто виртуальная машина на сервере.
Из других RDP и VNC-клиентов под Linux можно упомянуть Vinagre, Boxes, TightVNC (для доступа к Windows-хостам), FreeRDP (xfreerdp/wlfreerdp, пакет для Debian) и rdesktop.
Telegram-канал и уютный чат

Remote desktop access to CentOS Linux VPS is super easy using Windows remote desktop connection. Let’s head to enable remote desktop on CentOS Linux by installing XRDP on CentOS 8.x VPS and configure it for GUI remote connection.
The XRDP is an open-source implementation of the Microsoft Remote Desktop Protocol (RDP) that allows you to control a remote system graphically. With RDP, you can log in to the remote machine and create a real desktop session the same as if you had logged in to a local system.
The article explains the process of install and configure XRDP on CentOS VPS and connect it from Windows 10 remote desktop.
If you like to have remote access to CentOS VPS using SSH, head to configure SSH on CentOS Server article.
Installing Desktop Environment on CentOS
A Linux server usually comes without GUI, and the desktop environment not installed by default. If the CentOS VPS you have to connect to doesn’t have GUI, the first step is to install the desktop environment to have access a graphical interface remote desktop.
The Gnome is the default desktop environment in CentOS 8. To install Gnome on your remote machine, run the following command.
If your Linux machine has the desktop environment already installed, do not execute the command. Just update for latest security packages.
sudo yum groupinstall "Server with GUI"
![]()
It will take time and depending on your system speed and download speed to complete the installation of the Gnome packages and dependencies.
Install and Enable Remote Desktop on CentOS
The XRDP is available in the EPEL software repository. If EPEL doesn’t enable on your system, try to allow it by typing the following command.
sudo yum install epel-release
You might be faced with the below error. In this case, simply enable the epel package on your system.
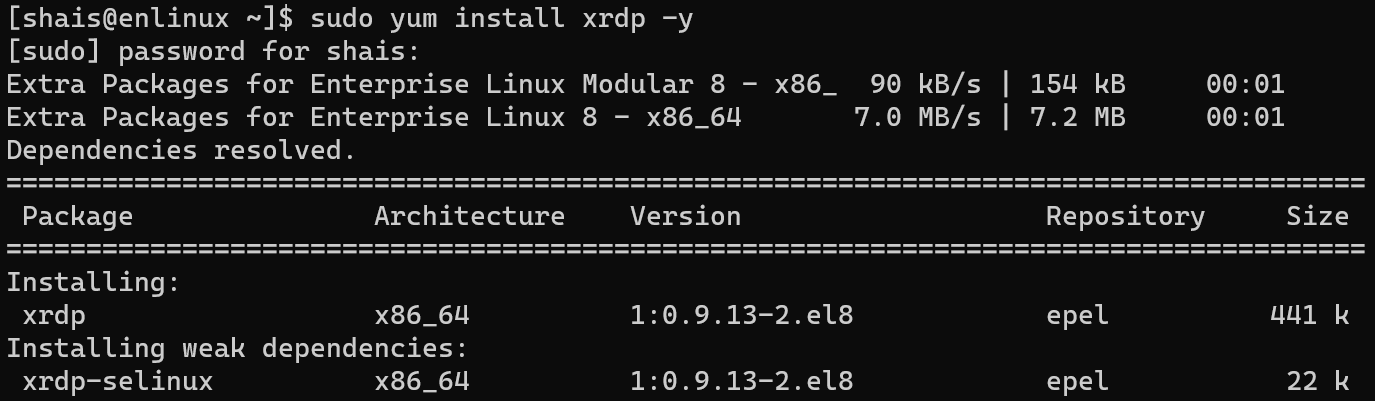
[root@enlinux ~]# yum install epel-release
Updating Subscription Management repositories.
Last metadata expiration check: 0:14:11 ago on Mon 24 Aug 2020 10:27:24 AEST.
No match for argument: epel-release
Error: Unable to find a match: epel-release
[root@enlinux ~]#
To enable epel-release on Red Hat 8.x, head up to this article: How To Install EPEL Repo on an RHEL 8.x
Now the system is ready for installing the XRDP package which included in the standard CentOS 8 repositories. Type the following command to install XRDP.
sudo yum install xrdp -y
When the installation process has done, start the XRDP service and enable it with the following commands.
sudo systemctl enable xrdp
sudo systemctl start xrdp

Type the following command to verify that XRDP is enabled and running on your machine.
sudo systemctl status xrdp
Configuring XRDP on CentOS Linux
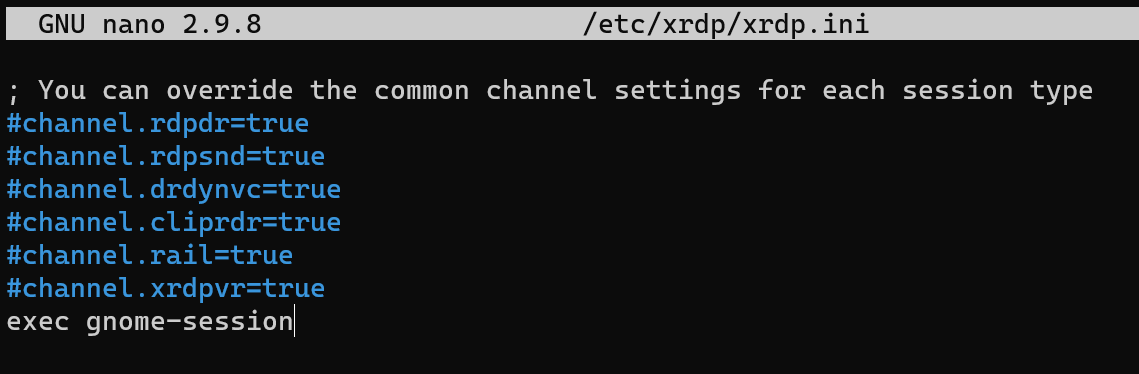
You can find the XRPD configuration files in the/etc/xrdpdirectory. For regular XRDP connections, you only need to set XRDP to use Gnome. To edit it the file, open the following file in your text editor and past the (exec gnome-session) at the end of the text.
sudo nano /etc/xrdp/xrdp.ini
Now just add the following line at the end of the file. Check the screenshot of xrdp.ini file to make sure you are doing as it should be.
exec gnome-session
When you have done, just save the file and restart the XRDP service with the following command.
sudo systemctl restart xrdp
Configuring Firewall for Remote Desktop
The default remote desktop port is 3389. So, as usual, the XRDP is listening to 3389 port on all interfaces. To make the machine Firewall aware that we are using the remote desktop port, we should add the port 3389 to the Firewall and allow it.
The following command will allow the port 3389 to accept incoming network traffic from anywhere.
Allowing access from anywhere is highly discouraged for security reasons.
sudo firewall-cmd --add-port=3389/tcp --permanentsudo firewall-cmd --reload

All good. It’s enough to allow remote desktop in the Linux Firewall. But to allow only for a specific network or ranges of IP addresses you need to type the following command. It’s a good practice for the production environment.
sudo firewall-cmd --new-zone=xrdp --permanentsudo firewall-cmd --zone=xrdp --add-port=3389/tcp --permanentsudo firewall-cmd --zone=xrdp --add-source=192.168.1.0/24 --permanentsudo firewall-cmd --reload
Verifying Remote Desktop XRDP
The final stage, verify the XRDP server to make sure it is up and running and listening to remote desktop port 3389. The netstat command helps to check it.
netstat –atnp | grep 3389
Connect CentOS Server Using Remote Desktop
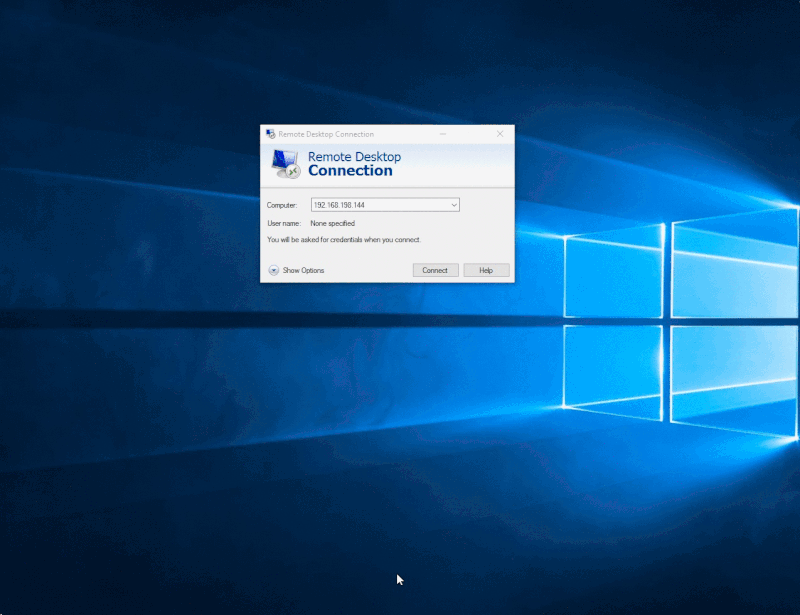
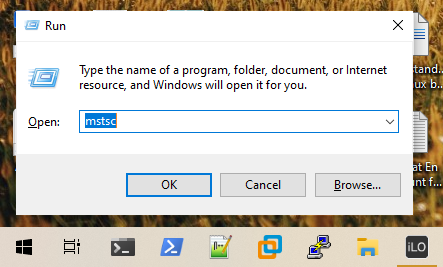
To run remote desktop connection in Windows 10, press (Windows + R) key to open the Run. Then type (mstsc) and press enter.
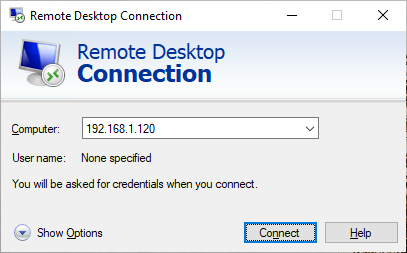
Type your CentOS Linux IP address and try to connect to the XRDP using Windows remote desktop.
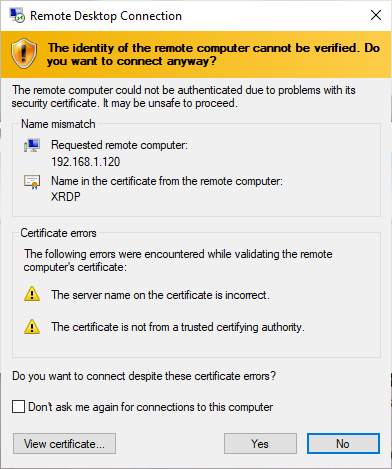
Accept the remote desktop connection certification prompt and go ahead to login page.
Type the the CentOS server username and password then connect it.
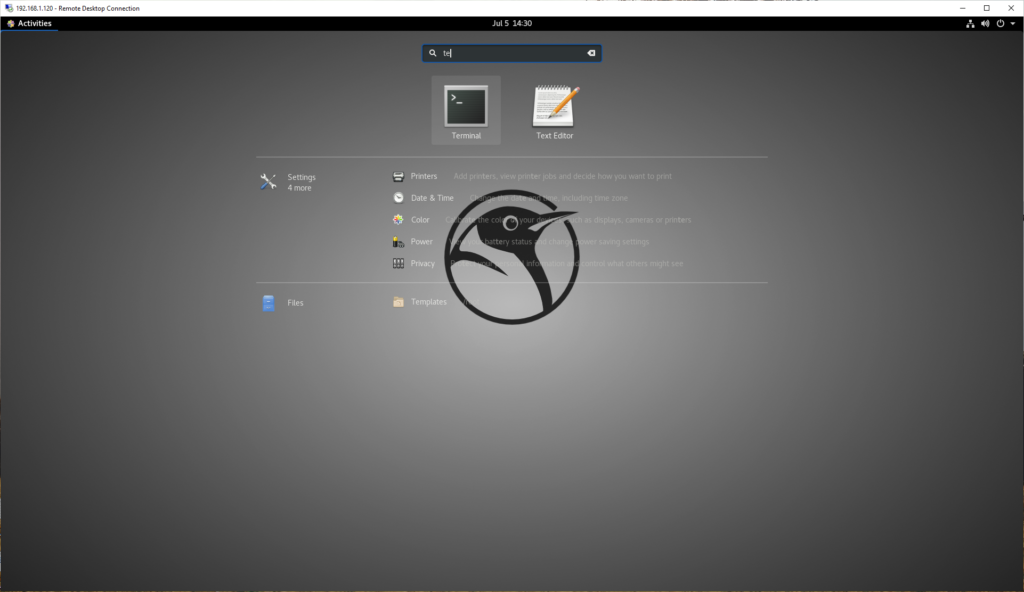
The result should be a friendly clean graphical interface of CentOS server like the below screenshot.
The final note: The Linux distros are capable of having access graphically using remote desktop protocol software. But the power of terminal and command lines are not in a GUI.
In this guide i will show how to CentOS 7 Remote Desktop From Windows and install tigervnc, xrdp on CentOS 7.
TigerVNC is a high-performance, platform-neutral implementation of VNC, a client/server application that allows users to launch and interact with graphical applications on remote machines.
xrdp – open source remote desktop protocol(rdp) server. Based on the work of FreeRDP and rdesktop, xrdp uses the remote desktop protocol to present a GUI to the user.
First of all we need install Gnome GUI on our CentOS 7 or RHEL 7 – How To Install Gnome CentOS 7.
CentOS 7 XRDP Install
Tigervnc server centos 7 installation with xrdp we can do by using YUM command:
# yum install xrdp tigervnc-server
Output:
[root@localhost ~]# yum install xrdp tigervnc-server
Loaded plugins: fastestmirror, langpacks
Loading mirror speeds from cached hostfile
* base: mirror.fileplanet.com
* epel: mirrors.develooper.com
* extras: mirror.hostduplex.com
* updates: repos-lax.psychz.net
Resolving Dependencies
--> Running transaction check
---> Package tigervnc-server.x86_64 0:1.8.0-13.el7 will be installed
---> Package xrdp.x86_64 1:0.9.9-1.el7 will be installed
--> Processing Dependency: xrdp-selinux = 1:0.9.9-1.el7 for package: 1:xrdp-0.9. 9-1.el7.x86_64
--> Processing Dependency: xorgxrdp for package: 1:xrdp-0.9.9-1.el7.x86_64
--> Running transaction check
---> Package xorgxrdp.x86_64 0:0.2.9-1.el7 will be installed
---> Package xrdp-selinux.x86_64 1:0.9.9-1.el7 will be installed
--> Finished Dependency Resolution

Dependencies Resolved

================================================================================
Package Arch Version Repository Size
================================================================================
Installing:
tigervnc-server x86_64 1.8.0-13.el7 base 215 k
xrdp x86_64 1:0.9.9-1.el7 epel 419 k
Installing for dependencies:
xorgxrdp x86_64 0.2.9-1.el7 epel 63 k
xrdp-selinux x86_64 1:0.9.9-1.el7 epel 16 k

Transaction Summary
================================================================================
Install 2 Packages (+2 Dependent packages)

Total download size: 713 k
Installed size: 2.7 M
Is this ok [y/d/N]: y
Downloading packages:
(1/4): xrdp-0.9.9-1.el7.x86_64.rpm | 419 kB 00:00
(2/4): tigervnc-server-1.8.0-13.el7.x86_64.rpm | 215 kB 00:00
(3/4): xorgxrdp-0.2.9-1.el7.x86_64.rpm | 63 kB 00:00
(4/4): xrdp-selinux-0.9.9-1.el7.x86_64.rpm | 16 kB 00:00
--------------------------------------------------------------------------------
Total 671 kB/s | 713 kB 00:01
Running transaction check
Running transaction test
Transaction test succeeded
Running transaction
Warning: RPMDB altered outside of yum.
Installing : xorgxrdp-0.2.9-1.el7.x86_64 1/4
Installing : 1:xrdp-0.9.9-1.el7.x86_64 2/4
Installing : 1:xrdp-selinux-0.9.9-1.el7.x86_64 3/4
Installing : tigervnc-server-1.8.0-13.el7.x86_64 4/4
Verifying : 1:xrdp-selinux-0.9.9-1.el7.x86_64 1/4
Verifying : 1:xrdp-0.9.9-1.el7.x86_64 2/4
Verifying : tigervnc-server-1.8.0-13.el7.x86_64 3/4
Verifying : xorgxrdp-0.2.9-1.el7.x86_64 4/4

Installed:
tigervnc-server.x86_64 0:1.8.0-13.el7 xrdp.x86_64 1:0.9.9-1.el7

Dependency Installed:
xorgxrdp.x86_64 0:0.2.9-1.el7 xrdp-selinux.x86_64 1:0.9.9-1.el7

Complete!
After xrdp and tigervnc-server installing start the xrdp service by using command:
# systemctl start xrdp
To start xrdp service at boot, use the enable command:
# systemctl enable xrdp
To conform xrdp listening on 3389 port with netstat command:
# netstat -tulpn | grep xrdp
Output:
tcp 0 0 127.0.0.1:3350 0.0.0.0:* LISTEN 7534/xrdp-sesman
tcp 0 0 0.0.0.0:3389 0.0.0.0:* LISTEN 7535/xrdp
Configure Firewall
Configure the firewalld to allow incoming RDP connections to TCP 3389 port:
firewall-cmd --permanent --add-port=3389/tcp
firewall-cmd --reload
Access CentOS From Windows Remote Desktop
Launch Windows rdp client and try access CentOS from Windows:

Access CentOS From Windows Remote Desktop
Ignore the warning of RDP certificate and accept the certificate:

Ignore the warning of RDP certificate and accept the certificate
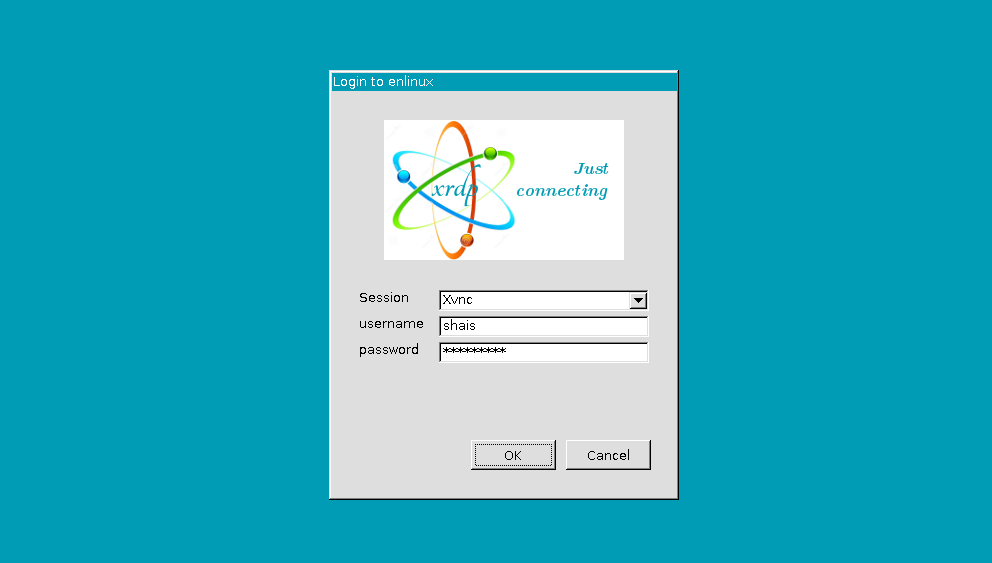
In next window make sure you use module Xvnc Session and type your Linux user credentials:

Click OK and in get CentOS 7 remote Desktop:

Read also: How to Remote Desktop from Windows to Ubuntu.
If you like what you are reading, please:
![]() Buy me a coffee
Buy me a coffee