Controlling your Windows computer remotely using third-party software or the built-in Remote Desktop feature is easy. However, the options for controlling a computer running on a different OS are quite limited.
Although Windows computers dominate the market, many people still use Macbooks that run on OS X. You might want to connect your old Windows PC to a Mac to access some files or programs.
Apple has its own remote access premium shareware called Apple Remote Desktop (ARD.) It comes with powerful features like software distribution and automation to perform repetitive tasks on remote computers. Unfortunately, it’s designed for Mac to Mac and not cross-platform.
In this article, we will be sharing a few methods to remotely access Apple Mac computers from another computer running Windows.
How to Remote to macOS from Windows
- RealVNC – Best for remotely accessing macOS from Windows overall
- Remote IT – Great for connecting users and devices when other solutions fail
- TightVNC – Open-source tool for remotely connecting to computers
- TeamViewer – Great remote access software for remotely connecting computers
- Zoho Assist – User-friendly remote control tool for quickly initiating
- AnyDesk – Excellent for managing remote desktop contacts
- UltraVNC – Great for connecting to a virtual PC or app
- BeyondTrust – Best tool for accessing your desktop securely
- Chrome Remote Desktop – Great for remotely controlling another computer’s desktop
- LogMeIn – Excellent for working remotely with access to remote control tools
1. RealVNC – Best for remotely accessing macOS from Windows overall
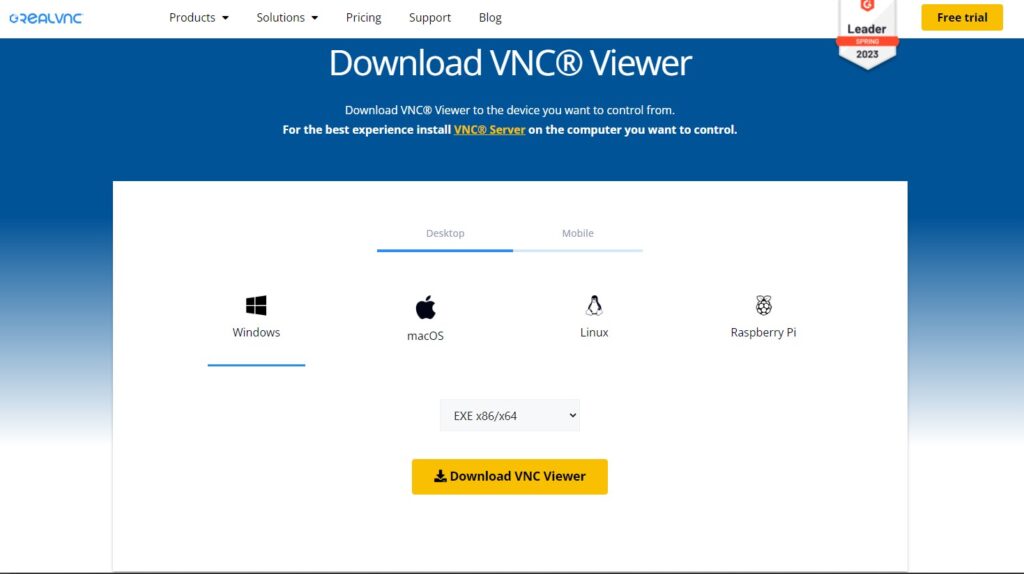
- Operating System: Windows, MacOS, Linux, and Raspberry Pi
- Pricing: Freemium
- Developer: RealVNC® Limited
RealVNC provides server and client tools for remotely connecting to another computer’s screen. It’s great for people who require 24/7 oversight over their systems to attend to problems when they occur.
You can use RealVNC to access your macOS computer from a Windows PC. It requires proper credentials, access to the internet, and having the software installed on both computers.
On the Mac, download VNC Connect and add your credentials after installing it. Second, download VNC Client on your Windows computer and verify the account from your email. A remote computer will automatically appear on your app screen. Select it to start controlling the device.
You’ll need to enter your desktop login credentials. Once logged in, you can control every aspect of the computer from your remote location.
Pros
- With a stable internet connection, the app takes just a few minutes
- Using the RealVNC server ensures your connection is secure
- The company offers easy-to-follow tutorials to help you get started faster
- Keep your organization connected, saving time and increasing productivity
Cons
- Once your free trial is over, you’ll pay to access the features
Download RealVNC
2. Remote IT – Great for connecting users and devices when other solutions fail

- Operating System: Windows, MacOS, Linux, and Raspberry Pi
- Pricing: Freemium
- Developer: RealVNC® Limited
Remote IT helps you connect computers using your browser, desktop, and mobile like they were on the same local network. Getting started with the application is free. It uses a private network to enhance security and provide better performance.
You can use Remote IT to connect to an endpoint or device, even if you don’t have the software installed on the target computer. It offers the option to connect to AWS, Mac, Windows, RasberryPi, Linux, Google Cloud, and Azure, among others.
To connect to Mac normally, download and install the software on the endpoint, register the devices, and add the services you’d like to connect to on port 5900, including SSL, Terraria, and RDP.
Navigate to System Preferences > Sharing and click the box next to Screen Sharing. Click on Allow Access for All Users and exit the window.
On your Windows PC, install any VNC client and open the Remote IT desktop app. The target computer should appear on your desktop under the devices tab. Click on it, log in, and start controlling the computer.
Pros
- The application offers a free plan for non-commercial usage
- You can connect to up to 2000 devices with access to all features
- Connect using a private network with advanced security
- Embed Remote IT on small IOT devices where you cannot install VPNs
Cons
- You need a third-party VNC client to use it
Download Remote IT
3. TightVNC – Open-source tool for remotely connecting to computers
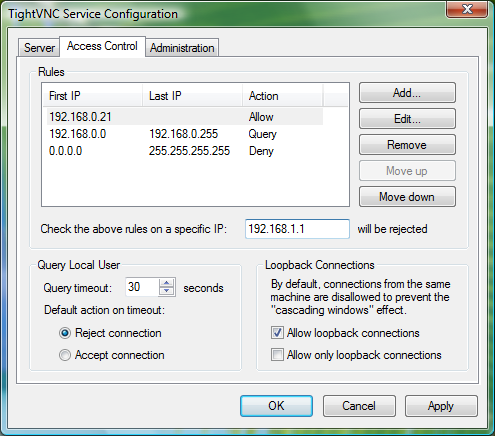
- Operating System: Windows, MacOS, iOS, and Android
- Pricing: Free
- Developer: GlavSoft LLC
TightVNC is a free and open-source remote desktop software for accessing and controlling other computers using the internet. It’s made for Windows and Linux, but a commercial license is available for Mac users.
After Screen Sharing your Mac computer with other users, you can use a tool like TightVNC on Windows to connect remotely. First, enable screen sharing then enable a VNC password on your Mac.
Next launch your TightVNC app on your desktop. Type in the IP address from your Mac computer displayed in the Screen Sharing window and click on Connect. Enter your macOS login credentials and start using the computer.
Pros
- The software is free and open source to use
- You connect to the computer directly using the internet
- TightVNC does not require you to create an account
- The application requires minimal configurations
Cons
- The connection is less secure compared to other options
Download TightVNC
4. TeamViewer – Great remote access software for remotely connecting computers
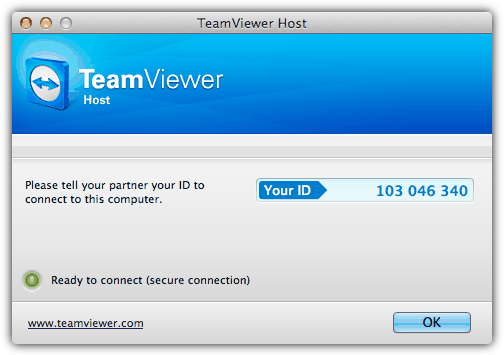
- Operating System: Windows, MacOS, Linux, Chrome OS, Android, iOS, and Raspberry Pi
- Pricing: Freemium
- Developer: TeamViewer
TeamViewer is a popular remote access software commonly used to provide remote support. It’s easy to use and comes with compelling features such as file transfer, switch sides, conference calls, VoIP, and screen recording. The app works on multiple operating systems, allowing you to control a Mac OS X system from a Windows computer.
You will need to download and install the “HOST” version of TeamViewer on the Mac computer that you want to remotely control. As for the Windows computer that will be controlling the Mac computer, simply download the TeamViewer full version, and install and run it. Enter the ID followed by the password and you’re able to connect to the OS X machine. The ID will not change and always stay the same on the machine.
The TeamViewer Host options can be accessed by clicking on the TeamViewer icon at the menu bar and selecting Preferences. You can change your password, configure the voice, microphone, phone conferencing, access control and etc.
Pros
- The software does not require installing an application on the host computer
- You can screen record, transfer files, and make conference calls
- It’s most suitable for business usage and team collaboration
- The tool is popular, so it’s easy to find solutions to the more pressing problems
Cons
- You might experience performance issues for slow computers
Download TeamViewer
5. Zoho Assist – User-friendly remote control tool for quickly initiating

- Operating System: Web-based
- Pricing: Freemium
- Developer: Zoho Corporation Pvt. Ltd
Zoho Assist is a user-friendly remote control application for initiating secure remote support and screen-sharing sessions. It assists you to get secure web-based control over remote PCs, laptops, mobile devices, and servers.
The software provides a Mac remote desktop software to help you access your Mac desktops and back-end servers. You get instant access to desktops so you can provide screen support to your customers anytime.
You must create a Zoho account, start a remote desktop protocol, and share your details with the host computer owner to get started. If you’re the owner, create a session and join using your PC and remote control your desktop with ease.
Pros
- The software offers a free account for personal use
- Schedule a session at your convenient time or start now
- When they receive an invite, users can download the shareware and start connecting
- The session remains secure as you only share your ID with respective people
Cons
- You need an enterprise license to access all features
Download Zoho Assist
6. AnyDesk – Excellent for managing remote desktop contacts
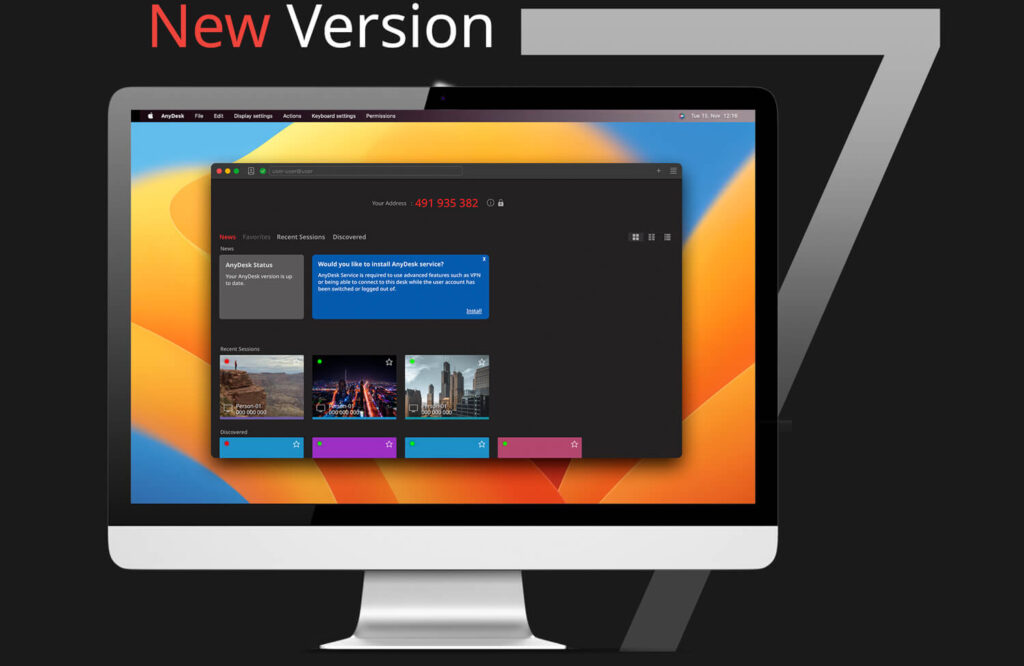
- Operating System: Windows, MacOS, Android, iOS, ChromeOS, Linux, and Raspberry Pi
- Pricing: Freemium
- Developer: AnyDesk Software GmbH
AnyDesk is a remote desktop connection protocol application for managing remote contacts and customers. You can use the software to access personal remote computers or other devices running the app.
You can use AnyDesk to connect any Windows computer to a Mac device. You don’t require an AnyDesk application, but you may need third-party VNC tools. The most recommended tool to use alongside AnyDesk is Atera.
The tool will download AnyDesk automatically on the target computer and enable remote access on your behalf. Copy the given code and paste it into your AnyDesk platform.
Pros
- It’s easy to find and install AnyDesk on a device on the user’s command
- The system saves your previous sessions, so it’s easier to connect to them in the future
- It’s easy to adapt the software to your company’s needs
- Most configurations are done for you by the AnyDesk app
Cons
- The premium version can be expensive to use
Download AnyDesk
7. UltraVNC – Great for connecting to a virtual PC or app
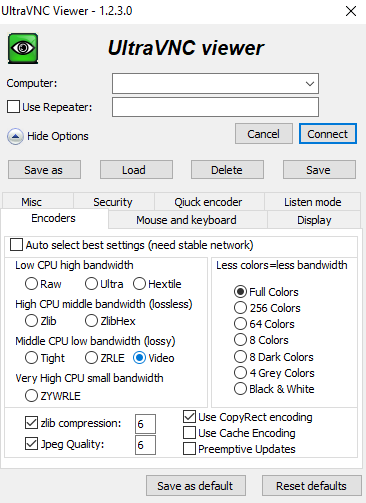
- Operating System: Windows, MacOS, and Linux
- Pricing: Free
- Developer: UltraVNC Team
UltraVNC is a free and open-source remote administration or desktop control utility for Windows and Linux. You don’t need to install it on your Mac PC as you can use system settings to share your screen.
To get started, share your screen from the Screen Share preferences on your Mac computer. On the Screen Share screen, select the Computer Settings button and choose VLC Viewers May Control Screen With Password.
On your Windows PC, open UltraVNC viewer and enter your IP address, and select Connect. Type the password you created on your Mac and the app will connect you to your Mac in a few seconds.
Pros
- UltraVNC is free and open-source so you can use it for life
- Use your mouse and keyboard to control other computers
- Great for connecting PCs in your local network
- It comes with features not present on other free versions
Cons
- Many companies consider UltraVNC a security risk
Download UltraVNC
8. BeyondTrust – Best tool for accessing your desktop securely

- Operating System: Windows, MacOS, Linux, Chrome OS, and web-based
- Pricing: Freemium
- Developer: BeyondTrust Corporation
BeyondTrust is a company that develops many access management, identity management, privileged remote access, and vulnerability management programs. It ensures that access is managed, monitored, and privileged access.
The platform supports access to Mac, Windows, and Linux simultaneous connections. You can also access your Android and iOS with screen sharing and remote control. The connections are fast, allowing you to manage unattended and grow your business securely with automation.
With privileged remote access, you can secure, manage, and audit team members’ privileges without using a VPN. It brings all appliance-based security that usually requires VPN tunneling, port-forwarding, and firewall configurations.
Pros
- Connect computers without the need for port-forwarding or VPNs
- Screen share your Android, iOS, Mac, Windows, and Linux devices
- See the screen of devices and control devices remotely
- Manage a large pool of devices simultaneously
Cons
- High licensing costs
Download BeyondTrust
9. Chrome Remote Desktop – Great for remotely controlling another computer’s desktop
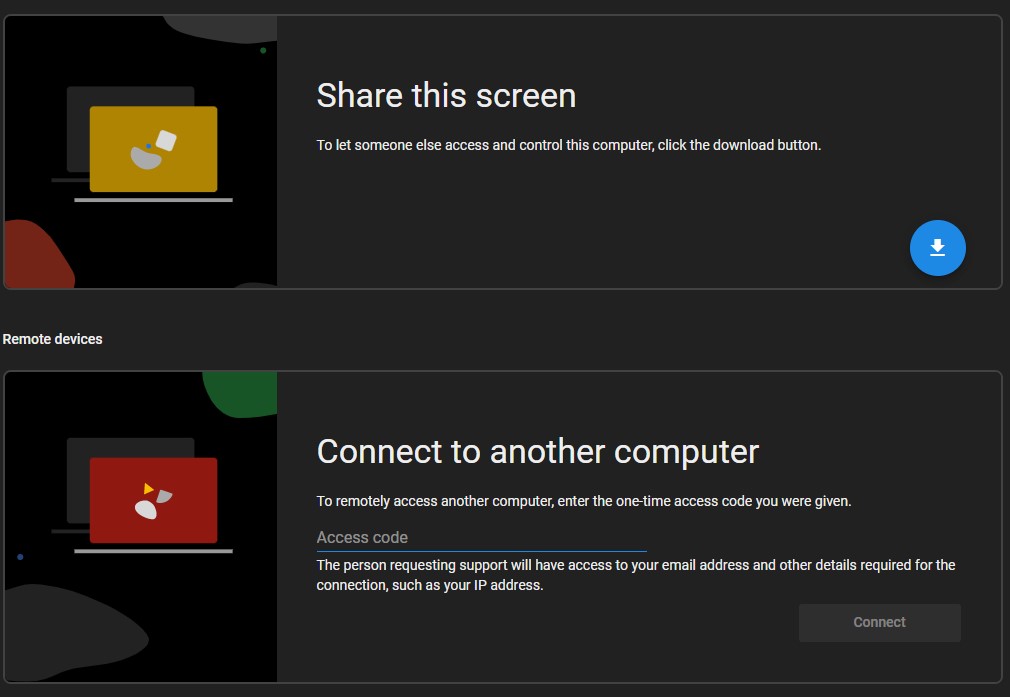
- Operating System: Web-based
- Pricing: Free
- Developer: Google
Chrome Remote Desktop is a remote desktop software designed for remotely controlling another computer internally. You can install the app to access more shortcuts or use a web browser, which takes up less space.
The downside of the software is that it gives the person connecting to your computer access to your IP and email address, among other critical information. However, if you own the device, then you don’t have to worry about anything.
Pros
- Allow another user to access and control your PC
- Installing a Chrome extension takes a few seconds
- Access another user’s computer by entering a code
- Set up SSH for remote computer connections
Cons
- The tool will share your private information
Download Chrome Remote Desktop
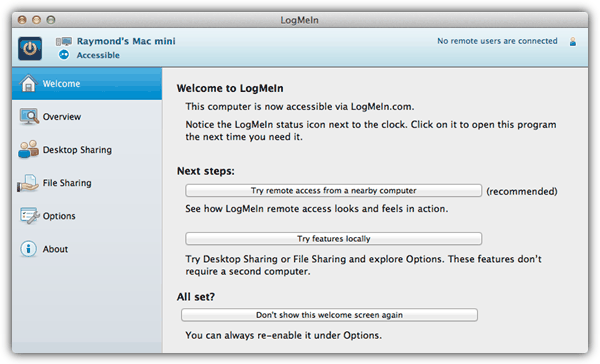
10. LogMeIn – Excellent for working remotely with access to remote control tools
- Operating System: Windows, MacOS, Linux, and Raspberry Pi
- Pricing: Freemium
- Developer: RealVNC® Limited
LogMeIn Free allows you to conveniently remotely control a Mac computer running OS X from Windows through its web interface or the Firefox plugin. You will need to create a free account and log in from the Mac computer.
Click the Add Computer button to download the LogMeIn Installer. After installation, you are able to access that computer from any other computer by logging in to LogMeIn. Do take note that the file transfer feature is disabled in the free version.
Pros
- Remotely control a computer from a remote location
- Access all your desktop files, programs, and information
- Provide high-level customer support by visualizing the problem
- Empowers your team to work from anywhere
Cons
- LogMeIn is an expensive tool
Download LogMeIn Free
How Do I Remotely Control Another Mac?
You don’t need to install additional software to control another Mac remotely; you can remotely control it using your MacOS. To get started, navigate to the Apple menu > System Settings and click General in the sidebar.
Turn on the remote login and click the info button on the right. Next, click Allow full disk access for remote users checkbox on your panel, giving the other computer full access.
Conclusion
If you have multiple computers or workstations, you don’t have to use one at a time. You can operate both computers simultaneously using the same mouse and keyboard. Try the above-mentioned tools to see which is most useful for you.
What do you think about the above-mentioned tools? Have a favorite app that you’d like to share with our readers? Share your thoughts in the comment section below.
На чтение 7 мин. Просмотров 2.7k. Опубликовано

Удаленный доступ к экрану – это удобный способ получить доступ к другому компьютеру, как если бы вы сидели перед ним. В OS X и Windows эта возможность встроена прямо в них, что означает, что вы можете легко обмениваться экраном вашего Mac с ПК с Windows, и наоборот.
Если вы используете смешанную сеть, это, скорее всего, комбинация компьютеров Mac и Windows. Для обслуживания файлов может быть установлена машина Linux, но у большинства людей есть Windows или Mac, а иногда и то и другое.
С каждым методом, описанным ниже, мы подключаемся с клиента, который мы установили в нашей системе, к целевому компьютеру. На нашем Mac мы используем приложение Remote Desktop (RDP), а в Windows – RealVNC Viewer.
Эти инструменты позволяют нам подключаться к целевому компьютеру с помощью собственного метода каждой системы. Другими словами, Windows изначально использует RDP, а OS X использует VNC. Это означает, что нам практически не нужно настраивать целевые объекты, поэтому все, как обычно, работает без проблем.
Подключение к ПК с Windows-клиентами с Mac
Ранее мы уже обсуждали, как использовать удаленный рабочий стол для доступа к другим компьютерам Windows в том же доме. Это не так сильно отличается от OS X, но давайте рассмотрим это ради тщательности.
Для подключения к ПК с Windows сначала необходимо включить удаленные подключения. Откройте «Свойства системы» и перейдите на вкладку «Удаленный», затем убедитесь, что «Разрешить удаленные подключения к этому компьютеру» включен.

Вы также хотите убедиться, что на вашем Mac установлен клиент удаленного рабочего стола Microsoft. Это доступно в App Store.

Удаленный рабочий стол будет установлен в папку приложения Mac. В нашем примере мы уже настроили профиль пользователя, который готов к действию. Однако давайте на минутку нажмем «Изменить» и покажем, что с этим связано.

Рядом с «Имя соединения» мы даем ему понятное имя, а «Имя ПК» – это либо имя, которое мы дали целевому ПК, либо его IP-адрес.
Мы не беспокоимся о настройке шлюза, потому что мы подключаемся к нашему ПК в нашей локальной сети. Кроме того, если вы не хотите вводить имя пользователя и пароль при каждом подключении, вы можете добавить их в «Учетные данные». Отсутствие ввода учетных данных означает, что при подключении к компьютеру под управлением Windows вам необходимо будет войти в систему. учетная запись.

Если вы хотите узнать имя и/или IP-адрес вашего ПК, вам необходимо проверить. Используйте сочетание клавиш «Windows + R», а затем введите «cmd», чтобы открыть командную строку. В командной строке введите «ipconfig» и нажмите «Return». Вы хотите использовать IPv4-адрес, который он вам дает.

Если вы не помните, как вы называли свой компьютер, вы можете найти эту информацию на панели управления «Система».
Преимущество использования имени компьютера перед IP-адресом состоит в том, что имя остается неизменным, если вы его не измените, тогда как IP-адреса могут изменяться время от времени.
Остальные параметры подключения к удаленному рабочему столу касаются разрешения, цветов и параметров полного экрана.

Когда вы подключаетесь к новому клиенту, вы, скорее всего, увидите диалоговое окно «Подтвердить сертификат». Нажмите «Продолжить» для подключения.

Если вы не хотите видеть это диалоговое окно с предупреждением в будущем, нажмите «Показать сертификат», а затем установите флажок «Всегда доверять…», как показано ниже.

Чтобы подтвердить изменения в настройках доверия к сертификату, вам потребуется ввести системный пароль.

Помните, что если вы ранее ничего не вводили в учетные данные подключения, вы увидите экран входа в систему при первом подключении. После успешного подключения к ПК с Windows с вашего Mac появится рабочий стол Windows.
 Если мы хотим связываться с нашим тестовым компьютером с Windows 10, нам не нужно на самом деле быть там.
Как мы уже упоминали, возможность подключения к машине с Windows – приятное удобство. Например, ваш компьютер под управлением Windows может быть супер мощной машиной, которую вы используете для компиляции или рендеринга. Вы можете использовать удаленный рабочий стол для проверки хода выполнения задания или запуска задач, фактически не находясь физически за компьютером.
Подключение к Mac с ПК с Windows
Подключение к Mac с ПК с Windows немного отличается. Вы не сможете использовать Remote Desktop, но это нормально, потому что есть бесплатный клиент под названием RealVNC viewer, который отлично справляется с задачей.
Как и в случае с Windows, вы сначала должны настроить свой Mac для совместного использования экрана.Откройте панель настроек «Общий доступ» и установите флажок «Общий доступ к экрану».
 Если вы хотите изменить имя вашего компьютера, вы можете нажать кнопку «Редактировать». Вы можете оставить параметры «Разрешить доступ для:» как есть.
Нажмите «Настройки компьютера…» и убедитесь, что «VNC-зрители могут управлять экраном с паролем». Затем введите простой пароль.
 Пароль может содержать от одного до восьми символов. Это не должно быть сложным, но, по крайней мере, сделать его трудно угадать.
VNC Viewer требует установки, но вам не нужно регистрировать учетную запись, чтобы использовать его.
Вспомните из более раннего скриншота, что к экрану нашего Mac можно обратиться по адресу 192.168.0.118 или Matt-Air.local. Если вы не знаете, как получить доступ к вашему Mac, вернитесь к настройкам общего доступа и дважды проверьте информацию в настройках общего доступа к экрану.
Мы вводим «192.168.0.118» в нашем клиенте VNC и оставляем шифрование как есть.

Приложение RealVNC Viewer имеет множество вариантов, которые вы можете просмотреть на досуге. Вы, вероятно, будете в порядке, оставив их без изменений, хотя, если вы хотите, чтобы ваше соединение автоматически открывало полный экран, вам нужно поставить галочку напротив «Полноэкранный режим».
 Честно говоря, мы почти никогда не связываемся с ними. Совместное использование экрана из Windows на Mac, кажется, работает просто отлично.
Мы возвращаемся к нашему соединению и нажимаем кнопку «Подключиться». Появится окно аутентификации, где вам нужно будет ввести простой пароль, который вы создали в настройках «Общий доступ» на вашем Mac.

Когда вы подключаетесь к целевому Mac, вам также необходимо войти в (предположительно вашу) учетную запись пользователя, так же, как мы делали это с Windows (если мы не предоставили свои учетные данные). После входа ваш рабочий стол Mac появится в окне VNC Viewer в том же состоянии, в котором вы его оставили.

Если вы наведите курсор мыши на верхнюю середину окна, вы можете вызвать дополнительные элементы управления, которые при наведении на них дают подсказку, объясняющую, что делает каждый из них.
 Эта маленькая панель инструментов позволит вам выполнять такие вещи, как закрытие соединения, переход к полноэкранному режиму и многое другое. Наведите курсор на каждую кнопку, чтобы узнать, что она делает.
Вы найдете удобные сочетания клавиш для закрытия и сохранения соединения, а также для изменения параметров и полноэкранную кнопку, чтобы ваш общий рабочий стол занимал весь экран.
Со стороны Mac, значок «Общий экран» появится в строке меню. Это позволяет быстро и легко получить доступ к настройкам общего доступа к экрану или отключить клиентов.

Важно помнить, что совместное использование экрана компьютера действительно подходит только для небольшой работы. Если вы пытались что-то удаленно починить или показать другому пользователю, как это сделать, это идеально, но для выполнения какой-либо значимой работы не так уж много. Вы всегда будете испытывать небольшое отставание и заикание, и с этим ничего не поделаешь.
Однако, как мы уже говорили, он не предназначен для работы в тяжелых условиях. Помните также, что мы показываем наши экраны только локально, а это означает, что если вы выйдете из дома, скажем, чтобы пойти выпить кофе, и вы поймете, что вам нужно подключиться к машине дома, вам нужно знать, как подключитесь к нему через свой роутер. Есть способы сделать это как на Mac, так и на Windows-машинах.
Мы рекомендуем вам ознакомиться с этими статьями для получения дополнительной информации о том, как удаленно подключаться к вашим компьютерам дома. Если у вас есть какие-либо комментарии или вопросы о том, что вы прочитали сегодня, пожалуйста, оставьте свой отзыв на нашем форуме.
Чтобы удаленно подключиться к операционной системе Mac OS с компьютера на Windows, существуют несколько способов.
Один из них — использование встроенного инструмента Apple Remote Desktop (ARD). Для этого необходимо установить ARD на компьютере Mac и на компьютере под Windows. После настройки соединения можно удаленно управлять Mac OS через клиентское приложение на ПК.
Другой вариант — использование сторонних приложений, таких как TeamViewer или AnyDesk. Эти программы позволяют удаленно подключиться к компьютеру Mac с помощью ПК под управлением Windows. Необходимо установить одну из этих программ и на компьютере Mac, и на компьютере Windows, затем установить соединение с помощью уникального идентификатора устройства или кода доступа.
Также существует возможность использования виртуальной машины в Windows с установленным Mac OS. Например, с помощью программы VirtualBox можно создать виртуальную машину с Mac OS и запустить ее на компьютере под управлением Windows. В результате можно иметь доступ к Mac OS на виртуальной машине без необходимости удаленного подключения.
Независимо от выбранного способа, для удаленного подключения к Mac OS из Windows необходимо убедиться, что оба компьютера подключены к интернету и настроены для разрешения удаленного доступа.
Удалённый рабочий стол на МАК!!! Инструкция для робо-владельцев)))
Удалённое управление компьютером: мой опыт TeamViewer, AnyDesk, Google Remote Desktop
НАСТРОЙКА Anydesk MacOS VENTURA
Как подключиться к другому компьютеру Mac
фишки Mac OS о которых ты не знал
Как восстановить удаленные файлы на MacOS — 4DDiG Data Recovery для Mac.


Remotely connecting to macOS computers from a Windows desktop or laptop and iOS devices like an iPhone or iPad allows you to access and control your Mac workstation from anywhere. From this article, you will learn all the different ways you can use to safely access your Mac over a distance and choose one that suits your needs the most.
How to access a Mac remotely with Remote Login
Remote Login is a built-in macOS service that allows remotely connecting to Mac from different Mac devices using SSH (Secure Shell Protocol) or SFTP (SSH File Transfer Protocol). Keep reading to find out what you need to do to enable this feature on your device:
Seting up Remote Login
-
Go to Apple Menu > System Settings.
-
In the sidebar, click General, then scroll down to find Sharing.
-
Tick the box next to the Remote Login service to turn it on, then tick the “Allow full disk access for remote users” checkbox, if needed.
-
Use the bullet list to specify if you want to allow remote access for all users in your local network or only the specific ones.
-
Copy the
ssh username@hostname
command and pass it to the other devices that will access your Mac remotely:

Safety precautions
By allowing remote access to Mac via Remote Login, you are making your device less secure. Here are some of the measures you may take to control Mac remotely without compromising your system and data safety:
- ➤ “Strong” passwords: it’s strongly recommended to never use any easy-to-guess passwords like your date of birth, kid’s name, etc. Use an automatically generated password instead and only store them in secure locations like Keychain Access or iCloud Keychain.
- ➤ Passkeys: use Touch ID and Face ID to log into your Mac account on mobile devices.
- ➤ Guest accounts: whenever you are letting someone else use your device, set up a separate user account or a guest account to prevent them from accessing your personal data.
- ➤ Hot corners: set up one of four hot corners to Lock Screen and use it every time you leave your device unattended.
- ➤ Admin privileges: set up your account as the only administrator for your device and limit all the other accounts’ ability to install and remove software and change settings.
- ➤ FileVault: for any sensitive data, use FileVault encryption so no one else can read or copy your data without your permission.
Using Mac Remote Management
Remote Management is a macOS feature you can use to allow remote access to your device via Microsoft Remote Desktop client for Mac or a third-party RDP client app. It can be of good service for those looking for a way to operate an office MacBook workstation from home or get emergency assistance from your company’s tech team.
Here is what you need to do to enable Remote Management on your device:
- Go to Apple Menu > System Settings.
- In the sidebar, click General, then scroll down to find Sharing.
- Tick the box next to the Remote Management service to turn it on and specify the level of access allowed in the authorized remote access section:

- Choose who you want to allow access from the menu:


Setting up Mac Remote Desktop
Apple Remote Desktop (ARD) is a paid add-on app that allows you to control multiple computers remotely over a network to exchange files, install updates, run apps, schedule automated tasks, etc. Basically, Remote Desktop Apple is a Mac alternative to a popular Microsoft Remote Desktop Protocol client for Windows.
Here are the basics of how to use Apple Remote Desktop:
- Download Remote Desktop from the App Store and follow the setup assistant to install it on your device:

- If you have a Task Server, enter its address and click Continue.
- Install the Remote Desktop client app on all your computers (it’s already pre-installed on macOS ones).
- Use Scanner to find and add all the client machines from your Bonjour domain that need Apple remote access.

Note: You can’t use Apple Remote Desktop app on your iPad or iPhone as there is no mobile version at the moment/ Install the Microsoft Remote Desktop client for iOS instead.
Control another Mac remotely with Screen Sharing
Mac’s built-in Screen Sharing feature allows you to access a Mac from another computer on the same network. It will be especially useful to those looking for an easy way to connect two computers that use the same iCloud account.
Here is how to access Mac via screen sharing:
- Go to Apple Menu > System Settings > Sharing and tick the checkbox (shown below) to enable Screen Sharing:

- Specify who can and cannot access your Mac under the “Allow access for” section and write down your Mac’s IP address:

- Now, on the other Mac, go to Finder > Go > Connect to Server and type the IP address into the respective text box.
- Request the connection via Permissions.


Connecting to a Mac from Windows
Let’s have a look at the native method of accessing Mac from PC, which can be specifically helpful for those who want to run Mac-exclusive alls on a Windows machine. But remember that after using this method you’ll be granted access to the Home folder only. To make other folders visible from a Windows machine, you will need to give specific access permission.
Here is what you need to do for connecting PC to Mac over network:
- Set up file sharing on your Mac and pass the computer’s name and password to your Windows machine.
- On the Windows PC, go to File Explorer > Network.
- Double-click the Mac you want to connect to and use the name and password to log into your user account.
Connect Mac from a non-Mac over network
Here is how to remotely connect to another Mac with a non-Mac device. While the process is still very simple, there are some steps users will need to handle differently.
On your macOS device:
- Go to System Preferences > Sharing > Computer Settings:

- Enter a password to allow VNC Viewer to control the screen and click “OK”:

- Specify user access privileged from the “Allow access for” section;
- Write down the IP address of your Mac;


On the other device:
- Type the IP address of your Mac into the VNC app:


Note: You can remotely access your Mac from iPads, iPhones, Windows, or Linux computers as long as the app is installed.
- On the Authentification tab, log in using the password you’ve already created.
- Hit Connect (as shown below):


FAQ
Screen Sharing allows users of other computers to remotely view and control this computer. It is based on the VNC (Virtual Network Computing) protocol.
Remote Management gives other users full access to the computer using Apple Remote Desktop.
Remote Login lets users of other computers access this computer using SSH and SFTP.
You can access your Mac over the Internet is possible with a VNC client or an Internet-based remote desktop app. Both machines must have a static IP address, which isn’t offered by many home Internet connections.
Similar to Windows and Linux PCs, Mac computers can be awakened or turned on remotely. Mac computers have multiple sleep modes that can be configured to accept Wake On Lan (WOL). Users can even make this work over the Internet.
Those without a set up WOL can’t remotely access a Mac unless it’s already on/awake.
If your Mac is your primary computer, you’ll like to have the ability to connect to it remotely from another computer. This gives you access to your files and folders even when you’re away from your machine.
If your second computer happens to be a Windows machine, you can use the SSH protocol to remote connect to your Mac from your Windows computer. This establishes a very secure connection between two of your computers and lets you work on your Mac files from your Windows machine.
In order to connect a Windows PC to your Mac via SSH, you need to first configure a few options on your Mac. Then you’ll be all set to connect to your Mac from any Windows computer located anywhere in the world.
Enable The Remote Login Feature On Mac
Your Mac has a feature called Remote Login that allows other computers on your network as well as on the Internet to remote connect to your Mac and perform tasks on it. To be able to SSH into your Mac from a Windows PC, you need to first enable this option on your Mac.
- Click on the Apple logo at the top-left corner of your screen and select System Preferences.
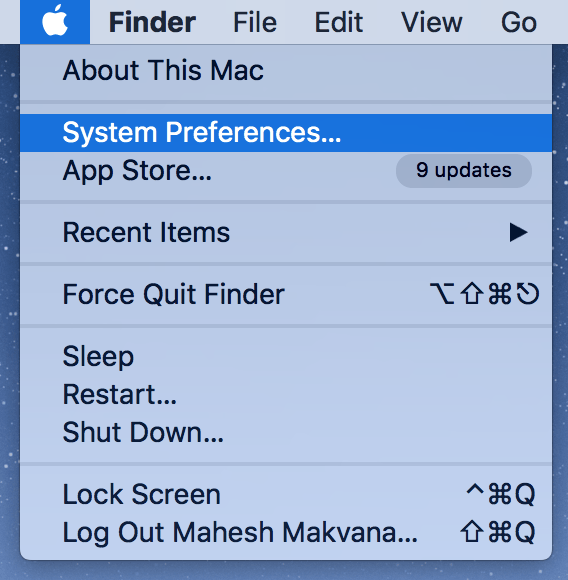
- On the following screen, find the option that says Sharing and click on it. It’ll open the sharing settings menu for your Mac.
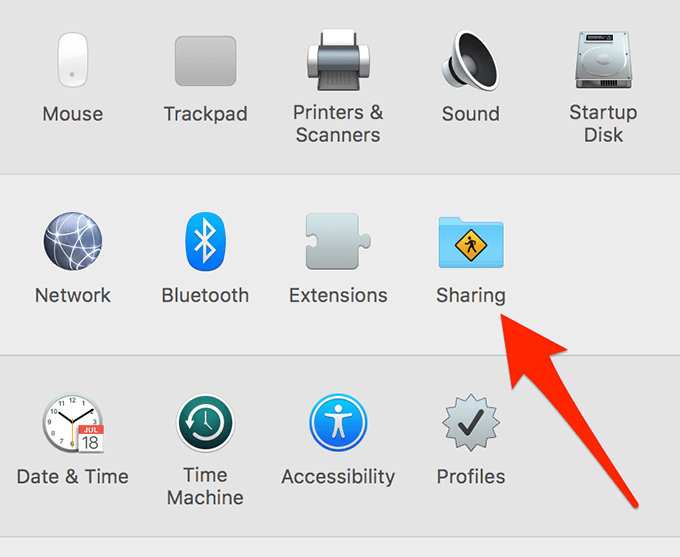
- The screen that opens has several options letting you share the contents of your Mac. Find the option that says Remote Login in the list and put a tick-mark in its box. This will enable the feature on your Mac.
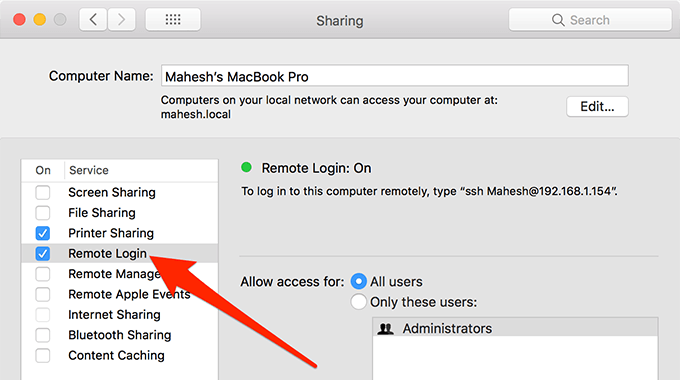
You are now all set to connect to your Mac from your Windows PC over SSH.
The only thing you now need is the IP address of your Mac. If you’ll be connecting from a Windows machine that is on the same network as your Mac, you’ll need the local IP of your Mac. You then don’t need to enable port forwarding on your router.
If you’ll be connecting from a Windows machine that’s not on your home network, you’ll need the global IP of your Mac. In this case, you’ll need to follow the port forwarding instructions given below to access your Mac remotely.
Find The Local IP Of Your Mac
You’ll find your Mac’s local IP on the Sharing pane you accessed previously. If you’ve closed it already, click on the WiFi icon at the top and select Open Network Preferences.
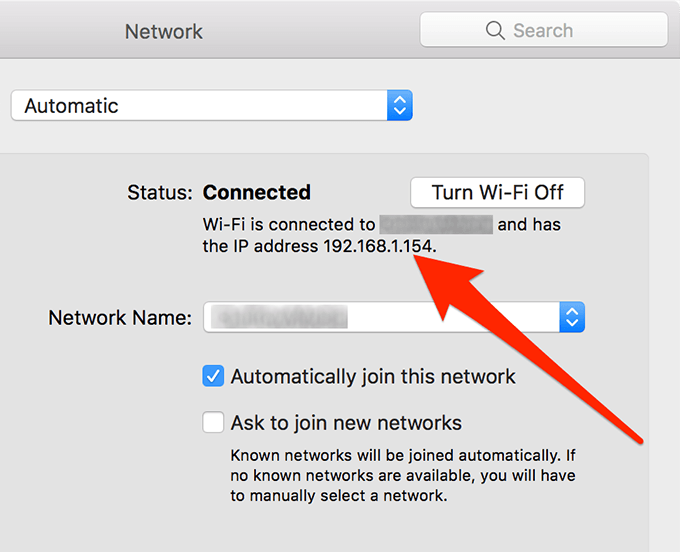
Your IP address should be listed on the following screen.
Find The Global IP Of Your Mac
You can do a simple Google search to find your IP address on the global Internet.
Head over to Google and search for My IP Address.
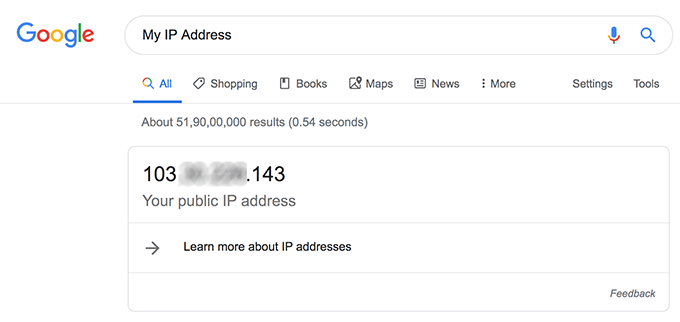
Google will let you know your public IP address.
Set Up Port Forwarding On Your Router
If you’re going to be remotely connecting to your Mac from a Windows PC far away from your home and not on your local network, you’ll need to forward the port on your router as shown below.
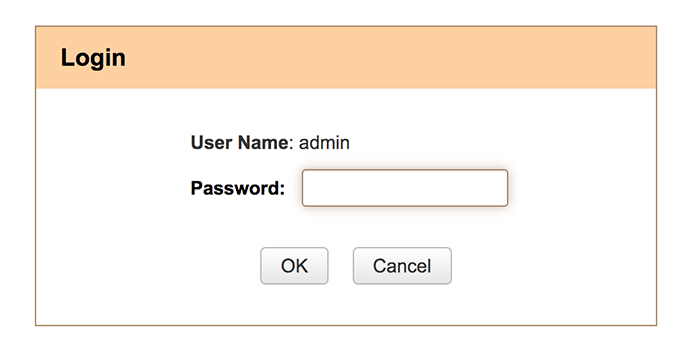
- Open a new tab in your browser, enter 192.168.1.1 in the address bar, and hit Enter. It’ll open your router’s settings page.
- When the page opens, log in using the default login which is admin and admin for both the fields and continue.
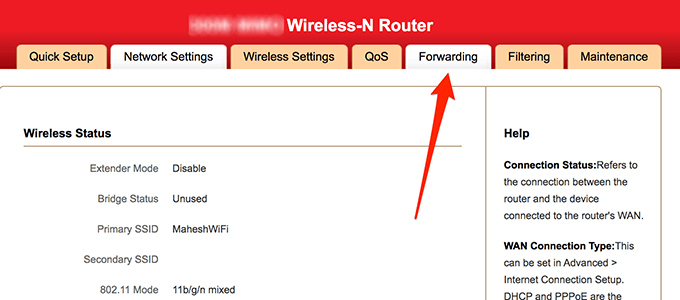
- Click on Forwarding at the top to open your forwarding settings page.
- Click on Port Forwarding on the following screen. Enter 22 and 22 in both port fields. Then, enter the local IP of your Mac in the LAN IP field, tick-mark Enable, and click on OK at the bottom.
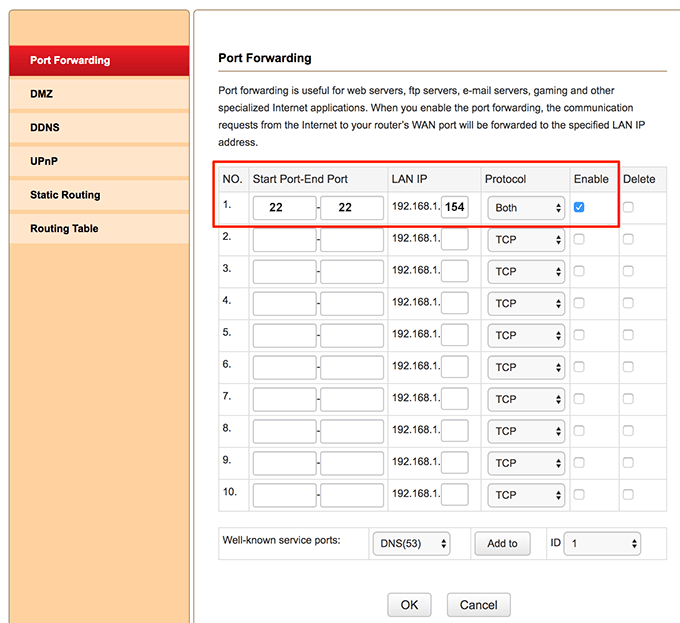
All the incoming traffic for your IP on port 22 will now be forwarded to your Mac. The reason you used port 22 is because it’s the port that SSH uses for connections.
Remote Connect To Mac with SSH Using PuTTY
PuTTY is a free SSH client available for Windows machines that lets you easily connect to any remote computer over the SSH protocol. This is what you’ll be using to remote connect to your Mac from your Windows computer.
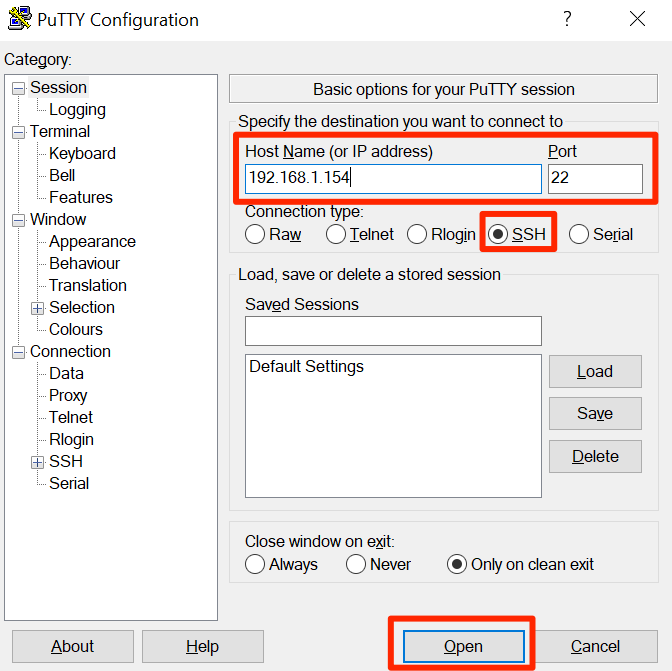
- Head over to the PuTTY website and download and install the app on your PC.
- Launch the app when it’s installed. The main interface shows several fields you can enter values.
- Put your cursor in the Host Name field and type in the IP address of your Mac.
- Ensure the Port field has 22 in it.
- Select the SSH option to ensure you’re connecting using the SSH protocol.
- Finally, click on Open to open a remote connection to your Mac.
- It’ll ask you to enter the username for your Mac. Enter your Mac username and press Enter.

- You’ll be asked for your user account password. Enter the Mac user account password and press Enter.
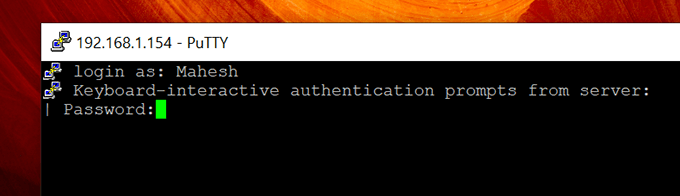
- If all goes well, you’ll be connected to your Mac from your Windows PC.

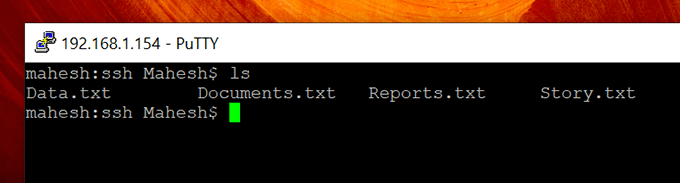
Now that you’re connected, you’ll want to know what things you can do with your SSH connection. Here are some of the basic commands you can run to perform actions on your Mac.
View Files And Folders List
To view the files and folders list for your current directory, you can run the following command.
ls
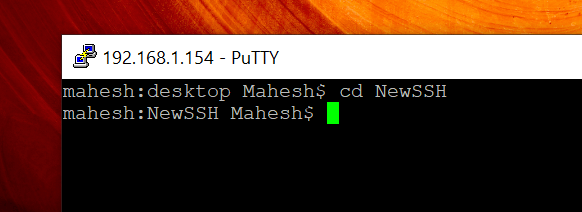
Change The Directory
To change the current directory in your SSH session, use the following command.
cd new-directory
View File Contents
You can access the contents of a file using an SSH command as follows.
cat file-name.ext

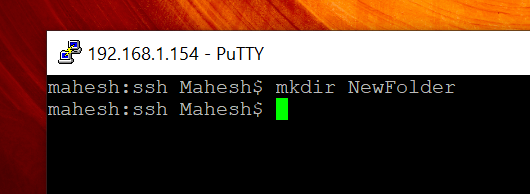
Create a New Folder
SSH lets you create new directories as well. To do it, run the following.
mkdir directory-name
Create a New File
You can even create a new file remotely on your Mac from Windows.
touch file-name.ext

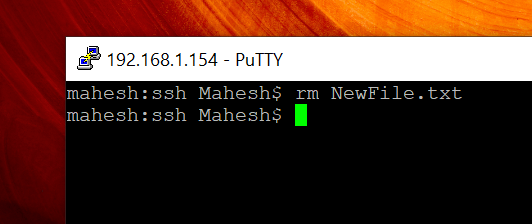
Delete a File
To get rid of a file on your Mac, use the following command on your PC.
rm file-name.ext
In addition to these, SSH has several other commands you can use to perform tasks on your Mac from your PC.