Содержание
- Способ 1: Закрытие связанного процесса
- Способ 2: «Командная строка»
- Способ 3: Изменение владельца файла
- Способ 4: Загрузка в «Безопасном режиме»
- Способ 5: Переименование файла
- Способ 6: Функции архивирования
- Способ 7: Сторонние программы
- Вопросы и ответы
Способ 1: Закрытие связанного процесса
Бывает, что при удалении файла появляется предупреждение о том, что удалить его нет возможности, поскольку он используется определенной программой, которая в этот момент запущена в системе.
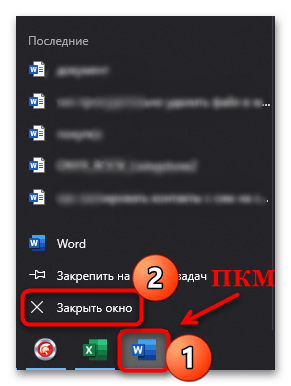
Если связанный с файлом софт отображается на нижней панели, то его нужно просто закрыть обычным способом. Когда его интерфейс не разворачивается, щелкните по задаче правой кнопкой мыши и выберите пункт «Закрыть окно».
Если же программа нигде не отображается, то выключить ее можно через «Диспетчер задач»:
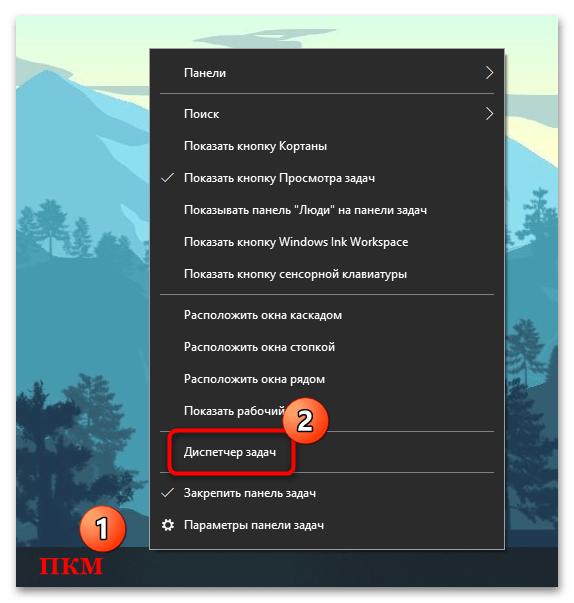
- Откройте «Диспетчер задач». Проще всего кликнуть правой кнопкой мыши по нижней рабочей панели и запустить приложение через контекстное меню.
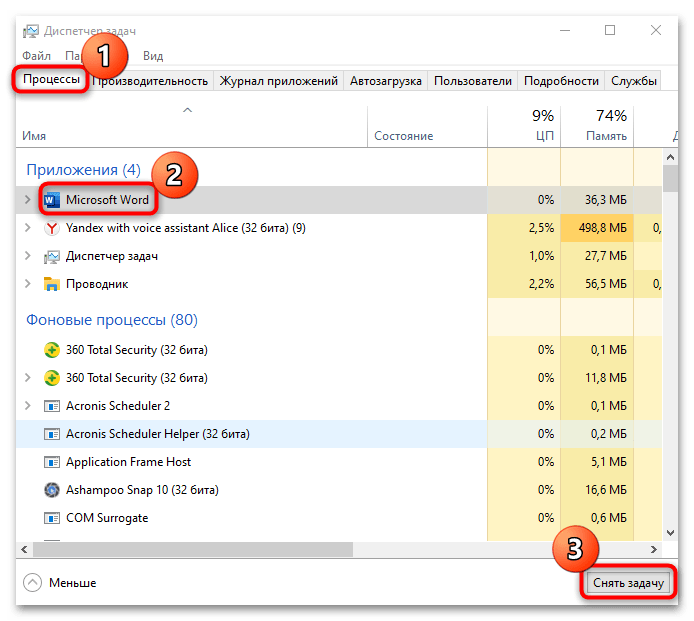
- На вкладке «Процессы» отыщите проблемную программу. Если необходимо, можно упорядочить названия по имени, кликнув по названию столбца вверху. Выделите приложение, затем выберите кнопку «Снять задачу». Для детального поиска процесса можно переключиться на вкладку «Подробности» и поискать там.
После того как программа будет закрыта, должно получиться удалить файл.
Читайте также: Методы принудительного удаления программ в Windows 10
Способ 2: «Командная строка»
Принудительно удалить файл в Windows 10 можно через встроенную консоль, использовав специальную команду и указав путь к нему. Метод может сработать, даже если файл открыт, но из-за сбоев в системе не получается его закрыть.
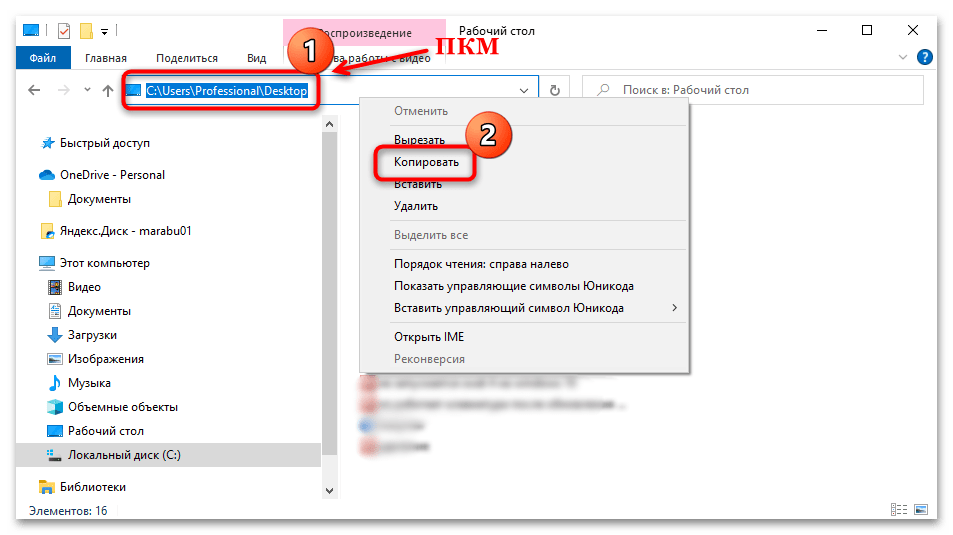
- Через «Проводник» перейдите к расположению файла. Если он находится на рабочем столе или в папке «Загрузки», то указывать нужно путь на диске C через персональную папку (то есть, например,
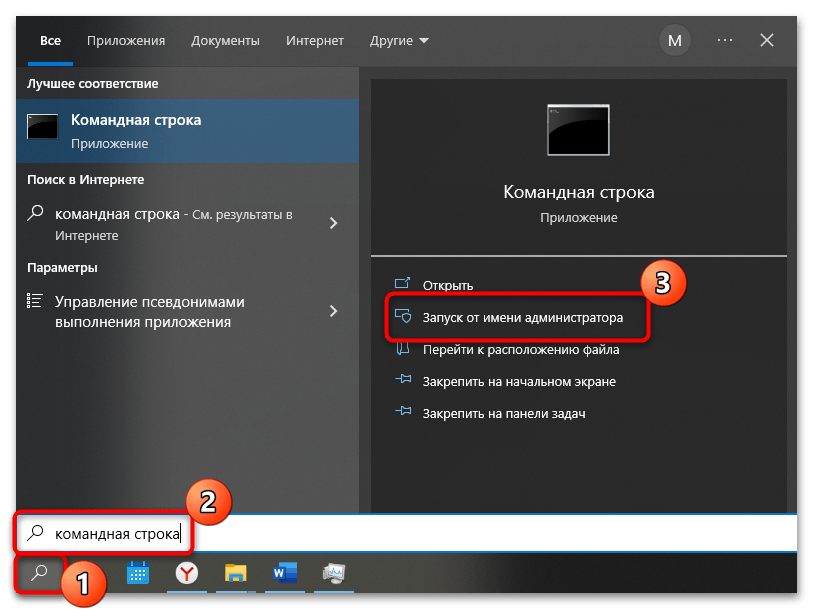
C:\Users\ИМЯ_ПОЛЬЗОВАТЕЛЯ\Downloads). Скопируйте адрес из верхней строки, кликнув по ней правой кнопкой мыши и выбрав пункт «Копировать». - Запустите «Командную строку» с расширенными правами, нажав на «Пуск» и введя в нем название приложения. Среди результатов выберите открытие от имени администратора.
- В консоли введите
del /f /s /q /a, затем поставьте пробел, откройте кавычки и вставьте путь к файлу, поставьте обратный слэш (\) и впишите точное название удаляемого файла с его расширением, после чего закройте кавычки. К примеру, если файл находится на рабочем столе, в нашем примере команда будет выглядеть так:del /f /s /q /a «C:\Users\Professional\Desktop\документ.docx», где «Professional» — имя нашей учетной записи. Нажмите на клавишу «Enter», чтобы подтвердить удаление.
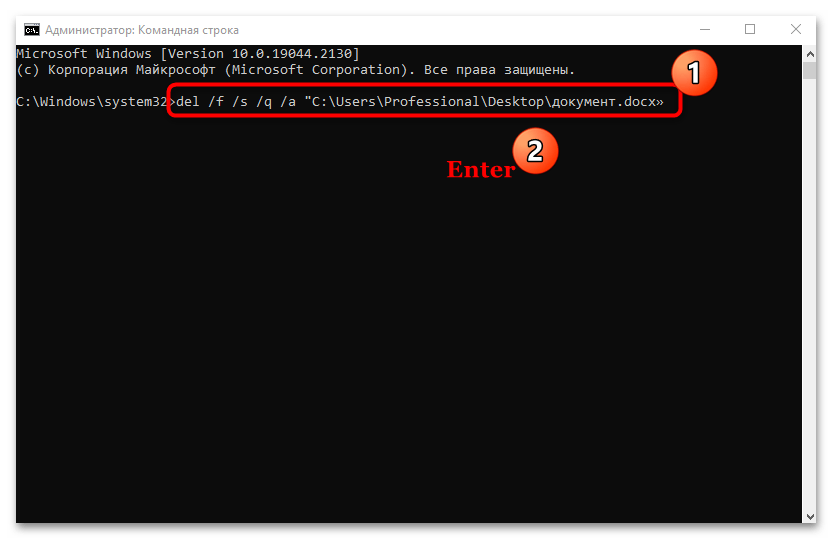
В результате отобразится сообщение, что файл удален, причем при таком подходе он будет стерт без временного помещения в «Корзину».
Способ 3: Изменение владельца файла
В том случае, если во время удаления Windows сообщает, что у пользователя нет прав осуществить процедуру, то здесь проблема заключается во владельце. Обычно это происходит, когда на компьютере используется несколько учетных записей или планируется удалить специфический файл. Чтобы удалить файл, который принадлежит другой учетной записи, потребуется получить право собственности на него. Следует отметить, что это доступно только для администратора Windows 10.
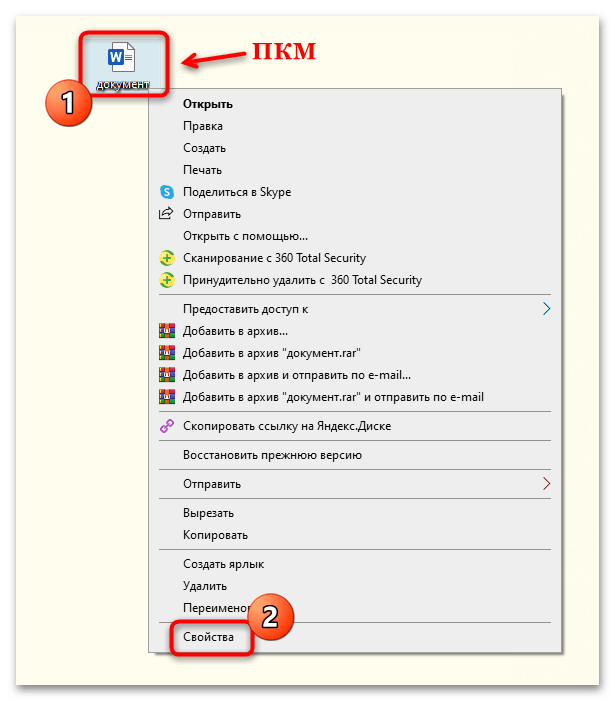
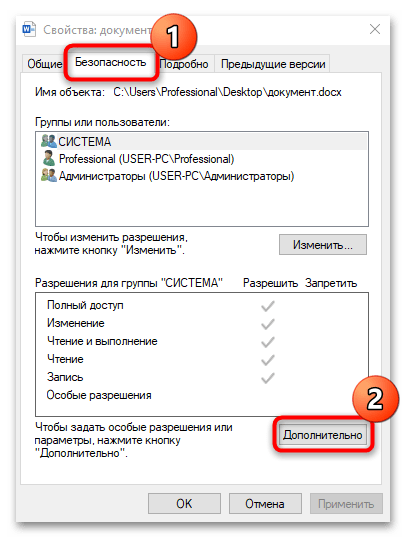
- Щелкните правой кнопкой мыши по названию файла, чтобы вызвать контекстное меню. Перейдите в раздел «Свойства».
- В новом окне нажмите на вкладку «Безопасность», затем на кнопку «Дополнительно».
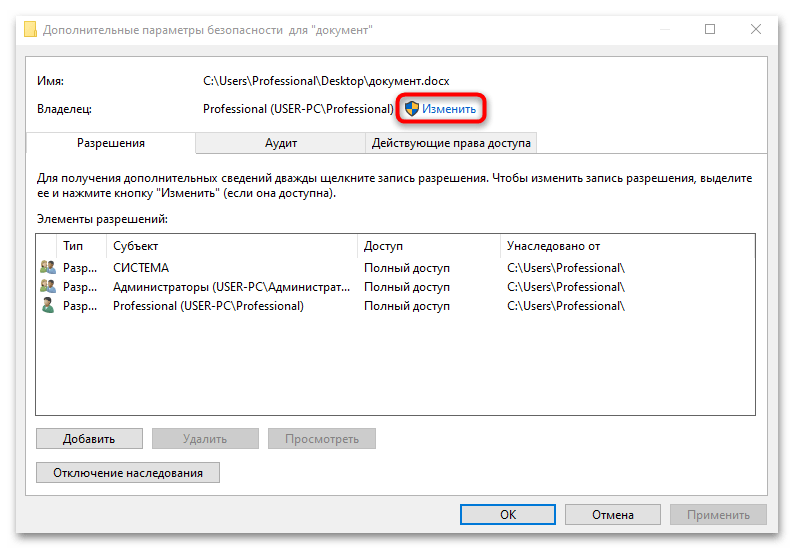
- На строке «Владелец» кликните по ссылке «Изменить».
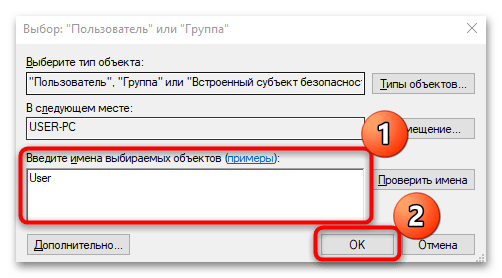
- Введите имя своей учетной записи в специальное поле и щелкните по кнопке подтверждения.
Закройте все окна раздела со свойствами и попробуйте снова удалить файл.
Способ 4: Загрузка в «Безопасном режиме»
Когда сторонние программы мешают удалению файла или это не получается сделать из-за вирусов, которые проникли в систему, может помочь загрузка Windows 10 в «Безопасном режиме»:
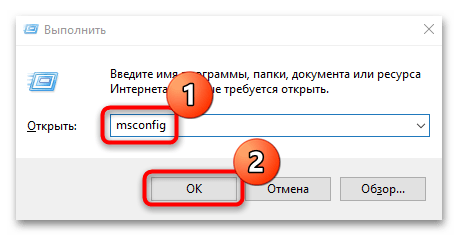
- Откройте средство «Конфигурация системы» с помощью диалогового окна «Выполнить». Одновременно нажмите клавиши «Win + R», затем напишите команду
msconfigи кликните по «ОК». - Перейдите на вкладку «Загрузка». В блоке «Параметры загрузки» отметьте пункт «Безопасный режим» и выберите параметр «Минимальная», при которой система будет запущена лишь только с критически необходимым количеством драйверов, служб и программ. Нажмите на «Применить».
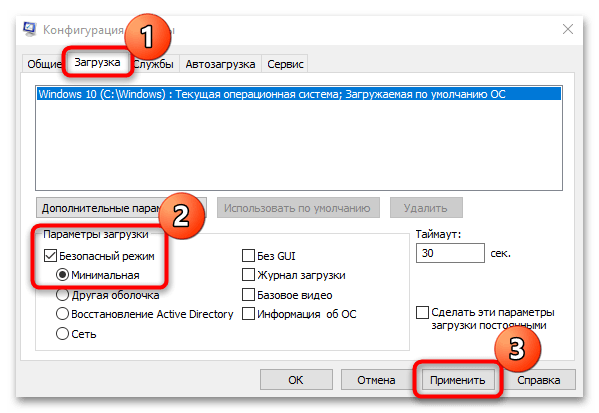
После процедуры останется перезагрузить компьютер, чтобы запустить систему в «Безопасном режиме». Найдите проблемный и файл и повторите попытку его удаления.
Читайте также: Выход из «Безопасного режима» на Windows 10
Способ 5: Переименование файла
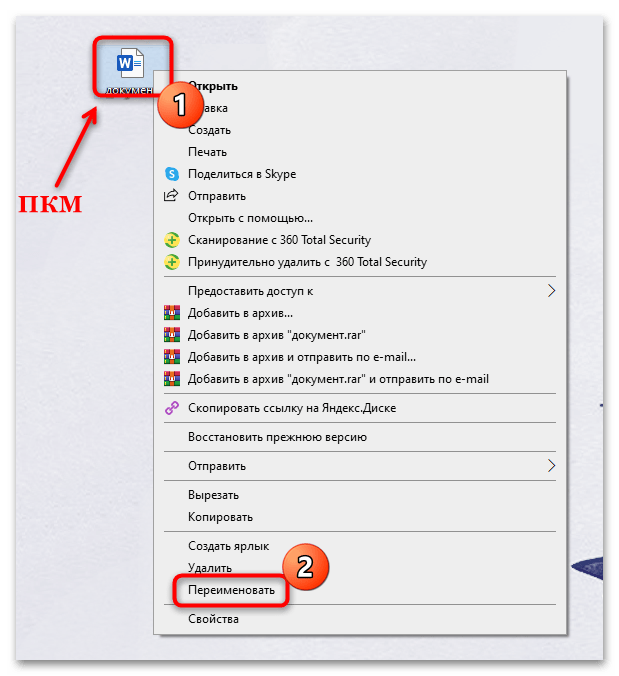
Многим помогает старый и проверенный метод, подразумевающий переименование файла. Возможно, проблема появилась из-за того, что в системе произошел сбой или часть проблемного файла записалась на битый сектор жесткого диска, поэтому такой метод может исправить ситуацию.
Переименуйте файл, используя функцию контекстного меню. Также можно попробовать изменить его расширение: после точки, отделяющей название от формата, впишите другое расширение, например измените .docx .zip.
Способ 6: Функции архивирования
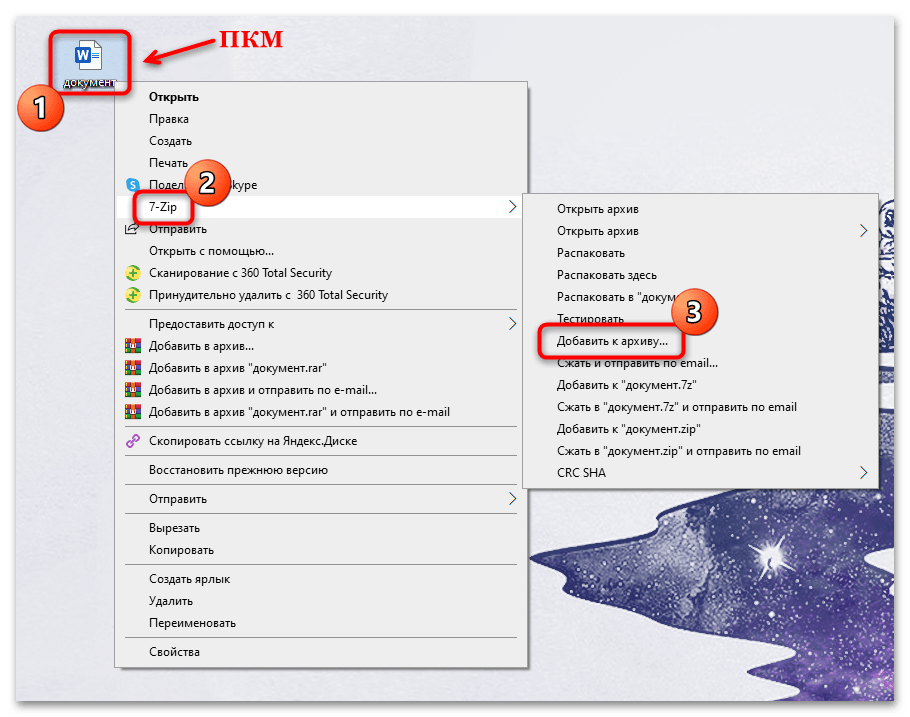
Некоторые архиваторы позволяют тонко настраивать процедуру архивирования файлов, в том числе удалять оригинал после завершения процедуры. Другими словами, вам понадобится заархивировать проблемные данные, выбрать соответствующую функцию в программе, а потом избавиться от самого архива. В этом может помочь бесплатный софт, например 7-Zip.
Скачать 7-Zip
- Установите архиватор. Его функции автоматически интегрируются в контекстное меню. Щелкните по файлу правой кнопкой мыши, наведите курсор на пункт «7-Zip» и из дополнительного списка выберите «Добавить к архиву…».
- В окне с настройками архива найдите блок «Опции» и отметьте пункт «Удалять файлы после сжатия». Нажмите на «ОК».
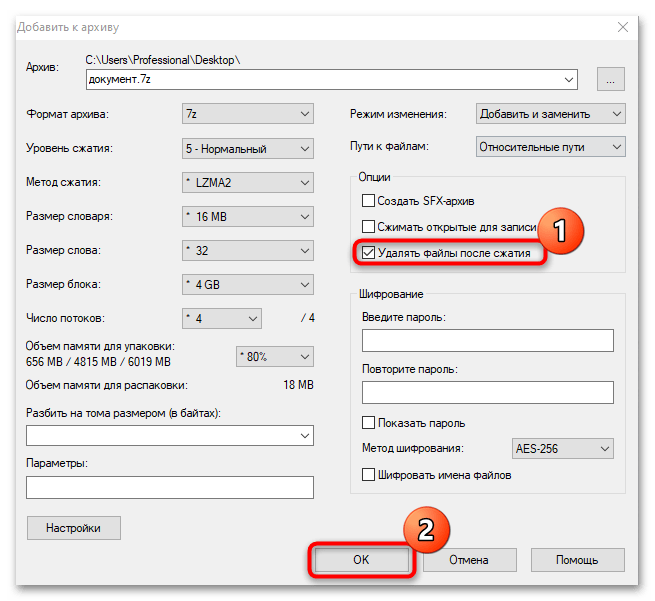
Дождитесь, пока архив будет создан. Изначальный файл должен быть удален автоматически, а вам останется вручную удалить саму сжатую папку.
Способ 7: Сторонние программы
Если ни один рассмотренный выше способ не помог, попробуйте прибегнуть к помощи специализированного софта, который предназначен для удаления неудаляемых обычными методами файлов. Помимо основной функции, многие программы располагают дополнительными возможностями по работе с данными: копирование, смена имени, отображение заблокированных и скрытых файлов. В отдельной статье на нашем сайте разобраны наиболее эффективные и проверенные приложения, а также представлены ссылки на их скачивание.
Подробнее: Программы для удаления файлов, которые не удаляются

Не зависимо от уровня владения ПК будь то начинающий или же продвинутый пользователь с такой процедурой как удаление файлов всем приходится сталкиваться регулярно. И, казалось бы, что может быть проще чем удалить ненужный документ, картинку или прочее. Но и в таком вопросе у пользователей могут возникнуть некоторые сложности. В настоящей инструкции мы поможем пошагово научиться выполнять эту операцию разными способами.
Содержание
- Удалить файлы с компьютера
- Принудительно удалить файл
- Удалить файл навсегда
- Удалить файл через командную строку
- Удалить файлPowerShell
Удалить файлы с компьютера
Стандартная процедура удаления файла в корзину выглядит следующим образом: выделите файл, который необходимо удалить (нажатием по нему ЛКМ) затем на клавиатуре нажмите кнопку Del или сочетание клавиш Ctrl+D. Можно воспользоваться контекстным меню, вызвав его можно нажатием на файле ПКМ и затем выбрать действие Удалить.
Если система потребует подтверждения удаления нажмите кнопку «Да».
Также можно воспользоваться строкой меню в папке.
Откройте папку, где расположен ненужный файл. Выделите его щелчком мыши, перейдите ко вкладке Главная и выберите действие Удалить. Вы можете открыть выпадающий список и выбрать удалить в корзину или же безвозвратно с ПК.
Принудительно удалить файл
Рассмотрим и такую ситуацию, когда вы любым удобным способом хотите удалить файл и в это время на монитор выводится сообщение о невозможности выполнения этого действия.
Причинами, по которым это могло случиться являются следующие:
- Отсутствие у вас прав администратора на удаление этого файла;
- Удаляемый файл открыт и используется каким-то приложением.
И если для первой ситуации вам достаточно зайти в систему под учетной записью администратора и попробовать вновь удалить файл. То во втором случае необходимо закрыть этот файл. Если вы видите, что файл открыт как в нашем случае в Word, вы можете его закрыть и завершить удаление. Если же программа, которая использует файл не отображается на панели задач, используйте Диспетчер задач.
Щелкните ПКМ по кнопке Пуск → Диспетчер задач (или воспользуйтесь горячими клавишами Ctrl+Shift+Esc) → во вкладке Процессы найдите приложение или процесс использующее файл (как правило, указывается в уведомлении как приведено выше) → щелкните по нему ПКМ → выберите действие Снять задачу.
В уведомлении нажмите кнопку Повторить попытку, после чего файл будет удален в Корзину.
Удалить файл навсегда
Если вы уверены, что файл вам больше никогда не понадобится, то можно сразу его удалить без предварительного перемещения в корзину. Для этого выберите файл, подлежащий удалению и нажмите на клавиатуре комбинацию Shift+Del. После чего подтвердите свое желание безвозвратно удалить файл нажав кнопку «Да».
Удалить файл через командную строку
Откройте командную строку от имени администратора (например, кнопка Пуск на панели задач → щелчок по ней ПКМ → выбрать из раскрывшегося списка Командная строка (администратор)).
Далее необходимо определить путь к файлу. В нашем примере файл под названием «Новый документ для winnote.ru» располагается на рабочем столе и путь к нему будет выглядеть следующим образом:
C:\Users\*имя пользователя*\Desktop\Новый документ для winnote.ru.txt
В окне командной строки введите команду del /f /s /q /a и затем путь к файлу в кавычках “C:\Users\*имя пользователя*\Desktop\Новый документ для winnote.ru.txt”.
Нажмите на клавиатуре клавишу Enter. На экран будет выведено сообщение об удалении фала.
Обратите внимание, что с помощью этого способа файл будет полностью удален с компьютера, без предварительного перемещения в Корзину.
Удалить файл PowerShell
Удалим текстовый документ, который располагается в папке на Рабочем столе. Определяем его путь (например, скопировав в адресной строке папки).
C:\Users\*имя пользователя*\Desktop\winnote\Новый документ для winnote.ru.txt
Запустите Windows PowerShell любым известным вам способом. Мы воспользуемся Поиском. На Панели задач щелкните значок в виде лупы и введите Windows PowerShell. Система предложит вам найденные варианты. Среди них выберите классическое приложение и запустите его от имени администратора.
Введите команду Remove-Item –Pathи далее в кавычках путь к удаляемому файлу “C:\Users\*имя пользователя*\Desktop\winnote\Новый документ для winnote.ru.txt”.
Нажмите Enter.
Файл успешно был удален из папки.
Надеемся, что описанные в статье способы помогут очистить ваш компьютер от ненужных файлов.

Sometimes it’s just faster to do things with the command line.
In this quick tutorial we’ll go over how to open Command Prompt, some basic commands and flags, and how to delete files and folders in Command Prompt.
If you’re already familiar with basic DOS commands, feel free to skip ahead.
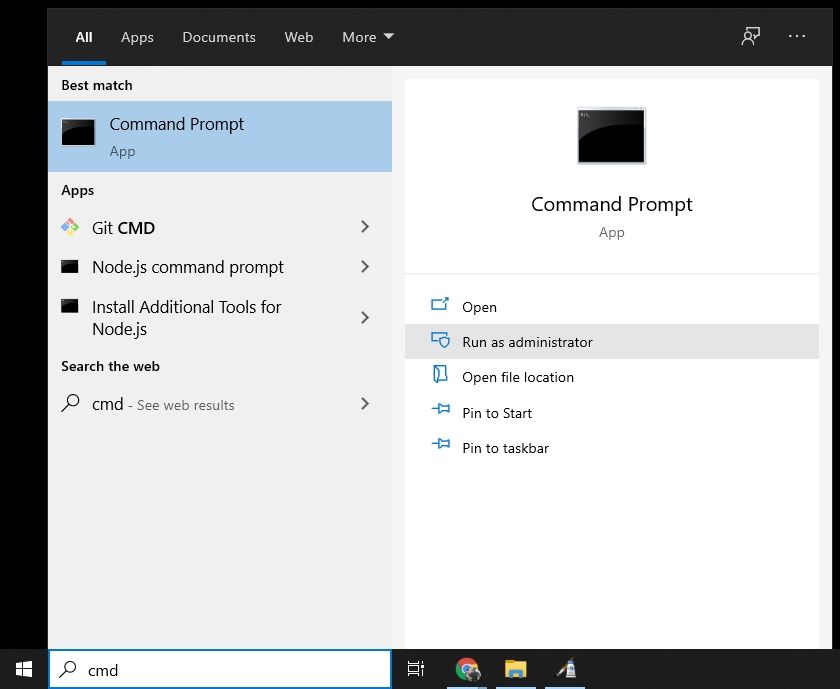
How to open Command Prompt
To open Command Prompt, press the Windows key, and type in «cmd».
Then, click on «Run as Administrator»:
After that, you’ll see a Command Prompt window with administrative privileges:
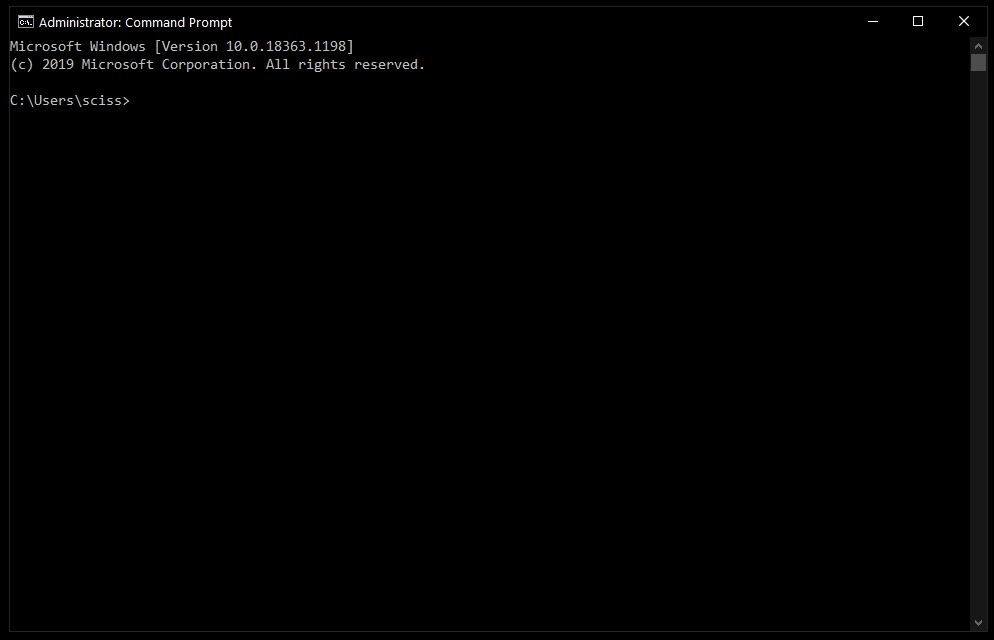
If you can’t open Command Prompt as an administrator, no worries. You can open a normal Command Prompt window by clicking «Open» instead of «Run as Administrator».
The only difference is that you may not be able to delete some protected files, which shouldn’t be a problem in most cases.
How to delete files with the del command
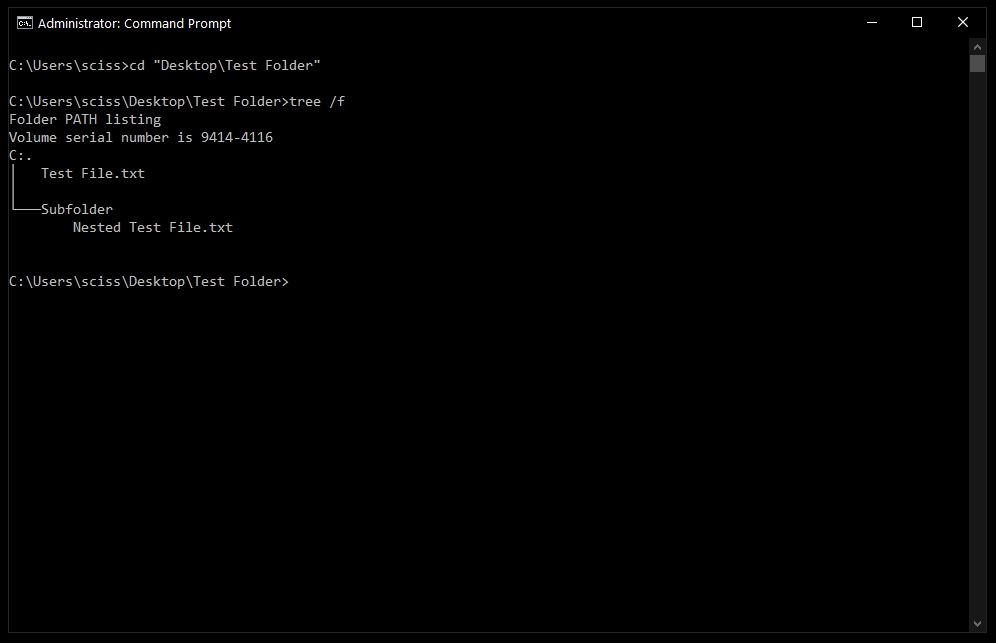
Now that Command Prompt is open, use cd to change directories to where your files are.
I’ve prepared a directory on the desktop called Test Folder. You can use the command tree /f to see a, well, tree, of all the nested files and folders:
To delete a file, use the following command: del "<filename>".
For example, to delete Test file.txt, just run del "Test File.txt".
There may be a prompt asking if you want to delete the file. If so, type «y» and hit enter.
Note: Any files deleted with the del command cannot be recovered. Be very careful where and how you use this command.
After that, you can run tree /f to confirm that your file was deleted:

Also, bonus tip – Command Prompt has basic autocompletion. So you could just type in del test, press the tab key, and Command Prompt will change it to del "Test File.txt".
How to force delete files with the del command
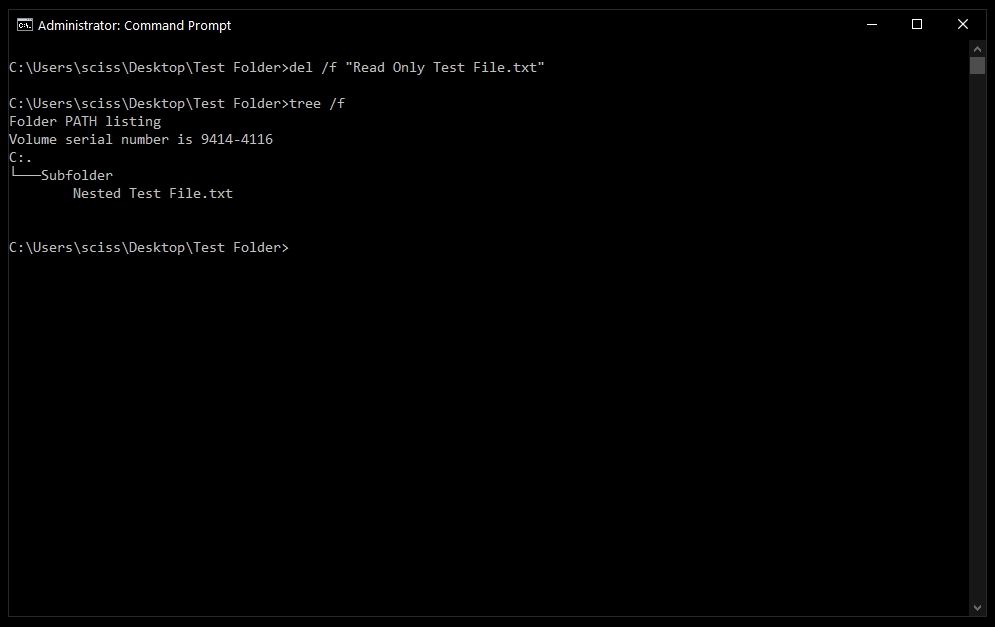
Sometimes files are marked as read only, and you’ll see the following error when you try to use the del command:
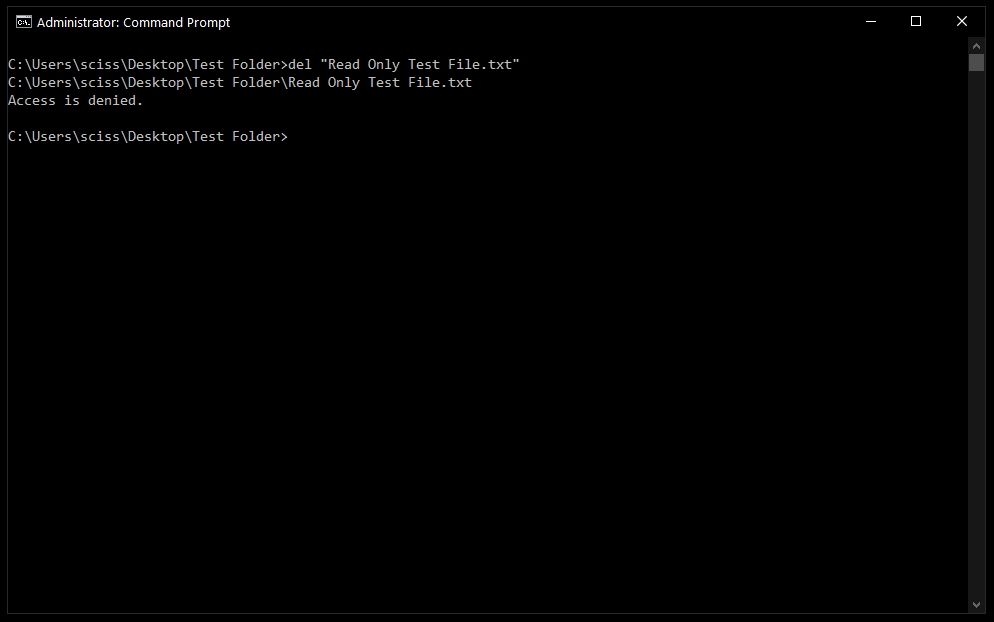
To get around this, use the /f flag to force delete the file. For example, del /f "Read Only Test File.txt":
How to delete folders with the rmdir command
To delete directories/folders, you’ll need to use the rmdir or rd command. Both commands work the same way, but let’s stick with rmdir since it’s a bit more expressive.
Also, I’ll use the terms directory and folder interchangeably for the rest of the tutorial. «Folder» is a newer term that became popular with early desktop GUIs, but folder and directory basically mean the same thing.
To remove a directory, just use the command rmdir <directory name>.
Note: Any directories deleted with the rmdir command cannot be recovered. Be very careful where and how you use this command.
In this case I want to remove a directory named Subfolder, so I’ll use the command rmdir Subfolder:
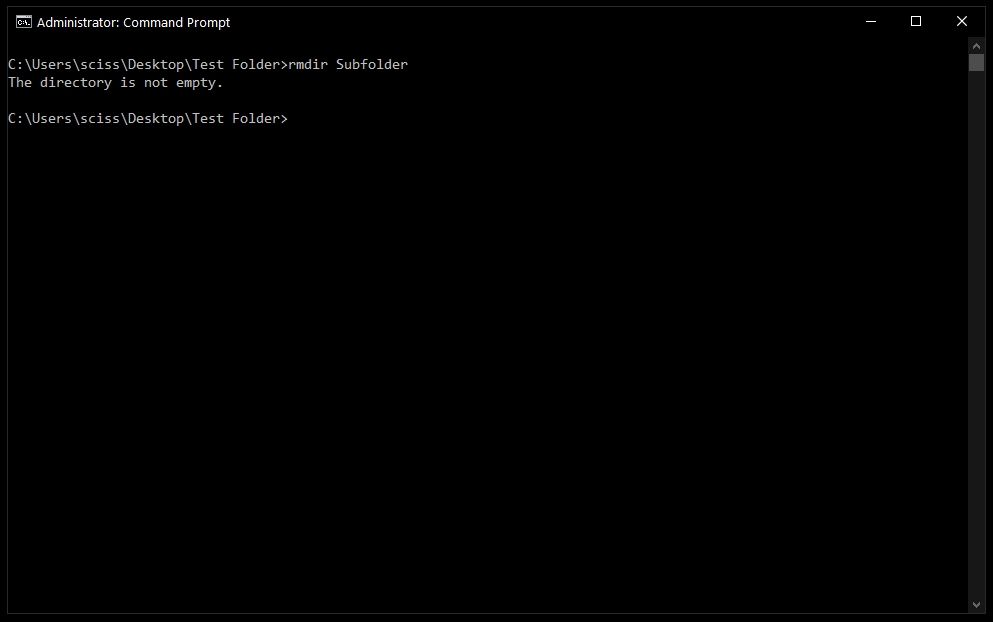
But, if you remember earlier, Subfolder has a file in it named Nested Test File.
You could cd into the Subfolder directory and remove the file, then come back with cd .. and run the rmdir Subfolder command again, but that would get tedious. And just imagine if there were a bunch of other nested files and directories!
Like with the del command, there’s a helpful flag we can use to make things much faster and easier.
How to use the /s flag with rmdir
To remove a directory, including all nested files and subdirectories, just use the /s flag:
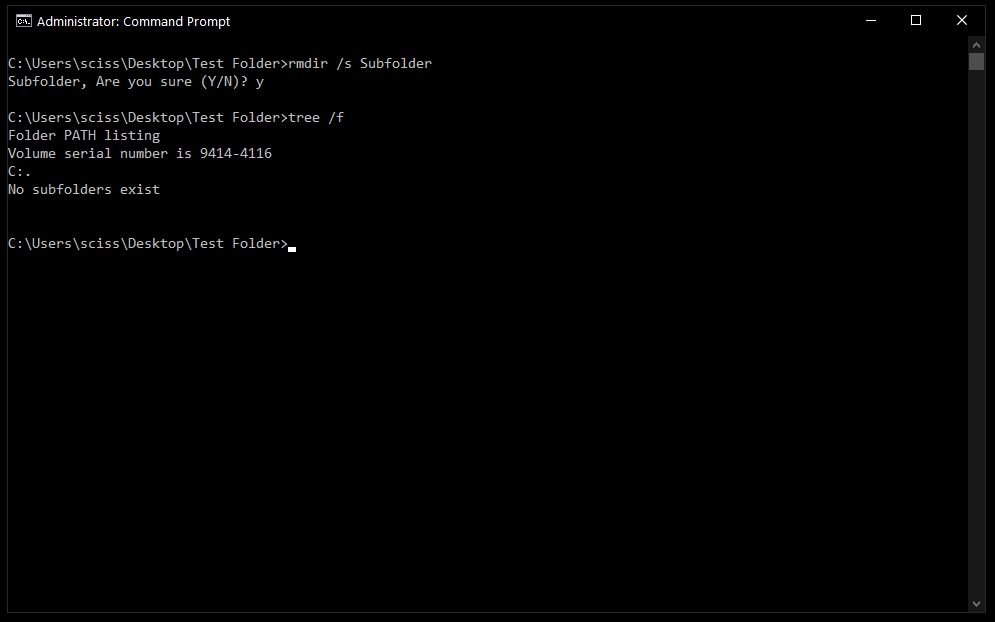
There will probably be a prompt asking if you want to remove that directory. If so, just type «y» and hit enter.
And that’s it! That should be everything you need to know to remove files and folders in the Windows Command Prompt.
All of these commands should work in PowerShell, which is basically Command Prompt version 2.0. Also, PowerShell has a bunch of cool aliases like ls and clear that should feel right at home if you’re familiar with the Mac/Linux command line.
Did these commands help you? Are there any other commands that you find useful? Either way, let me know over on Twitter.
Learn to code for free. freeCodeCamp’s open source curriculum has helped more than 40,000 people get jobs as developers. Get started
In some cases, for whatever reason, Windows will make sure that the provided file is used by the system and prevent it from being deleted. This file situation is very frustrating, especially if you know the file is not in use.
If you are having trouble in deleting any file or folder directly by right-clicking, then you can delete it using cmd. The commands below delete the specific file or folder and place them in the recycle bin:
- del
- rmdir
Here we have created a sample File and a Folder to delete it using CMD:

del command
del command is used to delete a file. Here, we will take our sample file “hello.txt” located at the desktop and try to delete it using the del command in CMD. Follow the steps given below to delete the file:
Step 1: Change the path of the directory in CMD and set it to the path of the file. Type the following command in cmd and press Enter:
cd desktop
Step 2: Delete the file “hello.txt” with following command:
del hello.txt

rmdir command
rmdir command is used to delete the entire folder or directory. Here, we will take our sample folder named “Tasks” placed at desktop and try to delete it using rmdir command in CMD. Follow the steps given below to delete the folder:
Step 1: Change the path of the directory in CMD and set it to the path of the folder. Type the following command in cmd and press Enter:
cd desktop
Step 2: Delete the folder “Tasks” with following command:
rmdir tasks

Last Updated :
03 Jul, 2022
Like Article
Save Article
Some folders and files are impossible to delete using Windows Explorer. These include files with long paths, names or reserved names like CON, AUX, COM1, COM2, COM3, COM4, LPT1, LPT2, LPT3, PRN, NUL etc. You will get an Access Denied error message when you try to delete these files using Windows Explorer, even if you are an administrator.
Regardless of the reason, these can only be force deleted using command line only. This article explains using cmd to delete folder or file successfully.
Table of contents
- Before we begin
- How to remove files and folders using Command Prompt
- Del/Erase command in cmd
- Rmdir /rd command in cmd
- Delete multiple files and folders
- Delete files and folders in any directory
- Check the existence of file or folder then remove using IF command
- How to remove files and folders using Windows PowerShell
- Delete multiple files and folders
- Delete files and folders in any directory
- Delete files and folders with complex and long paths using the command line
- Closing words
Before we begin
Here are some important things for you to understand before we dig into removing files and folders using Command Prompt and Windows PowerShell. These tips will help you understand the terms and some basic rules of the commands that will be used further in the article.
The most important thing to remember here is the syntax of the path and file/folder name. When typing file name, notice whether there is a gap (space) in it. For example, if the folder name has no space in it, it can be written as-is. However, if there is a gap in it, it will need to be written within parenthesis (“”). Here is an example:

Another thing to remember is that you might see different outcomes while removing folders that are already empty, and folders that have some content in them. Having said that, you will need to use the dedicated options in the command to remove content from within a folder along with the main folder itself. This is called a recursive action.
Furthermore, you must also know how to change your working directory when inside a Command Line Interface. Use the command cd to change your directory, followed by the correct syntax. Here are some examples:
One last thing that might come in handy is being able to view what content is available in the current working directory. This is especially helpful so that you type in the correct spelling of the target file or folder. To view the contents of the current working directory in Command Prompt and PowerShell, type in Dir.

Now that we have the basic knowledge, let us show you how you can delete files and folders using the command line on a Windows PC.
By default, there are 2 command-line interfaces built into Windows 10 – Command Prompt and Windows PowerShell. Both of these are going to be used to delete content from a computer.
How to remove files and folders using Command Prompt
Let us start with the very basic commands and work our way up from there for Command Prompt. We recommend that you use Command Prompt with administrative privileges so that you do not encounter any additional prompts that you already might have.
Del/Erase command in cmd
Del and Erase commands in Command Prompt are aliases of one another. Meaning, both perform the same function regardless of which one you use. These can be used to remove individual items (files) in the current working directory. Remember that it cannot be used to delete the directories (folders) themselves.
Use either of the following commands to do so:
Tip: Use the Tab button to automatically complete paths and file/folder names.
Del File/FolderName

Erase File/FolderName
Replace File/FolderName with the name of the item you wish to remove. Here is an example of us removing files from the working directory:

If you try to remove items from within a folder, whether empty or not, you will be prompted for a confirmation action, such as the one below:
![]()
In such a scenario, you will need to enter Y for yes and N for no to confirm. If you select yes, the items directly within the folder will be removed, but the directory (folder) will remain. However, the subdirectories within the folder will not be changed at all.
This problem can be resolved by using the /s switch. In order to remove all of the content within the folder and its subdirectories, you will need to add the recursive option in the command (/s). The slash followed by “s” signifies the recursive option. Refer to the example below to fully understand the concept:
We will be using the Del command here to recursively remove the text files within the folder “Final folder,” which also has a subdirectory named “Subfolder.” Subfolder also has 2 sample text files that we will be recursively removing with the following command:
Del /s "Final folder"
Here is its output:

As you can see in the image above, we had to enter “y” twice – once for each folder. with each confirmation, 2 text files were removed, as we had stated earlier in this example. However, if we use File Explorer, we can still see that both the directories – “Final folder” and “Subfolder” – are still there, but the content inside them is removed.
You can also make another tweak to the command so that it is executed silently and you will not be prompted for confirmation. Here is how:
Del /s /q "Final folder"
The /q illustrates that the action be taken quietly.

Rmdir /rd command in cmd
Similar to Del and Erase, rmdir and rd are also aliases for one another, which means to remove directory. These commands are used to remove the entire directory and subdirectories (recursively) including their contents. Use the command below to do so:
rmdir "New Folder"

The above command will remove the “New folder” only if it is empty. If a folder has subdirectories, you might get the following prompt:
![]()
In this case, we will need to apply the option for recursive deletion of items as we have done earlier with the Del command.
rmdir /s "Final folder"

Of course, this can also be performed with the /q option so that you are not prompted with a confirmation.
rmdir /s /q "Final folder"

Delete multiple files and folders
Up until now, we have completed the task of deleting single items per command. Now let’s see how you can remove multiple selective files or folders. Use the command below to do so:
For files:
Del "File1.txt" "File3.txt" "File5.txt"

For directories:
rd "Folder1" "Folder3" "Folder5"

Here is a before and after comparison of the directory where both of the above commands were executed:

You can also use an asterisk (*) concatenated with a file type or file name to perform bulk removal of files with the Del command. However, Microsoft has removed the support for the use of asterisks with rmdir so that users do not accidentally remove entire folders.
Here is an example of us removing all .txt files from our current working directory:
Del "*.txt"

Delete files and folders in any directory
We are working on removing content within the current working directory. However, you can also use the commands we have discussed till now to remove files and folders from any directory within your computer.
Simply put the complete path of the item you want to delete in enclosed parenthesis, and it shall be removed, as in the example below:

Check the existence of file or folder then remove using IF command
We have already discussed that you can view the contents of the working directory by typing in Dir in Command Prompt. However, you can apply an “if” condition in Command Prompt to remove an item if it exists. If it will not, the action would not be taken. Here is how:
if exist File/FolderName (rmdir /s/q File/FolderName)
Replace File/FolderName in both places with the name of the item (and extension if applicable) to be deleted. Here is an example:
if exist Desktop (rmdir /s/q Desktop)

How to remove files and folders using Windows PowerShell
The commands in Windows PowerShell to delete and remove content from your PC are very much similar to those of Command Prompt, with a few additional aliases. The overall functionality and logic are the same.
We recommend that you launch Windows PowerShell with administrative privileges before proceeding.
The main thing to note here is that unlike Command Prompt, all commands can be used for both purposes – removing individual files as well as complete directories. We ask you to be careful while using PowerShell to delete files and folders, as the directory itself is also removed.
The good thing is that you do not need to specify recursive action. If a directory has sub-directories, PowerShell will confirm whether you wish to continue with your deletion, which will also include all child objects (subdirectories).
Here is a list of all the commands/aliases that can be used in PowerShell to remove an item:
- Del
- Rm-dir
- remove-item
- Erase
- Rd
- Ri
- Rm
We tested all of these commands in our working directory and each of them was successful in deleting the folders as well as individual items, as can be seen below:

As can be seen above, the syntax of all the aliases is the same. You can use any of the commands below to delete an item using PowerShell:
Del File/FolderName
Rm-dir File/FolderName
remove-item File/FolderName
Erase File/FolderName
Rd File/FolderName
Ri File/FolderName
Rm File/FolderName
Delete multiple files and folders
You can also delete multiple selective files and folders just as we did while using Command Prompt. The only difference is that you will need to provide the complete path of each item, even if you are in the same working directory. Use the command below to do so:
Del "DriveLetter:\Path\ItemName", "DriveLetter:\Path\ItemName"
Remember to append the file type if the item is not a directory (.txt, .png, etc.), as we have done in the example below:
![]()
You can also use an asterisk (*) concatenated with a file type or file name to perform bulk removal of files with the Del command, as done in Command Prompt. Here is an example:
![]()
The command shown above will remove all.txt files in the directory “New folder.”
Delete files and folders in any directory
You can also remove an item in a different directory, just like we did in Command Prompt. Simply enter the complete path to the item in PowerShell, as we have done below:
![]()
Delete files and folders with complex and long paths using the command line
Sometimes you may encounter an error while trying to delete an item that may suggest that the path is too long, or the item cannot be deleted as it is buried too deep. Here is a neat trick you can apply using both Command Prompt and PowerShell to initially empty the folder, and then remove it using any of the methods above.
Use the command below to copy the contents of one folder (which is empty) into a folder that cannot be deleted. This will also make the destination folder empty, hence making it removable.
robocopy "D:\EmptyFolder" D:\FolderToRemove /MIR
In this scenario, the EmptyFolder is the source folder that we have deliberately kept empty to copy it to the target folder “FolderToRemove.”

You will now see that the folder that was previously unremovable is now empty. You can proceed to delete it using any of the methods discussed in this article.
Closing words
The command line is a blessing for Windows users. You can use any of these commands to remove even the most stubborn files and folders on your computer.
Let us know which solution worked for you in the comments section down below.