1. Overview
Windows Subsystem for Linux (WSL) allows you to install a complete Ubuntu terminal environment in minutes on your Windows machine, allowing you to develop cross-platform applications without leaving windows.
What you will learn:
- How to enable and install WSL on Windows 10 and Windows 11
- How to install and run a simple graphical application that uses WSLg
- How to install and run a much more advanced application that uses WSLg
Note: As of November 2022, WSL is now available as a Windows Store app for both Windows 10 and Windows 11. This means previous tutorials related to installing WSL as a Windows feature are no longer required.
What you will need:
- A Windows 10 or Windows 11 physical or virtual machine with all the updates installed
2. Install WSL
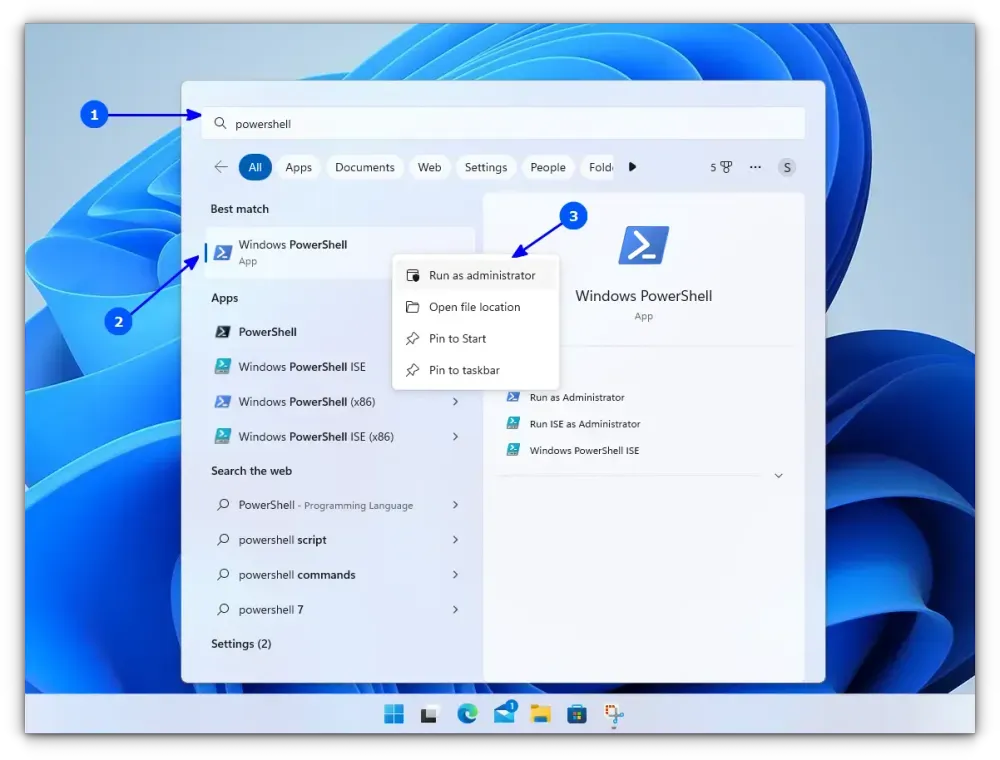
WSL can be installed from the command line. Open a powershell prompt as an Administrator (we recommend using Windows Terminal) and run:
wsl --install
This command will enable the features necessary to run WSL and also install the default Ubuntu distribution of Linux available in the Microsoft Store. It is recommended to reboot your machine after this initial installation to complete the setup.
You can also install WSL from the Microsoft Store.
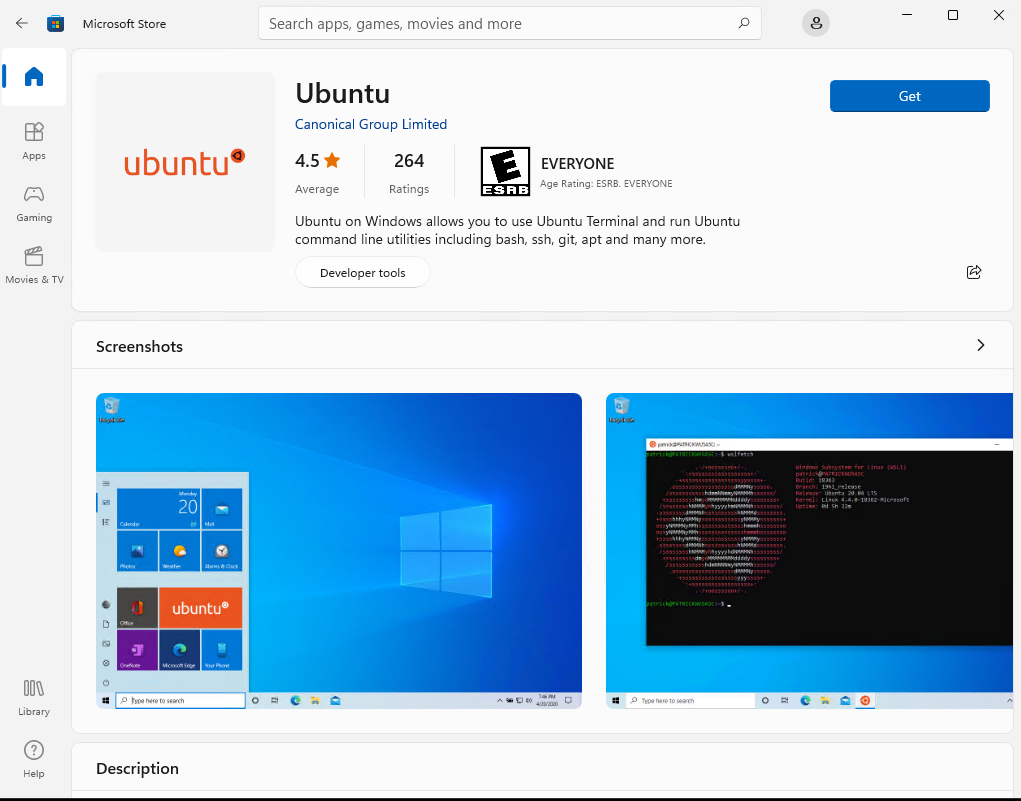
Installation of WSL from the Microsoft Store
Duration: 3:00
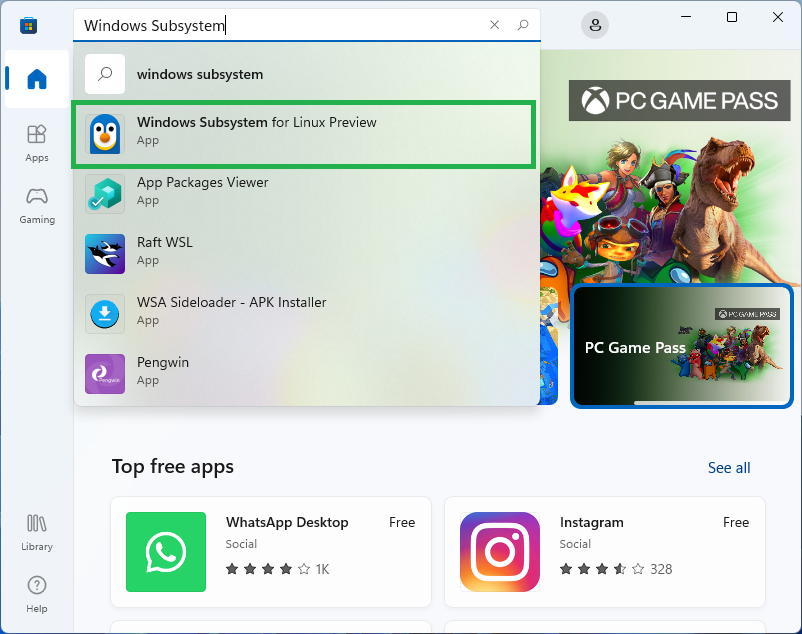
The WSL app is availble to install directly from the Microsoft Store like other Windows applications.
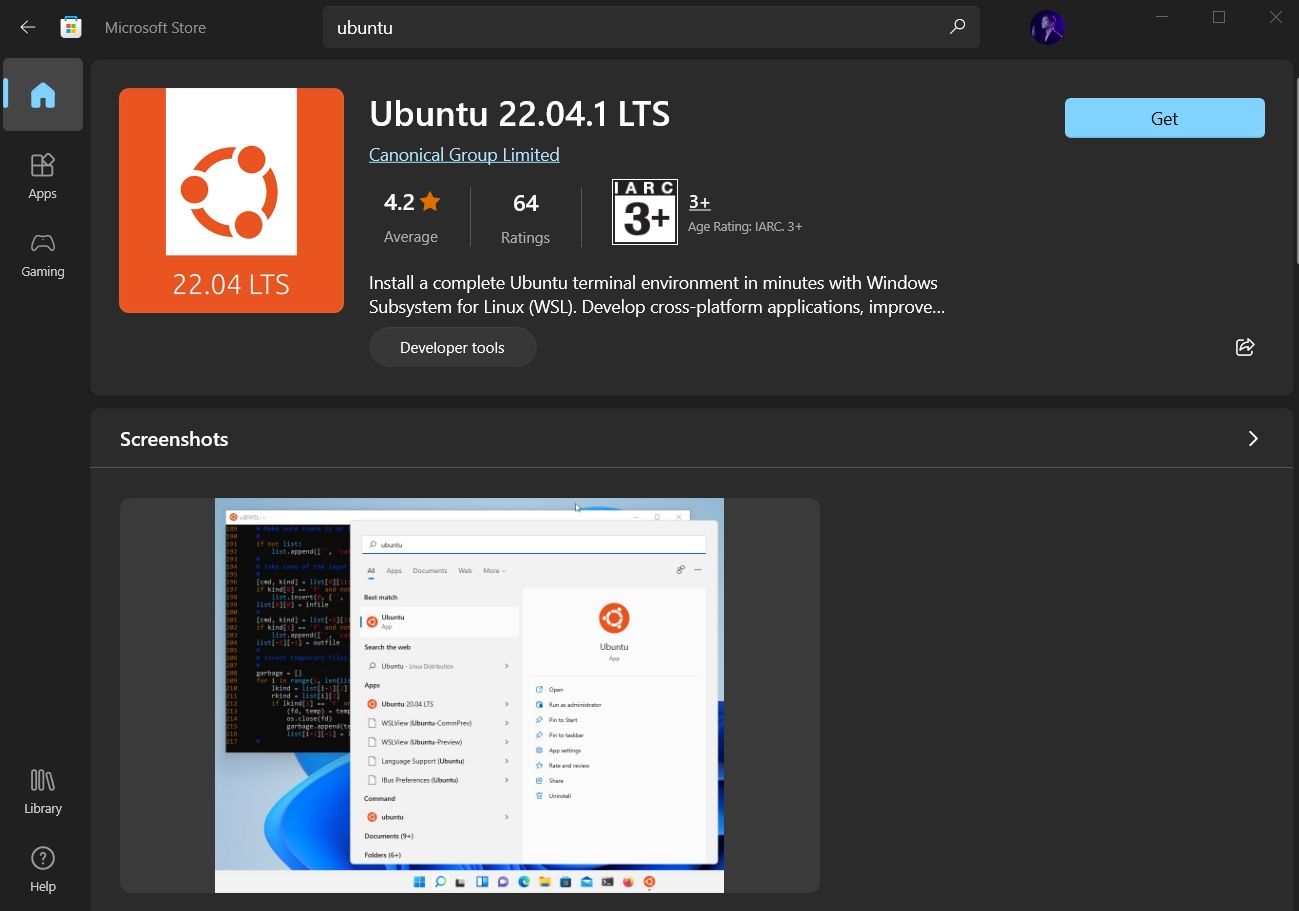
To install the WSL application from the Microsoft Store, open it and search for Windows subsystem.
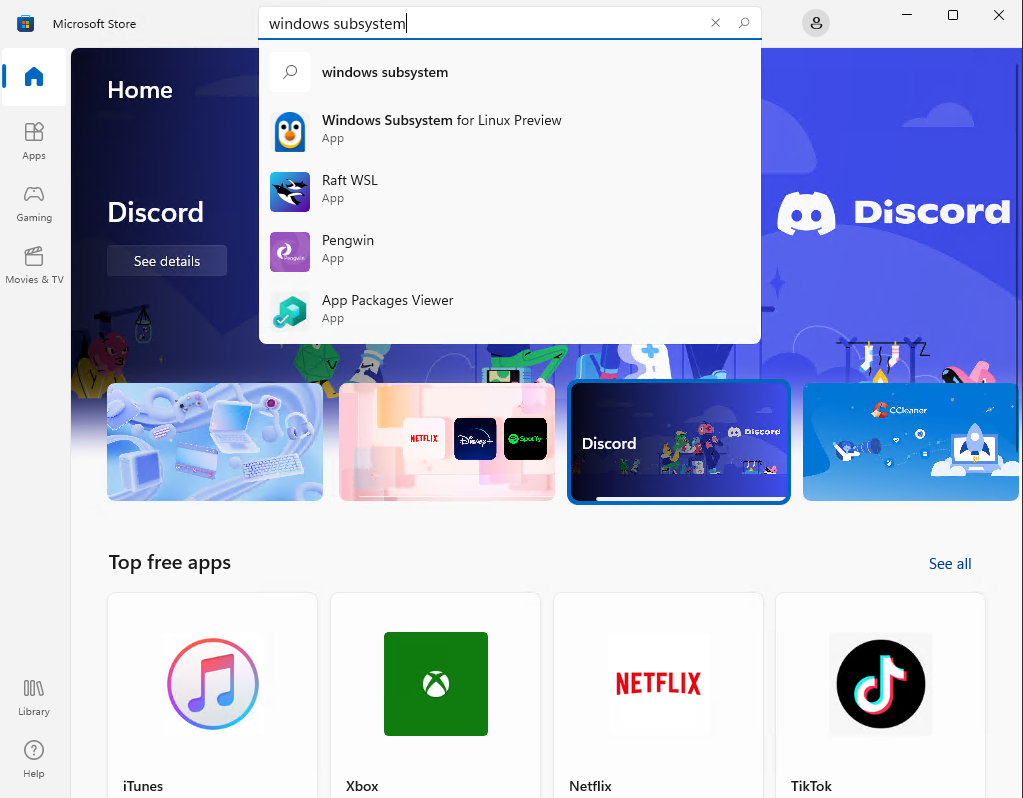
Click on the item Windows Subsystem for Linux to open the corresponding application page.
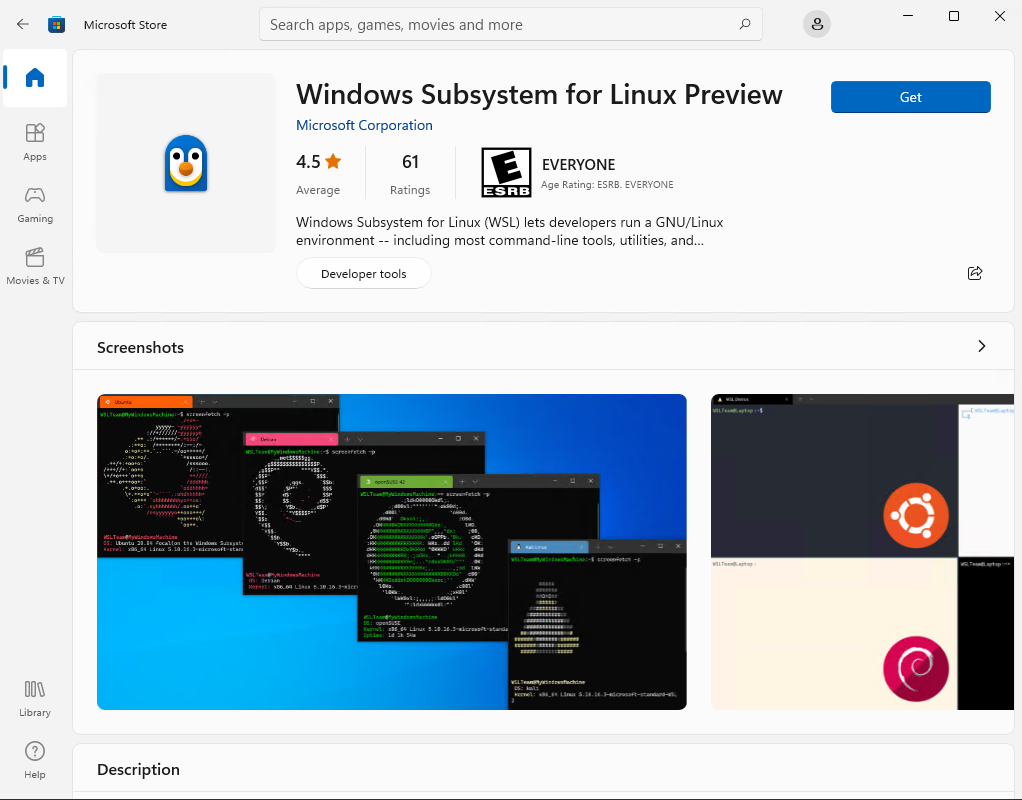
Click on Get to download and install the application.
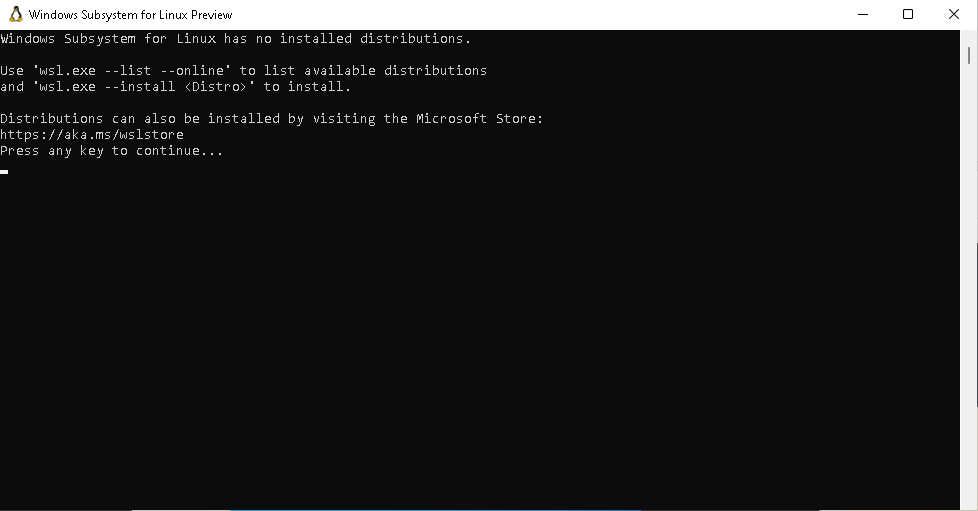
Upon installation, you can click on Open, but it will not do much since there is no Linux distribution installed.
However, if you really want to open the WSL application without installing a distribution, you’ll see a nice and short help message that you must follow in order to make something useful with WSL:
You can now proceed with the installation of Ubuntu.
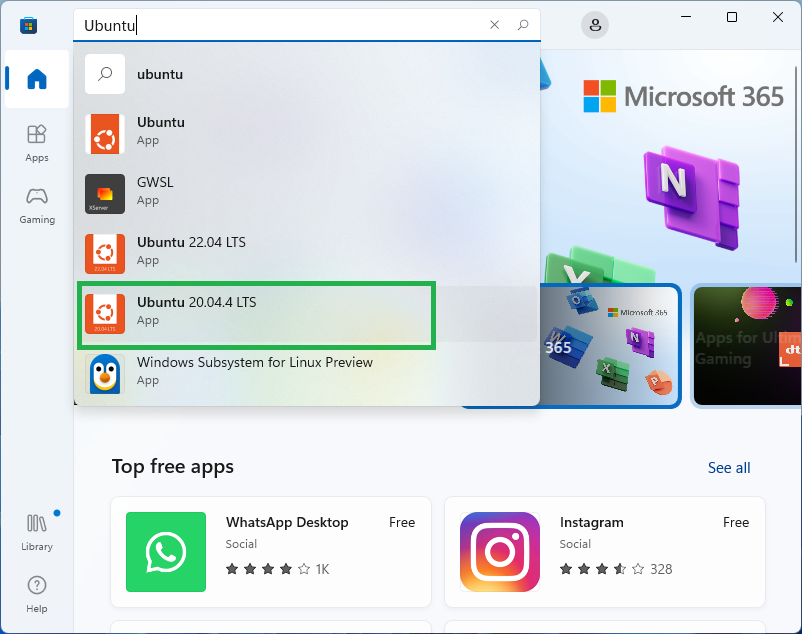
3. Download Ubuntu
WSL supports a variety of Linux distributions including the latest Ubuntu release, Ubuntu 20.04 LTS and Ubuntu 18.04 LTS. You can find them by opening the Microsoft Store app and searching for Ubuntu.
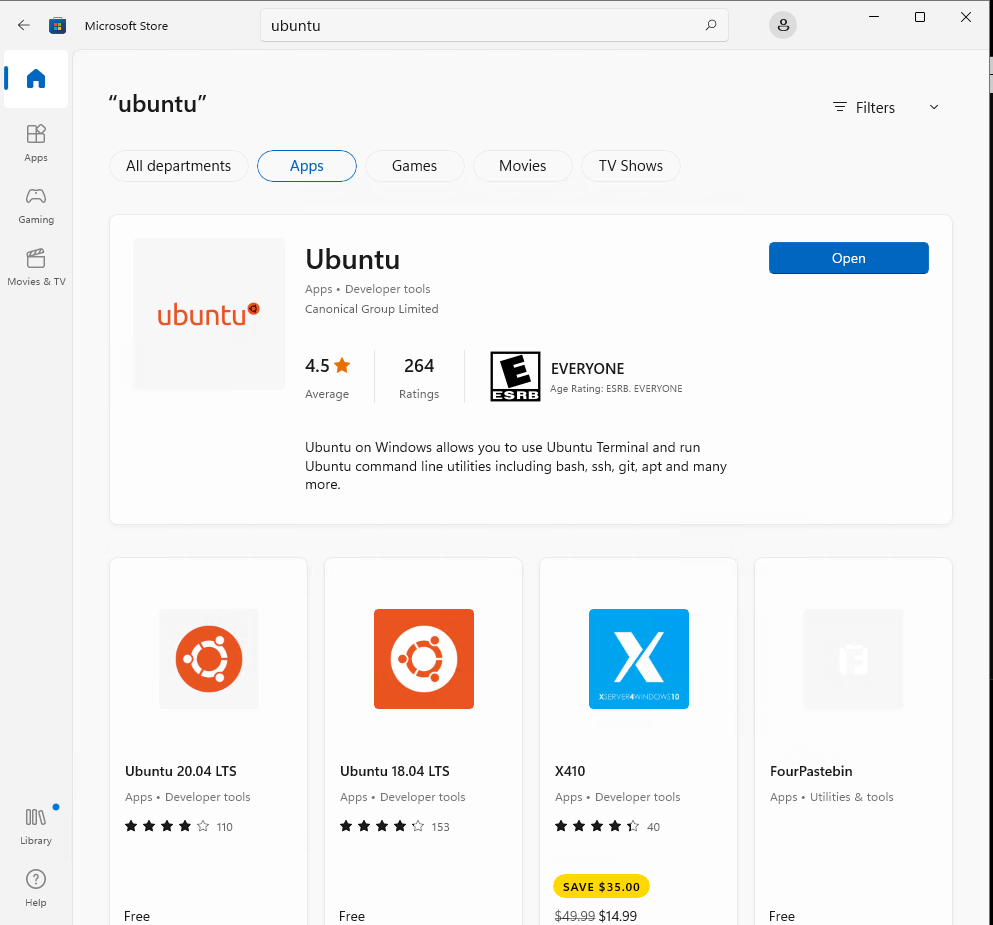
Choose the distribution you prefer and then select Get.
Which version should I choose?
There are three types of Ubuntu releases published to the Microsoft Store:
- Ubuntu with a version number e.g. Ubuntu 20.04.x. This will always be 20.04 and upgrades won’t be proposed.
- Ubuntu without a version number. This is the latest LTS version of Ubuntu after the first point release. At the time of writing, it is Ubuntu 22.04. It will remain Ubuntu 22.04 until the first point release of the next LTS release of Ubuntu, for example 24.04.1 in 2024.
- Ubuntu Preview is a daily build of the latest development version of Ubuntu. You should install it if you want to live on the edge but not for production workload as it doesn’t receive the same amount of QA as stable releases and may break at any time.
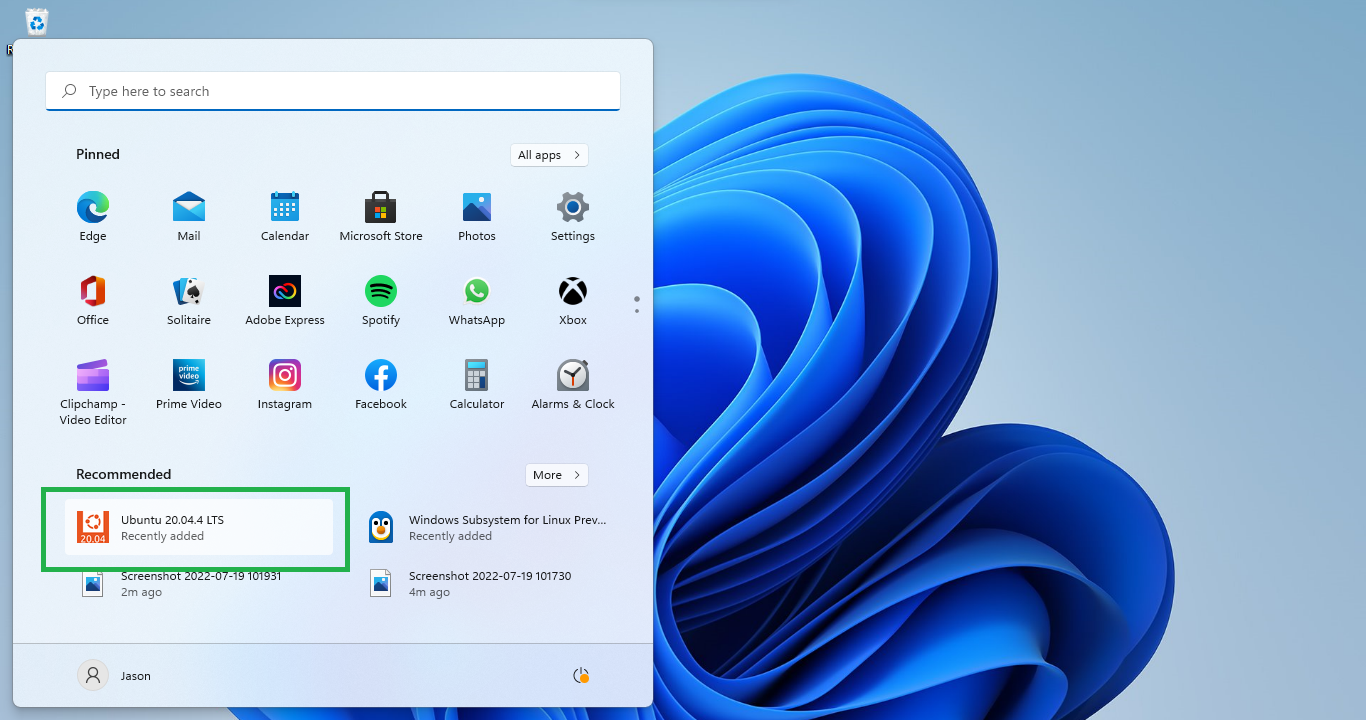
Ubuntu will then install on your machine.
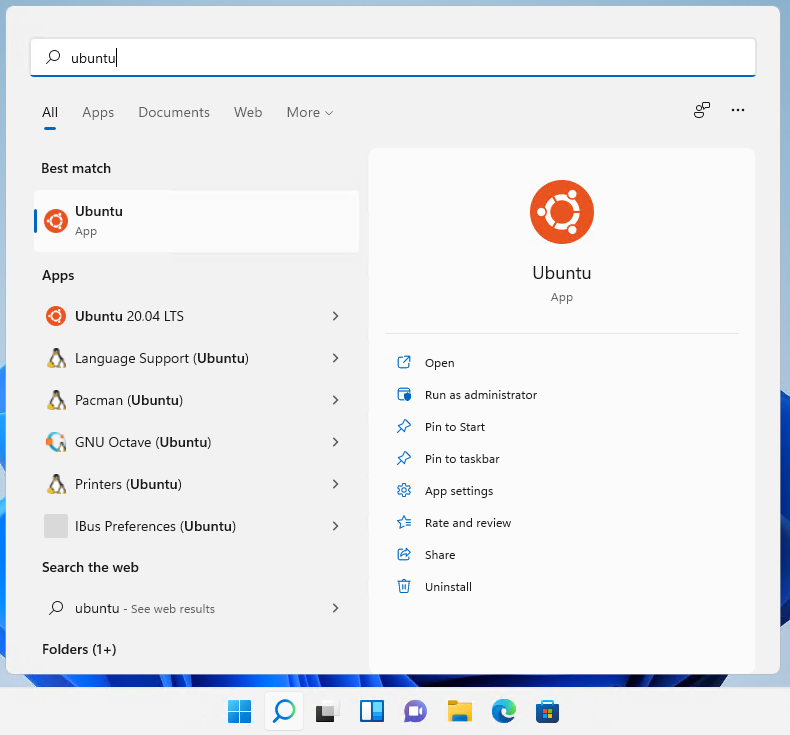
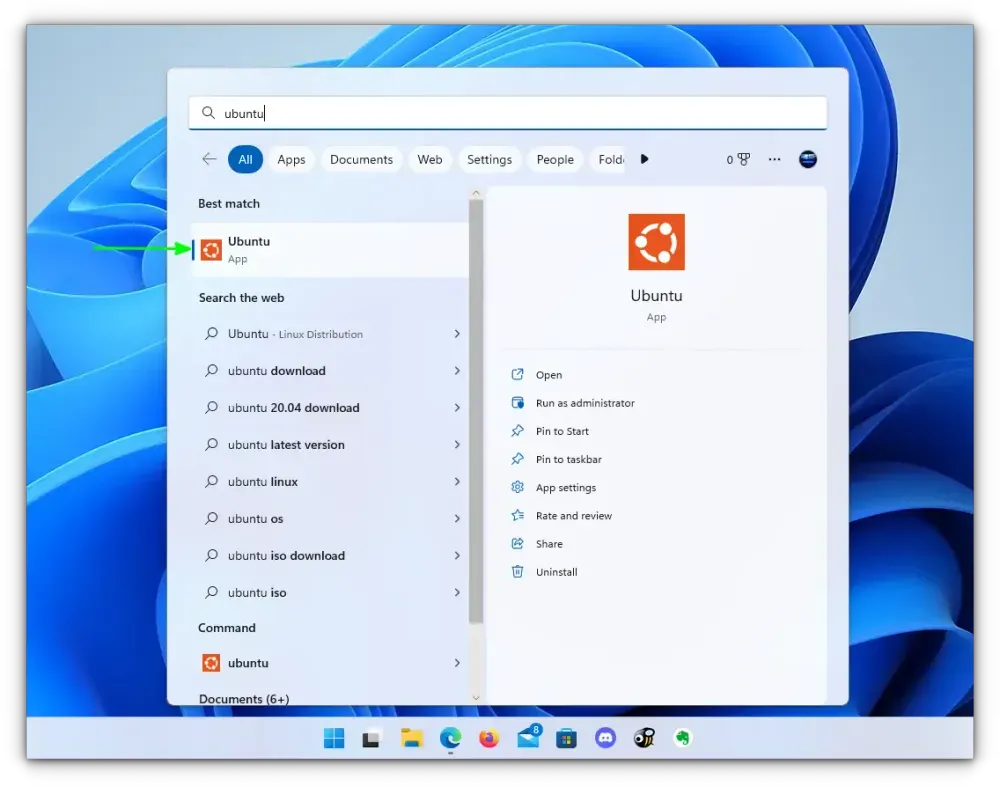
Once installed, you can either launch the application directly from the store or search for Ubuntu in your Windows search bar.
Install Ubuntu from the command line
It is possible to install the same Ubuntu applications available on the Windows Store directly from the command line.
In a Powershell terminal you can run:
wsl --list --online to see all available distros.

You can install a distro using the NAME by running:
wsl --install -d Ubuntu-20.04

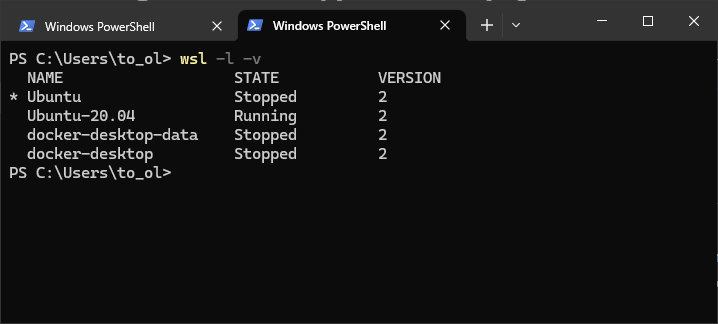
Use wsl -l -v to see all your currently installed distros and which version of WSL they are using:
4. Configure Ubuntu
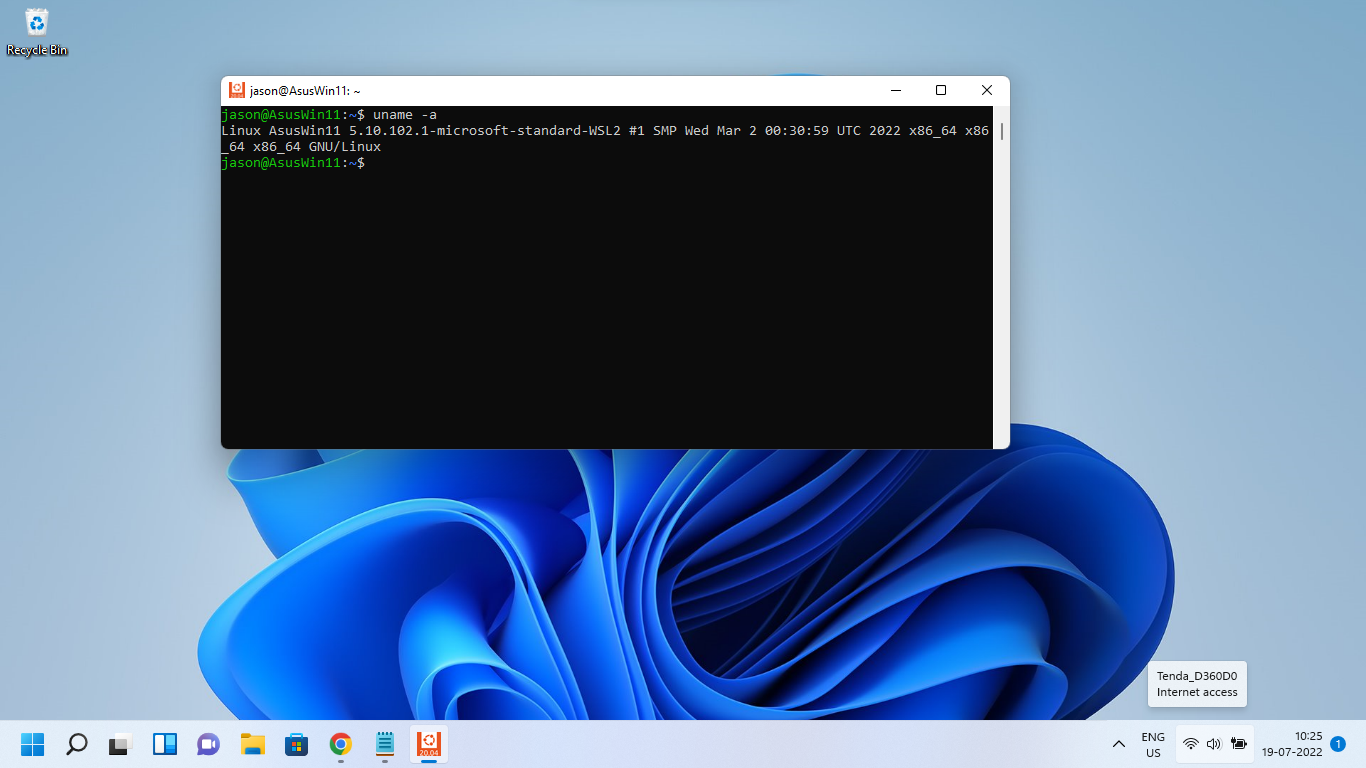
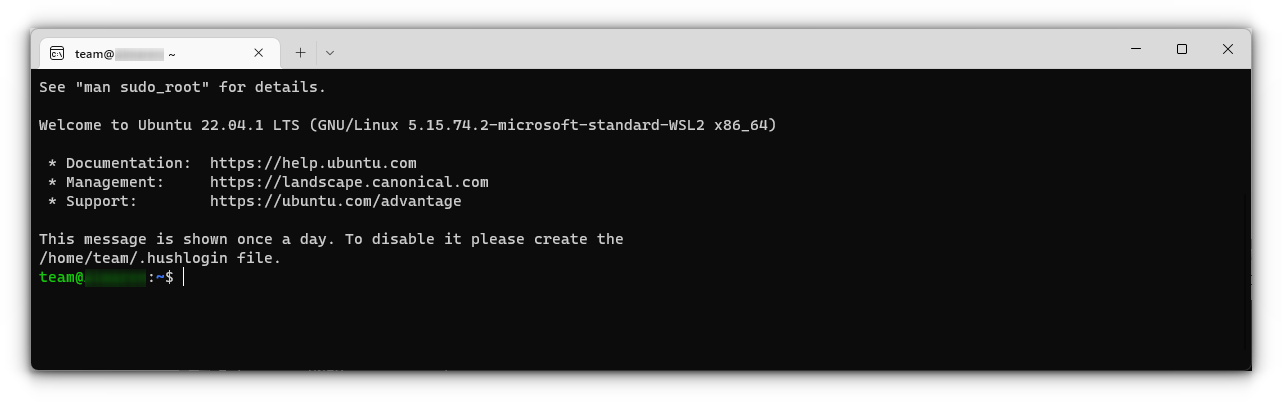
Congratulations, you now have an Ubuntu terminal running on your Windows machine!
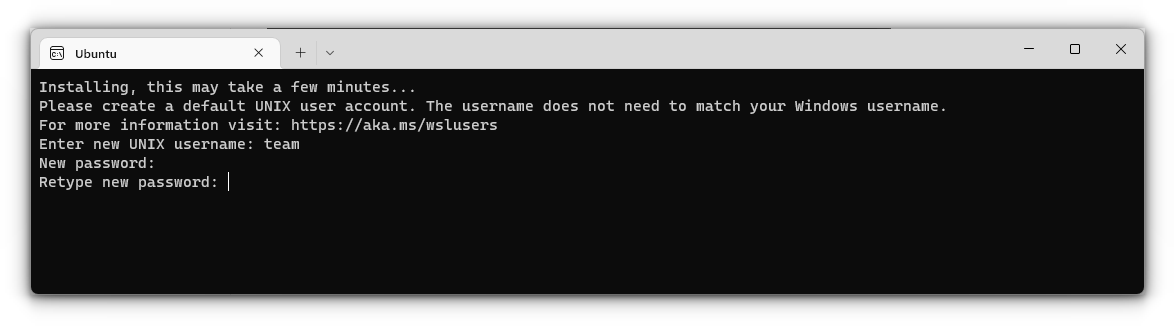
Once it has finished its initial setup, you will need to create a username and password (this does not need to match your Windows user credentials).

Finally, it’s always good practice to install the latest updates with the following commands, entering your password when prompted.
sudo apt update
Then
sudo apt full-upgrade
Press Y when prompted.
(Optional) Enable systemd
In September 2022, Microsoft announced support for systemd in WSL. This long-awaited upgrade to WSL unlocks a huge number of quality of life features for managing processes and services. This includes snapd support, which enables users to take advantage of all of the tools and apps available on snapcraft.io.
To enable systemd you will need make a small modification to /etc/wsl.conf in your Ubuntu distribution.
Run `sudo nano /etc/wsl.conf’ to open the file and insert the following lines:
[boot]
systemd=true
Then restart your distro by running wsl --shutdown in powershell and relaunching.
5. Install and use a GUI package
WSL2 comes with WSLg enabled by default. WSLg allows you to run graphical linux applications.
To check that you have the latest package lists, type:
sudo apt update
Then, start with some basic X11 applications:
sudo apt install x11-apps
To run the xeyes, a “follow the mouse” application, type:
xeyes &
The & at the end of the line will execute the command asynchronously. In other words, the shell will run the command in the background and return to the command prompt immediately.
The first launch of a GUI application takes a few seconds while WSL is initializing the graphics stack. Next executions of GUI applications are much faster.
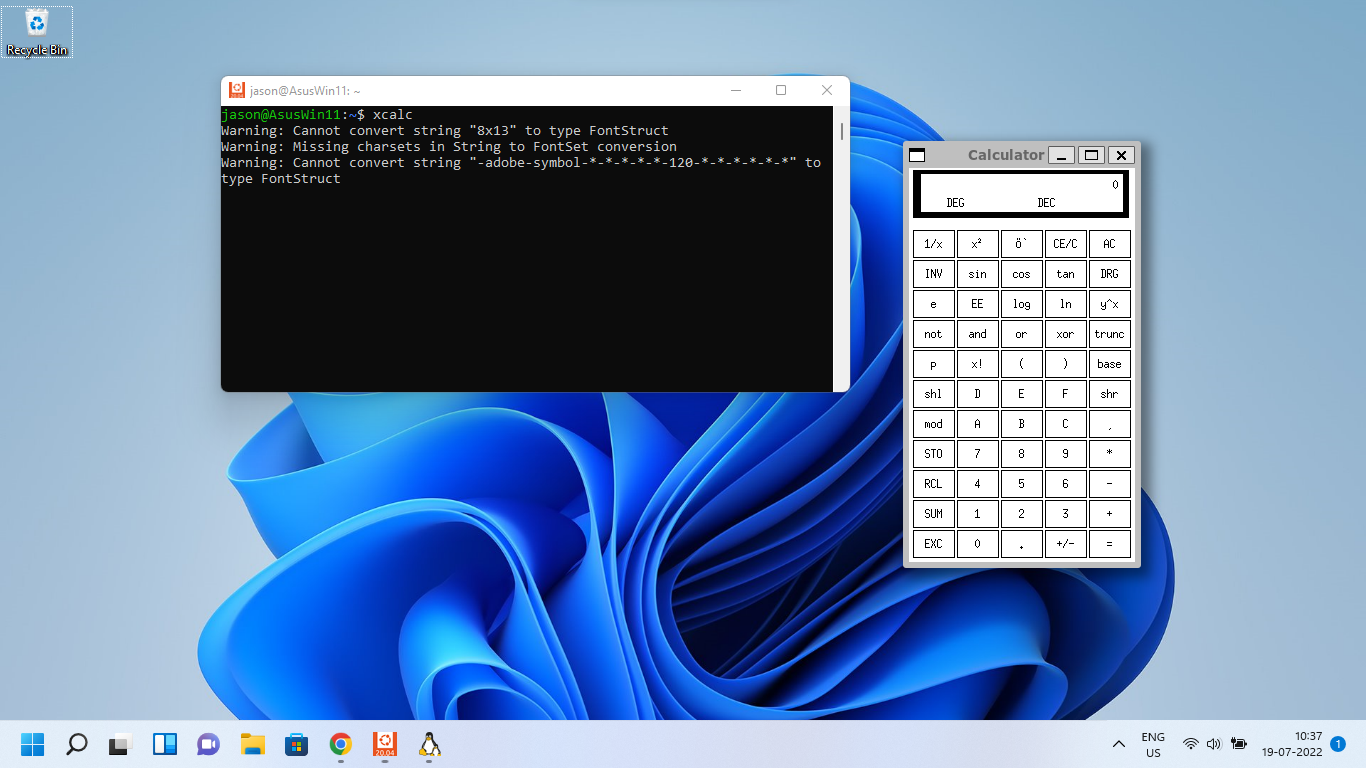
Leave xeyes opened and run the calculator xcalc with:
xcalc
When you move the cursor over the calculator, xeyes follows the cursor. This shows that several GUI applications can interact together.
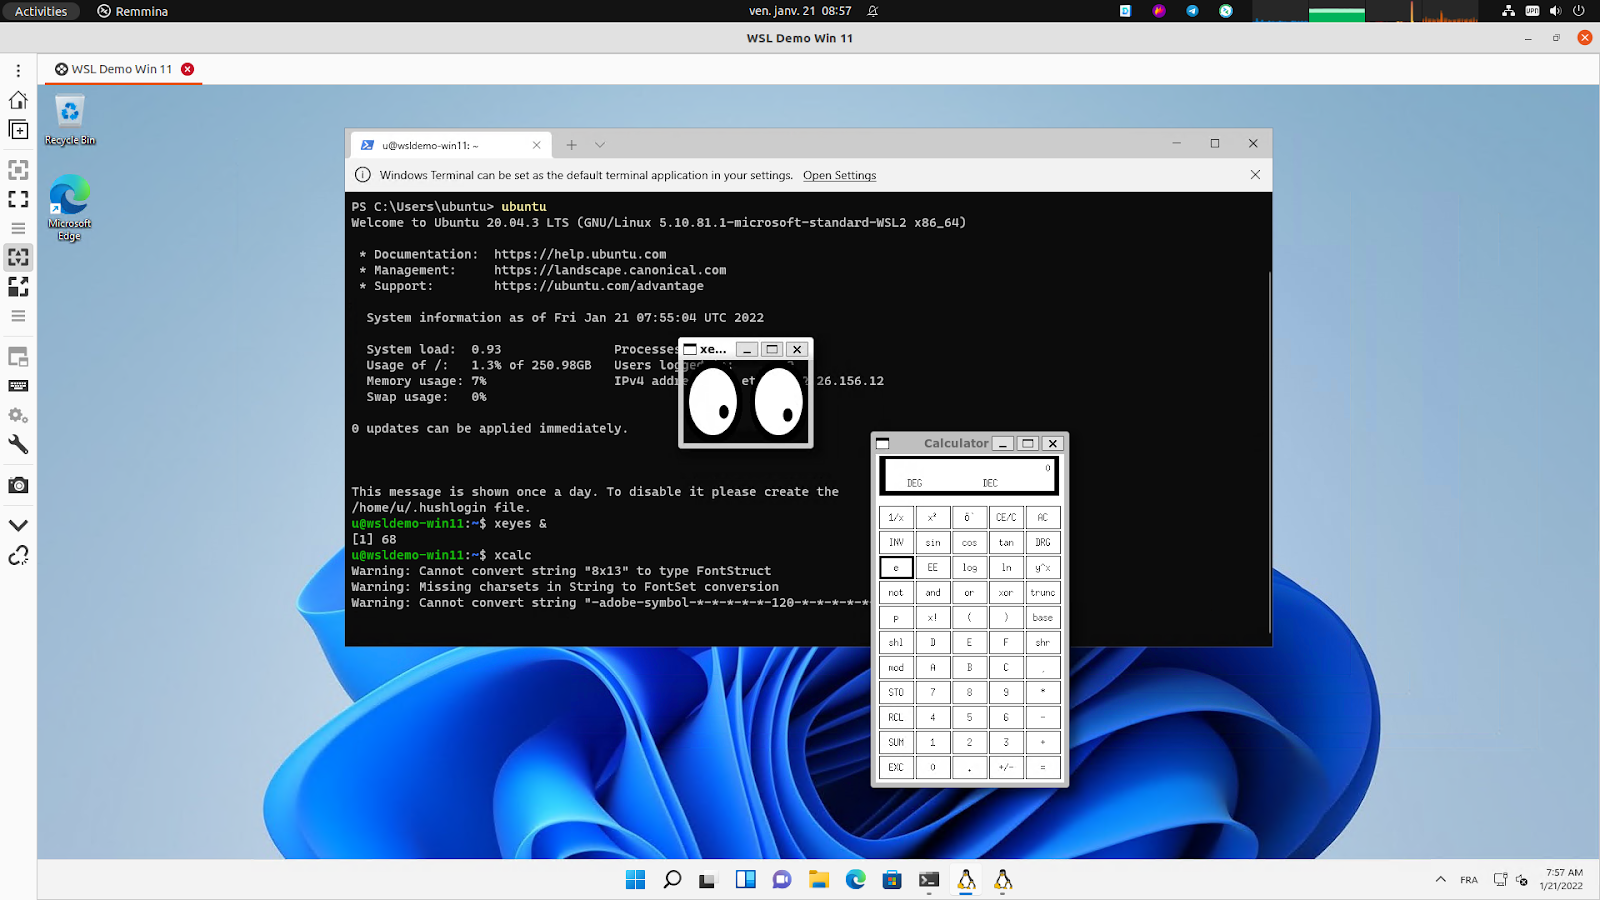
Note that applications running under WSLg display a little penguin at the bottom right corner of their icons in the Windows taskbar. That’s one way you can distinguish applications running on Windows or Ubuntu (besides the window decoration and styling).
![]()
Close xeyes and xcalc by pressing the cross icon on the top right corner of each X application window.
Xcalc and xeyes are very basic X Windows applications but there are plenty of choices in the Linux ecosystem corresponding to your needs and available out of the box on Ubuntu.
In the following example, we will use GNU Octave to perform numerical computation.
We will use it to calculate and draw a beautiful Julia fractal. The goal here is to use Octave to demonstrate how WSLg works, not to go through the theory of fractals.
First thing is to install the software like we did for x11-apps, from the terminal prompt run:
sudo apt install octave
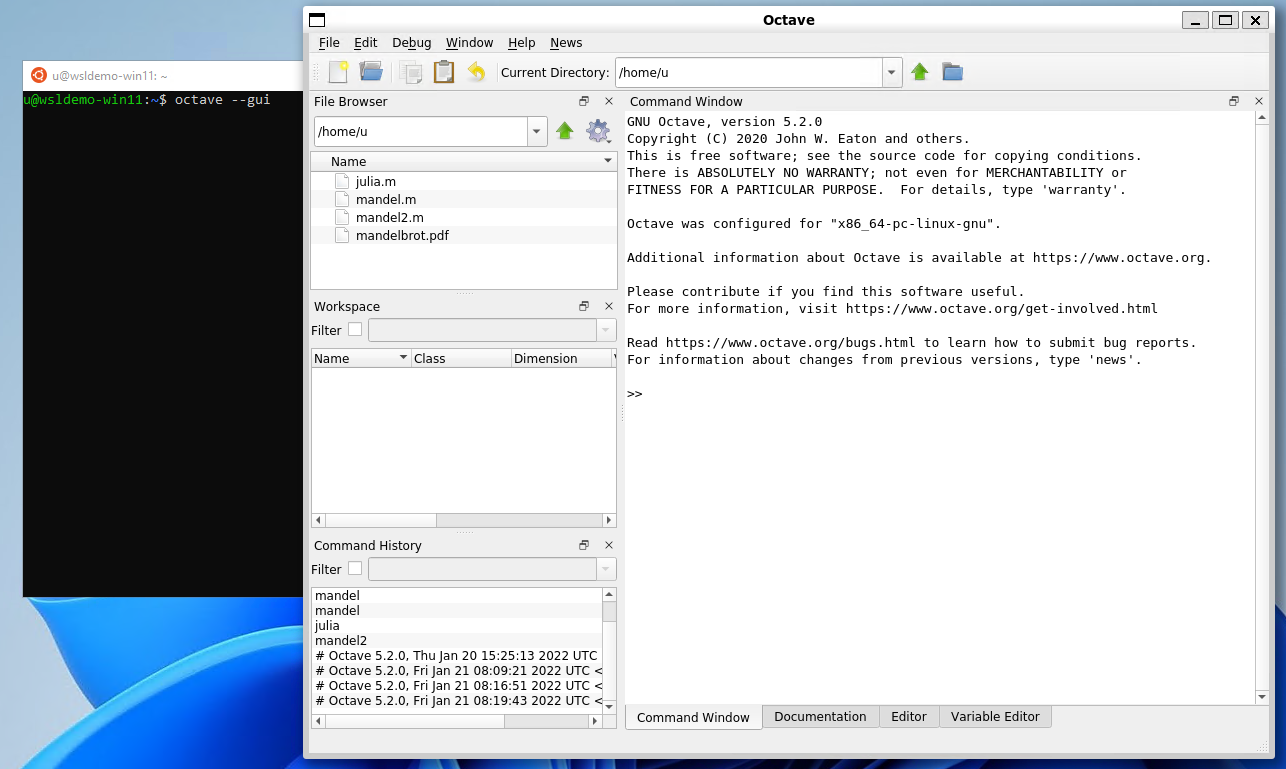
Then start the application:
octave --gui &
Do not forget the ampersand & at the end of the line, so the application is started in the background and we can continue using the same terminal window.
In Octave, click on the New script icon to open a new editor window and copy/paste the following code:
#{

Inspired by the work of Bruno Girin ([Geek Thoughts: Fractals with Octave: Classic Mandelbrot and Julia](http://brunogirin.blogspot.com/2008/12/fractals-with-octave-classic-mandelbrot.html))

Calculate a Julia set

zmin: Minimum value of c

zmax: Maximum value of c

hpx: Number of horizontal pixels

niter: Number of iterations

c: A complex number

#}

function M = julia(zmin, zmax, hpx, niter, c)

%% Number of vertical pixels

vpx=round(hpx*abs(imag(zmax-zmin)/real(zmax-zmin)));

%% Prepare the complex plane

[zRe,zIm]=meshgrid(linspace(real(zmin),real(zmax),hpx),

linspace(imag(zmin),imag(zmax),vpx));

z=zRe+i*zIm;

M=zeros(vpx,hpx);

%% Generate Julia

for s=1:niter

mask=abs(z)<2;

M(mask)=M(mask)+1;

z(mask)=z(mask).^2+c;

end

M(mask)=0;

end
This code is the function that will calculate the Julia set.
Save it to a file named julia.m. Since it is a function definition, the name of the file must match the name of the function.
Open a second editor window with the New Script button and copy and paste the following code:
Jc1=julia(-1.6+1.2i, 1.6-1.2i, 640, 128, -0.75+0.2i);

imagesc(Jc1)

axis off

colormap('default');
This code calls the function defined in julia.m. You can later change the parameters if you want to explore the Julia fractal.
Save it to a file named juliatest.m.
And finally, press the button Save File and Run.

After a few seconds, depending on your hardware and the parameters, a Julia fractal is displayed.
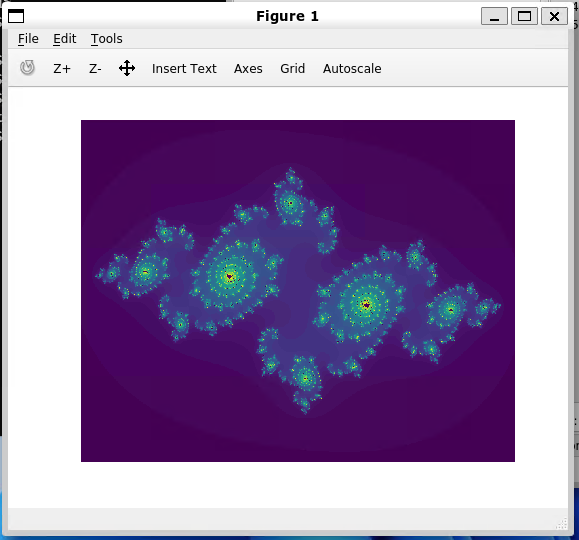
Like Octave, this window is displayed using WSLg completely transparently to the user.
Enjoy!
6. Enjoy Ubuntu on WSL!
That’s it! In this tutorial, we’ve shown you how to install WSL and Ubuntu on Windows 11, set up your profile, install a few packages, and run a graphical application.
We hope you enjoy working with Ubuntu inside WSL. Don’t forget to check out our blog for the latest news on all things Ubuntu.
Further Reading
- Enabling GPU acceleration on Ubuntu on WSL2 with the NVIDIA CUDA Platform
- Setting up WSL for Data Science
- Working with Visual Studio Code on Ubuntu on WSL2
- Microsoft WSL Documentation
- Whitepaper: Ubuntu WSL for Data Scientists
- WSL on Ubuntu Wiki
- Ask Ubuntu
Was this tutorial useful?
Thank you for your feedback.
Even though the latest Linux distributions are user-friendly, students and scholars tend to use Windows since they are only familiar with Windows operating system and will find it difficult to install Linux natively for doing their research simulations. Further, often they mistakenly crash their Windows machine while trying to dual-boot the system with Linux. and that may lead to severe data loss.
There are different ways to use a Linux application on windows. The popular methods are:
- Using Cygwin Environment
- Using MinGW/MinGW-64 Environment
- Using MSYS2 Environment
- Using Virtual Machines such as VirtualBox
- Using Windows Subsystem for Linux
Compiling the latest Linux-based applications/simulation tools such as ns-3 and OMNet++ using the first three methods (Cygwin, MinGW and MSYS2) will be a challenging task. Of course, some people successfully made it work but the rest of the people may fail to make it work because of various reasons.
But, using different virtualisation solutions such as Microsoft Virtual PC, Microsoft Hyper-V, VMWare, VirtualBox, Windows Subsystem for Linux etc., one can successfully install and use any Linux-based application under Windows. Among these, Windows Subsystem for Linux is the best and most efficient way of running a Linux-based application under Windows.
The Windows Subsystem for Linux (WSL)
The Windows Subsystem for Linux (WSL) lets developers run a GNU/Linux environment — including most command-line tools, utilities, and applications — directly on Windows, unmodified, without the overhead of a traditional virtual machine or dual-boot setup[1]. Particularly, by using the latest version of WSL2 under Windows 11 one can effortlessly run any Linux-based application including GUI applications under Windows 11.
Using WSL2, can install
(1) ns-2 and nam under Windows 11
(2) ns-3, NetAnim and NetSimulyzer under Windows 11
(3) OMNet++ with IDE under Windows 11
(4) SUMO with sumo-gui under Windows 11
There are countless possibilities for using WSL2 for a Linux-based research
Installing WSL2 Under Windows 11
One may find a detailed installation procedure for installing WSL2 under Windows 11 and using GUI based Linux application in[2]
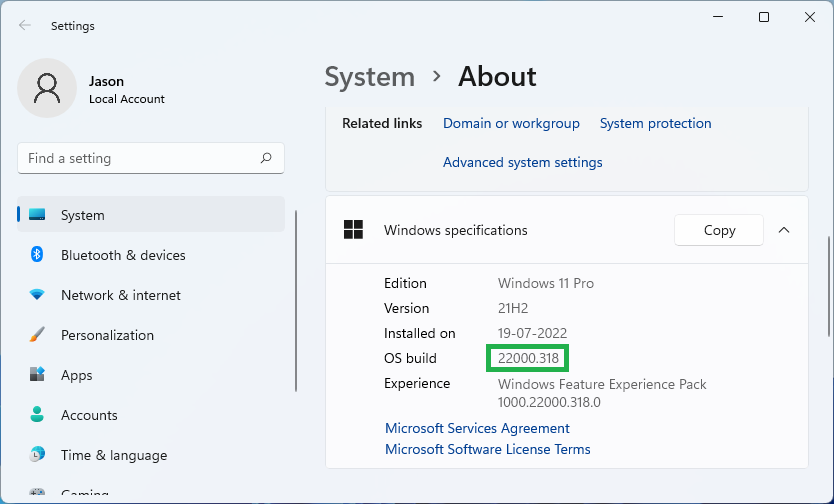
Step 1: Check the Windows ll Version
For running WSL2 with Linux GUI application support, we should use a suitable version of Windows 11. The OS build number of the Windows 11 must be higher than 22000. You may check it in System->About->Windows specifications section
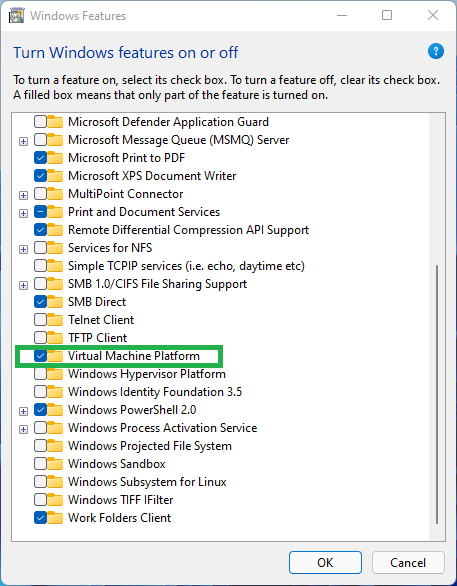
Step 2: Enable the Windows features “Virtual Machine Platform”
Open the “Turn Windows features on or off” window and enable the “Virtual Machine Platform” feature
Now we can install WSL2 support and suitable a Linux in it
Step 3: Install Windows Subsystem for Linux Preview
We can install “Windows Subsystem for Linux Preview” from the Microsoft Store. We may search for it in the search box and can find it and install it from here.
In fact, this preview version of WSL2 only supports running the Linux GUI application out of the box without any additional Xserver component. (it means, the X-server components are already buit-in with this WSL2 package)
After the successful installation of “Windows Subsystem for Linux Preview” , we can run the command ‘wsl’ from the “Windows PowerShell” – but it will not contain the Linux system installed in it. So, before running ‘wsl’ command, we have to install a suitable version of Linux from the Microsoft Store.
Step 4: Installing a Suitable Linux version from Microsoft Store.
We can install a suitable version of “Ubuntu” from the Microsoft Store. We may search for it in the search box and can find it and install it. Here we are installing Ubuntu 20.04.4 LTS version.
Step 5: Running Ubuntu
Now we can run the newly installed Ubuntu from the menu itself.
During the first run, it will ask and set a Linux user name and password. After that, it will directly run the terminal without asking username/password.
The following output shows the Ubuntu Terminal window which is running on WSL2. Here we may run any text-based and GUI-based Linux commands and applications.
Step 6: Installing some x11-based applications
On the latest Windows 11, WSL2 comes with WSLg (the graphical support) enabled by default. WSLg allows you to run graphical linux applications. So, now we can install some simple x11-based GUI applications and test the working of Linux GUI applications on Windows 11.
First, update the Ubuntu package repository.
$ sudo apt update
(After that, if necessary, we can upgrade the entire system with the latest modifications)
Now, to test the GUI application support, we can install some basic X11 applications as follows:
$ sudo apt install x11-apps
Step 6: Running a sample GUI application
In the following example, we are running a Linux GUI application called “xcalc”. If you notice that, the new Linux GUI application which is running under WSL2 Linux environment is getting displaying its “window” on the host (Windows 11) desktop itself
Conclusion
With the latest Windows 11 and its WSL2 support, we can run any GUI-based Linux applications under windows. The future version of WSL may even have excellent support for applications that may use 3D graphics subsystem.
Now we can install any text-based as well as GUI-based Linux application under this Ubuntu which is running under WSL2. So, now it is possible to install ns-3 with ‘NetAnim‘ (GUI) or ns-2 with the ‘nam‘ (GUI) OMNet++ with its ‘IDE’ (GUI), SUMO (GUI).
Note : But, you can not get good performance in terms of speed if you are comparing it with a native Linux installation on the same hardware. Even WSL may perform poor than some other virtualization solutions such as Virtual box (where it is possible to use a minimal, stripped version of Linux for better performance). So, if you are going to do some serious research work, I will advice using a simulator such as ns-3, only under a native Linux operating system and on native hardware.
The following Procedure explains the installation of ns-3 and NetAnim Under Windows 11 with WSL2 :
Installing ns-3 and NetAnim Under New Windows 11 Using WSL2
The following Procedure explains the installation of OMNet++ IDE Under Windows 11 with WSL2 :
Installing OMNet++ IDE Under new Windows11 Version Using WSL
Meantime, one may try the following installation procedures under WSL2.
Installing Aquasim & Aqua3D on an old Linux under VirtualBox
Installing Aquasim & Aqua3D on an old Linux under VirtualBox
References
- https://docs.microsoft.com/en-us/windows/wsl/about
- https://ubuntu.com/tutorials/install-ubuntu-on-wsl2-on-windows-11-with-gui-support#1-overview

I’ve been using Windows Subsystem for Linux (WSL) for my OS class for quite a while now. And I love how I can use Linux commands in Windows in a straightforward way without the added complexity of installing a virtual machine or dual booting.
By the end of this article, you should be able to run Linux commands right from Windows like this:
Prerequisites
To have WSL running effectively, I suggest you upgrade to Windows 11. WSL is also available on Windows 10, but it is way more efficient on Windows 11 based on my experience.
For Windows 10, you’ll need to have build 21364 or higher.
This article will cover what you can do on both Windows 10 and 11
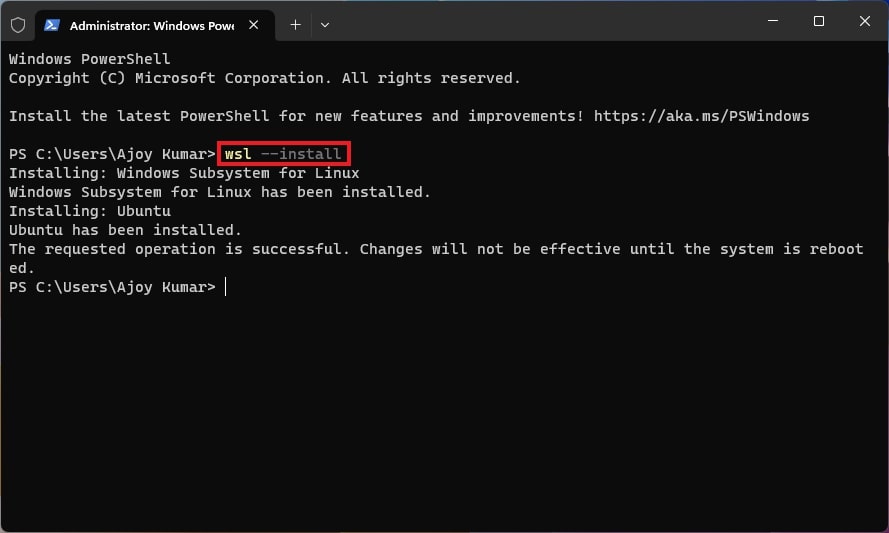
How to Install WSL
The command to run WSL is straightforward:
wsl --install
This will download the Linux kernel, set WSL 2 as the default, and install Ubuntu as the default distribution.
Don’t want ubuntu? Here is the command for you:
wsl --install -d <distro name>
These are the available distributions as of now:
- Ubuntu
- OpenSUSE Leap 42
- SUSE Linux Enterprise Server 12 (SLES)
- Kali Linux
- Debian GNU/Linux
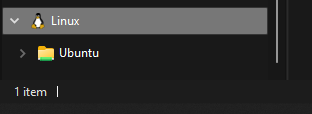
After this, you’ll find an app called Ubuntu (or any other distro) in your start menu:
Open the Linux Terminal
Open the Ubuntu app that you just installed, and you’ll be greeted with a Linux terminal! Try running some commands:
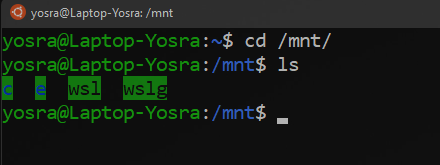
What if I want to access my Windows files?
If you go to your file explorer (winkey+E) you’ll find a new Linux option on the left where all your Linux files exist. This is where when any files you create in the terminal will be located:
But what if you want to access your regular files?
Luckily, you can do that easily. Just run the following command in your Linux terminal:
cd /mnt/
If you run ls here, you’ll find your computer drives. This way you’ll be able to cd your way into your files.
How to Create Aliases in WSL2
Do you ever have a long command to type and wish there were a shortcut for it? Then, aliases are your friends.
There are two ways to create aliases:
- per session
- permanently
How to create per session aliases in WSL2
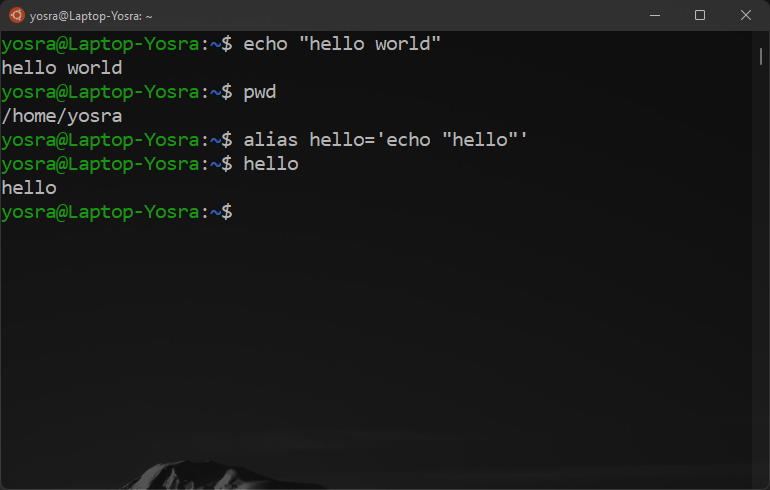
To create an alias in your current session of Linux (the alias will be forgotten once you close the terminal), then you should run the following command:
alias <alias name>='<command>'
for example:
alias runc='gcc main.c -o main'
How to create permanent aliases in WSL2
We’ll edit a file called .bash_aliases to save our aliases.
Run the following commands:
cd ~
ls -a
Look through the list of files that are printed out and look for .bash_aliases.
If you can’t find it, run the following command:
touch .bash_aliases
Now in order to edit the file, run this command:
vi .bash_aliases
You’ll be greeted with a screen like this:
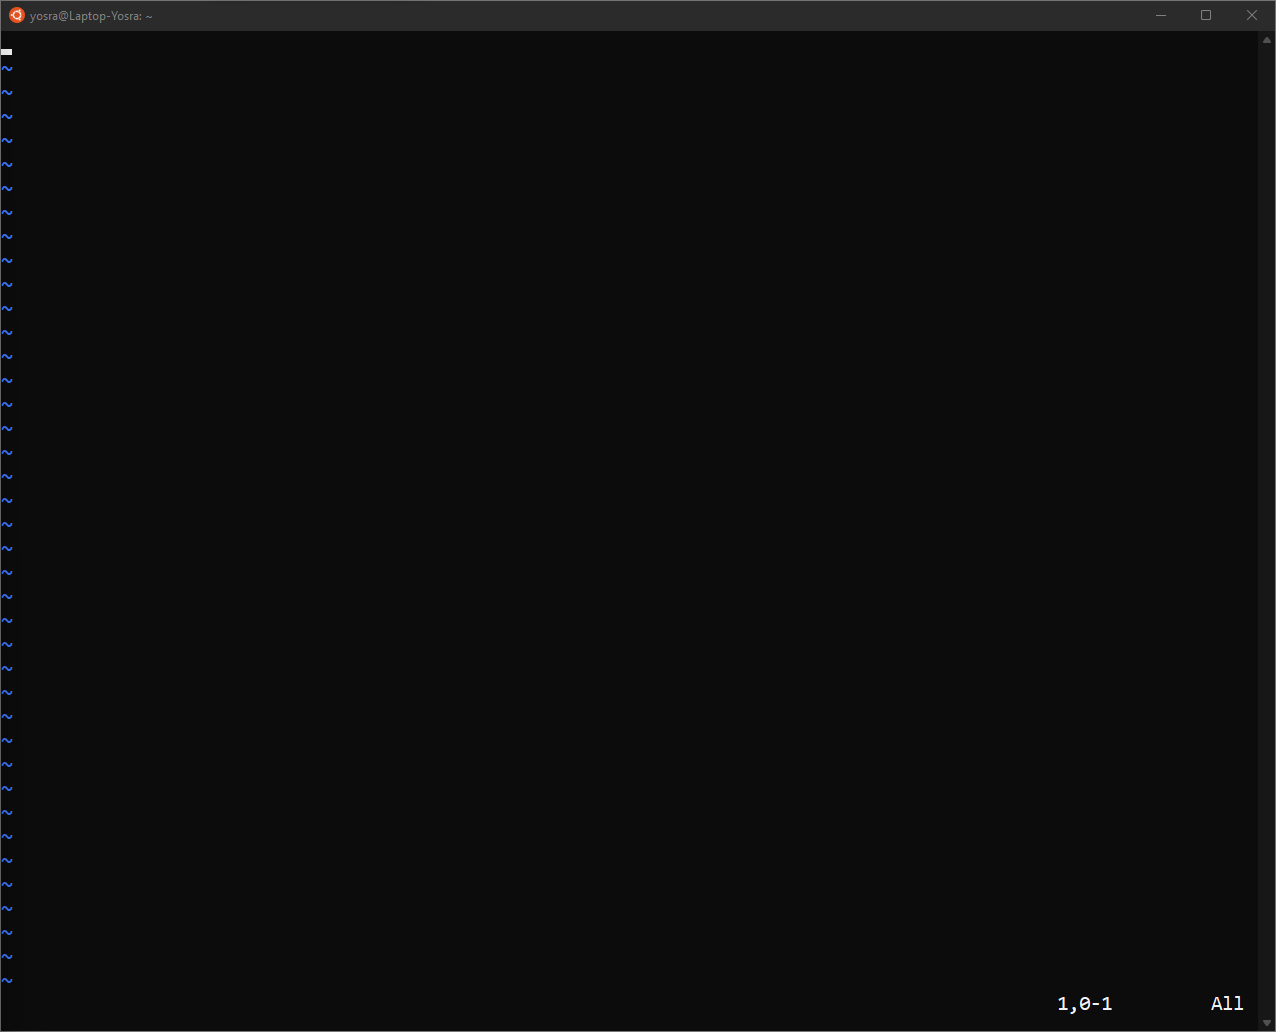
- Press «i» to start typing, and add as many aliases as you want.
For example:
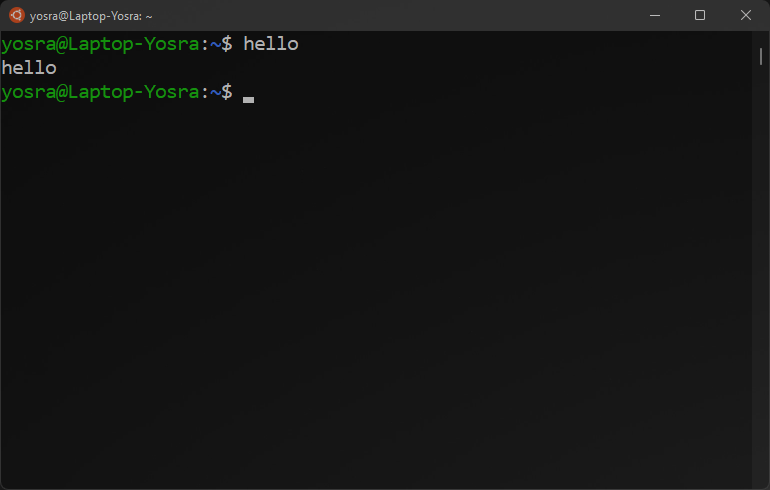
alias runc='gcc main.c -o main'
alias hello='echo hello'
- To exit the typing mode, press «ctrl + c».
- To exit Vim and save the files type «:wq!» (I’m proud that I didn’t have to google that.)
Now you’re ready! Restart Ubuntu and start typing any of the following aliases above and it should work perfectly:
Okay cool, now we know how to run command line apps from WSL2. But what if we want to run Linux GUI apps? The answer is simple – you just need to install the GUI app before running it. I’ll use Firefox as an example.
To install Firefox:
sudo apt install firefox
To run Firefox:
firefox
If you already have Firefox on your Windows machine, you’ll find that it isn’t open. That’s because you’re now running Firefox for Linux not Windows.
You can even run Firefox for Linux right from the start menu if you use Windows 11. You’ll find it under your distro’s folder.

Conclusion
This article covered how to run WSL 2 effectively. If you have any questions, feel free to contact me on any of my social media platforms
Learn to code for free. freeCodeCamp’s open source curriculum has helped more than 40,000 people get jobs as developers. Get started
When Microsoft released WSL first, it was revolutionary as it allowed to run Linux commands on Windows.
A few years later, Microsoft took it to the next level by releasing WSL 2. The new version of WSL allowed running GUI Linux apps on Windows.
It’s not that Windows has a dearth of GUI apps. But when working in the Linux environment inside WSL, using the GUI apps could come in handy.
For example, you have to edit a config file and are uncomfortable with the command line text editors like Nano. You use Gedit GUI text editor to make the changes. It simplifies the life of Windows users who have to use Linux for their work.
Wondering how to run Linux GUI apps on Windows? There are the main steps for that:
- Enable WSL 2 and install a Linux distribution with it
- Install appropriate graphics driver for WSL
- Install and use GUI Linux apps
Let’s see about the steps in detail.
Requirements
As stated above, running Linux GUI applications is not available for all Windows versions. To do this, your system should be:
- For x64 systems: Version 1903 or later, with Build 18362 or later.
- For ARM64 systems: Version 2004 or later, with Build 19041 or later.
- The installed Linux distribution should use WSL2
Remember that, the requirements above are solely for running Linux GUI apps. WSL is supported for some of the Windows 10 versions also. Please refer to the dedicated article detailing how to install WSL in Windows for more about WSL and its uses.
Step1: Installing Linux Distribution with WSL 2
This is a lot easier on Windows 11 which comes with built-in support for WSL 2.
On Windows 11
You can use the Microsoft Store but I find it easier to use the command line.
You need to open PowerShell with admin privileges. For this, search for Powershell in the start menu, right-click on Powershell and select Run as Administrator.
Enter the following command to install WSL.
wsl --installBy default, Ubuntu will be installed as the Linux distribution. If you want to install any other distribution, use the command below:
wsl --list --onlineThis will list all the available Linux distributions. Once you decide on the distribution, use the below command to install it.
wsl --install <Distribution Name>Once finished downloading and installing, you need to reboot to apply the changes.
On Windows 10
This is a bit complicated and takes some time and effort to run WSL version 2 on Windows 10.
Ensure that the Windows Subsystem for Linux feature is turned on. Execute the following command in Powershell with admin rights:
dism.exe /online /enable-feature /featurename:Microsoft-Windows-Subsystem-Linux /all /norestartReboot the device once the command is completed.
After this, you need to enable the Virtual Machine Platform feature. Open the Powershell with admin privileges and enter the following command:
dism.exe /online /enable-feature /featurename:VirtualMachinePlatform /all /norestartOnce again, restart the device to complete the WSL install and update to WSL 2.
Now, download the Linux Kernel Update Package for x64 machines from the official website. If you are using ARM64 devices, use this link to download the latest kernel update package.
If you are not sure about the device architecture, enter the command below in Powershell to get the type:
systeminfo | find "System Type"When the file is downloaded, double-click on it and finish the installation of the Kernel update package. Now, open PowerShell and run this command to set WSL 2 as the default version when installing a new Linux distribution:
wsl --set-default-version 2Once WSL2 is set as the default version, you can now install the Linux distribution of your choice.
Go to Windows Store and install Ubuntu.
🛠️ Configure the newly installed Ubuntu
Whether you installed WSL and Ubuntu using the Microsoft Store or the command line, you need to configure it.
Here’s how it is done:
Once you rebooted after installing Ubuntu, search for Ubuntu in Start Menu and open it.
It will ask you to enter a UNIX Username and Password. Enter these details and press enter key.
You will now be inside the terminal window of Ubuntu.
Once logged in, you need to update the installed Ubuntu. For this, enter the following commands one by one:
sudo apt update
sudo apt full-upgrade
After completing the update, you are good to go with Ubuntu in WSL.
Step 2: Installing GUI Applications
Once you are all set with the Linux distribution inside WSL, now is the time to install the Linux GUI application. It is done in two parts as described below.
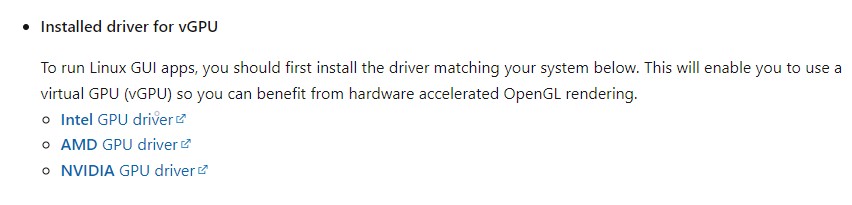
Download and Install Graphics drivers
To run GUI apps, you need to install appropriate graphics drivers. You can use the following link to download the drivers according to your provider.
- Intel GPU Driver for WSL
- AMD GPU Driver for WSL
- NVIDIA GPU Driver for WSL
Once installed, you are all done.
Install some GUI Apps
Now, go to your Ubuntu app and install any GUI app using the APT package manager. You should note that running apps from other sources like flatpak are problematic within WSL.
For this article, I installed the Gedit text editor using the following command:
sudo apt install gedit -yThis will install several MB of packages including required libraries. Once completed, you can run the following command to start the GUI Gedit app in Windows:
gedit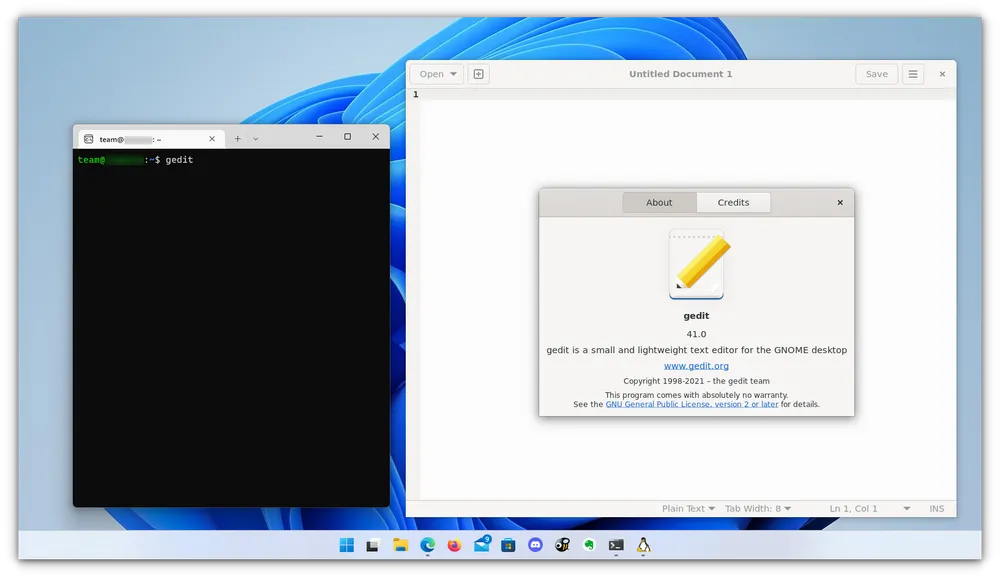
Similarly, you can install all the popular applications available to Linux, including Nautilus file manager, GIMP, etc. You can refer to the official documentation for more about running GUI applications in WSL.
Wrapping Up
With WSL, Microsoft has provided a comfortable way of using Linux within Windows. It keeps on improving with each major version. Running GUI Linux apps on Windows feature is proof of the same.
As you can see, it is rather simple to use WSL 2 on Windows 11. Running it on Windows 10 takes some effort.
I hope you find this tutorial helpful. Let me know if you face any difficulties.
Windows 11 brings with it a slew of exciting new features, including enhanced performance and a revamped user interface. However, one of the most noteworthy additions is the native support for running Linux GUI (Graphical User Interface) applications on the Windows platform.
To achieve this, you need to install Windows Subsystem for Linux (WSL). It is a compatibility layer in Windows operating systems that allows users to run Linux binary executables natively on the Windows operating system. Here is a step-by-step guide to installing Linux GUI apps on Windows 11.
However, to run and use Linux graphical applications on Windows 11, ensure that your system meets the requirements to support Linux GUI apps.
So, let’s discuss them one by one:
1. Install Graphics Drivers
First, ensure that you have the necessary graphics drivers installed on your Windows system to run graphical Linux apps. Microsoft has thoughtfully provided links to driver software for the three major GPU manufacturers: Intel, AMD, and NVIDIA.
If you are unsure about the graphics model you are using, you can follow our guide to check the graphics model accurately. After downloading and installing the latest graphics drivers for your system, remember to restart your computer to complete the installation.
2. Install WSL
Assuming you already have a working WSL installation on your system. However, if you have not installed WSL on your system yet, you can easily do so. Follow the steps mentioned below:
1. Open the Terminal with admin authority on your system.
2. On the terminal and run the below command:
wsl --install3. Now, it will install WSL on your system. Please wait for the installation to complete.
4. After that, continue with setting up the Linux distro. You have to create a username and password for your Linux distro. Once done, restart your system.
3. Updating WSL Version to WSL2
However, if you are using WSL, you need to update to WSL2 on your system, as WSL2 has added support for running Linux graphical apps on Windows 11.
To update the WSL version to WSL2, you can follow the steps below:
1. Open Windows Terminal as an administrator.
2. Type the following command to update to WSL2 on Windows 11:
wsl --update3. If an update is available, it will download and install the latest version of the WSL on your computer.
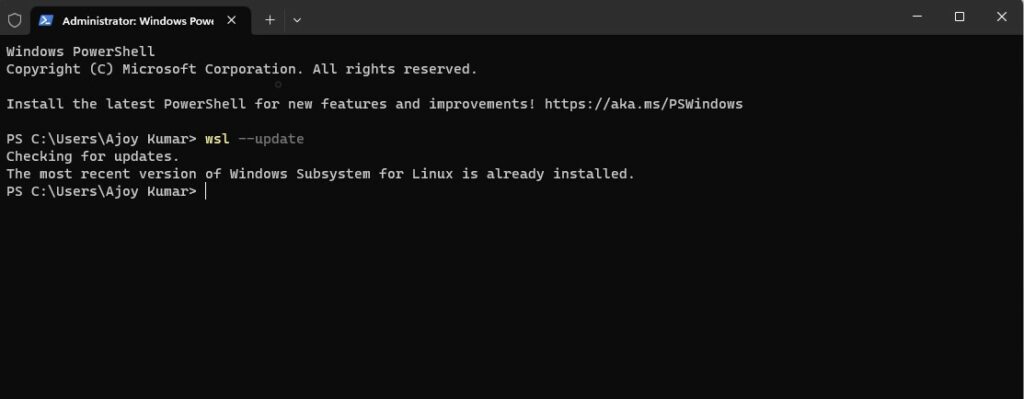
4. To apply the update, you will need to restart WSL. You can do this by running the shutdown command.
wsl --shutdown4. Installing Linux GUI Apps
Once you have installed all the prerequisites, including graphic drivers and WSL2, you are ready to install Linux GUI apps on Windows 11.
To do so, follow the steps below:
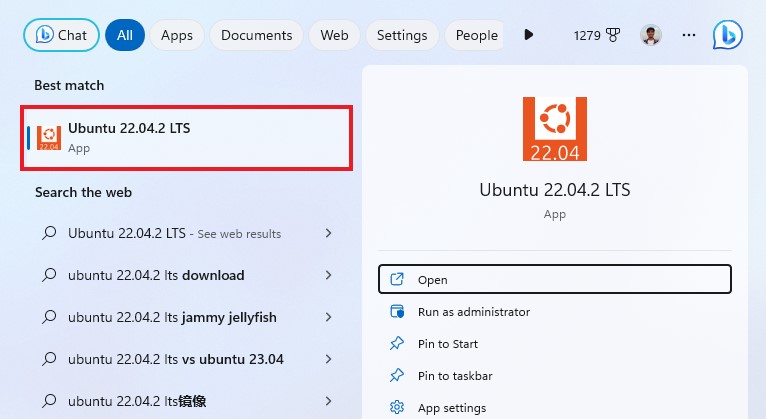
1. Open the Ubuntu Terminal. To do this, search for Ubuntu in the Windows search bar and open it.
2. Now, update the packages in your distribution to install the latest version of GUI apps on your system. For that, run the following commands one by one and enter your Linux password to execute the command.
sudo apt updatesudo apt upgrade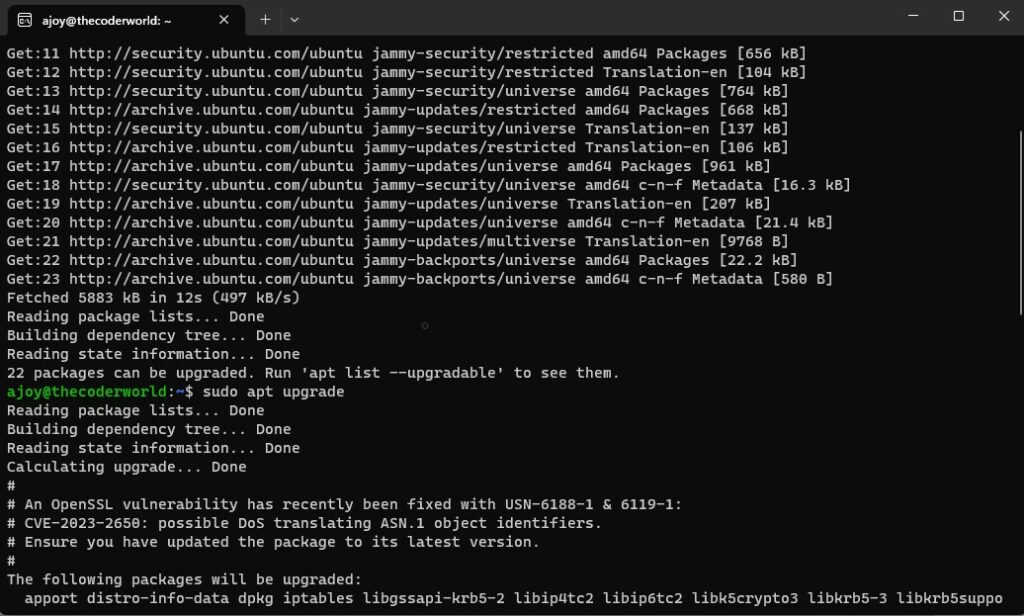
3. After that, run the terminal command for the application you want to install. For example, if you want to install VLC Media Player, you can run:
sudo apt install vlc -y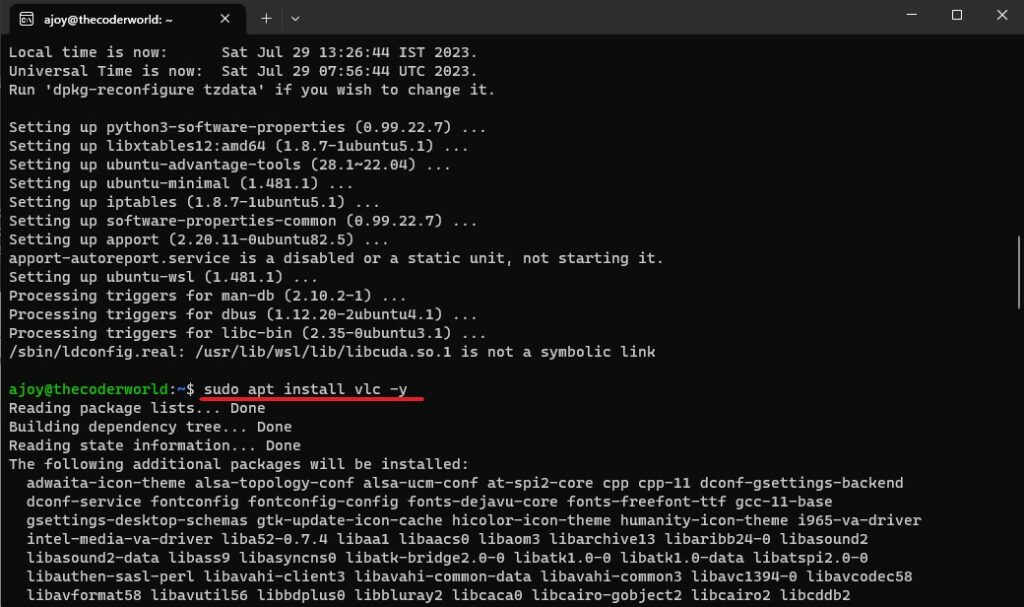
Here are some terminal commands to install some of the popular Linux applications on your system:
Gnome Text Editor: sudo apt install gnome-text-editor -y
GIMP: sudo apt install gimp -y
Nautilus: sudo apt install nautilus -y
LibreOffice: sudo apt install libreoffice -y
5. Running Linux GUI Apps
Once you have installed your Linux GUI app, you can easily run and use it on your Windows 11 operating system. For that, follow these steps:
1. Open the Ubuntu Terminal.
2. Type the name of the application in the Ubuntu Terminal, and it will open the application.
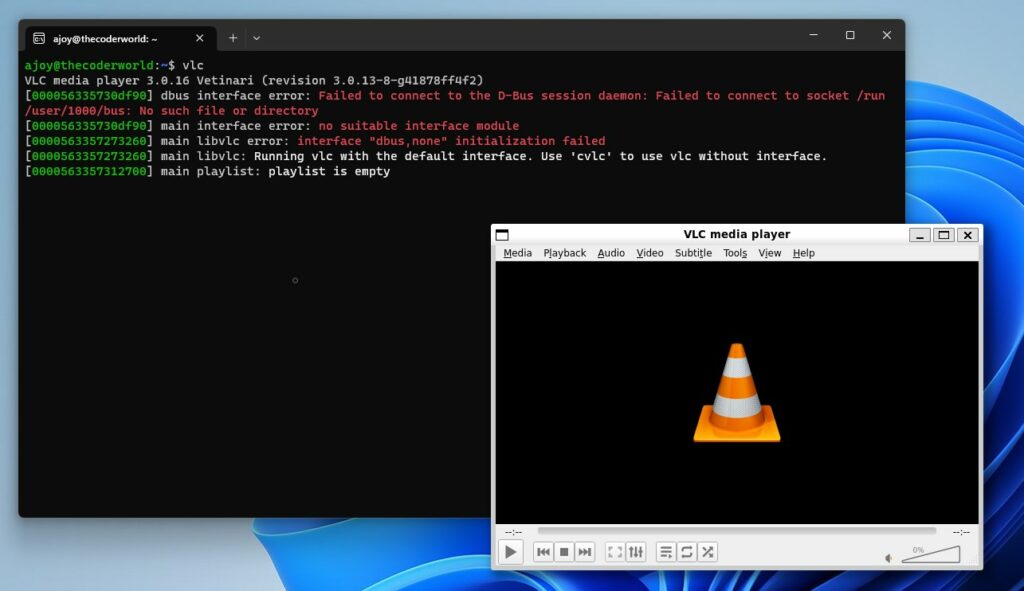
Now, you are ready to use Linux graphical applications on your Windows system.
Conclusion
With Windows 11’s native support for Linux GUI applications, you can seamlessly integrate the power of both operating systems. By following the steps outlined in this guide, you can enjoy a diverse range of Linux applications directly on your Windows 11 machine without the need for virtual machines or dual-booting.
Whether you’re a developer looking to utilize Linux-specific tools or a Linux enthusiast eager to explore the latest Windows release, the compatibility offered by Windows 11 opens up a world of possibilities for a unified computing experience.