Install a complete Ubuntu terminal environment in minutes on Windows with Windows Subsystem for Linux (WSL).
Access the Linux terminal on Windows, develop cross-platform applications, and manage IT infrastructure without leaving Windows.
Download from the Microsoft Store
Install Ubuntu on WSL ›

Deploying WSL at your company?
We help companies achieve a seamless integration with their WSL deployments. Contact us to learn more about how we support enterprises on the Windows Subsystem for Linux.
Contact us
What you never thought was possible on Windows
-
Editors
Run your choice of Linux text editors, including vim, emacs, and nano
-
Servers
Spin up Node.js, install your dependencies with npm, and start testing your web app
-
Development
Install compilers and libraries from the Ubuntu repository, maintained by Canonical
-
Systemd
Develop and run service applications and use snap packages to run popular workflow tools
-
Containers
Work with LXD and Docker containers on Windows
-
Scripting
Automate Linux and Windows tasks with advanced bash scripting
-
Network hardening
Leverage Linux security tools to test and harden your network
-
Data
Crunch big numbers with tools for R and Python
-
Kubernetes
Build, test, and deploy Kubernetes clusters on Windows
Why Ubuntu WSL?
Develop Graphical Applications
Develop and preview web and graphical applications on Linux using WSLg. Create multiplatform graphical applications using popular open source development frameworks like Flutter or React Native.
Learn how to run graphical apps with Ubuntu on WSL ›
Enterprise support
Ubuntu is certified on WSL through close collaboration with Microsoft. Enterprise support is provided for Ubuntu from Azure to Windows workstations creating a seamless operating environment.
Get in touch
Video Guides
An introduction to numerical computation applications using Ubuntu WSL
Tips for working with web services on Ubuntu WSL
Ubuntu on WSL: An FAQ for data scientists and developers
WSL: Partnering with Canonical to support systemd
Ubuntu Summit 2022 | The Windows Subsystem for Linux WSL Latest updates and future improvements
Latest Ubuntu WSL news from
our blog ›
Although Windows is the most widely used and most popular operating system for desktops and laptops, it is not as secure and open-sourced as Linux OS. That’s is why a lot of software developers and professionals prefer Linux OS.
Microsoft has started a partnership with Canonical, creators of Ubuntu Linux. This paved way for Linux users to use Linux on Windows. Yes, you can run Linux on top of Windows 10 without the need for a dual boot, or using VMWare/VirtualBox, or installing it as your main Operating System.
You can access various Linux commands and software from the Linux terminal in Windows 10. In this article, we’ll give you step-by-step instructions on how to install and run the Linux terminal on Windows 10 OS.
Enable Windows Subsystem for Linux (WSL) and Install Ubuntu in Windows 10
If you intend to run a Linux terminal on Windows 10, you must first turn on the ‘Windows Subsystem for Linux’ feature. Then you can download and install your choice of Linux distribution.
The Windows Subsystem for Linux (WSL) is a feature that creates a GNU/Linux environment that allows you to run core Linux command-line tools and services directly on Windows, alongside your desktop and modern store apps.
By enabling Windows 10’s Linux subsystem, you can install and run various Linux distributions (distros) such as Ubuntu, OpenSuse, SUSE Linux, Fedora, etc.
First, Check your Windows Version
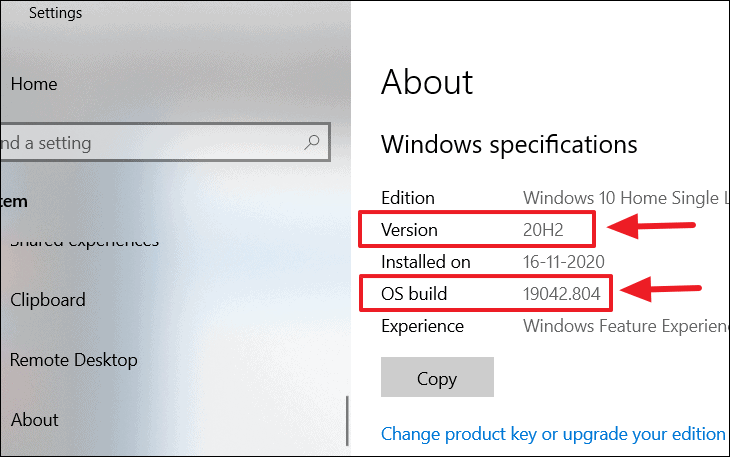
But before we get into how to enable Windows Subsystem for Linux (WSL) and install Linux, you need to check if you are running a compatible version of Windows 10. WSL is only supported on both Windows 10 64-bit (from version 1607) and Windows Server 2019.
To check your Windows version and build, go to ‘Settings’ from Windows Start menu.
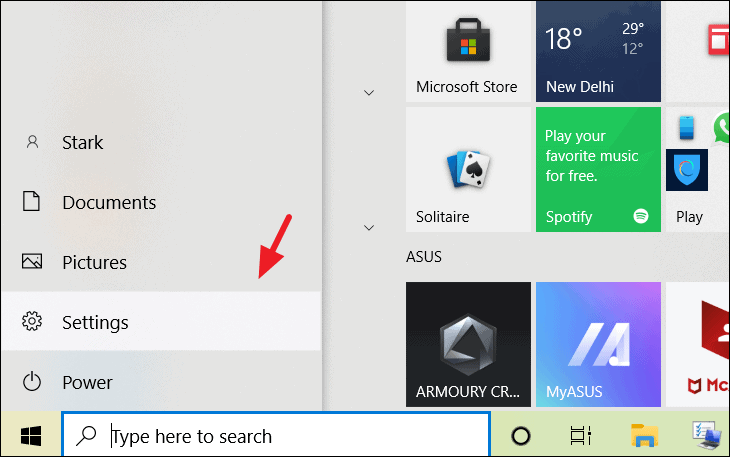
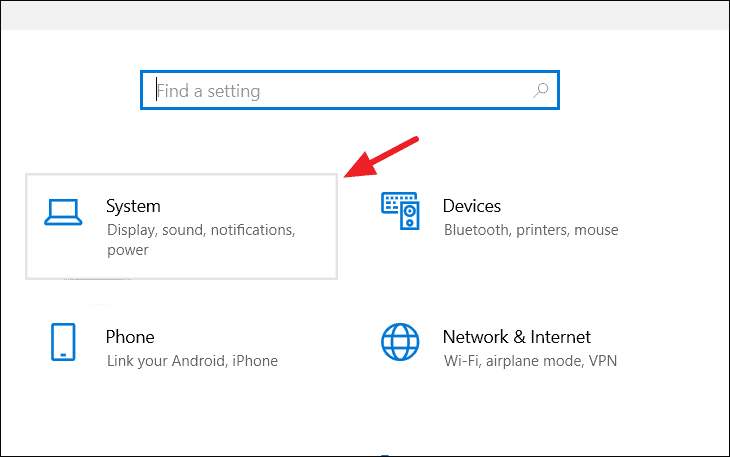
Next, click ‘System’ setting.
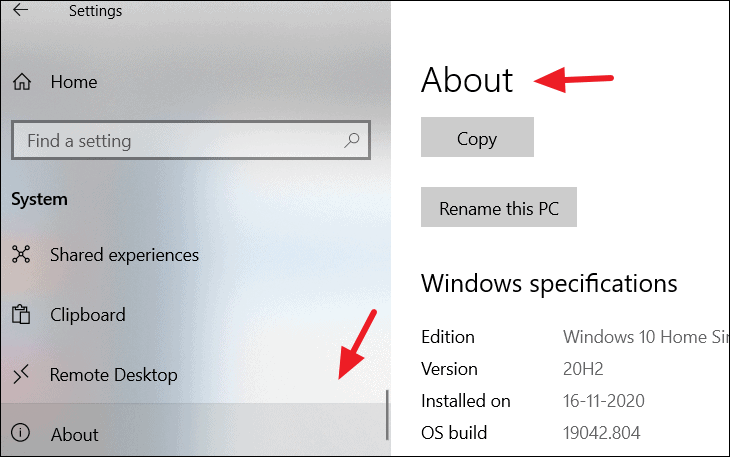
Then, scroll down and select ‘About’ option at the bottom of the left pane to view About section.
On the About page, under Windows specifications, you can see the ‘Version’ and ‘OS build’ of your Windows 10.
Enable Windows Subsystem for Linux
There are two different types of WSL versions: WSL 1 and WSL 2. While they both provide smooth and continuous integration of Linux within Windows, WSL 2 is the latest and fastest version with supports full Linux kernel and system call compatibility. WSL 1 runs a translation layer which bridges the gap between Linux kernal and Windows.
- To run WSL 2, you must be running Windows 10 x64 bit systems: Version 1903 or higher, with Build 18362 or higher.
- To run WSL 1, you will need Windows 10 x64 bit systems: Version 1709 or higher, with Build 16215 or higher.
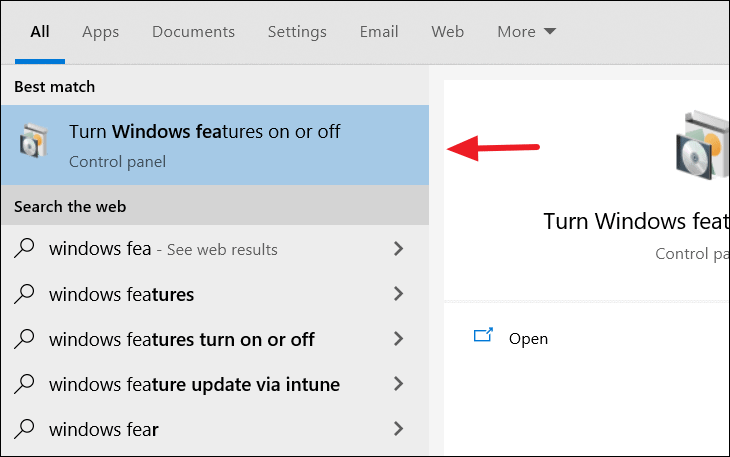
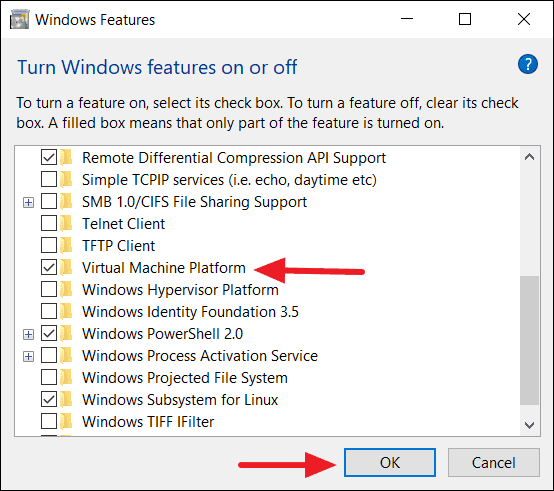
It doesn’t matter which version of WSL you want to run you must enable it first to use it. To do this, start type typing ‘Turn Windows features on and off’ into the Start Menu search field.
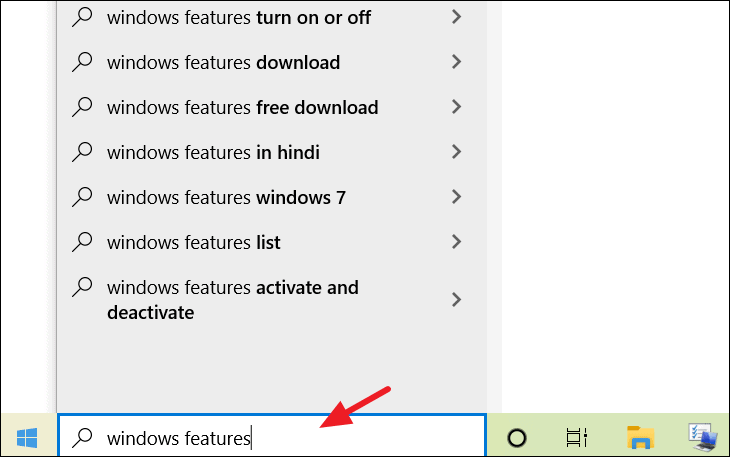
Select ‘Turn Windows features on and off’ control panel from the search result.
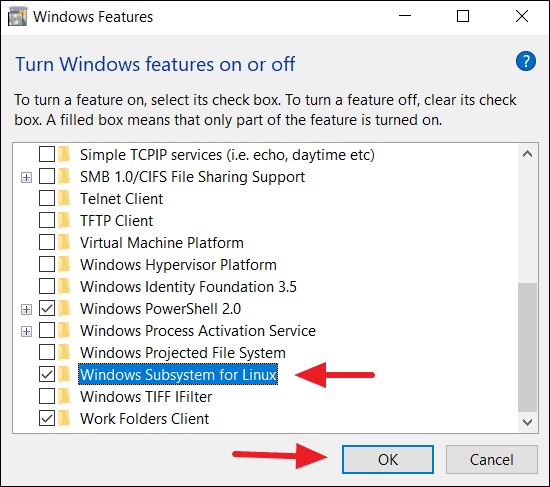
Then, scroll down to ‘Windows Subsystem for Linux’, tick the box in front of it, and click the ‘OK’ button.
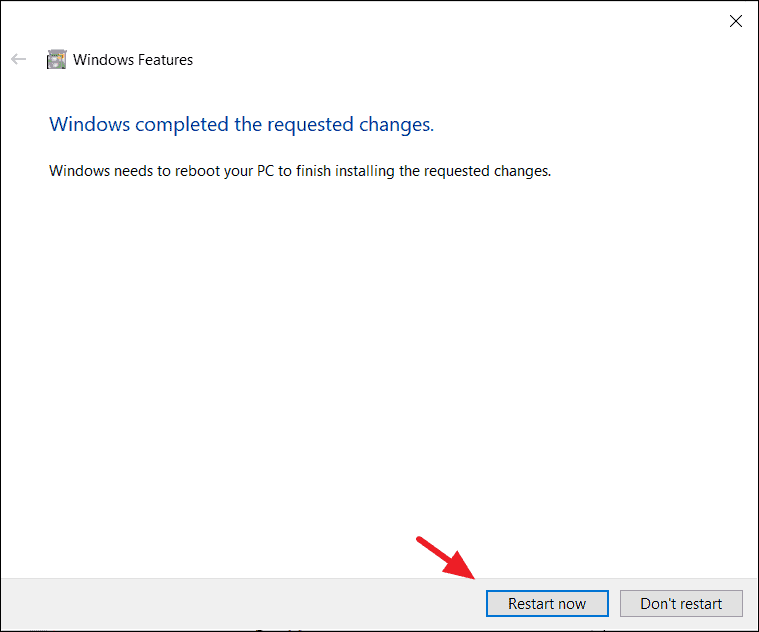
Once the changes are applied, click ‘Restart now’ to restart your computer
If you want to only install WSL 1, you can now restart your computer and install your Linux distro.
Enable WSL 1 via PowerShell
You can also enable WSL via the ‘PowerShell’ command-line tool. This does the same job as the Windows Features control panel. For that, open ‘PowerShell’ as an Administrator and run the below command.
dism.exe /online /enable-feature /featurename:Microsoft-Windows-Subsystem-Linux /all /norestart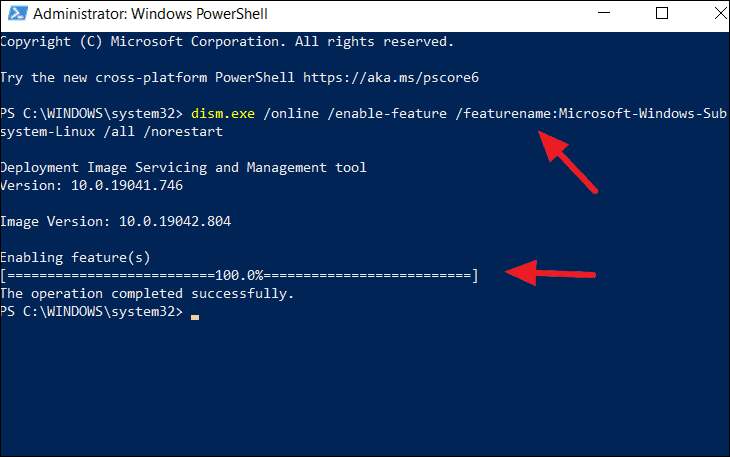
Enable WSL 2
We recommend you upgrade your WSL to version 2 for faster performance speed, and to run a real Linux kernel directly on Windows 10. All you need to do is enable the ‘Virtual Machine Platform’ feature in addition to the ‘Windows Subsystem for Linux’ feature on the Windows features control panel (see below).
Wait for the changes to be applied, then restart your computer.
Enable WSL 2 via PowerShell
This first step to enable WSL 2 is enabling the Virtual Machine Platform feature component on Windows. You can also enable WSL 2 via the ‘PowerShell’ command-line tool. To do that, open ‘PowerShell’ as an Administrator and run the following additional command with the WSL 1 command.
dism.exe /online /enable-feature /featurename:Microsoft-Windows-Subsystem-Linux /all /norestartdism.exe /online /enable-feature /featurename:VirtualMachinePlatform /all /norestart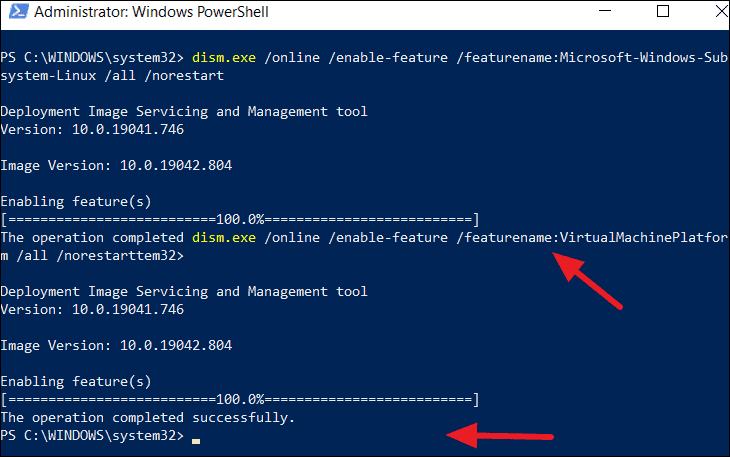
Set WSL 2 as the Default Version
Before setting up WSL 2 as your default version for all Linux distributions, download the WSL Linux kernel package update for x64 systems.
Run the .msi installer downloaded and install it. It will take only seconds.
To set WSL 2 as your default version when installing a new Linux distribution, open PowerShell and run this command the following command:
wsl –set-default-version 2
Then restart your system to switch the feature from WSL 1 to WSL 2.
Install your Linux distribution of choice
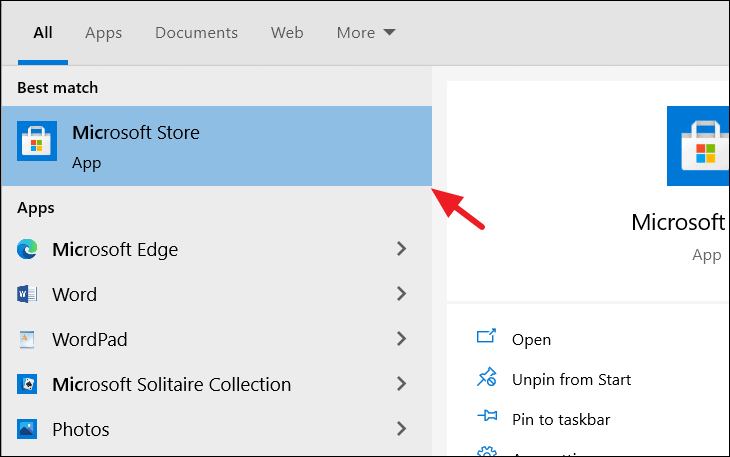
WSL is enabled, now we will install a Linux distribution. First, search for ‘Microsoft Store’ in the Start Menu search field. Then, open it from the search result.
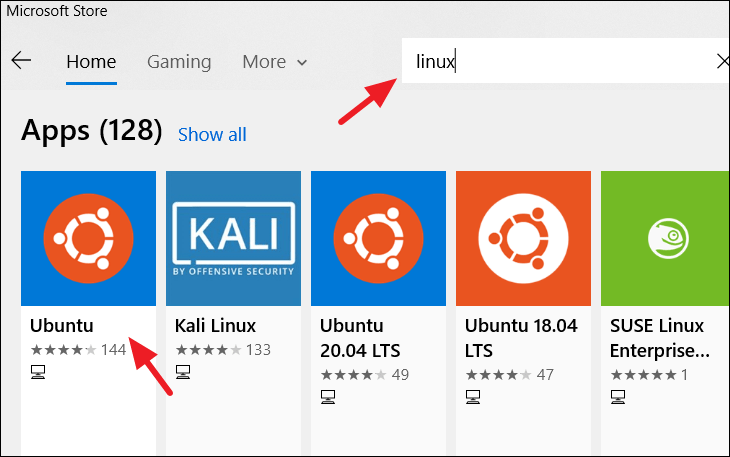
You’ll see a list of every Linux distributions currently available in the Windows Store which are supported by WSL.
- Ubuntu 16.04 LTS
- Ubuntu 18.04 LTS
- Ubuntu 20.04 LTS
- openSUSE Leap 15.1
- SUSE Linux Enterprise Server 12 SP5
- SUSE Linux Enterprise Server 15 SP1
- Kali Linux
- Debian GNU/Linux
- Fedora Remix for WSL
- Pengwin
- Pengwin Enterprise
- Alpine WSL
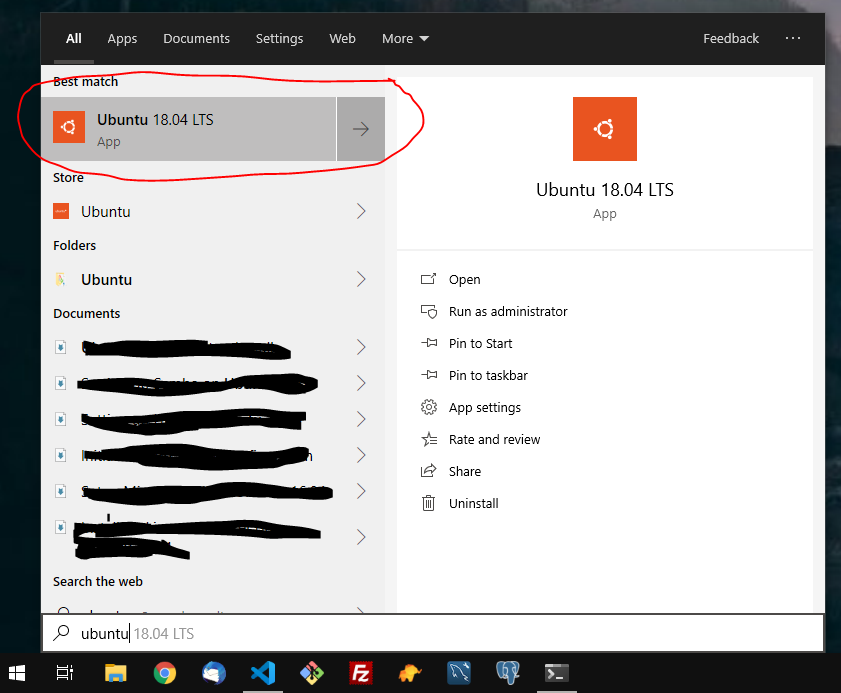
All of theses distributions are available for free. For our tutorial, we’ll select ‘Ubuntu’.
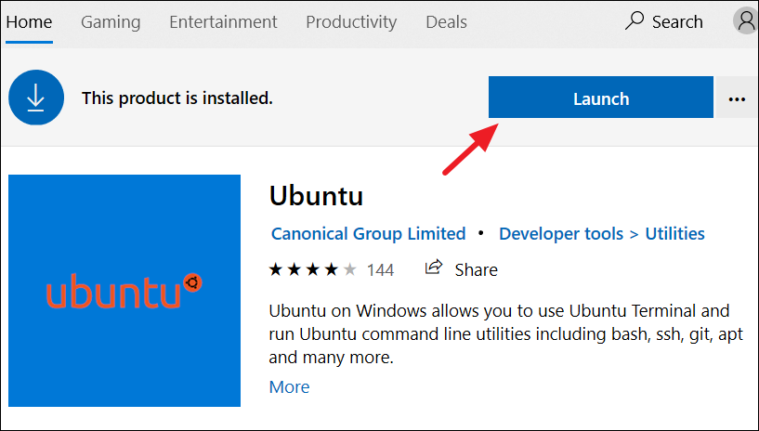
From the Ubuntu distribution’s page, Click the ‘Get’ button.
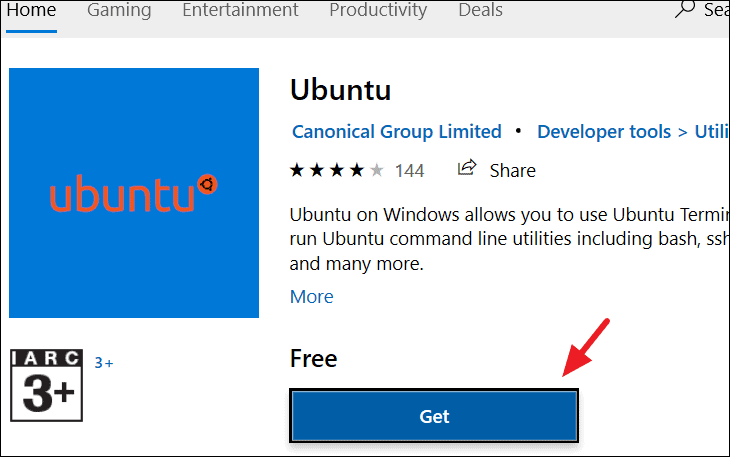
Now, Ubuntu distribution will be downloaded and installed automatically on your computer.
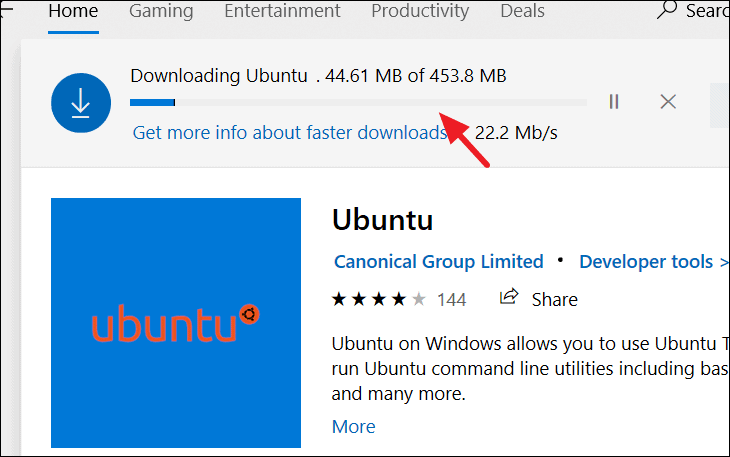
Once the installation finished, click the ‘Launch’ button to launch the terminal. You can also launch the app from the Windows Start Menu.
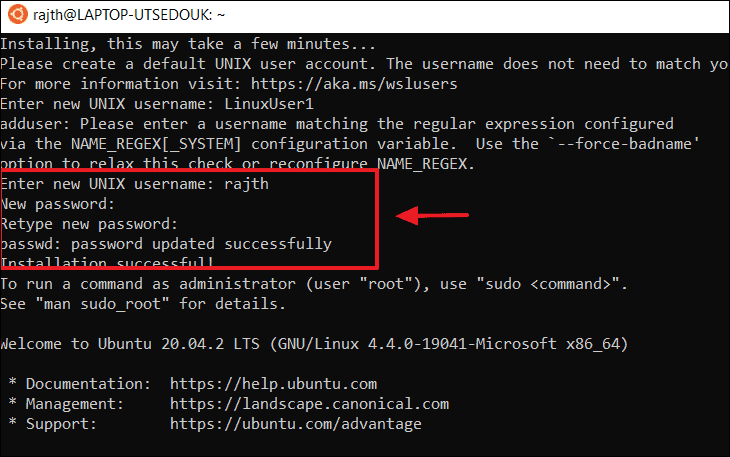
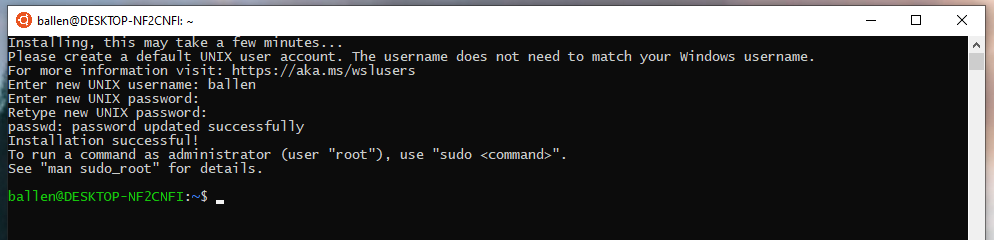
A new Ubuntu terminal window will appear. The first launch will take a few minutes to register the Ubuntu environment with WSL. Once that’s finished, the terminal will prompt you to create a ‘new Unix username’ and ‘new password’. Enter the new username and password and complete the setup.
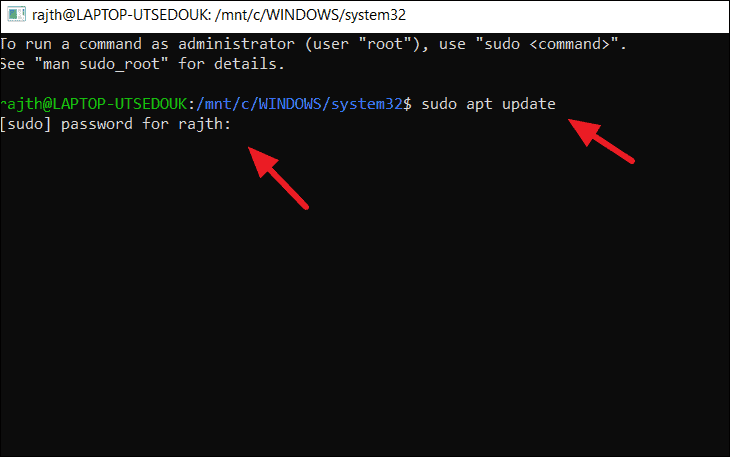
Once, the set up finished, it will take you to the bash command line. It’s better to update the software right away. In Ubuntu, you can search for, download, and install software updates, all from the apt command.
Enter the below command to update the software. And you’ll be prompted for the password, enter the newly created password to run the command as an administrator.
sudo apt updateThis ‘update’ command will update the Ubuntu repositories.
Ubuntu will download a series of package lists.
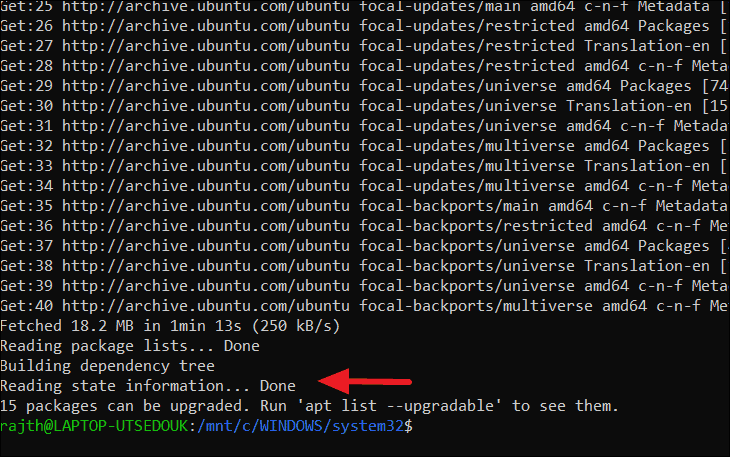
But they are not upgraded yet. To upgrade all available packages, enter the following command:
sudo apt upgradeEnter ‘Y’ at the prompt to continue the installation.
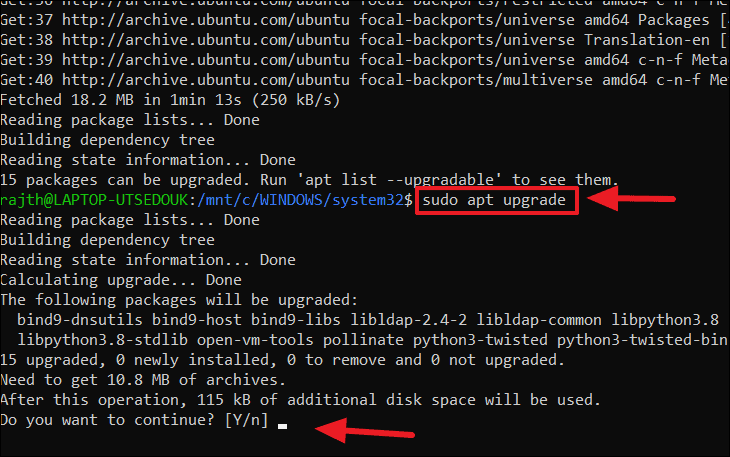
The ‘dist-upgrade’ command upgrade packages to their latest versions.
Upgrade WSL1 to WSL 2 for Ubuntu
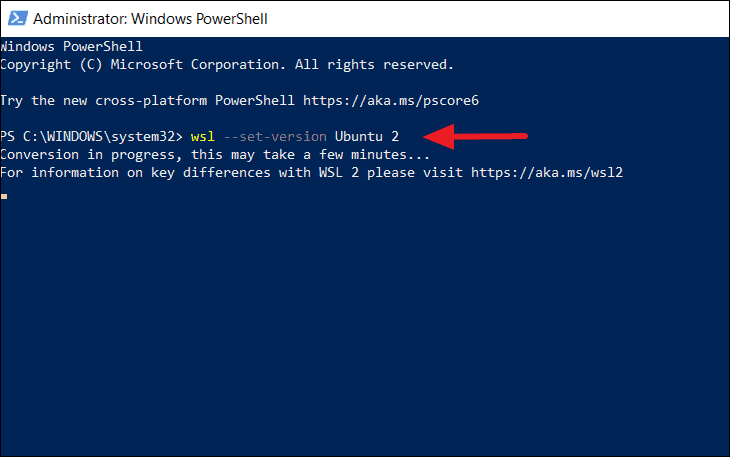
If you wish to upgrade the existing WSL 1 version to WSL 2 for a specific distribution. Then, run the below command in PowerShell.
wsl –set-default-version <Distro> 2Replace ‘<Distro>’ argument with the name of whichever distribution (Ubuntu in our case) your WSL 1 install runs.
Now, you can access Linux commands and software on a Windows 10 system using this Ubuntu Environment.
bash shell on Windows 10
You now have a full command-line ‘bash’ shell on your system based on the Linux distribution. You can access all the Linux commands and applications via that bash shell.
To run bash shell, type ‘bash’ into the Start Menu search field and click to open the bash command-line tool.
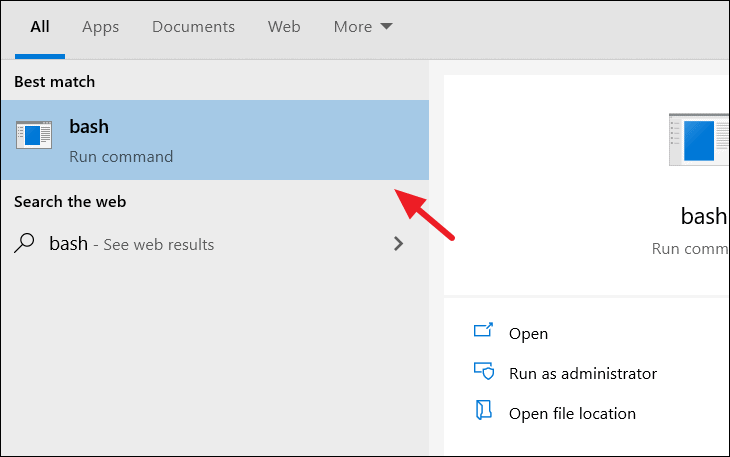
Now, you can start running commands there.

Enjoy Linux on Windows!
Microsoft recently released a new terminal application called Windows Terminal. The terminal application has a lot of features that the developers have been asking for years. One of those features is that ability to add any console window to a new tab. Let me show you how to add Ubuntu tab to the Windows Terminal.
By default, Windows Terminal comes with PowerShell and Command Prompt tabs. If you want to, you can add any number of other consols to the Windows Terminal. For example, if you are a web developer and need to add a Linux console to Windows Terminal. You can do that by adding a few lines of code in a JSON file.
Note: I assume you’ve already installed the new Windows Terminal app. If not, you can install it from the Microsoft Store.
1. Make sure that you’ve installed Ubuntu in Windows 10. If not, you can install Ubuntu in Windows 10 with just a few clicks. Follow that Ubuntu installation guide and come here next.
2. Before you can add Ubuntu tab to Windows Terminal, you need to generate a new GUID (Globally Unique Identifier). This is how Windows Terminal differentiates between different consols. To generate a new GUID, search for Ubuntu in the start menu and open it.

3. In the Ubuntu window, execute the uuidgen command. This will give a unique GUID, copy it. We are going to need that GUID in the coming steps. So, paste it somewhere safe.
A quick tip: Select the GUID with the mouse and right-click to copy.

4. Now, open Windows Terminal by searching for it in the start menu.
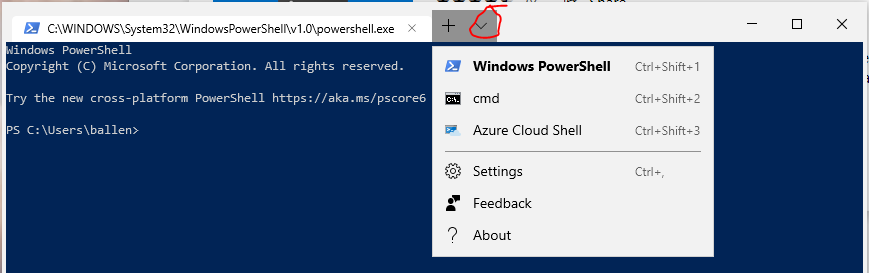
5. In the Terminal window, click on the dropdown icon and select “Settings”.

6. The above action will open the profiles.json file in your default code editor. In my case, the default code editor is VS Code. In the editor, scroll down until you see the Profiles array. At the end of the array add ,.

7. Next, copy and paste the below code under the , while replacing YOUR_GUID with the actual GUID you got in step 3.
Note: If you’ve installed a specific version of Ubuntu then modify the 5th line in the below code and add the version number too. For example, if you’ve installed Ubuntu 18.04, modify the line as wsl.exe -d Ubuntu-18.04.
{
"acrylicOpacity":0.75,
"closeOnExit":true,
"colorScheme":"Campbell",
"commandline":"wsl.exe -d Ubuntu",
"cursorColor":"#FFFFFF",
"cursorShape":"bar",
"fontFace":"Consolas",
"fontSize":12,
"guid":"{YOUR_GUID}",
"historySize":9001,
"icon":"C:/Dummy/image.png",
"name":"Ubuntu",
"padding":"0, 0, 0, 0",
"snapOnInput":true,
"startingDirectory":"%USERPROFILE%",
"useAcrylic":true
}

8. Press Ctrl + S to save the JSON file.
9. Now, go back to the Windows Terminal and click on the dropdown menu. You will see the new Ubuntu option.

10. Click on the Ubuntu option and the Ubuntu terminal will open in Windows Terminal.

Add Custom Tab Icon to Ubuntu Tab in Windows Terminal
If you look at the dropdown menu, there is no icon next to the Ubuntu option. That’s because you haven’t added any. The good thing is, you can any image you want as the Ubuntu tab icon.
1. The first thing you need to do is find the icon you want to set. The icon should be in PNG format with transparent background and 32×32 size. You can use this website to find free icons.
2. Once you have the icon, save it somewhere on your hard disk. For instance, I have a dedicated folder in my I drive that hosts all the icons I use for various folders.
3. Now, open the profiles.json file, go to the Ubuntu profile, find the “icon” value and replace the dummy icon path with the actual icon path. In my case, the icon path is “I:/System Icons/ubuntu.png”.
![]()
4. Save the file.
That is it. You will see the new icon applied instantly in the Windows Terminal.
![]()
It is that simple to add Ubuntu tab to Windows Terminal. If you are facing any problems, comment below and I will try to help as much as possible.
Oh-My-ZSH makes your terminal look and feel awesome – I used it daily on my MacOSX machines and also on Linux desktops in the past too!
I’ve recently switched my Apple MacBook Pro over to a Dell XPS and am now using Windows as my daily driver. More information on the move can be found in an earlier blog post.
I’ve put this quick tutorial together to demonstrate how you can run Oh-My-ZSH and have a really awesome Linux terminal on Windows (knowing that others will be switching back to soon Windows too ;))…
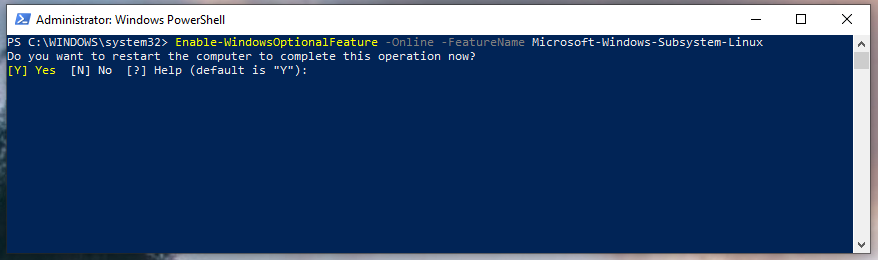
First of all, we need to enable WSL (Windows Sub-system for Linux), we can do this by opening PowerShell as Administator and then running the following command:
Enable-WindowsOptionalFeature -Online -FeatureName Microsoft-Windows-Subsystem-LinuxIt should look something like so:
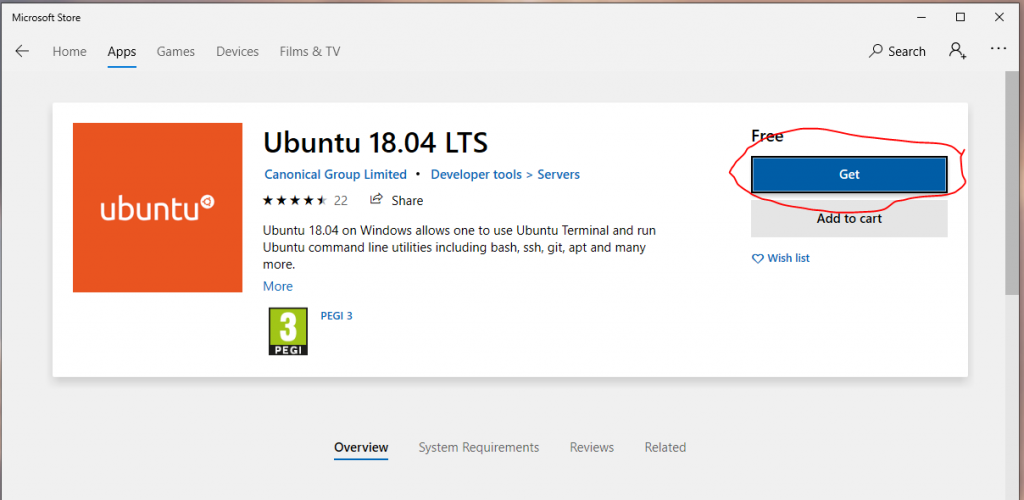
Once completed, Windows will require you to reboot your machine, at the prompt (shown above, type Y and press the return key (aka the “Enter” key), once logged back in we’ll open up the Microsoft Store and find “Ubuntu 18.04” and then install it by clicking the blue Get button:
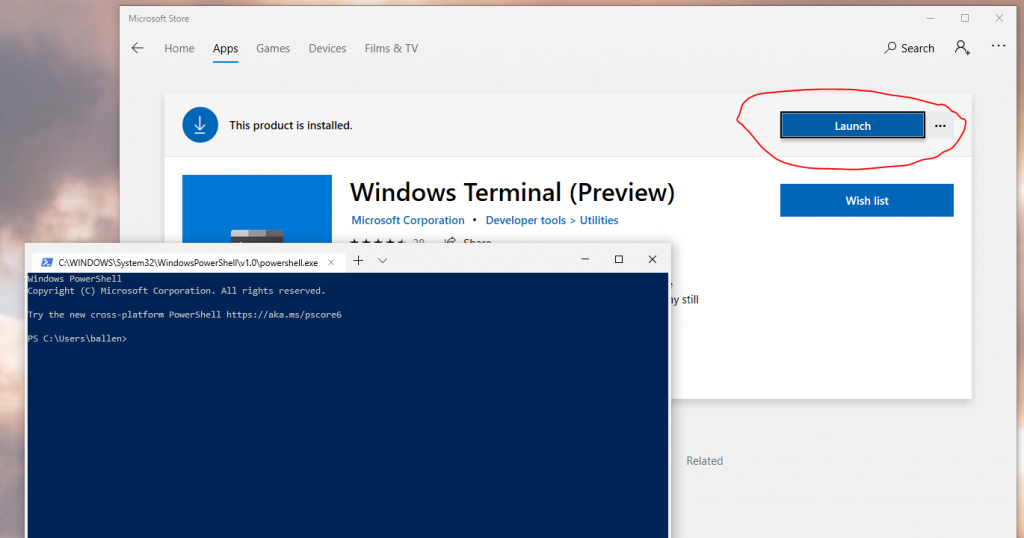
Once installed we will now go and install “Windows Terminal”, this is a new terminal developed by Microsoft that supports a whole host of goodness and makes this feel more like iTerm and other modern day terminal applications, using the Windows Store search box, search for “Windows Terminal” and install that too:
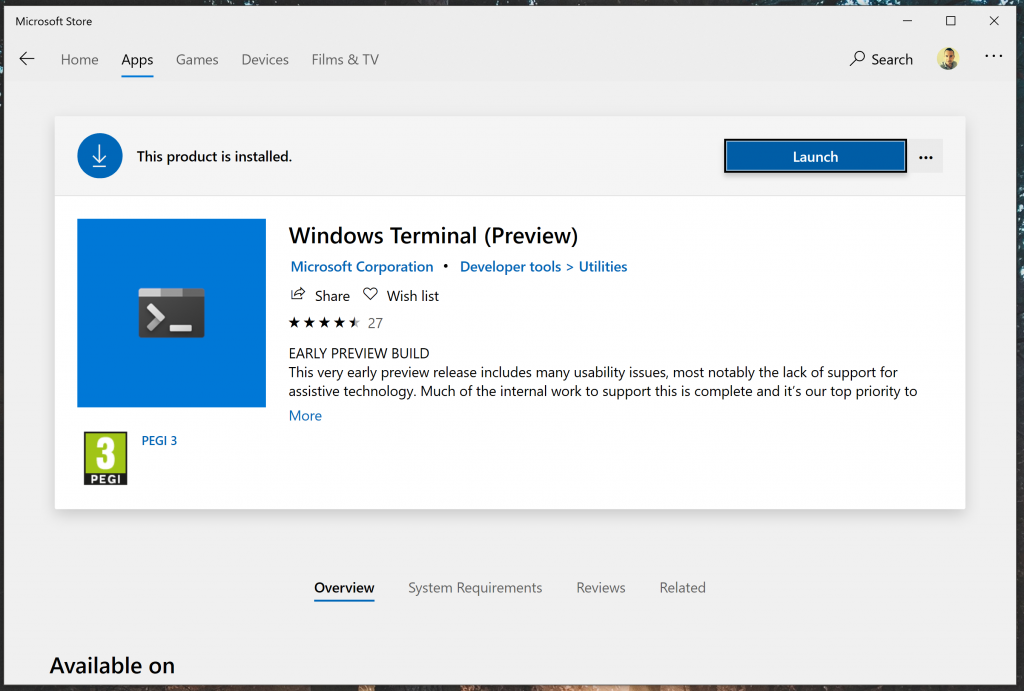
Great stuff, once the Windows Terminal is installed, you’ll see the Launch button, click this to open the newly installed Windows Terminal, it should appear as follows:
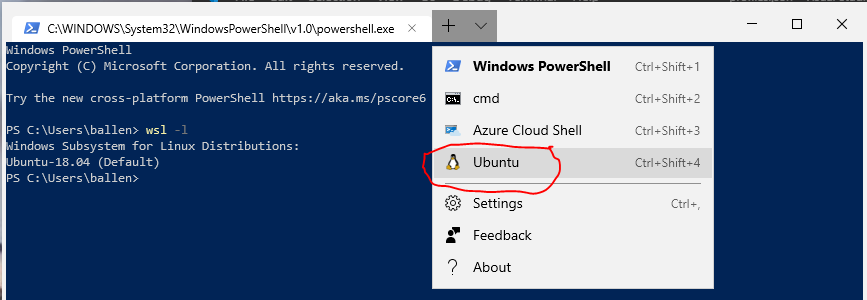
The next step is for us to initiate our WSL distrubution, to do this, open up the Start Menu and type (or find in the Programs List) “Ubuntu”, you should see it appear like so:
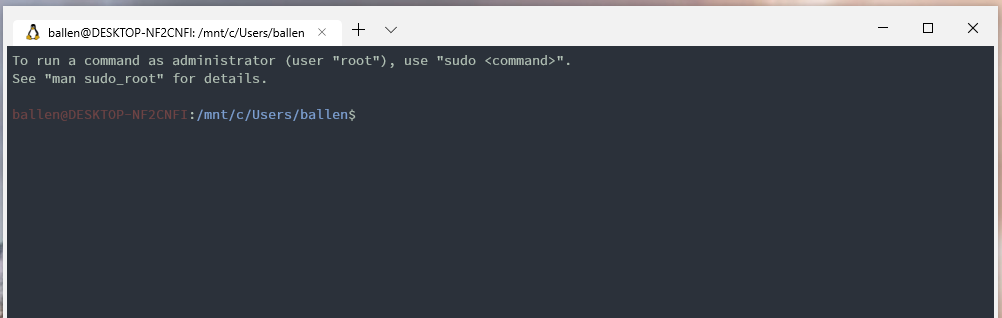
Click the icon to open up the default Ubuntu 18.04 terminal window, as this is the first time it has been run, it’ll first install some files that are required and you will then be prompted for a UNIX username – This account does not have to be the same as your windows login but I would recommend ensuring that it’s lowercase and only contain standard characters.

Once you have set a username and password you will then be presented with the standard BASH terminal like so:
Although we used the default “Ubuntu Logo” icon to open up our Linux terminal for the first time, going forwards we will access this from the Windows Terminal application instead (as it supports all the modern features of a Terminal client).
You can now close this window and we’ll move on the Windows Terminal configuration…
Now that we have the Windows Terminal open, we can see that it opens Powershell by default, you can open new tabs (which can be different shells, by default, Windows Terminal Preview as the time of writing includes PowerShell (the default), the standard Windows Command Prompt (cmd) and the Azure Cloud Shell.
As you’ve probably noticed, at this point we don’t yet have the Ubuntu Shell (bash) setup, we will move on to that next…
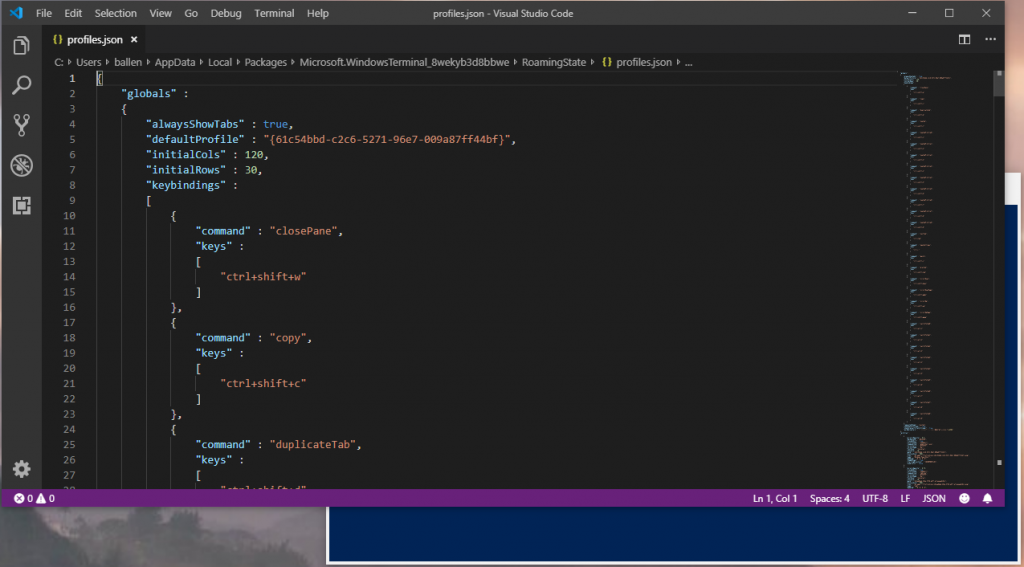
From the dropdown menu (shown in the screenshot above), click on the Settings option. The Windows Terminal settings are stored in JSON format, clicking the Settings option from the menu will open up your default text editor (in my case, I use Visual Studio code, the file looks as follows):
It’s worth noting that simply saving this file will automatically update your Windows Terminal configuration (settings are made on the fly when you save changes to this configuration file).
We are now going to add a new profile to our Windows Terminal settings file, to do this scroll down this file until you find the “profile” section, we we now paste the following JSON block into the file:
     {
            "acrylicOpacity" : 0.75,
            "closeOnExit" : true,
            "colorScheme" : "Bobstar",
            "commandline" : "wsl.exe -d Ubuntu-18.04",
            "cursorColor" : "#FFFFFF",
            "cursorShape" : "bar",
            "fontFace" : "Source Code Pro For Powerline",
            "fontSize" : 10,
            "guid" : "{9caa0dad-35be-5f56-a8ff-afceeeaa6101}",
            "historySize" : 9001,
            "icon" : "ms-appx:///ProfileIcons/{9acb9455-ca41-5af7-950f-6bca1bc9722f}.png",
            "name" : "Ubuntu",
            "padding" : "5, 5, 5, 5",
            "snapOnInput" : true,
            "startingDirectory" : "%USERPROFILE%",
            "useAcrylic" : false
        }
This profile is tells Microsoft Terminal to create a new item on to the terminal dropdown menu, the above code block’s commandline value is set to open up our WSL container named “Ubuntu-18.04“. If you want to check what other WSL containers you have running on your computer you can run wsl -l which will then output the list of WSL distrubutions you have installed from the Microsoft Store.
Saving the file at this point will now add the “Ubuntu” option onto your terminal dropdown menu as demonstrated here:
Before opening “Ubuntu” we need to do a few more things given that the profile configuation you copied in a few moments ago is customised and requires some additional fonts to be installed on your PC first.
Now download the free Source Code Pro for Powerline font and install from GitHub. You can also download it here if navigating GitHub is not something you really want to do.
Next up, back in the settings file (the JSON file), locate the “schemes” section and paste the following scheme in:
      {
            "background" : "#2B313A",
            "black" : "#0C0C0C",
            "blue" : "#406BA4",
            "brightBlack" : "#767676",
            "brightBlue" : "#7C9FD1",
            "brightCyan" : "#61D6D6",
            "brightGreen" : "#6D4344",
            "brightPurple" : "#B4009E",
            "brightRed" : "#96BAC9",
            "brightWhite" : "#F2F2F2",
            "brightYellow" : "#F9F1A5",
            "cyan" : "#3A96DD",
            "foreground" : "#B1C0B4",
            "green" : "#FFFFFF",
            "name" : "Bobstar",
            "purple" : "#881798",
            "red" : "#7B5761",
            "white" : "#CCCCCC",
            "yellow" : "#8DA76E"
        },
Next, I personally like to set “Ubuntu” as my default terminal you locate this section:
"defaultProfile" : "{61c54bbd-c2c6-5271-96e7-009a87ff44bf}",and change to:
"defaultProfile" : "{9caa0dad-35be-5f56-a8ff-afceeeaa6101}",Great – Now close the Windows Terminal application and re-open it – You should notice that you are now presented with the Ubuntu shell instead (by default) and should look something like this:
The next step we want to do is to update our default home directory that Ubuntu uses, instead of /home/{user} we’ll instead change it so our Linux home directory is mapped to our Windows home directory (C:\Users\{username}).
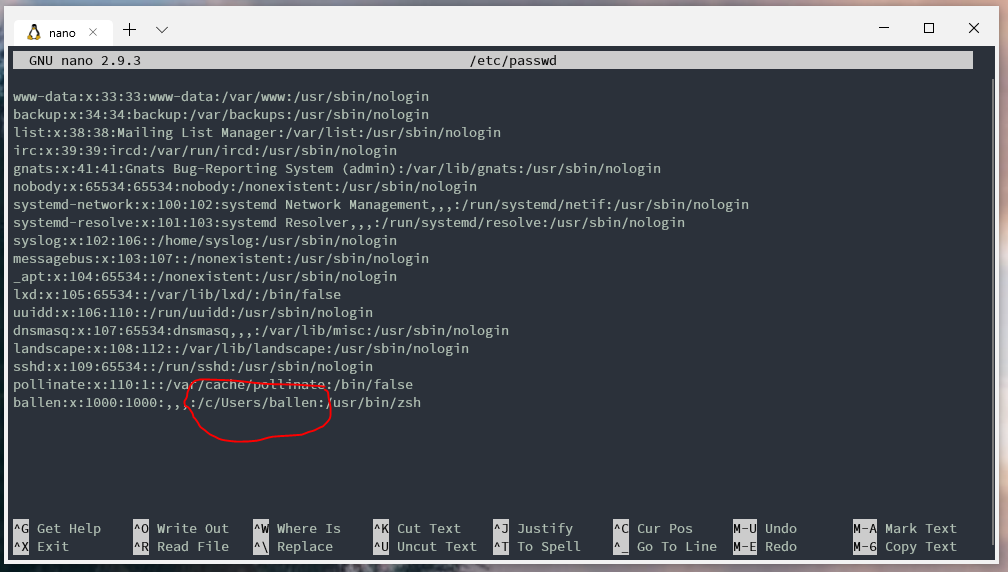
WSL mounts Windows drive letters under /mnt/{drive letter} by default, we will however change this in the wsl.conf in a few steps (we set the root to be ‘/’ instead), so we know that we therefore need to update our home directory from /home/{username} to /c/Users/{username}, we do this by editing the /etc/passwd file:
sudo nano /etc/passwd
Now, scroll to the bottom of this file, you should see you Linux username as the last entry, update the home path section to match as the above, this screenshot demonstrates what it should be (my username is ballen in this example, you’ll need to replace that with your own ;))
A vital step (to ensure Linux permissions are translated properly for SSH key permissions etc. We must now create a new file (/etc/wsl.conf) and add some settings, we can do this like so:
sudo nano /etc/wsl.conf
Add the following contents into this file and then save and exit!
[automount]
enabled = true
root = /
options = "metadata,umask=22,fmask=11"
At this point, I’d recommend that you close all Microsoft Terminal windows and then run the following command from a standard command prompt window, this will ensure that WSL is terminated properly as the wsl.conf file is re-ready when the light-weight Linux container is restarted:
wsl.exe --terminate Ubuntu-18.04Let’s now take a minute to recap…
At this point we have WSL installed, Ubuntu 18.04 LTS and the Windows Terminal installed and configured with a custom theme and updated the configuration to set our default terminal tab to open BASH (through our Ubuntu 18.04 LTS Linux distribution).
We will now move on to updating our Ubuntu 18.04 environment and install and configure Oh-My-ZSH.
Lets now update Ubuntu:
sudo apt-get update
sudo apt-get upgrade
Next we’ll install ZSH:
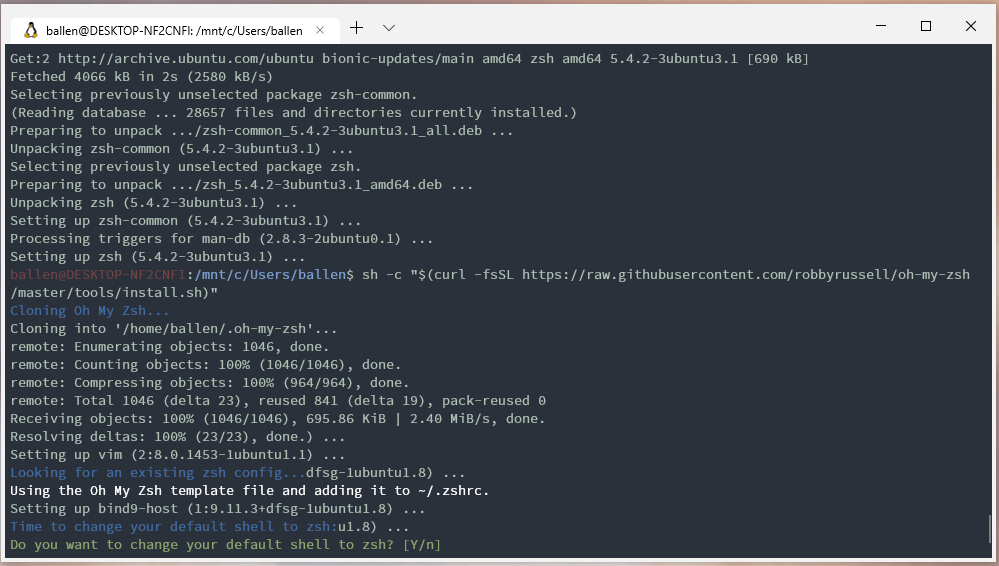
sudo apt-get install zshNow we’ll install Oh-My-ZSH using the following command:
sh -c "$(curl -fsSL https://raw.githubusercontent.com/robbyrussell/oh-my-zsh/master/tools/install.sh)"When prompted to “Would you like to change your default shell”, type Y and press the return key (ENTER):
Once the installation is completed, close the terminal.
We’ll now test that Oh-My-ZSH is configured to start up when we open our terminal, open up the Windows Terminal from the start menu and you should now be looking at the default Oh-My-ZSH theme like so:
Next up you will need to download my custom ZSH theme.
Extract the file named bobstar.zsh-theme (from the downloaded ZIP file) and copy this to the following location:
C:\Users\{username}\.oh-my-zsh\themes
We can now go and enable this theme to do this, back in the Windows Terminal type the following command:
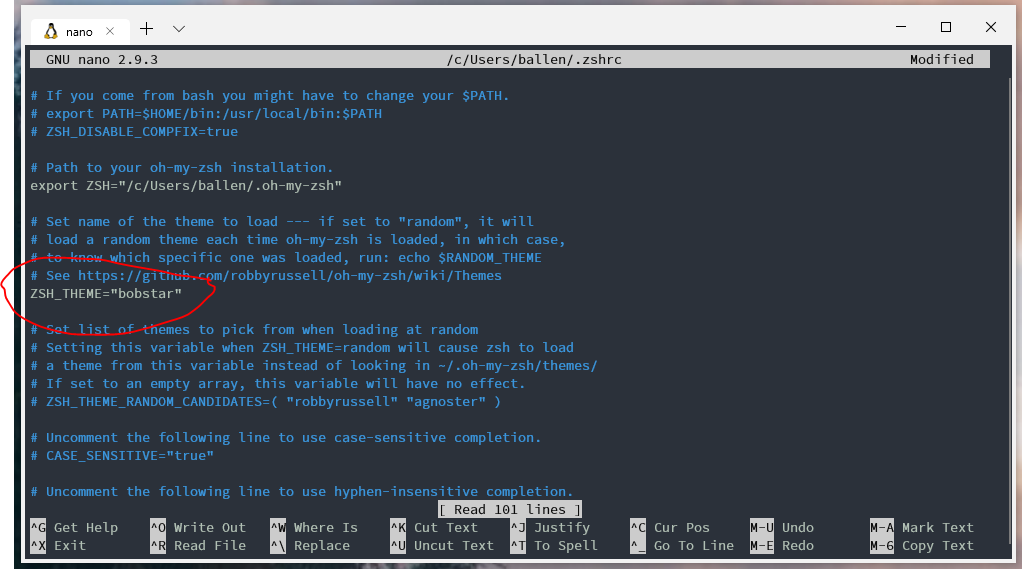
sudo nano ~/.zshrcWe will update the Oh-My-ZSH theme from the default robbierussel theme to our new bobstar theme, update the value in this file as shown here:
Now save the file and exit the file editor.
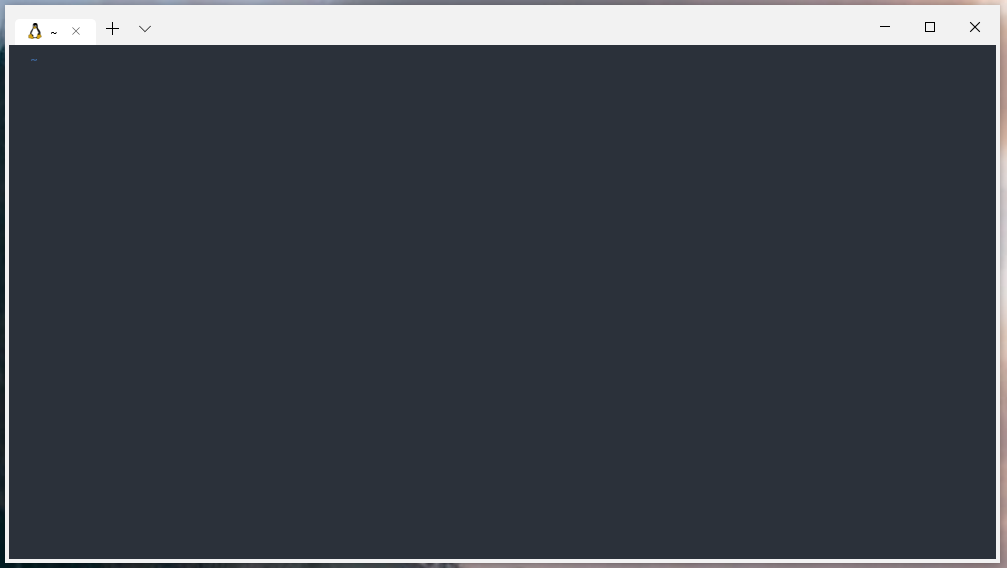
It’s now time to test it all out… Close your terminal and re-open it!
All going we’ll it should now look a little like this…
Tip: Once you change your home directory to match your Windows home directory path, you should set the Linux Ownerhsip settings correctly, this can be achieved by running the following command (assuming your Linux username is the same as your Windows username):
sudo chown -R $USER:$USER /c/Users/$USER
Под GNU/Linux-дистрибутивы создано огромное количество полезных и удобных инструментов и приложений для обычных пользователей и разработчиков. Далеко не всё из этого доступно на Windows, но, к счастью, для ОС от Microsoft есть решения, исправляющие эту проблему.
WSL — официальная подсистема Linux внутри Windows
В Windows 10 существует крайне полезная вещь под названием Windows Subsystem for Linux (WSL). Она позволяет использовать GNU/Linux-среду прямо в Windows и запускать не только команды, но и, например, Bash-скрипты. Для использования WSL необходимо следовать инструкции ниже.
Шаг 1. Проверьте, подходит ли текущая версия Windows требованиям. Для этого нажмите сочетание клавиш Win+R, затем введите winver. Найдите строку «Сборка ОС» — она должна быть свежее версии 14316.
Шаг 2. Запустите стандартную утилиту PowerShell от имени администратора и введите в ней команду для включения WSL:
dism.exe /online /enable-feature /featurename:Microsoft-Windows-Subsystem-Linux /all /norestart
Шаг 3. Если версия Windows, определённая в первом пункте, свежее 18362, вы можете установить WSL 2, который в разы быстрее первой версии и обладает доработанным ядром. Введите команду ниже, если нужно установить WSL 2:
dism.exe /online /enable-feature /featurename:VirtualMachinePlatform /all /norestart
После этого скачайте и установите пакет обновления с официального сайта.
Шаг 4. Перезагрузите компьютер. Если была произведена установка WSL 2, введите в PowerShell от имени администратора следующую команду:
wsl —set-default-version 2
Шаг 5. После перезагрузки откройте фирменный магазин приложений Microsoft Store и найдите подходящий GNU/Linux-дистрибутив. Самым популярным является Ubuntu — вы можете установить любую версию из представленных в Microsoft Store.
Шаг 6. Как только установка завершится, найдите дистрибутив в меню «Пуск» и запустите его.
Шаг 7. Пройдите этап первоначальной настройки, введя имя нового пользователя и придумав пароль.
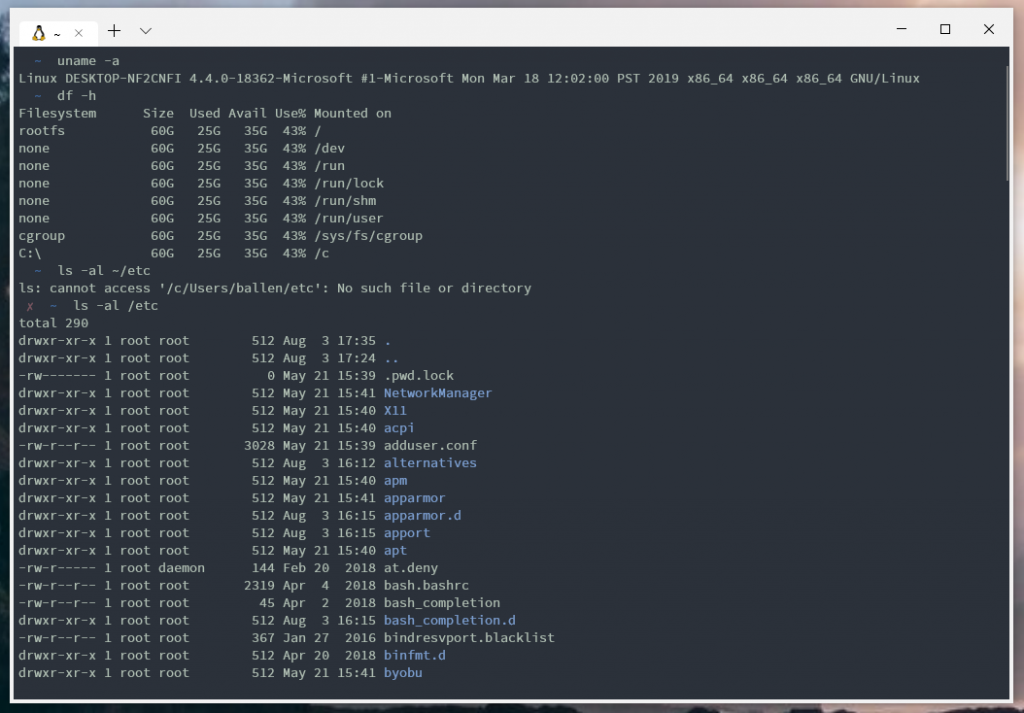
Шаг 8. Теперь различные GNU/Linux-команды можно выполнять, запустив дистрибутив, либо введя в командной строке wsl <команда>. Например, для просмотра всех файлов в текущей директории достаточно в командной строке выполнить wsl ls -a.
Обращу внимание на то, что путь к дискам в WSL отличается от такового в Windows. Вместо привычного C:/ используйте /mnt/c/. Также не забывайте про экранирование пробелов с помощью символа \ — это также пригодится при вводе путей к файлам.
Помимо выполнения базовых команд, с помощью WSL можно даже запускать приложения с графическим интерфейсом. Правда, рассчитывать на большое количество поддерживаемых подобных программ не стоит.
Шаг 1. Загрузите X-сервер и установите его.
Шаг 2. Запустите его с помощью ярлыка на рабочем столе. В открывшемся окне выберите вариант Multiple windows, затем Start no client. Завершите настройку кнопкой Finish.
Шаг 3. Откройте дистрибутив через меню Пуск и выполните команду export DISPLAY=:0
Шаг 4. Запустив приложение с графическим интерфейсом в WSL, вы увидите новое окно прямо в Windows.
CoreUtils — лёгкий инструмент для запуска базовых команд
Плюс данной утилиты — возможность запуска не только на Windows 10, но и на более старых версиях ОС. Кроме того, она легка и не занимает много места. Не обошлось без недостатков — программа скудна на функционал и не обновлялась очень давно. Она не только не умеет запускать скрипты и приложения с GUI, но и поддерживает лишь самые базовые GNU/Linux-команды. Установка CoreUtils весьма проста.
Шаг 1. Скачайте утилиту с официального сайта.
Шаг 2. Следуйте инструкциям установщика.
Шаг 3. Откройте «Панель управления», в разделе «Система и безопасность» выберите пункт «Система». На панели слева откройте «Дополнительные параметры системы». Нажмите кнопку «Переменные среды» и в открывшемся окне найдите область с заголовком «Системные переменные». В случае, когда там есть переменная Path, выберите её, нажмите «Изменить» и далее создайте новую строку. Содержимым этой строки должен быть путь к папке, который был указан при установке. Если вы ничего не меняли, то введите следующее:
C:\Program Files (x86)\GnuWin32\bin
Переменной Path нет? Тогда для начала создайте её кнопкой «Создать», затем в поле имени введите Path, а в поле значения — строку выше.
Шаг 4. Запустите командную строку и выполняйте команды прямо там.
Cygwin — запуск команд и Bash-скриптов
Ещё одна утилита, схожая с CoreUtils, но обладающая более широким функционалом — в том числе и возможностью запуска скриптов. Из минусов — немалый вес и более сложная установка. Разумеется, не идёт ни в какое сравнение с максимально удобным WSL, но для базовых команд вполне подойдёт.
Шаг 1. Загрузите Cygwin и запустите установку.
Шаг 2. Выберите Install from Internet, укажите директории для установки и загрузки пакетов, а также любой подходящий сайт из списка для скачивания файлов.
Шаг 3. В процессе установки можете выбрать необходимые пакеты, либо сразу нажать «Далее», оставив базовый набор.
Шаг 4. Откройте «Панель управления», в разделе «Система и безопасность» выберите пункт «Система». На панели слева откройте «Дополнительные параметры системы». Нажмите кнопку «Переменные среды» и в открывшемся окне найдите область с заголовком «Системные переменные». В случае, когда там есть переменная Path, выберите её, нажмите «Изменить» и далее создайте новую строку. Содержимым этой строки должен быть путь к папке, который был указан при установке. Если вы ничего не меняли, то введите следующее:
C:\cygwin64\bin
Переменной Path нет? Тогда для начала создайте её кнопкой «Создать», затем в поле имени введите Path, а в поле значения — строку выше.
Шаг 5. Команды можно выполнять как через командную строку, так и через специальный терминал.
Шаг 6. Для удаления Cygwin достаточно удалить папку, в которую программа была установлена, а также (по желанию) значение из переменной Path по методу, обратному тому, что был описан в 4 шаге (не удаляйте саму переменную).