У вас дома есть несколько устройств? Нужно ли использовать флэш-диск или SD-карту для переноса данных с Ubuntu на другой компьютер? Находите ли вы это раздражающим? Мы знаем, что это так. Поэтому мы не хотим, чтобы вы тратили свое драгоценное время, в то время как вы можете передавать свои файлы, документы и другие большие вещи быстро и легко, по локальной сети. Это одноразовая настройка, а затем с помощью нескольких щелчков мыши вы сможете обмениваться файлами между Ubuntu и Windows или любой другой системой Linux. И не волнуйтесь, это легко и займет всего немного времени.
Также стоит добавить, что это руководство должно быть полезно для любой версии ОС Linux.
Если вы используете Ubuntu, есть два способа поделиться своими локальными файлами по локальной сети, чтобы получить доступ к ним с Windows или других компьютеров с Linux.
- Для всех, кто имеет доступ к локальной сети, без пароля. Не совсем безопасный способ, но некоторым он действительно нужен, например, если необходимо очень быстро открыть доступ и времени на настройку ограниченного доступа нет.
- С паролем, защищающим папки для ограниченного доступа. Этот способ наиболее рекомендуем для всех, кто предпочитает конфиденциальность при передаче данных в локальной сети, поскольку доступ будет открыт только для ограниченного круга людей.
Мы рассмотрим оба метода в этой статье и дадим вам возможность решить, какой из них вы предпочитаете использовать.
Метод 1. Общий доступ к папкам в локальной сети без пароля
Вам придется выполнить некоторые настройки как в Windows, так и в Ubuntu.
Разрешение на совместное использование в Убунту
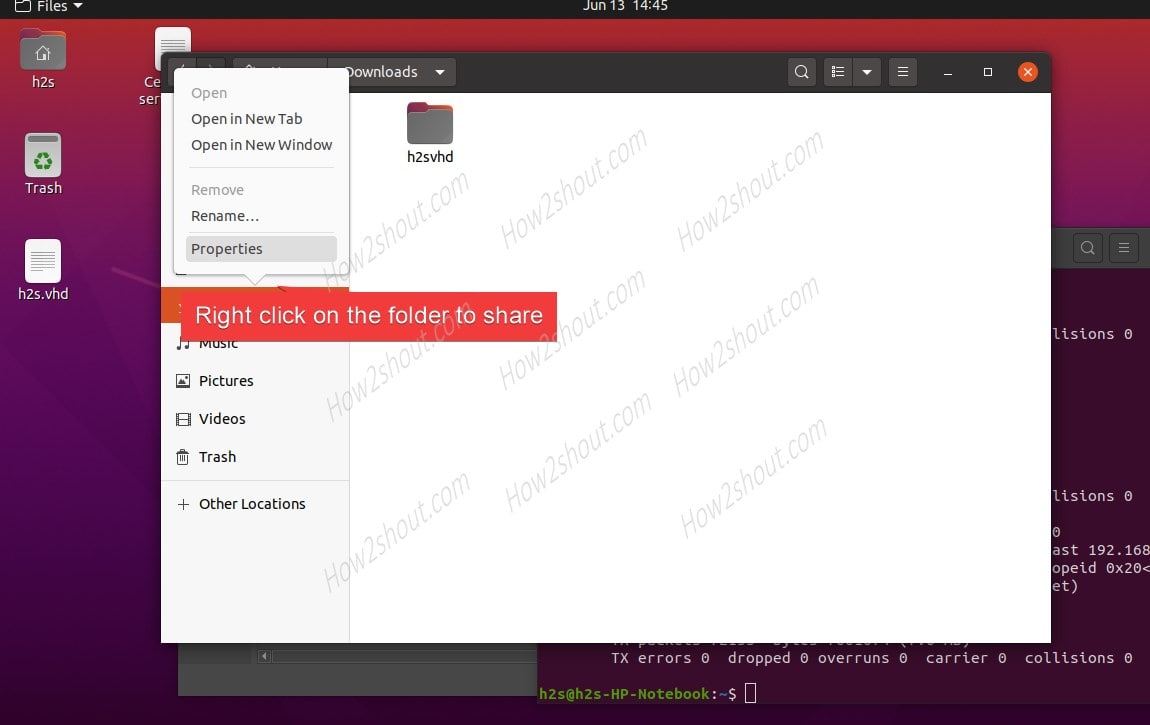
Чтобы предоставить общий доступ к папке в локальной сети в Ubuntu, щелкните правой кнопкой мыши нужную папку и выберите Локальный сетевой ресурс:

Не видите опцию локального сетевого ресурса?
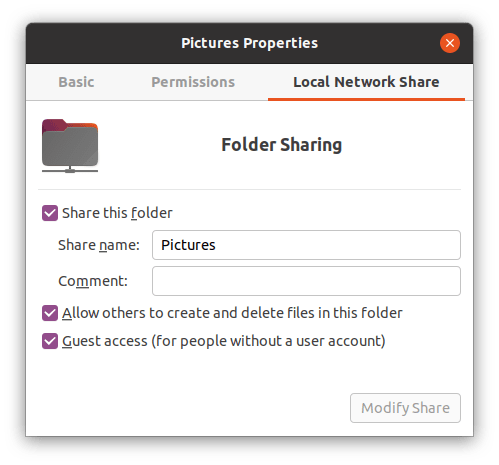
Когда вы нажимаете на Локальный сетевой ресурс, вы увидите опцию общего доступа к папке. Просто отметьте опцию Общий доступ к этой папке:

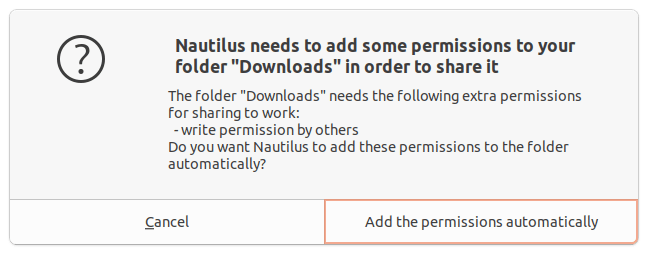
Поиск и устранение неисправностей: Если у вас появится сообщение о том, что служба Sharing service не устанавливается, как показано на скриншоте ниже, просто нажмите кнопку Установить службу и следуйте инструкциям.

Когда вы отметите опцию Общий доступ к этой папке, вы увидите опцию Создать общий доступ, доступную для вас. Вы также можете разрешить другим пользователям редактировать файлы в общей папке. Также можно отметить опцию гостевого доступа.

Вы увидите, что значок папки был изменен, чтобы показать, что она была совместно использована. Чтобы остановить общий доступ к папке, просто снимите флажок Общий доступ к этой папке.
Теперь нужно получить доступ к общей папке на машине Windows.
Шаг 2: Включение совместного доступа в Windows
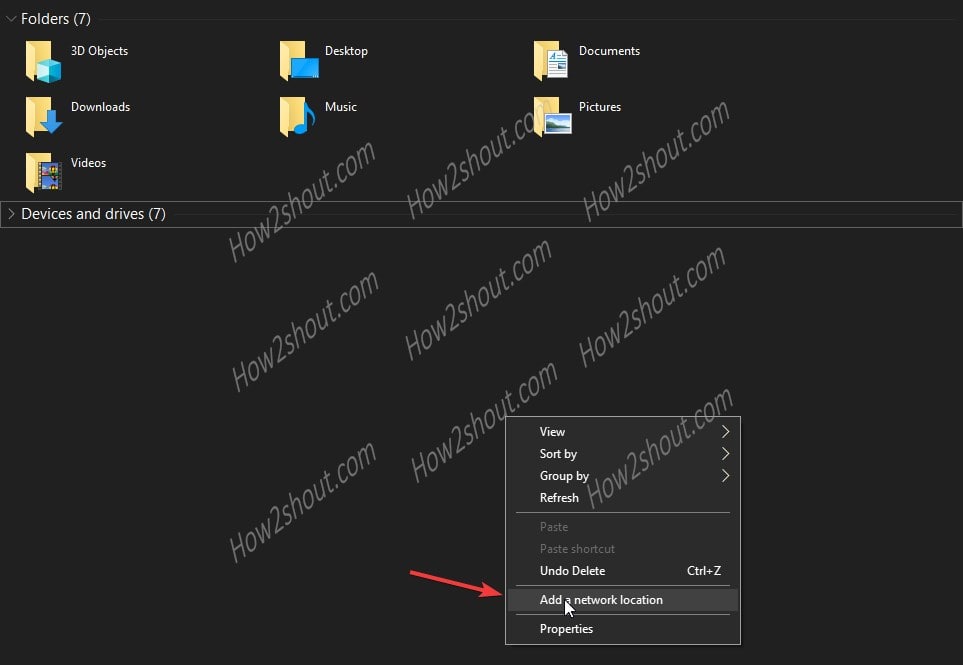
В Windows щелкните правой кнопкой мыши на «Этот Компьютер» или «Мой компьютер» и выберите «Добавить новое соединение».

Нажмите на кнопку «Далее».

Теперь пришло время ввести адрес сервера и имя папки, к которой мы предоставили общий доступ. Пожалуйста, введите в следующем формате.
Вы можете найти адрес вашего сервера, т.е. IP-адрес машины с Linux, введя команду ip a.
В моем случае IP-адрес машины с Linux равен 192.168.0.102, а папка, к которой я предоставил общий доступ, является общей.

Теперь добавьте местоположение следующим образом:

Теперь вы увидите этот экран, просто щелкните дальше.

Теперь вы можете получить доступ к общей папке в разделе «Этот ПК» или «Мой компьютер» в разделе «Сетевое расположение».

Это был простой способ. Он обеспечивает доступ к этим файлам любому человеку в вашей локальной сети.
По-хорошему вы должны предусмотреть это. Устройства в домашней сети должны быть общеизвестными. Но так может быть не всегда. Что, если вы хотите, чтобы к ним имели доступ только определенные люди?
Вот здесь и появляется Samba-сервер. Рассмотрим его во второй части урока.
2. Общий доступ к папкам в локальной сети в Ubuntu с помощью парольной защиты
Для этого нам необходимо настроить сервер Samba. На самом деле, мы использовали Samba в предыдущей части этого руководства. Мы просто не делали на этом акцент. Прежде чем мы перейдем к рассмотрению вопроса о том, как настроить Samba-сервер для совместного использования локальной сети в Ubuntu, давайте сначала посмотрим, чем на самом деле является Samba.
Что такое Самба?
Samba — это пакет программного обеспечения, позволяющий обмениваться файлами, документами и принтерами по сети, независимо от того, используете ли вы Linux, Windows и Mac. Он доступен для всех основных платформ и может отлично работать на них всех. Цитирование из Википедии:
Samba — пакет программ, которые позволяют обращаться к сетевым дискам и принтерам на различных операционных системах по протоколуSMB/CIFS. Имеет клиентскую и серверную части. Является свободным программным обеспечением, выпущена под лицензией GPL.
Инсталляция сервера Samba на Ubuntu
Вы можете легко установить Samba на свою систему. Перед установкой обновите систему, чтобы можно было установить любые доступные обновления.
sudo apt-get update && sudo apt-get upgradeТеперь установите Samba server и несколько других необходимых вещей с помощью следующей команды:
sudo apt-get install samba samba-common system-config-samba python-glade2После установки сервера Samba пришло время настроить Samba из окна графического интерфейса на общий доступ к файлам.
Настройка сервера Samba в Ubuntu
Откройте инструмент Samba Configuration из тире:

Перейдите в Параметры -> Настройки сервера. Хотя настройки по умолчанию хороши и могут быть такими же, как вам нужно. Но в некоторых случаях вам может понадобиться внести изменения.
В Параметрах сервера у вас есть две вкладки, ‘Basic’ и ‘Security’. В закладке Basic у вас есть следующие опции:
- Рабочая группа — это название рабочей группы компьютера, к которому вы хотите подключиться. Например, если вы хотите подключиться к компьютеру с Windows, то введете имя рабочей группы компьютера с Windows, а в Windows у вас уже есть то же имя рабочей группы, которое установлено по умолчанию в Настройках сервера Samba. Но если у вас другое имя рабочей группы в Windows, то вы введете его в это поле. (В Windows 7, чтобы получить имя рабочей группы, щелкните правой кнопкой мыши значок Этот компьютер и перейдите в Свойства, там вы увидите имя рабочей группы Windows).
- Описание — Это название вашего компьютера, как его видят другие. Не используйте пробелы или неинтернет-доброжелательные символы.

Разрешение ‘Гости’ не рекомендуется, поэтому нет причин изменять настройки безопасности. Оставьте все как есть.

Готово! Вы установили Samba-сервер. Мы недалеко от того, чтобы поделиться нашей первой папкой в сети.
Создание системного пользователя для совместного использования файлов в сети
Теперь мы создадим системного пользователя для совместного использования файлов в сети. Это очень просто.
- Перейдите в раздел «Системные настройки».
- В разделе Системные настройки нажмите Учетные записи пользователей.
- Нажмите кнопку разблокировки, чтобы включить значок +.
- Нажмите значок + (плюс), чтобы создать нового пользователя системы.

Теперь, как вы видите на изображении выше, вы можете ввести «Полное имя». При вводе ‘Полное имя’ Имя пользователя будет автоматически воспринято как ‘Полное имя’. Потому что мы создаем этого пользователя для совместного использования файлов, поэтому мы назначим тип аккаунта ‘Стандартный’.
Выполнили шаги, описанные выше? Идем дальше. Нажмите «Добавить».
Вы создали пользователя системы. Пользователь еще не активирован, поэтому мы активируем его, установив пароль для этой учетной записи. Убедитесь, что панель учетных записей пользователей разблокирована. Нажмите Аккаунт отключен и введите новый пароль, затем подтвердите пароль и нажмите Изменить.

Отлично! Мы установили и настроили Samba, мы создали системного пользователя для обмена файлами в сети с этой учетной записи, и мы активировали нашу только что созданную учетную запись. Теперь мы перейдем на Samba для последнего шага настройки общего доступа, затем мы предоставим общий доступ к папке.
Добавление нового пользователя Samba
Откройте Samba и нажмите Samba Users в разделе Preferences (Предпочтения). Заполните простую форму. Вот пара подробностей о полях формы:
Unix Username — В данном случае я выбираю пользователя, которого только что создал.
Имя пользователя Windows — Вы вводите это имя пользователя при доступе из компьютера на Windows
Samba Password — Вы введете этот пароль, когда захотите иметь доступ из компьютера на Windows.

После того, как вы закончите, нажмите OK. Теперь сделайте глубокий вдох. Вы успешно создали сеть с помощью Samba. Теперь перезапустите сеть или службы Samba и будьте готовы к обмену файлами с другими компьютерами.
sudo restart smbd && sudo restart nmbdОбщий доступ к папкам или файлам по сети
Обмениваться файлами с Samba очень просто с помощью графического интерфейса пользователя. Нажмите на иконку «Плюс» в Samba и вы получите такой диалог:

Заполните поля. В ‘Directory’ выберите папку, к которой вы хотите предоставить общий доступ. Здесь вы найдете подробную информацию о полях, которые увидите:
- Share name — это имя папки, которую увидит другой пользователь.
- Description простое описание содержимого, к которому вы предоставляете общий доступ в сети.
- Writable. Общие папки по умолчанию ‘только для чтения’. Вы можете установить их в режим «writable», если хотите, чтобы другие пользователи в сети изменили их.
- Visible. Как следует из названия, когда вы нажимаете Visible, общая папка будет видна людям в сети.
Теперь вы можете установить разрешения для папки, к которой вы предоставляете общий доступ. Для этого перейдите на вкладку «Доступ» и отметьте пользователей, которым вы хотите предоставить общий доступ к папке. Когда вы выберете Разрешить доступ всем, папка будет доступна всем в сети.

Наконец, нажмите OK для завершения обмена. Теперь папка открыта всем желающим. Вы завершили предоставление общего доступа к папке в сети. И все? Да! А как удалить папки из сети?
Удаление общих папок
Нам также иногда нужно будет удалить некоторые папки через некоторое время из сети. Это очень просто, и вот как мы можем это сделать.

Готово! Мы также можем обмениваться файлами по сети с помощью терминала, но это настраивается не так просто, как это было в графическом интерфейсе. Если вы зададите вопросы по доступу к файлам из командной строки, то я напишу учебное пособие о том, как обмениваться файлами по сети с помощью терминала в Linux.
Итак, как вам небольшое руководство о том, как делиться файлами по локальной сети в Linux? Я надеюсь, что с помощью него вы сможете легко обмениваться файлами между Ubuntu и Windows. Если у вас есть вопросы или предложения, не стесняйтесь задавать их в поле для комментариев ниже.
Do you have two machines one is running on Ubuntu and other using Windows 10 or 7 OS? If Yes, then you might need to access some folder or files resides on the Ubuntu system. However, usually, to transfer files or folder, we use USB drive but what about Network Share. If both the machines are on the same network then it would be a great idea to set up a sharing protocol such as SAMBA. This will not only allow to access you the files on Linux Machine directly over Ethernet or WiFi but also save your time.
Actually, I have one testing machine that is running on Ubuntu 20.04 Foocal fossa and the other one uses Windows 10, thus to easily access all the data such as screenshots captured on Linux, I have shared the Pictures folder. Although we have used Ubuntu 20.04, the steps will be the same for Ubuntu 19.04/18.04 LTS as well.
With the following steps you can share any of the existing folders of Ubuntu with Windows 10 0r 7:
- Open Ubuntu’s File Manager.
- Right-click on the folder that you want to share.
- Here we are sharing the Pictures folder of our Ubuntu 20.04 LTS PC.

- Select the Properties option.
- Click on the Local Network Share TAB.
- Select the box given in front of the option “Share this folder“.
- A pop-up will appear to install the SAMBA package on the system. Install it by providing your current account user password.
- By default, the Share name will be the name of the folder. However, you can change it whatever you want.
- Next, mark the “Allow others to create and delete files in this folder” option. If you want to write the files to the shared location remotely.
- Another option is “Guest access (for people without a user account“. By default, the users with an account can access the shared folders. In case, you want to allow anonymous users to access them, check this one otherwise leave it. However, if you are locally accessing the folder then check it for easy access.

- Finally, click on the Modify Share button and allow the setup to set permissions for the Ubuntu shared folder or files.

- Open Command Terminal.
- Type: ifconfig
- And note down the IP address of your machine.
Access the Ubuntu shared folder on Windows 10 remotely
- On the Windows 10 or 7, open MyComputer.
- Right-click anywhere on the blank space and select “Add a Network Location“.

- Network location wizard will open, click on the “NEXT” button.
- Select “Choose a custom Network location” option.
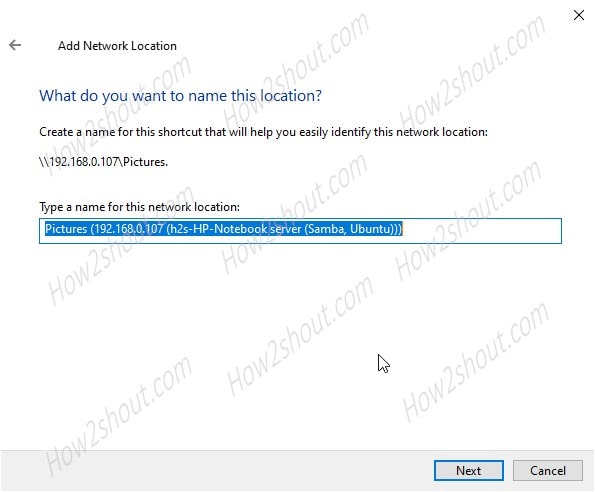
- Add the address of the folder shared on the Ubuntu. For that type \\ip-address-ubuntu\shared-folder name
- For example, in our case, the system IP address was- 192.168.0.107 and the shared folder named “Pictures”. Thus, the address will be \\192.168.0.107\Pictures

- In the same way, you also have to add the address and click on the Next button.
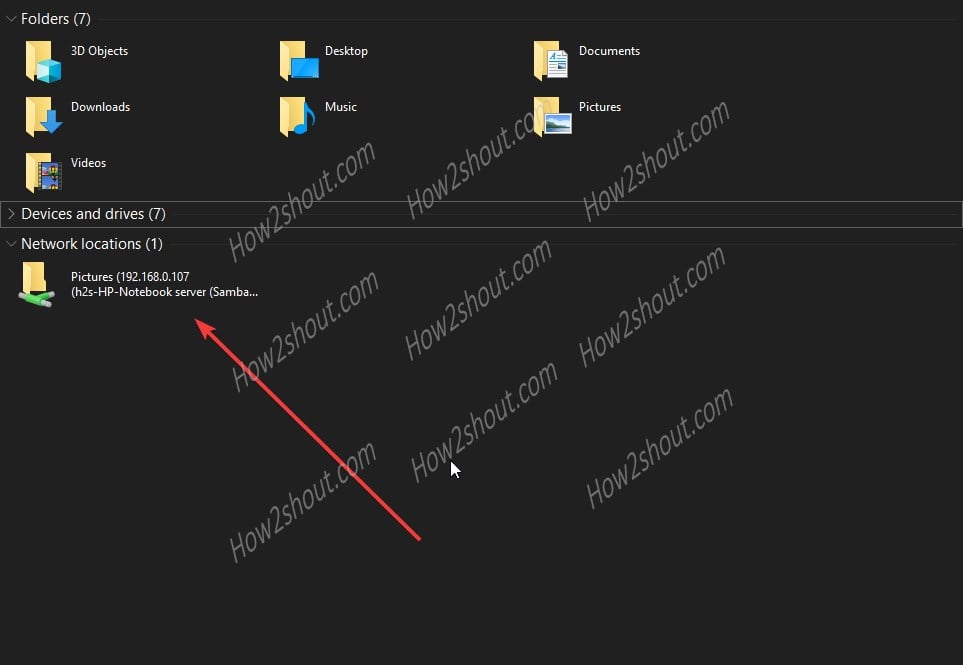
- Windows will automatically find the share Ubuntu folder and add it.
- Now, go to the Windows 10 or 7 MyPC area and start accessing the shared Ubuntu folder and files via SAMBA protocol.


#
# Пример файла конфигурации Samba для Debian GNU/Linux.
#
#
# Это основной конфигурационный файл Samba. Чтобы понять значение
# указанных здесь опций, прочитайте man-руководство smb.conf(5).
# У Samba есть большое количество опций настройки, большинство
# из которых здесь не показаны.
#
# Некоторые опции, который часто стоит настроить, показаны как
# закомментированные примеры в этом файле.
#  - Когда такие опции закомментированы с помощью ";", то эта
#    предложенная настройка включает опцию, которая отличается
#    от поведения по умолчанию Samba.
#  - Когда комментарий начинается с "#", то эта предложенная
#    настройка соответствует поведению по умолчанию Samba,
#    однако опция достаточно важна, чтобы быть упомянутой.
#
# ЗАМЕЧАНИЕ: всякий раз, когда Вы изменили этот файл, нужно
# проверить корректность сделанных настроек с помощью запуска
# команды "testparm" - она покажет базовые ошибки синтаксиса.
#==================== Глобальные настройки ====================
[global]
## Браузинг/идентификация ###
# Поменяйте это имя так, чтобы оно соответствовало рабочей
# группе / домену NT, куда сервер Samba будет входить как часть
# сетевого окружения:
   workgroup = WORKGROUP
# server string это эквивалент поля NT Description (описание сервера):
        server string = %h server (Samba, Ubuntu)
# Секция поддержки службы Windows Internet Name Serving:
# WINS Support - Tells the NMBD component of Samba to enable its WINS Server
#   wins support = no
# WINS Server - сообщает WINS-клиенту компоненты NMBD.
# Замечание: Samba может быть либо сервером WINS, либо клиентом WINS,
# но не может выполнять обе эти роли одновременно.
;   wins server = w.x.y.z
# Эта опция предотвратит для nmbd поиск NetBIOS-имен через DNS.
   dns proxy = no
#### Сетевые настройки ####
# Специфический набор интерфейсов / сетей для привязки службы.
# Это может быть либо имя интерфейса, либо IP-адрес/маска;
# обычно предпочитают имена интерфейсов.
;   interfaces = 127.0.0.0/8 eth0
# Привязка только и именованным интерфейсам и/или сетям; для её применения
# Вы должны использовать вышеуказанную опцию 'interfaces'. Рекомендуется
# разрешить эту функцию, если Ваша машина с Samba не защищена файерволом
# или сама является файерволом. Однако эта опция не может корректно
# обрабатывать динамические или не широковещательные интерфейсы.
;   bind interfaces only = yes
#### Отладка / учет ####
# Говорит Samba использовать отдельный log-файл для каждой машины, которая
# подключится:
   log file = /var/log/samba/log.%m
# Предел размера отдельных лог-файлов (в килобайтах).
   max log size = 1000
# Если Вы хотите, чтобы Samba писала только в системный лог (syslog),
# то установите следующий параметр как 'yes'.
#   syslog only = no
# Мы хотим свести к минимуму количество информации, сохраняемой в syslog.
# Вместо этого все должно идти в /var/log/samba/log.{smbd,nmbd}. Если Вы
# хотите писать именно в syslog, то должны установить следующий параметр
# в какое-то большее число.
   syslog = 0
# Сделать что-нибудь значимое, когда Samba упала: отправить письмо
# backtrace админу:
   panic action = /usr/share/samba/panic-action %d
####### Аутентификация #######
# Роль сервера. Определяет, в каком режиме будет работать Samba. Возможные
# значения "standalone server", "member server", "classic primary
# domain controller", "classic backup domain controller", "active
# directory domain controller".
#
# Большинство пользователей предпочитают "standalone sever" или "member server".
# Запуск в качестве "active directory domain controller" сначала потребует
# запуска "samba-tool domain provision" чтобы вычистить базы данных и создать
# новый домен.
   server role = standalone server
# Если Вы хотите использовать зашифрованные пароли, то Samba должна знать,
# какую базу данных паролей Вы используете.
   passdb backend = tdbsam
   obey pam restrictions = yes
# Этот двоичный параметр (yes/no) управляет, будет ли Samba делать попытки
# синхронизировать пароль Unix с паролем SMB, когда изменен шифрованный
# пароль SMB password в базе passdb.
   unix password sync = yes
# Для синхронизации пароля Unix, работающей на системе Debian GNU/Linux,
# должны быть установлены следующие параметры (благодаря Ian Kahan
<< kahan@informatik.tu-muenchen.de> для отправки корректного чат-скрипта
# программе passwd в Debian Sarge).
   passwd program = /usr/bin/passwd %u
   passwd chat = *Enter\snew\s*\spassword:* %n\n *Retype\snew\s*\spassword:*
    %n\n *password\supdated\ssuccessfully* .
# Эта двоичная опция управляет, будет ли использоваться PAM для изменений
# пароля, когда запрашивается SMB-клиент вместо программы, перечисленной
# d'passwd program'. Значение по умолчанию 'no'.
   pam password change = yes
# Эта опция управляет, как не успешные попытки аутентификации будут отображаться
# на анонимные подключения:
   map to guest = bad user
########## Домены ###########
#
# Следующие установки дают эффект только если установлено 'server role = primary
# classic domain controller', 'server role = backup domain controller', или
# 'domain logons'.
#
# Задает место нахождения директории профиля пользователя с точки зрения
# клиента). Следующий пример требует наличия настроенной на сервере Samba
# шары [profiles] (см. ниже):
;   logon path = \\%N\profiles\%U
# Другой общий выбор - сохранение профиля в домашней директории пользователя
# (это вариант по умолчанию для Samba):
#   logon path = \\%N\%U\profile
# Следующая установка дает эффект только если установлено 'domain logons'.
# Задает место нахождения домашней директории пользователя (с точки зрения
# клиента):
;   logon drive = H:
#   logon home = \\%N\%U
# Следующая установка дает эффект только если установлено 'domain logons'.
# Задает скрипт, запускаемый при логоне. Скрипт должен быть сохранен в шаре
# [netlogon].
# Замечание: файл скрипта должен иметь имя формата 'DOS'.
;   logon script = logon.cmd
# Это позволяет создавать пользователей Unix на контроллере домена через SAMR
# RPC pipe. Пример команды создает учетную запись пользователя  с запрещенным
# паролем Unix; пожалуйста адаптируйте этот пример под свои нужды:
; add user script = /usr/sbin/adduser --quiet --disabled-password --gecos "" %u
# Это позволяет учетным записям машины быть созданными на контроллере домена
# через SAMR RPC pipe. Следующий пример настройки подразумевает, что группа
# "machines" существует на системе:
; add machine script  = /usr/sbin/useradd -g machines -c "%u machine account"
 -d /var/lib/samba -s /bin/false %u
# Это позволяет группам Unix быть созданными на контроллере домена
# через SAMR RPC pipe.
; add group script = /usr/sbin/addgroup --force-badname %g
############ Разное ############
# Использование следующей строки позволит Вам настроить пользовательскую
# конфигурацию на базе машин. Строка %m будет заменена именем netbios машины,
# которая подключается.
;   include = /home/samba/etc/smb.conf.%m
# Некоторые умолчания для winbind (убедитесь, что Вы не используете эти
# диапазоны для чего-то еще).
;   idmap uid = 10000-20000
;   idmap gid = 10000-20000
;   template shell = /bin/bash
# Настройка опций шар пользователя, чтобы разрешить не-root
# пользователям расшаривать папки командой net usershare.
# Максимальное количество шар пользователя. 0 (по умолчанию) означает,
# что функция usershare запрещена.
;   usershare max shares = 100
# Разрешает пользователям, которым даны привилегии usershare, создавать
# публичные шары, не только аутентификационные:
   usershare allow guests = yes
#======================= Определения шар =======================
# Раскомментируйте следующее (и настройте другие опции ниже по мере
# надобности), чтобы разрешить шары домашней директории по умолчанию.
# Это расшарит каждую домашнюю директорию пользователя как
# \\server\username:
;[homes]
;   comment = Home Directories
;   browseable = no
# По умолчанию домашние директории экспортируются только для чтения
# (read-only). Поменяйте следующий параметр на 'no', если хотите
# иметь возможность писать в них:
;   read only = yes
# Маска создания файла установлена на 0700 по соображениям безопасности.
# Если Вы хотите создавать файлы с разрешениями group=rw, то установите
# следующий параметр на 0775 (полный доступ для всех задается маской 0x777).
;   create mask = 0700
# Маска создания директории установлена на 0700 по соображениям безопасности.
# Если Вы хотите создавать каталоги с разрешениями group=rw, то установите
# следующий параметр на 0775 (полный доступ для всех задается маской 0x777).
;   directory mask = 0700
# По умолчанию к шарам \\server\username могут подключаться кто угодно,
# кто имеет доступ к серверу Samba. Раскомментируйте следующий параметр
# для гарантии, что только "username" может подключиться к шаре
# \\server\username. Это может потребовать подстройки, если используются
# схемы внешней аутентификации.
;   valid users = %S
# Раскомментируйте следующее, чтобы создать директорию netlogon для
# логонов домена (Domain Logons). Также потребуется сконфигурировать
# Samba, чтобы она функционировала как контроллер домена.
;[netlogon]
;   comment = Network Logon Service
;   path = /home/samba/netlogon
;   guest ok = yes
;   read only = yes
# Раскомментируйте следующее, чтобы создать директорию profiles для
# хранения профилей пользователей (см. выше опцию "logon path").
# Также потребуется сконфигурировать Samba, чтобы она функционировала
# как контроллер домена. Путь ниже должен быть записываемым для всех
# пользователей, чтобы могли быть созданы их директории, когда пользователи
# логинятся первый раз.
;[profiles]
;   comment = Users profiles
;   path = /home/samba/profiles
;   guest ok = no
;   browseable = no
;   create mask = 0600
;   directory mask = 0700
[printers]
   comment = All Printers
   browseable = no
   path = /var/spool/samba
   printable = yes
   guest ok = no
   read only = yes
   create mask = 0700
# Клиенты Windows видят это имя шары как источник загружаемых драйверов принтера:
[print$]
   comment = Printer Drivers
   path = /var/lib/samba/printers
   browseable = yes
   read only = yes
   guest ok = no
# Раскомментируйте, чтобы позволить удаленное администрирование драйверов
# принтеров Windows. Вам может понадобиться заменить 'lpadmin' именем
# группы, членами которой являются Ваши пользователи с полномочиями
# администратора. Обратите внимание, что Вам нужно установить подходящие
# разрешения Unix для этих пользователей на директорию драйверов, чтобы
# они могли туда записывать:
;   write list = root, @lpadmin
# Эта шара для обмена файлами, в неё имеют полный доступ кто угодно
# без необходимости использования правильного пароля:
[share]
   path = /home/share/
   read only = No
   create mask = 0777
   directory mask = 0777
   browseable = yes
   public = yes
To add a share that is accessible by all users.
Create the directory for sharing the files and change the owner to the users group.
sudo mkdir -p /srv/samba/
sudo chown -R root:users /srv/samba/  [brusgroup][financial]
sudo chmod -R ug+rwx,o+rx-w /srv/samba/
Adding and managing users
eg. for group users and user mattu:
useradd mattu -m -G users
passwd mattu
sudo usermod -aG users mattu
Set a password for mattu
passwd mattu
Enter the password for the new user
Now add the user to the Samba user database.
sudo smbpasswd -a mattu
Enter the password for the new user
Edit the /etc/samba/smb.conf file
sudo vi /etc/samba/smb.conf
add the following lines and save the file
[allusers]
 comment = All Users
 path = /srv/samba/allusers/
 valid users = @users
 force group = users
 create mask = 0660
 directory mask = 0771
 writable = yes
If all users shall be able to read and write to their home directories via Samba, edit the /etc/samba/smb.conf file and remove all lines. In vim:
- Type
ggto move the cursor to the first line of the file, if it is not already there. - Type
dGto delete all the lines.
Now you should be able to log in from your Windows workstation with the file explorer using username ruchi and the chosen password and store files on the ubuntu server either in ruchi’s home directory or in the public shared directory.
[global]
workgroup = WORKGROUP
#netbios name = [FRODO]
passdb backend = tdbsam
printcap name = cups

add user script = /usr/sbin/useradd -m %u
delete user script = /usr/sbin/userdel -r %u
add group script = /usr/sbin/groupadd %g
delete group script = /usr/sbin/groupdel %g
add user to group script = /usr/sbin/groupmod -A %u %g
delete user from group script = /usr/sbin/groupmod -R %u %g
add machine script = /usr/sbin/useradd -s /bin/false -d /var/lib/nobody %u

# Note: The following specifies the default logon script.
# Per user logon scripts can be specified in the user account using pdbedit
logon script = scripts\logon.bat
# This sets the default profile path. Set per user paths with pdbedit
logon path = \\%L\Profiles\%U
logon drive = H:
logon home = \\%L\%U
domain logons = Yes
os level = 35
preferred master = Yes
domain master = Yes

#[deprecated thus change
#idmap uid = 15000-20000
#idmap gid = 15000-20000
#]
#[
idmap config * : backend = tdb
idmap config * : range = 10001-20000
idmap config DOMAIN : backend = rid
idmap config DOMAIN : range = 10000-20000
idmap config DOMAIN : base_rid = 0
#]
printing = cups


Example 2.8. Engineering Office smb.conf (shares and services)


[homes]
comment = Home Directories
valid users = %S
read only = No
browseable = No
# Printing auto-share (makes printers available thru CUPS)

[printers]
comment = All Printers
path = /var/spool/samba
printer admin = root, maryo
create mask = 0600
guest ok = Yes
printable = Yes
browseable = No

[print$]
comment = Printer Drivers Share
path = /var/lib/samba/drivers
write list = maryo, root
printer admin = maryo, root
# Needed to support domain logons

[netlogon]
comment = Network Logon Service
path = /var/lib/samba/netlogon
admin users = root, maryo
guest ok = Yes
browseable = No
# For profiles to work, create a user directory under the path
# shown. i.e., mkdir -p /var/lib/samba/profiles/maryo

[Profiles]
comment = Roaming Profile Share
path = /var/lib/samba/profiles
read only = No
profile acls = Yes
Ubuntu is an open-source operating system that is widely used among programmers, developers, and businesses. The operating system is user-friendly and easy to use. However, when it comes to sharing a folder on Ubuntu to access from Windows, the process can be pretty challenging for some users. Sharing a folder on Ubuntu to access from Windows allows you to share files between two operating systems, making it easier to collaborate on projects and share vital data.
This article will explore how to share a folder on Ubuntu to access from Windows. We will provide you with a step-by-step guide and various methods that you can use to share a folder on Ubuntu to access from Windows.
What to do before sharing a folder on Ubuntu to access from Windows
Before sharing a folder on Ubuntu to access from Windows, there are a few things you should do to ensure that the process goes smoothly and securely:
- Update Ubuntu: Ensure your Ubuntu system is up-to-date with the latest security patches and updates. This can help to ensure that your system is secure and that any known vulnerabilities are patched.
- Install Samba or SSHFS: Depending on the method you choose to share the folder, you may need to install Samba or SSHFS on your Ubuntu system. Ensure you have installed the required packages before proceeding with the sharing process.
- Create a shared folder: Choose the folder you want to share and create it in a location that is easily accessible. You may also want to set the appropriate permissions for the folder to ensure that users on the network can access it.
- Configure the sharing settings: Depending on your chosen method, you must configure the sharing settings for the folder. This may involve setting up a Samba server or configuring SSHFS to mount the remote filesystem.
- Secure your network: Ensure that your network is secure and that only authorized users can access the shared folder. You may want to set up a password or use encryption to protect the files on the network.
By following these steps, you can ensure the sharing process is secure, and your files are protected.
Creating shared folders on Ubuntu for Windows users
Now that we know what to do before sharing a folder on Ubuntu to access from Windows let us delve deeper into the different methods we can employ to complete this task
Method 1: Using Samba
Samba is a software package that allows Windows and Linux systems to share files and printers. To use Samba, you must install the software on your Ubuntu system. You can install Samba using the command line. Follow the steps below:
Step 1: Open the terminal on your Ubuntu system.
Step 2: Enter the following command to install Samba:
sudo apt-get install samba
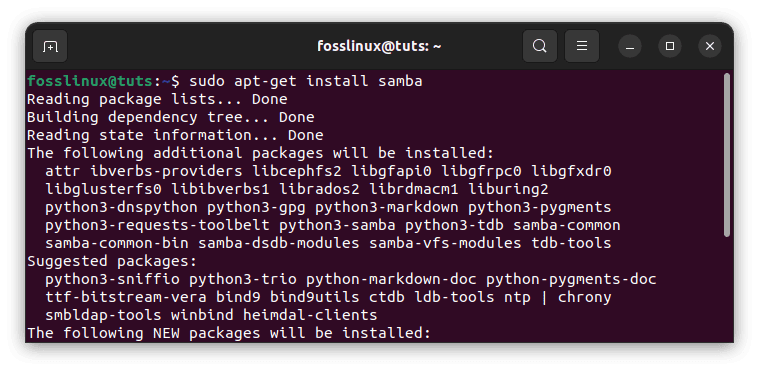
Install Samba
Step 3: Once Samba is installed, you must create a folder you want to share. You can create the folder using the command line or the file explorer.
Step 4: To create a folder using the command line, enter the following command:
sudo mkdir /home/username/sharedfolder
Replace “username” with your Ubuntu username and “sharedfolder” with the name of the folder you want to create.
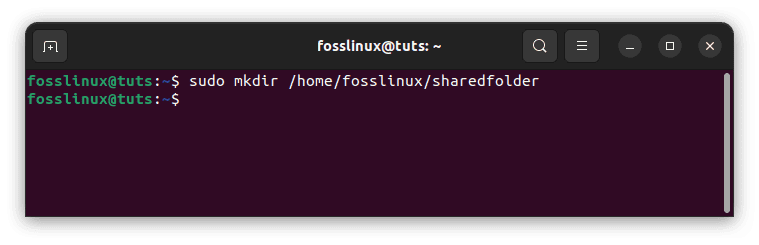
Create sharedfolder directory
Step 5: Once the folder is created, you need to configure Samba to allow access to the folder. Open the Samba configuration file using the following command:
sudo nano /etc/samba/smb.conf

Open Samba configuration file
Step 6: Scroll down to the bottom of the file and add the following lines:
[sharedfolder]

path = /home/username/sharedfolder

available = yes

valid users = username

read only = no

browseable = yes

public = yes

writable = yes
Replace “sharedfolder” with the name of the folder you created in Step 4 and “username” with your Ubuntu username.
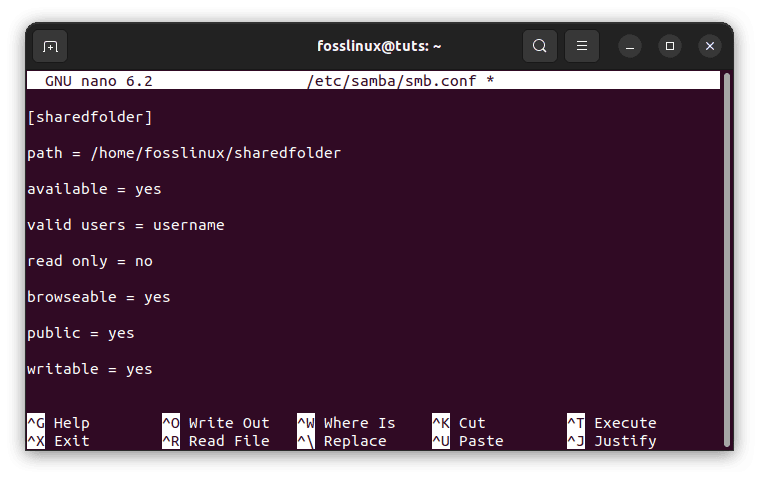
Append the following lines
Step 7: Save the file and exit.
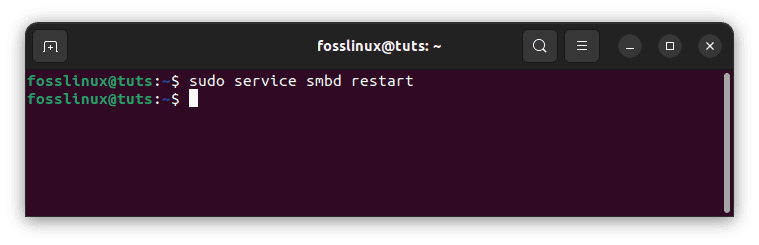
Step 8: Restart Samba using the following command:
sudo service smbd restart
Restart Samba service
Step 9: You can now access the shared folder from a Windows system. Open File Explorer on your Windows system and enter the following in the address bar:
\\<IP-address-of-Ubuntu-machine>\<shared-folder-name>
Replace <IP-address-of-Ubuntu-machine> with the IP address of your Ubuntu system and <shared-folder-name> with the name of the shared folder you created in Step 6.
For example, if your Ubuntu system has the IP address 10.211.55.8 and you named your shared folder “sharedfolder,” enter the following in the address bar:
\\192.168.1.100\sharedfolder
Press Enter to connect to the shared folder. You may be prompted to enter your Ubuntu system’s username and password to authenticate.
Once connected, you can transfer files between your Windows system and the shared folder on your Ubuntu system. You can also create shortcuts to the shared folder for quick access in the future.
That’s it! You have successfully shared a folder on Ubuntu to access from Windows using Samba.
Method 2: Using SSHFS
SSHFS is a filesystem client that allows you to mount a remote filesystem over SSH. You can use SSHFS to share a folder on Ubuntu to access from Windows. Follow the steps below:
Step 1: Install SSHFS on Ubuntu
SSHFS is not installed by default on Ubuntu, so you must install it first. Launch the terminal and run the following command:
sudo apt-get install sshfs
Enter your password when prompted, and press Enter to continue with the installation.
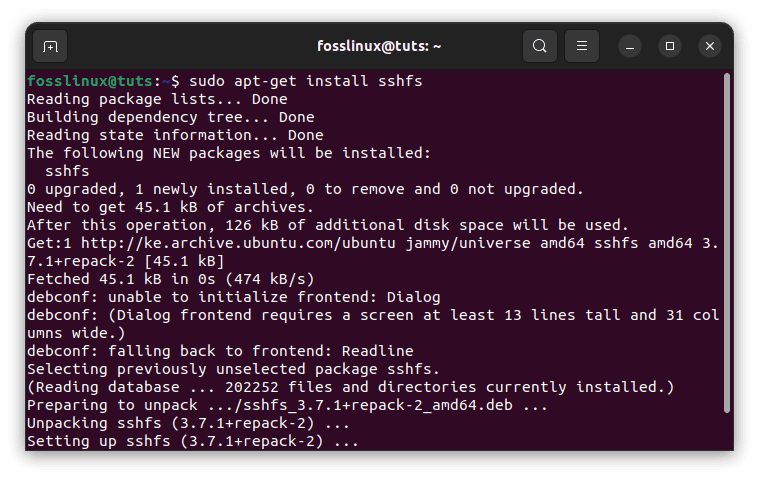
Install sshfs
Step 2: Create a new directory for the shared folder
Create a new directory on your Ubuntu system where you will mount the shared folder. You can name the directory anything you like, but for this example, we will name it “myshare.” Open a terminal and run the following command:
mkdir ~/myshare
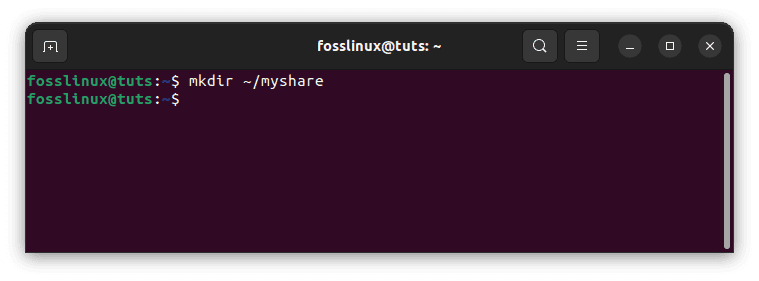
Create myshare directory
This will create a new directory named “myshare” in your home directory.
Step 3: Mount the shared folder over SSH
Now, you can mount the shared folder over SSH using the SSHFS command. Run the following command in the terminal:
sshfs <username>@<IP-address-of-Ubuntu-machine>:/path/to/shared/folder ~/myshare
Replace <username> with your Ubuntu system username, <IP-address-of-Ubuntu-machine> with the IP address of your Ubuntu system, and /path/to/shared/folder with the path to the folder you want to share.
For example, if your Ubuntu system has the IP address 10.211.55.8 , your username is “fosslinux,” and you want to share the folder located at /home/fosslinux/myshare, run the following command:
sshfs fosslinux@10.211.55.8:/home/fosslinux/myshare
Enter your Ubuntu system password when prompted to authenticate the SSH connection.
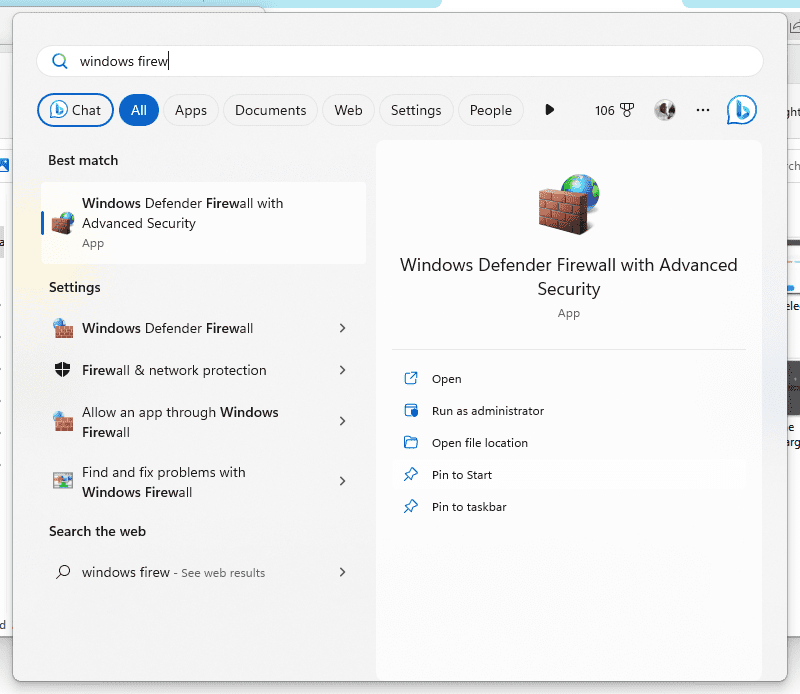
Step 4: Enable SSH traffic on Windows
Before accessing the shared folder on Windows, you must enable SSH traffic in the Windows Firewall. Follow the steps below:
- Open the Windows Firewall with Advanced Security by searching for “Windows Firewall” in the Start menu and clicking on “Windows Defender Firewall with Advanced Security.”

Open windows firewall with advanced security
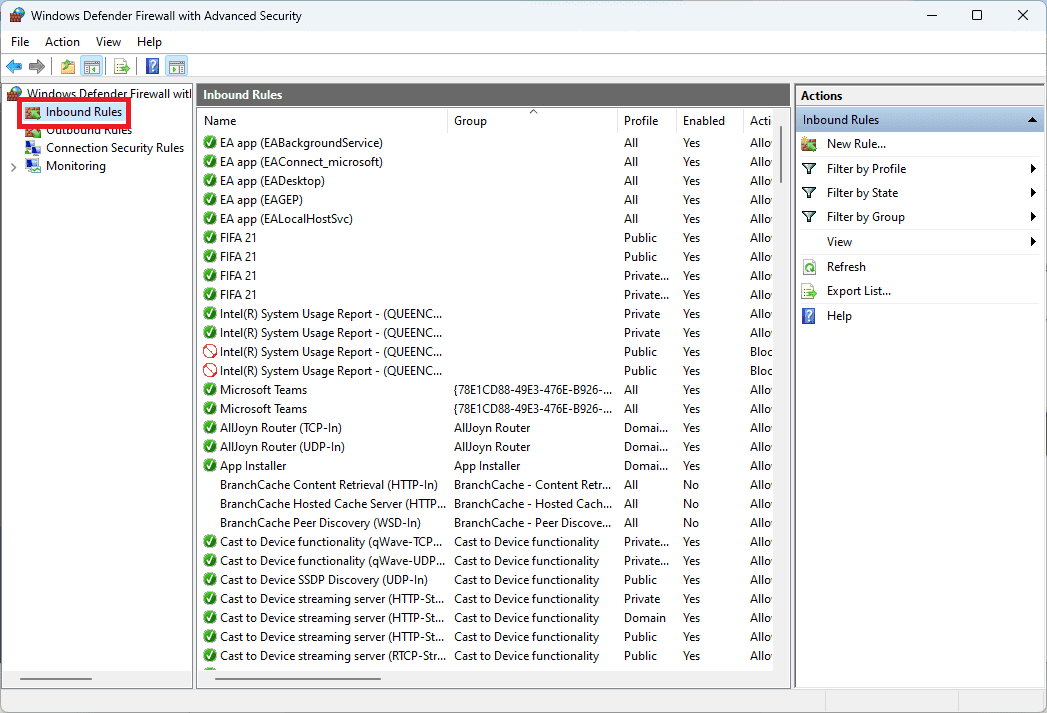
- Click on “Inbound Rules” in the left pane.

Click on Inbound rules
- Click on “New Rule…” in the right pane.
- Select “Port” and click “Next.”
- Select “TCP” and enter “22” in the “Specific local ports” field. Click “Next.”
- Select “Allow the connection” and click “Next.”
- Leave all options checked and click “Next.”
- Enter a name for the rule, such as “SSH,” and click “Finish.”
Step 5: Access the shared folder from Windows
Now, you can access the shared folder from a Windows system. Open File Explorer on your Windows system and enter the following in the address bar:
\\<IP-address-of-Ubuntu-machine>\myshare
Replace <IP-address-of-Ubuntu-machine> with the IP address of your Ubuntu system and “myshare” with the name of the directory you created in Step 2.
For example, if your Ubuntu system has the IP address 192.168.1.100 and you named your directory “myshare,” enter the following in the address bar:
\\192.168.1.100\myshare
Press Enter to connect to the shared folder. You may be prompted to enter your Ubuntu system’s username and password to authenticate.
Once connected, you can transfer files between your Windows system and the shared folder on your Ubuntu system
Method 3: Using FTP
FTP (File Transfer Protocol) is a common network protocol that transfers files from one host to another over the Internet. You can use FTP to share a folder on Ubuntu to access from Windows. Follow the steps below:
Step 1: Install vsftpd (Very Secure FTP Daemon) on your Ubuntu system using the following command:
sudo apt-get install vsftpd
Step 2: Configure vsftpd by editing the configuration file using the following command:
sudo nano /etc/vsftpd.conf
Step 3: Uncomment the following lines in the configuration file:
anonymous_enable=NO

local_enable=YES

write_enable=YES

chroot_local_user=YES

allow_writeable_chroot=YES

pasv_enable=YES

pasv_min_port=10000

pasv_max_port=10100
Step 4: Save the file and exit.
Step 5: Create a user account for FTP access using the following command:
sudo adduser ftpuser
Step 6: Set a password for the user account using the following command:
sudo passwd ftpuser
Step 7: Create a folder you want to share using the command line or the file explorer.
Step 8: Set the permissions for the folder using the following command:
sudo chmod 777 /path/to/sharedfolder
Replace “/path/to/sharedfolder” with the path to the folder you want to share.
Step 9: Restart vsftpd using the following command:
sudo service vsftpd restart
Step 10: You can now access the shared folder from a Windows system. Open File Explorer on your Windows system and enter the following in the address bar:
ftp://username:password@ipaddress/sharedfolder
Replace “username” with the username created in Step 5, “password” with the password you set in Step 6, “ipaddress” with the IP address of your Ubuntu system, and “sharedfolder” with the name of the folder you created in Step 7.
Critical aspects to put into consideration
Below are a few key aspects that we need to put into consideration about sharing a folder on Ubuntu to access from Windows:
1. Firewall settings
When sharing a folder on Ubuntu, you should ensure that the necessary ports are open in your firewall settings. Depending on the method you choose to share your folder, you may need to open different ports. For example, if you use Samba, you need to open ports 137-139 and 445. If you use FTP, you need to open ports 20 and 21 for FTP traffic and ports 10000-10100 for passive mode traffic.
To open ports in Ubuntu’s firewall, you can use the following commands:
sudo ufw allow 137:139/tcp

sudo ufw allow 445/tcp

sudo ufw allow 20/tcp

sudo ufw allow 21/tcp

sudo ufw allow 10000:10100/tcp
2. User permissions
When sharing a folder on Ubuntu, you should ensure that the user account you use to access the shared folder has the necessary permissions to read and write files. Depending on the method you choose to share your folder, you may need to set up user accounts specifically for that purpose.
For example, when using Samba, you can set up a user account for SMB access using the following command:
sudo smbpasswd -a username
Replace “username” with the username you want to use for SMB access.
When using FTP, you can create a user account for FTP access using the following command:
sudo adduser ftpuser
You can then set a password for the user account using the following command:
sudo passwd ftpuser
3. Accessing the shared folder from Windows
When accessing the shared folder from a Windows system, you may encounter some issues with authentication or connectivity. Here are some troubleshooting tips that you can try:
- Ensure your Windows system is in the same workgroup or domain as your Ubuntu system.
- Make sure that your Windows system can ping your Ubuntu system by its IP address or hostname.
- Ensure you have the correct login credentials for the user account you set up on Ubuntu.
- Make sure that you have the necessary software installed on your Windows system to access the shared folder. For example, if you use Samba, you must install the Samba client on your Windows system.
By following these tips and ensuring that your firewall settings and user permissions are set up correctly, you should be able to access your shared folder on Ubuntu from Windows without any issues.
4. Security considerations
Sharing a folder on Ubuntu to access from Windows can be a security risk if not done correctly. To minimize the risk, you should ensure you use strong passwords for your user accounts and limit the shared folder access to only the users who need it. You should also keep your Ubuntu system up-to-date with the latest security patches and updates.
In addition, you can consider using SSHFS to share your folder, as it provides encryption and secure authentication by default. You can also configure Samba to use encrypted communication by enabling the “encrypt passwords” option in the configuration file.
Conclusion
Sharing a folder on Ubuntu for access from Windows is a practical and effective way to facilitate seamless file sharing between the two operating systems. By using the Samba protocol, you can ensure cross-platform compatibility and make it easy for users to access shared resources. The process is quite straightforward, involving the installation of necessary packages, configuring the shared folder, and enabling the appropriate permissions. With this guide, you should now be well-equipped to create a shared folder on Ubuntu and access it from a Windows computer. This will not only streamline your workflow but also enhance collaboration and productivity in a mixed-OS environment.