Linux and Windows systems have major differences, with different file systems and protocols in use. Sharing files between them can be difficult, especially because they use two different sharing protocols. That doesn’t mean it’s impossible to mount a Windows share folder on Linux, however. Follow along below to find out how.
Also read: How to View Shared Files and Folders in Windows 10
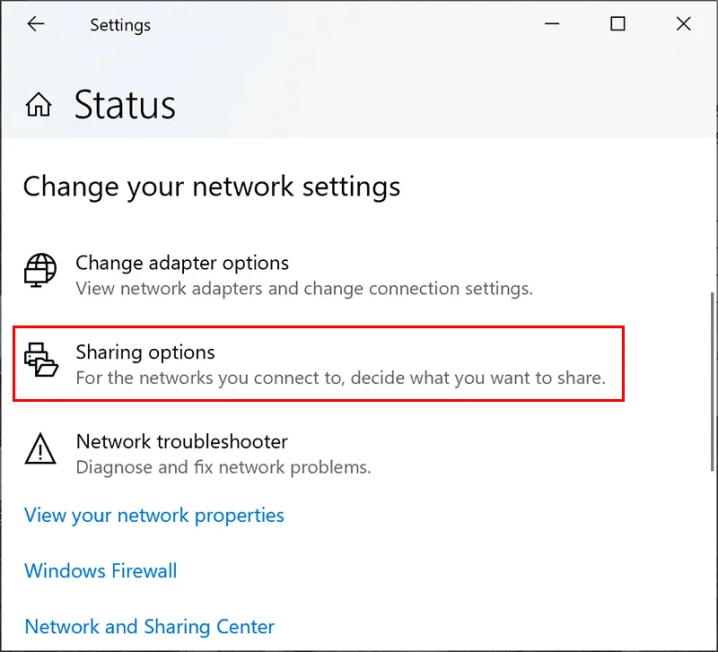
Before you do anything, you need to ensure that Windows has been correctly set up to allow for networking file sharing.
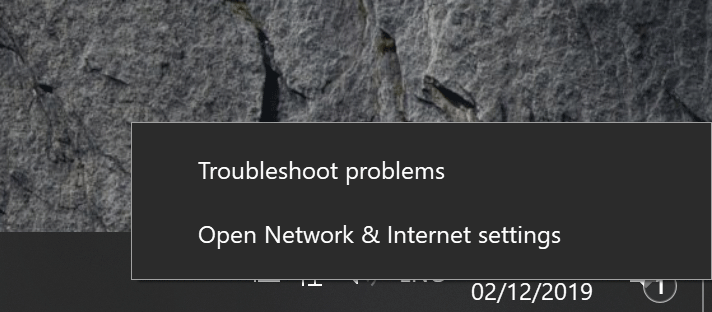
To enable this on Windows, right-click on the network icon in the notifications area of your Windows taskbar. From here, click «Open Network & Internet Settings.»

Under the «Status» category, click «Sharing options.»

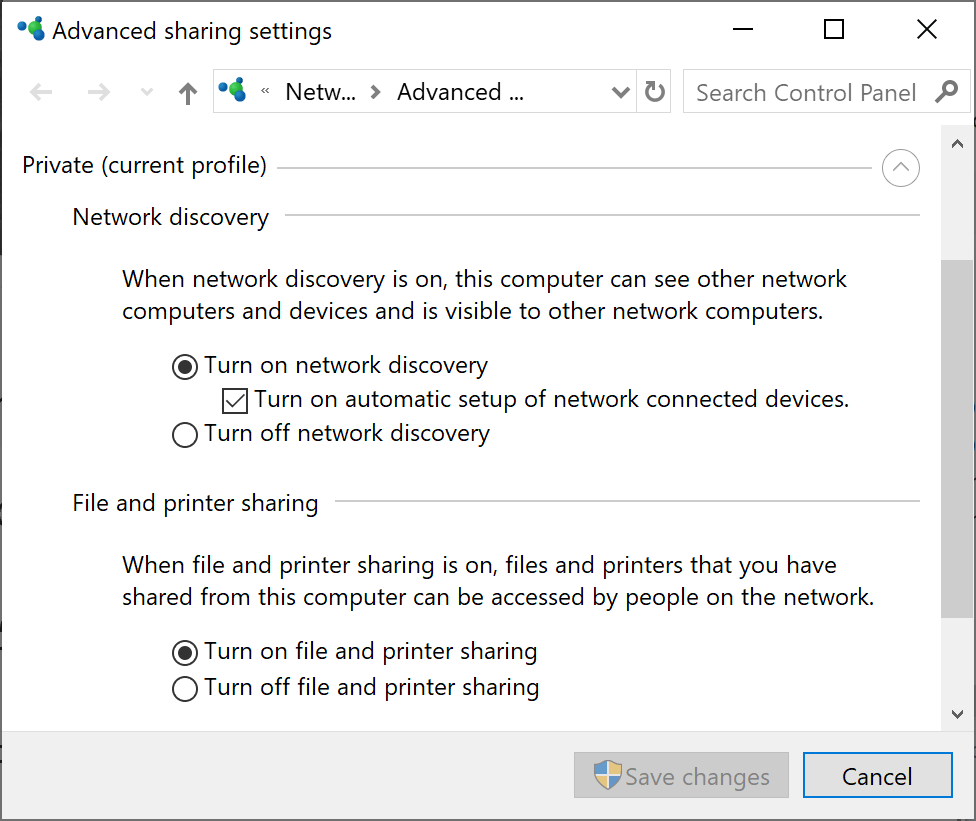
In your Windows sharing options menu, make sure that «Turn on network discovery» and «Turn on file and printer sharing» are enabled.
Click the radio buttons next to both options to make sure this is the case.

Click «Save changes» to save your settings. Once this is done, open Windows File Explorer and locate the folder you’re looking to share with your Linux PC.
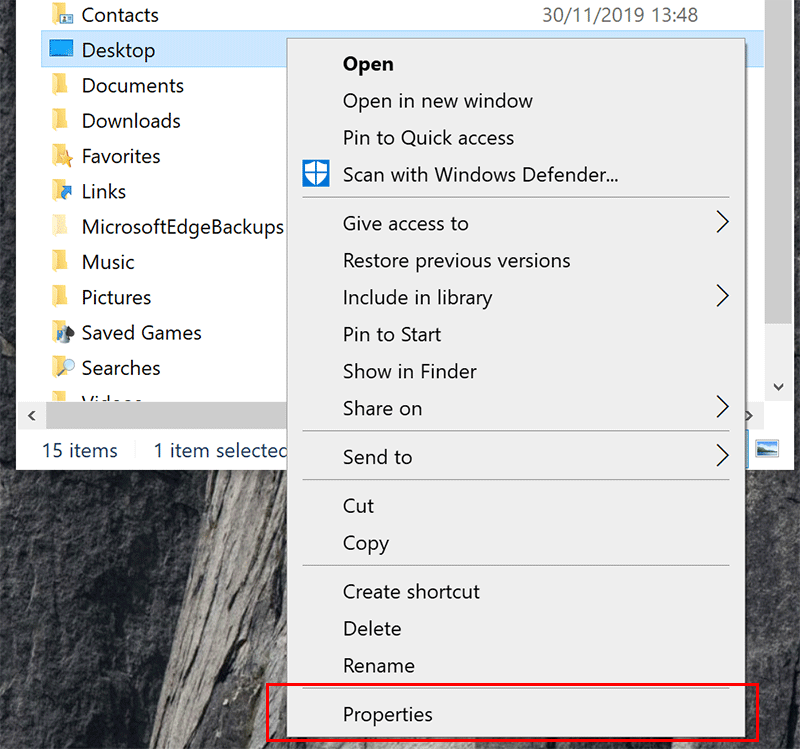
Right-click the folder and click «Properties.»

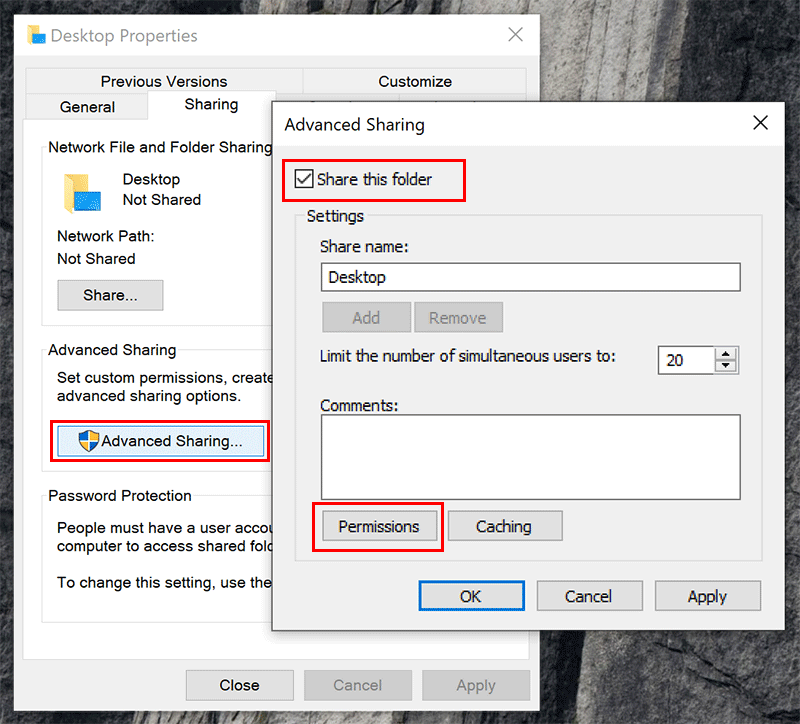
In your folder properties, click the «Sharing» tab, then click «Advanced Sharing.» Click to enable the «Share this folder» checkbox, then click «Permissions.»

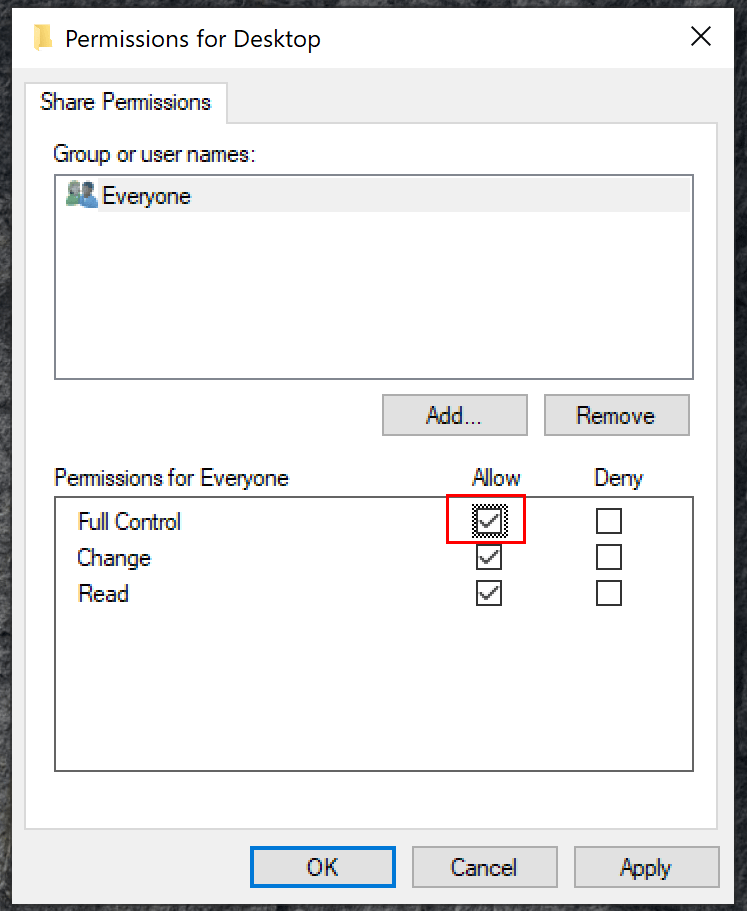
Under the «Permissions» section, set the control rights for your folder. By default, Windows will grant read-only access to your files.
If you want to allow everyone to read or write to the folder, click «Allow» for the «Full Control» permissions set. Set these permissions to suit your own requirements.

Once you’re done, click «OK» three times to close each of the dialog boxes.
Your folder should now be shared on your network, ready for you to access from your Linux PC.
Install CIFS-utils
Depending on your Linux distribution, you may be able to mount your Windows-shared folder automatically in your distribution’s file explorer.
However, this may not work correctly. The safest way to mount Windows-shared folders on Linux is to use the CIFS-utils package and mount the folder using the Linux terminal.
This allows Linux machines to access SMB file shares used by Windows PCs.

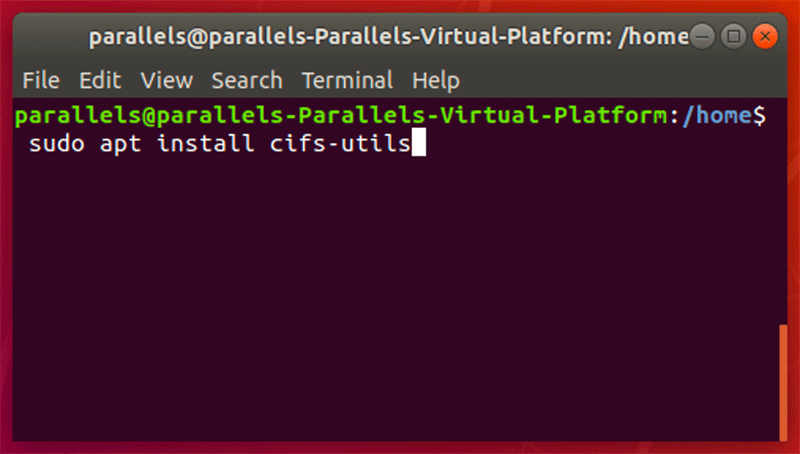
To install CIFS-utils, open a new terminal window. For Ubuntu and Debian-based distributions, type:
sudo apt install cifs-utils
For Arch users, type:
Once installed, you can then mount your Windows share folder from the Linux terminal.
Mount Windows SMB Share on Linux
You’ll need to create a mount directory before you can mount your Windows SMB-shared folder on Linux. This is where Linux will mirror the contents of your shared folder.
To do that, open a terminal window and type:
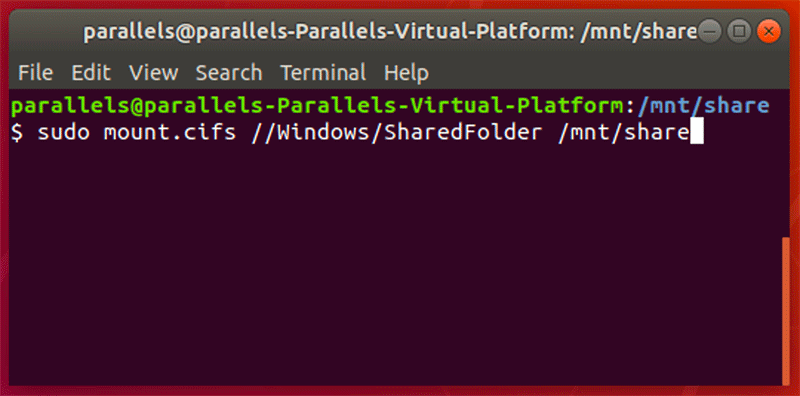
Once created, type the following:
sudo mount.cifs //Windows/SharedFolder /mnt/share -o user=account
Replace «Windows» with the IP address or hostname for your Windows PC and «SharedFolder» with your shared folder name. For the username, replace «account» with your Windows username or full Microsoft account email.

You’ll be asked to provide your Windows password before the mounting process is complete. Type this in, then click Enter. If you used the correct information, your Windows folder should now be mounted and accessible in the folder you created.
Sharing Files Between Linux and Windows in Dual Boot
Sharing files between Windows and Linux works great when you mount a shared folder between the two devices, but can you still share files with a dual boot setup? Linux and Windows have separate file systems. Linux usually uses Ext4, while Windows uses NTFS and also works with FAT32. This doesn’t mean it’s impossible to see and share files, though.
You’ll need a compatible Windows system, build 20211 or higher, and a few other resources to make it work. Don’t worry. Everything is free. This guide walks you through each step in the process, including a way to read and share files between Windows and Linux.
Frequently Asked Questions
1. Why do I get a syntax error when trying to mount a folder in Linux?
Either there’s a small error in the command in the terminal window, or you have a space in the folder name. Spaces don’t always come across correctly in the syntax. Instead of recognizing the command as the full name of the folder, the system sees two unrelated items.
Avoid this by placing the name in quotes. For instance, Shared Folder would become «Shared Folder.» Of course, you can also just rename the Windows 10 folder to place the words together or have a dash between them.
2. Can I mount a shared folder if I use VirtualBox?
Yes. The process should work the same way. You can also share devices, such as USB drives.
3. Can I mount guest, network, or password protected folders?
Yes, but since you’re not using the main Windows 10 account, you will need to adjust the syntax a bit. Plus, if you’re mounting a network folder, you’ll also need the server or machine name.
While this guide applies to Ubuntu, it should work for most major Linux distros as well. It lists the syntax for different scenarios, assuming you’ve already completed all of the steps (except the final mounting) above.
4. Why do I only have read access for the shared folder?
If you want to store files in the shared folder from Linux, make sure you have full read/write access to the folder in Windows. If the Windows user account only has read permission, this is the only permission you’ll have from Linux as well. You must change your account permissions from within Windows 10. For companies, you’ll need your IT admin to make the change for you.
5. Why aren’t folder changes showing up?
If you’ve made changes to the permissions of the folder, they may not show up immediately in Linux. You’ll need to remount the folder for changes to take effect.
Use the command above to remount any shared folders. This should ensure things work as expected. If you have any random glitches, remounting typically fixes them.
Wrapping Up
Mounting Windows and Linux shared folders gives you the freedom to access your most important files, no matter the operating system. The SMB protocol is well supported on Linux, so you shouldn’t find it difficult to continue accessing your Windows files and folders once you’ve installed the CIFS-utils package.
If you’d rather use a single system, here are five of the best Linux distros for Windows users you could use.

Crystal Crowder has spent over 15 years working in the tech industry, first as an IT technician and then as a writer. She works to help teach others how to get the most from their devices, systems, and apps. She stays on top of the latest trends and is always finding solutions to common tech problems.
Subscribe to our newsletter!
Our latest tutorials delivered straight to your inbox
If you’ve been looking for a solution on how to mount Windows folders on Linux, we’ve got just the right guide for you to follow.
Mounting Windows OS folders on your Linux system is possible depending upon your Linux distribution, and the Windows folders are automatically mounted on Linux. However, this may need to be revised. Note that Linux and Windows have significant file system differences. Sharing files between them can be difficult as they may use two different sharing protocols.
We will first discuss how we can share folders from Windows. Then, we will discuss how the shared folder can be accessed from Linux using CIFS. We will also discuss how a folder shared from Linux can be accessed on Windows using samba. Finally, we will see how shell scripting can mount a folder from Linux.
Note: While mounting the Windows folder from Linux, Linux doesn’t honor the access control list that NTFS maintains, so permissions are ignored. If you are really concerned, Windows have the option to encrypt your hard disk.
The easiest and safest way to mount Windows folders on Linux is via using the CIFS-utils package. Then, you will be able to mount the folder on Linux. The following paragraphs discuss setting up the CIFS-utils package to mount Windows files.
Sharing file system from Windows
Before proceeding with the setup on Linux, ensure you have shared the file correctly in Windows. Follow the steps below:
- First, open the “Network Sharing and Internet Settings”. For Windows 10 users, it is located at Settings > Network & Internet > Status > Network and Sharing Center. In Windows 11, you can find the network sharing option in Control Panel > Network and Internet > Network and Sharing Center. From the status category, select “Sharing Options”.
- In the Windows Sharing option, ensure that “Turn on network discovery” and “Turn on file and printer sharing” are enabled. Click save changes to save your changes.

- Now locate the folder you want to share. Right-click on the folder and select the properties.
- Click the sharing tab and then Advanced sharing.

- Enable the “Share this folder” checkbox.
- Provide the desired permissions.
- Click OK to close the dialog box.
Now, we will move towards the steps to be applied to Linux.
Install the CIFS-utils
The very first step is to install the CIFS-utils. For this purpose, open your terminal and then type the following command first to update your system and then install the cifs-utils package:
$sudo apt update
$sudo apt install cifs-utils
The above command will work for Ubuntu and Debian. The arch users may try the following command:
$pacman -S cifs-utils
For CentOS and Fedora, you should try the following command:
$sudo dnf install cifs-utils
After the installation, you can mount the Windows shared folder on Linux.
Create a mount directory
First, you will create a directory where Linux will mirror the shared folder’s contents. Open your Terminal and type the following command:
$sudo mkdir /mnt/share
Mount the folder
Now, you can mount the folder with the help of the following command:
$sudo mount.CIFS //Windows/SharedFolder /mnt/share -o user=account
Here, replace the Windows with the name or internet protocol (IP) address. Also, replace the SharedFolder with the name of your shared folder. For the user name, replace the account with your Windows user name or Microsoft account email. You will be prompted for the password. Upon success, no output will be produced. You can also provide the password on the command line as follows:
$sudo mount.cifs //Windows/SharedFolder /mnt/share -o user=account, password=abc
You can also provide a domain or workgroup as follows:
$sudo mount.CIFS //Windows/SharedFolder /mnt/share -o user=account, domain=domain, password=abc
Note: Now, you can verify that the Windows shared folder is successfully mounted using the commands “mount” or “df –h”.
After the shared files are mounted, the mount folder becomes the root directory of the mounted file system. Even you can work with remote files as they are local files.
Mounting a folder permanently
If you want to mount a windows folder permanently in Linux, edit /etc/fstab file and add the following line:
//servername/sharename /media/windowsshare cifs guest,uid=1000,iocharset=utf8 0 0
Then use the following command:
$sudo mount –a
The above command will mount all the entries listed in /etc/fstab.
Unmount a shared folder
You can also unmount a shared folder by using the following command on Linux:
$sudo umount ~/WindowsShare/
We can also use the samba to mount access to Linux files on Windows. Follow the steps below.
Install samba
First, install the samba using the following command on your Terminal:
$dnf install samba
Modify LinuxSE
In case your system is protected by LinuxSE, enable samba to access your home directory using the following command:
$setsebool -P samba_enable_home_dirs on
You can verify if the value is correctly set by using the following command:
getsebool samba_enable_home_dirs
Enable your user
Samba requires specifying the users that can connect. For this purpose, use the following command:
$smbpasswd -a <your-user>
You can check the list of allowed user types using the following command:
$pdbedit -L –v
You can also remove a user using the following command:
$smbpasswd -x <user-name>
Start samba
You can start the samba via the following command:
$systemctl start smb
To enable samba to start automatically on system startup, use the following command:
$systemctl enable smb
Configure the firewall
Now you need to enable the samba to access the network via configuring the firewall. For this purpose, type the following command:
$firewall-cmd --add-service=samba --permanent
Access folder from Windows
Now you can access the Linux folders in Windows. For this purpose, open Windows explorer and type the address of the Linux machine preceded by two backslashes. Provide the username and password. You should now be able to access your home directory.
Using a shell script to mount Windows folder on Linux
You can use the shell script to mount the Windows folder on Linux. Following is the shell script:
user=linuxuser
pass=passwd4user
wincp=//win_hostname
winpath=/win_directory
linuxpath=/linux_mntdir
fstab_line=$wincp$winpath /mnt$linuxpath smbfs
username=$user,password=$pass 0 0
/etc/init.d/smb start
echo $fstab_line >> /etc/fstab
mount –a
This article discusses how we can mount a Windows shared folder on Linux using CIFS. We also discussed accessing a Linux-shared file/folder on Windows. We also discussed how shell scripting could be used to mount Windows folders on Linux. Note that mounting a drive may cause performance issues. In these cases, you may want to perform CIFS performance tuning, such as setting CIFSMaxBufSize.
If this guide helped you, please share it.
Contents
- Prerequisites
- CIFS installation
- Mounting unprotected (guest) network folders
-
Mount password protected network folders
- Special permissions
- Mount password protected shares using libpam_mount (Ubuntu 9.04)
-
Troubleshooting
- Login errors
- Unprotected network folder won’t automount
- Mount during login instead of boot
- Slow shutdown due to a CIFS/Network Manager bug
- CIFS Options Deprecated
- Use of tilde in pathnames such as «credentials=~/.smbcredentials»
This document describes how to mount CIFS shares permanently. The shares might be hosted on a Windows computer/server, or on a Linux/UNIX server running Samba. This document also applies to SMBFS shares, which are similar to CIFS but are deprecated and should be avoided if possible (link).
(This document does not describe how to host the shares yourself, only how to access shares that are hosted somewhere else. For hosting shares, use Samba.)
Prerequisites
We’re assuming that:
- Network connections have been configured properly.
-
Your local (Ubuntu) username is ubuntuusername.
-
Share username on Windows computer is msusername.
-
Share password on Windows computer is mspassword.
-
The Windows computer’s name is servername (this can be either an IP address or an assigned name).
-
The name of the share is sharename.
-
You want to mount the share in /media/windowsshare.
CIFS installation
sudo apt-get install cifs-utils
On older systems:
sudo apt-get install smbfs
Mounting unprotected (guest) network folders
First, let’s create the mount directory. You will need a separate directory for each mount.
sudo mkdir /media/windowsshare
Then edit your /etc/fstab file (with root privileges) to add this line:
//servername/sharename /media/windowsshare cifs guest,uid=1000,iocharset=utf8 0 0
Where
-
guest indicates you don’t need a password to access the share,
-
uid=1000 makes the Linux user specified by the id the owner of the mounted share, allowing them to rename files,
-
iocharset=utf8 allows access to files with names in non-English languages. This doesn’t work with shares of devices like the Buffalo Tera Station, or Windows machines that export their shares using ISO8895-15.
-
If there is any space in the server path, you need to replace it by \040, for example //servername/My\040Documents
After you add the entry to /etc/fstab type:
sudo mount -a
This will (re)mount all entries listed in /etc/fstab.
Mount password protected network folders
The quickest way to auto-mounting a password-protected share is to edit /etc/fstab (with root privileges), to add this line:
//servername/sharename /media/windowsshare cifs username=msusername,password=mspassword,iocharset=utf8 0 0
This is not a good idea however: /etc/fstab is readable by everyone and so is your Windows password in it. The way around this is to use a credentials file. This is a file that contains just the username and password.
Using a text editor, create a file for your remote servers logon credential:
gedit ~/.smbcredentials
Enter your Windows username and password in the file:
username=msusername
password=mspassword
Save the file, exit the editor.
Change the permissions of the file to prevent unwanted access to your credentials:
chmod 600 ~/.smbcredentials
Then edit your /etc/fstab file (with root privileges) to add this line (replacing the insecure line in the example above, if you added it):
//servername/sharename /media/windowsshare cifs credentials=/home/ubuntuusername/.smbcredentials,iocharset=utf8 0 0
Save the file, exit the editor.
Finally, test the fstab entry by issuing:
sudo mount -a
If there are no errors, you should test how it works after a reboot. Your remote share should mount automatically.
Special permissions
If you need special permission (like chmod etc.), you’ll need to add a uid (short for ‘user id’) or gid (for ‘group id’) parameter to the share’s mount options.
//servername/sharename /media/windowsshare cifs uid=ubuntuuser,credentials=/home/ubuntuuser/.smbcredentials,iocharset=utf8 0 0
In addition to the initial assumptions, we’re assuming that
-
Your username and password are the same on the Ubuntu machine and on the network drive.
Install libpam-mount:
sudo apt-get install libpam-mount
Edit /etc/security/pam_mount.conf.xml using your preferred text editor.
gksudo gedit /etc/security/pam_mount.conf.xml
First, we’re moving the user specific config bits to a file which users can actually edit themselves: remove the commenting tags (<!— and —>) surrounding the section called <luserconf name=».pam_mount.conf.xml» />. Save the file when done. With this in place, users can create their own ~/.pam_mount.conf.xml.
gedit ~/.pam_mount.conf.xml
Add the following:
<?xml version="1.0" encoding="utf-8" ?>

<pam_mount>

<volume options="uid=%(USER),gid=100,dmask=0700" user="*" mountpoint="/media/windowsshare" path="sharename" server="servername" fstype="cifs" />

</pam_mount>
Troubleshooting
Login errors
If you get the error «mount error(13) permission denied», then the server denied your access. Here are the first things to check:
- Are you using a valid username and password? Does that account really have access to this folder?
-
Do you have whitespace in your credentials file? It should be password=mspassword, not password = mspassword.
-
Do you need a domain? For example, if you are told that your username is SALES\sally, then actually your username is sally and your domain is SALES. The fstab entry should read: …username=sally,password=pass,domain=SALES,… Or: …credentials=/path/to/file,domain=SALES,…
-
The security and version settings are interrelated. SMB1 is insecure and no longer supported by default. At first, try to not specify either security or version: do not specify sec= or vers=. If you still have authentication errors then you may need to specify either sec= or vers= or both. You can try the options listed at the mount.cifs man page. The man page list leaves out the option sec=lanman for some reason, but you should try that one as well (see discussion).
Unprotected network folder won’t automount
I’ve had a situation where an unprotected network folder wouldn’t automount during bootup, but after manually entering «sudo mount -a» was mounted correctly. I solved this by replacing the «guest» option by «username=guest,password=». If anyone has an explanation for this, please leave a comment.
//servername/sharename /media/windowsshare smbfs username=guest,password=,uid=1000,iocharset=utf8,codepage=unicode,unicode 0 0
Mount during login instead of boot
If for some reason/etc/rc0.d/S31umountnfs.sh (networking problems for example) the automatic mounting during boot doesn’t work, you can add the «noauto» parameter to your smbfs fstab entry and then have the share mounted at login.
In /etc/fstab:
//servername/sharename /media/windowsshare cifs noauto,credentials=/home/ubuntuusername/.smbpasswd 0 0
In /etc/rc.local:
mount /media/windowsshare
exit 0
Slow shutdown due to a CIFS/Network Manager bug
If you use Network Manager, and are getting really slow shutdowns, it’s probably because NM shuts down before unmounting the network shares. That will cause CIFS to hang and wait for 60 seconds or so. Here’s how to fix it:/etc/rc0.d/S31umountnfs.sh
sudo ln -s /etc/init.d/umountnfs.sh /etc/rc0.d/K14umountnfs.sh
sudo ln -s /etc/init.d/umountnfs.sh /etc/rc6.d/K14umountnfs.sh
Ubuntu 12.04 already runs umountnfs.sh at reboot and shutdown by default (/etc/rc0.d/S31umountnfs.sh and /etc/rc6.d/S31umountnfs.sh) so this is no longer necessary.
CIFS Options Deprecated
20 Feb 2008 TW
Using dmask or fmask in the fstab file produces the following warnings: WARNING: CIFS mount option ‘dmask’ is deprecated. Use ‘dir_mode’ instead. WARNING: CIFS mount option ‘fmask’ is deprecated. Use ‘file_mode’ instead.
Instead use this format: file_mode=0777,dir_mode=0777 . Or in some cases you might need to use file_mode=0777,dir_mode=0777,nounix (see discussion)
Use of tilde in pathnames such as «credentials=~/.smbcredentials»
20 Feb 2008 TW
Curiously, using credentials=~/.smbcredentials in fstab didn’t work. I had to use the full path, i.e. /home/username/.smbcredentials
(This is likely because the tilde «~» is only a shell short-hand alias for «$HOME»; it isn’t something recognized system-wide by all programs, especially not in a system file table where the concept of «HOME» doesn’t really exist. -Ian!)
CategoryDocumentation
Linux and Windows systems usually have major differences with different file systems and protocols in use. Sharing files between them is not so easy especially because they use two different sharing protocols. Here’s how to mount a Windows share folder on Linux.
However, this does not mean it is impossible to mount a Windows share folder on Linux, however. Go through the post and find out how it is done.
Share Your Windows Folder
Before you start doing anything, you need to make that window has been correctly set up to allow for networking file sharing.
To enable this on Windows 10 follow these steps:
Step 1: Simply right-click on the network icon in the notifications area of your Windows taskbar. From there, tap “Open Network & Internet Settings.”
Step 2: Under the “Status” category, tap “Sharing options.”
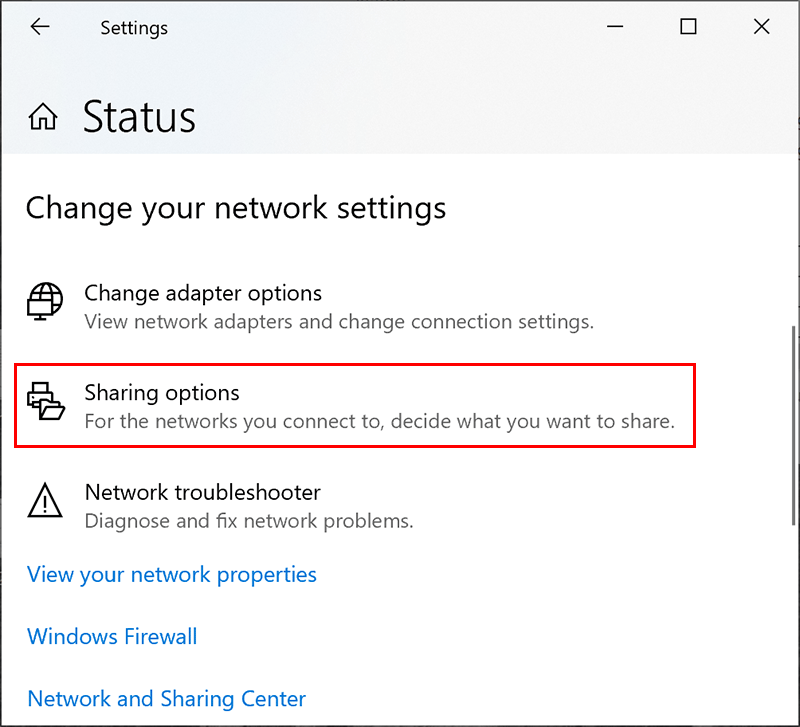
Step 3: In your Windows sharing options menu, make sure that “Turn on network discovery” and “Turn on file and printer sharing” are enabled.
Step 4: Tap on the radio buttons next to both options to make sure this is the case.
Step 5: Now tap on “Save changes” in order to save your settings. Once this is done then open Windows File Explorer and locate the folder you are looking to share with your Linux PC.
Step 6: Just Right-click the folder and click “Properties.”
Step 7: Now in folder properties, tap the “Sharing” tab, then click “Advanced Sharing.” Then tap to enable the “Share this folder” checkbox, then click “Permissions.”
Step 8: Here under the “Permissions” section, set the control rights for your folder. By default, Windows usually grants read-only access to your files.
Step 9: In case you want to allow everyone to read or write to the folder then tap “Allow” for the “Full Control” permissions set. Adjust these permissions to suit your own requirements.
Step 10: Once you are done, Tap “OK” three times to close each of the dialogue boxes. Now the folder should be shared on your network, ready for you to access from your Linux PC.
Install CIFS-utils
You may be able to mount your Windows-shared folder automatically in your distribution’s file explorer by depending on your Linux distribution.
However, this may not work properly. Also, the safest way to mount Windows-shared folders on Linux is to use the CIFS-utils package and mount the folder using the Linux terminal. This will allow Linux machines to access SMB file shares used by Windows PCs.
To install CIFS-utils, open a new terminal window. For Ubuntu and Debian-based distributions, type:
sudo apt install cifs-utils
For Arch users, type:
pacman -S cifs-utils
Once installed then you can easily mount your Windows share folder from the Linux terminal.
Mount Windows SMB Share on Linux
You will also need to create a mount directory before mounting your Windows SMB-shared folder on Linux. This is where Linux will replicate the contents of your shared folder.
In order to do that first open a terminal window and type:
sudo mkdir /mnt/share
Once it is created then type the following:
sudo mount.cifs //Windows/SharedFolder /mnt/share -o user=account
Now replace the “Windows” with the IP address or hostname for your Windows PC and “SharedFolder” with your shared folder name. For the username, replace “account” with your Windows username or full Microsoft account email.
Linux Mount Folder Command
Now you will be asked to provide your Windows password before the mounting process is complete. Type this in, then tap Enter. In case you used the correct information then your Windows folder should now be mounted and accessible in the folder you created.
Sharing Files Between Linux and Windows
Mounting Windows and Linux shared folders also gives you the freedom to access your most important files, no matter what the OS is. The SMB protocol is very well supported on Linux, so you will not find it difficult to continue accessing your Windows files and folders once you have installed the CIFS-utils package.
Learn how to access Windows SMB shares on Ubuntu 22.04 in this comprehensive guide. With step-by-step instructions and clear explanations, this guide is perfect for beginners and experts alike.
Are you struggling to access Windows SMB shares on your Ubuntu 22.04 machine? Do you feel lost in the sea of technical jargon and complicated instructions? Fear not, as this comprehensive guide will walk you through the process step-by-step and make it as easy as possible for you to access Windows SMB shares on Ubuntu 22.04.
Introduction
Ubuntu 22.04 is a popular open-source operating system that has gained a lot of popularity in recent years. Many users are switching to Ubuntu from other operating systems like Windows and macOS. One of the common issues that Ubuntu users face is accessing Windows SMB shares on Ubuntu. This is especially important for those who work in a mixed environment where some machines are running Windows and others are running Ubuntu. In this guide, we will explore how to access Windows SMB shares on Ubuntu 22.04.
To access Windows SMB shares on Ubuntu 22.04, follow the steps below:
1. You can either SSH to your Ubuntu 22.04 Server or if you have a GUI version you can open the Terminal on your Ubuntu machine by pressing the Ctrl+Alt+T keys.
2. Install the cifs-utils package by running the following command:
sudo apt-get install cifs-utils
3. Create a folder where you want to mount the Windows SMB share. For example, you can create a folder named win_share in your home directory by running the following command:
4. Mount the Windows SMB share by running the following command:
sudo mount -t cifs //windows-machine-name/share-name ~/win_share -o username=windows-username,password=windows-password,domain=windows-domain
Replace windows-machine-name, share-name, windows-username, windows-password, and windows-domain with the appropriate values. You may also use the IP address of the Windows machine instead of the machine name.
For example, if the Windows machine name is mywinpc, the share name is myshare, the Windows username is myuser, the password is mypassword, and the domain is mydomain, the command will look like this:
sudo mount -t cifs //mywinpc/myshare ~/win_share -o username=myuser,password=mypassword,domain=mydomain
5. Once you have successfully mounted the Windows SMB share, you can access it like any other folder on your Ubuntu machine. You can copy files to and from the Windows SMB share and perform other file operations.
Why Can’t I Access Windows SMB Shares on Ubuntu 22.04?
If you are unable to access Windows SMB shares on Ubuntu 22.04, there could be several reasons for it. Here are some common reasons:
- Incorrect credentials: Make sure you are using the correct Windows username, password, and domain in the mount command.
- Firewall settings: Check if the firewall on the Windows machine is blocking access to the SMB share.
- Network connectivity: Ensure that both the Ubuntu and Windows machines are on the same network and can communicate with each other.
- SMB version: Make sure that the Windows SMB share is using a version of SMB that is supported by your Ubuntu machine.
FAQs
Q1. What is SMB?
SMB stands for Server Message Block and is a protocol used for sharing files, printers, and other resources of a network. It is commonly used in Windows-based networks.
Q2. What is cifs-utils?
cifs-utils is a package in Ubuntu that provides utilities for mounting and managing SMB shares.
Q3. Can I mount multiple SMB shares on Ubuntu 22.04?
Yes, you can mount multiple SMB shares on Ubuntu 22.04. You just need to create different folders for each share and use a different mount command for each share.
Q4. Can I access Windows SMB shares without using the Terminal?
Yes, you can access Windows SMB shares without using the Terminal by using the Files application. Open the Files application and click on Other Locations. In the Connect to Server dialog, enter the address of the SMB share in the format smb://windows-machine-name/share-name and click Connect.
Q5. How do I unmount a Windows SMB share in Ubuntu 22.04?
To unmount a Windows SMB share in Ubuntu 22.04, use the following command:
sudo umount /path/to/mount/folder
Replace /path/to/mount/folder with the actual path to the folder where the Windows SMB share is mounted.
Q6. How do I make the Windows SMB share mount automatically on startup?
To make the Windows SMB share mount automatically on startup, you need to add an entry to the /etc/fstab file. Open the /etc/fstab file in a text editor and add the following line at the end of the file:
//windows-machine-name/share-name /path/to/mount/folder cifs username=windows-username,password=windows-password,domain=windows-domain 0 0
Replace windows-machine-name, share-name, windows-username, windows-password, windows-domain, and /path/to/mount/folder with the appropriate values. Save the file and reboot your Ubuntu machine.
Conclusion
Accessing Windows SMB shares on Ubuntu 22.04 may seem daunting at first, but with the right instructions and a little patience, it can be a breeze. In this guide, we have walked you through the steps required to access Windows SMB shares on Ubuntu 22.04, as well as provided some common troubleshooting tips. With this knowledge, you can now work seamlessly in a mixed environment with both Windows and Ubuntu machines.
Remember, the key to success is to take it one step at a time, and don’t be afraid to ask for help if you need it. Now, go ahead and access those Windows SMB shares on your Ubuntu 22.04 machine!