В этой статье мы рассмотрим, как в Linux смонтировать общую сетевую папку, расположенную на хосте Windows. В Windows для доступа к общим сетевым папкам используется протокол SMB (Server Message Block), который ранее назывался CIFS (Сommon Internet File System). В Linux для доступа к сетевым папкам Windows по протоколу SMB можно использовать клиент cifs-utils или Samba.
- Смонтировать сетевую папку в Linux с помощью cifs-util
- Автоматическое монтирование сетевой папки в Linux
- Linux: подключиться к сетевой папке с помощью клиента samba
Содержание:
Совет. Для доступа к сетевым папкам по SMB/CIFS используется порт TCP/445. Для разрешения имени используются порты UDP 137, 138 и TCP 139. Если эти порты закрыты, вы сможете подключиться к сетевой папке Windows только по IP адресу.
Смонтировать сетевую папку в Linux с помощью cifs-util
Вы можете смонтировать сетевую папку, находящуюся на Windows хосте, с помощью утилит из пакета cifs-util. Для установки пакета выполните команду:
- В Ubuntu/Debian:
$ sudo apt-get install cifs-utils - В CentOS/Oracle/RHEL:
$ sudo dnf install cifs-utils
Создайте точку монтирования:
$ sudo mkdir /mnt/share
Теперь вы можете смонтировать сетевую папку с компьютера Windows под пользователем User03с помощью команды:
$ sudo mount.cifs //192.168.31.33/backup /mnt/share -o user=User03
Укажите пароль пользователя Windows для подключения к сетевой папке.
![]()
При подключении сетевой SMB папки можно задать дополнительные параметры:
$ sudo mount -t cifs -o username=User03,password=PasswOrd1,uid=1000,iocharset=utf8 //192.168.31.33/backup /mnt/share
- //192.168.31.33/backup – сетевая папка Windows
- /mnt/share – точка монтирования
- -t cifs – указать файловую систему для монтирования
- -o опции монтирования (эту опцию можно использовать только с правами root, поэтому в команде используется sudo)
- username=User03,password=PasswOrd1 – имя и пароль пользователя Windows, у которого есть права доступа к сетевой папке. Можно указать имя пользователя guest, если разрешен анонимный доступ к сетевой папке
- iocharset=utf8 – включить поддержку кодировки UTF8 для отображения имен файлов
- uid=1000 – использовать этого пользователя Linux в качестве владельца файлов в папке

По умолчанию шары Windows монтируются в Linux с полными правами (0755). Если вы хотите изменить права по-умолчанию при монтировании, добавьте в команду опции:
dir_mode=0755,file_mode=0755
Если вы хотите использовать имя компьютера при подключении сетевого каталога Windows, добавьте в файл /etc/hosts строку:
IP_АДРЕС ИМЯ_КОМПЬЮТЕРА
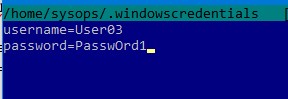
Чтобы не указывать учетные данные пользователя Windows в команде монтирования сетевой папки, их можно сохранить в файле.
Например:
$ mcedit ~/.windowscredentials
Добавьте в файл:
username=User03
password=PasswOrd1
Для подключения к папке под анонимным пользователем:
username=guest
password=
Если нужно указать учетную запись пользователя из определенного домена Active Directory, добавьте в файл третью строку:
domain = vmblog.ru
Измените права на файл:
$ chmod 600 ~/.windowscredentials
Теперь при подключении сетевой папки вместо явного указания имени пользователя и пароля можно указать путь к файлу:
$ sudo mount -t cifs -o credentials=/home/sysops/.windowscredentials,uid=1000,iocharset=utf8 //192.168.31.33/backup /mnt/share
Отмонтировать сетевую SMB папку:
$ sudo umount /mnt/share
Автоматическое монтирование сетевой папки в Linux
Можно настроить автоматическое монтирование сетевой папки Windows через /etc/fstab.
$ sudo mcedit /etc/fstab
Добавьте в файл следующую строку подключения SMB каталога:
//192.168.31.33/backup /mnt/share cifs user,rw,credentials=/home/sysops/.windowscredentials,iocharset=utf8,nofail,_netdev 0 0
- rw – смонтировать SBM папку на чтение и запись
- nofail – продолжить загрузку ОС если не удается смонтировать файловую систему
- _netdev – указывает что подключается файловая система по сети. Linux не будет монтировать такие файловые системы пока на хосте не будет инициализирована сеть.
Вы можете указать версию протокола SMB, которую нужно использовать для подключения (версия SMB 1.0 считается небезопасной и отключена по-умолчанию в современных версиях Windows). Добавьте в конец строки с настройками подключения параметр vers=3.0.
//192.168.31.33/backup /mnt/share cifs user,rw,credentials=/home/sysops/.windowscredentials,iocharset=utf8,nofail,_netdev,vers=3.0 0 0
Если на стороне хоста Windows используется несовместимая (старая версия) SMB, при подключении появится ошибка:
mount error(112): Host is downилиmount error(95): Operation not supported
Чтобы сразу смонтировать сетевую папку, выполните:
$ mount -a
Linux: подключиться к сетевой папке с помощью клиента samba
Установите в Linux клиент samba:
- В Ubuntu/Debian:
$ sudo apt-get install smbclient - В CentOS/Oracle/RHEL:
# dnf install smbclient
Для вывода всех SMB ресурсов в локальной сети:
$ smbtree -N
Вывести список доступных SMB папок на удаленном хосте Windows:
smbclient -L //192.168.31.33 -N
Если в Windows запрещен анонимный доступ, появится ошибка:
session setup failed: NT_STATUS_ACCESS_DENIED
В этом случае нужно указать учетную запись пользователя Windows, которую нужно использовать для подключения:
smbclient -L //192.168.31.33 -U User03
Если нужно использовать учетную запись пользователя домена, добавьте опцию –W:
smbclient -L //192.168.31.33 -U User03 –W Domain

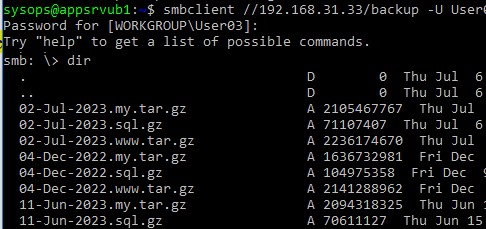
Для интерактивного подключения к сетевой папке Windows используется команда:
smbclient //192.168.31.33/backup -U User03 -W Domain
или
smbclient //192.168.31.33/backup -U User03
Для анонимного доступа:
smbclient //192.168.31.33/backup -U Everyone
После успешного входа появится приглашение:
smb: \>
Вывести список файлов в сетевой папке:
dir
Скачать файл из сетевой папки Windows:
get remotefile.txt /home/sysops/localfile.txt
Сохранить локальный файл из Linux в SMB каталог:
put /home/sysops/localfile.txt remotefile.txt
Можно последовательно выполнить несколько команд smbclient:
$ smbclient //192.168.31.33/backup -U User03 -c "cd MyFolder; get arcive.zip /mnt/backup/archive.zip"
Полный список команд в smbclient можно вывести с помощью команды help. Команды smbclient схожи с командами ftp клиента.
При использовании команды smbclient может появиться ошибка:
Unable to initialize messaging contextsmbclient: Can't load /etc/samba/smb.conf - run testparm to debug it.
Чтобы исправить ошибку, создайте файл /etc/samba/smb.conf.
Если на хосте Windows отключен протокол SMB 1.0, то при подключении с помощью smbclient появится ошибка:
Reconnecting with SMB1 for workgroup listing.
protocol negotiation failed: NT_STATUS_CONNECTION_RESET
Unable to connect with SMB1 -- no workgroup available.
Монтирование SMB не что иное как подключение сетевой папки WIndows в Linux. SMB (Server Message Block) — сетевой протокол удаленного доступа к сетевым ресурсам (файлы, папки, принтеры и т.п.). В первой версии протокола был известен также как CIFS (Common Internet File System). Протоком SMB повсеместно используется во всех ОС Microsoft Windows.
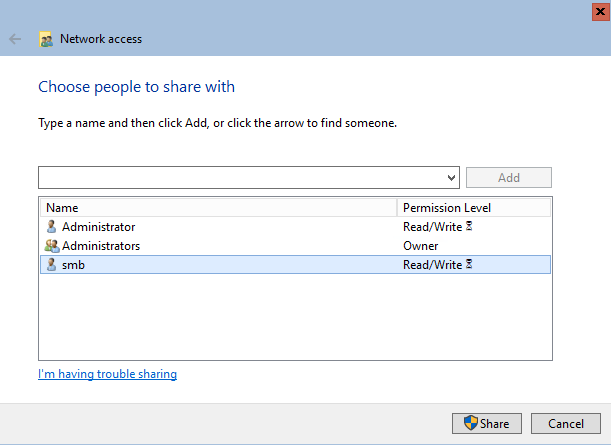
В современных дистрибутивах Linux уже можно совершенной спокойно путешествовать по сетевым дискам. Но куда удобнее если смонтировать сетевой диск сразу в папку, да еще и на рабочем столе, красота. Я создал папку с общим доступом на сервере Hyper-V, её и буду монтировать. Монтирование SMB буду делать под специально заведенным пользователем, дабы не светить пароль админа.
Монтируемая папка
Монтируемая директория доступна только администраторам и пользователю smb (создан специально для монтирования). Сделать общую папку на сервере Windows можно двумя способами: 1 — через свойства папки; 2 — через Powershell. Через свойства папки проще и быстрее как для новичка.
Но в моем случае с сервером HyperV 2019 сработал только второй способ, через Powershell.
New-SmbShare -Name "smb_mount" -Path "F:\smb_mount" -FullAccess "Administrator", "smb"

Данной командой я сделал общей папку расположенную по пути F:\smb_mount и присвоил ей имя smb_mount. Права на доступ к папке выдал пользователю Administrator и smb.
Общая папка у меня доступна по пути \\hvs19\smb_mount, но монтировать я буду ее по ip адресу. Принципиального вопроса как монтировать нет, просто не всегда есть возможность использовать имя.
С монтируемой папкой закончили, создадим папку куда будем монтировать. Я создал папку в /opt и назвал её F (по имени диска где лежит монтируемая папка) для удобства.
Установим набор утилит для монтирования SMB
Для Ubuntu (и прочих Debian`ов)
sudo apt-get install cifs-utils
Для Centos 8 (и прочих RPM дистрибутивов на YUM)
sudo yum install cifs-utils
Монтирование SMB
Все необходимые папки мы создали, теперь приступим к монтированию файловой системы.
sudo mount -t cifs -o username=smb,password=пароль //192.168.1.110/smb_mount /opt/F
Пройдемся по параметрам:
- -t cifs — тип файловой системы cifs (полностью совместим с SMB)
- username — пользователь у которого есть доступ к монтируемой папке (на сетевом диске). Если разрешено, можно использовать гостя, без пароля. В таком случае указываем username=guest
- password — пароль от учетной записи этого пользователя
- //192.168.1.110/smb_mount — общая папка на сервере которую монтируем
- /opt/F — папка куда монтируем.
Посмотрим что все получилось, проверим свободное место в сетевой папке
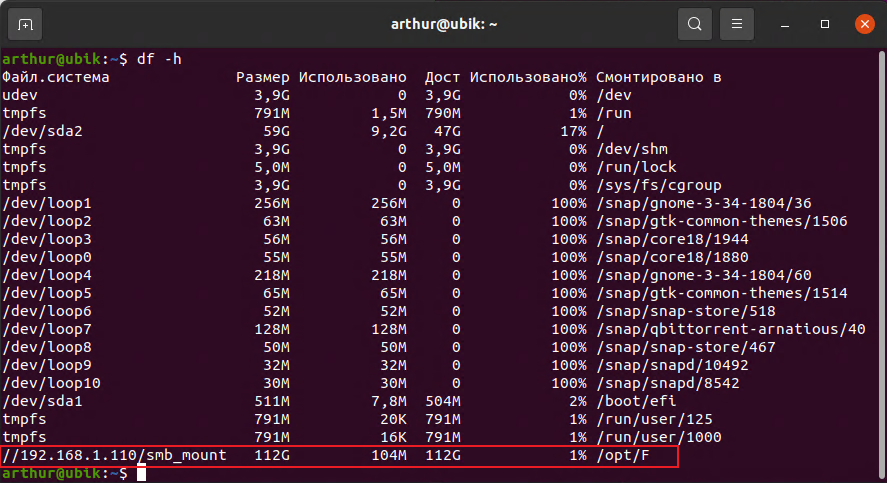
Можно использовать дополнительные возможности при монтировании, используя ключи после параметра -o. Вот некоторые из них
- rw — запись и чтение
- ro — только чтение
- iocharset=utf8 — в данной кодировке будет выводится информация;
- codepage=cp866 — кодировка используемая на сервере с общей папкой. Обычно Windows устанавливает кодировку cp866.
- vers=3.0 — принудительно указать версию подключения SMB протокола. Для безопасного подключения используйте последнюю версию.
Используя команду mount мы монтируем папку в ручном режиме и после перезагрузки монтирования не произойдет. Для автоматического монтирования папки читаем следующий раздел.
Автоматическое монтирование SMB
Для постоянного монтирования папке при старте системы необходимо внести изменения в файл /etc/fstab. При монтировании сетевого диска с SMB используется пароль. Для большей сохранности не будем указывать его в файле fstab, а сохраним в директории root.
Создадим файл с учетными данными
Добавим в файл строки: имя пользователя, пароль, домен (если используется). У меня домена нет, поэтому добавлю только имя и пароль
username=smb
password=пароль
domain=mydomain
Откроем файл /etc/fstab для редактирования
Добавим новую строку в конец файла
//192.168.1.110/smb_mount /opt/F cifs user,rw,credentials=/root/.cifsmnt 0 0
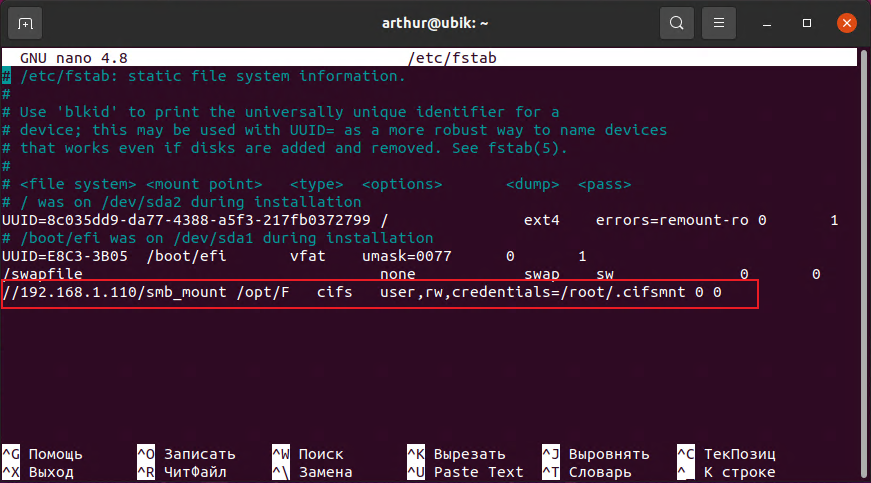
Сохраним файл и перезагрузим компьютер. После этого сетевая папка будет монтироваться автоматически.
Разберем указанные параметры
- //192.168.1.110 — ip адрес сервера где находится сетевая папка
- /smb_mount — сетевая папка на указанном выше сервере
- /opt/F — папка на локальном компьютере куда будем монтировать сетевую папку
- cifs — тип монтируемой файловой системы
- user — разрешение монтировать для любого пользователя
- rw — разрешения на чтение/запись на диск при монтировании
- credentials — путь к файлу с данными учетной записи используемых для подключения по SMB
- 0 — не использовать дамп
- 0 — не проверять файловую систему при старте программой fsck
Права на папки и файлы
Примонтированный диск по умолчанию монтируется от root и разрешает запись на диск только под ним. Рассмотрим опции позволяющие изменить доступ на примонтированные папки и файлы. Также рассмотрим настройки по смене владельца смонтированной папки.
- uid — задает владельца каталога. Узнать uid пользователей можно в файле /etc/passwd
- gid — задает группу владельца каталога. Узнать gid групп можно в файле /etc/passwd
- file_mode=0777 — права на доступ к файлам. 0777 — разрешено запись/чтение всем.
- dir_mode=0777 — права на доступ к папкам. 0777 — разрешено запись/чтение всем.
Пример записи в файле /etc/fstab монтирования от моего пользователя (не root) с полным доступом ко всем файлам и папкам
//192.168.1.110/smb_mount /opt/F cifs user,rw,credentials=/root/.cifsmnt,file_mode=0777,dir_mode=0777,uid=1000,gid=1000 0 0
Размонтирование SMB
Размонтировать сетевую папку SMB можно используя команду umount
В параметрах команды umount указываем директорию куда была смонтирована сетевая папка. В моем случае это /opt/F
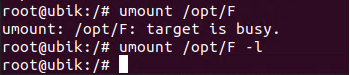
Если смонтированная файловая система сейчас занята, появится сообщение umount: target is busy . В таком случае размонтировать получиться с ключом -l
Решение проблем монтирования
Если по какой либо причине после ваших попыток папка все же не монтируется, необходимо смотреть системный журнал.
grep "cifs" /var/log/syslog

В системном журнале будет указана причина ошибки монтирования. Как пример не верный логин/пароль, не установленные утилиты cifs и т.п.
Хотите отблагодарить автора статьи? Это даст ему дополнительный стимул к написанию новых статей.
Монтирование сетевой папки в Linux | Ubuntu
07.08.2019
Сегодня в статье рассмотрим пример как можно примонтировать сетевую папку Windows или Unix в операционную систему Linux.
-
1.
Установка -
2.
Настройка-
2.1.
Ручное монтирование сетевой папки -
2.2.
Автоматическое монтирование сетевой папки при загрузки системы
-
2.1.
В качестве подопытного будем использовать ПК с установленной на неё Ubuntu Server. Но данное руководство будет справедливо и для большинства других ОС на Linux.
Установка
Для работы c сетевыми дисками SMB/CIFS (Windows или Samba) нам понадобиться утилита cifs-utils. Для её установки открываем терминал и набираем следующую команду:
sudo apt-get install cifs-utilsНастройка
Далее потребуется создать директорию, куда мы хотим примонтировать нашу расшаренную сетевую папку. Для этого давайте наберем вот такую команду:
sudo mkdir /home/user/shareгде
- user – имя вашего пользователя
- share – название директория куда будем монтировать нашу сетевую папку
Ручное монтирование сетевой папки
Далее набираем команду для монтирования нашей сетевой папки.
sudo mount -t cifs //myserver/share-name /home/user/share -o username=user2,password=parol,domain=mydomenили
mount -t cifs //192.168.0.1/share-name /home/user/share -o username=user2,password=parol,domain=mydomen- //myserver/share-name – это путь до нашей шары в сети. Если используются русские буквы или пробел в имени сетевой папки, надо весь путь заключить в кавычки “
//192.168.0.1/Мои документы“
- /home/user/share – это наша директория куда мы будем производить монтирование.
Так же сразу можно задать права доступа и кодировку, тогда надо вписать следующие параметры:
mount -t cifs //192.168.0.1/share-name /home/user/share -o username=user2,password=parol,domain=mydomen,iocharset=utf8,file_mode=0777,dir_mode=0777- username – указываем имя пользователя на удаленном хосте (сервере)
- password – указываем пароль пользователя user2
- domain – название домена (рабочей группы), если необходимо
- iocharset – указываем кодировку (utf8; cp1251; koi8-r)
- file_mode – права доступа к файлам
- dir_mode – права доступа к директории
Автоматическое монтирование сетевой папки при загрузки системы
Для упрощения и безопасности создадим файл, куда мы сможем вписать информацию о пользователе (логин, пароль, домен/рабочая группа). Набираем в терминале:
sudo nano /root/.smbuserusername=user2
password=parol
domain=mydomenДля безопасности ограничим доступ к файлу:
sudo chmod 400 /root/.smbuserТеперь необходимо отредактировать файл fstab. Открываем его в терминале и вписываем необходимую информацию:
sudo nano /etc/fstab//192.168.0.1/share-name /home/user/share cifs credentials=/root/.smbuser 0 0- credentials – тут указываем путь до файла с нашими данными для входа.
Также если при попытки создать или удалить какие-либо файлы у Вас не хватает прав, то необходимо добавить uid и gid параметры.
//192.168.0.1/share-name /home/user/share cifs credentials=/root/.smbuser,uid=1000,gid=1000 0 0- uid и gid – цифра 1000 указывает на нашего пользователя для которого производим монтирование шары. Если у вас идентификатор отличается, то указываем свой.
Проверяем, работоспособность
mount -aЕсли не было ошибок, то для проверки всё ли у нас примонтировалось наберем команду:
df -hЕсли в выводе видим сетевую папку, то все хорошо. При следующей перезагрузки ПК, удаленная шара уже смонтируется автоматически.
Если есть вопросы, то пишем в комментариях в Телеграмм и ВК.
Ссылки в шапке страницы.
Заранее всем спасибо!!!
RSS
Если вы нашли ошибку, пожалуйста, выделите фрагмент текста и нажмите Ctrl+Enter.
Contents
- Introduction
- Prerequisites:
- Enable Name Resolution
- Install cifs-utils
-
Manual mounting from the command line
- Most basic mount command
- Unmounting
- Mount with read/write access
- Mount with authentication — next line
- Mount with authentication — same line
- Mount with authentication — file
-
FSTAB
- FSTAB with inline authentication
- FSTAB with file authentication
- If you need even more security
-
Troubleshooting
- Common mistakes
- Common error messages
Introduction
This document will cover how to connect to a Windows file share from the Linux command line on a single-user machine or a machine where all the users are ok with the other users having access to the mounted share. This method gives you considerably higher performance compared to the userland mounts that most GUI programs create. (just check out the benchmark at MountCifsFstabBenchmark) This method has been tested with Ubuntu 14.04 thru 20.04 and with Windows XP,7,10, and Server2019.
Prerequisites:
- A machine running Ubuntu 14.04 or newer
- A machine running Windows XP or newer
- The IP address or hostname of the Windows machine
- The name of the file share on the Windows machine
- A Windows username and password with permission to the file share
- root access to the Ubuntu machine. Pretty much every command on this page requires root.
Enable Name Resolution
This optional step requires Ubuntu 18.04 or newer and allows you to use the hostname of your windows machines instead of its IP address.
First, install winbind and libnss-winbind
apt install winbind libnss-winbind
then, edit nsswitch.conf and find the line that starts with «hosts» and add «wins» after «files»
nano /etc/nsswitch.conf
BEFORE: hosts: files mdns4_minimal [NOTFOUND=return] dns )
AFTER: hosts: files wins mdns4_minimal [NOTFOUND=return] dns ) restart the winbind service
systemctl restart winbind
Install cifs-utils
Ubuntu’s kernel has built-in support for mounting Windows file shares. It’s called the cifs kernel client, and it’s considerably faster than the mounts created by GUI programs such as nautilus and caja and thunar and some command line programs such as gio.
To be able to control the kernel’s cifs client, you’ll need to install cifs-utils:
apt install cifs-utils
Manual mounting from the command line
All of these commands require root permission, so let’s just start bash with root so we don’t have to type sudo on everything:
sudo bash
You’ll need to create a folder to host the mount point:
mkdir /mnt/share1
Most basic mount command
This command will only work if the windows machine as the “Turn OFF password protected sharing” option set.
Let’s start out with the most basic form of the mount command that actually works:
mount //win10/share1 /mnt/share1
When it asks for a password, don’t type one, just press enter. (replace “win10” with the hostname of your windows machine) (replace the first “share1” with the name of the file share on your windows machine) This command is actually all you need if the windows machine has the “Turn OFF password protected sharing” option set. You will have read/write permission to the share as long as you have root permissions in Linux. You will only have read-only access to the mount from GUI programs because GUI programs don’t normally run with root permission.
Unmounting
To UNmount it:
umount /mnt/share1
(notice it’s not unmount, it’s umount)
Mount with read/write access
In order to get read/write access to your mount from GUI programs or without root permissions, you’ll need to tell the kernel which Linux users are allowed to have read/write access to the mount. If you want ALL Linux users to have read/write access to the mount, you’ll want to use the noperm option, like this:
mount -o noperm //win10/share1 /mnt/share1
When it asks for a password, don’t type one, just press enter. -o means mount options are specified next noperm means “client does not do permission check”, which is going to get you read/write access to the mount replace “win10” with the hostname of your windows machine replace the first “share1” with the name of the file share on your windows machine
Mount with authentication — next line
Now let’s assume the windows machine has the “Turn ON password protected sharing” option set, so you will need to specify a windows username and password to access the share.
mount -o noperm,username=john,domain=domain1 //win10/share1 /mnt/share1
When it asks for a password, enter the windows password that goes with the windows account.
-o means mount options are specified next
noperm means “client does not do permission check”
replace “john” with the windows username. The windows machine will need to have an account matching this username, and this account needs to have permissions to the file share
replace “domain1” with the name of your active directory domain. If you don’t know what an active directory domain is, you don’t have one, so just leave this option blank or remove it.
replace “win10” with the hostname of your windows machine
replace the first “share1” with the name of the file share on your windows machine
Mount with authentication — same line
Let’s take it one step future and specify the password on the command line too so we don’t have to type it. This could be useful for scripts, but…
SECURITY WARNING: Keep in mind that anybody that has permissions to read the script file will be able to see your windows account password. The password would also be visible briefly in the output of the ps command or any command that shows a list of processes, and even non-root Linux users can see this list. Any program that logs commands would also log the password, including bash’s .history file which is enabled be default.
mount -o noperm,username=john,password=123,domain=domain1 //win10/share1 /mnt/share1
-o means mount options are specified next
noperm means “client does not do permission check”
replace “john” with the windows username. The windows machine will need to have an account matching this username, and this account needs to have permissions to the file share
replace “123” with the windows password
replace “domain1” with the name of your active directory domain. If you don’t know what an active directory domain is, you don’t have one, so just leave this option blank or remove it.
replace “win10” with the hostname of your windows machine
replace the first “share1” with the name of the file share on your windows machine
Mount with authentication — file
If you don’t like having those security risks, you can put the windows username and password in a separate file, and make that file readable only by root:
mount -o noperm,credentials=/root/creds.txt //win10/share1 /mnt/share1
-o means mount options are specified next
noperm means “client does not do permission check”
replace “/root/creds.txt” with the file that contains the windows username/password
replace “win10” with the hostname of your windows machine
replace the first “share1” with the name of the file share on your windows machine
Now we need to create our creds.txt file
nano /root/creds.txt
username=john
password=123
domain=domain1
replace “john” with the windows username. The windows machine will need to have an account matching this username, and this account needs to have permissions to the file share
replace “123” with the windows password
replace “domain1” with the name of your active directory domain. If you don’t know what an active directory domain is, you don’t have one, so just leave this option blank or remove it.
You can make it readable only by root:
chmod 600 /root/creds.txt
FSTAB
If you want to have persistent mounts, so that the mounts get mounted automatically at boot time, you can use the fstab file.
nano /etc/fstab
If the windows machine has the “Turn OFF password protected sharing” option set, and you want all Linux users to have read/write permissions to the share, add this line to the bottom of the fstab file:
//win10/share1 /mnt/share1 cifs noperm,_netdev 0 0
replace “win10” with the hostname of your windows machine
replace the first “share1” with the name of the file share on your windows machine
cifs tells the kernel to use mount.cifs as opposed to ext3 or ntfs or some other type of file system
noperm means “client does not do permission check”. This is required for read/write permissions from non-root linux users. You can safely remove this option if you only want root to have read/write and other users will have read-only
_netdev will cause the kernel to wait on the network to become ready before attempting the mount. Without this option, the mount will probably fail during boot because the network won’t be ready yet
the 2 zeros tell the kernel we don’t want to dump or check the filesystem
Now you can mount and unmount with very simple commands:
mount /mnt/share1
umount /mnt/share1
(you’ll need to be root though, unless you want to adjust your sudoers file to allow non-root users to have this ability)
FSTAB with inline authentication
Now let’s assume the windows machine has the “Turn ON password protected sharing” option set, so you will need to specify a windows username and password to access the share. SECURITY WARNING: Keep in mind that anybody that has permissions to read the fstab file will be able to see your windows account password, and the fstab file is readable by all Linux users by default!
//win10/share1 /mnt/share1 cifs noperm,_netdev,username=john,password=123,domain=domain1 0 0
replace “win10” with the hostname of your windows machine
replace the first “share1” with the name of the file share on your windows machine
cifs tells the kernel to use mount.cifs as opposed to ext3 or ntfs or some other type of file system
noperm means “client does not do permission check”. This is required for read/write permissions from non-root Linux users. You can safely remove this option if you only want root to have read/write and other users will have read-only
_netdev will cause the kernel to wait on the network to become ready before attempting the mount. Without this option, the mount will probably fail during boot because the network won’t be ready yet
replace “john” with the windows username. The windows machine will need to have an account matching this username, and this account needs to have permissions to the file share
replace “123” with the windows password
replace “domain1” with the name of your active directory domain. If you don’t know what an active directory domain is, you don’t have one, so just leave this option blank or remove it.
the 2 zeros tell the kernel we don’t want to dump or check the filesystem
FSTAB with file authentication
If you aren’t cool with all linux users being able to see your windows password, or you don’t want programs you run without root to be able to see your windows username and password, you can put the windows username and password in a separate file, and make that file readable only by root:
//win10/share1 /mnt/share1 cifs noperm,_netdev, credentials=/root/creds.txt 0 0
replace “win10” with the hostname of your windows machine)
replace the first “share1” with the name of the file share on your windows machine)
cifs tells the kernel to use mount.cifs as opposed to ext3 or ntfs or some other type of file system)
noperm means “client does not do permission check”. This is required for read/write permissions from non-root Linux users. You can safely remove this option if you only want root to have read/write and other users will have read-only)
_netdev will cause the kernel to wait on the network to become ready before attempting the mount. Without this option, the mount will probably fail during boot because the network won’t be ready yet)
replace “/root/creds.txt” with the file that contains the windows username/password) (the 2 zeros tell the kernel we don’t want to dump or check the filesystem)
Now we need to create our creds.txt file:
nano /root/creds.txt
username=john
password=123
domain=domain1
replace “john” with the windows username. The windows machine will need to have an account matching this username, and this account needs to have permissions to the file share replace “123” with the windows password replace “domain1” with the name of your active directory domain. If you don’t know what an active directory domain is, you don’t have one, so just leave this option blank or remove it. You can make it readable only by root:
chmod 600 /root/creds.txt
If you need even more security
This should cover the majority of home and business use cases. In more complex business environments, you might need to setup a mount that some users have read-only access to, and other users have full read/write, and other users have no access at all. The usermode fuse cifs client (which is what gui programs like natulus and caja use) is the easy answer to this, but there is a huge performance penalty. If you need fancy permissions AND speed, check out the MountCifsFstabSecurely page.
Troubleshooting
— If you are having a problem with the FSTAB method, try the manual mounting method and you will likely discover your problem.
— If you have access to another windows computer, see if it will mount the fileshare properly.
— Check the kernel log after you get a mount error to see if it logged a more useful error message:
dmesg
Ignore the white messages. Only the red messages are relevant. Search the internet for these error message(s)
Common mistakes
— Don’t use backslashes in the windows unc paths, always use forward slashes
- Incorrect: \\win10\share1 Correct: //win10/share1
— Don’t put spaces in the credentials options.
- Incorrect: username = john Correct: username=john
— If your windows password has special characters in it, like spaces or symbols, you might need special escape codes to make Linux read the password properly.
Common error messages
— mount: /mnt/share1: cannot mount //win10/share1 read-only.
- You need to install cif-utils
— mount error: could not resolve address for …: Unknown error
-
You need to Enable Name Resolution (see section above)
— mount error(2): No such file or directory
- The windows machine couldn’t be found. Can you ping it? OR the share name isn’t valid. Try this command to see if you can see the list of shares:
apt install smbclient
smbclient -L \\win10 -U john
— mount error(13): Permission denied
- Your windows username or password isn’t being accepted by the windows machine. Check the windows account to make sure “force user to change password on next login” isn’t on, and make sure “disable account” is off.
— mount error(112): Host is down
- You are probably using Ubuntu 16.04 or older with Windows 10 or newer. You can make your mount work by adding «vers=3.0» to the options.
— The mount command appears to hang when mounting a share on a Windows XP or older computer and smbclient throws «protocol negotiation failed: NT_STATUS_IO_TIMEOUT».
- You can make your mount work by adding «vers=1.0» to the options.
CIFS (Common Internet File System) – это популярный протокол обмена файлами в Интернете. Этот протокол и позволит пользователям ОС Linux получить доступ к общей папке Windows.
CIFS – это реализация SMB (Server Message Block) – протокола, используемого для совместного использования сетевых файлов. Но он устарел.
В этой статье мы по шагам пройдем все этапы установки и настройки CIFS, чтобы подключиться к сетевому ресурсу Windows на ОС Linux.
Установка CIFS
Сейчас мы установим пакет cifs-utils на Ubuntu Linux (точно так же можно сделать на всех Debain-подобных ОС).
$ sudo apt-get update
$ sudo apt-get install cifs-utils
Монтируем Windows Share (сетевой ресурс)
Сейчас мы разберем на примерах, как монтировать общую папку Windows вручную и автоматически.
Создадим на нашем Linux директорию, к которой мы будем монтировать сетевой ресурс. Назовем ее myshare и расположена она будет в каталоге /mnt
$ sudo mkdir /mnt/myshare
Сетевой ресурс (шара) Windows может быть примонтирован к ОС Ubuntu или Debian с помощью следующей команды:
$ sudo mount -t cifs -o username=user,password=Passw0rd //WINDOWS_HOST_IP/share /mnt/myshare
Где:
WIN_HOST_IP – это IP адрес хоста Windows, на котором расположена общая папка
share – имя сетевого ресурса
user – наш пользователь и Passw0rd – пароль с которыми мы подключемся к шаре.
Если пользователь доменный, то необходимо в опциях (-o) указать домен.
$ sudo mount -t cifs -o username=user,password=Passw0rd,domain=domain_name //WIN_HOST_IP/share /mnt/myshare
По-умолчанию сетевой ресурс монтируется с полными правами (rwx или 777). Если Вы хотите установить иные права, используйте опции dir_mode и file_mode.
$ sudo mount -t cifs -o username=user,password=Passw0rd,dir_mode=0755,file_mode=0755 //WIN_HOST_IP/share /mnt/myshare
Так же Вы можете установить владельцев uid (id пользователя) и gid (id группы).
$ sudo mount -t cifs -o username=user,password=Passw0rd,uid=1000,gid=1000,dir_mode=0755,file_mode=0755 //WIN_HOST_IP/share /mnt/myshare
Если после выполнения предыдущих команд Вы не получили никаких ошибок, то можете с помощью команды df -h убедиться, что сетевой ресурс успешно примонтирован к нашему ПК на Linux. В примере WIN_HOST_IP = 192.168.1.100 и имя общей папки share
$ df -h
Filesystem                 Size  Used Avail Use% Mounted on
udev                       3,9G     0  3,9G   0% /dev
tmpfs                      787M  2,2M  785M   1% /run
/dev/sda2                  450G   23G  405G   6% /
tmpfs                      3,9G  705M  3,2G  18% /dev/shm
tmpfs                      5,0M  4,0K  5,0M   1% /run/lock
tmpfs                      3,9G     0  3,9G   0% /sys/fs/cgroup
//192.168.1.100/share  1000G  108G  82G   11% /mnt/myshare
Безопасность учетных данных при монтировании через CIFS
В этом разделе опишем, как лучше всего передавать учетные данные (имя пользователя, пароль, домен) при монтировании сетевого ресурса к ОС на базе Линукс.
Создайте файл с учетными данными для cifs: /etc/cifs-credentials
Внутрь поместите следующее содержимое:
username=user
password=Passw0rd
domain=domain_name
Задайте права для этого файла:
$ sudo chmod +rw /etc/cifs-credentials
Теперь мы можем подключить общую папку такой командой:
$ sudo mount -t cifs -o credentials=/etc/cifs-credentials //WIN_HOST_IP/share /mnt/myshare
В примерах выше, после того, как Вы перезагрузите свой ПК, сетевой ресурс не примонтируется. Поэтому сделаем так, чтобы шара подключалась автоматически. В Linux это делается через файл /etc/fstab. Откройте этот файл любимым редактором.
$ sudo vim /etc/fstab
И добавьте такую строку:
//WIN_HOST_IP/share /mnt/myshare cifs credentials=/etc/cifs-credentials,file_mode=0755,dir_mode=0755 0 0
Следующей командой запустим монтирование всех точек, описанных в /etc/fstab
$ sudo mount -a
Теперь наш удаленный сетевой ресурс будет доступен даже после перезагрузки.
Как размонтировать общую папку CIFS
Размонтирование производится таким же способом, как и обычно мы жто делаем с дисками:
$ sudo umount /mnt/myshare
Часто бывает так, что сетевой ресурс занят каким-то процессом и тогда Вы получите ошибку при попытке размонтирования, тогда запустите команду с ключем -l (–lazy)
$ sudo umount -t cifs -l /mnt/myshare
Итог
Итак, в этой статье мы рассмотрели, как быстро примонтировать удаленную сетевую папку, которая находится на хосте с Windows, к нашему хосту на Linux с помощью CIFS. Если у Вас остались какие-либо вопросы, пожалуйста, пишите в комментариях.