В этой статье мы рассмотрим, как в Linux смонтировать общую сетевую папку, расположенную на хосте Windows. В Windows для доступа к общим сетевым папкам используется протокол SMB (Server Message Block), который ранее назывался CIFS (Сommon Internet File System). В Linux для доступа к сетевым папкам Windows по протоколу SMB можно использовать клиент cifs-utils или Samba.
- Смонтировать сетевую папку в Linux с помощью cifs-util
- Автоматическое монтирование сетевой папки в Linux
- Linux: подключиться к сетевой папке с помощью клиента samba
Содержание:
Совет. Для доступа к сетевым папкам по SMB/CIFS используется порт TCP/445. Для разрешения имени используются порты UDP 137, 138 и TCP 139. Если эти порты закрыты, вы сможете подключиться к сетевой папке Windows только по IP адресу.
Смонтировать сетевую папку в Linux с помощью cifs-util
Вы можете смонтировать сетевую папку, находящуюся на Windows хосте, с помощью утилит из пакета cifs-util. Для установки пакета выполните команду:
- В Ubuntu/Debian:
$ sudo apt-get install cifs-utils - В CentOS/Oracle/RHEL:
$ sudo dnf install cifs-utils
Создайте точку монтирования:
$ sudo mkdir /mnt/share
Теперь вы можете смонтировать сетевую папку с компьютера Windows под пользователем User03с помощью команды:
$ sudo mount.cifs //192.168.31.33/backup /mnt/share -o user=User03
Укажите пароль пользователя Windows для подключения к сетевой папке.
![]()
При подключении сетевой SMB папки можно задать дополнительные параметры:
$ sudo mount -t cifs -o username=User03,password=PasswOrd1,uid=1000,iocharset=utf8 //192.168.31.33/backup /mnt/share
- //192.168.31.33/backup – сетевая папка Windows
- /mnt/share – точка монтирования
- -t cifs – указать файловую систему для монтирования
- -o опции монтирования (эту опцию можно использовать только с правами root, поэтому в команде используется sudo)
- username=User03,password=PasswOrd1 – имя и пароль пользователя Windows, у которого есть права доступа к сетевой папке. Можно указать имя пользователя guest, если разрешен анонимный доступ к сетевой папке
- iocharset=utf8 – включить поддержку кодировки UTF8 для отображения имен файлов
- uid=1000 – использовать этого пользователя Linux в качестве владельца файлов в папке

По умолчанию шары Windows монтируются в Linux с полными правами (0755). Если вы хотите изменить права по-умолчанию при монтировании, добавьте в команду опции:
dir_mode=0755,file_mode=0755
Если вы хотите использовать имя компьютера при подключении сетевого каталога Windows, добавьте в файл /etc/hosts строку:
IP_АДРЕС ИМЯ_КОМПЬЮТЕРА
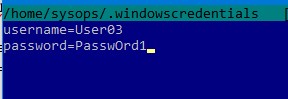
Чтобы не указывать учетные данные пользователя Windows в команде монтирования сетевой папки, их можно сохранить в файле.
Например:
$ mcedit ~/.windowscredentials
Добавьте в файл:
username=User03
password=PasswOrd1
Для подключения к папке под анонимным пользователем:
username=guest
password=
Если нужно указать учетную запись пользователя из определенного домена Active Directory, добавьте в файл третью строку:
domain = vmblog.ru
Измените права на файл:
$ chmod 600 ~/.windowscredentials
Теперь при подключении сетевой папки вместо явного указания имени пользователя и пароля можно указать путь к файлу:
$ sudo mount -t cifs -o credentials=/home/sysops/.windowscredentials,uid=1000,iocharset=utf8 //192.168.31.33/backup /mnt/share
Отмонтировать сетевую SMB папку:
$ sudo umount /mnt/share
Автоматическое монтирование сетевой папки в Linux
Можно настроить автоматическое монтирование сетевой папки Windows через /etc/fstab.
$ sudo mcedit /etc/fstab
Добавьте в файл следующую строку подключения SMB каталога:
//192.168.31.33/backup /mnt/share cifs user,rw,credentials=/home/sysops/.windowscredentials,iocharset=utf8,nofail,_netdev 0 0
- rw – смонтировать SBM папку на чтение и запись
- nofail – продолжить загрузку ОС если не удается смонтировать файловую систему
- _netdev – указывает что подключается файловая система по сети. Linux не будет монтировать такие файловые системы пока на хосте не будет инициализирована сеть.
Вы можете указать версию протокола SMB, которую нужно использовать для подключения (версия SMB 1.0 считается небезопасной и отключена по-умолчанию в современных версиях Windows). Добавьте в конец строки с настройками подключения параметр vers=3.0.
//192.168.31.33/backup /mnt/share cifs user,rw,credentials=/home/sysops/.windowscredentials,iocharset=utf8,nofail,_netdev,vers=3.0 0 0
Если на стороне хоста Windows используется несовместимая (старая версия) SMB, при подключении появится ошибка:
mount error(112): Host is downилиmount error(95): Operation not supported
Чтобы сразу смонтировать сетевую папку, выполните:
$ mount -a
Linux: подключиться к сетевой папке с помощью клиента samba
Установите в Linux клиент samba:
- В Ubuntu/Debian:
$ sudo apt-get install smbclient - В CentOS/Oracle/RHEL:
# dnf install smbclient
Для вывода всех SMB ресурсов в локальной сети:
$ smbtree -N
Вывести список доступных SMB папок на удаленном хосте Windows:
smbclient -L //192.168.31.33 -N
Если в Windows запрещен анонимный доступ, появится ошибка:
session setup failed: NT_STATUS_ACCESS_DENIED
В этом случае нужно указать учетную запись пользователя Windows, которую нужно использовать для подключения:
smbclient -L //192.168.31.33 -U User03
Если нужно использовать учетную запись пользователя домена, добавьте опцию –W:
smbclient -L //192.168.31.33 -U User03 –W Domain

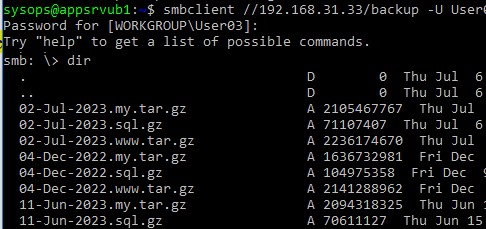
Для интерактивного подключения к сетевой папке Windows используется команда:
smbclient //192.168.31.33/backup -U User03 -W Domain
или
smbclient //192.168.31.33/backup -U User03
Для анонимного доступа:
smbclient //192.168.31.33/backup -U Everyone
После успешного входа появится приглашение:
smb: \>
Вывести список файлов в сетевой папке:
dir
Скачать файл из сетевой папки Windows:
get remotefile.txt /home/sysops/localfile.txt
Сохранить локальный файл из Linux в SMB каталог:
put /home/sysops/localfile.txt remotefile.txt
Можно последовательно выполнить несколько команд smbclient:
$ smbclient //192.168.31.33/backup -U User03 -c "cd MyFolder; get arcive.zip /mnt/backup/archive.zip"
Полный список команд в smbclient можно вывести с помощью команды help. Команды smbclient схожи с командами ftp клиента.
При использовании команды smbclient может появиться ошибка:
Unable to initialize messaging contextsmbclient: Can't load /etc/samba/smb.conf - run testparm to debug it.
Чтобы исправить ошибку, создайте файл /etc/samba/smb.conf.
Если на хосте Windows отключен протокол SMB 1.0, то при подключении с помощью smbclient появится ошибка:
Reconnecting with SMB1 for workgroup listing.
protocol negotiation failed: NT_STATUS_CONNECTION_RESET
Unable to connect with SMB1 -- no workgroup available.
Learn how to access Windows SMB shares on Ubuntu 22.04 in this comprehensive guide. With step-by-step instructions and clear explanations, this guide is perfect for beginners and experts alike.
Are you struggling to access Windows SMB shares on your Ubuntu 22.04 machine? Do you feel lost in the sea of technical jargon and complicated instructions? Fear not, as this comprehensive guide will walk you through the process step-by-step and make it as easy as possible for you to access Windows SMB shares on Ubuntu 22.04.
Introduction
Ubuntu 22.04 is a popular open-source operating system that has gained a lot of popularity in recent years. Many users are switching to Ubuntu from other operating systems like Windows and macOS. One of the common issues that Ubuntu users face is accessing Windows SMB shares on Ubuntu. This is especially important for those who work in a mixed environment where some machines are running Windows and others are running Ubuntu. In this guide, we will explore how to access Windows SMB shares on Ubuntu 22.04.
To access Windows SMB shares on Ubuntu 22.04, follow the steps below:
1. You can either SSH to your Ubuntu 22.04 Server or if you have a GUI version you can open the Terminal on your Ubuntu machine by pressing the Ctrl+Alt+T keys.
2. Install the cifs-utils package by running the following command:
sudo apt-get install cifs-utils
3. Create a folder where you want to mount the Windows SMB share. For example, you can create a folder named win_share in your home directory by running the following command:
4. Mount the Windows SMB share by running the following command:
sudo mount -t cifs //windows-machine-name/share-name ~/win_share -o username=windows-username,password=windows-password,domain=windows-domain
Replace windows-machine-name, share-name, windows-username, windows-password, and windows-domain with the appropriate values. You may also use the IP address of the Windows machine instead of the machine name.
For example, if the Windows machine name is mywinpc, the share name is myshare, the Windows username is myuser, the password is mypassword, and the domain is mydomain, the command will look like this:
sudo mount -t cifs //mywinpc/myshare ~/win_share -o username=myuser,password=mypassword,domain=mydomain
5. Once you have successfully mounted the Windows SMB share, you can access it like any other folder on your Ubuntu machine. You can copy files to and from the Windows SMB share and perform other file operations.
Why Can’t I Access Windows SMB Shares on Ubuntu 22.04?
If you are unable to access Windows SMB shares on Ubuntu 22.04, there could be several reasons for it. Here are some common reasons:
- Incorrect credentials: Make sure you are using the correct Windows username, password, and domain in the mount command.
- Firewall settings: Check if the firewall on the Windows machine is blocking access to the SMB share.
- Network connectivity: Ensure that both the Ubuntu and Windows machines are on the same network and can communicate with each other.
- SMB version: Make sure that the Windows SMB share is using a version of SMB that is supported by your Ubuntu machine.
FAQs
Q1. What is SMB?
SMB stands for Server Message Block and is a protocol used for sharing files, printers, and other resources of a network. It is commonly used in Windows-based networks.
Q2. What is cifs-utils?
cifs-utils is a package in Ubuntu that provides utilities for mounting and managing SMB shares.
Q3. Can I mount multiple SMB shares on Ubuntu 22.04?
Yes, you can mount multiple SMB shares on Ubuntu 22.04. You just need to create different folders for each share and use a different mount command for each share.
Q4. Can I access Windows SMB shares without using the Terminal?
Yes, you can access Windows SMB shares without using the Terminal by using the Files application. Open the Files application and click on Other Locations. In the Connect to Server dialog, enter the address of the SMB share in the format smb://windows-machine-name/share-name and click Connect.
Q5. How do I unmount a Windows SMB share in Ubuntu 22.04?
To unmount a Windows SMB share in Ubuntu 22.04, use the following command:
sudo umount /path/to/mount/folder
Replace /path/to/mount/folder with the actual path to the folder where the Windows SMB share is mounted.
Q6. How do I make the Windows SMB share mount automatically on startup?
To make the Windows SMB share mount automatically on startup, you need to add an entry to the /etc/fstab file. Open the /etc/fstab file in a text editor and add the following line at the end of the file:
//windows-machine-name/share-name /path/to/mount/folder cifs username=windows-username,password=windows-password,domain=windows-domain 0 0
Replace windows-machine-name, share-name, windows-username, windows-password, windows-domain, and /path/to/mount/folder with the appropriate values. Save the file and reboot your Ubuntu machine.
Conclusion
Accessing Windows SMB shares on Ubuntu 22.04 may seem daunting at first, but with the right instructions and a little patience, it can be a breeze. In this guide, we have walked you through the steps required to access Windows SMB shares on Ubuntu 22.04, as well as provided some common troubleshooting tips. With this knowledge, you can now work seamlessly in a mixed environment with both Windows and Ubuntu machines.
Remember, the key to success is to take it one step at a time, and don’t be afraid to ask for help if you need it. Now, go ahead and access those Windows SMB shares on your Ubuntu 22.04 machine!
I hope this article was helpful, if you have any questions, please feel free to contact me. If you would like to be notified of when I create a new post you can subscribe to my blog alert.
On 18.04, I have just had success with the following:
On Ubuntu:
Install smbclient and add client max protocol = NT1 to /etc/samba/smb.conf as per L.D. James’ answer (see this post for more info).
On Windows: Create a folder in Windows to share, e.g. named shared.
Make sure the folder is shared: I created a new user on Windows, keeping the NewUser name and selected a simple password (I first tried changing the name, but found that change was apparently only skin deep. Perhaps if I had rebooted…). I logged in with NewUser, then logged back in with my admin account. I activated network sharing on my private network and for the folder specifically (see e.g. this post). Then I right clicked the folder and chose Give access to..., choosing NewUser (you may want additional permissions: see the just linked to post). Under the Sharing tab, the folder now has a network path: //COMPUTERNAME/shared.
Still on Windows:
To gain access to the shared folder, I used the IP of the Windows machine instead of the COMPUTERNAME, cf. this.
To find the IP of your Windows machine, right click the network logo, open Network and Sharing Settings and choose Change connection properties. Take note of the IPv4 near the bottom.
In Ubuntu:
Finally, open a terminal on you Ubuntu machine and execute
sudo mount -t cifs -o username=NewUser //[insert IPv4 here]/shared /home/your_ubuntu_username/shared
and provide the password for NewUser when prompted.
This mounts the shared Windows shared folder as a folder shared in your Ubuntu user’s home directory.
The command is based on suggestions from here, where there are also suggestions for storing login credentials.
I hope it works. Good luck!
У вас дома есть несколько устройств? Нужно ли использовать флэш-диск или SD-карту для переноса данных с Ubuntu на другой компьютер? Находите ли вы это раздражающим? Мы знаем, что это так. Поэтому мы не хотим, чтобы вы тратили свое драгоценное время, в то время как вы можете передавать свои файлы, документы и другие большие вещи быстро и легко, по локальной сети. Это одноразовая настройка, а затем с помощью нескольких щелчков мыши вы сможете обмениваться файлами между Ubuntu и Windows или любой другой системой Linux. И не волнуйтесь, это легко и займет всего немного времени.
Также стоит добавить, что это руководство должно быть полезно для любой версии ОС Linux.
Если вы используете Ubuntu, есть два способа поделиться своими локальными файлами по локальной сети, чтобы получить доступ к ним с Windows или других компьютеров с Linux.
- Для всех, кто имеет доступ к локальной сети, без пароля. Не совсем безопасный способ, но некоторым он действительно нужен, например, если необходимо очень быстро открыть доступ и времени на настройку ограниченного доступа нет.
- С паролем, защищающим папки для ограниченного доступа. Этот способ наиболее рекомендуем для всех, кто предпочитает конфиденциальность при передаче данных в локальной сети, поскольку доступ будет открыт только для ограниченного круга людей.
Мы рассмотрим оба метода в этой статье и дадим вам возможность решить, какой из них вы предпочитаете использовать.
Метод 1. Общий доступ к папкам в локальной сети без пароля
Вам придется выполнить некоторые настройки как в Windows, так и в Ubuntu.
Разрешение на совместное использование в Убунту
Чтобы предоставить общий доступ к папке в локальной сети в Ubuntu, щелкните правой кнопкой мыши нужную папку и выберите Локальный сетевой ресурс:

Не видите опцию локального сетевого ресурса?
Когда вы нажимаете на Локальный сетевой ресурс, вы увидите опцию общего доступа к папке. Просто отметьте опцию Общий доступ к этой папке:

Поиск и устранение неисправностей: Если у вас появится сообщение о том, что служба Sharing service не устанавливается, как показано на скриншоте ниже, просто нажмите кнопку Установить службу и следуйте инструкциям.

Когда вы отметите опцию Общий доступ к этой папке, вы увидите опцию Создать общий доступ, доступную для вас. Вы также можете разрешить другим пользователям редактировать файлы в общей папке. Также можно отметить опцию гостевого доступа.

Вы увидите, что значок папки был изменен, чтобы показать, что она была совместно использована. Чтобы остановить общий доступ к папке, просто снимите флажок Общий доступ к этой папке.
Теперь нужно получить доступ к общей папке на машине Windows.
Шаг 2: Включение совместного доступа в Windows
В Windows щелкните правой кнопкой мыши на «Этот Компьютер» или «Мой компьютер» и выберите «Добавить новое соединение».

Нажмите на кнопку «Далее».

Теперь пришло время ввести адрес сервера и имя папки, к которой мы предоставили общий доступ. Пожалуйста, введите в следующем формате.
Вы можете найти адрес вашего сервера, т.е. IP-адрес машины с Linux, введя команду ip a.
В моем случае IP-адрес машины с Linux равен 192.168.0.102, а папка, к которой я предоставил общий доступ, является общей.

Теперь добавьте местоположение следующим образом:

Теперь вы увидите этот экран, просто щелкните дальше.

Теперь вы можете получить доступ к общей папке в разделе «Этот ПК» или «Мой компьютер» в разделе «Сетевое расположение».

Это был простой способ. Он обеспечивает доступ к этим файлам любому человеку в вашей локальной сети.
По-хорошему вы должны предусмотреть это. Устройства в домашней сети должны быть общеизвестными. Но так может быть не всегда. Что, если вы хотите, чтобы к ним имели доступ только определенные люди?
Вот здесь и появляется Samba-сервер. Рассмотрим его во второй части урока.
2. Общий доступ к папкам в локальной сети в Ubuntu с помощью парольной защиты
Для этого нам необходимо настроить сервер Samba. На самом деле, мы использовали Samba в предыдущей части этого руководства. Мы просто не делали на этом акцент. Прежде чем мы перейдем к рассмотрению вопроса о том, как настроить Samba-сервер для совместного использования локальной сети в Ubuntu, давайте сначала посмотрим, чем на самом деле является Samba.
Что такое Самба?
Samba — это пакет программного обеспечения, позволяющий обмениваться файлами, документами и принтерами по сети, независимо от того, используете ли вы Linux, Windows и Mac. Он доступен для всех основных платформ и может отлично работать на них всех. Цитирование из Википедии:
Samba — пакет программ, которые позволяют обращаться к сетевым дискам и принтерам на различных операционных системах по протоколуSMB/CIFS. Имеет клиентскую и серверную части. Является свободным программным обеспечением, выпущена под лицензией GPL.
Инсталляция сервера Samba на Ubuntu
Вы можете легко установить Samba на свою систему. Перед установкой обновите систему, чтобы можно было установить любые доступные обновления.
sudo apt-get update && sudo apt-get upgradeТеперь установите Samba server и несколько других необходимых вещей с помощью следующей команды:
sudo apt-get install samba samba-common system-config-samba python-glade2После установки сервера Samba пришло время настроить Samba из окна графического интерфейса на общий доступ к файлам.
Настройка сервера Samba в Ubuntu
Откройте инструмент Samba Configuration из тире:

Перейдите в Параметры -> Настройки сервера. Хотя настройки по умолчанию хороши и могут быть такими же, как вам нужно. Но в некоторых случаях вам может понадобиться внести изменения.
В Параметрах сервера у вас есть две вкладки, ‘Basic’ и ‘Security’. В закладке Basic у вас есть следующие опции:
- Рабочая группа — это название рабочей группы компьютера, к которому вы хотите подключиться. Например, если вы хотите подключиться к компьютеру с Windows, то введете имя рабочей группы компьютера с Windows, а в Windows у вас уже есть то же имя рабочей группы, которое установлено по умолчанию в Настройках сервера Samba. Но если у вас другое имя рабочей группы в Windows, то вы введете его в это поле. (В Windows 7, чтобы получить имя рабочей группы, щелкните правой кнопкой мыши значок Этот компьютер и перейдите в Свойства, там вы увидите имя рабочей группы Windows).
- Описание — Это название вашего компьютера, как его видят другие. Не используйте пробелы или неинтернет-доброжелательные символы.

Разрешение ‘Гости’ не рекомендуется, поэтому нет причин изменять настройки безопасности. Оставьте все как есть.

Готово! Вы установили Samba-сервер. Мы недалеко от того, чтобы поделиться нашей первой папкой в сети.
Создание системного пользователя для совместного использования файлов в сети
Теперь мы создадим системного пользователя для совместного использования файлов в сети. Это очень просто.
- Перейдите в раздел «Системные настройки».
- В разделе Системные настройки нажмите Учетные записи пользователей.
- Нажмите кнопку разблокировки, чтобы включить значок +.
- Нажмите значок + (плюс), чтобы создать нового пользователя системы.

Теперь, как вы видите на изображении выше, вы можете ввести «Полное имя». При вводе ‘Полное имя’ Имя пользователя будет автоматически воспринято как ‘Полное имя’. Потому что мы создаем этого пользователя для совместного использования файлов, поэтому мы назначим тип аккаунта ‘Стандартный’.
Выполнили шаги, описанные выше? Идем дальше. Нажмите «Добавить».
Вы создали пользователя системы. Пользователь еще не активирован, поэтому мы активируем его, установив пароль для этой учетной записи. Убедитесь, что панель учетных записей пользователей разблокирована. Нажмите Аккаунт отключен и введите новый пароль, затем подтвердите пароль и нажмите Изменить.

Отлично! Мы установили и настроили Samba, мы создали системного пользователя для обмена файлами в сети с этой учетной записи, и мы активировали нашу только что созданную учетную запись. Теперь мы перейдем на Samba для последнего шага настройки общего доступа, затем мы предоставим общий доступ к папке.
Добавление нового пользователя Samba
Откройте Samba и нажмите Samba Users в разделе Preferences (Предпочтения). Заполните простую форму. Вот пара подробностей о полях формы:
Unix Username — В данном случае я выбираю пользователя, которого только что создал.
Имя пользователя Windows — Вы вводите это имя пользователя при доступе из компьютера на Windows
Samba Password — Вы введете этот пароль, когда захотите иметь доступ из компьютера на Windows.

После того, как вы закончите, нажмите OK. Теперь сделайте глубокий вдох. Вы успешно создали сеть с помощью Samba. Теперь перезапустите сеть или службы Samba и будьте готовы к обмену файлами с другими компьютерами.
sudo restart smbd && sudo restart nmbdОбщий доступ к папкам или файлам по сети
Обмениваться файлами с Samba очень просто с помощью графического интерфейса пользователя. Нажмите на иконку «Плюс» в Samba и вы получите такой диалог:

Заполните поля. В ‘Directory’ выберите папку, к которой вы хотите предоставить общий доступ. Здесь вы найдете подробную информацию о полях, которые увидите:
- Share name — это имя папки, которую увидит другой пользователь.
- Description простое описание содержимого, к которому вы предоставляете общий доступ в сети.
- Writable. Общие папки по умолчанию ‘только для чтения’. Вы можете установить их в режим «writable», если хотите, чтобы другие пользователи в сети изменили их.
- Visible. Как следует из названия, когда вы нажимаете Visible, общая папка будет видна людям в сети.
Теперь вы можете установить разрешения для папки, к которой вы предоставляете общий доступ. Для этого перейдите на вкладку «Доступ» и отметьте пользователей, которым вы хотите предоставить общий доступ к папке. Когда вы выберете Разрешить доступ всем, папка будет доступна всем в сети.

Наконец, нажмите OK для завершения обмена. Теперь папка открыта всем желающим. Вы завершили предоставление общего доступа к папке в сети. И все? Да! А как удалить папки из сети?
Удаление общих папок
Нам также иногда нужно будет удалить некоторые папки через некоторое время из сети. Это очень просто, и вот как мы можем это сделать.

Готово! Мы также можем обмениваться файлами по сети с помощью терминала, но это настраивается не так просто, как это было в графическом интерфейсе. Если вы зададите вопросы по доступу к файлам из командной строки, то я напишу учебное пособие о том, как обмениваться файлами по сети с помощью терминала в Linux.
Итак, как вам небольшое руководство о том, как делиться файлами по локальной сети в Linux? Я надеюсь, что с помощью него вы сможете легко обмениваться файлами между Ubuntu и Windows. Если у вас есть вопросы или предложения, не стесняйтесь задавать их в поле для комментариев ниже.
The ability to access shared folders with Ubuntu enables you to interact with files and folders stored on a remote machine. Ubuntu offers you different methods to retrieve files, transfer data or collaborate with another operating system such as Windows. In this article, I will explore different approaches on how to access shared folder in Ubuntu and have a seamless sharing experience.
Key Takeaways
- Learning how to use a graphical interface for accessing folders.
- Knowing how to use commands to access shared folders.
- Understanding the difference between cifs-utils and smbclient.
Requirements
- User must have sudo/root privilege.
- User must have a text editor.
Process Flow Chart
[Distro Used Throughout the Tutorial: Ubuntu 22.04.02 LTS]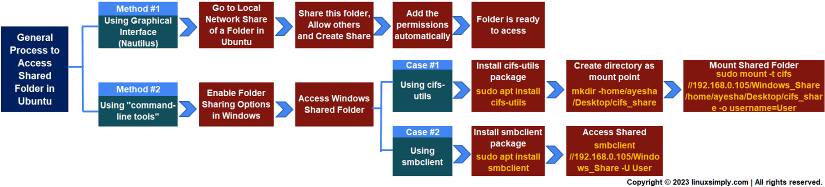
Watch 2 Methods to Access Shared Folder in Ubuntu
With the help of a graphical interface or command line tools, accessing shared files has become incredibly convenient. I have shown here two different approaches to accomplish this task. So, regardless of your expertise in Ubuntu, you can now easily manage files with Ubuntu.
You can read our Comparative Analysis of Methods to distinguish among these three methods and choose the best one according to your need.
Method 01: Using Graphical Interface (Nautilus) to Access Shared Folder in Ubuntu
Nautilus is regarded as the official file manager for GNOME desktop environment or default desktop environment. It provides a graphical user interface (GUI) to navigate and manage files and folders in Ubuntu. In this method, my primary goal is to show you how to enable sharing of a folder created in Ubuntu and access it from both Ubuntu and Windows.
Steps to Follow >
➊ Power on Ubuntu.
➋ Choose a folder you want to share with other operating systems such as Windows. I have chosen the folder called Share in my Desktop for this purpose.
➌ Afterwards, right-click on Share folder and a popup menu will appear and click on Local Network Share.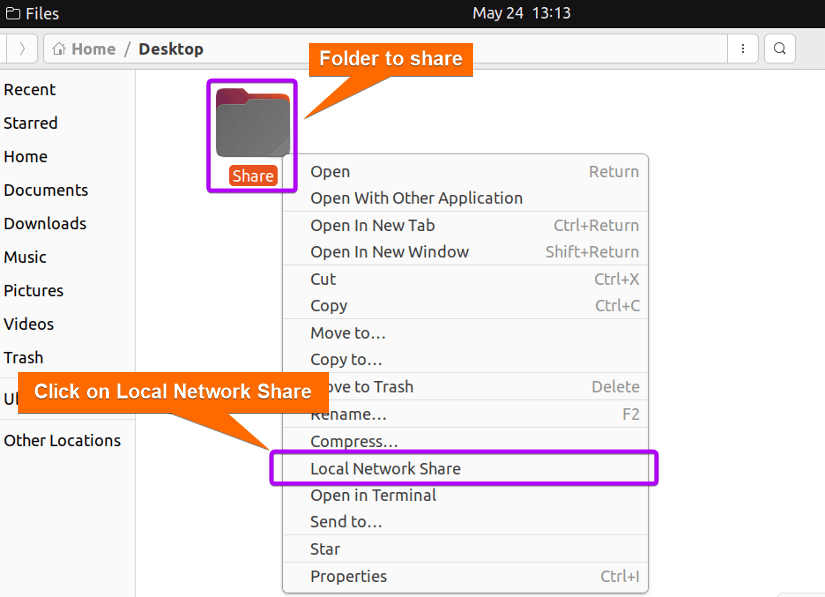 ➍ A dialogue box will appear on the screen as in the image below. Select Share this folder, Allow others to create and delete files in this folder, and then press Create Share.
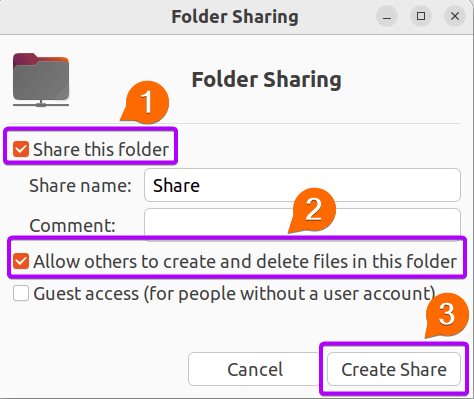 ➎ Now Nautilus will require you to press Add the permissions automatically to finally prepare the folder for sharing.
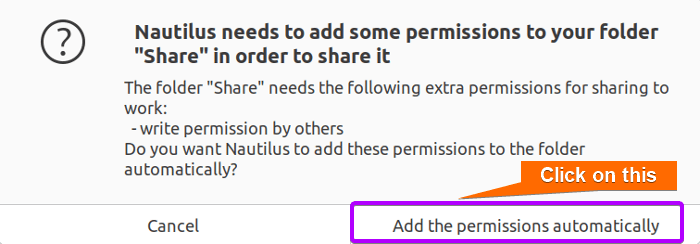 ➏ You will see that the folder Share is ready to access.
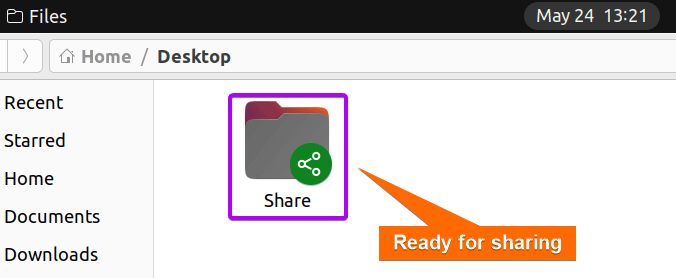 The green share icon at the bottom-right corner of the folder indicates that you can share this folder’s contents.
➐ Now you can create files in this folder. I have saved an image, Photos.jpeg and created a folder, Files to share within the Share directory.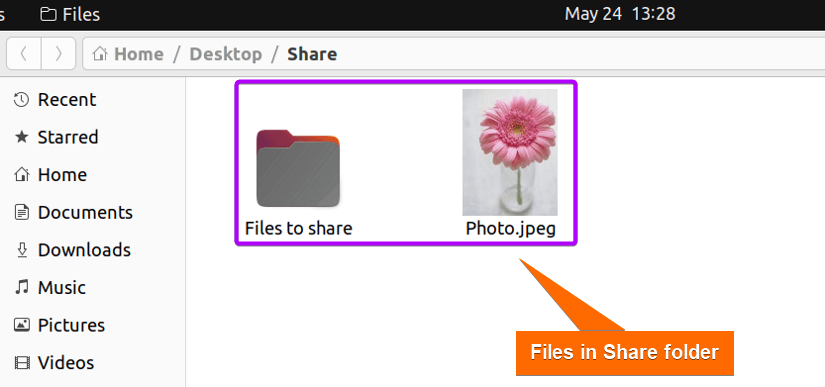 ➑ Now go to the Ubuntu terminal and run the following command.
hostname -IEXPLANATION
- hostname -I: Obtains IP address of the current Linux system.
 It is visible that 192.168.153.128 is the IP address of my Ubuntu system.
➒ Now go to This PC in Windows and type IP of your Linux system and name of folder, Share in the address box.
\\192.168.153.128\ShareEXPLANATION
- 168.153.128: IP address of Linux system.
- Share: Name of folder which needs to be accessed.
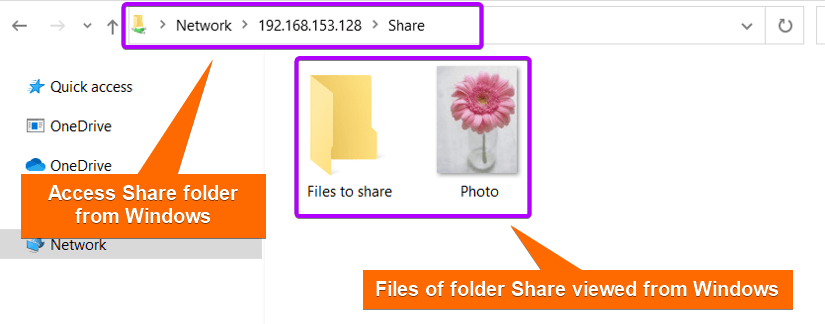
From the above image, it is clear that I can view the contents of the “Share” folder from Windows and have full control over these files.
Read More: Install, Configure and Connect Samba on Ubuntu Using GUI
Method 02: Using Ubuntu Command-line Tools to Access Shared Folder
If you want to have remote access over a network or customize command scripts according to your sharing requirements, command-line tools will be a perfect choice. The cifs-utils and smbclient packages are prominent command-line tools for this purpose. In this method, I will demonstrate to you how to handle folders that were originally created on Windows but are being accessed from Ubuntu.
Step 1: Enable Sharing Options in Windows
Before a folder can be accessed from a remote environment, it is necessary to enable sharing options in Windows.
Steps to Follow >
➊ Open Control Panel and go to Network and Internet > Network and Sharing Center.
➋ Click on Change advanced sharing settings at the left side of the page. ➌ Then, turn on network discovery, file and print sharing, and click Save changes.
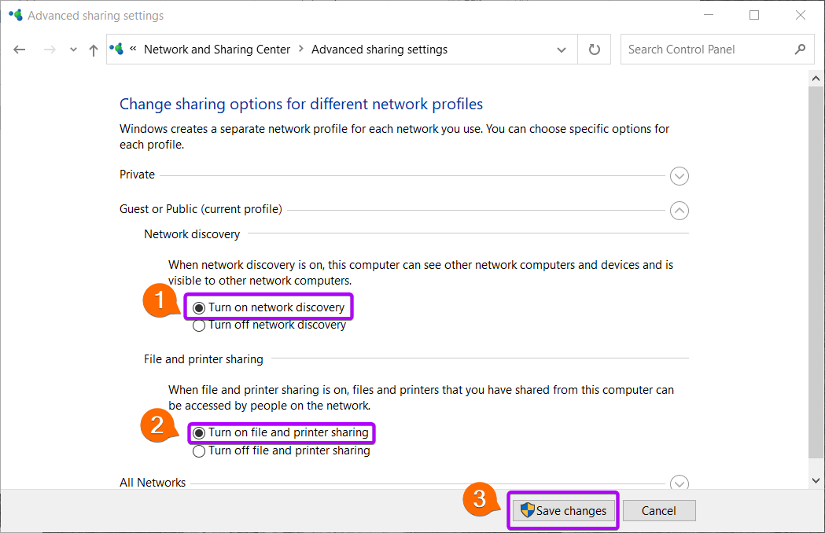
Read More: How to Share Files between Linux and Windows Dual Boot [3 Methods]
Step 2: Enable Sharing Options for a Folder in Windows
Subsequently, you have to activate the sharing settings of a folder in Windows. For this purpose, I used Windows_Share folder created on Windows. You can either create a fresh folder similar to mine or use a preexisting one.
Steps to Follow >
➊ I have created a folder called Windows_Share on Windows and saved a file named Document in it.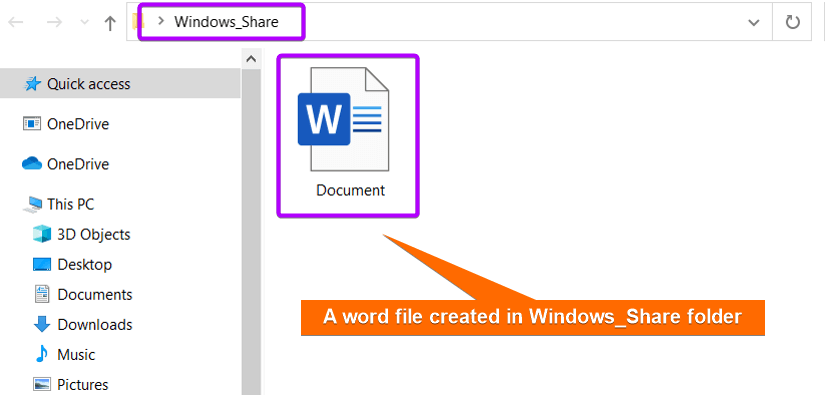 ➋ Afterwards, right-click on Windows_Share and go to Properties.
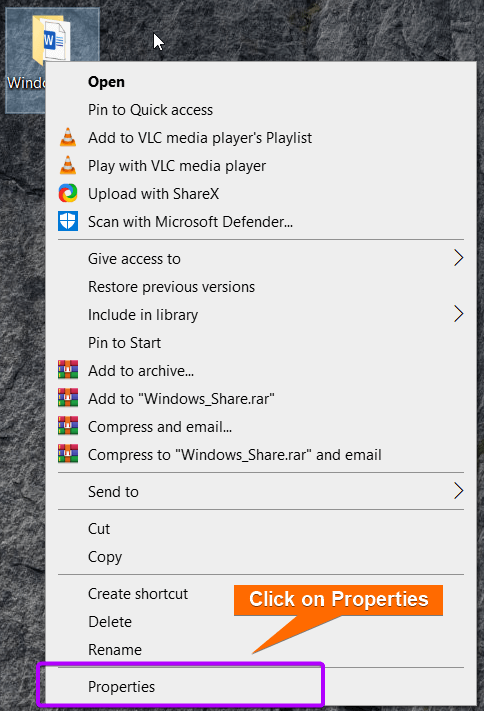 ➌ Navigate to Sharing > Advanced Sharing.
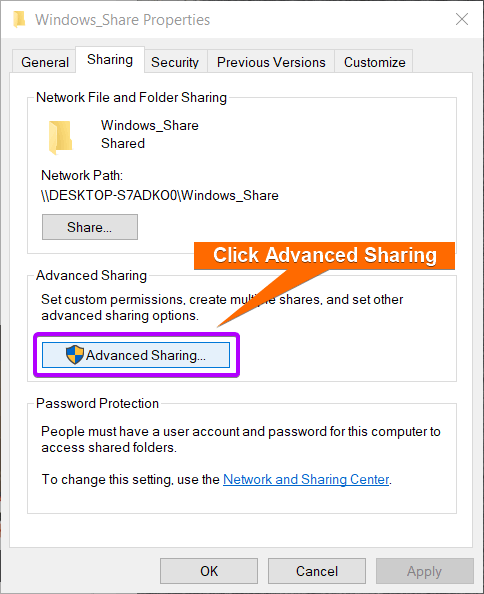 ➍ Select Share this folder and then click on Permissions.
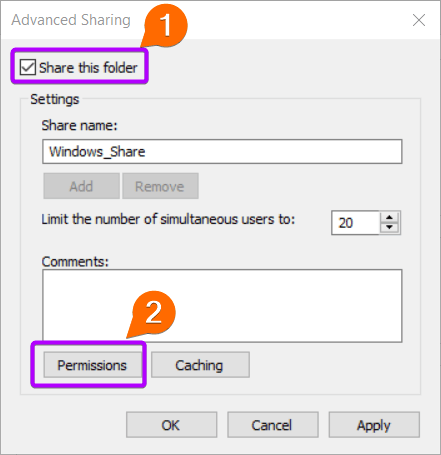 ➎ Here, I clicked on Add since I prefer only the account, User, to be able to share the Windows_Share folder. Otherwise, you can select Everyone to give anyone access to your folder.
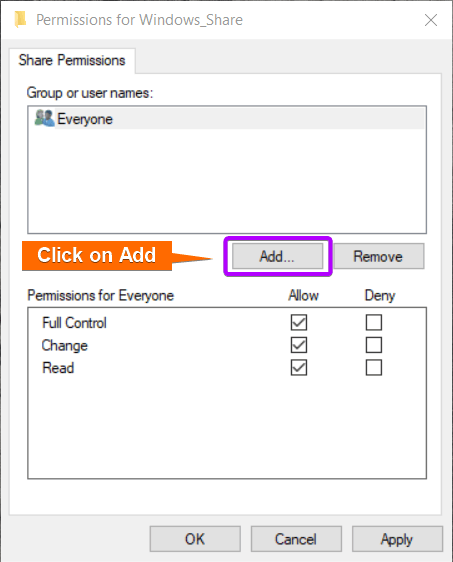 ➏ Then put in the name of your desired user account. I enlisted my account, User, and clicked OK.
 ➐ You will be redirected to Permissions for Windows_Share. Enable Full Control, Change, and Read permissions for your desired account. You can enable these options for anyone by selecting Everyone. Click OK to save these changes.
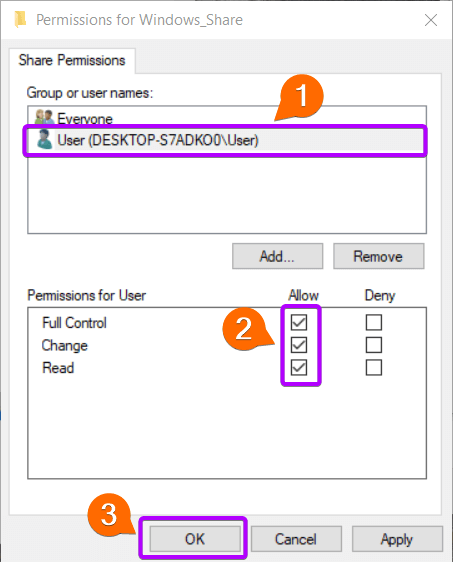 As you can see, User is my Windows user account which has all three permissions of the shared folder, Windows_Share.
➑ Now go to Security and check the recent changes for your specified account for sharing the folder. Press Close to close Windows_Share Properties.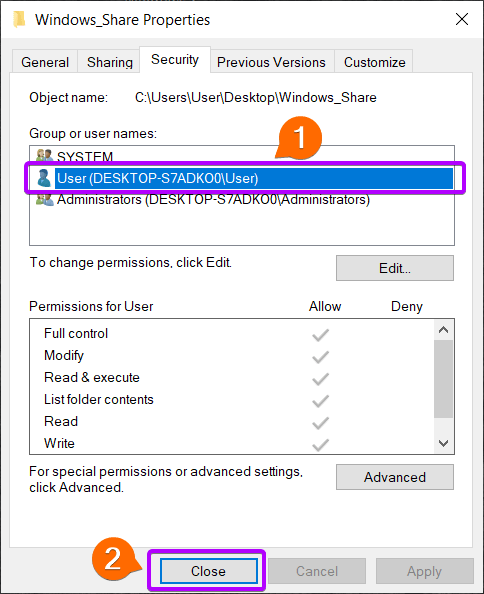
Read More: How to Share Files between Linux and Windows
Step 3: Access Windows Shared folders in Ubuntu
Two prominent command line tools for accessing shared folders are cifs-utils package and smbclient package. The cifs-utils package has more comprehensive features for managing shared folders. On the other hand, the smbclient tool is a lightweight utility for basic sharing operations with folders.
Case 1: Using cifs-utils to Access Windows Shared Folder in Ubuntu
CIFS or Common Internet File System contains tools and utilities that help to mount and manage SMB/CIFS share files, printers, or serial ports over a network. The cifs-utils package helps to mount SMB shares to local directories. Therefore, this package will build a bridge between Windows and Ubuntu for the shared folder, Windows_Share.
Steps to Follow >
➊ Open your Ubuntu terminal.
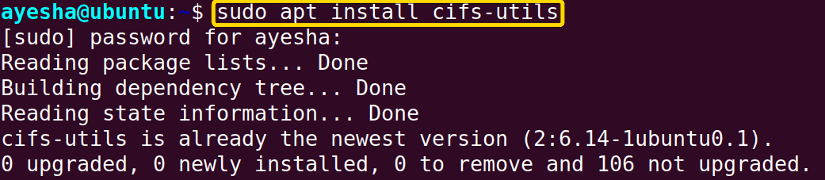
➋ Execute the following command to install the cifs-utils package.
sudo apt install cifs-utilsEXPLANATION
- sudo: Permits a user with administrative privileges to execute commands.
- apt install: Installs a specific package.
- cifs-utils: Package that supports mounting CIFS/SMB file system. CIFS is the core file-sharing protocol used by Samba.
 ➌ Now you need to create a directory that will serve as a mount point or be linked to the shared folder, Windows_Share on a Windows machine.
mkdir /home/ayesha/Desktop/cifs_shareEXPLANATION
- mkdir: Creates a new directory or folder.
- /home/ayesha/Desktop/cifs_share: Absolute path of cifs_share folder in Desktop.
My newly created cifs_share directory in Desktop will now be able to mount the shared folder, Windows_Share.
➍ Lastly to mount a shared folder run the following command:
sudo mount -t cifs //192.168.0.105/Windows_Share /home/ayesha/Desktop/cifs_share -o username=UserEXPLANATION
- sudo: Permits a user with administrative privileges to execute commands.
- mount: Attaches or mounts a file system to a specific directory.
- -t cifs: ‘t’ specifies that CIFS (Common Internet File System) needs to be mounted.
- 192.168.0.105: IP address of Windows system.
- Windows_Share: Name of the shared folder in Windows which needs to be accessed.
- /home/ayesha/Desktop/cifs_share: Absolute path of cifs_share folder in Desktop of my Linux system.
- -o: Specifies the options to be used when mounting a file system, in this case, specifies username option.
- username =User: Provides the name of the account in Windows which has access to the shared folder.
 As you can see in the preceding image, I was prompted to enter my password for my Windows user. Moreover, my Windows IP is 192.168.0.105 and the user account that has the control of shared folder is User.
➎ Now navigate to Files >Desktop > cifs_share.
➏ Open cifs_share folder and you can view the word file, Document from Ubuntu.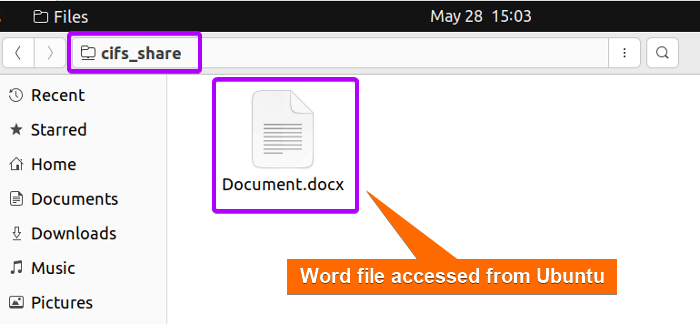 The image above shows that the word file, Document which was created in Windows can now be accessed from Ubuntu.
Case 2: Using smbclient to Access Windows Shared Folder in Ubuntu
For interacting with SMB shares, smbclient is a command-line tool that provides a client interface to access and manage resources on SMB (Server Message Block) servers. The smbclient tool offers various tools to browse, download and manage files on SMB shares.
Steps to Follow >
➊ Open your Ubuntu terminal.
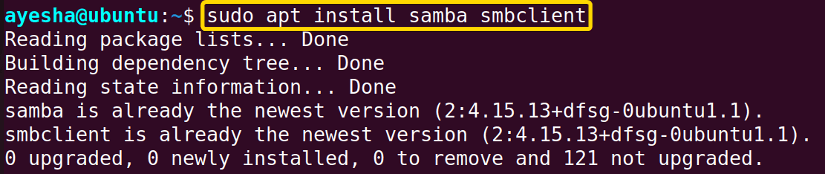
➋ To install smbclient package, execute the command below.
sudo apt install smbclientEXPLANATION
- sudo: Permits a user with administrative privileges to execute commands.
- apt install: Installs a specific package.
- smbclient:Name of the package which needs to be installed.
 ➌ Now to gain access to the Windows folder, Windows_Share in Ubuntu terminal, execute the following command.
smbclient //192.168.0.105/Windows_Share -U UserEXPLANATION
- smbclient: Command that interacts with SMB shares.
- 192.168.0.105: IP address of my Windows system.
- Windows_Share: Name of the shared folder.
- -U: Specifies username.
- User: Name of Windows user account which has access to shared folder.
 It is clear from the above image, that the Windows account, User is acting as the SMB server and I had to enter my password to authenticate this account.
➍ In order to get a better understanding of this accessing method, let’s list its contents with the following command.
lsEXPLANATION
- ls: Lists contents of a directory.
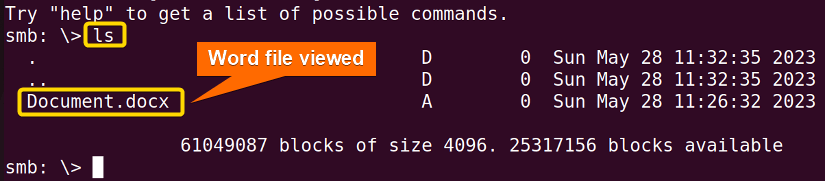 You can see in the preceding image that the previously created word file, Document of Windows_Share folder is now displayed.
Read More: How to Access Samba Share from Windows [2 Methods]
Comparative Analysis of Methods
Going through the aforementioned methods, it is understandable you might feel confused about the right procedure. Take a look at the pros and cons below and decide which method works best for you.
| Methods | Pros | Cons |
|---|---|---|
| Method 1 |
|
|
| Method 2
(Case 1) |
|
|
| Method 2 (Case 2) |
|
|
To summarize, method 1 is suitable if you prefer a graphical interface over commands. It may not be a feasible choice when working in an environment without GUI. On the other hand, method 2 is reliable for working efficiently in a remote environment.
Although case 1 is a more comprehensive tool, it’s difficult to operate due to its complicated configuration process. On the other hand, lightweight and compatible case 2 is a favorite choice when it comes to basic share operations. However, consider your required level of functionality for shared files, expertise in Linux commands, or network speed to choose the most suitable method for you.
Conclusion
An effective sharing process between Ubuntu or any other operating system like Windows should include easy access to shared folders in Ubuntu. This article demonstrated three simple ways to accomplish this task. However, the best method for accessing folders ultimately depends on your preference for a graphical interface such as Nautilus or a command-line interface like cifs-utils and smbclient command.
People Also Ask
What network protocols can I use to access a shared folder in Ubuntu?
SMB/CIFS is the most widely used file-sharing protocol for Windows, Linux and macOS systems. Besides this, some other network protocols are NFS, SSHFS and FTP or SFTP.
How do I mount a CIFS share from Windows Command Line?
Type the command net use Z: \\computer_name\share_name /PERSISTENT:YES in command line window of Windows. Z: represents the drive where you want to assign your share folder.
How does CIFS authentication work?
CIFS is based on a client-server model. The client sends an authentication request to server and the server asks for user credentials based on authentication protocol. Afterwards, the client sends the response back to the server which it verifies . Hence if the credentials matches, a secure connection is established between client and server.
How does SMB protect data when sharing files?
SMB Encryption is used to protect data which provides end-to-end encryption. Encryption protocols like Transport Layer Security (TLS) or Secure Sockets Layer (SSL) make it difficult to intercept or decipher data.
How to unmount a shared folder?
To unmount a folder, especially from the default folder for mounting, mnt, you can use the command sudo unmount /mnt/<folder-name>.
Related Articles
- How to Configure NFS Server in Linux? [5 Steps]
- How to Install and Configure Samba Server in Ubuntu? [4 Steps]
- How to Install, Configure and Connect Samba Client on Ubuntu
- How to Copy File from Windows to Linux Using SSH [2 Methods]