
You don’t have to have two different computers to use Linux and Windows 10. It’s possible to have a Linux distro installed on a computer with Windows 10 preinstalled.
In this article, I will show you how to dual boot Windows 10 and the popular Ubuntu Linux distro. But before that, you have to install Ubuntu on your Windows 10 PC.
Before you go through this process, you must backup your files. That’s because installing an OS is a risky process. Sometimes it can overwrite the existing OS and delete all your files.
N.B.: Most of the processes in this article take time to get done, so you need to be patient.
What We’ll Cover – A step-by-step Guide to Dual-Booting Windows 10 and Linux
- Prerequisites
- How to Partition your Hard Drive for Ubuntu
- How to Optimize your Hard Drive for More Partition Space (Optional)
- How to Download Ubuntu in ISO Image Format
- How to Make an Ubuntu (Linux) Bootable USB Drive
- How to Install Ubuntu Linux Distro along with Windows 10
- Now You Can Dual Boot Ubuntu and Windows 10
- Conclusion
Prerequisites
Most importantly, there are some things you must have in place if you want to use (and dual boot) Ubuntu and Windows 10 on the same PC:
- A computer preinstalled with Windows 10
- A partitioned hard drive
- A BIOS in UEFI mode (Unified Extensible Firmware Interface)
- An empty USB drive of at least 4Gig for creating a bootable disk
- An internet connection to download Ubuntu ISO image (the Linux distro) and Rufus (a bootable drive creation tool)
How to Check If Your PC BIOS is in UEFI Mode
To check if your PC BIOS comes in UEFI mode, search for “system information” and hit ENTER.
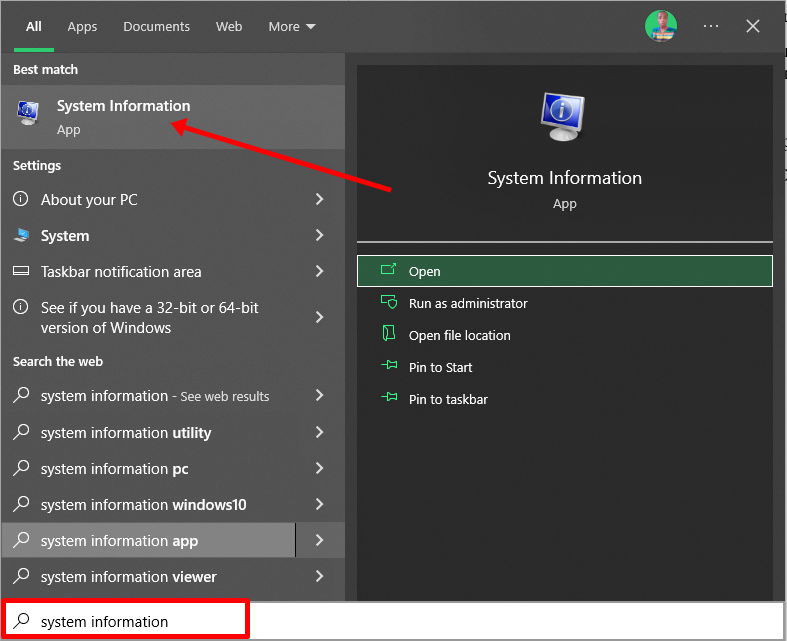
Look under BIOS mode to confirm that your PC BIOS mode comes as UEFI.
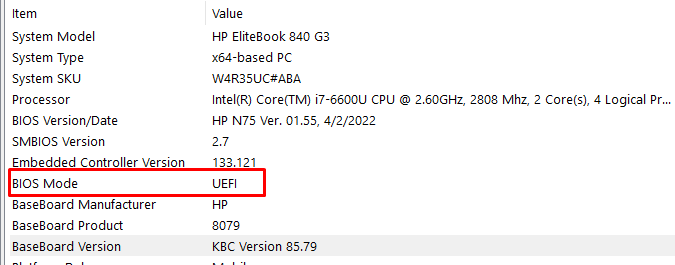
If your PC BIOS is not in UEFI mode, the two operating systems won’t see each other. You can learn more about the difference between these two modes here.
How to Partition your Hard Drive for Ubuntu
You have to partition your hard drive because you must set aside at least 20Gig for Ubuntu to live in and boot from.
To partition your hard drive, follow the steps below:
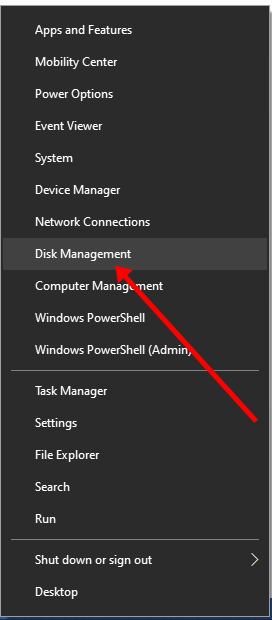
Step 1: Right-click on Start and select “Disk Management”.
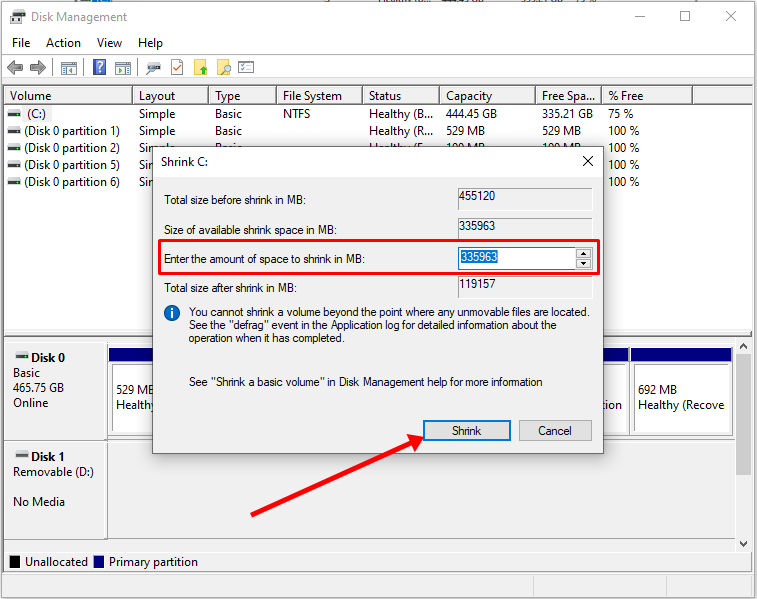
Step 2: Right-click on your C drive and select shrink volume.
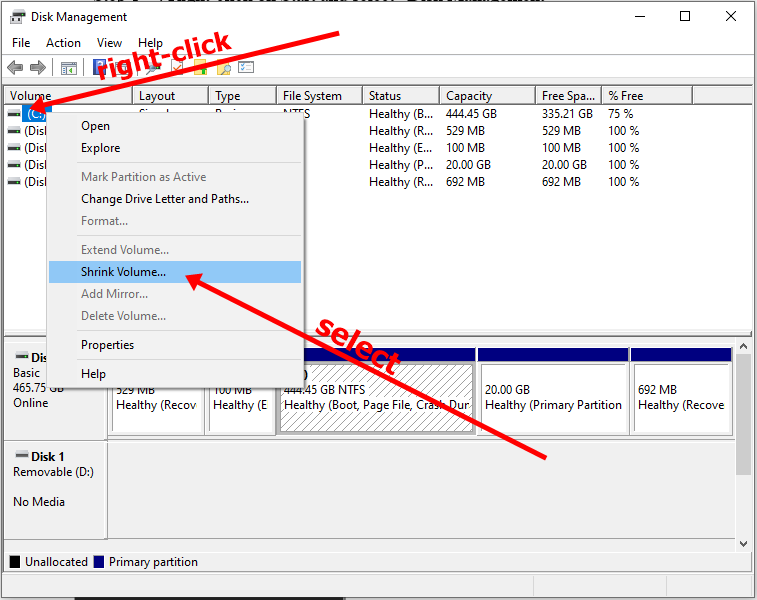
Step 3: Select at least (20000) 20Gig for Ubuntu and click “Shrink”. IT can take some time to complete, so be patient.
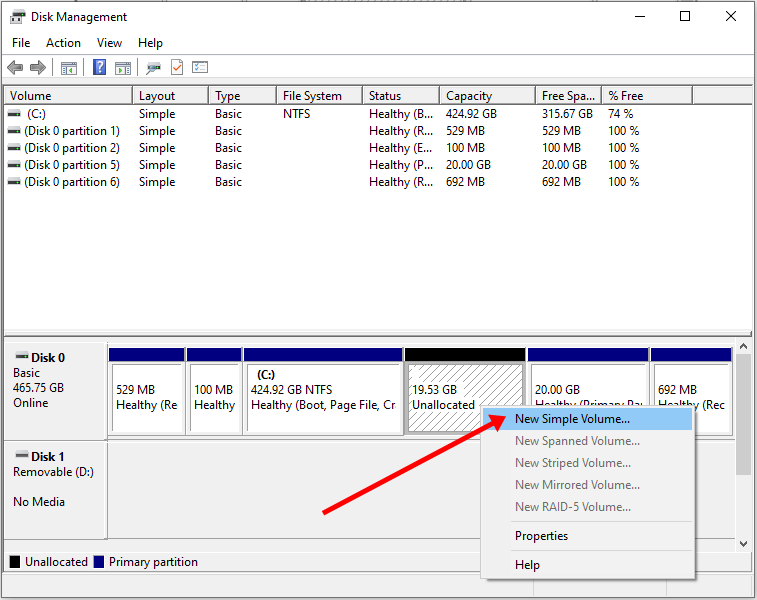
Step 4 (optional): You can go ahead and assign a letter to the new volume. Right-click on the unallocated space and select “New Simple Volume”.
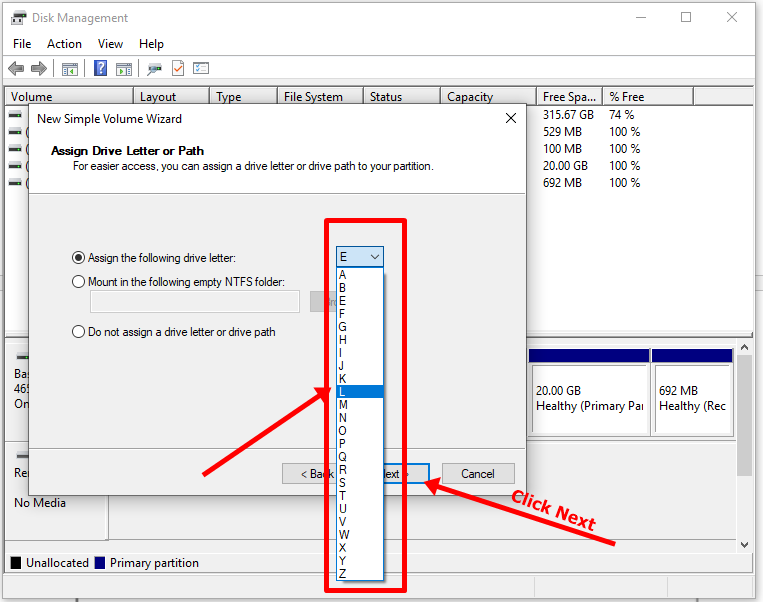
Step 5: Follow the wizard and assign a letter to the drive, then follow the rest of it.
After completing the wizard, the drive should be listed on your computer.
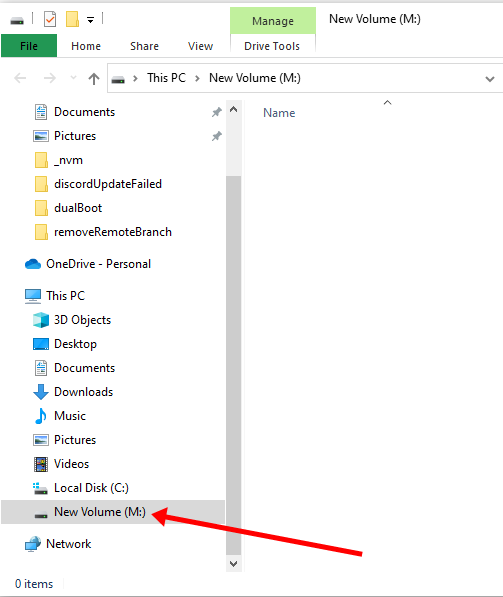
Congrats! You’ve successfully partitioned your hard drive.
N.B.: If you have a lot of free space in your hard drive but your PC still didn’t give you up to 20Gig partition space, then you need to optimize your PC’s hard drive. Proceed to the next section of this article to do that.
How to Optimize your Hard Drive for More Partition Space (Optional)
The common purpose of hard disk optimization is to speed up your computer during boot time and make it run smoother.
At the same time, the process will defragment the hard disk and make free space more available for partitioning.
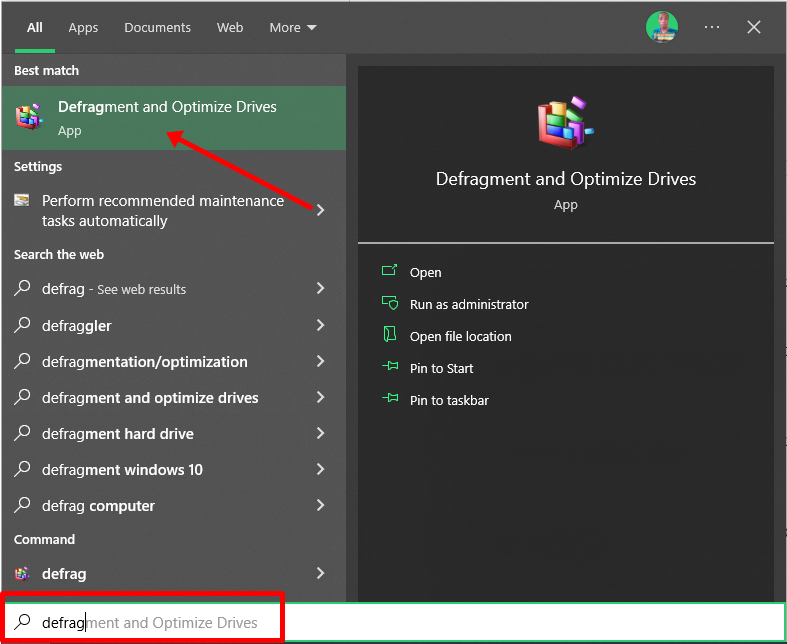
To optimize your hard drive, click Start (Windows logo key), search for “defrag” and select “Defragment and Optimize Drives”.
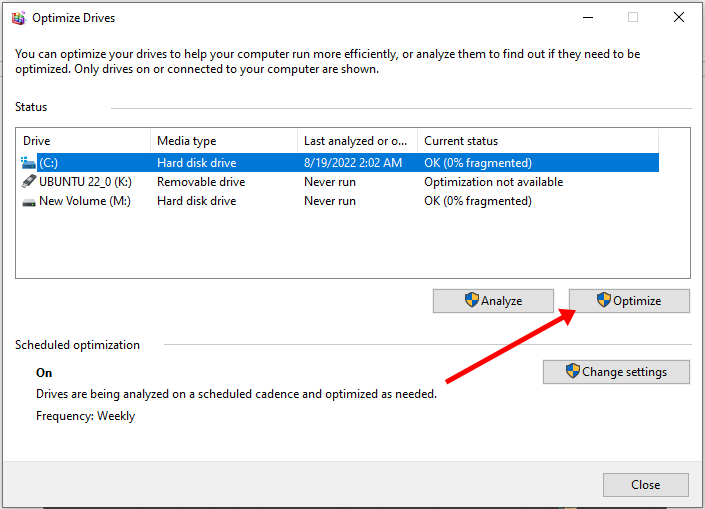
Make sure your C drive is highlighted, then click “Optimize”.
After you’ve been able to set aside at least 20Gig for Ubuntu by partitioning your hard drive, then it’s time to download Ubuntu and make a bootable USB.
How to Download Ubuntu in ISO Image Format
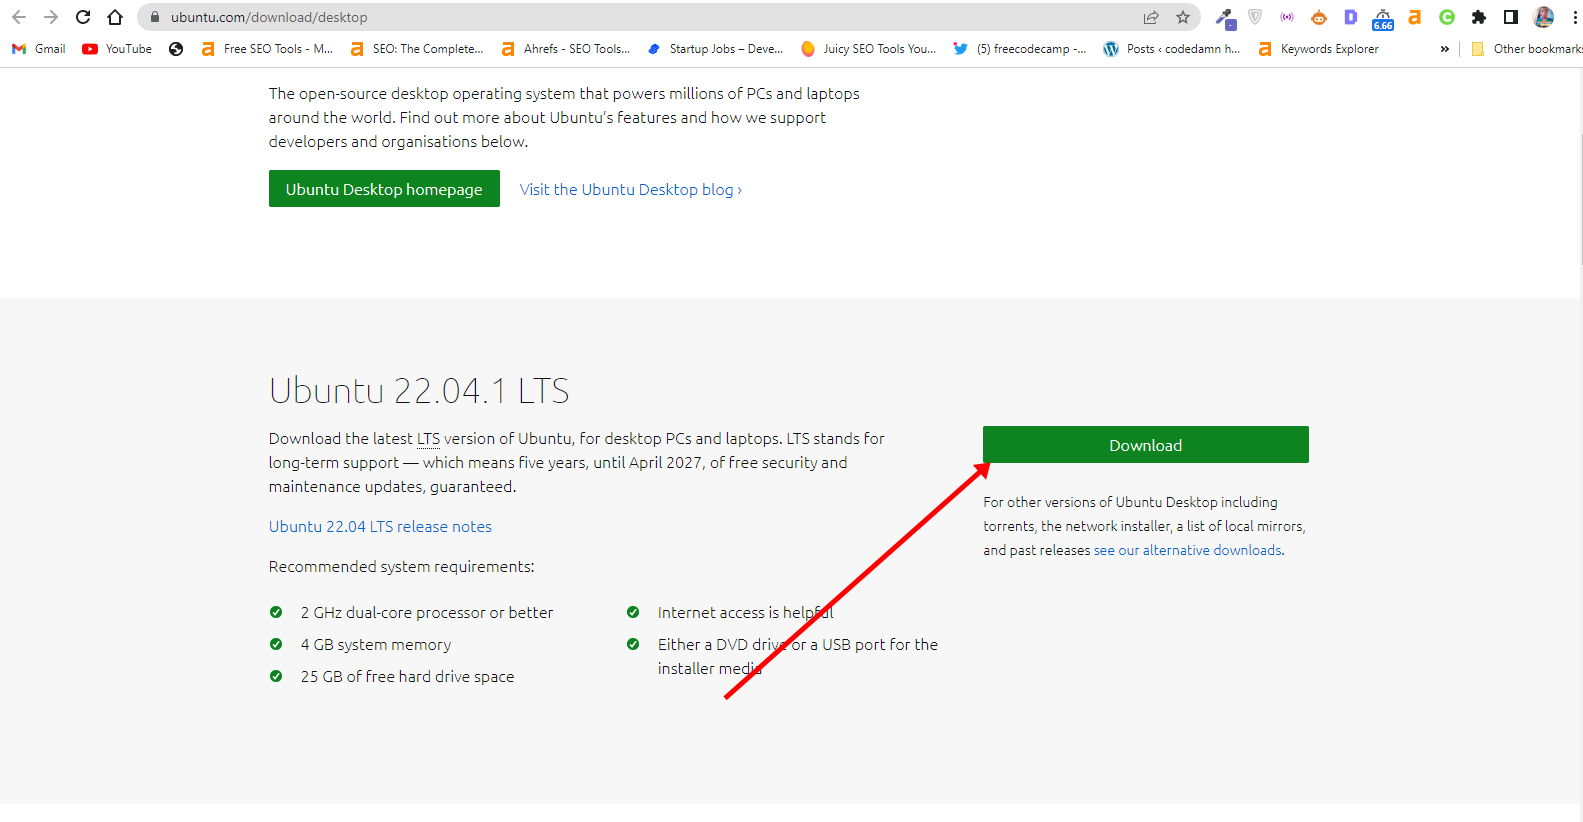
The next thing is to download Ubuntu in ISO image format so you can install Ubuntu. You can download it from the Ubuntu distro website.
After downloading Ubuntu, don’t do anything with it yet. You need to make a bootable USB and put it in there. That’s how you’ll be able to use it.
The reason you can’t install Ubuntu just like that is that it doesn’t come as an executable. It comes in form of ISO (optical disk image). That means you have to find a disk to put it in before it can work.
The next part of this guide shows how you can put the downloaded Ubuntu ISO on a USB stick.
How to Make an Ubuntu (Linux) Bootable USB Drive
You won’t be able to make a bootable USB drive for Ubuntu by just placing the downloaded ISO image in it. Follow these steps to get it done:
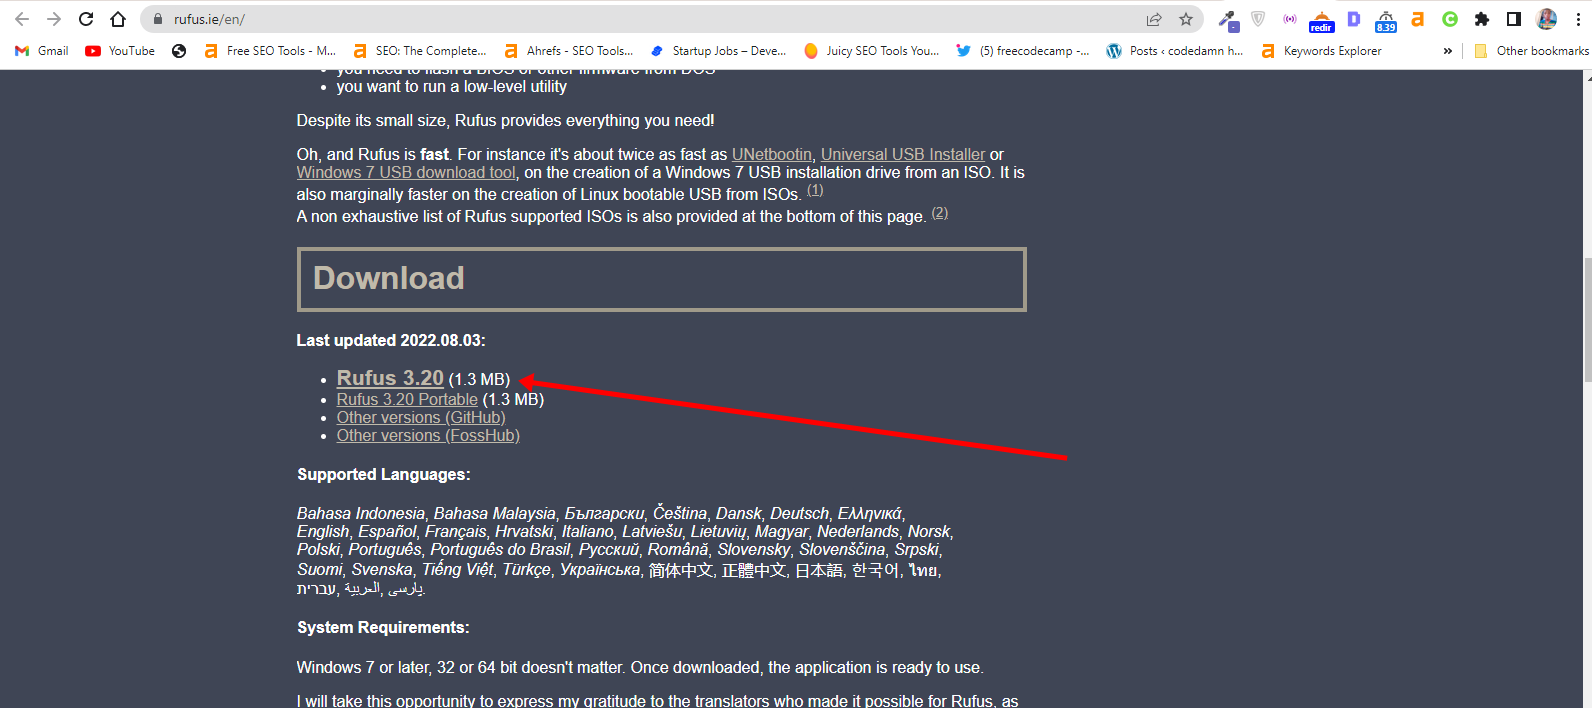
Step 1: You need to download a bootable USB drive creation tool like Rufus. You can download Rufus from their website.
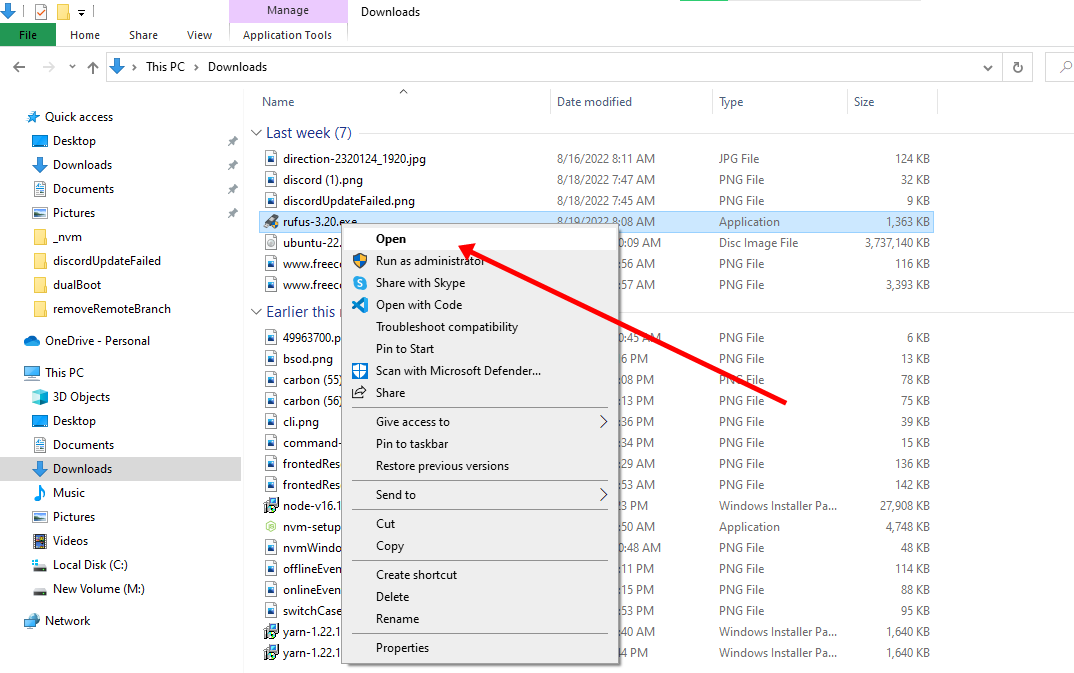
Step 2: Insert the empty USB drive into your Windows 10 PC. Right-click on Rufus and select “Open”.
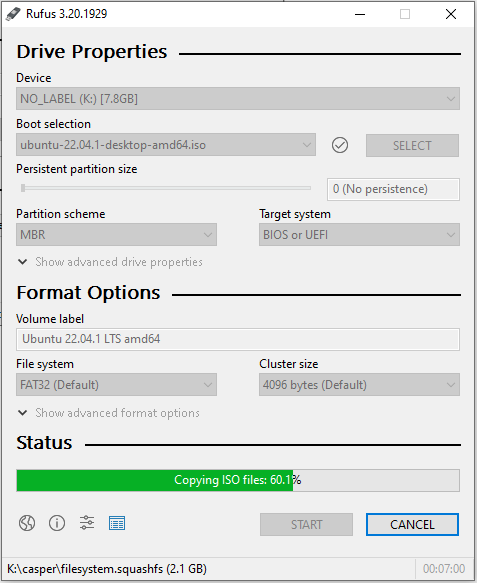
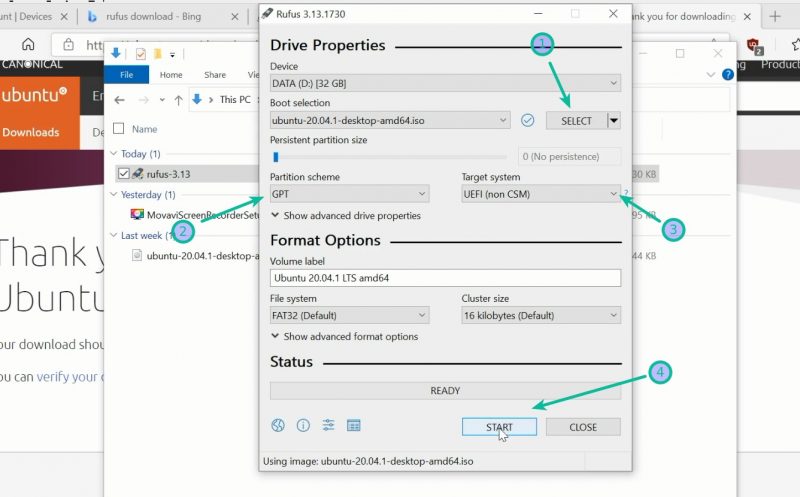
Step 3: Under “Device”, select your USB drive. And under “Boot selection”, click the “Select” button and select the Ubuntu ISO file you downloaded
Step 4: Leave every other thing as default and click the “START” button to start burning the Ubuntu distro to the drive.

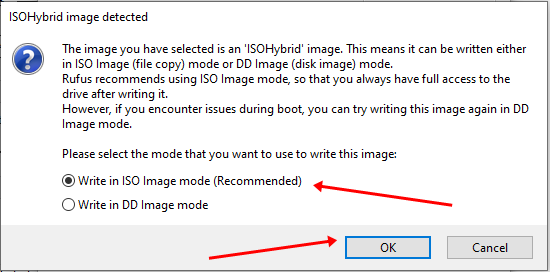
Step 5: Click OK to start the process.
Once the process is done, you should see “READY” on a green background. Click the Close button. Its time to install Ubuntu.
Congrats! Now you have a bootable drive with which you can install Linux.
The next step is to install the Ubuntu distro on your Windows 10 PC. To do this, you have to boot your PC from the bootable USB drive you created.
How to Install Ubuntu Linux Distro along with Windows 10
Step 1: Ensure the bootable drive is inserted into your Windows 10 PC
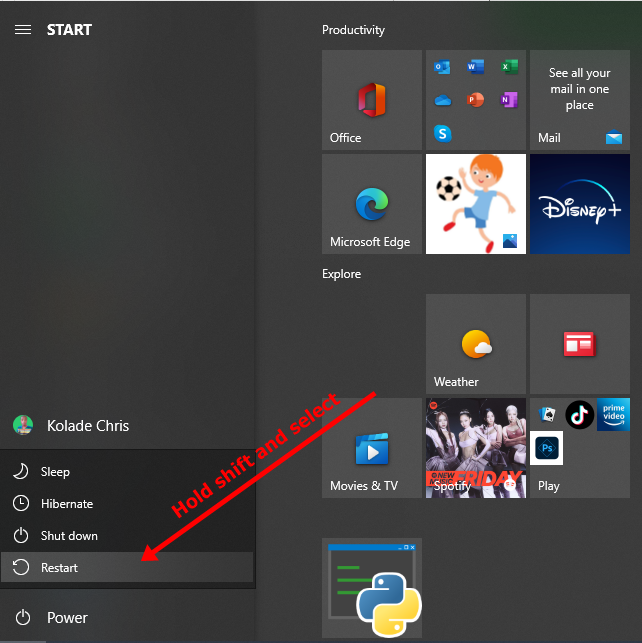
Step 2: Right-click on Start, hold SHIFT, and select Restart.
Step 2: Select “Use a Device”.
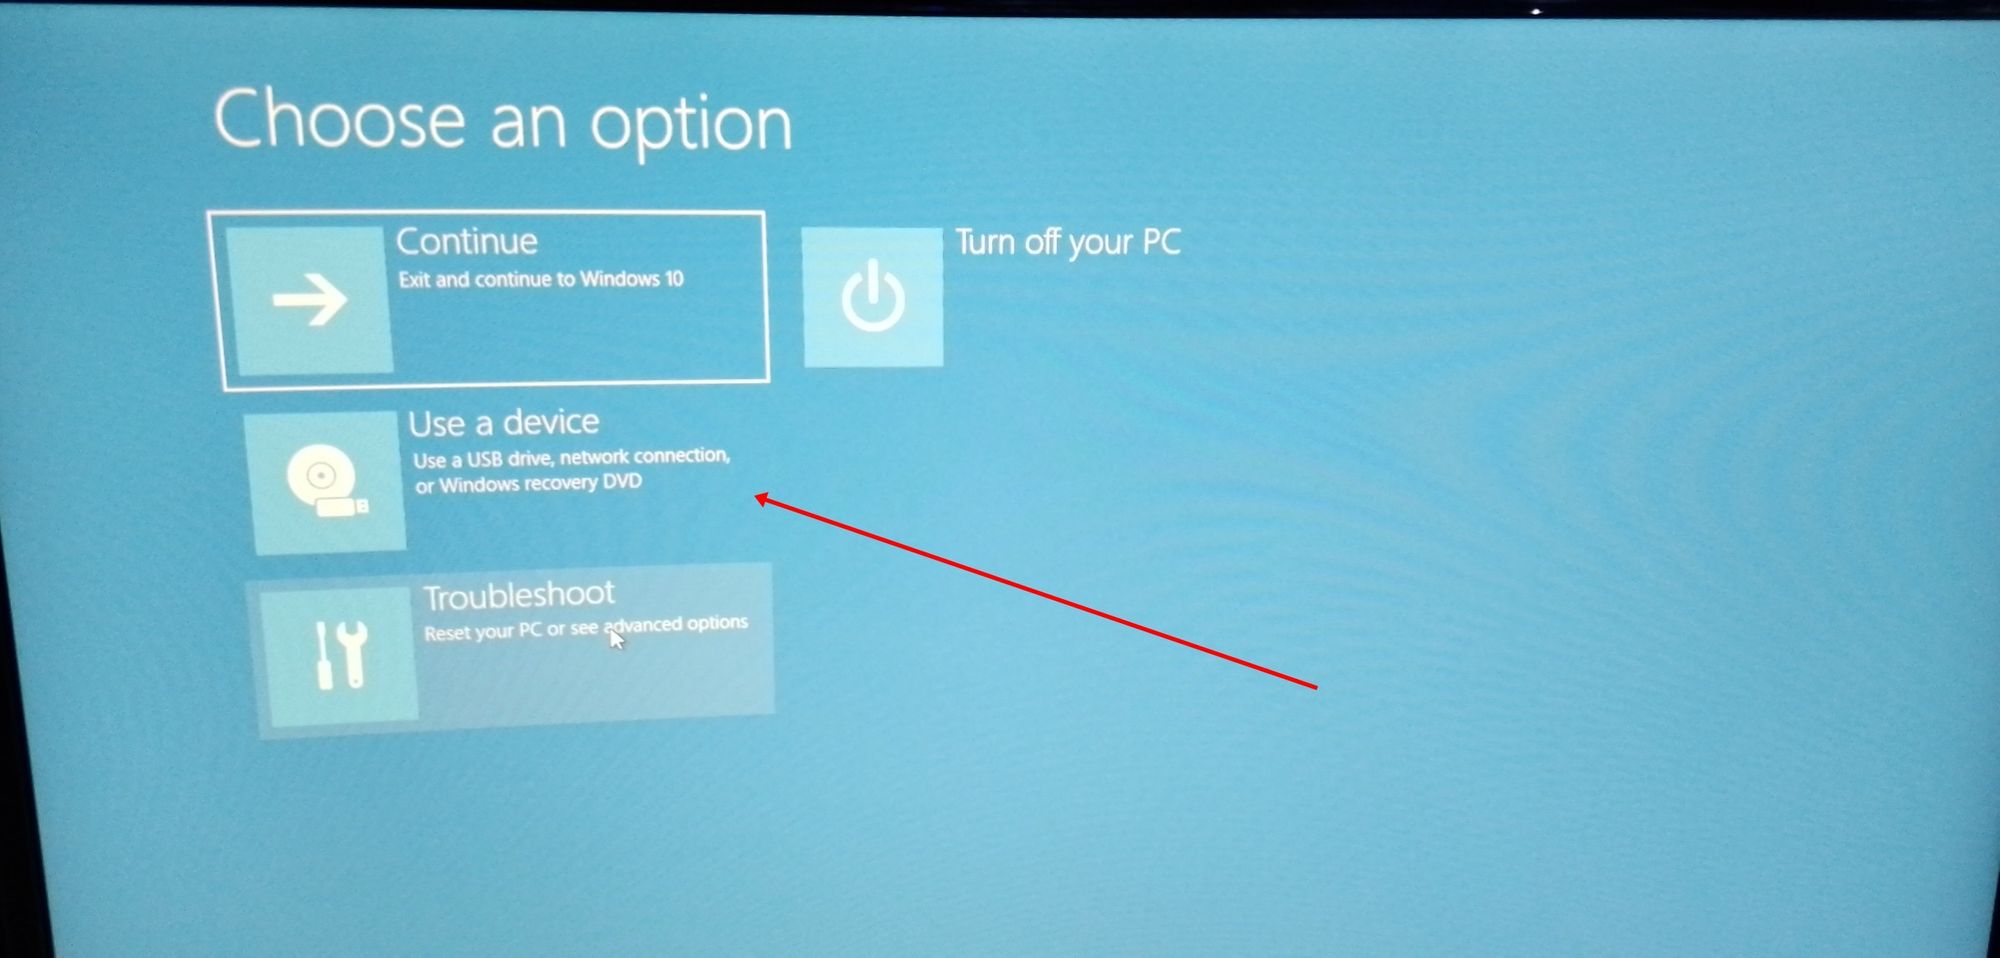
Step 3: On the next screen, you should see several devices you can boot from.
You may see the bootable drive as the name of the USB brand.
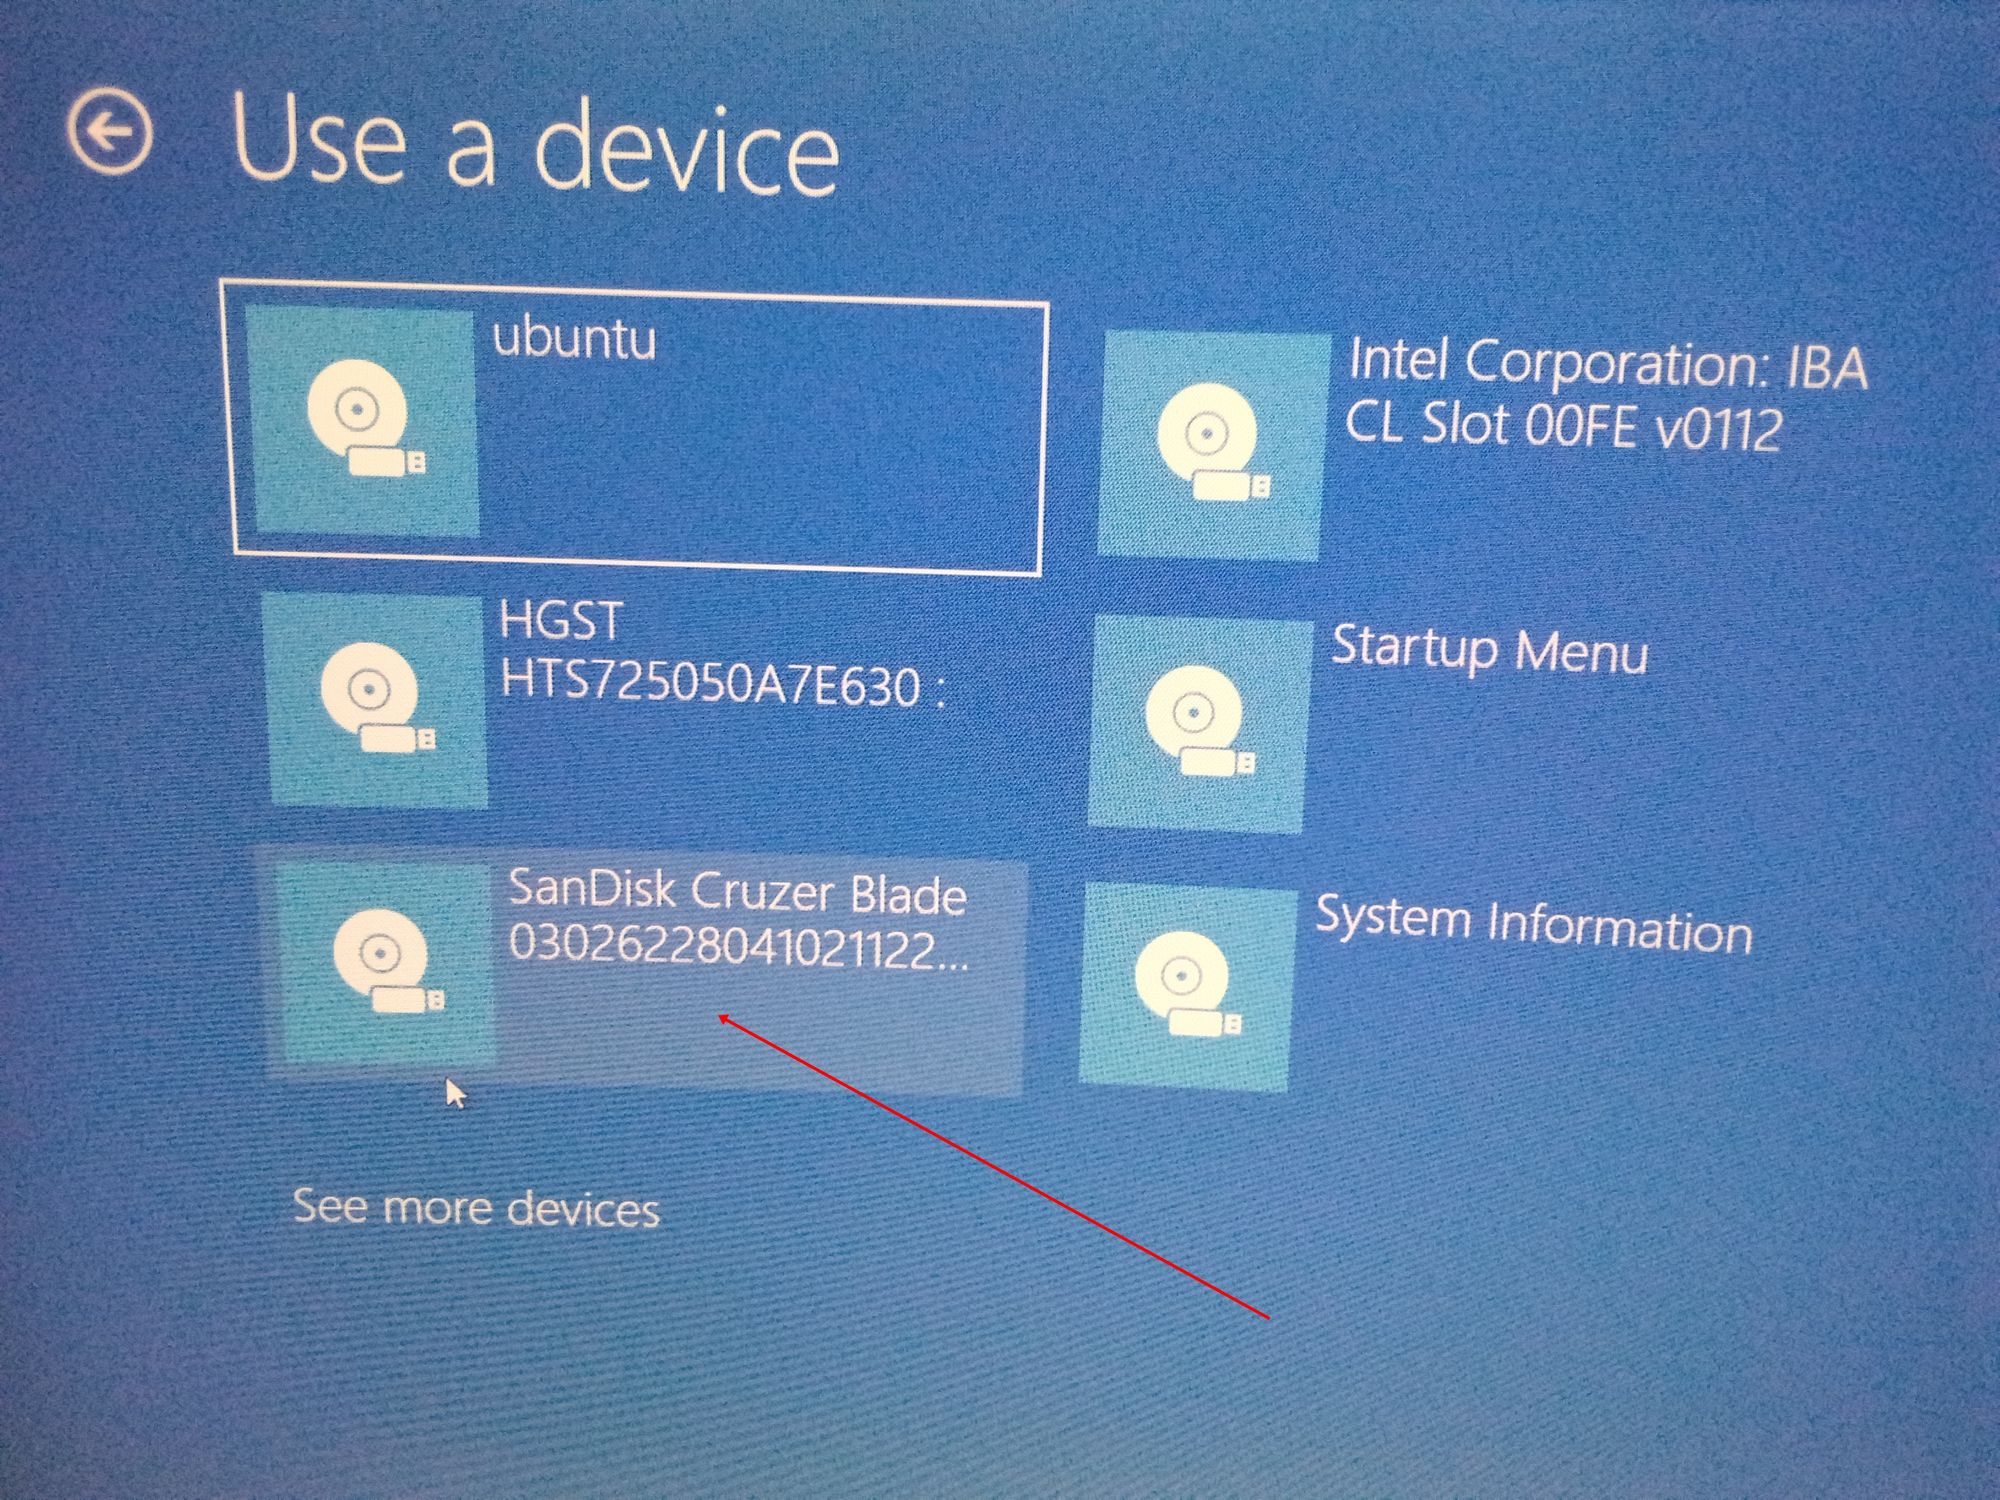
It’s possible to see it as “Ubuntu” too. Some other times, you might not see it, so you need to click on “See more devices».
If you still cannot see your bootable drive, head over to your boot menu by getting into BIOS. You will see it there.
N.B.: You should be very careful while making changes in BIOS. Whatever you do there has a lasting effect on your computer. If you are not sure of what you’re doing there, you should contact an IT professional.
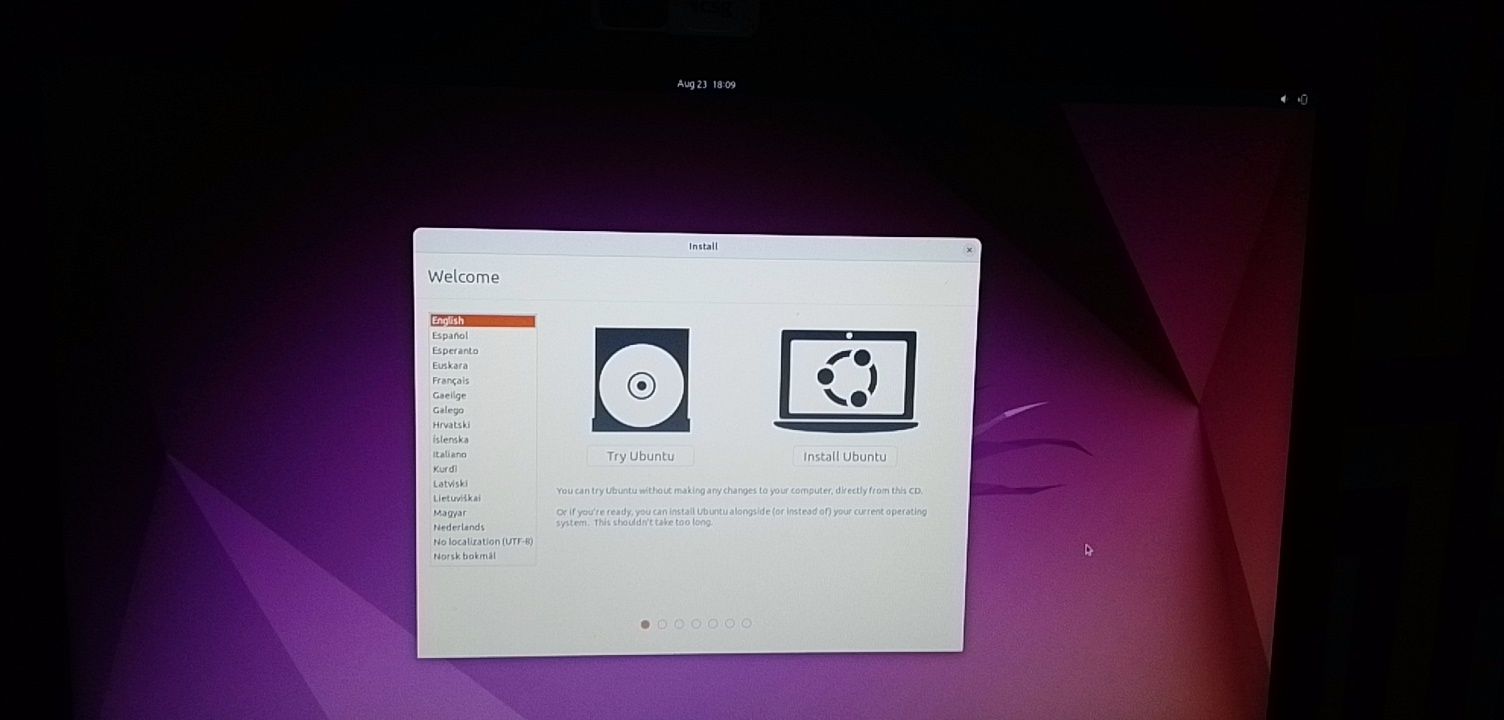
Step 4: Choose «Install Ubuntu». You can also try it before installing it.
Follow other prompts of the installation wizard and make sure you don’t replace your Windows 10 OS installation with Ubuntu. This is why I suggested you back up all your files.
When you get to the point to select the partition you made, scroll to the partition you made earlier and press ENTER.
Click OK to select all the space in the partition.
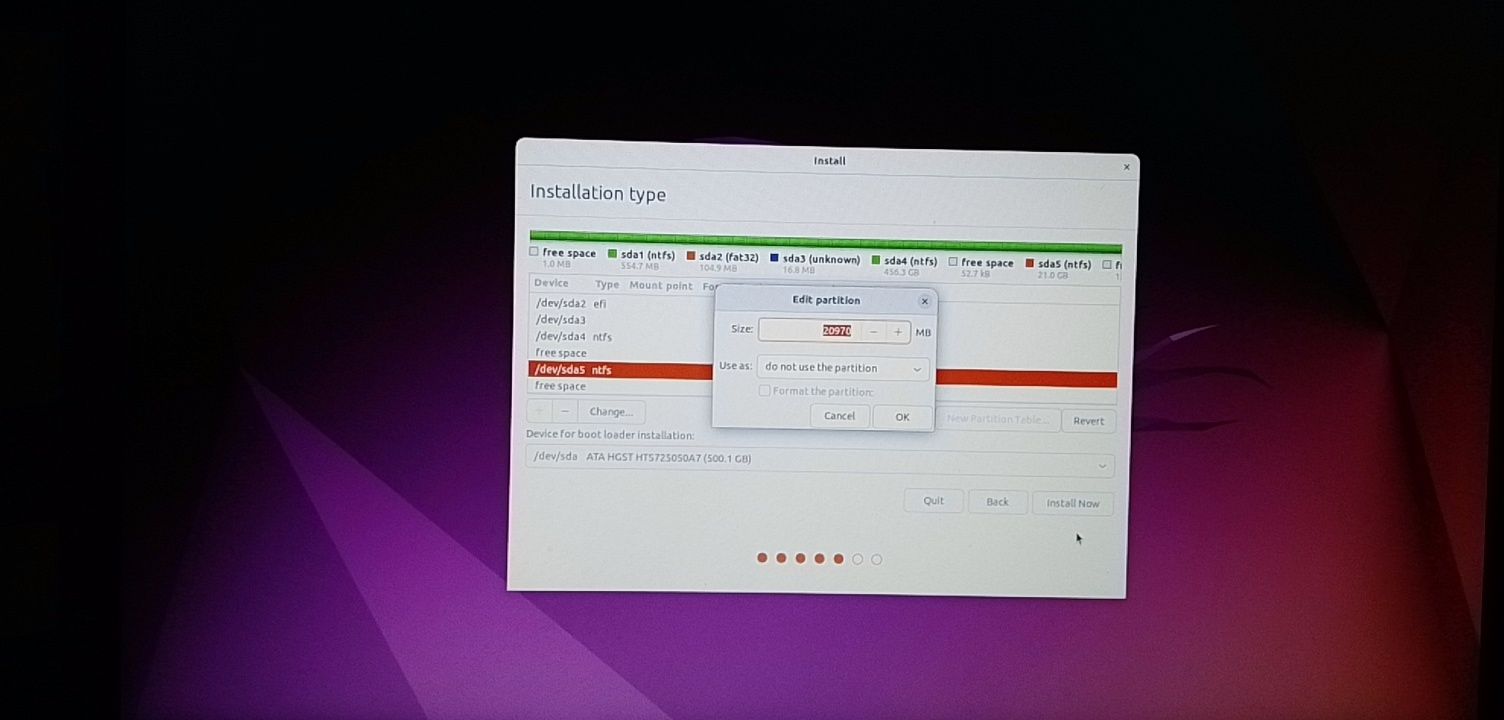
This time around, the “Install now” button will not be greyed out anymore.
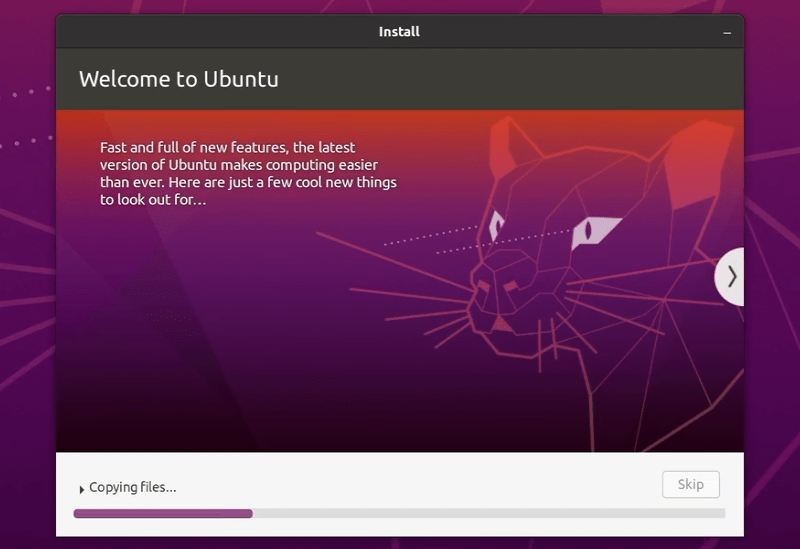
Follow other prompts until Ubuntu starts installing.
After the installation is done, Ubuntu will prompt you to remove the bootable drive and press ENTER to reboot your Computer.
Now You Can Dual Boot Ubuntu and Windows 10
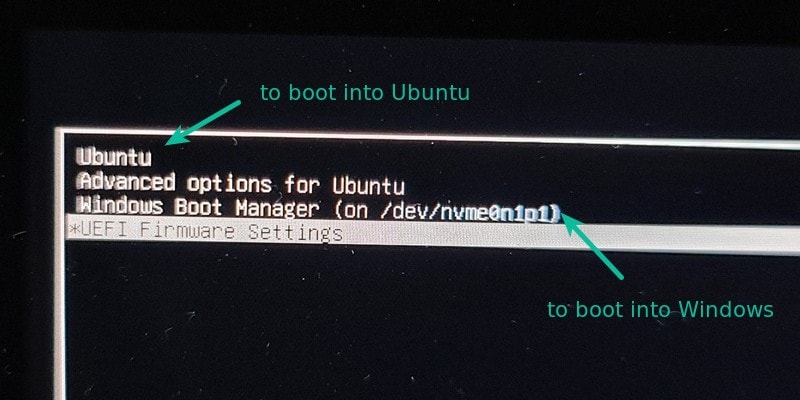
Immediately after you reboot the computer, you should see a screen that looks as shown below:
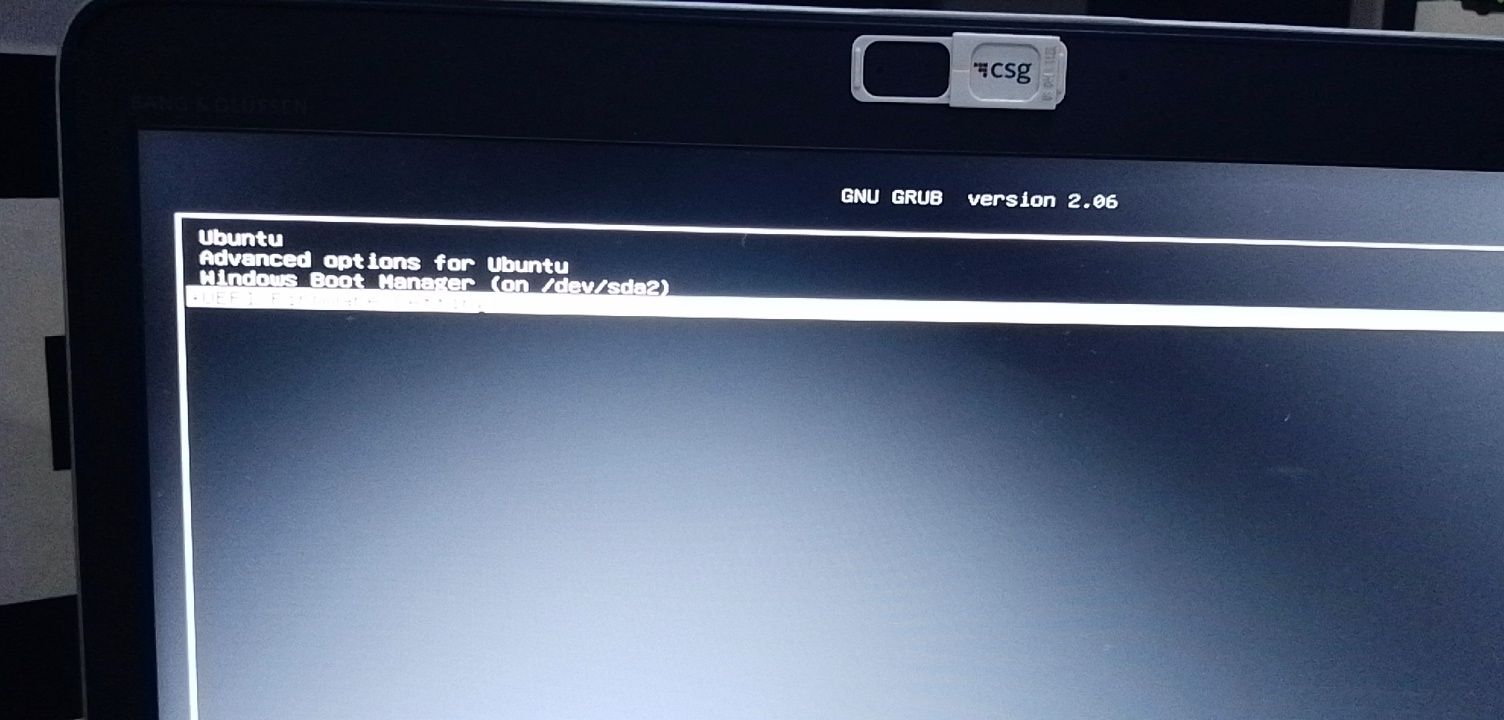
Now, you can select which one to boot into between Ubuntu and Windows 10.
To boot into Ubuntu, select Ubuntu. And to boot into Windows 10, select Windows boot manager.
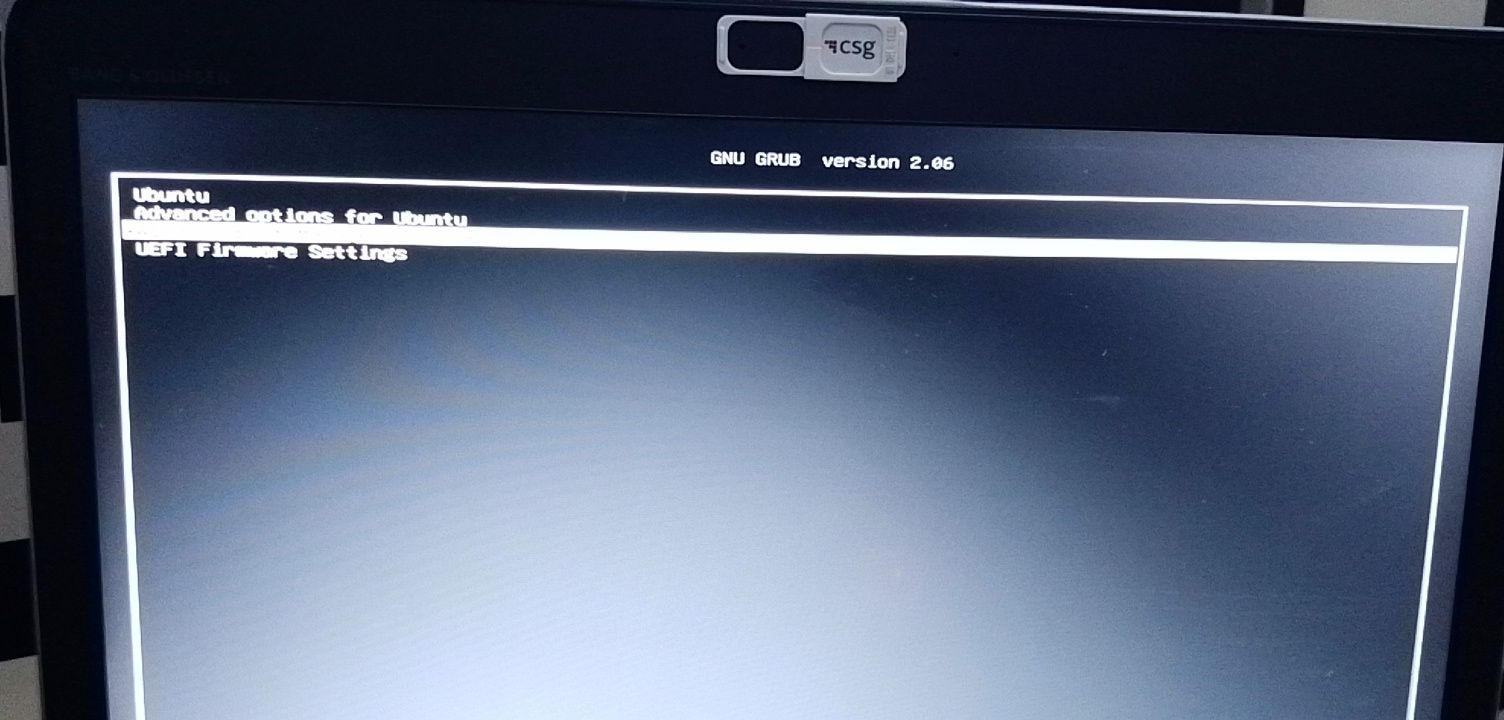
You can also get into your BIOS from the same place by choosing UEFI Firmware Settings.
Conclusion
I hope this article helps you dual boot Ubuntu and Windows 10 on your computer.
The ultimate aim of this article was to show you how to dual boot Ubuntu and Windows 10.
But the article went beyond that to show you how to:
- check if your PC’s BIOS is in UEFI mode
- partition your hard drive
- optimize your hard drive
- make a bootable USB drive
- install Ubuntu Linux Distro along with Windows on your Windows 10 PC.
If you find this article helpful, kindly share it with your friends and family.
Learn to code for free. freeCodeCamp’s open source curriculum has helped more than 40,000 people get jobs as developers. Get started
Dual booting Linux with Windows is one of the most convenient ways of enjoying the two operating systems on the same computer.
You have both OS installed on the disk, on real hardware and when you power on your system, you can choose which operating system to use.
In an earlier tutorial, I showed the steps to dual boot Ubuntu with Windows 7 which comes with an MBR partition. The steps are almost the same for the newer systems that come preinstalled with Windows 10.
In this tutorial, I’ll show you how to install Ubuntu with Windows 10 already installed on the system.
💡
Before you start following the tutorial, I advise reading it entirely first. See what you need and what you should do in this tutorial. Once you have a good idea about the procedure and have all the necessary things on hand, start the process. Dual-boot is not a complicated process. It just takes some time and patience.
The steps mentioned here apply to other Ubuntu versions such as Lubuntu, Kubuntu, Xubuntu and Ubuntu-based Linux distributions such as Linux Mint, elementary OS, etc.
Compatibility checks
This tutorial is suitable for systems that come with Windows 10 pre-installed with UEFI secure boot and GPT partitioning system. Please check whether your system uses GPT or MBR.
Make sure your system uses UEFI: This tutorial is only applicable for systems with UEFI boot. If you have bought your system in the last 5-6 years, chances are that you should already have a UEFI system on GPT partition. However, there is no harm in verifying that your system uses UEFI. If your system uses legacy BIOS with MBR partitioning system, please follow this dual boot tutorial.
Bitlocker encryption process is different: Newer systems with Windows 10 Pro have their disk encrypted with Bitlocker. If you have such a system, please follow this tutorial to dual boot with Bitclocker encryption.
Dual Booting Ubuntu With Windows 10 Pro With BitLocker Encryption
I have written about dual booting Windows and Ubuntu in the past. The process has improved so much in the last few years. Ubuntu and other Linux play very well with secure boot and UEFI now. So, why I am I writing about installing Ubuntu with Windows 10 once again?
 It’s FOSSAbhishek Prakash
System with both SSD and HDD: If you have a system with both SSD and HDD, i.e. dual disk system, the process is pretty much the same. However, you’ll be a lot better following this dedicated tutorial on dual booting dual disk system.
Dual Booting Ubuntu and Windows With a SSD and a HDD
Dual booting Ubuntu and Windows is not that complicated and I have covered it in detailed tutorial in the past. Recently, I also wrote about dual booting on a Bitlocker encrypted Windows system. And yet here I am talking about it again. Why? Because the scenario is slightly different and
It’s FOSSAbhishek Prakash

Prerequisites: What do you need?
You’ll need the following things to easily and safely install Linux alongside Windows:
- A computer that comes preinstalled with Windows 10.
- A USB key (pen drive or USB drive) of at least 4 GB in size and no data on it.
- Internet connection (for downloading Ubuntu ISO image and live USB creating tool). You can do this on any system, not necessarily on the system you are dual booting.
- Optional: External USB disk for making back up of your existing data.
- Optional: Windows recovery or bootable disk (if you encounter any major boot issues, it could be fixed).
Let’s see the steps of installing Ubuntu alongside Windows 10. I have made a video of the entire process. You may watch that as well.
Step 1: Make a backup of your Windows system [optional]
It is always nice to have a backup of your data, just in case you mess up with the system while dealing with disk partitions.
I advise copying all the essential data you cannot afford to lose on an external USB disk. You can use an external HDD (slower but cheaper) or SSD (faster but expensive) and copy the important files and folders.
Step 2: Download Ubuntu (or whichever Linux distribution you are using)
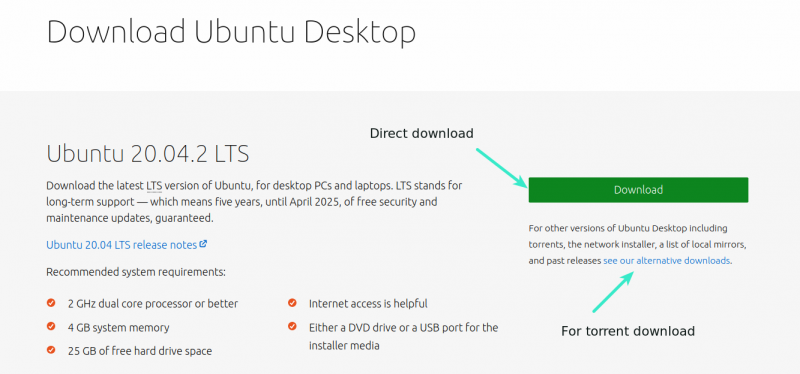
Head over to Ubuntu’s website and download the ISO file. The file should be around 2.5 GB in size. If you need to download Ubuntu via torrents, you can click the ‘alternative downloads.’
Step 3: Create a live USB/disk of Ubuntu
I presume that you are using Windows to create the live USB. Several free applications allow you to create a live Ubuntu USB. You can use any of these tools. Since I cannot show all of them, I’ll go with Rufus.
Download Rufus for free from its website. It will download a .exe file.
Plug in your USB. This device will be formatted so make sure you don’t have any important data on this USB disk.
Run the Rufus tool you just downloaded. It automatically identifies the plugged-in USB but double-check it anyway. Now, browse to the location of the downloaded ISO image and ensure that it uses GPT partitioning scheme and UEFI target system.
Hit the start button and wait for the process to complete. Your live Linux USB is ready.
📋
Installing Ubuntu and creating the live Ubuntu USB process can be done on any computer. But the rest of the process takes on the system on which you are dual booting.
Step 4: Make some free space on your disk for Ubuntu installation
In many systems, while installing Ubuntu, it gives the option to make a disk partition for Ubuntu. However, that is not a surety. This is why making the required free space on the disk would be better before starting the installation procedure.
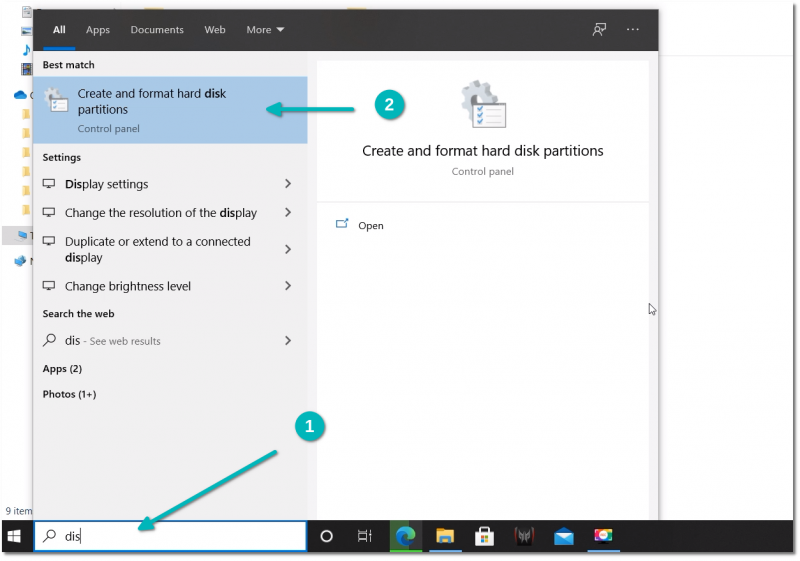
In the Windows menu, search for ‘disk partitions’ and go to ‘Create and format hard disk partitions.’
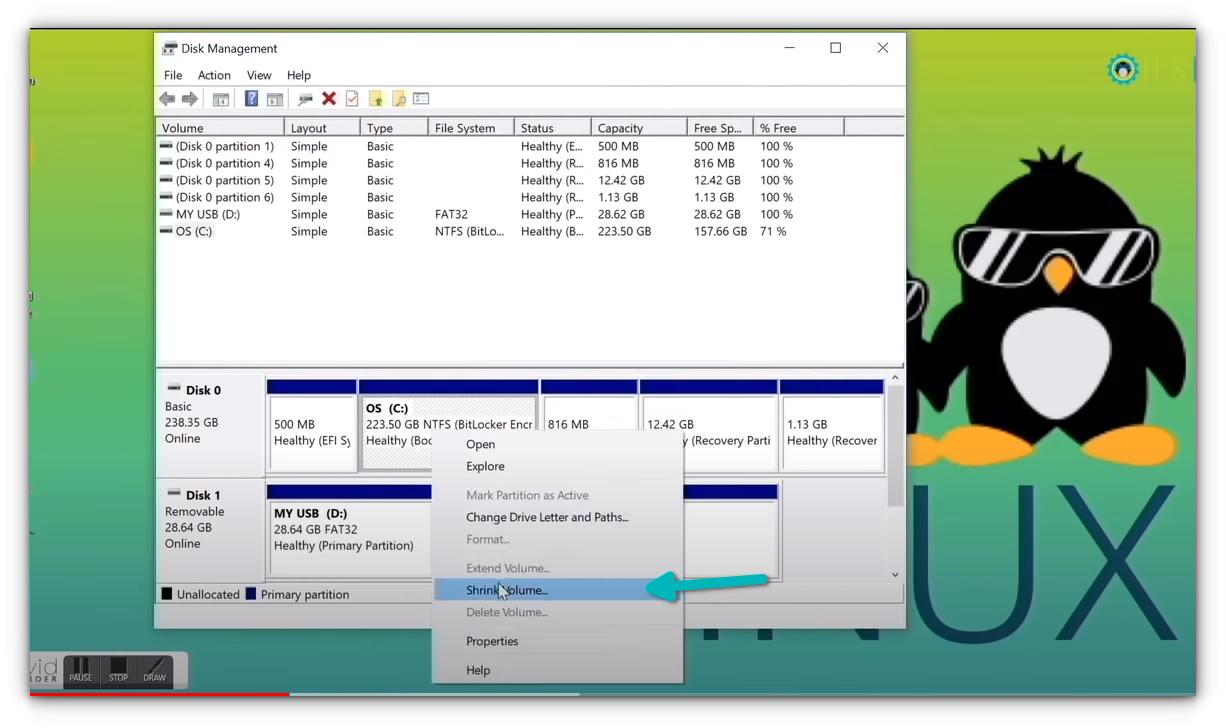
In the Disk Management tool, right-click on the drive which you want to partition and select shrink volume.
If you have just one partition like this, you need to make some free space out of it for Linux. Use any of them except C drive if you have several partitions of considerable size because it may erase the data.
The 256 GB in my system already had several partitions from the manufacturer but mainly for backup and other purposes. The primary partition was the C drive, around 220 GB, where Windows 10 is installed. In my case, I shrank the C drive to make some free space for Linux installation.
How much space do you need for Linux in dual boot?
This depends on how much total disk space you have. You may install Ubuntu on 15 or 20 GB but you’ll soon start running out of disk space. These days, you should have at least 120 GB of disk. In that case, go for 30-40 GB of disk for Linux. If you have 250 GB disk, allocate 60-80 GB or even more. If you have more disk space, allocate even more free space, if you want.
What if you have D, E or F drives?
This is a common confusion for many people as they think Ubuntu can only be installed on the C drive. That’s not true. I had only one C drive, so I shrank it. If you have D, E or F drive, you may shrink one of those drives. You may also choose to delete the D, E or F drive. NEVER DELETE C DRIVE.
Step 5: Boot from live Ubuntu USB
You created a live Ubuntu USB in step 3. Plug it into the system. Before you go and boot from the live USB, let’s have a quick word about the infamous secure boot.
Do I need to disable the secure boot for installing Linux?
6-8 years back, the UEFI secure boot was not well-supported by Linux; hence, you had to disable secure boot before installing Linux. Thankfully, Ubuntu and many other Linux distributions currently support secure boot very well. Usually, you should not need to do anything about it. However, if your system doesn’t allow booting from live USB or if you see any other related issue, you may disable the secure boot on Windows.
Alright! Let’s see how to boot from the USB. You can go to the boot settings by pressing F2/F10 or F12 at the system start time and selecting to boot from the USB. However, some people find it difficult.
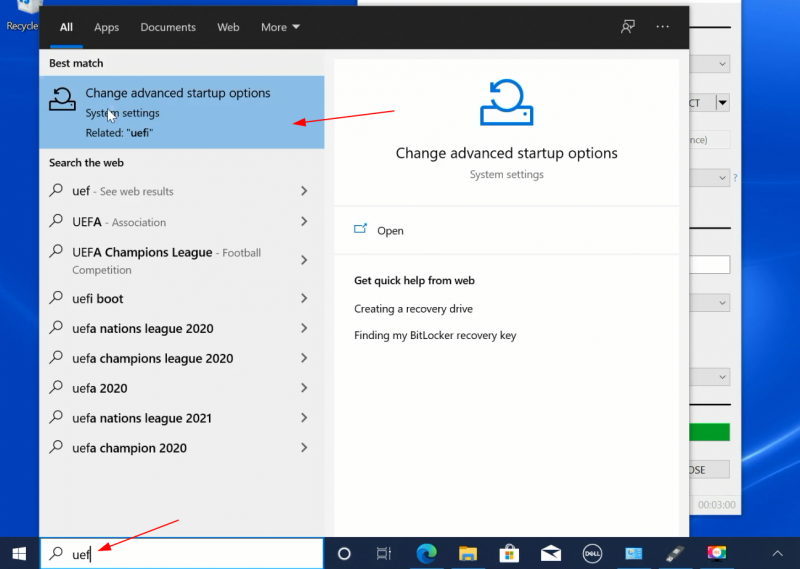
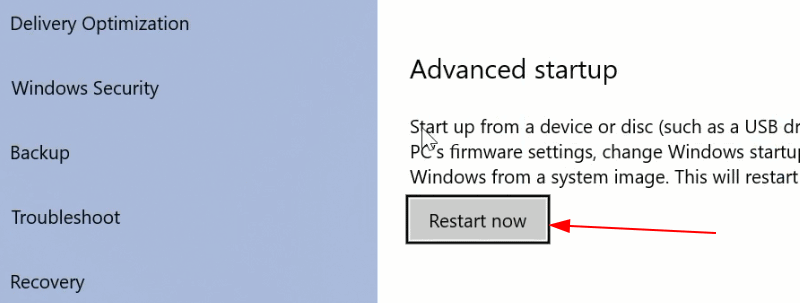
The longer but an easier step is to access the UEFI boot settings from within Windows. In the Windows menu, search for UEFI and then click on ‘Change advanced startup options’:
Go to the Advanced startup option and click on Restart now button.
On the next screen, click on ‘Use a device’:
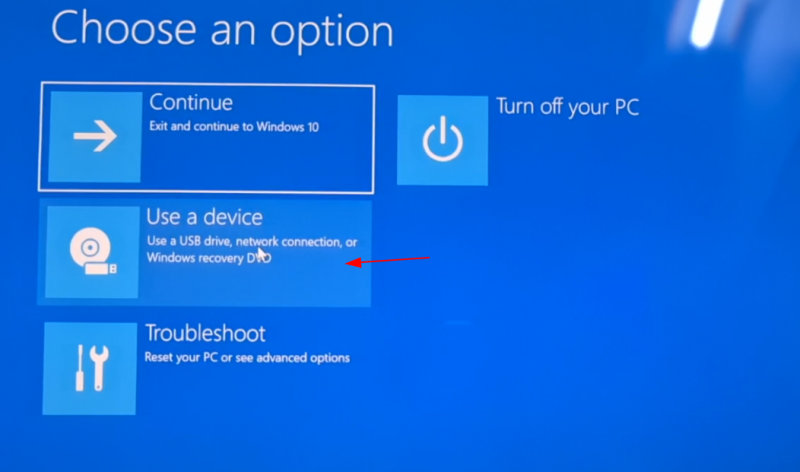
Recognize the USB disk with its name and size. It may also be displayed as EFI USB Device.
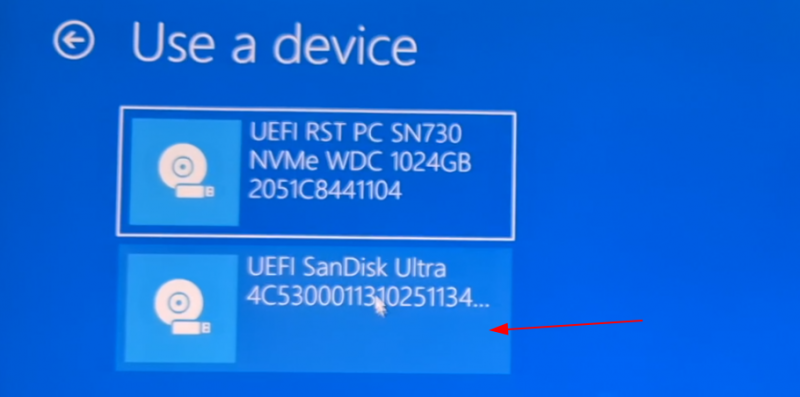
Now it will power off your system and reboot into the disk you chose which should be the live USB disk. You should see a screen like this after a few seconds:
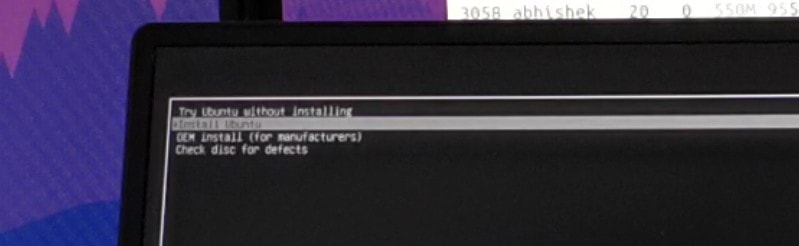
The ‘Try Ubuntu without installing’ option allows you to experience Ubuntu from the live disk. The option to install Ubuntu can be found on the desktop.
The “Install Ubuntu” option will start the Ubuntu installation immediately.
You can opt for either option based on your preference.
Step 6: Installing Ubuntu along with Windows 10
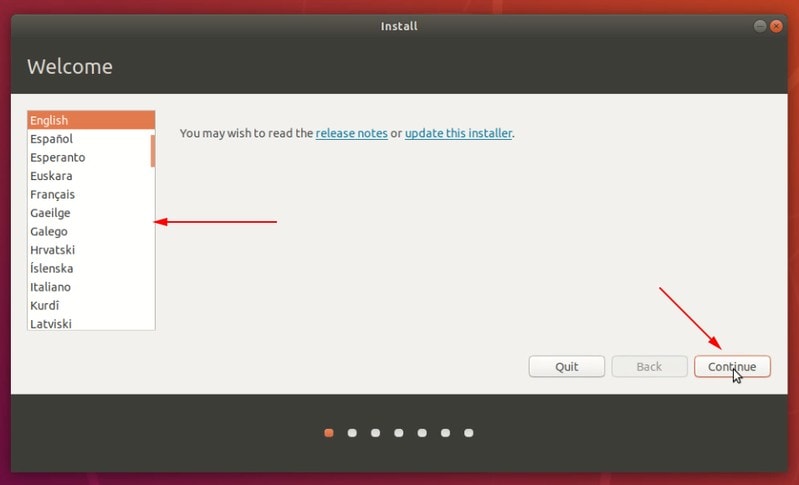
Start the installation procedure. The first few steps are simple. You choose the language and keyboard layout.
On the next screen, choose Normal installation. No need to download updates or install third-party software just yet. You may do it after the installation completes.
Hit continue. It may take some time to go to the next step.
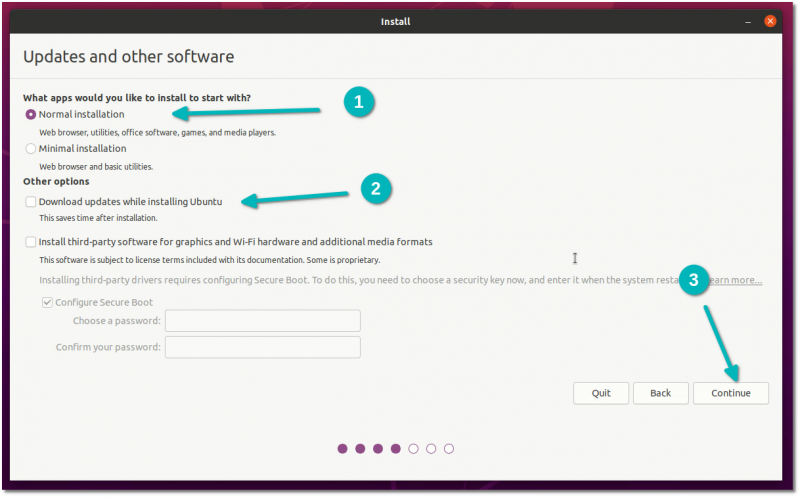
Note: Some people try to download updates and install media codes while installing. In my experience, it sometimes creates issues during installation and may also cause the installation to fail. For this reason, I advise against them.
Important: Installation takes two approaches based on what you see on the next screen
Since this is a detailed tutorial, I’ll cover both aspects.
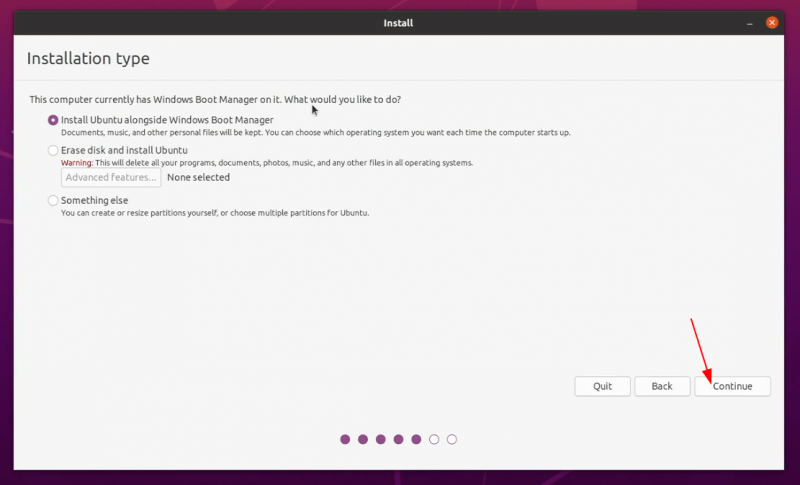
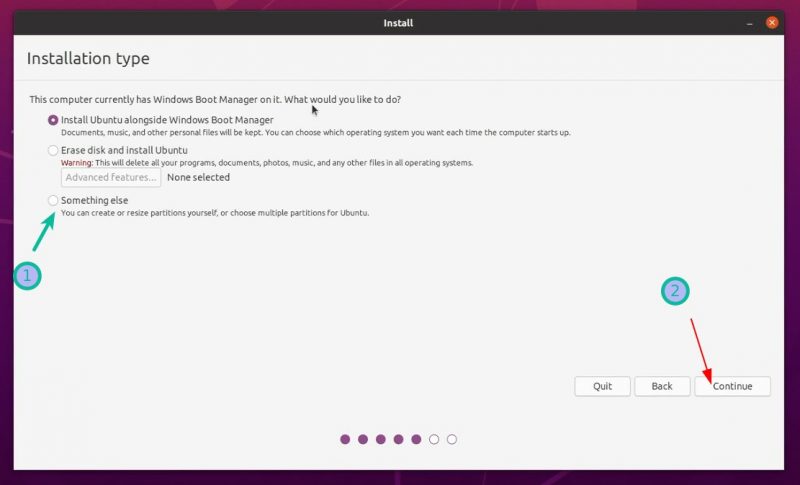
Approach 1: You see the “Install Ubuntu alongside Windows Boot Manager”
If you see the “Install Ubuntu alongside Windows Boot Manager” on the Installation type screen, you are in luck. You can select this method and hit continue.
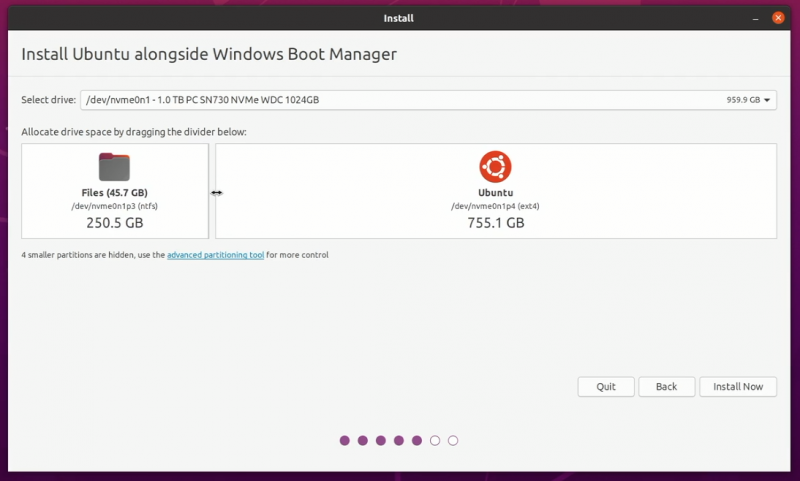
The next screen will give you the option to create a partition for Ubuntu by dragging the divider. You can allocate appropriate disk space to Linux here. Ubuntu will create one partition of the allocated disk space and it will have root with home and a swapfile of 2 GB in size under root itself.
Approach 2: You don’t see ‘Install Ubuntu alongside Windows Boot Manager’ option or it is greyed out
But if you are one of the unlucky ones who don’t see this option, no need to worry. Things are not that bad for you. You can still install Ubuntu with Windows.
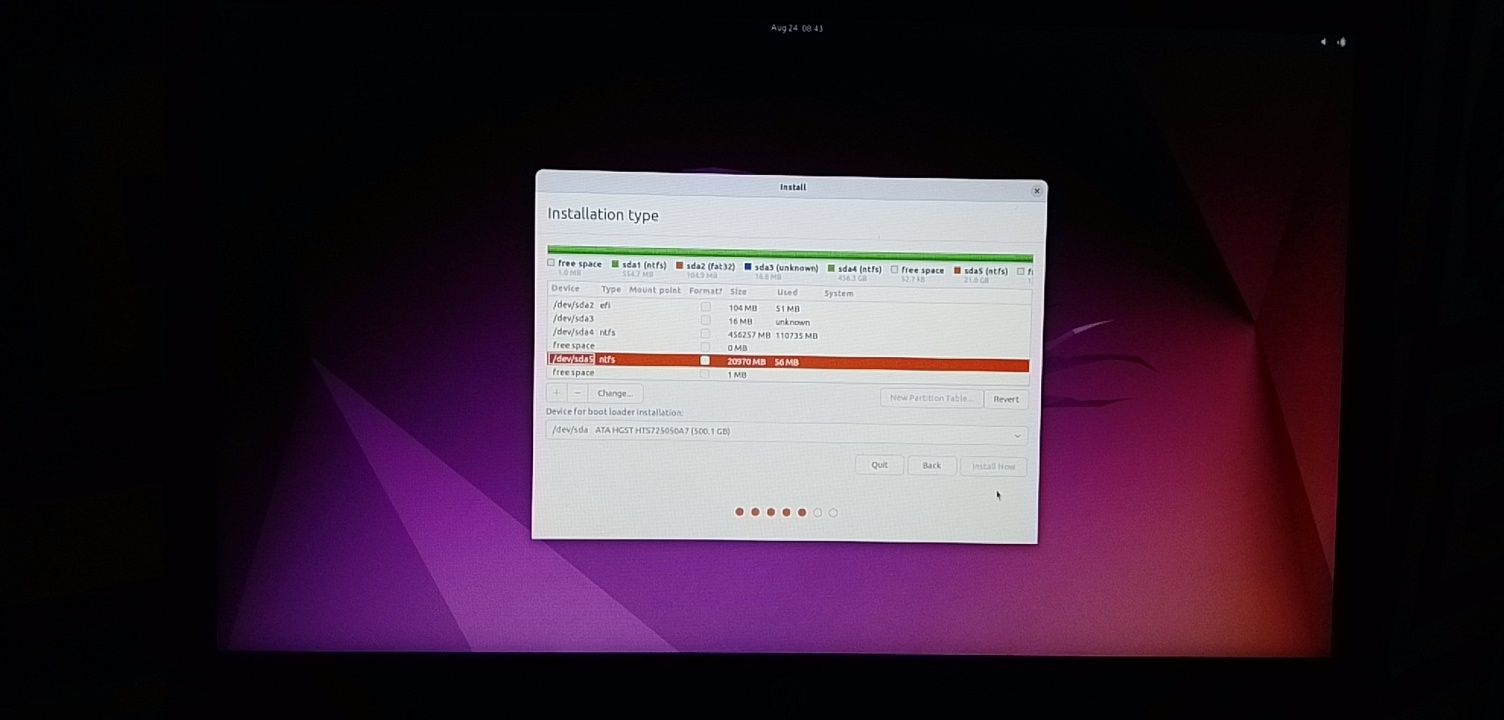
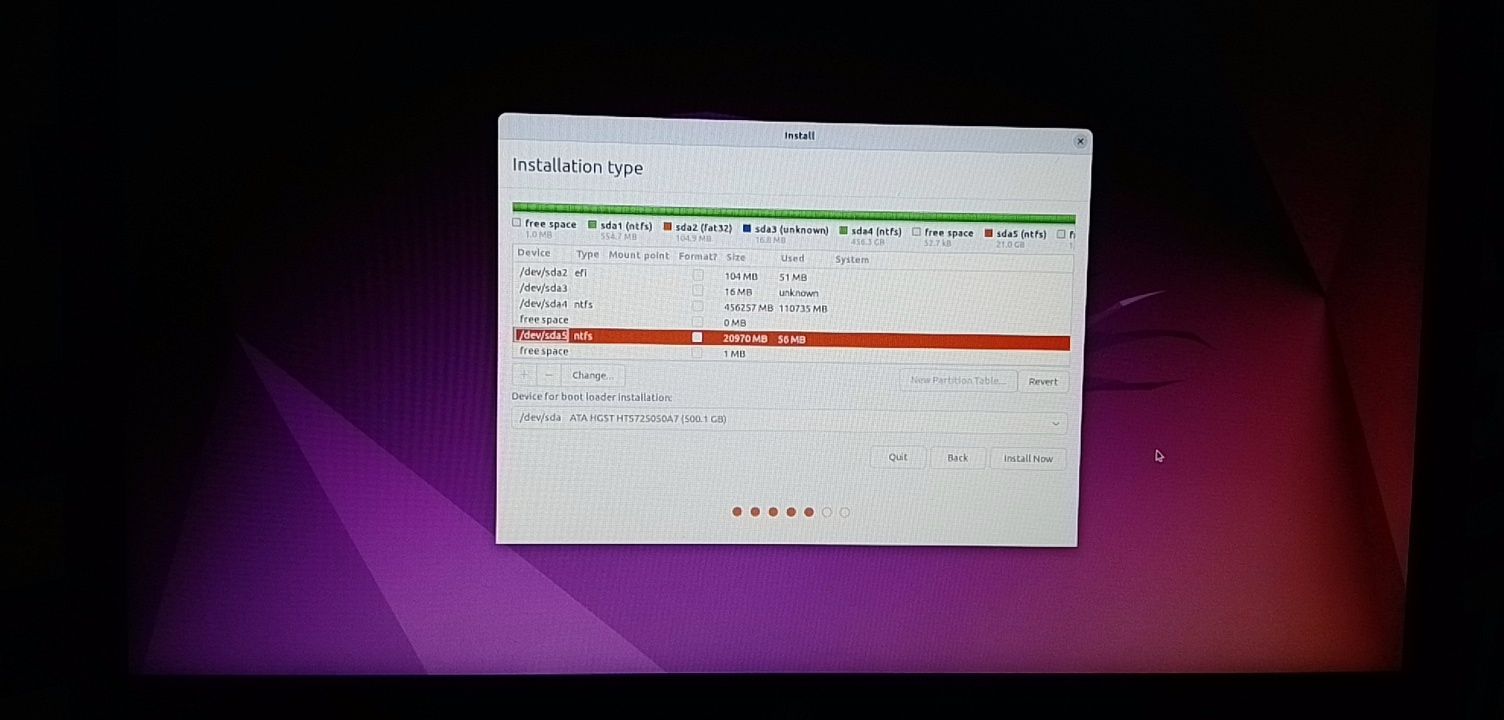
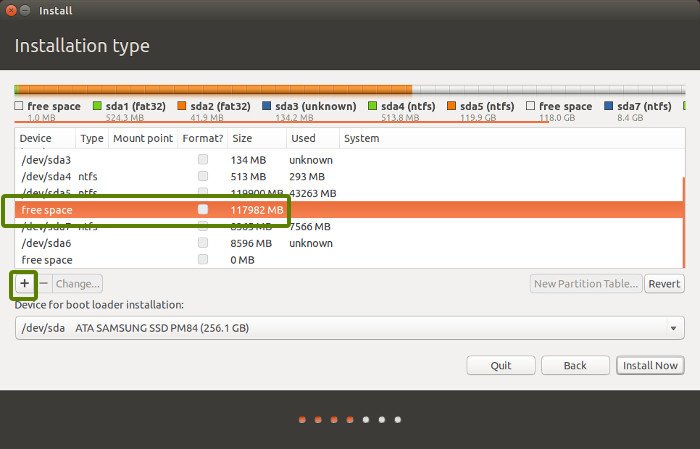
On the Installation type screen, go with Something Else.
It will take you to the partitioning screen. Remember you had created some free space beforehand?
You may allocate the entire free space to root (swapfile and home will be created automatically under root) or separate root, swap and home partitioning. Both methods are acceptable.
I show the steps for creating root, swap and home partitions separately. But feel free to use a single partition for all of them.
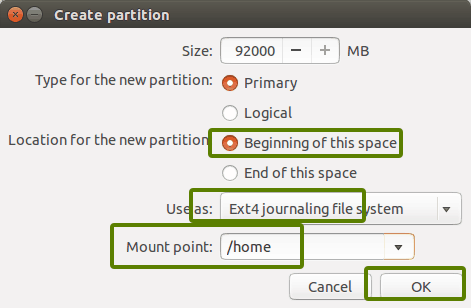
Select the free space and click on the + sign.
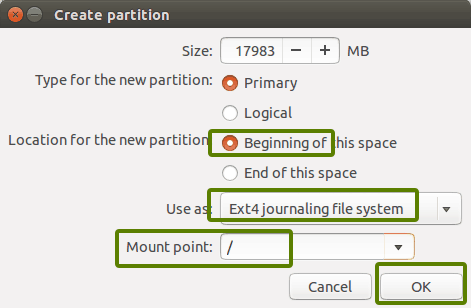
It will provide you with the option to create a Linux partition. You are creating the Root partition. Anything above 25 GB is more than sufficient for it. Choose the size, select Ext 4 as the file type and / (means root) as the mount point.
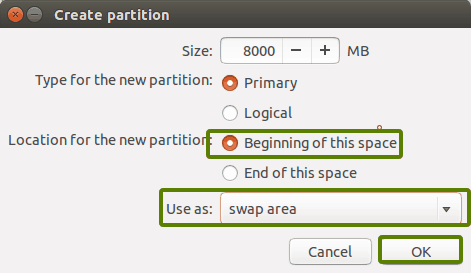
Clicking on OK in the previous step will bring you to the partition screen. Next, create a swap. Like previously, click on the + sign again. This time, use the file type as the Swap area.
Ideal swap size in Linux is debatable. If you have 2 GB or less RAM, use swap double the size of RAM. If you have 3-6 GB of RAM, use a swap of the same size as RAM. If you have 8 GB or more RAM, you may use swap half the size of RAM (unless you have plenty of disk space, and you want to use hibernation and in that case, use a swap of at least the same size as RAM).
If you feel like you have less swap on your system, don’t worry. You can easily create swapfile and add more swap space to your systems.
Similarly, create a Home partition. Allocate it maximum space (in fact allocate it the rest of the free space) because this is where you’ll save music, pictures and downloaded files.
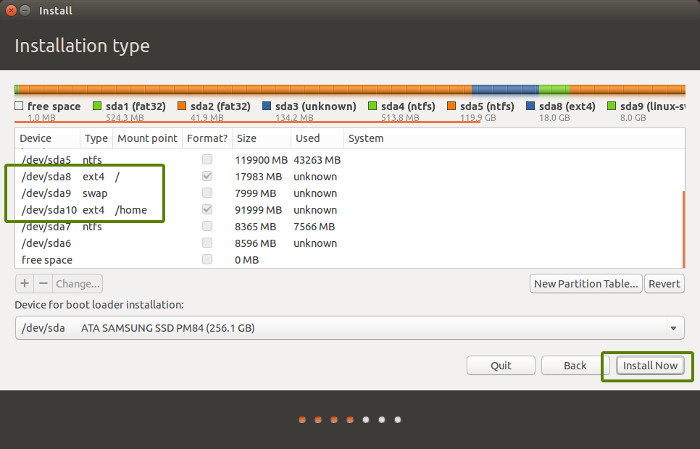
Once you are ready with Root, Swap and Home, click on Install Now:
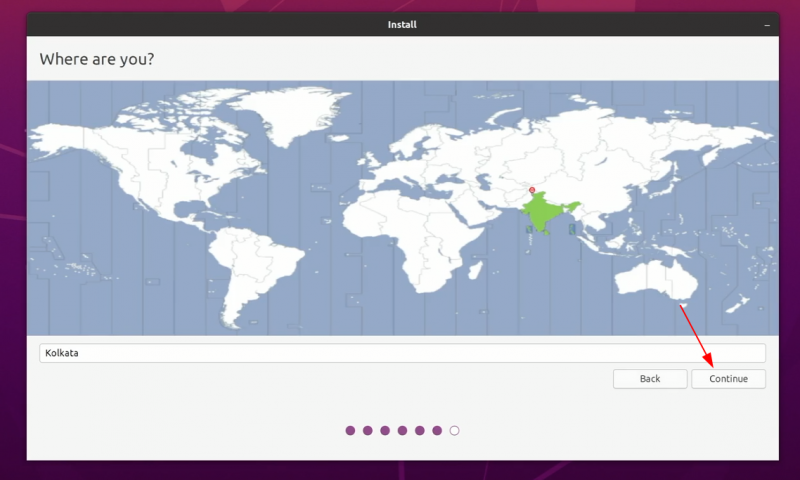
Well, you have almost won the battle. You can smell victory now. Select a timezone when asked.
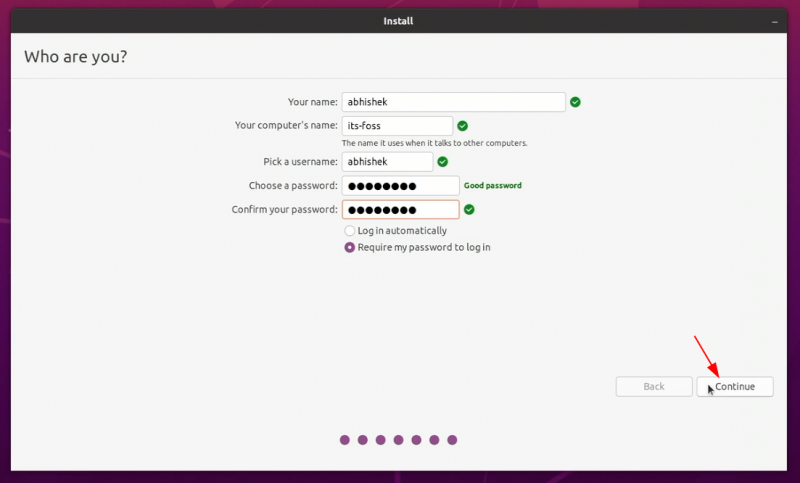
Next, you’ll be asked to enter a username, hostname (computer’s name) and password.
Now it’s just a matter of waiting. It should take 8-10 minutes to complete the installation.
Once the installation finishes, restart the system.
You’ll be asked to remove the USB disk. You can remove the disk at this stage without worrying. The system reboots after this.

💡
You do not need the live USB disk to use Linux anymore. You have installed Ubuntu on your computer’s disk. Remove the USB and keep it for later if you want to use it for installing Linux on some other system. You may also format and use it for regular data storage or transfer.
If everything goes smoothly, you should see the grub screen once the system powers on. Here, you can choose Ubuntu to boot into Ubuntu and Windows boot manager to boot into Windows. Pretty cool, right?
Dual boot did not succeed? Here are some troubleshooting tips
Life is not even for everyone. For some, the dual boot might not succeed just yet. However, instead of giving up, you may follow a couple of tips and retry the installation procedure.
Try changing the USB port
This may sound ridiculous but sometimes some USB ports cause issue with booting the USB or installing Linux. Changing the USB port could be a trick.
Try not using internet while installing Linux
I have experienced that sometimes Linux installation throws error if it is connected to the internet. If you encountered a “‘grub-efi-amd64-signed’ package failed to install into /target” error, please try installing Ubuntu without internet.
Disable secure boot and/or fast boot
In some rare cases, secure boot would not allow you to boot from live USB or install Linux. Disable secure boot. You may also disable fast boot in some cases.
Dual boot finished but you don’t see the grub screen to boot into Ubuntu
Please check your boot order in the UEFI settings. Do you see Ubuntu/UEFI below Windows Boot Manager? If yes, move it up the order. If you don’t see grub at all, you may carefully try this or this tutorial.
Grub rescue error or no bootable device found after dual booting
Use this tutorial for no bootable device found error. And this one is for grub rescue error.
Additional Tips: You’ll notice that there is a time difference between Windows and Ubuntu You can fix the time gap issue in dual boot easily. Also, in the grub screen, Ubuntu is up the priority. You can also change the boot order to make Windows default if you are going to use Windows more often than Linux. If you want to reverse the process, follow this guide to remove Ubuntu from dual boot with Windows.

I hope this guide helped you to dual boot Ubuntu with Windows 10 UEFI. I went into too much detail here, but I wanted to answer all the typical confusion and show all the required steps.
If you still have doubts or face strange errors, please comment, and I’ll try to help you out.
Both the operating system from Microsoft and the open source solution Ubuntu have their advantages and disadvantages. Would you prefer to sometimes work with one, sometimes with the other system? You don’t need two PCs for that. Let both operating systems run by dual boot on one computer. You then simply select the desired system when booting.
Contents
- Quick guide: Dual Boot with Windows 10 and Ubuntu
- Install Ubuntu in addition to Windows 10
- Step 1: Prepare Windows
- Step 2: Prepare a boot stick
- Step 3: Install Ubuntu
- Step 4: Select operating system
- Alternatives: Don’t use Ubuntu via dual boot with Windows 10.
$1 Domain Names
Register great TLDs for less than $1 for the first year.
Why wait? Grab your favorite domain name today!
Matching email
SSL certificate
24/7/365 support
Quick guide: Dual Boot with Windows 10 and Ubuntu
- If necessary: Install Windows 10
- Check if the system has UEFI
- Prepare partition or hard disk for Ubuntu
- Create bootable USB stick with ISO file for Ubuntu
- Boot from the USB stick
- Install Ubuntu next to Windows
- Select which operating system to boot in the start menu
Install Ubuntu in addition to Windows 10
You probably already have Windows 10 installed on your PC or laptop and now want to install Ubuntu as a second operating system. Even if neither system is present yet, you should install Windows 10 first and then set up dual boot with Ubuntu.
Tip
You can use other distributions based on Ubuntu in the same way at the same time as Windows 10. For example, Linux Mint, Lubuntu, or Xubuntu can also be used for dual boot.
Step 1: Prepare Windows
First, check whether your system is set up for dual booting at all. For this UEFI is needed, the further development of BIOS. Newer PCs and laptops should be equipped with the interface in any case. To be sure, you can simply call up the system information. You should find the corresponding information under the item “BIOS Mode”.

If you have been working with your system for a long time, i.e. you have not just set it up again, make a data backup to be on the safe side. If an unexpected error occurs during the installation of the second operating system, important data can also be lost. A backup in the cloud is a good option.
Note
With HiDrive from IONOS, you’ll always have your most important documents and pictures at your fingertips — no matter what device you’re using.
Finally, you will also need storage for the Ubuntu installation. It’s best if the second operating system gets its own hard drive. If only one is available, you’ll need to create a new partition. Plan at least 20 GB here, so that you can also work well with Ubuntu. More is definitely better, though.
Step 2: Prepare a boot stick
Now you create a bootable USB stick. First you need an empty USB stick. Then download the ISO image of Ubuntu (or a comparable distribution). Now you need some software to make the USB stick bootable. The tool called Rufus is often used for this. With this, only a few clicks are needed to load the ISO file correctly onto the stick.

Tip
For detailed instructions on how to make a USB stick bootable, see the Digital Guide. In the article, you will also learn about different methods and tools.
You may also need to set the correct boot order in UEFI. To do this, start the BIOS and set it to boot from a USB stick first.
Step 3: Install Ubuntu
Now that you have made all the preparations, insert the USB stick into the PC or laptop and restart the system. The BIOS will now access the USB stick and launch the setup application of Ubuntu.

Note
If the boot process does not start, you may still need to turn off Secure Boot first. To do this, switch to the UEFI and look for the corresponding option there.
Follow the instructions of the installer until the software asks you if you want to install Ubuntu in addition to Windows 10 (or Windows Boot Manager). Confirm this. In the next step, you just need to verify that the software has chosen the correct partition for the installation. When you have completed the setup, both operating systems are installed in parallel. Now remove the USB stick again, so that the system will not try to boot from it at the next startup.
Step 4: Select operating system
Now that you have two equivalent operating systems installed on one PC or laptop, you have to select whether you want to work with Windows or Ubuntu every time you (re)start. This menu is provided by the Grub software, which is part of Ubuntu.
Alternatives: Don’t use Ubuntu via dual boot with Windows 10.
There are other ways you can work with Ubuntu in addition to your Windows 10 installation without having to resort to dual-booting. These are especially suitable if you rarely need to resort to the second operating system.
For example, you can install Ubuntu in a virtual machine. With this method, you launch additional software, which then loads Ubuntu. So instead of loading either one system or the other, you have Windows and Ubuntu running at the same time. You can simply switch windows. The downside is that this method takes a lot of system resources, so it runs comparatively slowly.
Another way you can work with Ubuntu in addition to Windows 10 is to use a live system loaded from a USB stick. So instead of installing Ubuntu on your hard drive, you just use the USB stick.
You also still have the option of not installing the second system on your own PC, but instead relying on a cloud. For example, at IONOS you can very easily set up a cloud server that runs Ubuntu. You only need an Internet connection to connect, and then use the full resources of the server.
Related articles

How to install the Windows 11 upgrade
If you have a valid license or product key, you can install a Windows 11 update free of charge and benefit from new features, such as the redesigned taskbar or the optimized voice, touch, and pen operation. But what exactly are the hardware requirements for a Microsoft update and what are the options for installing a Windows 11 update?
How to install the Windows 11 upgrade

How to find and retrieve your Windows 10 product key
If you’re planning to update your computer or reinstall Windows 10, you need to retrieve your Windows 10 key – also referred to as a product licensing key. In 2016, Microsoft changed the way it licenses products and issued digital licenses for codes to be automatically transferred during a reinstallation. But there are some situations when it may be necessary to find your Windows key and enter it…
How to find and retrieve your Windows 10 product key
 Maksim KabakouShutterstock
How to downgrade Windows 11 to 10
Is Windows 11 taking up too much of your device’s resources? Or perhaps you preferred working in Windows 10? Whatever your reasons, it is possible to downgrade from Windows 11 to 10 within the first few days after an upgrade and switch back to the previous version. Find out how to uninstall Windows 11 after the end of a trial period.
How to downgrade Windows 11 to 10
Ubuntu is a free and open-source distribution that is far more resource-friendly than Windows 10. The majority of creative professionals and programmers prefer to use Ubuntu for its privacy and security, complete customization and personalization capabilities, and its use with cloud computing. When it comes to getting technical work completed, it’s best performed in Ubuntu.
It is not recommended that you install Windows 10 after Ubuntu, but it can be done.
Of course, there are also things that Windows 10 has over Ubuntu, making it more likely to be a PC user’s OS of choice. Simply put, there are quite a few things that Ubuntu can’t do that Windows 10 can.
These primarily revolve around everyday computer activities such as gaming, surfing the web, and other forms of media and entertainment. These things are better left to Windows 10.
This is why it has become commonplace in recent years to have a dual-boot system. Using Ubuntu for technical purposes and Windows 10 for general use is the way of the future.
Installing Ubuntu On a Windows 10 PC
For those of you with Windows 10 already installed on their PC, installing Ubuntu is a straightforward process. It’s the easier method of the two as Ubuntu is commonly installed “on top” of Windows 10.
Ubuntu Requirements For Windows 10
Back up all of your important data prior to installing Ubuntu. Purchase yourself a USB stick with a minimum of 8GB storage to serve as a boot drive and make sure that your Windows PC meets the following requirements:
2 GHz dual-core processor2 GB RAM25 GB of hard-drive spaceVGA capable of 1024×768 screen resolution.
How To Dual Boot Ubuntu With Windows 10
Head over to the Ubuntu website and download the latest version of the Ubuntu ISO file.
Next, it’s time to create a bootable USB stick. Using the USB you purchased, download Rufus from the official website. The program will help you to create a USB stick for Ubuntu as Rufus is UEFI-compatible.
After it’s downloaded, launch Rufus. Locate the create a bootable disk using section and select the ISO image. Find the Ubuntu ISO file you downloaded earlier and select it.
Now you’ll need to create a disk partition for Ubuntu. Right-click the Windows 10 Start Menu and open Disk Management.
Right-click on the drive which you want to partition and select shrink volume. Allocate a minimum of 64GB storage to ensure that Ubuntu functions properly.
Finally, restart your PC and open the Boot Menu or UEFI Firmware settings. Then boot from the USB stick that contains Ubuntu. Select your preferred language from the Ubuntu installation menu. You’ll also need to select Install Ubuntu alongside Windows 10 in order to be able to dual-boot both operating systems.
Once the setup process is complete, restart your computer. Now, whenever you turn on your computer you’ll be asked to boot into either Ubuntu or Windows 10.
Installing Windows 10 Onto An Ubuntu Machine
Installing Windows 10 after Ubuntu can be a tad trickier and is honestly not recommended. However, if this is what you have to work with, there is definitely a procedure you can follow.
Prepare A Partition For Windows 10
Ensure that the intended partition for the Windows operating system is the Primary NTFS partition. You’ll need to create this on Ubuntu, specifically for Windows installation purposes.
You can create a partition by using the gParted or Disk Utility command-line tools. You’ll have to delete any already created logical/extended partitions you may have and create a new primary partition. This will erase all data currently residing in the partition, so back up what is necessary.
Installing Windows 10
You’ll need a USB stick or DVD with Windows 10 preloaded on to it in order to start the Windows installation process. You will also obviously need a functioning Windows Activation Key to authenticate the installation.
Boot up using whichever medium you’ve chosen.
Choose Custom Installation, because you want to get everything right moving forward and choosing this option will help to avoid issues.
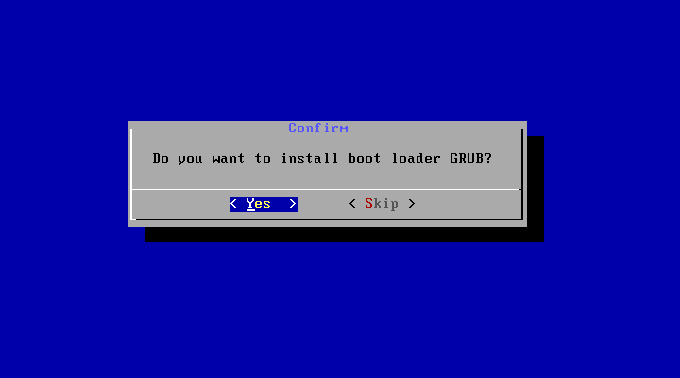
Select the NTFS Primary Partition that you created earlier as your Windows 10 installation partition. GRUB will be replaced by the Windows bootloader once the installation process is complete which means the GRUB menu will no longer be there when you go to boot your machine. However, we can just install GRUB again once you’re ready to do so.
Installing GRUB
Acquire a LiveCD or LiveUSB of Ubuntu and load it up. Open up the Terminal and type in the following:
Boot-repair will launch automatically after installation has come to an end. Select the recommended repair option, wait until GRUB is fully installed, then reboot your computer.
The GRUB menu will once again be there to greet you. You can now choose which operating system you want to run.
Dual boot Ubuntu Windows 10- How to Dual boot Ubuntu and Windows 10 or some also searches for how to Dual Boot Ubuntu with Windows 10 is common and here you will get the full tutorial.
You can the same methods to dual boot other flavors of Ubuntu as Lubuntu, Kubuntu, and Xubuntu too. basically, all of the Linux distros have the same installation and booting system, only the setup of installation has little changes.
How to Dual Boot Ubuntu and Windows 10?

Here is the entire procedure to perform the installation.
Our Dual Boot settings
Before we being, you should know that we have dual-booted Windows and Ubuntu on our system with UEFI secure boot and hard disks as GPT partitions. Both of the qualities can be found in recent systems, if you have brought your system a while ago then you will need to check and change if needed.
Prerequisites before doing the Dual Boot
Like we mentioned before, you will need to check your system supports UEFI secure boot and your hard disk is GPT partitioned. Installed Windows 10 OS on your system should be the first step.
The next thing will be to disable BitLocker. If you have installed Windows 10 Pro, then there is a great possibility that you also have BitLocker. Make sure, you have the recovery keys and the application is disabled.
You will also need an Intel Core 2 Duo or better with 250+ GB of storage. For dual-booting, we would recommend you to have at least 500 GB of storage. There is a specific need for SDD or HHD hard drives, any of them would do the work. It is quite obvious to state, still using SDD will only improve the performance.
For RAM memory try to have 4-16 GB RAM. A USB drive with 8 GB of storage is also needed. This will be later used for the installation of Ubuntu.
Internet connection to download necessary drive and setup of Ubuntu is required. Having a bootable USB drive of Windows 10 or Windows recovery is also needed, in case something goes wrong.
Reminder: Please make sure, you have the backup of all of your data. as there is a slight chance of losing your data during the installation.
Download Ubuntu
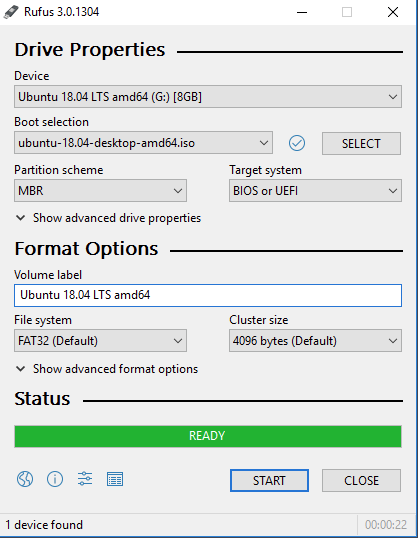
Visit the official website of Ubuntu and download Ubuntu’s setup file. Once downloaded, you will also need to make it bootable on your USB drive using a third-party application as Rufus.
- Download Ubuntu
- Download Rufus and run it.
- First select the ISO file of Ubuntu.
- In the Partition Scheme, select it as GPT.
- For Target System, select UEFI (non CSM).
- Name your USB drive.
- File system should be FAT32(Default).
- Cluster size also should be as Default.
- In last click on START.
Now, Rufus will start creating a bootable USB of Ubuntu that can be later used for dual booting.
Related: Free Download Ubuntu Image
Disk partition of Dual Boot
Most of the users quickly get fed up with dual booting and changes to a single OS. deleting the Ubuntu-related file on such occasions is a real challenge. Even if you want to use the dual boot option for a long period of time then having a separate partition for the OS will only improve the performance and makes thing organized.

- Go to Start and type “Disk Partition” and you will find Create and format hard disk partitions on your screen. You can also get access to Disk Management tool by opening CMD and use “diskmgmt.msc” command.
- Once you are inside the Disk Management Tool, there you will need to create a disk for Ubuntu only.
- right click on your C drive and click on Shrink Volume. Even tough 20 GB for the Ubuntu is enough and 100 GB is a good size. However, soon you will experience disk space shortage. So, try to do the partition about 130 GB or more.
If you don’t have enough space, then try to delete other drives to make space for your Ubuntu drive.
Note: no matter what you do, don’t try to delete the C: drive as it possesses windows files and on deleting, many important files might be deleted too. this can cause a lot of trouble.
Boot Ubuntu
Plugin your USB drive and restart your system. While your system boots, press the F2/F10 key on your keyboard to boot the USB.

change advanced startup settings 
advanced startup-restart now


If you find that challenging, then you can insert your USB and type “UEFI” in Start and click on Change advanced startup options. You will find a Restart now button right below Advanced startup, click on it.
In Choose an option, click on Use a device then select your bootable USB of Ubuntu. Soon your system will power off and restart again. This time, your system will start the installation of Ubuntu.
Installation of Ubuntu

On installation, the first thing will be to select Language and Keyboard layout. Then you will be in Updates and other software windows, select Normal Installation. Select the other option of Download updates while installing Ubuntu in the section below and click on Continue.

Remember that we are not going to select options to download third-party applications as media codes. For now, let’s keep things simple, once the installation got completed, then you can use other features too.
Installation type
In Installation Type, don’t select Install Ubuntu alongside Windows Boot Manager; as it will do auto partition and you can use the dragger to do the partition. Another drawback will be the merging of root and home files, which will cause problems with uninstalling the Ubuntu or Windows 10.

Instead, select the Something else option and click on Continue.
You are here to create a partition. Select the drive that you have created for Ubuntu and use that. If you didn’t create a new disk, then you can use the free space and create a new disk. The only thing that you will need to keep in mind is:

- Size: 130+ GB storage
- Type of the new partition: Primary
- Location for new partition: Beginning of this space
- Use as: Ext4 journaling file system
- Mount Point: (select the location)
Click on OK.
Note: avoid trying to delete any disk, if you are not familiar with it. As it can be your C drive (contains windows files) or System Reserved drive. Don’t format or any file, until you are sure is totally useless.
Install Ubuntu on your system
Once you have completed this step then you can dual boot Ubuntu and Windows 10.
A step above will do the partition and create a root disk. When the root file is created, click on Install Now.
Popup about swap will appear, ignore it and click on Continue.
Select your Time zone and click on Continue.

Type the User name and Hostname (Sudo or computer name), enter your password, and click on Continue.

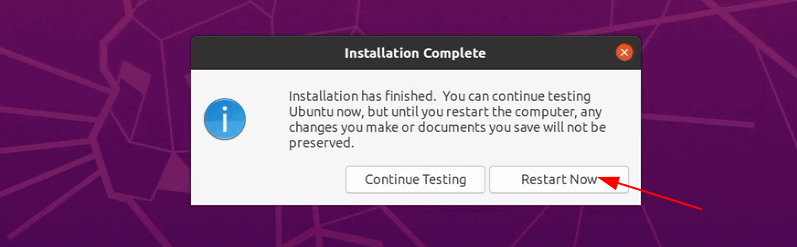
The installation will take place. This might take a while, so be patient. Once the installation got completed, two options will be provided:
- Continue Testing
- Restart Now.
Click on Restart Now, and unplug your USB drive.
Enjoy your Dual Boot Windows and Ubuntu on your system.
How to toggle between Ubuntu and Windows in Dual boot?
Want to change between Windows 10 and Ubuntu, then you can use this feature (which is mostly disabled on most systems). This feature enables you to show all the OS on your system and you can boot any of them.
Start your PC and click on This PC. On the left side, right-click on This PC.
Soon you will see the Properties option, click on it.
Go to Advanced system settings, then in the Advanced tab, you will find the Startup and Recovery section. Click on Settings and will be taken to System startup. Check the Time to display list of operating systems and also insert the duration by inserting numbers too.
Type the seconds and click on OK. Restart your system and you will have lists of OS on your system to boot. Dual boot ubuntu Windows 10
Related: Install Windows 10 on macOS Big Sur using Boot Camp