 Компоненты Hyper-V в Windows 10 позволяют создавать виртуальные машины встроенными средствами системы (подробнее: Виртуальные машины Hyper-V в Windows 10), а также служит для работы таких компонентов как Песочница Windows 10. Однако в некоторых случаях включенные компоненты Hyper-V могут мешать: например, для запуска виртуальных машин VirtualBox или эмуляторов Android.
В этой инструкции подробно о том, как отключить Hyper-V в Windows 10 двумя способами: первый предполагает отключение соответствующих компонентов системы, второй — отключение гипервизора без удаления самих компонентов Hyper-V.
- Отключение Hyper-V путем удаления в компонентах
- Как отключить Hyper-V без удаления
- Видео инструкция
- Дополнительные способы удалить Hyper-V
Отключение Hyper-V в компонентах Windows 10
Первый способ отключить Hyper-V предполагает использование соответствующего раздела «Программы и компоненты» в панели управления, шаги будут следующими:
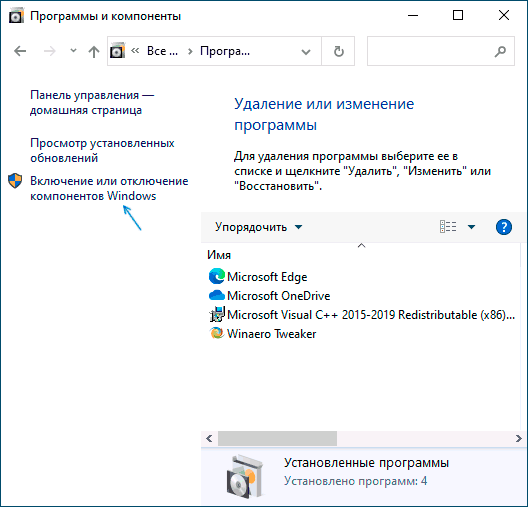
- Откройте Панель управления, для этого можно использовать поиск в панели задач, либо нажать Win+R на клавиатуре, ввести control и нажать Enter.
- В панели управления перейдите в раздел «Программы и компоненты» или «Удаление программы».
- Слева нажмите по пункту «Включение или отключение компонентов Windows».

- Снимите отметку с пункта «Hyper-V» и примените настройки.

- При появлении запроса на перезагрузку, перезагрузите Windows 10 для вступления изменений в силу.

Обычно указанных действий достаточно, чтобы устранить проблемы, которые иногда могут быть вызваны наличием Hyper-V в системе.
Если указанные шаги не помогли, попробуйте там же в компонентах отключить пункт «Песочница Windows» и также перезагрузить компьютер при необходимости.
Как отключить Hyper-V без удаления компонентов
Предыдущий метод отключения Hyper-V предполагает удаление соответствующих компонентов из системы, однако можно обойтись и без этого:
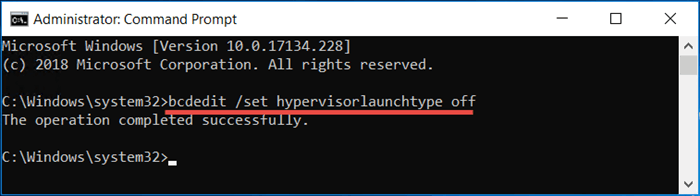
- Запустите командную строку от имени Администратора, для этого можно использовать поиск в панели задач, а потом выбрать пункт «Запуск от имени администратора». Другие способы запуска командной строки от имени администратора.
- Введите команду
bcdedit /set hypervisorlaunchtype off
и нажмите Enter.
- Перезагрузите компьютер.
После перезагрузки Hyper-V (гипервизор) будет выключен и не будет влиять на запуск каких-либо других виртуальных машин, при этом сам компонент останется включенным.
Чтобы снова включить Hyper-V, используйте ту же команду, но измените off на auto и перезагрузите компьютер. Также есть возможность создания меню загрузки для выбора режима, в котором будет запускаться система — с включенным или отключенным Hyper-V, об этом в инструкции Как запускать виртуальные машины Hyper-V и VirtualBox на одном компьютере.

Видео
Дополнительные способы удалить Hyper-V
Помимо описанных способов, вы можете удалить компоненты Hyper-V в PowerShell с помощью команды
Disable-WindowsOptionalFeature -Online -FeatureName Microsoft-Hyper-V-Hypervisor
Или, при использовании командной строки, с помощью команды:
DISM /Online /Disable-Feature:Microsoft-Hyper-V
Надеюсь, материал помог разобраться. Если же остаются вопросы — задавайте в комментариях. Также помните, что для работы виртуальных машин и эмуляторов следует включить аппаратную виртуализацию.
You can use the Turn Windows Features On or Off feature to remove Microsoft’s virtualization solution, Hyper-V Manager, from your computer.
Hyper-V is a widely used virtualization software used by many system administrators today. The fact that Hyper-V Manager is free is one of its best features. It is worth noting that the operating systems Windows 8.x and 10 have incorporated it as an inherent feature.
You can install this virtualization program on your computer from the Windows features when installing Hyper-V. Before performing the Hyper-V setup, determine if your computer supports virtualization technology.
Click the link below to determine whether a computer’s CPU supports the virtualization feature.
- How to Enable Virtualization Technology in a Computer
Furthermore, Hyper-V offers three distinct installation options for Windows. You can perform Hyper-V installations through the links below.
- How to Install the Hyper-V Software on Windows 10 OS
- How to Enable Hyper-V using Powershell
- How to Configure Hyper-V using CMD
This article teaches you how to uninstall Hyper-V and Windows’s emulation features.
How to Disable Hyper-V
To uninstall Hyper-V from your PC, follow the steps summarized below.
Step 1
Choose Programs and Features by right-clicking the Windows desktop’s Start button.

Step 2
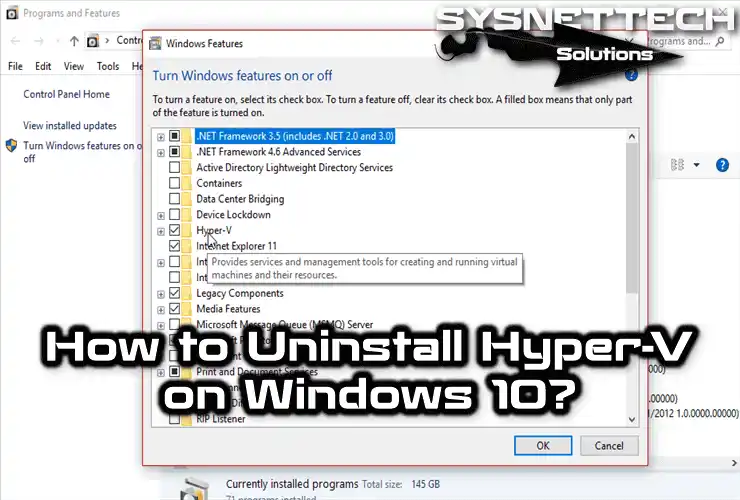
In the Programs and Features screen, look for the button labeled Turn Windows features on or off.

Step 3
The image below shows Hyper-V selected once Windows Features opens. Uncheck Hyper-V Checkbox as follows.

Step 4
To deactivate Hyper-V, uncheck the checkbox that you see and click OK.

Step 5
We are applying changes.

Step 6
After turning off Hyper-V, the system settings change will only take effect when you restart your computer.

Step 7
If you have one of the newer Build versions of Windows 10, you may not see the Windows Hypervisor Platform option in the sub-options of HyperV in Step 4. So if your operating system’s build number is 1809 or higher, deselect it as in the image below.

Step 8
After the above steps, you can use virtualization software like VirtualBox and VMware without Hyper-V interfering. If Hyper-V persists, start CMD as administrator and enter this command:
bcdedit /set {current} hypervisorlaunchtype offSuppose you wish to re-enable the Hypervisor and use Hyper-V again. If that is the case, you can execute the command below to do so:
bcdedit /set {current} hypervisorlaunchtype autoIn addition, instead of using the above commands, download the regedit file from here. After downloading the Windows-compatible reg file, double-click it to launch the regedit program. Once installed, click Yes to apply the changes and restart your computer to use the modifications.
How to Delete Hyper-V ⇒ Video
Watch the video below to start understanding how to turn off virtualization for Hyper-V entirely. You can consider becoming a subscriber to our channel on YouTube if you believe that the information we provide interests you.
Conclusion
This post has reviewed the ins and outs of uninstalling the Hyper-V virtualization software on Windows 10. Please visit this address if you have any problems removing the application.
Related Articles
♦ How to Use Private Virtual Switch
♦ How to Create Internal Virtual Switch
♦ How to Create External Virtual Switch
♦ How to Connect Virtual PC to Internet
♦ How to Install Ubuntu in Hyper-V

TolgaBagci
Hello, I’m Tolga! I am a computer specialist who has been specializing in computer technologies for about 20 years. I provide solutions to problems encountered in many areas such as hardware, system, network, virtualization, server systems, and operating systems, and create relevant content on my website by explaining how to solve these problems. My goal is to be a reliable source of expert, quality, and trustworthy solutions for your computer problems. By following innovations and using the latest technologies, I aim to be successful in my job and provide you with the best service. Don’t hesitate to contact me for any questions or curiosity about technology. Have a nice day, stay up to date 
Since Windows 8, we can create a virtual machine with Hyper-V. As a newly publish function, it has some unignorable shortcomings while compares to VirtualBox and VMware. Such as Hyper-V needs to configure virtual switch manager to connect to the network and it cannot connect to USB flash disk directly. That’s why most people tend to utilize VMware or VirtualBox instead. Besides, Hyper-V conflicts with VMware and VirtualBox. So, let’s go ahead and get started on how to disable or turn off Hyper-V in Windows 10.
- Option 1: Disable Hyper-V Windows 10 by Control Panel
- Option 2: Turn off Hyper-V Windows 10 via Computer Management
- Option 3: Disable Hyper-V Windows 10 by Command Prompt
- Option 4: Disable Hyper-V Windows 10 PowerShell
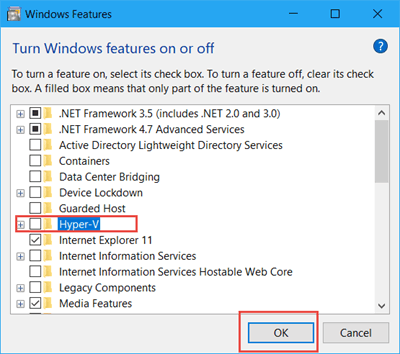
Option 1: Disable Hyper-V Windows 10 by Control Panel
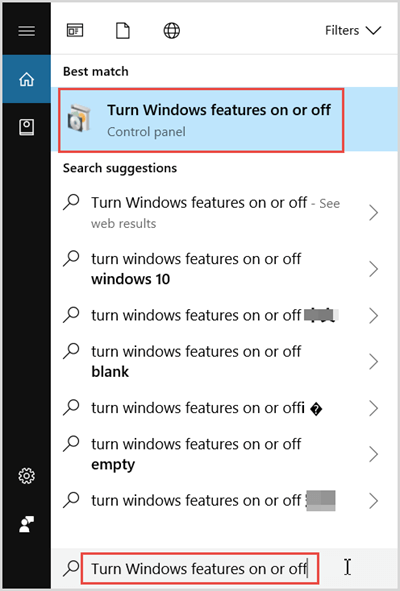
Step 1: Type Turn Windows features on or off in the Windows search bar and hit Enter to open it. Or you can navigate to Control Panel > Program > Turn Windows features on or off.
Step 2: Uncheck the box of Hyper-V and click OK. Restart your computer to disable Hyper-V completely.
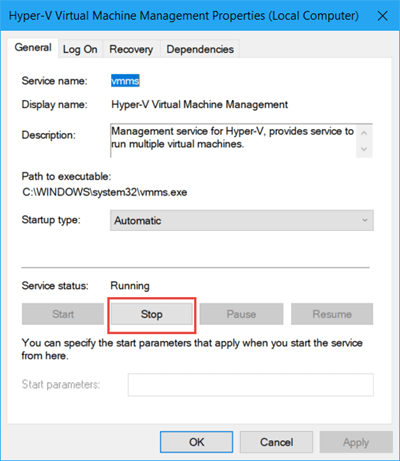
Option 2: Turn off Hyper-V Windows 10 via Computer Management
Step 1: Right-click on This PC icon then select Manage.
Step 2: In the Computer Management window, expand Services and Applications > Services and double Hyper-V Virtual Management.
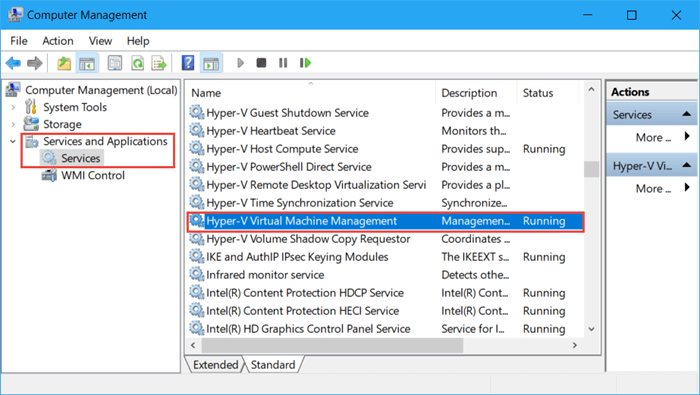
Step 3: Tap on Stop button to turn off Hyper-V in Windows 10.
Option 3: Disable Hyper-V Windows 10 by Command Prompt
Step 1: Type cmd in the search bar and Run Command Prompt as administrator.
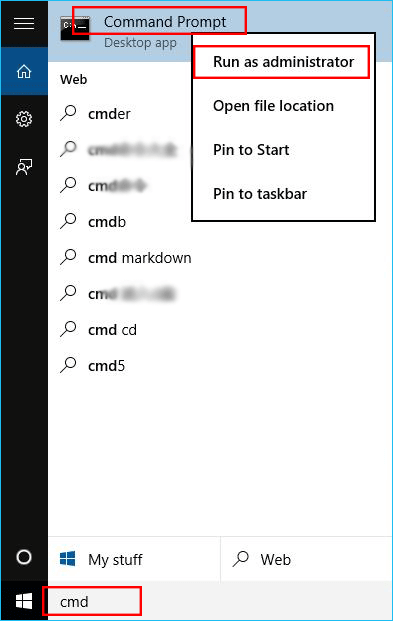
Step 2: Execute the “bcdedit /set hypervisorlaunchtype off” to disable Hyper-V in Windows 10. Restart to take effect.
Note: To enable Hyper-V in Command Prompt, you can run “bcdedit /set hypervisorlaunchtype auto” instead.
Option 4: Disable Hyper-V Windows 10 PowerShell
Step 1: Right-click on the Start icon and select Windows PowerShell (admin).
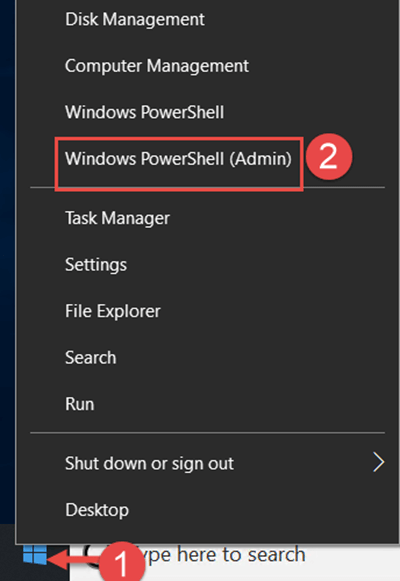
Step 2: Copy the command line below and run it.
Disable-WindowsOptionalFeature -Online -FeatureName Microsoft-Hyper-V-All
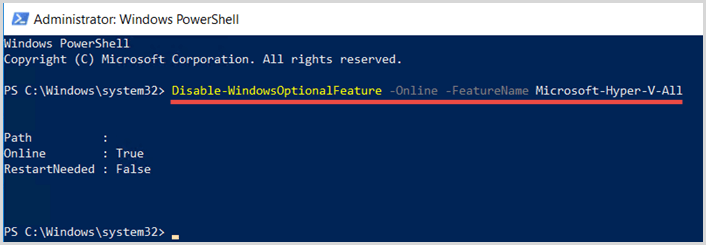
Step 3: Reboot Windows 10 to make changes effect.
If Hyper-V is getting in the way of your plans, you can get rid of it on Windows 11 using these tips.
Hyper-V comes pre-installed on Windows 11 computers. While the virtualization tool is not available out of the box on the Home edition of the OS, you can install it with a batch script.
Unfortunately, Hyper-V can conflict with third-party apps on your PC. As a result, you may encounter the Hyper-V detected error when trying to launch an app, PC games, or hardware tuning utilities.
Luckily, you can disable Hyper-V in Windows 11 with the help of the classic Windows Features dialog, Command Prompt, and PowerShell.
How to Check if Hyper-V Is Running on Windows 11
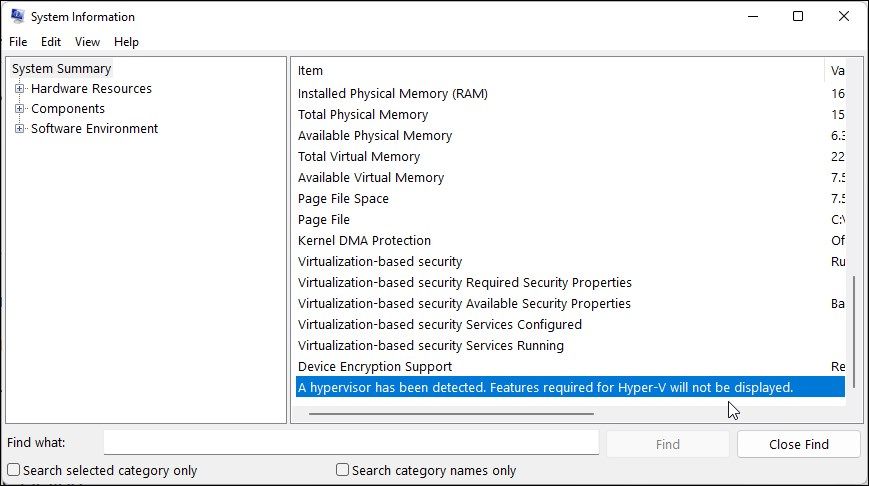
You can access the System Information app to determine if Hyper-V virtualization is running. This is useful if you need to verify Hyper-V’s status after disabling it.
To check the current Hyper-V status on your computer:
- Press Win + R to open Run.
- Type msinfo32.exe and click OK to open the apps.
- Next, check if the following entry is available at the bottom of the details tab:
A hypervisor has been detected. Features required for Hyper-V will not be displayed. - If yes, you’ll need to disable Hyper-V, Memory integrity, and the Credential Guard feature, as discussed below to use other virtualization tools without any error.
1. How to Disable Hyper-V via the Windows Features Dialog
The Windows Features dialog lets you add additional features that are disabled by default in Windows 11. You can also use it to disable some advanced features, including Hyper-V.
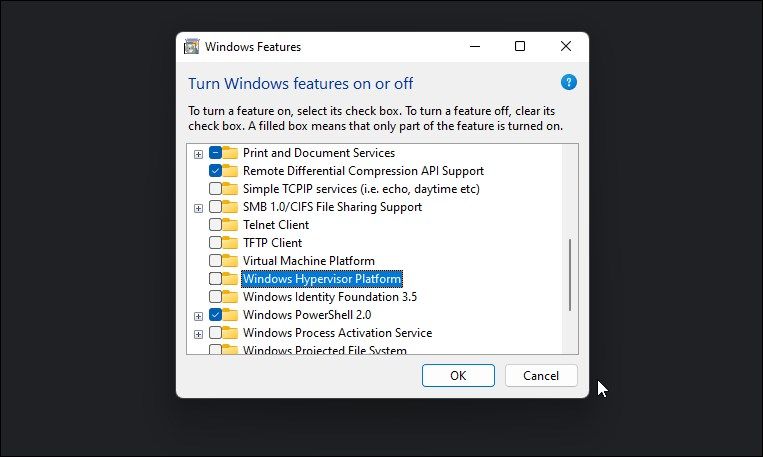
Note that to fix the Hyper-V detected error, you will need to disable the Virtual Machine Platform and Windows Hypervisor Platform feature in addition to Hyper-V.
To disable Hyper-V using the Windows Features dialog:
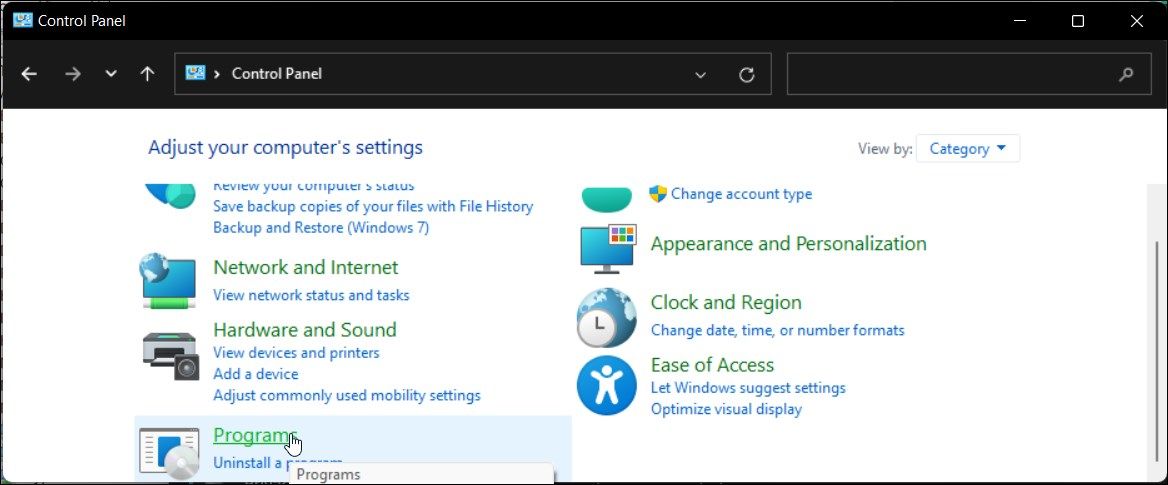
- Press the Win + R key to open the Run dialog.
- Type control and click OK to open the Control Panel.
- In the Control Panel, click on Programs.

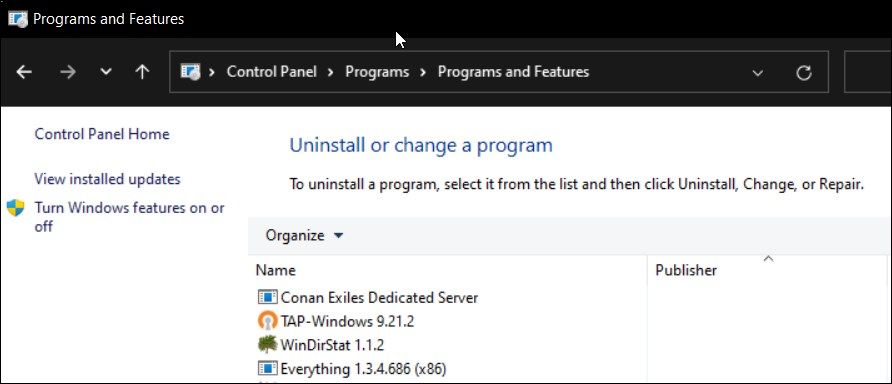
- Next, click on Programs and Features.
- In the left pane, click on Turn Windows features on or off.

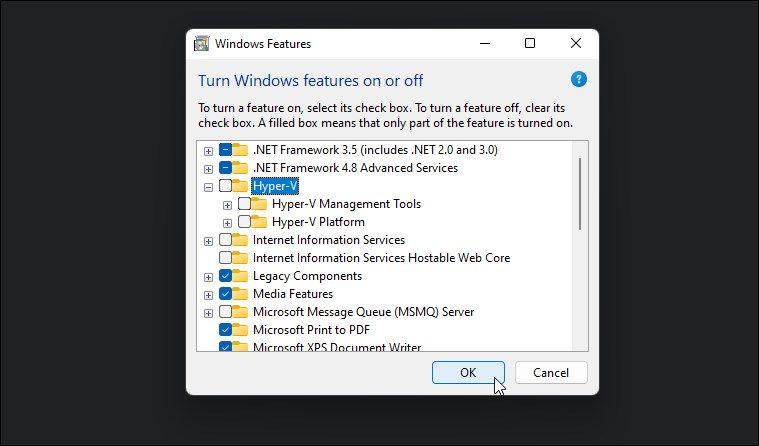
- In the Windows Features dialog, locate Hyper-V.
- Uncheck the Hyper-V option to disable the feature.

- Next, scroll down and locate the Virtual Machine Platform and Windows Hypervisor Platform options.

- Unselect both options and click OK.
- Windows will uninstall Hyper-V and other features from your system.
- Once done, restart your PC to apply the changes.
2. How to Disable Hyper-V Using BCDEDIT

You can disable Hyper-V in boot configuration using the BCDEdit tool. Useful if you only want to deactivate Hyper-V and not uninstall it completely.
To disable Hyper-V using BCDEdit:
- Press the Win key and type cmd.
- Right-click on the Command Prompt and select Run as administrator.
- In the Command Prompt window, type the following command and press Enter:
bcdedit /set hypervisorlaunchtype off - When the success message appears, close the Command Prompt, and restart your PC to apply the changes.
- If you need to activate Hyper-V again, use the following command:
bcdedit /set hypervisorlaunchtype auto - Make sure to restart your PC to apply the changes.
Additionally, you can use the BCDEdit tool to perform other advanced tasks, such as deleting the old boot menu options and adding a safe mode shortcut to Windows 11’s boot menu.
3. How to Uninstall Hyper-V Using the Command Prompt
If the Windows Features dialog fails to remove Hyper-V, you can use the Command Prompt to disable the hypervisor. Here’s how to do it.
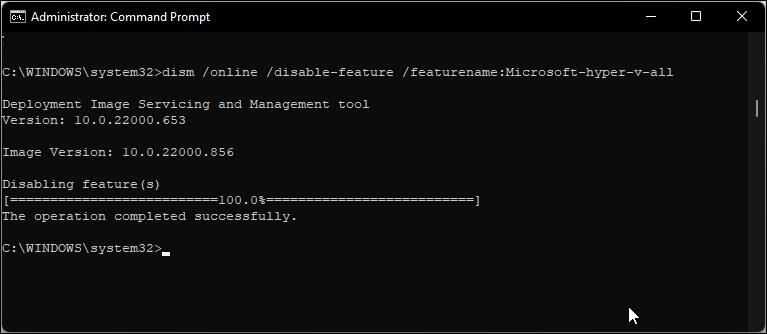
- Open Command Prompt as administrator.
- In the Command Prompt window, type the following command and press Enter:
dism /online /disable-feature /featurename:Microsoft-hyper-v-all - Upon execution, the DISM tool will disable Hyper-V and show the operation completed successfully message to indicate successful execution.
- Type exit to close the Command Prompt and restart your PC.
After the restart, you should be able to run your games and other hypervisors without the error.
If not, open the Windows Features dialog, disable the Virtual Machine Platform and Windows Hypervisor Platform options and restart your PC.
4. How to Disable Hyper-V Using PowerShell

If you prefer PowerShell, you can use the WindowsOptionalFeature cmdlet to disable Hyper-V in Windows 11. To do this, you need to launch PowerShell with admin privileges and execute the command. Here’s how to do it.
- Press the Win key and type powershell.
- Right-click on PowerShell and select Run as administrator.
- Click Yes when prompted by User Account Control.
- In the PowerShell window, copy and paste the command below and press Enter:
Disable-WindowsOptionalFeature -Online -FeatureName Microsoft-Hyper-V-All - Wait for the process to complete. Once done, close PowerShell and restart your PC to apply the changes.
How to Uninstall the Hyper-V Virtual Network Adapter
Often during the restart, after uninstalling Hyper-V, you may encounter the «We couldn’t complete the updates, undoing changes» message.
To resolve this issue, make sure the Hyper-V virtual network adapters are deleted from your PC. You can delete the virtual network adapter from Device Manager.
To delete Hyper-V’s virtual network adapters:
- Press Win + R to open Run.
- Type dvmgmt.msc and click OK to open Device Manager.
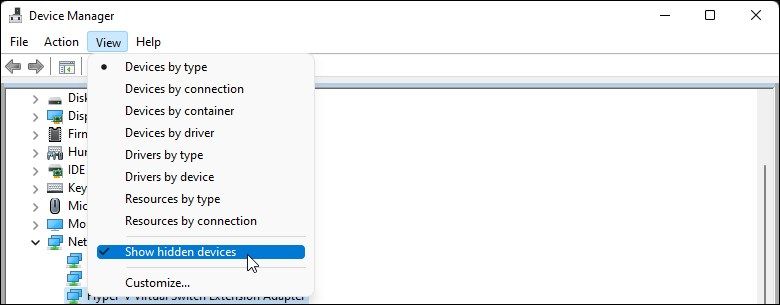
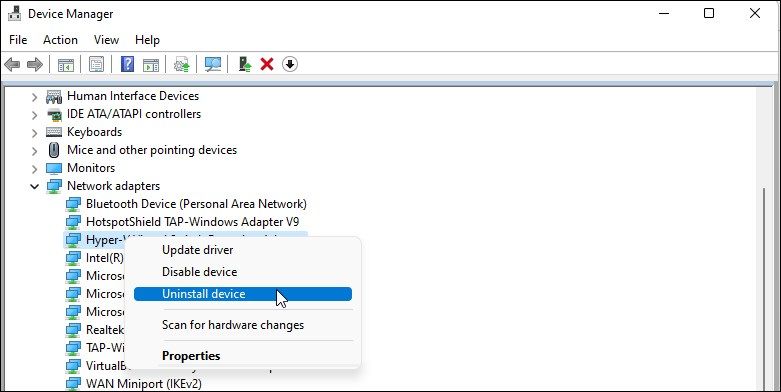
- In Device Manager, expand the Network Adapters section to locate the Hyper-V Virtual network adapters.
- If no virtual adapters associated with Hyper-V is listed, then click on View and select Show hidden devices.

- Right-click on the Hyper-V Virtual Ethernet Adapter and select Uninstall device.
Do not remove the Microsoft Wi-Fi Direct Virtual Adapter.
- Click Uninstall to confirm the action.

- Repeat the steps to delete all the virtual network adapters associated with Hyper-V.
- Once done, close Device Manager and restart your PC. Next, uninstall Hyper-V and check for any improvements.
How to Turn Off Virtualization-Based Security (Memory Integrity)
If you encounter the Hyper-V detected issue even after you disable Hyper-V, try to disable the Memory integrity feature in Windows Security.
The Memory integrity feature is part of Core Isolation. It helps prevent threat actors from accessing and infecting high-security processes using malicious code.
By default, Windows disables the Memory integrity feature to avoid conflict with apps and device drivers due to incompatibility issues. This can also cause issues with third-party virtualization tools and programs that need to access your system’s virtualization hardware.
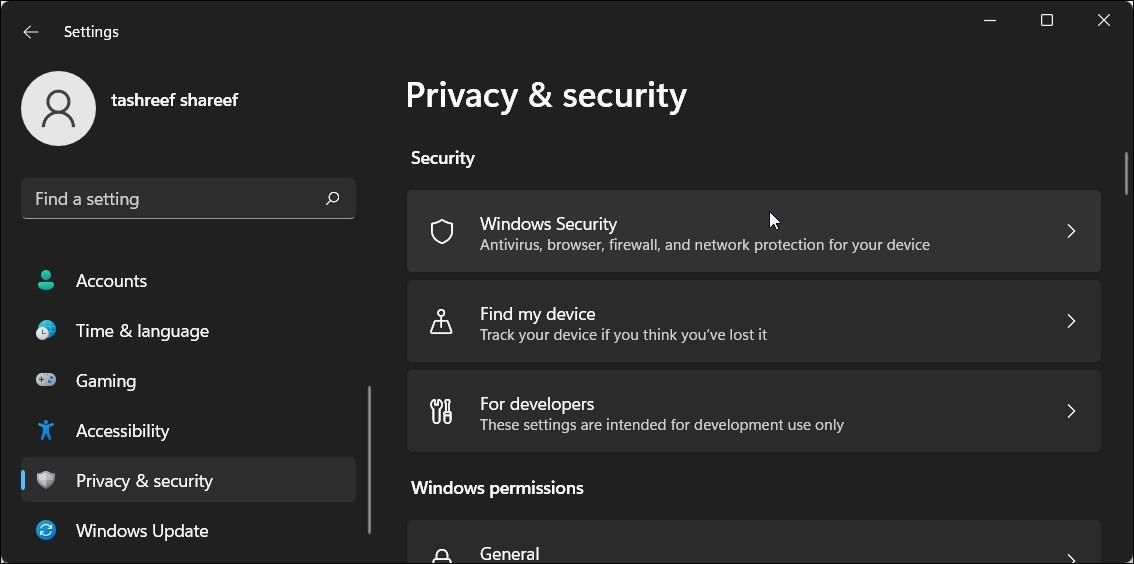
To turn off Memory integrity in Windows Security:
- Press Win + I to open the Settings app.
- In the left pane, click on the Privacy & security tab.

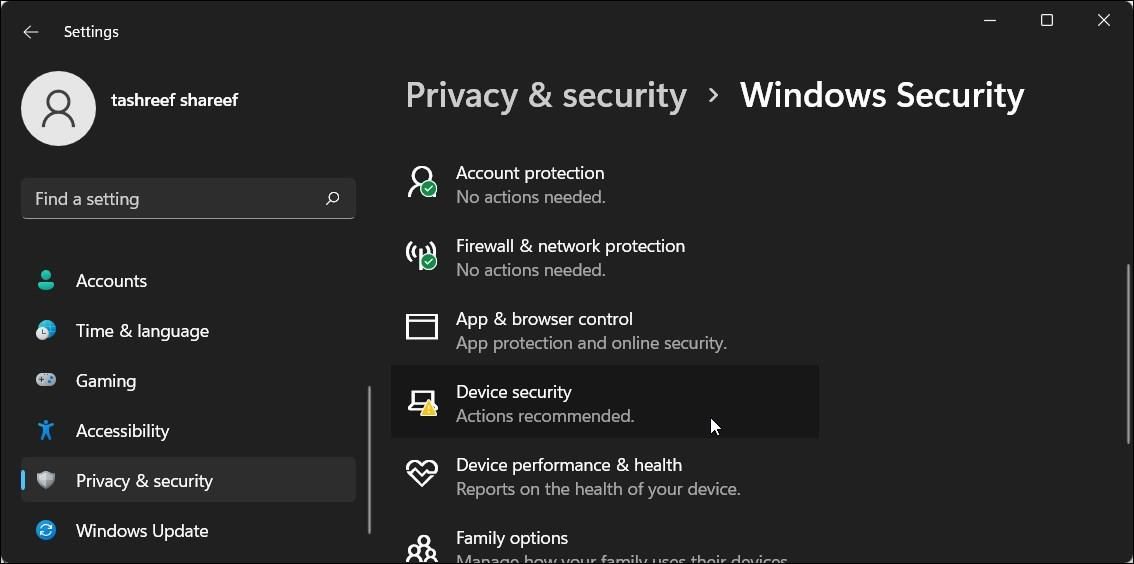
- Next, click on Windows Security.
- Under the Protection areas section, click on Device security.
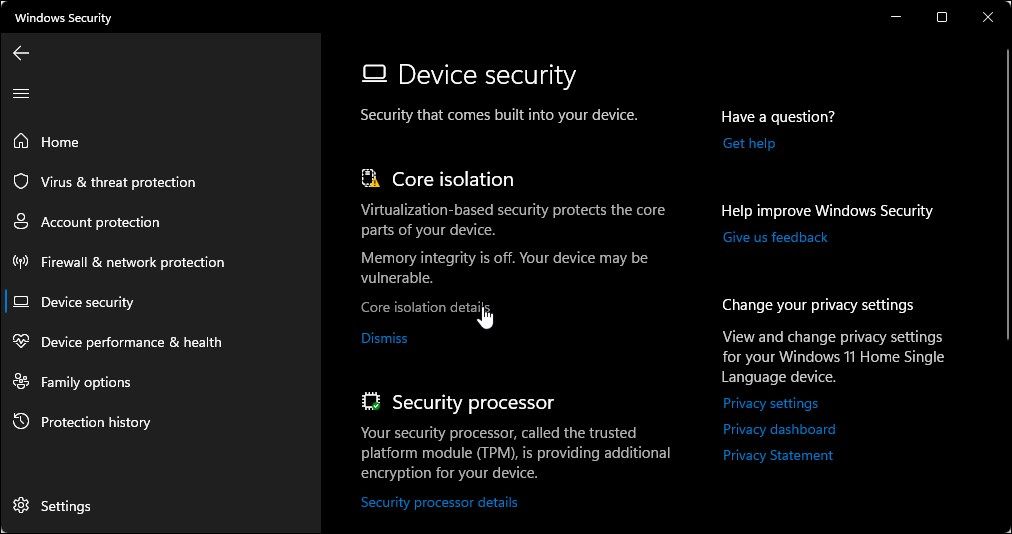
- Next, click on Core isolation details under the Core isolation section.

- Toggle the switch under Memory integrity to turn it Off.
- Restart your PC to apply the changes.

Hyper-V is an excellent utility if you want an out-of-the-box virtualization solution. However, it is not without its flaws. Many third-party hypervisors, including the major players VirtualBox and WMware Workstations, don’t work with Hyper-V enabled.
If you are unsure of which hypervisor to use, compare the three popular virtualization tools to help you determine the best of the lot.
Virtualization Technology allows us to run a virtual machine inside the operating system in your current machine. Before you can use Hyper-V to create a virtual machine, you have to enable Hyper-V. Here this article will show you how to enable or disable Hyper-V in Windows 10.
Requirements:
- Windows 10 Professional, Enterprise or Education 64-bit version. If you’re not sure if you have a 32-bit or 64-bit version, click here to check it out.
- You must have a minimum of 4 GB RAM.
- Your CPU must support VM Monitor Mode Extension (VT-c on Intel CPU’s)
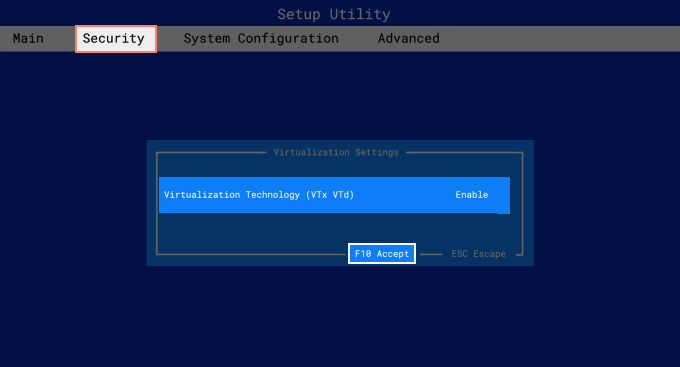
You have to enable Virtualization Technology in your BIOS settings.
To Do: Enter BIOS setup by repeatedly pressing the DEL key or other BIOS setup access key while your PC is loading. Search for Virtualization Technology and enable it in your BIOS settings. It’s usually listed under one of these tabs: Security, Advanced or System Configuration.
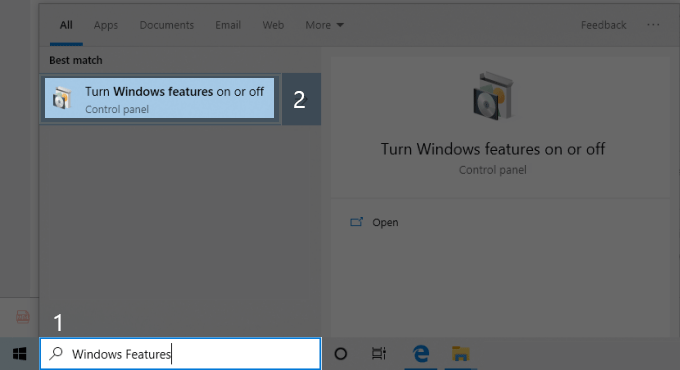
How to enable Hyper-V in Windows 10
Search for “Windows features” in the Start menu, hit the Enter key to open it.
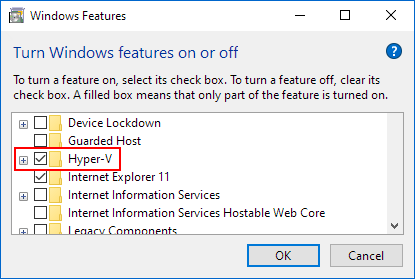
Here, scroll down to Hyper-V and enable it by clicking in the white box next to it. Then click OK.
After it finishes setting the feature, you’ll have to restart your computer to make the change take effect. Now once computer rebooted, search for hyper in your start menu and open Hyper-V Manager.

You are now ready to start enjoying Virtualization Technology by creating new virtual machines, run existing ones from another computer and even migrating your old machine to your Hyper-V.
How to disable (remove) Hyper-V in Windows 10
Now follow any of the following methods to disable Hyper-V:
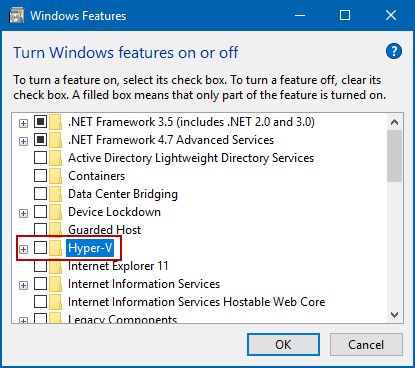
Option 1: Search for “Turn Windows features on or off” in the Start menu, hit the Enter key to open the Windows Features window. Here, scroll down to Hyper-V and disable it by clearing checkbox next to it. Then click OK.
Option 2: Disable Hyper-V by using command.
Press Windows logo key + X, then hit A to run Command Prompt as administrator. In Command Prompt window, type bcdedit /set hypervisorlaunchtype off and hit Enter key to execute this command.

Option 3: Disable Hyper-V by stopping its service.
Search for “service” in the Start menu, hit the Enter key to open the Component Service window. Then click Services option in the left panel and the hit H key on your keyboard. This can help you quickly locate and find the Hyper-V Virtual Machine Management service. When getting it, right-click on it and select Stop.

You have to restart your computer to finish turning this feature off.
disable hyper-v enable hyper-v in Windows 10 turn off hyper-v