-
Нажмите Пуск и откройте Параметры . В разделе Конфиденциальность и защита выберите Безопасность Windows > Брандмауэр и защита сети. Открыть параметры службы «Безопасность Windows»
-
Выберите профиль сети: Сеть домена, Частная сеть или Общедоступная сеть.
-
В разделе Брандмауэр Microsoft Defender установите для параметра значение Вкл. Если ваше устройство подключено к сети, настройки сетевой политики могут помешать вам выполнить эти шаги. За дополнительными сведениями обратитесь к администратору.
-
Для выключения переключите этот параметр в положение Выкл. Отключение брандмауэра Microsoft Defender может сделать ваше устройство (и сеть, если таковая имеется) более уязвимым для несанкционированного доступа. Если нужно использовать блокируемое приложение, вы можете разрешить его использование через брандмауэр вместо отключения самого брандмауэра.
-
Нажмите кнопку Пуск и выберите Параметры > Обновление и безопасность > Безопасность Windows > Брандмауэр и защита сети. Открыть параметры службы «Безопасность Windows»
-
Выберите профиль сети: Сеть домена, Частная сеть или Общедоступная сеть.
-
В разделе Брандмауэр Microsoft Defender установите для параметра значение Вкл. Если ваше устройство подключено к сети, настройки сетевой политики могут помешать вам выполнить эти шаги. За дополнительными сведениями обратитесь к администратору.
-
Для выключения переключите этот параметр в положение Выкл. Отключение брандмауэра Microsoft Defender может сделать ваше устройство (и сеть, если таковая имеется) более уязвимым для несанкционированного доступа. Если нужно использовать блокируемое приложение, вы можете разрешить его использование через брандмауэр вместо отключения самого брандмауэра.
-
Select Start , then open Settings . Under Privacy & security , select Windows Security > Firewall & network protection. Open Windows Security settings
-
Select a network profile: Domain network, Private network, or Public network.
-
Under Microsoft Defender Firewall, switch the setting to On. If your device is connected to a network, network policy settings might prevent you from completing these steps. For more info, contact your administrator.
-
To turn it off, switch the setting to Off. Turning off Microsoft Defender Firewall could make your device (and network, if you have one) more vulnerable to unauthorized access. If there’s an app you need to use that’s being blocked, you can allow it through the firewall, instead of turning the firewall off.
-
Select the Start button > Settings > Update & Security > Windows Security and then Firewall & network protection. Open Windows Security settings
-
Select a network profile: Domain network, Private network, or Public network.
-
Under Microsoft Defender Firewall, switch the setting to On. If your device is connected to a network, network policy settings might prevent you from completing these steps. For more info, contact your administrator.
-
To turn it off, switch the setting to Off. Turning off Microsoft Defender Firewall could make your device (and network, if you have one) more vulnerable to unauthorized access. If there’s an app you need to use that’s being blocked, you can allow it through the firewall, instead of turning the firewall off.
The Microsoft Defender Firewall is a security feature in Windows 10 that monitors all network traffic, both incoming and outgoing, and either allows or blocks it based on a set of rules designed to keep your system safe from hackers. Although it is advised that the firewall always be active, there are times when turning it off is necessary, such as if you need to test an app connection or if you wish to utilize a different firewall solution.
However, if you don’t know how to Turn Off Firewall Windows 10 and looking for a way to do it, you’ve come to the right spot. In this article, you’ll discover the finest ways to turn off Windows 10 firewalls. Let’s get going!

Method 1. Turn off The Firewall in Windows 10 using Control Panel
The first and the most direct method to turn off the firewall in Windows 10 is Control Panel. The Control Panel in Microsoft Windows is where you can modify the operating system’s settings. It’s a collection of software applications that enable you to install and uninstall programs, manage user accounts, change accessibility settings, and tweak your network configuration.
To turn off the firewalls on your Windows 10 PC using Control Panel, follow the steps below:
Step 1. In the Search menu, search Control Panel, and launch it by clicking on it.
Step 2. Now, click on the «System and Security» option, and go to Windows Defender Firewall
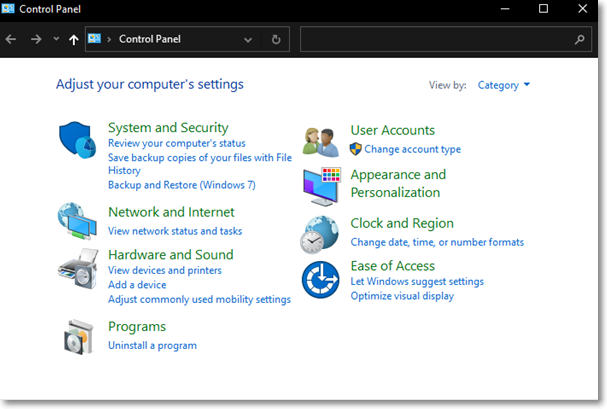
Step 3. Next, you’ll need to click the «Turn Windows Firewall on or off» option to proceed.

Step 4. To turn off the firewall for the private network, go to the Private network settings section, and check the Turn off Microsoft Defender Firewall checkbox. Moreover, to deactivate the firewall for the public network, check the Turn off Microsoft Defender Firewall checkbox that is located under the Public network settings section of the Customize Settings window.
Note: It is not necessary to disable both firewalls; you can select according to your needs.

Step 5. Once you’re done selecting the boxes, click «OK» to disable the firewall and apply the settings.
Method 2. Turn off The Firewall in Windows 10 with Windows Security
Another method for turning off the firewall of your Windows 10 PC is by using Windows Security. Windows 10 comes with Windows Security, an antivirus program that offers the most recent antivirus protection. When you start Windows, your device will be actively secured against potential threats because of Windows Security. It is integrated to perform routine scans to look for malware, viruses, and other potential security risks. In addition to this protection in real-time, updates will be downloaded automatically to assist in maintaining the security of your device and warding off any dangers with Windows Security.
To turn off Windows Firewall via Windows Security, follow the steps below:
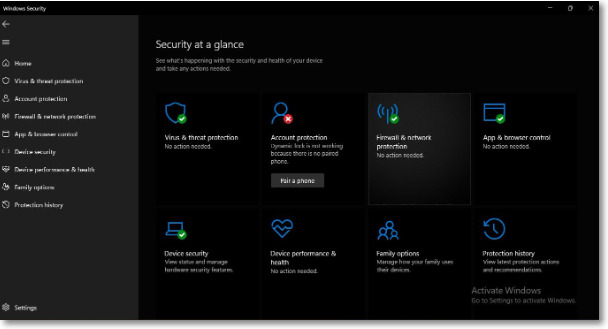
Step 1. Go to the Search menu on your Windows 10, and type Windows Security. Click on it to open the tool.
Step 2. Select Firewall & network protection either from the sidebar or the front menu.
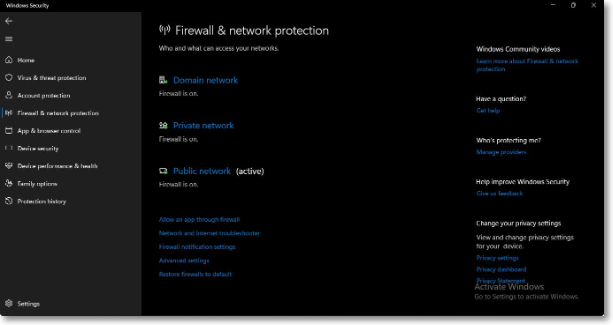
Step 3. Now, you will see three different types of Windows firewalls, i.e. Domain network, Public network, and Private network.
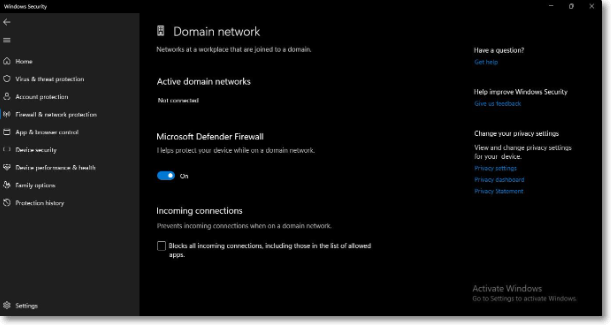
Step 4. Now, click on the firewall you wish to disable. After that, toggle the switch to OFF under the Microsoft Defender Firewall option. You can do it for any of the three types.
Note: if you wish to turn off the firewall from your Windows 10 PC completely, you need to turn off each of the three firewalls by following the above guideline.
Method 3. Turn off The Firewall in Windows 10 with The Command
The last and a little complicated method for people who are not tech-savvy to turn off the Windows 10 firewall is by using the Command Prompt. It’s a program included in Windows 10 that acts as an interpreter for commands. One uses it to get their commands carried out on Windows PC. Most of these commands automate routine work in Windows through scripts and batch files, carry out complex administrative tasks, or investigate and resolve certain Windows problems.
To turn off the Windows 10 firewall via Command Prompt, follow the steps below:
Step 1. Go to the Search menu, type either CMD or Command Prompt and launch this Windows terminal by clicking on it.
Step 2. Type netsh advfirewall set domainprofile state off on your Command Prompt, and press Enter to disable the Domain Network Firewall. You can run the same command by typing publicprofile or privateprofile instead of domainprofile to disable the Public or Private Network Firewall.
Step 3. You can turn off all the firewalls on Windows 10 at one go by typing netsh advfirewall set allprofiles state off and pressing Enter.

Conclusion
Microsoft integrated a firewall in Windows 10 to protect your system from viruses, third-party malware, and other security risks. Although it is not recommended that you turn off the firewall on Windows PC, there are situations when you need to. However, some people are unaware of it. To help them out, we provided three built-in methods to Turn Off Firewall Windows 10 in this article. So, disable your firewall today and start testing your network connections!
Windows Firewall is a security feature that protects your system from unauthorized access and disabling it is not recommended unless it is absolutely necessary.
If there is a legitimate reason, there are plenty of ways to disable Windows Firewall.
Here’s how to do that, how to turn it off for a single program, and how to enable it again.
Let’s dig in.
How to Disable Windows Firewall
If the built-in Windows Firewall is doing more harm than good, especially if there’s another firewall program in place, here’s how you can disable the Windows Defender Firewall.
Windows Security App
The easiest way to disable the firewall on Windows 10 (version 1703 and later) is through the Windows Security app:
- Click Start and open Settings.

- Select Update & Security.
- Click on Windows Security from the left-side menu.
- Select Firewall & Network protection.

- There, you’ll find three network types: Domain Network, Private Network, and Public Network– all of which are protected by the Windows Firewall.
- To disable the Firewall on Windows, click on each of them and toggle the switch under Windows Defender Firewall.

Windows Defender Firewall Control Panel
Disabling Windows Firewall is also possible via the Control Panel:
- Click on Start, type in “Control Panel” and open it.
- Select System and Security.
- Click on Windows Defender Firewall.

- Select Turn Windows Defender Firewall on or off from the left-side menu.

- Check the box next to Turn off Windows Defender Firewall and click OK to save the changes. You can disable it for private and/or public networks.

NETSH Command-Line
In Windows, there is a command-line for most GUI operations. If you know your way around, turning off the Windows Firewall can be quicker than using the GUI options.
On top of that, Windows commands allow you to automate and script the task.
Disabling Firewall on Windows 10 can be done with the netsh advfirewall set command to turn off the firewall individually for separate networks or all network profiles:
- Click the Start button, type in “Command Prompt,” right-click on the app, and select Run as administrator.

- Type one of the following Windows commands to disable the firewall and press Enter:
- netsh advfirewall set currentprofile state off : Disable the firewall for the network profile that is active or connected.
- netsh advfirewall set allprofiles state off: Disable the firewall on all network profiles at once.
- netsh advfirewall set domainprofile state off: The firewall will turn off for the domain network profile only.
- netsh advfirewall set publicprofile state off: The firewall will be disabled for the public network profile only.
- netsh advfirewall set privateprofile state off: Disable the firewall for the private network profile.
Set-NetFirewallProfile PowerShell cmdlet
Another way to turn the firewall off on Windows 10 is to use the built-in Net Security PowerShell cmdlet Set-NetFirewallProfile.
To use this cmdlet:
- Click the Start button. Type “PowerShell” to find the app, right-click on it, and select Run as administrator.

- Type one of the following commands to disable the Windows 10 firewall and press Enter:
- Set-NetFirewallProfile- All- Enabled False: Disable Windows Firewall for all network profiles.
- Set-NetFirewallProfile- Profile Private- Enabled False: Disable the firewall for the private network profile only.
- Set-NetFirewallProfile- Profile Domain— Enabled False: Disable the firewall for the domain network profile only.
- Set-NetFirewallProfile- Profile Public— Enabled False: Disable the firewall for the public network profile only.
Disable Windows Firewall Remotely With PowerShell
PowerShell also allows you to disable the Windows Firewall via remote access on one or more computers at once.
Note that this method will only work if the WinRM is enabled on the computer where you want to turn off the firewall.
If you need to disable the firewall on one remote computer you can use the Enter PsSession cmdlet and run the following command:
Enter PsSession — ComputerName desktop2
Set-NetFirewallProfile- All- Enabled False
If you need to disable Windows Firewall on more than one computer, you can use
the Invoke — Command cmdlet instead:
$computers = @(“desktop2”)
$computers| ForEach — Object {
Invoke — Command — ComputerName $_ {
Set-NetFirewallProfile- All- Enabled False
By running this command Windows Firewall will be disabled for all network profiles on each specified computer.
Group Policy
System administrators can use Group Policy– which you can create on the Group Policy Management Console on the server – to disable Windows Firewall on selected or all computers in the domain.
To do that:
- Press the Windows key and the R key on your keyboard to open the Run command dialog box and type in the gpmc.msc command.

- In the Group Policy Management Console, expand the Domains folder and right-click on the domain where you want to create the Group Policy.
- Select Create GPO in this domain, and Link it here …
- In the New GPO dialog box type in Disable Windows Firewall, and click OK.
- Right-click on the New GPO and click Edit.
- In the Group Policy Management Editor expand these folders Computer Configuration>Policies>Administrative Templates>Network>Network Connections>Windows Defender>Firewall>Domain Profile.
- In the settings list on the right, double-click on Windows Defender Firewall: Protect all Network Connections to open its properties, then select Disabled and click OK.
- Go back and apply the same option to the Standard Profile settings.
You can apply the New GPO to the domain computers by doing the following:
- In the Group Policy Management select Disable Windows Firewall.
- Click the Add button under Security Filtering.
- In the Select User, Computer or Group dialog box search for Domain Computers and click OK.
The next time the client computers get the policy update, Windows Firewall will be disabled on every one of them.
How to Turn off Windows Firewall for a Single Program
Windows also lets users turn off the Windows Firewall for a specific program.
To do that:
- Open the Start menu and go to Settings.
- Select Update & Security, click on Windows Security, and open the Firewall and Network Protection settings.
- Click on Allow an app through Windows Firewall.

- Click on Change Settings.

- Locate the program you want to disable the firewall for and click on the checkbox next to it. You can also click on the app, select Remove, and then OK.

Note: Disabling the firewall for a program/ app doesn’t prevent it from running on Windows.
Bottom Line
The Windows Defender Firewall is a tool that protects your computer from all types of network-based threats. But, sometimes, you may need to turn it off. There are many ways to disable Windows Firewall, including via the Windows Security App, a command line, and through a group policy, depending on what exactly you’re trying to turn off.
Check out the complete guide and know how to turn off the firewall Windows 10/11 with the help of some easy methods.
A firewall is a great security feature on Windows and other operating systems. The feature allows you to protect yourself and your network from the attacks of hackers and other meddling attackers. So, it’s very important to keep the feature up and running at all times for security.
Although the firewall can protect you from attacks, it may also cause problems for your device. Sometimes, the firewall may prohibit you from accessing a website to run software on your Windows PC. This is because even if the app or website is clean and harmless, the feature mistakes the same to be harmful. In such a case, you will not be able to access the website or app until you turn off the firewall.
If the firewall is causing a lot of problems for you, you can disable it with ease. There are some procedures that allow you to turn off the feature and use your device and its attributes as you may.
In this guide, we will list a couple of methods to help you turn off the Windows Firewall. All you have to do is follow any of the methods provided, as required, and disable the security feature. That’s enough of the introduction part, let’s head over to the solutions now.
How to Disable the Firewall in Windows 10 and Windows 11
To know how to turn off the firewall Windows 10/11, you can take the help of the upcoming sections of this article. Below, you will find a couple of procedures allowing you to turn off the feature. You should take the help of the specific method(s) according to the operating system installed on your device and other requirements.
Use the Control Panel to Disable the Firewall in Windows 10
The best and the most secure way to turn off the Windows firewall is using the Control Panel. This is a Windows-integrated utility that allows you to get a hold of different attributes and working of the Windows operating system. Follow the steps below for precision:
- Press the Win+S keys, type Control Panel, and hit the Enter key.

- Click on System & Security.

- Select Windows Defender Firewall to get on with the procedure.
- From the left side, click on the Turn Windows Defender Firewall on or off button.

- Within the categories named Private Network Settings and Public Network Settings, check the box named Turn off Windows Defender Firewall and click the Ok button.


The procedure is quite the same for Windows 11.
Also Read: Best Firewall Software For Windows
Take the Help of Windows Settings
The next method that you can try to turn off the firewall is to use the Settings of your operating system. For the same, you can follow the steps provided right below:
- Firstly, right-click on the Start/Windows icon on the taskbar and open Settings.

- Click on Update and Security to proceed.

- From the left pane of the window, click on Windows Security.
- Click on the option named Firewall & network protection.
- Select from the networks available: Domain, Private, or Public network.
- Lastly, Turn off the Defender for the network.


Use Command Prompt and Turn Off the Firewall in Windows 10
You can also seek the help of the Command Prompt to disable the firewall in Windows 10. For this, you will need to use the steps provided below:
- Press Win+S keys, search for Command Prompt and click on Run as administrator.

- Click on Yes to proceed.
- When the tool appears, enter the below command and hit the Enter button.
netsh advfirewall set currentprofile state off (for current network profiles)
netsh advfirewall set allprofiles state off (for all network profiles)
netsh advfirewall set domainprofile state off (for domain network profiles)
netsh advfirewall set privateprofile state off (for private network profiles)
netsh advfirewall set publicprofile state off (for public network profiles) - Wait while the procedure completes.

How to Disable the Firewall in Windows 10? (Notifications Only)
Sometimes, you are just fed up with the notifications from the Firewall. So, in such a situation, you can easily turn off the notifications from the feature. Follow the procedure shown below for precision:
- Firstly, press the Win+S keys, type Control Panel, and hit the Enter key.
- Click on System & Security.
- Open the Security and Maintenance options.

- From the left pane, click on Change Security and Maintenance settings.
- Look for Security Messages and unmark the boxes named Virus protection and Network firewall.

- Lastly, click on the Ok button to apply the changes.


Also Read: [Fixed] Network Discovery is Turned Off Windows
How to Turn Off the Windows Firewall on Multiple Devices?
Sometimes, you have more than just one computer and want to turn off the Windows firewall on all of these. In such a case, it will take a lot of time and effort to do the same individually. However, you can take the help of Windows PowerShell to do this. Below is the detailed procedure for the same:
- Press the Win+S keys, type Windows PowerShell, and hit the Enter key.

- Lastly, enter the below command and hit the Enter key.
Enter-PsSession -ComputerName desktop1 Set-NetFirewallProfile -All -Enabled False
You may need to use the below command if there are more than just some computers.
$computers = @(‘desktop1’) $computers | ForEach-Object {
Invoke-Command -ComputerName $_ { i. Set-NetFirewallProfile -All -Enabled False
} }

Also Read: How to Fix Remote Desktop stops working in Windows
How to Turn Off the Firewall Windows 10/11: Executed Successfully
So, this was everything related to how to disable the firewall in Windows 10/11. We think we were able to help you precisely as you expected. However, if you have any queries related to the topic, you can ask them in the comments below. We will be happy to help you. Your suggestions are well appreciated.
If you liked this guide on how to turn off the firewall, subscribe to the newsletter of the blog.