File transfer between an iPhone and a computer is often needed in our daily lives. We may find ourselves needing to transfer files from iPhone to PC or transfer files from PC to iPhone at one time or another due to reasons like making a backup of precious data, enriching device content, or purely file sharing. The files we want to transfer may be photos, videos, contacts, messages, PDFs, Excel files, Word documents, or other items.
Six proven ways to help you transfer data from iPhone to PC. Whether you want to transfer photos, videos, music, PDFs, or documents, you can get things done using one of the tips below. The ways to transfer files from PC to iPhone are also provided.
To help you learn all the methods quickly, we made this comparison table. Have a look at them before diving into the detailed information.
| Methods | Effectiveness | Difficulty |
|---|---|---|
| EaseUS MobiMover | High — Selectively transfer data from iPhone to PC. | Super easy |
| iCloud | Medium — Feasible, but only 5GB of free storage is offered. | Easy |
| iCloud Drive | Medium — Works for Word, Excel, and PowerPoint files. | Moderate |
| Dropbox | Medium — Efficient, but only 2GB of free storage is offered. | Easy |
| iTunes File Sharing | Medium — Only transfer files that are associated with an app to your PC. | Moderate |
| File Explorer | Medium — Mainly transfer videos and photos | Easy |
📖Also Read: How to Transfer Files Between iPhone and Mac
1. Easiest Way to Transfer Data from iPhone to PC
Applies To: Photos, Videos, Audio Files, Contacts, Messages, Podcasts, Books…
The easiest way to transfer data from iPhone to Windows laptop or Mac is probably a third-party tool called EaseUS MobiMover Pro. With it, you can not only transfer files from your iPhone to a PC but also add content to your iPhone from a computer. Surely, you are also able to transfer data from one iOS device to another using this tool.
Unlike the inbuilt tools, this iPhone data transfer to PC software allows users to selectively transfer files between an iPhone and a computer, be it a Windows PC or a Mac. But to use it, you will need to download and install it first. If you are OK with that, you may have a try.
- 📝What to prepare
- A USB cable to connect your iPhone and PC
- Stable Internet connection and enough power on both devices
- MobiMover app from EaseUS
To transfer files from iPhone to PC:
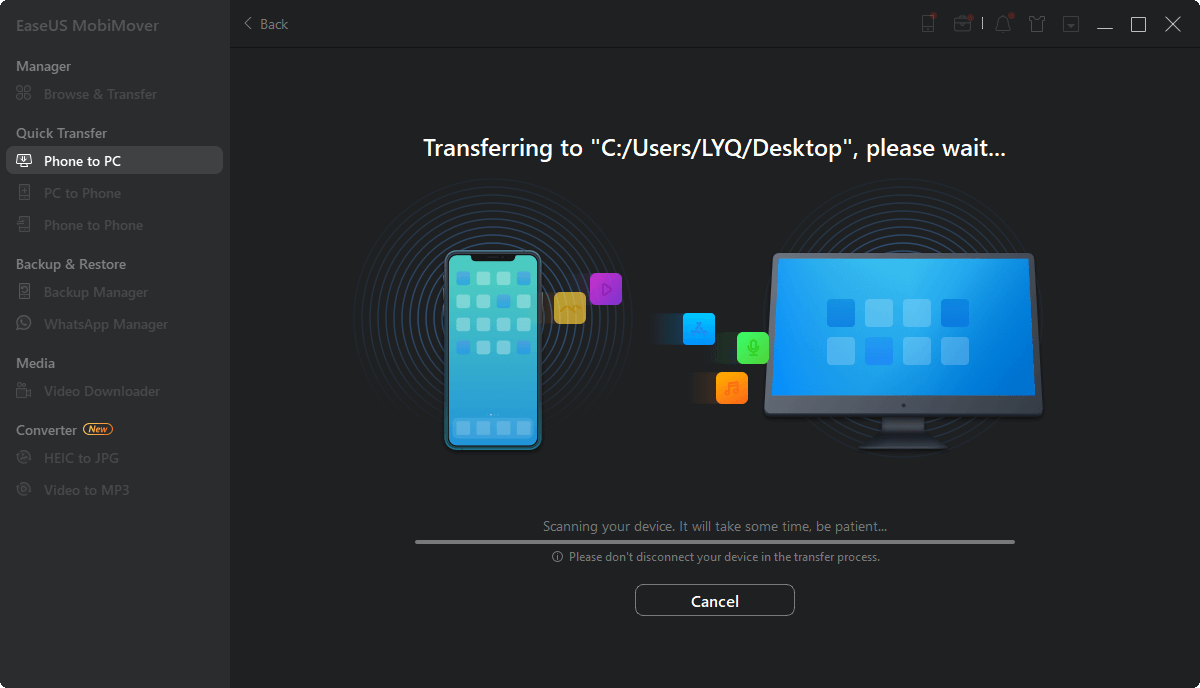
Step 1. Connect your iPhone to your PC with a USB cable. Then launch EaseUS MobiMover and go to «Phone to PC» > «Next».

Step 2. Check the types of files you want to transfer and click «Transfer». You can specify a location to keep the transferred items in advance. Otherwise, they will be placed on Desktop by default.

Step 3. Wait for the transfer process to finish. When it has done, go to the selected folder to check the items.
If transferring files from iPhone to PC without iTunes is what you want, don’t hesitate to try EaseUS MobiMover. It’s a versatile tool that supports Apple devices like iPhone, iPad, and iPod and has extra amazing features like video download and iPhone unlock.
🍎Check a video tutorial here:
- 00:00 — introduction
- 00:21 — transfer files with EaseUS MobiMover
- 01:40 — transfer files via File Sharing
- 02:36 — transfer files Using File Explorer
LEARN MORE
If you’re interested in how to transfer voice memos from iPhone to PC, you can click here for more information.
Second Choices of Transferring Data From iPhone to Windows PC
1. iCloud
Applies To: Photos, Contacts, Calendars, Reminders, Notes, and more
The best thing about iCloud is that you can transfer files from iPhone to computer wirelessly. The requirements for using iCloud include the same Apple ID on the devices, a stable network connection, and enough iCloud storage space.
However, iCloud only offers 5GB of free storage space, so you need to buy more if your files are larger than that. Anyway, make sure the requirements are met, and then follow the steps below to transfer files from your photo library, contact list, and more to the computer using iCloud.
- 📝What to prepare
- Stable Internet connection and enough power on both devices
- Enough storage space in iCloud
- An iCloud account logged in on both devices
To download files from iPhone to PC:
If you have installed iCloud for Windows:
Step 1. Open «Settings» on your iPhone and go to [your name] > «iCloud».
Step 2. Toggle on the option accordingly. For example, if you want to transfer photos from iPhone to PC, select the «Photos» option and turn on «iCloud Photos».
Step 3. Open iCloud for Windows on your computer and turn on the corresponding option. Then you can access the files on your iPhone from PC.

If you didn’t install iCloud for Windows:
Step 1. Open «Settings» on your iPhone, go to [your name] > «iCloud» and turn on the option according to the file you want to transfer.
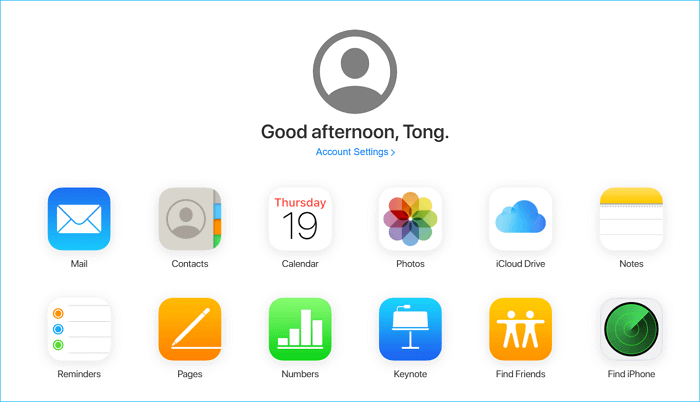
Step 2. On your PC, go to iCloud.com and sign in with the Apple ID you use on the iPhone.
Step 3. Select the category you intend to copy.
Step 4. Choose the items you want to transfer and then download them to your PC.
LEARN MORE
iCloud can only be used on a PC running Windows 10 system or later. So, click here to learn how to transfer photos from iPhone to PC Windows 7.
2. iCloud Drive
Applies To: Excel, Word, PowerPoint Files
As you may know, iCloud Drive is an option in iCloud and is helpful for syncing documents across your devices on which iCloud Drive is enabled. To transfer files from iPhone to PC using iCloud Drive, you first need to add the items to iCloud Drive on your iPhone and then access or download them on the computer. Here are the details:
- 📝What to prepare
- Download iCloud on Windows PC
- Stable Internet connection
- Open iCloud Drive on File Explore
To copy files from iPhone to PC with iCloud Drive:
Step 1. On the iOS device, go to the «Settings» app and select [your name] > «iCloud».
Step 2. Scroll down to enable «iCloud Drive».
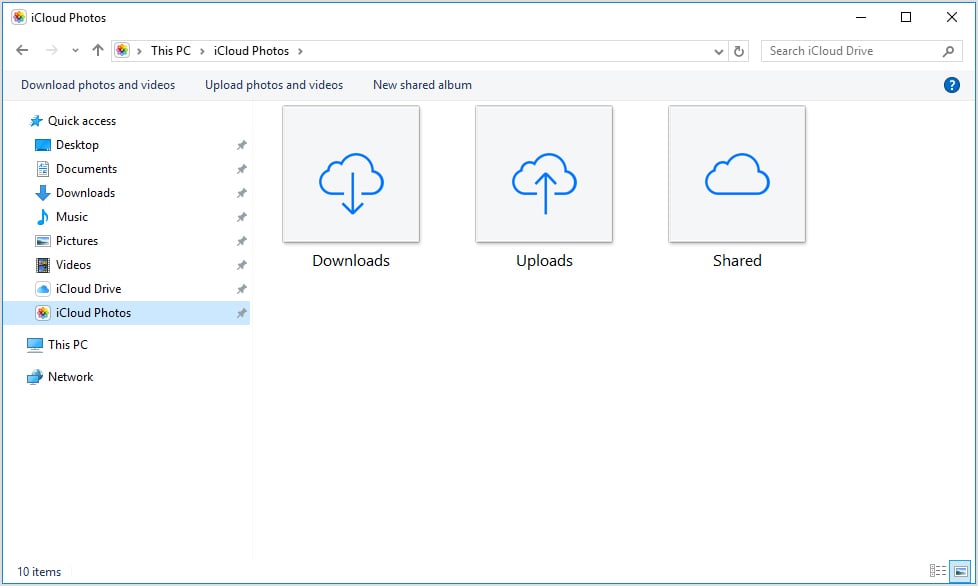
Step 3. Open the «Files» app and select «Browse» > «iCloud Drive». Search for the files you attempt to copy to your PC and upload them to iCloud Drive.
Step 4. If you have downloaded and set up iCloud for Windows, go to the iCloud Drive folder in File Explorer to access the files from your iPhone. If not, go to iCloud.com, sign in with your Apple ID, choose «iCloud Drive» among the options and then select and download the files to your PC.
While using iCloud services, you may encounter issues like «iCloud Drive not syncing». If you do, stay calm and follow the troubleshooting guide to solve the problem.
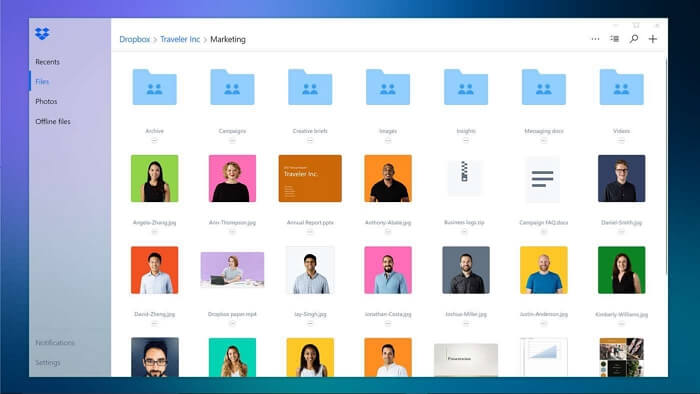
3. Dropbox
Applies To: Photos, Videos, Audios, Documents…
Dropbox, like iCloud, is a cloud service that helps you transfer files without using a USB cable. Instead, you need to download and install the Dropbox app on both your source device and target device to upload and download the files you want to share.
- 📝What to prepare
- A Dropbox account
- Stable WiFi connection
- Sign in the same Dropbox account on both iPhone and PC
To move files from iPhone to PC with Dropbox:
Step 1. Download and install Dropbox on your devices and sign in with the same account.
Step 2. To transfer files from iPhone to PC, upload the items to Dropbox on your iOS device first. If you transfer a file from PC to iPhone, upload the file to Dropbox from your PC.
Step 3. Go to Dropbox on your PC, and then you can see the files you just uploaded. Select the items and download them to your computer.
LEARN MORE
Both iCloud Drive and Dropbox enable a wireless data transfer from iPhone to PC. If you want to know more information about it, click here to learn How to Transfer Photos from iPhone to Computer Without USB.
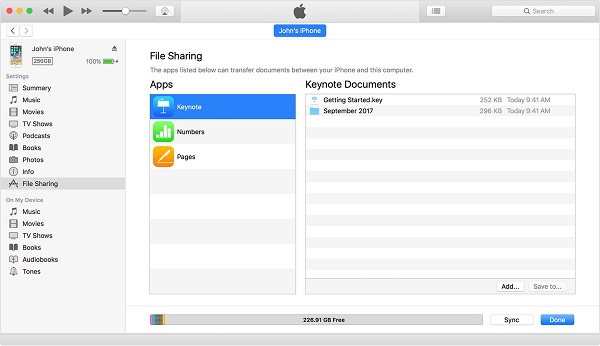
4. iTunes File Sharing
Another way is to use iTunes to transfer iPhone data to a PC. It is mainly designed to share files between your computer and a supported app on your iPhone/iPad. If you are sure the files you want to transfer are created by an app that is compatible with File Sharing, you can transfer content from your iPhone to a PC or laptop using this feature.
With iTunes, you can freely choose to transfer files iPhone files to PC via a USB cable or Wi-Fi connection. If you prefer to send files over Wi-Fi, you need to set up Wi-Fi syncing first according to the guide provided by Apple.
- 📝What to prepare
- A USB cable
- A PC running Windows 7 or later version
- Sufficient storage space on your PC
- Download iTunes and ensure it is the latest version
Steps to transfer data from iPhone to PC via iTunes:
Step 1. Connect your iPhone your computer and launch iTunes if it doesn’t run automatically.
Step 2. In the iTunes window, click the «Device» tab and select «File Sharing».
Step 3. Select the app shown in the list from which you want to transfer files to PC.
Step 4. Select the files you want to move to the computer and click «Save to».
Step 5. Select a location to save the items and click «Save to» to start transferring files from your iPhone to the computer.
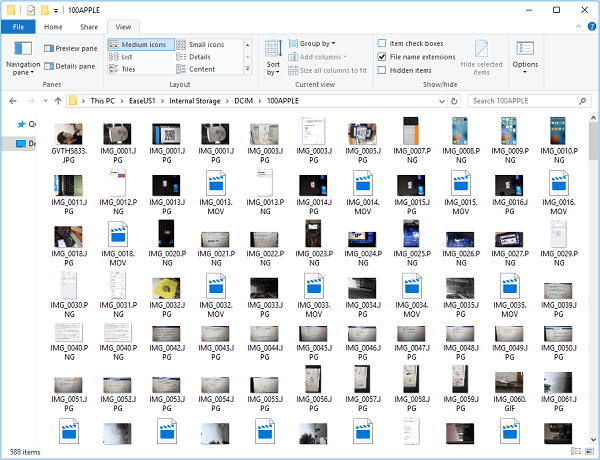
5. File Explorer
If the content you are looking to copy is photos and videos in your iPhone camera roll, the easiest way to transfer data from iPhone to PC is to use Windows File Explorer. It allows you to transfer photos and videos from iPhone to PC using USB directly. No third-party software is needed.
- 📝What to prepare
- An iPhone
- A USB cable
- A PC with a USB port running Windows 7 or later, including Windows 10
Here is how to transfer iPhone data to Windows PC:
Step 1. Connect the iOS device to the PC with a USB cable.
Step 2. Unlock the iPhone and trust the computer.
Step 3. Go to «This PC» > «[your iPhone name]» > «Internal Storage» > «DCIM» > «100APPLE».
Step 4. Manually copy the photos and videos you want to transfer from your iPhone to PC.
Troubleshooting: Issues You May Encounter While Data Transferring
#1. Why is my iPhone not showing up on Windows Explore?
🙋♂️I can no longer access the photos on my iPhone via windows explorer. I did all the usual BS restarting the iPhone, checking to make sure that the device was in Device Manager properly etc.
If you pull up iTunes, it works fine, I just can’t see it in Windows Explorer anymore. I plugged my iPhone into my computer… the same deal. Did anyone get any ideas? — Reddit
There are several potential reasons why you cannot access the iPhone through Windows Explorer:
- Outdated or faulty Apple Mobile Device USB driver: If the Apple Mobile Device USB driver on the computer is outdated or faulty, it can cause issues with accessing files on the iPhone.
- Settings issues on the iPhone: If the location and privacy settings on the iPhone are not set correctly, it can prevent access to files.
- Cable or connection issues: If the cable connecting the iPhone to the computer is faulty or the USB port is not working properly, it can cause issues with accessing files.
- Compatibility issues: If there are compatibility issues between the version of Windows on the computer and the version of iOS on the iPhone, it can cause problems with accessing files.
- Software bugs or glitches: Occasionally, software bugs or glitches can cause issues with accessing files on the iPhone through Windows Explorer.
#2. Why can’t I transfer photos from iPhone to PC?
🙋♂️After connecting my phone to the computer, I immediately get a «something went wrong» error message where it reminds me to make sure that my device actually has files on it and stuff. Usually after trying again, it realises that I do have photos and gives me options to import. I create a file on my desktop for them, click to import all and opt to delete photos after importing.
I tried importing the rest (using the «since last import» option) and a few hundred made it onto my computer before failing with another error message saying that «my files may not have been imported» and all other attempts since then have just failed immediately without importing anything. I uninstalled then reinstalled iTunes which this time came with Apple Mobile Device Service, still no luck.
TL,DR: I want to import all of my iPhone photos to my Windows PC and delete the originals but it fails every time. — Reddit
The reasons why you can’t transfer photos from iPhone to PC can be caused by several factors, such as outdated software, insufficient storage space, or a corrupted file. Here are some specific reasons and solutions to help the user resolve this issue:
- Outdated Software: The user should check if their iPhone and Windows PC have the latest software updates. If not, they should update their devices and try importing the photos again.
- Insufficient Storage Space: The user should ensure that their Windows PC has enough storage space to accommodate the photo files. They can check the available storage space and delete unnecessary files to create more space.
- Corrupted File: If the import process terminates abruptly, it could be due to a corrupted file. The user should try importing the photos in batches instead of importing all at once. This will help identify the corrupted file and allow the user to skip it during the import process.
- Try Different Methods: The user can try using different methods to import their photos, such as iCloud or Google Photos. Alternatively, they can use third-party software such as iExplorer or AnyTrans.
- Restart Devices: The user should restart their iPhone and Windows PC before proceeding with the import process. This will help refresh the devices and may resolve any connection issues causing the import process to fail.
By following these solutions, the user can troubleshoot and resolve any issues preventing them from importing all their iPhone photos to their Windows PC and deleting the original files.
#3. Can you AirDrop from iPhone to PC?
🙋♂️I always use AirDrop to transfer my files, like photos, to other iPhones and Macs. For some reason, now, I still want to Airdrop from iPhone to my PC, but I failed. Why? — from Quora.
Sadly no. AirDrop is a feature available on Apple devices that allows for seamless file sharing between compatible devices using Wi-Fi and Bluetooth. However, it is specifically designed for sharing files between Apple devices and does not have native support for transferring files directly from an iPhone to a PC.
While AirDrop is not available for PC, there are alternative methods to transfer files between an iPhone and a PC, such as using cloud storage services like iCloud or Dropbox, or using a USB cable and software like iTunes or File Explorer.
#4. Why does it take so long to transfer data from iPhone to PC?
🙋♂️I am transferring files from my iPhone to PC. It’s been 30 minutes, but I haven’t finished the task. Why does it take so long? — Reddit
Actually, there are many factors that will lead to the slow transfer of data from an iPhone to PC, including the file size and quantity, USB port and cable, background process and apps, file encryption, storage space, etc.
To speed up your transfer, you can check out the below tips:
- Use a USB 3.0 Port instead of 2.0 port
- Close the background apps and process before starting your transferring
- Transfer files in batches
- Find a professional iPhone transfer software
The Bottom Line
I believe you are so clear about the answers now. If you are an iPhone user, learning these tips will do great help whenever iOS data transfer is needed. Whether you want to transfer data from iPhone to PC or vice versa, these solutions are applicable.
For the simplest and most efficient method, we recommend using EaseUS MobiMover — the easiest way to transfer data from iPhone to PC. It is also worth noting that these tips can be applied for transferring files from iPhone to Mac or from iPad to computer. Choose the solution that best fits your needs and make data transfer a breeze.
For more information about how to transfer files from iPhone to PC, check the frequently asked questions below.
1. Why can’t I see my iPhone files on my computer with a USB cable?
The problem could be with your computer, its USB port, or the USB cord that connects it to your device. Try a different computer, USB port, or USB cord if possible. Check the charging port on the bottom of your iPhone or iPad for any trash.
2. Can you sync iPhone to computer wirelessly?
To start to configure Wi-Fi syncing, connect your device to your Mac via a USB or USB-C cable. Then you enable Wi-Fi syncing and customize the settings. When your device connects to your Mac through Wi-Fi, you can sync it from the sidebar.
3. Can I transfer photos from my iPhone directly to my PC?
You may transfer photographs and movies to your computer using the Photos app and a USB cord. You may also use iCloud Photographs to make your photos available on all of your devices.
Transfer photos from an iPhone to your PC.
First, connect your iPhone to a PC with a USB cable that can transfer files.
-
Turn your phone on and unlock it. Your PC can’t find the device if the device is locked.
-
On your PC, select the Start button and then select Photos to open the Photos app.
-
Select Import > From a USB device, then follow the instructions. You can pick the items you want to import and select where to save them. Allow a few moments for detection and transfer.
Make sure the photos you want to import are actually on the device rather than in the cloud. Then, follow the steps for your type of device.
For more info, see Import photos and videos from phone to PC
Need more help?
Want more options?
Explore subscription benefits, browse training courses, learn how to secure your device, and more.
Communities help you ask and answer questions, give feedback, and hear from experts with rich knowledge.
Want to transfer files from iPhone to Windows, but don’t know how? Looking for the best methods to transfer files from iPhone to Windows and vice-versa. Then this article is the right place for you and this will help you to transfer files from iPhone to Windows and from windows to iPhone very easily.
In this article, we included all the possible methods only after trying each of them. So, you can use the methods discussed here without any doubt and they perform really well. The main aim of this article is to make the readers aware of all the possible methods to perform the transfer process.
- READ MORE – 7 Best Ways to Transfer Files From PC to PC
- 5 Free Ways to Transfer Files From Android To Mac
Table of Contents
1. Windows Explorer
This is the most commonly known and used method to transfer files from iPhone to Windows. To perform this method, you need to connect the iPhone to windows using the USB cable and the rest of the steps are as follows.
How To Transfer Files From iPhone To Windows using Windows Explorer
- Firstly, Connect your iPhone to the Windows using the lightning cable and allow the permission in your iPhone(If asks).

- Launch the Windows File Explorer on your Windows and there you will find the iPhone storage.

- Browse the files available on the iPhone storage from the explorer and select the files to transfer. Right-click on selected files to open the options list. Choose the “Copy” option from that list.

- Now go to the destination folder in your windows, to where you want to transfer the files. Right-click and select the “Paste” option from the options list. That’s it, files start to transfer from iPhone to Windows.

- Likewise, to transfer files from Windows to iPhone, you need to copy the files from the windows and move to the storage of the iPhone and paste them there.
- READ MORE – How to Transfer files from PC to Mac (With Pictures)?
- How To Transfer Files From PC To iPhone Without iTunes?
2. iMazing

iMazing is a premium device management tool that helps users to perform various operations like transfer, backup, and much more. This is compatible with both Windows and macOS platforms. This made the iMazing in gaining a huge user base across the globe. Its simple user interface makes the users to work smoothly. This will help you to transfer files from iPhone to Windows using a Wired connection and as well as a wireless connection. To perform a wireless transfer, you need to connect both devices to the same internet/Wi-Fi connection.
Highlights of iMazing
- Easy-To-Use
- Install iOS updates from the software
- Automatic and Manual Backups
- Powerful Performance
Pricing
iMazing provides its services in two different versions, such as Personal and Business. The prices of all the two versions are listed below
- Personal
- Device License
- 1 Device – ₹2,700
- 2 Devices – ₹3,500
- 3 Devices – ₹4,000
- 5 Devices – ₹5,500
- 10 Devices – ₹10,000
- Unlimited Devices – ₹3,500/Year
- Device License
- Business
- Business – ₹4,000/seat per year
- Configurator (macOS only) – ₹28,000/sear per year
- CLI – ₹20,000/seat per year
- Custom Licensing
How To Transfer Files From iPhone To Windows using iMazing

In This section, I will show you the step-by-step procedure involved in transferring files from iPhone to Windows and from Windows to iPhone.
Total Time: 5 minutes
STEP-1: Download the iMazing Application

Visit the official site of iMazing and download the latest version of an application to your Windows PC/laptop.
STEP-2: Launch and Connect iPhone

Install and launch the iMazing application on your windows system. Then it asks you to connect the iPhone as soon as launching the application. Connect your iPhone to the computer using the lightning/USB-C cable.
STEP-3: Choose the export option

After connecting the iPhone to the computer, you will find the interface with all the features as displayed in the screenshot. Click on the “Export All Data” option.
STEP-4: Choose Data to Transfer

It redirects you to a page and there you will find various data options. Select the required data to transfer by checking in the boxes. Later, click on the “Export” option available at the bottom right corner. Then a small window will pop up. Choose the destination location from that window to transfer files from iPhone to Windows.
STEP-5: Transfer Status
Then the transfer process starts and the status will be seen as shown in the screenshot. And after the completion of the transfer process, you will get a notification. This is how you can transfer files from iPhone to Windows using iMazing.
Supply:
- iPhone,
- Windows Pc/Laptop,
- iMazing
Tools:
- Device Manager
- READ MORE – 8 Best Ways to Transfer Photos From iPhone To iPhone
- 6 Best Ways To Transfer iPhone Photos To PC (Windows)
3. EaseUS MobiMover

EaseUS MobiMover is an application that helps in transferring the files and media like photos, music, videos, etc., from one device to another. This allows transferring files from one iPhone to another and from iPhone to Windows or Mac. EaseUS MobiMover allows you to backup, restore, and transfer WhatsApp Chats and attachments. You can also convert HEIC to JPG and video to MP3 files. This is a free application and is compatible with both Windows and macOS platforms.
Highlights of EaseUS MobiMover
- Free To Download
- Allows to convert HEIC to JPG and Videos to music
- Backup and Restore iPhone
- Compatible with both Windows and macOS platforms
- Supports macOS 11.5 Beta – 10.13
Pricing
EaseUS MobiMover is available for FREE to Download.
How To Transfer Files From iPhone To Windows Free using EaseUS MobiMover
- STEP-1: Firstly, go to the official site of EaseUS and find the MobiMover application. It is available for both Windows and macOS. Download the application according to your operating system.
- STEP-2: Install and launch the application on your Windows PC/laptop. Then you will find the interface as shown in the screenshot. It notified you to connect your iPhone.

- STEP-3: Connect your iPhone and move to the Phone to PC option available under the Quick Transfer section. Then it shows all the categories available to transfer. Choose the categories and click on “Transfer”.

- STEP-4: It starts to transfer the selected files from iPhone to windows. The transfer time depends on the size of the files.

- STEP-5: After the completion of the transfer process, it notifies you as successfully Transferred. This is how you can easily transfer files from iPhone To Windows. Likewise, by choosing the Pc to Phone option, you can also transfer files from Windows to iPhone.

- READ MORE – 4 Best Ways To Backup iPhone To PC(Windows)
- How To Transfer Contacts From iPhone To iPhone – 7 Best Methods
4. iCloud

iCloud is the cloud platform available for Apple users similar to Google Drive which is available for Android users. This comes as inbuilt cloud storage with a capacity of 5GB for an Apple ID. All the photos, videos, documents, etc., can be synced to this iCloud storage and can be accessed from anywhere just by signing in to the Apple account associated to it.
Highlights of iCloud
- Safe and Secure
- Available for free with Apple ID
- Automatically syncs your data
- Can be accessed from anywhere and at any time
Pricing
iCloud is completely free to use.
How To Transfer Files From iPhone To Windows using iCloud
- Go to Settings on your iPhone and click on the “Profile” option available at the top of the settings.

- There you will find the “iCloud” option, tap on it. Then you will find various categories as shown in the screenshot. Turn ON all the categories that you want to sync to iCloud Drive.

- Now, visit the official site of iCloud and log in using Apple credentials. There, you will find the options as displayed in the screenshot.

- Choose the type that you want to download. Here, I’m choosing the “Photos” category to transfer from iPhone to Windows.
- Choose the Photos by clicking on each photo or else, choose all by using the keyboard shortcut – “CTRL/CMD +A”. Later, click on the “Download” option by clicking on the icon available at the top right corner. Then it shows two options, such as Unmodified Originals and Most Compatible. Choose one and later, click on “Download”.

- That’s it, this is how you can easily transfer files from iPhone to Windows, and similarly using the import option, you can transfer files from Windows to iPhone.
- READ MORE – 3 Ways to Import Google Contacts to Phone(Android & iPhone)
- IOTransfer 4 Review: A Better Way To Manage Your iPhone or iPad
5. Snapdrop

Snapdrop is a tool that helps you to transfer files between the devices that are connected to the same network. It is available in both web and app versions. This is a free-to-use tool to transfer files from iPhone to Windows, Android to Windows, and Vice-Versa. As this is available in the web version, you can use this regarless of storage issue on your device.
Highlights of Snapdrop
- Easy-to-use
- Available in Web and App versions
- 100% Free
- Transfer files at a very faster rate
Pricing
Snapdrop is an Open-source tool and is available in App and Web versions.
How To Transfer Files From iPhone To Windows using Snapdrop
- Firstly, Visit the Official site of Snapdrop on iPhone and Windows PC using any web browser. Then you will find the interface as shown in the screenshot.

- Then you will find your device and the other devices available in your network that are ready to transfer files.

- Choose the device from the iPhone and then it shows three options, such as Photo Library, Take Photo or Video, and Choose Files. Here, I’m selecting the “Choose Files” option by tapping on it. Then it takes you to a page from where you can select the files to transfer.

- The transfer process starts as soon as you select the files. Later, after the completion of the transfer process, you will find a message as “File Transfer Completed”.

- Likewise, you can transfer files from Windows to iPhone and Android Devices.
- READ MORE – 15 Must-have iPhone Apps That You Need to Try
- How to Send ColorNote Notepad notes to iPhone & PC from Android?
Conclusion
Transfer of files from one device to another is a very common process and users are looking for best handy methods. With the increase in technology, wired transfer transformed into wireless transfer which is a considered as a good thing. So, we provided the both wired and wireless methods that helps the users to transfer files from iPhone to Windows and vice-versa. If you want to transfer files of larger size, then we recommend to use the wired method as it transfers data at a faster rate compared to wireless. One more thing about the wireless transfer is that it uses your internet/Wi-Fi, so try to avoid a wireless transfer if you are using limited data packs.
There is a software that will help you to transfer files from iPhone to windows both Wirely and wirelessly. It is none other than iMazing. This is the finest and safest software that helps you in transferring the files of any size. So, we recommend making iMazing your first choice.
I hope this tutorial helped you to know How to Transfer Files From iPhone To Windows. If you want to say anything, let us know through the comment sections. If you like this article, please share it and follow WhatVwant on Facebook, Twitter, and YouTube for more Technical tips.
- READ MORE – How to recover deleted files from Windows, Mac, iPhone, USB, etc.,
- What Are Some Neat Things We Can Expect in macOS Monterey?
How To Transfer Files From iPhone To Windows – FAQs
Can I AirDrop to a PC?
AirDrop only works on Mac, iPhones, and iPads, but similar solutions are available for Windows PCs and Android devices.
Does Apple have a transfer app?
Apple made an Android app called Move To iOS that makes moving your messages, photos, videos, and more from an Android phone to an iPhone easy.
Is Snapdrop safe to use?
Yes, it is. The whole concept is very simple. SnapDrop opens a connection on your local network, which can be discovered by any other devices using that network.
Is SnapDrop fast?
Apart from being platform-agonstic, the best part about Snapdrop is that how fast the transfer is despite having high-grades TLS encryption. Images and files ranging from 4-5MB in size are sent in a flash.
Is Snapdrop open source?
Snapdrop for Android is Android™️ client for the free and open source local file sharing solution.
For quite a long time, finding an answer to how to transfer files from iPhone to PC has been fraught with difficulty. There is some degree of compatibility between the iPhone and PC; nevertheless, in contrast to data syncing with Mac, it is still difficult to transfer files between the iPhone and PC. There are a few different methods by which you may synchronise and transfer data between your Windows computer and your iPhone or iPad.
If you use an iPhone, familiarising yourself with these guidelines will be of great use to you anytime the iOS data transfer is required. It does not matter whether you want to move files from your iPhone to your PC or vice versa; these options will work.
Transfer Up To 5 GB For Free
No-Registration Required

1. Transfer Files From iPhone To PC Using iCloud
Overall, iCloud is one of the simplest methods to transfer data between an iPhone and almost any other device, including a Windows PC. Essentially, you upload your data to iCloud and then retrieve them on another device.
Nevertheless, the free iCloud plan only provides 5GB of storage space. Therefore, if you want to utilise iCloud to transfer larger files, you must subscribe to a premium plan.
- Launch the Files app on your iPhone.
- Locate the files you want to transfer to your computer.
- Long-press the Copy button and touch it for individual files. To copy several files, utilise the Select option from the menu with three dots.
- In the app, go to iCloud Drive and paste the copied files there. Your files have been transferred to iCloud Drive.
- Use iCloud.com or the iCloud Drive application for Windows to download the files to your computer.
2. Transfer Files From iPhone To PC Via Bluetooth
Bluetooth is another simple technique to transfer data from iPhone to PC. However, one aspect you need to remember is that transferring data from iPhone to PC over Bluetooth is only possible for a limited number of different file formats.
Since it is so time-consuming to manually choose files for iPhone to Bluetooth file transfer, you can only transmit a small quantity of data through Bluetooth, which means you can only share a limited amount of information.
Besides, Bluetooth is by no means the most efficient method for transferring data. As a result, in the next paragraph, we will discuss yet another effective strategy.
- Swipe the settings panel on the iPhone’s home screen upward and press and hold the Bluetooth symbol. Permit it to connect to the computer to which you want to transmit the data.
- To begin the transmission, select the Windows “settings” option and then activate the Bluetooth option. Within the windows tab, the “device” option may be found. Turn on Bluetooth from there to enable the Bluetooth device to accept files.
- Select the files you intend to transfer from your iPhone to your computer.
- These files will appear in a pop-up on your computer.

3. Transfer Files From iPhone To PC Using File Explorer On Windows
Now in our article on how to transfer files from iPhone to PC, we’ll take a look at the most dominant and popular operating system; Windows. You may be familiar with File Explorer, the software for managing and transferring files on Windows computers. It makes it simple for you to access the files on your computer and traverse the storage space on it.
If the data you need to transfer is photos and videos from your iPhone’s camera roll, Windows File Explorer is the way to go, as it enables direct picture and video transmission from iPhone to PC through USB connection. No further software is required.
- File Explorer has a graphical user interface for data administration. Using a USB connection, you may connect the iPhone to a computer.
- Unlocking the iPhone Allow the connection to successfully establish by selecting “Trust” on your iPhone. a
- Navigate to “This PC” > “[the name of your iPhone]” > “Internal Storage” > “DCIM” > “100APPLE.”
- Your iPhone images will be neatly organised into date-based folders.
- You may now copy the desired photo(s) to your computer.

4. How To Transfer Files From iPhone To PC With iTunes
The primary purpose of iTunes File Sharing is to facilitate data transfer between your computer and a compatible application running on your iPhone or iPad. If you are certain that the files you wish to transfer were produced by an app compatible with File Sharing, then you may use this function to move material from an iPhone to a PC.
To transfer files from an iPhone to a PC with the help of iTunes File Sharing and USB, follow the subsequent steps:
- Connect your iPhone to your computer and start iTunes if it is not already running automatically.
- In the window for iTunes, go to the “Device” tab, and from there, pick “File Sharing.”
- If you wish to transfer files from one programme to another on your PC, choose that app from the list.
- After deciding which are files you wish to copy to the computer, choose those files and then click the “Save to” button.
- To begin transferring files from your iPhone to the computer, choose a place on your computer where you would want to store the files, and then click the “Save to” button.

5. Transfer Files From iPhone To PC Using FileMail
You may send files from your iOS device to your computer with the help of FileMail. Sending huge films, audio files, high-quality photo collections, and collections of any other sort of media is straightforward.
The iphone file transfer application is easy to use and has a “WiFi only” option in case you want to prevent your mobile data limit from being exceeded while using the app. To get started, download and install the app on your iOS device. You can share up to 5 GB for free, with no need to register.
- Install the Filemail mobile application for ioS on your iPhone
- On your PC, either navigate to Filemail’s home page, or install the Filemail Desktop app for PC. This will enable you to get UDP transfer acceleration for faster transfer rates.
- Launch the FileMail application on your iPhone
- Sign in to your current FileMail account, or if you want, you may skip this step and use our service without paying a dime.
- Simply choose the items you want to send after clicking the “attach files” button.
- Please provide the e-mail addresses of the recipients, the message topic, and the content (optional).
- Click “Send”. If you have a limited mobile data, the application may inquire whether it should deliver your files by simply using WiFi connections.
- The process of uploading your files will now begin. When it is finished, a download link will be sent to your e-mail as soon as it is complete.
- Click on the link, and you will be taken to a page where the files can be downloaded. Or you can take the link into our dedicated Windows-based file transfer app for PC and download from there.

6. How To Transfer Files From iPhone To PC — Pros & Cons Of Different Methods
| Transfer Type | Pros | Cons |
|---|---|---|
|
iTune |
Supports both USB and WiFi connectivity. |
Not all iDevice applications support the iTunes File Sharing function. |
|
iCloud |
All your devices will be synchronised and updated whenever you modify a file. |
Requires an Internet connection. |
|
Bluetooth Sharing |
Very easy process to send files |
Sluggish transmission times, it can take a long while to send files |
|
File Explorer |
Easy to use and with a straightforward user interface |
Sometimes iPhone does not appear in Windows Explorer, preventing them from seeing iPhone images on a PC. |
|
FileMail |
Users may use it without being registered, and it is free |
You will need to have an internet connection. If wanting to share files larger than 5GB, you will need a subscription. |
Transfer Files Of Any Size
Unlimited Recipients, Downloads, & Bandwidth
Windows/Mac users may come to this question, “Can i transfer files from iPhone to PC?”. The answer, of course, is Yes. In this article, we will share 5 methods to transfer files from iPhone to PC including iTunes and iCloud. For more detail, please read on!
- Method 1. One click to Transfer Files from iPhone to PC with Tenorshare iCareFone
- Method 2: Transfer Files from iPhone to PC Using USB
- Method 3: Get Files from iPhone to PC using iCloud
- Method 4. Copy Files from iPhone to PC via iTunes
- Method 5. Transfer Large Files from iPhone to PC through OneDrive/Google Drive/DropBox
Method 1. One Click to Transfer Files from iPhone to PC with Tenorshare iCareFone (Recommended)
Tenorshare iCareFone is one of the best iOS file manager, which is compatible with Mac and Windows 7/8/10. It supports to transfer more than 20 types of files, including music, photos, large video files, contacts, etc. No matter how large the file is, iCareFone can handle it without any effort. In addition, iCareFone has other useful function, for example, back up your iPhone/iPad data and selectively restore to your device.
Follow these simple steps to transfer files from iPhone to PC without iTunes: (You need to download the program on your computer and connect your iPhone to it.)


-
After the connection is established, switch to Manage option on the main interface.

-
On the left hand menu, select the file you want to transfer,such as photos. After that, click on the «Export» button and then select a location to save on your computer.
-
Wait for seconds, and now the transferring finished. You files was transferred from iPhone to your computer.
Video Tutorial on How to Transfer Files to iPhone from PC with iCareFone
Method 2: Transfer Files from iPhone to PC Using USB
Yes, you can simply use USB to transfer files! Just connect your iPhone to the Windows PC through a USB cable. (Note: it’s better to install iTunes on your computer.)
- The Windows Explorer will be launched after recognizing the device, if it does not you have to do it manually by going to the «Start Menu» or you can go to the «Taskbar»
- Now, go to «This PC» and you will find your iDevice as a «Portable Device».
-
Enter the «Portable Device» and go to «Internal Storage» to find «DCIM», this is the place where all of your photos and videos are stored.
- Select the ones you want to transfer and copy them to your computer.
Cons:
This technique can only be applied to transfer photos and videos. If you have any other kind of data on your transfer list, then you have to look for other ways to do it. It is indeed a major con!
Method 3: Get Files from iPhone to PC using iCloud
iCloud will regularly store back up your device whenever you are connected to steady Wi-Fi. You can access the data in iCloud Drive and iCloud Photos under the File Explorer tab on your PC.
Steps on using iCloud:
-
On your iPhone, go to «Settings», then enter Apple ID and click «iCloud». Now enable iCloud Backup.
- Download the iCloud on your Windows PC or go to iCloud.com, and login the iCloud account. Select the options and content you want from the interface and click «Apply».
-
Click “This computer” and find the iCloud Folder. Now you can copy data from iPhone to PC.

Steps on using iCloud Drive:
-
On your iPhone, go to «Settings», then enter Apple ID and click «iCloud». Now scroll down to find iCloud Drive and open it.
-
Download the iCloud on your computer or go to iCloud.com, and login the iCloud account. Select the options and content you want from the interface and click «Apply».
-
Click “This computer” and find the iCloudDrive Folder. Now you can move files from iPhone to PC.
Cons:
iCloud only provides 5GB free storage space, so it will overwrite backup data every time.
Method 4. Copy Files from iPhone to PC via iTunes
iTunes can also be used to transfer data. You can use iTunes file sharing to move files from iPhone to PC. Here are the steps on using iTunes file sharing:
-
Download and install the latest iTunes on your PC. Launch it and connect your iPhone with a USB cable. Choose trust if asked whether trust this computer. Then click the phone icon.
-
Now, on the left list, choose file sharing.
-
Now choose the app from which you want to transfer files. And select the files, then click save to. Now your files will be transferred to computer.
Cons:
Some files are incompatible with the program, so they cannot be shared.
Method 5. Transfer Large Files from iPhone to PC through OneDrive/Google Drive/DropBox
Here are the steps on how to use OneDrive to transfer:
-
Download and open OneDrive App on your iPhone.
-
Sign in your OneDrive Account (sign up if you don’t have account). Then tap on the Plus button in the top right corner.
-
Then tap on upload, and choose Browse. Now you can select the files hat you want to transfer and transfer will finish after several seconds.
-
On your computer, sign in the same OneDrive account and you’ll see the files. You can download them to your computer for offline use.
Here are the steps on how to use Google Drive to transfer:
-
Download and open Google Drive on iPhone.
-
Sign in your Google Drive Account (sign up if you don’t have account). Then tap Add button to create a new, and tap upload.
-
Then find and tap the files you want to move, and then tap upload.
-
On computer, sign in the same Google Drive account, and now you’ll see the files on your computer.
If you want to use DropBox instead of OneDrive, please follow the steps below. (Most people use it to transfer photos from iPhone to PC.)
-
Download and install Dropbox Desktop on your iPhone.
-
Choose a folder that you want to use to store your files.Tap on the Plus button and then tap upload files. Now you can select the files to upload.
-
On computer, sign in the same account and you’ll see the files.
Cons:
Although it may be convenient to use cloud services to transfer photos, this is not the most effective way to transfer data, and it may take a long time due to the speed of the Internet.
Frequently Asked Questions about Transferring from iPhone to PC
Q1. Can I Airdrop from iPhone to pc?
No, AirDrop only works on Apple devices, which allows users to wireless transfer photos, document, videos and more to a nearby Mac or iOS devices.
Q2. How Do I Transfer Files from iPhone to PC without iTunes
Apart from iTunes, you can transfer files to iPhone from PC using USB, iCloud, OneDrive, Dropbox, WhatsApp, Wechat and other social apps.
Q3. What is the easiest way to transfer files from iPhone to computer?
There are two easiest ways: Use USB (time-saving) and Use iCareFone (time-saving and multi-functional).
Q4. How do I transfer files from iPhone to Windows computer?
The 5 methods in this article are available on both Windows and Mac. So you can choose one of them to transfer files to Windows.
Conclusion
To sum it up, there are numerous ways to transfer data from iPhone to computer Windows 7/8/10. Among of these methods we mentioned above, Tenorshare iCareFone is the fastest way to transfer files from iphone to pc without itunes. If you like this article, don’t forget to share and comment!!