In Windows 11, Microsoft has introduced so many new features like widgets, Android Apps support, Snap Layouts, Virtual desktops, and many more. Even, so many taskbar customization options have been introduced. But still, the network speed monitor on Windows 11 missing. In Android, you can enable network speed indicators easily from the settings app. But, in Windows, such an option is missing and much needed. Yes, undoubtedly, the task manager shows the download/upload speed of an active internet connection in send/receive data form. But, you cannot pin it to the taskbar. Like, you can add performance stats to the Windows 11 taskbar.
Well no worries, there are some free third-party apps and tools available. Which shows your Internet connection’s download and upload speed in real time. This means you can constantly track active internet usage on your Windows PC/Laptop. Which will help you to track down connection issues in your network. Also, these net speed monitor apps will work on both Ethernet and WiFI connections. There are so many Internet Speed Monitor Apps available for Windows 11 to use. So, feel free to choose an app that adds a network monitor to the taskbar, and, comes with numerous customization settings.
Add network speed monitor to the Windows 11 Taskbar
Net Speed Meter.
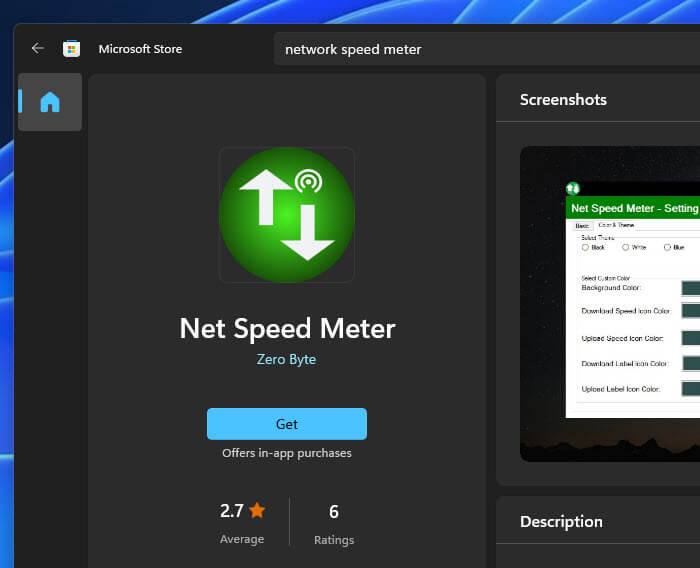
If you don’t want to download an App from a third-party source, then Net Speed Meter is the best app for you. It is available for free on the Microsoft Store. Net Speed Meter app shows the real-time download and upload speed of your internet connection. And, runs in the system tray. The best part is you can drag and drop the network monitor anywhere on the desktop, so no restrictions. App also comes with so many customization options. Like, you can change the speed unit from bits per second to bytes per second. Moreover, you can change the font and text size. Even, you can change the color & theme as well.
By default, the Net speed meter is set as a startup app. So, it gets automatically started when you start Windows 11, no need to run it manually every time. The app does refresh the network speed every 500ms. Which you can change if you want. Test Speed option is also available to perform an Internet Speed Test.
- Click on the start button and after that, click on Microsoft Store App from the pinned apps section.
- Microsoft Store will get open, and search for Net Speed Monitor. Or, you can use the following link to directly open the App page.
- Once you find the Net Speed Monitor app, click on Get to install it in your Windows 11.

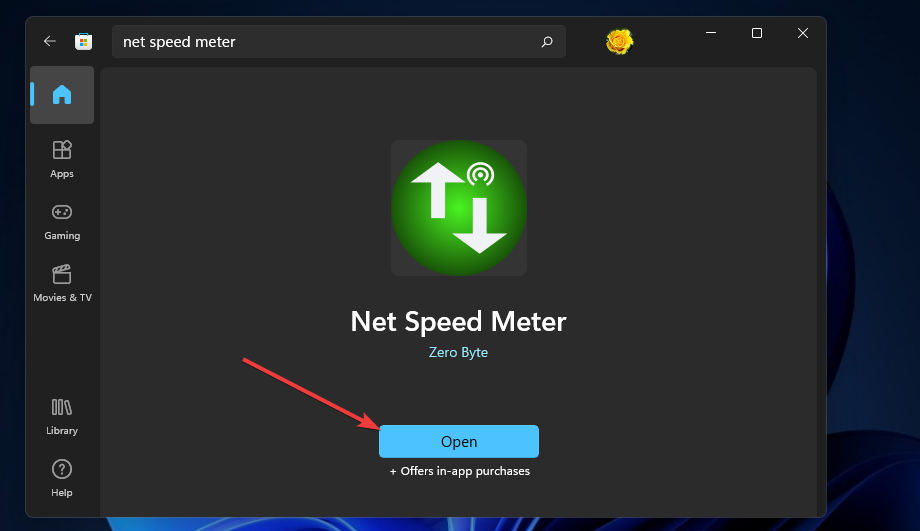
- The app will now get downloaded and installed, click on Open to launch it.
- You will now immediately see a Network Speed Monitor in the upper right corner of your desktop.
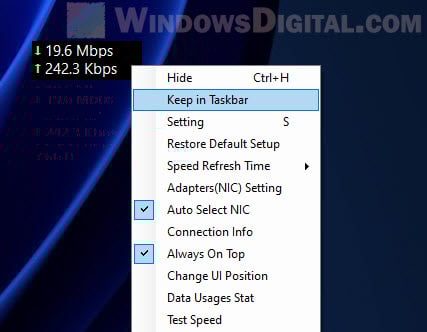
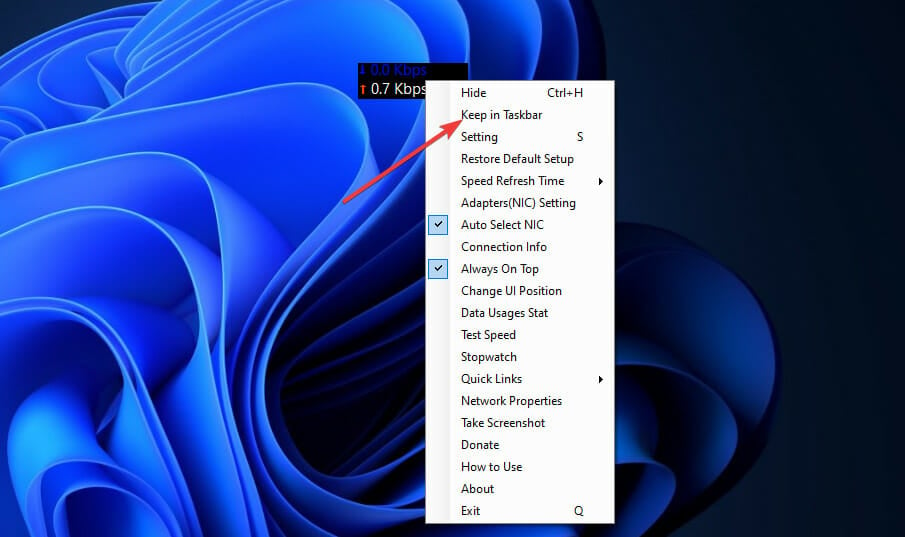
- Do right-click on it, and a menu will appear. Click on “Keep in Taskbar”.

You can also drag and drop the network speed meter wherever you want.
- Once you set it to the desired position, right-click again on it and click on settings.

- Select Byte/s in unit speed so that you will get an accurate result. You can also change font and size if you want.

- After that, click on Color & theme and now select the transparent theme. So that it can blend with your Windows 11 theme.

Also, you can change the speed refresh time to fast. By default, it might be set to normal. Okay, so that’s how you can add Network Speed Monitor to the Windows 11 Taskbar.
Windows 11 Traffic Monitor
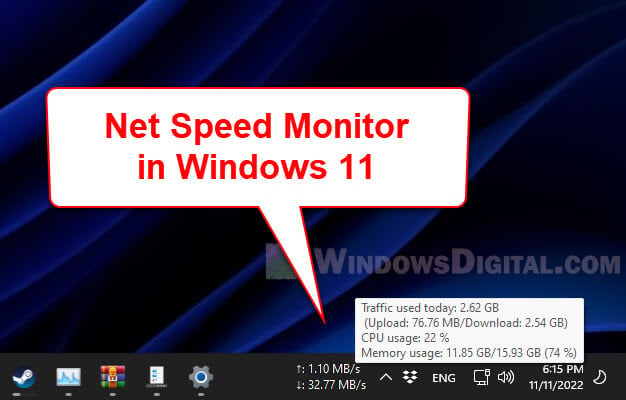
Traffic Monitor is another free and open-source Windows 11 app to display Windows 11 real-time network speed. Apart from Internet Speed, this app also can display CPU and Memory usage in the taskbar. The traffic Monitor app also can display “historical traffic statistics”, which are locked in the net speed meter app. So definitely, this app is better than that.
The traffic Monitor app comes with two network monitor windows – Main Window and Taskbar Window. The Main Window offers you a graphical interface, which you can drag and drop anywhere on the desktop and lock. But, you cannot drag the main window to the taskbar. So, if you want to add a Network Speed Monitor to the taskbar on Windows 11, then the taskbar window will help you with it. Traffic Monitor also comes with many customization options.
You can customize where you want to show the network monitor in the taskbar. Also, you can choose the background color, text, and theme. Even, you can change the net speed unit as well. Skin replacement function is also available for the main Window. Personally, I find it better than the Microsoft Store.
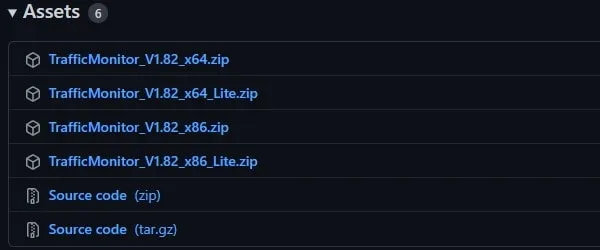
- First, do download the zip file of TrafficMonitor from GitHub.
It is available for 64-bit and 32-bit Windows OS. Also, there is a lite version also available, but better to download the main version.
Note: I am using Windows 11 64-bit version, so I have downloaded the “TrafficMonitor_V1.82_x64.zip” file.
- Once the zip file gets downloaded. Do right-click on it and then click on Extract All > Extract.
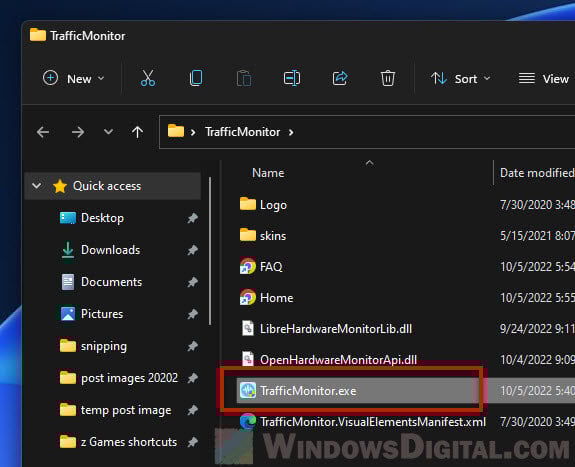
- Open the extracted TrafficMonitor folder and then right-click on the “TrafficMonitor” file and click on “Run as administrator”.

Windows Protection window might appear. Click on More Info > Run anyway. You will now see a shield icon in the Windows taskbar. Click on it and after that click on Yes in the UAC window.
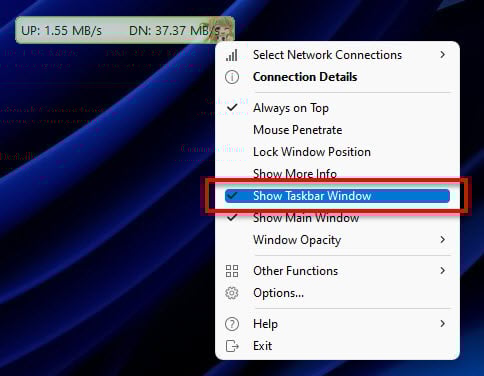
- That’s it, the main window of TrafficMonitor will now appear. Right-click on it, and then click on “Show Taskbar Window”.

Internet Speed Monitor will now appear in the taskbar.
- Now to disable the main window, right-click again on it. And, after that, click on “Show main Window” to uncheck it.

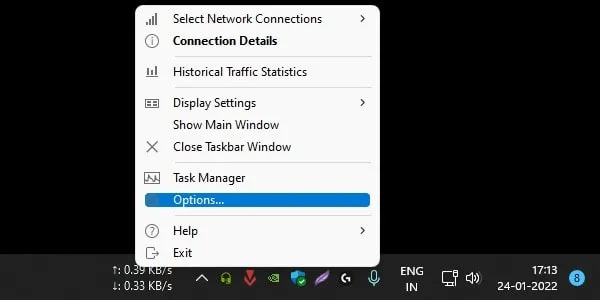
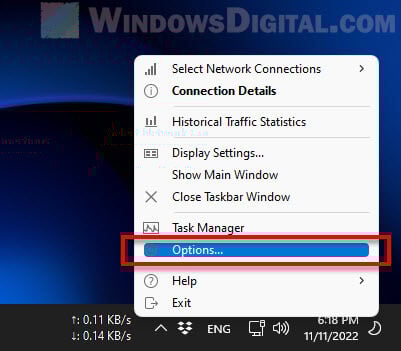
- Okay, now right-click on TrafficMonitor visible in the taskbar. And, click on options to open settings.
- You can now customize the taskbar window. Also, you can change the net speed unit if you want.

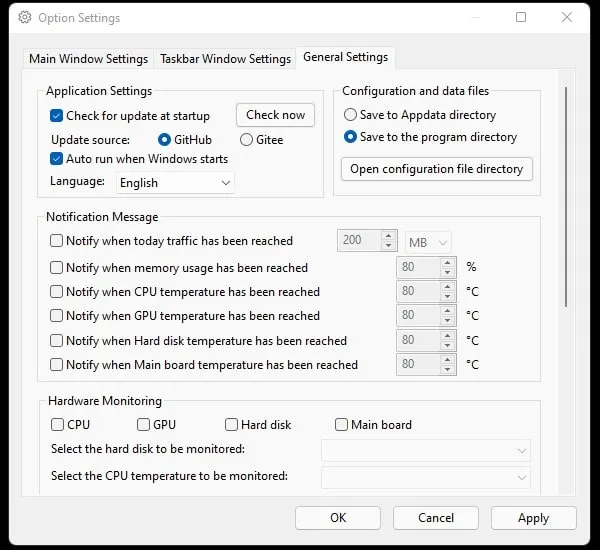
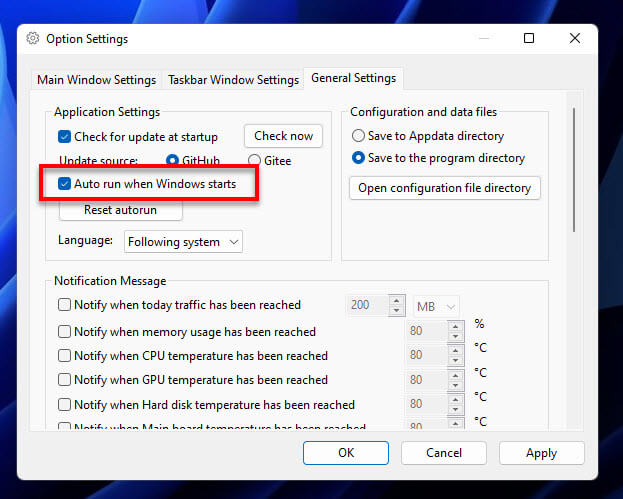
- Click on the General Settings tab. And, do enable the “Autorun when Windows starts” option. Also, select English as the language and click on Apply > OK.
That’s it, so that was the easiest way to add real-time download and upload speed to the Windows 11 taskbar.
The Internet today is full of surprises and hidden things that users may not be aware of. Having a traffic monitor to monitor your network speed from time to time can be crucial to let you know if there is anything that is using the internet bandwidth without your knowledge. It is also a great way to know how much internet speed an app is using when it is downloading or uploading something.
Back in Windows 10 and older versions of Windows, there was a simple and popular third-party app called “NetSpeedMonitor” that can display the real-time network or internet speed directly on the taskbar. Sadly, this app is not supported in Windows 11.
Also see: How to Know Which App is Using The Internet in Windows 11
How to add a network speed monitor in Windows 11
Fortunately, there are a few other apps that are able to do the same thing as NetSpeedMonitor to display a real-time network speed monitor on the taskbar in Windows 11. This guide will show you how to add a net speed monitor to the Windows 11 taskbar.
Traffic Monitor for Windows 11
Traffic Monitor is a free and open-source app that lets users display the live network speed on either the taskbar or as a floating gadget on the desktop in Windows. Most importantly, it works perfectly fine on Windows 11.
One huge feature that makes the app stands out among other similar network speed monitor apps is that Traffic Monitor can also display the CPU and Memory usage alongside the Network traffic usage.
Follow the steps below to install Traffic Monitor and add its net speed monitor to the Windows 11 taskbar or desktop.
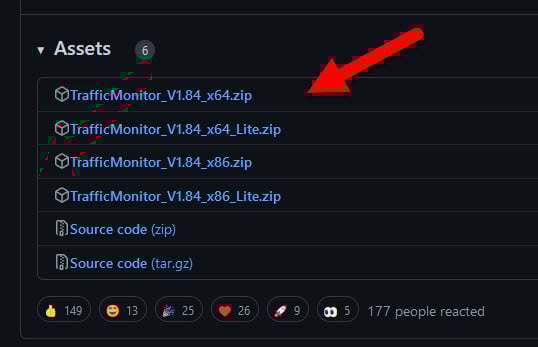
- Go to https://github.com/zhongyang219/TrafficMonitor/releases to download Traffic Monitor. Check the latest release and select the x64.zip under “Assets” to download it. You can download the Lite version but it has much lesser features.

- Once downloaded, unzip the file and open the TrafficMonitor.exe from the extracted folder.

- The app will start off with a floating network speed monitor gadget on the desktop which you can move around easily. To enable it to show on the taskbar instead, right-click the floating network meter and select “Show Taskbar Window“.

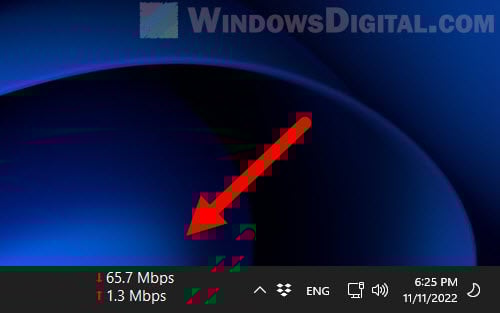
- The net speed monitor will now be displayed on the Windows 11 taskbar.

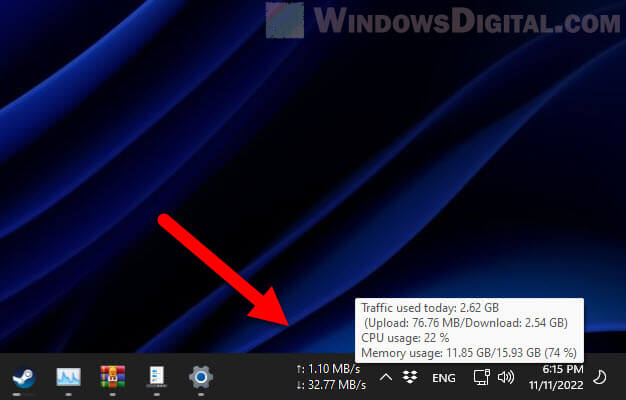
When you hover your mouse cursor over the speed meter, it will display more details such as the total traffic used today (upload and download), as well as the CPU and Memory usage in percentage.
If you don’t want the floating network meter to display on the desktop, right-click on the gadget and uncheck “Show Main Window”. This option will disable traffic monitor from showing on the desktop.

Read next: How to Change Ethernet Network Speed from 100 Mbps to 1 Gbps
Configure Traffic Monitor to auto start on Windows startup
As Traffic Monitor needs to be running in Windows 11 in order for the net speed monitor to continue displaying on the taskbar, to save you the hassles from having to run the app every time you startup your computer, you can set the app to automatically run when Windows starts.
To do so, right-click the net speed monitor on the taskbar and select Options.
Next, go to the “General Settings” tab and enable the checkbox for “Auto run when Windows Starts” under Application Settings.
In the mean time, you can also configure other settings from the “Taskbar Window Settings” tab for the net speed monitor on the taskbar or the “Main Window Settings” tab for the floating meter.
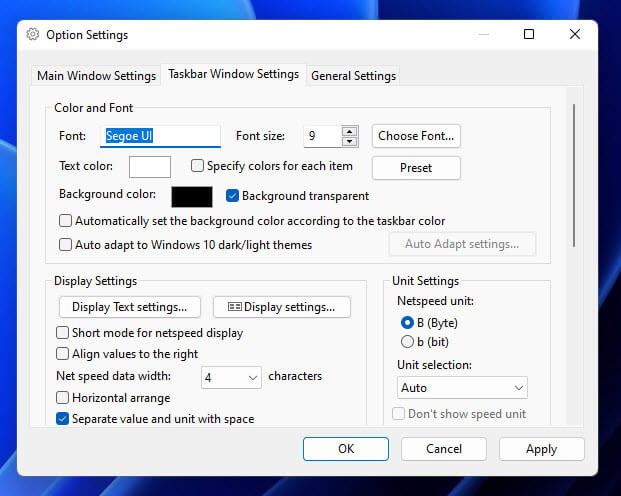
You can change settings such as the color and font of the speed meter, netspeed unit used (Byte or bit), and other display settings.
Related issue: Ethernet Internet Speed Capped at 100 Mbps (Fix)
Internet speed monitor app from Microsoft Store
Alternatively, you can look for a network or internet speed monitor app from the Microsoft Store.
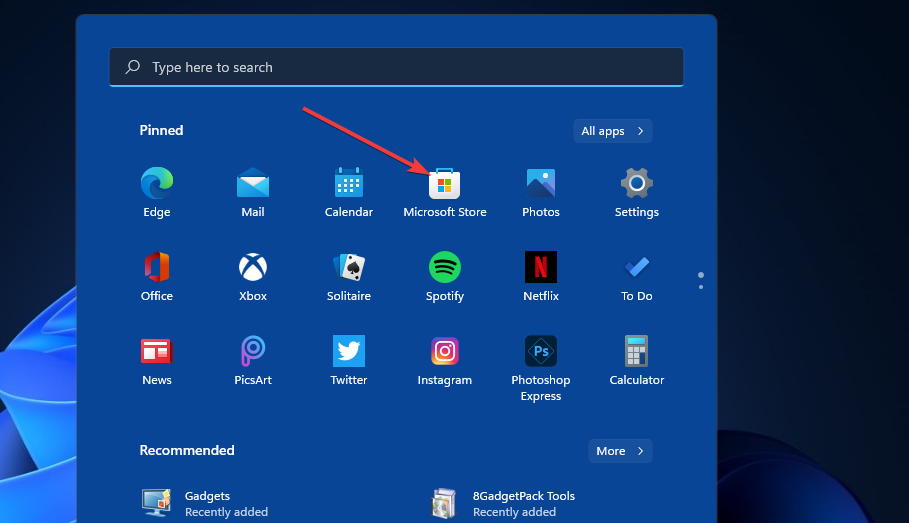
- First, open Microsoft Store via Start menu.
- Search for “Net Speed Meter” using the search bar in the Microsoft Store’s window.
- Select Net Speed Meter and click Get to install the app.

- Once the installation is completed, click Open to launch the app.
- The app will start out as a floating network meter on the desktop. To move it to the taskbar instead, right-click the floating meter and select “Keep in Taskbar“.

- The net speed monitor will then display on the taskbar in Windows 11.

Task Manager’s Performance tab or Resource Monitor
If you only want to monitor your network or internet speed without installing any third-party app, you can quickly view the network usage via the Task Manager Performance tab or the Resource Monitor in Windows 11. This method does not add any meter to the taskbar or on the desktop.
To check the internet speed via Task Manager, first press Ctrl + Shift + Esc to open Task Manager in Windows 11. If it isn’t already in full details mode, click “More details“.
Next, click the “Performance” tab and select your Ethernet or WiFi adapter from the left pane. The network speed usage will shown on the right – the “Send” and “Receive” speed.
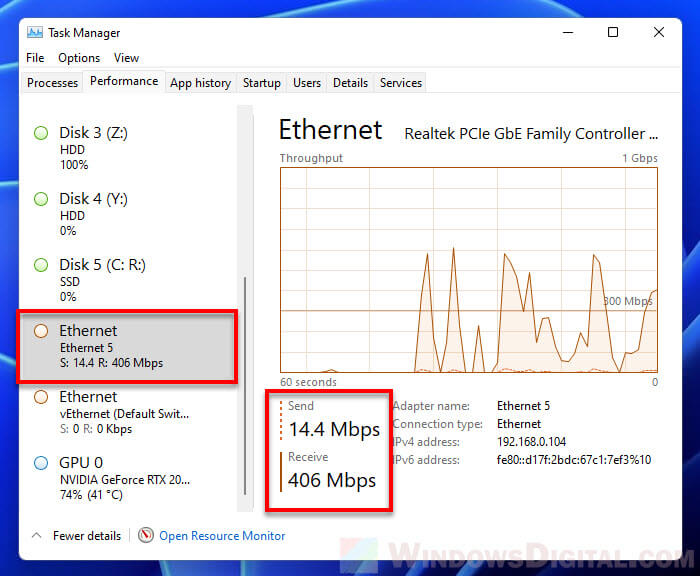
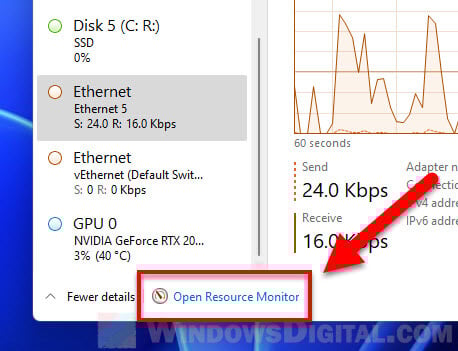
Alternatively, to view more details about which app or process is using the network bandwidth, you can use the Resource Monitor instead. To do so, click Open Resource Monitor at the bottom of the Task Manager window.
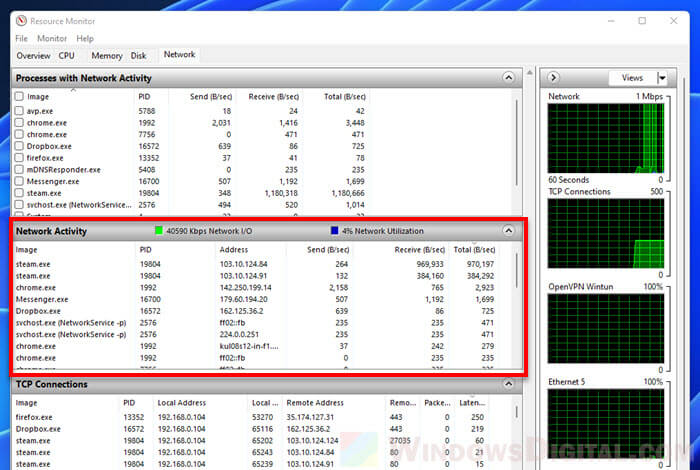
Then, select the Network tab and expand Network Activity. From there, you can view the network transfer speeds (Send, Receive and Total) of all running processes. You can sort the list by transfer speed by clicking the header of the relevant column you want to sort.
TrafficMonitor
для Windows


TrafficMonitor — это универсальная программа массового назначения для слежения за сетевым и Интернет трафиком, с богатым набором настроек и расширенной функциональностью. Будет незаменима как простому пользователю, так и для администраторов локальных сетей.
Основные функциональные особенности программы TrafficMonitor:
- Основное системное окно с графиком текущего соединения и четырьмя независимыми, настраиваемыми полями для отображения выбранных счетчиков.
- Более 125 различных счетчиков.
- Функциональное OSD окно с настраиваемыми группами счетчиков
- Многостраничное всплывающее окно с перечнем всех доступных счетчиков
- Множество редакторов, таких как: редактор значений счетчиков, редактор счетчиков статистики, редактор тарифов, редактор праздников, редактор счетчиков остатка, редактор горячих клавиш, редактор оповещений, редактор цветовых схем программы и т.п.
- Контроль статистики, как по сетевому интерфейсу, так и по удаленному соединению
- Большое количество необходимых настроек, которое обеспечивает максимальную гибкость программы.
- Ведется полный отчет, по статистике, причем в двух независимых формах.
- Первая – это отчет, разбитый по категориям: Весь период, Текущий Год, Текущий месяц, Текущий день и Сессии. Вся статистика предоставлена в удобной древовидной структуре. Все данные ведутся с точностью до настраиваемого интервала времени (если не достаточно точности до сессии)
- Вторая – это история подключений, которая, в сущности, дублирует вариант отчета, но с сессионной формой отображения. У каждого способа есть свои плюсы и минусы, в зависимости от способа расчета тарифа.
- Ведется подробный лог программы, разделенный на следующие типы: События, Сообщения, Ошибки и Оповещения.
Для работы программы необходимо чтобы на Вашем компьютере была установлена платформа Microsoft .NET Framework 2.0 или выше (в Windows 7, Vista уже присутствует).
![]()
Что нового в TrafficMonitor 2.1.8015.1?
- [+] Добавлена поддержка 64-битных операционных систем.
- [+] Добавлена возможность установки продукта пользователям не имеющих прав администратора.
- [*] Оптимизирована работа списков в отчёте, истории соединений и журнала. Теперь скорость построения списков значительно увеличилась.
- [*] Не работало обновление продукта, если в системе не было ни одного удалённого соединения.
- [*] В главном меню пункт «Режим графика» теперь отображается только если в системе существует и сетевой интерфейс и удалённое соединение.
- [*] Изменён внешний вид всплывающих подсказок.
- [*] В два раза увеличена задержка появления окна всех счётчиков, при наведении на иконку программы в системном лотке.
ТОП-сегодня раздела «Учет и контроль трафика»
![]() NetLimiter Pro 5.1.7.0
NetLimiter Pro 5.1.7.0
NetLimiter — эффективная утилита для контроля и управления сетевым трафиком, с возможностью…
 NetworkTrafficView 2.43
NetworkTrafficView — удобный инструмент сетевого мониторинга, который перехватывает пакеты,…
![]() TMeter 18.0.875
TMeter 18.0.875
TMeter — это средство учета трафика и организации доступа в Интернет для операционных систем…
![]() NetBalancer 11.0.1.3304
NetBalancer 11.0.1.3304
NetBalancer — небольшая программа для контроля и управления интернет-трафиком на ПК. Можно…
Отзывы о программе TrafficMonitor
Марат про TrafficMonitor 2.1.8015.1 [15-12-2011]
Прекрасная программа, спасибо большое разработчику!
2 | 2 | Ответить
Marina про TrafficMonitor 2.1.8015.1 [11-12-2010]
Спасибо Vitmihailov! поменяли интерфейс-работает!
3 | 2 | Ответить
Vitmihailov про TrafficMonitor 2.1.8015.1 [22-06-2010]
to Олег: попробуйте сменить контроллируемый интерфейс через настройки. У меня по началу то же счетчики были нулевые, думал прокси не будет отслеживать. Поменял — все нормально стало.
2 | 2 | Ответить
Dillan про TrafficMonitor 2.1.8015.1 [12-06-2010]
ПО TrafficMonitor 2 начиная с версии 2.1.8000.1 теперь
распространяется бесплатно, более подробно читайте здесь http://www.grmm.ru/traffic_monitor/
2 | 2 | Ответить
Олег про TrafficMonitor 2.0.7072.1 [06-10-2007]
Установил TrafficMonitor 2.0.7072.1 ,
запустил, установилась в трее и на этом ее
работа закончилась.Все показатели в 0, счет
трафиков не ведется, сеть не опознается,
наличие обмена по сети не видит. Наверно есть
ограничения по сетевым протоколам? Во
6 | 20 | Ответить

Thank you for posting in r/WindowsInsiders. This subreddit is for discussions related to the Windows Insider Program, and devices running on Insider builds. Discussions and issues related to the production versions of Windows should be posted in r/Windows10 or r/Windows11.
If you have not already, please specifiy which branch you are running (Dev, Beta, or Release Preview), and your full build number. If you are unsure, you can check by running winver from a Run window or search box. You can also go to Settings -> System -> About, and it will be near the bottom.
I am a bot, and this action was performed automatically. Please contact the moderators of this subreddit if you have any questions or concerns.
Choose the perfect internet speed monitor for your device
by Matthew Adams
Matthew is a freelancer who has produced a variety of articles on various topics related to technology. His main focus is the Windows OS and all the things… read more
Updated on January 19, 2023
Reviewed by
Vlad Turiceanu

Passionate about technology, Windows, and everything that has a power button, he spent most of his time developing new skills and learning more about the tech world. Coming… read more
- You can add a Windows 11 network speed monitor that provides real-time download and upload speed info to the desktop.
- Feel free to choose a dedicated app that adds a network monitor to the taskbar.
- You may also consider a network speed monitor that comes with numerous customization settings.
XINSTALL BY CLICKING THE DOWNLOAD FILE
- Download Restoro PC Repair Tool that comes with Patented Technologies (patent available here).
- Click Start Scan to find Windows 11 issues that could be causing PC problems.
- Click Repair All to fix issues affecting your computer’s security and performance
- Restoro has been downloaded by 0 readers this month.
Are you wondering what your PC’s Internet speed is? If so, a network speed monitor is what you need. These monitors show your Internet connection’s download and upload speed in real-time.
Sure, there are numerous Internet speed test webpages you can open in browsers. However, those web apps generally provide only a max speed figure for your connection. They don’t display real-time upload and download speeds.
If you want a real-time network speed monitor for Windows 11 that shows download/upload speeds on the desktop, you’ll need to check out some third-party apps. You can add taskbar and sidebar network speed monitors to Windows 11 by using our recommendations below.
The widgets bar comes like a new gadget sidebar for Windows 11, which you can open by clicking its taskbar button. That seems an obvious place to include a new network speed monitor for the latest desktop platform.

However, that widget panel doesn’t include a network speed monitor. There are 11 widget options available there, and none of them add a net speed meter to the panel. So, you’ll have to check out the third-party software below.
How can I add a Windows 11 net speed monitor?
1. Get Net Speed Meter
1. First, you’ll need to sign in to your Microsoft account to download a UWP app from MS Store. If you don’t have such an account, set one up from the Microsoft account page.
2. Click Start on Windows 11’s taskbar.
3. Then select the Microsoft Store app on the Start menu to open it.
4. Type Net Speed Meter in the MS Store’s search box.
5. Then select the Net Speed Meter app in the search results.
6. Click the Get button for Net Speed Meter to install it.
7. When installed, click the Open button on the Net Speed page.
8. Select the Yes option when asked to keep Net Speed Meter on the taskbar. Then you’ll see Net Speed Meter on the desktop.
9. You can drag and that meter around the desktop by left-clicking it and holding the left mouse button.
10. To add that speed meter to the taskbar, right-click it and select the Keep in Taskbar button.
11. You can customize Net Speed Meter by right-clicking it and selecting Setting. Then change the options according to preference.
Some PC issues are hard to tackle, especially when it comes to corrupted repositories or missing Windows files. If you are having troubles fixing an error, your system may be partially broken.
We recommend installing Restoro, a tool that will scan your machine and identify what the fault is.
Click here to download and start repairing.
12. For further instructions, you can right-click Net Speed Meter and select the How to use option.
If you’re looking for an internet speed meter for Windows 11, you should know that our first recommendation is Net Speed Meter. It is a Microsoft Store application that can be downloaded for free by all users with an account.
The Net Speed Meter app can be customized to your liking via Settings, and can be added to your Windows 11 taskbar for quick access.
2. Get 8GadgetPack
2.1 Install 8GadgetPack
- Click the Download button on the 8GadgetPack webpage.
- Then press the File Explorer taskbar button.
- Open the folder that includes the 8GadgetPack setup wizard.
- Double-click 8GadgetPackSetup to open the installer window.
- Click the Install button on the 8GadgetPack Setup window.

- Select the Show gadgets when setup exits checkbox.

- Press the Finish button. Then the 8GadetPack sidebar will open on the right of the Windows 11 desktop.


- Right-click the sidebar and select Add gadgets.

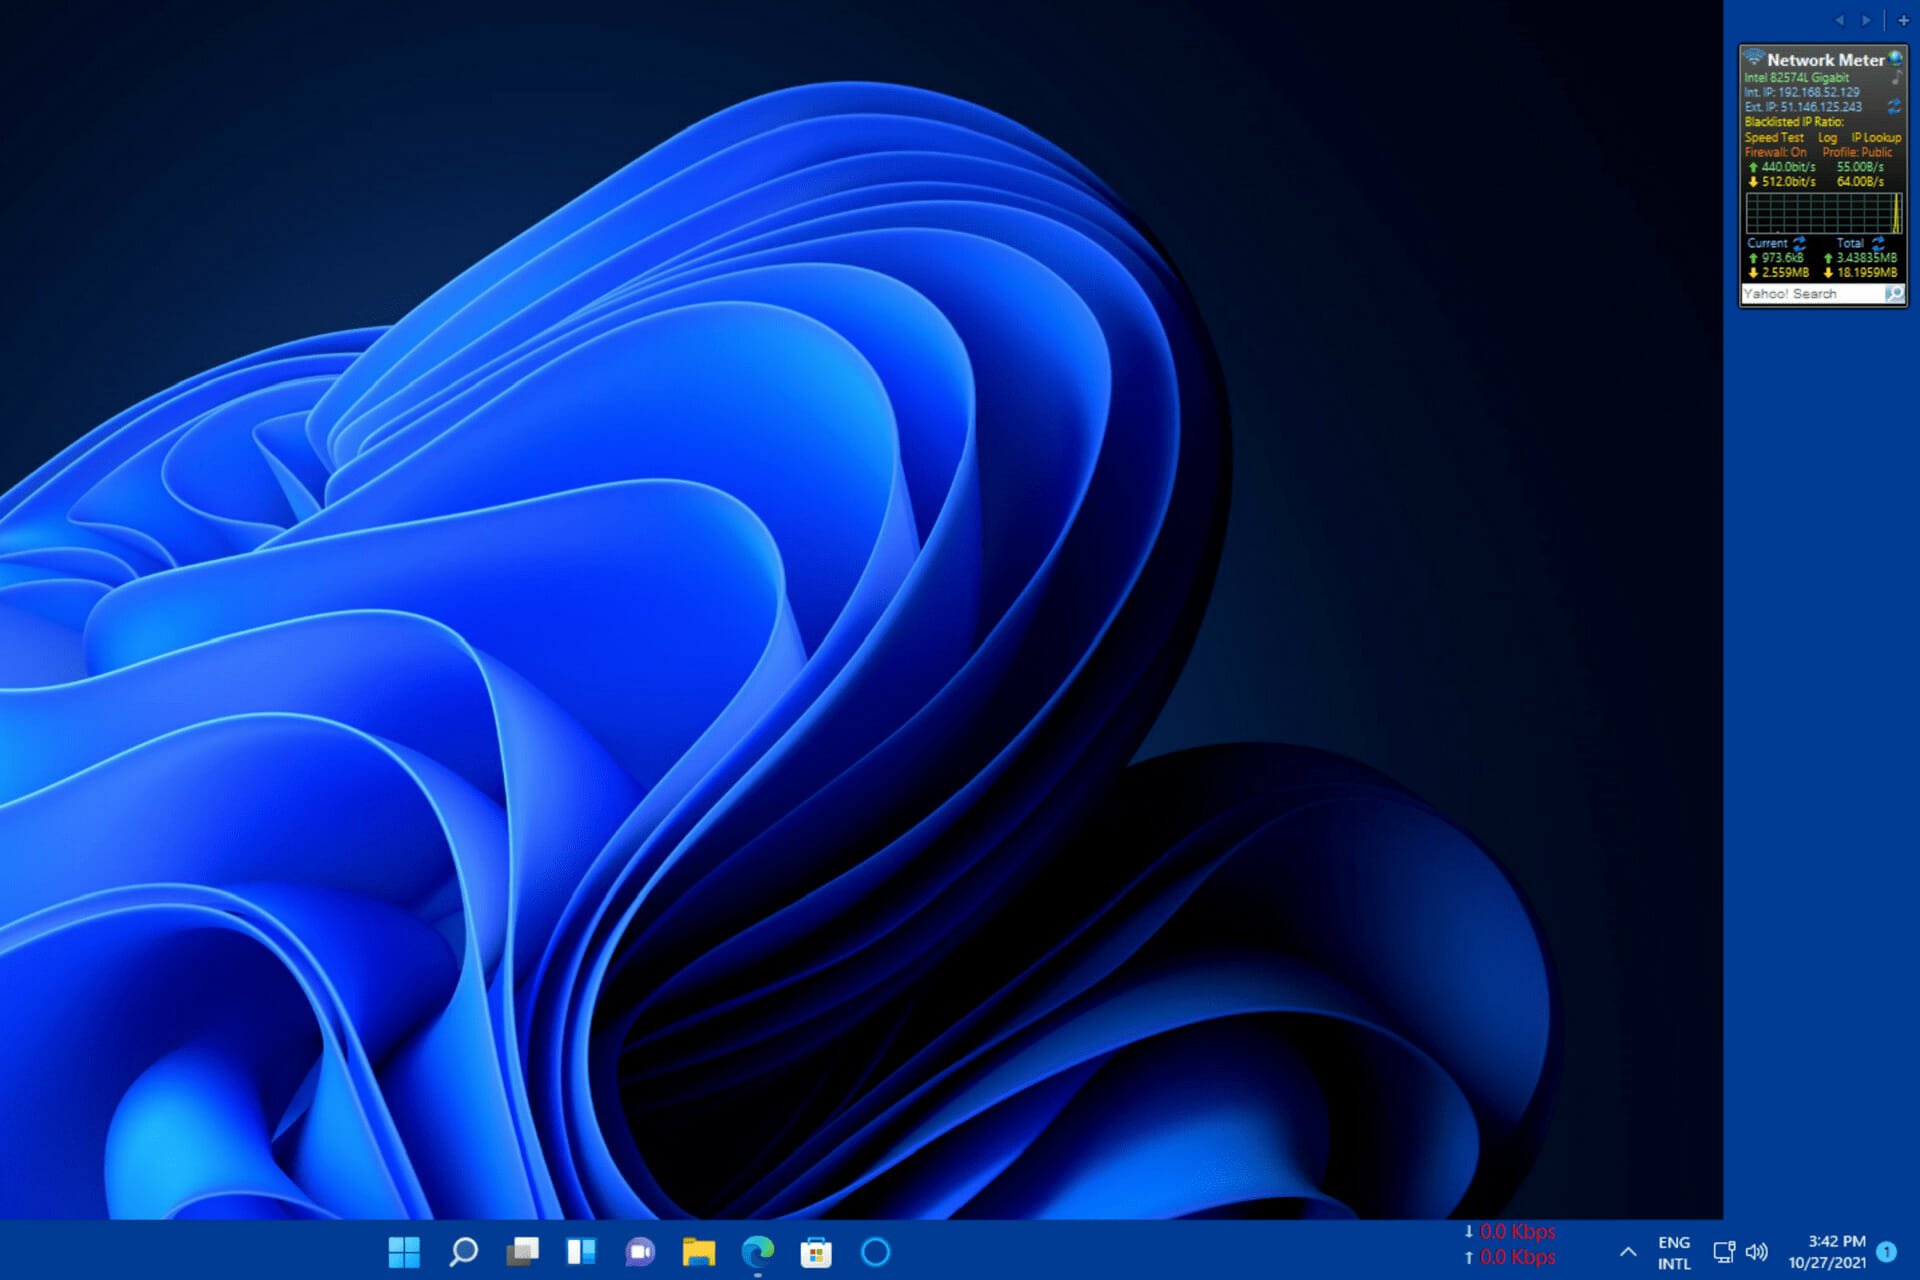
- Double-click Network Meter on the third page of the gadget list to add it to the sidebar.

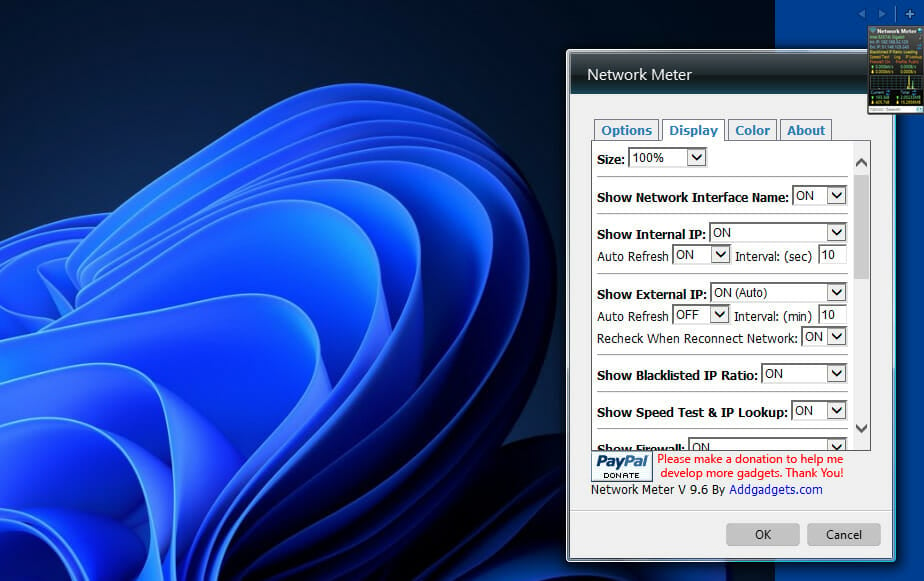
- To configure the Network Meter, right-click its sidebar gadget and select Options.
- Select the Display tab.

- You can add or remove details the gadget displays by selecting ON or OFF drop-down menu options for them.
- To change the gadget’s colors, select the Color tab. Then you can click the codes there to open color palettes.


- Slow LAN speed on Windows 10/11 PCs [FIX]
- Error 0x80071129: How to Fix This OneDrive Tag Issue
- How to Remove Quick Access in Windows 11
- No Location Tab in Properties: How to Enable It
Can I check the connection speed in Windows 11 without third-party apps?
Windows doesn’t have any desktop feature that displays connection speed details.
However, the status window for your connection includes speed info. You can open that window via the Control Panel as follows:
- Open the search utility by clicking the magnifying glass taskbar button.
- Enter Control Panel within the search utility’s text box.
- Click Control Panel to open that window.
- Select the Network and Internet category.

- Then click Network and Sharing Centre.

- Select the Change adapter settings on the left of the window.

- Then double-click your connection to open its status window, which displays the speed info.

- Click Close to exit the window


- Error 0x80071129: How to Fix This OneDrive Tag Issue
- How to Remove Quick Access in Windows 11
- No Location Tab in Properties: How to Enable It
- How to Delete a Partition on Windows 11 [Quick Ways]
How can I speed up my PC’s download speed?
If your PC’s download speed is a little slow, there are various ways you can speed it up. Firstly, close as many background apps as you can on your PC. You can do that by turning off the Let apps run in the background option on the Settings’ Background apps tab.
Windows 11’s system updates can hog bandwidth, which slows down downloads. So, reducing bandwidth usage for updates might boost your download speed. You can limit bandwidth for updates via the Windows Update tab’s advanced options in Settings.

Also, turn off any other devices you have connected to the Internet, such as tablets, smartphones, consoles, etc. Select to disable their Internet connections if you can, and turn them off. By doing so, you’ll maximize network bandwidth for your Windows 11 PC.
As for your PC’s network adapter card, keep in mind that it connects your PC to the Internet. Learn how to check network card speed to see the speed of all your network devices right away. The steps from this Windows 10 procedure may be applied in Windows 11 too.
You can also try updating your network adapter’s driver if your PC’s download speed seems a lot lower than what it should be.
You can do that by scanning your computer with a third-party driver updater utility, such as DriverFix. Driver updater software enables you to download and install new drivers for PC devices in no time.
Moreover, don’t hesitate to use the best bandwidth limiter tools for those programs that use more bandwidth. Even if they are for Windows 10, you can also use them to see exactly what apps are more demanding in terms of network data.
A Windows 11 net speed monitor is a nice addition to the desktop. Net Speed Meter and 8GadgetPack’s Network Meter are two freely available ones that pack in numerous customization settings.
8GadgetPack’s Net Meter gadget provides more network info than Net Speed Meter. With all the additional gadgets that software comes with, some users might prefer 8GadgetPack. However, you can’t add Net Meter to Windows 11’s taskbar.
Either of those network speed monitors on your desktop will make it clearer how long your downloads and uploads might take. With one of those apps installed, you can proactively monitor your PC’s network speed. So, 8GadgetPack and Net Speed Meter are two Windows 11 apps worth noting.
Even more, check out the best resource monitor software for Windows 10. Most of these tools can be enjoyed by Windows 11 users as well.
Which network speed monitor is your choice? Let us know in the comments area below.
![]()
Newsletter
Монитор скорости сети необходим вам, если вы хотите узнать производительность вашей сети на ПК с Windows 11. Будет рекомендован NetSpeed Monitor, и будет рассказано, как настроить NetSpeed Monitor в Windows.
Чтобы получить базовую текущую пропускную способность, интернет-запрос и время ответа, попробуйте Бесплатный онлайн-инструмент для проверки скорости интернета в Windows 11 без загрузки и установки каких-либо сторонних инструментов.
В то время как NetSpeed Monitor может предоставить вам гораздо больше информации, включая текущую скорость добавления и загрузки вашей сети. Тогда вы сможете легко узнать о скорости интернета на панели задач Windows 11. Как бесплатный и простой в использовании инструмент мониторинга скорости интернета, NetSpeedMonitor позволяет вам бесплатно проверить скорость интернета в вашей системе и помочь вам записать статус использования.
Прежде чем идти, вы должны знать, что разработчик не обновил версию, чтобы она идеально работала в Windows 11, но только более старая версия Windows 10/8/7 может ее запускать.

Шаг 1: Скачать Монитор скорости сети;
Шаг 2: Щелкните исполняемый файл, чтобы запустить его и установить в своей системе Windows;
Шаг 3: После завершения установки разрешите запуск NetSpeed Monitor при запуске и перезагрузите компьютер, если вы не можете найти скорость онлайн полностью на своей собственной панели задач.
Если вы также не можете получить информацию из Интернета в своей системе Windows, обратитесь за помощью на ее официальный сайт.
V1.84.1
- 修正Windows11下任务栏窗口无法显示到左边的问题
- 修正任务栏显示在桌面两侧时任务栏窗口会显示不全的问题
- 修正Windows11 22H2中,关闭了所有窗口且任务栏上没有固定任何图标时,任务栏窗口位置不正确的问题
- 为触屏设备添加长按右键菜单的支持
- 修正由于最新版本Windows11中搜索按钮比较宽导致任务栏窗口的位置不正确的问题
- 修正“关于”对话框的大小有时不正确的问题
V1.84
- 修正Windows11 22H2版本中任务栏窗口位置不正确的问题。
- 修正Windows11下任务栏窗口显示在左侧时会和系统自带的小组件重叠的问题。
- 新增CPU频率的显示。
- 修正主窗口网速单位缺少“/s”的问题。
- 修正写入ini文件时可能导致字符串缓冲区不足的问题。
- 插件接口更新,允许插件响应键盘事件。
- 修正任务栏窗口在不同DPI显示器切换后显示不正常的问题。
- 修正简体中文语言下历史流量统计中的“转到今天”命令无效的问题。
- 修正“插件管理”界面中在右键菜单中选择“详细信息”会弹出“选项”对话框的问题。
- 更新HardwareMonitor lib 以解决无法获取 Intel 12 代处理器温度的问题。
V1.83
- 修正当已经存在一个开机自启动的任务计划时,无法设置开机自启动的问题,
- 新增当已经存在TrafficMonitor进程时启动程序,弹出“程序已经在运行”对话框。
- 鼠标提示中新增插件信息的显示。
- 修正插件被禁用后仍然会被加载的问题。
- 任务栏中的插件项目支持自由排序。
- 选项设置中新增可以选择要在“网络连接列表”中显示的网络的功能。
- 新增显示总网速的功能。
- 新增在任务栏中显示网速占用图的功能。
- 修正硬件监控中有多个名称相同的硬盘时只能显示一个硬盘的问题。
- 优化任务栏窗口横向滚动图的显示效果。
- 任务栏窗口右键菜单中的“显示设置”由菜单改为对话框形式。
- “选择网络连接”菜单中添加“刷新网络连接列表”命令。
- 修正几处导致程序崩溃的问题。
V1.82
- 新增插件系统,可以通过插件在任务栏窗口和主窗口显示更多自定义内容。
- 任务栏右键菜单中增加“任务管理器”命令。
- 选项设置中新增“应用”按钮。
- 历史流量统计中增加周视图。
- 新增任务栏项目间距的设置。
- 修正Windows11深色模式下任务栏右键菜单无法弹出的问题。
- 修正Windows11下使用StartAllBack等软件将任务栏恢复为Windows10样式时,任务栏窗口无法显示的问题。
V1.81
- 修正1.80版本以来的一些崩溃的问题
- 任务栏窗口显示项目支持自定义排序
- 任务栏窗口中显示的项目数量为奇数时,最后一个项目垂直排列,以节省任务栏空间
- 新增显示硬盘利用率的功能
- 将右键菜单中的一些设置添加到选项设置界面中
- 新增主窗口对多显示器的支持,在不勾选“允许超出屏幕边界”的情况下也能移动到其他显示器了
V1.80.3
- 修正无法显示CPU温度的问题
- 新增可以选择监控指定CPU核心的温度的功能
- 修正一处导致程序崩溃的问题
V1.80.2
- 修正几处导致程序崩溃的问题
- 获取温度信息改用LibreHardwareMonitor
- 新增可选择要监控哪块硬盘的温度的功能
- 新增可选择要监控哪些硬件的功能
- 修正程序退出时LibreHardwareMonitorLib.sys文件没有解除占用的问题
由于此版本存在问题,暂停下载。
V1.80.1
- 修正无法获取AMD显卡温度的问题
- 修正自动切换为浅色模式颜色预设时程序崩溃的问题
- 修正无法获取11代Intel处理器温度的问题
- 修正设置开机自启动无效的问题
由于此版本存在问题,暂停下载。
V1.80
- 新增CPU、显卡、硬盘和主板温度监控的功能
- 新增显卡利用率监控的功能
- 修正历史流量统计数值溢出导致统计数值不正确的问题
- 修正屏幕分辨率更改后主窗口位置不正确的问题
- 修正系统DPI更改后,主窗口和任务栏窗口界面元素的大小不会随DPI变化的问题
- 新增任务栏窗口自由指定显示项目的功能
- 新增xml格式的主窗口皮肤,支持温度显示
- 修正使用触屏设备时,选项设置中的子窗口无法使用触屏滚动的问题
- 将检查更新的处理放到后台线程中,以解决检查更新时程序长时间没有响应的问题
- 修正任务栏窗口中按Alt+F4后程序异常的问题
- 新增对每秒4GB以上网速的支持
- 新增可选择更新源为Gitee,以解决中国大陆地区有时无法访问GitHub导致程序无法更新的问题
- 新增内存显示方式设置
- 修正当前监控的网卡被关闭或禁用,再次启动后无法自动选择之前监控的网卡的问题
- 开机自启动采用任务计划实现,以解决有时开机自启动无效的问题
- 修正一些崩溃的问题
- 其他细节方面的改进
由于此版本存在问题,暂停下载
V1.79.1
- 修正注册表句柄泄漏的问题。
- 修正当主窗口和任务栏窗口都不显示时,不统计CPU和内存利用率的问题。
Несмотря на то, что большинство интернет-провайдеров (ISP) предоставляют безлимитное подключение к Интернету (если вы не злоупотребляете им), вы все равно можете пользоваться услугами, которые обеспечивают ежемесячный лимит данных, такими как поставщики мобильных точек доступа.
Если у вас нет безлимитного тарифного плана, вам следует воспользоваться функцией Windows 11 «Использование данных». Цель этой функции — отслеживать объем передаваемых данных за определенный период времени. Он также имеет функцию, которая позволяет вам устанавливать ограничения и получать уведомления, если ваш объем данных превышается.
В этом руководстве по Windows 11 мы объясним вам, как приступить к настройке и использованию функции потребления данных, чтобы отслеживать использование интернет-данных и избегать непредвиденных расходов.
Проверьте использование Интернета с помощью диспетчера задач
Диспетчер задач в Windows 11 позволяет получить доступ к информации о программах и системных процессах, которые в данный момент открыты. Можно просмотреть информацию обо всех операционных программах, включая процессор, память, диск, графический процессор и потребление сети. Как правило, вы можете увидеть, какое приложение использует Интернет на ПК, посмотрев сеть, используемую для каждого приложения.
Узнайте, как использовать диспетчер задач в Windows 11, чтобы узнать, какие приложения или программы используют Интернет.

Чтобы получить доступ к диспетчеру задач, сначала нажмите клавиши Ctrl + Shift + Esc или щелкните правой кнопкой мыши кнопку «Пуск» на рабочем столе и выберите «Диспетчер задач».
Если в окне «Диспетчер задач» включен упрощенный режим, открыто только несколько приложений и не отображается дополнительная информация, нажмите «Подробнее» в нижней части окна, чтобы увеличить диспетчер задач и отобразить дополнительную информацию.
Затем перейдите на вкладку «Процессы» , если вы этого еще не сделали. Взглянув на столбец «Сеть», вы можете просмотреть использование сети каждой открытой программой. Существующая пропускная способность сети каждого приложения (скорость передачи данных) отображается в столбце Сеть. Если использование приложения превышает 0 Мбит/с, программа использует сеть.
Нажав на столбец «Сеть», вы можете упорядочить программы по их существующему потреблению сети, от наибольшего к наименьшему. Это значительно упростит обнаружение программ, потребляющих сетевой трафик в данный момент (приложений с использованием сети более 0 Мбит/с).
Проверьте использование через монитор ресурсов
Вы можете увидеть сетевую активность процессов с помощью монитора ресурсов, который можно просмотреть через диспетчер задач, чтобы проверить пропускную способность сети, которую каждая программа использует для отправки или получения данных.
Перейдите на вкладку «Производительность» в диспетчере задач. Нажмите «Открыть монитор ресурсов» в нижней части окна.

Перейдите на вкладку «Сеть» в окне «Монитор ресурсов». Затем, если он еще не расширяется, выберите Процессы с сетевой активностью. Глядя на «Отправить (Б/сек), «Получить (Б/сек)» и «Всего (Б/сек), можно увидеть, какую пропускную способность сети использует каждая текущая программа.
В столбце «Отправить» отображается количество байтов данных, передаваемых с вашего ПК в секунду для каждой программы, а в столбце «Получение» отображается количество байтов данных, собираемых с вашего ПК в секунду для каждой программы. Сумма столбцов «Отправить» и «Получить» — это столбец «Итого».
Примечание . Перемещение данных между компьютерами в одной сети будет отображаться в статистике сети. Это означает, что если вы перемещаете или получаете данные с другого компьютера по той же сети, в то время как ваш компьютер не подключен к Сети, Диспетчер задач отобразит передачу как сетевое использование программы, которую вы используете для передачи. Это связано с тем, что диспетчер задач отслеживает весь входящий и исходящий трафик вашего сетевого интерфейса, включая трафик в вашей локальной сети.
Как определить, сколько данных использовала каждая программа
В настройках Windows 11 есть раздел, где вы можете просмотреть использование данных каждой из ваших программ за предыдущие 30 дней. Чтобы изучить статистику потребления данных в Windows 11, сначала запустите «Настройки», нажав клавиши Win + I.

Щелкните Сеть и Интернет на левой панели. Затем справа нажмите кнопку Использование данных .
В разделе «Статистика потребления» вы можете просмотреть список приложений и их общее использование данных за предыдущие 30 дней, ранжированные от наибольшего к наименьшему.
Вы можете узнать, какие программы используют большую часть ваших интернет-данных. Если приложение использовало какие-либо данные за последние 30 дней, посмотрите статистику потребления данных.
Заключительные комментарии
Таким образом, Интернет является основной необходимостью в настоящее время. Проверка использования и пропускной способности интернета является обязательной для пользователя, чтобы управлять использованием и расходами. Таким образом, вышеупомянутые шаги и информация заставят вас проверить использование Интернета. Вы также можете легко проверить программу, используя пропускную способность. Если вы не можете это сделать или у вас возникли проблемы, всегда обращайтесь в службу поддержки Windows.
Выберите вариант загрузки:
- скачать с сервера SoftPortal
TrafficMonitor — это универсальная программа массового назначения для слежения за сетевым и Интернет трафиком, с богатым набором настроек и расширенной функциональностью (полное описание…)

Рекомендуем популярное
![]() NetLimiter Pro 5.3.1.0
NetLimiter Pro 5.3.1.0
NetLimiter — эффективная утилита для контроля и управления сетевым трафиком, с возможностью…
![]() NetBalancer 11.0.1.3304
NetBalancer 11.0.1.3304
NetBalancer — небольшая программа для контроля и управления интернет-трафиком на ПК. Можно…
NetworkTrafficView 2.50
NetworkTrafficView — удобный инструмент сетевого мониторинга, который перехватывает пакеты,…
![]() NetTraffic 1.66.2
NetTraffic 1.66.2
NetTraffic — небольшая полезная утилита для мониторинга сетевого трафика и учета статистики на выбранных интерфейсах…
![]() TweakMASTER Pro 3.60
TweakMASTER Pro 3.60
TweakMASTER — Программа служит для оптимизации сетевых соединений и фактически представляет…
Want a network speed monitor on Windows 11?
If yes, then you are in the right place.
When you use an Android device, you have the ability to show the internet speed quite easily. In fact, there is a pre-built feature for this.
But what if you want to see the network speed on your Windows 11 operating system?
However, there are various ways exist to monitor traffic or to keep track of how fast your internet is working.
But the worst part is that there is only one in-built tool for this: Task Manager. Despite its usefulness, you can’t pin that to the taskbar.
This basically means that you have to launch the tool every time you want to check the net speed in Windows 11 OS.
But don’t worry, we have found some ways to check in real-time.
So, without further ado, let’s get started…
Table of Contents
But before we dive in further, let’s see a quick overview.
Fortunately, there are a number of third-party tools that enable a real-time display of the download and upload speed of your internet connection.
And if anyone of you is searching for “NetSpeedMonitor for Windows 11” then it’s not working anymore. Earlier, it used to work but now it is not compatible with this latest operating system. Hoping that an update will be released to fix this issue.
In the meantime, you can also go through these alternatives. But don’t feel that they are not helpful because here we have listed the best net speed monitor for Windows 11 system.
Note:- If you are having issues with internet speed, try cFosSpeed.
So, let’s get started…
1. Net Speed Meter
Net Speed Meter is one of the best tools you can use to monitor the bandwidth or the real-time speed on your Windows computer’s network. And the best part is that you can get this application from Microsoft Store for free and can also add this auto-startup app, so that it can automatically start when you boot up your computer.
Furthermore, this application can be customized according to your needs like changing fonts, text sizes, themes, colors, and also the speed unit can be changed from bits to bytes.
Now let’s see how to install it on Windows 11:-
1. Get the app from the Microsoft Store.
2. Upon completion of installation, launch the app by clicking on it.

3. Now a new monitor will appear in the upper right corner of your screen, just right-click on it and select the “Keep in Taskbar” option.

4. And then you will see a network speed monitor in the taskbar.

Quick Tip:- You can also drag and drop this network monitor anywhere on the desktop screen, like a widget.
2. 8GadgetPack
Although Microsoft has added lots of new gadgets to the panel of Windows 11. But still, there is not a single widget to monitor internet speed that can be added to the panel to check it continuously.
In that case, the only option left is to use a third-party application like 8GadgetPack which can easily display the network speed in real-time on any PC. And the best part is that this app is compatible with almost all operating systems like Windows 10, 8, and 7.
And here’s how you can use the 8GadgetPack:-
1. First, get started by downloading it from here.
2. Installing the software is easy, just you have to double-click on the setup file and then click on the Install button.

3. Once installation is done, you will see a sidebar on your desktop. So to move further, right-click on the sidebar & then select the “Add Gadgets” option.

4. After that, search for the “Network Meter” gadget or widget and then double-click on it.

And then it will automatically be added to the sidebar.

5. Now if you want to configure it, then right-click on the sidebar gadget and change the display, color & other options accordingly.

3. Traffic Monitor for Windows 11
TrafficMonitor is another free third-party tool that you can use to keep an eye on the speed of your uploads and downloads at all times with this small widget in the taskbar. In addition to that, you can also use this app as a permanent “Internet Speed Monitor for Windows 11” which also displays CPU and Memory usage.
Apart from that, you also get lots of other features like historical traffic, drag-drop, add-in taskbar, or desktop screen. For customization, options like background theme, color, and different text fonts are available.
Now let’s see how to setup it:-
1. First of all, download the Traffic Monitor app from Github.
2. After downloading the zip file, right-click on it and then select the “Extract All > Extract” option.
3. Once the file is extracted, right-click on the “TrafficMonitor” and then choose the “Run as administrator” option.
4. After that, you will see a TrafficMonitor gadget opened on the desktop screen. Now right-click on it, then enable the “Show Taskbar Window” option and uncheck or disable the “Show Main Window” option.
5. Now if you want to do some customization, then right-click on the widget and click on the Options.
And then the “Options” dialog box will open up, where you can customize settings for the main window, taskbar window, and general.
Now let’s see some other ways.
4. Manually Check Network Speed
However, all the above methods work perfectly fine if you want to monitor the net speed in real time. But if only need this a few times, then you can also check the connection speed without using third-party applications.
Yes, you heard it right! By using the default network settings of Windows 11 you can check the internet speed in the form of sent and received bytes. Just you have to follow the below-mentioned steps:-
- First, go to the Control Panel.
- Now click on the Network and Internet settings.
- After that, open the Network and Sharing Centre section.
- Now in the left pane, click on the Change adapter settings option.
- At last, double-click on the network, and then all the connection information like speed, duration, and activity will open up.

5. Check Internet Speed Online
There are numerous websites exist that permit you to test your internet speed, making it easier than ever to find out how fast your connection is while uploading and downloading files. You just have to open your browser and then visit any of the sites listed below, I usually prefer the in-built tool of Google.
Just go online and then visit any of these websites:-
- Internet Speed Test by Google.
- Speedtest by Oakla.
- Fast.com

That’s it for now…
Conclusion
So, that’s how you can easily monitor your network traffic using different widgets and gadgets in the taskbar. And I hope you have liked all the internet speed meter for PC which we have mentioned above.
As we’ve discussed in this blog, there are both third-party methods as well as using the default Windows settings that you can use to look for this information or stats of your connection.
Stay tuned for the latest posts…
Feel free to share your thoughts via comments and also tell us about this post on How to Use Network Speed Monitor on Windows 11.
If you liked this post, don’t forget to share it.