Chrome can become slow and laggy due to cache or history data
by Loredana Harsana
Loredana is a passionate writer with a keen interest in PC software and technology. She started off writing about mobile phones back when Samsung Galaxy S II was… read more
Updated on
- If Chrome is running slow, this can be due to many reasons, such as caching blocks, outdated software, too much use of resources, and more.
- Deleting the cache and history can lighten the browser up and fix this problem, at least temporarily.
- However, before trying any of our solutions, ensure you have a strong Internet connection.
XINSTALL BY CLICKING THE DOWNLOAD
FILE
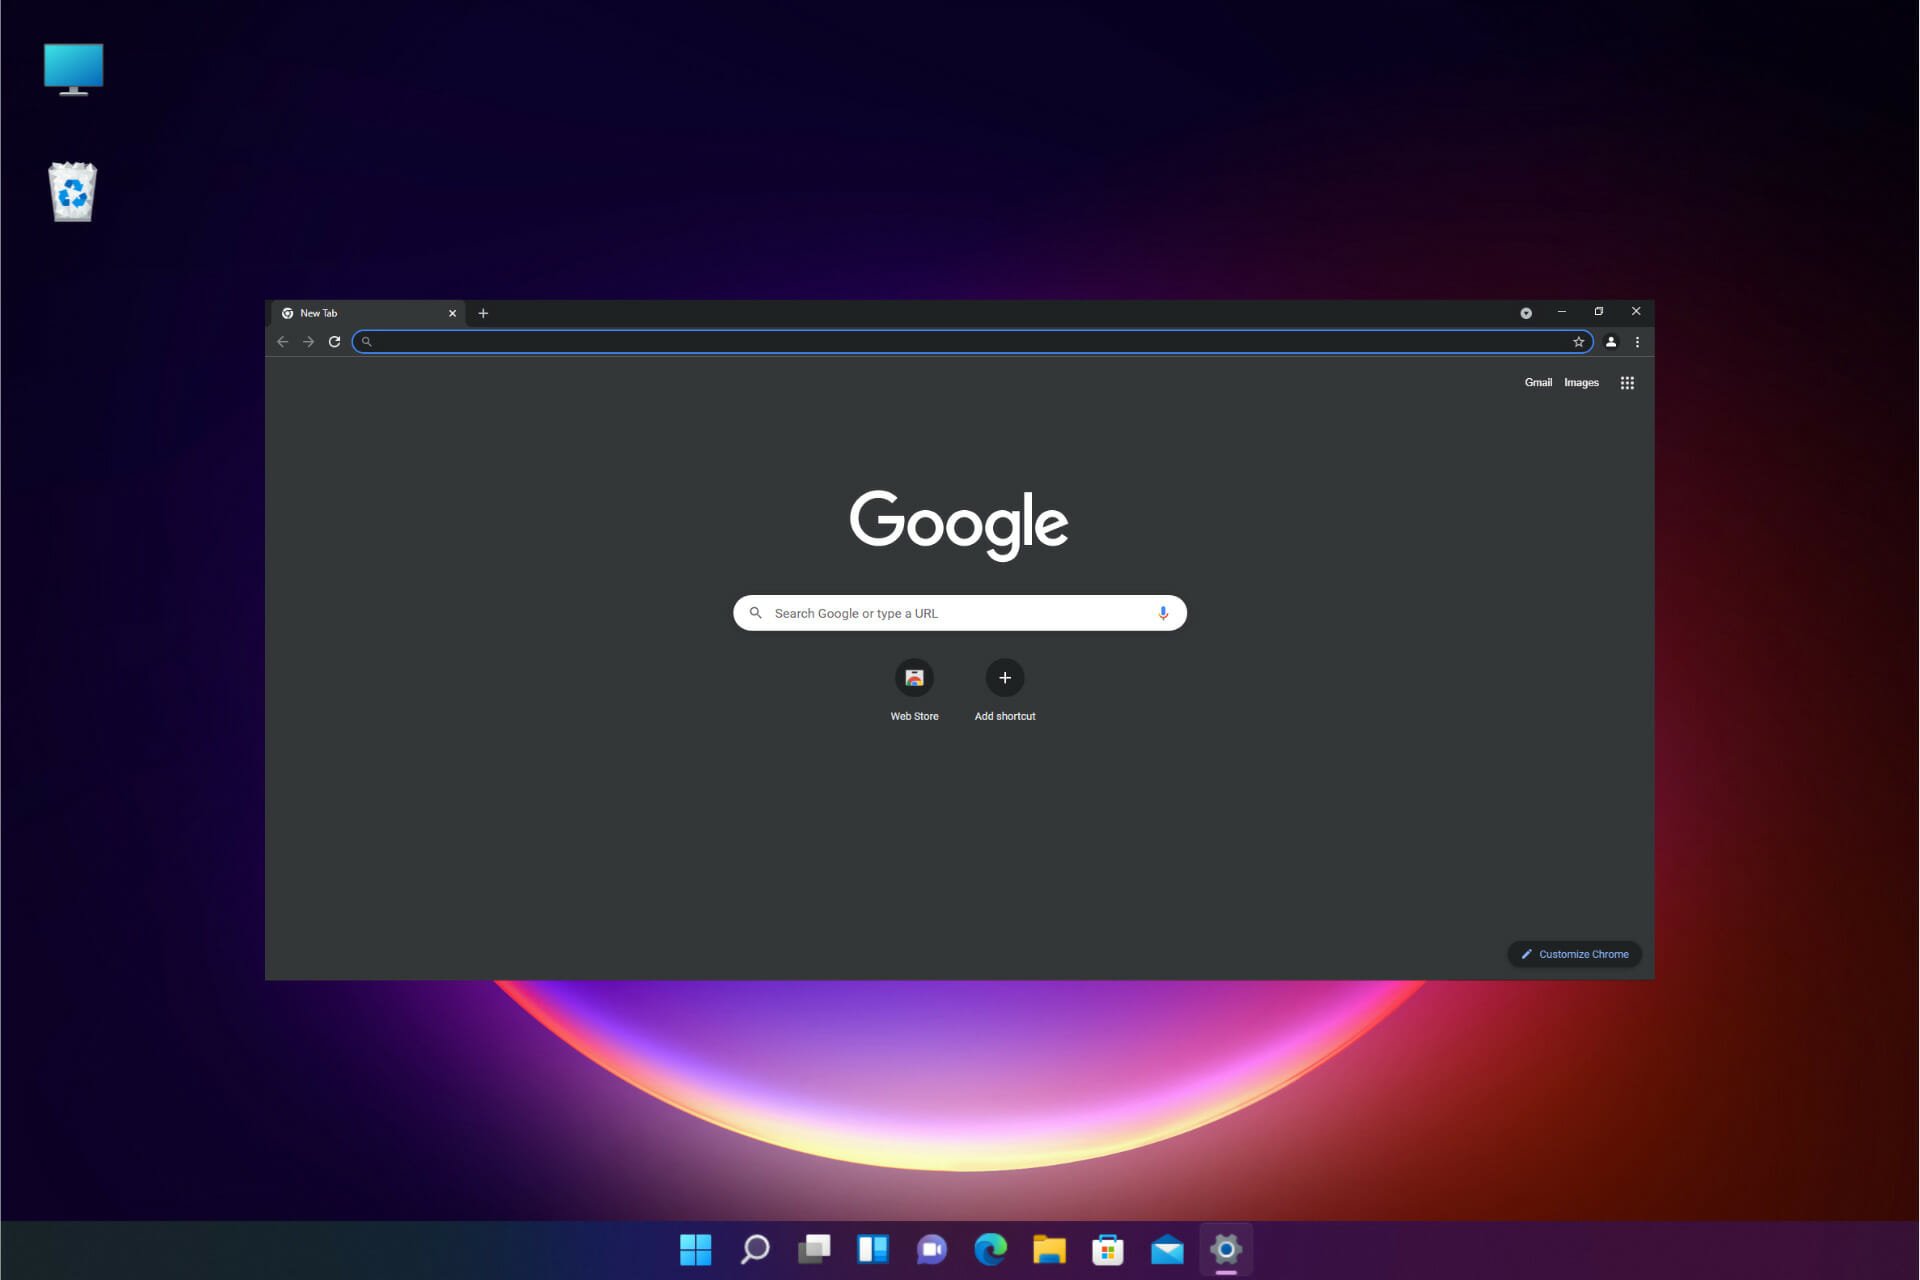
Google Chrome is the leading Internet browser, and six out of ten users use it to browse the Internet. One of the overwhelming reasons for this high adoption level is its speed, reliability, and performance.
However, many of our readers reported that Chrome is slow in Windows 11, and their browsing experience is altered.
There are a variety of different reasons that can impact its speed and performance. Some possible reasons include high disk usage, too many open tabs, some extensions, a high volume of caches, and more.
Before fixing it, let’s take a more in-depth look at the possible causes of why Chrome is slow in Windows 11.
Why is Chrome suddenly so slow?
Chrome can slow down for many reasons, ranging from intense memory usage to an outdated version.
➡ Cache

Chrome can slow down when you have too many tabs open as it holds the cache or temp files in its memory for a long time.
While this can speed up your browsing experience, storing too much browsing history can also slow it down.
➡ Outdated browser
An outdated browser can slow your browsing experience as it may not have the latest patches/fixes.
The updates often happen automatically, but for some reason, if it doesn’t happen in your system due to the existing settings, you may have to do it manually.
How we test, review and rate?
We have worked for the past 6 months on building a new review system on how we produce content. Using it, we have subsequently redone most of our articles to provide actual hands-on expertise on the guides we made.
For more details you can read how we test, review, and rate at WindowsReport.
➡ Resource Usage
Another probable reason is excess resource usage. Chrome uses multiple threads to improve your browsing and user experience, which can sometimes take up many resources.
While it is hard to pinpoint the exact reason, some of the other possible causes may be:
- Extensive use of Chrome add-ons and extensions
- Opening too many tabs
- Large browser history
- Poor Internet connection
Fortunately, there are many simple ways to fix this Chrome slow Windows 11 issue, and you will have to follow our guide below.
Quick Tip:
While Chrome can become slow and laggy due to cache or history data, you can try a faster and more reliable browser like Opera One.
Using this browser instead will give you enhanced security online with its free VPN or integrated ad-blocker. Hence, you’ll get improved speed to navigate freely on your PC.

Opera One
Benefit from faster navigation with this browser and light resource usage on your Windows 11 PC.
How do I make Chrome run faster on Windows 11?
1. Restart your browser
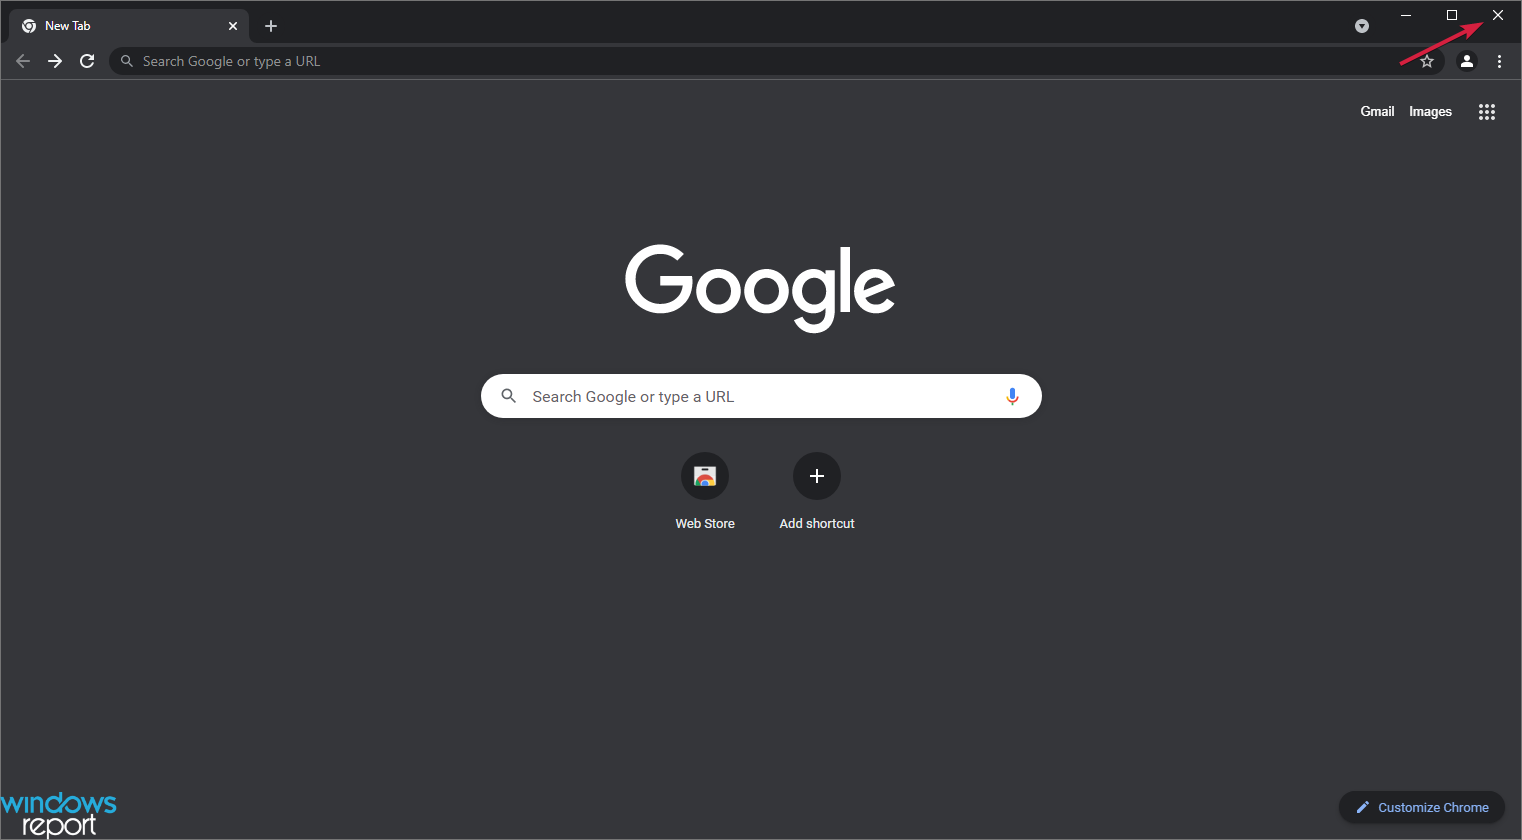
- Click on the X button from the top right corner to close the browser and try restarting it again. If it doesn’t work, try the next step to close the browser completely.

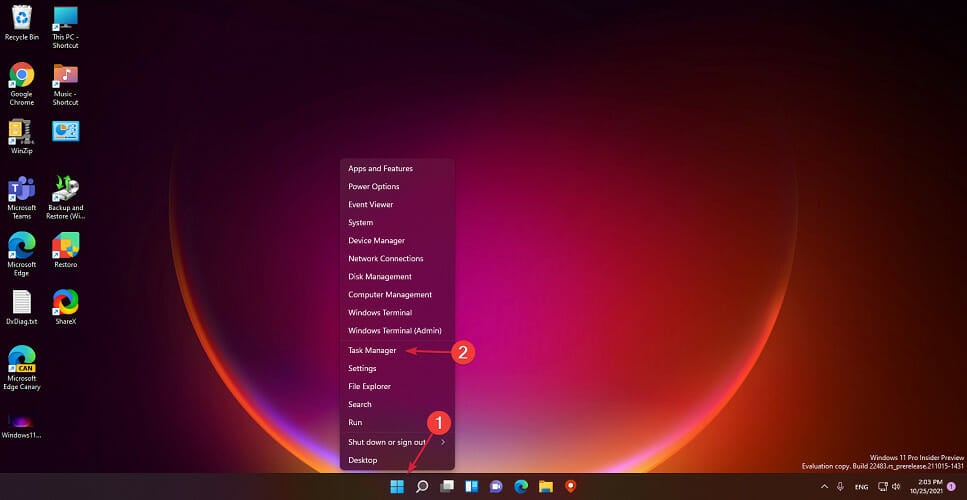
- Right-click the Start button and select Task Manager from the list.

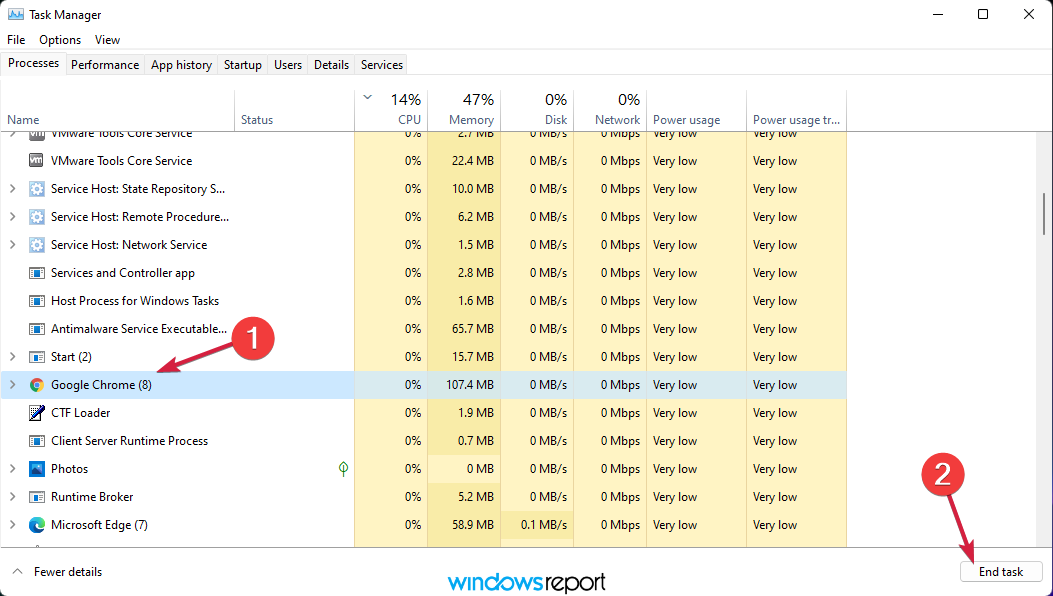
- Click on Google Chrome from the list of processes and hit the End task option from the bottom right corner.

- Now try to start Chrome again and see if you have the same problem.
The simplest solution is often the most effective, at least in the world of computers! That is to close Chrome and start it again. Once done, the Google Chrome lagging issue in Windows is fixed.
2. Clear the browsing data
- At the top right-hand corner, look for three vertically-lined dots and click them.
- Navigate to More Tools, then click on Clear Browsing History.
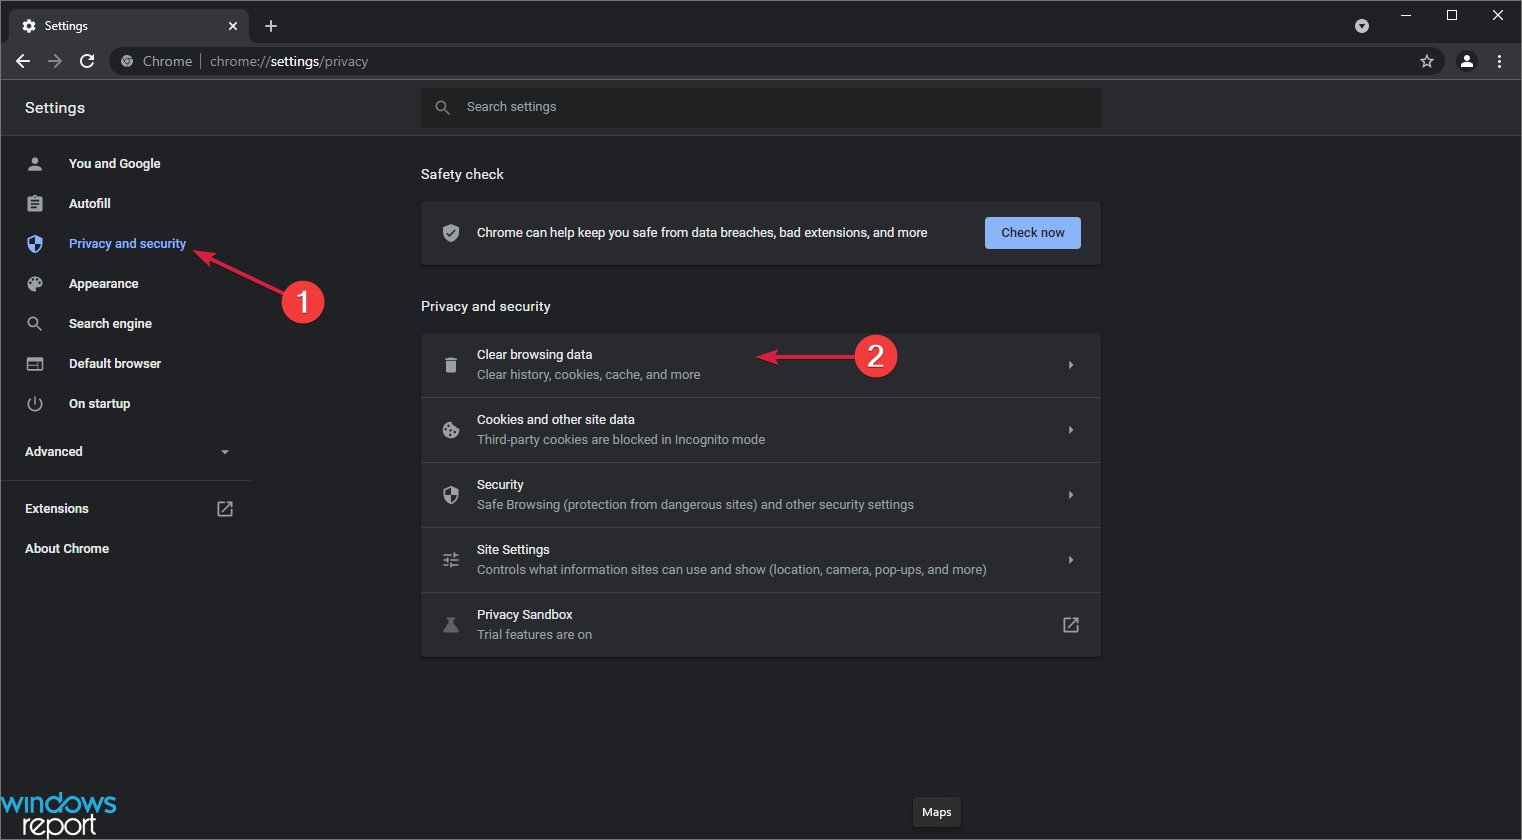
- Click on Privacy and security from the left pane, then select the Clear browsing data option.
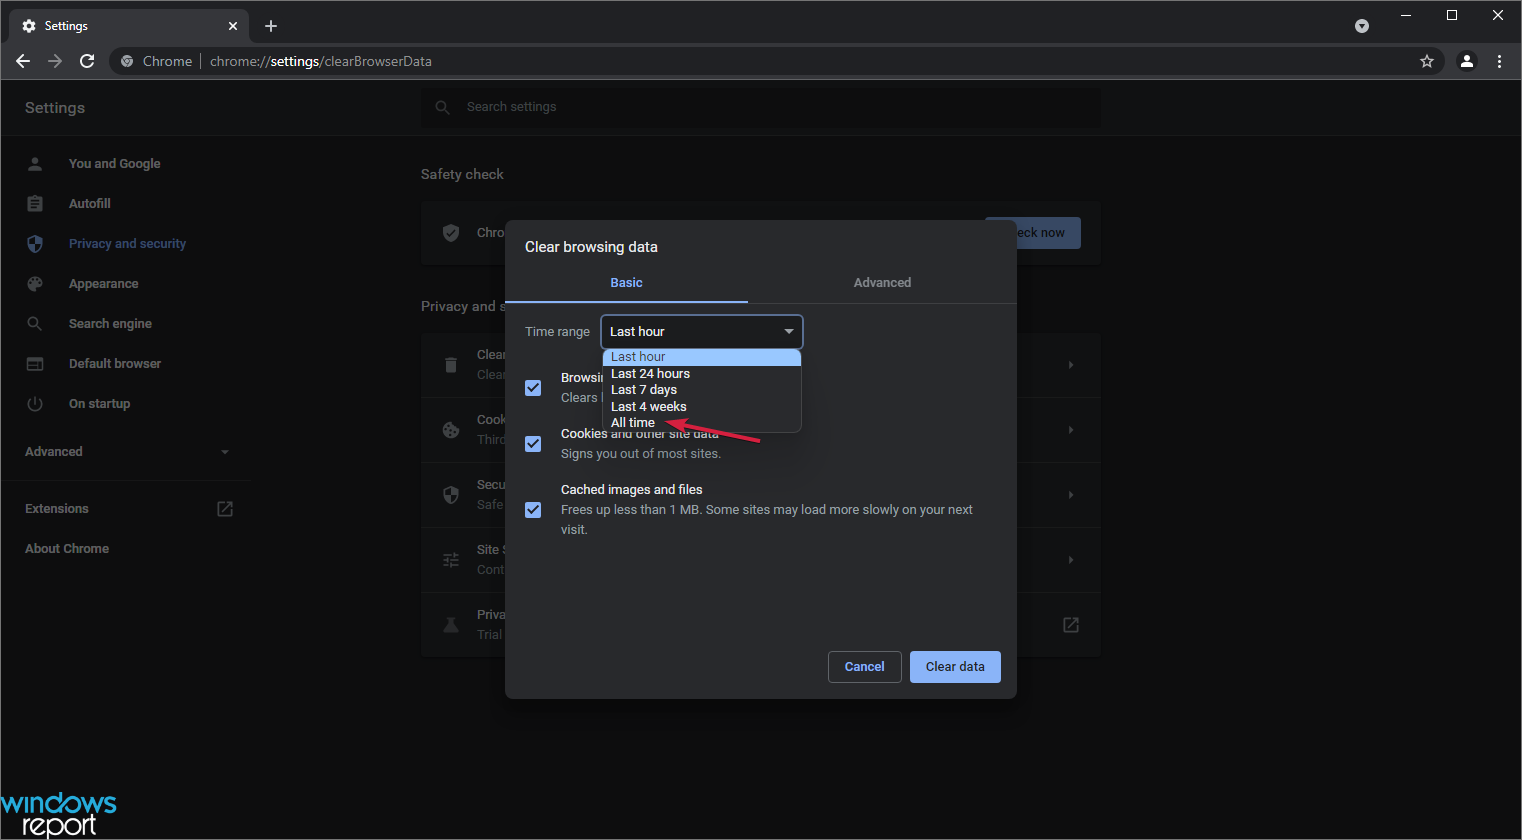
- Click on the Time range tab and select All time from the list of options.
- Now, decide what data you want to remove (preferably all of them) and then choose Clear data.
- Restart Chrome and see if it now works faster than before.

Another possible reason for a slow Chrome in Windows 11 is excess stored data. Chrome stores all your data, including the sites you visit, websites’ cookies, cached images, files, etc.
These data levels can quickly add up, depending on how much time you spend browsing the Internet.
Since Chrome has to load all the data at startup, it can be slow. So, consider deleting unwanted data and browsing history so your Chrome loads faster.
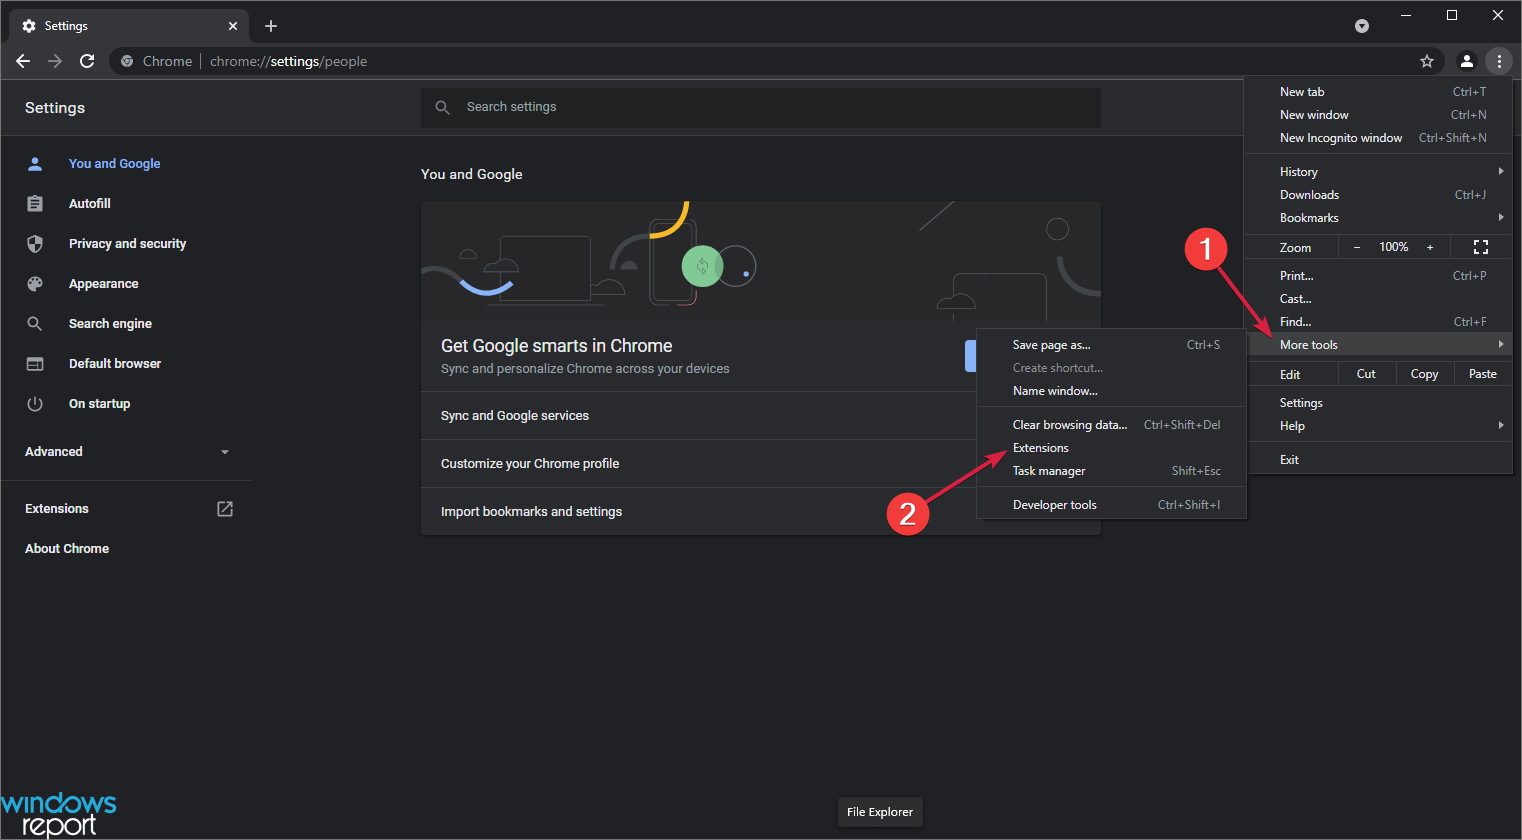
3. Use Chrome’s Task Manager
- Click on the three vertical dots button from the top right corner to access Chrome’s menu.
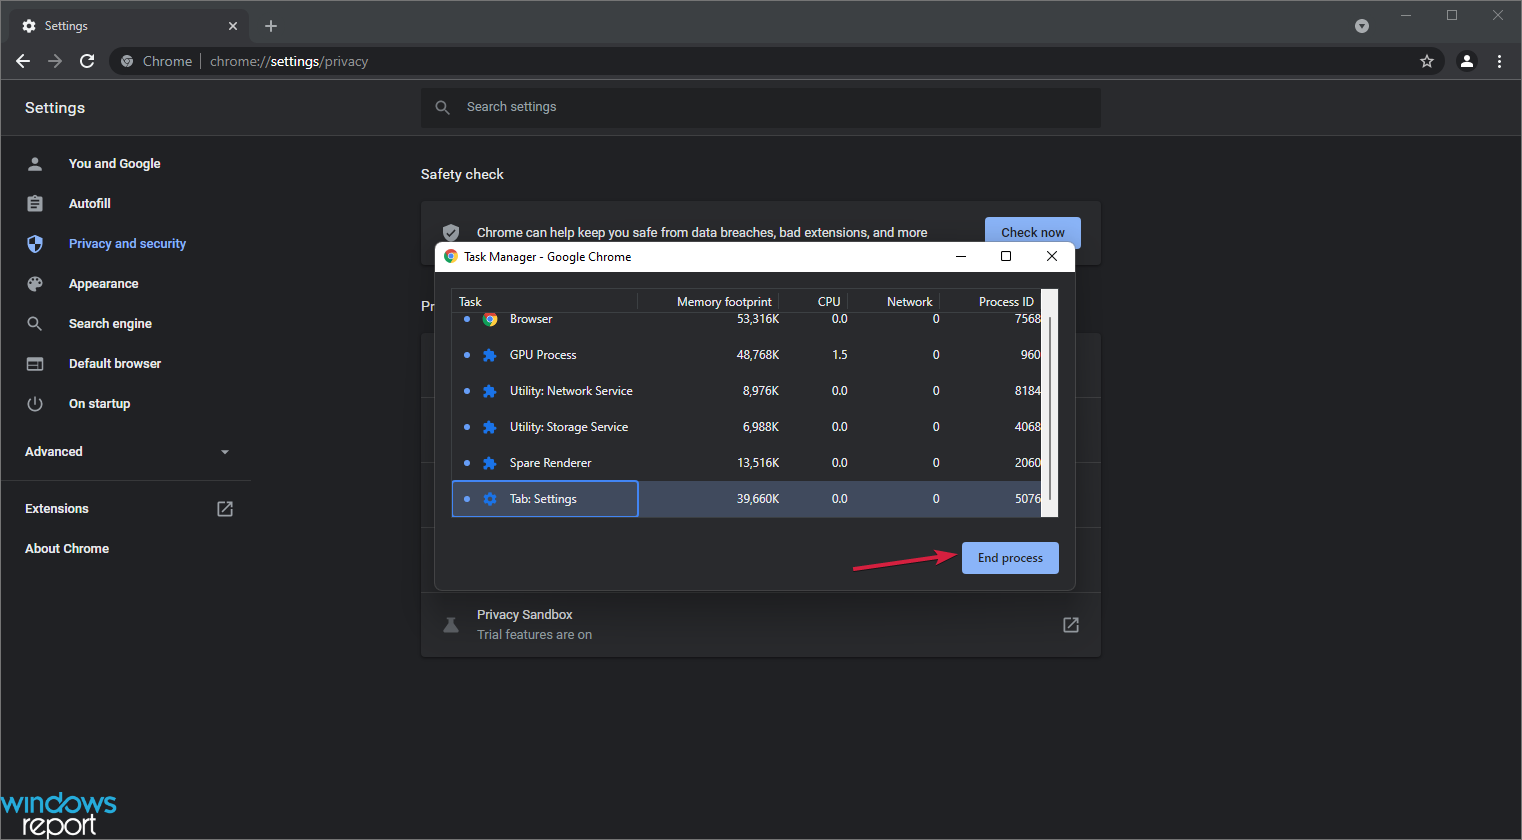
- Select More tools and choose Task manager from the list. You can also open Chrome’s Task manager using the Shift + Esc key combination.
- Look for unuseful processes that consume more CPU resources, click on them, then hit the End Process button from the bottom right corner. Chrome can’t work with some methods; if you end them, Chrome will restart them immediately.


Chrome runs multiple processes in the background, which can take up many of your CPU resources, leading to a slow Windows 11.
An excellent way to fix this is to open Chrome’s Task Manager to look through the processes and end the unwanted ones.
4. Disable the preload option
- Click on the three vertically-aligned dots from the top right corner and select Settings from the list.
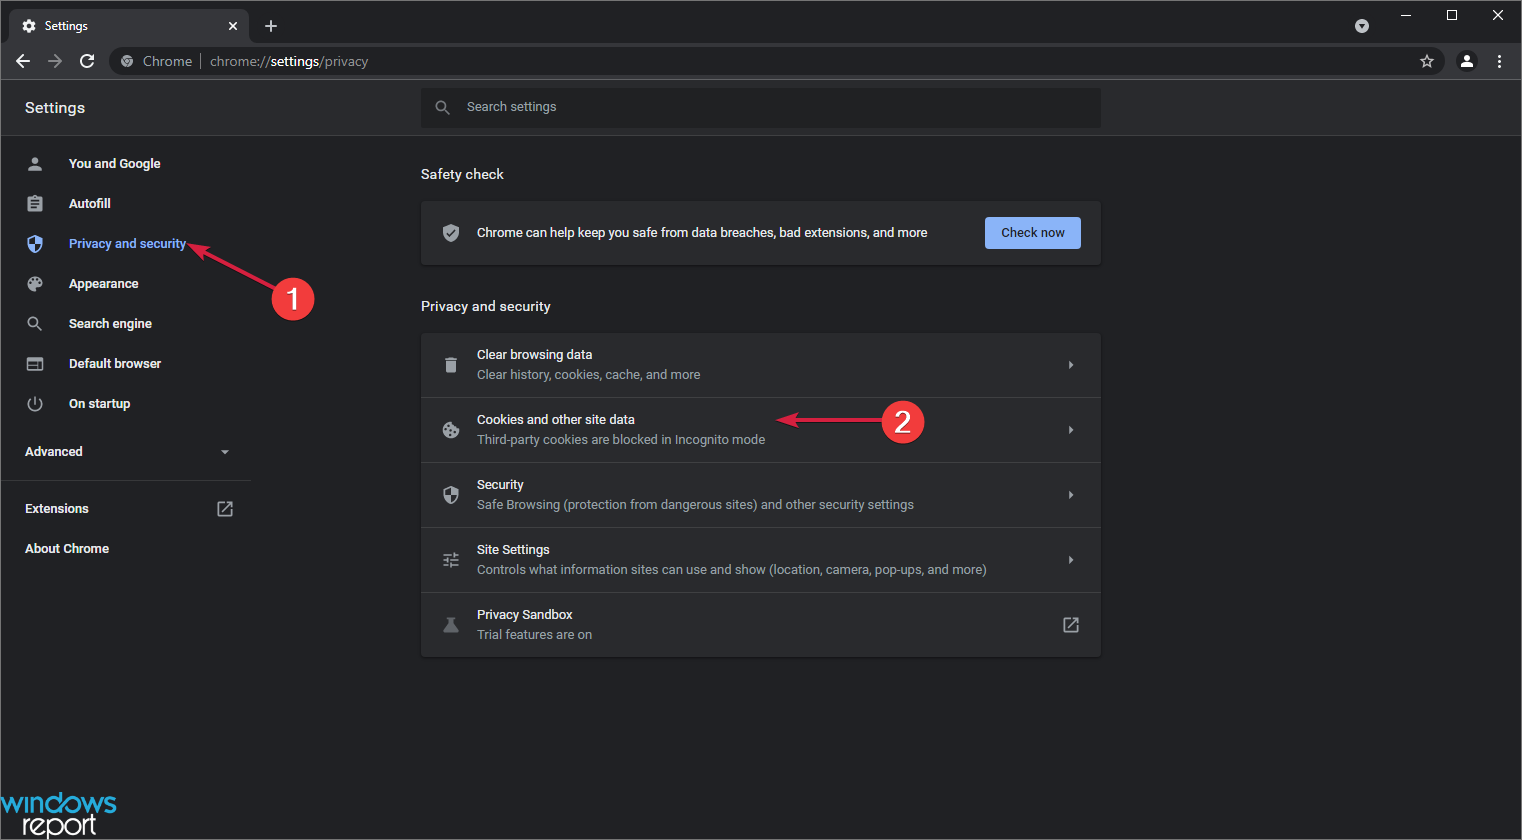
- Navigate to the Privacy and Security option on the left-hand pane, then select Cookies and other site data.
- Look for an option called Preload pages for faster browsing and searching, and disable it.
- Restart Chrome and see if it is faster now.

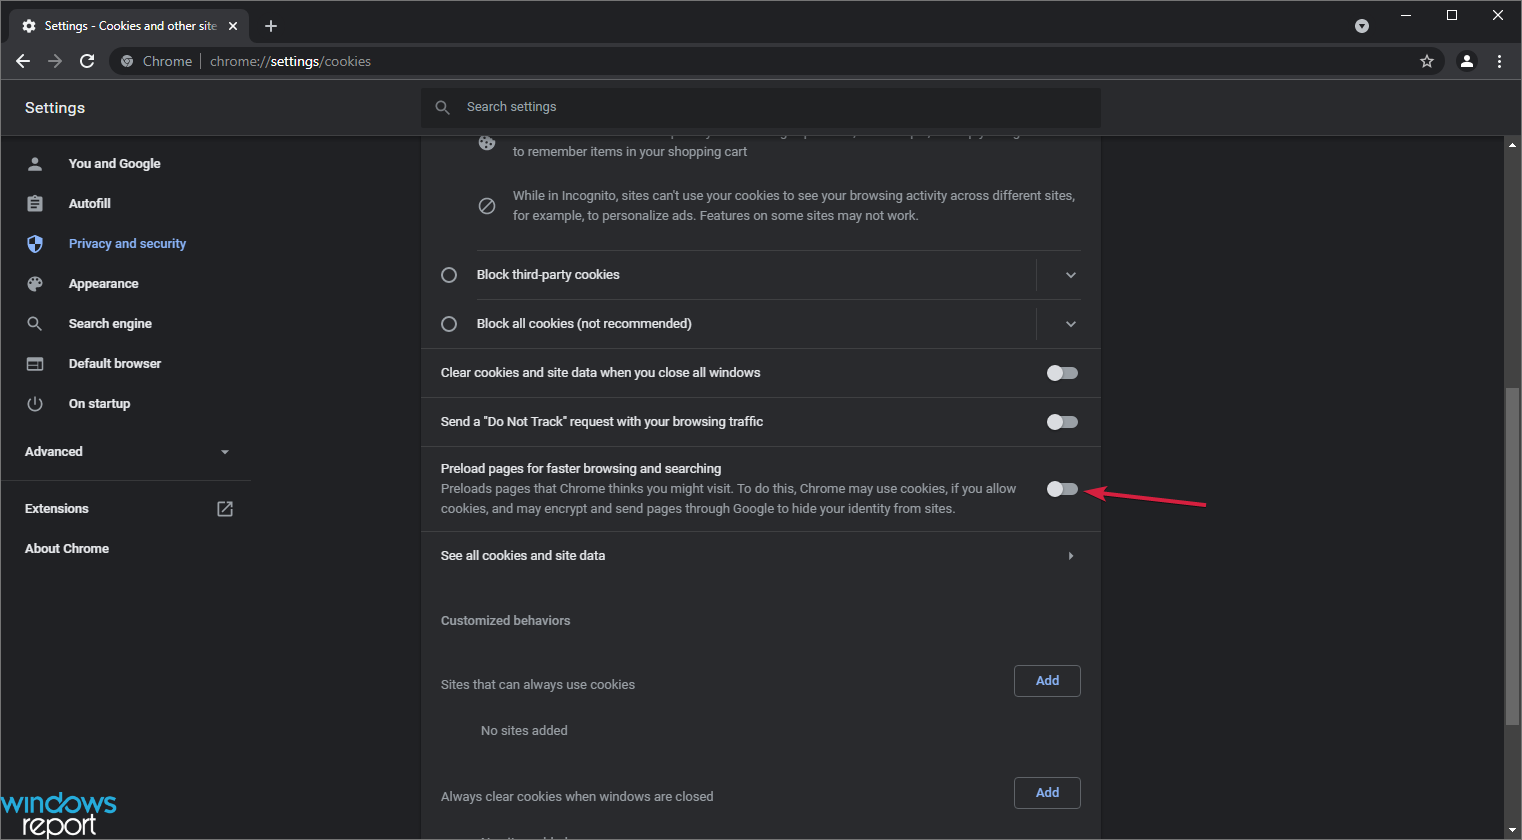
Chrome uses your browsing history to predict what pages you will likely open and preloads them for you.
While this can be convenient, it is often a waste of your resources and can cause Chrome to slow down in Windows 11.
To avoid this bottleneck, disable the preload option using the steps above. This option will significantly increase your Chrome speed and performance and is a proper fix for Chrome working slowly in Windows 11.
5. Remove Chrome extensions
- Click on the three vertically-aligned dots on the right-hand top corner.
- Navigate to More tools and click on Extensions.
- Go through this list and remove the ones you don’t need by clicking the Remove button in each extension. You can also deactivate them by toggling off the switch to their lower right corner, so they don’t load.

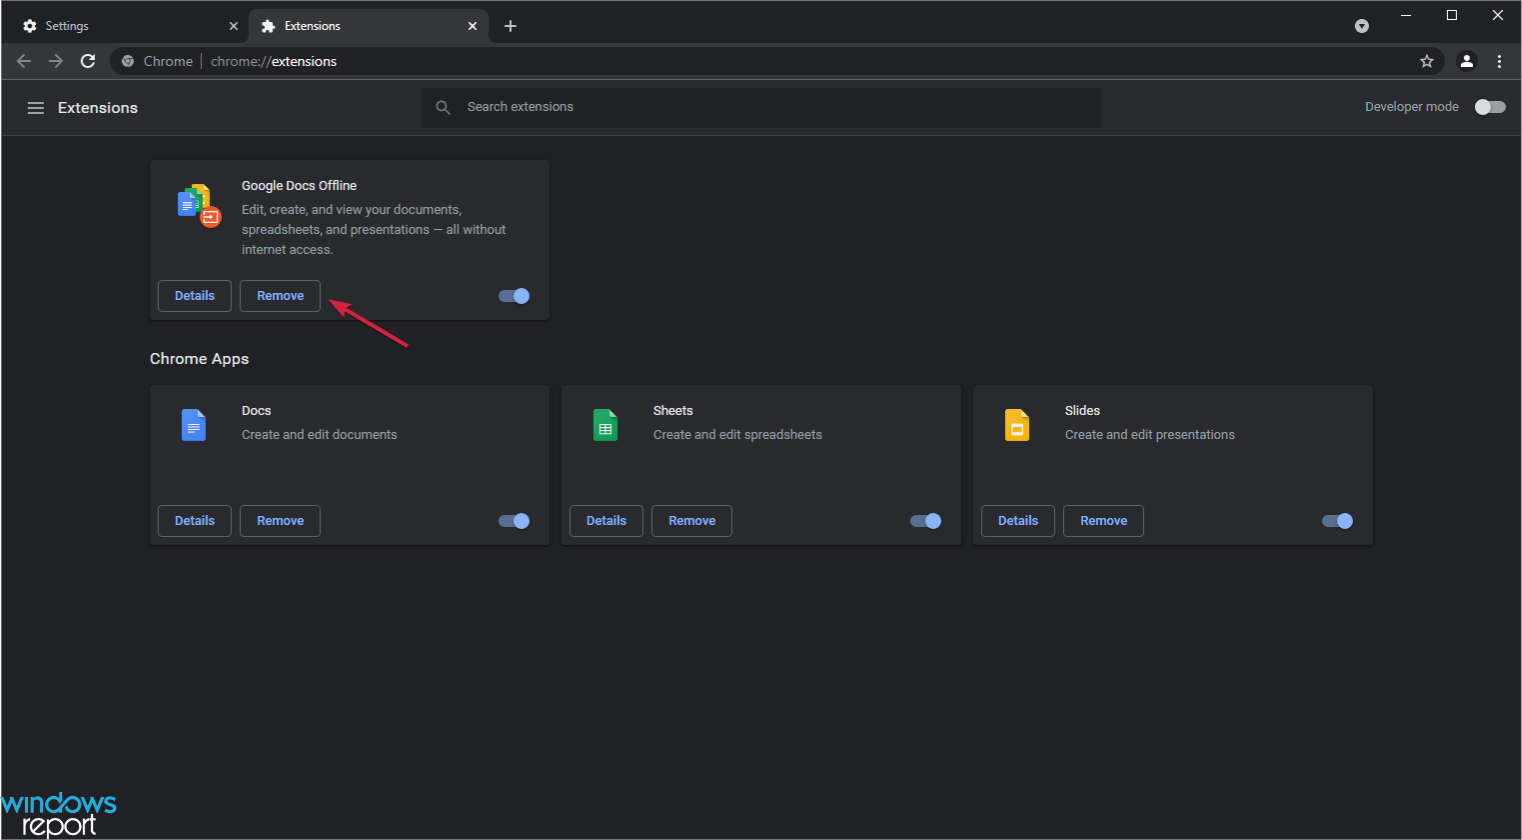
Using many extensions can cause Chrome to be slow in Windows 11. First, check the installed browser extensions and remove the ones you don’t need. Finally, restart Chrome and check if it is faster.
6. Update Chrome
- Click the three vertically-lined dots on the top right-hand corner and select Settings.
- On the Settings page, select About Chrome on the left-hand pane.
- If your browser is up-to-date, you can see it; otherwise, Google will auto-update when you open this page.

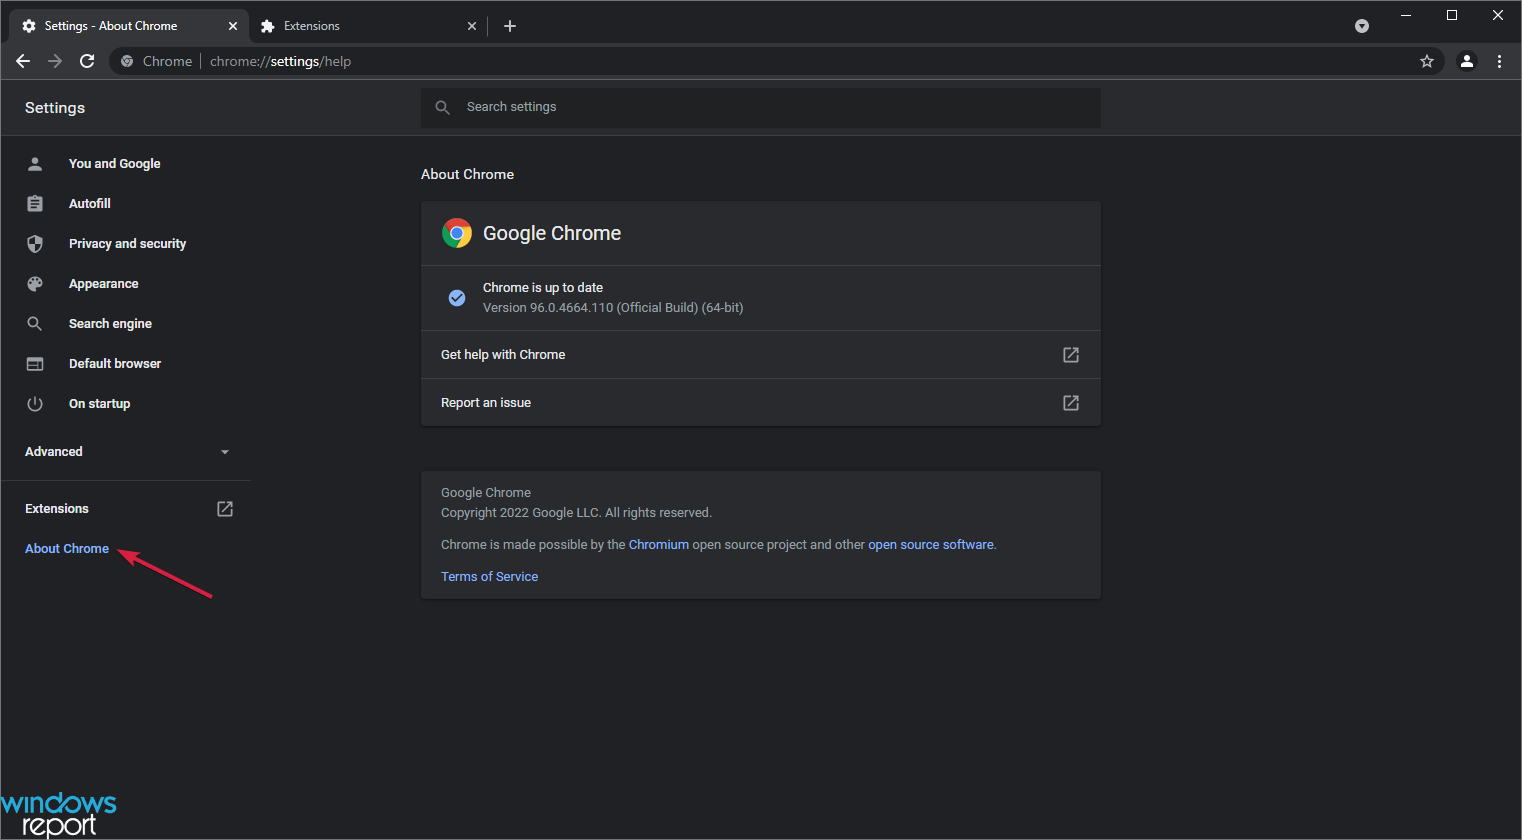
Google releases regular updates in the form of Chromium builds that address its existing issues and vulnerabilities.
It’s a good idea to install these updates monthly to ensure that your browser is up-to-date with the latest version.
You should reset the browser if Chrome is still slow after a Windows 11 update.
7. Reset Google Chrome
- Click the three vertical dots on the top right corner and select Settings.
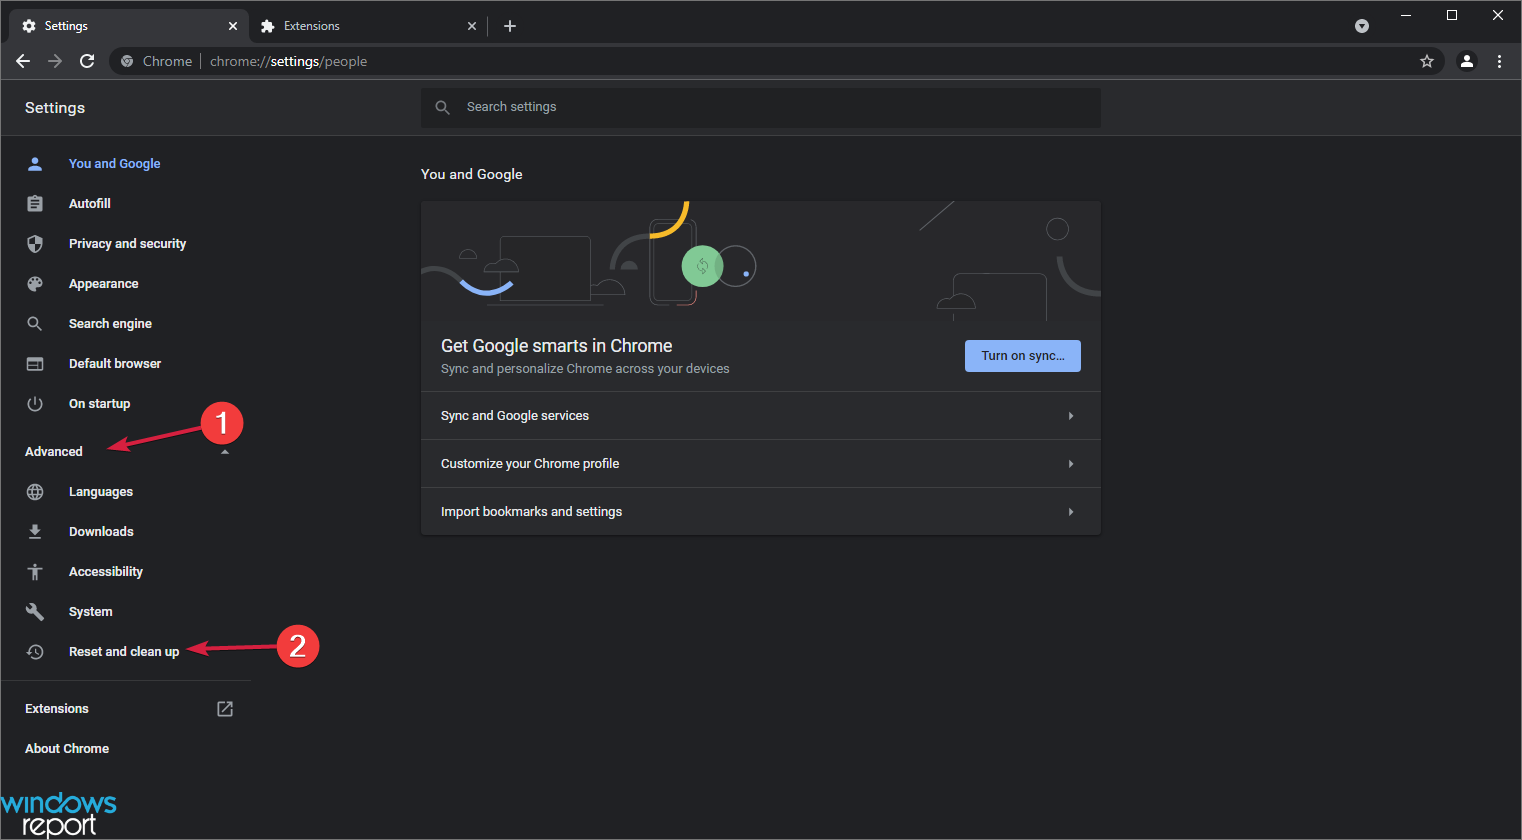
- Select the Advanced option from the left, and after it expands, click on Reset and clean up.
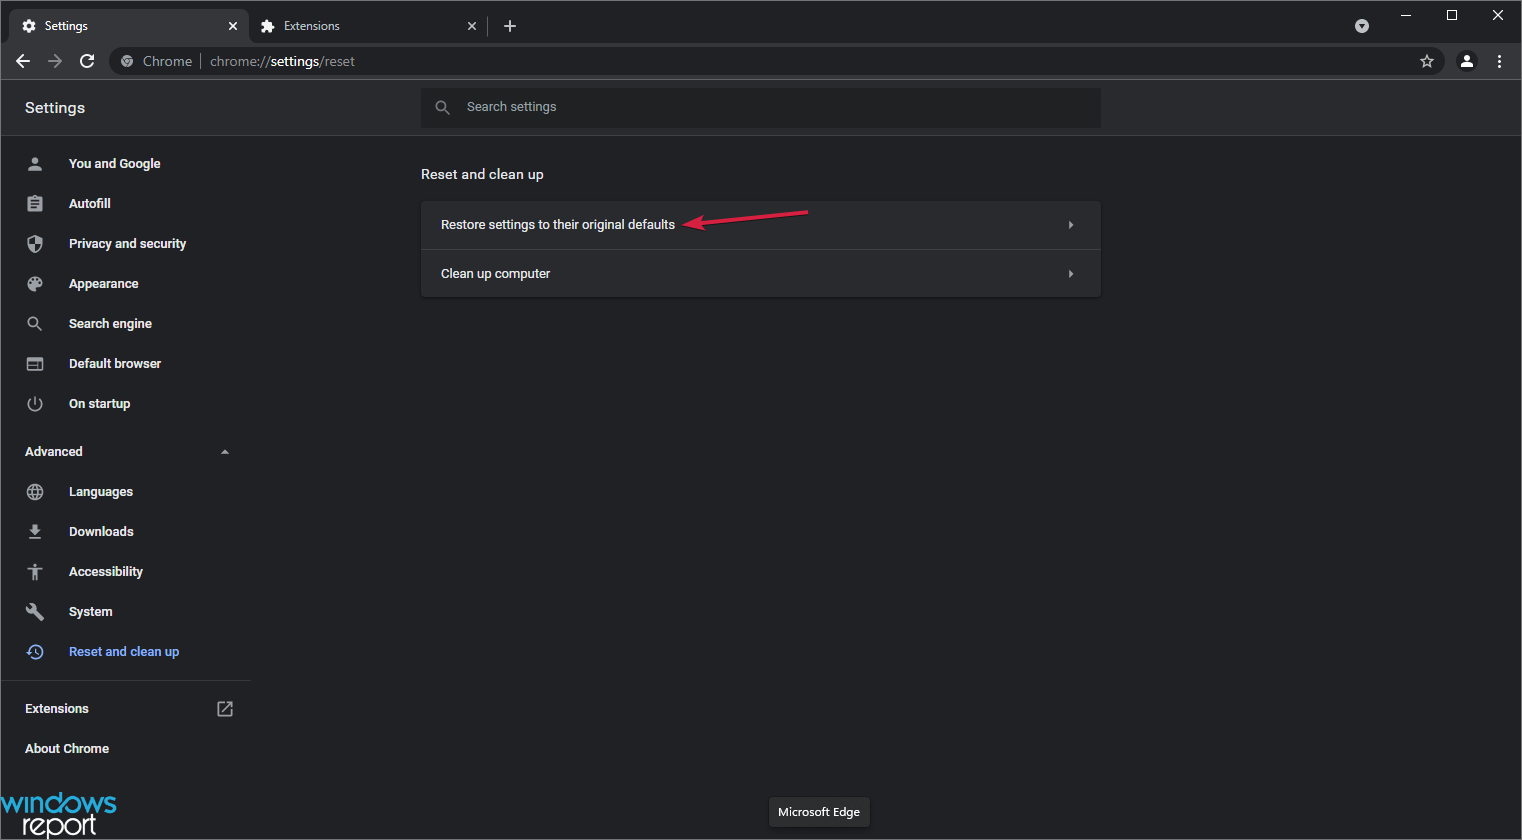
- Choose Restore settings to their original defaults.
- Now you only have to click on Reset settings.

Thus, these are some ways to address the slow Chrome issues in Windows 11. So, it would help if you tried all these options to see which works for you.
Does clearing history make Chrome faster?
To make your browser faster, you need to rid it of as much data as possible.
Your browser history is some data even though, in some cases, it may be so small and insignificant. However, clearing it will reduce the amount of data the browser holds and may make the browser generally faster.
However, in reality, the difference may be minute and negligible.
To conclude, Chrome being slow to open in Windows 11 can be due to many reasons, and we strongly suggest you run through each of the above options, as one of them is sure to fix your problem, depending on the underlying cause.
Note that if all browsers are slow in Windows 11, you may consider a malware scan of the entire system. Also, some Windows 11 Chrome users have said disabling hardware acceleration has also helped.
However, if you can’t make Chrome work as it should, we have a list of the best browsers for Windows 11, and you may choose a better one.
Contact us through the comments section if you have questions regarding a slow Chrome in Windows 11.
You can also read about fixing high CPU usage in Windows 11, which can make Chrome and other apps run faster on Windows 11.
![]()
Время на прочтение
2 мин
Количество просмотров 7.6K

Пользователи и профильные эксперты сообщили, что обновление KB5030219 для Windows 11 22H2, вышедшее 12 сентября в рамках ежемесячного вторника патчей, вызывает синий экран смерти (BSoD), зависания в приложениях, включая браузеры и клиент Steam, а также снижает производительность и стабильность основных компонентов ОС, включая заикание звука, пропадание вкладок в «Проводнике» и сбои при попытке открыть меню «Пуск».
В некоторых случаях пользователи после установки KB5030219 столкнулись с невозможностью загрузить систему после перезагрузки или у них происходило зависание ОС на экране приветствия или блокировки.
Часть пользователей сообщили, что у них пропадал доступ к сетевым сервисам, а также происходило удаление рабочих драйверов оборудования, например, после перезагрузки в системе не оказывалось ранее установленного видеодрайвера Nvidia.
Пользователи игровых ПК сообщили, что у них значительно снижалась производительность в играх, особенно Starfield или они вообще перестали запускаться с ошибкой таймаута приложений по TDR (режиму Timeout Detection and Recovery в Windows, который автоматически перезагружает видеокарту при обнаружении зависания без необходимости перезагрузки ОС) в приложениях Direct3D 12 для Windows).
После удаление обновления KB5030219 в большинстве случаев ПК с Windows 11 22H2 начинали работать стабильнее, а игры на них стали запускаться без тормозов и ошибок.
Профильные эксперты из TechRadar пояснили, что это удивительно длинный список серьёзных проблем и багов по всем направлениям от одного обновления ОС. По их мнению, пользователи ожидают, что с каждым новым патчем будет наблюдаться некоторая нестабильность, а такой уровень хаоса в ОС после установки обновления показывает действительно тревожное положение дел в отделе тестирования в Microsoft.
Примечательно, что Microsoft не признаёт, что с обновлением KB5030219 что-то не так. В сообщении техподдержки про KB5030219 Microsoft заявляет, что компании «в настоящее время не известно о каких-либо проблемах с этим обновлением», и оставляет этот патч доступным для установки.
Оптимизация браузера – это процесс настройки программного обеспечения, чтобы достичь максимальной производительности и снизить возможность возникновения проблем, таких как лаги и сбои. Когда дело доходит до использования браузера в операционной системе Windows 11, правильная оптимизация может значительно повысить вашу эффективность и удовлетворение от работы в Интернете. В этой статье мы рассмотрим несколько важных способов оптимизации браузера для Windows 11.
1. Обновите ваш браузер
Перед тем как приступить к оптимизации, убедитесь, что ваш браузер имеет последнюю версию. Новые обновления зачастую содержат исправления ошибок, улучшения производительности и новые функции, которые могут значительно повысить работу браузера.
2. Оптимизируйте настройки браузера
Большинство популярных браузеров, таких как Google Chrome, Mozilla Firefox и Microsoft Edge, предлагают ряд настроек, которые можно настроить для улучшения производительности. Например, вы можете отключить автоматическое обновление расширений, отключить анимации и визуальные эффекты, а также настроить свои предпочтения в отношении сохранения истории и кэширования.
3. Очистите временные файлы и кэш
Накопление временных файлов и кэша со временем может привести к замедлению работы браузера. Воспользуйтесь встроенной функцией очистки временных файлов браузера или сторонними программами для очистки, чтобы избавиться от ненужных данных.
4. Установите плагины и расширения по необходимости
Плагины и расширения могут добавить полезные функции в ваш браузер, но излишнее количество плагинов может замедлить его работу. Регулярно проверяйте и удаляйте ненужные плагины и расширения, чтобы уменьшить нагрузку на браузер.
5. Используйте антивирусное программное обеспечение
Наличие вредоносного программного обеспечения на вашем компьютере может негативно сказаться на работе браузера. Установите надежное антивирусное программное обеспечение и регулярно проверяйте систему на вирусы и вредоносные программы.
6. Апгрейд системы
Если у вас старый компьютер или слабое оборудование, то обновление компонентов может быть необходимо для обеспечения плавной работы браузера. Размышляйте о расширении оперативной памяти, установке более быстрого процессора или использовании SSD для улучшения производительности.
7. Заключение
Правильная оптимизация браузера для Windows 11 – это ключевой фактор для достижения быстрой работы и предотвращения возможных лагов и сбоев. Следуя приведенным выше советам, вы сможете улучшить производительность браузера и повысить свою эффективность при использовании Интернета. Не забывайте следить за обновлениями браузера и операционной системы, чтобы быть уверенными, что вы всегда работаете с последними исправлениями и улучшениями.
Узнайте, что вызывает проблемы с отставанием или медленным открытием Google Chrome в Windows 11, а также девять рабочих способов, с помощью которых вы можете решить эту проблему.
Из всех доступных браузеров Google Chrome является наиболее часто используемым браузером из-за его простоты и быстрой загрузки. Его функция синхронизации позволяет получить доступ к Chrome через различные операционные системы, будь то Windows, Android или даже iOS. Хотя это выдающийся браузер с отличными возможностями, пользователям Windows 11 трудно работать из-за проблем с медленным открытием или отставанием.
Несколько пользователей жалуются на то, что запуск в Windows 11 занимает много времени. Некоторым Google Chrome требуется даже 10-15 минут, чтобы стать полностью функциональным, что совершенно неприемлемо. Если вы один из таких пользователей и вам интересно, как решить эту проблему, этот пост предназначен для вас. Давайте посмотрим, что может вызвать проблемы с медленным открытием в Chrome и как их исправить.
Что может вызвать отставание Google Chrome или проблемы с медленным открытием?
Ниже приведены ключевые переменные, которые могут привести к медленной загрузке Google Chrome в операционных системах Windows 11.
- Аппаратная доступность: если в настройках выбрана аппаратная доступность, загрузка Google Chrome в Windows 11 может занять много времени.
- Поврежденная папка Google Chrome по умолчанию также может препятствовать быстрому открытию браузера. Чтобы решить эту проблему, необходимо переименовать каталог по умолчанию.
- Установка расширения: Добавление расширений в Google Chrome может замедлить скорость загрузки браузера в новой операционной системе.
Убедитесь, что вы отключили прокси/VPN в настройках Chrome и системы, прежде чем переходить к способам повышения скорости загрузки Google Chrome в операционной системе Windows 11. Затем систему следует перезапустить. После этого попробуйте каждое из следующих решений по одному, пока скорость загрузки Google Chrome не вернется к нормальной.
Как сделать вашу Windows 10 быстрой и эффективной
Чтобы исправить очень медленное или отстающее открытие Chrome на ПК с Windows 11, просмотрите приведенные ниже предложения и посмотрите, решит ли кто-нибудь эту проблему.
1]Отключить расширения
Наличие нескольких расширений в Google Chrome может быть причиной плохой скорости загрузки браузера в Windows. Когда пользователь пытается запустить Google Chrome, браузер не открывается до тех пор, пока не будут загружены все его расширения. Итак, лучше отключить все расширения, следуя приведенным ниже инструкциям —
Примечание: Если вы используете какое-либо расширение слишком часто, вы можете оставить его как есть.
- Запустите Google Chrome и нажмите на три вертикальные точки в правом верхнем углу.
- Когда это меню развернется, нажмите «Настройки».
- Двигаясь вперед, нажмите «Расширения» на левой панели навигации.
- Браузер Chrome перенаправит вас на страницу расширений.
- Отключите переключатель рядом с любым расширением, которое вы редко используете.
- Сделайте это для всех тех расширений, которые вы не используете активно в Google Chrome.
- Перезапустите Chrome и посмотрите, решится ли проблема сейчас.
Подсказка: если проблема не устранена даже после этого, отключите режим разработчика на странице «Расширения».
2]Отключить аппаратное ускорение
Аппаратное ускорение позволяет пользователям Windows 11 повысить производительность и более плавно запускать приложения, что позволяет избежать зависания приложений. Можно только включить или выключить эту функцию, нет возможности повысить или замедлить аппаратное ускорение.
Тяжелые процессы, такие как рендеринг видео и загрузка игр, выполняются быстрее, если эта функция включена в Google Chrome. Хотя это действительно повышает производительность некоторых приложений, это может вызвать проблемы с открытием облегченных приложений. Браузер Chrome работает плавно, когда аппаратное ускорение остается отключенным. Вот как вы можете выполнить эту задачу –
- Сначала запустите Google Chrome.
- Нажмите на пользовательское меню (три точки) и выберите «Настройки».
- Затем прокрутите вниз и выберите «Дополнительно» в раскрывающемся меню.
- Выберите «Система» и найдите «использовать аппаратное ускорение, если оно доступно» в системном разделе.
- Когда найдете, сдвиньте тумблер влево.
- Перезапустите браузер и проверьте, устраняет ли это проблемы с задержкой или медленным открытием Chrome на вашем компьютере.
3]Переименуйте папку по умолчанию
Папка по умолчанию находится в каталоге установки Google, и в ней хранится такая информация, как профили пользователей, содержащие настройки и расширения каждого пользователя и многое другое. Этот контент может быть причиной медленной загрузки браузера в операционной системе Windows 11.
Переименование этой папки избавит вас от всех предыдущих данных и, таким образом, может даже исправить проблемы с задержкой или медленным открытием Google Chrome. Однако перед этим обязательно экспортируйте все свои закладки в определенное место или просто синхронизируйте Chrome со своей учетной записью Google. Если вы не примете эти меры предосторожности, переименование папки по умолчанию приведет к сбросу Chrome, который забудет все ваши закладки и другие сохраненные данные.
Вот как переименовать папку по умолчанию в Google Chrome —
- Прежде всего, нажмите Win + E, чтобы запустить проводник.
- В проводнике перейдите по пути ниже —
C:UsersИмя пользователяAppDataLocalGoogleChromeДанные пользователя
- Обязательно замените «Имя пользователя” с тем, который у вас есть на вашем ПК с Windows.
- Может случиться так, что вы не видите папку AppData в своем профиле пользователя. Ну, это потому, что профиль остается скрытым. Чтобы сделать это видимым, выберите «Вид» > «Показать» > «Скрытые элементы».
- После того, как вы включите просмотр скрытых файлов и папок, вы должны легко добраться до пути, указанного выше.
- Внутри пользовательских данных щелкните правой кнопкой мыши папку «По умолчанию» и переименуйте ее во что-нибудь «Старый_по умолчанию“.
- Теперь, когда вы переименовали папку по умолчанию, закройте проводник Windows, а затем Google Chrome.
- Перезапустите браузер Chrome и посмотрите, решена ли его проблема с медленной загрузкой или все еще существует.
Как исправить проблему с белым или пустым экраном в Google Chrome
4]Сброс сетевого адаптера
Сетевой адаптер — это компонент, который позволяет компьютерам пользователей подключаться к Интернету при подключении к модему, беспроводному сетевому адаптеру или другому сетевому адаптеру. Опытные пользователи сообщают, что изменение настроек сетевого адаптера может замедлить загрузку браузера в ОС Windows 11. Шаги по сбросу сетевого адаптера перечислены ниже:
- Откройте командную строку (admin), нажав «Windows + X» или введя «cmd» в меню «Пуск», затем щелкнув правой кнопкой мыши командную строку и выбрав «Запуск от имени администратора».
- Введите следующую команду в консоли Windows и нажмите Enter –
netsh сброс винсока
- После сброса сетевого подключения проверьте, запускается ли Chrome нормально или по-прежнему загружается очень медленно.
5]Очистить данные просмотра
Данные просмотра, включая файлы cookie и кеш, — это информация, которая сохраняется, когда пользователь взаимодействует с веб-сайтом. История — самый важный компонент любого браузера. Все это работает вместе, чтобы обеспечить правильную работу браузера. Если какой-либо из них имеет поврежденный файл, это повлияет на способность браузера работать должным образом. Проблема медленной загрузки веб-браузера может быть решена путем очистки данных браузера. Ниже приведены шаги, которые необходимо предпринять:
- Перейдите в Google Chrome и откройте его. Выберите пользовательское меню (три точки), в раскрывающемся меню выберите «Настройки».
- Выберите «Безопасность и конфиденциальность» на левой панели и нажмите «Очистить данные браузера».
Примечание: Кроме того, вы также можете нажать Ctrl + Shift + Del, чтобы получить доступ к странице «Очистить данные просмотра».
- Перейдите на вкладку «Дополнительно» и выберите временной диапазон в раскрывающемся меню.
- Установите все флажки и нажмите «Очистить данные».
- Перезапустите Google Chrome и посмотрите, решится ли проблема сейчас.
6]Запустите средство устранения неполадок совместимости программ.
Встроенный инструмент, предоставляемый Microsoft, т.е. Средство устранения неполадок совместимости программ может решить любые проблемы совместимости для пользователя. Устранение неполадок можно выполнять автоматически или вручную для конкретного приложения. Вот как можно устранить неполадки Google Chrome по возможным причинам, препятствующим быстрой загрузке браузера.
- Введите «Устранение неполадок» после нажатия клавиши Windows.
- Выберите «Настройка устранения неполадок», затем «Другие средства устранения неполадок» в следующем окне.
- Прокрутите вниз и найдите «Устранение неполадок совместимости программ». Когда найдете, нажмите кнопку «Выполнить» рядом с ним.
- Выберите Google Chrome в раскрывающемся меню и нажмите кнопку «Далее».
- Чтобы завершить процесс устранения неполадок, следуйте инструкциям на экране.
- Перезапустите Chrome и посмотрите, устранена ли задержка при загрузке.
7]Используйте инструмент очистки Google Chrome
Google Chrome Cleanup Tool — это, по сути, бесплатная программа для Windows, созданная Google, которая относится к категории продуктивного программного обеспечения с подкатегорией каталогизации. Возможно, вредоносное ПО в реестре компьютера и файле конфигурации приводит к зависанию Google Chrome на начальной стадии загрузки. Эта проблема может быть решена с помощью инструмента очистки.
- Нажмите на меню действий (три точки) в левом верхнем углу браузера, чтобы открыть его.
- Затем выберите Настройки.
- Выберите опцию «Дополнительно» в раскрывающемся меню. Затем выберите «Сбросить и очистить» из выпадающего меню.
- Выберите «Очистить компьютер» в раскрывающемся меню.
- Нажмите кнопку «Найти», чтобы начать поиск.
- Сканирование начинается с сообщения «Проверка на наличие вредоносного программного обеспечения…». Дождитесь его окончания.
- Если обнаружен опасный файл, вам будет представлен список вредоносных файлов. Что ж, нажмите кнопку «Удалить».
- Теперь снова откройте браузер, чтобы увидеть, решена ли проблема.
Я надеюсь, что это исправит проблемы с задержкой или медленным открытием Google Chrome на вашем ПК с Windows 11. Если нет, следуйте последним двум обходным путям.
8]Войдите в свою официальную учетную запись Google.
Возможно, пользователь еще не вошел в свою учетную запись Google. Это замедляет загрузку Google Chrome в операционной системе Windows 11. Войдите в свою учетную запись Google и посмотрите, все ли работает нормально.
- Запустите Google Chrome и нажмите Ctrl + T.
- Когда откроется новая вкладка, щелкните значок профиля пользователя рядом с панелью поиска.
- Значок профиля пользователя расширится следующим. Нажмите «+ Добавить», чтобы добавить новую учетную запись в браузер Chrome.
- Используйте свой идентификатор электронной почты и пароль Gmail для входа в свою учетную запись Google.
- Перезапустите браузер и проверьте, быстро ли теперь загружается Chrome.
9]Переустановите Google Chrome
Если ни один из вышеперечисленных методов не работает, медленная скорость загрузки Google Chrome, скорее всего, связана с поврежденным файлом Chrome. Итак, удалите существующее программное обеспечение Google Chrome и установите новое программное обеспечение Google Chrome. Это определенно решит любую проблему, существовавшую ранее в браузере Chrome.
Я надеюсь, что эта статья помогла решить проблему зависания Google Chrome при загрузке в операционной системе Windows 11. Если вы нашли эту статью полезной, пожалуйста, поделитесь ею с друзьями и семьей.
In this guide, we will show various methods to fix the slow and laggy performance of Microsoft Edge in Windows 11. One major reason why many users decided to jump ships from Google Chrome over to Edge was due to the former’s excessive memory-hogging nature. The offering from Google has always been notoriously infamous for exhausting the system resources beyond what is actually required. This not only slows the browser but in some cases, the entire system as well.
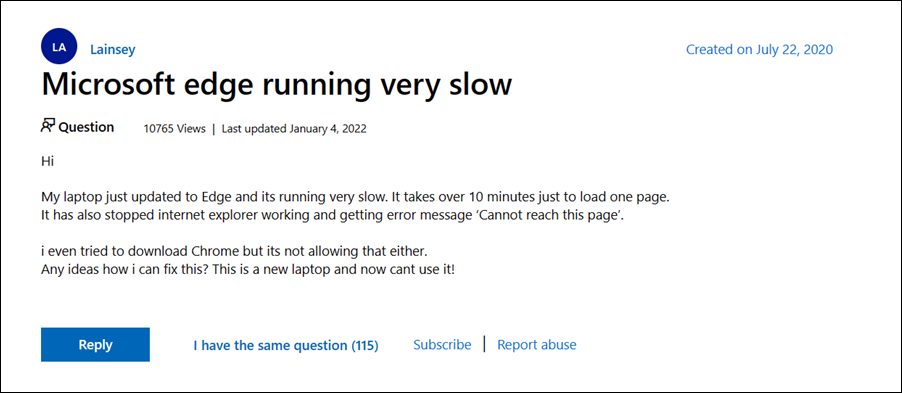
However, many users are now questioning their decision whether or not they should have made a switch from Chrome to Edge. This is because the latter isn’t proving to be any good either. Various users have voiced their concern that the Edge browser is performing extremely slow and sluggishly on the latest OS build. The browser takes ages to open, the tabs are taking forever to load a page, and in some instances, the webpage ends up displaying an Out of Memory error.
The efforts the Redmond giants have put in forcing this browser onto its userbase are quite commendable. However, if they would have put at least a fraction of this effort towards improving the browser’s performance as well, then it would made the browsing experience much easier and streamlined. Anyways, there are still some silver linings among those dark clouds so let’s keep our focus on them. So in this guide, we will list out numerous methods to fix the slow and laggy performance of Microsoft Edge in Windows 11.

Do note that there’s no universal fix as such. You will have to try out each of the below-mentioned workarounds and see which one works best in your favor. So with that in mind, let’s get started.
FIX 1: Restart Edge Processes
Your first course of action should be to restart Edge and all its processes. Doing so will give it a fresh instance to work upon and this, in turn, might rectify the underlying issue as well. So refer to the below instruction steps to try it out:
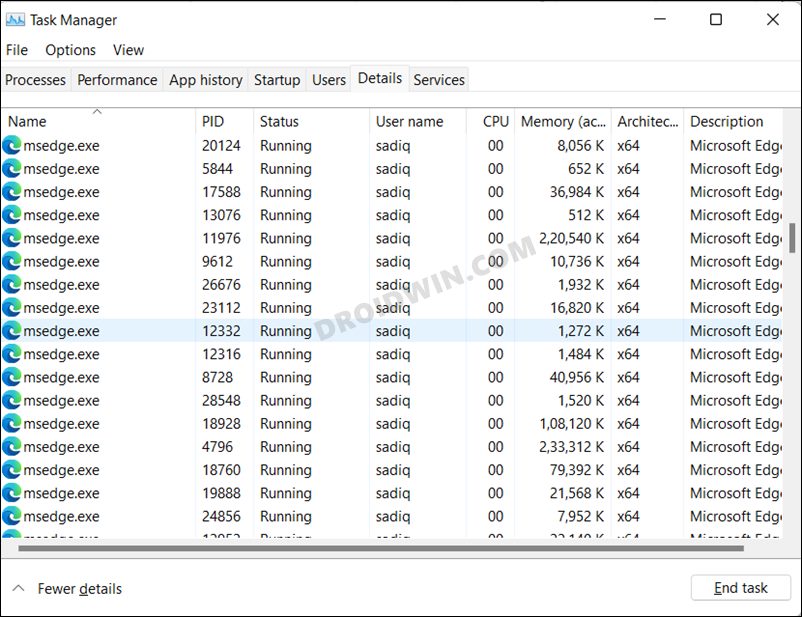
- Close the Edge browser and bring up the Task Manager via Ctrl+Shift+Esc shortcut keys.
- Then scroll to Background Processes, select all the Edge processes, and hit End Task.

- After that, go to the Details tab, select all the msedge.exe processes and click End Task.

- Now launch the Microsoft Edge browser on your Windows 11 PC and check if its slow/laggy performance has been fixed or not.

FIX 2: Restart Services via Edge Task Manager
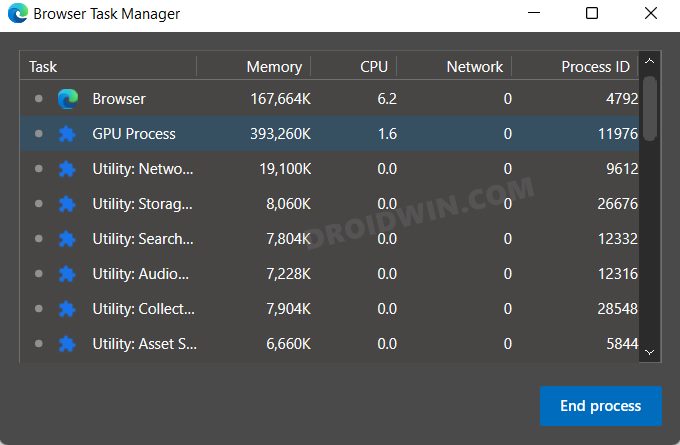
Edge (and other Chromium browsers too) comes with a built-in Task Manager that lists out all the running browser services and processes as well as the total CPU and RAM they are consuming. With the help of this data, we will be able to get hold of those services that are consuming more than the permissible level of system resource, and we will then disable those services. So proceed with the below steps to try it out:
- Launch Edge and use the Shift+Esc shortcut keys to open its own Task Manager.
- Then select all these services that are leaking high memory footprints.

- Finally, hit the End Process button to stop those services.
- Check if it fixes the Microsoft Edge slow or laggy nature in Windows 11.
FIX 3: Disable Preload Pages in Edge
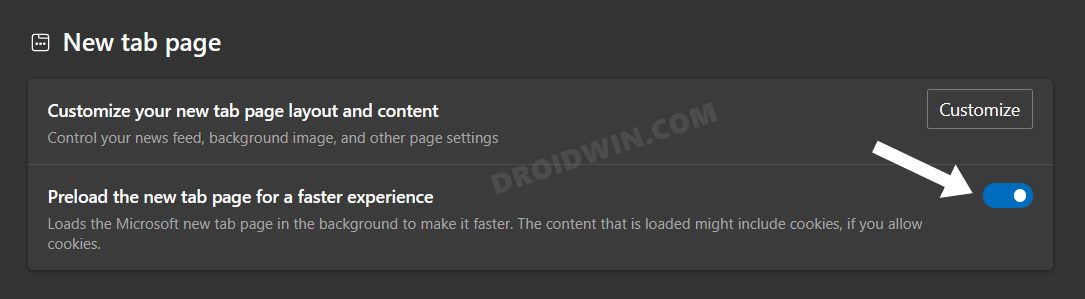
Edge automatically preloads a few web pages that it thinks you might visit at a later date. It does so based on the cookies that it had collected and based on your browsing history. However, this feature has more drawbacks than benefits as it ends up consuming necessary storage space as well as crucial system resources, with the only benefit being that you would be able to view these pages a few seconds earlier. So with the caveats outweighing the perks, it’s better to keep this feature disabled, which could be done as follows:
- Launch Edge and head over to the below location:
edge://settings/startHomeNTP
- Now scroll to the New Tab Page section.

- Then disable the toggle next to Preload the new tab page for a faster experience.
- See if it is able to fix the Microsoft Edge slow or laggy nature in Windows 11.
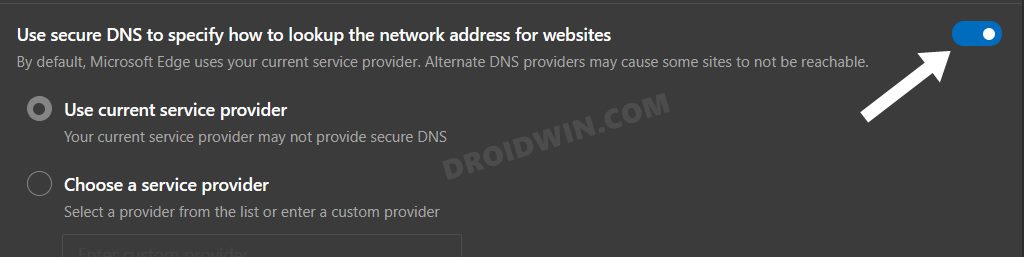
FIX 4: Disable Secure DNS
Various users have reported that when the browser uses a secure gateway to the Domain Name Server, then it ends up taking a considerable amount of additional time frame. Therefore, you could consider disabling it, using the instructions listed below:
- Launch Edge and head over to the below location
edge://settings/privacy

- Now disable the toggle next to Use secure DNS to specify how to look up the network address for websites.
- Check if it does any good when it comes to fixing the Microsoft Edge slow or laggy nature in Windows 11.
FIX 5: Disable Edge Extensions
It’s no hidden secret that extensions contribute a lot towards memory consumption. One major reason for that is the fact that these add-ons are continuously running in the background while you are working inside the browser environment in the foreground. So you could consider temporarily disabling these extensions and let the browser cool down a little bit.
Once a considerable time period has elapsed and Edge is running along the expected lines, you may then re-enable the disabled extensions. However, if the extensions shoot up the memory resources every time you enable them, then it’s better to remove it from the browser and look out for their alternatives. Here’s how all of this could be carried out:
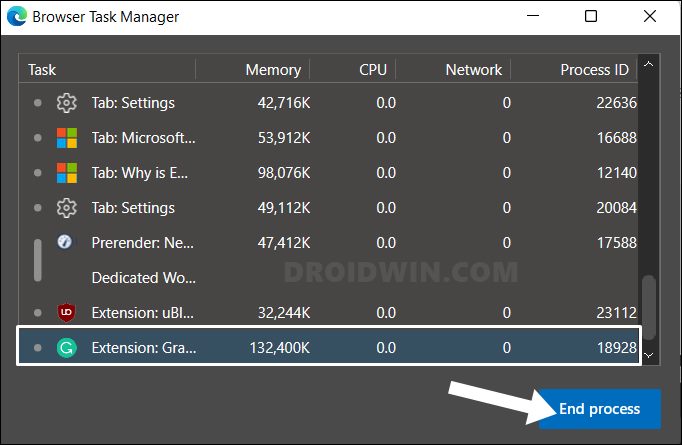
- Bring up Edge’s Task manager via Shift+Esc shortcut keys.
- Then check out the Memory footprints of each extension and note down the name of the one that is exceeding its limit!

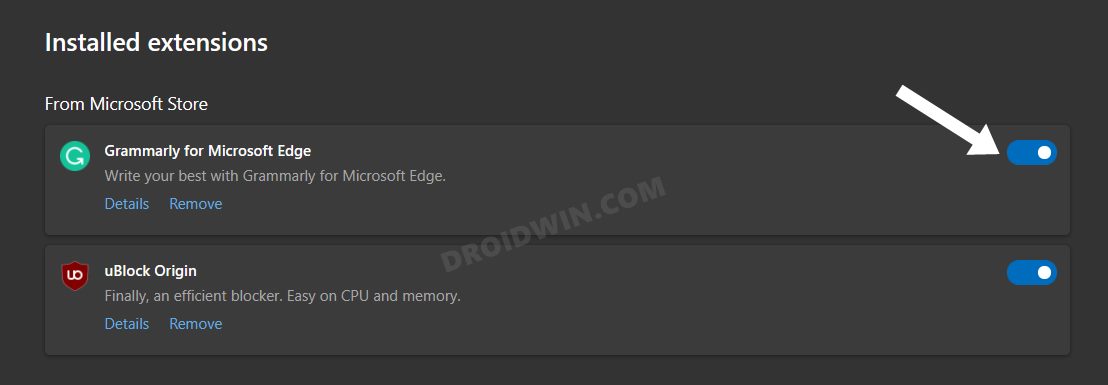
- After that, head over to the below location:
edge://extensions/
- Now disable the toggle next to the extension that you need to disable.

- On the other hand, to uninstall an extension, just hit the Remove button.
- Verify if these tweaks managed to fix the Microsoft Edge slow or laggy performance in Windows 11.
FIX 6: Flush Edge DNS
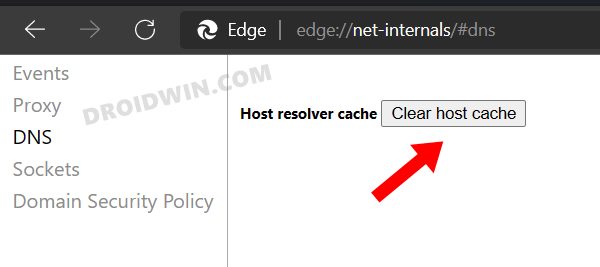
Edge stores the data related to the websites you visit in its Domain Name Server. But if a lot of data gets stored in this record book, then it could slow down the loading of the websites as well have negative consequences on the browser as well. Therefore, consider deleting these data and let the browser repopulate them from scratch the next time you visit that site.
- So launch Edge and head over to the below location:
edge://net-internals/#dns

- Then click on the Clear Host Cache button and wait for the process to complete.
- Now check if it fixes the Microsoft Edge slow or laggy performance in Windows 11.
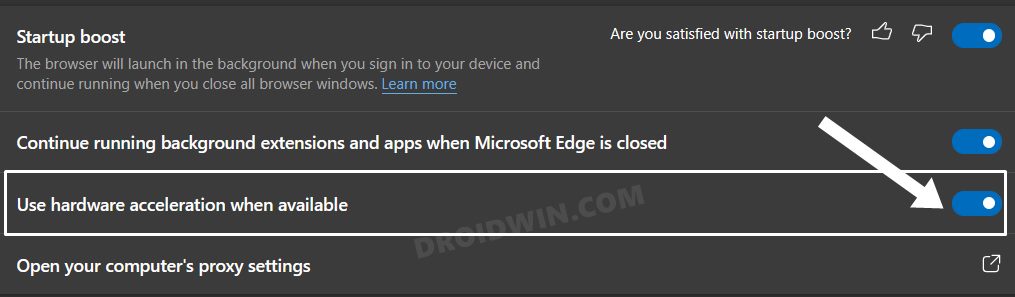
FIX 7: Disable Edge Hardware Acceleration
The Hardware Acceleration feature checks the prowess of your PC’s CPU as well as GPU and if it finds the latter’s processing capability to be much more than the formers, then it allocates the browser’s functionality to the latter aka GPU. But it is still a debatable topic as to how GPU could eclipse the CPU in this aspect, and hence the general advice is to disable this feature. Here’s how it could be done:
- Launch Edge and head over to the below location
edge://settings/system

- Then disable the toggle next to Use hardware acceleration when available
- Check if it fixes the Microsoft Edge slow or laggy performance in Windows 11.
FIX 8: Opt for Edge Balance Tracking Protection
Edge comes with three different levels of tracking protection: Basic, Balanced, and Strict. And there are no brownie points in guessing which out of the three is applies the most restrictive approach. However, applying this Strict measure has its own downsides as well as it tends to be over-protective in some aspects and could in turn conflict with the proper functioning of the browser. Therefore, you should instead opt for a balanced approach, thereby maintaining an equilibrium between security and performance.
- So launch the Edge browser and head over to the below location:
edge://settings/privacy

- Then select Balanced from the list.
- Check if it fixes the Microsoft Edge slow or laggy performance in Windows 11.
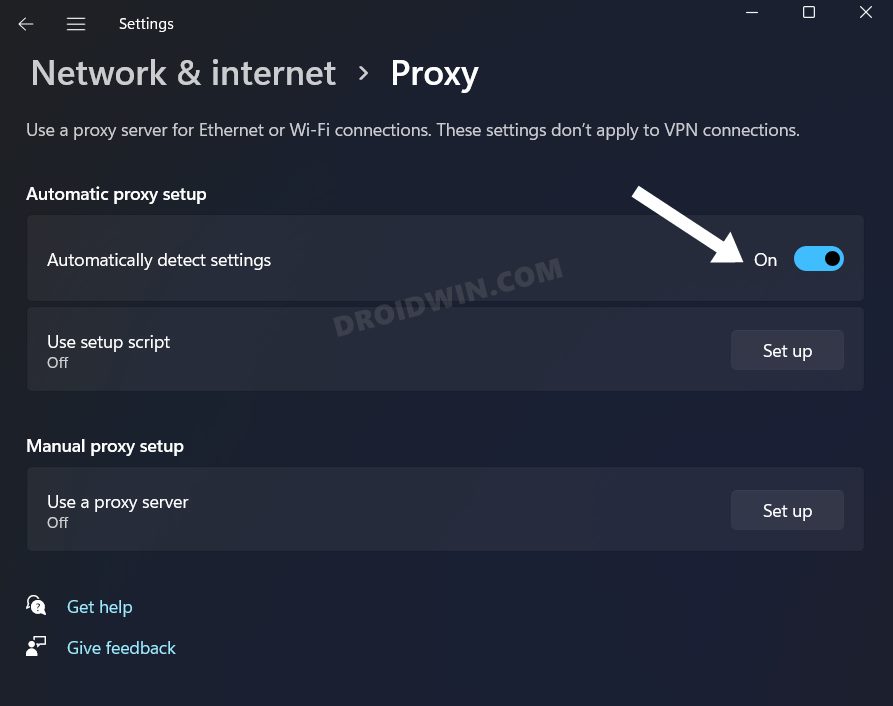
FIX 9: Disable Edge Automatic Proxy
If you have enabled Proxy on your PC to circumvent your ISP default DNS or simply to access geo-restricted contents, then it could conflict with the proper functioning of the browser. Therefore, you should disable this automated proxy setting on your PC, right from the Edge menu itself. Here’s how:
- Launch Edge and head over to the below location:
edge://settings/system
- Then click on Open your computer’s proxy settings.

- After that, disable the toggle next to Automatically Detected Settings.

- Verify if it does any good when it comes to fixing the slow or laggy performance of Microsoft Edge in Windows 11.

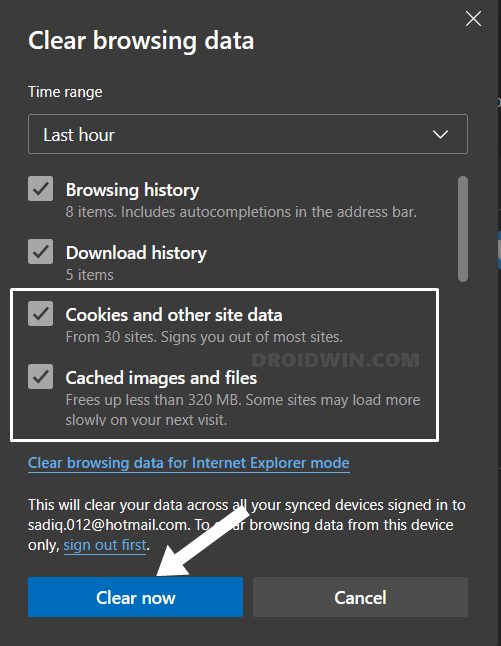
FIX 10: Delete Edge Data
If a lot of browser data gets accumulated over the due course of time or if the stored data gets corrupted, then it could spell trouble for the entire functioning of the browser. Therefore, you should consider deleting the cookie’s data as well as its cached files. So refer to the below instruction steps to try it out:
- Launch Edge and head over to the below location
edge://settings/clearBrowserData
- You may also use the Ctrl+Shift+Del shortcut for the same.
- Now checkmark Cookies and Other site data and Cached images and files.

- Finally, hit the Clear Now button and wait for the process to complete.
- Once done, verify if it fixes the Microsoft Edge slow or laggy performance in Windows 11.
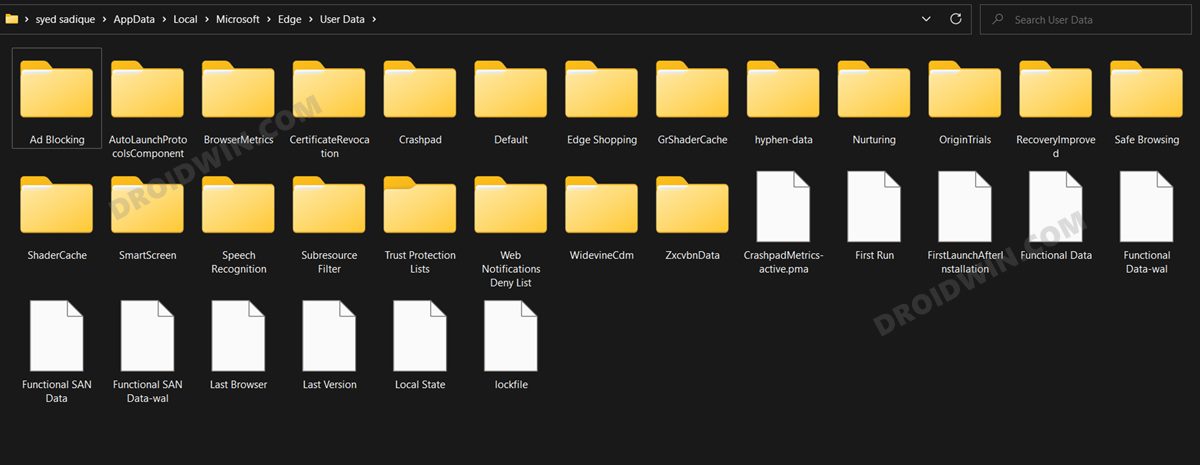
FIX 11: Delete Edge User Profile
Edge stores all the browser-related data inside the C Drive. If any of this data gets corrupted, then its repercussions will have to be faced by the entire browser environment. Therefore, you should consider deleting this Profile data and then let Edge re-populate it from scratch from your signed-in account. Do note that this will delete bookmarks, favorites, site settings, cookies, and all the locally saved data (which you could easily get back after signing in with your account).
- Open File Explorer via Windows+E shortcut keys and go to the below location:
%USERPROFILE%\AppData\Local\Microsoft\Edge\User Data
- Copy this User Data folder and paste it somewhere else (it will act as a backup).

- Now delete this User Data folder from the Edge directory.
- Check if it fixes the Microsoft Edge slow or laggy performance in Windows 11.
- If it doesn’t, then paste the User Data back to the Edge directory to get all your data back and then move over to our next fix.
FIX 12: Reset Microsoft Edge
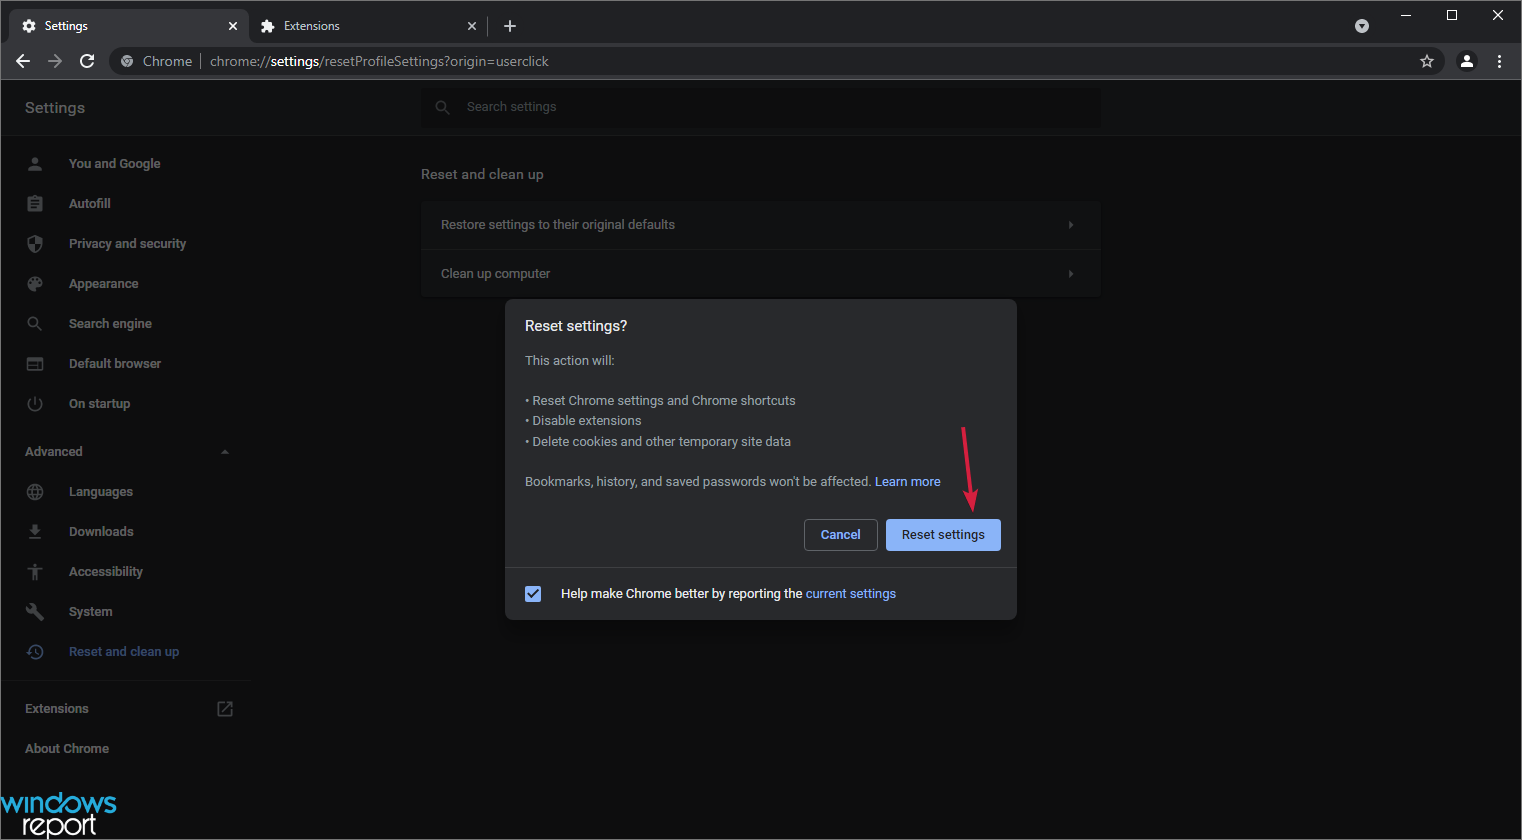
If the browser settings and configuration files get corrupted, then the best course of action is to reset the browser to its factory default state, exactly how it was when you first downloaded it. This will remove all the customizations and will revert it back to its original state. So proceed with the below steps and give it a try
- Launch Chrome and head over to the below location:
edge://settings/resetProfileSettings?origin=userclick

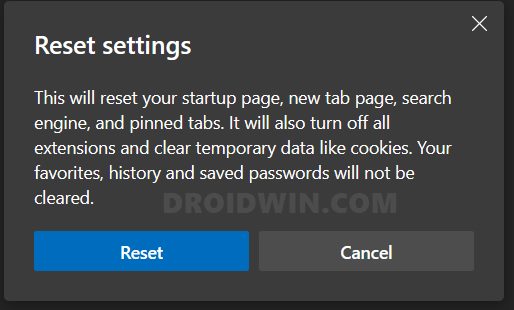
- Then click on the Reset button in the confirmation dialog box.
- Now restart your browser and check if it fixes the Microsoft Edge slow or laggy performance in Windows 11.
FIX 13: Reinstall Microsoft Edge
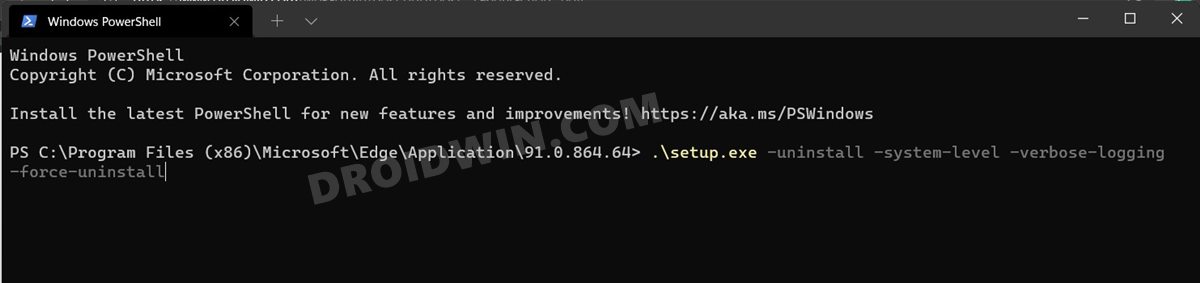
If none of the aforementioned methods worked out in your favor, then you have no choice but to uninstall and remove all the browser files from your PC and then install its fresh build. Doing so generally resolves all the browser-related issues and there is every chance that it would rectify the current issue as well. However, since Microsoft treats it as a system app (well, kind of), you wouldn’t be able to uninstall it the normal way (aka from Control Panel/Settings menu). For that, you will have to instead make use of the Powershell window.
- So refer to our detailed guide on How to Uninstall Microsoft Edge in Windows 11.

- Once the browser has been uninstalled, head over to the Microsoft official site and download the latest build of Edge.
- Then launch the setup and proceed with the on-screen instructions to install it.
- Once installed, launch Microsoft Edge and you should no longer face any performance-related issues now.
So with this, we round off the guide on how you could fix the Microsoft Edge slow or laggy performance in Windows 11. We have listed thirteen different methods for the same. Do let us know in the comments section which one spelled out success for you. Likewise, all your queries are welcomed in the comments section below.
- Microsoft Edge Not Working in Windows 11: How to Fix [10+ Methods]
- How to Bring Back the Old Download Menu in Microsoft Edge
- Enable Hidden Performance Mode/Efficiency Mode in Edge
- Disable Context Menu while selecting texts in Microsoft Edge
- How to Disable Edge’s New URL Copy and Paste Feature
About Chief Editor

Sadique Hassan
administrator
A technical geek by birth, he always has a keen interest in the Android platform right since the birth of the HTC Dream. The open-source environment always seems to intrigue him with the plethora of options available at his fingertips. “MBA by profession, blogger by choice!”