This article applies if you’ve recently made changes to your device hardware and are trying to upgrade to Windows 11. Hardware changes might affect your upgrade eligibility, though you’ll need to take a few steps to see your updated eligibility in Settings.
This article might also apply if messages in the PC Health Check app and the Windows Update page in Settings don’t match.
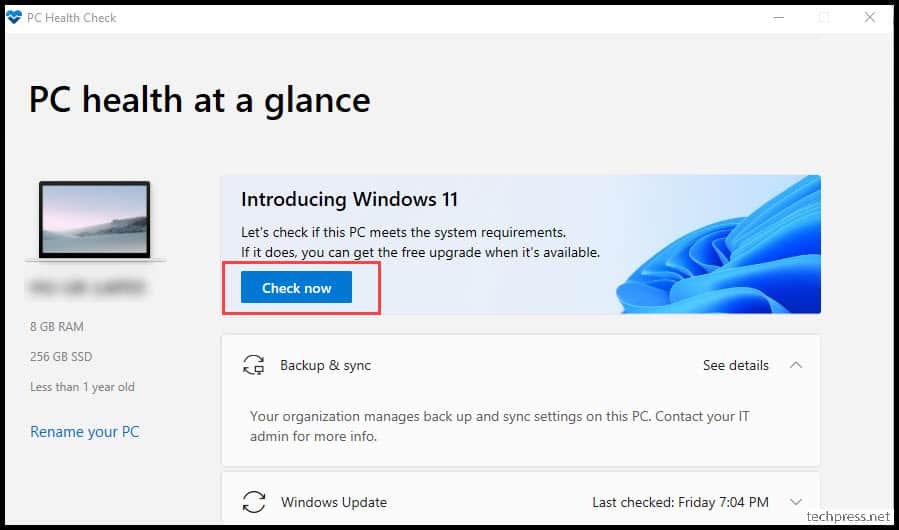
If you recently made any changes to your hardware and want to see if your computer now meets the requirements for Windows 11, the easiest way to do that is with the PC Health Check app:
-
If you haven’t yet, install the PC Health Check app here.
-
Press Windows logo key + S or select Search, type pc health check, and select PC Health Check from the list of results.
-
Select Check now.
It can take up to 24 hours for Windows Update to refresh your eligibility info. If your eligibility info is not updating in a timely manner, you can also manually refresh the Windows 11 eligibility assessment using the following steps.
Note: Changing your hardware doesn’t necessarily mean your device will be offered Windows 11 immediately. The upgrade will roll out over time to in-market devices based on intelligence models that consider hardware eligibility, reliability metrics, device age, and other factors. We intend to roll the upgrade offer out as quickly as possible, while ensuring a high-quality experience.
How to manually refresh Windows 11 eligibility assessment
You can refresh the Windows 11 eligibility assessment by either using Task Scheduler or running it from an administrator Command Prompt.
Refresh using Task Scheduler
-
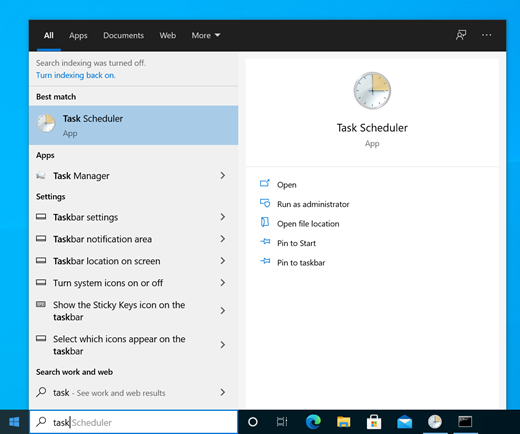
Press Windows logo key + S or select Search, type task scheduler, and select Task Scheduler from the list of results.

-
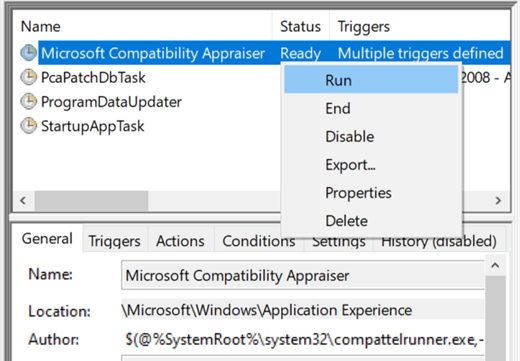
Using the left navigation pane, navigate to \Microsoft\Windows\Application Experience.
-
Right-click (or press and hold) on the task called Microsoft Compatibility Appraiser, then select Run.
-
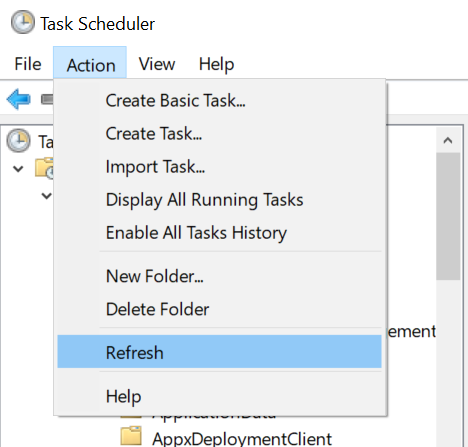
Wait until the task is complete (it will show as Ready). You can select Action > Refresh in the top navigation menu to refresh its state.
Refresh using an administrator Command Prompt
-
Press Windows logo key + S or select Search, type cmd, and then select Run as administrator under Command Prompt on the right side.
-
Then type the following command and press Enter:
schtasks.exe /Run /TN «\Microsoft\Windows\Application Experience\Microsoft Compatibility Appraiser»
-
Wait a couple of minutes for the task to complete, then reopen Settings > Update & Security > Windows Update.
Related topics
Upgrade to Windows 11: FAQ
Windows 11 System Requirements
Can I upgrade to Windows 11?
Ways to install Windows 11
Installing Windows 11 on devices that don’t meet minimum system requirements
Need more help?
Want more options?
Explore subscription benefits, browse training courses, learn how to secure your device, and more.
Communities help you ask and answer questions, give feedback, and hear from experts with rich knowledge.
Windows 11 имеет определенные требования к аппаратному обеспечению компьютеров. Компьютеры, которые не соответствуют минимальным системным требованиям, не могут быть обновлены до Windows 11.
Вы можете использовать приложение PC Health Check Microsoft, чтобы проверить, можно ли запустить Windows 11 на вашем компьютере.
Для этого выполните следующие действия:
- Перейдите на страницу https://aka.ms/GetPCHealthCheckApp, чтобы загрузить установочный пакет приложения PC Health Check Microsoft.
Вы также можете посетить официальный веб-сайт Microsoft https://www.microsoft.com/ru-ru/windows/windows-11, чтобы получить подробную информацию о Windows 11.
Нажмите ЗАГРУЗИТЬ ПРИЛОЖЕНИЕ PC HEALTH CHECK (DOWNLOAD PC HEALTH CHECK APP) в разделе Проверьте совместимость (Check for compatibility) на официальном веб-сайте Microsoft, чтобы загрузить и установить приложение.

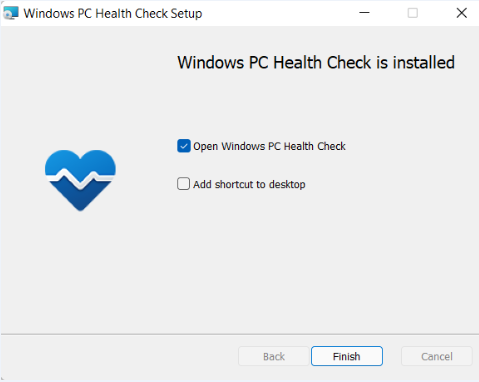
- Дважды нажмите на установочный пакет, чтобы установить приложение PC Health Check, затем нажмите Готово (Finish).
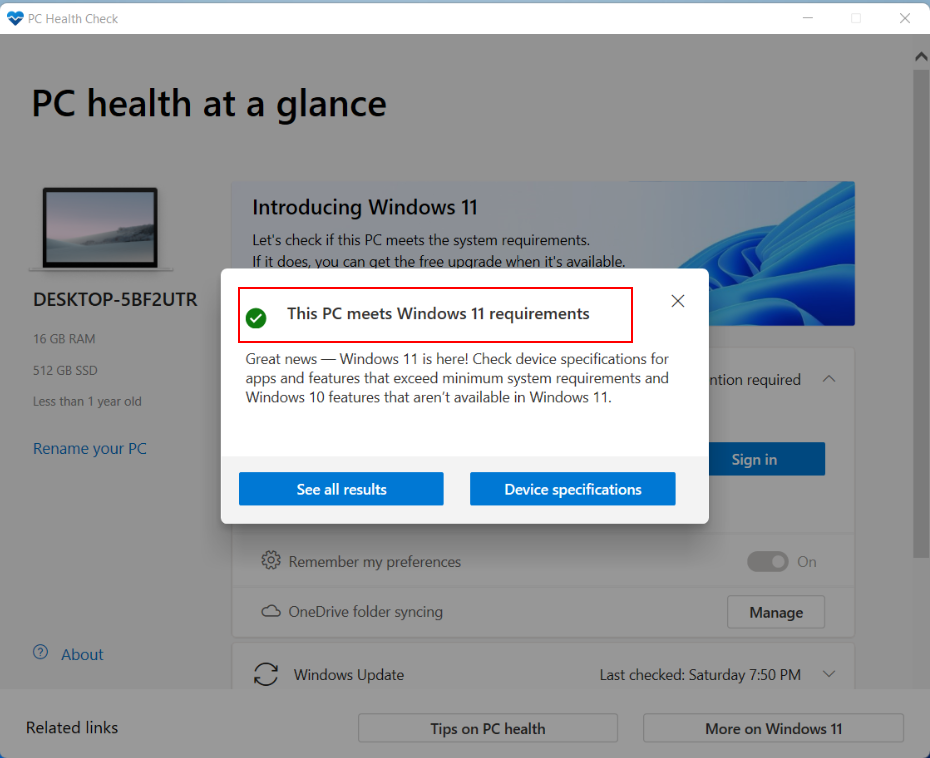
- Нажмите Проверить сейчас (Check now) под надписью Представляем Windows 11 (Introducing Windows 11), чтобы посмотреть результаты проверки.

- Если отображается надпись Этот компьютер соответствует требованиям Windows 11 (This PC meets Windows 11 requirements), вам необходимо только ожидать обновления от Microsoft.

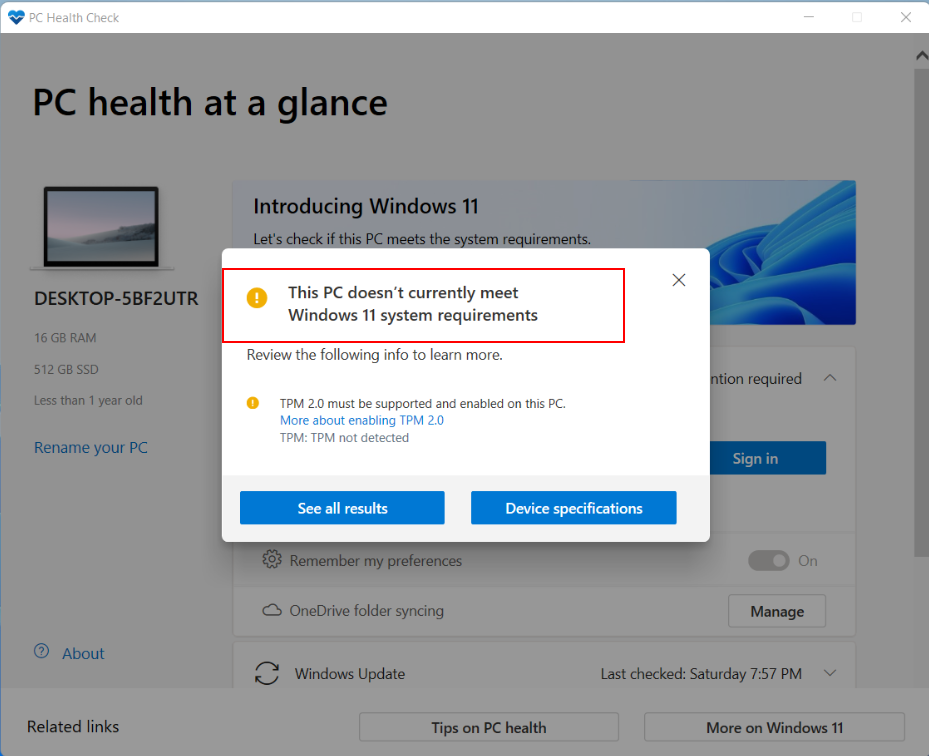
- Если отображается надпись Этот компьютер не отвечает требованиям к системе для Windows 11 (This PC doesn’t currently meet Windows 11 system requirements), нажмите Показать все результаты (See all results), чтобы посмотреть причины несовместимости компьютера с системой Windows 11.
Если в результатах указана причина, связанная с модулем TPM, см. информацию по ссылке https://consumer.huawei.com/en/support/content/ru-ru15825140/. Если ваше устройство оснащено модулем TPM, включите TPM и нажмите Проверить сейчас (Check now), чтобы проверить, можно ли использовать Windows 11 на этом компьютере.
Если указаны другие причины, связанные с аппаратным обеспечением, это означает, что аппаратное обеспечение вашего компьютера не соответствует требованиям к установке Windows 11.
- Если отображается надпись Этот компьютер соответствует требованиям Windows 11 (This PC meets Windows 11 requirements), вам необходимо только ожидать обновления от Microsoft.


Please note there are below requirements before starting the installation / upgrade to Windows 11:
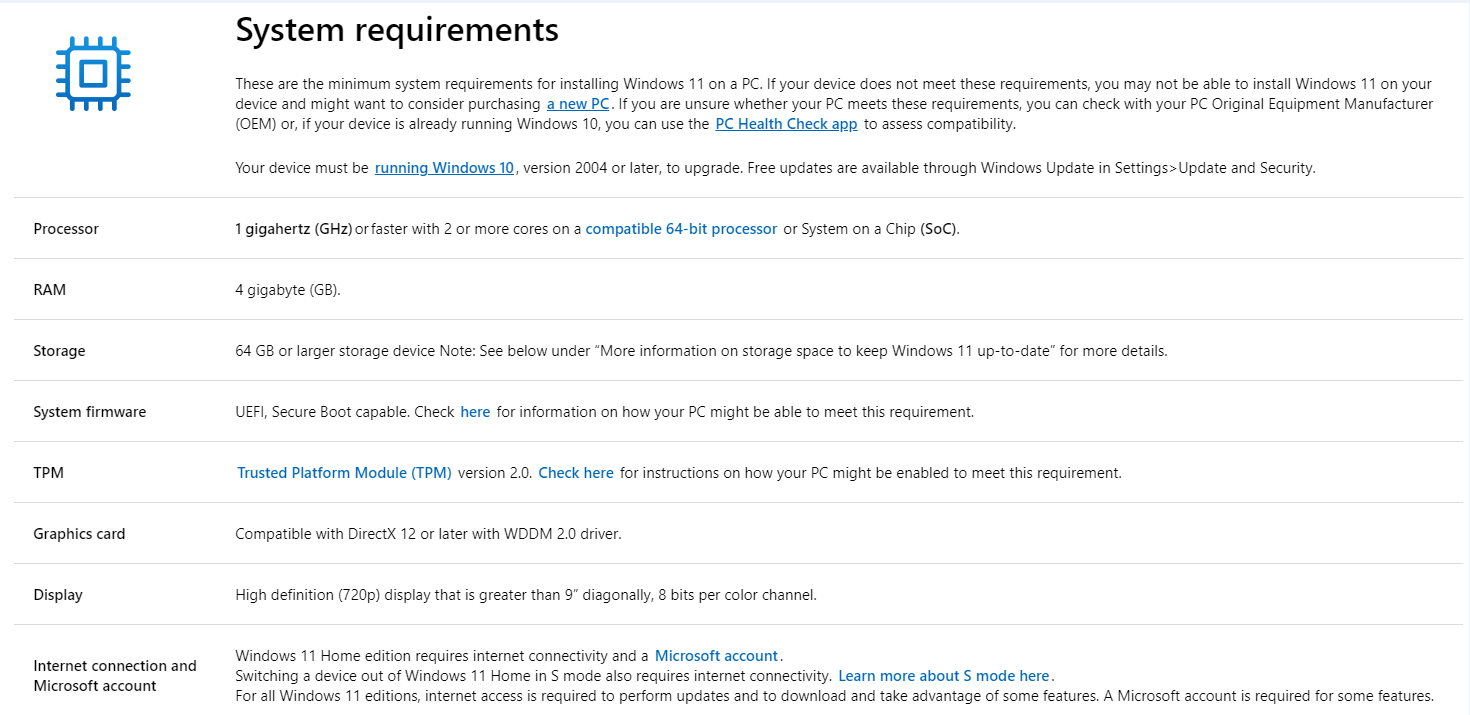
| Processor | 1 gigahertz (GHz) or faster with 2 or more cores on a compatible 64-bit processor or System on a Chip (SoC). |
| RAM | 4 gigabyte (GB). |
| Storage | 64 GB or larger storage device Note: See below under “More information on storage space to keep Windows 11 up-to-date” for more details. |
| System firmware | UEFI, Secure Boot capable. Check here for information on how your PC might be able to meet this requirement. |
| TPM | Trusted Platform Module (TPM) version 2.0. Check here for instructions on how your PC might be enabled to meet this requirement. |
| Graphics card | Compatible with DirectX 12 or later with WDDM 2.0 driver. |
| Display | High definition (720p) display that is greater than 9” diagonally, 8 bits per colour channel. |
| Source:Microsoft |
To check if you are meeting all the requirements for Windows 11 installation, Download and Install PC Health Check App and click on Check now button. If you are meeting all the requirements that’s great, you can start the upgrade process.
But as we know there are a lot of systems which are not meeting the CPU or TPM requirements, you can follow the steps as given in the next sections of this article to bypass this requirement.
Also, If you have TPM 1.2 and your laptop is compatible with TPM 2.0 then you can upgrade it using BIOS security settings. Please check the next section on how to upgrade it. If Secure Boot is disabled on your system, you can enable it via BIOS.
Upgrade TPM level from TPM 1.2 to TPM 2.0 and enable secure boot
If you are using TPM (Trusted Module Platform) 1.2 and want to upgrade it to TPM level from 1.2 o 2.0. First you need to check if your laptop / desktop is compatible with TPM 2.0.
If yes, then you can change BIOS security settings from TPM 1.2 to TPM 2.0. If your local drives are encrypted with Bitlocker, disable bitlocker and decrypt your drive before the upgrade. Also, make sure to take a backup copy of all your data before taking this action.
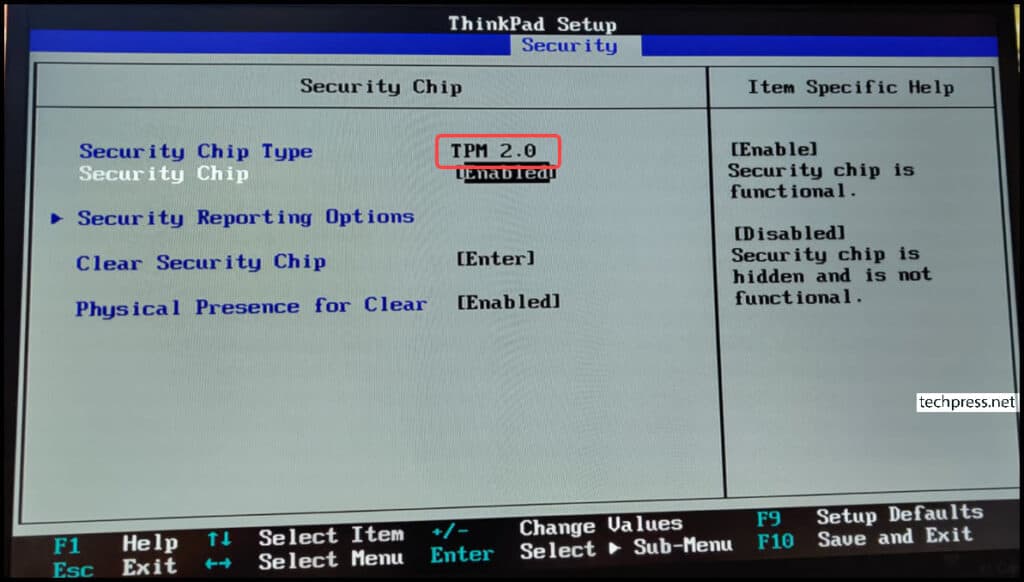
- Restart the machine and press F1 to enter into the BIOS mode. Go to Security tab and using your keyboard select Security Chip and Press Enter.
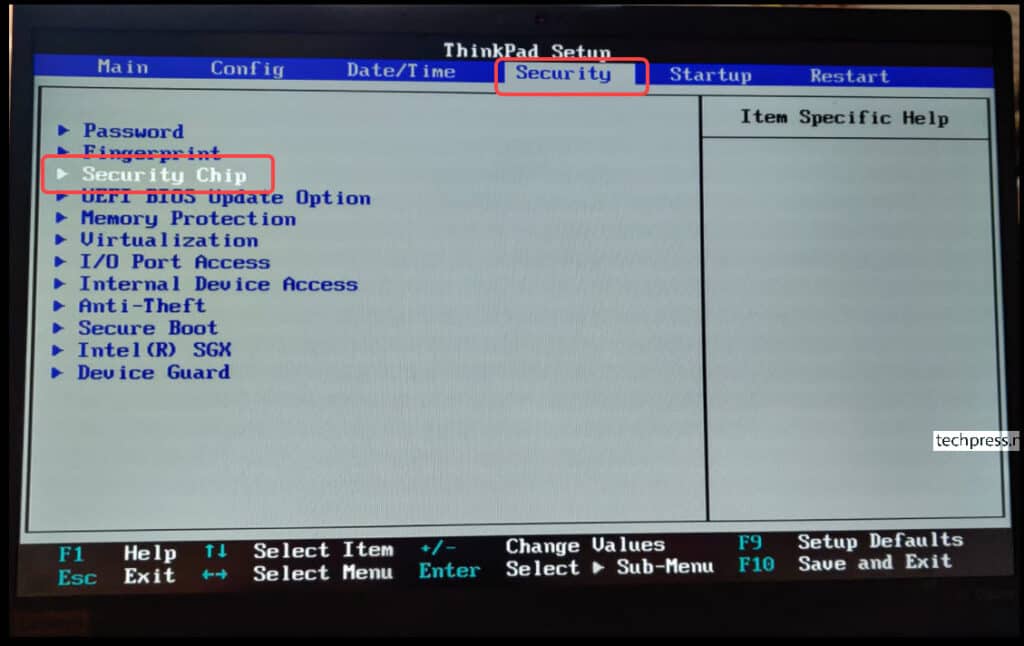
- Check the Security Chip Type to see if you can change the TPM level from 1.2 to TPM 2.0. On my laptop it was set to TPM 1.2 which i updated it to TPM 2.0.
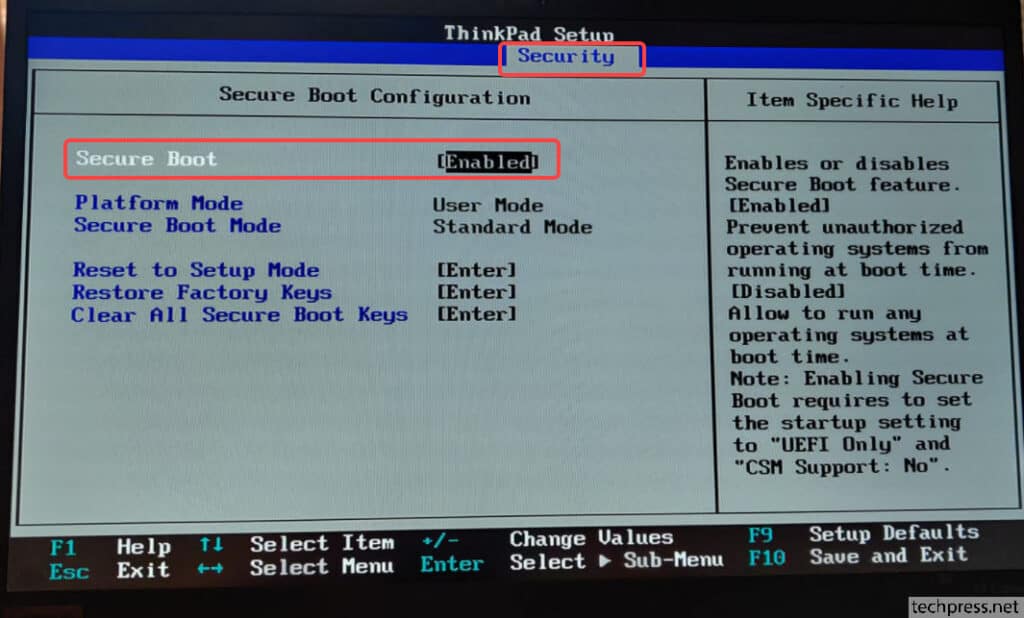
- To check the Secure Boot, Go to Security tab -> select Secure Boot and press Enter.
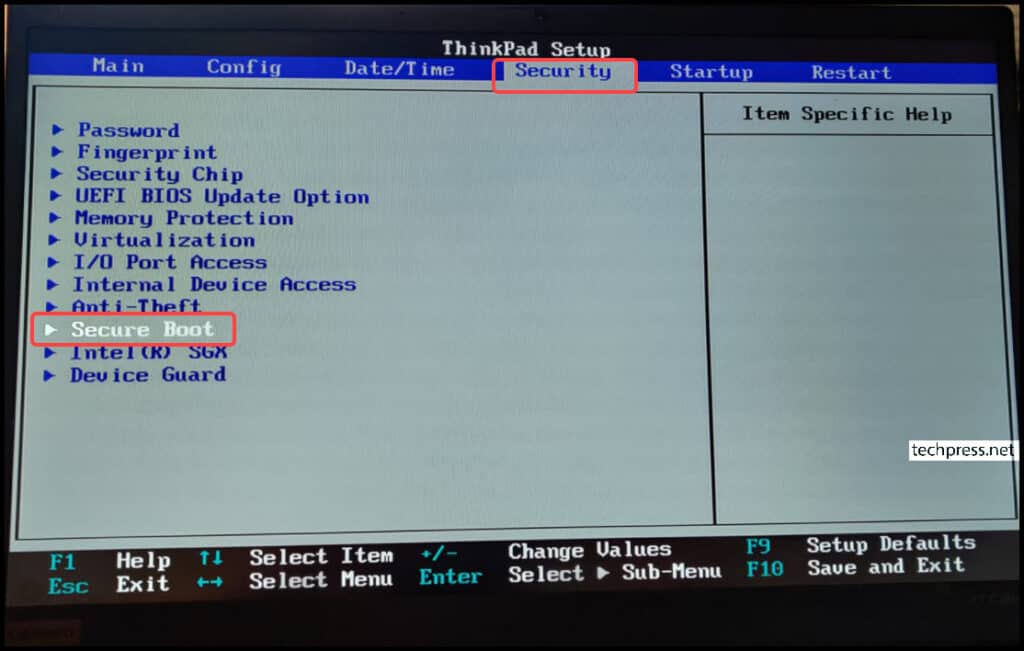
- Make sure Secure Boot is Enabled.
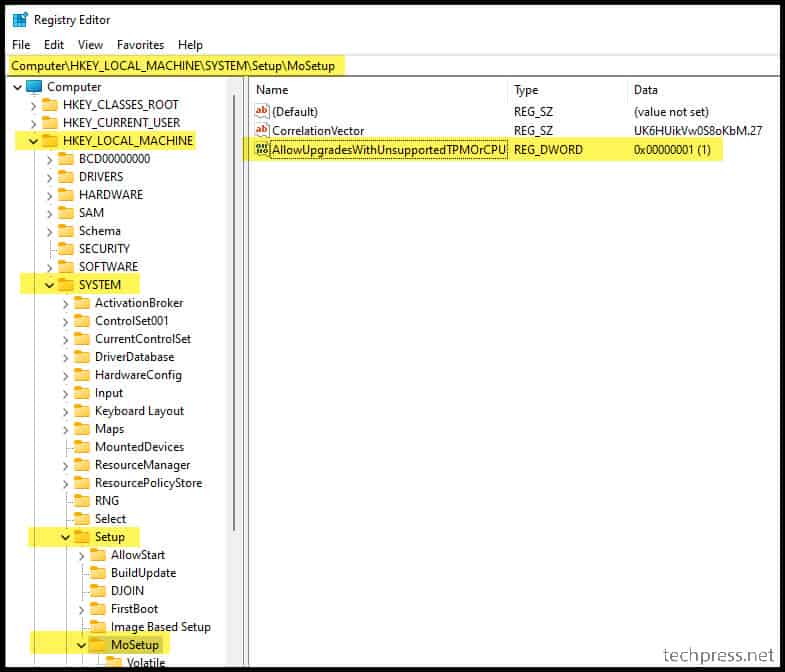
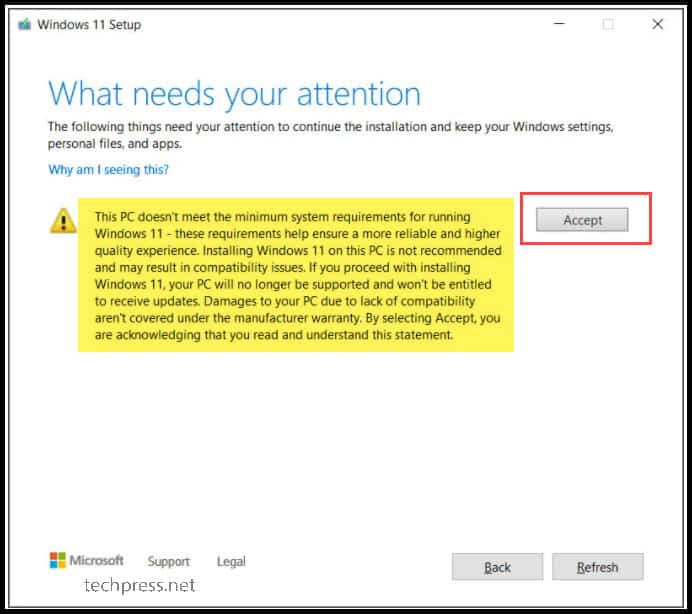
If you are not meeting the TPM 2.0 or CPU requirements then below registry entry needs to be created to bypass the TPM or CPU checks. You will still require TPM 1.2 at least to proceed with the installation. During Windows 11 setup process, a warning message will be shown, click on Accept to continue with the installation process.
Steps to create registry entry (Please note that you will require administrator rights on the PC to make changes in the registry and your system will require a reboot after the registry entry is created)
- Click on Start and search for Registry Editor.
- Navigate to HKEY_LOCAL_MACHINE\SYSTEM\Setup\MoSetup.
- Create a REG_DWORD registry entry
AllowUpgradesWithUnsupportedTPMOrCPUand set its value to 1.
Once the registry entry is created and you start the setup process to install windows 11, you will receive below Warning message to state that your PC doesn’t meet the minimum system requirements for running Windows 11. Click on Accept and then click on Refresh to proceed with the installation of Windows 11.

Conclusion
- Make sure to use PC Health Check App to check if your device is compatible before upgrade to Windows 11.
- If Device is not compatible w.r.t. TPM or CPU then create a reg key as I had mentioned earlier in this post. This will bypass TPM and CPU checks.
- Fix for 0x800F0830 – 0x2003 – The Installation failed in the SAFE_OS phase with an error during INSTALL_UPDATES operation.
Windows 11 was officially announced on June 24th and Microsoft provides PC Health Check for Windows 10 users to check if their computer is compatible with the new operating system. The PC Health Check will show two different results:
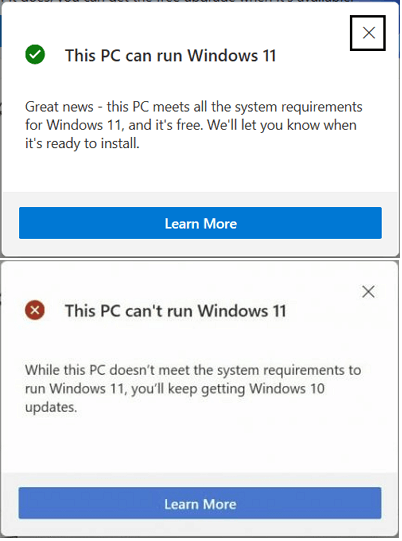
1. This PC can run Windows 11. Great news — this PC meets all the system requirements for Windows 11.
2. This PC can’t run Windows 11. While This PC doesn’t meet system requirements on Windows 11.
If you received the first message, congratulation. You can directly update to Windows 11 and it will run smoothly without any issue on your computer. However, if you get the second error message, it means that your current computer is not compatible with Windows 11 and you can’t directly install it on your computer. Follow this guide, we’ll show you how to fix your PC can’t run Windows 11 error.
Error: This PC can’t run Windows 11
What is the «This PC can’t run Windows 11» error? It’s an error message popped up by the PC Health Check application which is a tool for checking Windows 11 compatibility. When your computer doesn’t reach the Windows 11 minimum system requirement as shown below, you’ll receive the error message telling «This PC can’t run Windows 11»:
| Processor: 1 gigahertz (GHz) or faster with 2 or more cores on a compatible 64-bit processor or System on a Chip (SoC) | Internet connection: Microsoft account and internet connectivity required for setup for Windows 11 Home |
| TPM: Trusted Platform Module (TPM) version 2.0 | Graphics card: DirectX 12 compatible graphics / WDDM 2.x |
| Storage: 64 GB or larger storage device | Display: >9” with HD Resolution (720p) |
| System firmware: UEFI, Secure Boot capable | Memory: 4 GB RAM |
As the different support for Windows 11 in computer hardware, the descriptions of the «This PC can’t run Windows 11» error may be different. Here is a list of all error messages that popped up by PC Health Check, and if you are one of them, follow the respective solution to fix it on your computer now:
- This PC can’t run Windows 11. The PC must support Secure Boot.
- This PC can’t run Windows 11. The system disk needs to be 64GB or larger.
- This PC can’t run Windows 11. The processor isn’t supported for Windows 11.
- This PC can’t run Windows 11. TPM 2.0 is a requirement for running Windows 11.
- Other more…
So how to fix these issues and it works for your computer to get Windows 11 update? Follow the respective fix for each issue and make it possible to update or install Windows 11 on your computer now.
Guide 1: How to Fix «This PC can’t run Windows 11. The PC must support Secure Boot» Error
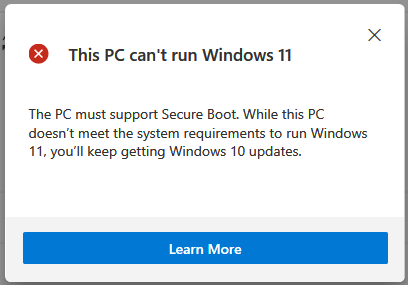
Detailed Error Message: «This PC can’t run Windows 11. The PC must support secure boot. While this PC doesn’t meet the system requirements to run Windows 11, you’ll keep getting Windows 10 updates.»
Most modern PCs in Windows 10/8 are shipped with the Secure Boot mode. It keeps your computer safe. And it requires the Secure Boot mode to be enabled for updating or installing Windows 11.
How to Fix Guide:
1. Check if your system supports Secure Boot
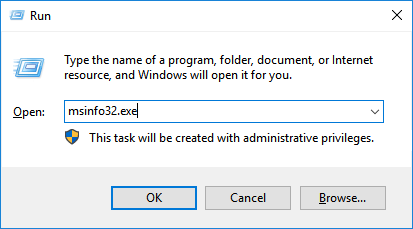
Step 1. Press Windows + R keys, type msinfo32.exe, and hit Enter.
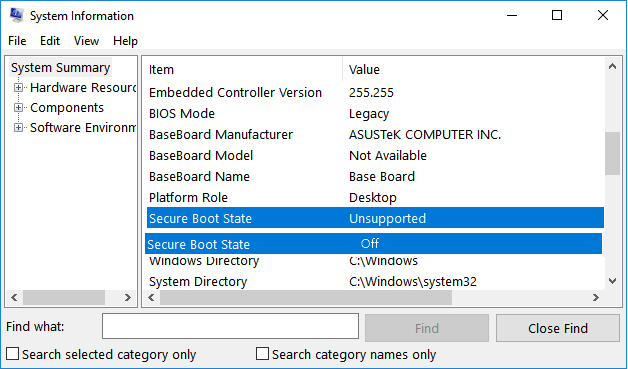
Step 2. On the System Information window, select System Summary.
Step 3. Scroll down to see if you find a section named Secure Boot State (as shown below).
If the Secure Boot State shows as «Off», it means that your computer support Secure Boot and you can jump to the third part to enable it.
If the Secure Boot State shows as «Unsupported», it indicates that your computer hardware doesn’t support secure boot. To fix it, move to the next part to check if your computer supports UEFI mode first.
2. Check if your computer supports UEFI mode
Step 1. Restart PC and press F2/F10/Del to enter BIOS.
Step 2. Go to the Boot Menu, find the boot mode section, click to see if your computer supports UEFI mode.
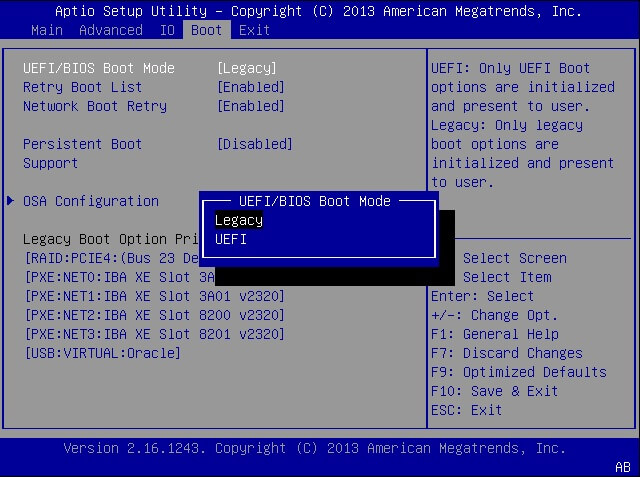
If you see a UEFI mode, it means your computer supports this boot mode. And if it’s currently disabled, move to the next guide to enable UEFI and Secure Mode.
Note that, if your computer doesn’t support UEFI mode, you can’t enable Secure Boot and upgrade to Windows 11.
3. Enable UEFI Mode and Secure Boot
Enable UEFI Mode:
Step 1. Open Disk Management and check if the system disk is with GPT type.
If not, convert the OS disk to GPT disk first as UEFI and Secure Boot requires GPT disk type.
Here we suggest you applying EaseUS Partition Master with its disk conversion feature for help. It converts the disk to MBR or GPT without removing any data or partitions.
Step 2. After disk conversion, restart PC and enter BIOS, go to the Boot Menu, click Boot Mode and select «UEFI».
Step 3. Save the changes and restart the PC.

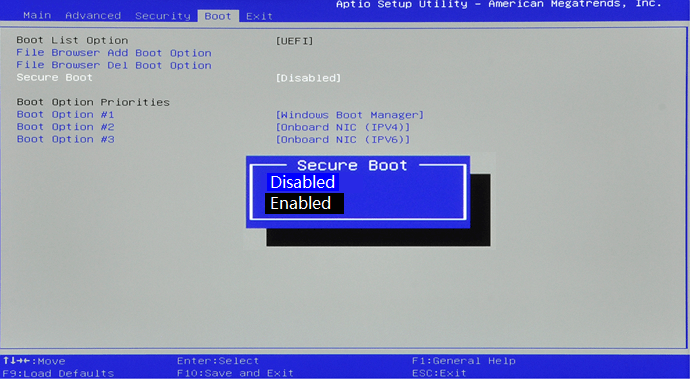
Enable Secure Boot:
Step 1. Restart PC and re-enter BIOS settings.
Step 2. Go to the Boot Menu, select the Secure Boot settings and set it to «Enabled».
When you complete the process, you can continue installing the Windows 11 update on your computer now.
Guide 2. How to Fix «This PC can’t run Windows 11. The system disk needs to be 64GB or larger.» Error
Detailed Error Message: «This PC can’t run Windows 11. The System disk needs to be 64GB or larger. While this PC doesn’t meet the system requirements to run Windows 11, you’ll keep getting Windows 10 updates.
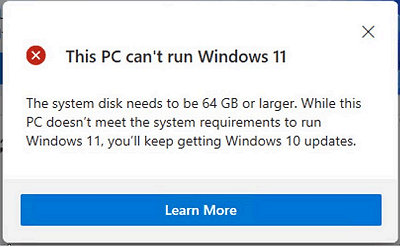
This error message indicates that your system disk space is too small, which mostly happens on old computers. Here are two tips for you:
1. If your computer is too old, bought before the year of 2015, we suggest that you stay with Windows 10.
2. If your computer is new but the OS disk is too small, you can upgrade your system disk to fix this issue.
How to Fix Guide: (Upgrade OS disk to a larger one)
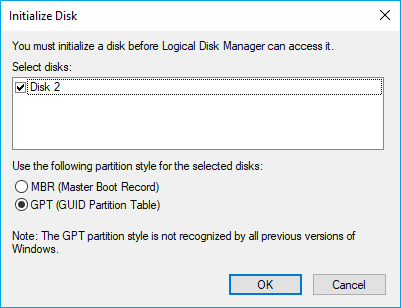
1. Purchase and Prepare a New Disk — SSD (Preferred)
- New disk capacity must be bigger than 64GB.
- SSD is more recommended for replacing OS disk.
- Initialize disk in Disk Management: Right-click SSD > Initialize > Select «GPT».
2. Transfer OS to New Disk
It’s recommended that you transfer OS to the new disk and keep data on the old drive, which is the best way of optimizing the computer performance.
EaseUS Partition Master with its Migrate OS to HDD/SSD feature enables you to fully transfer OS and installed applications to the new disk in a few simple clicks.
Note: The operation of migrating OS to SSD or HDD will delete and remove existing partitions and data on your target disk when there is not enough unallocated space on the target disk. If you saved important data there, back up them to an external hard drive in advance.
Step 1. Select «Clone» from the left menu. Select the «Migrate OS» and click «Next» to continue..
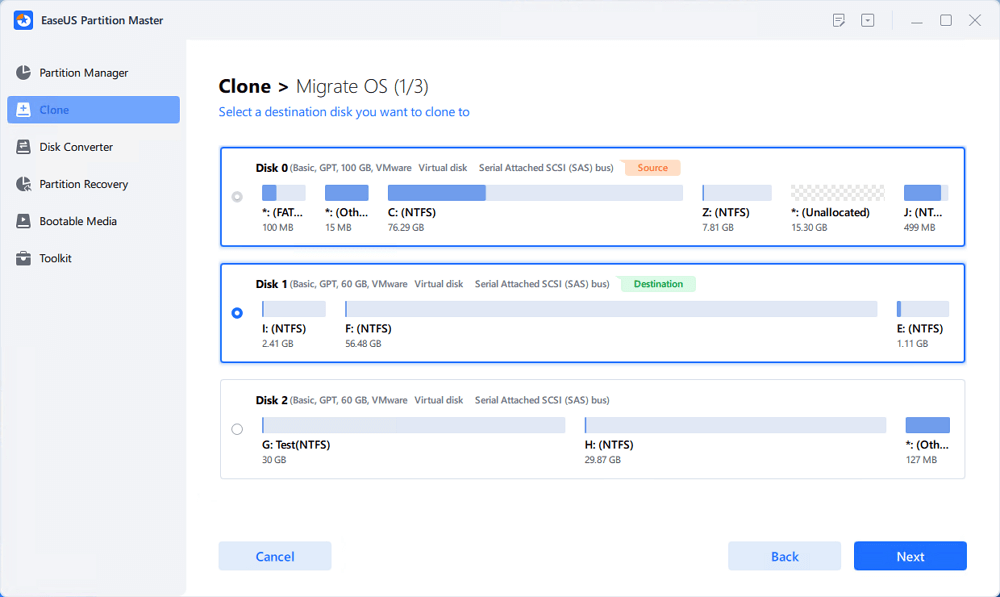
Step 2. Select the target disk you want to clone. Click «Next».
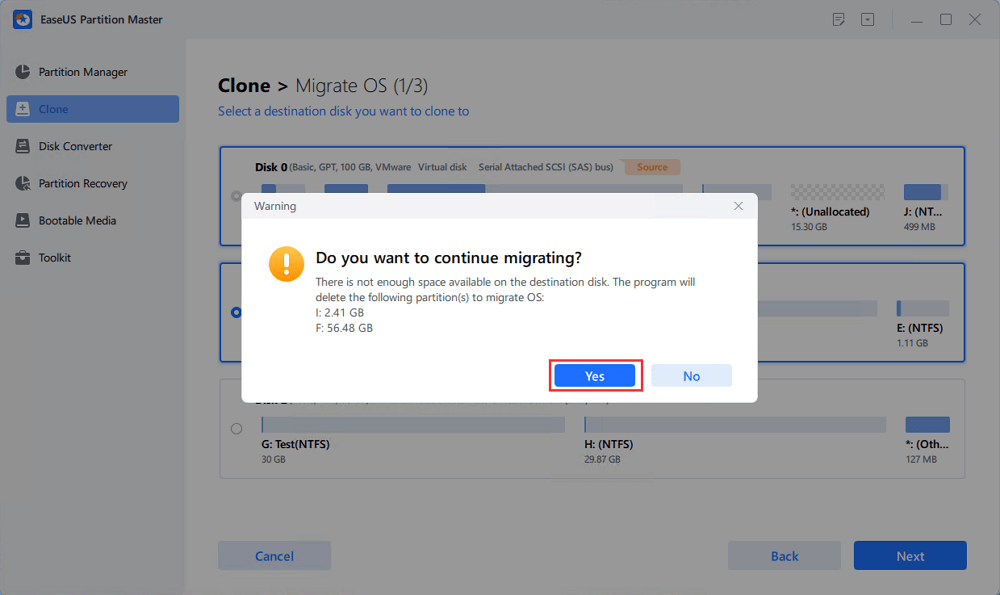
Step 3. Click «Yes» after checking the warning message. The data and partitions on the target disk will be deleted. Make sure that you’ve backed up important data in advance. If not, do it now.
Step 4. Preview the layout of your target disk. You can also click the disk layout options to customize the layout of your target disk as you want. Then click «Start» to start migrating your OS to a new disk
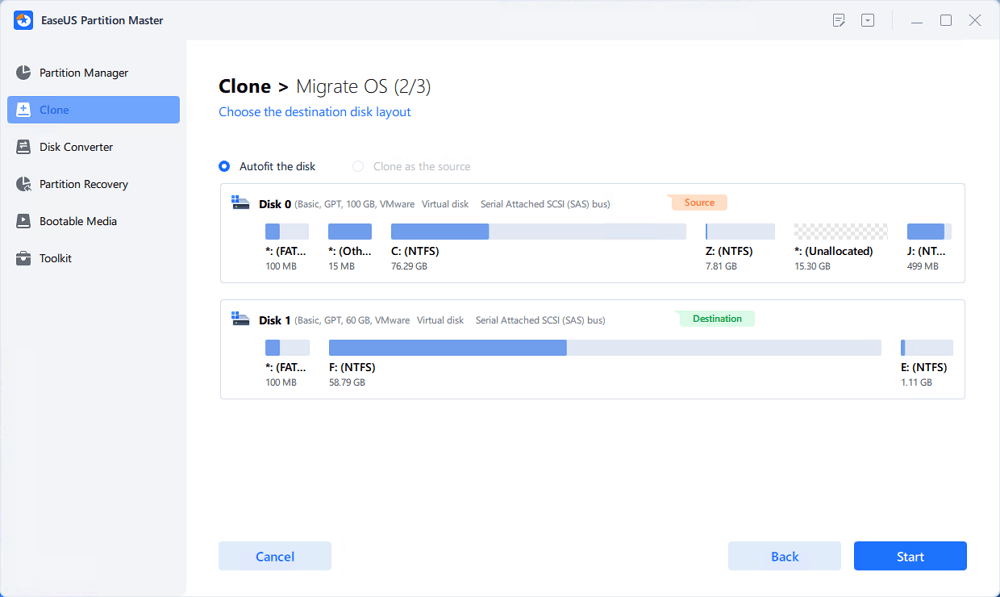
Step 5. When you see a confirming message, asking «If you want to start up computer from the clone target disk», tick «Adjust the order to boot from the clone target disk» and click the respective button through your demands.
- Reboot Now: it means to reboot the PC and boot OS from the new disk immediately.
- Done: it means to make the changes later.

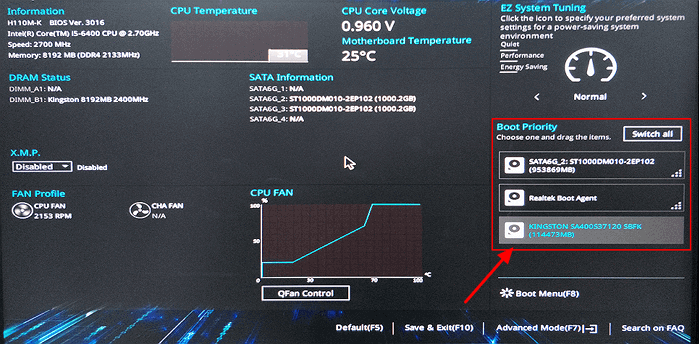
When you are done with this, restart the computer as requested. If necessary, go and enter BIOS to set the new SSD as boot drive:
When the computer boots up, you can continue with the Windows 11 update process now.
Guide 3: How to Fix «This PC can’t run Windows 11. The processor isn’t supported for Windows 11.» Error
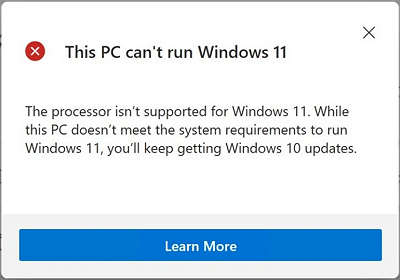 Detailed Error Message: This PC can’t run Windows 11. The processor isn’t supported for Windows 11. While this PC doesn’t meet the system requirements to run Windows 11, you’ll keep getting Windows 10 updates.
This error message means that your computer processor is not included in the supported processor list.
How to Fix:
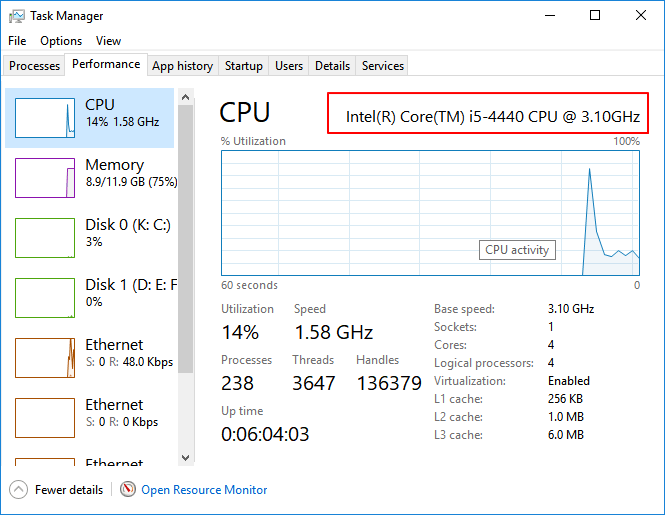
1. Check your processor
- Press Ctrl+Alt+Del to bring up Task Manager, select to open it.
- Go to the performance section and check the CPU generation. (CPU is sometimes called as the processor.)
2. Check if your processor is supported for Windows 11
Go to Windows 11 Supported Intel Processors page and find if your processor is on the list.
https://docs.microsoft.com/en-us/windows-hardware/design/minimum/supported/windows-11-supported-intel-processors
3. 3 options to fix unsupported processor
- Option 1. Stay with Windows 10
- Option 2. Replace processor in a local computer repair center.
- Option 3. Change processor on your own. (Risky) See how to upgrade CPU processor.
Editor’s Suggestion: To keep your computer safe, it’s a wise choice of staying with your current operating system.
Guide 4: How to Fix «This PC can’t run Windows 11. TPM 2.0 is a requirement for running Windows 11.» Error
Detailed Error Message: This PC can’t run Windows 11. TPM 2.0 is a requirement for running Windows 11. We recommend that you check if TMP 2.0 is enabled.
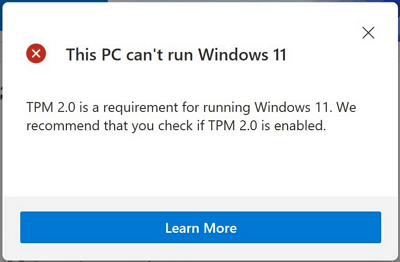
The error message contains two meanings: 1. Your computer contains a TPM chip but its not enabled; 2. Your computer doesn’t contain a TPM 2.0 chip and you can’t update the computer to Windows 11. So how to fix this issue? Check the fixes below.
How to Fix:
1. Check if your computer supports Trusted Platform Module
Step 1. Press Windows + R keys, type tpm.msc in the Run dialog, and hit Enter.
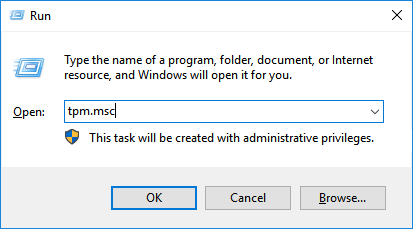
Step 2. When the Trusted Platform Module (TPM) utility pops up, check if the TPM is in use.
If yes, you’ll see it under the Status section, marked as The TPM is ready for use.
Step 3. Under the TPM Manufacturer Information section, you’ll be able to check the TPM version.
If it’s TPM 2.0, your computer is good to install and run Windows 11. Move to the next guide to enable it.

But if it’s not TPM 2.0, or its version is lower, it means that you can’t update to Windows 11.
Editors Suggestions: When your computer warns «Compatible TPM cannot be found» or the TPM module version is lower than 2.0, staying with your current computer operating system will be a wise decision.
2. Enable TPM 2.0 chip for Windows 11
Step 1. Restart PC and press F2/F10/Del key to enter BIOS.
Step 2. Use the left key and go to the Security section.

Step 3. Check the TPM State and if it’s Disabled, change it to Enabled.
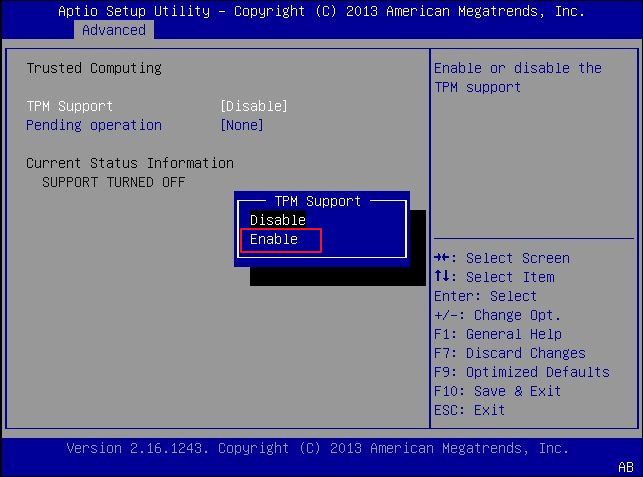
Step 4. Save the changes and exit BIOS.
Now you can restart the computer and get Windows 11 update on your computer successfully.
This PC can’t run Windows 11 Is Not The End of The Day, Fix It and Get Windows 11 on Your PC Now
On this page, we explained that This PC can’t run Windows 11 error mainly occurs when you use Microsoft PC Health Check to check if your computer is compatible with Windows 11.
And when the PC has a compatibility issue, you’ll get this error. Fortunately, you can do something to fix the error and make yourself ready for this new OS update. We collected 4 major error messages with respective solutions for you.
If you are with one of the errors, go and follow to fix it, then make your computer ready for Windows 11 update now.
FAQs About This PC can’t run Windows 11
We listed 4 major errors related to This PC can’t run Windows 11 that happened to Windows 11 users while using PC Health Check. According to some Windows users, it seemed that when they install Windows 11 via the Insider program, they also came across some similar issues.
If you are encountering one of them, follow the quick guide to fix it:
1. How to fix «This pc can’t run Windows 11. The PC must support TPM 2.0. The PC must support Secure Boot.»?
To fix this issue, you’ll need to revert to Guide 1 and Guide 2 for help. Or, do the listed work here:
- First, confirm if your computer supports Secure Boot and TPM 2.0.
- If not, stay with Windows 10 or your current operating system.
- If yes, go to BIOS to enable UEFI mode and turn on Secure Boot. And enable TPM mode.
2. How to fix «This PC can’t run Windows 11. There must be at least 4GB of system memory.»?
This issue happens when the system memory storage is too low. If your processor matches with Windows 11, you can fix this issue by adding a new memory stick to your computer.
- Mostly, the new memory stick should be the same brand as your current one.
- Also, if your current computer doesn’t have an extra memory stick slot, replace the old memory stick with a bigger one.
3. What caused the «PC can’t run Windows 11» issue?
First, let’s make it clear that the «This PC can’t run Windows 11» error is not caused by the Windows 11 compatibility check tool, either it’s PC Health Check or WhyNotWindows11, etc., tools.
The basic reason why PC not compatible with Windows 11 is that Windows 11 has some basic system requirements on your computer.
And when the hardware or software on your computer doesn’t match with the new OS requests, the compatibility issue comes up. Again, let’s see all the basic requirements of Windows 11:
- UEFI and Secure Boot must be enabled.
- TPM 2.0 chip must be enabled.
- OS disk storage must be 64GB or bigger.
- Processor must be Intel Core processor produced from 2017 or AMD Zen 2 processors from 2019.
- Memory at least needs to be 4GB or even bigger.
- Graphics card must be DirectX12 or later with a WDDM 2.0 driver.
- Display must be at least 720P or higher.
Today, Windows 11 availability begins both for new devices pre-loaded with Windows 11 and eligible Windows 10 devices. Windows continues to be integral to how more than a billion people connect, learn, play and work. Windows 11 brings you closer to what you love, empowering your creativity and productivity while advancing critical elements such as security and reliability. In this post I’ll explain the measured and phased rollout process for Windows 11, and how to get the upgrade when your device is ready.
About the upgrade to Windows 11
Our launch approach to Windows 11 leverages the well-established systems and processes used for the 1.3 billion Windows 10 devices we have shipped and serviced for over five years. We will use a measured and phased process in offering Windows 11 as we have done with Windows 10 feature updates. Our objective is to provide you with a smooth upgrade experience. We will begin to offer the upgrade to eligible new devices first1,2. Then, as with previous rollouts, we will study device health data and other signals to determine the pace at which Windows 11 is offered via Windows Update.
Over time, we will make Windows 11 available to existing (in-market) devices based on hardware eligibility, reliability metrics and other factors that impact the upgrade experience. If you have a Windows 10 PC that’s eligible for the upgrade, Windows Update will let you know via the Windows Update Settings page when it’s available. We expect all eligible Windows 10 devices to be offered the upgrade to Windows 11 by mid-2022.
Oct. 4, 2021 also marks the start of the 24-month lifecycle for the Home and Pro editions of Windows 11.
How to get Windows 11
Windows 11 devices
Starting today, a variety of exciting new devices are available pre-loaded with Windows 11, and new devices still shipping with Windows 10 will be the first to be offered the upgrade.
Windows 10 devices
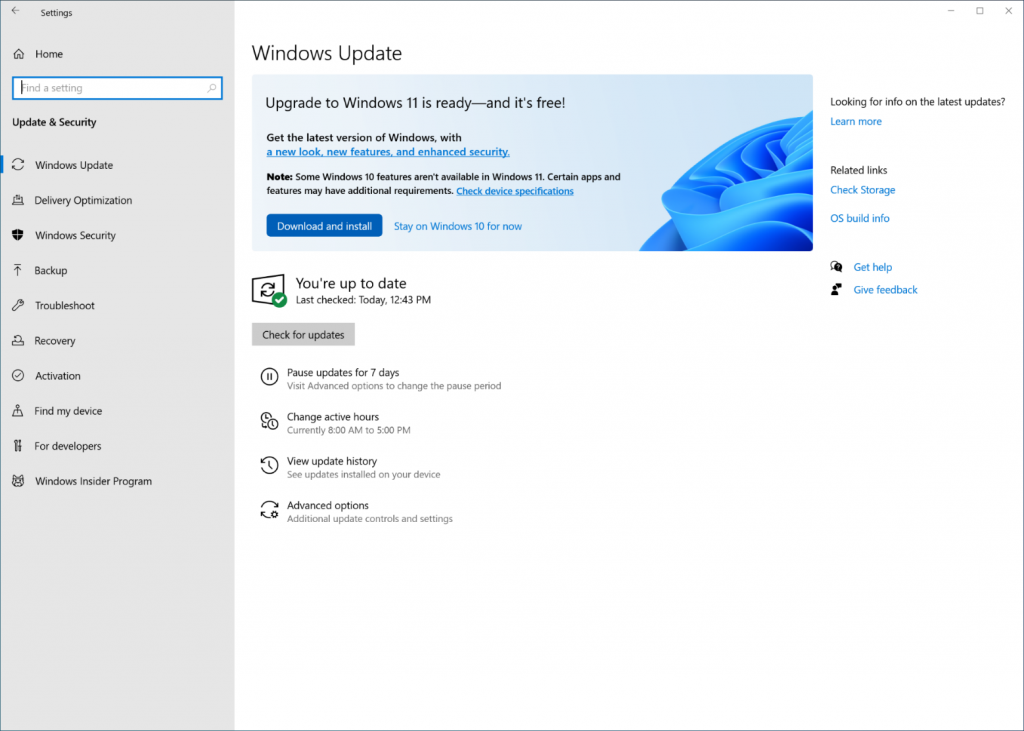
If you are running Windows 10 today, you can check to see if your device is eligible (i.e., meets the minimum system requirements for Windows 11) to upgrade using the PC Health Check app. You can then check to see if the Windows 11 upgrade is ready for your specific device by opening Windows Update settings (Settings > Update & Security > Windows Update) and selecting Check for updates3. If your device is eligible and the upgrade is ready, the option to download and install will appear: If you are ready to install Windows 11, simply select Download and install4. For more information on the Windows 11 upgrade experience, watch this video.
Our measured and phased approach to the rollout of Windows 11 means we will offer the upgrade via Windows Update when data shows that your device is ready, as our objective is to provide a good upgrade experience. If we detect that your device may have an issue, such as an application incompatibility, we may put a safeguard hold in place, and not offer the upgrade until that issue is resolved. To learn more about the status of the Windows 11 rollout, safeguard holds, and which holds may be applied to your device, visit Windows release health. Learn more about the ways to install Windows 11.
Information for commercial and education customers
Windows 11 is tailor-made for today’s hybrid work and learning environments. We have modernized the overall user experience, while still maintaining a familiar feel. In fact, Windows 11 is built on the consistent, compatible and familiar Windows 10 foundation you know. You can plan for, prepare and deploy Windows 11 alongside Windows 10 using the same processes, policies and management applications. For new information about the latest features for commercial organizations, see Windows 11 available today to empower your hybrid workforce.
If you’re an IT administrator, we recommend that you begin targeted deployments now as part of your regular Windows Update motion. For a list of the latest resources and tools, see our post on Tools to support Windows 11 deployment. In addition, to help make Windows 11 deployment easier, there are new capabilities coming in Endpoint analytics to help you assess your organization’s readiness for Windows 11 and hybrid work at scale. You can learn more in the Microsoft Endpoint Manager blog. In addition, Microsoft built the Windows 11 Readiness report in Update Compliance to help IT administrators identify which devices meet the Windows 11 minimum system requirements and are capable of an upgrade, and which are not capable and why.
Windows 11 is available through familiar channels and processes including Windows Server Update Services (WSUS), Windows Update for Business, and the Volume Licensing Service Center (VLSC)5 for phased deployment using Microsoft Endpoint Manager or other endpoint management solutions. Oct. 4, 2021 marks the start of the 36 months of servicing support lifecycle for Enterprise and Education editions of Windows 11. As it is being released in the second half of the year, the version number for this original release of Windows 11 is 21H2.
Protected and productive
As I’ve noted in past blogs, being on the latest version of Windows provides you with the best in creativity, protection and productivity. This has never been truer than with Windows 11! Windows 11’s minimum system requirements enable a new era of experiences, reliability and security. As Panos Panay shared in June, this is the first version of a new era of Windows. And, for customers who are using a device that is not eligible for Windows 11, Windows 10 is a great place to be. Windows 10 will be serviced through Oct. 14, 2025 and we previously announced that the next feature update to Windows 10 is coming very soon, continuing to offer you both support and choice with Windows.
As we closely monitor the measured and phased rollout of Windows 11, we will continue to share timely information on the status of the rollout and known issues (open and resolved) across all Windows feature and monthly updates via the Windows release health dashboard and @WindowsUpdate. As always, please continue to tell us about your experience by providing comments or suggestions via Feedback Hub.
Editor’s note – Oct. 4, 2021 – The video linked to above was updated.
Editor’s note – Oct. 6, 2021 – The final footnote below was updated with new availability information.
1The Windows 11 upgrade will start to be delivered to qualifying devices beginning Oct. 4, 2021. Timing varies by device.
2 Eligible Windows 10 devices must be on version 2004 or later, and have installed the Sept. 14, 2021 servicing update or later, to upgrade directly to Windows 11.
3 Certain features require specific hardware; see Windows 11 specifications for more information.
4 New Windows 11 users will be shown and need to accept the Microsoft Software License Terms after selecting “Download and install” before the download will commence.
5 Downloads will be available the week of October 11th in the VLSC and similar channels across all products, markets and languages.